

Page 1

CeeNee eeTee
USER
MANUAL
2013
Hello, my name is CeeNee eeTee! Thank you for taking me home, it's nice to meet you.
I am a network media player that is capable of playing Full 1080P high definition content.
I can play streamed media contents over the Local Area Network (LAN) or online sources.
With a built-in hard drive, I can play your movies, music, karaoke, view photos, and flash
applications.
Let's get set up, so we can start enjoying media!
Copyright© 2013 All rights reserved
CeeNee, Inc.
Website: www.ceenee.com
All rights reserved. No part of this publication may be reproduced, stored in a retrieval
system, or transmitted, in any form by means of electronics, mechanical, photocopying,
recording, or otherwise, without the prior written permission of CeeNee, Inc.
Page 2

Disclaimer
The information in the CeeNee product documentation and on this User Manual has been
carefully checked and is believed to be accurate; however, no responsibility is assumed for
inaccuracies.
CeeNee, Inc. reserves the right to make changes without further notice to any products to
improve reliability, function or design. CeeNee, Inc. does not assume any liability arising out of
the application or use of any product or circuit described; neither does it convey any license
under its patent rights of others.
The CeeNee consumer product line is for home use only. The CeeNee general policy
does not recommend the use of its consumer products in life support applications wherein a
failure or malfunction of the product may directly threaten life or injury. Per the terms and
conditions of sales of CeeNee, Inc., the user of CeeNee products in life support applications
assumes all risks of such use and indemnifies CeeNee, Inc. against all damages.
1
Page 3

TABLE OF CONTENTS
Disclaimer ....................................................................................................................................... 1
Product Safety ................................................................................................................................. 3
Recording your CeeNee Product Information ................................................................................ 4
Product Overview ........................................................................................................................... 5
Package Contents ......................................................................................................................... 5
Connections .................................................................................................................................. 6
Getting Started ................................................................................................................................ 9
Quick Start ................................................................................................................................... 9
Installation .................................................................................................................................... 9
Typical connection diagram for Karaoke ..................................................................................... 14
Using the CeeNee eeTee HD Karaoke/Network media player ..................................................... 15
Using the Remote Control .......................................................................................................... 15
Insert Remote Control Batteries ................................................................................................. 15
Usage & Navigation ...................................................................................................................... 17
Menus. ........................................................................................................................................ 17
Home… ...................................................................................................................................... 17
Video ..................................................................................................................................... 18
Music ..................................................................................................................................... 20
Photo ...................................................................................................................................... 22
Karaoke ................................................................................................................................. 24
Applications ........................................................................................................................... 28
Web browser .......................................................................................................................... 29
YouTube ................................................................................................................................ 29
Settings .................................................................................................................................. 30
1. Video-Audio ............................................................................................................... 30
2. Video .......................................................................................................................... 33
3. Music .......................................................................................................................... 34
4. Photo ........................................................................................................................... 34
5. Karaoke ....................................................................................................................... 36
6. System ........................................................................................................................ 41
7. Network ...................................................................................................................... 43
8. Shared Network .......................................................................................................... 47
Codec Support ............................................................................................................................ 49
Video Containers ................................................................................................................... 49
Video Code Format ............................................................................................................... 49
Audio Containers ................................................................................................................... 50
Audio Codec Format ............................................................................................................. 50
Photo Containers ................................................................................................................... 50
CeeNee Technical Support ......................................................................................................... 51
Troubleshooting ............................................................................................................................ 52
HISTORY .................................................................................................................................. 54
2
Page 4

Product Safety
Follow all instructions.
Heed all warnings.
Do not throw, shake, or drop the device, otherwise damage may occur.
Avoid exposing the product to moisture, high humidity, or dust.
Do not attempt to repair or service the product yourself. Opening or removing the covers
may expose you to the risk of high voltages, electric shock and other hazards. If repair is
required, please contact your dealer and refer all servicing to qualified service personnel.
Do not touch the power cord during lightning. Avoid handling the power cord during
electrical storms to avoid electric shock.
Unplug the device during lightning storms or when unused for long periods of time.
Do not overload power strips or extension cords. Overloading an electrical outlet can
result in fire, electric shock, or device damage.
Never push foreign objects into the device.
Hold the outer power connector when removing the power cable. Pulling the power cable
itself may damage the wires inside the cable and it can cause a fire, or electric shock.
Do not spray chemical on, or near the device.
Maintain a distance of at least 3 feet between CeeNee products and any heat source, i.e.
radiator, heater, oven, amplifier etc.
Do not operate the product close to smoke.
Do not use the product in an enclosed environment, or the device may get damaged.
Do not touch the connector with wet hands to avoid the risk of electric shock.
Do not block any ventilation openings. Install in accordance with the manufacturer’s
instructions.
Operating environment. Temperature: 0°C ~ 85°C, Humidity: 20% ~ 80% non-
condensing.
For additional safety information, please refer to www.ceenee.com.
3
Page 5

Recording your CeeNee Product Information
Serial Number:
Model Number:
Purchase Date:
System and Software Notes:
In the following table, please write the serial and model numbers of your new CeeNee
eeTee product.
You can find this information on the label at the bottom of the device. You should also
note the date of purchase. This information may be required when requesting technical support.
4
Page 6

Product Overview
This user manual provides step-by-step instructions for installing and using your new
media player. For the latest CeeNee product information and news, please visit us at
www.ceenee.com.
The CeeNee eeTee HD Karaoke Network Media Player is an ultra-compact, highdefinition (HD) USB 2.0 media player that connects to an entertainment unit through a variety of
audio/video interfaces and supports playback of major audio, video and image file formats. It
supports high-definition video playback of up to Full HD 1080p through an HDMI connection or
standard definition for TVs with lower capabilities. High-fidelity digital audio is supported from
an optical interface. A USB port and an SD card slot are available to connect major external
storage devices. The included remote control lets you quickly browse through your media library
and configure settings.
Package Contents
CeeNee eeTee HD Karaoke Network Media Player (with an internal hard drive built-in)
AC Adapter
HDMI Cable
Composite A/V Cable
Mini USB/OTG Cable
Remote Control
2 AAA Batteries
Quick Start Guide
USB Mini-B Host Adapter
USB Wi-Fi dongle
* USB 3G/4G dongle (Optional)
5
Page 7
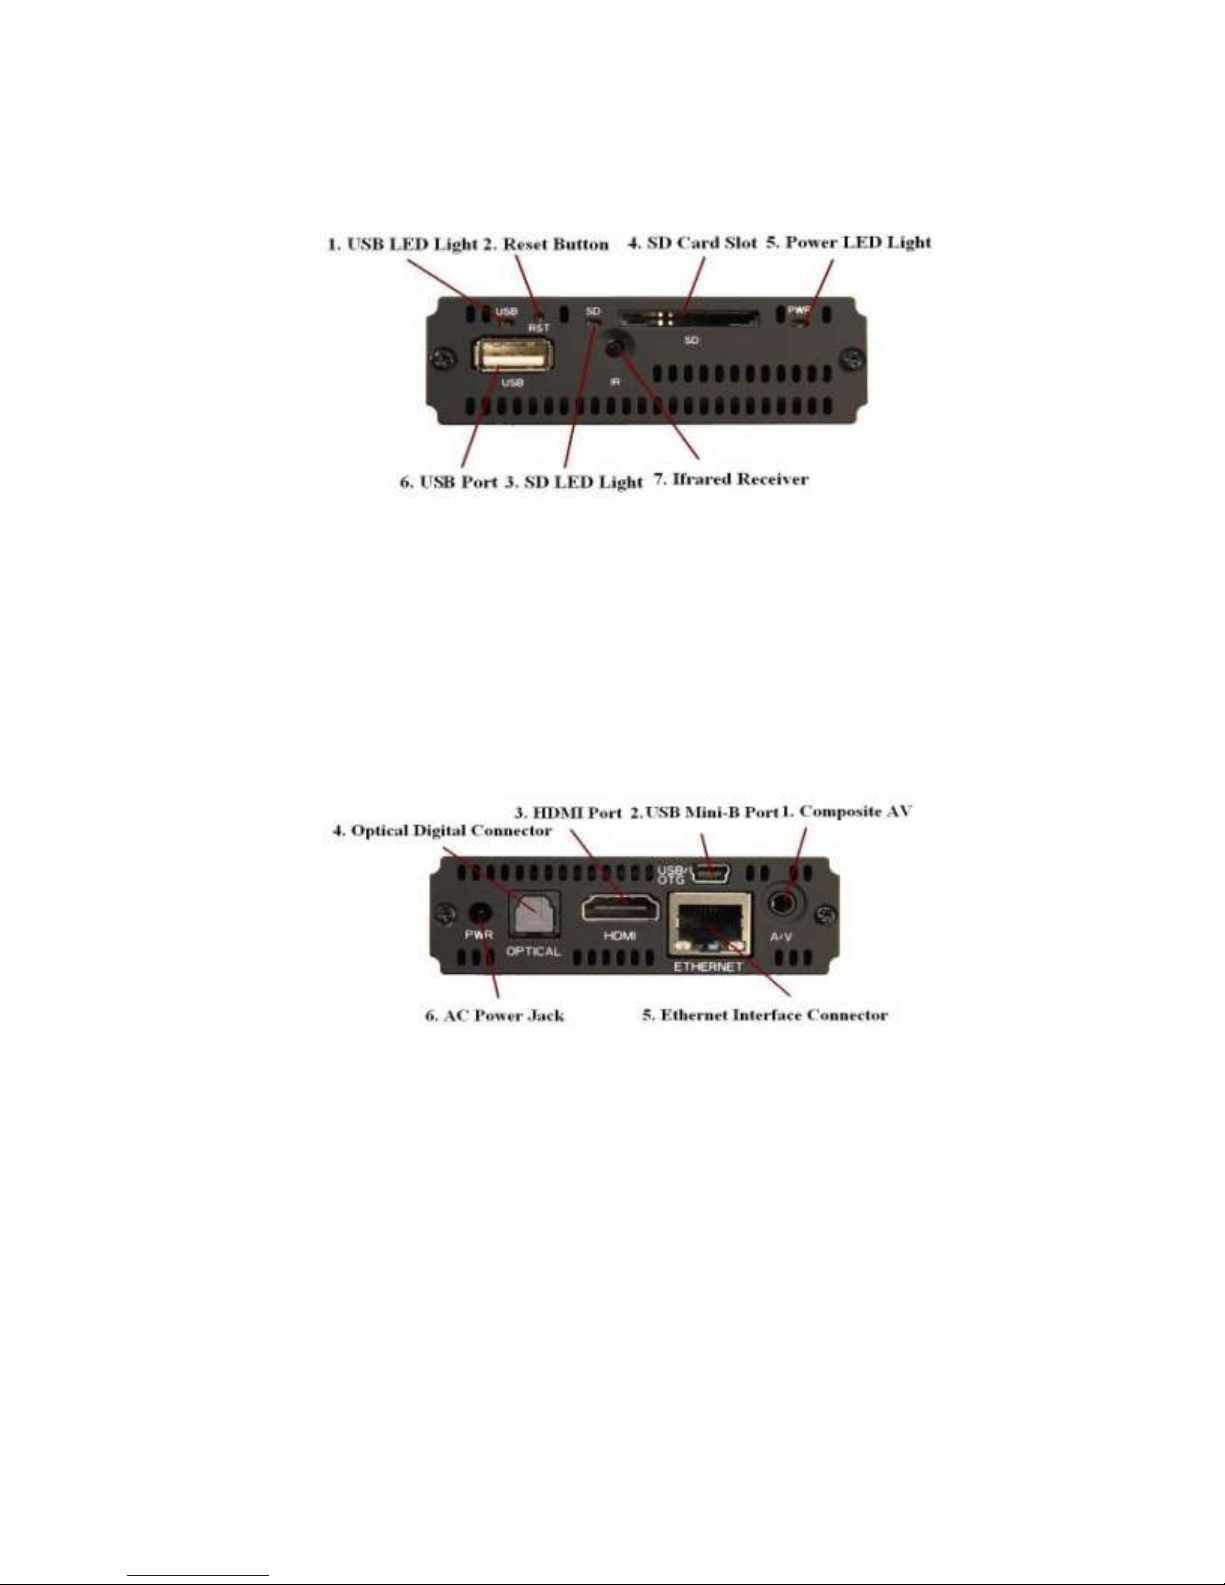
Connections
Figure 1: CeeNee eeTee Front Panel
1. USB LED Light
2. Reset Button
3. SD Card LED Light
4. SD Card Slot
1. Composite AV
5. Power LED Light
6. USB Port
7. Infrared Receiver
Figure 2: CeeNee eeTee Back Panel
4. Optical Digital Connector
2. USB Mini-B Port
3. HDMI Port
5. Ethernet Interface Connector
6. AC Power Jack
6
Page 8

Connecting devices (not included with the package)
Connection
Quality
Connections
HDMI
BEST
Specialized, high- definition connector
COMPOSITE
GOOD
Yellow = video
Red = right audio
White = left audio
1. USB external drive
2. SD/SDHC Card
3. Network storage devices
Getting Started
Quick Start
Connect the CeeNee eeTee media player to your TV or entertainment unit through the desired
interface option.
Step 1: Insert the Network cable or USB Wi-Fi dongle or USB 3G/4G dongle if applicable.
Step 2: Connect the optical digital cable if applicable.
Step 3: Connect the AC adapter.
Step 4: Insert two AAA batteries into the remote control device.
Step 5: Connect CeeNee eeTee to a computer to transfer files (music, movie, karaoke songs,
flash applications and photos) using mini USB/OTG cable.
Step 6: Insert USB Hard Drive and/or SD card and/or USB Flash drive (not included with the
package) that store(s) your favorite movies, music, karaoke songs, flash applications (including
games not included with the package) and photos to the player.
Step 7: Wait a moment for me to search for content and then enjoy!
Installation
Step 1: Connect the CeeNee eeTee media player to your TV or entertainment unit through the
desired interface option.
Choosing the Best Connection
The quality of the media contents depends on the quality of your TV and its connection to
the CeeNee eeTee media player. The standard connection uses the included composite AV
cables.
9
Page 9
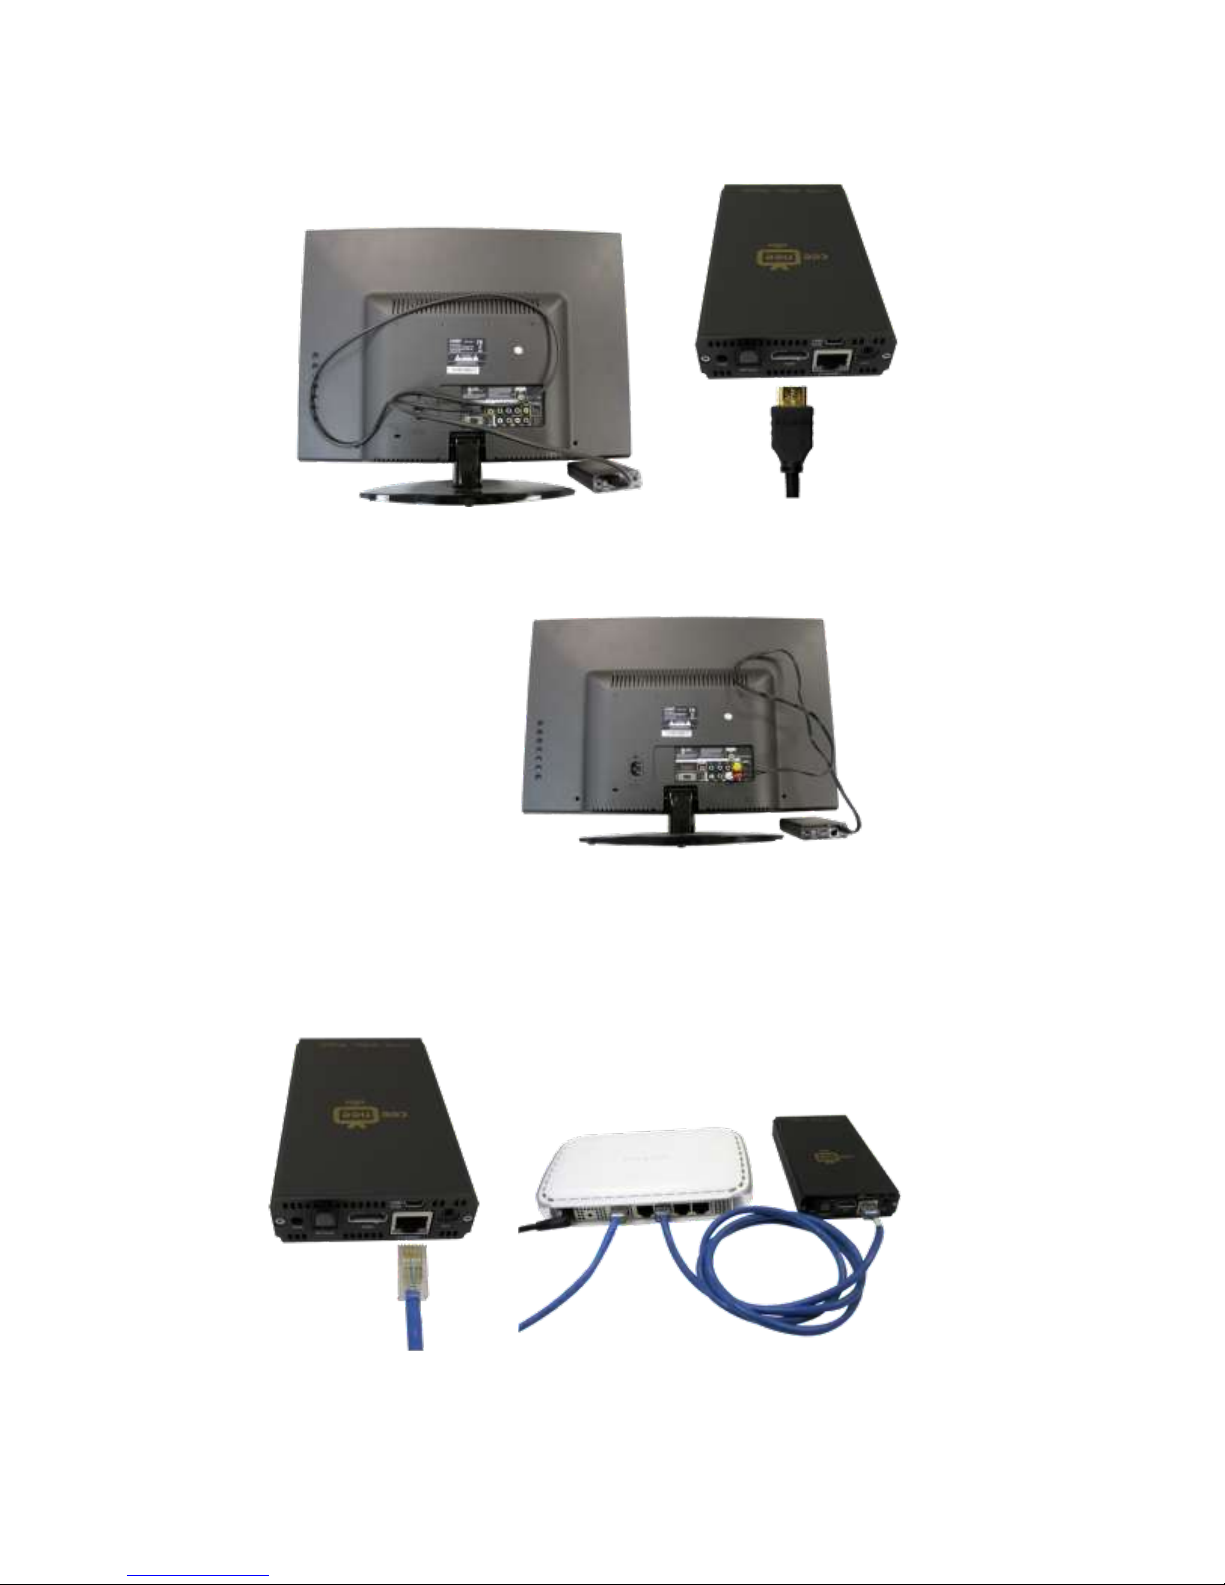
Figure 3: HDMI connection vs. Composite connection
For High Definition TV
For Standard Definition TV
Step 2: Insert the network cable or USB Wi-Fi dongle or USB 3G/4G dongle (This step is
optional and only required if networking and internet browsing is desired).
Figure 4: Connect CeeNee eeTee to the Internet/Network
10
Page 10
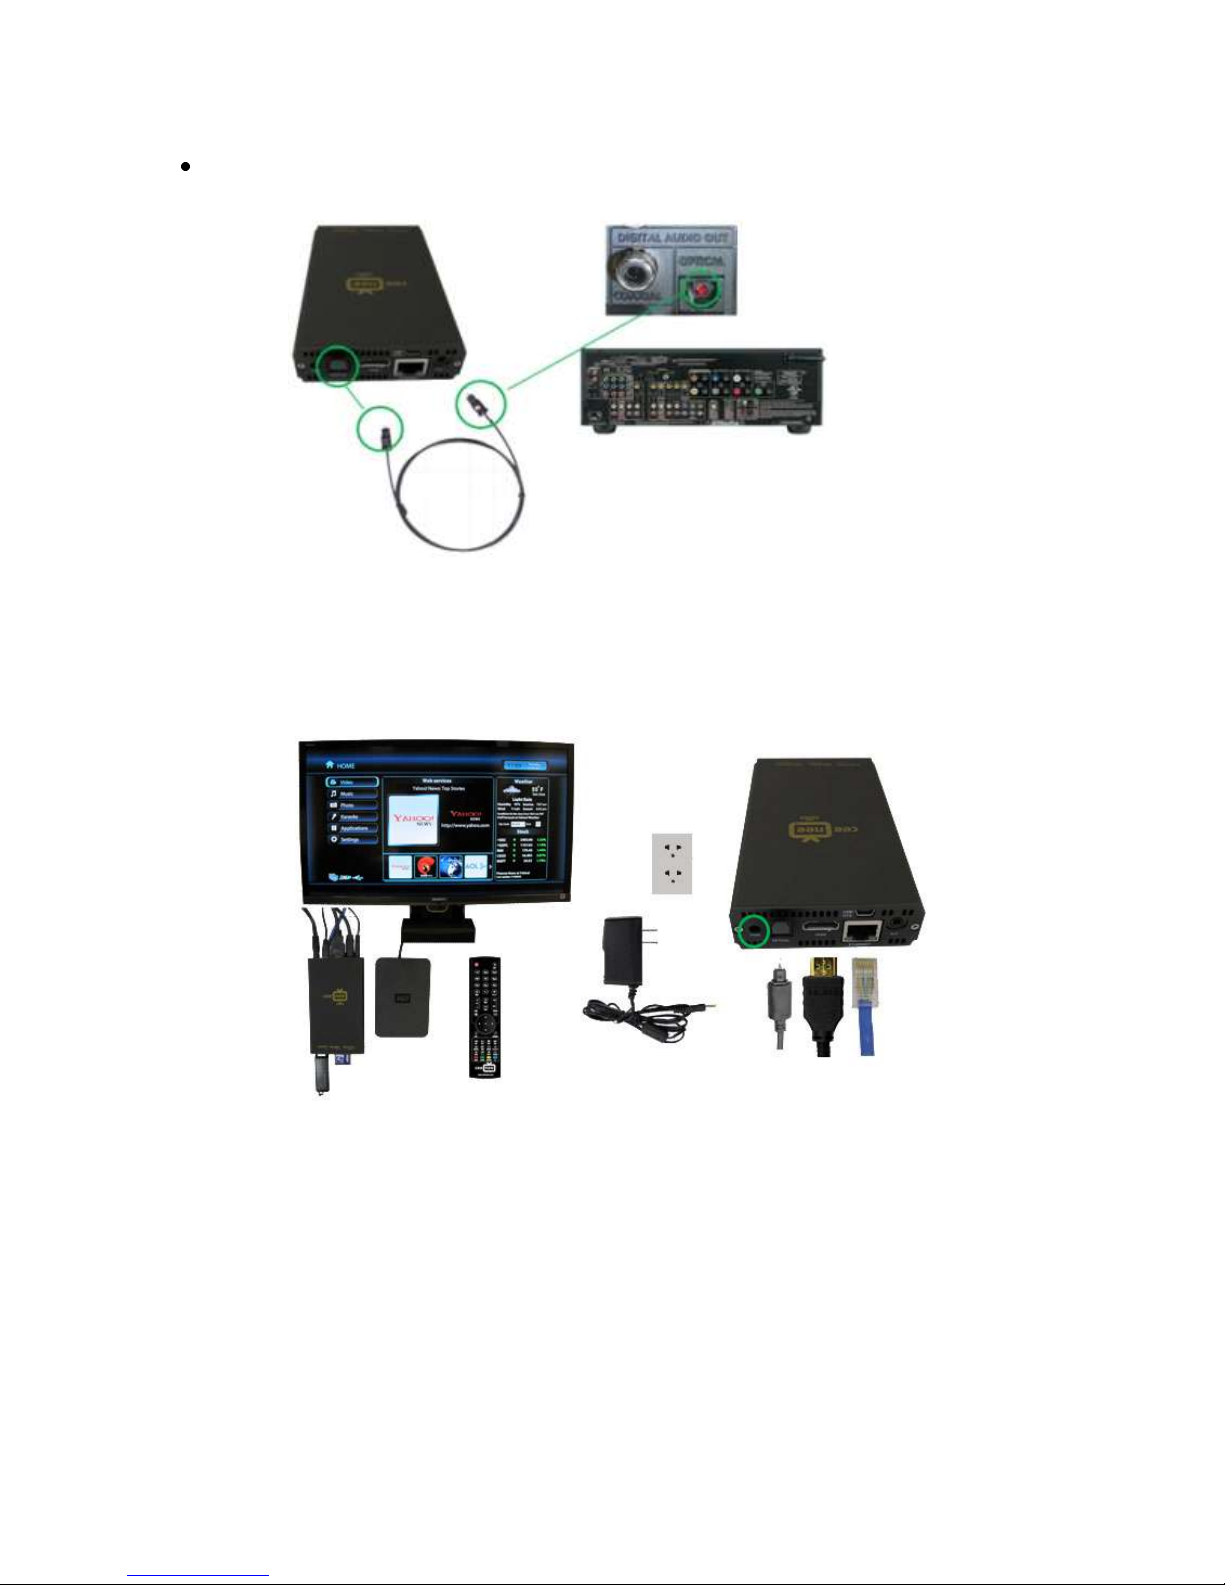
Step 3: To utilize the optical digital sound:
Insert the optical digital cable (Optical digital cable is not included).
Figure 5: Connect the optical cable to CeeNee eeTee
Step 4: Connect the AC adapter between the wall unit and CeeNee eeTee.
Figure 6: Connect the AC adapter between the wall unit and CeeNee eeTee.
11
Page 11
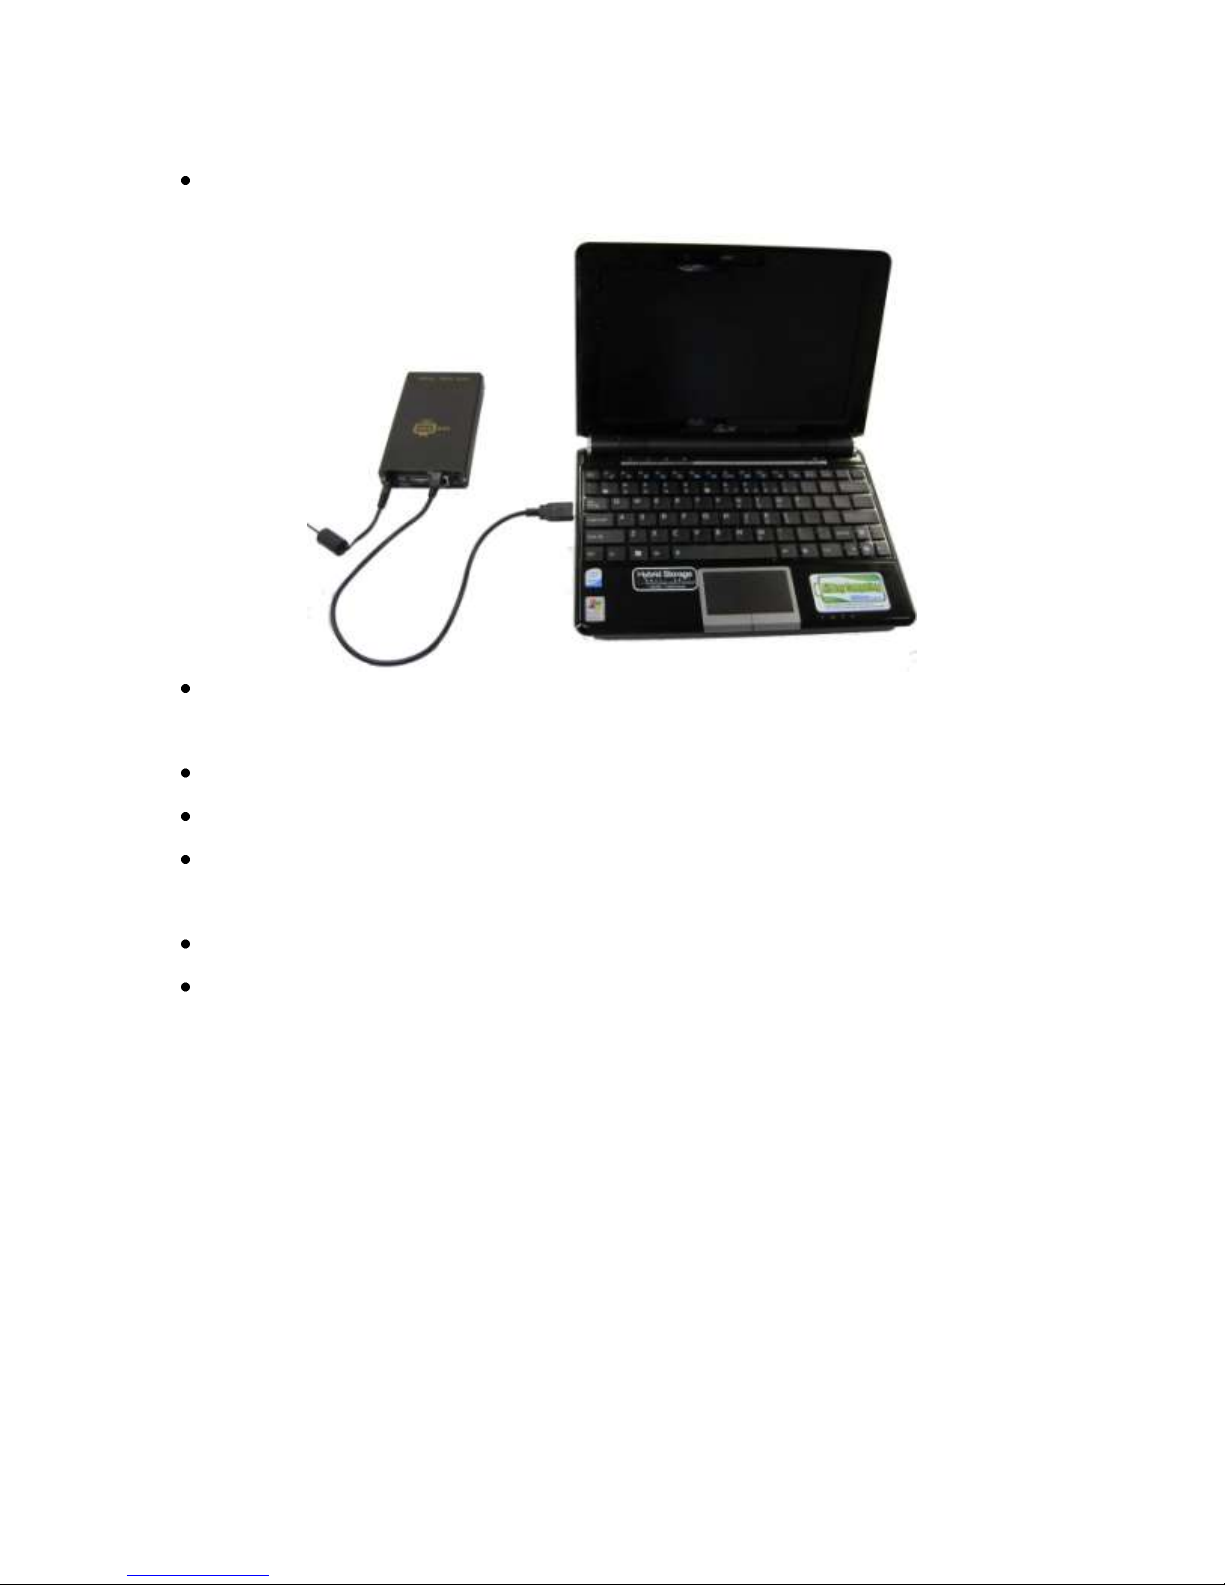
Step 5: To transfer media contents to the eeTee internal hard drive:
Connect CeeNee eeTee to the computer using the supplied mini USB/OTG cable.
Connect Mini-B type connector end of the USB/OTG cable to the CeeNee eeTee’s mini
connector located on the back side of the player
Connect USB-A type connector end of the cable to the computer/laptop
Connect the AC adaptor to the eeTee
Wait for at least 40 seconds while the computer/laptop scans the internal HDD of CeeNee
eeTee
Computer/laptop will show the notification of newly connected CeeNee eeTee
Copy favorite media contents on the CeeNee eeTee
12
Page 12
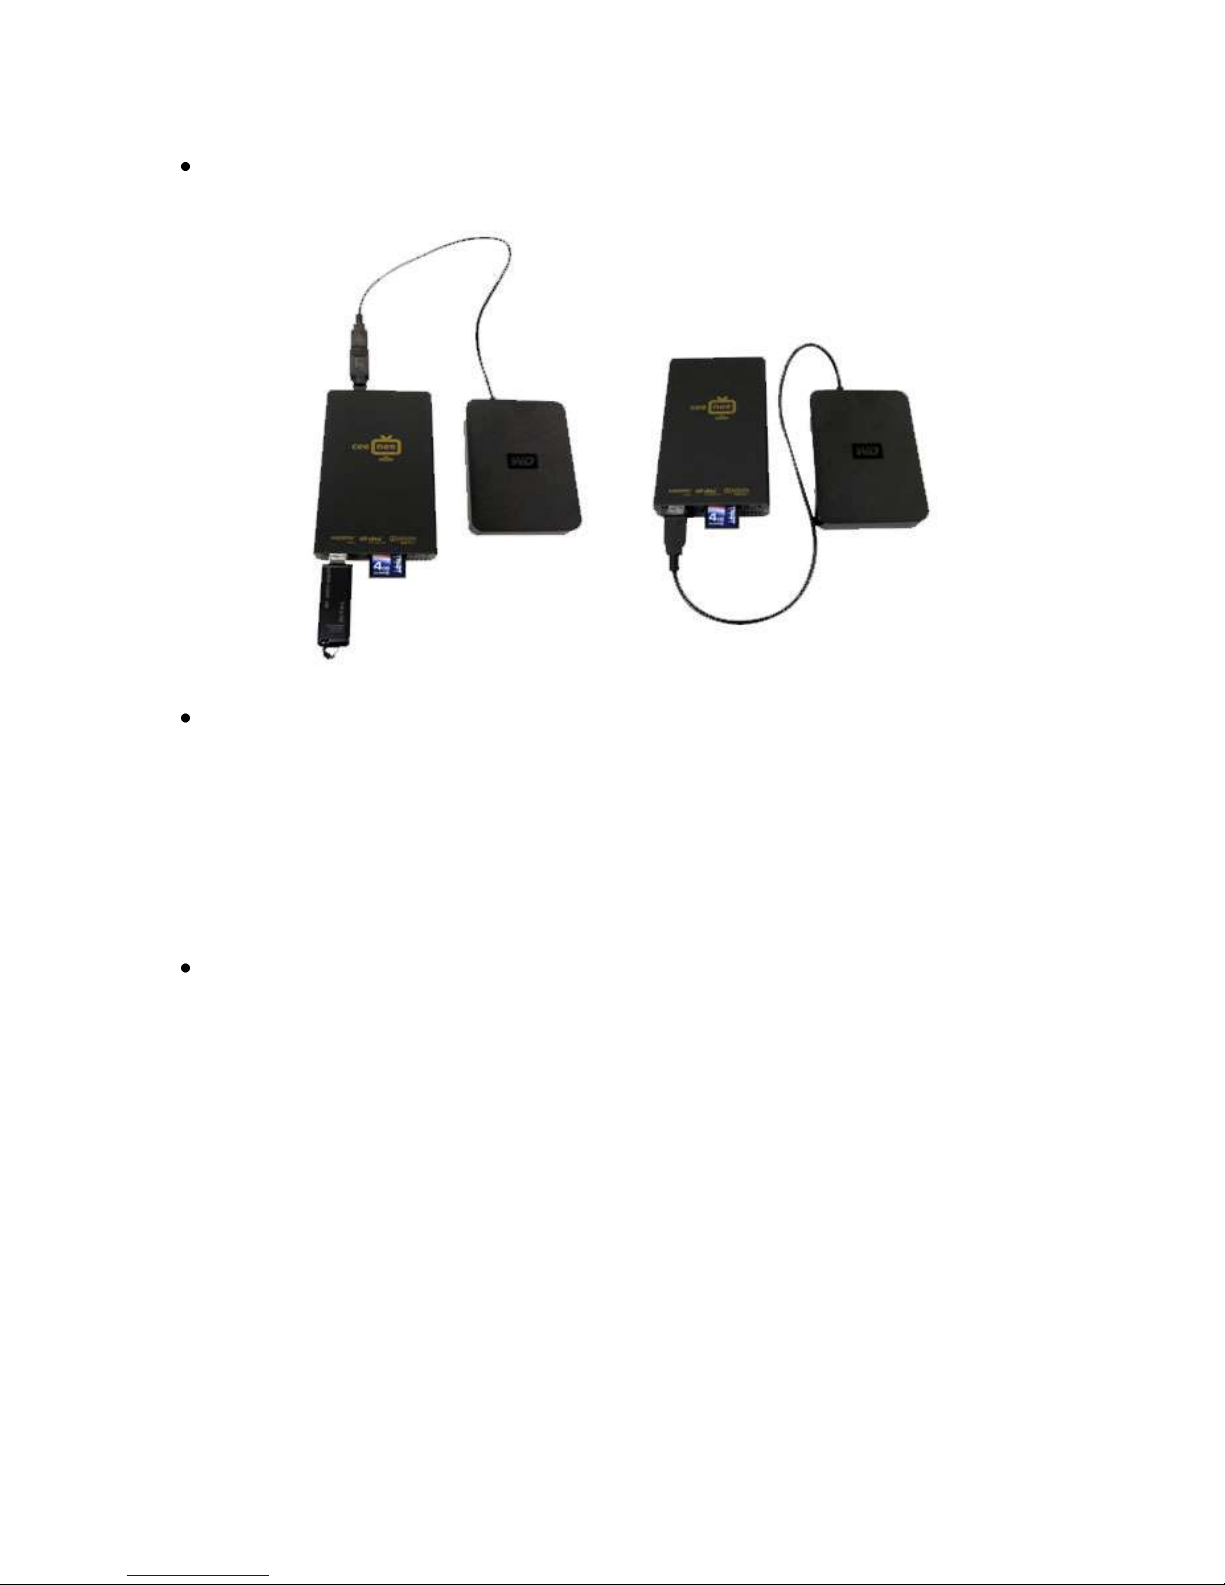
Step 6: Connecting and removing the USB drive or SD card
Connect a USB drive or an SD card to the CeeNee eeTee media player.
Please wait for about 40 seconds while the CeeNee eeTee media player scans the USB
device or the SD card for the media files. In the case of the USB Devices, this may take a
few minutes, depending on the storage capacity of the USB device and the number of
available media files. When the external device is detected, respective status light turns
on and the Home screen displays the new USB directory icon or the SD card icon that is
applicable.
Removing the USB Device/SD card
To prevent data loss, we highly recommend that the user removes the storage device
properly following the below procedure.
To remove a USB device or a SD card:
- Press the EJECT button on the remote.
- Select the desired device you want to remove.
- Highlight OK on the prompt and then press the OK button on the remote.
- Disconnect the ejected device from the CeeNee eeTee media player.
13
Page 13
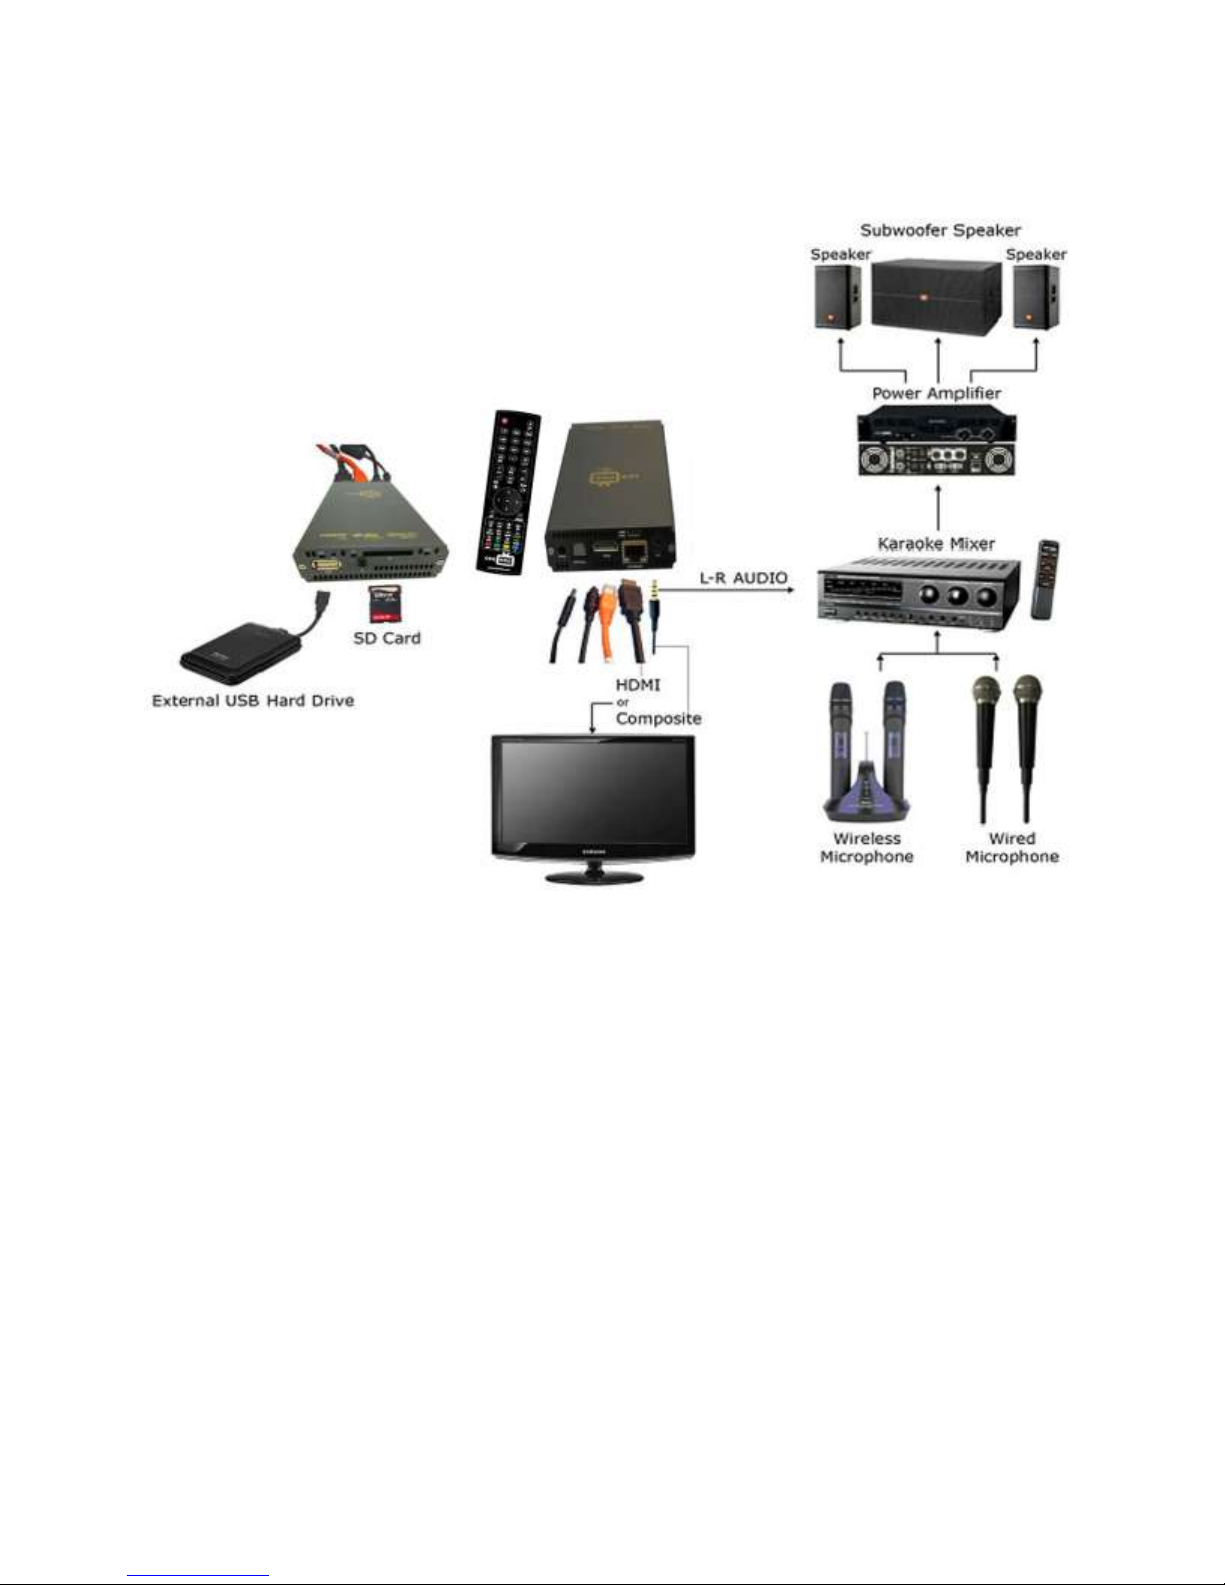
Typical connection diagram for Karaoke
Figure 7: Typical connection diagram for Karaoke
14
Page 14
Using the CeeNee eeTee HD Karaoke/Network media
player
Using the Remote Control
The CeeNee eeTee remote control lets you navigate the Home screen, browse for media
files, enable playback options and customize the system settings. The infrared sensor detects
infrared signals from the remote.
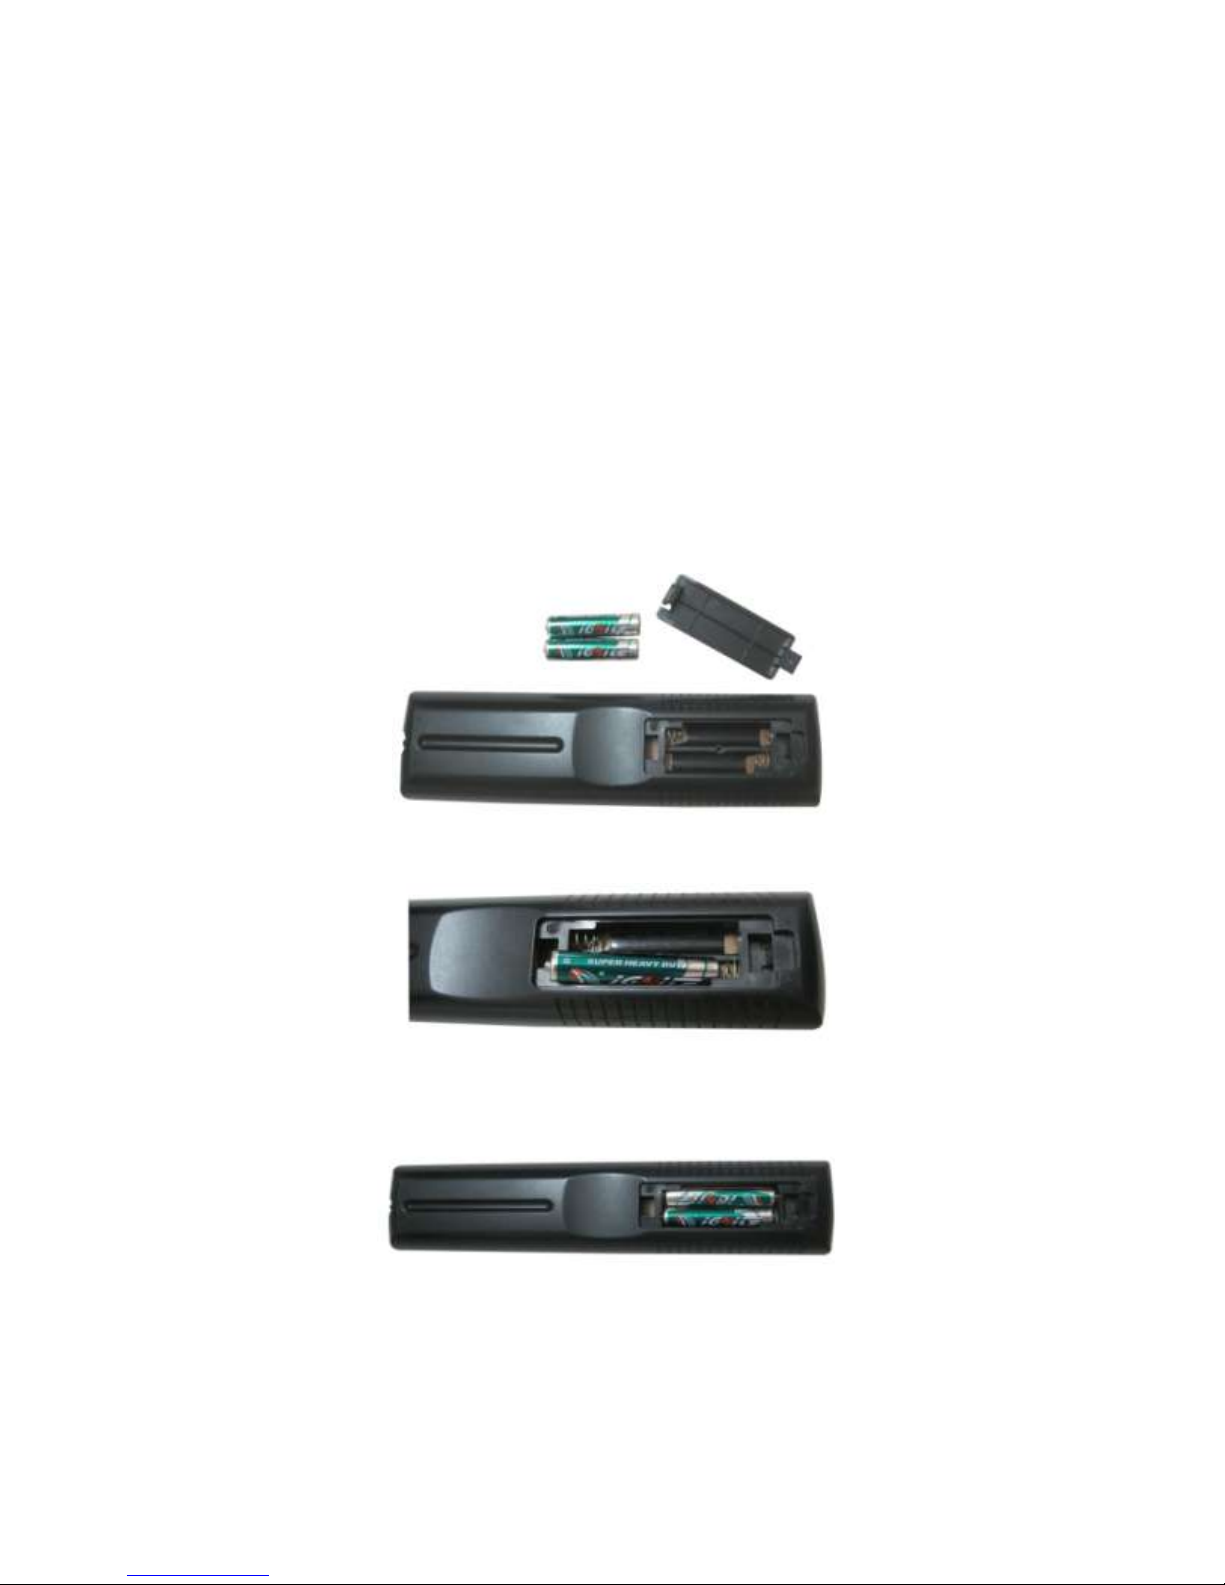
Insert Remote Control Batteries
Step 1: Remove the battery cover.
Step 2: Insert the batteries corresponding to the (+) and (-) marks on the battery compartment.
Step 3: Reattach the battery cover.
Figure 8: Insert Remote Control Batteries
15
Page 15
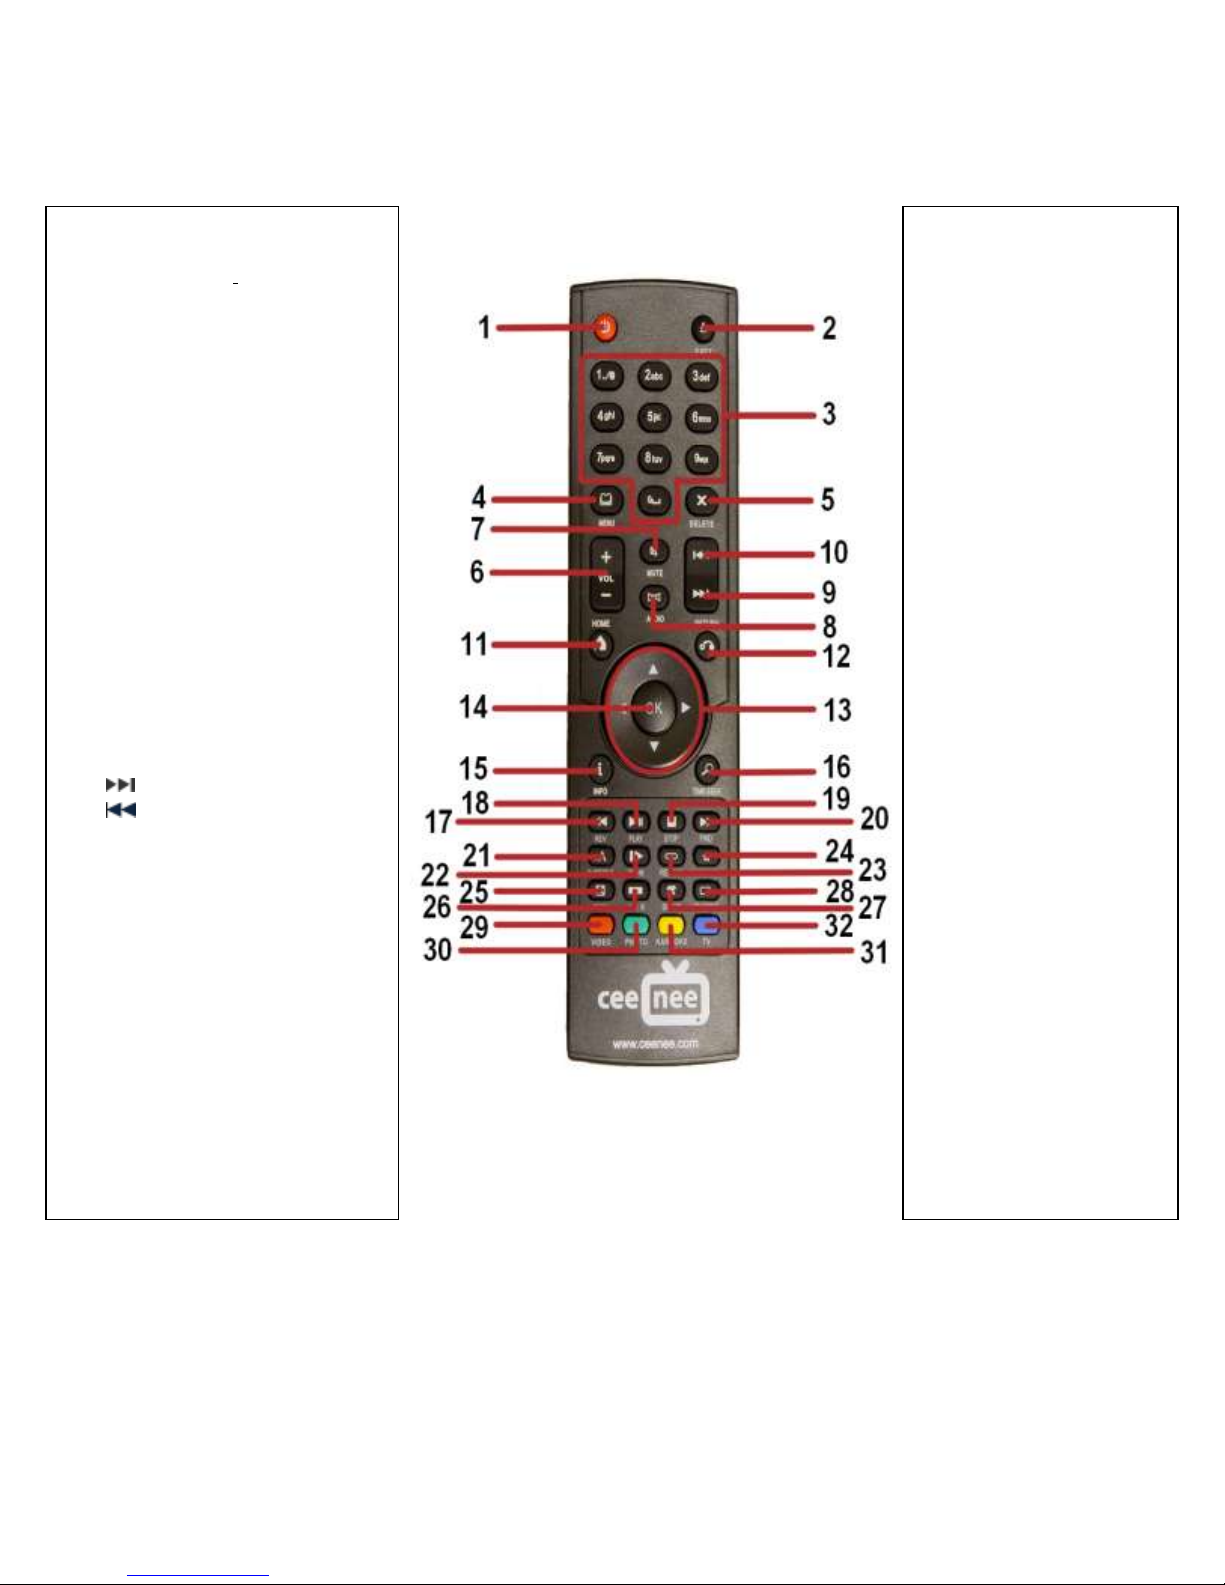
1. POWER: Switch the power
on/off
2. EJECT: Eject safely an
attached folder from shared
network: from a USB or a
SD card
3. NUMBER PAD: Searches by
video/song/photo/application
name by alphanumeric keys.
Press multiple times on the
numeric key cycles through
numbers and letters.
4. MENU: Toggle the menu bar
5. DELETE: Delete input
character or delete a queue
song in Karaoke
6. VOL +/-: Volume Up/Down
adjustment
7. MUTE: Turn the sound
on/off
8. AUDIO: Select audio channel
9. : Next track
10. : Previous track
11. HOME: Exit back to the
homepage
12. RETURN: Navigate back to
the previous screen
13. 4 WAY NAVIGATION
ARROWS: Navigate through
the menu
14. OK: To choose a selection
15. INFO: Display main/sub-
screen picture source
16. TIME SEEK: Play at time
which is being selected
17. REV: Backward
18. PLAY: Play/Pause
19. STOP: Halt play and
return to the list
20. FWD: Forward
21. SUBTITLE: Switch
subtitles
22. SLOW: Do not
support
23. REPEAT: Switch
modes: Normal,
Repeat One, Repeat
All, Shuffle, Repeat
All and Shuffle
24. BOOKMARK: Do
not support
25. ZOOM: Zoom frame
(support only video
and photo)
26. 16:9: Switch Aspect
ratio:
Normal/Widescreen
27. SETUP: Go to
Settings interface
28. TV Mode: Do not
support
29. VIDEO (RED): Go
to Video interface
30. PHOTO (GREEN):
Go to Photo interface
31. KARAOKE
(YELLOW): Go to
Karaoke interface
32. TV (BLUE): Go to
Music interface
Remote Control
16
Page 16
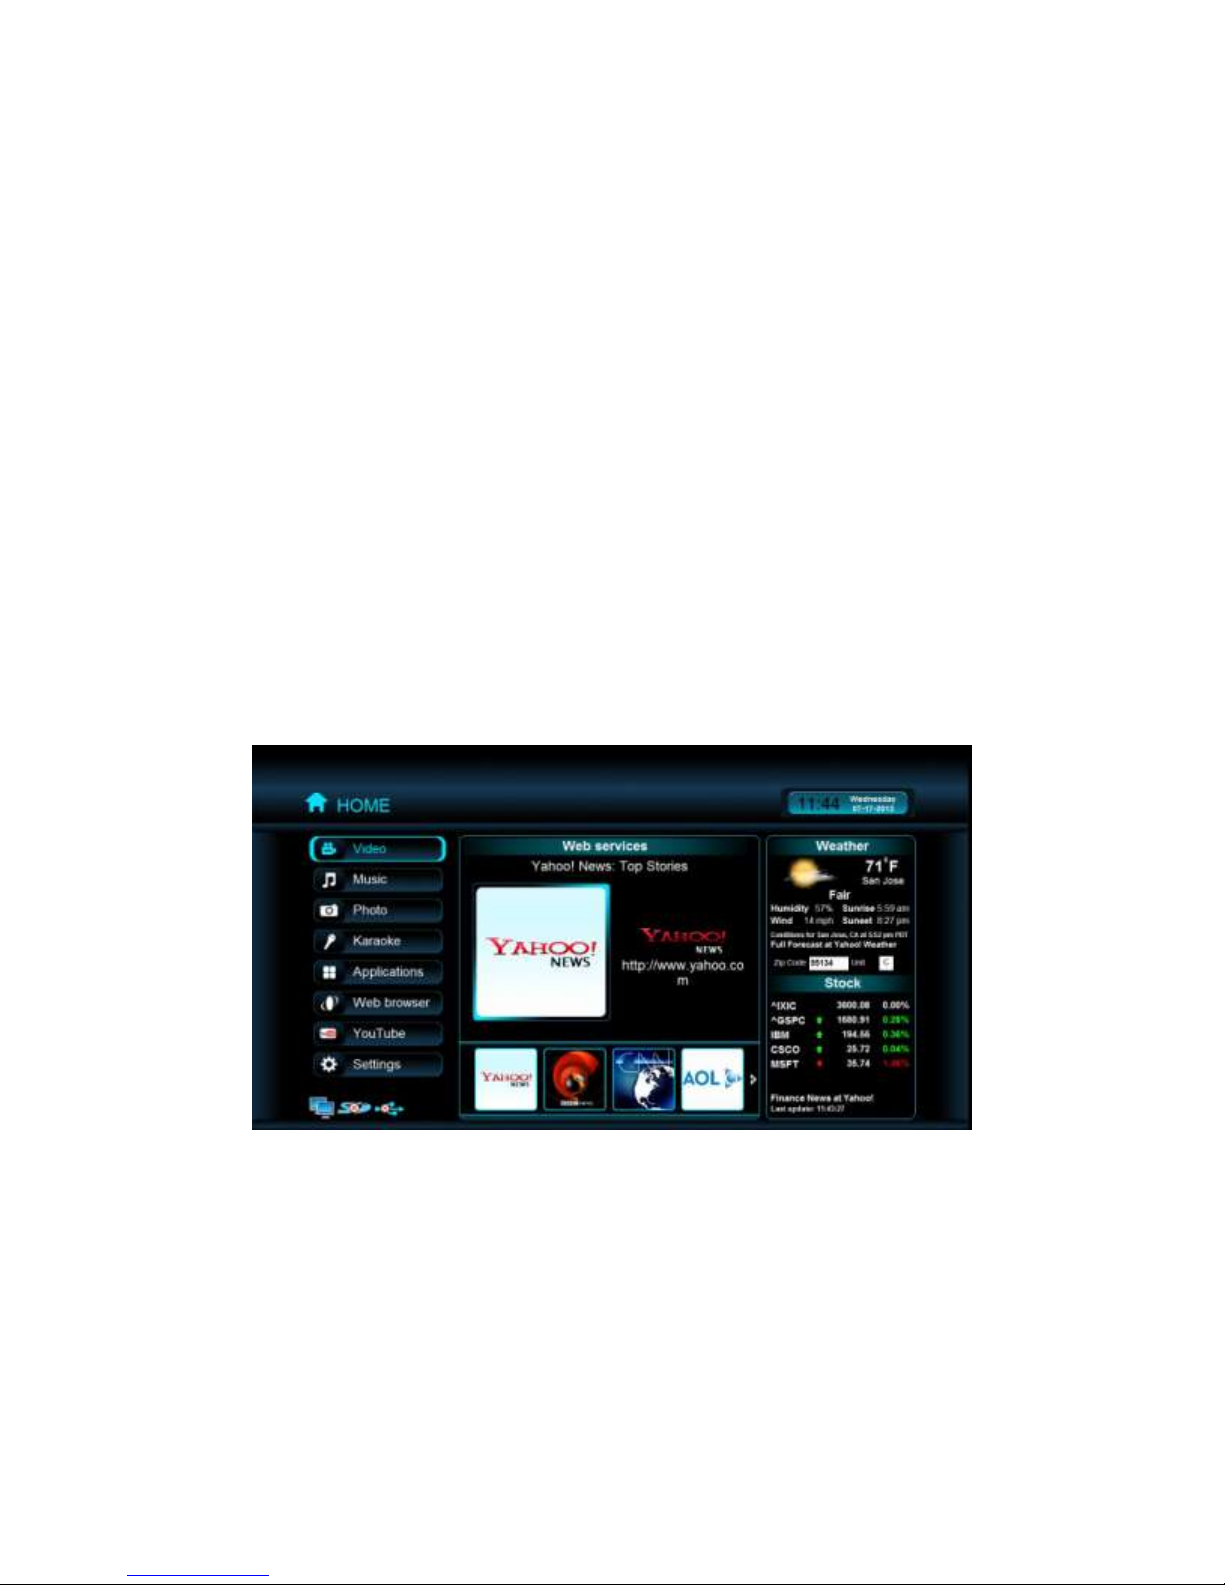
Usage & Navigation
Menus
Use the 4-way arrows on the remote control to navigate through the menu. Press the
“OK” button to select a feature, and then press the “RETURN” button to go back.
Turning on the CeeNee eeTee Player for the first time may take a few moments for the
Navigation Home to display. Users will be prompted to select the default langue. We
currently support English, Vietnamese, Japanese, Chinese, Spanish, and Korean.
Ejecting a Disk: Press the “EJECT” button on the remote control.
Home
The navigation is split into several parts. The left side of the screen shows Video, Music,
Photo, Karaoke, Applications, Web Browser, YouTube and Settings. The center shows
news feeds and the right side shows time, weather and stock.
17
Page 17
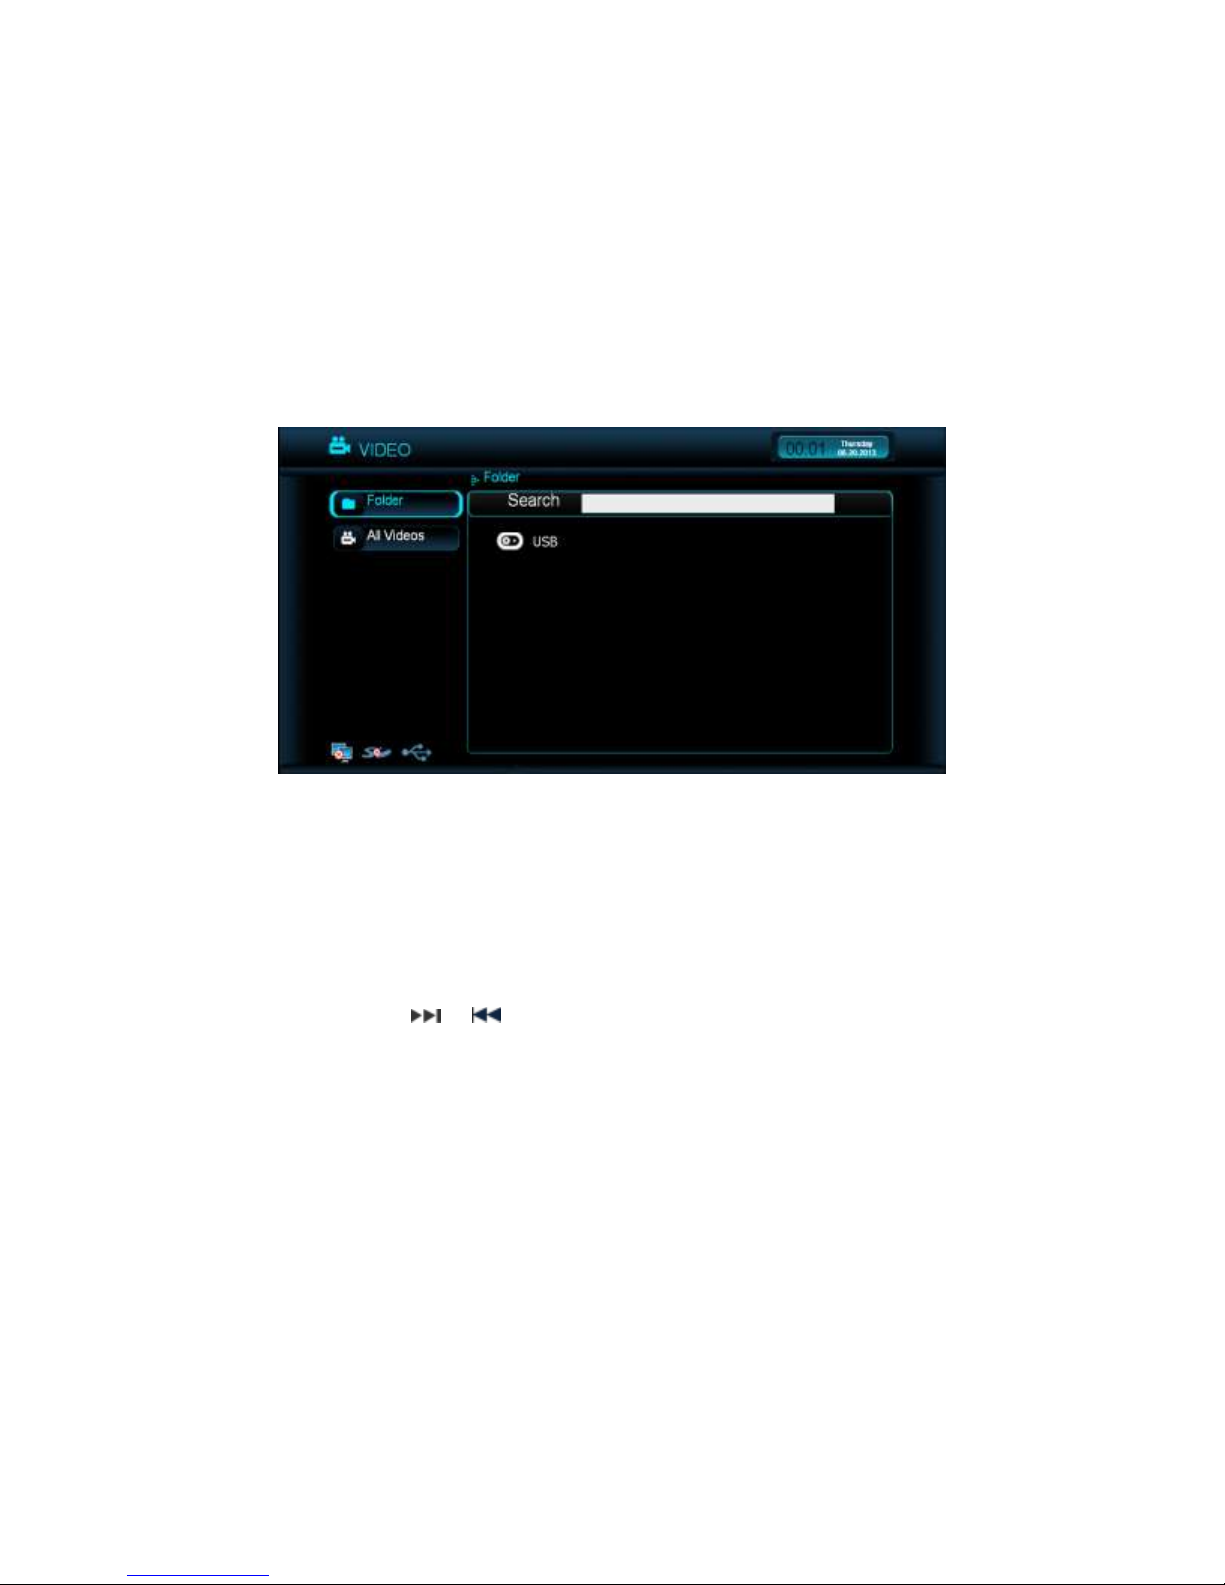
Video
1. Two methods to go to Video interface:
Select the “Video” tab in the CeeNee eeTee homepage, and then press the
“OK” button on the remote.
Press the “VIDEO (RED)” button on the remote when you are viewing the
interfaces such as Home page, Music list, Photo list, Application list, Karaoke,
Settings.
2. Organizing videos: Folder, All Videos and Search.
3. In the video browser screen:
a. Press the “OK”, “PLAY” or “RIGHT ARROW” button and then select a USB,
an SD card or shared directories from a Local Network.
b. Searching: Use the NUMBER PAD and press “OK” to search. Press the
“DELETE” button if you need to delete a character in the search box.
c. Press the or button to display the next/previous page in the video list.
d. Press “OK”, “PLAY” or “RIGHT ARROW” button on the remote to play a
video.
e. Press the “PHOTO (GREEN)” button to go to PHOTO interface.
f. Press the “KARAOKE (YELLOW)” button to go to KARAOKE interface.
g. Press the “TV (BLUE)” button to go to MUSIC interface.
h. Press the “SETUP” button to go to SETTINGS interface.
i. Press the “RETURN” button to go back to the previous screen.
j. Press the “HOME” button to exit back to the home page.
18
Page 18
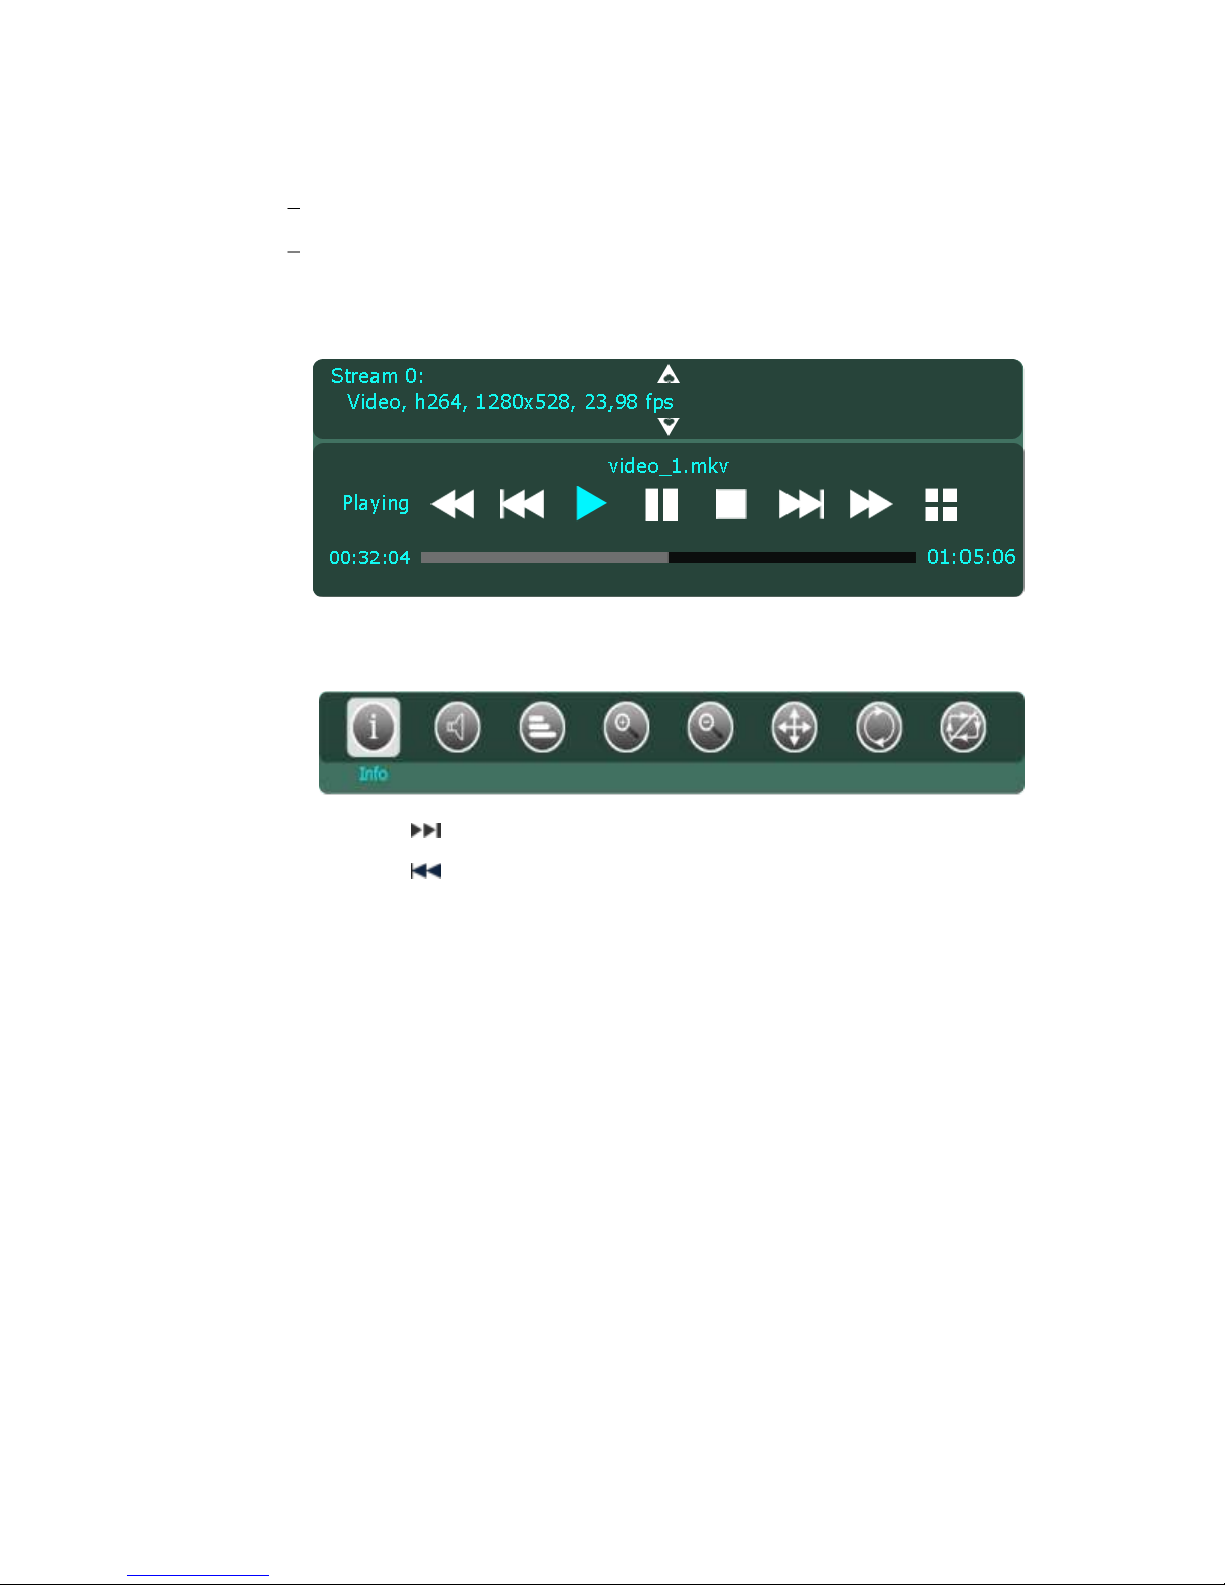
4. In the video player screen::
a. When playing a video, if the program displays “Resume?” message:
Press “YES” to start playing the video again after being interrupted.
Press “NO” to play the video from the beginning.
b. Press the “INFO” button to bring up the playback options such as fast forward,
pause, play and stop.
c. Press the “MENU” button to bring up the selections such as Audio Channel,
Subtitles, Zoom in, Zoom out, Move, Restore and Repeat.
d. Press the button to play the next video.
e. Press the button to play the previous video.
f. Press the “FWD” button to seek forward the video.
g. Press the “REV” button to seek backward in the video.
h. Press the “PLAY” button to play/pause the video.
i. Press the “STOP” button to stop the video.
j. Press the “TIME SEEK” button to play the video at the time that is being
selected.
k. Press the “AUDIO” button:
Depending on the media, if containing more than one soundtrack you can
press the audio button to select accordingly.
While playing a video, press AUDIO with “LEFT or RIGHT ARROW” to
select the available soundtrack.
It may take a few seconds to change audio track because it has to sync.
19
Page 19
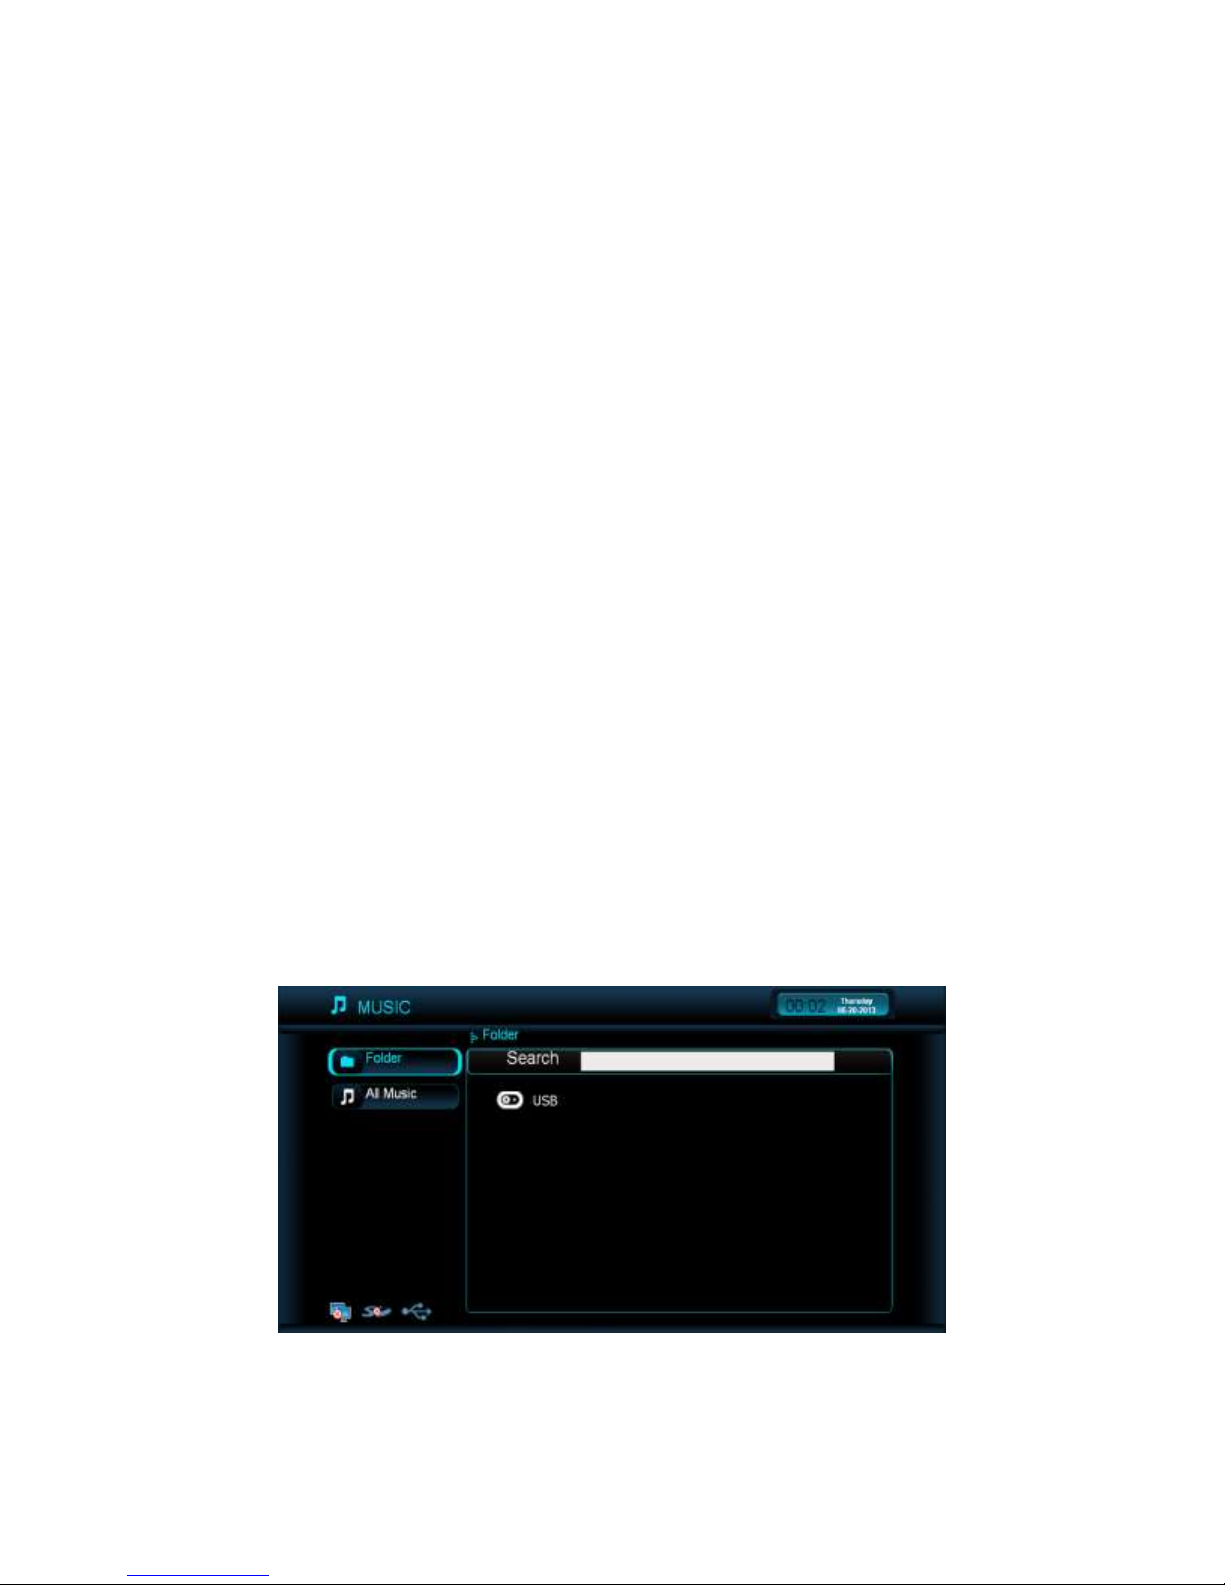
Music
l. Press the “MUTE” button to turn the sound on/off.
m. Press the “VOL+/- ” to adjust volume up/down.
n. Press the “SUBTITLE” button, a dialog will be showed and you can change
the values to get a suitable subtitle.
o. Press the “REPEAT” button and use the “LEFT or RIGHT ARROW” button
to switch modes: Normal, Repeat One and Repeat All.
p. Press the “ZOOM” and “UP ARROW” button to zoom in the frame or
“DOWN ARROW” button to zoom out the frame.
q. Press “16:9” button to switch Aspect ratio: Normal/Widescreen
r. Press the “SETUP” button to go to SETTINGS interface.
s. Press the “RETURN” button to go back to the previous screen.
t. Press the “HOME” button to exit back to the homepage.
1. Two methods to go to Music interface:
Select the “Music” tab in the CeeNee eeTee homepage, and then press the
“OK” button on the remote.
Press the “TV (BLUE)” button on the remote when you are viewing the
interfaces such as Home page, Video list, Photo list, Karaoke, Application list,
Settings.
2. Organizing music: Folder, All Music and Search
20
Page 20
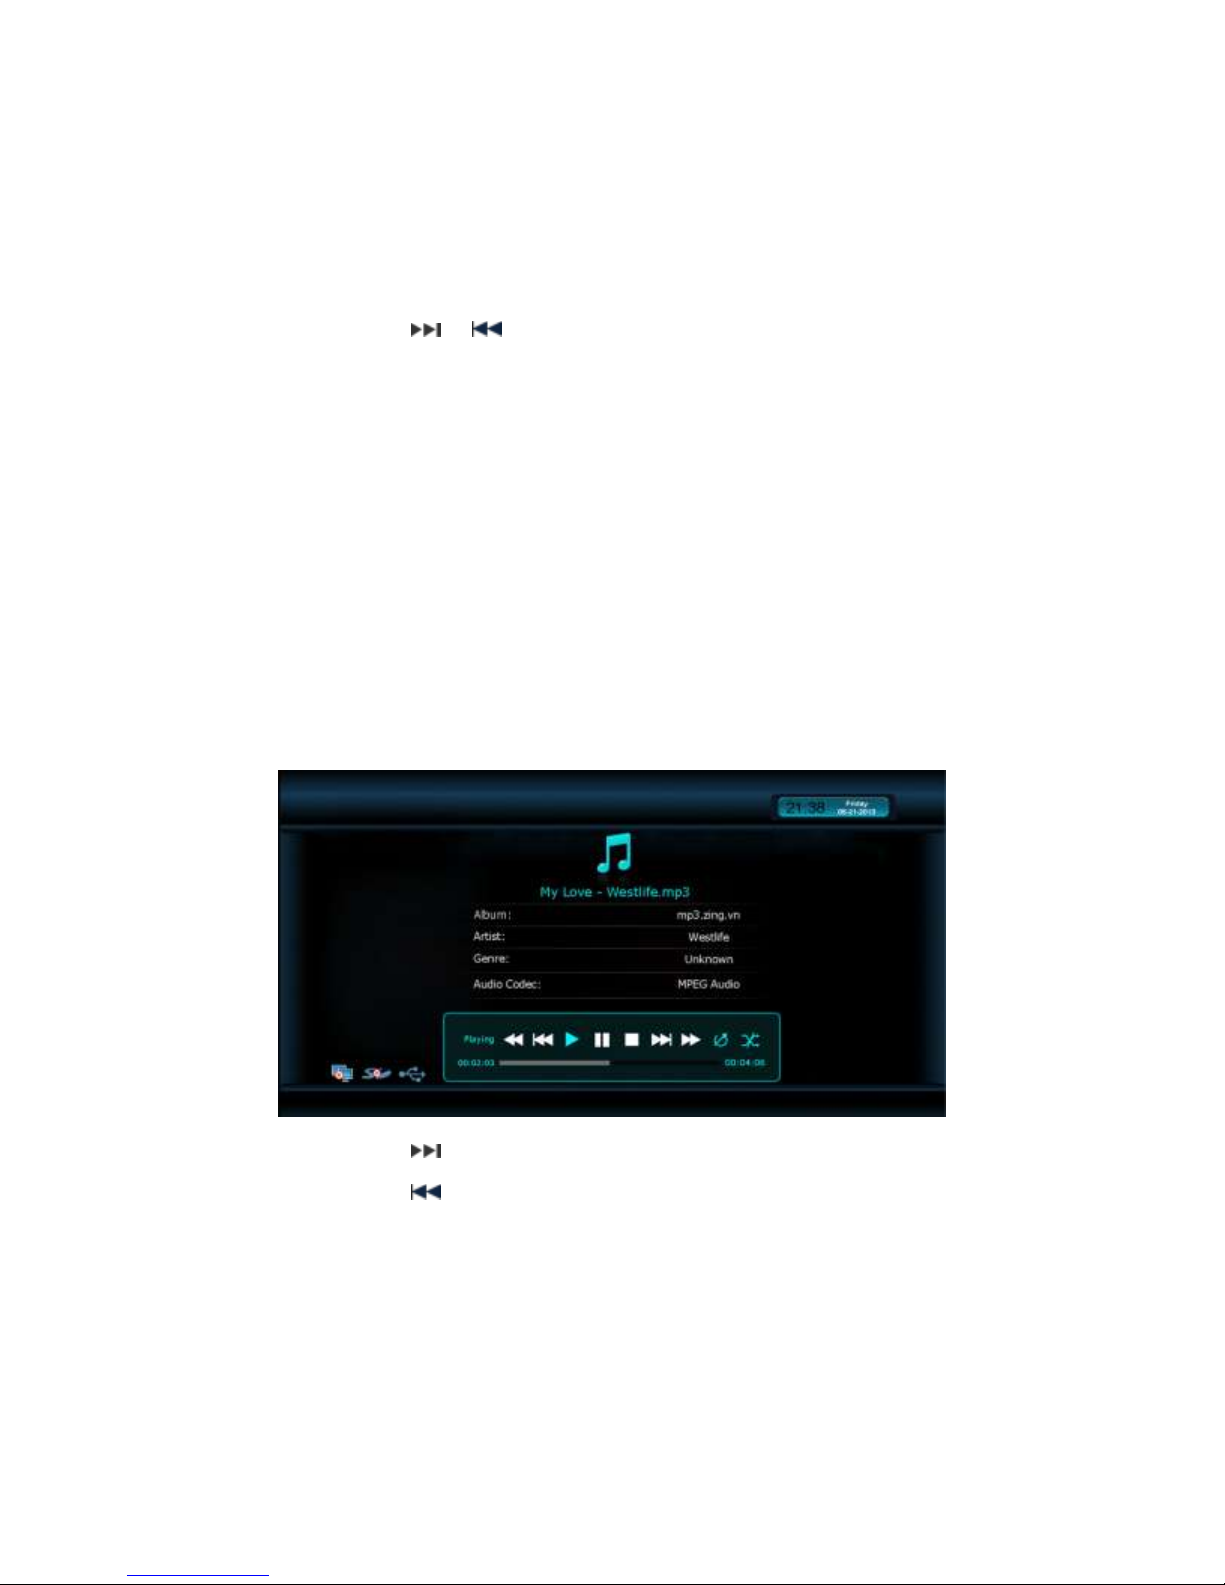
3. In the music browser screen:
a. Press the “OK”, “PLAY” or “RIGHT ARROW” button to select a USB, or a
SD card, or shared directories from Local Network.
b. Searching: Use the NUMBER PAD and press “OK” to search. Press
“DELETE” button if you need to delete a character in the search box.
c. Press the or button to display the next/previous page in the music list.
d. Browse to the music to play and select the song by pressing “OK”, “PLAY” or
“RIGHT ARROW” button on the remote
e. Press the “VIDEO (RED)” button to go to VIDEO interface.
f. Press the “PHOTO (GREEN)” button to go to PHOTO interface.
g. Press the “KARAOKE (YELLOW)” button to go to KARAOKE interface.
h. Press the “SETUP” button to go to SETTINGS interface.
i. Press the “RETURN” button to get back to the previous screen.
j. Press the “HOME” button to get back to the home page.
4. In the music player screen:
a. Press the button to play the next song.
b. Press the button to play the previous track.
c. Press the “FWD” button to seek forward the song track.
d. Press the “REV” button to seek backward the song.
e. Press the “PLAY” button to play or pause the track.
f. Press the “STOP” button to halt play and return to the list
g. Press the “MUTE” button to turn the sound on/off
h. Press the “VOL+/-” to adjust the volume up/down
21
Page 21
* Note:
Photo
i. Press the “REPEAT” button to switch modes: Normal, Repeat One, Repeat
All, Shuffle, Repeat All and Shuffle
j. Press the “SETUP” button to go to SETTINGS interface
k. Press the “RETURN” button to get back to the previous screen
l. Press the “HOME” button to get back to the home page
- You still can continue to listen to music if you return to HOME page, browse video list
or view a photo.
- When pressing the STOP button, opening a video, applications, going to Karaoke, Web
browser, YouTube or Settings, the music will be stopped.
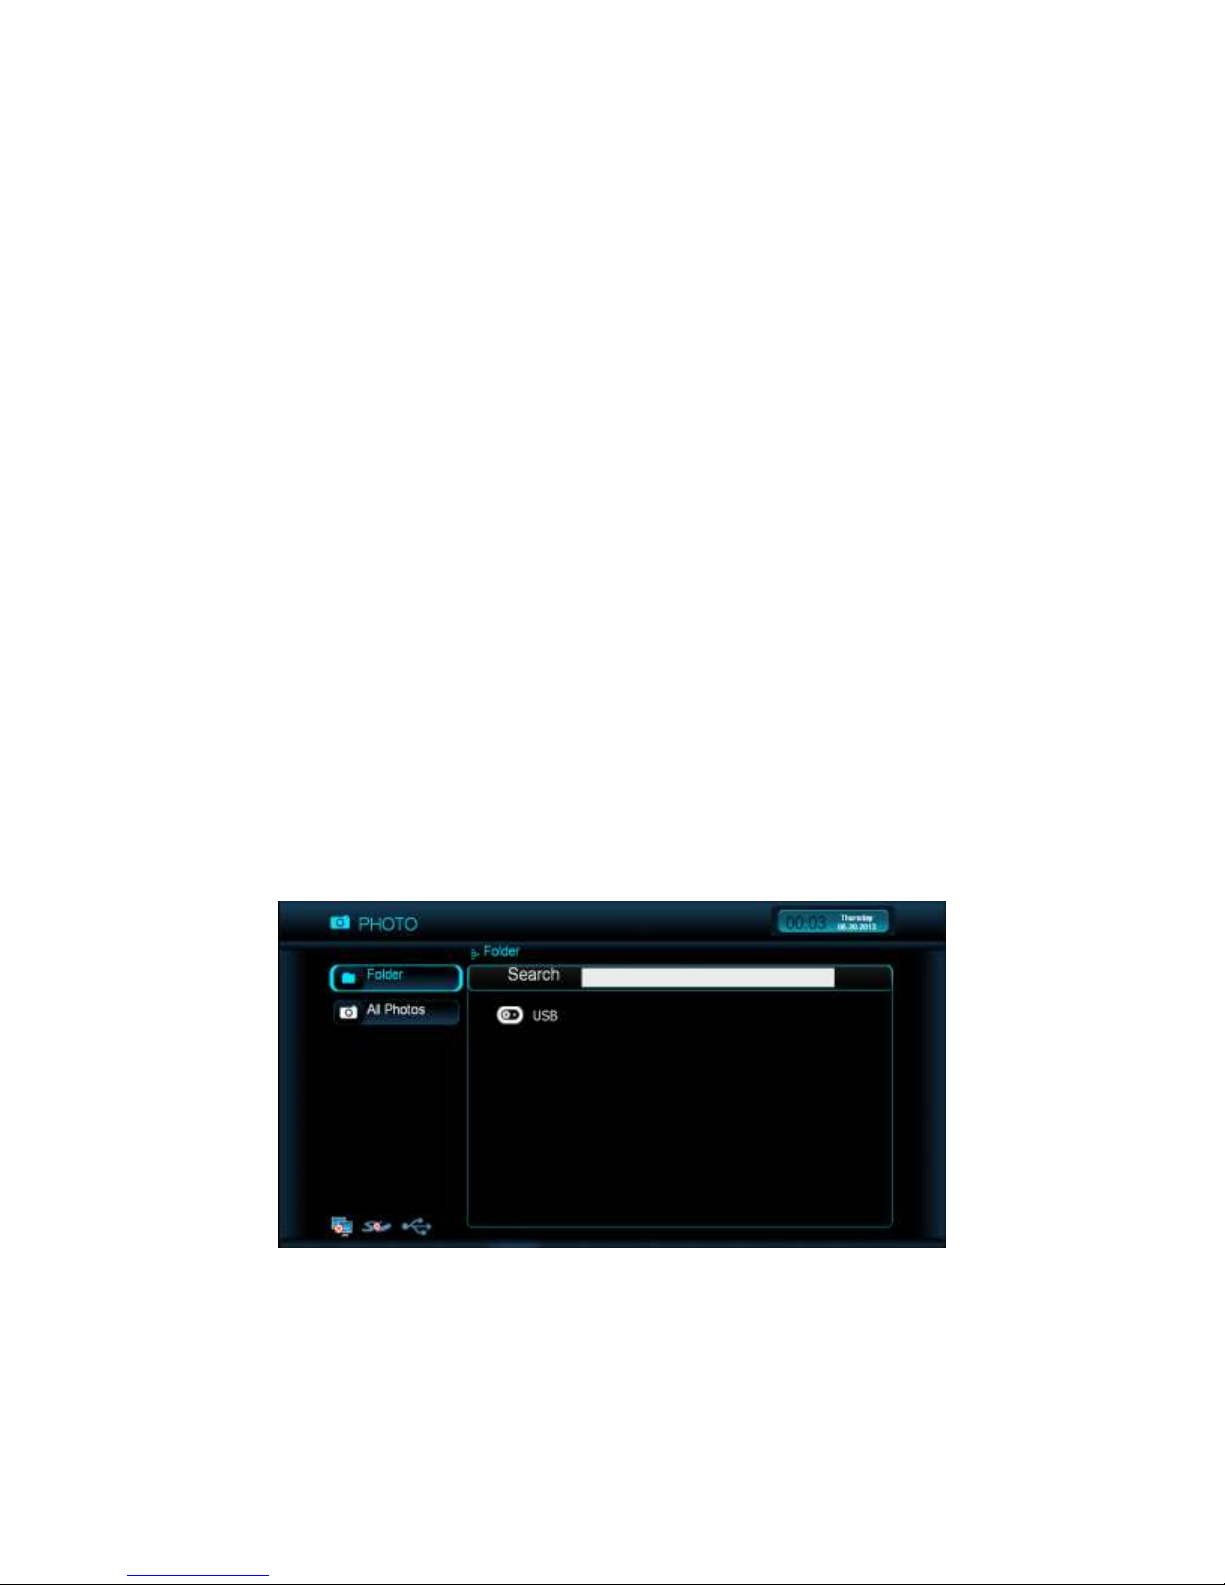
1. Two methods to go to Photo interface:
Select the “Photo” tab in the CeeNee eeTee homepage, and then press the “OK”
button on the remote.
Press the “PHOTO (GREEN)” button on the remote when you are viewing the
interfaces such as Home page, Video list, Music list, Karaoke, Application list,
Settings.
2. Organizing photo: Folder, All Photos and Search
3. In the photo browser screen:
a. Press the “OK”, “PLAY” or “RIGHT ARROW” button to select a USB, a SD
card or shared directories from Local Network
22
Page 22
b. Searching: Use the NUMBER PAD and press “OK” to search. Press
“DELETE” button if you need to delete a character in the search box
c. Press the or button to display the next/previous page in the photo list
d. Browse to the photo to view and select the photo by pressing “OK” or
“RIGHT ARROW” button on the remote
e. Select the photo on the list and press the “PLAY” button on the remote to view
photo slides
f. Press the “VIDEO (RED)” button to go to VIDEO interface.
g. Press the “KARAOKE (YELLOW)” button to go to KARAOKE interface.
h. Press the “TV (BLUE)” button to go to MUSIC interface.
i. Press the “SETUP” button to go to SETTINGS interface.
j. Press the “RETURN” button to get back to the previous screen.
k. Press the “HOME” button to get back to the home page.
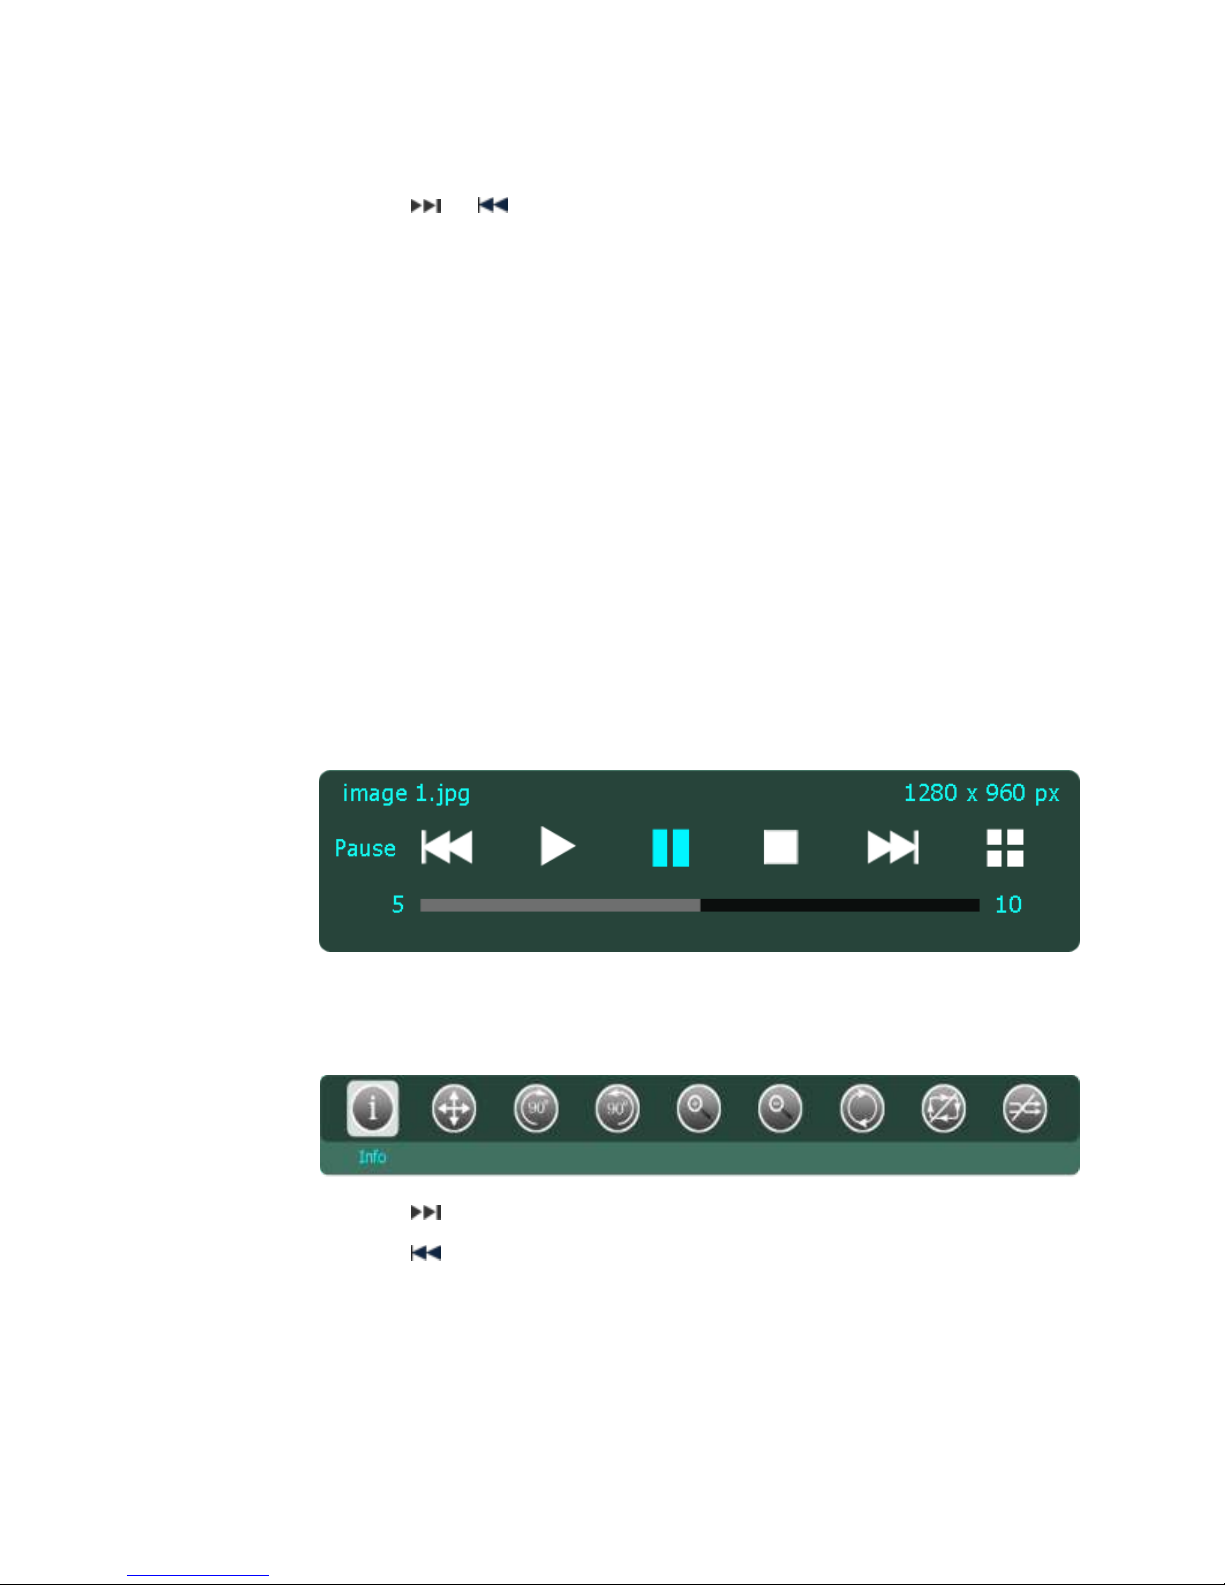
4. In the photo player screen:
a. Press the “INFO” button to view photo’s information
b. Press the “MENU” button to bring up the selections such as Move, Rotate
Right, Rotate Left, Zoom in, Zoom out, Restore, Repeat and Shuffle
c. Press the or “RIGHT ARROW” button to view next photo
d. Press the or “LEFT ARROW” button to view previous photo
e. Press the “PLAY” button to play/pause the photo (when view slide photo)
23
Page 23

f. Press the “STOP” button:
To halt play and return to the list
If the user is viewing photo and listening to music, press the “STOP”
button to halt play photo and return to the list and then press the “STOP”
button again to stop the music.
g. Press the “MUTE” button to turn the sound on/off (if user view photo and
listen to music concurrently).
h. Press the “VOL+/-” to adjust the volume up/down (if user view photo and
listen to music concurrently).
i. Press the “REPEAT” button and use the “LEFT, RIGHT, UP or DOWN
ARROW” button to switch modes: Normal, Repeat All, Shuffle, Shuffle and
Repeat All.
j. Press the “ZOOM” button then the “RIGHT ARROW” button to zoom in the
photo, or the “LEFT ARROW” button to zoom out the photo.
k. Press the “SETUP” button to go to SETTINGS interface.
Karaoke
The CeeNee Karaoke Player is a full featured sing-along player. There are functions to
create a song book, queue songs and modify playlists.
Navigating the Karaoke Menu
1. Playing a Song: Two methods to go to Karaoke interface:
2. If the screen displays the “Empty. Please press SETUP button on remote
l. Press the “RETURN” button to get back to the previous screen.
m. Press the “HOME” button to get back to the homepage.
Select the “Karaoke” tab on the CeeNee eeTee homepage, and then press the
“OK” button on the remote.
Press the “YELLOW” button on the remote when you are viewing the
interfaces such as Home page, Video list, Music list, Photo list, Application list,
Settings.
control” message, you have to go into “Settings -> Karaoke -> Select Folder (if
you select “HD Karaoke”) or Select MP3 Folder (if you select “MP3 Karaoke”) to
add any folder containing Karaoke files (go to section “Settings/5.Karaoke” in
24
Page 24
this Manual to view in details). Return to Karaoke interface after adding
successfully.
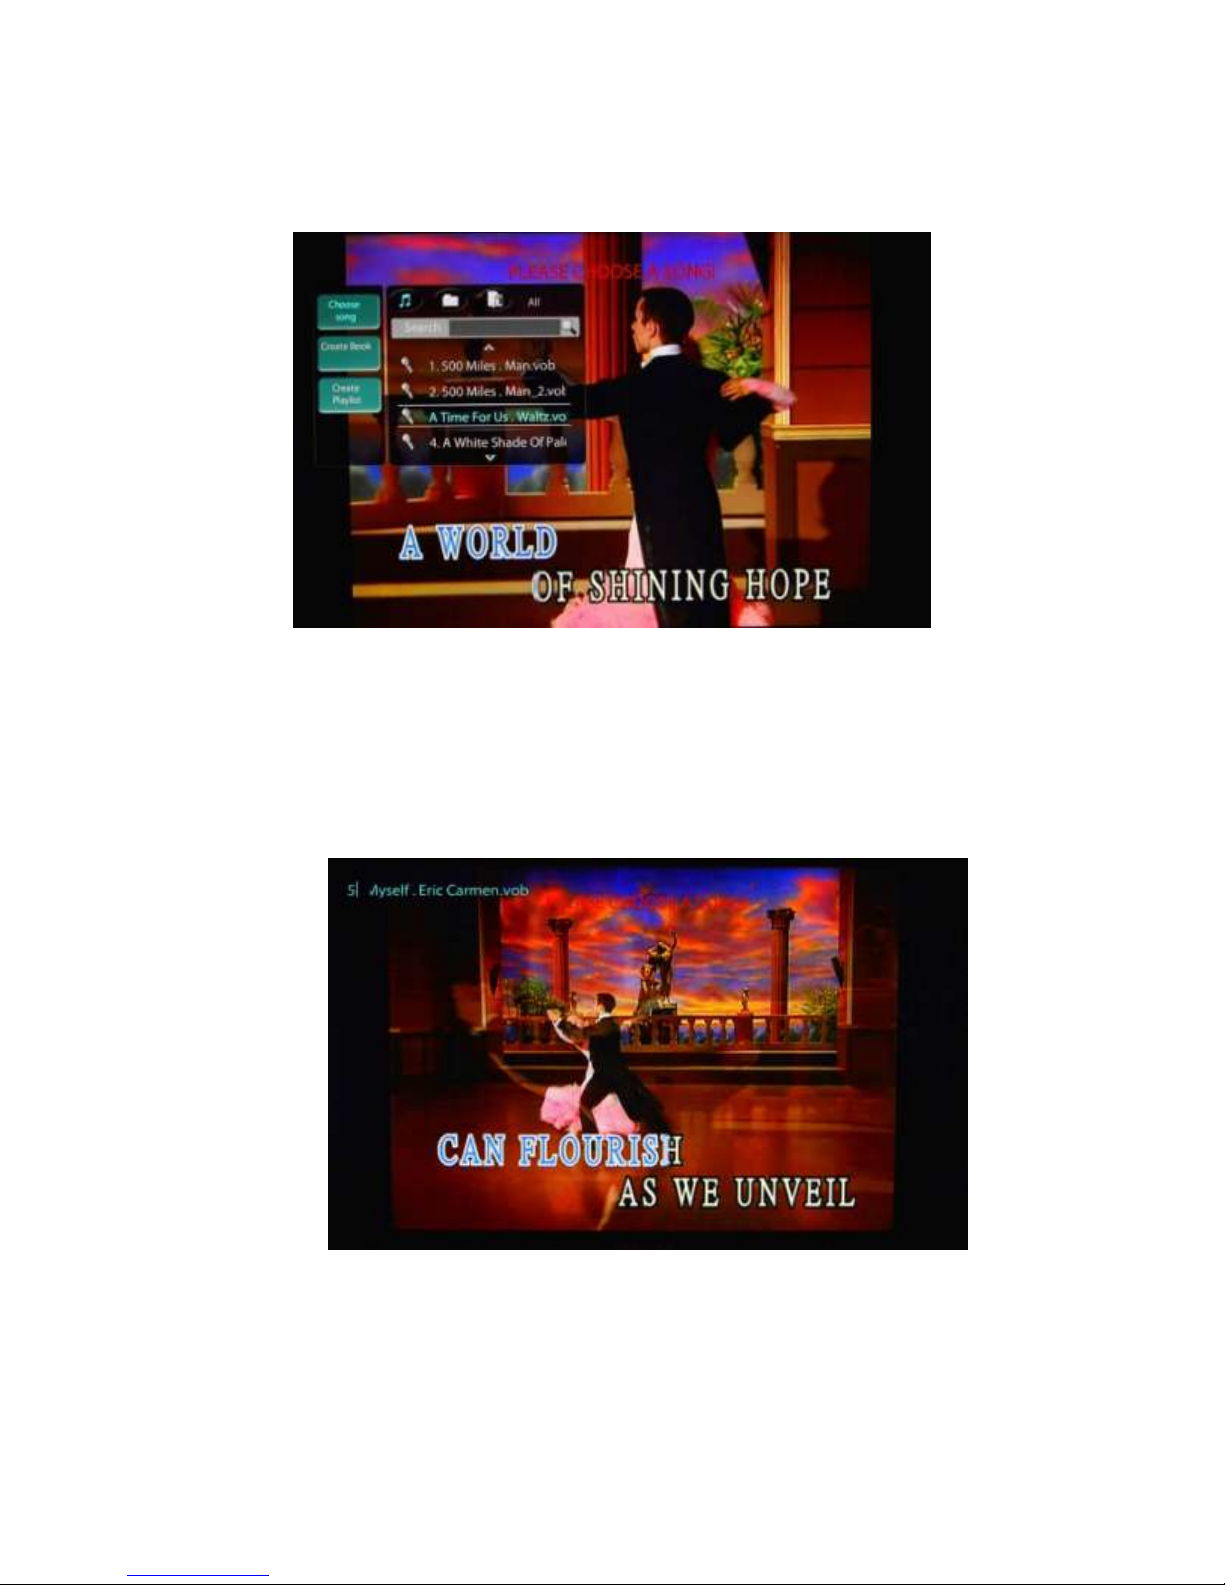
3. Select a song from the karaoke song list and press the “OK” button to play.
4. Searching:
a. Quick search: Before finding a song, you must turn off the main menu by
pressing the “MENU” button. Next, use the NUMBER PAD and press “OK”
to select the song
25
Page 25
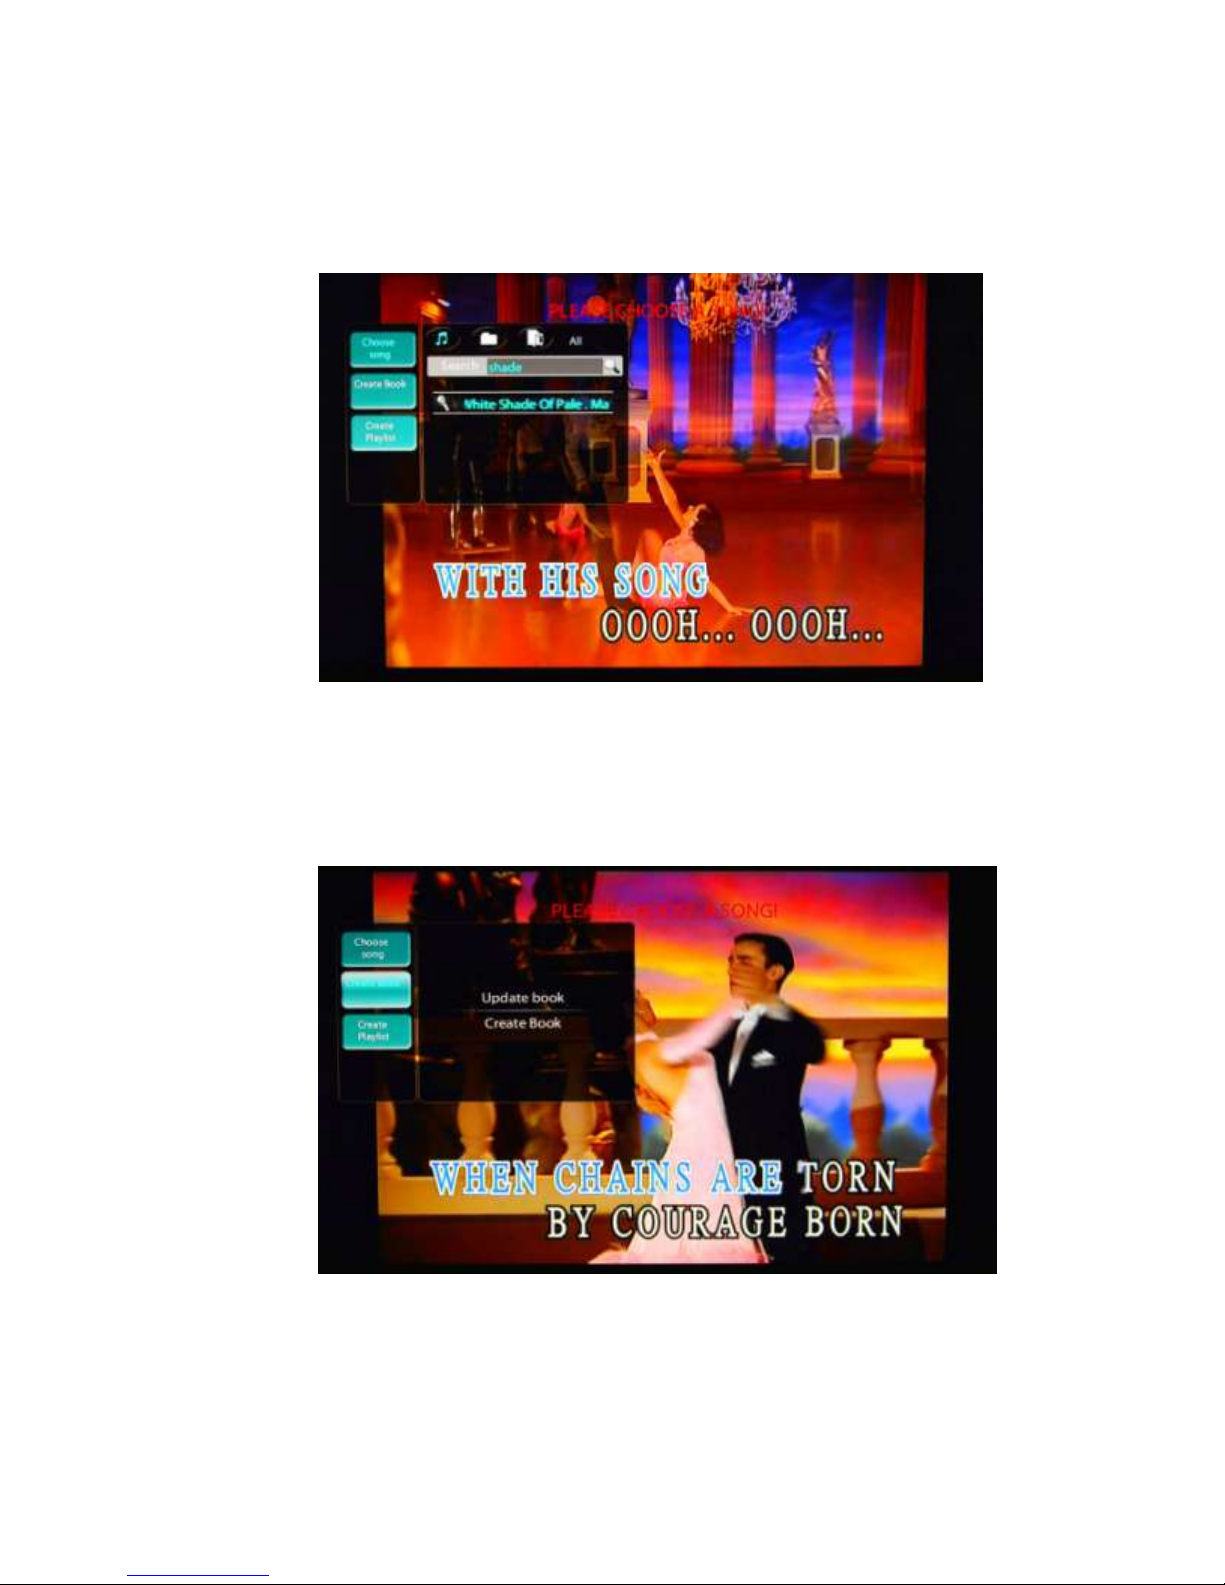
b. Normal search: Press the “MENU” button to display the main menu. Next,
select the “Choose Song” tab and press the “RIGHT ARROW” button. Then
use the NUMBER PAD and press “OK” to search.
If you need to delete the input text in the search box, press “DELETE” button.
5. Create Book:
a. Press the “MENU” button, and then press the “DOWN ARROW” button to
select the “Create Book” tab. This will enable the user to create or update a
Karaoke song book, which the user can print out:
Update book: Replace whole content of the existing book.
Create book: Create a printable Excel file that the user can print out, with
the song numbers and song titles. This file will then be saved in a
location specified by the user. This song book is helpful in
26
Page 26
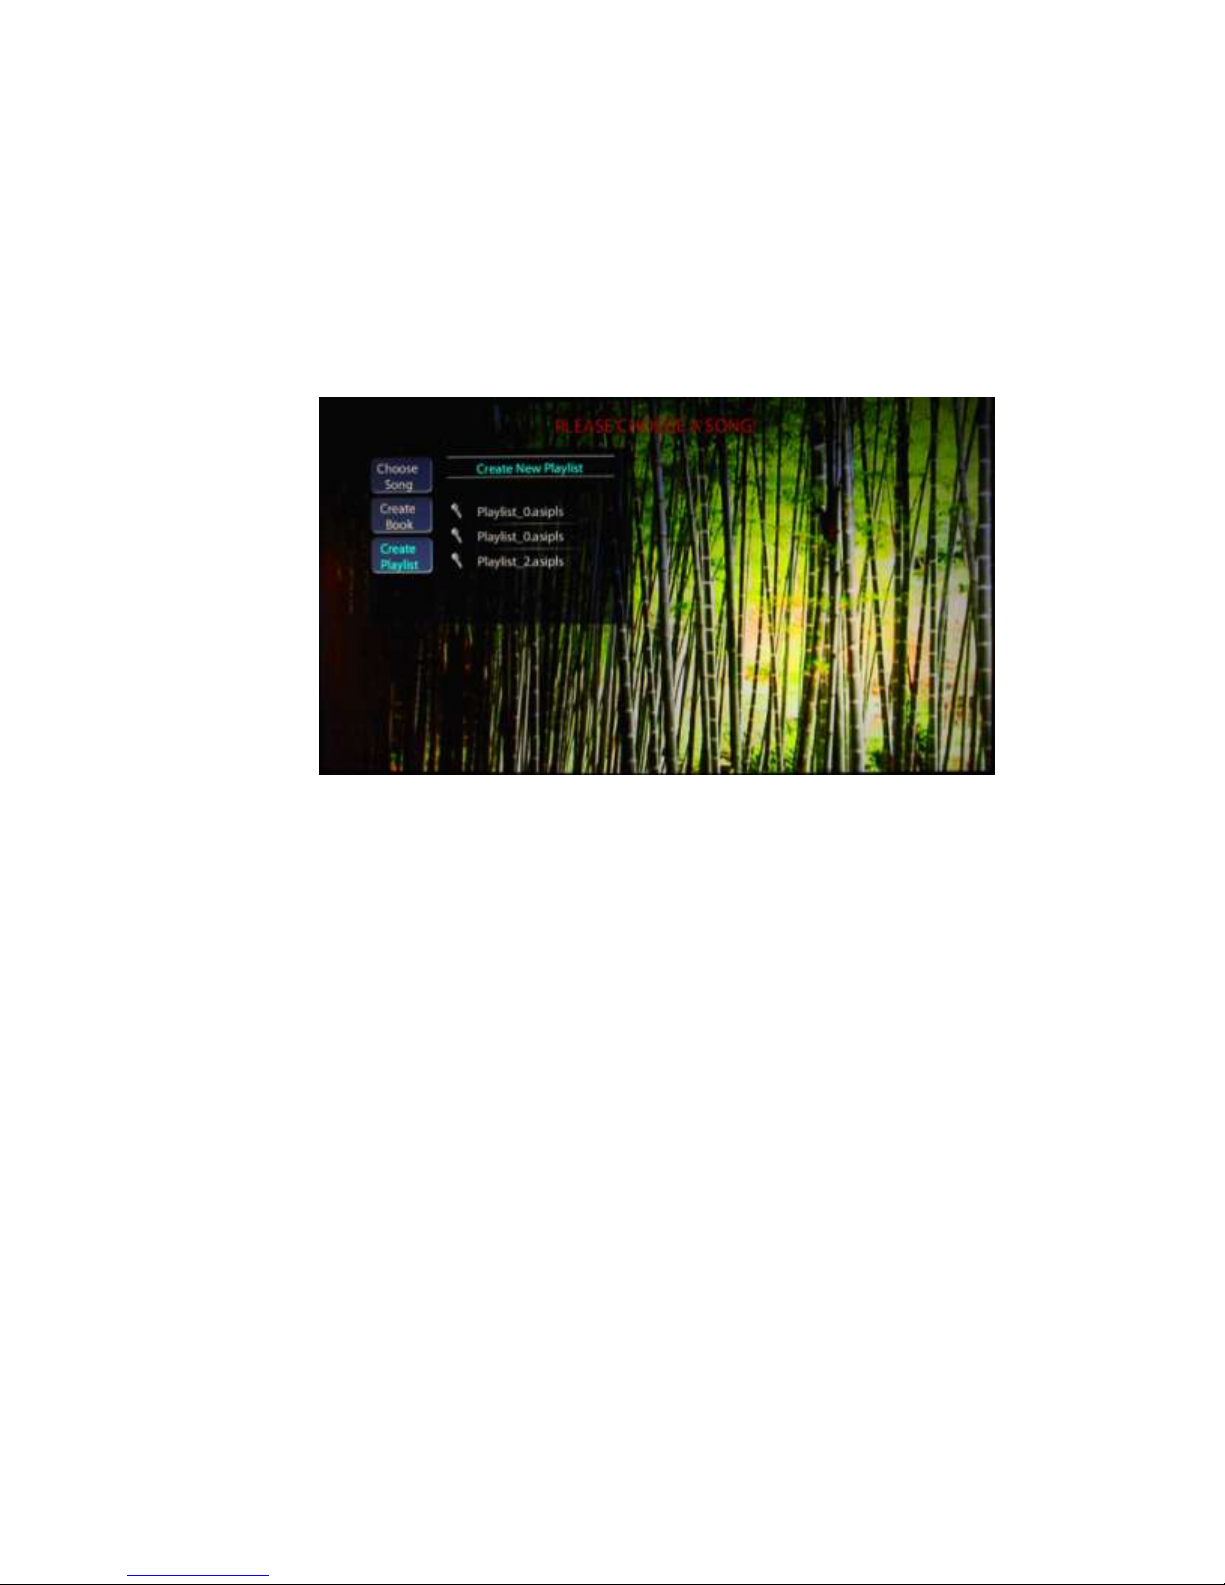
browsing/queuing songs while others are singing. A song book only
includes all songs in the active devices.
6. Create Playlist:
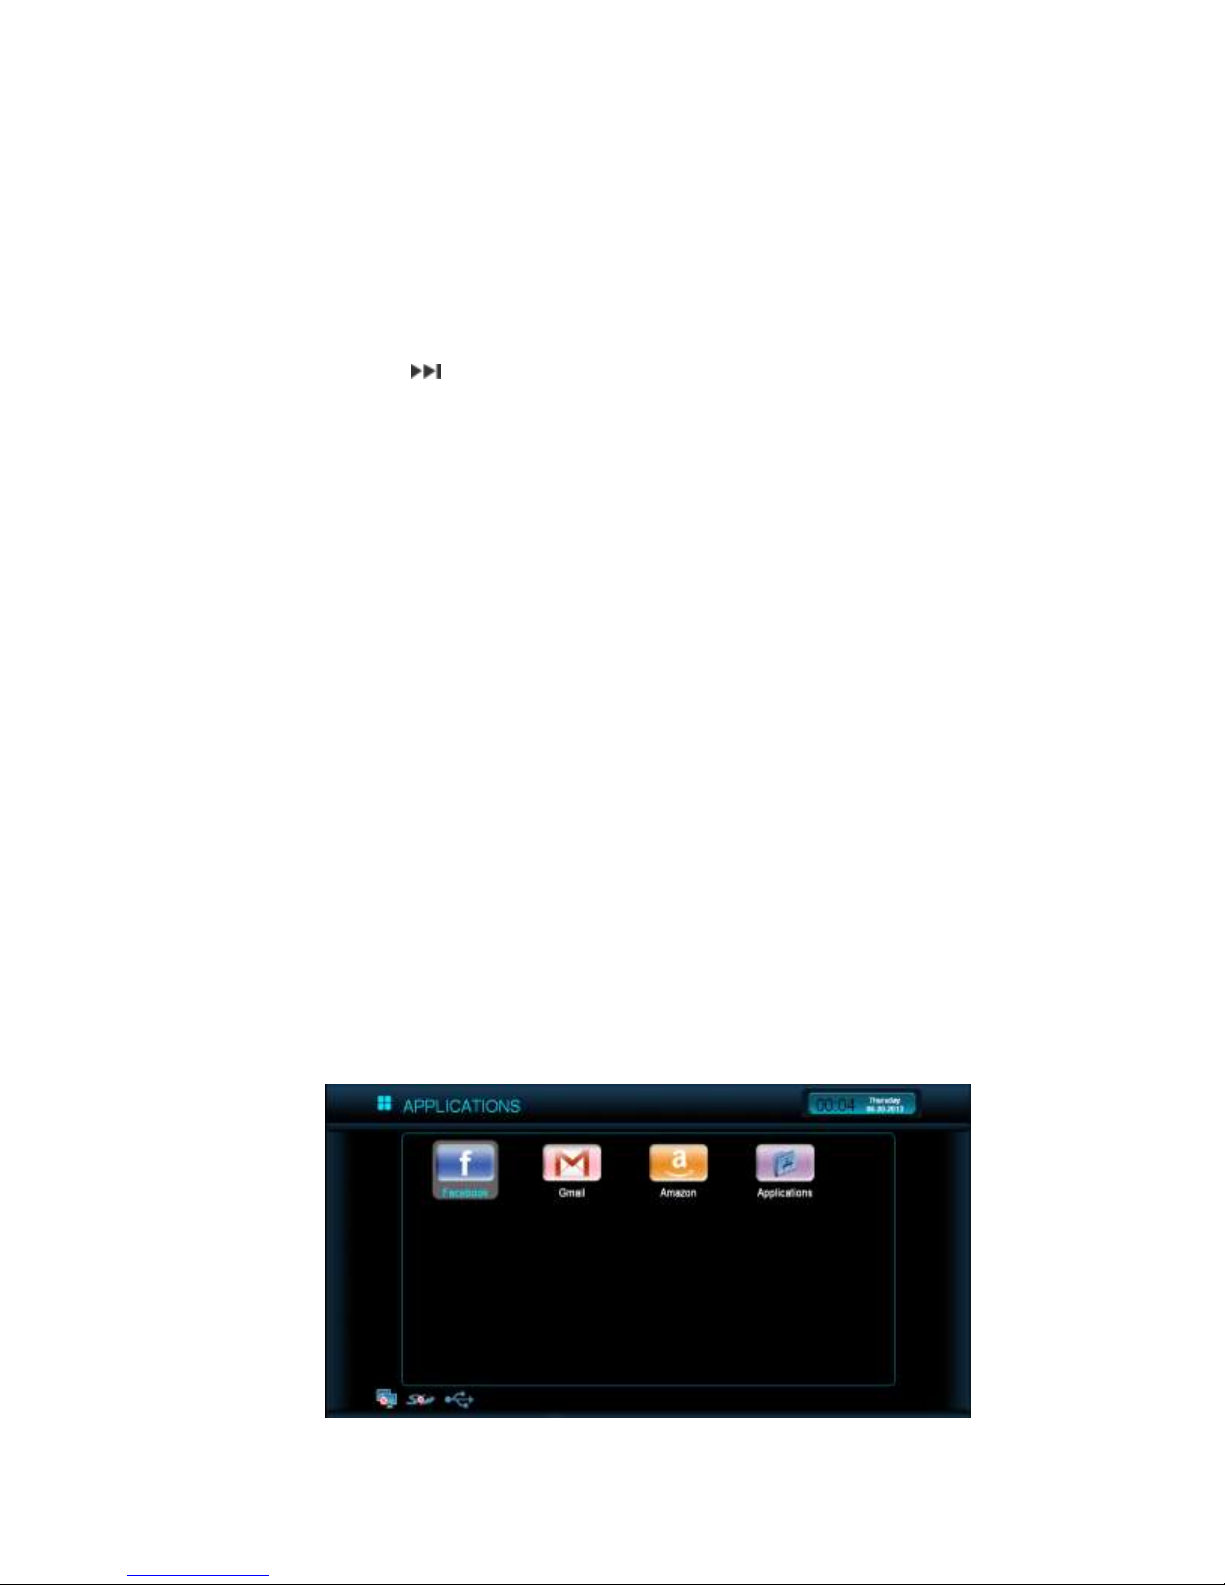
a. Press the “MENU” button and then the “DOWN ARROW” button to select the
“Create Playlist” tab.
b. Press the “OK or RIGHT ARROW” button to go to the create playlist menu.
Select the “Create New Playlist” and press “OK” button.
Type the desired playlist name and press the “RIGHT ARROW” button to
go to the songs. Select the song and press “OK” to add to the playlist.
Press the “LEFT ARROW” to go back to the playlist. Press the “UP
ARROW” to highlight the playlist name and press “OK”.
Select the location to save your playlist.
* To delete a playlist, simply highlight it and press the Delete button on the remote control.
Select Yes to confirm.
7. To insert a song to the top of queue songs:
a. After selecting the songs from the “Choose Song” tab, they will appear on the
top screen. Use the “LEFT or RIGHT ARROW” button to select the song
which you wish to move and press “OK”
8. To delete a song on queue songs:
a. Select a song on queue songs by using the “LEFT or RIGHT ARROW” button
and press the “DELETE” button
27
Page 27
9. Karaoke Playback Menu
a. Press the “MENU” button to toggle on/off the main menu.
b. Press the “MUTE” button to turn the sound on/off.
c. Press the “VOL+/-” to adjust the volume up/down.
d. Press the “AUDIO” button to select an Audio Channel.
e. Press the button to play the next song in the queue.
f. Press the “PLAY” button to play/pause the current song.
g. Press the “STOP” button to stop playback.
h. Press the “FWD” button to fast forward the current song.
i. Press the “REV” button to backward the current song.
j. Press the “16:9” button to switch Aspect ratio: Normal/Widescreen.
k. Press the “VIDEO (RED)” button to go to VIDEO interface.
l. Press the “PHOTO (GREEN)” button to go to PHOTO interface.
m. Press the “TV (BLUE)” button to go to MUSIC interface.
n. Press the “SETUP” button to go to SETTINGS interface.
o. Press the “RETURN” button to go back to the previous screen.
p. Press the “HOME” button to exit back to the homepage.
Applications
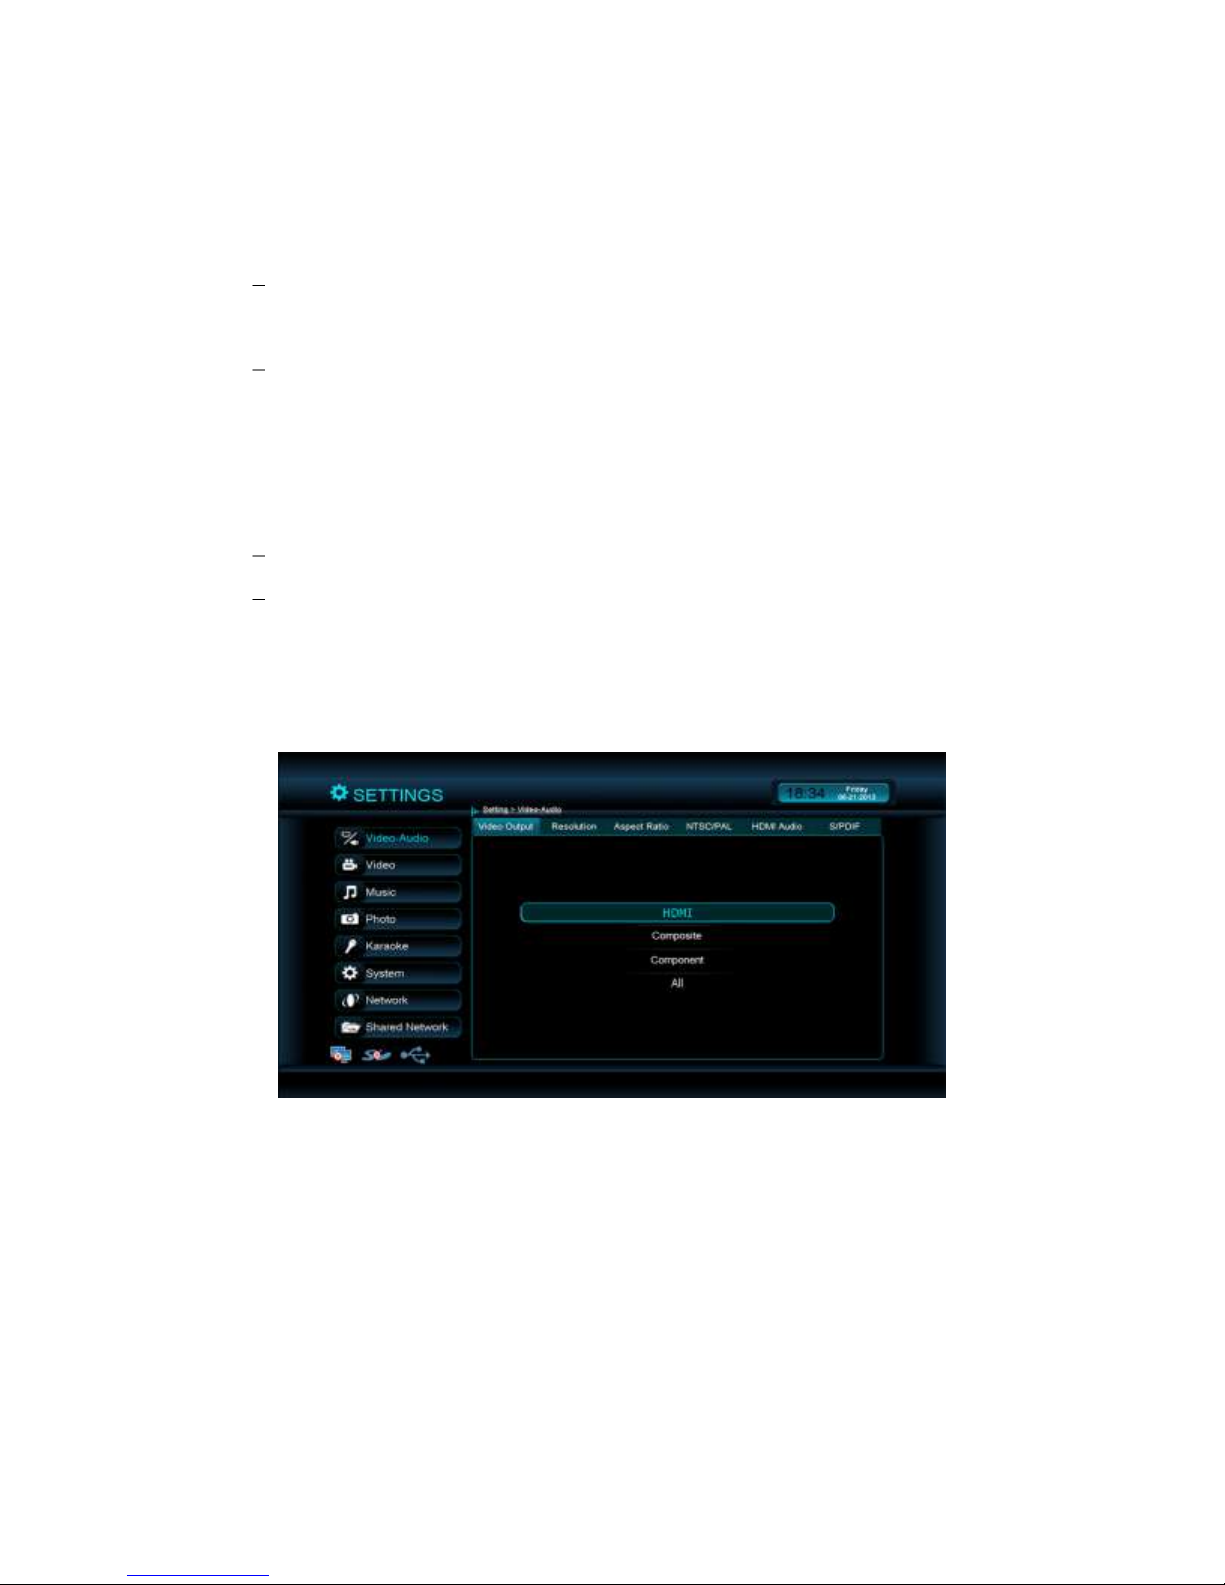
- There are three applications we currently have. They are Facebook, Gmail, and
Amazon. We will continue to develop additional applications, and these will be available
on the new firmware. Please check out the website for firmware update frequently.
28
Page 28

- The Applications folder allows users to access flash games that they downloaded from
“Game” menu on http://www.ceenee.com. To access the games, please do the following:
1. Select the “Applications” tab on the CeeNee eeTee home page. Next, choose the
“Applications” button and press the “OK” button on the remote.
2. Organizing application: Folder, All and Search.
3. In the application browser screen:
a. Press the “OK”, “PLAY” or “RIGHT ARROW” button to select a USB, a SD
card, or shared directories from Local Network.
b. Searching: Use the NUMBER PAD and press “OK” button to search. Press
“DELETE” button if you need to delete a character in the search box.
c. Press the or button to display the next/previous page in the application
list.
d. Browse to the application to play and select the application by pressing the
“OK” or “RIGHT ARROW” button on the remote.
e. Press the “VIDEO (RED)” button to go to VIDEO interface.
f. Press the “PHOTO (GREEN)” button to go to PHOTO interface.
g. Press the “KARAOKE (YELLOW)” button to go to KARAOKE interface.
h. Press the “TV (BLUE)” button to go to MUSIC interface.
i. Press the “SETUP” button to go to SETTINGS interface.
j. Press the “HOME” button to get back to the home page.
4. In the application player screen:
a. Press the “RETURN” button to get back to the previous screen.
b. Press the “HOME” button to get back to the home page.
Web browser
Select the “Web browser” button in the CeeNee eeTee homepage and press the “OK”
button on the remote control to browse the websites.
YouTube
Select the “YouTube” button in the CeeNee eeTee homepage and press the “OK” button
on the remote control to go to YouTube page.
29
Page 29
Settings
Two methods of Settings interface:
Select the “Settings” button on the CeeNee eeTee homepage and press the “OK”
button on the remote control
Press the “SETUP” button anywhere except when you are viewing the
Applications, Web browser, and YouTube.
The “Settings” menu has options to change features and settings in the CeeNee eeTee.
1. Video-Audio
The menu and submenu can change the output of Video and Audio.
To access the submenus on the right: Use the 4-way arrows on the remote, press
the “RIGHT ARROW” button and select “Video output,” “Resolution,” etc.
a. Video Output: Select the output of video: HDMI, Composite, Component or All.
Default is “All”.
30
Page 30
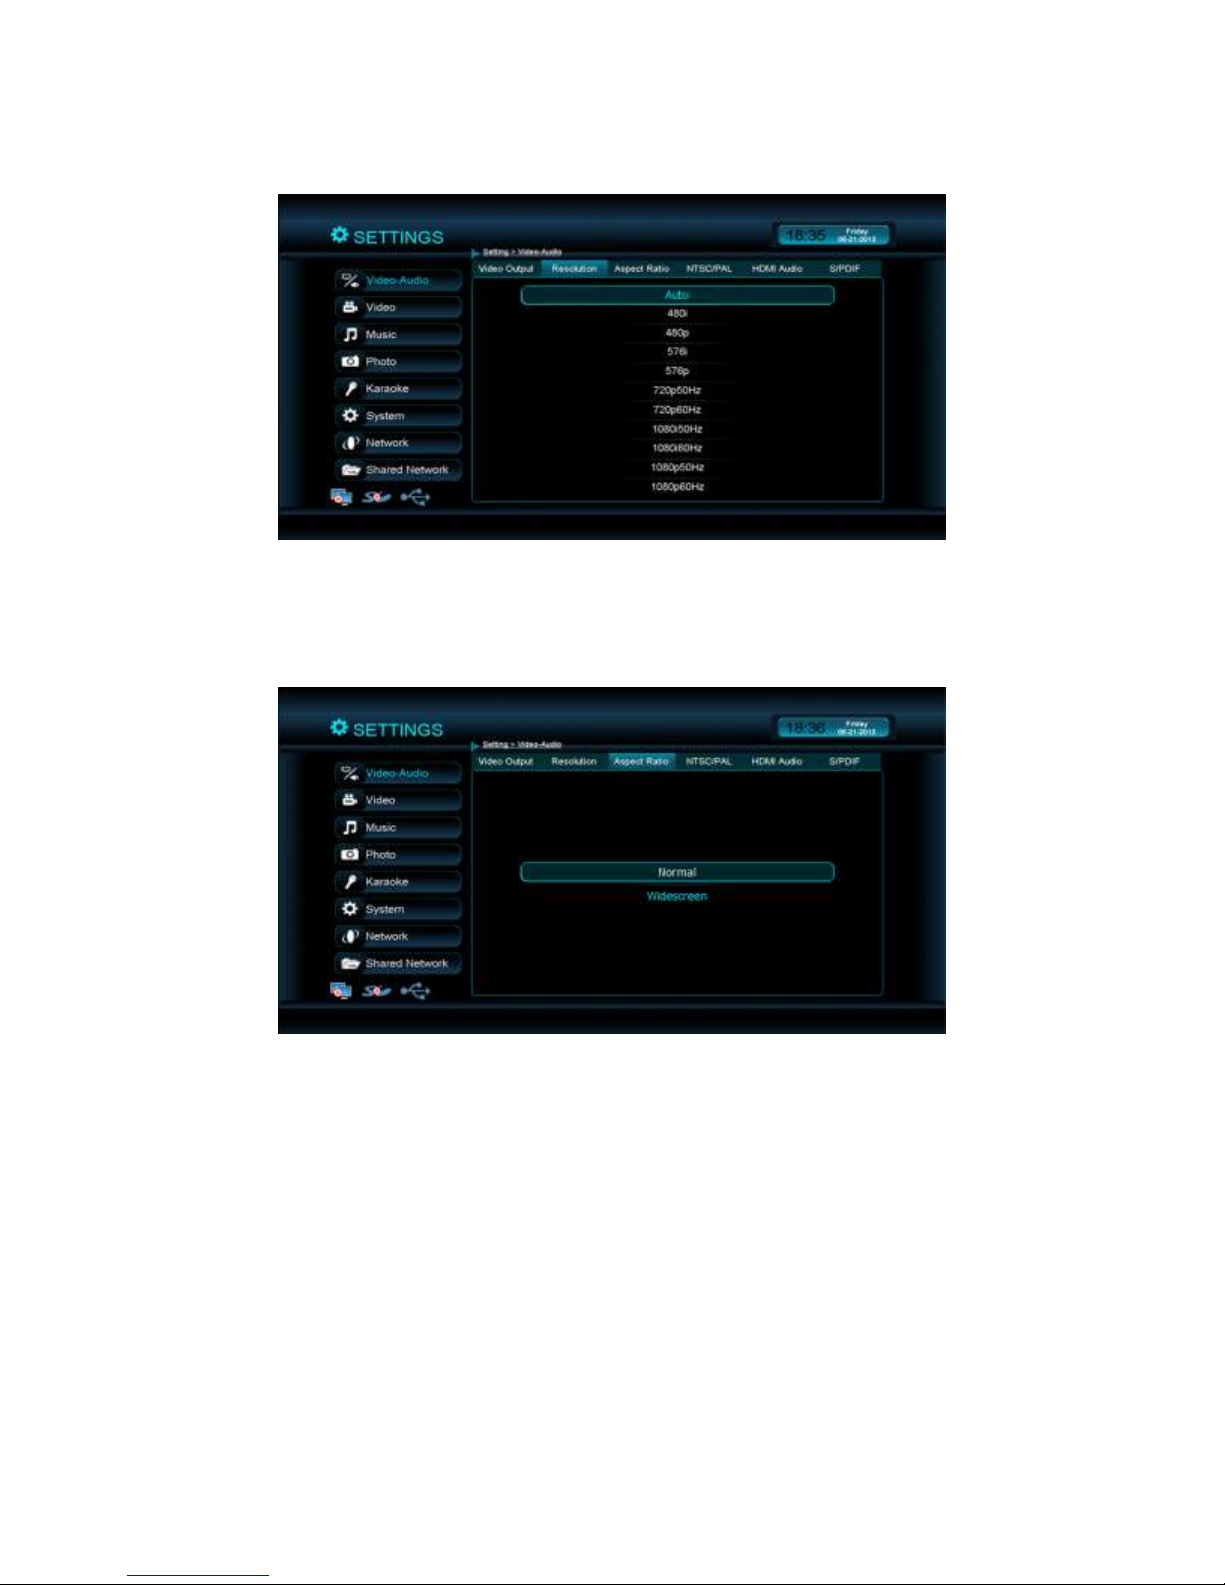
b. Resolution: Change the size of the screen from 480i all the way to 1080p60Hz.
Default is "Auto".
c. Aspect Ratio: Change the screen format to either 4:3 “Normal” or to 16:9
“Widescreen”. Default is “Widescreen”.
31
Page 31
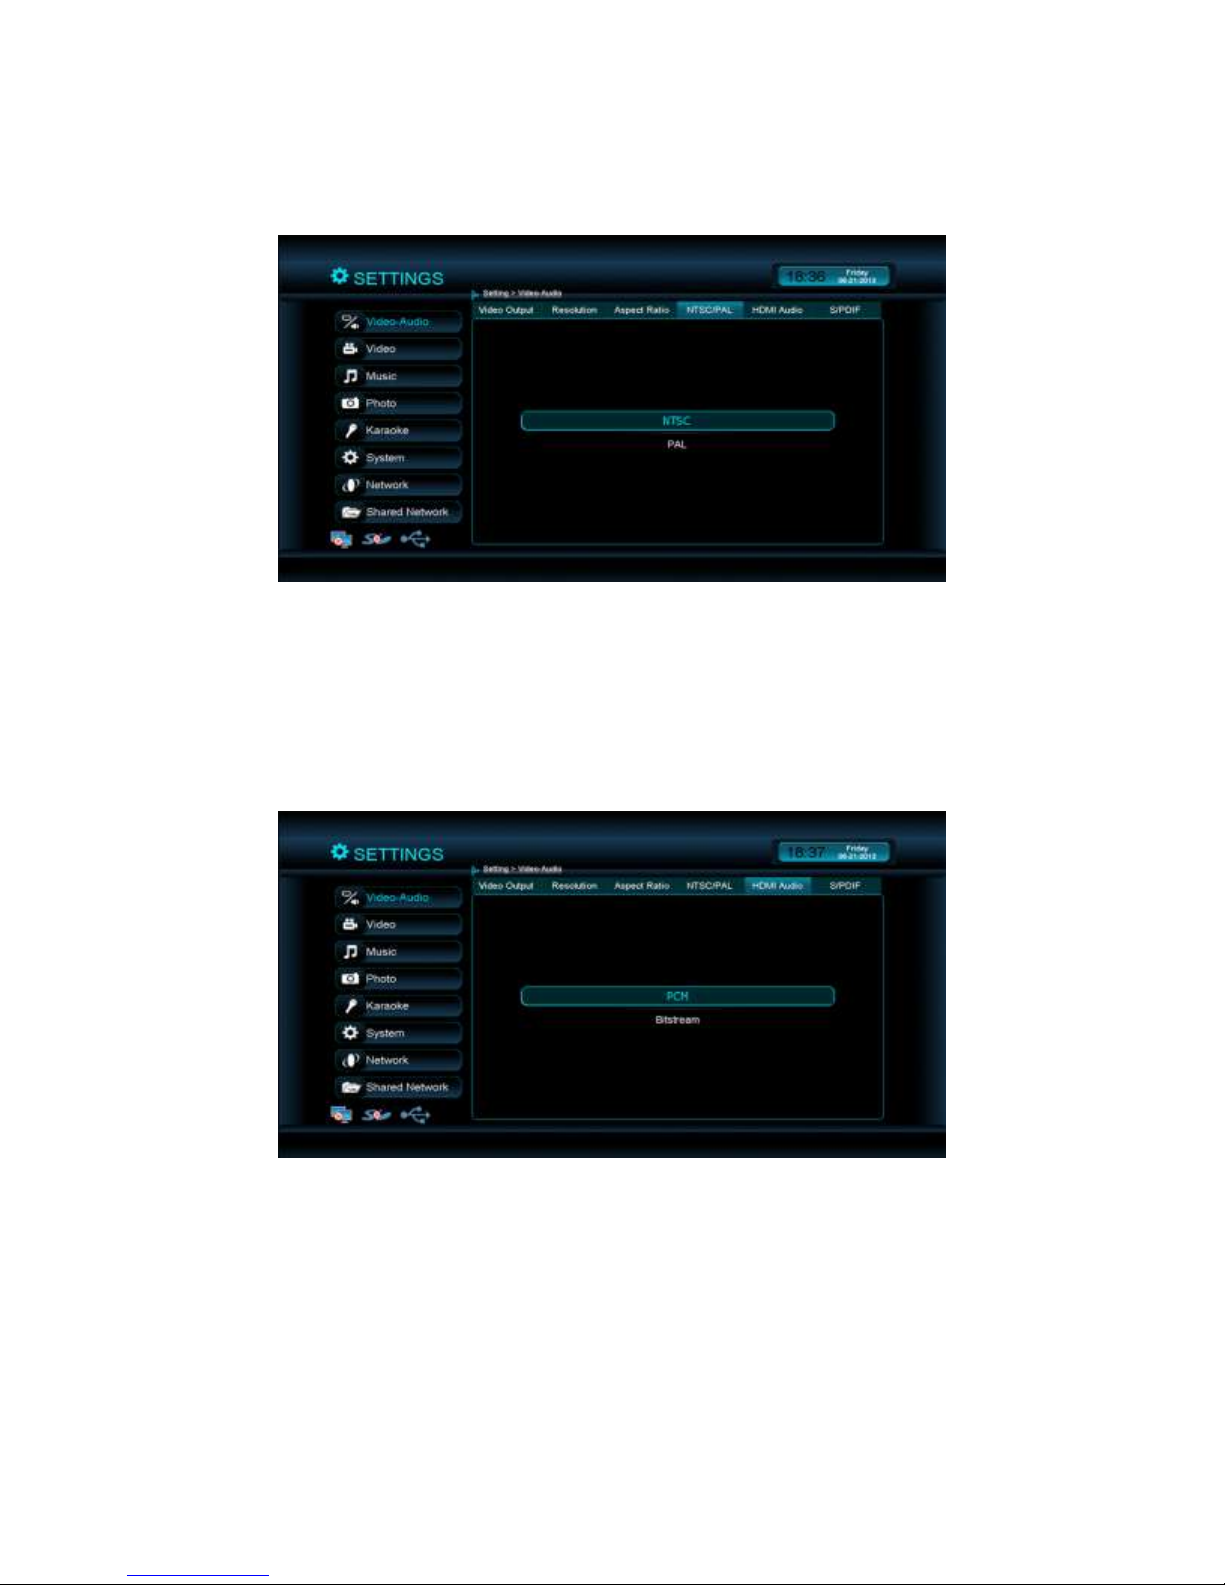
d. NTSC/PAL: American Television is displayed in NTSC format - this is a default
standard if the CeeNee eeTee is purchased in the U.S. PAL is a default standard for
Asian and European countries.
e. Digital Audio Output: includes two parts
- HDMI Audio: change the audio format to either PCM or Bit Stream. PCM is for
stereo sound, and Bit Stream is to pass through digital audio, especially for DTS
movies and/or Dolby digital movies. Default is “PCM”.
32
Page 32
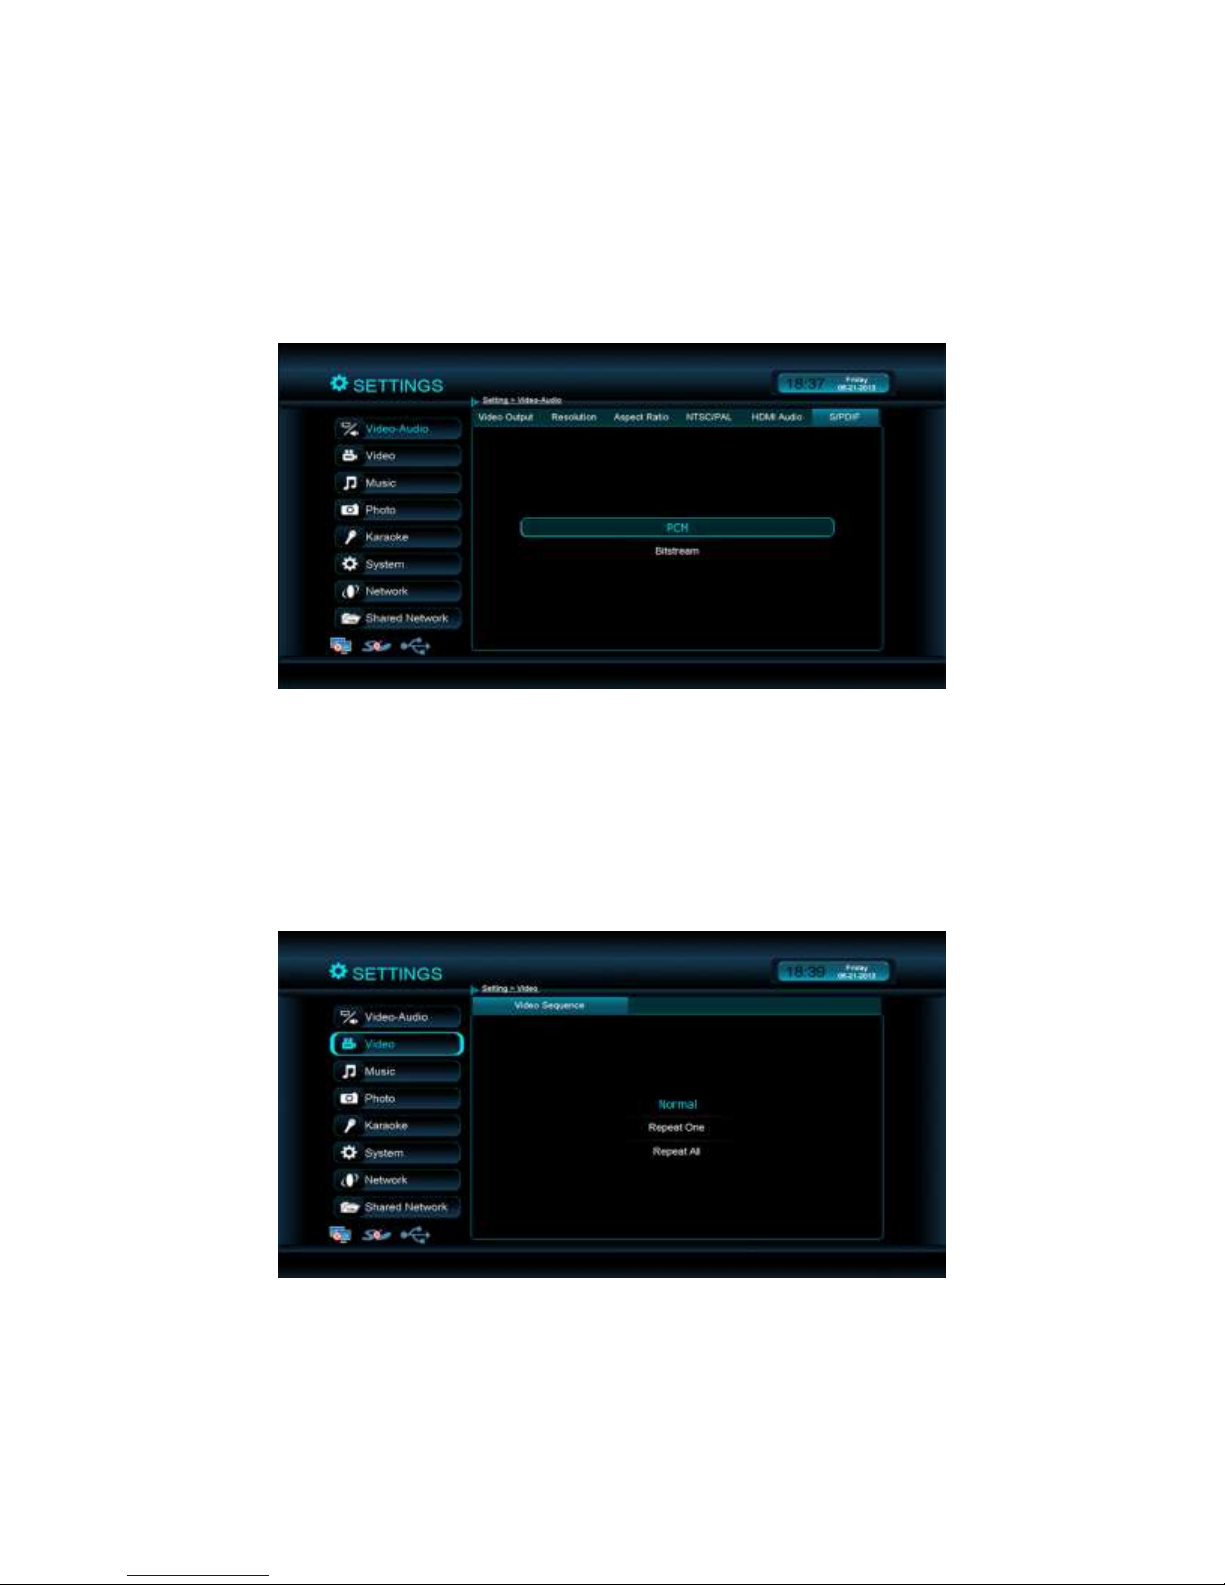
- S/PDIF Audio: (Sony/Philips Digital Interconnect Format) is for optical sound. It
is used for transporting high quality digital audio signals on transmit or receive.
You have two options when you select S/PDIF: PCM or Bit Stream. PCM is for
stereo sound; Bit Stream is for pass through digital audio, especially for DTS
movies and/or Dolby digital movies. Default is “PCM”.
The Video, Music and Photo menus change the way how the content is played back.
2. Video
a. Video Sequence: Adjust the frequency of video playback to either play just once,
or repeat. Default is “Normal”.
33
Page 33
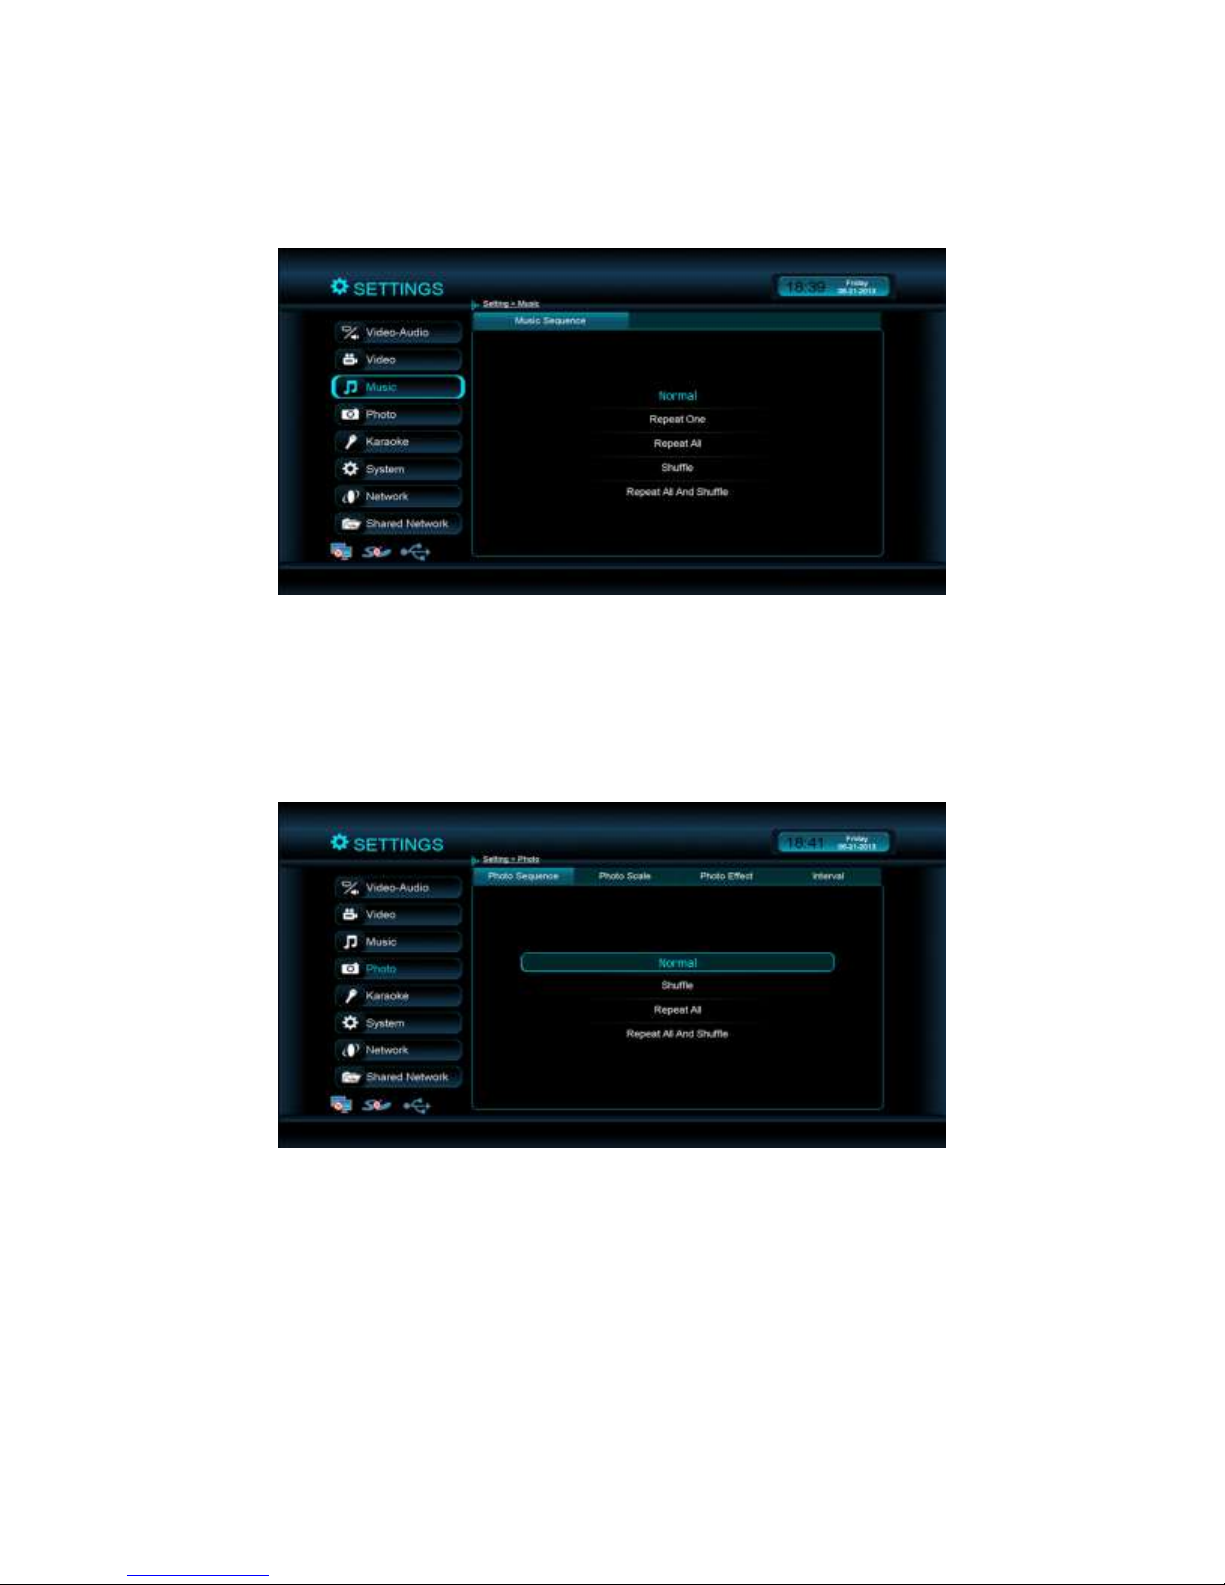
3. Music
a. Music Sequence: Adjust the frequency of music playback to Normal, Repeat
One, Repeat All, Shuffle, Repeat All and Shuffle. Default is “Normal”.
4. Photo
a. Photo Sequence: Adjust the frequency of photo playback to Normal, Shuffle,
Repeat All, Repeat All and Shuffle. The default is set to "Normal".
34
Page 34
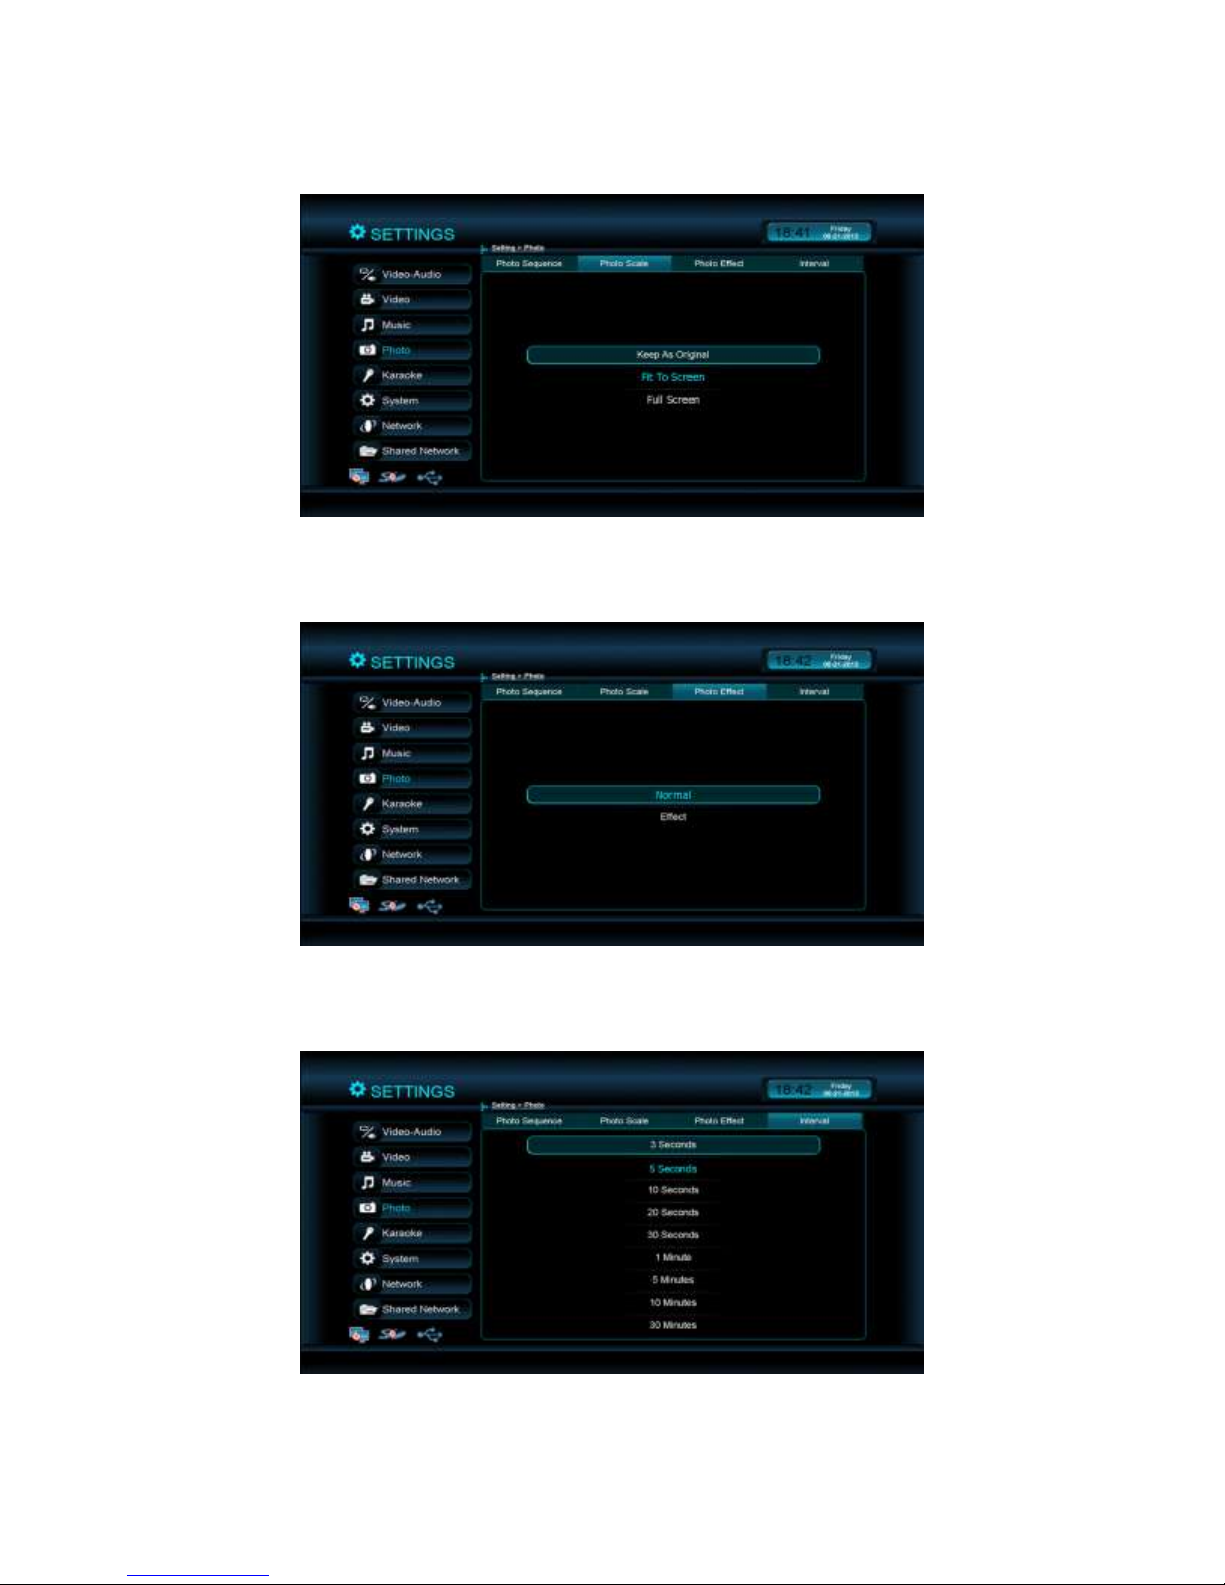
b. Photo Scale: Option to enlarge photo to fill the screen. The default setting is “Fit
to screen”.
c. Photo Effect: Enable fade-out between photos during photo slideshow playback.
The default setting is “Normal”.
d. Interval: Define the amount of time between playbacks of photos from 3 seconds
to 30 minutes. The default setting is “5 seconds”.
35
Page 35
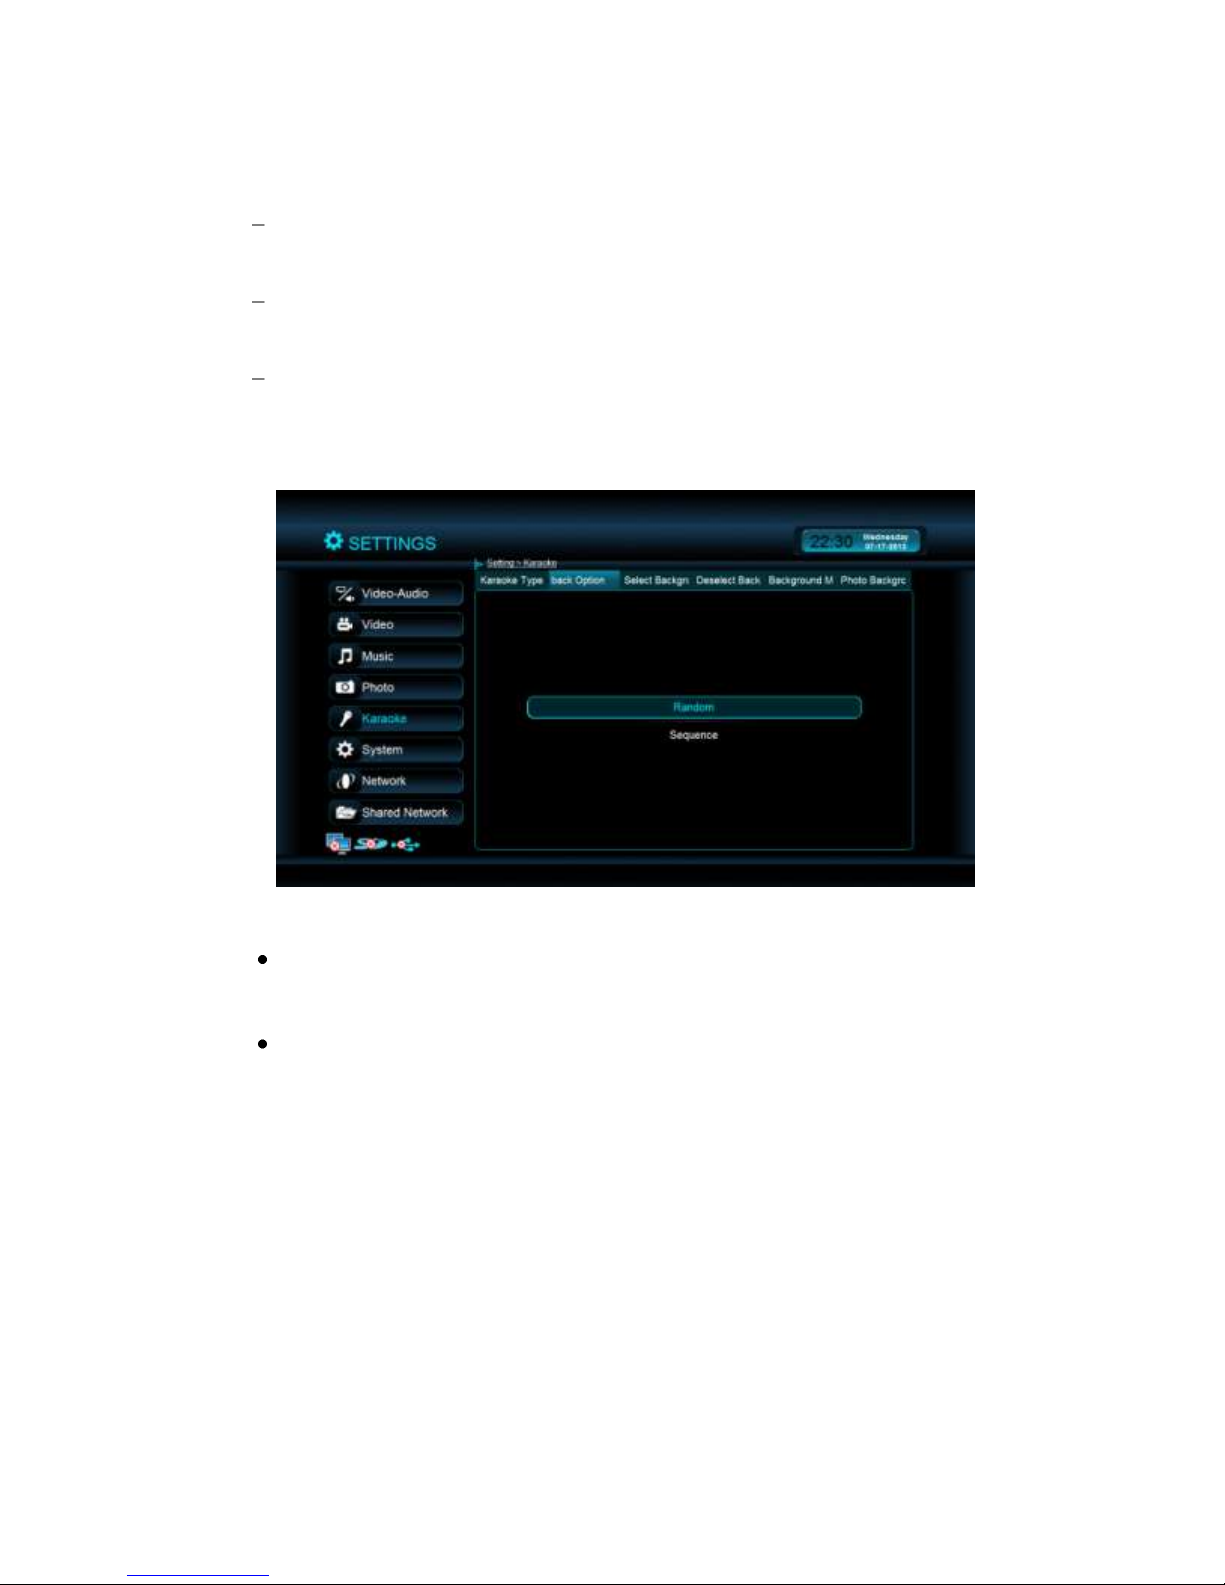
5. Karaoke
a. Karaoke Type
CeeNee requests every user to create a folder with the name called "Karaoke" on
the external HDD and put all the karaoke songs in this folder.
CeeNee firmware can play karaoke songs directly from this folder without any
extra effort.
If at all users want to have a separate folder for the karaoke songs other than the
name mentioned above. It’s very simple to setup your karaoke source:
b. Playback Option
When finish a Karaoke song and don’t have any queue song in Karaoke interface:
If you select “Playback Option” is “Random”, CeeNee eeTee will select a
random song in the Karaoke folder to play.
And if you select “Playback Option” is “Sequence”, CeeNee eeTee will play the
next song in the Karaoke folder automatically.
36
Page 36
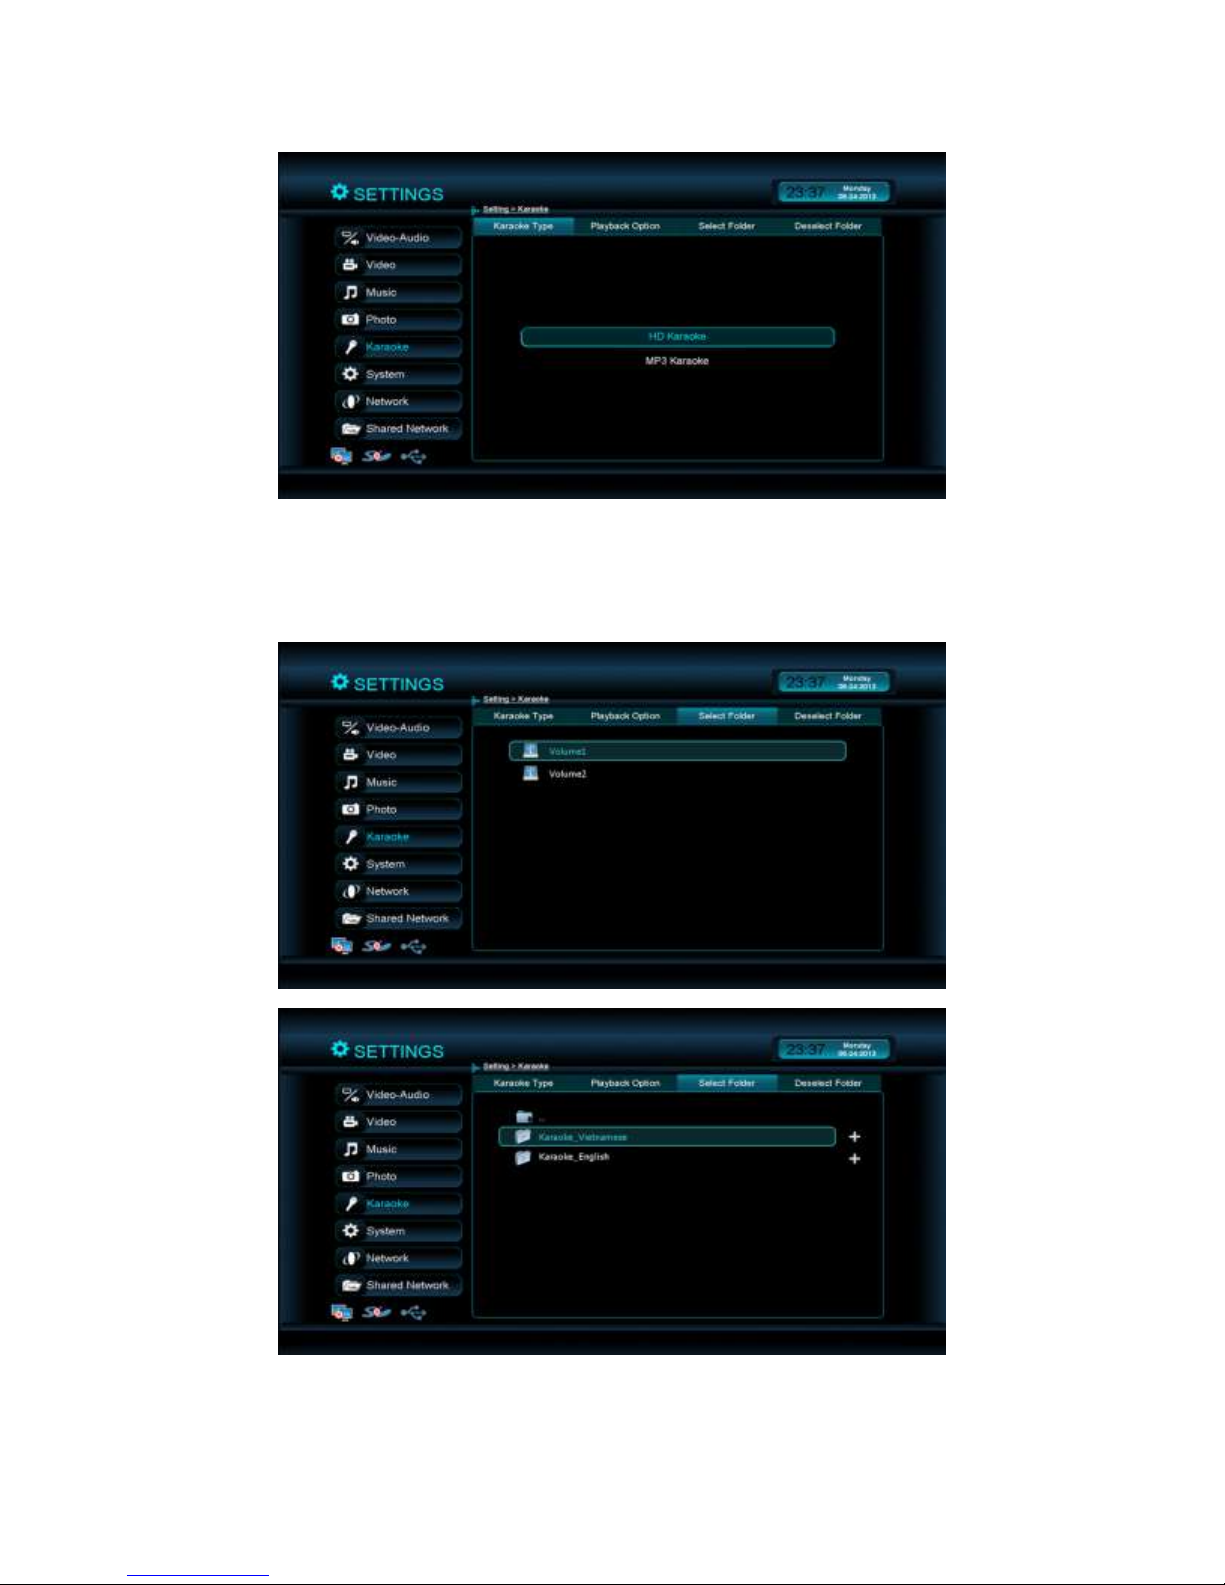
c. HD Karaoke
i. Select Folder: You can view the folders on your attached HDD and you can
select the folder that contains karaoke songs. Go to the Karaoke folder and
firmware will display the songs from the selected resource.
37
Page 37
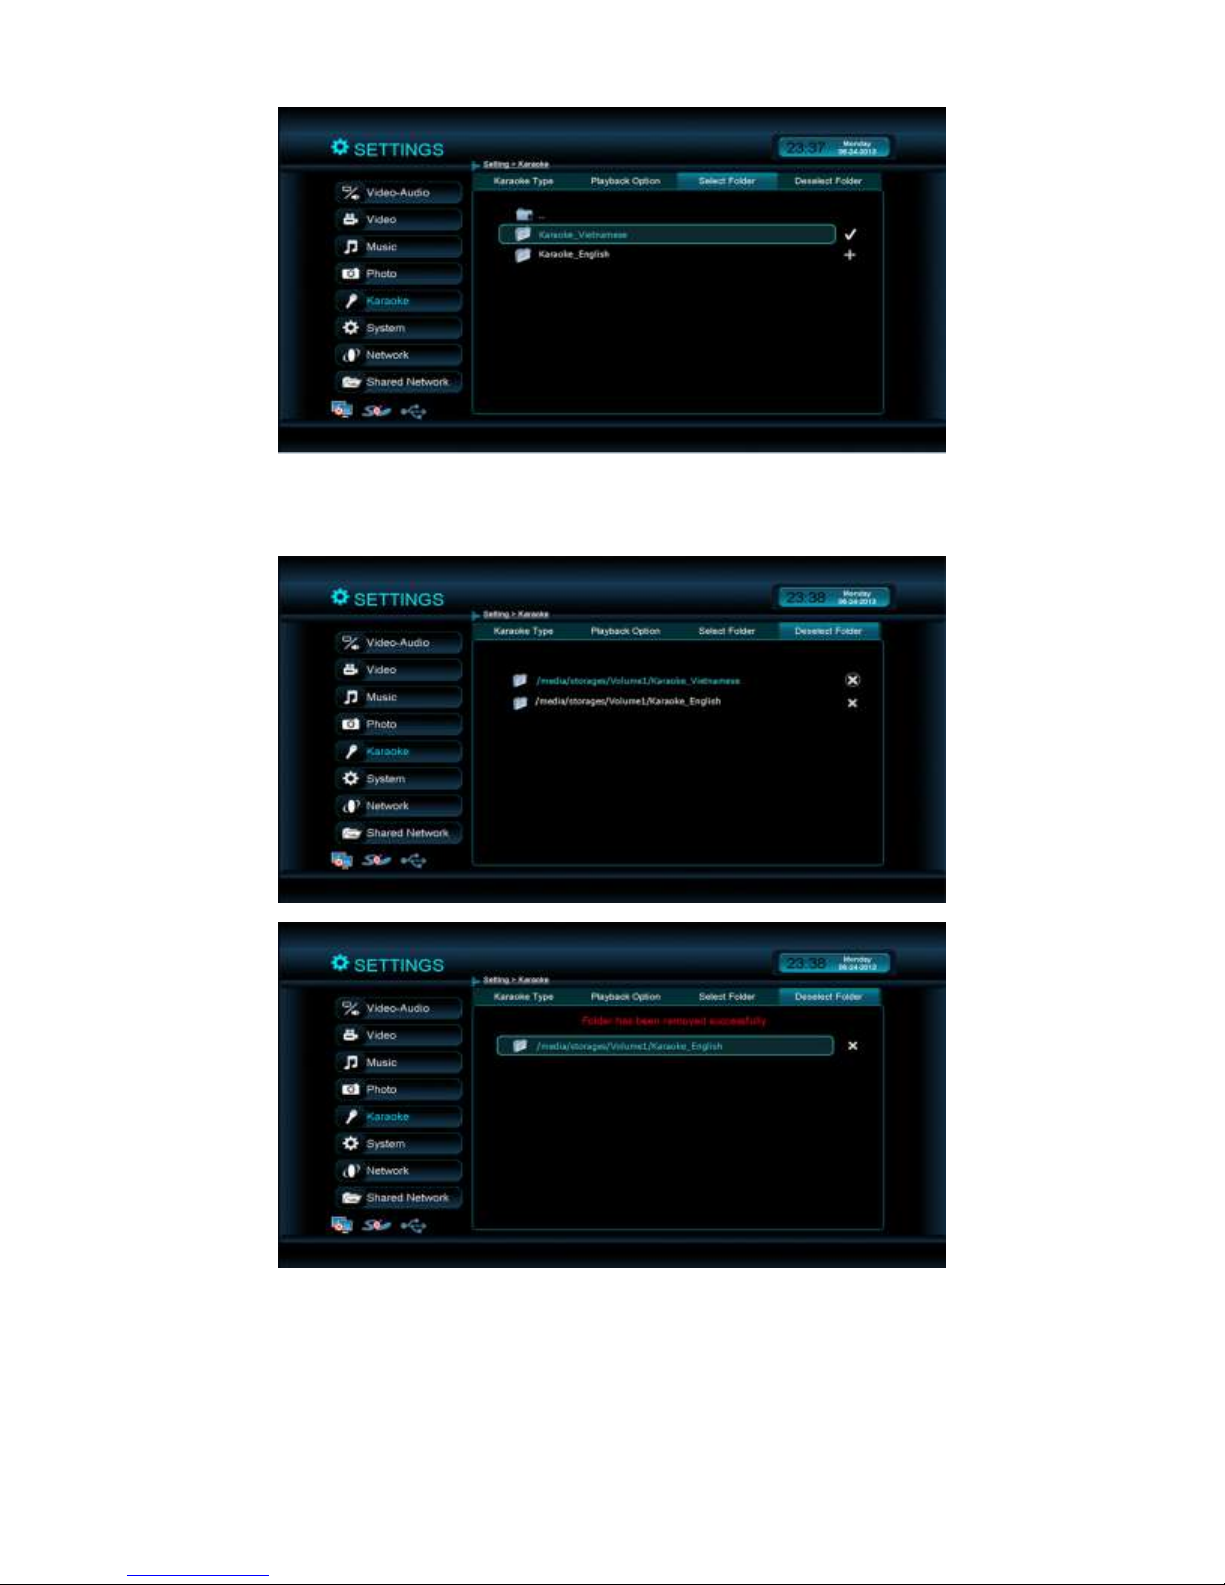
ii. Deselect Folder: You can view the folders on your attached HDD and you can
deselect the folder that contains karaoke songs.
38
Page 38
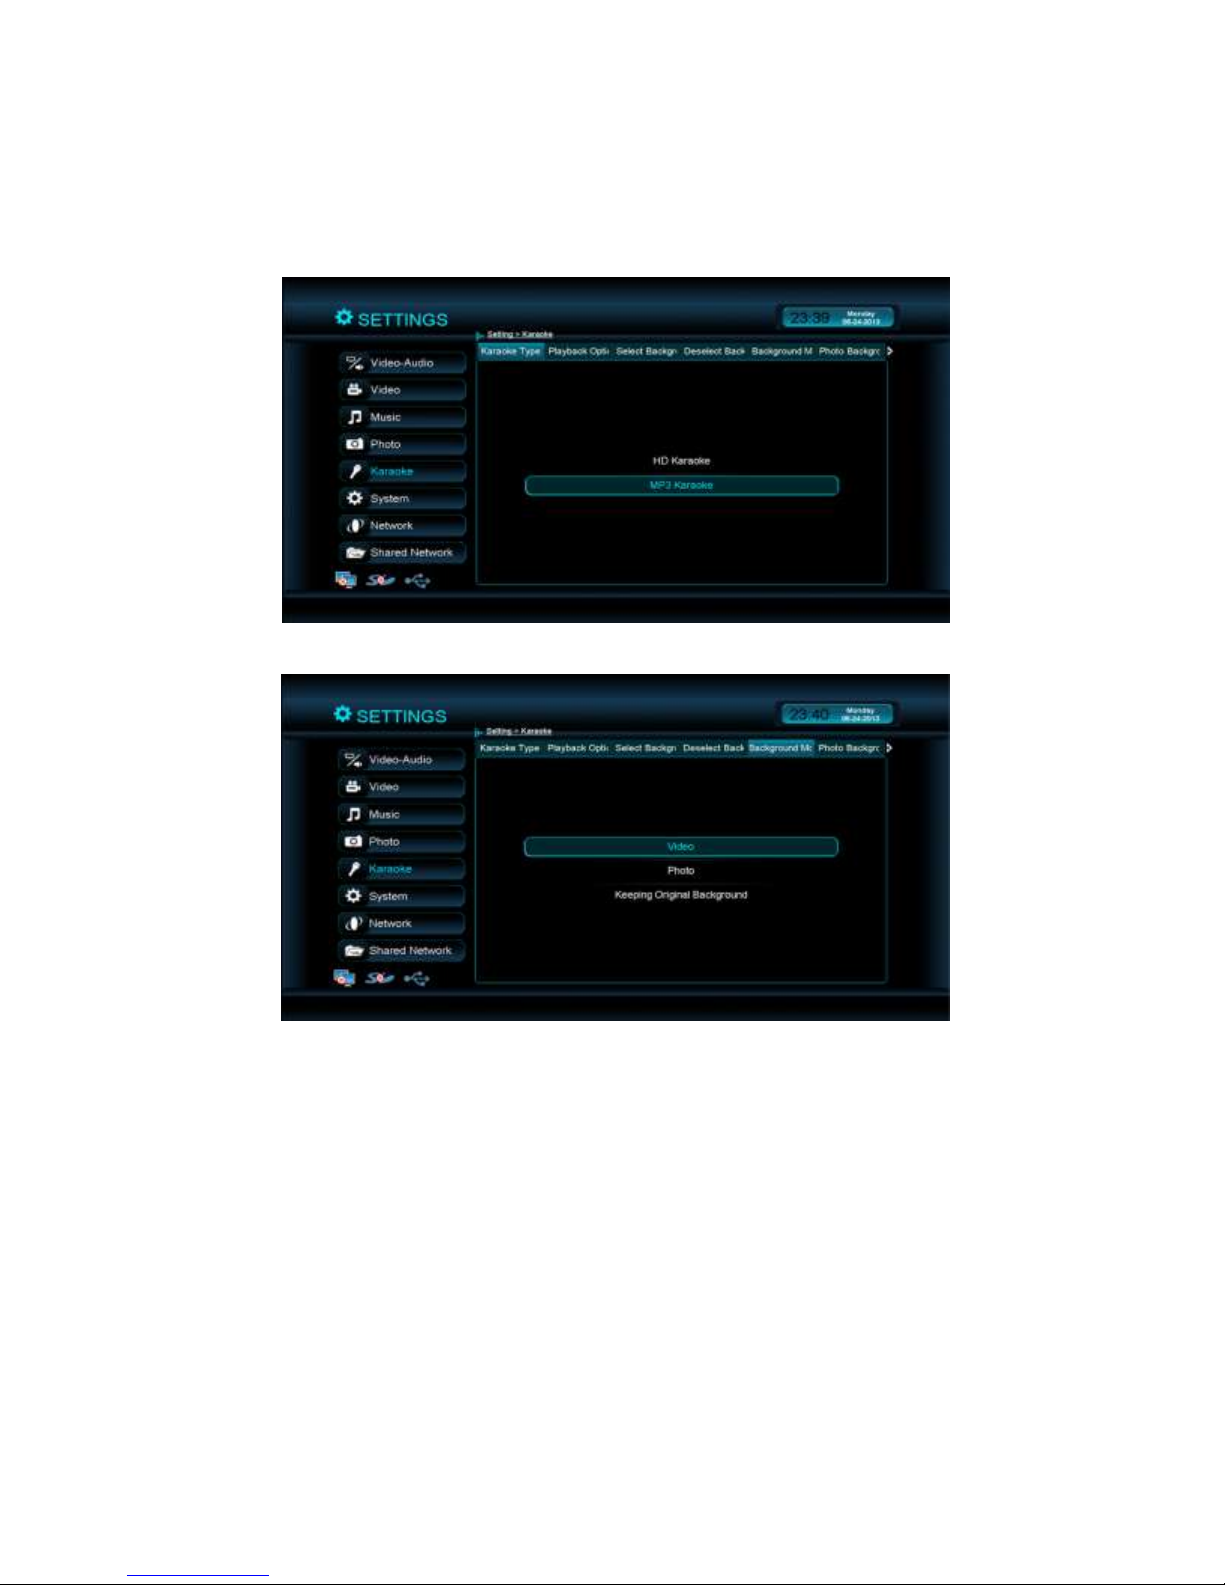
d. MP3 Karaoke:
i. Select the Background: User has freedom to play any video or photo background
while playing Mp3 karaoke. Select the Background mode as "Photo" or "Video"
or “Keep Original Background”.
39
Page 39
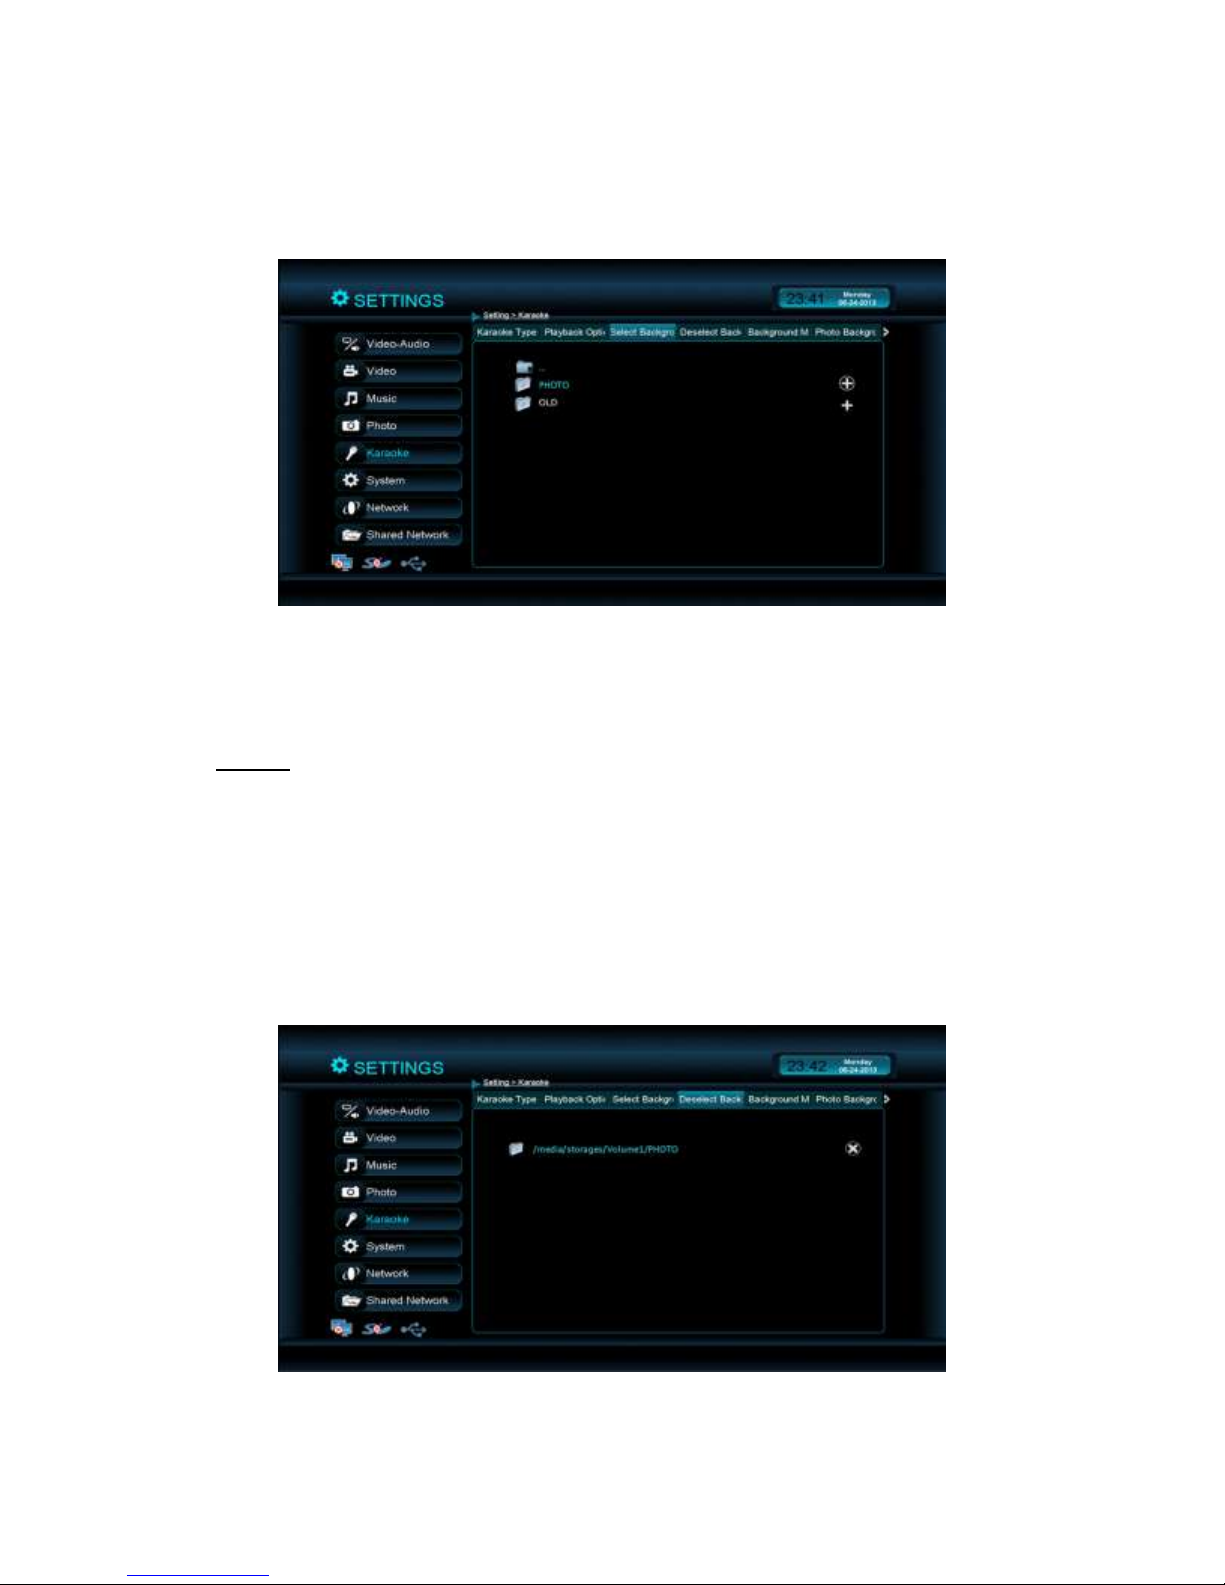
Select the resource for the background (video/photo): Choose the folder that
contains the photos or the videos that you want to play in the background while
playing the MP3 karaoke songs.
Go to the Karaoke and the player will display the MP3 karaoke songs from the
"Karaoke folder.” It will start playing the user selected background.
* Note:
If the user selected background is very big in size and contents then CeeNee will
switch to its default background to guarantee the smooth karaoke playback. The player
will start playing Nature photos or the ocean videos automatically it encounters the
problem displaying the user selected background.
ii. Deselect background: Remove the resource for the background (video/photo):
40
Page 40
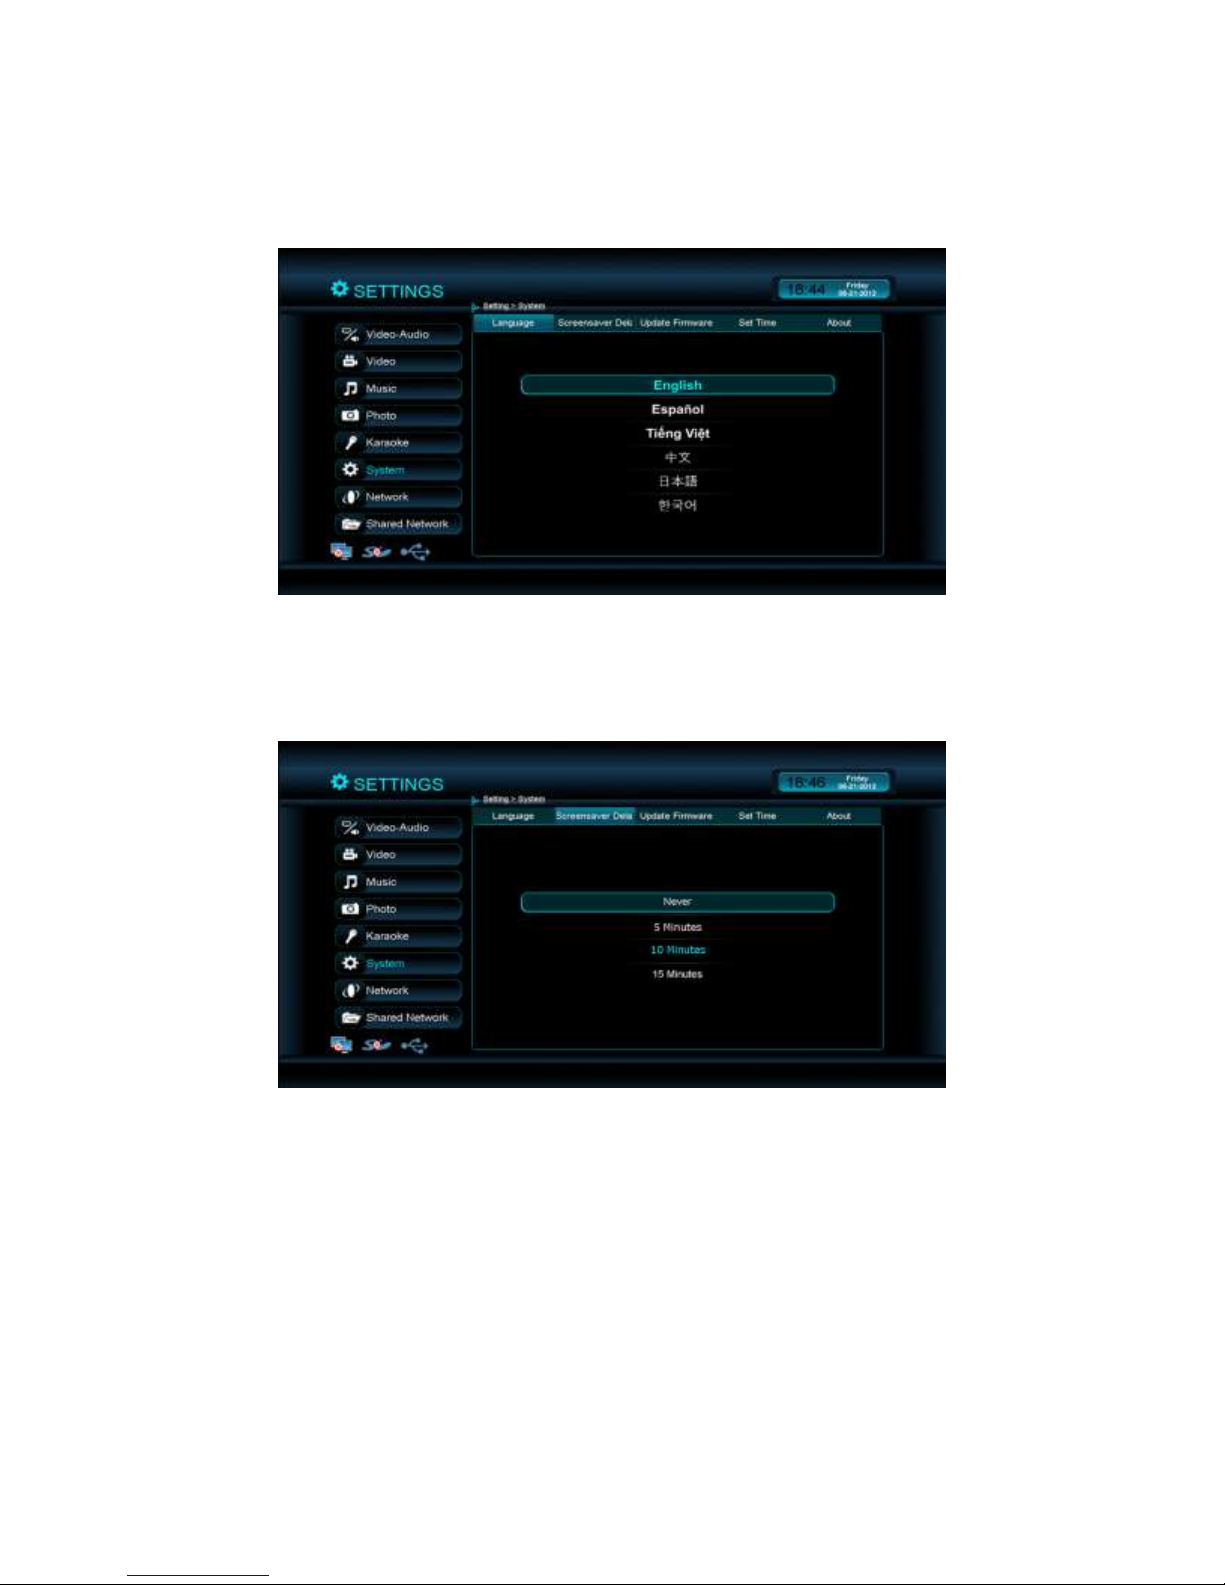
6. System
a. Language: Option to change the user interface languages: English, Spanish,
Vietnamese, Chinese, Japanese and Korean.
b. Screensaver Delay: Set the amount of time before the screensaver is turned on.
The default setting is “10 minutes”.
41
Page 41
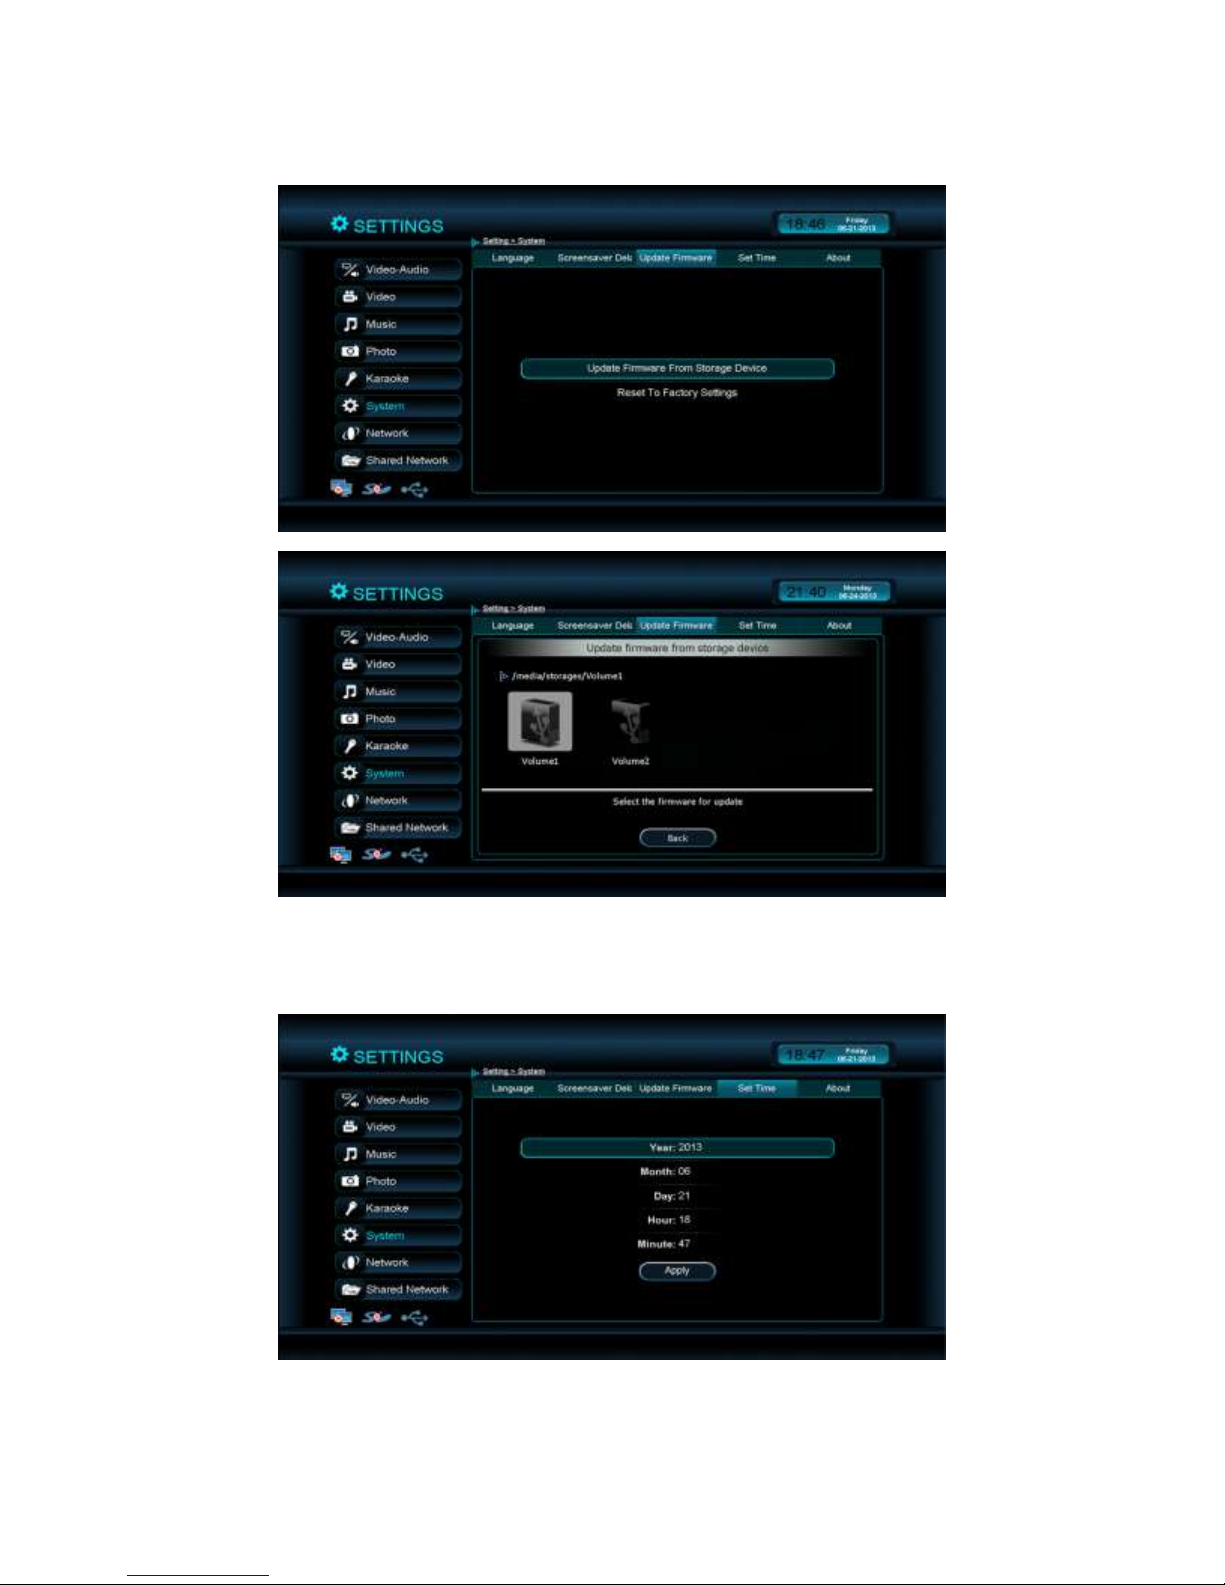
c. Update firmware: Download the firmware and upgrade the device to the most
current firmware.
d. Set time: Display time on the Clock
42
Page 42
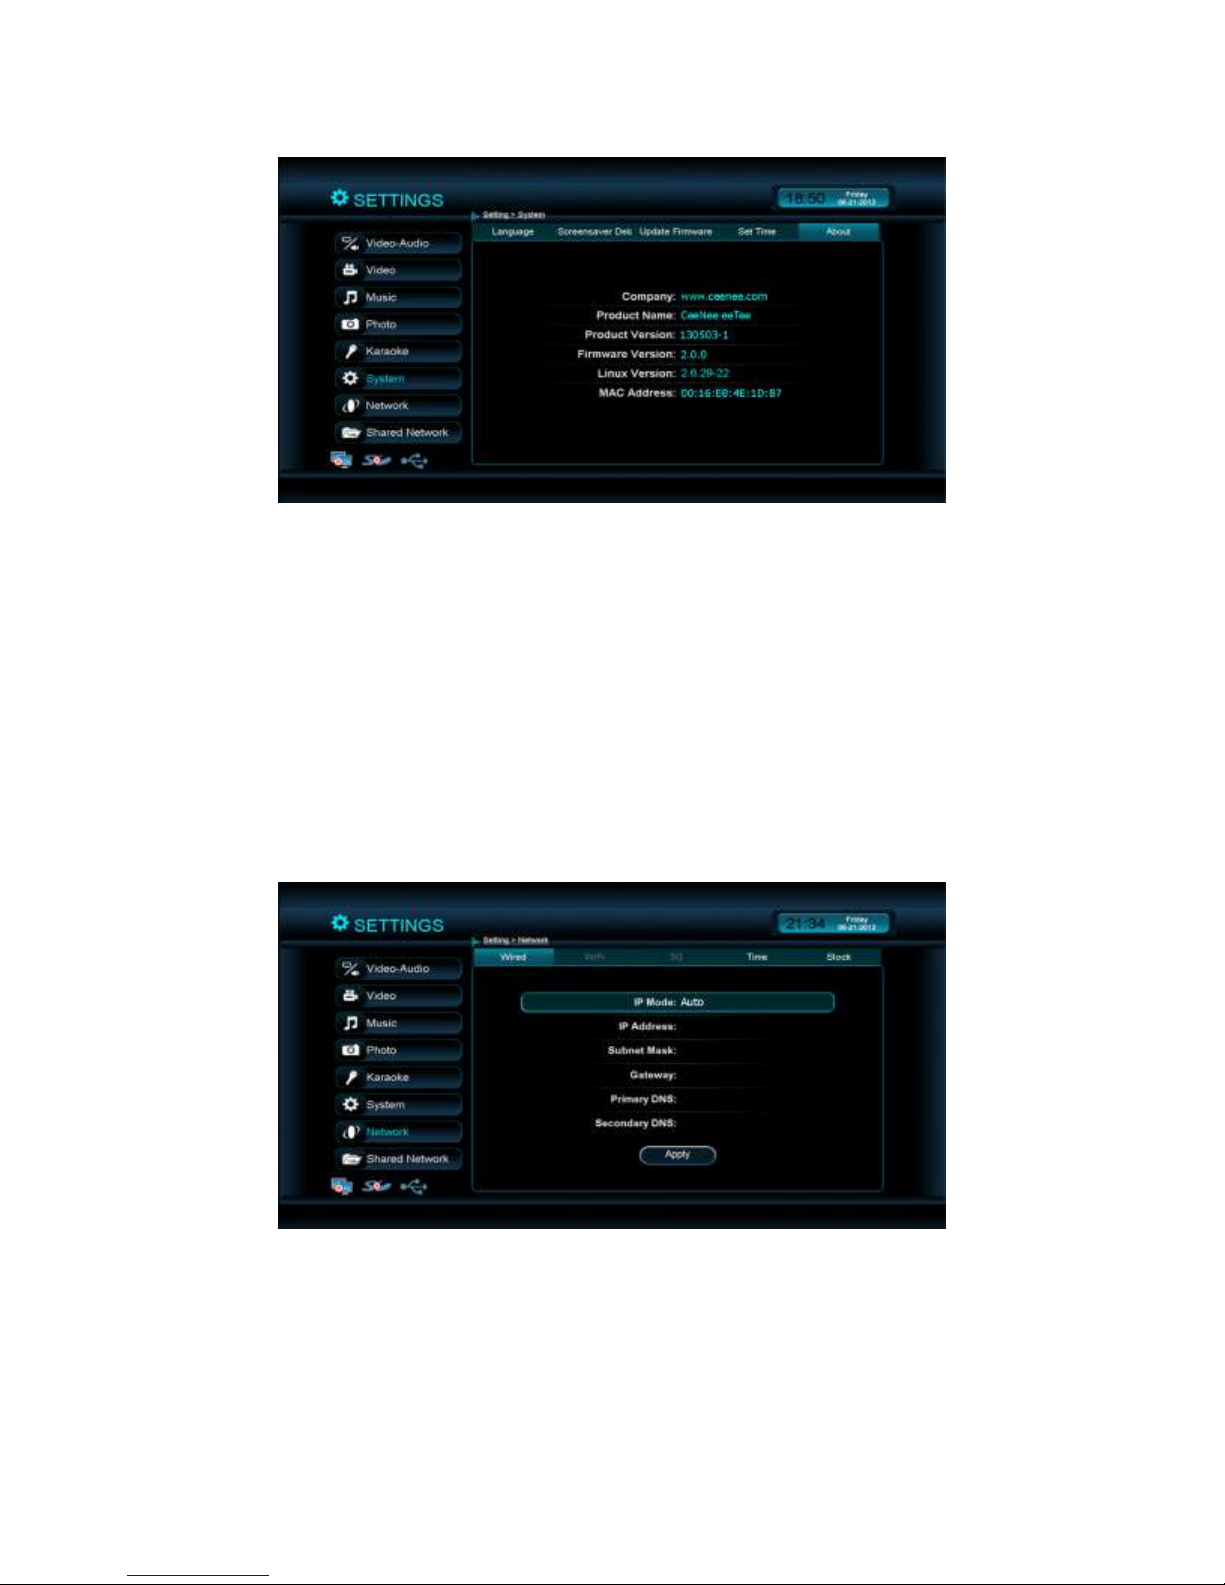
e. About: Describe the product, firmware, and Linux version.
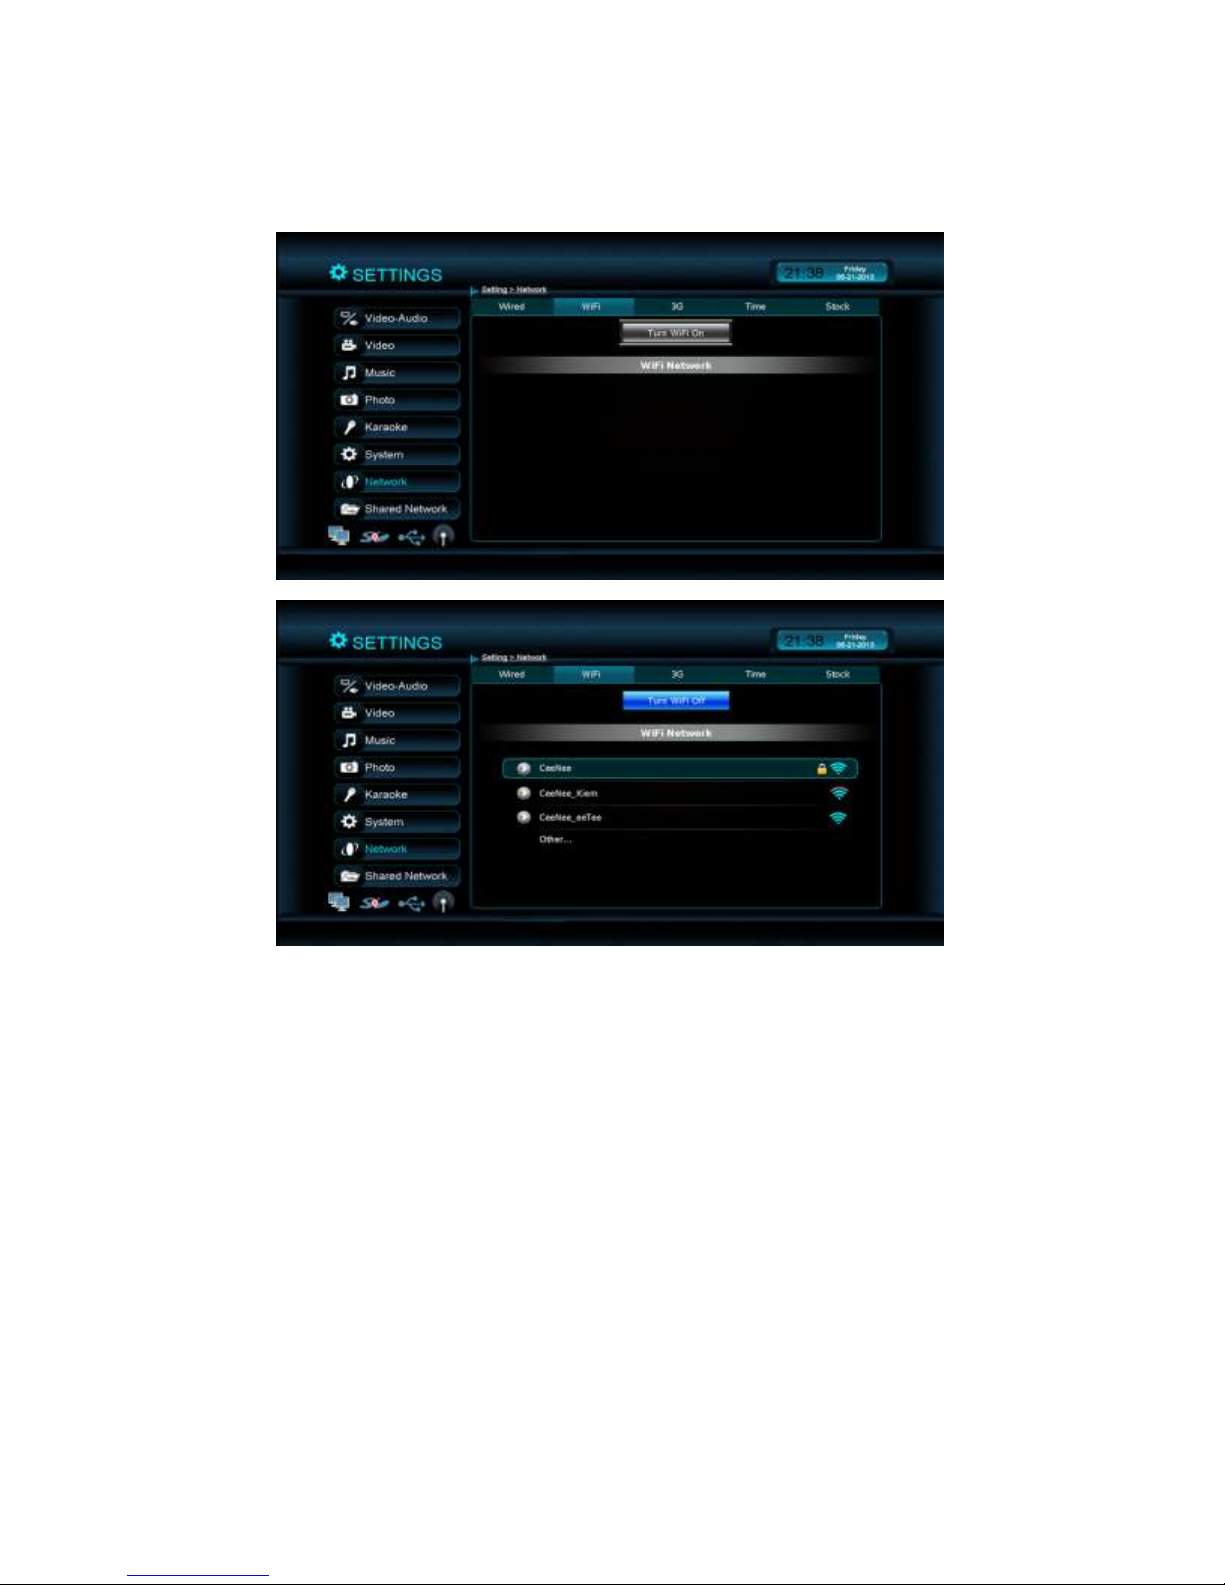
7. Network
a. Wired:
To change the method of IP addresses retrieval to either “On” (DHCP) or “Off”
(Static). First, select “IP Mode: Auto” and then press the “OK” button on the
remote to switch between “On” and “Off.” To change the “IP Address” and other
settings, select the settings, press “OK,” and then use the onscreen keyboard to
enter the numbers.
43
Page 43
b. Wi-Fi:
In the Settings, select Network press “OK” to turn on Wi-Fi. When it is on, it will
scan all the available Wi-Fi networks automatically.
44
Page 44
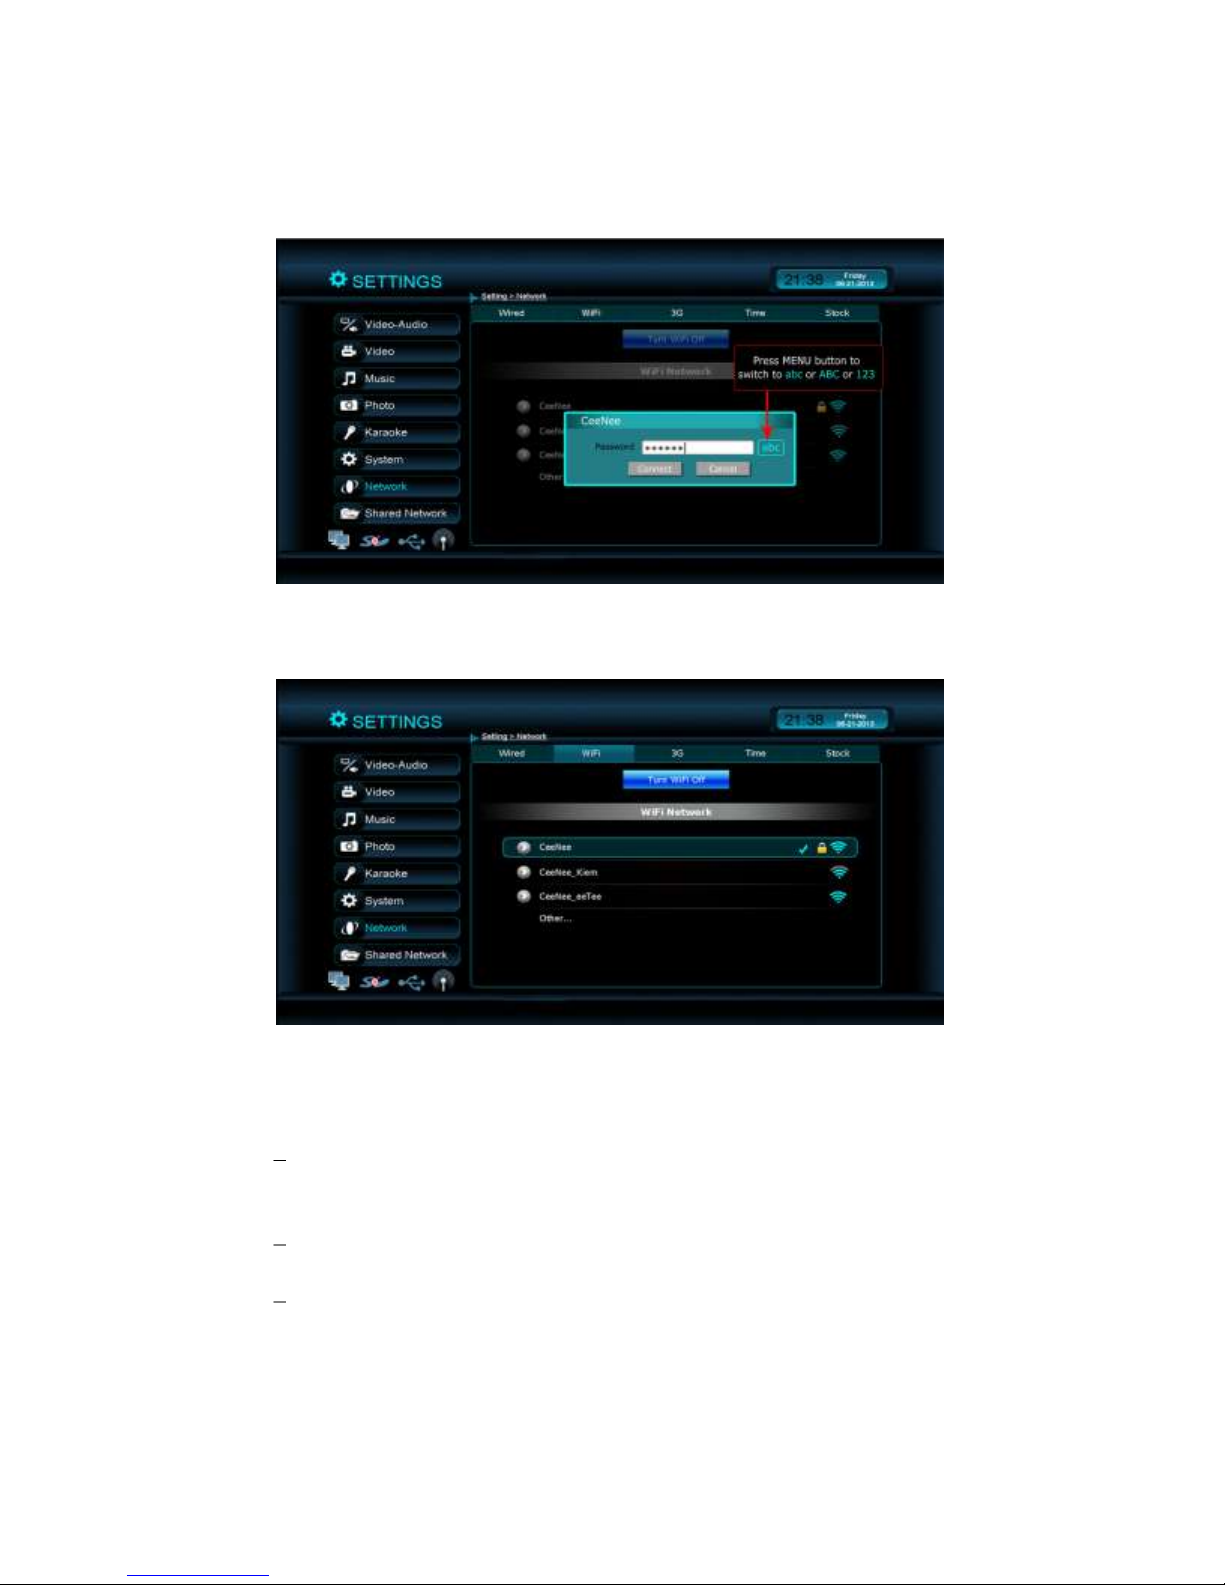
Use the “DOWN ARROW” button to select the network. With WI-Fi including
password, the user must enter the password. While enter password, to switch
character groups (abc, ABC, 123), the user needs to focus the cursor on
“Password” textbox and press MENU button on remote control.
After entering the password, select “Connect” button to connect. If Wi-Fi is
connected successfully, a tick icon will be displayed on this Wi-Fi.
c. Wi-Fi Configuration:
To configure WiFi, in the WiFi menu, use the “UP” and “DOWN” arrow
buttons to highlight the connected network and press OK.
Select IP Setting and press OK
The IP Mode: Auto will get the IP automatically from the router or switch. Use
the “UP” or “DOWN” arrow button to highlight the IP Mode, and press OK to
change to manual. Enter your settings and select Apply to save.
45
Page 45
d. 3G:
Select the correct country and then the service provider. Choose the correct APN
and then press Connect.
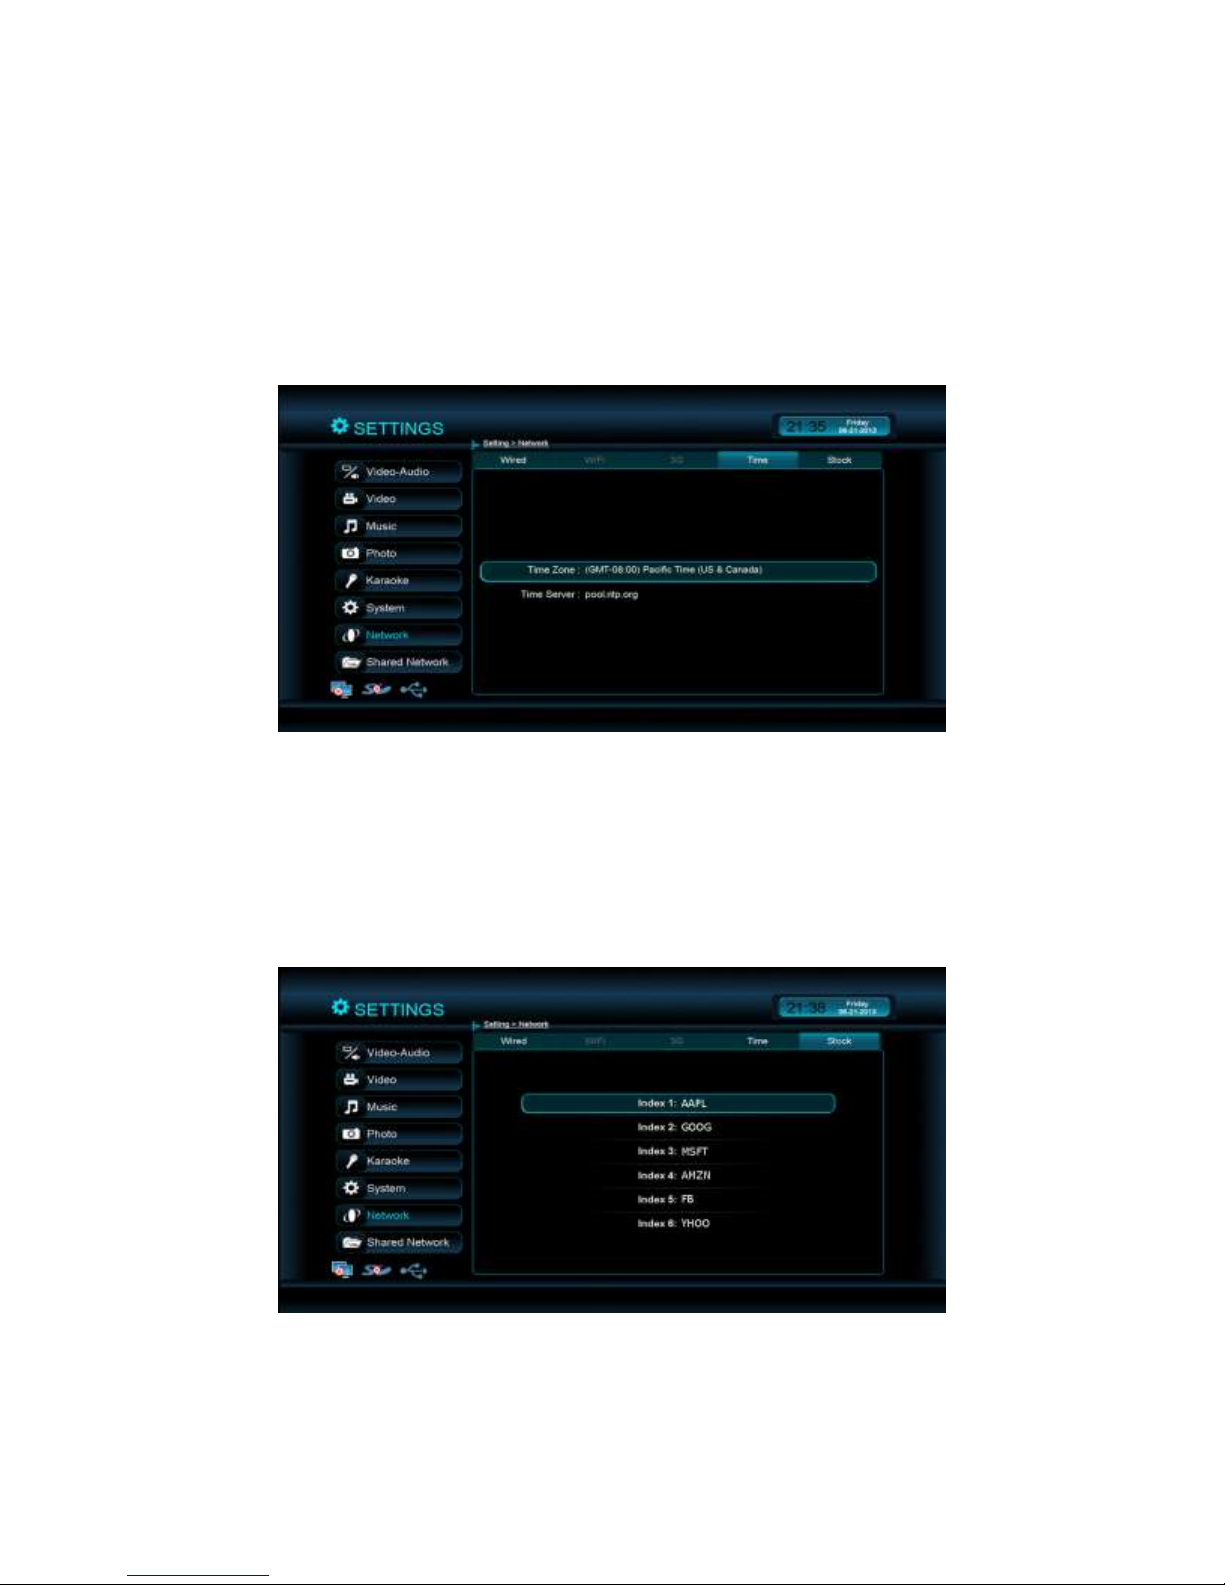
e. Time:
Adjust the “Time Zone” to match the user’s local time. “Time Server” is the
location the time is updated from.
f. Stock:
Information about stock index will be displayed on the Home page. To change
stocks index, press the “OK” button and enter the stock index that you wish to
replace.
46
Page 46
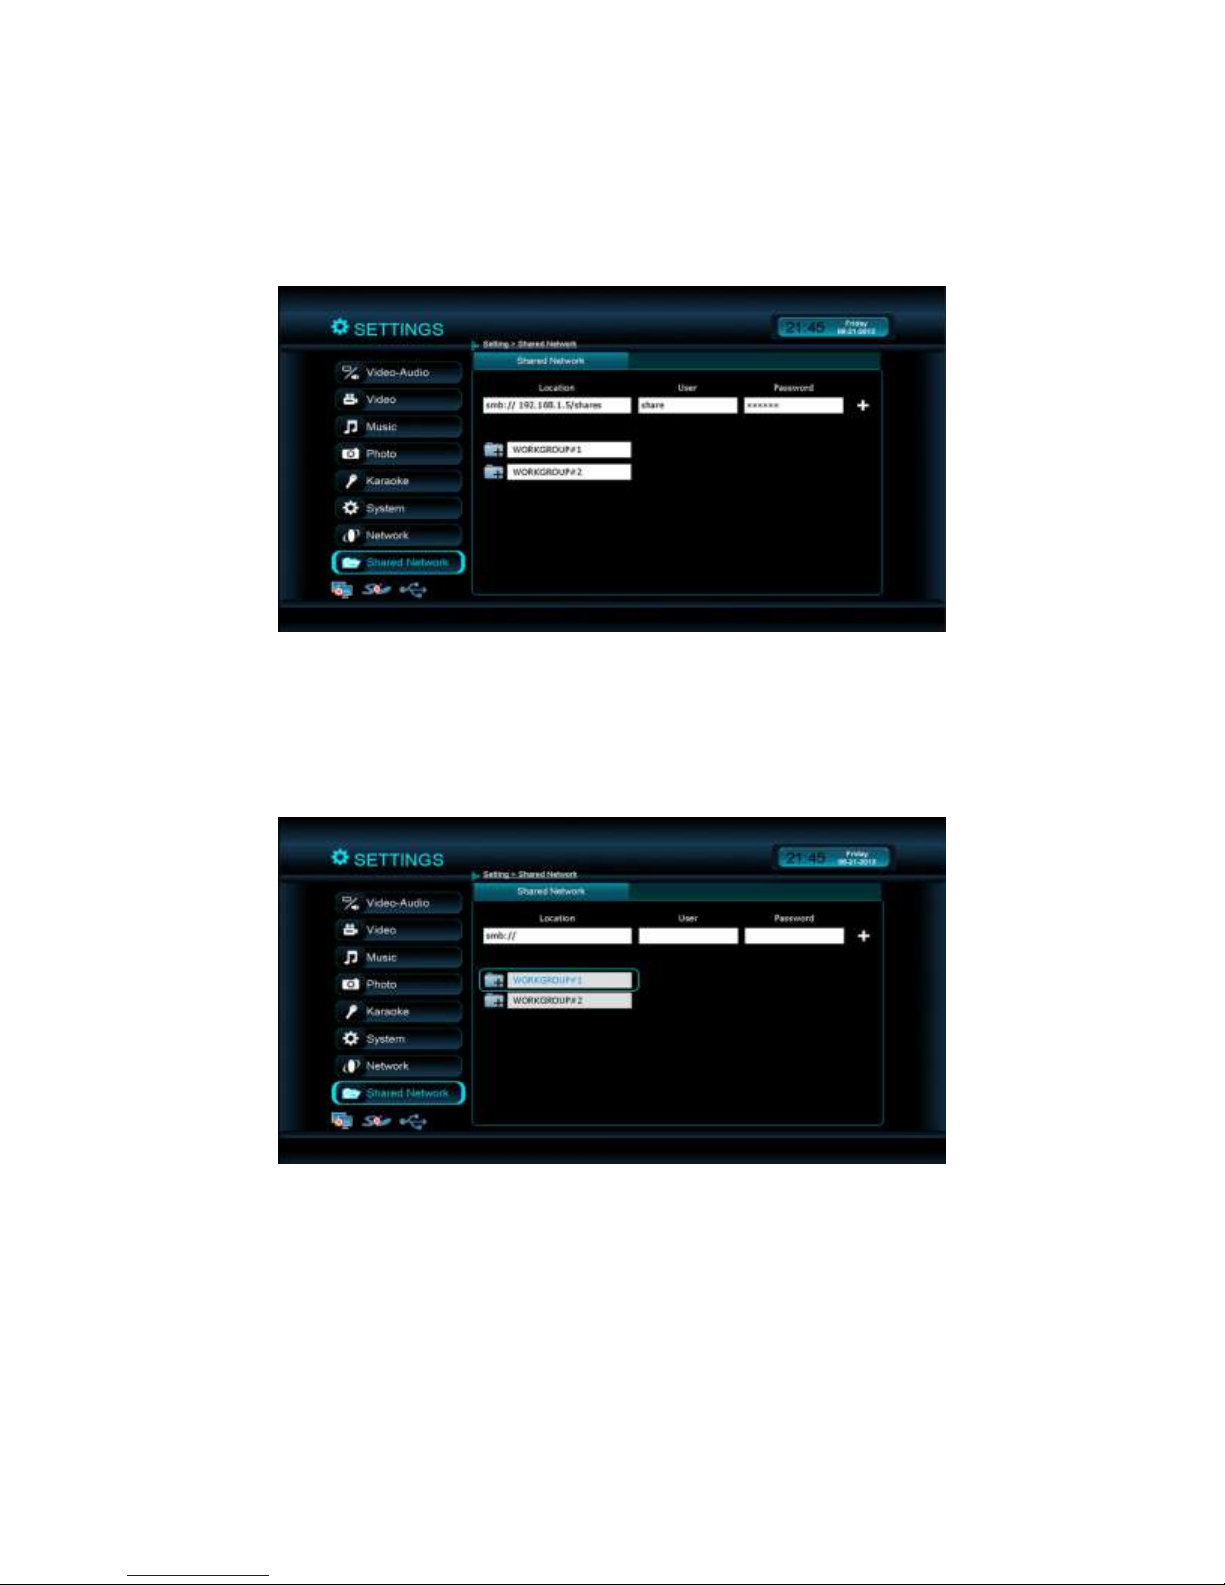
8. Shared Network
a. Requirement: enable windows file sharing over the network.
b. There are two ways to get directory from shared network:
Way 1: Enter location, username and password directly.
Way 2: Browse through your network to your shared computer to share a folder.
Step 1: Select a work group
Enter the Username and Password for your shared folder.
47
Page 47
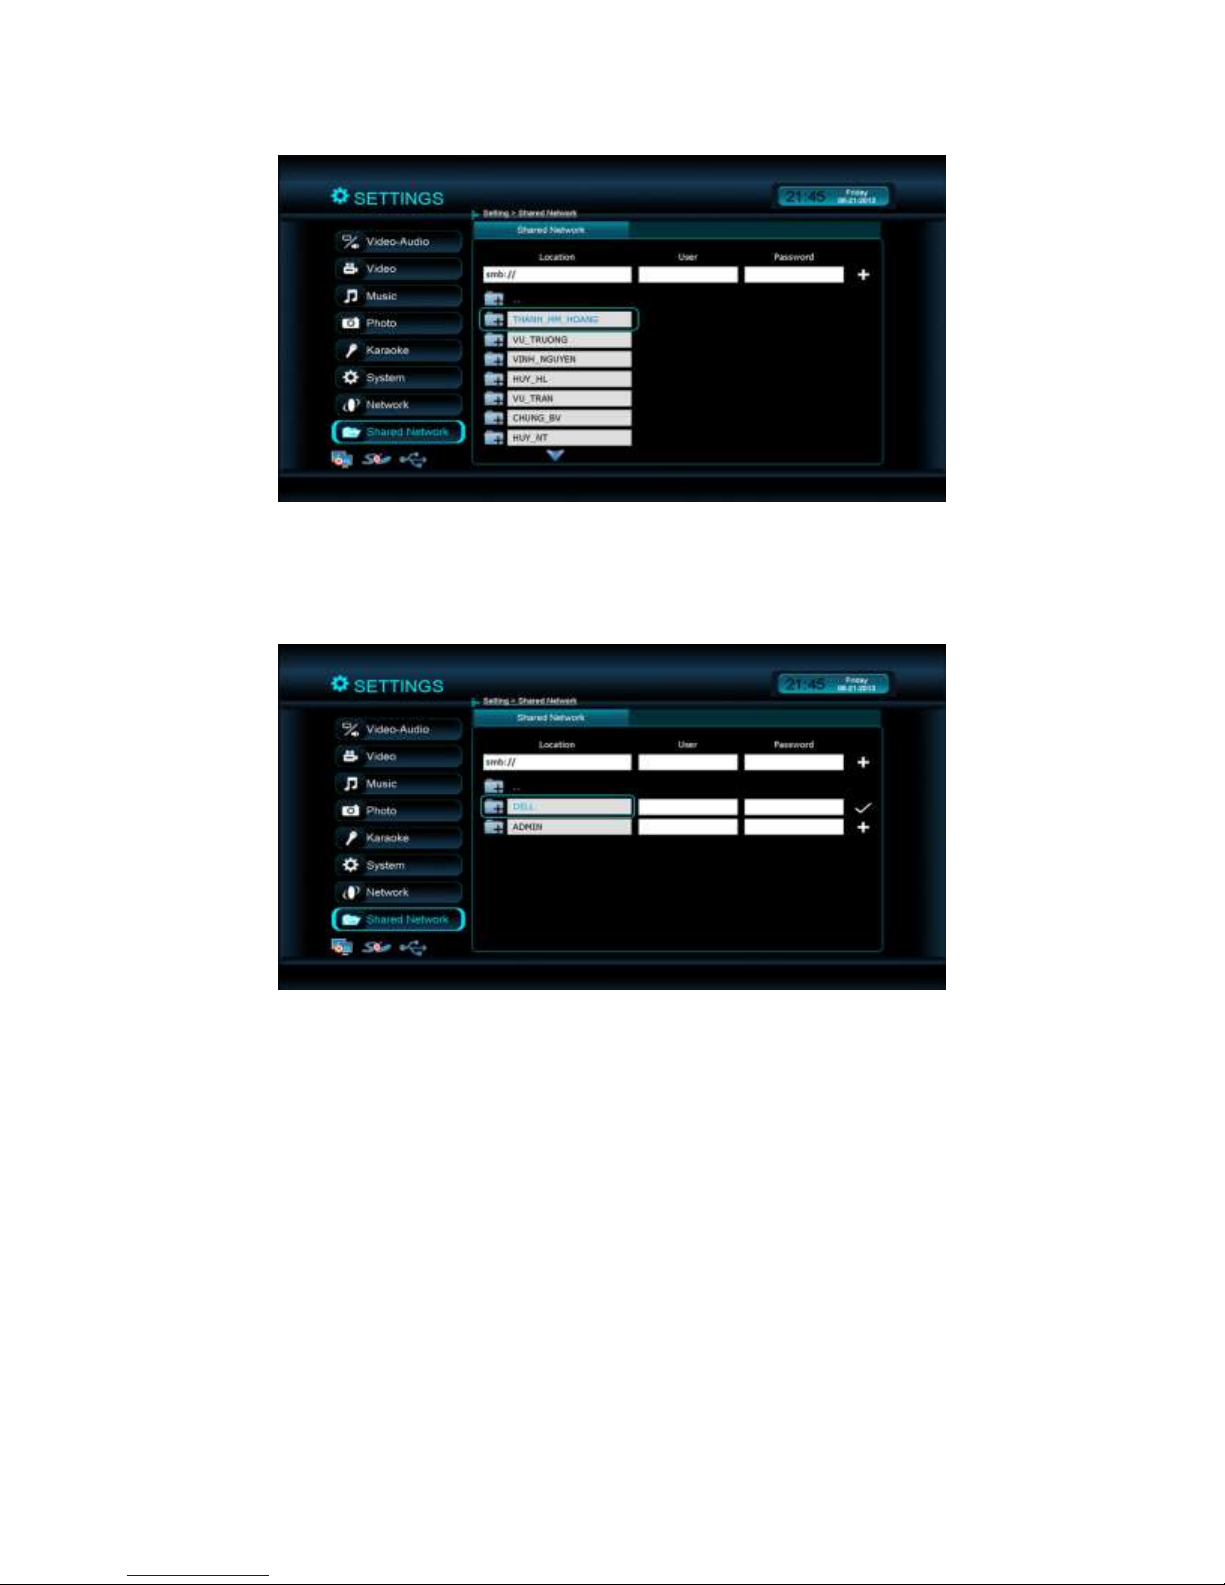
Step 2: Select a Computer/NAS and press “OK”
Step 3: Select a directory, enter Username and Password (optional) and select the
+ icon to add it.
48
Page 48

Codec Support
Video Containers
MPEG1/2/4 Elementary (M1V, M2V, M4V)
MPEG1/2 PS (M2P, MPG, DAT, VOB)
MPEG2 Transport Stream (TS, TP, TRP, M2T, M2TS, MTS)
AVI, ASF, WMV
Matroska (MKV)
MOV (H.264), MP4, RMP4
FLV (only support H264)
MP3+G, CD+G, MP3+XML
Video Code Format
XVID SD/HD
MPEG-1
MPEG-2 MP@HL
MPEG-4.2 ASP@L5, 720p, 1-point GMC
MPEG-4.10 (H.264)
BP@L3
[email protected]
[email protected]
[email protected]
WMV9
MP@HL
SMPTE 421M (VC-1)
MP@HL
AP@L3
49
Page 49

Audio Containers
AAC, M4A
MPEG audio (MP1, MP2, MP3, MPA)
WAV
FLAC
OGG
Audio Codec Format
DTS
Dolby
Dolby Digital
Dolby Digital Plus
Dolby TrueHD
MPEG
AAC, HE-AAC
DRA
FLAC
Photo Containers
JPEG, BMP, PNG, GIF
50
Page 50

CeeNee Technical Support
Important: Should you encounter any problem, please do not return this product to the
store before carefully reading the user manual. You can also find answers for your technical
support questions through e-mail support service at [email protected]. Besides, we also
provide the page http://support.ceenee.com/create-new-ticket/ so you can create a new ticket. If
you still need assistance, please visit us at www.ceenee.com
Your CeeNee product includes one year manufacturer's limited warranty and a free
lifetime technical support. Tampering and misusing the product will lead to warranty avoidance.
The lifetime period commences on the date of your first telephone contact with CeeNee technical
support. To keep you informed of new features and services, remember to register your CeeNee
product online at https://ceenee.com/wp-signup.php
51
Page 51

Troubleshooting
Problem
Solution
DISPLAY
The TV screen is blank and the
CeeNee player power LED remains
off.
• Make sure the TV is on.
• Make sure that the power adapter and power outlet
are okay.
• Make sure that the power adapter is properly
attached to both the CeeNee player and the power
outlet.
The TV screen is blank and the
CeeNee player power LED is ON.
• Make sure the TV is turned on.
• Make sure that the interface cable is properly
attached to both the TV and the CeeNee player.
• Press and hold the reset button for 10 seconds.
The TV screen is blinking and
fuzzy.
• Make sure that the interface cable is properly
inserted on both the TV and the CeeNee player.
• Make sure the CeeNee player power LED is on.
• If you are using a standard definition TV, Make
sure that the Composite option is selected as the
video output.
• If you are using an LCD TV, Make sure that the
HDMI option is selected as the video output.
• Make sure that the video resolution option is set as
Auto.
• Make sure the TV system setting matches the
system used in your region.
The pictures are distorted on the
display screens.
• Navigate to the Settings | Photo and select Keep as
original or Fit to screen in the Photo Scaling field
FILES
Some of the media files do not play.
• Verify compatibility of the media file with the
CeeNee player. Refer to “Supported formats” in
the user manual.
52
Page 52
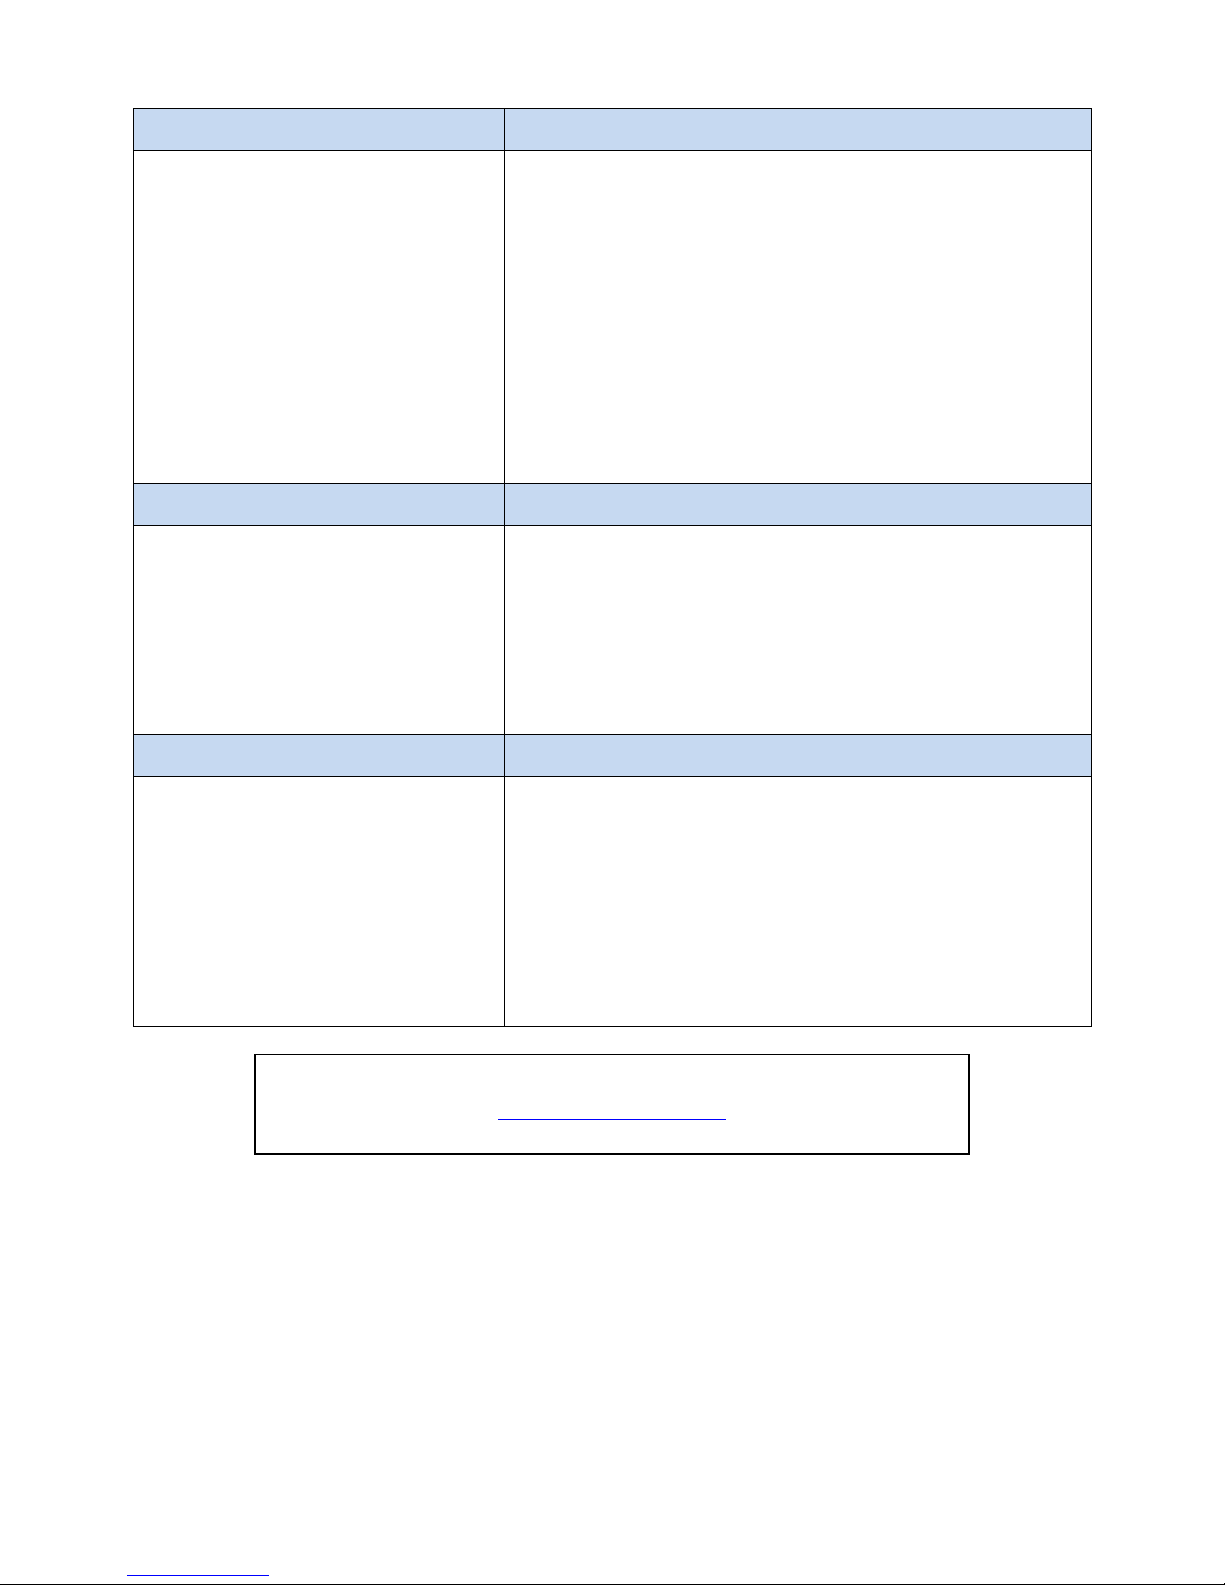
AUDIO
There is no sound.
• Make sure the volume on the entertainment unit is
not muted.
• Make sure the correct audio output setting is
selected.
• If you are using an optical and/or HDMI
connection, make sure the entertainment unit is
capable of processing bit streams otherwise PCM
setting should be selected.
USB DEVICE
The attached USB device is not
visible on the Home screen.
• CeeNee Network Media Player only supports mass
USB storage modes. Make sure that the USB
device is configured as a "mass storage device."
• Make sure that the USB device’s file system
supports NTFS, FAT/FAT32
REMOTE CONTROL
The CeeNee player remote control
does not work.
• Press only one button at a time.
• Make sure the batteries are properly inserted.
• The batteries may already be drained out. Replace
batteries with new ones.
• Make sure that the path between the remote control
and the CeeNee player is not blocked.
For latest information, please go to our website
http://www.ceenee.com
53
Page 53

HISTORY
Created/Modified By
Date
Revision
Comment
K.D
04/09/2012
1.0
First release
HMHT
06/24/2013
2.0
Second release
54
 Loading...