

Page 1
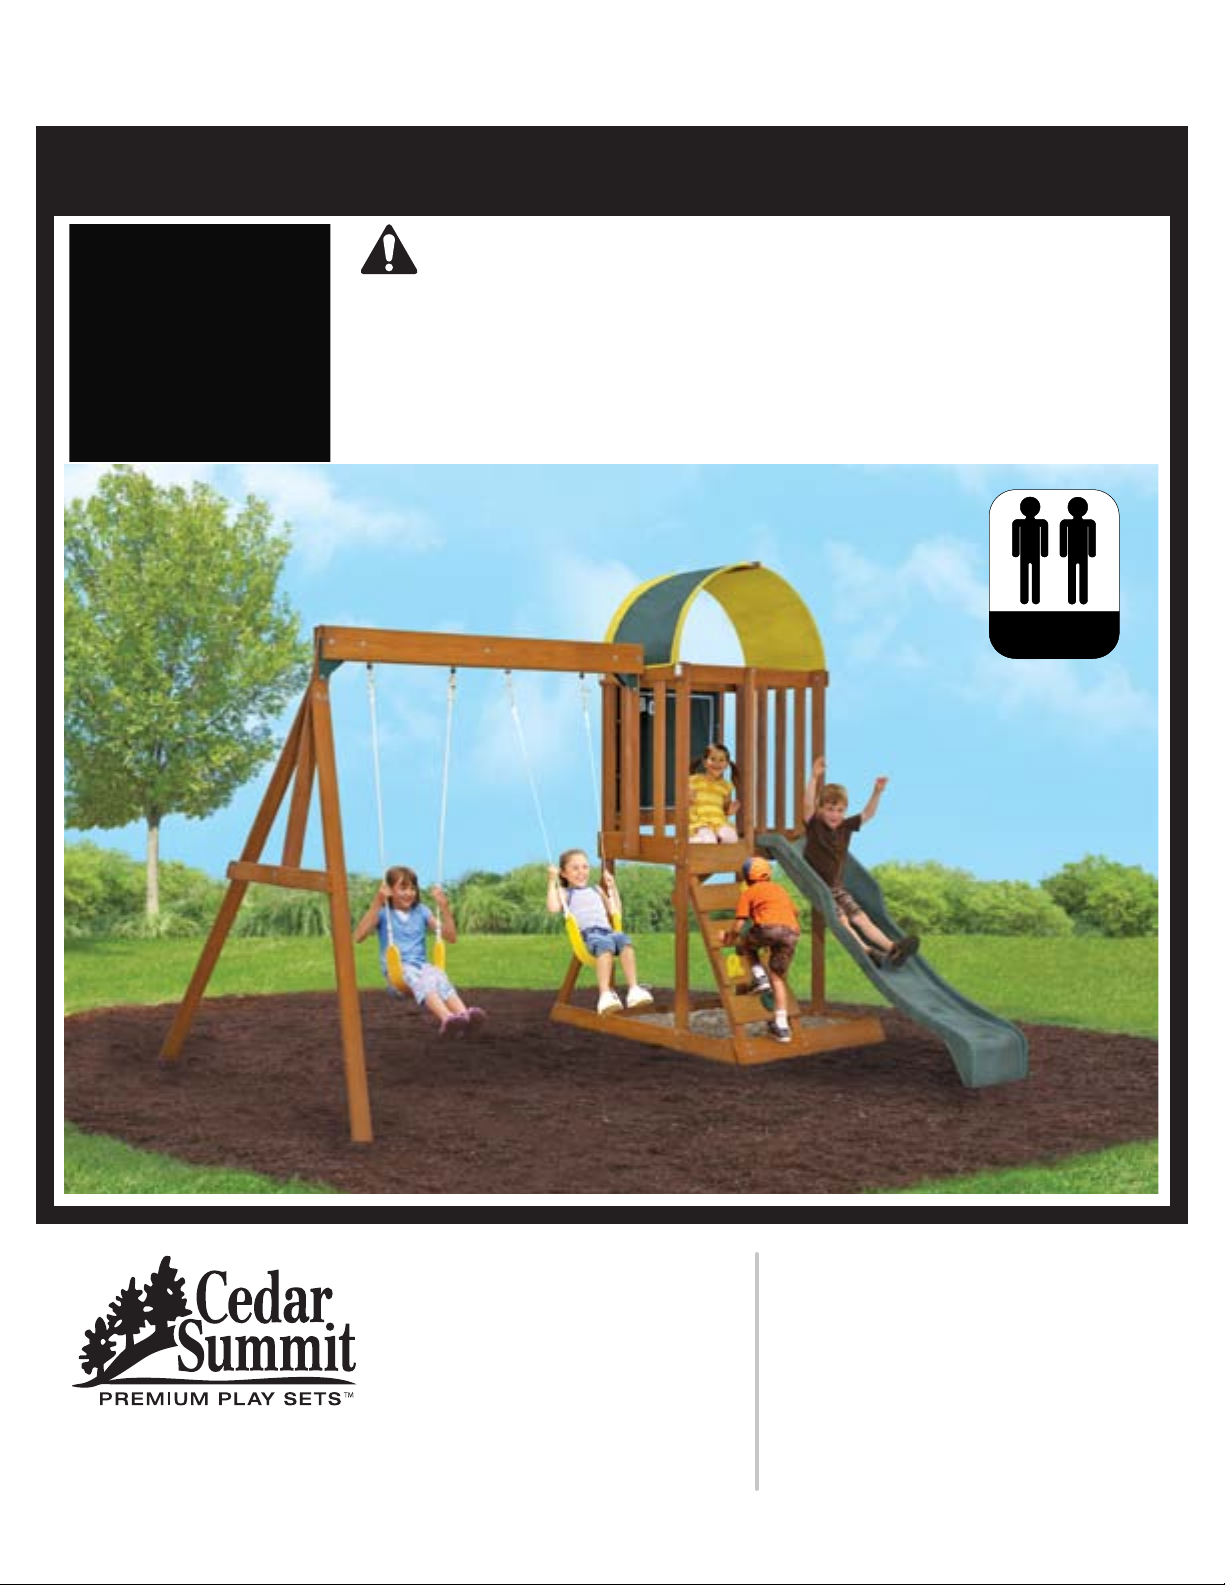
A I N S L E Y P L AY S Y S T E M – F 2 4 1 4 5
INSTALLATION AND OPERATING INSTRUCTIONS
WARNING
and give them to any future owner of this play system. Manufacturer contact information provided below.
OBSTACLE FREE SAFETY ZONE - 22’3” x 28’ area requires Protective Surfacing. See page 3.
MAXIMUM VERTICAL FALL HEIGHT - 6’ (1.8 m)
CAPACITY - 6 Users Maximum, Ages 3 to 10; Weight Limit 110 lbs. (49.9 kg) per child.
RESIDENTIAL HOME USE ONLY. Not intended for public areas such as schools, churches, nurseries, day cares or parks.
To reduce the risk of serious injury or death, you must read and
follow these instructions. Keep and refer to these instructions often
4 - 8 Hrs
Two person
assembly
3404145
Cedar Summit
c/o ©Solowave Design L.P.
Mount Forest, ON Canada
N0G 2L0
www.cedarsummitplay.com
[email protected]
Customer Service
1-877-817-5682 (toll free)
1-519-323-2258
Table of Contents
Warnings and Safe Play Instructions. . . . . . . . . . . . . . . pg. 2
Protective Surfacing Guidelines. . . . . . . . . . . . . . . . . . .pg. 3
Instructions for Proper Maintenance
About Our Wood – Limited Warranty
Keys to Assembly Success
Metric Conversion Sheets
Part ID
. . . .. . . . . . . .. . . . . . . . . . . . . . . . . . . . . . . . . . . pg. 9
Installation of I.D./Warning Plaque
. . . . . . . . . . . . . . .pg. 4
. . . . . . . . . . . . . . pg. 5
. . . . . . . . . . . . . . . . . . . . . . pg. 6
. . . . . . . . . . . . . . . .. . . . . pg. 7,8
. . . . . . . . . . . .Final Step
Rev 02/27/2014
Page 2
Warnings and Safe Play Instructions
CONTINUOUS ADULT SUPERVISION REQUIRED. Most serious injuries and deaths on playground equipment have occurred
while children were unsupervised! Our products are designed to meet mandatory and voluntary safety standards. Complying
with all warnings and recommendations in these instructions will reduce the risk of serious or fatal injury to children using
this play system. Go over the warnings and safe play instructions regularly with your children and make certain that they
understand and follow them. Remember on-site adult supervision is required for children of all ages.
WARNING
SERIOUS HEAD INJURY HAZARD
Installation over concrete, asphalt, dirt, grass, carpet
and other hard surface creates a risk of serious injury
or death from falls to the ground. Install and maintain
shock absorbing material under and around play-set as
recommended on page 3 of these instructions.
COLLISION HAZARD
Place play-set on level ground at least 6 feet from any
obstruction such as a garage or house, fences, poles,
trees, sidewalks, walls, landscape timbers, rocks,
pavement, planters, garden borders, overhanging
branches, laundry lines, and electrical wires. (See
OBSTACLE FREE SAFETY ZONE on cover)
CHOKING HAZARD/SHARP EDGES & POINTS
Adult assembly required. This product contains small
parts and parts with sharp edges and points. Keep parts
away from children until fully assembled.
WARNING LABEL
Owners shall be responsible for maintaining the legibility
of the warning labels.
STRANGULATION HAZARD
• NEVER allow children to play with ropes, clotheslines,
pet leashes, cables, chains or cord-like items when using
this play-set or to attach these items to play-set.
• NEVER allow children to wear loose tting clothing,
ponchos, hoods, scarves, capes, necklaces, items with
draw-strings, cords or ties when using this play-set.
• NEVER allow children to wear bike or sport helmets
when using this play-set.
Failure to prohibit these items, even helmets with chin
straps, increases the risk of serious injury and death to
children from entanglement and strangulation.
TIP OVER HAZARD
Choose a level location for the equipment. This can reduce
the likelihood of the play set tipping over and loose-fill
surfacing materials washing away during heavy rains.
DO NOT allow children to play on the play-set until the
assembly is complete and the unit is properly anchored.
WARNING – Safe Play Instructions
Observe capacity limitations of your play-set. See
front cover.
Dress children with well fitting and full foot enclosing
footwear.
Teach children to sit with their full weight in the center
of the swing seat to prevent erratic swing motion or
falling off.
Check for splintered, broken or cracked wood; missing,
loose, or sharp edged hardware. Replace, tighten and or
sand smooth as required prior to playing.
Verify that suspended climbing ropes, rope ladders, chain
or cable are secured at both ends and cannot be looped
back on itself as to create an entanglement hazard.
On sunny and or hot days, check the slide and other
plastic rides to assure that they are not very hot as to
cause burns. Cool hot slide and rides with water and wipe
dry prior to using.
Do not allow children to wear open toe or heel footwear
like sandals, flip–flops or clogs.
Do not allow children to walk, in front, between, behind
or close to moving rides.
Do not let children twist swing chains or ropes or loop
them over the top support bar. This may reduce the
strength of the chain or rope and cause premature failure.
Do not let children get off rides while they are in motion.
Do not permit climbing on equipment when it is wet.
Do not permit rough play or use of equipment in a
manner for which it was not intended. Standing on or
jumping from the roof, elevated platforms, swings,
climbers, ladders or slide can be dangerous.
Do not allow children to swing empty rides or seats.
Do not allow children to go down slide head first or
run up slide.
Page 3
Protective Surfacing - Reducing Risk of Serious Head Injury From Falls.
One of the most important things you can do to reduce the likelihood of serious head injuries is to install shock-absorbing
protective surfacing under and around your play equipment. The protective surfacing should be applied to a depth that is suitable
for the equipment height in accordance with ASTM F1292. There are different types of surfacing to choose from; whichever
product you select, follow these guidelines:
Loose-Fill Materials
• Maintain a minimum depth of 9 inches of loose-fill materials such as wood mulch/chips, engineered wood fiber (EWF), or
shredded/recycled rubber mulch for equipment up to 8 feet high; and 9 inches of sand or pea gravel for equipment up to 5 feet
high. NOTE: An initial fill level of 12 inches will compress to about a 9-inch depth of surfacing over time. The surfacing will also
compact, displace, and settle, and should be periodically raked and refilled to maintain at least a 9-inch depth.
• Use a minimum of 6 inches of protective surfacing for play equipment less than 4 feet in height. If maintained properly, this
should be adequate. (At depths less than 6 inches, the protective material is too easily displaced or compacted.)
NOTE: Do not install home playground equipment over concrete, asphalt, or any other hard surface. A fall onto a hard surface
can result in serious injury to the equipment user. Grass and dirt are not considered protective surfacing because wear and
environmental factors can reduce their shock absorbing effectiveness. Carpeting and thin mats are not adequate protective
surfacing. Ground level equipment -- such as a sandbox, activity wall, playhouse or other equipment that has no elevated play
surface -- does not need any protective surfacing.
• Use containment, such as digging out around the perimeter and/or lining the perimeter with landscape edging. Don’t forget to
account for water drainage.
• Periodically rake, check and maintain the depth of the loose-fill surfacing material. Marking the correct depth on the play
equipment support posts will help you to see when the material has settled and needs to be raked and or replenished. Be sure to
rake and evenly redistribute the surfacing in heavily used areas.
• Do not install loose fill surfacing over hard surfaces such as concrete or asphalt.
Poured-In-Place Surfaces or Pre-Manufactured Rubber Tiles
You may be interested in using surfacing other than loose-fill materials - like rubber tiles or poured-in-place surfaces.
• Installations of these surfaces generally require a professional and are not “do-it yourself” projects.
• Review surface specifications before purchasing this type of surfacing. Ask the installer/manufacturer for a report showing that
the product has been tested to the following safety standard: ASTM F1292 Standard Specification for Impact Attenuation of
Surfacing Materials within the Use Zone of Playground Equipment. This report should show the specific height for which the
surface is intended to protect against serious head injury. This height should be equal to or greater than the fall height - vertical
distance between a designated play surface (elevated surface for standing, sitting, or climbing) and the protective surfacing
below - of your play equipment.
• Check the protective surfacing frequently for wear.
Placement
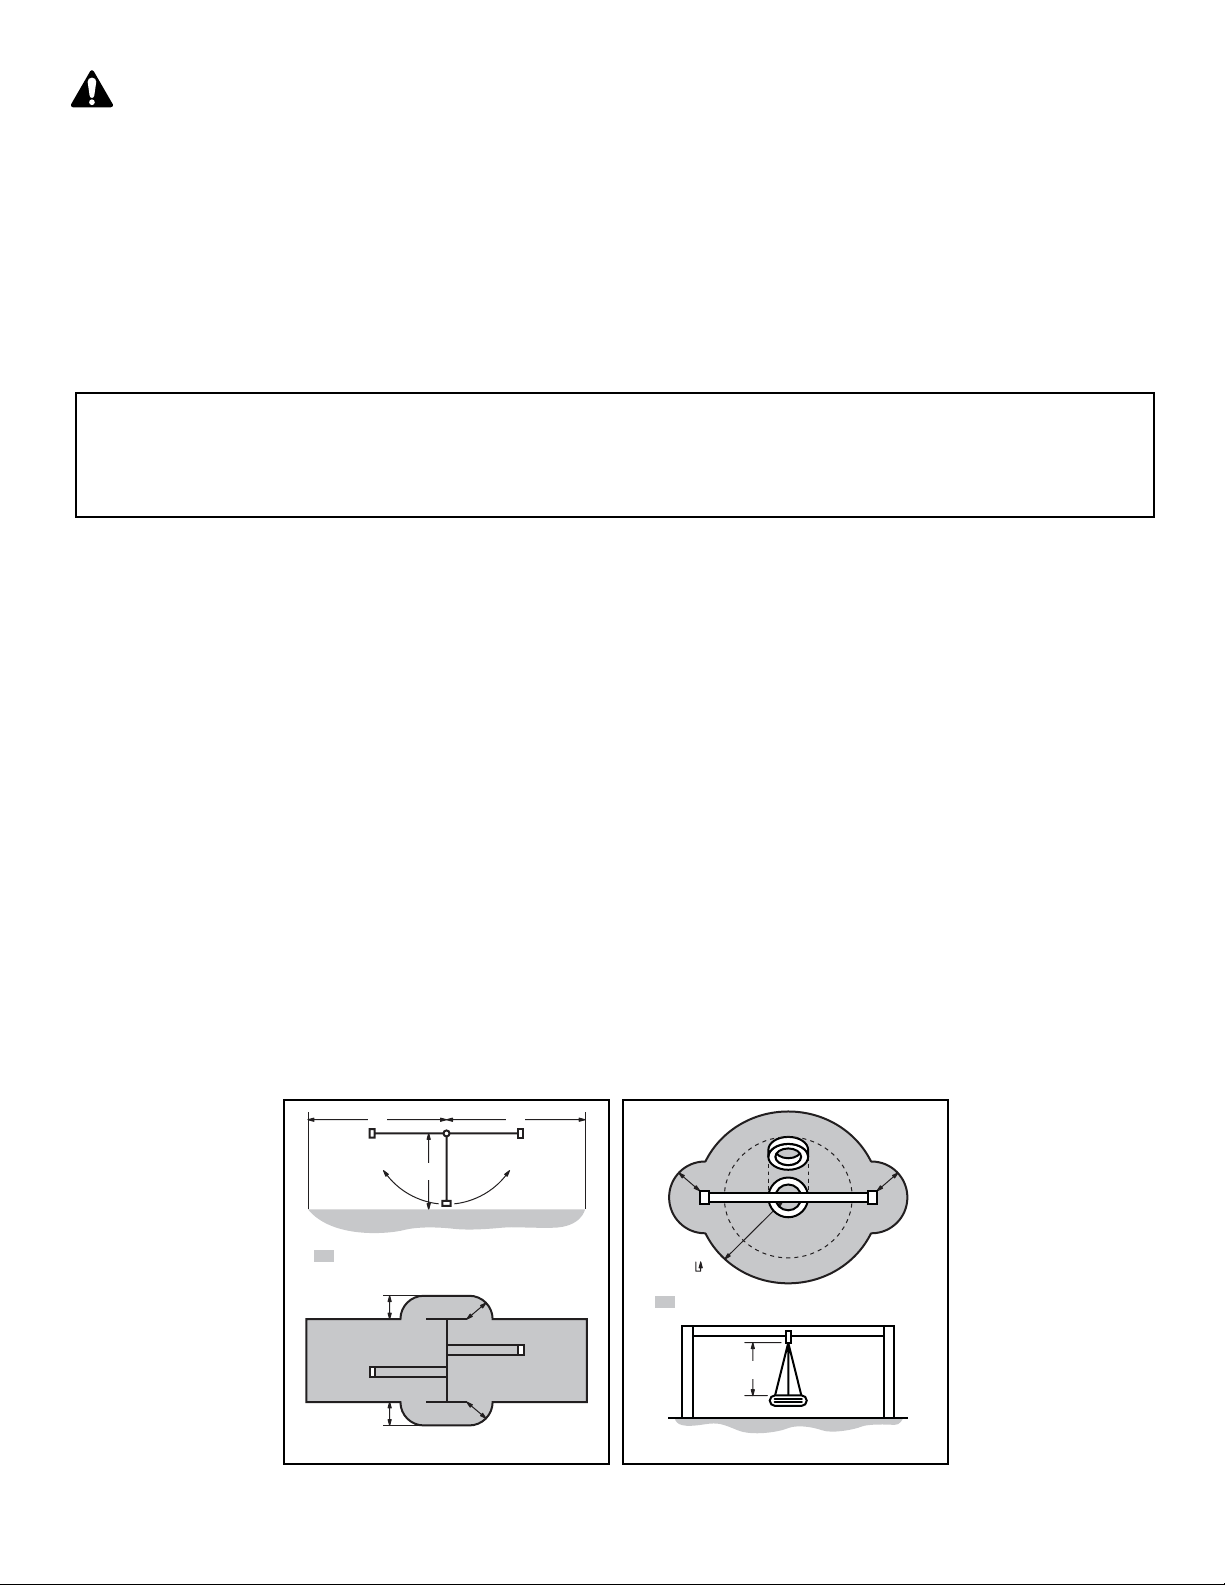
Proper placement and maintenance of protective surfacing is essential. Refer to diagram on front cover. Be sure to;
• Extend surfacing at least 6 feet from the equipment in all directions.
• For to-fro swings, extend protective surfacing in front of and behind the swing to a distance equal to twice the height of the top
bar from which the swing is suspended.
• For tire swings, extend surfacing in a circle whose radius is equal to the height of the suspending chain or rope, plus 6 feet in all directions.
2H 2H
H
Denotes Use Zone with Protective Surfacing
6 ft.
6 ft.
Use Zone for Single-Axis Swings
6 ft.
6 ft.
6 ft. 6 ft.
6 ft.
Denotes Use Zone with Protective Surfacing
L
Use Zone for Multi-Axis Swings
From the CPSC Outdoor Home Playground Safety Handbook. At www.cpsc.gov/CPSCPUB/PUBS/324.pdf
Page 4
Instructions for Proper Maintenance
Your Cedar Summit Play System is designed and constructed of quality materials with your child’s safety in mind. As with all
outdoor products used by children, it will weather and wear. To maximize the enjoyment, safety and life of your Play Set, it is
important that you, the owner, properly maintain it.
Check the following at the beginning of the play season:
HARDWARE:
Check metal parts for rust. If found,
sand and repaint using a non-lead
paint complying with 16 CFR 1303.
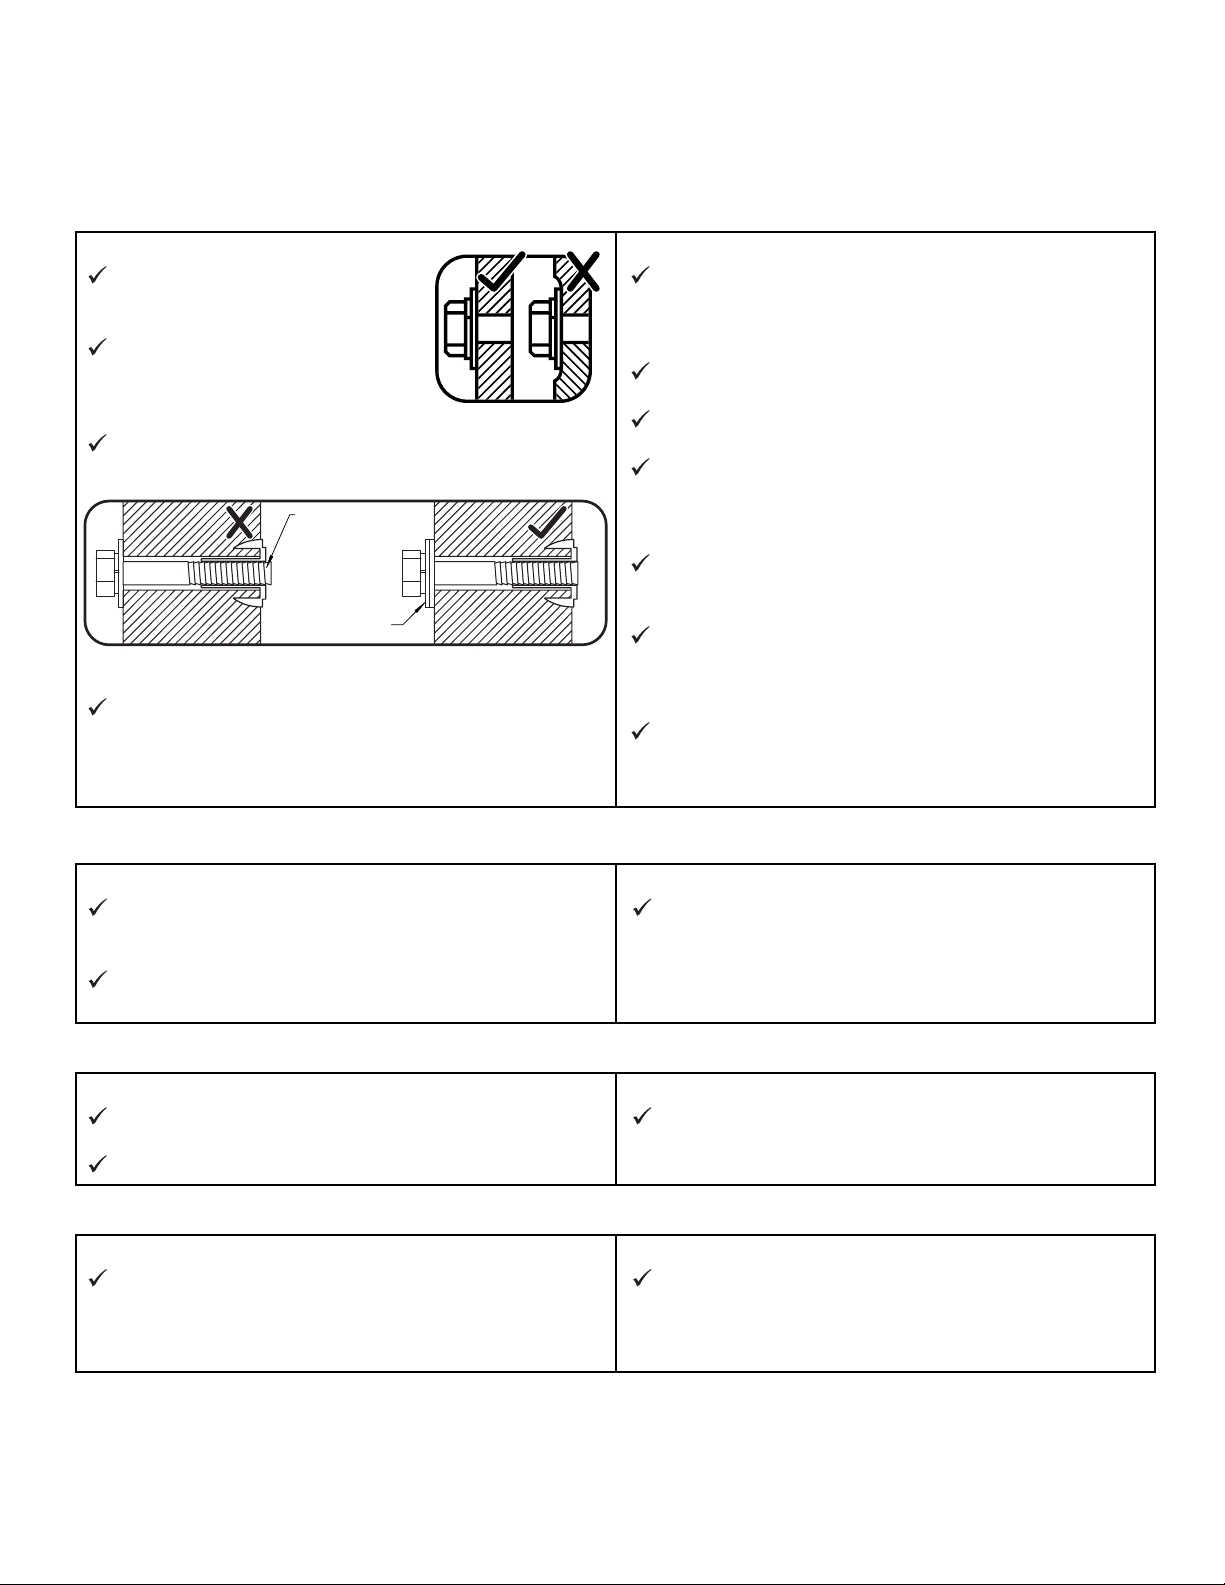
Inspect and tighten all hardware. On
wood assemblies DO NOT OVERTIGHTEN as to cause crushing and
splintering of wood.
Check for sharp edges or protruding screw threads, add
washers if required.
If Bolt protrudes
beyond T-Nut
Use an extra
Flat Washer
SHOCK ABSORBING SURFACING:
Check for foreign objects. Rake and check depth of loose
fill protective surfacing materials to prevent compaction
and maintain appropriate depth. Replace as necessary.
(See Protective Surfacing, page 3)
GROUND STAKES (ANCHORS):
Check for looseness, damage or deterioration. Should
firmly anchor unit to ground during use. Re-secure and
or replace, if necessary.
SWING HANGERS:
Check that bolts are secure and tight. Quick clips should
be completely closed and threaded clips screwed tight.
If squeaking occurs lubricate bushings with oil or WD-40®.
SWINGS, ROPES AND RIDES:
Reinstall if removed during cold season. Check all
moving parts including swing seats, ropes, chains and
attachments for wear, rust and other deterioration.
Replace as needed.
Check that ropes are tight, secure at both ends and
cannot loop back as to create an entrapment.
WOOD PARTS:
Check all wood members for deterioration, structural
damage and splintering. Sand down splinters and replace
deteriorated wood members. As with all wood, some
checking and small cracks in grain is normal.
Unprotected, they will appear weathered over time.
Periodic application of an exterior water repellent or stain
(water-based) will help improve appearance and life.
Check twice a month during play season:
HARDWARE:
Inspect for tightness. Must be firmly against, but not
crushing the wood. DO NOT OVER-TIGHTEN.
This will cause splintering of wood.
Check for sharp edges or protruding screw threads.
Add washers if required.
SHOCK ABSORBING SURFACING:
Rake and check depth of loose fill protective surfacing
materials to prevent compaction and maintain appropriate
depth. Replace as necessary.
(See Protective Surfacing, page 3)
Check once a month during play season:
SWING HANGERS:
Check that they are secure and orientated correctly. Hook
should rotate freely and perpendicular to support beam.
If squeaking occurs lubricate bushings with oil or WD-40®.
SWINGS AND RIDES:
Check swing seats, all ropes, chains and attachments for
fraying, wear, excessive corrosion or damage.
Replace if structurally damaged or deteriorated.
Check at the end of the play season:
SWINGS AND RIDES:
To prolong their life, remove swings and store inside
when outside temperature is below 32°F/0°C. Below
freezing, plastic parts may become more brittle.
If you dispose of your play set: Please disassemble and dispose of your unit so that it does not create any unreasonable hazards
at the time it is discarded. Be sure to follow your local waste ordinances.
SHOCK ABSORBING SURFACING:
Rake and check depth of loose fill protective surfacing
materials to prevent compaction and maintain appropriate
depth. Replace as necessary.
(See Protective Surfacing, page 3)
Page 5
About Our Wood
Cedar Summit Premium Play Systems uses 100% FSC wood. Although we take great care in selecting the best quality lumber
available, wood is still a product of nature and susceptible to weathering which can change the appearance of your set.
What causes weathering? Does it affect the strength of my Play System?
One of the main reasons for weathering is the effects of water (moisture); the moisture content of the wood at the surface is
different than the interior of the wood. As the climate changes, moisture moves in or out of the wood, causing tension which can
result in checking and or warping. You can expect the following due to weathering. These changes will not affect the strength of
the product:
1. Checking is surface cracks in the wood along the grain. A post (4” x 4”) will experience more checking than a board (1” x 4”)
because the surface and interior moisture content will vary more widely than in thinner wood.
2. Warping results from any distortion (twisting, cupping) from the original plane of the board and often happens from rapid
wetting and drying of the wood.
3. Fading happens as a natural change in the wood color as it is exposed to sun-light and will turn a grey over time.
How can I reduce the amount of weathering to my Play System?
At the factory we have coated the wood with a water repellent or stain. This coating decreases the amount of water absorption
during rain or snow thus decreasing the tension in the wood. Sunlight will break down the coating, so we recommend applying a
water repellent or stain on a yearly basis (see your local stain and paint supplier for a recommended product).
Most weathering is just the normal result of nature and will not affect safe play and enjoyment for your child. However if you are
concerned that a part has experienced a severe weathering problem please call our consumer relations department for further assistance.
Complete and mail registration card to receive important product notifications and assure prompt
warranty service.
10 Year Limited Warranty
Solowave Design warrants that this product is free from defect in materials and workmanship for a
period of one year from the original date of purchase. In addition, lumber is warranted for 10 years
against structural failure due to rot and insect damage. All other parts, such as hardware, swings, rides,
accessories, and slides carry a one-year warranty only.
This warranty applies to the original owner and registrant and is non-transferable.
Regular maintenance is required to assure the integrity of your Play System. This warranty does not
cover any inspection cost.
This Limited Warranty does not cover:
• Labor for replacement of any defective item(s);
• Incidental or consequential damages;
• Cosmetic defects which do not affect performance or integrity;
• Vandalism; improper use or installation; acts of nature;
•
Minor twisting, warping, checking, or any other natural occurring properties of wood that do not
affect performance or integrity.
Solowave Design products have been designed for safety and quality. Any modifications made to
the original product could damage the structural integrity of the unit leading to failure and possible
injury. Solowave Design Inc. cannot assume any responsibility for modified products. Furthermore,
modification voids any and all warranties.
This product is warranted for RESIDENTIAL USE ONLY. Under no circumstance should a
Solowave Design Play System be used in public settings such as schools, churches, playgrounds,
parks, day cares and the like. Such use may lead to product failure and potential injury. Any and all
public use will void this warranty.
Solowave Design disclaims all other representations and warranties of any kind, express or implied.
This Warranty gives you specific legal rights. You may have other rights as well which vary from state to state or
province to province. This warranty excludes all consequential damages, however, some states do not allow the
limitation or exclusion of consequential damages, and therefore this limitation may not apply to you.
Page 6
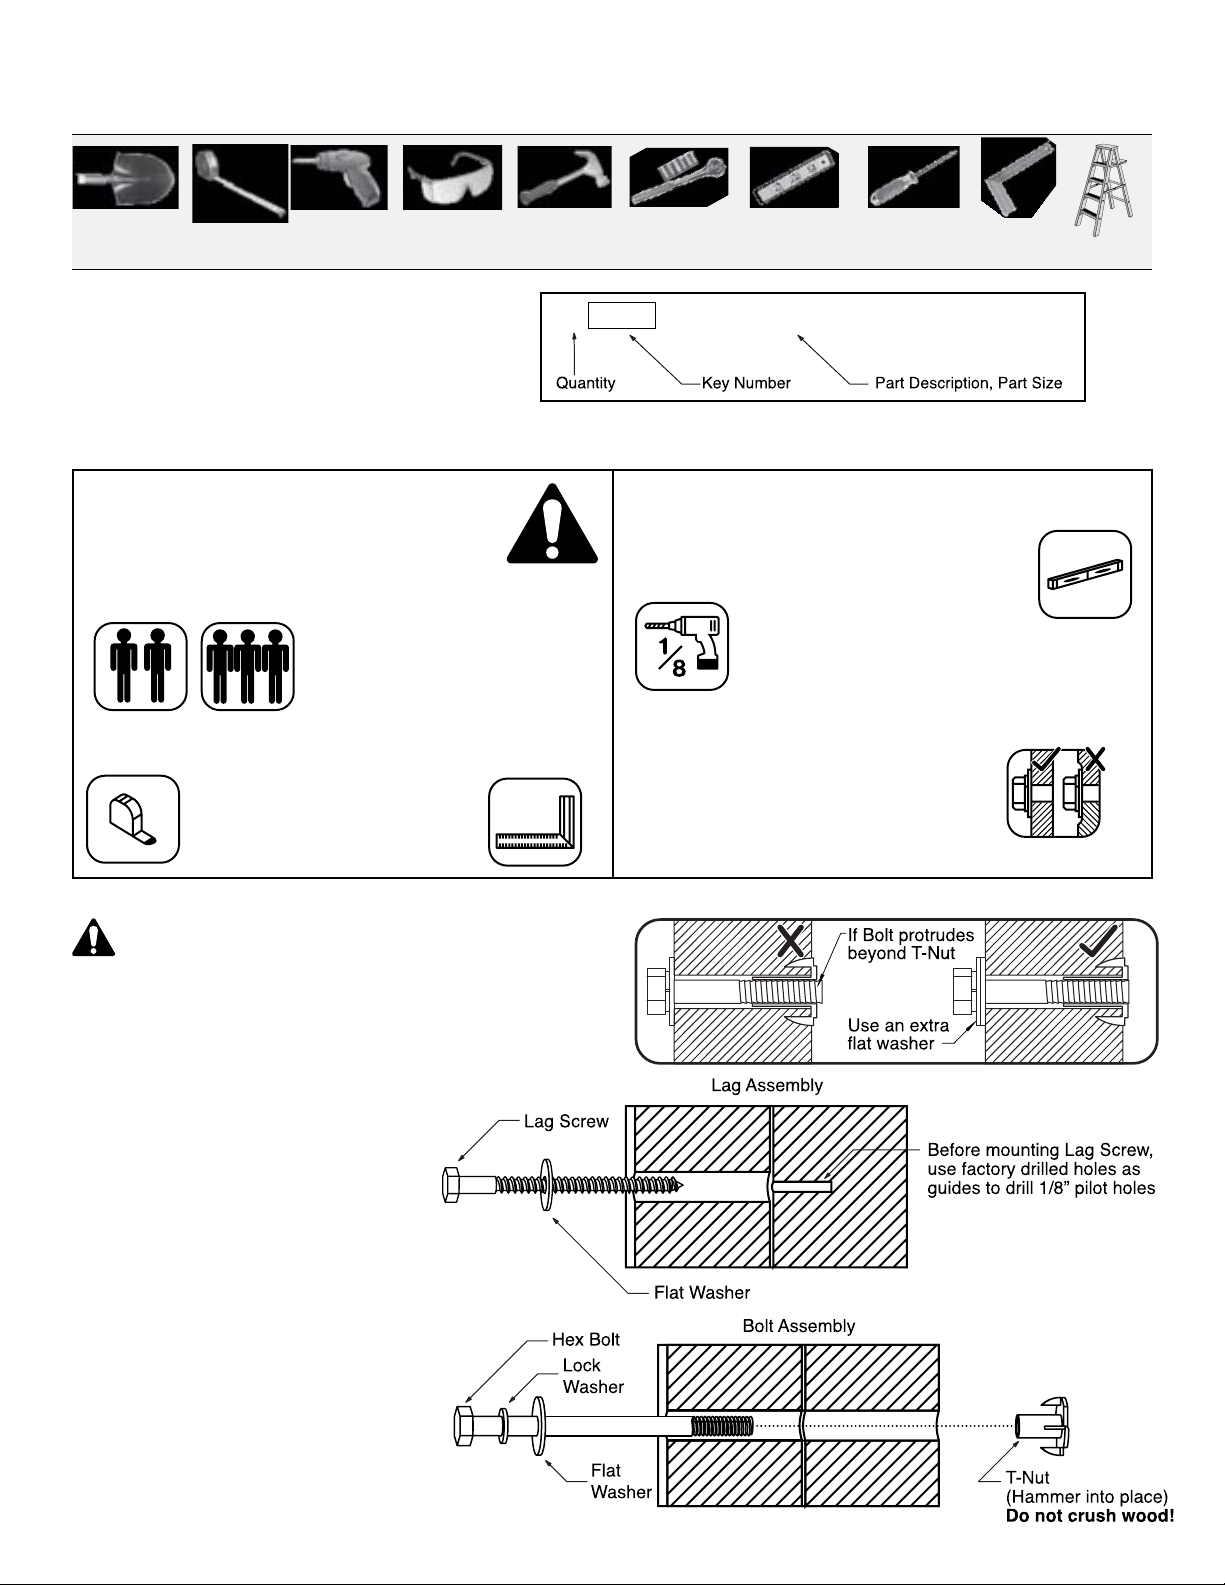
Tools Required
Keys to Assembly Success
Shovel Level #2 & #3 Phillips
Part Identification Key
On each page, you will find the parts and
quantities required to complete the assembly
step illustrated on that page. Here is a sample.
Symbols
Throughout these instructions symbols are provided as important reminders for proper and safe assembly.
This identifies information that requires special
attention. Improper assembly could lead to an
unsafe or dangerous condition.
Use
Help
Measure
Distance
Measuring
Tape
Use
Help
Check that assembly is square
before tightening bolts.
Use a measuring tape to assure
proper location.
Drill (1/8”
3/16” Bit)
Where this is shown, 2 or 3
people are required to safely
complete the step. To avoid
injury or damage to the
assembly make sure to get help!
Safety
Glasses
Hammer Ratchet 1/2”,
Square
Assembly
7/16” & 9/16”
A1
12342X Post 2 x 4 x 83”
Check that set or assembly is properly level
before proceeding.
This indicates time to tighten bolts, but
not too tight! Do not crush the wood.
This may create splinters and cause
structural damage.
Pre-drill
1/8” Bit
or Robertson
Pre-drill a pilot hole before
fastening screw or lag to prevent
splitting of wood.
Square
Ruler
Tighten
Step
Ladder
Use
Level
Bolts
CAUTION – Protrusion Hazard
Once the assembly is tightened, watch for exposed
threads. If a thread protrudes from the T-Nut, remove the
bolt and add washers to eliminate this condition. Extra
washers have been provided for this purpose.
Proper Hardware Assembly
Lag screws require drilling pilot
holes to avoid splitting wood. Only
a flat washer is required. For ease of
installation liquid soap can be used
on all lag-type screws.
For bolts, tap T-Nut into hole with
hammer. Insert the hex bolt through
lock washer first then flat washer then
hole. Because the assemblies need to
be squared do not completely tighten
until instructed. Pay close attention to
diameter of the bolts. 5/16” is slightly
larger than 1/4”.
No Yes
Page 7
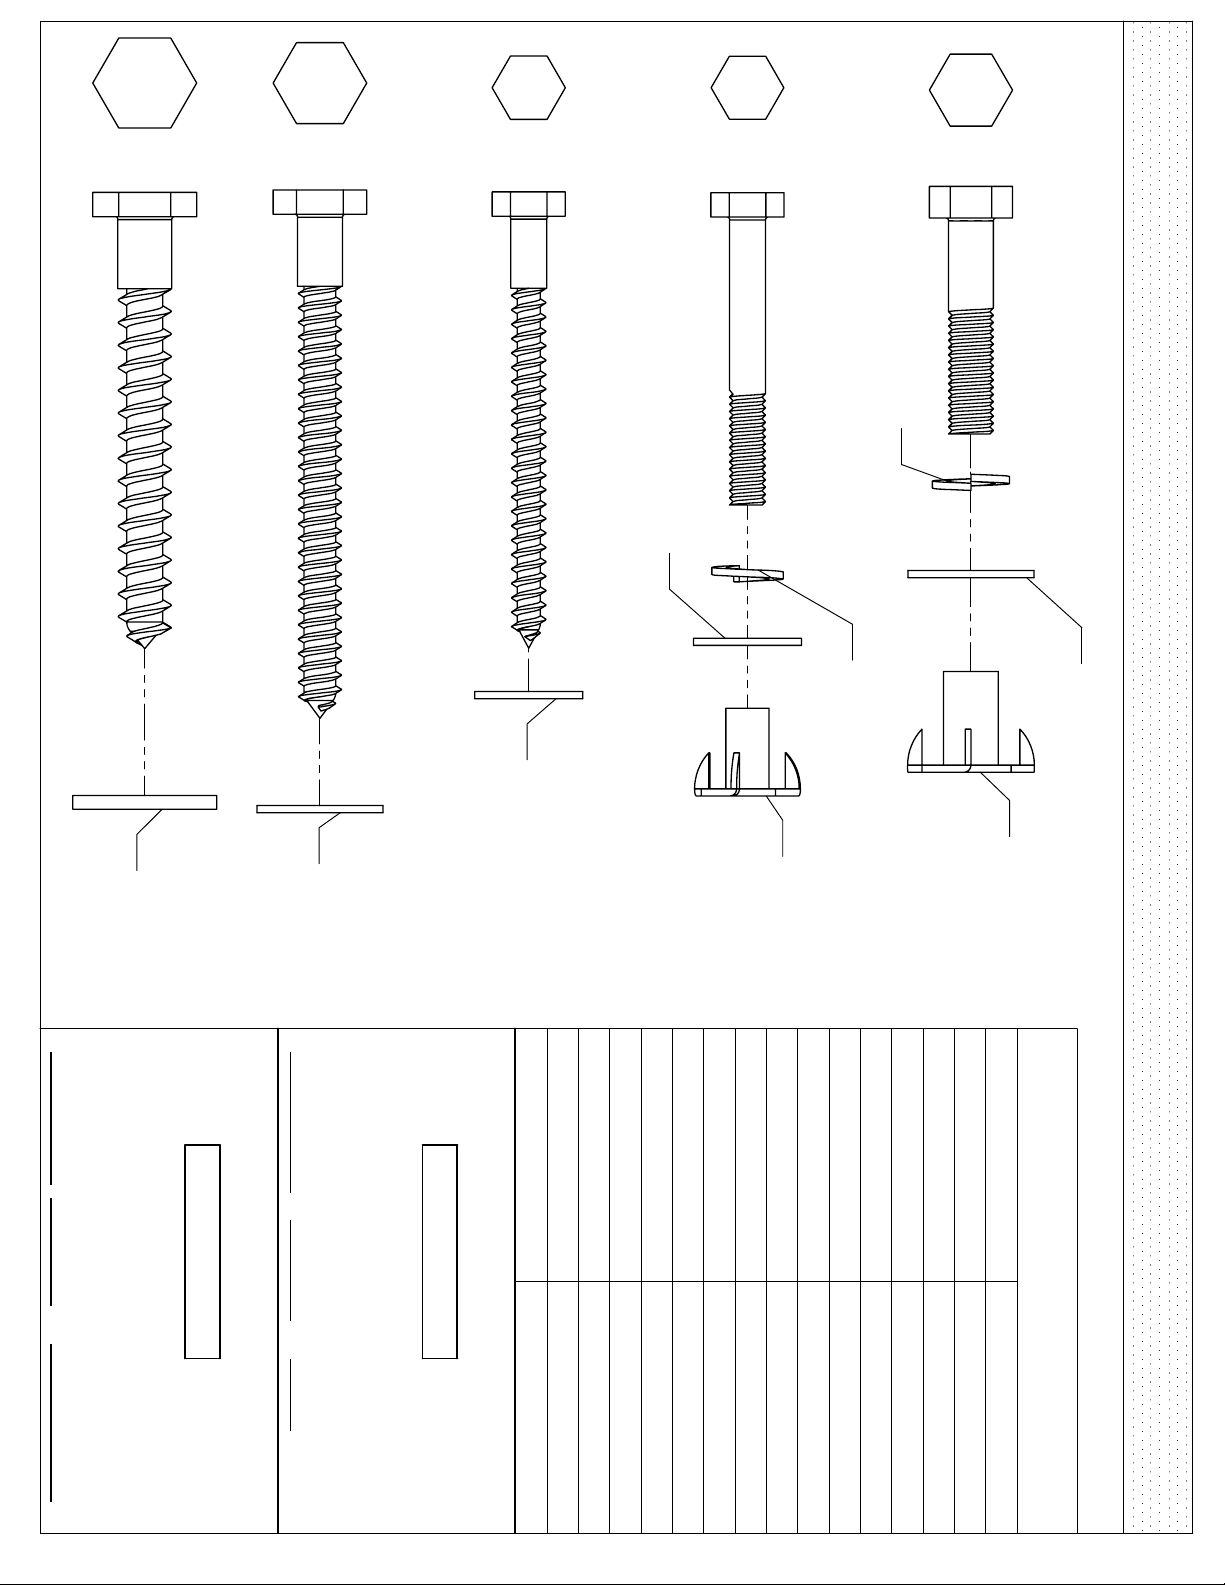
3/8"(.38) = 9.5mm Lag Screw
5/16"(.31) = 8mm Lag Screw
1/4"(0.25) = 6mm Lag Screw
1/4"(0.25) = 6mm Hex Bolt
5/16"(.31) = 8mm Hex Bolt
5/16" (8mm) Lock Washer
1/4" (6mm) Flat Washer
1/4" (6mm)
Lock Washer
5/16" (8mm)
Flat Washer
SOLO)WAVE DESIGN HARDWARE
4.5 inches x
25.4mm
=
BOLT LENGTH 4½ (4.5) inches long
1/4" (6mm)
Flat Washer
5/16" (8mm)
1/4" (6mm)
5/16" (8mm)
3/8" (9.5mm)
Flat Washer
For example:
Flat Washer
For example:
BOLT DIAMETER 5/16 (0.31) inches
0.31 inches
T-Nut
T-Nut
inches vs millimetres
1 inch = 25.4mm
1 inch = 25.4mm
DIAMETER CONVERSION
3/4 19
1/2 12.7
7/8 22
1-
1 25.4
1/8
1¼ 32
1½ 38
2 51
2½ 64
3 76
3½ 89
4 102
4½
5 127
5½ 140
LENGTH CONVERSION
HARDWARE LENGTH CHART
6 152
x 25.4mm = 8mm
114mm long
29
114
Page 8
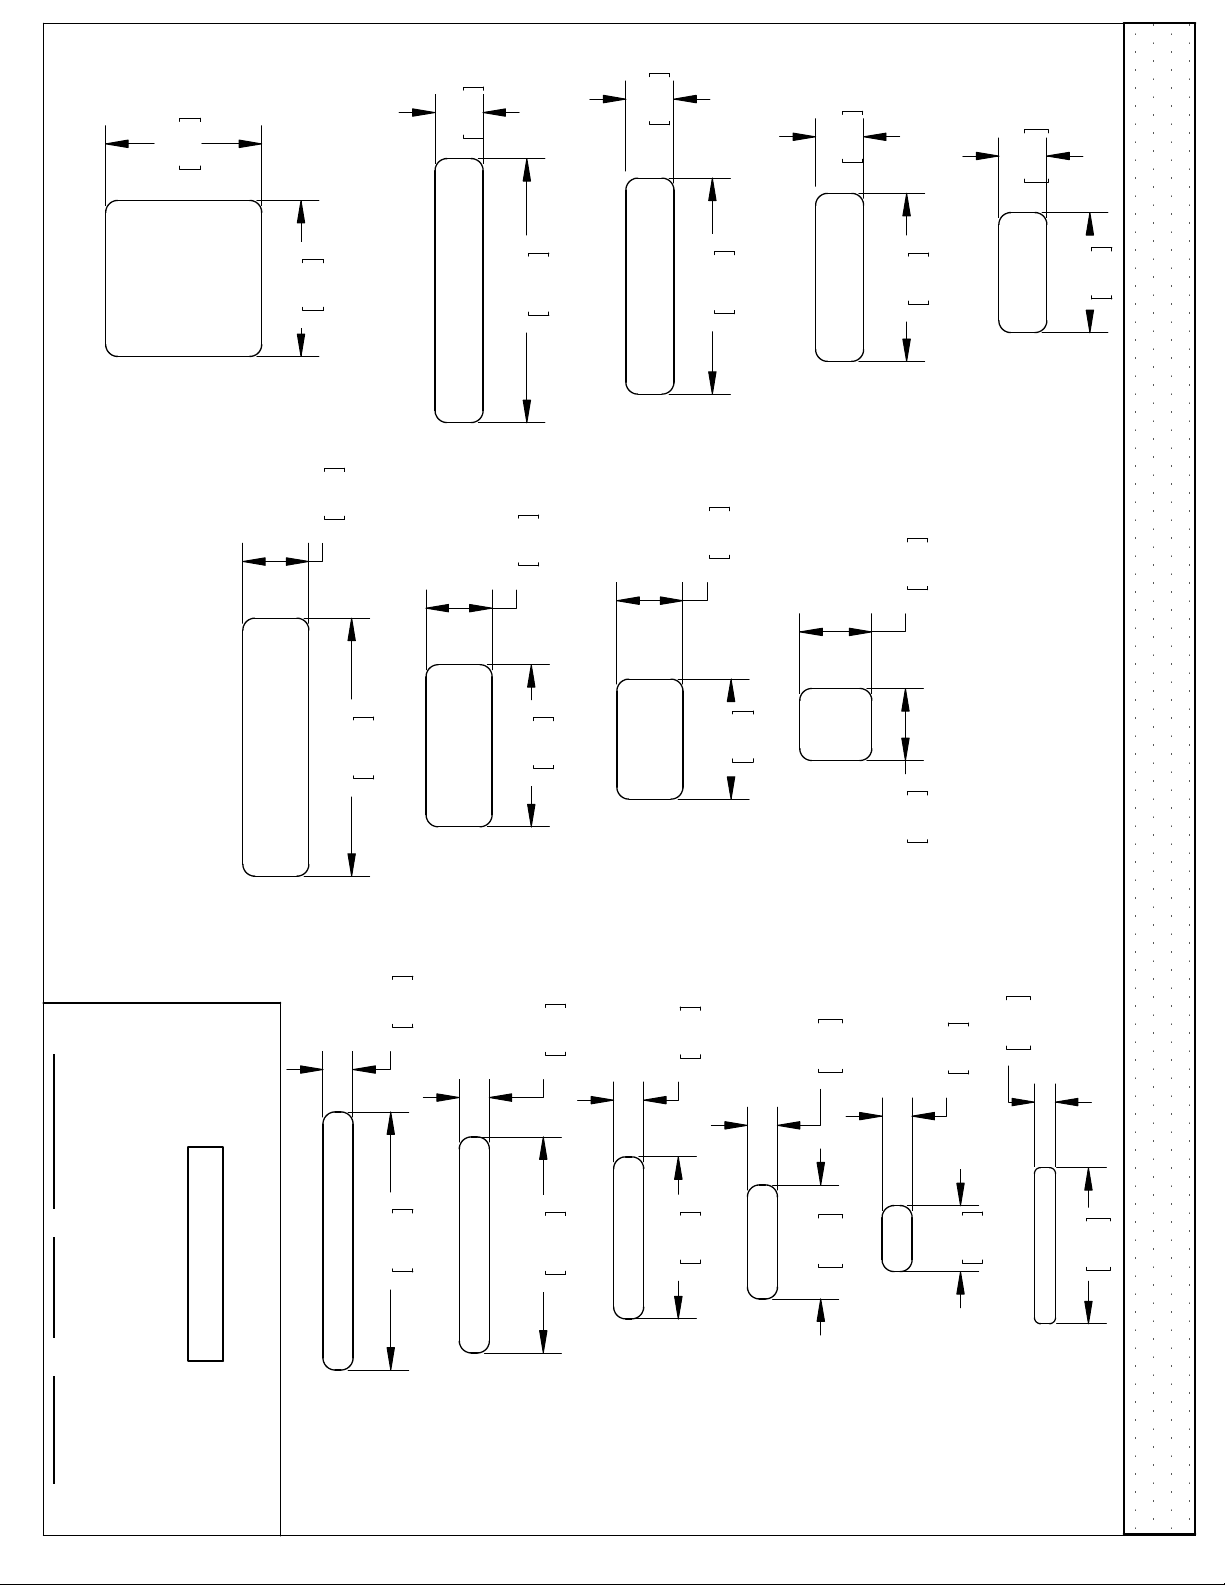
3 1/2"
88.9
1"
25.4
1"
25.4
1"
25.4
SOLO)WAVE DESIGN WOOD PROFILES
25.4
1"
5/4 x 6
5/4 x 5
4 x 4
3 1/2"
88.9
1 1/2"
38.1
Dimensions in brackets
[mm] represent millimetres.
2 x 6
5 3/8"
136.5
2 x 4
5 1/2"
139.7
1 3/8"
34.9
3 3/8"
85.7
4 1/2"
114.3
1 3/8"
34.9
2 x 3
2 1/2"
63.5
5/4 x 4
3 1/2"
88.9
1 1/2"
38.1
2
x 2
5/4 x 3
2 1/2"
63.5
For example:
BOARD LENGTH 59¼ (59.25) inches
59.25 inches
x 25.4mm =
1 inch = 25.4mm
LENGTH CONVERSION
15.9
5/8"
5 3/8"
136.5
15.9
5/8"
4 1/2"
114.3
1 1/2"
38.1
11.1
15.9
5/8" 3 3/8"
85.7
15.9
5/8"
2 3/8"
60.3
5/8"
15.9
1 3/8"
34.9
.44
3 1/4"
82.6
1505mm
1 x 6
1 x 5
1 x 4
1 x 3
1 x 2
1/2 x 4
Page 9
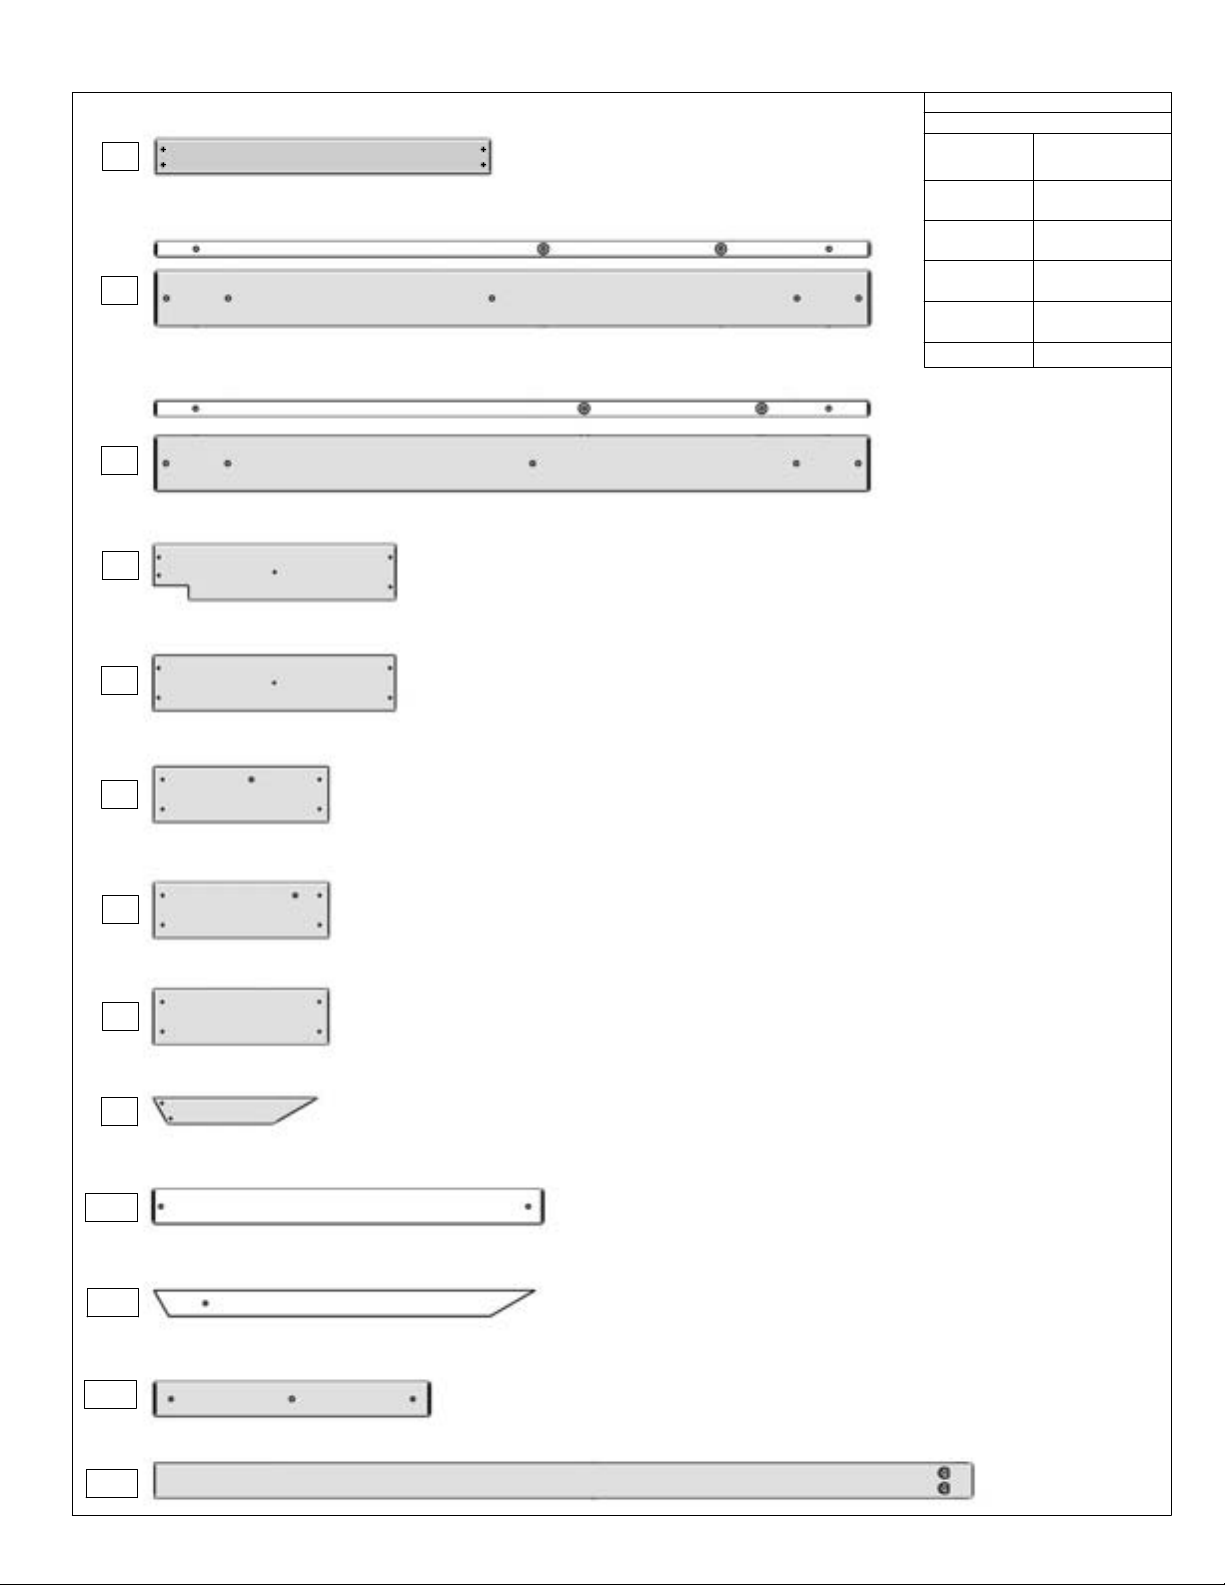
(Reduced Size)Part Identification
(5) CE Floor Board 1 x 4 x 32-1/2"
A1
3630304 Box 1
(1) CE SW Beam Back 2 x 6 x 69-1/2"
A2
3631772 Box 1
(1) CE SW Beam Front 2 x 6 x 69-1/2"
A3
3631773 Box 1
(2) CE Gap Board 1 x 6 x 23-1/2"
A4
3631774 Box 1
(5) Floor Board 1 x 6 x 23-1/2"
A5
3631776 Box 1
WOOD CHART
Nominal Size
2" x 6"
2" x 4"
2" x 3"
2" x 2"
5/4" x 4"
5/4" x 5"
5/4" x 6"
1" x 6"
1" x 5"
1" x 4"
1" x 2"
Actual Size
1½" x 5
1
1
1½" x 1½"
⅝" x 5
⅝" x 4½"
⅝" x 3
⅝" x 1
" x 3⅜"
⅜
" x 2½"
⅜
1" x 3½"
1" x 4½"
1" x 5½"
⅜
⅜
⅜
⅜
"
"
"
"
(2) CE Rock Board B 1 x 6 x 17"
A6
3631777 Box 1
(2) CE Rock Board A 1 x 6 x 17"
A7
3631778 Box 1
(1) CE Access Board 1 x 6 x 17"
A8
3631779 Box 1
(1) Gusset 2 x 3 x 16"
A9
3640312 Box 1
(2) Front Divider 1 x 4 x 38"
A10
3640359 Box 1
(1) Lower Diagonal 2 x 3 x 37"
A11
3640369 Box 1
(1) SW Top 1 x 4 x 26-7/8"
A12
3641748 Box 1
(2) SW Post 2 x 4 x 79-1/2"
A13
3641749 Box 1
Page 10
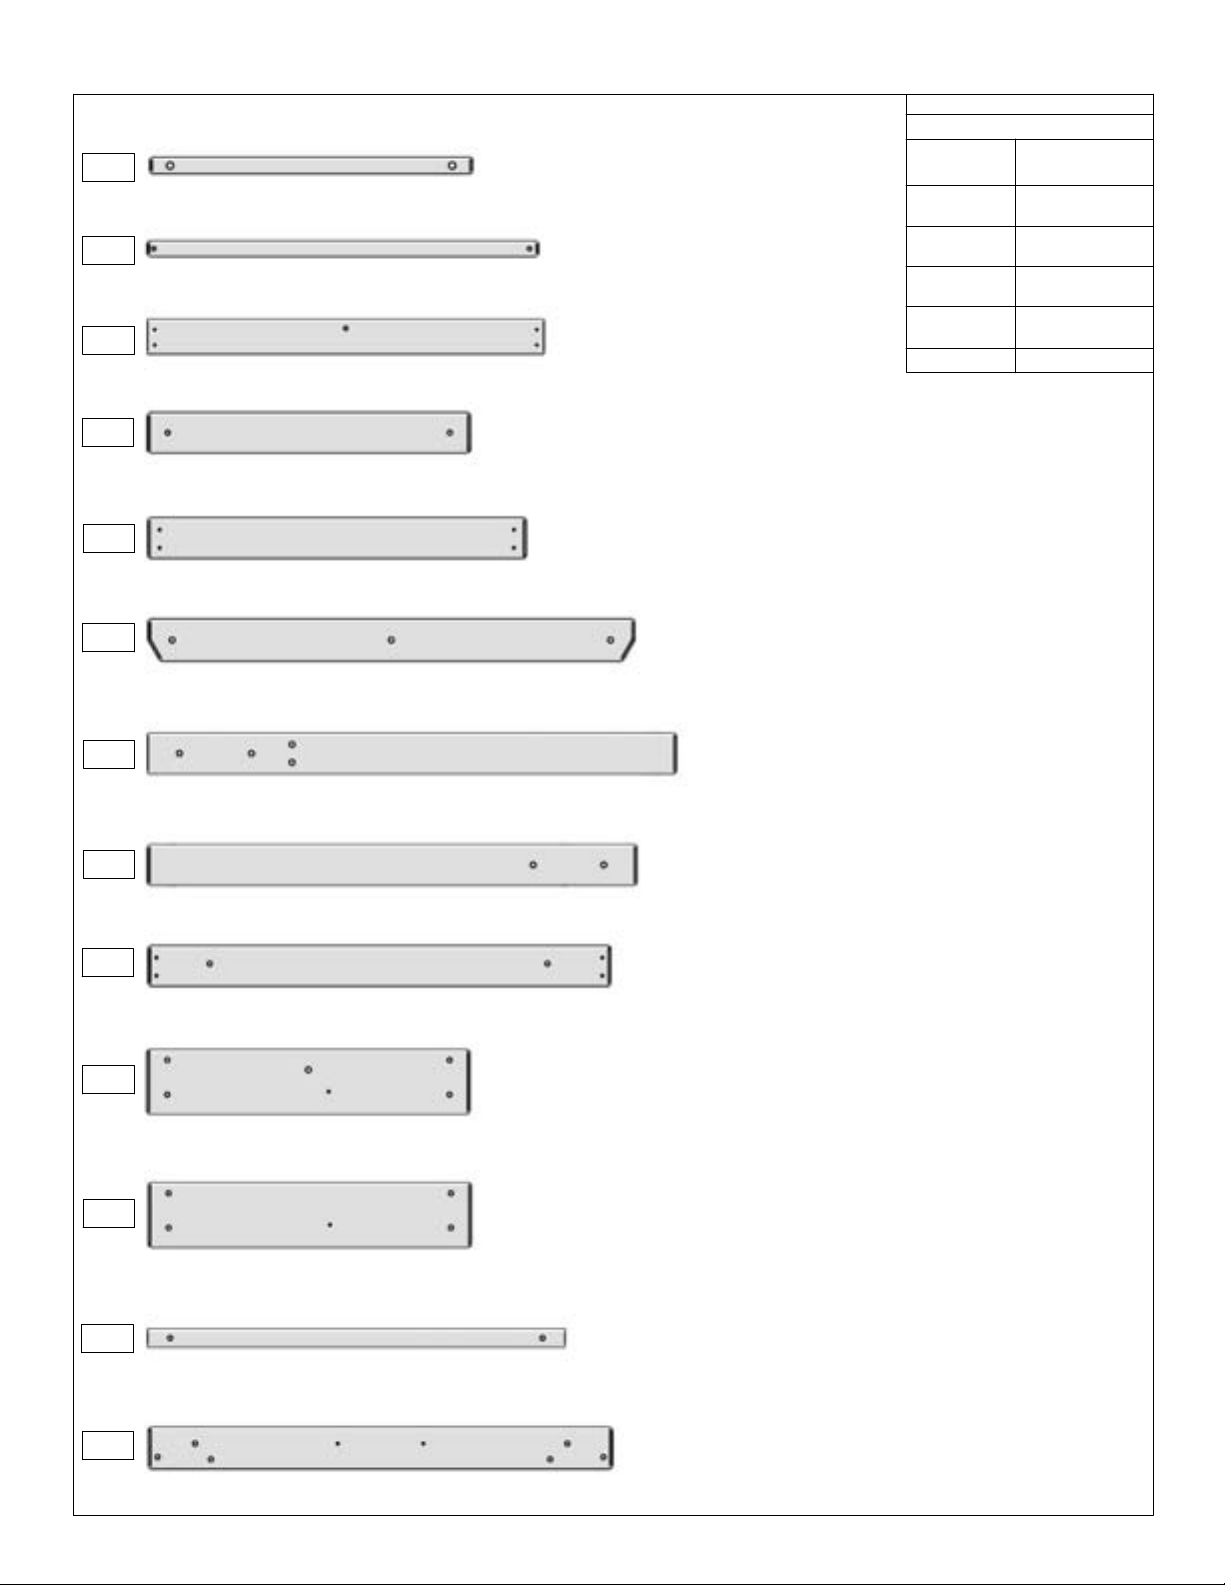
Part Identification (Reduced Part Size)
(1) Tarp Support 1 x 2 x 26-7/8"
A14
(1) Centre Divider 2 x 2 x 38"
A15
(1) Top Front 1 x 4 x 38-1/2"
A16
(1) Top End 1 x 4 x 26-7/8"
3641750 Box 1
3641751 Box 1
3641752 Box 1
WOOD CHART
Nominal Size
2" x 6"
2" x 4"
2" x 3"
2" x 2"
5/4" x 4"
5/4" x 5"
5/4" x 6"
1" x 6"
1" x 5"
1" x 4"
1" x 2"
Actual Size
1½" x 5
1
1
1½" x 1½"
⅝" x 5
⅝" x 4½"
⅝" x 3
⅝" x 1
" x 3⅜"
⅜
" x 2½"
⅜
1" x 3½"
1" x 4½"
1" x 5½"
⅜
⅜
⅜
⅜
"
"
"
"
A17
3641753 Box 1
(1) Lower Back Wall 1 x 4 x 31-1/2"
A18
3641754 Box 1
(1) SW Support 5/4 x 4 x 40-1/2"
A19
3641755 Box 1
(1) SW Upright 2 x 4 x 44"
A20
3641756 Box 1
(1) Wall Mount 2 x 4 x 40-3/4"
A21
3641757 Box 1
(1) Top Back 1 x 4 x 38-1/2"
A22
3641758 Box 1
(1) SW Floor 1 x 6 x 26-7/8"
A23
3641759 Box 1
(1) Floor 1 x 6 x 26-7/8"
A24
3641760 Box 1
(1) Side Joist 2 x 2 x 34-3/4"
3641761 Box 1
A25
(1) Floor Back 5/4 x 4 x 38-5/8"
A26
3641762 Box 1
Page 11
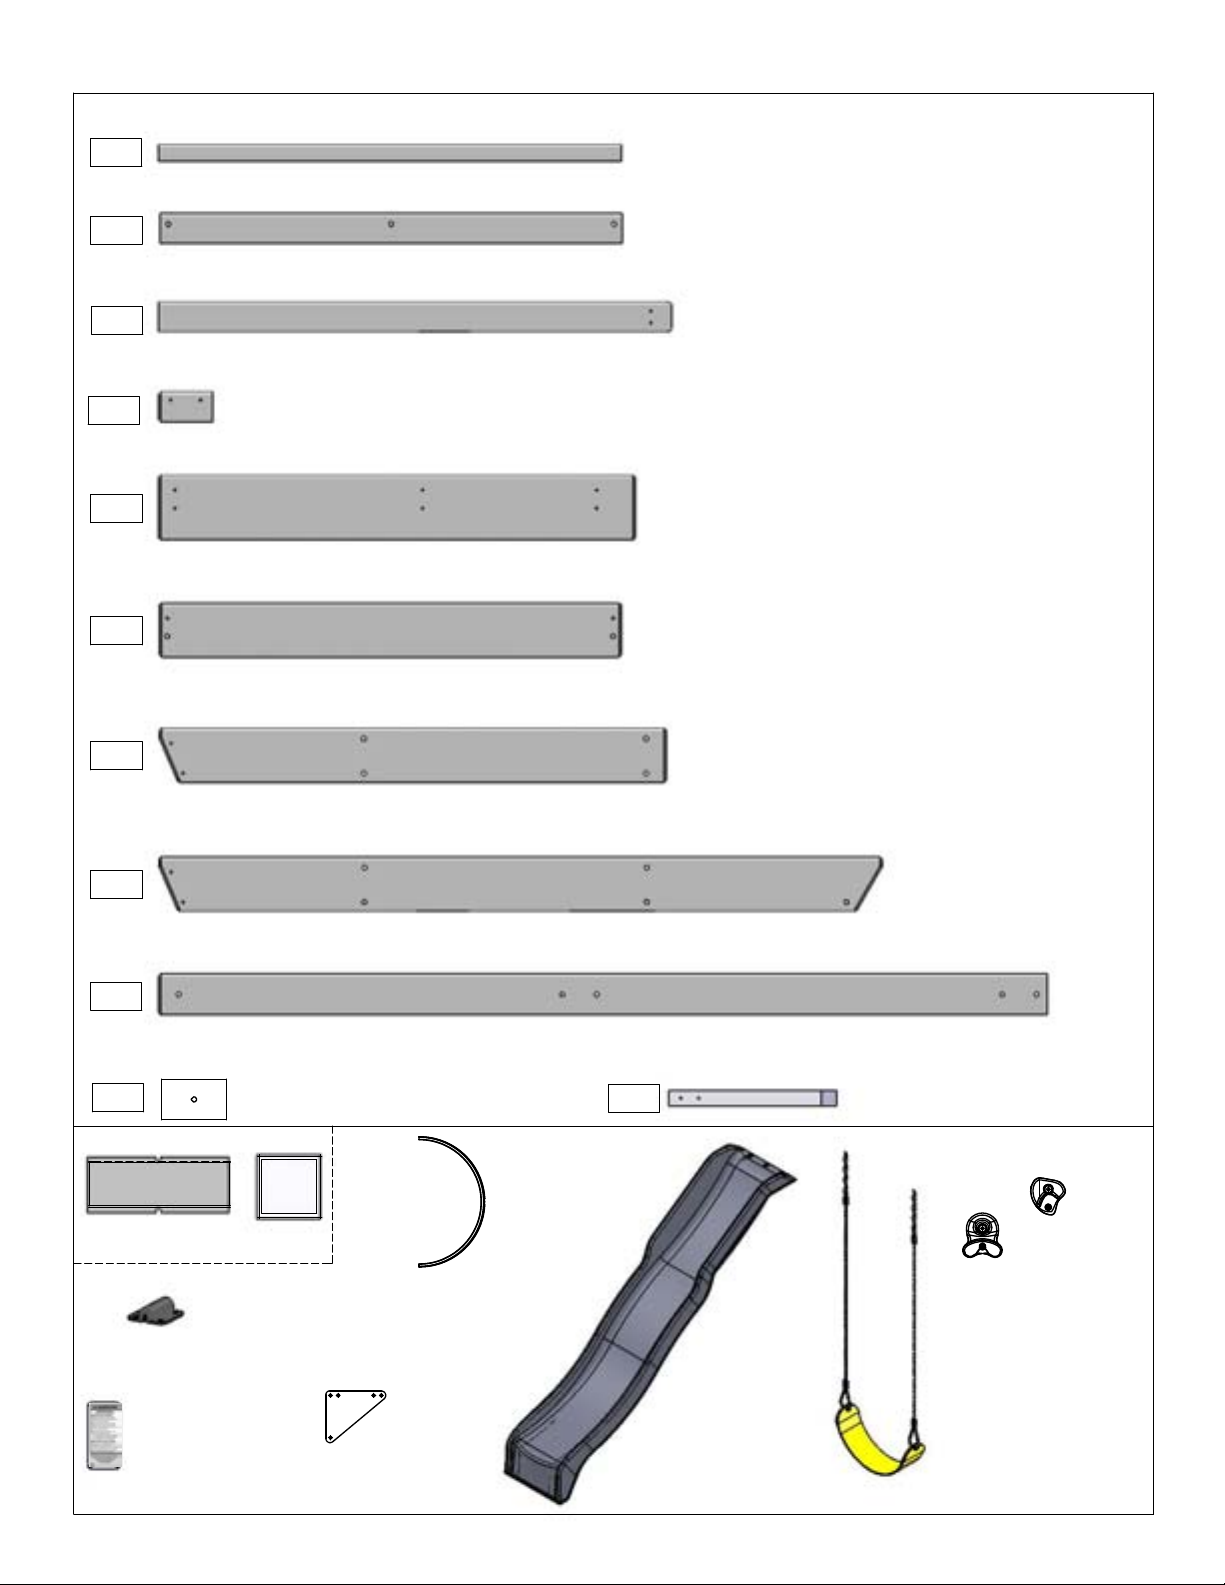
Part Identification (Reduced Part Size)
(1) Floor Joist 5/4 x 2 x 38-1/2"
3641763 Box 1
A27
(1) Floor Front 2 x 3 x 38-1/2"
3641764 Box 1
A28
(2) Rock Rail 2 x 3 x 42-3/4"
3641765 Box 1
A29
(3) Corner Block 2 x 3 x 4-1/2"
A30
(1) Lower Front 1 x 6 x 39-3/4"
A31
(1) Lower Back 1 x 5 x 38-1/2"
A32
3641766 Box 1
3641767 Box 1
3641768 Box 1
(1) Ground Side 1 x 5 x 42-1/4"
A33
3641769 Box 1
(1) SW Ground 1 x 5 x 60-1/4"
A34
3641770 Box 1
(4) Post 2 x 4 x 74"
A35
3641771 Box 1
(1) Sw Rail Block 2 x 4 x 5-3/8"
A36
9750140
1X 3750140
Andorra Tarp Set
3644919 Box 1
3750704
1X 3391267 (2pk)
Canopy Tube 1/2" x 67"
(4) Ground Stake 1-1/4 x 1-1/2 x 14"
A37
3650318 Box 1
1X 3320184 Rocks (4pk)
4-Green
1X 3320550 (4pk)
Canopy Tube Holder -White
1X 9320357 Cedar
Summit I.D. Plaque
1X 3200184
Triangle Plate (4pk)
Green
1X 3310140
40" High Rail Slide
Green
2X 3724942
Short Swing -Yellow
Page 12
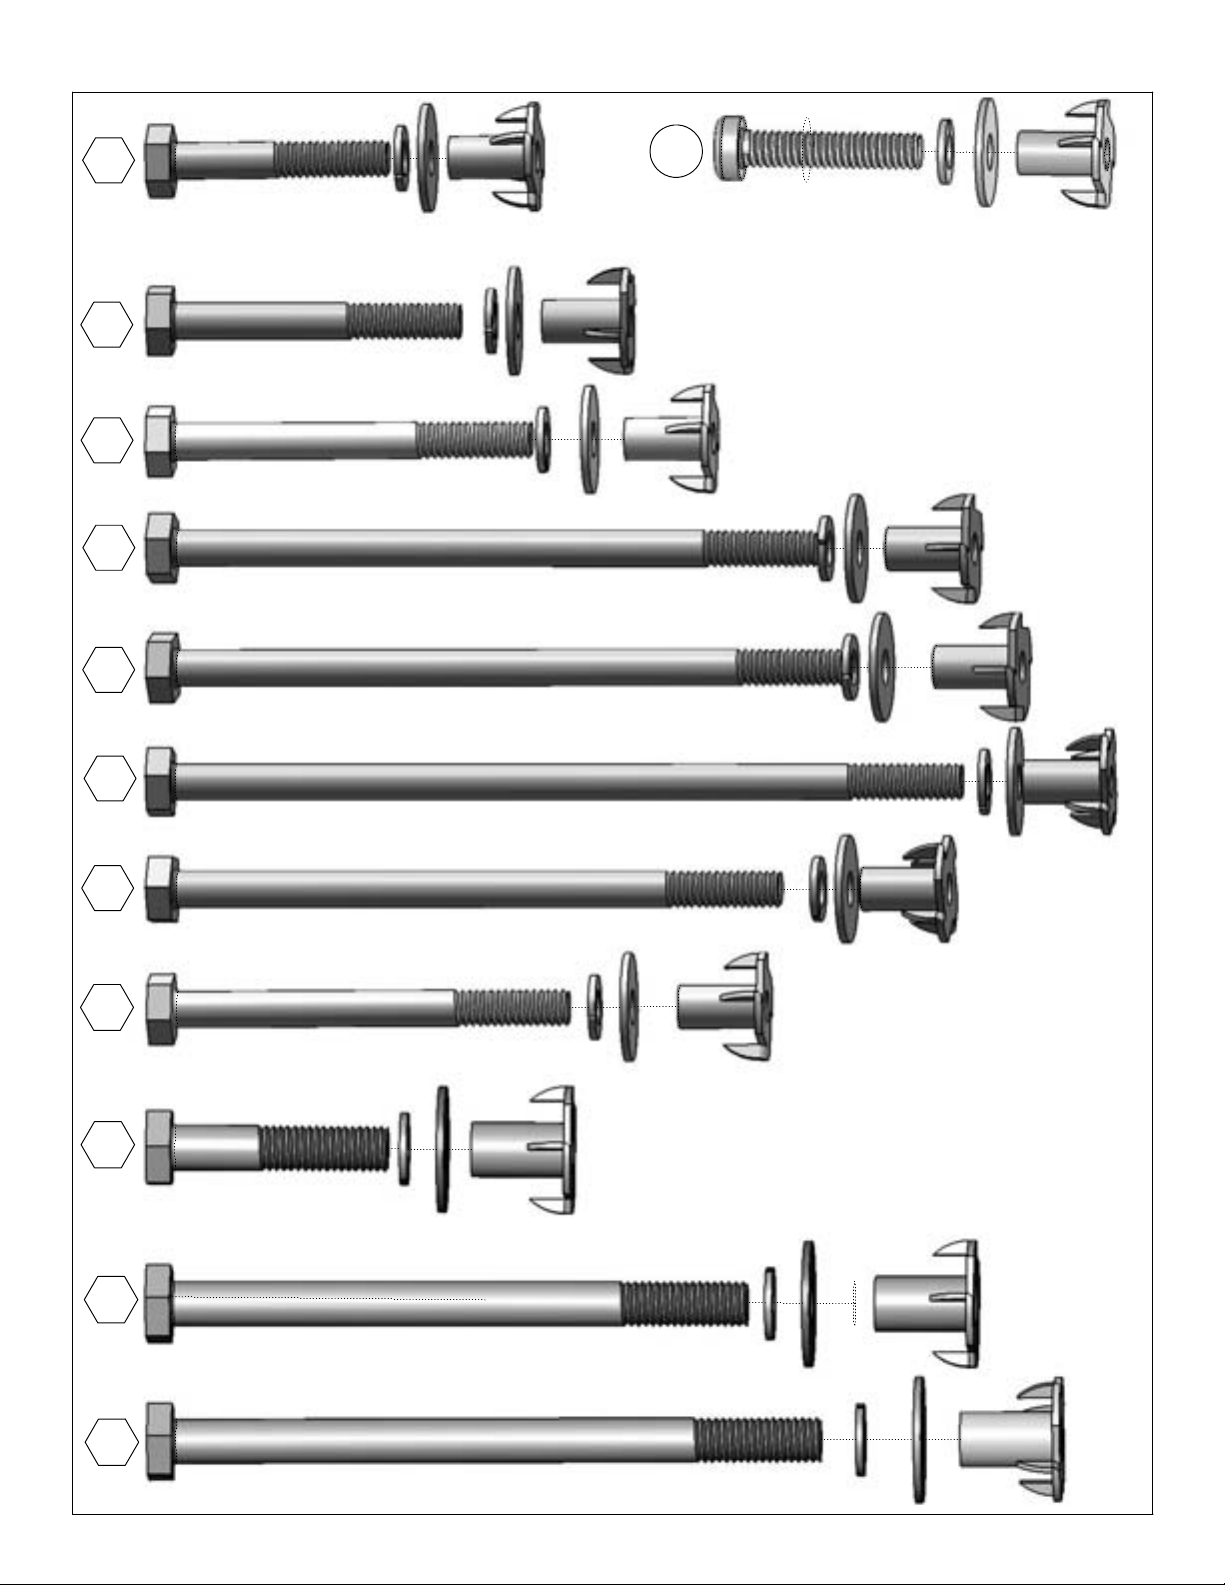
Hardware Identification (Actual Size)
H1
(2) Hex Bolt 1/4 x 1 1/2" 9277212
1/4" Lock Washer - 1/4" Flat Washer - 1/4" T-Nut
H2
(22) Hex Bolt 1/4 x 2" 9277220
1/4" Lock Washer - 1/4" Flat Washer - 1/4" T-Nut
H3
(2) Hex Bolt 1/4 x 2 1/2" 9277222
1/4" Lock Washer - 1/4" Flat Washer - 1/4" T-Nut
H5
(2) Hex Bolt 1/4 x 4 1/2" 9277242
1/4" Lock Washer - 1/4" Flat Washer - 1/4" T-Nut
H6
(2) Hex Bolt 1/4 x 4 3/4 9277243
1/4" Lock Washer - 1/4" Flat Washer - 1/4" T-Nut
PB2
(2) Pan Bolt 1/4 x 1 1/4"
Lock Washer 1/4" Flat Washer 1/4" T-Nut
9274211
H7
H8
H11
G1
G4
(4) Hex Bolt 1/4 x 5 1/2" 9277252
1/4" Lock Washer - 1/4" Flat Washer - 1/4" T-Nut
(1) Hex Bolt 1/4 x 4 1/4" 9277241
1/4" Lock Washer - 1/4" Flat Washer - 1/4" T-Nut
(1) Hex Bolt 1/4 x 2 3/4" 9277223
1/4" Lock Washer - 1/4" Flat Washer - 1/4" T-Nut
(4) Hex Bolt 5/16 x 1 1/2"
5/16" Lock Washer - 5/16" Flat Washer - 5/16" T-Nut 9277312
(4) Hex Bolt 5/16 x 4" 9277340
5/16" Lock Washer - 5/16" Flat Washer - 5/16" T-Nut
G5
(5) Hex Bolt 5/16 x 4 1/2" 9277342
5/16" Lock Washer - 5/16" Flat Washer - 5/16" T-Nut
Page 13
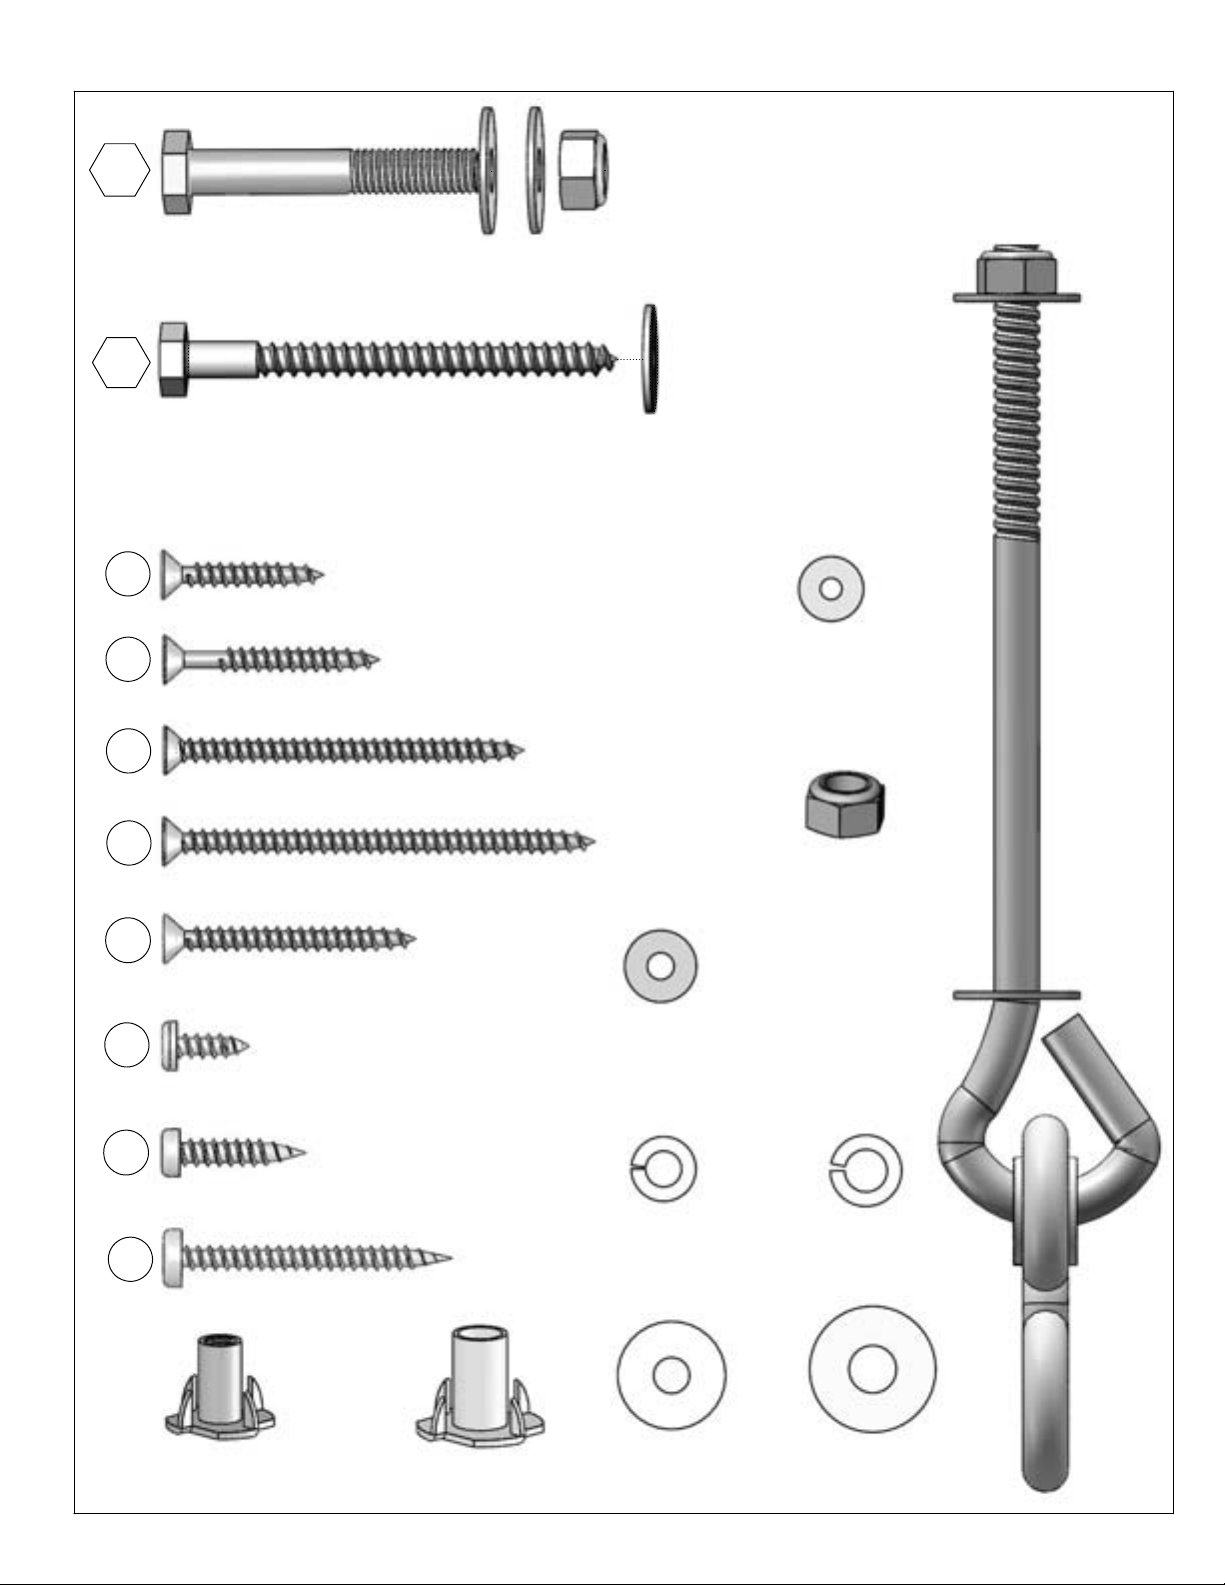
Hardware Identification (Actual Size)
G8
LS3
S1
S2
9277320
(2) Hex Bolt 5/16 x 2"
2-5/16" Flat Washer, 1- 5/16" Lock Nut
9262230
(3) Lag Screw 1/4 x 3" -1/4" Flat Washer
(24) Flat Head Screw #8 x 1 1/8" (9290514)
(59) Flat Head Screw #8 x 1 1/2" (9260512)
(18)
#8 Flat Washer
(9251500)
S3
S4
S15
S5
S10
S7
(12) Flat Head Screw #8 x 2 1/2" (9260522)
(6) Flat Head Screw #8 x 3" (9290530)
(10) Pan Screw #8 x 1-3/4" (9260513)
(22) Pan Screw #8 x 1/2" (9264504)
(16) Pan Screw #8 x 1" (9264510)
(14) Pan Screw #12 x 2" (9264620)
3/16" Flat Washer
(12)
(9251100)
(38)
1/4" Lock Washer
(9253200)
(2)
5/16" Lock Nut
(9283300)
(1 pk of 4)
Bolt Thru Swing
Hangers
(3202000)
(13)
5/16" Lock Washer
(9253300)
(38)
1/4" T-Nut
(9285200)
(13)
5/16" T-Nut
(9285300)
(41)
1/4" Flat Washer
(9251200)
(17)
5/16" Flat Washer
(9251300)
Page 14
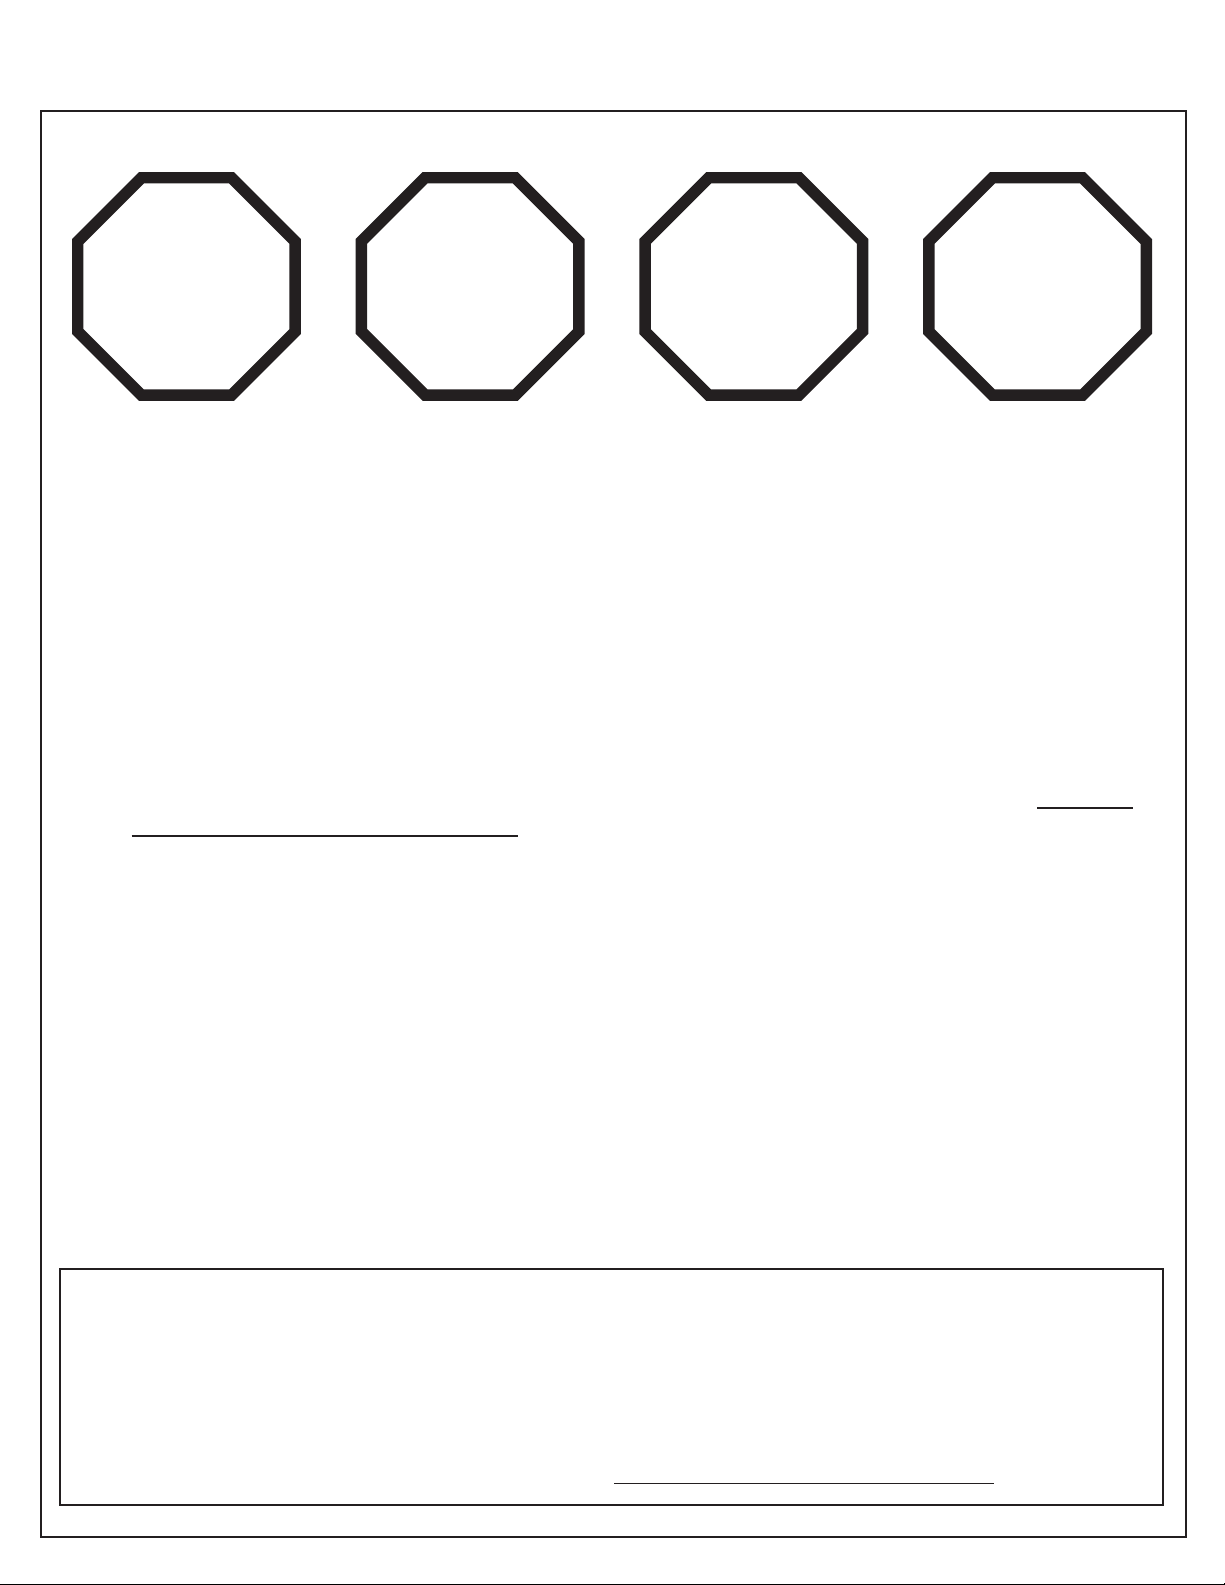
First Step: Inventory Parts - Read This Before Starting Assembly
STOP STOPSTOP STOP
This is the time for you to inventory all your hardware, wood and accessories,
A.
referencing the parts identication sheets. This will assist you with your assembly.
• The wood pieces will have the four digit key number stamped on the ends of the
boards. The wood pieces are referenced throughout the instructions with this number.
• Please refer to Page 6 for proper hardware assembly.
• Each step indicates which bolts and/or screws you will need for assembly, as well as
any at washers, lock washers, t-nuts or lock nuts.
B. If there are any missing or damaged pieces or you need assistance with
assembly please contact the Consumer Relations Department directly. Call us
before going back to the store.
1-877-966-3738
C. Read the assembly manual completely, paying special attention to ANSI warnings;
notes; and safety/maintenance information on pages 1 - 6.
D. Before you discard your cartons ll out the form below.
• The carton I.D. stamp is located on the end of each carton. The tracking number is
located on the Big Backyard ID Plaque (3320356).
• Please retain this information for future reference. You will need this information if you
contact the Consumer Relations Department.
MODEL NUMBER: F24145
CARTON I.D. STAMP: __ __ __ __ __ 14459 ___ (Box 1)
CARTON I.D. STAMP: __ __ __ __ __ 14459 ___ (Box 4)
CARTON I.D. STAMP: __ __ __ __ __ 14459 ___ (Box 2)
CARTON I.D. STAMP: __ __ __ __ __ 14459 ___ (Box 3)
TRACKING NUMBER (from ID Plaque):
CARTON I.D. STAMP: __ __ __ __ __ 14459 ___ (Box 5)
CARTON I.D. STAMP: __ __ __ __ __ 14459 ___ (Box 6)
Page 15
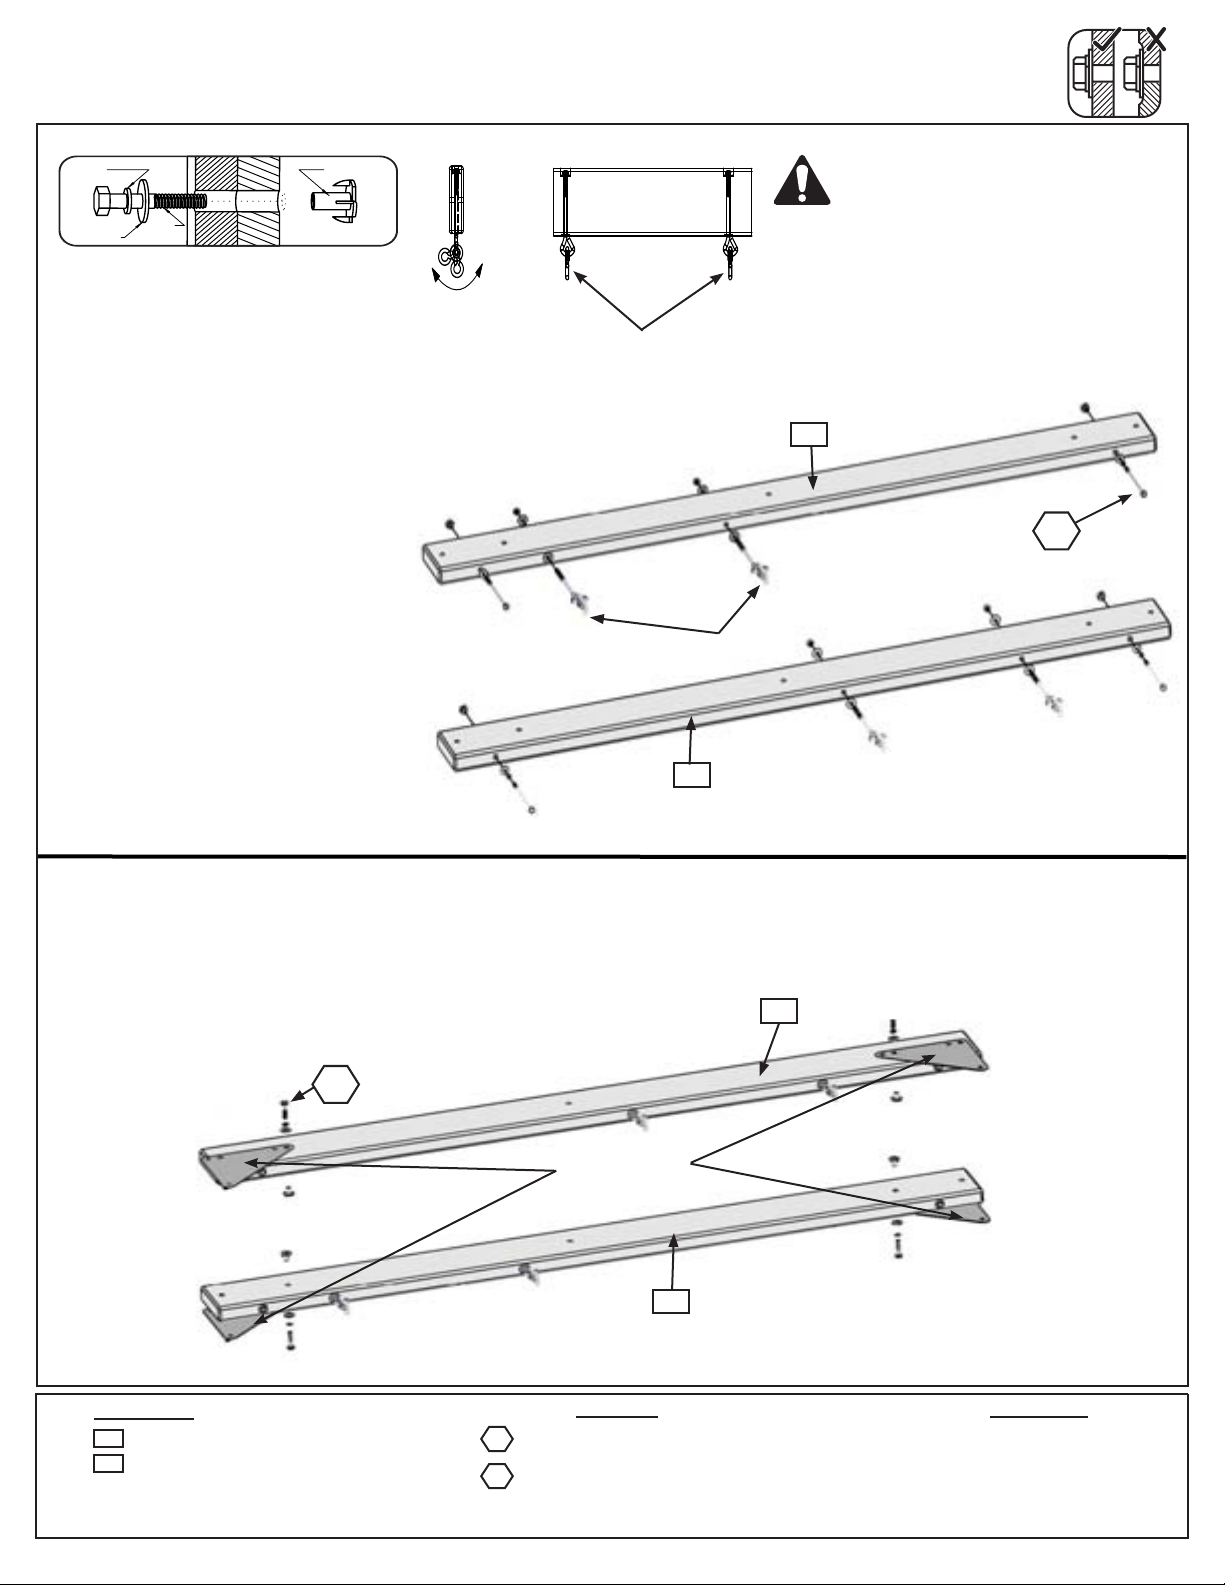
Step 1: Swing Beam Assembly
Hex Bolt Assembly
Lock
Washer
Flat
Washer
He x
Bolt
T-Nu t
A: In the middle holes of (A2) CE
SW Beam Back install 2 Bolt Thru
Swing Hangers making sure the
swing hangers are oriented in the
direction shown in g. 1.3 to maintain
proper swing motion.
B: In the end holes of (A3) CE SW
Beam Front install 2 Bolt-Thru Swing
Hangers making sure the swing
hangers are oriented in the direction
shown in g. 1.3 to maintain proper
swing motion.
C: Attach 1 (H7) 1/4 x 5-1/2” Hex
Bolt (with lock washer, at washer
and t-nut) to the ends of each (A2)
CE SW Beam Back and (A3) CE SW
Beam Front. The bolts do not attach
to anything, but MUST be installed
to the beams to prevent splitting and
checking of wood. (g. 1.1)
Fig. 1.3
Make sure triangle is
tight against beam
Bolt Thru Hangers
A2
Back
Warning: For your childs safety,
orientate the swing hangers as
shown to ensure your swing will
have proper swing motion when
installed. Failure to do so could
result in premature failure of the
swing hanger or swing chain.
Fig. 1.1
A3
Front
H7
x 4
D: Attach 1 Triangle Plate to each end of both the (A3) CE SW Beam Front and (A2) CE SW Beam Back using 1
(G1) 5/16 x 1-1/2” Hex Bolt (with lock washer, at washer and t-nut) per Triangle Plate in the hole indicated in g.
1.2. Correct hole usage is very important. Refer to g 1.2 for correct placement of Hex Bolts.
Back
A2
Fig. 1.2
x 4
G1
Important!
Swing End
(With Overhang)
Wood Parts
A3
1 x CE SW Beam Front 2 x 6 x 69-1/2”
A2
1 x CE SW Beam Back 2 x 6 x 69-1/2”
Triangle Plates
Front
A3
Hardware
4 x 5/16 x 1-1/2” Hex Bolt
G1
(5/16”lockwasher,5/16”atwasherand5/16”t-nut)
H7
4 x 1/4 x 5-1/2” Hex Bolt
(1/4”lockwasher,1/4”atwasherand1/4”t-nut)
Important!
Fort End Side
(No Overhang)
Other Parts
4 x Bolt Thru Swing Hangers
1 x Triangle Plates (pkg of 4)
15
Page 16
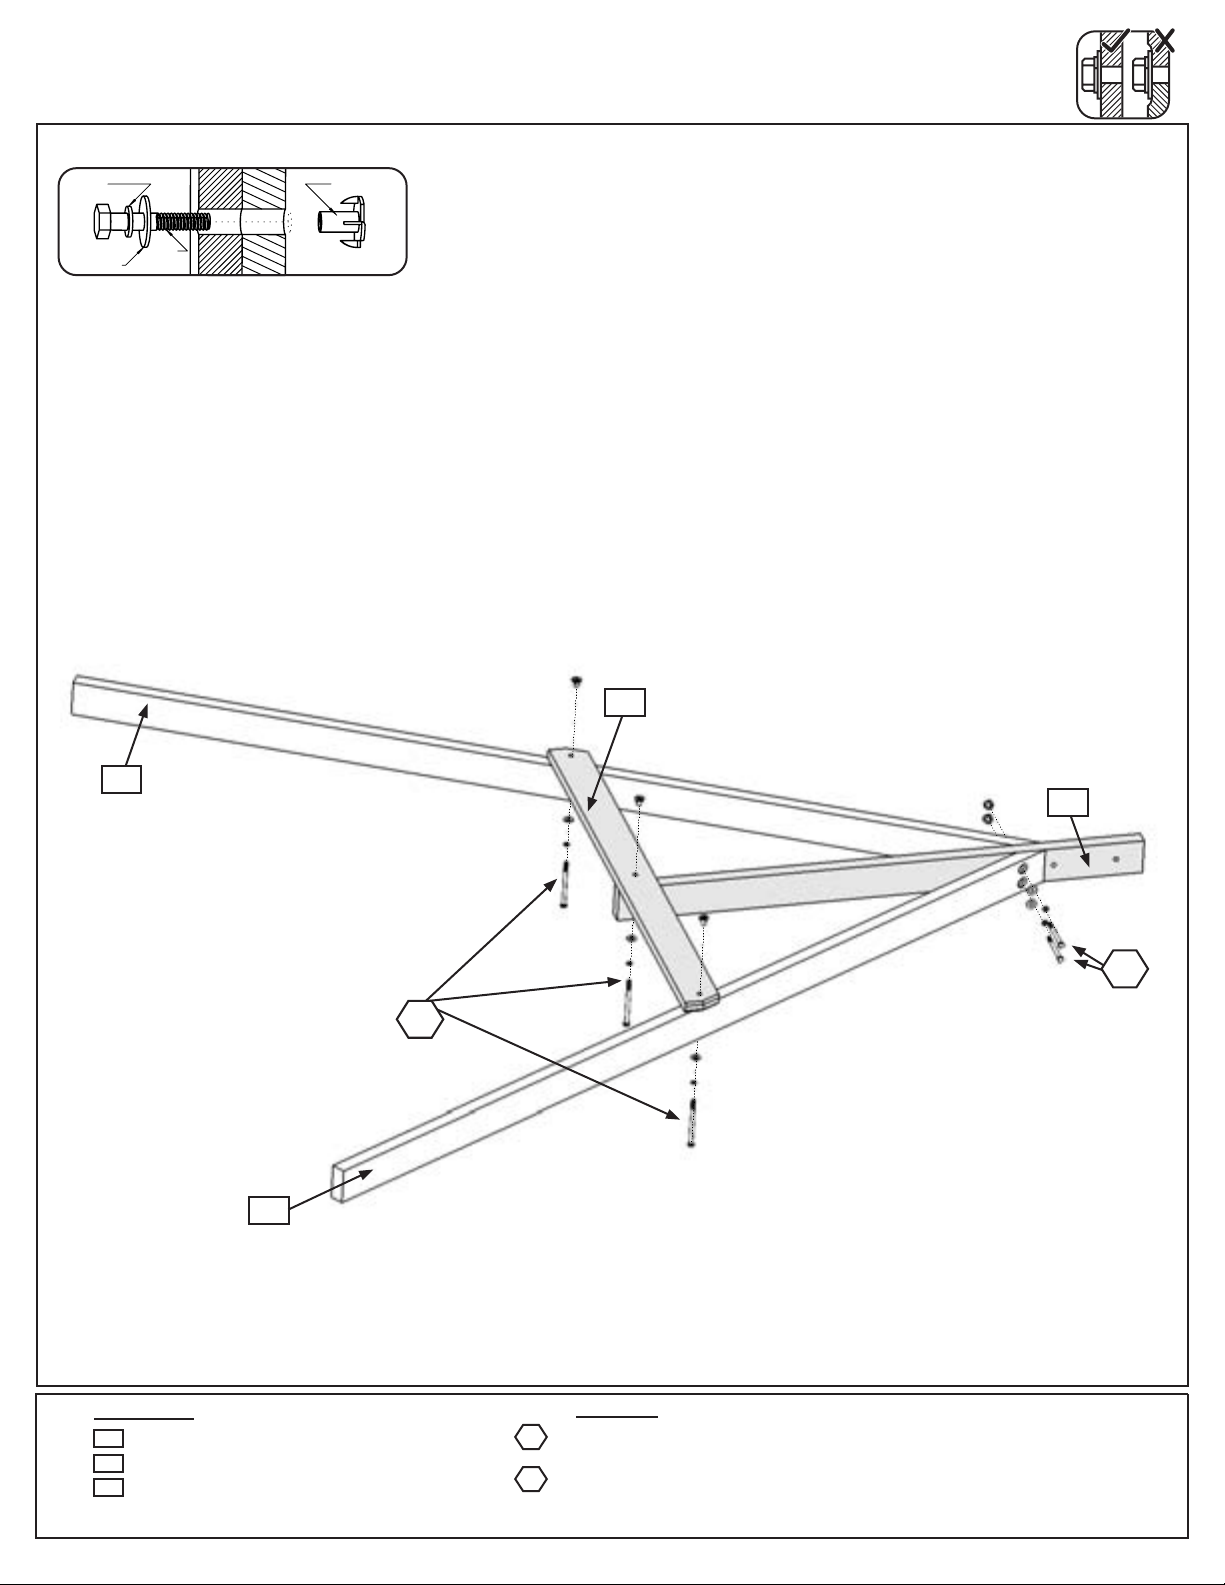
Step 2: Swing End Assembly
Hex Bolt Assembly
Lock
Washer
T-Nu t
Flat
Washer
He x
Bolt
A: Attach 2 (A13) SW Posts to (A20) SW Upright using 2 (G4) 5/16 x 4” Hex Bolts (with lock washer, at washer
and t-nut). (g. 2.1)
B: Attach (A19) SW Support to both (A13) SW Posts and (A20) SW Upright using 3 (G5) 5/16 x 4-1/2” Hex Bolts
(with lock washer, at washer and t-nut). (g. 2.1)
Fig 2.1
A19
A13
A20
A13
Wood Parts
A13
2 x SW Post 2 x 4 x 79-1/2”
A20
1 x SW Upright 2 x 4 x 44”
A19
1 x SW Support 5/4 x 4 x 40-1/2”
G5
Hardware
2 x 5/16 x 4” Hex Bolt
G4
(5/16”lockwasher,5/16”atwasher,and1/4”t-nut)
3 x 5/16 x 4-1/2” Hex Bolt
G5
(5/16”lockwasher,5/16”atwasher,and1/4”t-nut)
G4
16
Page 17
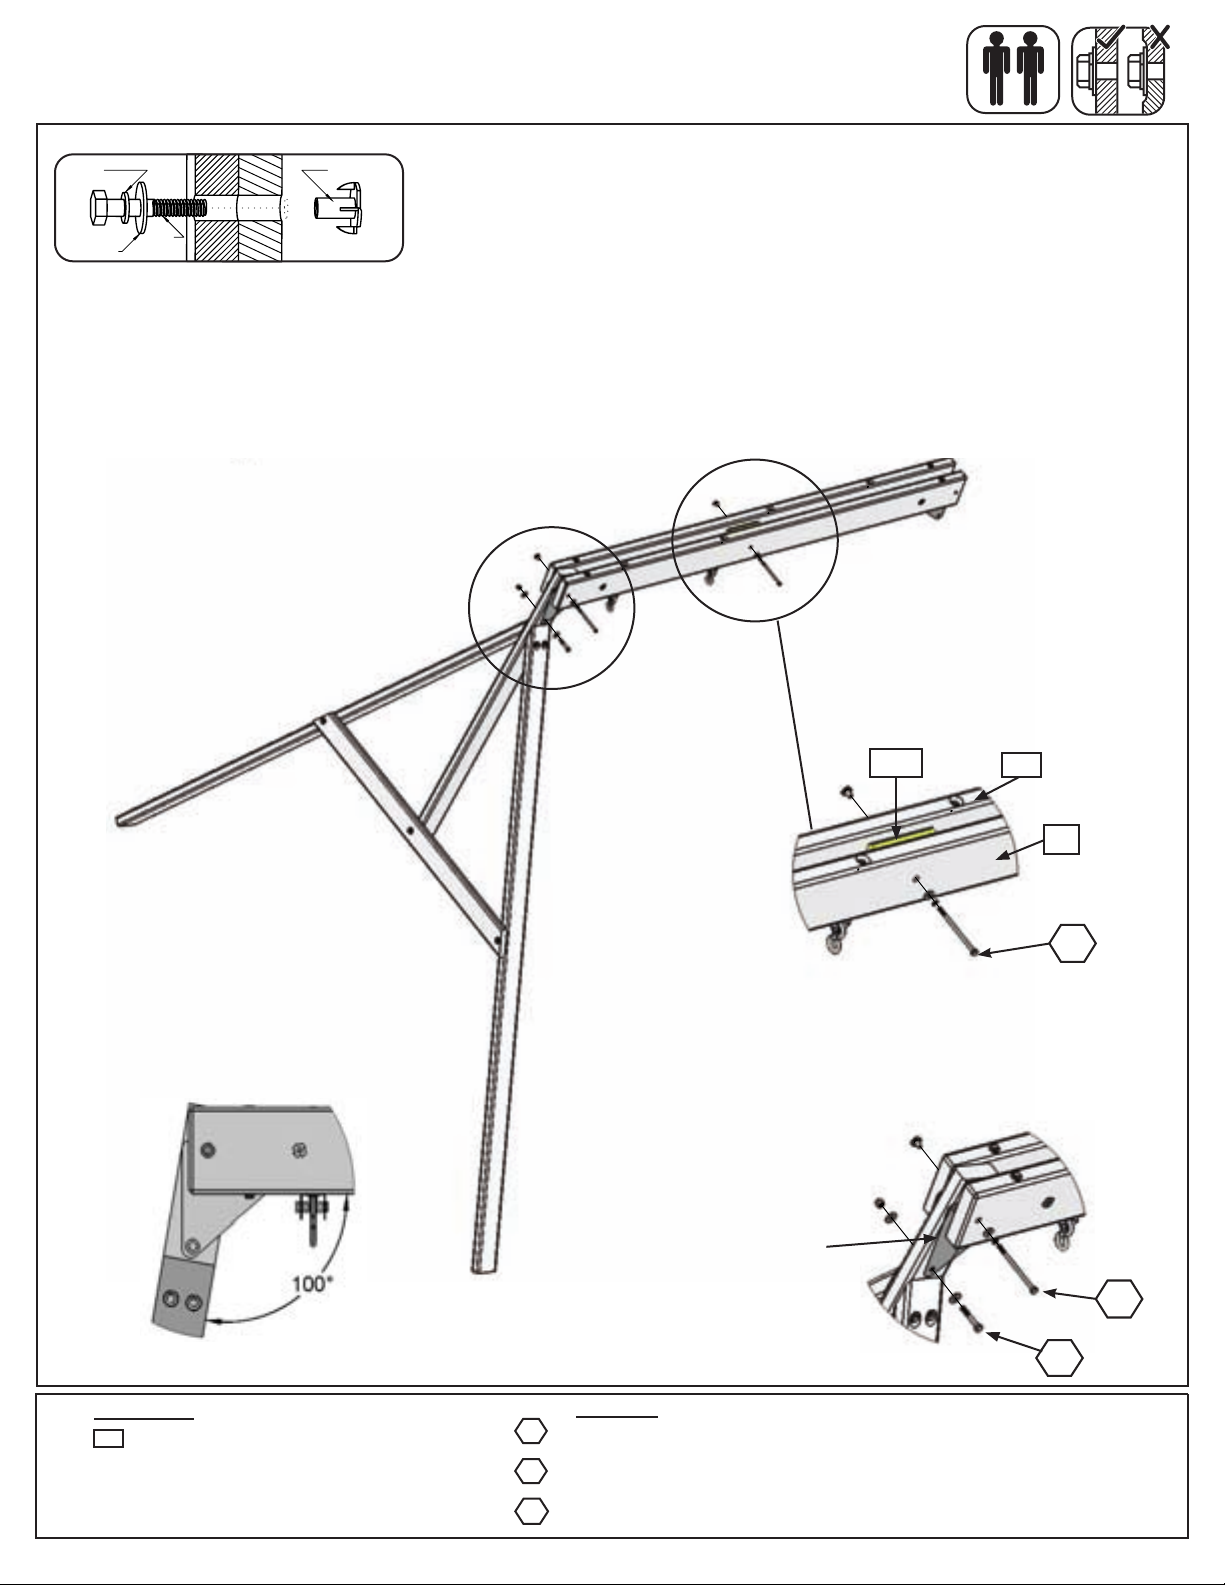
Step 3: Swing Beam
Hex Bolt Assembly
Lock
Washer
T-Nu t
Flat
Washer
He x
Bolt
A: Place (A36) SW Rail Block in the centre between (A3) CE SW Beam Front and (A2) CE SW Beam Back and
attach beams with 1 (H8) 1/4 x 4-1/4” Hex Bolt (with at washer, lock washer and t-nut). (g. 3.1 & 3.2)
B: Attach Swing Beam Assembly to the side of the Swing End Assembly with the overhang (g. 3.3) using 1 (G5)
5/16 x 4-1/2” Hex Bolt (with lock washer, at washer and t-nut) in the top hole of Triangle Plate and 1 (G8) 5/16 x
2” Hex Bolt (with 2 at washers and lock nut) in the bottom hole of Triangle Plate. (g. 3.3) Make sure Swing End
Assembly ares out at an angle. (g 3.4)
Fig. 3.1
A36
A3
Fig. 3.2
A2
H8
Fig. 3.4
Fig. 3.3
Side with
Overhang
G5
G8
Wood Parts
A36
1 x SW Rail Block 2 x 4 x 5-3/8”
17
1 x 1/4 x 4-1/4” Hex Bolt
(1/4”lockwasher,1/4”atwasher,1/4”t-nut)
1 x 5/16 x 4-1/2” Hex Bolt
(5/16”lockwasher,5/16”atwasher,1/4”t-nut)
1 x 5/16 x 2” Hex Bolt
(5/16”atwasherx2,5/16”locknut)
Hardware
H8
G5
G8
Page 18
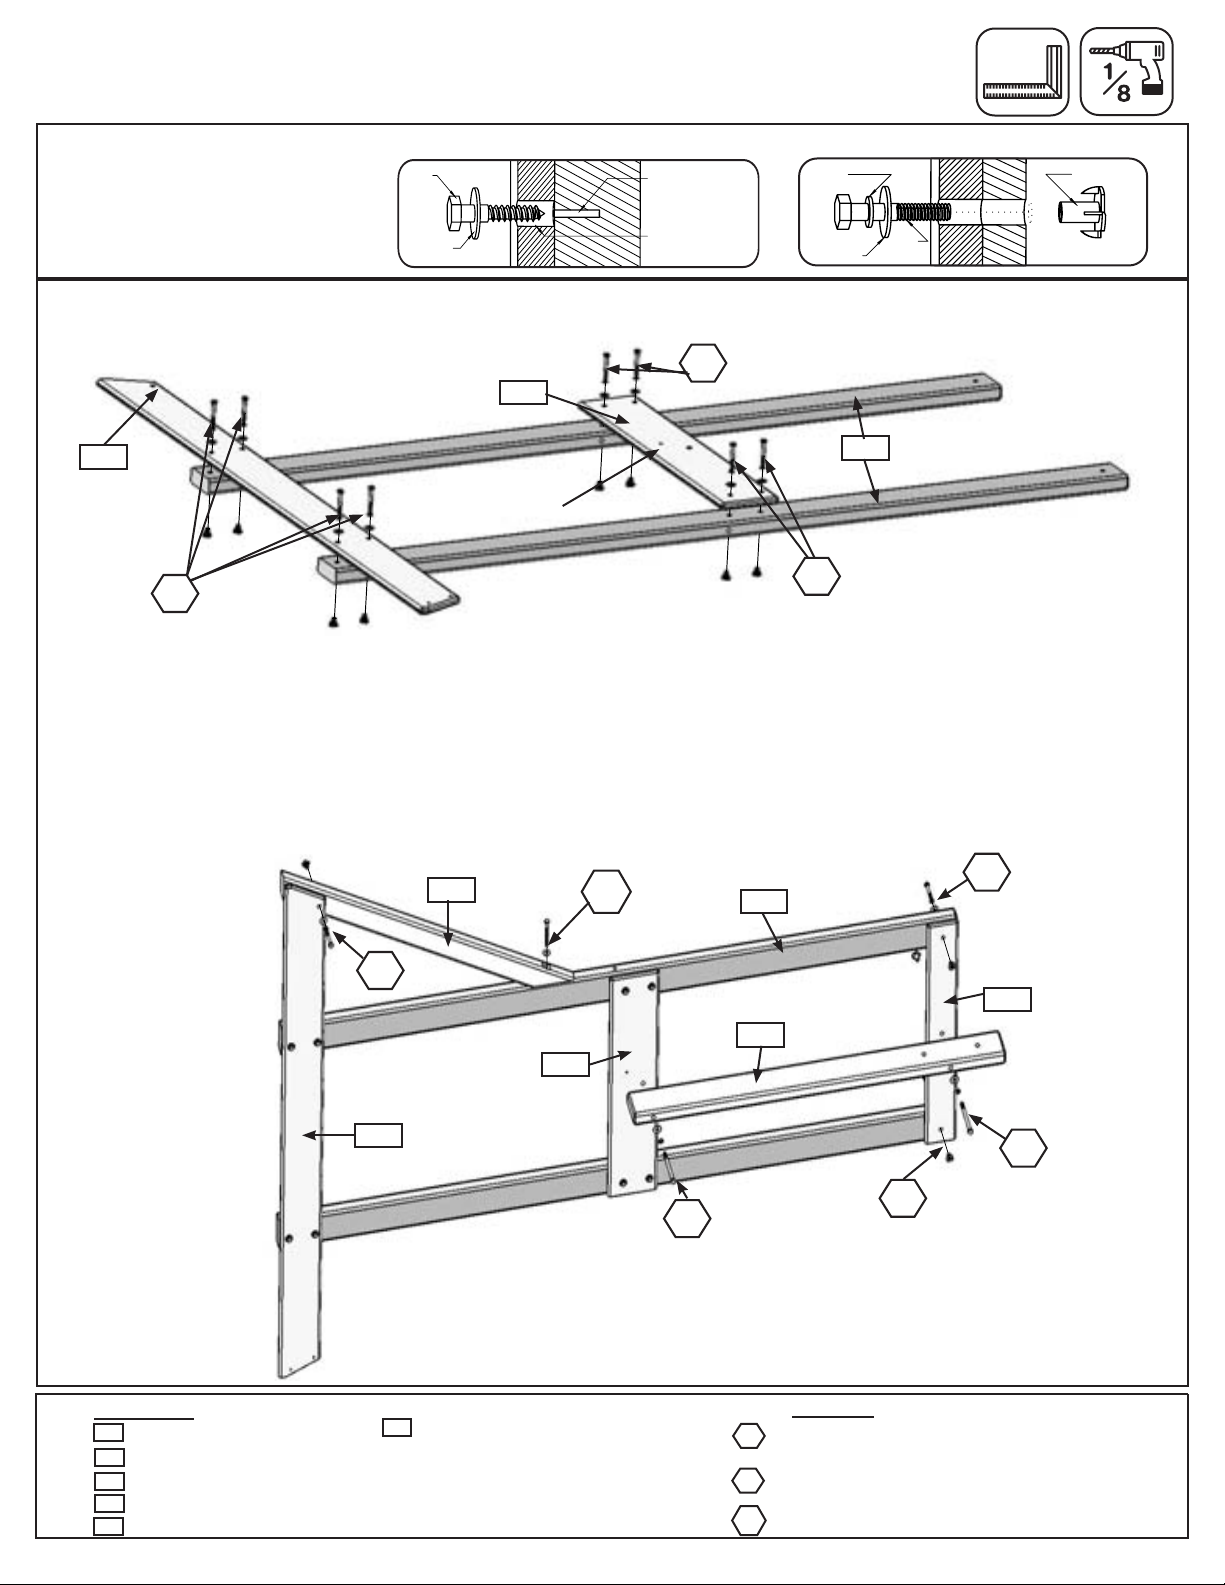
Step 4: Swing Side Assembly
Note: Pre-drill all holes using
a 1/8” drill bit before installing
the lag screws.
Predrill Pilot Holes for Lag Screw
Lag
Screw
Flat
Washer
Predrill 1/8”
pilot hole
Use factory drilled
hole as a guide
Lock
Washer
Flat
Washer
Hex Bolt Assembly
He x
Bolt
T-Nu t
A: To 2 (A35) Posts attach (A34) SW Ground and (A23) SW Floor using 4 (H2) 1/4 x 2” Hex Bolts (with lock
washer, at washer and t-nut) in each board. Be sure to keep bolts loose. (g. 4.1)
Fig. 4.1
A34
H2
A23
A35
Notice hole
location
H2
H2
B: Attach (A12) SW Top to each (A35) Post with 2 (H2) 1/4 x 2” Hex Bolts (with lock washer, at washer and t-
nut) Hex Bolts are to be installed from the back of the assembly. Be sure to keep bolts loose. (g. 4.2)
C: Make sure assembly is square and then fasten (A11) Lower Diagonal to (A34) SW Ground at an angle using 1
(H2) 1/4 x 2” Hex Bolt (with lock washer, at washer and t-nut) and to (A35) Post using 1 (LS3) 1/4 x 3” Lag Screw
(with at washer). (g 4.2).
D: Attach (A21) Wall Mount to (A23) SW Floor and (A12) SW Top with 2 (G4) 5/16 x 4” Hex Bolts (with lock
washer, at washer and t-nut). (g. 4.2)
H2
E: Tighten all bolts.
A11
LS3
A35
H2
A12
A21
A23
A34
G4
Fig. 4.2
H2
G4
Wood Parts
A35
2 x Post 2 x 4 x 74”
1 x SW Ground 1 x 5 x 60-1/4”
A34
1 x SW Floor 1 x 6 x 26-7/8”
A23
A11
1 x Lower Diagonal 2 x 3 x 37”
A21
1 x Wall Mount 2 x 4 x 40-3/4”
18
A12
1 x SW Top 1 x 4 x 26-7/8”
11 x 1/4 x 2” Hex Bolt
(1/4”lockwasher,1/4”atwasher,1/4”t-nut)
2 x 5/16 x 4” Hex Bolt
(5/16”lockwasher,5/16”atwasher,5/16”t-nut)
1x 1/4x3”LagScrew(with1/4”atwasher)
Hardware
H2
G4
LS3
Page 19
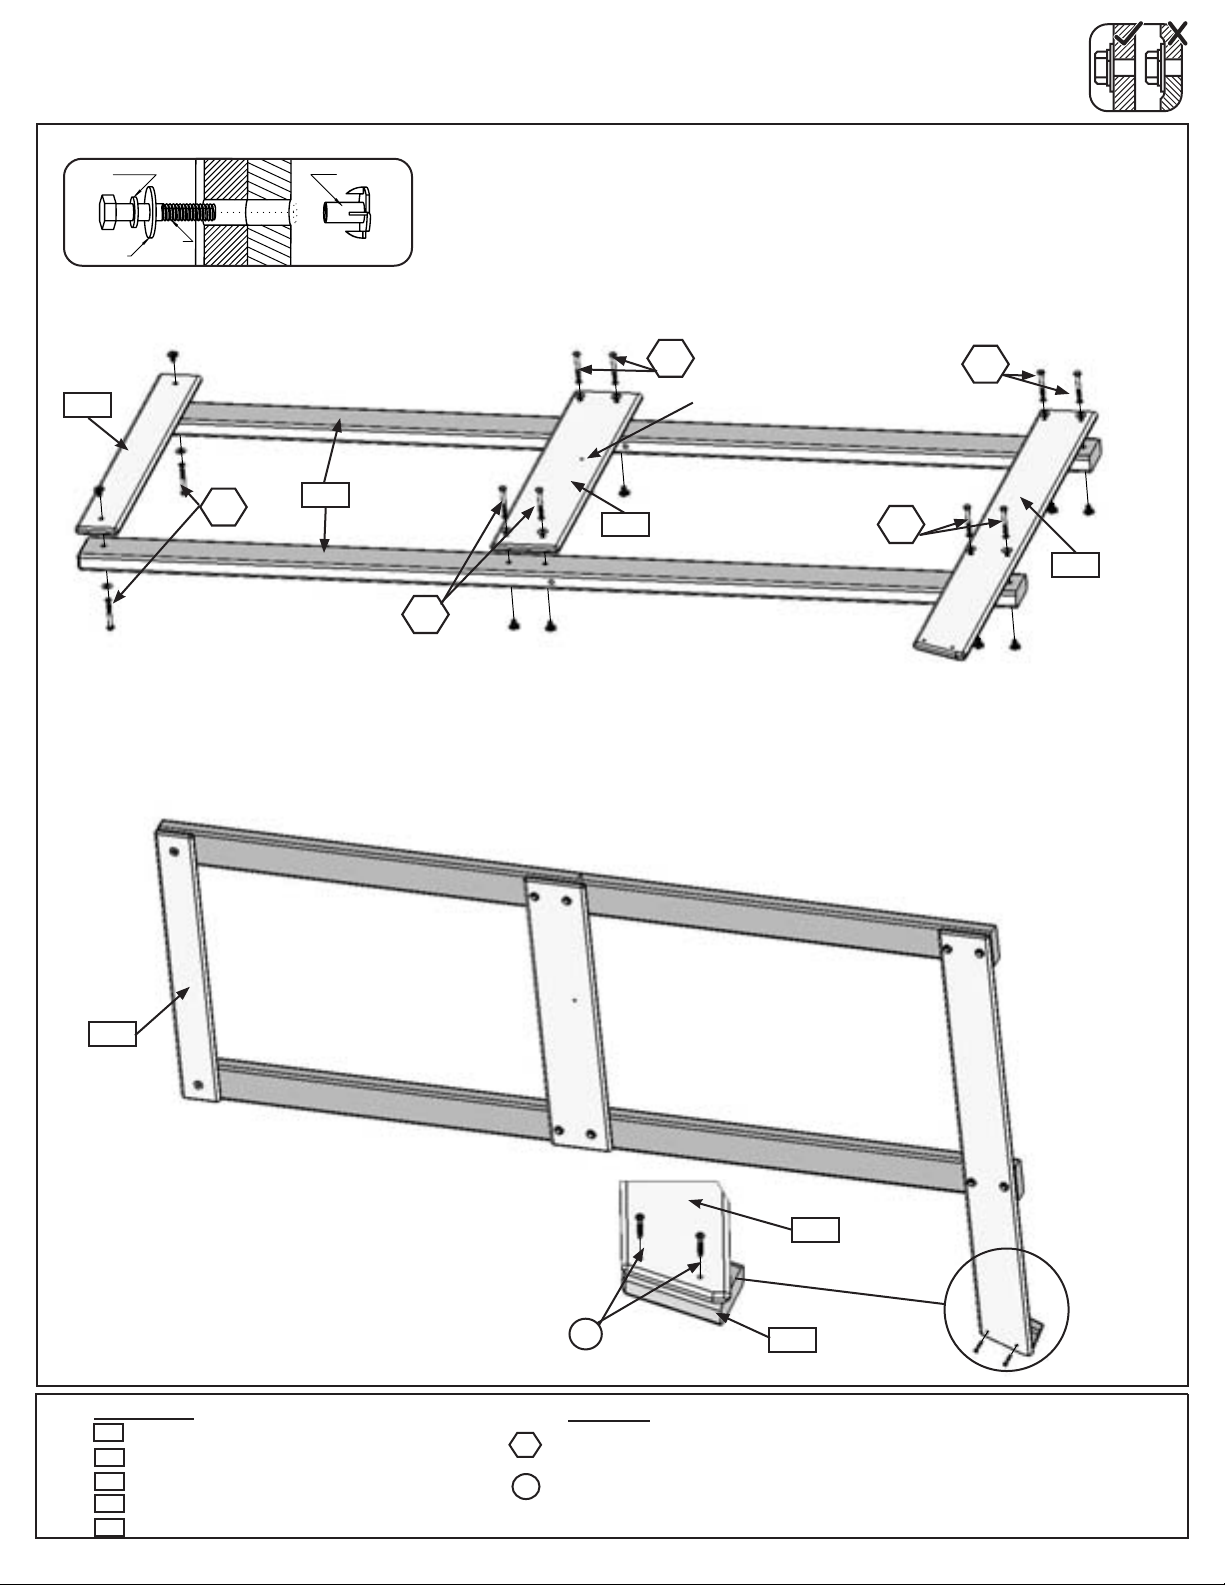
Step 5: Wall Side Assembly
Hex Bolt Assembly
Lock
Washer
T-Nu t
Flat
Washer
He x
Bolt
A: To 2 (A35) Posts attach (A24) Floor and (A33) Ground Side with 4 (H2) 1/4 x 2” Bolts (with lock washer, at
washer and t-nut) per board. (g. 5.1)
A17
H2
A35
Back
H2
A24
H2
Notice hole towards back
Fig. 5.1
H2
H2
A33
B: Attach (A17) Top End to each (A35) Post with 2 (H2) 1/4 x 2” Hex Bolts (with lock washer, at washer and
t-nut). These Hex Bolts are to be installed from the back of the assembly. (g. 5.1)
C: Attach (A30) Corner Block ush to angled extension of (A33) Ground Side with 2 (S2) 8 x 1-1/2” Wood
Screws as shown in g. 5.2.
A17
Fig. 5.3
S2
Wood Parts
A35
2 x Post 2 x 4 x 74”
1 x Ground Side 1 x 5 x 42-1/4”
A33
1 x Floor 1 x 6 x 26-7/8”
A24
A30
1 x Corner Block 2 x 3 x 4-1/2”
A17
1 x Top End 1 x 4 x 26-7/8”
19
10 x 1/4 x 2” Hex Bolt
(1/4”lockwasher,1/4”atwasher,1/4”t-nut)
2 x #8 x 1-1/2” Wood Screw
Hardware
H2
S2
Fig. 5.2
A33
A30
Page 20
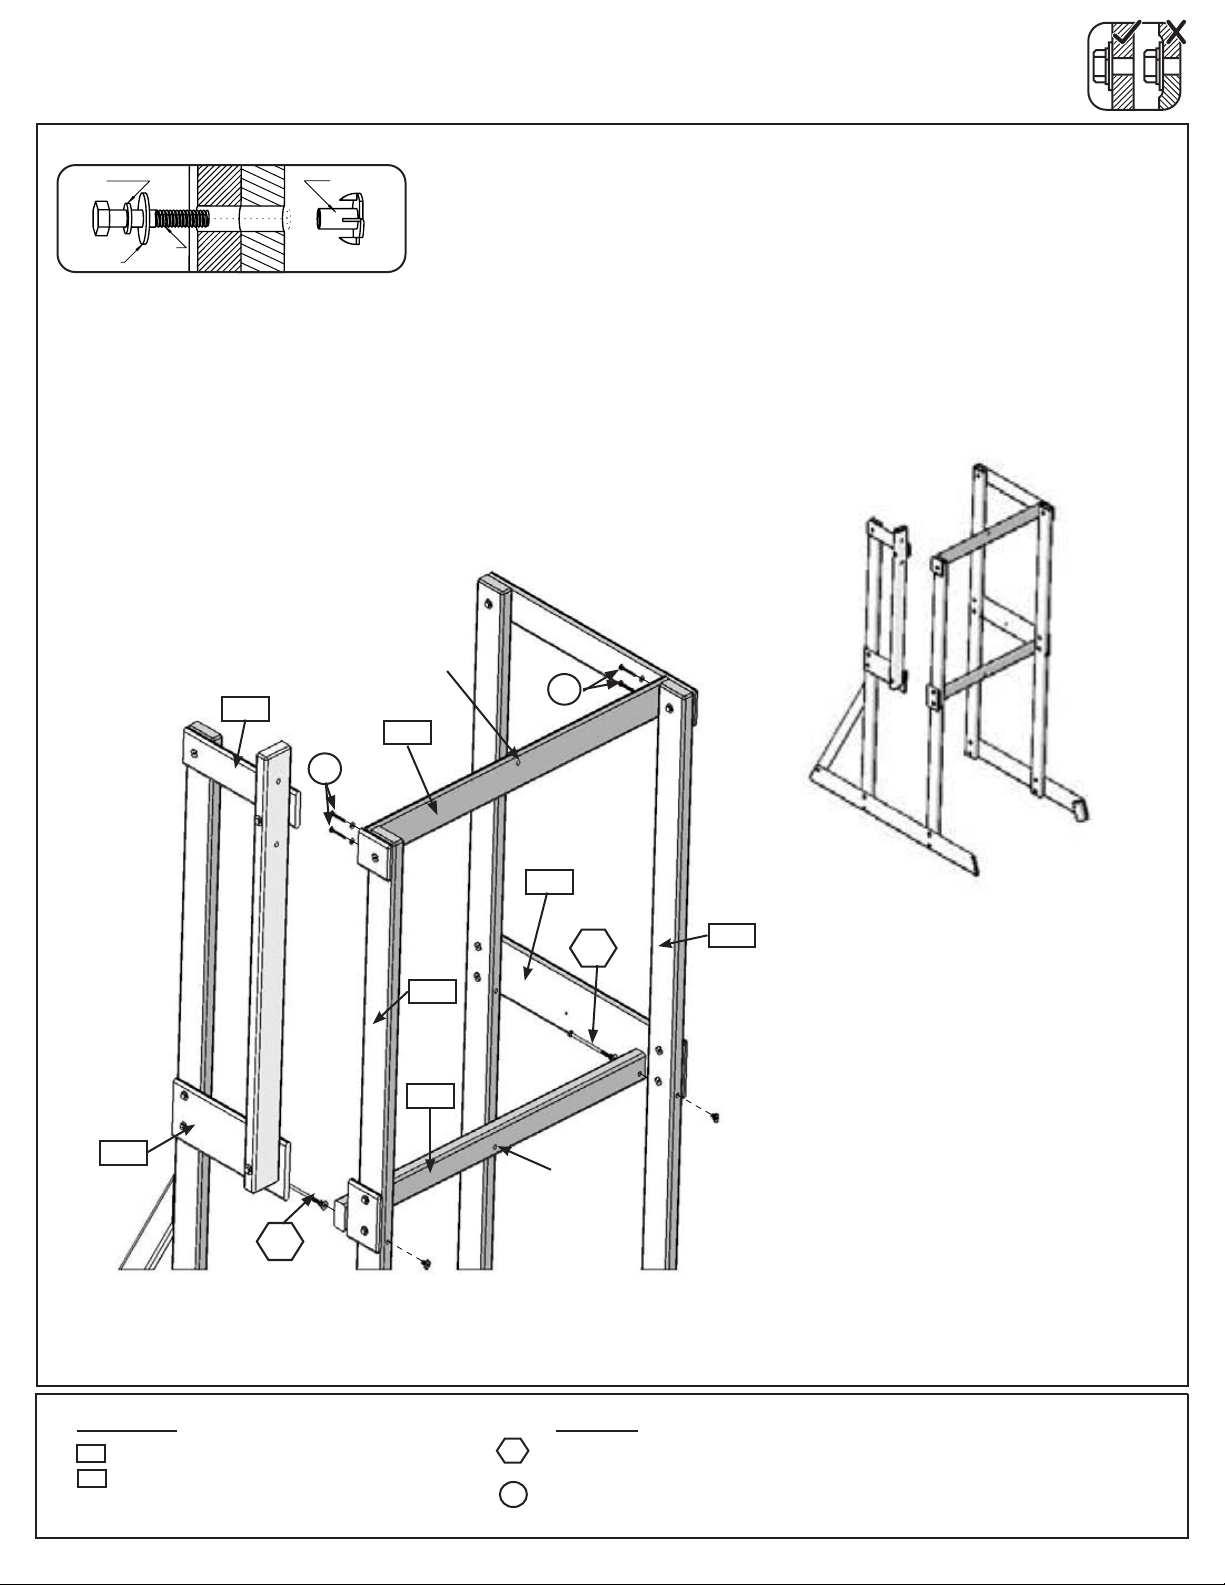
Step 6: Front Frame Assembly
Hex Bolt Assembly
Lock
Washer
T-Nu t
Flat
Washer
He x
Bolt
A: Attach (A28) Floor Front to (A35) Posts with 2 (H6) 1/4 x 4-3/4” Bolt (with at washer, lock washer and t-nut).
Hex Bolts to be installed from the inside of the assembly. (g. 6.2)
B: Attach (A16) Top Front to (A35) Posts with 4 (S7) 12 x 2” Pan Screws (with 3/16” at washer). (A16) Top
Front should be ush to the top of each (A35) Post. (g. 6.1 & 6.2)
Fig. 6.2
A12
S7
Notice hole
towards top
A16
Slide wall side
S7
Parts removed
for clarity
A23
H6
Wood Parts
A28
1 x Floor Front 2 x 3 x 38-1/2”
1 x Top Front 1 x 4 x 38-1/2”
A16
A24
H6
A35
A35
A28
Notice hole
towards bottom
Hardware
H6
2 x 1/4 x 4-3/4” Hex Bolt
(1/4”lockwasher,1/4”atwasher,1/4”t-nut)
S7
4x #12x2”PanScrew(with3/16”atwasher)
Swing wall side
Fig. 6.1
20
Page 21
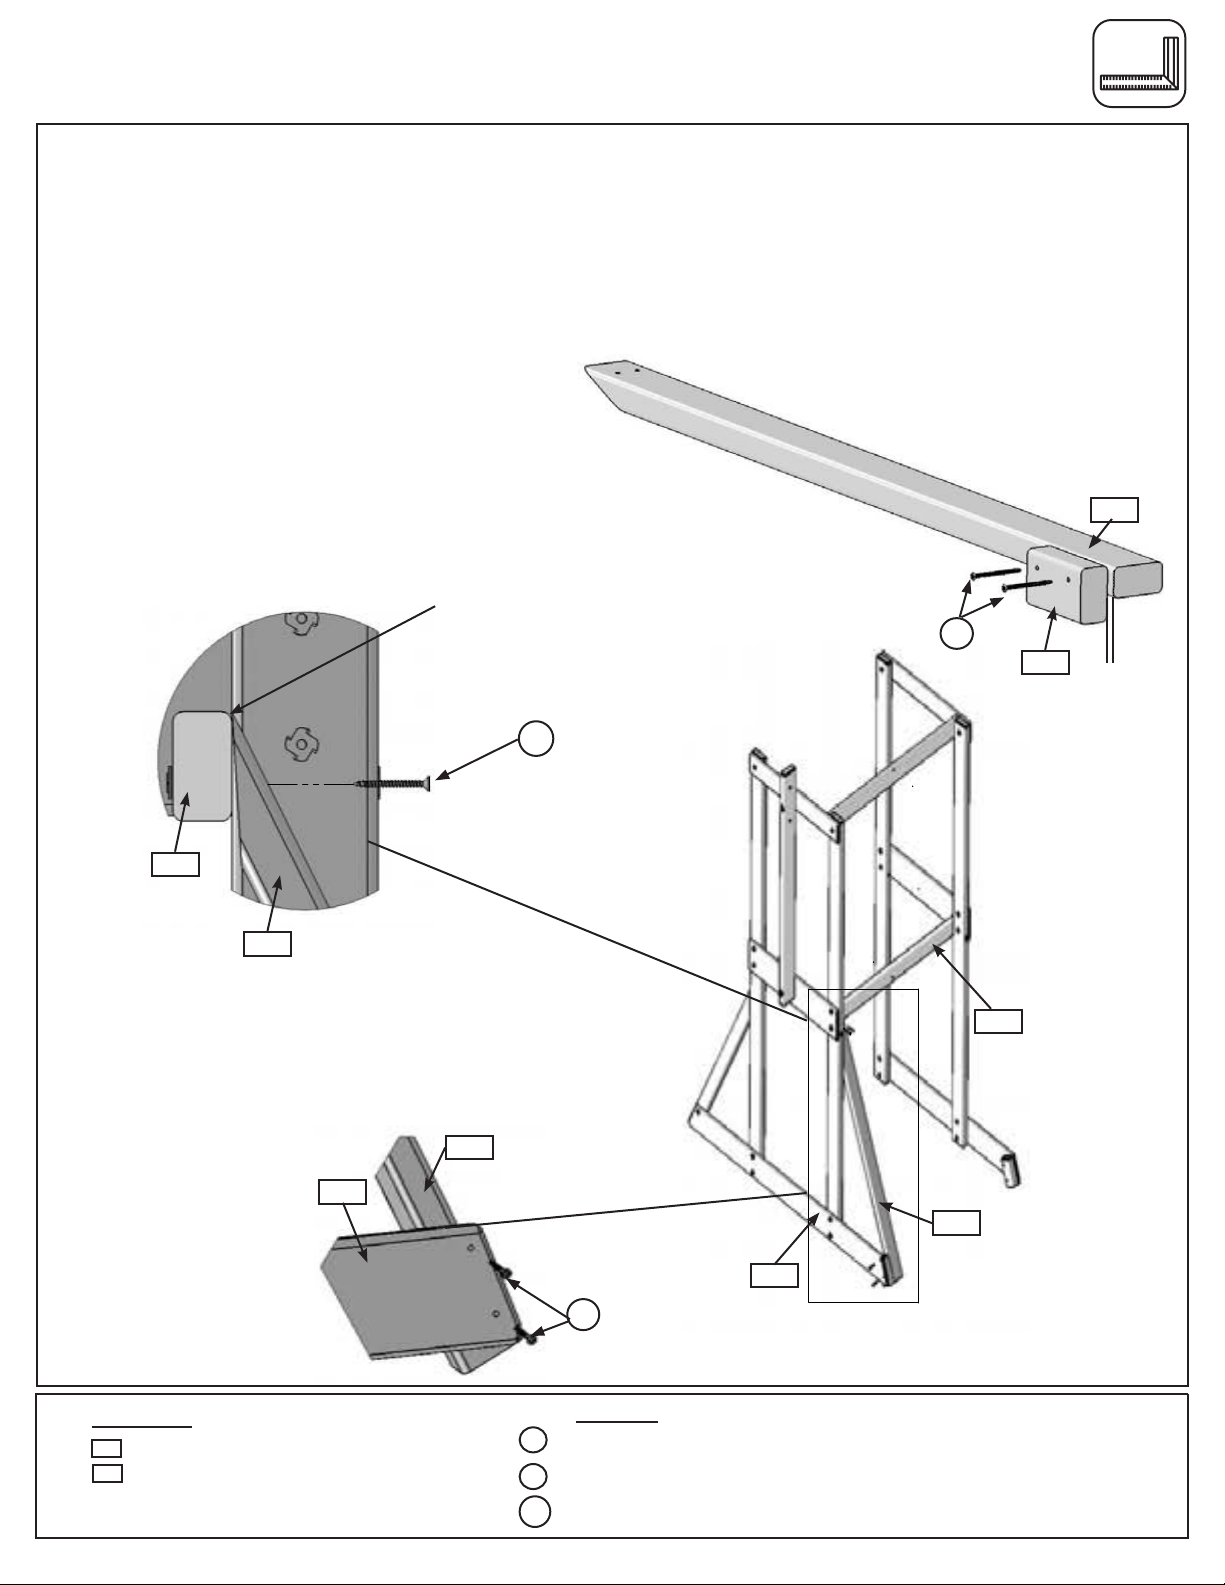
Step 7: Rock Rail Assembly
A: Attach (A30) Corner Block 1/2” from bottom of (A29) Rock Rail with 2 (S3) 8 x 2-1/2” Wood Screws as shown
in g. 7.1.
B: Make sure assembly is square and then attach (A29) Rock Rail with Corner Block to (A28) Floor Front with
2 (S15) #8 x 1-3/4” Wood Screws. Top of (A29) Rock Rail angled edge should be ush to the top of (A28) Floor
Front. (g. 7.2 & 7.3)
C: Attach (A34) SW Ground to (A29) Rock Rail with 2 (S2) #8 x 1-1/2” Wood Screws as shown in g. 7.2 & 7.4.
Fig. 7.1
A29
Fig. 7.3
A28
A29
Flush
A29
S15
x 2
S3
A30
Fig. 7.2
A28
1/2”
Fig. 7.4
Wood Parts
A30
1 x Corner Block 2 x 3 x 4-1/2”
1 x Rock Rail 2 x 3 x 42-3/4”
A29
21
A34
S2
Hardware
S3
2 x #8 x 2-1/2” Wood Screw
S2
2 x #8 x 1-1/2” Wood Screw
S15
2 x #8 x 1-3/4” Wood Screw
A29
A34
Page 22
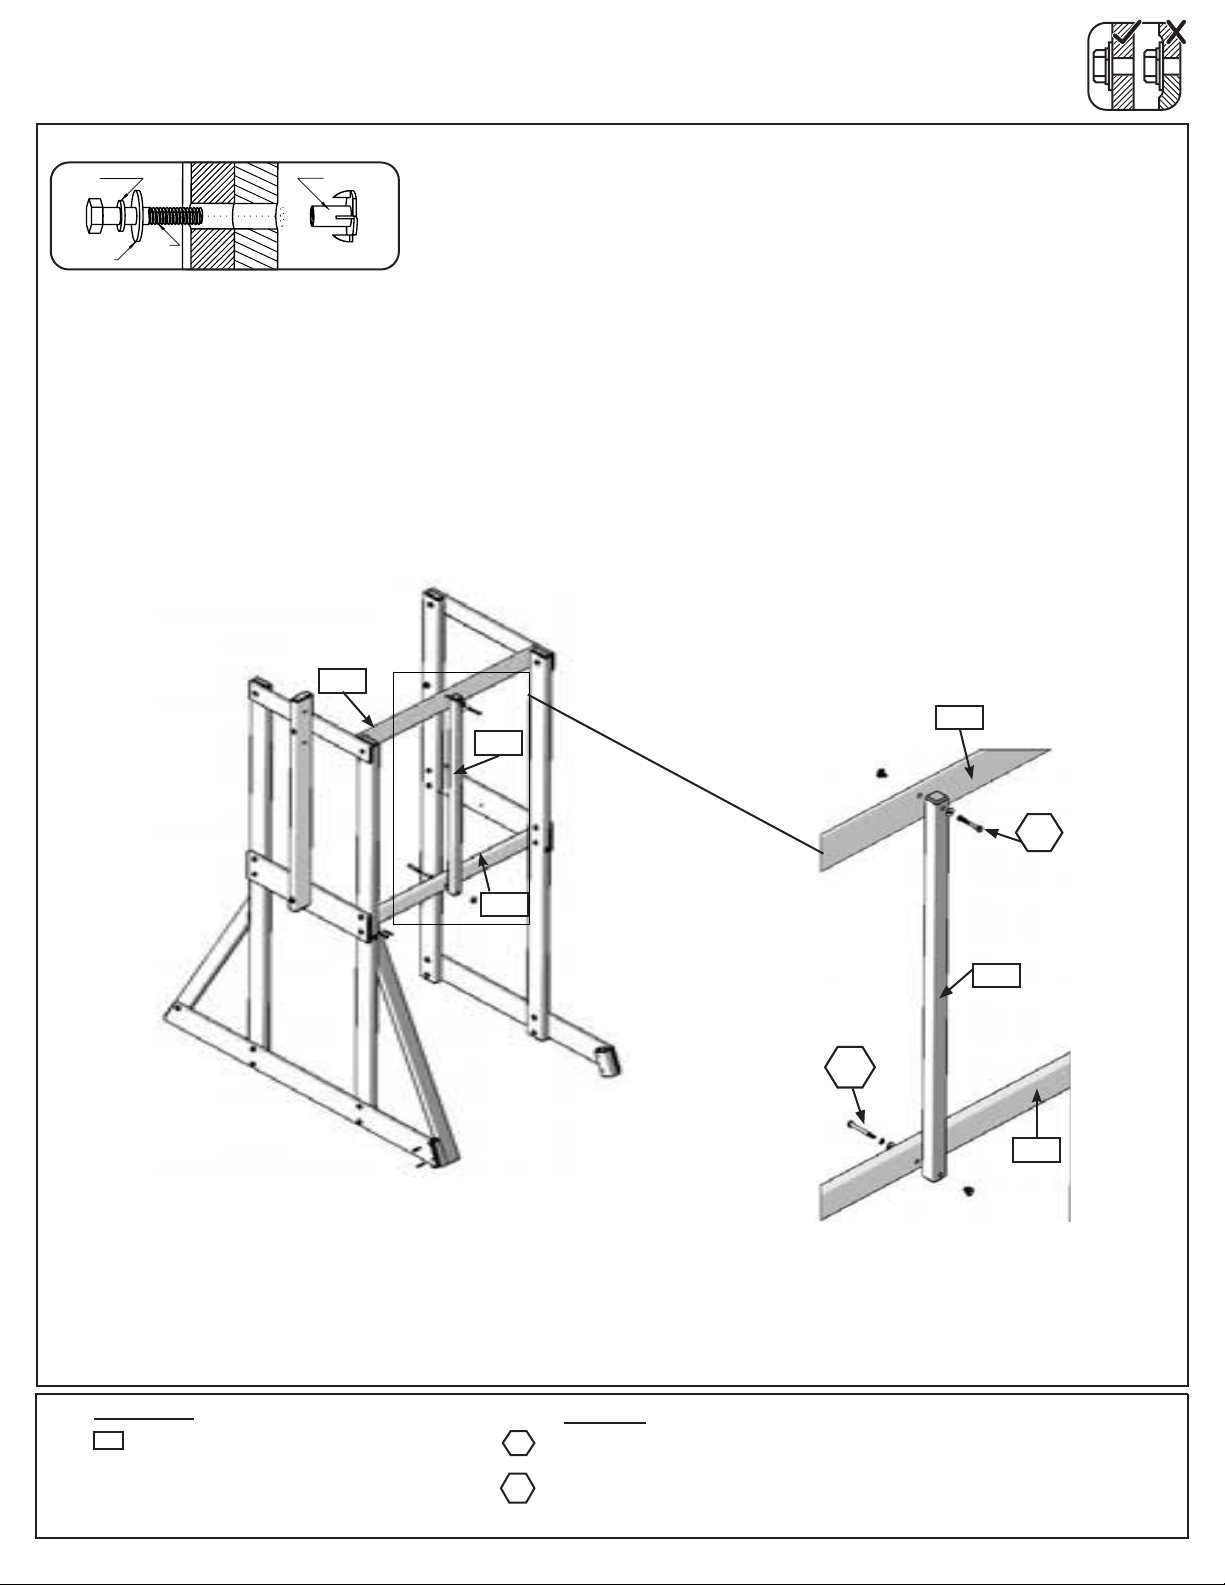
Step 8: Attach Centre Divider
Hex Bolt Assembly
Lock
Washer
T-Nu t
Flat
Washer
He x
Bolt
A: Attach (A15) Centre Divider to (A16) Top Front with 1 (H2) 1/4 x 2” Bolt (with at washer, lock washer and
t-nut) from outside of the assembly and to (A28) Floor Front with 1 (H11) 1/4 x 2-3/4” Bolt (with at washer, lock
washer and t-nut) from inside the assembly. (g. 8.1)
A16
A16
A15
A28
H2
A15
H11
A28
Fig. 8.1
Wood Parts
A15
1 x Centre Divider 2 x 2 x 38”
22
1 x 1/4 x 2” Hex Bolt
(1/4”lockwasher,1/4”atwasher,1/4”t-nut)
1 x 1/4 x 2-3/4” Hex Bolt
(1/4”lockwasher,1/4”atwasher,1/4”t-nut)
Hardware
H2
H11
Page 23
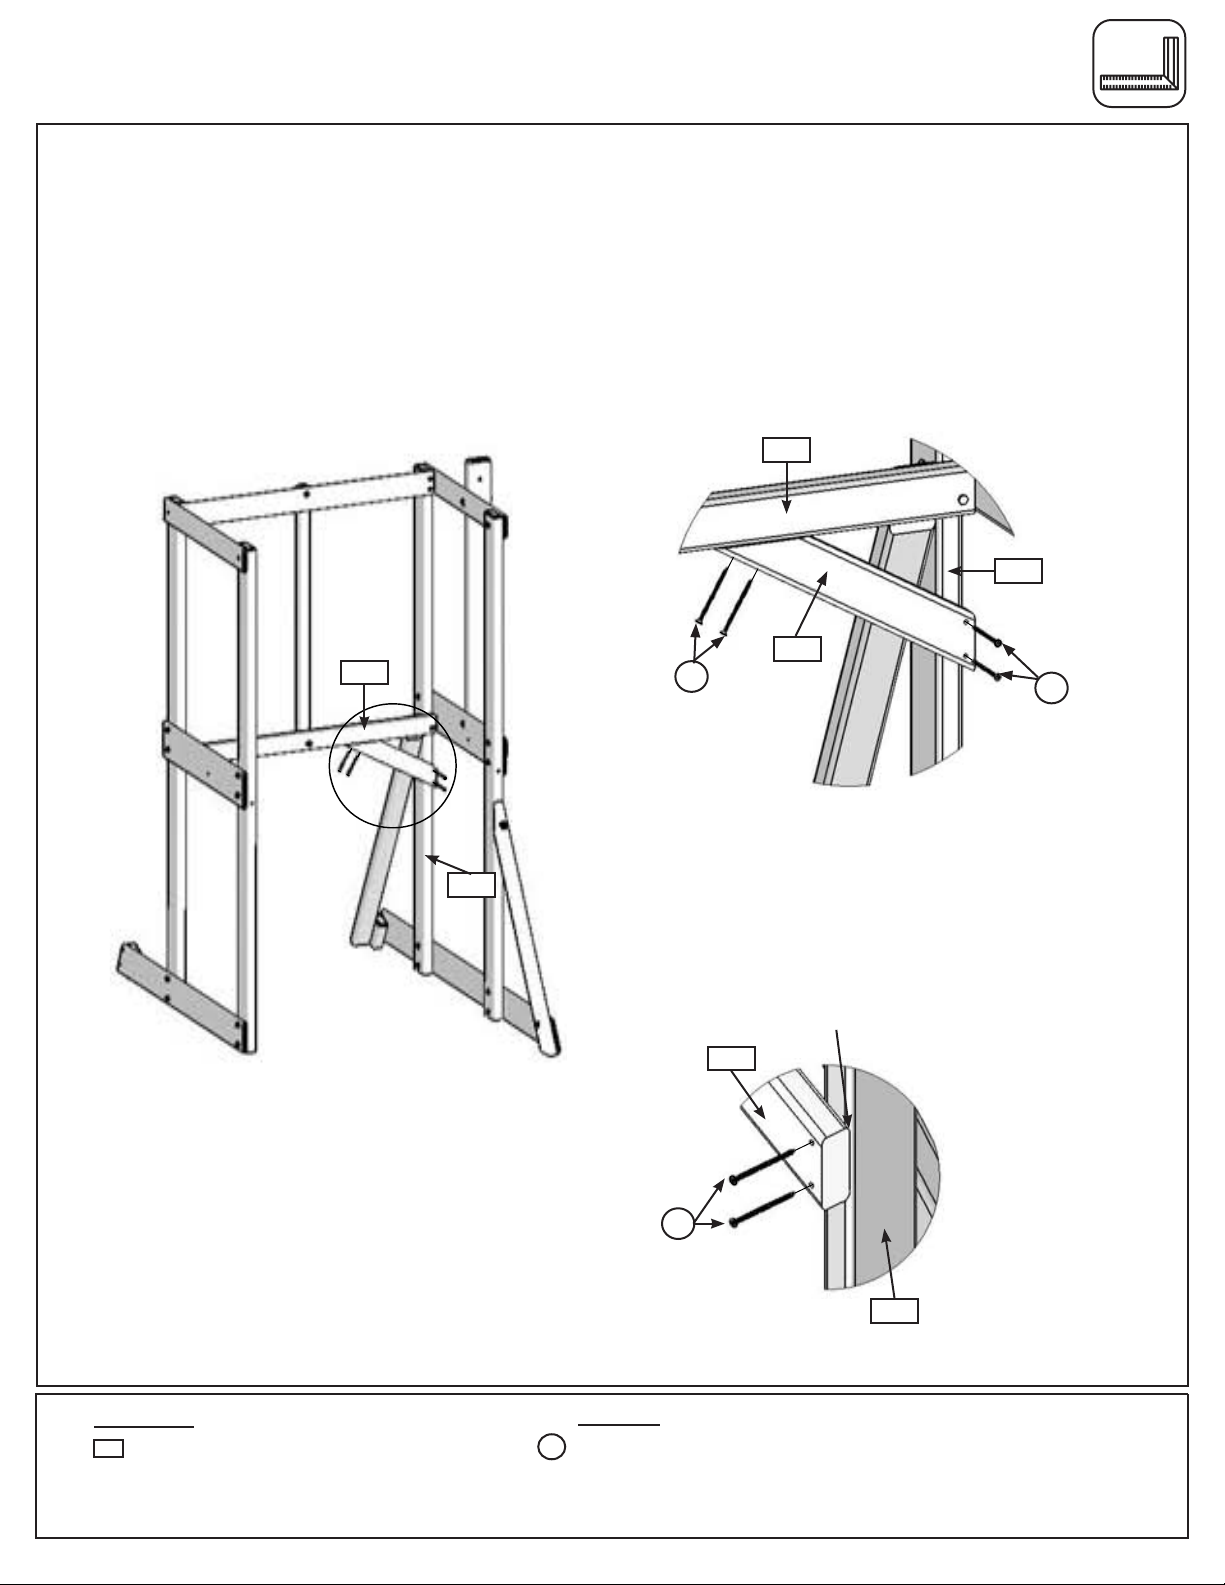
Step 9: Attach Gusset
A: Make sure assembly is square and then place 1 (A9) Gusset tight to the under side of (A28) Floor Front and
to (A35) Post from the inside of the assembly. Make sure the gusset is ush to the outside of the post and attach
with 2 (S4) #8 x 3” Wood Screws per side. (g. 9.1, 9.2 & 9.3)
Fig. 9.1
A28
A35
S4
A28
A9
Flush to
outside edge
Fig. 9.2
A35
S4
A9
S4
Wood Parts
A9
1 x Gusset 2 x 3 x 16”
23
4 x #8 x 3” Wood Screw
Hardware
S4
Fig. 9.3
A35
Page 24
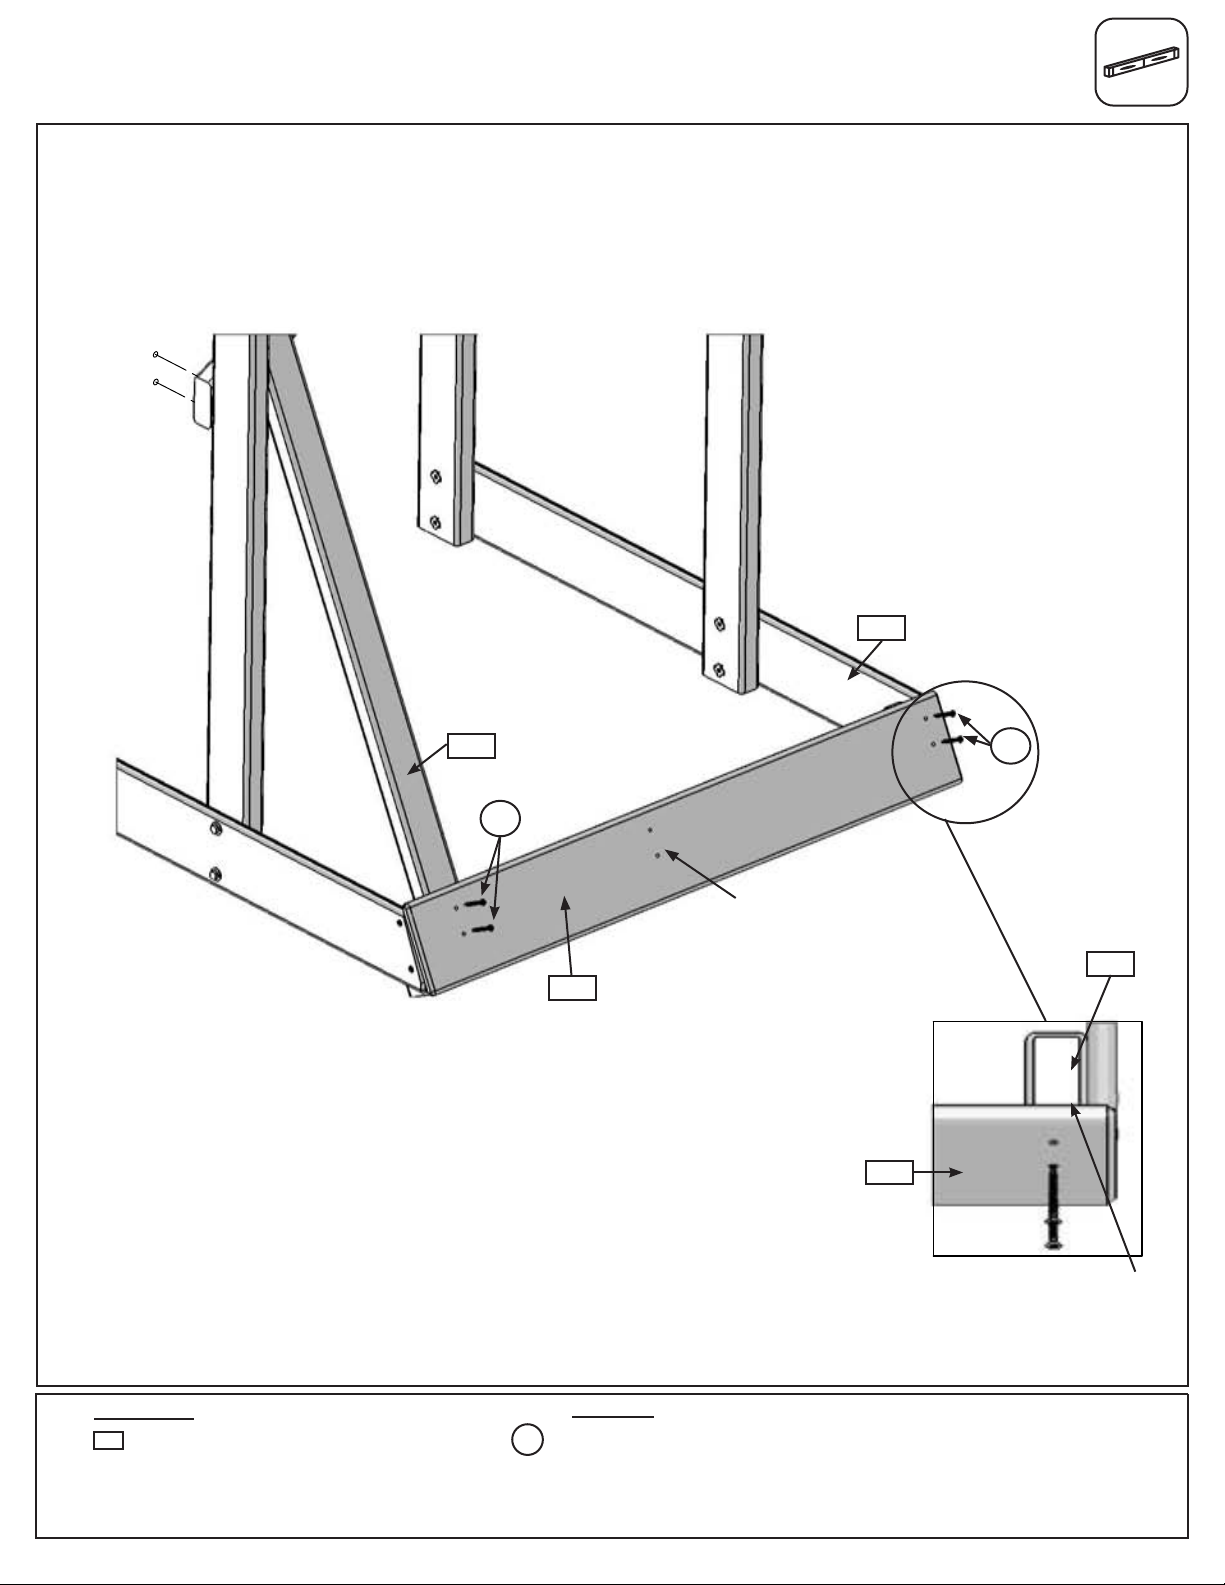
Step 10: Attach Lower Front
A: Attach (A31) Lower Front ush to the top of (A30) Corner Block at (A33) Ground Side with 2 (S15) #8 x 1-3/4”
Screws. (g. 10.1 & 10.2)
B: Make sure (A31) Lower Front is level and then attach to (A29) Rock Rail with 2 (S15) #8 x 1-3/4” Screws. (g.
10.1)
Fig. 10.1
A33
A29
S15
A31
Notice hole orientation
towards top
A31
Fig. 10.2
S15
A30
Flush to top
Wood Parts
A31
1 x Lower Front 1 x 6 x 39-3/4”
24
4 x #8 x 1-3/4” Wood Screw
Hardware
S15
Page 25
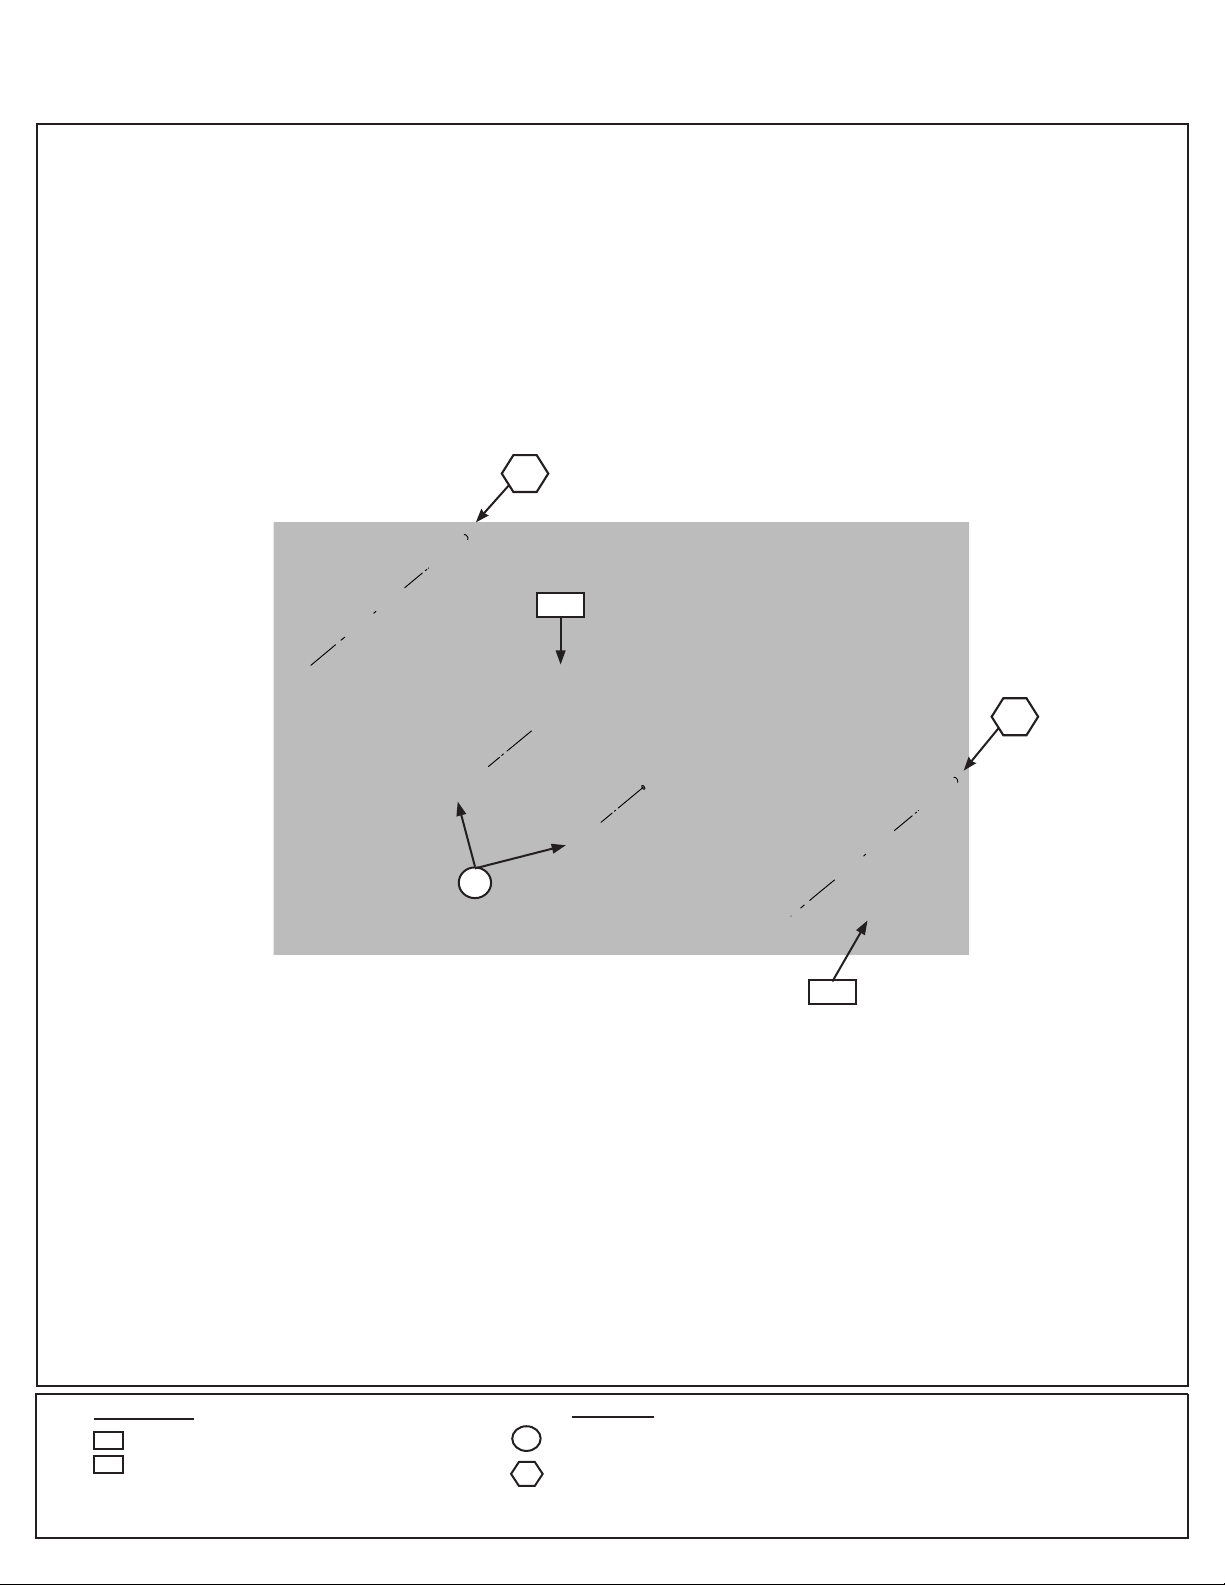
Step 11: Floor Back Assembly
A: Attach (A26) Floor Back to (A25) Side Joist with 2 (H3) 1/4 x 2-1/2” Bolts (with at washer, lock washer and
t-nut) and 2 (S7) 12 x 2” Pan Screws (with at washers) as shown in g. 11.1. Bolts to be installed on (A25) Side
Joist side and screws installed from (A26) Floor Back side.
H3
Fig. 11.1
A25
S7
H3
A26
Wood Parts
A25
1 x Side Joist 2 x 2 x 34-3/4”
A26
1 x Floor Back 5/4 x 4 x 38-5/8”
25
2x #12x2PanScrew(with3/16”atwasher)
2 x 1/4 x 2-1/2” Hex Bolt
(1/4”lockwasher,1/4”atwasher,1/4”t-nut)
Hardware
S7
H3
Page 26
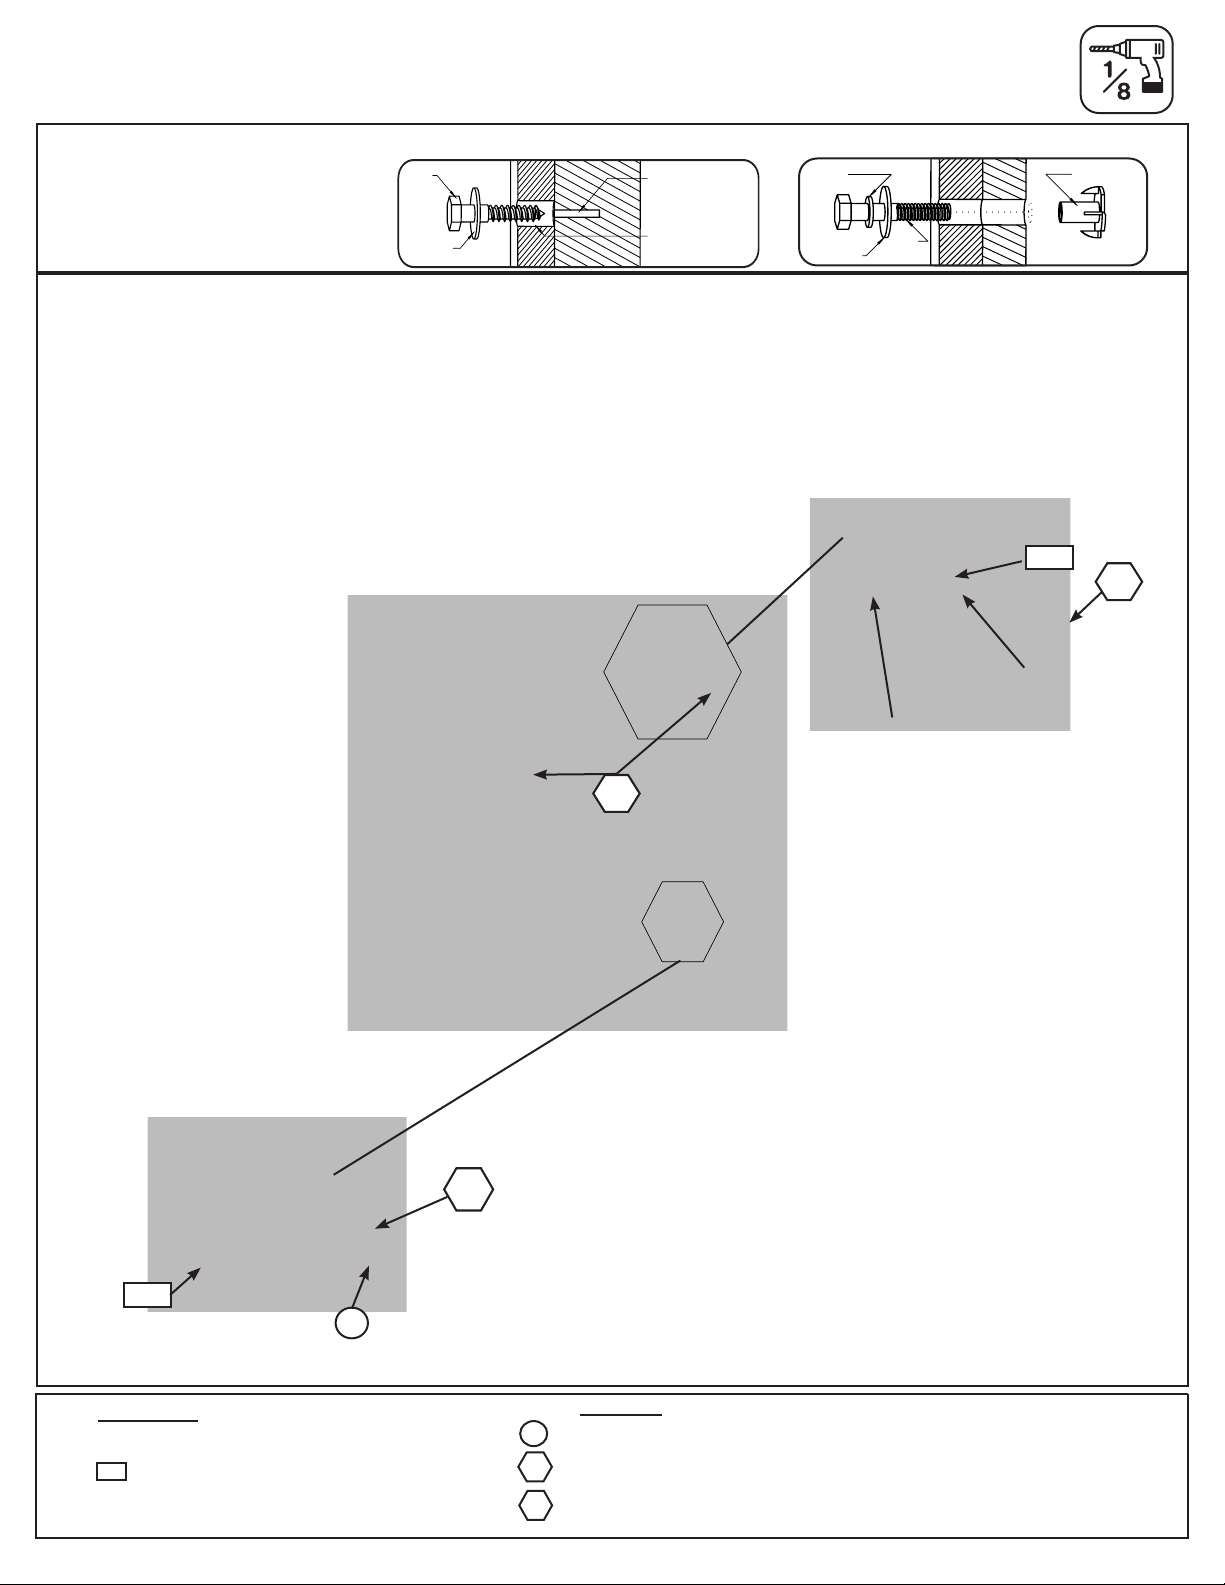
Step 12: Floor Back Assembly
Pre-drill all pilot holes using a
1/8” drill bit before installing
the lag screws.
Predrill Pilot Holes for Lag Screw
Lag
Screw
Flat
Washer
Predrill 1/8”
pilot hole
Use factory drilled
hole as a guide
Lock
Washer
Flat
Washer
Hex Bolt Assembly
He x
Bolt
T-Nu t
A: On the back side of the assembly attach (A32) Lower Back ush to the bottom and outside edge of (A35) Posts
with 2 (LS3) 1/4 x 3” Lag Screws (with at washer) in the top, pre-drilled holes and 2 (S7) 12 x 2” Pan Screws (with
3/16” at washer) in the bottom holes as shown in g. 12.1 & 12.3.
B: Attach Floor Back Assembly from Step 11 to both (A35) Posts with 2 (H5) 1/4 x 4-1/2” Hex Bolts (with lock
washer, at washer and t-nut) through (A26) Floor Back. Notice the hole orientation towards bottom of board. (g.
12.1 & 12.2)
Fig. 12.2
A26
Fig. 12.1
Hole towards bottom
H5
Fig. 12.3
A32
Floor Back
Assembly
H5
Back
LS3
S7
Wood Parts
1 x Floor Back Assembly (from Step 11)
A32
1 x Lower Back 1 x 5 x 38-1/2”
26
2x #12x2”PanScrew(with3/16”atwasher)
2 x 1/4 x 3” Lag Screw (1/4”atwasher)
2 x 1/4 x 4-1/2” Hex Bolt
(1/4”lockwasher,1/4”atwasher,1/4”t-nut)
Hardware
S7
LS3
H5
Page 27
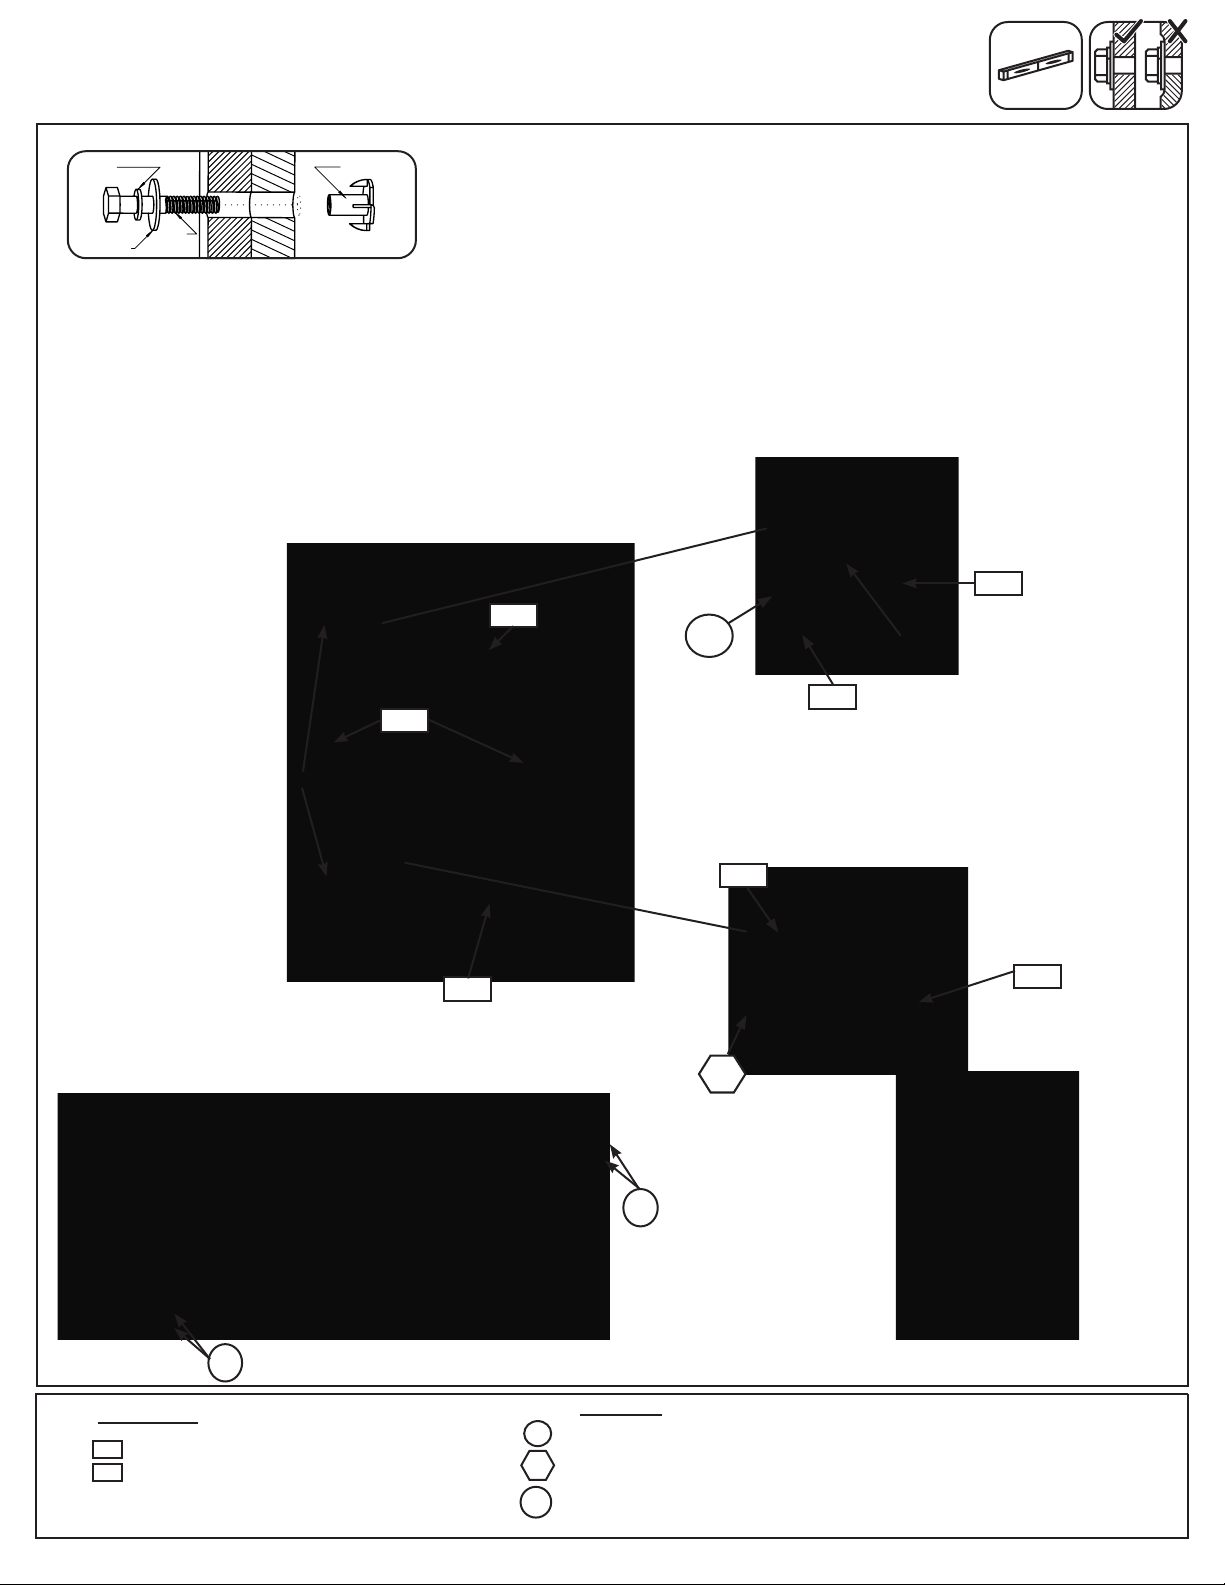
Step 12: Floor Back Assembly cont.
Hex Bolt Assembly
Lock
Washer
T-Nu t
Flat
Washer
He x
Bolt
C: Attach 2 (A10) Front Dividers to (A26) Floor Back with 1 (H1) 1/4 x 1-1/2” Hex Bolt (with lock washer, at washer
and t-nut) per board. Be sure to keep bolts loose. (g. 12.4 & 12.5)
D: Attach each (A10) Front Divider to (A22) Top Back using 1 (PB2) 1/4 x 1-1/4” Pan Bolt (with lock washer, at
washer and t-nut) per board. Be sure to keep bolts loose. (g. 12.4 & 12.6)
E: Level and attach (A22) Top Back to both (B35) Posts using 4 (S7) #12 x 2” Pan Screws (with 3/16” at washers).
(g. 12.7)
Fig. 12.5
Fig. 12.4
A22
A22
A10
Loosely attach bolts
PB2
x 2
Hole towards top
A10
Fig. 12.7
S7
Wood Parts
A22
1 x Top Back 1 x 4 x 38-1/2”
A10
2 x Front Divider 1 x 4 x 38”
A10
A26
H1
S7
Hardware
S7
4x #12x2”PanScrew(with3/16”atwasher)
2 x 1/4 x 1-1/2” Hex Bolt
H1
(1/4”lockwasher,1/4”atwasher,1/4”t-nut)
PB2
2 x 1/4 x 1-1/4” Pan Bolt
(1/4”lockwasher,1/4”atwasher,1/4”t-nut)
Fig. 12.6
A26
27
Page 28
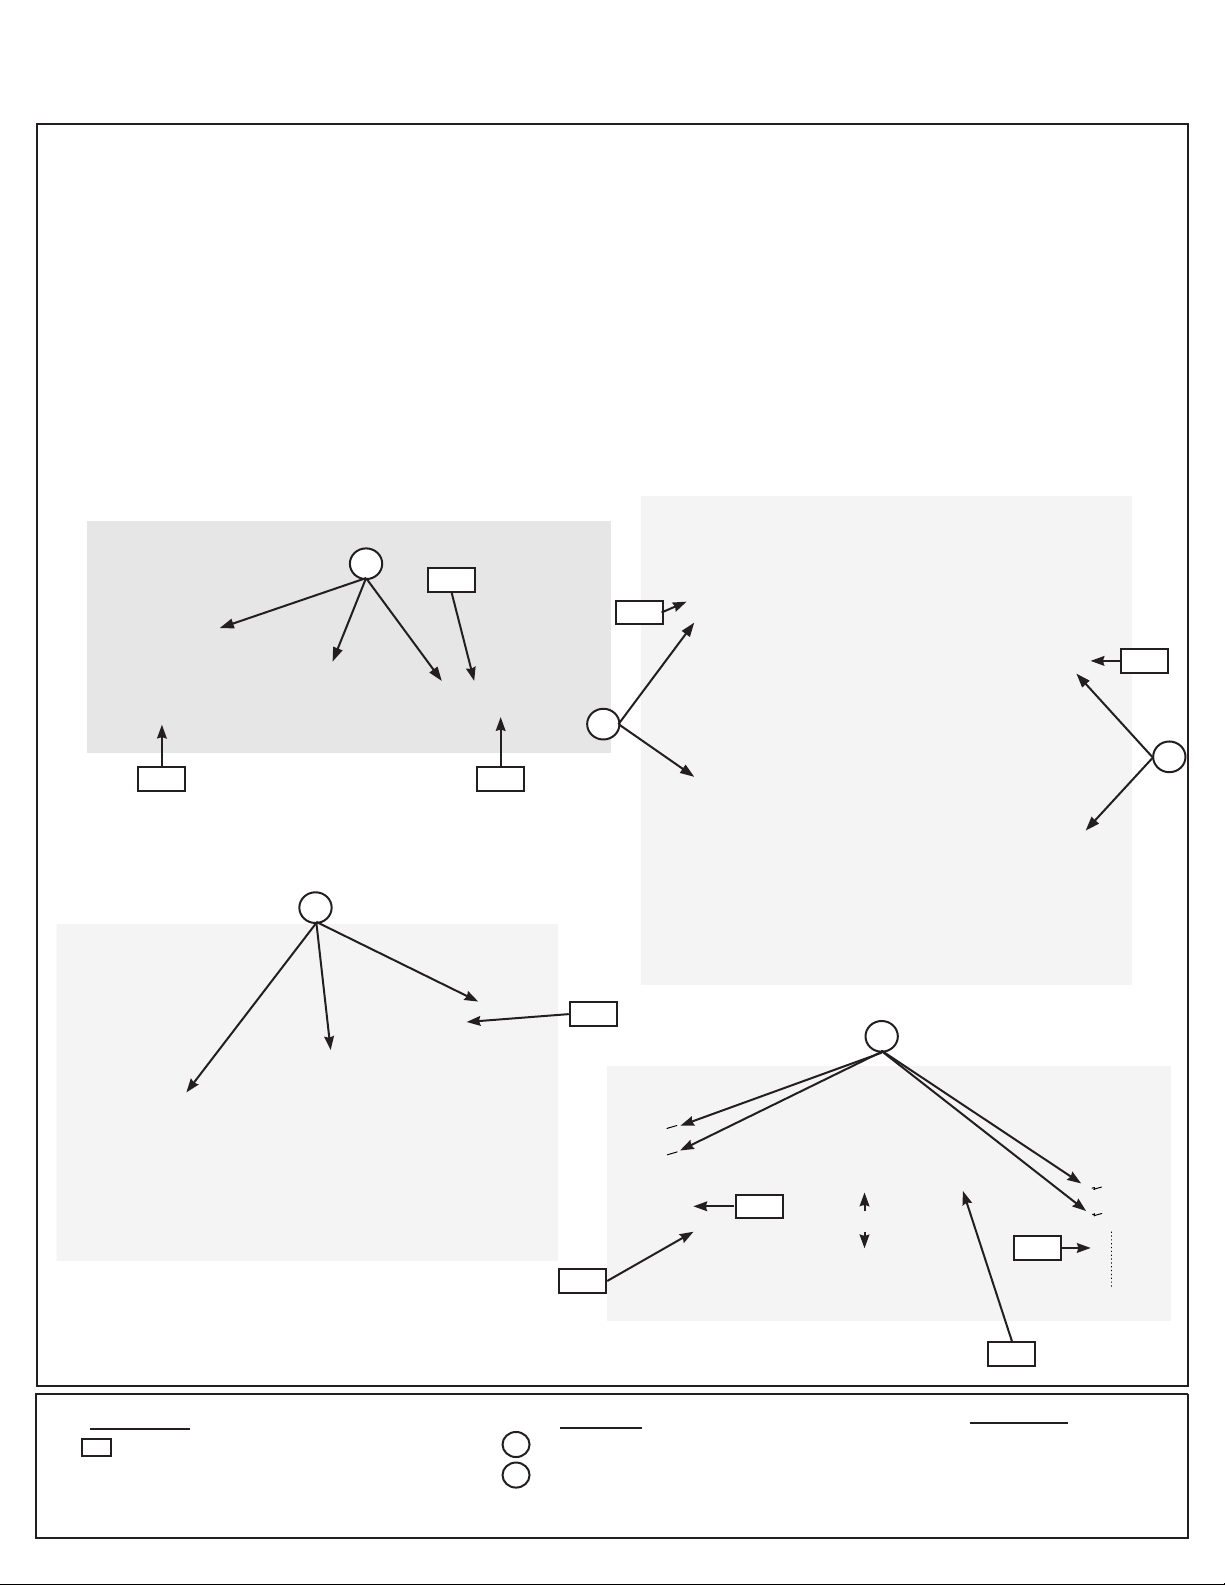
Step 13: Chalk Wall Assembly
A: Place the Chalk Wall Tarp in between each (A10) Front Divider and (A22) Top Back. Make sure tarp is taut
and then attach to (A22) Top Back with 3 (S5) #8 x 1/2” Wood Screws (with #8 at washer). Tighten the bolts in
both (A10) Front Dividers. (g. 13.1)
B: Recheck that tarp is taut and then attach Chalk Wall Tarp to both (A10) Front Dividers from the inside of the
assembly with 2 (S5) #8 x 1/2” Pan Screws (with #8 at washer) per board as shown in g. 13.2.
C: 3” above (A26) Floor Back attach (A18) Lower Back Wall to each (A10) Front Divider with 4 (S1) #8 x 1-1/8”
Wood Screws. (g. 13.3)
D: Attach Chalk Wall Tarp to (A18) Lower Back Wall with 3 (S5) #8 x 1/2” Wood Screws (with #8 at washer).
(g. 13.4)
Fig. 13.1
Fig. 13.4
A10
Fig. 13.2
S5
A22
A10
A10
S5
S5
A10
S5
A18
S1
Fig. 13.3
A10
A26
Wood Parts
A18
1 x Lower Back Wall 1 x 4 x 31-1/2”
28
10x #8x1/2PanScrew(with#8atwasher)
4 x #8 x 1-1/8 Wood Screw
Hardware
S5
S1
3”
A10
A18
Other Parts
1 x Chalk Wall Tarp
Page 29
Step 14: Floor Frame Assembly
A: From inside of the assembly, measure 3-1/8” down from the top of (A23) SW Floor (g. 14.2) and (A24) Floor
(g. 14.3) and then attach (A27) Floor Joist to each board with 1 (S4) #8 x 3” Wood Screws per end. Make sure
the (A27) Floor Joist is installed with the 1-3/8” side facing up. (g. 14.1 & 14.2)
Fig. 14.2
3-1/8”
S4
A21
A27
A23
1-3/8”
A23
Fig. 14.1
A24
A24
A27
S4
3-1/8”
Fig. 14.3
Wood Parts
A27
1 x Floor Joist 5/4 x 2 x 38-1/2”
29
2 x #8 x 3” Wood Screw
Hardware
S4
Page 30
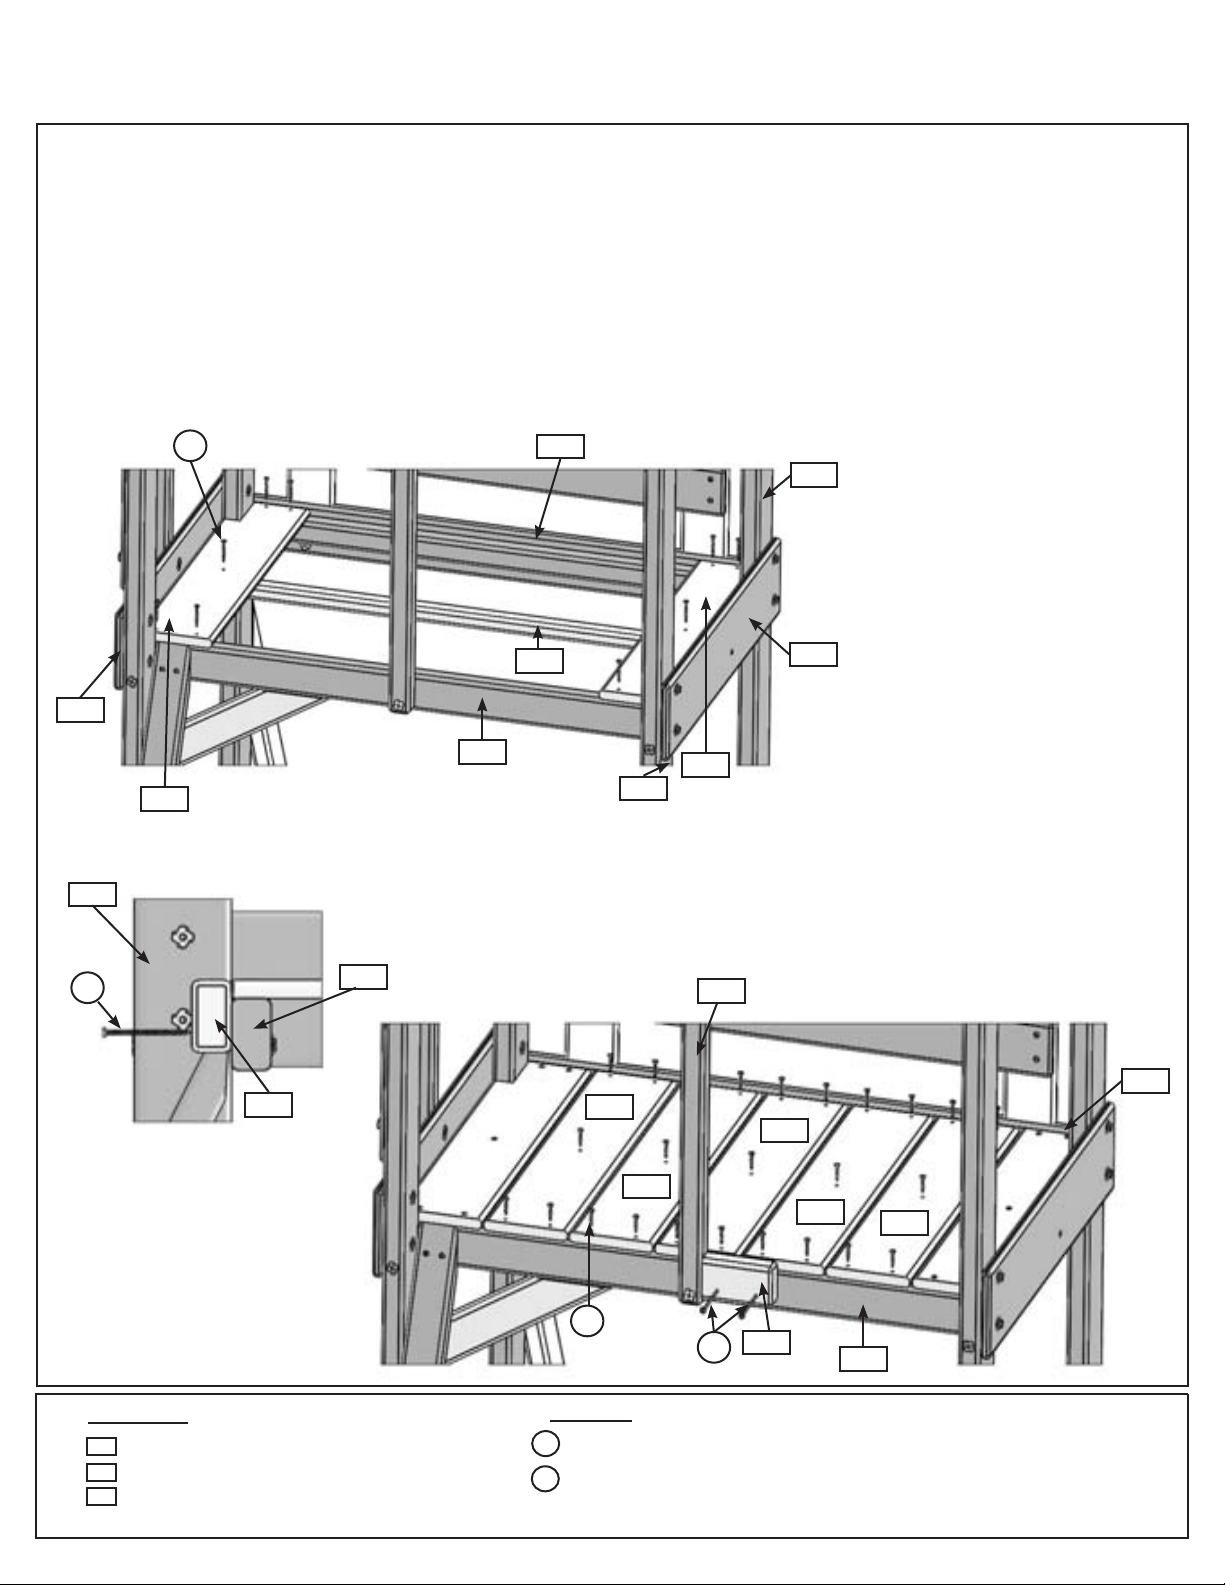
Step 15: Attach Floor Boards
A: Install 1 (A4) CE Gap Board to each end of the assembly attaching to (A25) Side Joist, (A27) Floor Joist and
(A28) Front Floor using 5 (S2) #8 x 1-1/2” Wood Screws per board. Make sure boards are tight to (A23) SW
Floor, (A24) Floor, (A26) Floor Back and each (A35) Post. (g. 15.1)
B: In between both (A4) CE Gap Boards place 5 (A5) Floor Boards making sure all boards are evenly spaced.
Attach to (A25) Side Joist, (A27) Floor Joist and (A28) Front Floor using 5 (S2) #8 x 1-1/2” Wood Screws per
board. All boards should be tight to (A26) Floor Back. (g. 15.2)
C: Tight to (A15) Centre Divider and ush to top of (A5) Floor Board attach (A30) Corner Block to (A28) Floor
Front with 2 (S3) #8 x 2-1/2” Wood Screws. (g. 15.2 & 15.3)
S2
x 5 per board
A25
A35
Fig. 15.1
A23
A15
S3
x 2
A4
Fig. 15.3
A30
A28
A28
A27
A5
A35
A5
A4
A15
A5
A24
A5
Fig. 15.2
A26
A5
S2
A30
x 5 per board
Wood Parts
A5
5 x Floor Board 1 x 6 x 23-1/2”
A4
2 x CE Gap Board 1 x 6 x 23-1/2”
A30
1 x Corner Block 2 x 3 x 4-1/2”
30
Hardware
S2
35 x #8 x 1-1/2” Wood Screw
S3
2 x #8 x 2-1/2” Wood Screw
S3
A28
Page 31
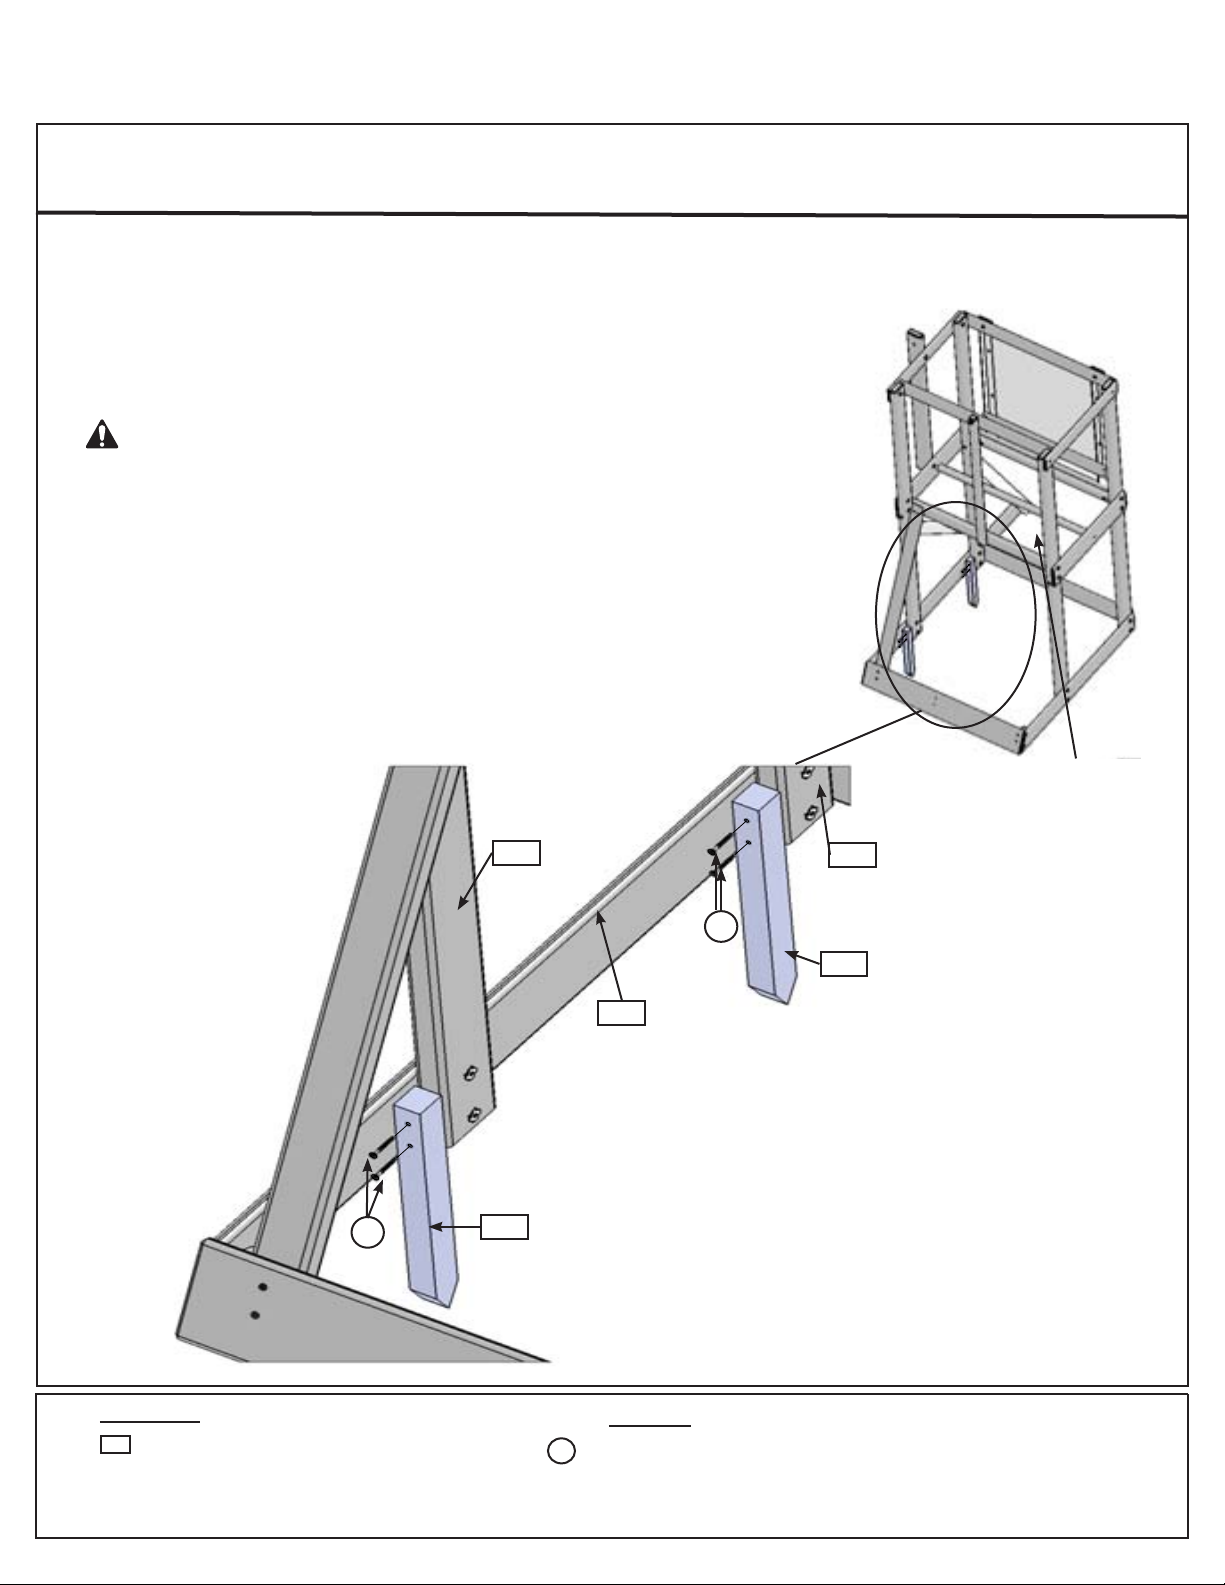
Step 16: Attach Ground Stakes
MOVE FORT TO FINAL LOCATION. FINAL LOCATION MUST BE ON LEVEL GROUND
A: Drive 2 (A37) Ground Stakes 10-1/2” into the ground at the 2 (A35) Posts on (A34) SW Ground as shown in
g.16.1. Attach using 2 (S3) #8 x 2-1/2” Wood Screws per ground stake. (g. 16.1)
WARNING: To prevent tipping and avoid potential
injury, stakes must be driven 10-1/2” into ground.
Digging or driving stakes can be dangerous if you do not
checkrstforundergroundwiring,cablesorgaslines.
S3
A35
A37
Fig. 16.1
Floor boards were
removed for clarity
A35
S3
A37
A34
Wood Parts
A37
2 x Ground Stake 1 1/4 x 1 1/2 x 14”
31
4 x #8 x 2-1/2” Wood Screw
Hardware
S3
Page 32
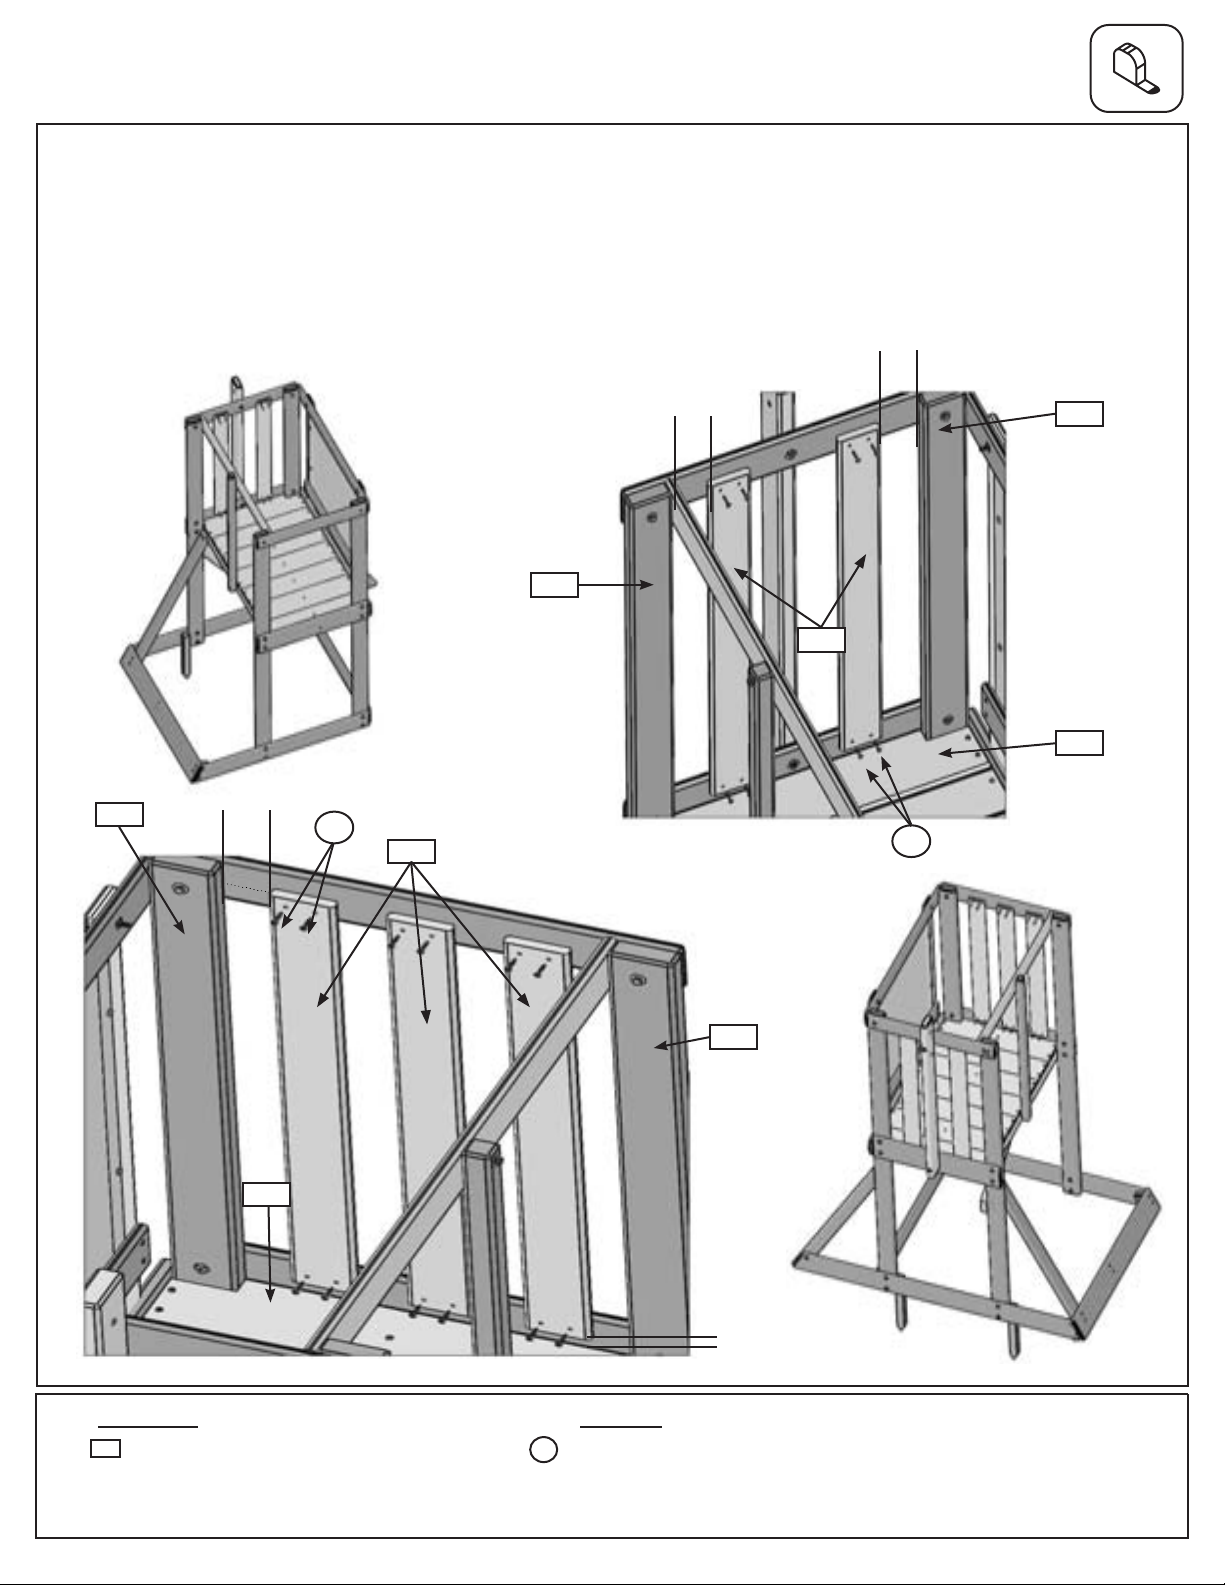
Step 17: Wall Assembly
A: On the Swing Side Wall attach 2 (A1) CE Floor Boards on either side of the (A21) Wall Mount with 4 (S1)
#8 x 1 1/8” Wood Screws per board. Make sure the bottom of the boards are 1” up from the (A4) CE Gap
Boards and there is approximately 3” between each (A35) Post and (A1) CE Floor Board, not exceeding
3-1/4”. (g. 17.1 & 17.2)
B: On the opposite wall attach 3 (A1) CE Floor Boards between the 2 (A35) Posts with 4 (S1) #8 x 1-1/8”
Wood Screws per board. Make sure the bottom of the boards are 1” up from the (A4) CE Gap Board and
there is approximately 2-1/2” between each board, not exceeding 2-3/4”. (g. 17.3 & 17.4)
3“
Fig. 17.2
Fig. 17.1
A35
2-1/2“
S1
A1
A35
Fig. 17.4
3“
A1
Fig. 17.3
x 4 per board
S1
A35
A4
A35
A4
1“
Wood Parts
A1
5 x CE Floor Board 1 x 4 x 32-1/2”
32
20 x #8 x 1-1/8” Wood Screw
Hardware
S1
Page 33
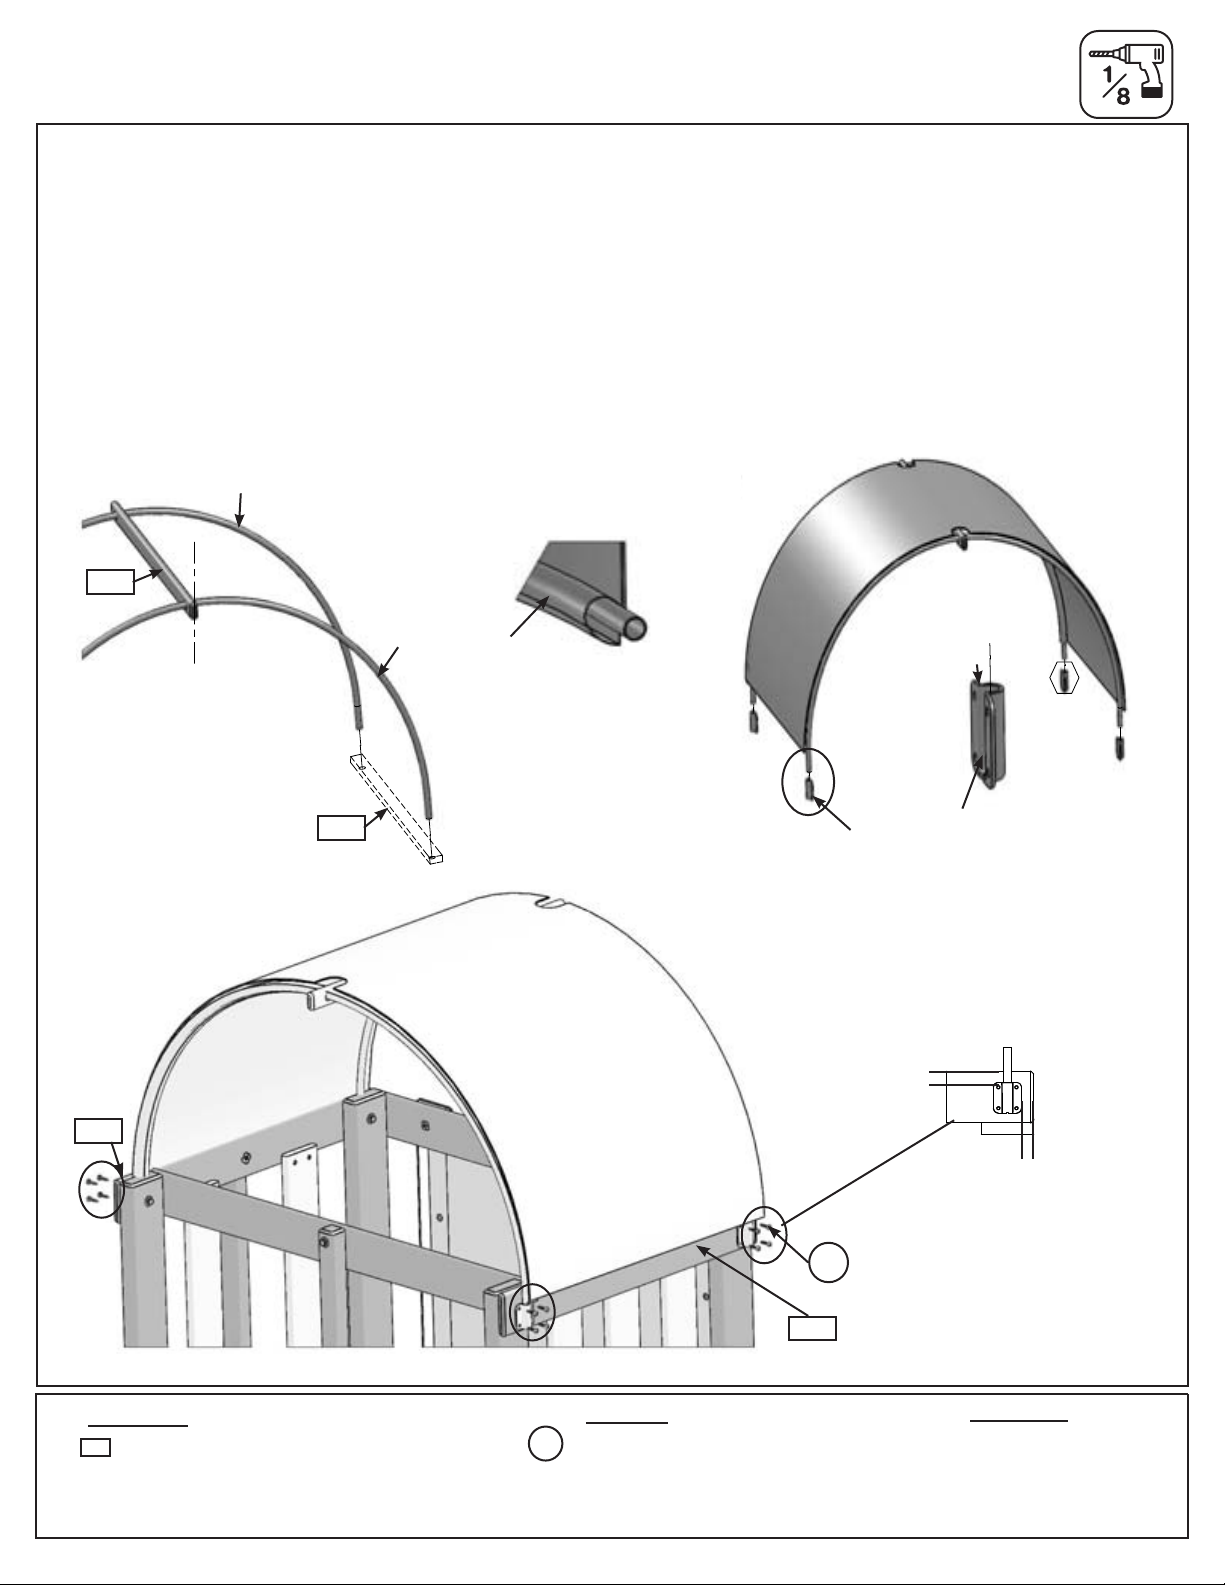
Step 18: Canopy Roof Assembly
A: Feed both Canopy Tubes through each sleeve of the Canopy Roof until it reaches the mid point, then insert
the Canopy Tubes through the holes in (A14) Tarp Support and bring it up to the centre line. (g. 18.1)
B: Continue feeding Canopy Tubes through the rest of the Canopy Roof sleeves and then insert the ends of the
tubes into tube holders. The at side of the tube holders should face inwards. Make sure the notched out holes
in the Canopy Roof are at the centre line. (g. 18.1 & 18.2)
C: Place Canopy Roof on fort at (A12) SW Top and (A17) Top End as shown in g. 18.3. The tube holders
should be 5/8” from outside edge and 3/4” from top of (A12) SW Top and (A17) Top End. (g. 18.4) Pre-drill
holes for the screws and then attach tube holders to each board with the 4 (S10) #8 x 1” Pan Screws per tube
holder. (g. 18.3)
Canopy tube
A14
Centre line
Fig. 18.1
A14
Canopy sleeve
Tube holder
Fig. 18.3
Top of holder
Bottom of holder
3/4”
Fig. 18.2
Fig. 18.4
A12
5/8”
x 4 per corner
S10
A17
Wood Parts
A14
1 x Tarp Support 1 x 2 x 26-7/8”
33
16 x #8 x 1” Pan Screw
Hardware
S10
Other Parts
1 x Canopy
2 x Canopy Tube
4 x Canopy Tube Holder
Page 34
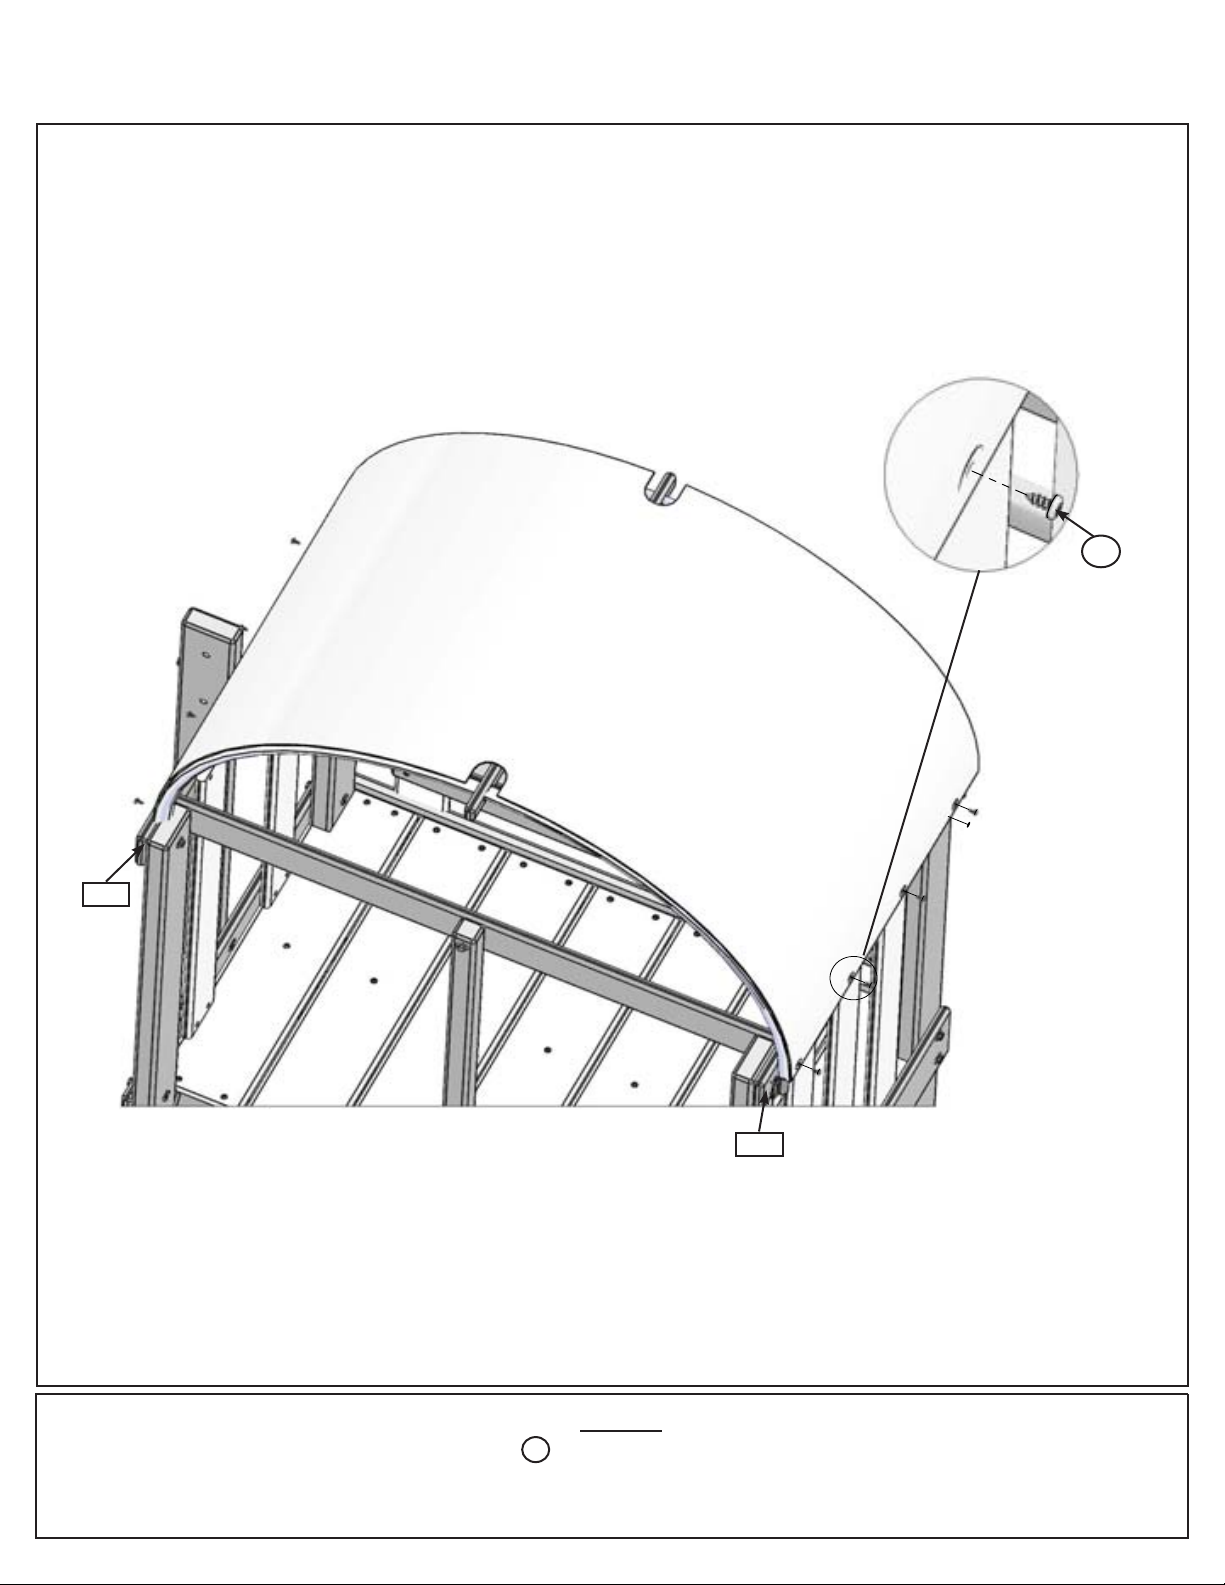
Step 18: Canopy Roof Assembly cont.
D: Loosen the top bolt in (A21) Wall Mount, tuck Canopy Roof in between fort and (A21) Wall Mount and then
secure Canopy Roof to (A12) SW Top and (A17) Top End with 4 (S5) #8 x 1/2” Pan Screws (with #8 at washer)
per board. Be sure to re-tighten bolt in (A21) Wall Mount. (g. 18.5)
Fig. 18.5
x 4 per side
S5
A12
A17
Hardware
S5
8x #8x1/2”PanScrew(#8atwasher)
34
Page 35
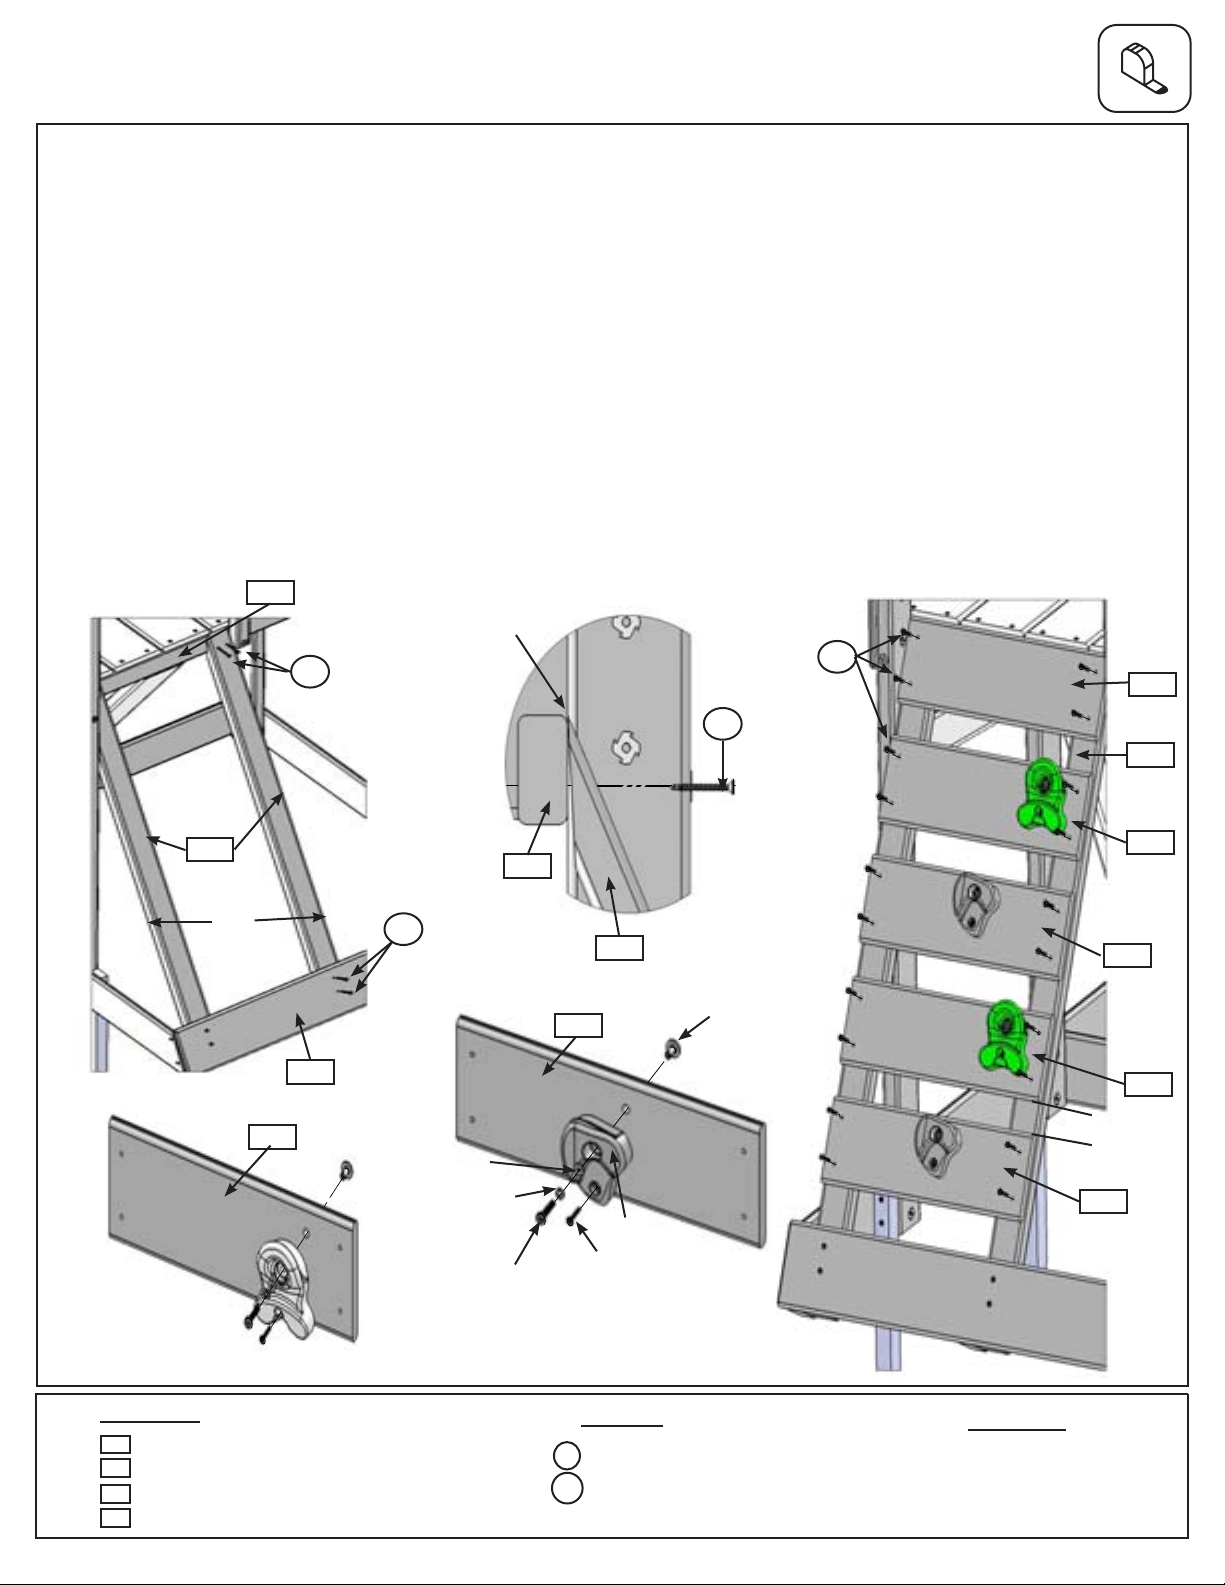
Step 19: Attach Rock Rail
A: Attach 1 (A29) Rock Rail 17” from the already installed (A29) Rock Rail to (A28) Floor Front and (A31) Lower
Front with 4 (S15) #8 x 1-3/4” Wood Screws. Top of (A29) Rock Rail angled edge should be ush to the top of
(A28) Floor Front. (g. 19.1 & 19.2)
B: Attach (A8) CE Access Board to the top of each (A29) Rock Rail as shown in g. 19.5. Make sure (A8) CE
Access Board is ush to the outside and top edges of each Rock Rail. Attach using 4 (S2) #8 x 1-1/2” Wood
Screws. (g. 19.5)
C: 2” down from the bottom of (A8) CE Access Board attach 1 (A7) CE Rock Board A, followed by 2 (A6) CE
Rock Board B and 1 more (A7) CE Rock Board A, making sure the sides are ush to the outside edges of each
(A29) Rock Rail. Stagger Rock Boards so the rock holes do not form a straight line. Attach using 4 (S2) #8 x
1-1/2” Wood Screws. Make sure the gap between boards are spaced 2” and do not exceed 2-1/4”. (g. 19.5)
D: Place 1 rock on each (A6) CE Rock Board A and (A7) CE Rock Board B (g. 19.3) and attach using included
hardware. The screw must be in the hole directly under the Pan Bolt, it will stop the rock from spinning. (g. 19.4)
Fig. 19.1
A29
17”
A28
A7
S15
A31
S15
Fig. 19.4
Flat washer
Lock washer
Flush
A28
A6
A29
Rock
Fig. 19.2
S15
Barrel nut
S2
x 4 per
board
A8
A29
A7
A6
A7
2” Not to
exceed
2-1/4”
A6
Pan Bolt
Pan Screw
Fig. 19.3
Fig. 19.5
Wood Parts
A7
2 x CE Rock Board A 1 x 6 x 17”
A6
2 x CE Rock Board B 1 x 6 x 17”
A8
1 x CE Access Board 1 x 6 x 17”
A29
1 x Rock Rail 2 x 3 x 42-3/4”
35
20 x #8 x 1-1/2” Wood Screw
4 x #8 x 1-3/4” Wood Screw
Hardware
S2
S15
Other Parts
1 x Rock with hardware (pkg of 4)
Page 36
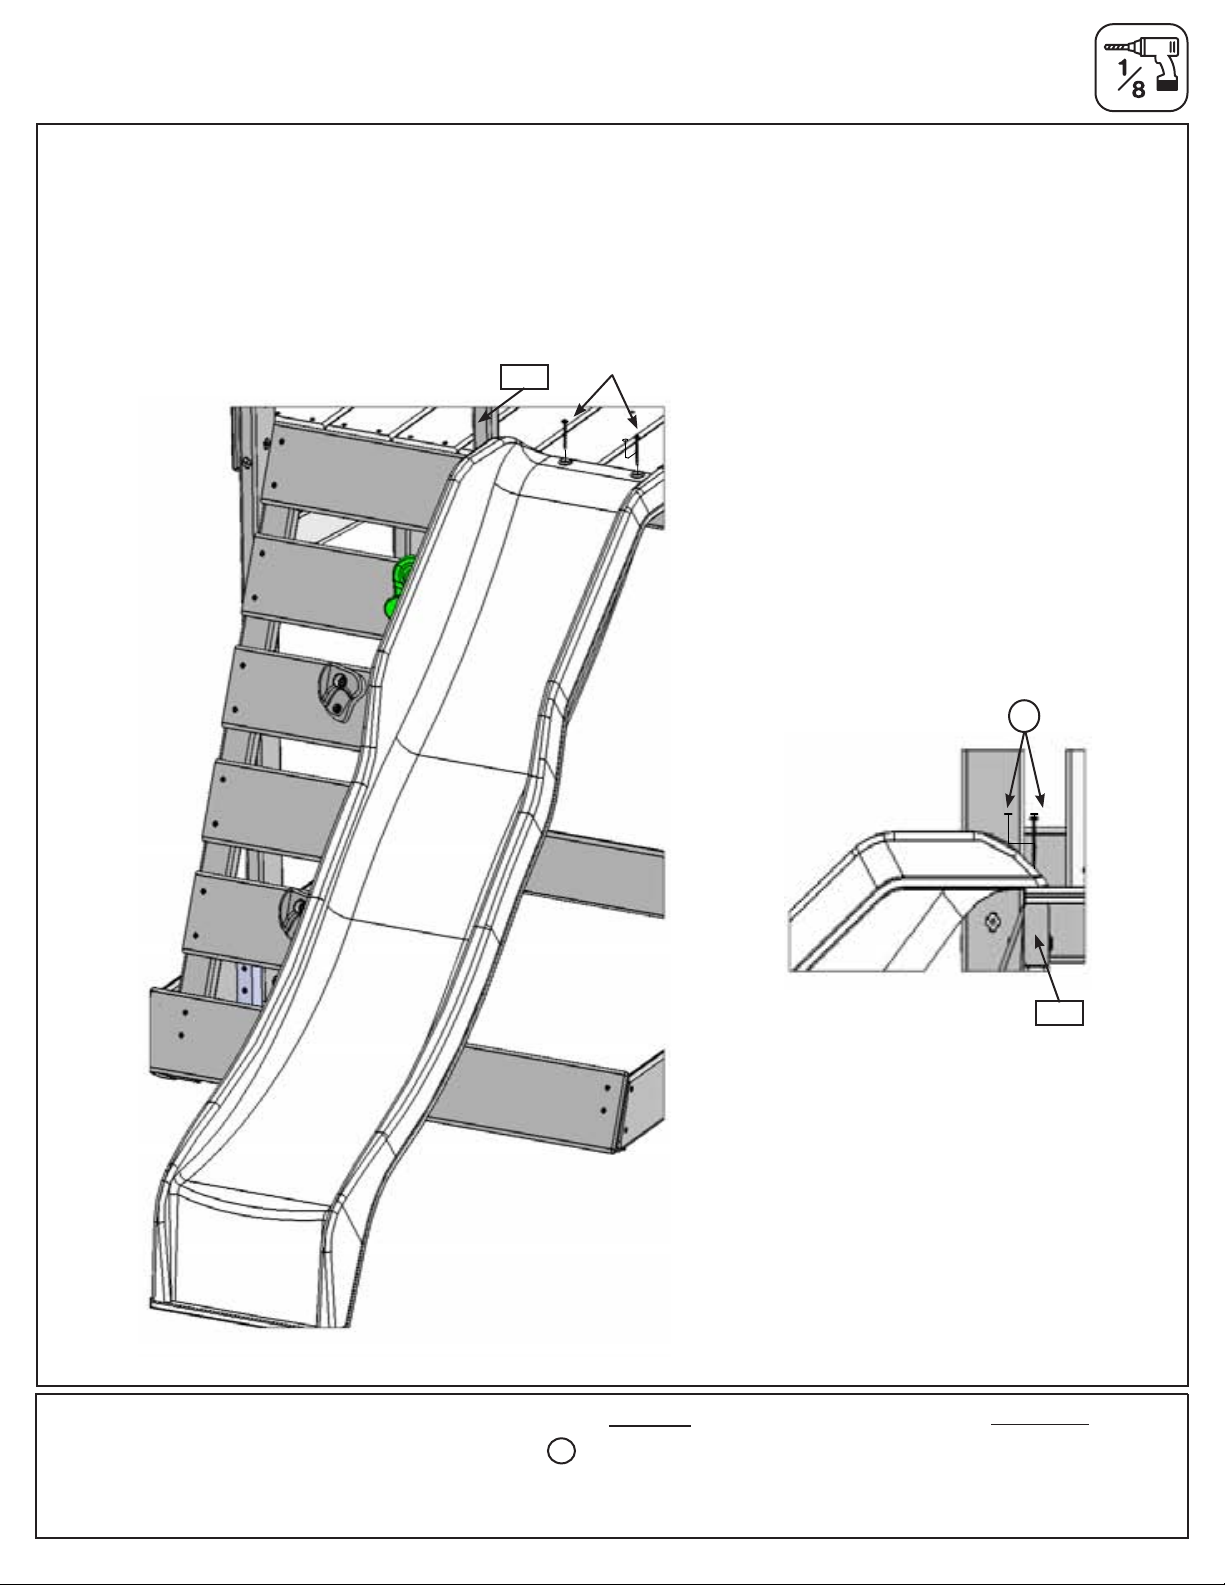
Step 20: Attach Slide
A: Beside Rock Wall, centre slide in opening between (A15) Centre Divider and (A35) Post.
B: Pre-drill 1/8” pilot holes and attach slide to fort through the oor boards and into (A28) Floor Front using 2 (S7)
#12 x 2” Pan Screws. (g. 20.1 & 20.2)
A15
Fig. 20.1
S7
Fig. 20.2
A28
Hardware
S7
2 x #12 x 2” Pan Screw
36
Other Parts
1 x Slide
Page 37
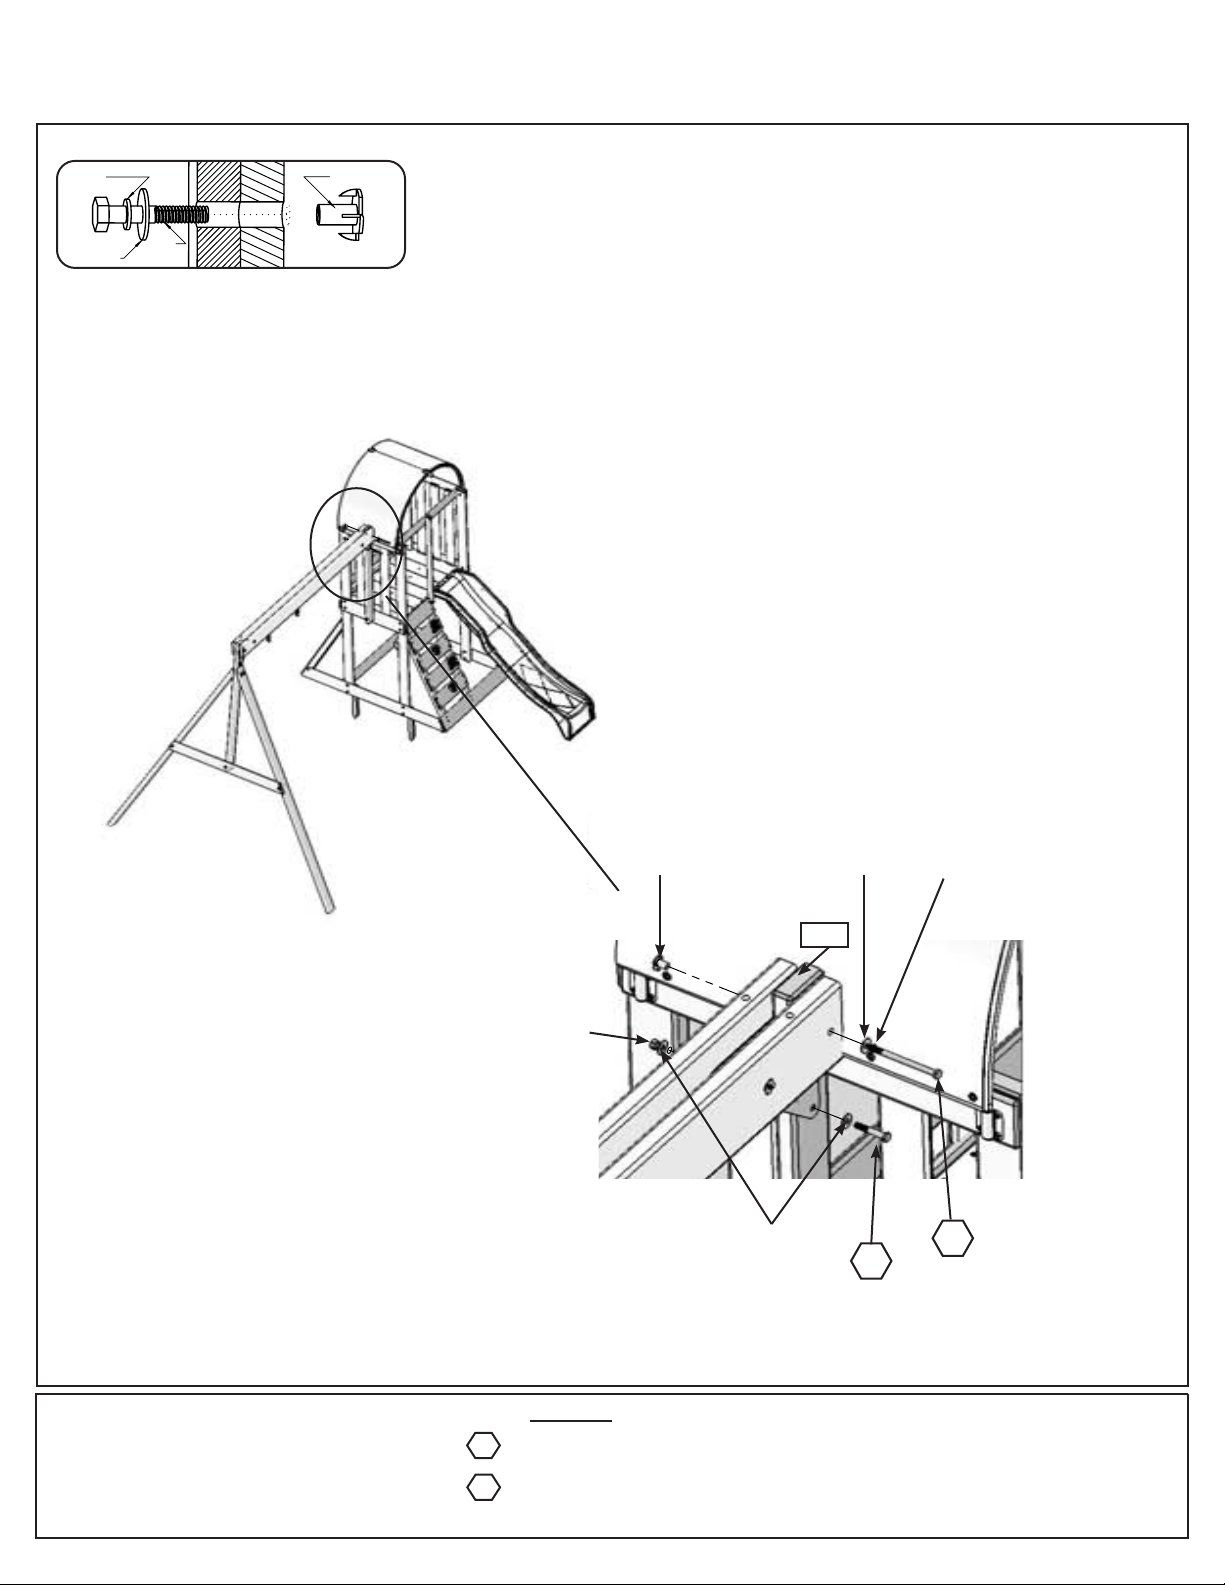
Step 21: Attach Swing To Fort
Hex Bolt Assembly
Lock
Washer
T-Nu t
Flat
Washer
He x
Bolt
A: Attach Swing Assembly from Step 3 to (A21) Wall Mount with 1 (G5) 5/16 x 4-1/2” Hex Bolt (with lock washer,
at washer and t-nut) and 1 (G8) 5/16 x 2” Hex Bolt (with 2 at washers and 1 lock nut) as shown in g. 21.1 &
21.2.
Fig. 21.1
T-nut
Flat washer
A21
Lock nut
Flat washer
G8
Hardware
1 x 5/16 x 4-1/2” Hex Bolt
G5
(5/16”lockwasher,5/16”atwasher,5/16”t-nut)
1 x 5/16 x 2” Hex Bolt
G8
(5/16”atwasherx2,5/16”locknut)
Lock washer
Fig. 21.2
G5
37
Page 38
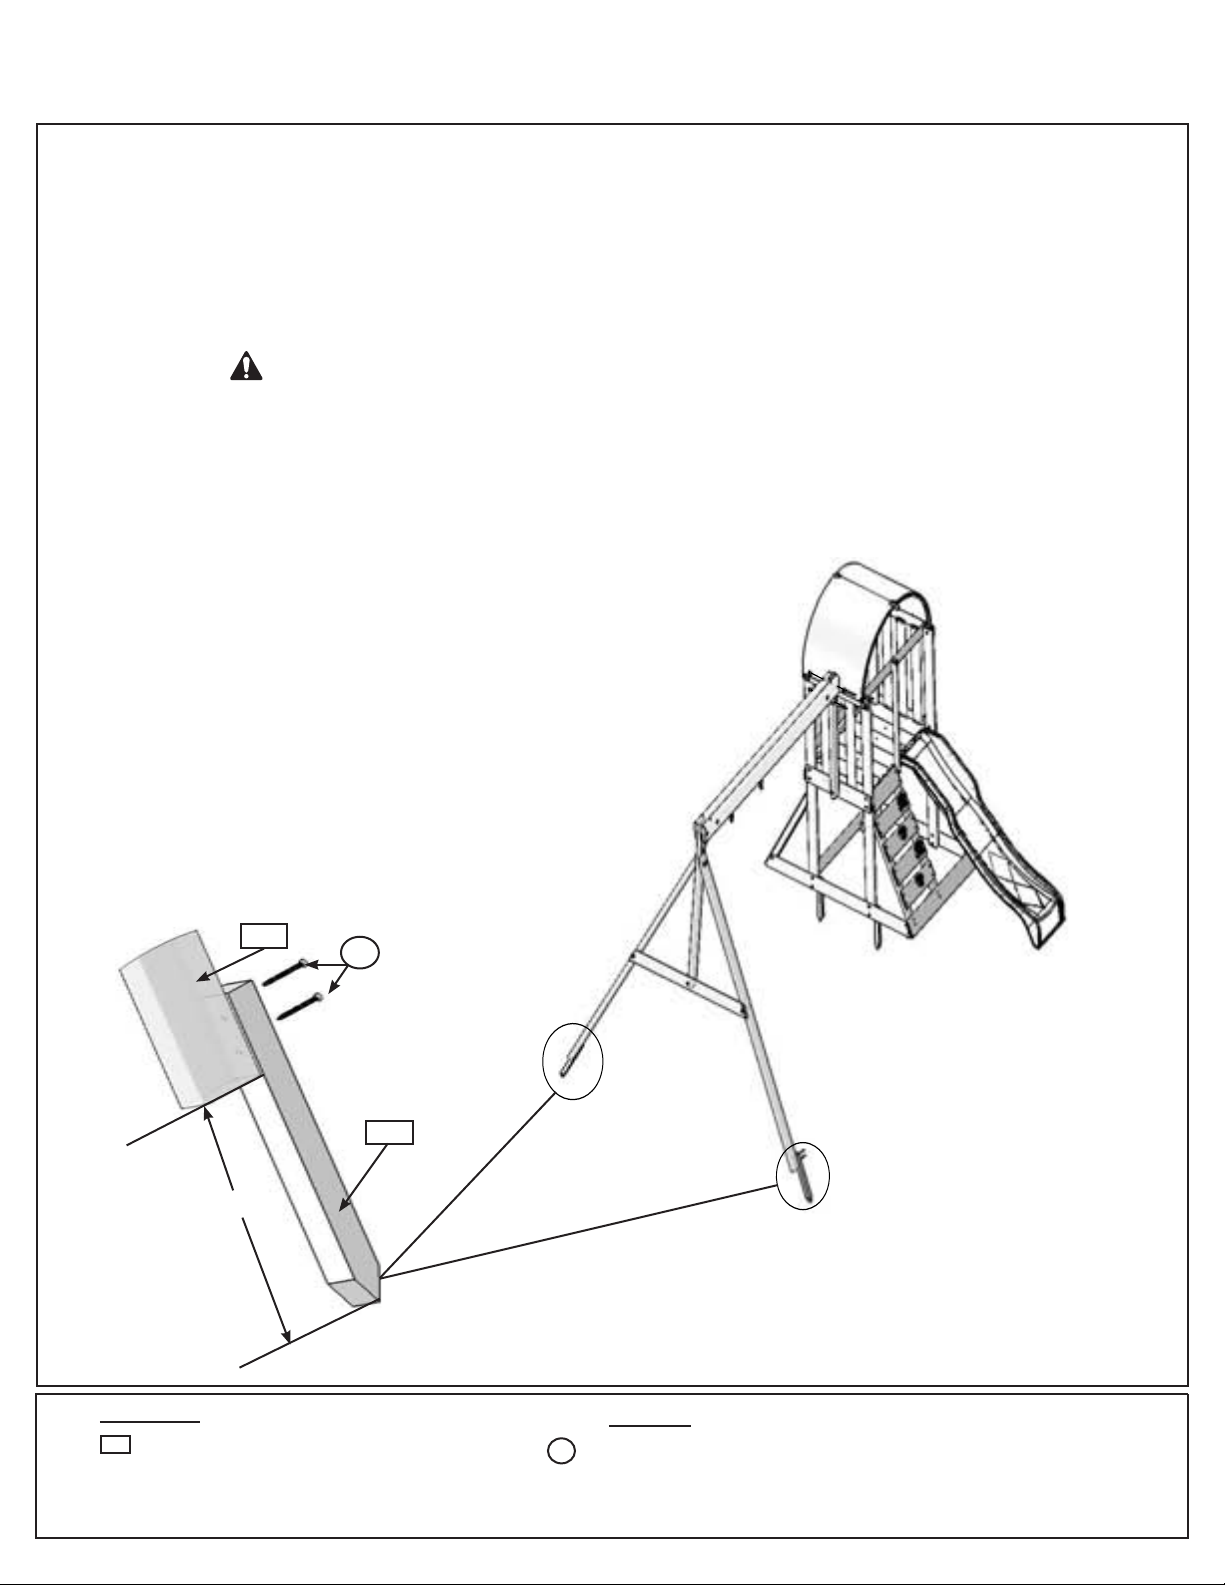
Step 22: Attach Ground Stakes to Swing End
A: Drive 1 (A37) Ground Stake 10-1/2” into the ground at each (A13) SW Post on the inside of the assembly
and attach with 2 (S3) #8 x 2-1/2” Wood Screws per ground stake. (g. 22.1 & 22.2)
WARNING: To prevent tipping and avoid potential injury, stakes
must be driven 10-1/2” into ground. Digging or driving stakes can be
dangerousifyoudonotcheckrstforundergroundwiring,cablesor
gas lines.
Fig. 22.2
10-1/2”
A13
Fig. 22.1
S3
A37
Wood Parts
A37
2 x Ground Stake 1 1/4 x 1 1/2 x 14”
38
4 x #8 x 2-1/2” Wood Screw
Hardware
S3
Page 39
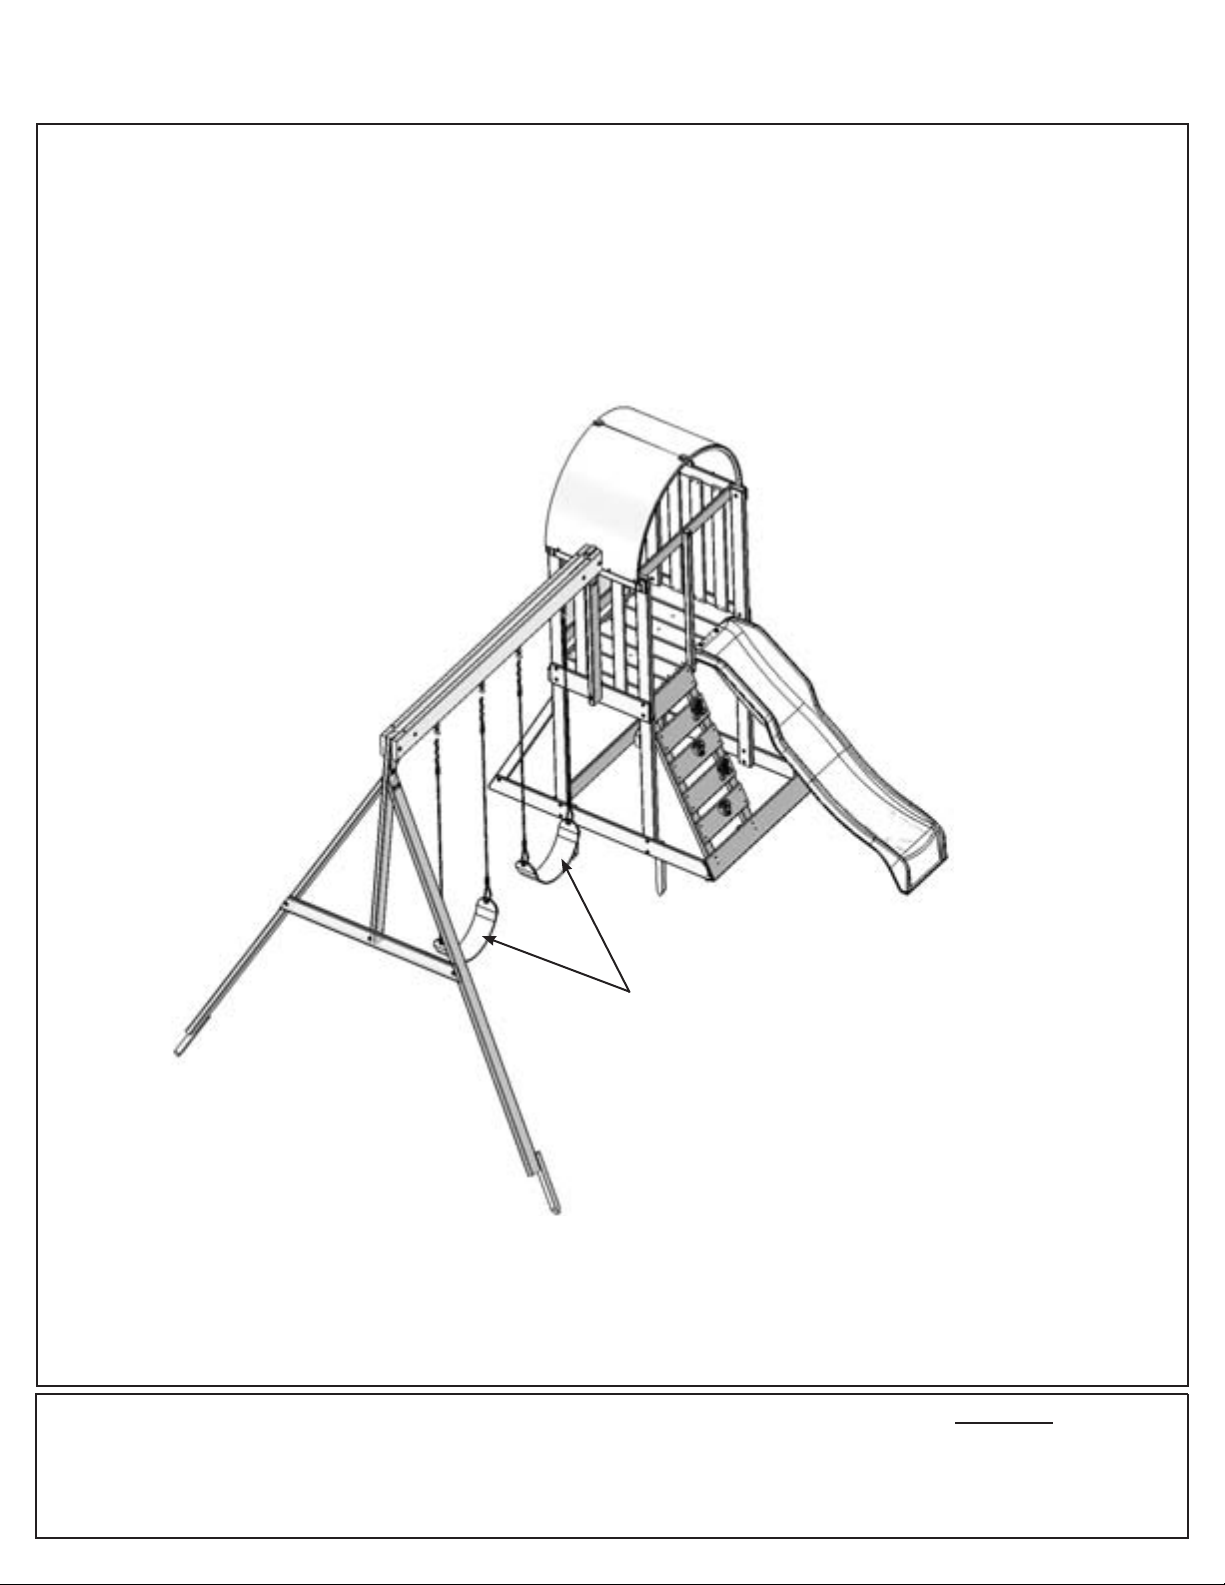
Step 23: Attach Swings
A: Attach 2 Belt Swings to the Bolt-Thru Swing Hangers. (g. 23.1)
Fig. 23.1
Belt
swings
Other Parts
2 x Belt Swing
39
Page 40
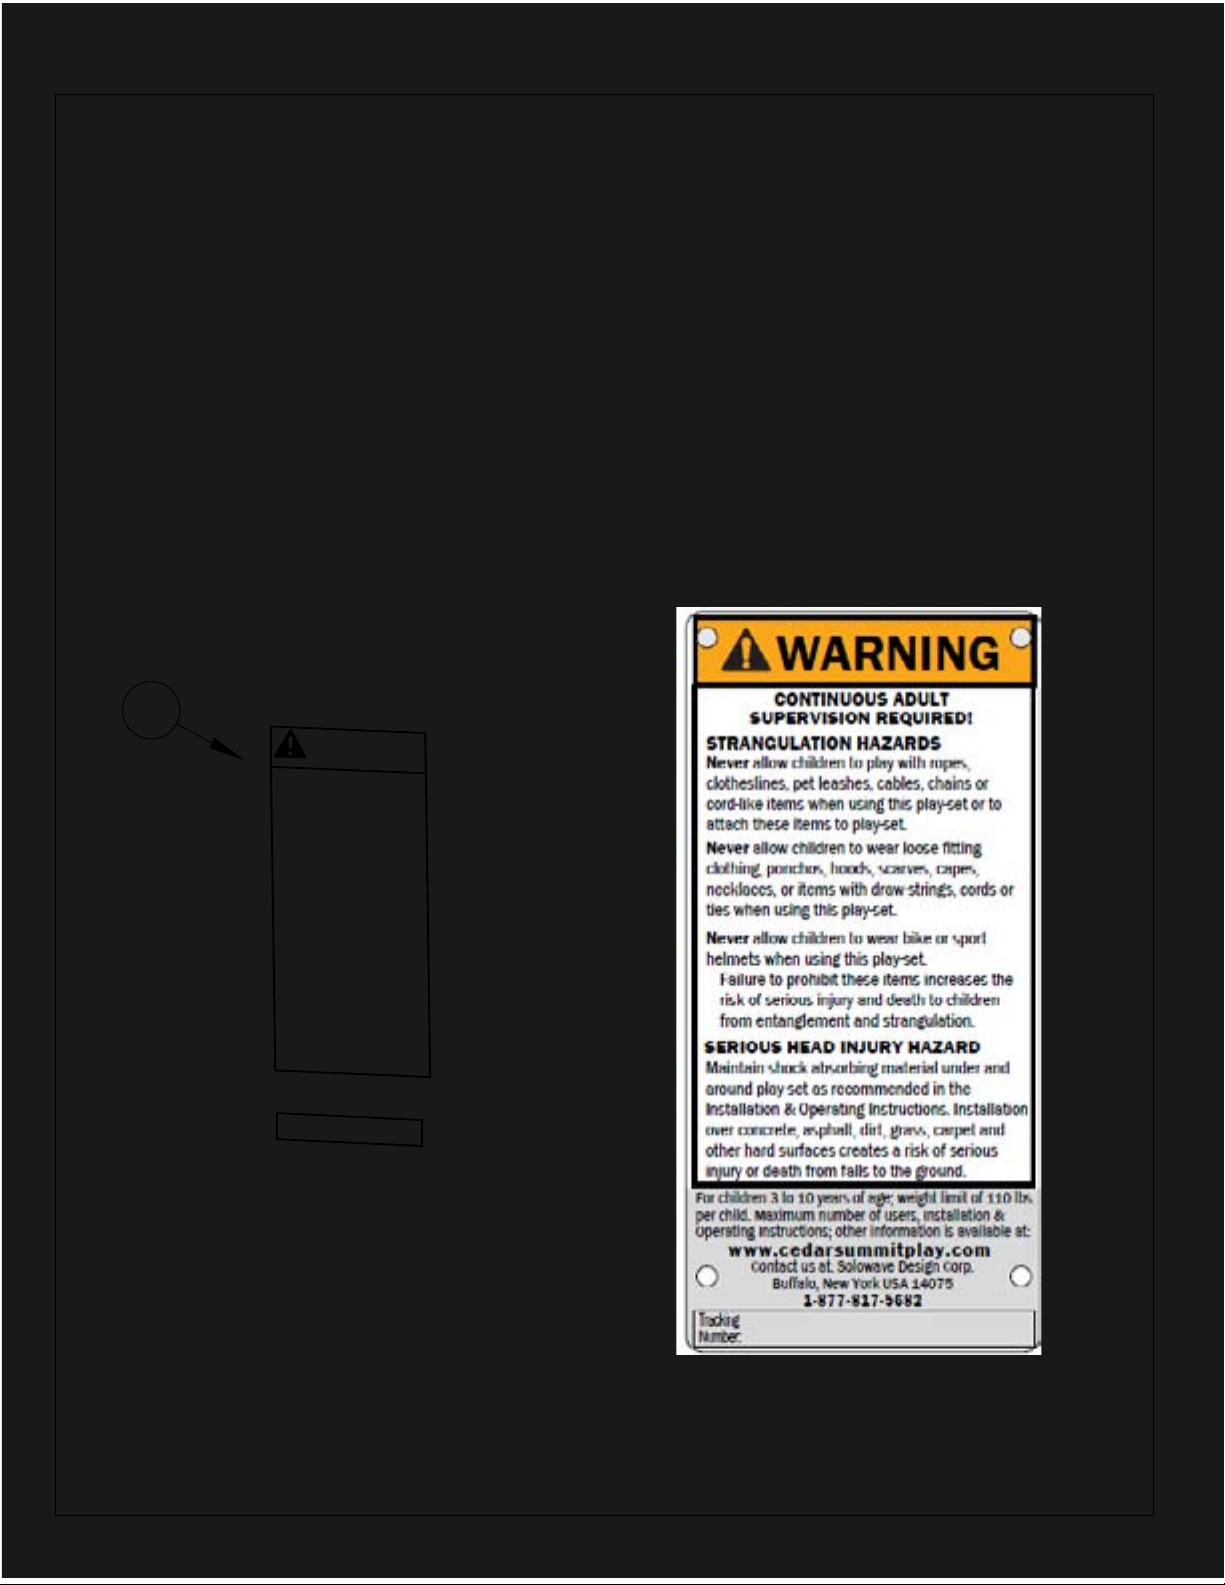
Final Step: Attach I.D. Plaque
ATTACH THIS WARNING & I.D.
PLAQUE TO A PROMINENT
LOCATION ON YOUR PLAY
EQUIPMENT! (Fort or Swing Post)
This provides warnings concerning
safety and important contact
information. A Tracking Number
is provided to allow you to get critical
information or order replacement parts
S5
for this specific model
F
OR
T
OR
SW
-
-
-
-
-
-
-
-
-
-
-
-
-
-
-
-
-
-
-
-
-
-
-
-
-
-
-
-
-
-
-
-
-
-
-
-
-
-
-
-
-
-
-
-
-
-
-
-
-
-
-
-
-
-
-
-
-
-
-
-
-
-
-
-
-
-
-
-
-
-
-
-
-
-
-
-
-
-
-
-
I
NG
W
-
-
-
-
-
-
-
-
-
-
-
-
-
-
-
-
-
-
-
-
-
-
-
-
-
-
-
-
-
-
-
-
-
-
-
-
-
-
-
-
-
-
-
-
-
-
-
-
-
-
-
-
-
-
-
-
-
-
-
-
-
A
R
-
-
-
-
-
-
-
-
-
-
-
-
-
-
-
-
-
-
-
-
-
-
-
-
-
-
-
-
-
-
-
-
-
-
-
-
-
-
-
-
-
-
-
-
-
-
-
-
-
-
-
-
-
-
-
-
-
-
-
-
-
-
-
-
-
-
-
-
-
-
-
-
-
-
-
-
-
-
-
-
-
-
-
-
-
-
-
-
-
-
-
-
-
-
-
-
-
-
-
-
-
POST
N
I
N
-
-
-
-
-
-
-
-
-
-
-
-
-
-
-
-
-
-
-
-
-
-
-
-
-
-
-
-
-
-
-
-
-
-
-
-
-
-
-
-
-
-
-
-
-
-
-
-
-
-
-
-
-
-
-
-
-
-
-
-
-
-
-
-
-
-
-
-
-
-
-
-
-
-
-
-
-
-
-
-
-
-
-
-
-
-
-
-
-
-
-
-
-
-
-
-
-
-
-
-
-
-
-
-
-
-
-
-
-
-
-
-
-
-
-
-
-
-
-
-
-
-
-
-
-
-
-
-
-
-
-
-
-
-
-
-
-
-
-
-
-
-
G
-
-
-
-
-
-
-
-
-
-
-
-
-
-
-
-
-
-
-
-
-
-
-
-
-
-
-
-
-
-
-
-
-
-
-
-
-
-
-
-
-
-
-
-
-
-
-
-
-
-
-
-
-
-
-
-
-
-
-
-
-
-
-
-
-
-
-
-
-
-
-
-
-
-
-
-
-
-
-
-
-
-
-
-
-
-
-
-
.
Attach with (S5) #8 x 1/2" Pan Screws to a
location on your set that is easily seen and
read by a supervising adult.
Page 41

Page 42

Page 43

Page 44
CEDAR SUMMIT
Consumer Registration Card
First Name Initial Last Name
Street Apt. No.
City State/Province ZIP/Postal Code
Country Telephone Number
E-Mail Address
Model Name Model Number (Box Labels)
Serial Number (on ID Plaque)
Date Purchase Purchased From
MM / DD / YY
How would you rate this product for quality?
Excellent
Very Good
Average
How would you rate this product for ease of assembly?
Excellent
Very Good
Average
How would you rate our instructions?
Excellent
Very Good
Average
How would you rate the quality of packaging?
Excellent
Very Good
Average
Would you recommend the purchase of our products to friends and family?
Yes
No
Comments:
Below Average
Below Average
Below Average
Below Average
Poor
Poor
Poor
Poor
MAIL TO:
Solowave Design
TM
375 Sligo Road W.
Mount Forest, Ontario, Canada
N0G 2L0
Attention: Customer Service
REVISION: 11/28/12
Fill out your registration card online at
www.cedarsummitplay.com/registration
Cedar Summit would like to say Thank You for
your time and feedback.
CUT ALONG LINE
 Loading...