

Page 1
Regulatory Information
This equipment has been tested and found to comply with the limits for a Class B digital device, pursuant to part
15 of the FCC Rules. Operation is subject to the following two conditions: (1) This device may not cause harmful
interference, and (2) this device
must accept any interference received, including interference that may cause undesired operation.
These limits are designed to provide reasonable protection against harmful interference in a residential
installation. This equipment generates, uses, and can radiate radio frequency energy and, if not installed and used
in accordance with the instructions, may cause harmful interference to radio communications. However, there is
no guarantee that interference will not occur in a particular installation. If this equipment does cause harmful
interference to radio or television reception, which can be determined by turning the equipment off and on, the
user is encouraged to try to correct the interference by one or more of the following measures:
• Reorient or relocate the receiving antenna.
• Increase the separation between the equipment and receiver.
• Connect the equipment to an outlet on a circuit different from that to which the receiver is connected.
• Consult the dealer or an experienced radio/TV technician for help.
Important: Changes or modifications to this product not authorized by the manufacturer could void the radio
frequency compatibility and wireless compliance and negate your authority to operate the product. The use of
non-compliant peripheral devices could cause
the emission of radiation is are not within the limits set by part 15 of the FCC rules. Only use peripheral devices
that have been tested to provide electromagnetic compatibility when connected to this unit.
Exposure to Radio Frequency (RF) Signals
Your device contains a radio transmitter and receiver. The radiated output power is far below the international
radio frequency exposure limits. These limits are part of comprehensive guidelines and establish permitted levels
of RF energy for the general
population. The guidelines are based on the safety standards previously set by international standards bodies:
• American National Standards Institute (ANSI) IEEE. C95.1-1992
• National Council on Radiation Protection and Measurement (NCRP). Report 86. 1986
• International Commission on Non-Ionizing Radiation Protection (ICNIRP) 1996
• Ministry of Health (Canada), Safety Code 6.
The standards include a substantial safety margin designed to assure the safety of all persons, regardless of age
and health. The exposure standard for wireless mobile phones employs a unit of measurement known as the
Specific Absorption Rate, or SAR. The standard incorporates a substantial margin of safety to give additional
protection for the public and to account for any variations in usage.
As with other mobile radio transmitting equipment, users are advised that for satisfactory operation of the
equipment and for the safety of personnel, it is recommended that no part of the human body be allowed to
come too close to the antenna during operation of the equipment.
Your device has an internal antenna. Use only the supplied integral antenna. Use of unauthorized or modified
antennas may impair call quality and damage the phone, causing loss of performance and SAR levels exceeding
the recommended limits as well as result in non-compliance with local regulatory requirements in your country.
To assure optimal phone performance and ensure human exposure to RF energy is within the guidelines set forth
in the relevant standards; always use your device only in its normal-use position. Do not touch or hold the
antenna area unnecessarily when placing
or receiving a phone call. Contact with the antenna area may impair call quality and cause your device to operate
at a higher power level than needed. Avoiding contact with the antenna area when the phone is IN USE optimizes
the antenna performance and the battery life.
CT4_QSGRev01 1408
Quick Start Guide For
Cedar Tree Technologies
CT4 Handheld
Cedar Tree Technologies
1220 NW Kings Blvd • Corvallis, OR 97330 • 541-230-1206
[email protected] • www.cedartreetechnologies.com/support
Page 2
What's In The Box
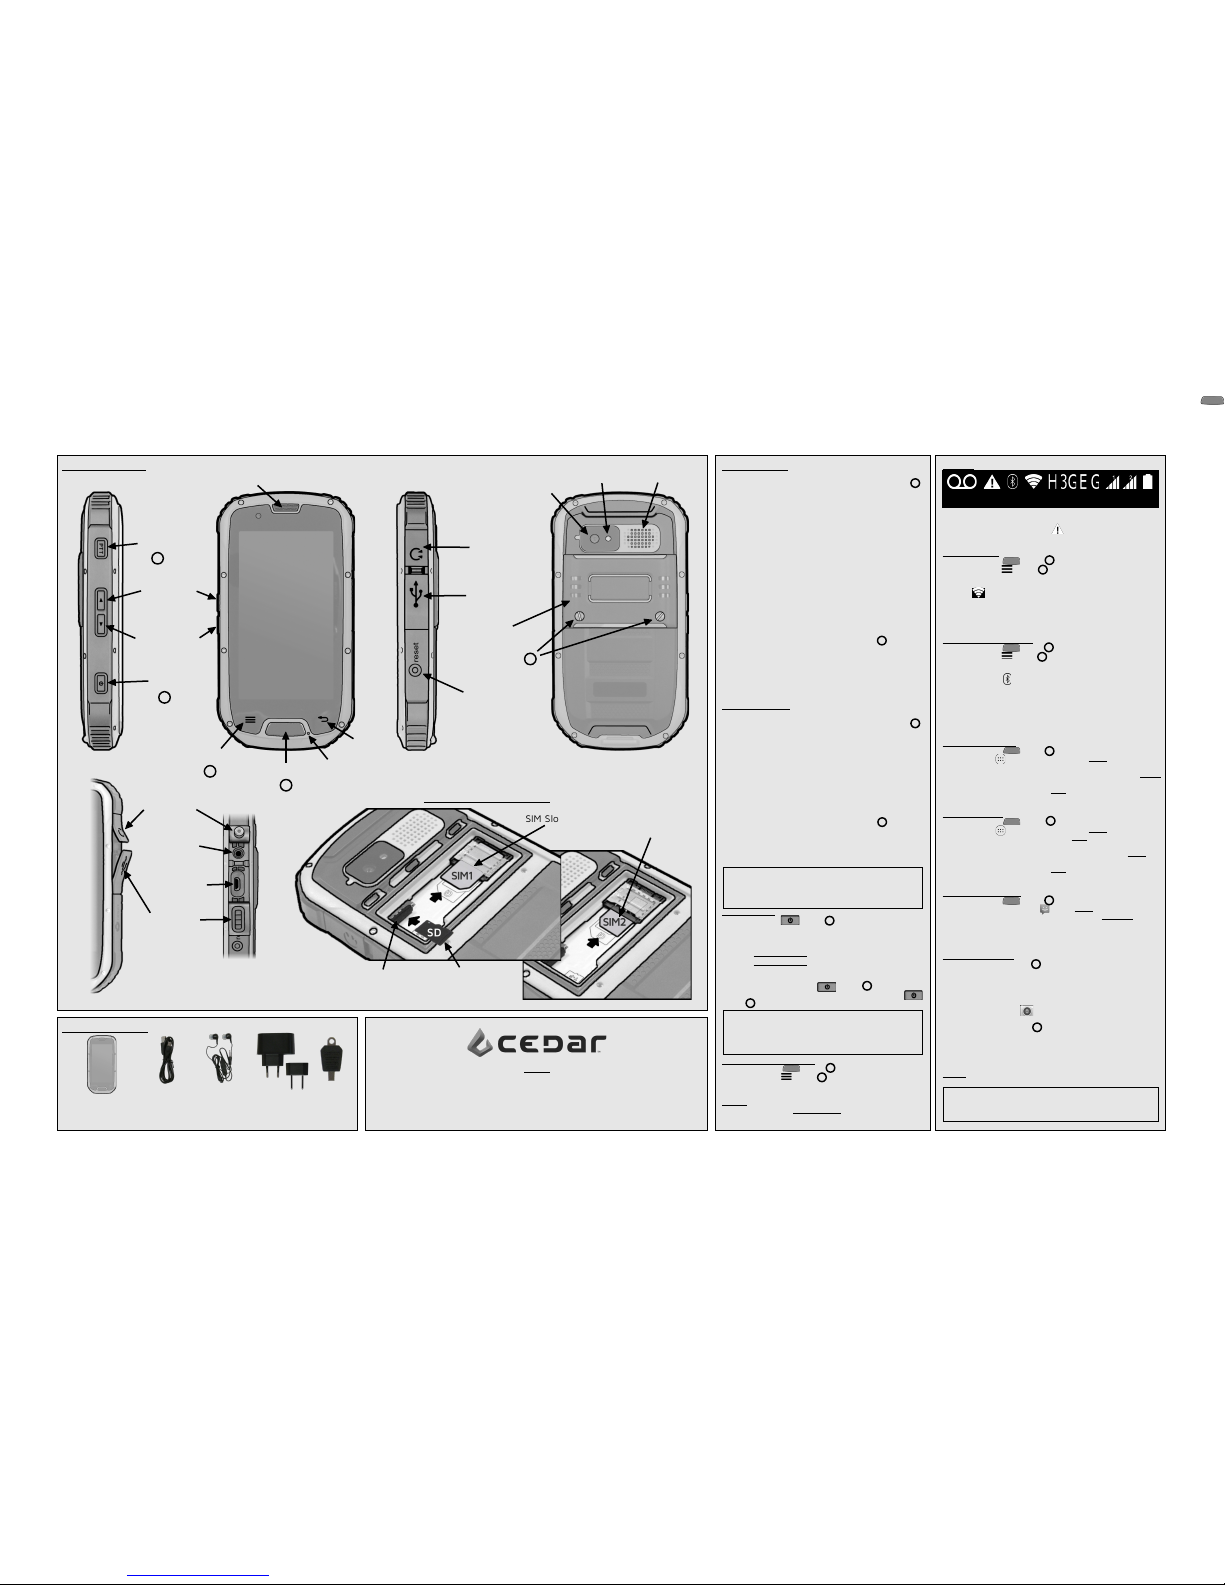
Buttons and ports
Installing a SIM card
1) Orient device as shown in the figure at lower left.
2) Using the provided screwdriver tool loosen the two screws
on the rear port cover by turning them counter-clockwise.
3) Carefully lift and remove the rear port cover with the provided
screwdriver tool
4) Locate SIM Slot 1 in figure at lower left
5) Orient the SIM Card 1 as shown so that the contacts are down
and the notch is on the right
6) Gently push SIM Card 1 into the device with the provided tool
until it is fully seated. NOTE: Forcing the card into or out of the
slot could damage the unit. If the card does not seat properly or
does not function correctly, check the card orientation and try
again. SIM Slot 2 is available for customers who intend to be
connected to two cellular networks simultaneously. To use this
feature, rotate SIM Card 2 as shown below left so the contacts
are up and the notch is on the left before insertion into the slot.
7) To remove SIM cards, gently pull on the SIM card with
tweezers or your fingernail until it slides free of the slot.
8) Replace the rear port cover by aligning the three tabs on the
cover with the slots in the case.
9) Using the provided tool, tighten the two screws on the rear
port cover by turning them clockwise until the cover is fully
seated. Screws should be snug but over-tightening the screws
can damage the unit.
NOTE: The CT4 only accepts full-sized SIM cards. If your cellular
carrier provides you with a micro SIM, you will need to insert the
micro SIM into a SIM card adapter before using it in your device.
Installing an SD card
1) Orient device as shown in the figure at lower left.
2) Using the provided screwdriver tool loosen the two screws
on the rear port cover by turning them counter-clockwise.
3) Carefully lift and remove the rear port cover with the provided
screwdriver tool
4) Orient the SD card as shown so that the contacts are down
and the notch is on the left.
5) Gently push the SD card into the device with the provided tool
until it is fully seated. NOTE: Forcing the card into or out of the
slot could damage the unit. If the card does not seat properly or
function correctly, check the card orientation and try again.
6) To remove the SD card, gently pull on the SD card with
tweezers or your fingernail until it slides free of the slot.
7) Using the provided tool, tighten the two screws on the rear
port cover by turning them clockwise until the cover is fully
seated. Screws should be snug but over-tightening the screws
can damage the unit.
NOTE: The CT4 only accepts microSD cards. Larger SD cards (i.e.
full-sized or miniSD) are not compatible with this unit.
Initial Power Up
1) Press the Power button
for 3 seconds
and wait for
the device to boot
2) Swipe the screen from left to right to unlock the device. The
SIM management app will automatically launch.
3) On the SIM card changed screen tap Ch ange
4) On the SIM management screen tap Da ta c onne ctio n and
then tap the button next to your SIM. This will activate the data
connection for the newly inserted SIM.
5) A quick press of the Po wer button will turn off the
display. To fully power down the device, press the Po wer
button
for 3 seconds
and tap Pow er o ff.
Adding your Google Account
1) Press the Hom e button
2) Press the Men u button
3) Tap Sys tem set ting s
4) Scroll down to Acc oun ts and tap Ad d a n ac coun t on the
Settings screen
5) Tap Goo gle on the Add an account screen
6) Follow the instructions to setup your Google account
Indicators
NOTE: Data speed is indicated by a small superscript above each
cellular icon. H (HSPA) is the highest data speed followed by 3G, E
(edge) and G (GPRS). The warning ‘Slot 2:No SIM card detected’
can be ignored if using only one SIM.
Connect to Wi-Fi
1) Press the Hom e button
2) Press the Men u button
3) Tap Sys tem set ting s
3) Tap the OFF icon next to Wi- Fi to turn WL AN on. The Wi -Fi
indicator will appear at the top of the display and Wi -Fi will read
ON.
4) Tap Wi- Fi to view the list of nearby access points
5) Tap on the access point you wish to connect to. Enter any required
passwords to gain access to the WLAN network.
Connect a Bluetooth device
1) Press the Hom e button
2) Press the Men u button
3) Tap Sys tem set ting s
3) Tap the OFF icon next to Blu etoo th to turn Bluetooth on. The
Bluetooth indicator will appear at the top of the display and
Bluetooth will read ON.
4) Tap Blu etoo th to view the list of nearby Bluetooth devices
5) Tap on the device you want to access
6) NOTE: If you are connecting another device to the CT4, tap No t
vis ible to oth er B luet oot h de vice s to make your device
temporarily discoverable.
Accessing Applications
1) Press the Hom e button
2) Tap the App s icon at the bottom of the Home screen
3) All applications installed on your device will be shown.
4) Tap and hold any application icon to create a shortcut on the Home
screen.
5) Tap Pla y St ore (on the second Apps screen) to locate and install
new applications.
Accessing Widgets
1) Press the Hom e button
2) Tap the App s icon at the bottom of the Home screen
3) Tap the Wid gets tab at the top of the Apps screen
4) All widgets installed on your device will be shown.
4) Tap and hold any widget icon to create a shortcut on the Home
screen.
5) Tap Pla y St ore (on the second Apps screen) locate and install
new widgets.
Sending a Text Message
1) Press the Hom e button
2) Tap on the Mes sag ing Icon on the Home screen
3) Tap on the plus symbol at the bottom left of the Messaging screen
4) Enter the phone number of the person you are texting in the ‘To’ box
5) Type the text message
6) Tap the send icon (paper airplane) at the bottom right
Operating the Camera
1) Press the Cam era button
2) Compose the photo by tapping the Camera screen with two fingers
and sliding them apart to zoom. Slide them together (pinching) to
zoom out.
3) Tap the Lig htn ing icon at the bottom right to turn flash on, off, or
auto.
4) Tap the Cam era
icon at the bottom right to use the front
facing camera
5) Press the Cam era button or circular Shut ter icon at the
bottom right of the display to take a still photo
6) You can capture video with sound by tapping the Vi deo icon at the
bottom-left of the display. NOTE: The video files will be stored on the
SD card.
7) Additional settings are available using the icons at the top of the
Camera screen. Tap the Gea r icon to access advanced camera
settings.
4
Support
Web: www.cedartreetechnologies.com/support
Email: [email protected]
Cedar Tree Technologies
1220 NW Kings Blvd • Corvallis, OR 97330 • 541-230-1206
[email protected] • www.cedartreetechnologies.com
1
CT4
Handheld
USB Cable Earphones Power Plug
and Adapter
Tool
Earphone
Port Cover
USB / Charging
Connector
USB / Charging
Port Cover
Reset Button
Port Cover
Earphone
Jack
Power
Volume up
Volume down
Menu
Home
Back
Microphone
Speaker
Rear
Port Cover
Camera
Port Cover
Screws
Flash
Rear-facing
Camera
1
Installing A SIM or SD Card
2
3
3
SIM Slot 1
SD Card
Port Cover
SIM Slot 2
SD Slot
WARNING: Ensure that the audio, USB, and rear port covers
are clean and securely seated before exposing the unit to
water. Failure to perform this step could lead to water
damage of the unit.
5
NOTE: After impact or extended underwater use, the device
may become unresponsive. To recover, power the device off
and back on. If the device is still unresponsive, charge for ten
minutes before powering on.
NOTE: Use only the supplied Micro USB cables for charging the device
and transferring data. Some existing USB cables will not charge the
device because the barrel is too large, or the connector is too short.
4
1
3
4
1
1
3
3
3
5
Voic ema il
Wi-F i Data Spe eds
Cellu lar 1 & 2
Signa l Str ength
Blue toot h
Warn -
ing
Battery
2
3
4
2
5
2
3
Handset Speaker
 Loading...