


User Requirement Document
Serial Number: 84-20-0076-20-01
Version: 1.0
Issued on: 2005/03/24
for C8000
Prepared by: CECW
Reviewed by:
Date: 2005/03/24
Date:
Approved by:
Date:

Revision Record (Part II)
Version No. Author Date Description Memo
01 Nancy 2005/03/24 First version
5.8.2 Calendar & Schedule
Add "Exit" menu as the last option
of weekly view & monthly view
01 Nancy 2005/03/29
Annex A: C8000 Menu Tree
[4] Mobile office
Calendar
of weekly view & monthly view
3.2.1 Alpha/numeric keypad
01 Nancy 2005/03/30
grid.
press 1 key can input space”
5.6.3 Image editor
Add “Send MMS” menu in Tag-It
option, add it behind “Open” menu.
Change the title to “5.6.3 Tag-It”.
01 Nancy 2005/03/31
Annex A: C8000 Menu Tree
[3]Multimedia
Tag-It
Add “Send MMS” beind “Open”
menu
Add "Exit" menu as the last option
Add follow sentence before the
“ Under T9Eng input method,
Call 24ard

NOTICE
For body worn operation this phone has been tested and meets
FCC RF exposure guidelines when used with an accessory that
contains no metal and that positions the handset a minimum of 1.5
cm from the body. Use of other accessories may not ensure
compliance with FCC RF exposure guidelines.
Call 24ard

REVISION RECORD (PART II)..........................................................................................................2
1.PURPOSE AND OBJECTIVES OF THE DOCUMENT................................................................. 6
1.1 Purpose...........................................................................................................................................6
1.2 Major objectives............................................................................................................................. 6
2 REFERENCE DOCUMENTS............................................................................................................7
3. INTERFACE DESCRIPTION ..........................................................................................................7
3.2 Keypad ...........................................................................................................................................7
3.2.1 Alpha/numeric keypad.............................................................................................................7
3.2.2 Control keypad........................................................................................................................8
3.2.3 Key function in idle screen....................................................................................................10
3.3 Screen...........................................................................................................................................11
3.3.1 Screen elements.....................................................................................................................11
3.4 C8000 indicator light....................................................................................................................13
3.5 C8000 Earphone operation........................................................................................................... 13
4 BASIC DESIGN ................................................................................................................................14
4.1 Basic principle..............................................................................................................................14
4.2 New event.....................................................................................................................................14
4.2.1 Brief description....................................................................................................................14
4.2.2 New message.........................................................................................................................14
4.2.4 Calendar event prompt ..........................................................................................................14
4.2.5 Missed call ............................................................................................................................15
4.2.6 Alarm clock ...........................................................................................................................15
4.2.7 Count-down timer .................................................................................................................15
4.3 Menu ............................................................................................................................................15
4.4 SD Card........................................................................................................................................15
5 SERVICE INTRODUCTION........................................................................................................... 16
5.1 Power on/off.................................................................................................................................16
5.1.1 Power on ...............................................................................................................................16
5.1.2 Switching on Handset by Alarm clock function....................................................................16
5.1.3 Power off...............................................................................................................................16
5.2 Call management..........................................................................................................................17
5.2.1 General principle...................................................................................................................17
5.2.2 Call information ....................................................................................................................17
5.2.3 Scratchpad.............................................................................................................................17
5.2.4 Making calls..........................................................................................................................18
5.2.5 Auto redial.............................................................................................................................20
5.2.6 First incoming call.................................................................................................................20
5.2.7 Single call..............................................................................................................................20
5.2.8 Call waiting (second incoming call)......................................................................................21
5.2.9 Processing multi-party call....................................................................................................21
5.2.10 Multi-party call (telephone conference)..............................................................................22
Call 24ard

5.2.11 End a call.............................................................................................................................22
5.2.12 Mute/Unmute ......................................................................................................................22
5.2.13 Adjust receiver/headset volume...........................................................................................22
5.2.14 Record during the call.........................................................................................................22
5.2.15 Hand free mode during the call...........................................................................................23
5.3 Public Land Mobile Network (PLMN) management ...................................................................23
5.3.1 Public Land Mobile Network................................................................................................23
5.3.2 PLMN list..............................................................................................................................23
5.3.3 Selection of PLMN ...............................................................................................................23
5.4 Handset functions.........................................................................................................................23
5.4.1 Phonebook.............................................................................................................................23
5.4.2 Call list..................................................................................................................................31
5.4.3 Call Forward .........................................................................................................................32
5.4.4 Call settings...........................................................................................................................33
5.4.5 Security settings ....................................................................................................................35
5.4.6 Guard settings........................................................................................................................36
5.4.7 Network settings....................................................................................................................36
5.4.8 In-Flight Mode ......................................................................................................................37
5.5 Settings.........................................................................................................................................37
5.5.1 Sound settings .......................................................................................................................37
5.5.2 Interface settings ...................................................................................................................38
5.5.3 Phone settings........................................................................................................................39
5.5.4 Quick settings........................................................................................................................41
5.5.5 Clock settings........................................................................................................................43
5.5.6 Hotkey settings......................................................................................................................43
5.5.7 Resource Management..........................................................................................................44
5.5.8 Touch panel adjust.................................................................................................................45
5.5.9 Factory Settings.....................................................................................................................45
5.6 Multimedia ...................................................................................................................................48
5.6.1 DV/DC ..................................................................................................................................48
5.6.2 Record...................................................................................................................................51
5.6.3 Image editor ..........................................................................................................................51
5.6.5 Image browser.......................................................................................................................52
5.6.6 Audio player ..........................................................................................................................54
5.6.7 Video player ..........................................................................................................................55
5.7 Messages ......................................................................................................................................57
5.7.1 WAP settings .........................................................................................................................57
5.7.2 Web browser..........................................................................................................................57
5.7.4 SMS.......................................................................................................................................59
5.7.6 MMS .....................................................................................................................................63
5.7.9 QQ (Java based, Provided by 3rd party.)................................................................................70
5.7.10 STK Service........................................................................................................................70
5.8 PIM...............................................................................................................................................71
5.8.1 Phonebook (Please refer to the Handset part) .......................................................................71
Call 24ard

5.8.2 Calendar & Schedule.............................................................................................................71
5.8.3 Notepad.................................................................................................................................74
5.8.4 World time.............................................................................................................................74
5.8.5 Calculator..............................................................................................................................75
5.8.6 Alarm clock ...........................................................................................................................75
5.9 Mobile Office...............................................................................................................................76
5.9.1 PC sync and backup(PC) .................................................................................................76
5.9.4 Chinese-English 2-way Dictionary .......................................................................................76
5.9.5 Stopwatch..............................................................................................................................78
5.9.6 Count-down timer .................................................................................................................78
5.10Games..........................................................................................................................................79
5.10.1 Java Application...............................................................................................................79
5.10.2 Local Games........................................................................................................................81
5.11 System Configuration.................................................................................................................81
5.12 GUI/MMI ...................................................................................................................................81
5.12.1 panel....................................................................................................................................81
5.12.2 Handwriting ........................................................................................................................82
5.13 Drivers........................................................................................................................................82
5.14 Other...........................................................................................................................................82
5.14.1 Shared lib ............................................................................................................................82
5.14.2 Bootloader...........................................................................................................................82
5.14.3 Testing ................................................................................................................................. 82
ANNEX A: C8000 MENU TREE ........................................................................................................83
[1] HANDSET.......................................................................................................................................83
Demo (Only when there is no SIIM card)..........................................................................................83
Phonebook..........................................................................................................................................83
Call list ...............................................................................................................................................84
Call forward .......................................................................................................................................84
Call settings........................................................................................................................................84
Security settings .................................................................................................................................85
Guard settings.....................................................................................................................................86
Network Settings................................................................................................................................86
In-flight mode.....................................................................................................................................86
[2] MESSAGES.....................................................................................................................................86
SMS....................................................................................................................................................86
MMS ..................................................................................................................................................88
WAP ...................................................................................................................................................92
WEB...................................................................................................................................................92
STK .................................................................................................................................................... 94
[3]MULTIMEDIA ................................................................................................................................94
DC ...................................................................................................................................................... 94
DV......................................................................................................................................................95
Call 24ard

Record ................................................................................................................................................96
Image editor .......................................................................................................................................96
Image browser....................................................................................................................................96
Audio player....................................................................................................................................... 97
Video player .......................................................................................................................................97
[4] MOBILE OFFICE..........................................................................................................................97
Calendar .............................................................................................................................................97
Notepad ..............................................................................................................................................99
Chinese-English 2-way Dictionary.....................................................................................................99
Calculator ...........................................................................................................................................99
Alarm clock........................................................................................................................................99
World time........................................................................................................................................100
Stopwatch.........................................................................................................................................100
Count-down timer ............................................................................................................................100
Sync..................................................................................................................................................100
[5] SETTINGS ....................................................................................................................................100
Sounds settings.................................................................................................................................100
Interface Settings..............................................................................................................................101
Phone settings...................................................................................................................................102
Quick Settings .................................................................................................................................. 103
Clock settings...................................................................................................................................103
Hotkey settings.................................................................................................................................103
Touch panel adjust............................................................................................................................103
Resource manager ............................................................................................................................103
Factory settings ................................................................................................................................103
[6] USER DEFINE..............................................................................................................................104
JAVA manager ..................................................................................................................................104
Games...............................................................................................................................................104
1.PURPOSE AND OBJECTIVES OF THE DOCUMENT
1.1 Purpose
This document describes the C8000 Handset from the end user point of view. Besides major
characteristics of the C8000 Handset, it also defines the user interface.
1.2 Major objectives
The goal of C8000 Handset is to become high-end products in the mobile phone market,
principally aiming at the following consumer groups:
Call 24ard

• Senior business personnel
• High-end market
2 REFERENCE DOCUMENTS
<<C8000 User Interface Specification>>
3. INTERFACE DESCRIPTION
3.2 Keypad
The keypad to this Handset has 28 keys in all, which are divided into tow functional
blocks as described below:
• Alphanumeric keypad, 12 keys in total
• Control keypad, 16 keys in total.
3.2.1 Alpha/numeric keypad
Alpha/numerical keypad is composed of 12 keys arranged according to a certain standard.
Among them, there are 10 digit keys referred as [0]~[9] keys, and two symbol keys referred as [*]
Call 24ard
Key
label
key and [#] key.
Keys in the Alpha/numeric keypad allow user to input numbers or characters. As shown in
table 1, press the same key may result in different values depending on different screen
environment.
Under T9Eng input method, press 1 key can input space.
Content Input in Editors
Number
PW Currency Time Calculator
S P L P
Capital Lower case
T9
spell
T9
stroke
1
2ABC
3DEF
4GHI
5JKL
6MNO
7PQRS
8TUV
9WXYZ
0.
Space1@#=
<>()&_£$¥
ABC2AДЕЖЗ abc2адежз — 2 2 2 2 2 2 2
DEF3ÉE∆Φ def3éè∆Φ
GHI4ΓΙ Ghi4Γì
JKL5Λ Jkl5Λ
MNO6ÑOÖØ mno6ñòöø 丶 6 6 6 6 6 6 6
PQRS7ßΠΘΣ pqrs7ßΠΘΣ
TUV8ÜU
WXYZ9ΩΞΨ
ABC&abc exchange
Space1@#=
<>()&_£$¥
Tuv8üù
wxyz9ΩΞΨ
ABC&abc
exchange
1 1 1 1 1 1 1
3 3 3 3 3 3 3
丿 4 4 4 4 4 4 4
丨 5 5 5 5 5 5 5
ABC&abc
exchange
乛
?
0(LP) 0 . 0 0 . 0 0
7 7 7 7 7 7 7
8 8 8 8 8 8 8
9 9 9 9 9 9 9
Input mode switch
*
#
(Longpress can switch
handwriting/keypad
wirting)
Input Symbol
3.2.2 Control keypad
The Control Keypad of the Handset includes:
• 11 keys on the top of numeric keys (PickUp, On/Off, Clear/Cancel/Back, Up,
Down, Left, Right, Middle, Left softkey, Right softkey, Home)
Call 24ard
Same as
Capital
Input
Symbol
Table 1. Input Contents of Alpha/numeric Keys in Different Editors
Same as
Capital
Input
symbol
Same
as
Capital
Input
symbol
Input
mode
switch
# wp decimal
+
positive
/minus

• Five keys on the side of the Handset (Mode key, Menu key, Shooting key,
Focus (in) key, Focus (out) key.
Detailed description of control key:
[On/Off]) key:
• If the handset is power off, press this key to power on (need to long press
when the handset is charging).
• If the handset is power on, long press this key to power off no matter what
state the handset is now.
• If the user is browsing menu or editing text or enter other applications etc,
short press this key to close the current application.
• Press this key to end the current call if during a call.
• Press this key to reject a call if there’s an incoming call。
[PickUp] key:
• If in idle state, short press this key to enter dailed call list.
• If there’s an incoming call, then press this key to accept call.
• Press this key to dial a number.
• If the call is in background, then long press this key to switch back to call. If
there’s no call, then long presss this key to enter dial input screen.
[Up] key & [Down] key:
• In editor, if the input method is pinyin or stroke now, press this key to scroll
page to display candidate character.
• Scroll the screen up/down.
• Browse sms text or other long text.
• Browse previous/next file when preview image.
• Focus in/out when in camera
• Select previous/next file when in audio player and video player.
[Left] key & [Right] key:
• In editor, press this key to move cursor left/right.
• If under pinyin or stroke input method, press this key to move to select word
or pinyin combination.
• Browse main menu collection.
• Scroll page when browse list.
• Browse previous/next file when preview image.
• play previous/next frame when view mms.
[C]( Cancel/Clear/Back)key:
Also named “Back” key.
During editing text, if the string is not null, then short press [C] key to delete the
character on the left side of the cursor, if there is no character on the left side of the cursor,
then delete the character on the right side of the cursor. If the string is not null, then long
press [C] key will clear all string no matter where the cursor is.
If browse menu, short press [C] key to back to previous menu, if already back to main
matrix menu , then short press [C] to back to table, and last short press [C] to back to idle.
Call 24ard

[Home] key:
Press this key will back to idle screen no matter in any circumstance, but the current
running applications don’t close and just switch to background.
There are two side keys on the left side of the phone, they are “Mode” key and “Menu” key;
there are three side keys on the right side of the phone, from the top to down they are
“Multimedia” key (also named “Shooting” key), “Focus (in)” key (also named right side “up” key)
and “Focus (out)” key (also named right side “down” key).
Left side [Mode] key:
• When the phone’s cover is open, as long as already entered in DC or DV, press this key
can switch in DC/DV/DC Player/DV Player.
• As long as there’s an incoming call, then short press this key to silence and long press to
reject the incoming call.
Left side [Menu] key:
• When the phone’s cover is open, as long as already entered in DC/DV/DC photo player,
press this key can open the “Option” menu.
• As long as there’s an incoming call, then short press this key to silence and long press to
reject the incoming call.
Right side [Multimedia] key:
• If the phone’s cover is open, in idle state, long press this key to open DC/DV.
• When the phone’s cover is open, as long as already entered in DC or DV, in preview
screen, short press this key to shoot photo or begin/stop shoot video.
• If the “Option” menu of DC/DV is open, then short press this key to close the
“option” menu.
• During a call, short press this key to start/stop record.
• When there’s an incoming call, short press this key to silence, and long press to
reject.
Right side [Up]/[Down] key:
• Enter DC, when in preview screen, short pressing realizes zooming in steps
and long pressing realizes continuous zooming.
• When there’s an incoming call, short press this key to silence, and long press
to reject.
• When the phone’s cover is open, if already in DC photo Player or DV Player
or video player or audio player, short press to select previous or next file.
3.2.3 Key function in idle screen
When the screen is display idle state, the user can:
• Press [PickUp] key to enter dialed call list.
Call 24ard

• Press [UP] key to enter call list (Mixed).
• Press [Down] key to enter phonebook name list.
• Press [Left] key to enter audio player.
• Press [Right] key to enter SMS.
• Press [OK] key to enter main menu.
• Press [SKL] key to enter main menu.
• Press [SKR] key to enter running program list. The running program list doesn’t include
Touch panel adjust/Flight mode/Factory setting/sync/Call.
• Press number key input phone number, and then dial or enter “Option” menu.
• Use hot key.(Please refer to hot key setting)
• If the phone’s cover is open, long press right side “Multimedia” key to enter DC/DV.
Key function with no SIM card
• Press [OK] key to enter main menu.
• Press [Left] key to enter audio player.
• Press [SKL] key to enter menu.
• Press [SKR] key to enter running program list.
• Press [PickUp] key to enter ‘SOS’.
• If the phone’s cover is open, long press right side “Multimedia” key to enter DC/DV.
3.3 Screen
3.3.1 Screen elements
3.3.1.1 Overview
The Handset employs a liquid crystal display (LCD) screen which is 240 (width)×
320(height) pixels without hard icon. C8000 can display 262K colors, TFT technology.
Each character displayed in screen is a complete graph block, the size of which depends on
the font of the character.
3.3.1.2 Icons
All icons in the Handset are dynamic soft icons. For the detailed icons, please refer to the ID
design.
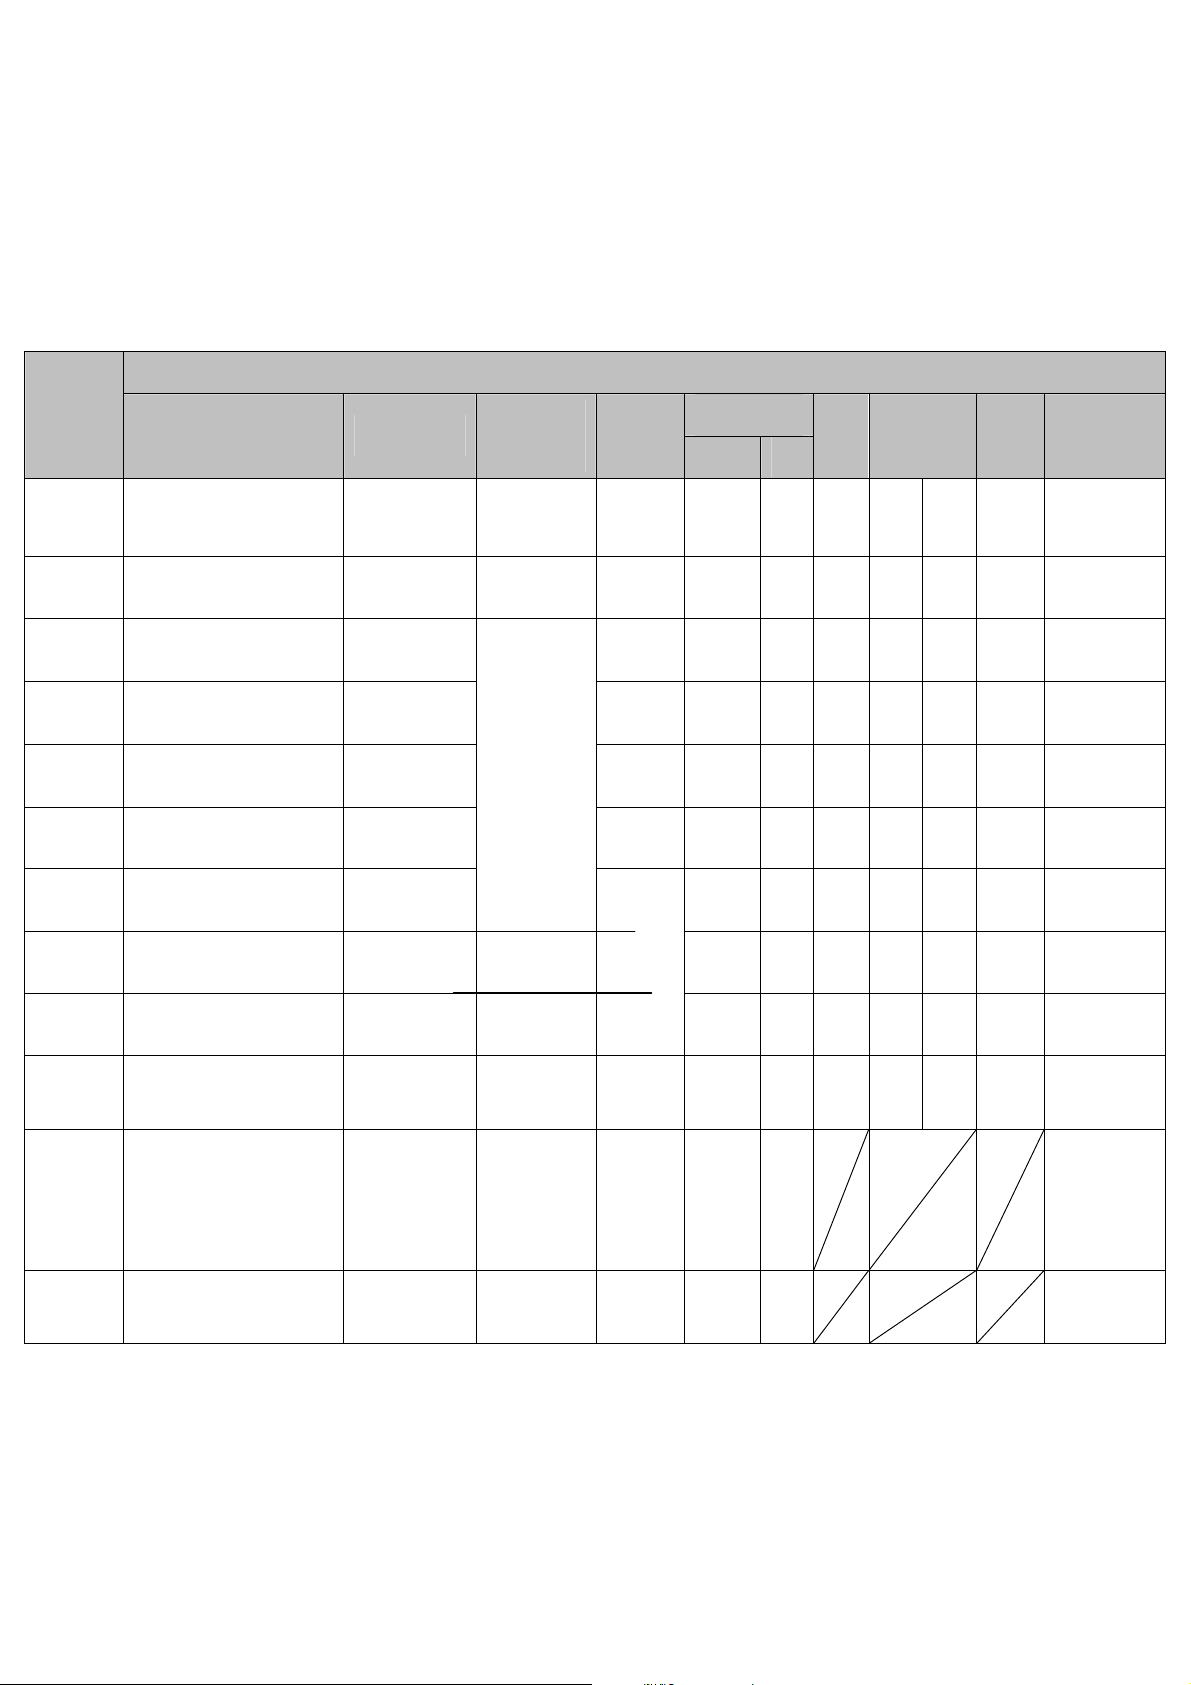
The priority order of icons displayed in the Handset is as shown in the table below with
priority decreasing from up to down.
Icon Icon Name Description
Network (closed
network)
Call 24ard
The Network icon is composed of two parts. The left part indicates the
Handset is registered on the network, and the right part shows signal
strength, which is divided into five levels (from no signal to the
strongest signal strength). Moreover, before the Network is found,
another icon shall be used instead. In PDA mode, Another icon should
be used.
Dynamic Icons
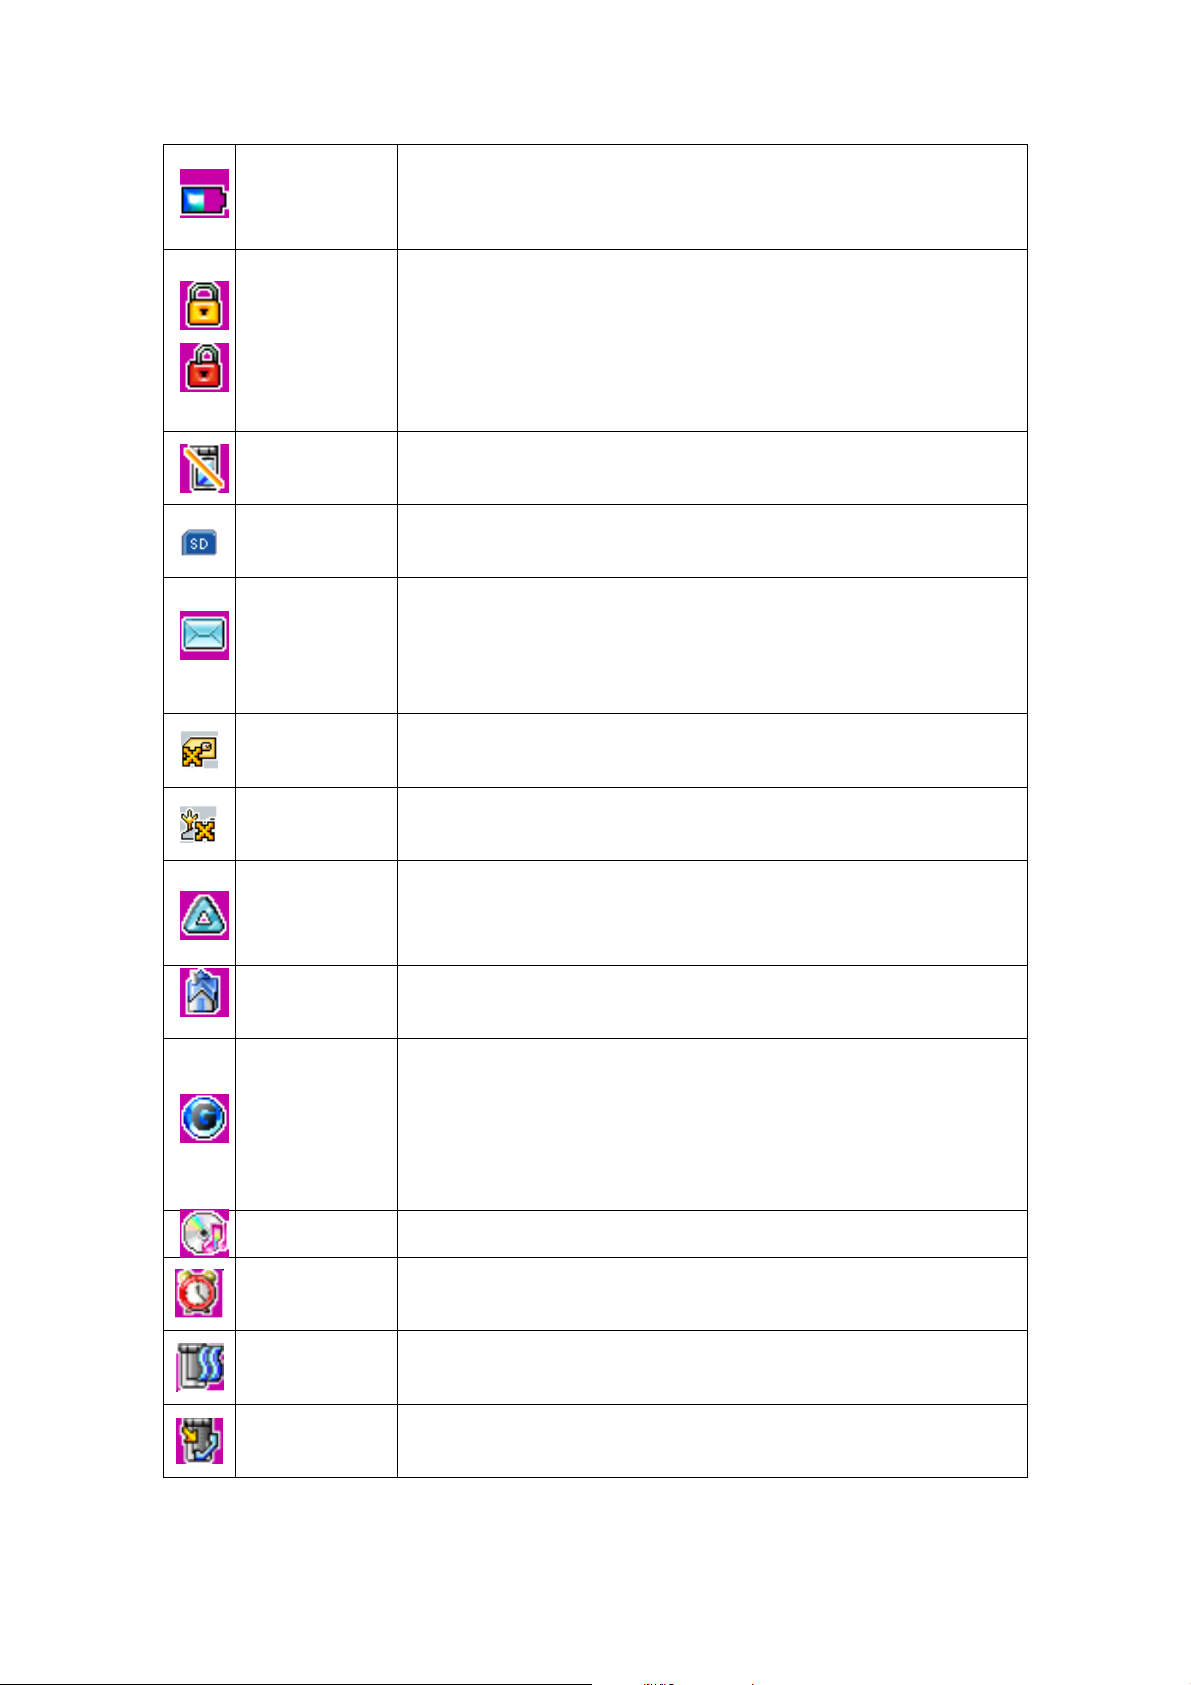
Battery (thick
battery)
Indicates the electricity quantity of the battery with five levels in total.
This icon scrolls during the process of charging. When the thick battery
is used, different icons are displayed.
Lock/Unlock
When lock is activated:
If phone function is activated, the user is asked to input password when
he wants to power on. Display the first icon.
If phone function is deactivated, then display the second icon.
Note: The user can select Lock or Unlock.
Missed call
prompt
SD card
Message
Indicates there is at least a piece of missed call in the missed call list.
If the user plug in SD card in the phone, then this icon will display. The
user can touch this icon to uninstall the SD card.
Indicates there is at least a piece of unread message. When message
memory is full, an icon indicating the memory is full will be displayed.
(including SMS,
MMS, QQ info)
No sim card Indicates there’s no sim card in the phone
Active flight
mode
If the memory is full and there is unread message, then only an icon
showing the memory full is displayed.
Indicates currently the filight mode is active
International
Local network
roaming
Displayed only when the Handset is registered out of the home area and
have registered with a different network (when traveling in other
countries, for example). Otherwise, it is removed.
Displayed when the Handset is registered on a local network.
Otherwise, it is removed. (the function requires network support)
GPRS comprises two situations (exclusive): GPRS network exists but
the user has not attached to the network. Or GPRS network exists and at
GPRS
the same time the user has attached to the network.
Only displays this icon when the user has attached to the network. If the
user does not attach to the network, do not display this icon.
Audio player When mp3 plays, there is a play prompt.
Alarm clock Indicates the Alarm Clock is activated.
Vibration
Call Forwarding Indicates call forwarding function has been activated.
Indicates the Handset will vibrate on occurrence of incoming call, new
events or alarm clock event.
Call 24ard

For the display position of the icons, please refer to OSG.
The Vibration icon is only effect for incoming call, and don’t effect for sms/mms/alarm
clock/etc. If the user press “#” key to on/off vibration is still only effect for incoming call.
For lock/unlock/SD Card/message/miss call icons, the user can use touch pen to click this
icon to active related function. If the user use touch pen to click SD card icon, then user can
uninstall the SD card, if the user user touch pen to click lock/unlock icon, then enter guard setting
menu, if the user use touch pen to click message icon, then enter inbox open message list, if the
user click miss call icon, then open missed call list.
3.4 C8000 indicator light
Under different circumstance, C8000 indicator light flashing principle is as follows:
z Power on/off moment: the light color is red.
z Working:the light color is blue and flash every 3 seconds.
z charging:no matter the phone is power on or power off, the light is purple and always
shine till the charging is end. After charging, the light resumes original state. If during charging,
there is an incoming call, then the light is same with incoming call.
z Incoming call:the light color display three color: blue-red- purple, and according to
this order to flash every 500 ms.
z Low battery alert: the light color is red, and flash slowly.
Silence Indicates silence function has already been activated.
WAP Alert Indicates WAP alert info comes.
Table 2 Icons Description
3.5 C8000 Earphone operation
The user can accept/reject call by button on the earphone. There are four circs:
1. The user input number on the idle
After the user input numbers, if the user short press the button on the earphone, then call
out the number, if the user long press the button, then back to idle.
2. During the outgoing
When the user dialing out a call, during outgoing, short press the button has no response,
while long press the button to end outgoing.
3. During a call
Short press the button has no response, while long press the button to end the call.
4. During incoming(include second call waiting)
If there’s an incoming call, then short press the button to accept the call, while long press
the button to reject the call.
Call 24ard

4 BASIC DESIGN
4.1 Basic principle
If Scratch pad editor is used during the call, then contents of Scratch-pad editor will be
displayed at first after end the call.
Contents of a feedback screen will stay in the screen until a preset time(20 seconds) set by
the timer or until another event occurs. Timing can begin again depending on keystrokes.
When sending a message or making a call, if a number or a name has been selected from the
Phonebook, then press [Pick Up] will begin to launch the call. However, press the key has no
effect in Phonebook editor or message editor.
When displaying a title, if the length of the title exceeds the width of the screen, then the
exceeding part will not be displayed. If the title is a number, then “…” will be displayed in the
beginning of the number.
Once the users close the phone’s cover, all the running applications will be killed, besides
audio player.
If the vibrator is active, then vibrator should deactivated while plug charger.
The files under video player or audio player or image browser or notepad are all sorted by
created time.
When the user input password (include PIN code, call barring password, guard setting
password, etc), if the user input number of character is less than password character number, then
there’s no response when the user press “OK”. If the user want to input number of character is
more then the password charater number, then the phone will forbid it.
4.2 New event
4.2.1 Brief description
When new events occur, they will be put into new events stack, all new event priority is
higher than old event.
The user can press [C] key or right softkey to exit from the broadcasting message or new
event screen environment.
4.2.2 New message
In case of new messages(SMS,MMS), press “Read” in idle state to enter the inbox list. The
user also can use the menu to enter Messages/Inbox. Each unread message is marked with an icon.
4.2.4 Calendar event prompt
If there’s a new calendar even arrived, it will display title on the prompt dialog. If the title is
too long, then display “…” at the end. Without SIM card, these events (Organizer prompts) are
also visible.
4.2.5 Missed call
If there’s a missed call, then the screen will display “missed call” prompt dialog, the user can
press “OK”key or left softkey to read list . After the user press “ignore” or right softkey, the
Handset displays the missed call icon on idle till the user enter call list.
Call 24ard

4.2.6 Alarm clock
When the Handset is off, alarm clock can awake the Handset, display alarm animation and
give out alarm clock ringer. When alarm clock ringer time expires or any key is pressed during the
alarm ringer, the alarm clock will stop and the Handset will automatically turn off.
In idle state, alarm clock is displayed and alarm clock ringer is given out. When alarm clock
ringer time expires or any key is pressed during the alarm ringer, the alarm clock will stop and the
Handset will automatically return to idle state.
In the menu: the alarm clock animation is displayed, and alarm clock ringer is sent out. When
alarm clock ringer time expires or any key is pressed, the Handset will stop the alarm clock and
return to the original state.
4.2.7 Count-down timer
Similarly to alarm clock, however, it is set to prompt the user after the set time passed, and
there is no repeated option. Other operations are the same as alarm clock.
4.3 Menu
In idle state, press “OK’” key or left softkey enter main menu. On main menu , the user can
use touch pen to click header of the main menu to switch to other menu collections, or press
“left”/ “right” key to switch in six menu collections.
Enter main menu, there are two display styles for each menu collection, one is nine grids, the
other is list. The user can press left softkey to switch in this two styles.
When the user select a menu table, press “OK” key or “down” key can select the first menu
under the current collection. If the users select the top layer menu of any collection, press “Up”
key, the focus back to menu collection.
Use direction key to select a menu and press “OK” key to enter this menu. If the focus on a
menu now, then use touch pen click this menu can enter this menu too. But if the focus doesn’t on
this menu, then use touch pen first click this menu to select it, and second click this menu to enter.
This rule is effective for menu list or other list too, but the rule is not effective for option menu
and the list with checkbox or the menu with a popup sub menu.
After enter any menu, if exit from this menu, then the focus still stay on that menu icon.
If the time exceed 1 second when enter a menu, it will display an animation.
4.4 SD Card
The phone support SD card. If the user insert SD card in the phone, then the SD card icon
willl display on the top line of screen. If the user want to uninstall SD card, he should first click
this icon. If the user click this icon, then popup a dialog to ask the user “OK to uninstall SD
card? ”, if the user select “OK” then uninstall SD card, and prompt the user “Now you can take
SD card out from the slot safely”. If the user take SD card out without uninstall it first, then after
the user take it out, popup a dialog to prompt the user “Unsafe to plug out may cause data loss.”
If the phone can’t support the inserted card, or can’t identify the inserted card, then prompt
the user “Unknow SD card plug in.”
Call 24ard

5 SERVICE INTRODUCTION
5.1 Power on/off
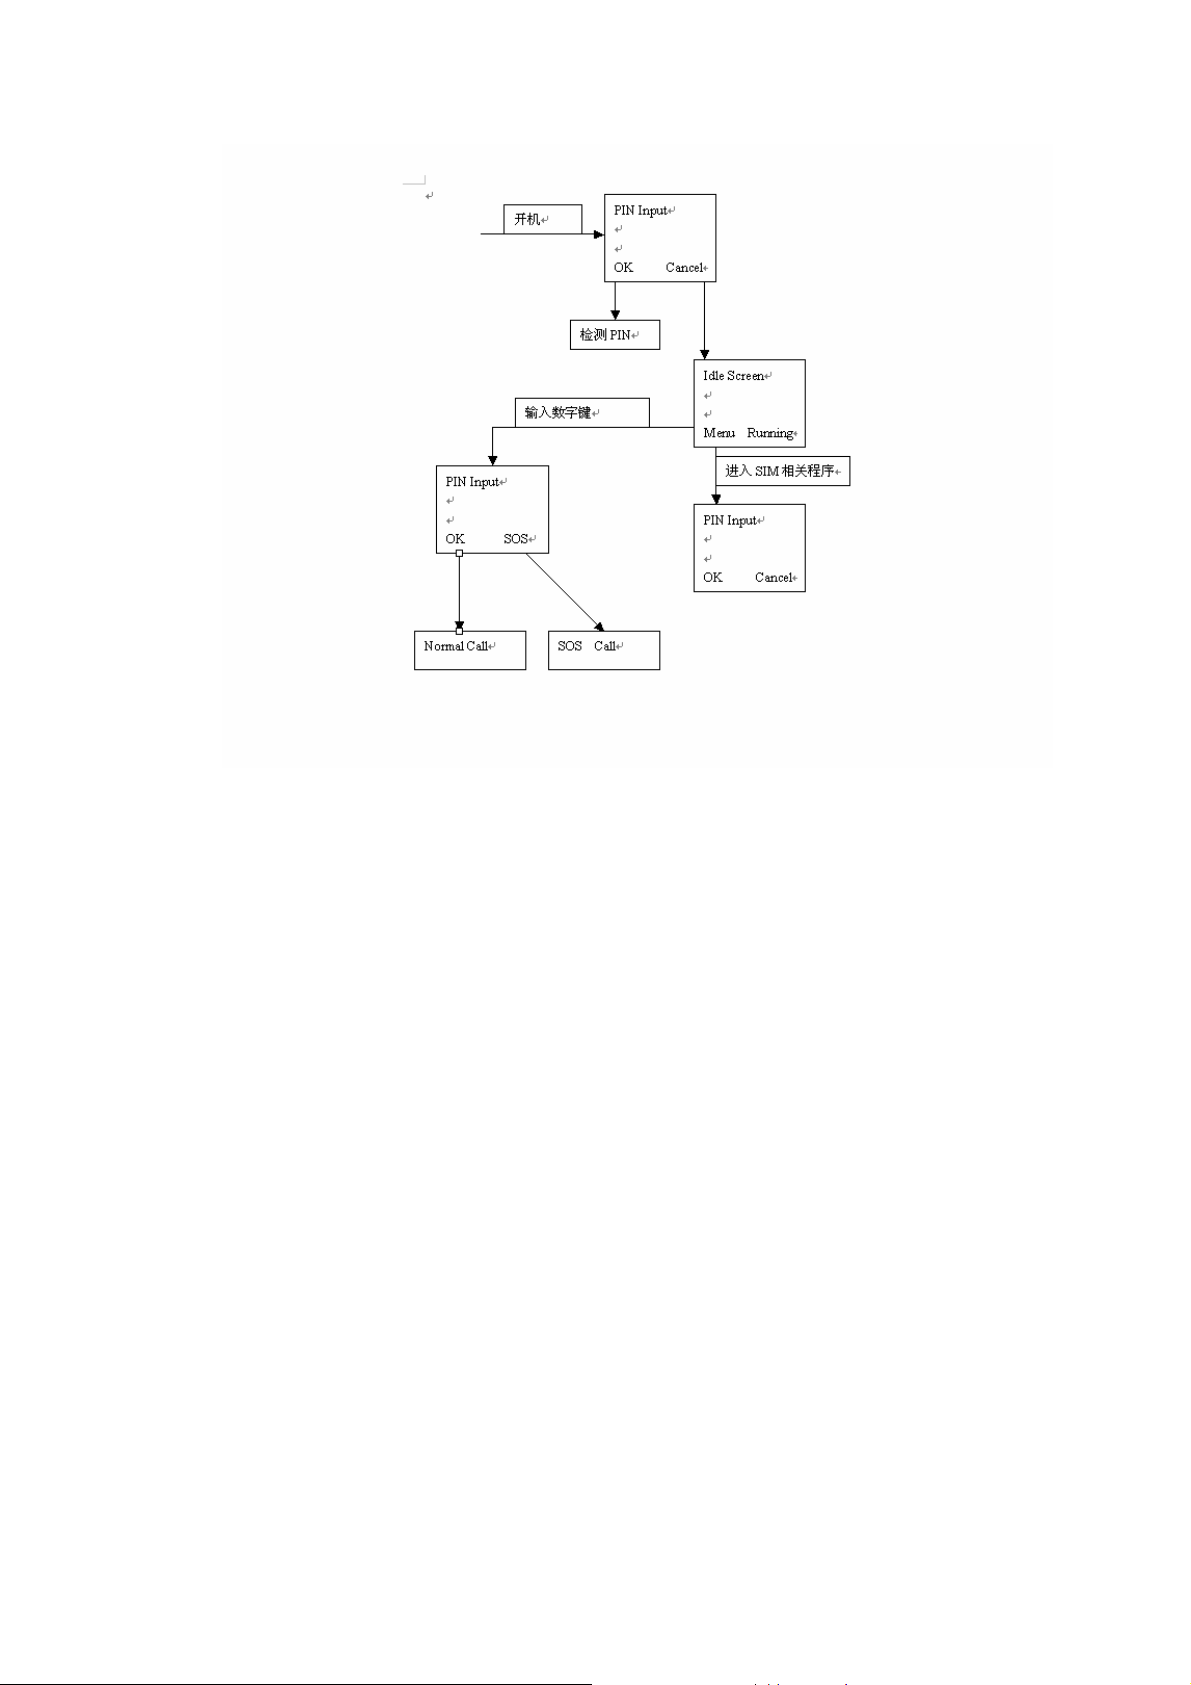
5.1.1 Power on
To switch on the Handset, press [On/Off] key. Before initialization, the Handset displays
power on screen and gives out the power on tone.
If the phone is protected from password(On), will ask the user to input. Only correct input
can go through.
In case of no SIM card or other errors, the Handset will enter “Usage Restricted” state. Under
this state, the user only can switch off the Handset, dial SOS numbers, or press “OK” to browse
some menus, and can’t see all menu options that require SIM card information, such as Message
list.
When the SIM card is not available (for example, IMEI error), the Handset will also enter the
“Usage Restricted” state.
If PIN code is activated or the SIM card is locked, the Handset will enter safe mode. And the
user will be required to input PIN code.
5.1.2 Switching on Handset by Alarm clock function
If the Handset is off when alarm clock time arrives, the Handset will automatically switch on,
activate alarm clock function and display alarm clock screen. After alarm clock prompt is over, or
press any key during the process of alarm clock prompt, alarm clock function will be closed, and
then the Handset will automatically switch off. During this process, no registry or network
connection is required.
In C8000, count-down timer also can switch on the Handset.
5.1.3 Power off
When the Handset is on, long press [On/Off] key can turn off the Handset. The Handset
displays switching off screen and gives out a switching off prompt sound. After that:If auto
switching on has been activated, then “Auto power on has been activated, please pay attention to
avoid automatically switching on the Handset in improper occasions ” will be displayed after the
user long press red key. Then the Handset is turned off.
If the Charger is plugged in, then battery charges will be displayed when Handset off screen.
During the process of switching off the Handset, long press [On/Off] key is of no effect.
In case of insufficient battery electricity, the Handset will give off prompt sound to remind
the user. If electricity quantity of the battery is too low, the Handset will automatically turn off.
5.2 Call management
5.2.1 General principle
During a call, short press right side “Multimedia” key can start/end record and there’s a
Call 24ard

recording icon display on the screen. No matter handfree or unhandfree, the user can record the
current call. The max recording time is 99 minutes. If the call is end, the recorder auto stop, and
the recording file saved automatically, the saved file name is “Call_DateTime”, for example
“Call_200501101520”.
If the incoming cal is a“data call”,then the screen will prompt“data call”,and there’s only
a“Reject”softkey,the user can’t accept this type call.
When there’s an incoming call or dial a number or during a call, if the number or name is too
long to display on the screen, then add “…” after name or number.
During the phone is connecting with wap by CSD mode, if the user call out a number, then
popup a dialog to prompt the user “Can’t call out, here a CSD data connection now”. If there’s an
incoming a call and the user accept this call, then disconnect the CSD data connection, and back to
idle screen after end the call. If the user reject this call, then continue CSD data conneciton.
If the user dialed number is an emergency call, then the name field display “SOS”.
If the user accept a call when open the flip, if he plug the earphone and close the flip, the call
should not be end.
Input numbers under idle state, if the user press “OK” key then open the call option menu
include “IP Dial”, “Send SMS”, “save” , “Dial”.
If the user dial a number or there’s an incoming call, then the phone should matching all
number filed of each namecard, and should not only matching default number type of each
namecard.
5.2.2 Call information
During a call, the name or number of the call party and call duration time should display on
the screen. If the user end the call, and the total time should display too.
5.2.3 Scratchpad
During a call, once press any of [0]~[9] key, [#] key and [*] key, the scratchpad will be active.
Then the Handset will open the Scratchpad editor, where input numbers and symbols can be
added.
Press “Back”, or press [C] key if the input string is empty, the Handset will return to in call
screen. If the user doesn’t press any key, the Handset will also return to in call screen after 20
seconds and save the Scratchpad content at the same time.
Scratchpad can accommodate up to 160 characters.
In the Scratchpad screen, press [On/Off] key can end all call; press [PickUp] key can
automatically hold the original call and dial the number displayed in Scratchpad.
On occurrence of the following, Scratchpad will be cleared:
a) A new call arrives during a call;
b) A new call is established with a third party during a call;
c) The call ends.
Press “Option” in Scratchpad to enter options list, and then the user can select “IP dial”,
“Send SMS” , “Save” or “Dial” to the number.
5.2.4 Making calls
Input numbers under idle state, then press [PickUp], or press “OK”/left softe key to enter
Call 24ard

dialing preparation option list to select “dialing”, “IP dialing”, and then the Handset enters dialing
state. Another way, input numbers under idle state, if the name is display in the matching list,
press up/down key to select and press [PickUp] key to dial. In case of IP dialing, the system will
add an IP special service number before the number input by the user, and then send the number to
the network.
The user also can select a record from the Phonebook or Call list, and press [PickUp] key or
use dialing option to make a call.
If the called party answers, then the screen will display detailed call information, including
the name (or number) of the called party and the call duration; press the volume key on the side of
the Handset can adjust the receiver volume.
Press [On/Off] key screen can end the call, and the Handset will return to Idle state.
5.2.4.1 Dialing an international long distance call
To make an international long distance call, input an international head code (00 or “+”), plus
the country code and the local telephone number of the called party.
To enter “+”, long press [*] key.
5.2.4.2 Emergency call
Whether the Handset is registered on a network or not, the user can dial emergency calls
(“112” or specific emergency calls of the country the user is in).
When insert SIM card, and the phone register network successfully, In idle screen, input an
emergency number and press [PickUp], the Handset will establish a process for the emergency
call.
If the network is not register, then the emergency calls are not saved in Call list.
When there’s no SIM card insert in phone, or register network unsuccessfully, once the user
press a number key, then auto enter “SOS” screen, the user can input number up to 40 bytes. Press
left softkey to call, and press right softkey to back.
When the user insert SIM card, but the SIM card is locked, then the user should input
password. The user press number key to input password, and press left softkey “OK” to confirm.
If the user wants to send emergency all, he should press right softkey “Cancel” to exit PIN input
box and back to idle. On idle state, press number key, then popup PIN input box, press right
softkey “SOS” to enter the “SOS call” screen, the user can input number up to 40 bytes. And then
press [PickUp] key or softkey can directly make a call, and display the dialing animation.
Call 24ard
5.2.4.3 IP call
The user can choose to make IP dialing. After the user selects the “IP call” option, the
Handset will automatically add the preset IP special service number before the telephone number
(if the former several digits are the IP special number, the Handset can recognize it, avoiding to
add repeated numbers), and make IP dialing.
The premise of IP dialing is to input an IP special service number into the IP special service
number screen in Phonebook menu. The input principle is: the IP special service number must be
consistent with the IP special service number provided by the telecom operator who has provided
the SIM card (for example, if the Handset uses a SIM card number provided by China Telecom,
then the IP special service number may be 17951 (currently); for a SIM card number provided by
China Unicom, the IP special service number may be 17911 (currently). The user also can input an
IP number provided by a telecom operator who has business relation with the registered operator).
Thus, once an IP number is input, then the user will be able to select “IP call” to use this function.
If the user has not input an IP special service number before, when he selects “IP call”, the system
will open a number editor and require the user to input an IP number
An exception: If an input or selected telephone number equals to or is less than four digits,
then even after selecting “IP call”, the IP special number will never be automatically added before
the telephone number, and the original number will be used to launch the call.
Once a call is established, its process is the same with “Outgoing calls”. But IP dialing
animation is different from common dialing animation.
Call 24ard

5.2.5 Auto redial
For some network calling management failures, the Handset provides auto-redial function (it
is necessary for the user to activate the Auto redial function in Phone settings.)
Before redialing, it will ask user whether redial. Press “OK” or left softkey, then the Handset
will begin automatic redialing. If the user press right softkey/[C] key/ [Home]key/ [On/Off] key,
then don’t auto redial and return to idle state. If there’s an incoming call or the user closer the flip,
the auto redial is end too.
If a new call arrives during the process of redialing, then redialing will automatically ends. In
the interval of two redialing, the Handset will display redialing waiting screen.
If the user close the flip during auto redial, then end auto redial( If the earphone not plug).
The number of auto redialing will not be added into the Call list.
5.2.6 First incoming call
In case of an incoming call, the Handset will
• Give incoming call prompts depending on the current setting (ringer, volume, vibration).
• Switch the screen to the incoming call animation interface. Incoming calls have the
highest priority, thus can interrupt the current screen of any type.
At that time, the user can:
• Press [PickUp] key or “Accept” softkey to answer the incoming call when the
Handset cover is not closed and enter “In call screen”. After the call ends, the
Handset will return to idle state. If “Any key answer” function is activated, then
press any key (except [On/Off]/ [SKR]/ [C]/ [Home] / [UP]/ [Down]/ [Left]/ [Right]
key) can answer the call. If “Auto answer” is activated, then the Handset will
automatically answer the call 10 seconds after it arrives. In this case, the incoming
call will be added into call list. When the Handset cover is closed, plug in the
headset (if it has not been plugged in) or open the cover (if uncover function is
activated) to answer the incoming call.
• Press the [On/Off] key or the “Reject” softkey to reject the call. The Handset will
return to the previous screen. In this case, the incoming call will be added into call
list.
• Reject by touch “busy tone” button on screen.
• Accept by touch “hand free” button on screen.
5.2.7 Single call
During a single call, the user can perform the following operations
In the call option menu,
• Hold
• Namelist
• Send SMS
• Scratch pad
• Dial new number
• Hand free / Cancel hand free
Call 24ard

• Mute/Unmute
• Reord/Stop record
• End all calls
The user alse can adjust volumn by left side up/down key
To end the current call, also can press [On/Off].
During the call, the user can record the conversation. The coding format is only AMR.
5.2.8 Call waiting (second incoming call)
If a new incoming call arrives when the Handset is in call, the Handset will display call
waiting screen and give out four short waiting prompt sounds. The user can
• Press [On/Off] key or touch [Reject] button on screen to reject the second incoming call,
and the screen will return to single call screen.
• Press [PickUp] key or touch [Accept] button on screen, then the system will
automatically hold the first incoming call and establish talking with the second calling
party.
• Touch [Waiting] button on screen, then the sencond incoming call continue waiting.
• The user doesn’t make any operation and continue to talk with the first calling party,
then the Handset will return to normal in call screen after incoming call prompt ends
after a while. The new incoming call will be saved in call list with “missed call” icon.
• Press numeric keys or [*] and [#], then the Handset will open the scratchpad editor
under call waiting state.
5.2.9 Processing multi-party call
Under this state, the Handset can manage three types of calls at the same time:
• The current active call (including the counterpart of the call)
• A call in holding
• A call in waiting.
When there are calls of the three types at the same time, the user can
• Press [Up]/[Down] key on the side of the Handset to adjust receiver volume.
• Reject the third calling party and continue with the current active call and the call in
holding.
• Press [PickUp] key can activate the waiting call and hold the multi-party call.
When there are a holding call and an active call at the same time, the user can:
• Switch calling state between the holding call and the active call (press [PickUp] can
make quick switching)
• Press right softkey “Reject” to end the current call
• Press red key to end call.
• Record the active call
• Mute/unmute
• Hand free
Call 24ard

5.2.10 Multi-party call (telephone conference)
When the Handset is in call, and there is a call in waiting, the user can answer the waiting
call and hold the current active call, then select “Join”, thus combining the two incoming calls
with the Handset into a telephone conference. The Handset is the manager of the conference.
During the conference, the user can select “Split” in the multi-party call menu, so as to separate a
member and separately talk with him, or select “End call” to end talking with a member.
During the conference, the user can dial the telephone number of a person who is not in the
conference, or accept a new waiting incoming call. The system will automatically hold the
multi-party call. After the call to the new member is activated, select “Join” to add the new
member into the conference.
Doing so, the Handset can add new members in succession into a telephone conference. Up
to 5 members can enter a telephone conference, and in addition, there may be a call in waiting.
During a telephone conference, the screen displays “multi-party call”.
When in multi-party call, if one of phones held itself, then the other phones’ screen will
display “Call has been put on hold”, if that call retrieved itself, then the other phones’ screen will
display “Call has been retrieved”.
5.2.11 End a call
When ending a call in a normal way (the counterpart or the user hangs up the call), the
Handset will turn on the backlight, and display “Call end”, the name (or the number) of the
counterpart and call duration depending on different settings. And then return to idle (or event)
screen.
If a call is terminated due to abnormal causes, then the Handset will display error information
before to display normal ending screen, and give out invalid sound in low volume and turn on the
backlight at the same time.
If the Handset is processing a two-party call (including telephone conference), then the
system will return to the idle screen after the call ends. Here, if there is a second call in holding,
then the holding call screen will be displayed. Press [On/Off] key or select “End call” in the call
holding menu, then the system will end the holding call and return to Idle state.
5.2.12 Mute/Unmute
During a call, the user can select silence or cancel silence, thus the microphone will have no
effect. When a call is switched from a party to the other party, silence will be cancelled.
5.2.13 Adjust receiver/headset volume
During an active call, call holding or waiting, if the Handset has not entered the call menu list,
then press the volume key on the left-side of the Handset can increase or reduce the volume of a
call, and a volume screen is displayed.
After volume setting is finished, the volume is refreshed, and it will remain as the volume of
the next call.
5.2.14 Record during the call
The user can press a dedicated key to start recording during the call (single call, or multiparty
call). AMR coding will be used. And can also stop it.
Call 24ard

5.2.15 Hand free mode during the call
The user can press a dedicated key to enter hand free mode during the call (single call, or
multiparty call). And can also stop it.
5.3 Public Land Mobile Network (PLMN) management
5.3.1 Public Land Mobile Network
In idle state, the Handset displays the network name. If the Handset can’t identify the
network name, then it displays country code and network code.
5.3.2 PLMN list
The Handset manages three public land mobile network lists, separately available PLMN list,
prohibited PLMN list and Preferential PLMN list. If the Handset is rejected by a PLMN when
attempting to register on, it will automatically add the PLMN into prohibited PLMN list.
5.3.3 Selection of PLMN
5.3.3.1 Automatic
In automatic mode, if the Handset has just been switched on or has lost the current network,
it can automatically select PLMN again. The Handset will attempt to register on the home PLMN,
if such attempt fails, then it will try to register on other networks listed in the preferential PLMN
list. If it fails again, the Handset will randomly register a network listed in the available PLMN list.
If it still fails, then the Handset will try to register on other provided networks (receiving signal
strength shall be larger than –85dBm). If it fails, the Handset will randomly try registry in the
order of descending signal strength. During registry, if the user presses any key, “Register” prompt
will disappear. Any operation before registry succeeds will make the Handset give out “Fail”
prompt. After registry succeeds, the Handset will display the antenna icon and give out registry
success prompt sound.
5.3.3.2 Manual
If the user selects to manually register network, then the Handset will search for all available
networks. During this period, the screen will display network searching animation and then
display all searched networks, which are arranged in the following order:
• Home PLMN
• Preferential PLMN
• Other PLMN networks with signal strength bigger than –85dBm, arranged at random
• Other available PLMN arranged in the order of descending signal strength
If the user selects one of the above and press “OK”, the Handset will try to register on the
selected network. If it succeeds, the Handset will be solely registered on this network. This status
will be kept until the Handset is switched off. Once switched off, the Handset will switch to the
automatic selection mode. If registry fails, the Handset will also switch to automatic selection
mode.
5.4 Handset functions
5.4.1 Phonebook
The max storage capacity of handset phonebook is 2000 items.
Call 24ard

When there’s an incoming call, the matching principle between incoming call number and
phone book is as follows:
China Mainland version
¾ both <= 11 digits, only the two numbers are the same length
and same number, we think they are the same number
¾ one < 11 digits and one > 11 digits, they are different
¾ both >11 digits or one >11 one =11, compare the last 11,at the same time, it
support floating 5 digits(like birder match algorithm description)
¾ if the number which saved in phonebook include ext., and the user dial out a
number which include ext. too, then first compare the part before “w” of two
numbers, if the result is consilient, then compare the part behind “w” of two
numbers, if the result is consilient too, then this two number is same,
otherwise this two number doesn’t matching.
¾ If the number which saved in phonebook include ext., and the user dial out a
number which doesn’t include ext., then this two number doesn’t matching.
test cases:
rule1:
1.dial number 123456789 record number in phonebook is 123456789, solution
is match.
2. dial number 123456789 record number in phonebook is 223456789, solution
is no match.
rule2:
1.dial number 13912345678 record number in phonebook is 3912345678,
solution is no match.
rule3:
1.dial number 13912345678 record number in phonebook is 13912345678,
solution is match.
2 dial number 008613912345678 record number in phonebook is 13912345678,
solution is match.
3.dial number 12345613912345678 record number in phonebook is
13912345678, solution is no match.
If the user want to dial out a number, when he input number on screen, the matching principle
between phonebook and input number is as follows:
Only the user input numbers exceed three, begin to match. As long as the phonebook records
includ the numbers that the user input, then it will display. For example, if the user input “623”,
then the all phonebook records which include “623” (for example 623, 8623775, 6238123,
82847623 etc) will display on the screen.
PB includes two types:
SIM Card PB (its capacity depends on SIM) and Handset PB. There’s some difference in
content and operation between them, but they are sorted together in the mixed list.
Call 24ard

z SIM Card PB
Each record in the SIM Card includes s a name and a number. The saved record must
have a name and a number.
z Handset PB (Smart PB)
Each record in the Smart Phonebook is called a “name card” which may include the
following information:
Name (up to 40 bytes for handset phonebook name, up to 14 bytes for
SIM card phonebook name)
Number (each name card can have up to 5 numbers, and the type of each
number is fixed, in other word, each type just only has one number. Each number
cannot exceed 40 bytes and only can be “0--9”, “*”, “#”, “w” and “p”)
Default Number Type (If the records in the SIM Card are copied or
moved to the Handset, the number will be put in this field)
Phone Number
Office Number
Family Number
Fax Number
E-mail (Up to 100 bytes)
Post Address (up to 128 bytes)
Post Code (up to 10 bytes)
Company (up to 128 bytes)
Note (up to 1024 byte)
Each name card (when created by the user) should include a name (can not be empty) and at
least a piece of other information.
In the Handset PB, the user can group the name cards into “Default”, “Family”, “Friend”,
“Colleague”, “Society” or “Private” (the name and corresponding group icon can be changed).
Different group can have different ringer.
If copy a record from other phone, and this record just only has name not has number, then
our phone can display/search/modify it. But if the user modify this record, he must input other info
besides name.
Add new
When the user add a new number, on the “add new” screen, the user can press [up]/[down]
key to move to others input box and edit area. If the user want to add a big head icon for the new
number, he can click the pictuer box, then it will open the picture list, the use can use direction
key to select a picture and press “OK” key to adopt it, if the user select a more biger picture, the
phone should auto zoom. After finished all input, the user can press “Finish” left soft key to save it
or press “Back” key to cancel.
The record without name can’t be save.
Call 24ard

For each record in SIM card or handset, the name field can input any character、number、
Chinese/English word. The number field only can input numbers and “*”“#”“+”“w”“p”, can’t
input Chinese word or other English characters. “w” only can input one time,and the “p” must
display behind “w”. “p” can be input many time. The post code field only can input numbers. The
other fields can input any character、number、Chinese/English word.
When in a call, if the opposite party number is in PB and associated with a big head icon,
then the big head icon will be displayed with the name and number as indication instead of call
icon.
Capacity
Enter this menu, the user will see the total number on the SIM card and handset, and he will
see how many has been used on the SIM card and handset.
Sort the Mixed List
Upon entering the PB, select “Enter” to enter the Mixed List of the SIM Card PB and
Handset PB. The list only display the name of each record.
Mixed List supports Keystroke Quick Positioning
The user can press the initial letter of the name (initial Pinyin letter for Chinese records) to
quick locate the record with this initial letter, and then press [Up]/[Down] key to browse.
Take key [2] for example, valid “Pinyin” defined to key [2] include only “A”, “B” and “C”.
Press key [2] in the PB list, and then:
1. Select “A” to see all Pinyin with the initial letter as “A”: “a”, “ai”, “an”, “ang” and “ao”.
2. Search for Chinese records with initial Pinyin “a” in PB. Move to the first matching
Chinese record with initial Pinyin “a” if there is any.
3. If there is no Chinese name with initial Pinyin “a” in PB, then repeat step 2 to search for
Chinese record with initial Pinyin “ai”, “an”, “ang” and “ao”. Move to the first matching record if
there is any.
4. If there are no matching records, step 1---3 will be repeated to search for letter “B” and
“C”. If found, then move to the first matching record; otherwise it indicates no matching Chinese
records can be found by pressing key [2].
5. Start searching for English records. Search for the name with an initial letter “A” and move
to the first matching record if there is any matching record. Otherwise, search names with initial
letter “B”, “C” and “2”. The rest follows the same procedure.
6. If no matching records are found by all GSM letters defined to [2] key, the cursor will stay
unchanged.
Search
Call 24ard

C8000 supports following Search methods:
• By surname
Classify the initials of all PB records (initial letter for English name and initial
Pinyin for Chinese name, “L” for “Li”(李) for example). The records with same initials
are put in one group. If a letter is none of the initial in Phonebook, it will not be listed.
All letters are listed in alphabetical order. All surnames with the same initial will be
listed to the right of the letter (there will be another line if one line is not enough). All
surnames in one group are listed in Pinyin order. When the user selects a surname, all
records with this surname will be listed.
• By keyword
The user inputs the keyword (including figures and characters) to search for all
matching records in Phonebook.
• By initials
The user inputs initials of the key word to find the name. For example, input
“LB” for “Li Bai”(李白) and “TB” for “Tom Bruce”. The number of name initial
letter is up to 20 bytes.
Note: For English character, it is insensitive to capitalization. For example, “ABC” is equal to
“abc”.
PB list
PB list displays name list with the icon of the record at the right. It’s SIM card icons for
records from the SIM card and the default number type for the records from the Handset. The user
can select “Enter” menu under the phonebook to enter the pb list.
The user can add new records.
The user can also perform the following operations through the Option Menu:
• Add new: the user can add a new phone number.
• Modify: modify the selected record
• Delete: delete the selected record
• IP dial: the user is asked to input IP number first if it is not input before IP dial.
First.
• Send sms: sends short message to the selected record.
• Dial: dial a number. First, dial the default type number, if there’s no default type
number, then dial default field number, if there’s no default field number, then
dial phone number, office, family, fax number by orderly.
• Copy to phone (if the record is in the SIM Card)
Copy the selected SIM Card record to the name card in the Handset PB. The phone
number in the SIM Card record will be put to default phone number field of the name
cards (automatically set as the default field).
Call 24ard

• Copy to SIM card ((if the record is in the phone)
The selected name card in the Handset PB can have up to 5 phone numbers. This
operation will only copy all the phone numbers to the SIM Card with each phone
number occupying one record in SIM Card. Name in the record all comes from the name
field of the name card.
• Move to phone (if the record is in the SIM Card)
• Move to SIM card (if the record is in the phone)
It is similar to “Copy”. Only that the source record will be deleted after copy.
• Send name card: The user can send name card of the selected record by SMS
in text formatting (Note: If the record is too long, part of it may fail to be sent out).
• Speed dial: set hotkeys to the default number of the selected record.
• Copy and edit: copy one record as a new record and the user can edit it. The
new record will add in the memory which the user select. The user can add similar
records at his convenience.
It is similar to “Copy”. Only that the source record will be deleted after copy.
For a selected record in the Handset PB, if it includes non-phone number fields
(such as e-mail, remarks, post address and post code field, etc.), then should popup a
dilaog to prompt user “Some non-number fileds will be lost.”
Detailed Info
When the user selects one record from the PB List and press[OK]key, he will see the
detailed info of the record and modify the items in the record. Similarly, operations can be
done through the Option Menu.
• Operation of SIM Card Record
Modify, Delete contact, IP dial, Send SMS, Dial, Copy to phone, Move to
phone ,Send name card, Speed dial,Cancel big head icon(if there is an icon related with
the record),.
• Operation of Handset Record
Modify, Delete contact, IP dial, Send SMS, Dial, Copy to SIM Card, Move to SIM
Card, Speed dial,Send name card, Cancel big head icon(if there is an icon related with
the record),.
On detailed info screen, the user can move focus on each field of the namecard, if
the user move focus on number-fields, then the user can press green key or select “Ip
dial/dial” in option to dial the number he selected, if the user move focus on non-number
field, then the user can press green key or select “Ip dial/dial” in option to dial the default
type number, if there’s no default type number, then dial default field number, if there’s
no default field number, then dial phone number, office, family, fax number by orderly.
Delete All
Call 24ard

• SIM card
Delete all records that saved on the SIM card. Before delete, it should prompt user.
• Phone
Delete all records that saved on the phone. Before delete, it should prompt user.
Copy All
• SIM to Phone
The records can be copied to the phone one by one to the last until the phone is full.
The name and number of a SIM Card record are copied to the Handset PB with the SIM Card
number defined as the default phone number (default field).
• Phone to SIM
The records can be copied to the SIM Card one by one to the last until the SIM Card is full,
or the SIM Card is full.
A name card in the Handset PB can have up to 5 phone numbers. This operation will copy all
the phone numbers to the SIM Card, and each phone number occupies one record in SIM Card.
Name in the record all comes from the name field of the name card.
In addition, if the Handset PB record not has phone number field, then skip it and copy the
next one.
Move All
It is similar to the above “Copy All”, only that the source records will be deleted after
copy.
Before this operation, should popup a dilaog to prompt user “Some non-number fields
will be lost”.
Group Settings
For six groups, the user can change the name, set the picture or ringer type of each group.
New Entry Storage
New numbers will be added into the corresponding PB as the user selects (SIM Card or
Handset).
Own Info
The user can add, display, modify, send and clear the phone owner’s info.
• Modify Own Info
The user can input different fields here (the details of the field is the same with
Call 24ard

a Handset PB recor, but the own info don’t include group).
• Delete Own Info
The user can clear own info, that is, to empty all the fields of own info.
• Send Own Info
The user can send own info by SMS in text formatting (Note: If the own info
is too long, part of it may fail to be sent out).
Select “Send own info”, then transfer SMS editor. The own info will display
on the SMS editor, the user can send it as SMS.
• Display Own Info
Display all fields of the own info and the user can press [Up]/[Down] key to
view them.
The own info should save in phone, not save in sim card. If the user don’t insert sim card, the
phone’s own info don’t lose. If the user change sim card, the phone’s own info don’t lose and still
can display/modify/delete/add/send.
IP service number
The user can save IP sevice numbers here. If the user change SIM card, then this number
don’t reserve
5.4.2 Call list
5.4.2.1 All Call list
Overview
There are three types of call: missed calls, received calls and dialed numbers, these three
types calls are all sorted together in the mixed call list.
In the call list, N call records can be stored. For each record, up to M latest time and date can
be stored. The order in the number list is based on the latest time of each record.
C8000 sets no limitation to the value of M and N, that is, unlimited. However, considering
flash capacity, a value should be provided to control the total call history number in call list. The
total call history record in call list should be 100 and each record can store 8 latest time. The
earliest record will be deleted automatically if records overflow.
After the user dials a number, information of the call will be automatically added into the call
list with “dialed numbers” icon despite the called party answers or rejects the call.
If the Handset receives a call and the user answers it, than information related to the call will
be added into the call list with “Received calls” icon.
If the Handset receives a call but the user doesn’t answer the call or rejects the call, then
information related to the call will be added into the call list with “Missed calls” icon, and the
screen display “missed call” prompt.
Call 24ard

Call list does not include auto redial numbers.
View and deal with records in Call list
The user enters the Call list. The user can press “Option” softkey to delete records in the call
list. In “Option’ softkey, there are five menu items: “Delete selected”, “Delete dailed”, “Delete
answered”, “Delete missed”, “Delete all”.
The user can select any record in the list , press green key to call the record, and press “OK”
key to view detailed information (the time list of the number). On detailed info screen, the user
can view detailed information of other records by pressing Left/Right key and view more time
record about this number by pressing Up/Down key.
When detailed information of a record is displayed, press “Option” then the user can select
the following functions:
• IP dial
• Send sms
• Delete
• Save (if the number is not in Phonebook)
• Dial
5.4.2.2 Call meters
Overview
This function group allows the user to set or display the latest call duration, the latest GPRS
service, accumulative calls duration . The timer can deal with all calls. Call duration is displayed
in the format of “hh:mm:ss”.
When the Handset is switched off, it still keeps all information of the previous call.
• Last call: displays the duration of the latest communication call .
• Last GPRS call: displays the bytes that the latest GPRS service transmits.
• Call timer: display ccumulative call duration, it has 3 sub menus:
• Dialed call: displays the total duration of all outgoing calls.
• Incoming call: displays the total duration of all incoming calls.
• Reset: clear the accumulative call time to zero. Before clear, should
prompt user “ Are you sure to reset?”
5.4.3 Call Forward
This function just forward call , and don’t forward data and fax. Only unconditional forward
Call 24ard

can set forward icon on idle, and only inquire unconditional forward status when power on.
Totally, there are four types of call forward:
• Unconditional
After unconditional divert is activated, all incoming calls will be diverted to a pre-
designated number. The Handset will give out no prompt information.
• When busy
After Divert when busy is activated, an incoming call will be diverted to a preset
number if the user is busy or rejects the call.
• When no reply
After Divert when no reply, an incoming call will be diverted to a preset number if the
user doesn’t answer the call.
• Unreachable
After Divert when unable to reach is activated, an incoming call will be diverted to a
preset number if the network can’t contact the user.
The user can do the following after he selects any type of call divert:
• Enable
Select this menu, then press the right key, the user can select a number to define the
destination number of call divert service. This number can be a new input number or
from PB, or a voice mail number. Voice mail number is automatically saved in the
Handset. If there is no voice mail number, the Handset will prompt “Number is
empty” when the user activates call divert and selects “Voice mail”. The user can
input voice mail number here.
• Disable
Cancel selected call divert.
• Stat u s
Inquire the status of selected call divert. “Network connecting” displays during
inquiring. The status will be displayed after inquiring.
In addition, the user can Cancel all or Inquire all:
• Disable all
Cancel all call divert at one time.
• Stat u s
Inquire status of all call divert in one operation.
5.4.4 Call settings
The user can set the following items in Call settings menu. The user can press OK key to
activate or deactivate for the first five items and results will be displayed on the right of the menu
Call 24ard

bar.
Minute reminder
The user can select to set minute prompt sound during a call, then the Handset will give out
prompts at the 50th second of each minute after a call begins.
Any key answer
Any key can answer the incoming call except [On/Off]/ [SKR]/ [C]/ [Home] / [Up] / [Down]
/ [Left] / [Right] /[OK]key when this function is activated.
Auto redial
The user can choose to activate or deactivate the auto redial function.
When the auto redial function is activated, if the call can not be connected, the Handset will
auto redial in a certain time interval. There will be a prompt for every redialing. The auto redialing
can be canceled by pressing the key [C].
During the process of redialing, if the user uses the Handset, then redialing will exit
automatically.
Auto answer
The user can choose whether to activate the “auto answer” function, that is, the Handset will
answer the call after a short time(10 seconds) ringer when there is an incoming call.
If the phone’s cover is close and the earphone not plug in the phone, then don’t auto answer
even though the “auto answer” function is active. If earphone was plug in the phone, then can auto
answer.
Active flip
The user can answer the call after open the cover when this function is activated.
Call waiting (needs network support)
• GSM call:
If a new call arrives during a call, the Handset will display call waiting screen and let the user
choose whether to answer the second call when this function is activated. If the function is
deactivated, there will be no prompt when a new call arrives and the calling party will hear the
busy tone. The user can select this menu and then press the right key to activate, deactivate or
inquire the state.
If the user active or deactive GSM call waiting, it should affect three kinds of call at same
time, include voice call, data call and fax call. If the user inquire the state of GSM call waiting,
then it should return three kinds of state, for example:
Voice call active/deactive
Data call active/deactive
Call 24ard

Fax call active/deactive
• GPRS call:
If another voice incoming call arrives when processing a GPRS session, whether or not to
prompt the user is determined by this option. The user can select this menu and then press the
right key to activate or deactivate this option.
Send ID (need network support)
The user can choose whether to send ID(phone number) to the one who is called by this
option. There are four sub menus in this menu:on, off, default and status.
If the user select “On” or “Off”, but the network can’t accept this setting, then need to prompt
the users “The network doesn’t support!”.
5.4.5 Security settings
• PIN code
Some settings of the Handset and SIM card are protected by passwords.
• PIN code protects all services related with network except emergency calls
If the SIM card has not activate PIN function, then the user will not be required to enter PIN
when switching on the Handset. The user can activate the function by using the menu.
• Call barring
The additional service of call barring is set in the Security settings menu. This additional
service allows the user to control the type of calls. For each type, the user can activate, deactivate
or inquire the state.
Activating and deactivating call barring service requires the call barring code, which will be
sent to the network for verification.
Five type calls will be bar:
Roaming calls
All incoming calls are barred from being answered when the user is in roaming.
All incoming calls
All incoming calls are barred from being answered.
All outgoing calls
When the user attempts to dial a call, the Handset will display “dialing barred”.
Local calls only
Only those calls to the home country are allowed.
International calls
When the user attempts to make an international long-distance call, the Handset will display
“dialing barred”.
• Change PIN/Call barring code
The user can use three edit screens (“Enter the old PIN”, “Enter the new PIN”, and “Repeat
Call 24ard

the new password”) to change PIN/Call barring code.
5.4.6 Guard settings
5.4.6.2 Power on protection
If the user active “power on protection”, then the user will be required password when the
phone power on.
To set a password for power on, select it and press “OK” key to open sub menu, the user can
select “on” to active this function. Before active, the user will be required to inpute the password,
if the password is wrong, then can’t active safeguard and back to previous screen.
If the protection is active, then the user will be required password when the phone power
on.If the password input by the user is incorrect, the Handset will directly inform the user the
password is wrong and return to the previous screen. It’s not necessary to set the maximum times
for the user to input password. Otherwise, it may be very troublesome for the user go to the after
service to unlock the password.
Passwords of protection function are four-digit, “0000” as default, and the user can change
them. To change a password, first input the old password, then input a new password and repeat it
to confirm the new password.
5.4.7 Network settings
In idle state, the Handset displays the network name. If the Handset can’t identify the
network name, then it displays country code and network code.
Preferred networks
The preferred networks list is saved in the SIM card and it determines the order when the
Handset automatically registers the network.
• Show preferred networks
Enter this menu, the preferred networks list is displayed and the one on the top is of the
highest priority.
Press “up” / “down” key to select a network, and then press the softkey “Move”, this network
will be moved to the top of the preferred networks list which shows its highest priority.
• Delete preferred networks
The preferred network list will be displayed after confirmation and the user can choose a
certain network and delete it by pressing “Delete” softkey.
• Add available networks
The Handset begins to search the available network after confirmation and then display the
Call 24ard

list on the screen. The user can select anyone and add it to the end of the preferred network list by
pressing the “Add” key.
• Add existing networks
It will be displayed in the existing networks list saved in the Handset after confirmation. The
user can select anyone and add it to the end of the preferred network list by pressing the “Add”
key.
• Add network code
The Handset will open the editor after confirmation. The user can input mobile country code
and mobile network code in turn. The code will be added to the preferred network list after
confirmation again.
Attach GPRS
The Handset supports GPRS and this option designates the time on attaching GPRS. It’s
always attached or only attached during PDP session.
Register again
The Handset will search the available network immediately after confirmation and then the
list will be displayed on the screen. The user can select one of the networks and press the
“Register” key, then the Handset tries to register the network.
5.4.8
In-Flight Mode
If the flight mode is close now, then the user select this menu, it will popup a dialog to ask
“OK to activate in-flight mode?”, press “OK” key of left softkey to active, press “C” key or right
softkey to cancel. If the user press “OK” to activate flight mode, then popup an info box to prompt
“In-flight mode activated” and the signal icon was changed.
If the flight mode is active now, then the user select this menu, it will popup a dialog to ask
“Ok to deactive
in-flight mode?”, press “OK” or left softkey to close, press “C” key or right
softkey to cancel. If the user press “OK” to close flight mode, then popup an info box to prompt
“Iin-flight mode closed” and the signal icon was changed.
The user also can active/close flight mode by click signal icon.
If the user active flight mode, then all operation related to the network can not go on.
If the user active flight mode, then the user can’t register network.
5.5 Settings
5.5.1 Sound settings
Sound settings is composed of two parts:
Call 24ard

• Call Ringer type settings
• The other of the sound settings are in accord with the items of the “Personalized settings ”
of the current selected profile in the “Quick settings ”(no repetition here). Please refer
to 5.5.4 Quick settings
Ring type
The PB in this Handset is composed of six groups. Each group has a different ringer for the
user to know which group’s call it is.
All ringers are in one list, but the user can view ringer of one type by selecting from the
combo box. The selected ringer will be marked with a sign on the right. When the user views the
ringer list, the selected ringer will be played with defined volume (if it is mute, then play with low
volume).
The ringer can be classified as follows: (Can have more if new type is added.)
• All: all the following types (as default.)
• MIDI
• MP3
• AMR
• WAV
5.5.2 Interface settings
Interface settings is as follows:
Idle screen type
The Handset provides four types of idle screen, they are:
o Digital
o Analog
o Monthly view
o World time
The user can preview every type by the left softkey.
Wallpaper
The user can set the wallpaper in idle state.
Enter this menu, there is a picture list. All pictures are display on the screen. The
user can view pictures of one type by selecting from the combo box.
The group type can be: all(default), picture(Jpg), icon(bmp), animation (GIF), and
PNG. ).
The user can press “Up”/”Down” key move focus between combo box and
wallpaper list. If the focus on combo box, press “OK” key to open combo box, then
use “Up”/”Down” key to select a picture type, press “OK” key then the all wallpapers
of this type will display on the list.
Call 24ard

If the focus on the top layer picture, press “Up” key, the focus back to combo box. If
the focus on combo box, press “Down” key, then the focus move to the first picture.
When the focus on a picture, the user can press direction key to select any picture,
and then the left softky “Option” includs:“Preview”、“Icon view”、“List view”、“set
as wallpaper”. Select a picture and then press “OK” key can set as wallpaper too.
If the picture size is smaller than the screen, then the picture will be display at
center; if the picture size is larger than the screen, then the picture will zoom by
geometric proportion.
If the selected picture is .gif file, and if the file is smaller than the scree, then
display it at center and at same time, the animation file must be play; if the file is
larger than the screen, then the file will zoom same as screen and be static.
Idle screen content
The user can set the content displayed on the idle screen:
o Time
o Week
o Chinese calendar (this option only effective for chinese language circs.)
o Wallpaper
o Year and month
Each option mentioned above can be set as “On” or “Off”. The user can use “Up”
/ ”Down” key to select an item, and press “OK” key to on/off it. On this screen, the left
softkey is “Finish”, and the right softkey is “Back”. Press left softkey to save and back,
press right softkey back but not save.
If the user does not select any wallpaper, then the screen will display white
background.
Under English language, can’t display lunar calendar.
Screen theme
The screen theme includes the headline, status bar, soft key, scroll bar, button, etc. (For
more detailed items, please refer to OSG.) Changing theme means changing the screen
display style.
Entering “Screen theme”, the system should list all themes. The user can preview and
select one of them.
C8000 can support three types of themes, (please refer to OSG for details)
5.5.3 Phone settings
Language
Multi-language support means the product can display multi-langrage. Display includes
menu, button, prompt, etc. The content of data file will not change with language. For
example, a Simplified Chinese name card will not change to Traditional Chinese
automatically when the system switches to Traditional Chinese. But menu, button and
Call 24ard

program will switch to Traditional Chinese.
The user can set the language of menu and prompt.
The interface shall support multiple languages, like:
• Simplified Chinese/Trandional Chinese
• English
Under English language, can’t display lunar calendar.
Input method
C8000 can support input methods, such as T9 Simple Chin. Pinyin, T9 Traditional Chin.
Zhuyin, T9 Simple Chin.strokes, T9 Traditional Chin. strokes, T9 Eng, abc, 123.
For each input method, the user can select On/Off. If Off, when the user switch input
method in editor, closed input method will not occur.
Power on greetings
Power on greetings set by the user will be displayed after the Handset plays Power on
animation. The user can set the content of Power on greetings. The max long of wellcome
word is less than 16 words.
Auto power on/off
The Handset has auto power on/off function
Auto power on/off can be set separately. Input power on/off time in time edit window.
Enter “auto power on/off” menu, the focus first on “power on” checkbox, the user can
press “OK” key to on/off “auto power on”, if the “auto power on” is on, then the focus move
down to the “auto power on time” editbox, the user can input time, and press “OK” or
“down” key to move down to the “auto power off” checkbox, the user also can press “OK”
key to on/off it. If the user active “auto power off”, then the focus move down to the “auto
power off time” editbox, after input time, if the user press “OK” key then save and back. If
the user press “down” key then the focus back to “auto power on” checkbox
On this screen, the user can use “Up”/”down” key to move focus between “auto power
on/off” checkbox and “auto power on/off” editbox, the left softkey is “Finish” and the right
softkey is “Back”. If the user press left softkey then save the current setting and back. If the user
press right softkey then back and not save.
Brightness
The user can press “right”/”left” key to adjust lighteness for the main screen(10 levels).
Short press can adjust one level, long press can adjust continuously. When the user adjust
lighteness,he can see the effect real-time.
Call 24ard

LCD sleep interval
On occurrence of the following, the LCD backlight and keyboard light will be lighted:
• Press a key
• During a period after the keyboard is released
• During a period after an accessory is connected to the Handset
• During a period after a new event occurs
• During a period after a call arrives
• During a period when the screen displays call information after a call ends.
• During a period after receipt of a message from the network
• During a period after the Handset cover is opened.
The user can set interval for 10 seconds, 30 seconds, 1 minute, 3 minutes, 5 minutes or 10
minutes.
5.5.4 Quick settings
The user can use the preset parameters by simple operation with Quick settings. The selected
mode will be marked with a sign on the right.
Quick settings are a group of preset character definitions. After one profile is activated, it will
automatically overwrite the original setting. The Handset provides a group of default profiles,
including Normal, Silent, Meeting, Outdoor and car.
For each profile, there is a set of default parameter values (see the following table), which
can be changed by the user according to his preferences and saved in the profile. If the profile has
been activated, the modified settings will become effective immediately, and will be saved
automatically.
In addition, the use can change the name of any profile at will (the length of the name is up to
16 bytes).
General Silent Meeting Outdoor Car
Call ringer alert Ringer+LED
Ringer volume
Message volume
volume 5 volume 1 volume 1 volume 5 volume 5
Vibrate+LED Vibrate+L
ED
Ringer+
Vibrate
Ringer
Alarm volume
Key tone
Off Off Off On
Touch panel tone
Alarm clock Ringer Vibrate Vibrate
Call 24ard
Ringer +
Vibrate
On
Ringer

Message Alert
Calendar alert
Power on/off tone On Off Off On On
Battery alert On On On On On
Enter “Quick settings” menu, there are five profiles display on the screen, the user can use
“Up”/”Down” key to select a profile, press left softkey “Option”, the user will see:
z Enable: Select this menu to active the selected profile and back. The user also can press
“OK” key to active and back. Don’t save if the touch pen clicks it.
z Personalize: The user can change parameters according to his preferences and saved in
the profile
z Rename: Change the name of the selected profile.
Personalize
Based on default value, the user can set value in each mode at will.
Note, if the vibrator is active, then vibrator should deactivated while plug charger.
ringer volume & alert
The user also can adjust ringer volume. There are totally five levels of volume set, along with
gradually increasing volume ( a sign occurs on top of volume level) . Once the user selects one, it
will become effective to the selected group ringer.
The user can select alert type: Activated or deactivate ringer, vibrate or Light.
Message alert
The user can adjust volume of SMS /MMS tone. There are totally five levels of volume.
The user can select alert type: Activated or deactivate ringer, vibrate .
Alarm clock
The user can adjust alarm volume. There are totally five levels of volume set with gradually
increasing volume ( a sign occurs on top of volume level).
The user can select alert type: Activated or deactivate ringer, vibrate .
This menu is effective for count-down timer too.
Calender alert
The user can activate or deactivate tone, vibration.
Events can be from “Calender and schedule”
Key tone
Call 24ard

After Key tone is activated, key tone will be heard when a key is pressed. Depending on the
current situation, the prompt sound may be common or double tone multi-frequency (DTMF)
sound. For the latter, if the user presses an illegal key, the Handset will give out a invalid
sound, not DTMF sound.
Touch panel tone
The user can activate or deactivate tone when clicking the touch panel.
Power on/off tone
The user can activate or deactivate power off tone.
Battery alert
The user can activate or deactivate battery alert in case of low battery.
Automatically switch off the Handset when battery is used out:When the battery electricity
quantity is too low to work normally, the Handset will automatically turn off.
5.5.5 Clock settings
It is used to set the clock of the phone.
Date and time are set in one screen. The week day and Chinese calendar are to be update
when the user input date. On this screen, the left softkey is “Finish”, the right softkey
is ’back’.
The user can select to edit date or time by pressing Up/Down key and move to different
number by pressing Left/Right key. When the focus is in “Date” edit box, press “OK” key or
“down” key the focus jump to “Time” edit box. When the focus is in “Time” edit box, press
“Up” key the focus jump to “Date” edit box, press “OK” key to save and back.
When input date or time, press“C” key to delete a number, long press “C” key clear
all numbers, and display “YYYY/MM/DD” and “HH:MM”.
Only correct numbers are allowed to input and wrong numbers will be filtered. The
cursor will move to next location automatically after input.
The validate date is from 1971/1/1 to 2037/12/31。
Date input format: In the format of “YYYY/MM/DD” ( Chinese ) and
“DD/MM/YYYY”(English).
Time input format: “HH:MM”
Display the week day: In the format of “星期 X” (X is one of “一二三四五六日”)(Chinese),
and one of ”Monday, Tuesday, Wednesday, Thursday, Friday, Saturday, Sunday”.(English)
In Chinese mode displays the Chinese calendar date in the format of “年月日”. The year of
Chinese calendar date should include “天干地支“。
5.5.6 Hotkey settings
A user can set a new hotkey to establish a relation between a certain function and a numeric
key. He also can change or delete an existing hotkey.
Call 24ard

There are two means to set a hotkey: one is long press an undefined numeric key in idle state,
the other is to set the hotkey function for a numeric key in the menu.
After entering “Hotkey settings” menu, the user can browse the Hotkey list. Items in the list
is displayed in a way as follows: in the left is a key code, and in the right is the corresponding
hotkey function; if the key is not used, then “No hotkey” is displayed.
Select a hotkey and presses “OK” or left softkey, then available function list is displayed, and
the user can select a function corresponding to a key from the list. Here, the user can press “OK”
or left softkey to confirm the current setting and back to the previous screen.
When the phone is leave factory, the [1] and [#] hotkey is fixed. Long press [1] key to enter
“Voice mailbox”. Long press [#] key to on/off vibrate.
When the user set “Speed dial” hot key function, it will open an editor,the user can input
number.
Some hotkeys will be invalid when the Handset is in Restricted Idle.
The phone provide a total of 8 hotkeys ([2]-[9] keys) for the user to set a shortcut method.
The default shortcut of 8 keys are as follows, the user can change them.
5.5.7 Resource Management
5.5.7.1 Program installation
By Sync.
5.5.7.2 Resource Management
5.5.7.2.1 File Management
File management is to manage files opened to the user. From top to bottom are:“Local/SD”;
folder name or file list; Shortcut tool buttons. The left softkey is “Option”, the right softkey is
“Back”.
Local /SD:Press left./right key to switch to local flash or SD card.
Folder name:Display the name of current folder and its path.
File list:Display all files in current folder, including folders and files with icons before them
to differentiate. For folder, use touch pen first click folder is select it, and second click this folder
to enter it.
The options include:
Capacity: Display the total capacity, used capacity, left capacity etc (only when the focus on
the page header of local and SD).
Call 24ard

Format: Select this menu to format the SD card, before this opertiong, should prompt the
user (only when the focus on the page header of SD).
The follows options only when the focus on the file list:
Open:Enter selected directory. It is invalid for a selected file.
Cut:Cut the selected file into the buffer
Copy:Copy the selected file into the buffer
Paste:Paste the selected file into the current directory from the buffer
Delete:Delete selected file
Upwards:Back to previous directory.
Select all: Select all the files under the current folder.
5.5.7.2.2 Program management(depend on market demand)
Enter this menu, only the program that can be uninstalled display on the screen. The user can
use “up”/”down” key to select a program, and press left softkey “unload” to uninstall this program.
Press right softkey to back. The program which be uninstalled don’t display on the screen next
time.
5.5.8 Touch panel adjust
In this screen a cross occurs at the top left corner to prompt the user to click. After the user
clicks, a cross occurs at the bottom left corner. After the user clicks, a cross occurs at the bottom
right corner. After the user clicks, a cross occurs at the top right corner. After the user clicks, a
cross occurs in the middle of the screen. After the user clicks, if error is within limit, then the
regulation is successful. It will return automatically in two seconds. Otherwise, it will repeat the
steps above.
If the user does nothing for 10 seconds since it prompts user at any step, it will return
automatically. If there is any event of higher priority (such as the incoming call, alarm, SMS, or
Org. alert), it will also return automatically.
5.5.9 Factory Settings
if the user select “Factory settings”, prompt “OK to restore factory settings?”,if the user
select “OK”, then restore factory setting, and prompt “Restart the Phone to active.”
The user can set the following settings to factory settings value.
Parameter Default value
Quick settings Normal
Quick setting 1name Normal
Quick setting 2 name Silent
Quick setting 3 name Meeting
Quick setting 4 name Outdoor
Call 24ard

Quick setting 5 name Use in car
For other factory settings for quick settings, please refer to quick settings section.
Group ringer type
Default First Midi
Family First Midi
Friend First Midi
Colleague First Midi
Society First Midi
Private First Midi
Sound settings
Message alert
Alarm clock
Event alert
Ringer
Light
volume 5
First Midi
Key tone Off
Touch panel tone Off
Power on/off tone On
Battery alert On
Phone settings
Main screen idle type Digital
Wallpaper First wallpaper
Idle state content All content is on
Interface theme First theme
Languages Simplified Chinese
Contrast 8
Backlight Off after 10 seconds
Input Method All input method is on
Auto power on/off Off
Call 24ard

Hot key settings
Refer to 5.5.6 Hotkey settings
Call settings
Minute reminder On
Anykey answer Off
Auto redial Off
Auto answer Off
GPRS call waiting Off
Active flip Off
Call volume 5
Send ID Off
Call guard settings
Off
Attch to GPRS Always attached
Alarm settings Off
Group icon ID 1~6
Group name Default/Family/Friend/Colleague/Society/Private
IP service number Empty
PB memory type SIM Card
SMS settings
Validity period Maximum
Status report On
Reply path Off
Select memory SIM card
MMS settings
Read report
off
Delivery
report off
Validity period Maximum
Call 24ard

Hide sender off
Delivery time Immediate
DV/DC
Meter mode (Only in DC) Single
White balance Auto
Image size 320*240
quality Fine
Photo effect Off
Exp.compen 0
Storage location Phone
Display info On
5.6 Multimedia
5.6.1 DV/DC
If the phone’s cover overturns to 90 degree and time more than 1.5 s, then enter DC/DV.
Leave factory, system enter DC default, but next time enter DC/DV according to the user enter
what function last time.
If the phone’s cover overturns to 180 degree and time less than 1.5 s, then the screen content
doesn’t change, but the screen should overturns 180 degree too. If the time more than 1.5 s, then
enter DC/DV.
After enter DC/DV, press the left side “Menu” key to open “Option” menu, right side
“Up”/”Down” key is as same function as “Left”/”Right” key on keypad, this four keys can
select an menu item from the “Option”. Enter any menu item, left side “Menu”/”Mode” key is
as same function as “Up”/”Down” key on keypad, this four keys can select any value of the
selected menu. Press right side “Multimedia” key to start/stop shooting, or close “Option”
menu is the “Option” menu is open.
For DC, the user can use “Up”/”Down” key and right side keys to adjust zooming(support
8 times zooming). Short pressing realizes zooming in steps and long pressing realizes
continuous zooming.
In the preview screen, if there is no key pressing operation for 2 minutes, the system will
return to the idle screen.
During recording a video, the phone need to judge the memory by real-time, if the free
memory is insufficient (already use 98% of memory), then auto stop the recording and save the
current recorded video, and last
wirte a red line word on the screen to prompt the user “Memory is
Call 24ard

insufficient”.
Picture and video will be automatically saved to the selected storage equipment by the
default name(like img001.jpg, where 001 is increased automatically.) when shooting is over. The
taken picture is kept on the screen for 2 seconds and then the system returns to the preview status.
After shooting, the screen back to preview, press left side “Mode” key can switch to DC
player/DV Player to view the photos or videos. In DV player, press right side “Up”/”down” key
can select previous/next file, press “Multimedia” key to play/pause, press “2”/”8” key to adjust
volume. In DC player, press right side “Up”/”down” key can select previous/next file. Press left
side “Menu” key and left softkey to popup/hide sub menu(If the sub-menu was popuped, press
“mode” or “Multimedia” key to close sub menu), the sub menu includes: Delete、Edit、send,select
any option, and press “OK” or use touch pen to click it to execute.
Note: the option menu for both DC and DV are very similar. They will be listed as below.
The difference will be specified.
• Meter mode (Only in DC) (this option’s value won’t be apply for next time if the value
is changed)
There are three modes in DC: Single (default), Continuous, Self-timer 10sec.
“Single” is used to shoot one photo.
“Continuous”, is used to continuously shoot a series of photos. The interval of two
pictures depends on HW maximum speed. And fixed number (5)of photos will be taken.
Self-timer 10 sec, is used to shoot one photo with 10 seconds delay after the user presses
key to start.
• White balance(this option’s value won’t be apply for next time if the value is changed)
The user can select from one of the following items
Auto(default),
Sunny
Cloudy
Incandescent
Fluorescent
• Night mode(only in dc, this option’s value won’t be apply for next time if the value is
changed)
Two choices:ON、Off
• Image size/quality
For the quality, the user can adjust the image compression ratio. The higher the
compression ratio, the lower the picture quality. Three quality can be selected:
quality only for DC
Normal
Call 24ard

Fine(default)
Super fine
The image size can be:
For DC
1280*1024
640*480
320*240(default)
160*120
For DV
320*240(default)
176*144
If the user want to shoot MMS picture, the image size will be restricted as follows.
(Only allowed sizes are shown to the user.)
MMS Image size only can be: 160*120
• MMS mode(For DV): Limit the size of video in 50k.
• Photo effect(this option’s value won’t be apply for next time if the value is changed)
The photo effect can be as follows:
Off(default)
Neutral
Vivid
Sepia
Cold
Reversal
B&W
• Exp.compen(this option’s value won’t be apply for next time if the value is changed)
The user can change it range from –2EV to +2EV, 1EV per step. 0 as default.
• Storage location
It can be saved in “SD card” or “Phone”. The system will save the photo/video by the
default name(img001.jpg/vid001.avi). If the storage is not enough, the system will
indicate, “Storage is full!”
• Display
This setting specifies whether to display DC settings parameters on the
screen.
If the selection is “On” (default), the shooting screen will display some
Call 24ard

info (Please refer to UIS). If the selection is “Off”, the above mentioned info
will not be displayed.
In DC/DV preview screen, there’s a “Exit” icon,the user can use touch pen to click this
icon to exit fromDC/DV.
5.6.2 Record
The system enters record screen. The content is :
• Title: Recorder
• Button “START” to record and then the key becomes “STOP”.
• Recorded time
• Max record time
• Left and Right softkey prompt.
The record format is AMR only.
If record time is already set, presses“START” to recording and now the right softkey is
“Stop”. During recording, the system will judge the free memory by real-time and automatically
stop recording and save the recorded file when the free memory is insufficient or the record time is
over. If the user presses “STOP”, the system will stop recording in despite of the record time and
now the right softkey is “Back”. Press “C” key or “Back” softkey can exit recorder. When
recording is over, the system will save the recorded file by a default name.
The user can edit the max record time, use touch pen to click “Max record time” area, and
then press numeric key or “Up”/”Down” key to adjust time, press “Left”/”Right” key to move to
other number. The max record time is 99 minutes. The default time is 3 minutes.
Press “Option” softkey, you will see:
• Audio player: The system enters audio player menu and the user can play the newly
recorded sound file. The key is not available during recording.
• Record again: To record a new one.
• Storage location: . Option includes “Phone” and “SD” card. The user can select one of
them.
• Send by MMS: The system enters MMS editor and takes the recorded clip as the first
object of new MMS.
5.6.3 Tag-It
Image editor is used to edit or draw images. If the user does not open any image, the system
will display a blank image.
Image editor displays the following:
Image name
Edited image
Color palette, foreground color, background color
Floating tool bar:
Select: Outlines a portion of the screen with a user designated rectangular marquee.
Pencil: Draws a freehand line on the image.
Call 24ard

Eraser:
Fill: Fill in the area with the foreground color. The area is an adjacent area with the
same color with the selected point.
Rectangle: Draw rectangle with selected foreground color.
Circle: Draw circle with selected foreground color.
Line: Draw lines with selected foreground color. The user can select size (four
thickness types, from 1 dot line to 4 dot line.).
Rotate& Flip:
Rotate: Turns the image around its center point. The system displays
floating bar when the user selects Rotate. The user can select “90 degree
clockwise”, “90 degree anti-clockwise” and “180 degree”.
Flip: Mirrors the image on the horizontal or vertical plane. The system
displays floating bar when the user selects Flip. The user can select horizontal or
vertical mirror image.
Eyedropper:The eye dropper tool samples the color at the tip of the dropper and
displays it in the color picker.
Text: Adds text to your image. Select this tool to touch screen, the text will insert in the
place where the touch pen clicked, and open a text editor.
For the above shortcut tools, the user can use touch pen to select, also can press
“1-9” ,”0” , “Up”/”Down” key to select, and then press “OK” key.
If some of tool buttons have annex options, then if the focus on this button, press “OK”
key or “Right” key can open the annex option. Use “Left”/”Right” key to select an option, press
“OK” or “Left”(only the focus on the leftmost option) key to close annex option.
The right softkey is “Back”. The left softkey “option” menu is:
Undo: Undo is active from the moment you make a change to image. Only can undo
one time.
Redo: Redo is active after you click the undo button. You can redo any change you have
undo.
Copy:
Cut:
Paste:
New: Create a new image file and edit. The system will inform if the current image is
not saved.
Open:The system will enter the image list. The user can select one picture to open it in
the editor and close the current picture. The system will inform if the current
image is not saved.
Send mms: The user can send the current editing picture by mms. The more info please
refer to same option of image browser.
Save:The system will save the modified file.
Save as:Save to another file with new name.
Cancel edit:The system will cancel all edit.
If the user select to save the picture, then enter “picture save” screen. The user can input file
name in edit box, and press “Up”/”down” key to select picture format (jpg/bmp/png),at last press
Call 24ard

“OK”key to enter file management to select storage path.
5.6.5 Image browser
The following types of image can be supported:
picture(Jpg),
icon(bmp),
animation (GIF),
PNG
Enter “Image browser” menu, the focus first on the combo box, press “OK” key can
open combo box, and press “Up”/”down” key to select location, press “OK” to save. Press “down”
key, the focus move down to the image list. If the focus on the top layer image, press “Up” key,
then the focus move to combo box.
The system displays all miniatures and names in both phone and SD card in the image
browser. If the file can’t be support, then display a fixed picture. The user can press “Up”, “Down”,
“Left” and “Right” direction keys to select Picture displayed on the screen. A scroll bar will occur
in the right side if one screen is not enough.
When the user select a picture, the option menu is as follows:
• Browse: select this option can open image browser to browse the select picture.
• Delete:The unlocked and non-built-in picture can be deleted.
• Edit:The system enters Image editor.
• Send MMS:The system enters MMS editor and takes the current picture as the first
object of new MMS. Can’t send picture which saved in Sd card. If the user select a SD card
picture, then prompt “can’t send SD card file, please copy this file from SD card to local”. If
the picture is more than 50K, then can’t send it and prompt the user.
• Detailed info:The system enters detailed info screen. The screen includes: the file name,
format, resolution, size, storage location, etc.
• Rename:The unlocked and non-built-in file has this option.
• Add frame effect:(The option enabled only when the current picture is less than
640*320size). Enter “Add frame” screen add all kinds of frame on the selected picture, and
all breviary picture display on the screen. The left softkey is “Preview” and the right softkey
is “Back”. Press direction key to select a breviary picture, press “OK” key or left softkey to
enter next screen to preview. And now press “Left”/”down” key or use touch pen to click
“left”/”right” button on the screen to preview other breviary. The left softkey is “Save as”,
the right softkey is “Back”, select “save as” can save the picture.
When the user select a picture, and press OK key or select “Browse” from “Option” or use
touch pen double-press the picture to enter Picture browser screen which displays the following:
• Filename
• ”slide show” button, use touch pen click this button to open slide show, all pictures will
display one by one every 1 s. click this button again to close slide show.
• Picture is displayed in the middle. The system will zoom out the picture automatically if
the picture is too big when entering this screen.
• Shortcut tool buttons:from left to right, the buttons are “Previous”, “Fit in”, “ZOOM In”,
“ZOOM Out”, “Original size”, and “Next”.
Call 24ard

• The function of the left and right softkey: “Option” and “Back”
Pressing Up/Left direction key can view the previous picture, while pressing Down/Right
direction key can view the next picture.
The option menu is as follows: (Most of them have the same functionality as above option
for a single picture.)
Zoom: will have four sub-menu items.
Zoom in: can zoom in the picture. It can be pressed 3 times, then becomes gray
(not available).
Zoom out: can zoom out the picture. It can be pressed 3 times, then becomes gray
(not available).
Fit in: will be fit in the picture display area.
Original size: Display the picture in original size.
Set as wallpaper:
Delete:
Edit:
Send via MMS:
Detailed info:
Add frame effect:
5.6.6 Audio player
The following types of audio format can be supported:
• MIDI(SP-MIDI)
• MP3
• AMR
• WAV.
The system enters audio menu.
• Title
• Combo box: to select the storage location
• Display the filename (with suffix) list in both phone and SD card. All the system
build-in ringer files don’t be include in the list and can’t be delete, send, upload…, for
example the embed incoming call ringer, message ringer and etc.
• A scroll bar is added in the right side if one screen is not enough.
• The bottom displays the functions of the left and right softkey
The user can use “Up”/”Down” key to move to an audio file, and press “OK” key to
select/unselect(use touch pen also can select/unselect). The user can select many files one time.
The left softkey “Option” includes:
• Play : Enter audio player screen to play the selected files. If the user select file can’t be
support, then popup a dialog to prompt “Can’t support this file”
Call 24ard

In the audio play screen, The following button is used:
Play/Pause
Stop
Fast forward(Midi file can’t be support this)
Fast Revind(Midi file can’t be support this)
previous
Next
Volume up/down :On left area of the screen. Use touch pen click it can adjust
volume.
Play list:On the right area of the screen. If the user selects many files at one
time, then this area can show the user which file is playing now. the user also can use
touch pen click it to play other audio in play list.
Play mode:under “volume adjust” area, the user can use touch pen click this
icon to select play audio by order or random.
Cycle mode:under “play list” area, the user can use touch pen click this icon
to select whether play audio circularly.
the slider at the bottom of the screen can display the current audio ‘s playing
progress. (Midi file can’t be support this)
Keypad function is as follows:
Left side “Up”/”down” key: adjust volume
Right side “Up”/”down” key: select previous/next file
Right side “Multimedia” key: short press to play/pause, long press is stop(when
the phone’s cover is open) or “back” (when the phone’s cover is close)
“Up”/”down” key: select previous/next file
“Left”/”Right” key: Rewind/Forward
“ok” key: play/pause
right softkey: stop/back
“C” key: Back
• Delete:Delete the selected files. Before delete, it should prompt “Really want to
delete?”
• Select all: Select all the files.
• Send via MMS:If the user selects many files one time, this option is not available.
Can’t send audio which saved in Sd card..
• Detailed info:The system enters detailed info list to display the detailed info of current
file
• Rename:The system enters the edit screen and the user can change the select file
name. If the user selects many files one time, this option is not available
• Flip exit:the user can decide whether the audio player is close if the phone’s cover is
close. There are two choices: on, off.
5.6.7 Video player
When the user enters video player, all videos in phone and SD card are listed with breviary
Call 24ard

picture, if the video file can’t be support, then display a fixed picture. The user only can select
one file at one time. When the user select a file, the left softkey “option” menu as follows:
• Play:Enter video player screen to play the selected file, the use also can press “OK”
key to play. If the user select file can’t be support, then popup a dialog to prompt “Can’t
support this file”.
• Delete:The unlocked video can be deleted.
• Send via MMS:If the selected file is less than 95K, then prompt the user.
• Detailed info:The system enters detailed info screen. The screen includes: the file
name, format, resolution, size, locked or not, storage location, etc.
• Rename:
In the video play screen, left softkey is “Hide”/”Open”(used to open/hide bottom toolbar),
the right softkey is “Back”. The bottom toolbar includes:
Play/Pause
Stop
Delete
Volume up/down (The video can also be muted.)
Keypad function is as follows:
“2”/”8” key: adjust volume
Right side “Up”/”down” key: select previous/next file
Right side “Multimedia” key: short press to play/pause, long press is stop
“Up”/”down” key: select previous/next file
“Left”/”Right” key: Rewind/Forward
“ok” key: play/pause
Right softkey: stop/back
“C” key: Back
The video can output to TV to play. If the user plug link to TV, please prompt the user
"Please re-plug the link" if there's any other reason that the device can't work with mobile or
prompt the user "please wait..." if the device is not ready. If the user link the mobile to TV
successfully, then there will be an icon automatically display on the video play screen and if
the user play this video, then this video will directly play on TV, not on mobile.
When the video was playing on TV, the mobile LCD doesn’t play this video and just
display video player screen, at same time, the mobile LCD doesn’t respond any pen-touch
event, but only can accept key-press events.
When the video was playing on TV, the user can control the TV display only by keypad
of the mobile. The key function is as follows:
“2”/”8” key: adjust volume
Right side “Up”/”down” key: select previous/next file
Right side “Multimedia” key: short press to play/pause, long press is stop
“Up”/”down” key: select previous/next file
“Left”/”Right” key: Rewind/Forward
“ok” key: play/pause
Call 24ard

right softkey: stop/back
“C” key: Back
If the user want to switch back to the mobile LCD, he must first stop the video, and then
the control power automatically revert to mobile, the user can play video on LCD by
pen-touch or key-press event.
When the video was playing on TV, if the link between mobile and TV was interrupted,
the TV will display blue screen, but the video will not stopped till the user press stop it
himself or the video is end. The user can continue to watch television by reinsert link as long
as the video not end.
5.7 Messages
5.7.1 WAP settings
The user can set parameters of wap in this menu. The user can modify the profile settings,
create new profiles. Only 10 profiles can be add in.
Enter wap settings, select a profile, press left softkey “Option”, the menus include:
Add: Create a new profile.
Delete: Delete the selected profile, before delete, should prompt the user.
Edit: Modify the parameters of the profile. Please refer to 5.7.1.5.1.
Connect:
5.7.1.5.1 Edit profiles
The detail of each profile is as follows:
Profile name
The user can set the name of profile.
Bearer
The user can select CSD or GPRS. Please note, maybe some embed profile only can be set
CSD or GPRS.
User name: user’s name when log on WAP server.
Password: password when log on WAP server.
Gateway: IP address/port of the gateway server
5.7.2 Web browser
The user inputs website in address bar, presses OK or clicks Website to open
web page. The operation should be performed when connected.
Starting up browser will open Homepage automatically.
Title bar:Display the name of the web page, display downloading progress.
Web site:An edit box to Input website. Common input is called here and
“Website” is a clickable control. Before the edit box, there are three shortcut
tool buttons are “Backward”, “Refresh” and “stop”, and behind the edit box,
Call 24ard

there is a shortcut tool button is “Go”.
Content area:Display content of web page, including image and text.
Left softkey: “Option”, please refer to 5.7.2.1 Options.
Right softkey: “Back”, if the user press right softkey, then there should be a
dialog for the user to confirm the exit action, after the confirmation of the exit
action, browser terminates and control will return to the previous page where user
starts the browser.
The user can press up/down and left/right key to scroll the web pages.
If the web page is not found, then it wills popup an info box to prompt.
5.7.2.1 Options
The options include:
Forward:Go to next page.
Backward :Go to the previous page and the system will save 8 records (first in,
first out), that is, go backward 8 times at most.
Homepage:Go to homepage. It is a website. Open Homepage when he selects
Homepage or start up Browser.
Refresh:Refresh content of the current page.
Bookmarks:Display/edit Favorites. Bookmarks stores websites in common use.
History:View 、delete and select a History record.
Settings: Configure web browser.
Enter select mode:select this menu, the user can use “Up” / ”Down” / ”Right”
/ ”Left” key to select a picture to save. On the screen, the right softkey is “Back”,
and the left softkey is “Option”, the “option” include :
“save as”: save the selected picture into user local picture folder under
file management.
“Set as wallpaper”:
Exit select mode: exit and back to previous screen.
Set as homepage:Set the current page as homepage.
Offline pages: Save the current page as a file of html, or save all.
Quit: Quit the web browser directly.
5.7.2.1.1 Bookmarks
Bookmarks manage websites in common use. Website bar displays current website.
If the user selects bookmarks, then it will enter next screen to display bookmark list, and
now the left softkey is “Option” and the right softkey is “Back”. Press “Option” softkey enter
next screen, the user can add bookmark, edit, Delete, enter the bookmark”.
Call 24ard

5.7.2.1.2 History
History stores web pages browsed by the user. It is stored by a rule of “First in, first out”
and there is a maximum. On history list screen, there is a “more” menu at last line. The web
pages browsed by the user is displayed in the middle. The left softkey “Option” includes
Clear all, Delete and go. If there isn’t any history, then it should popup an info box to prompt
“No history available”.
Open: Select “Open” to connect to the page.
Delete: Delete the selected web page. Before delete the web page, it should popup an
info box to confirm.
Clear all: Delete all the web pages browsed by the user. Before this operation, it should
popup an info box to confirm.
5.7.2.1.4 Settings
The user can configure the web browser here. There are eight items under “settings”.
1. Edit homepage
2. Select Profile
3. Rename Profile
4. Connection
5. Browser options
6. Cache
7. Cookies
8. Push settings
9. Clear history list
5.7.4 SMS
Besides in SIM card, SMS can be stored in the Handset, which provides additional storage
positions (the max storage capacity is 1000 items). The user can select a preferential location for
saving SMS. If the preferential location is full, then SMS will be saved in the non-preferential
medium.
After the user insert SIM Card and the SMS initialization is done, if the SIM location has
been full, and the FLASH location has not yet, then one SIM SMS will be moved to FLASH
location automatically.
There are four SMS boxes. SMS list in each box displays name or number. The content of the
selected SMS will be displayed. If it is too long, it can be scrolled to display the completed
information.
• Inbox
Save received SMS ((other than broadcasting SMS and level 0 messages).
• Sent Box
The sent successfully SMS will be saved in the Sent Box. The sent ones in Group SMS will
Call 24ard

be saved in sent box one by one(one for each person).
• Unsent Box
The unsent SMS or failed sent SMS will be automatically saved in the unsent box. The
unsent ones in Group SMS will be saved in unsent box one by one(one for each person).
• Favorite
The user can remove SMS from Inbox to favorite. The sms in favorite box just only can be
stored in the Handset and can’t be stored in SIM card.
When the user enter in any box, the left softkey is “Delete”, to delete the selected sms
When the user selects and view a SMS in any box, the option menu has the following
operation:
• Reply (an option only in Inbox) : the replied SMS automatically includes the destination
number and reply address (it is necessary for the sender to set this option as
“Activated”).
• Send (an option only in sent box and unsent box)
• Forward
• Delete: the Handset will display “Ok to delete?” Press “Exit” to return to the previous
screen, or press “OK” to confirm and the Handset will display deletion screen. After
deletion is finished, the screen will display “ SMS deleted” and return to the menu of the
upper level.
• Move to favorites (an option only in inbox): the user can save the SMS to the favorites
for long-term reservation. The items saved in the favorites will not be deleted in “Delete
all” operation.
• Store number(an option only in inbox and favorite box): if the original address (the
sender’s number which is not saved in the SIM card) of a SMS occurs or the number is
in the text, then this menu will be automatically displayed. The user is required to input
a name and select a storage location (SIM PB or Handset PB).
• Dial(an option only in inbox and favorite box)
Write SMS
Use touch pen click “To…” button to open phonebook list, in phonebook list, the user can
select name. Enter SMS editor, the focus first on “recipients” edit box. After input recipients(only
can input number) and then press “Down” key, the focus move down to the content edit box.
In SMS content edit box, press “Up” key to move up one line, press “Down” key to move
down one line, press “Left” key to move left a character, press “Right” key to move right a
character.
When the focus in the content edit box, press “OK” key to open left softkey “Option” menu,
the “Option” menu includes: Send now、Save、Namelist、Send & Save、
Save as User-defined、
Insert User-defined.
Receive SMS
When new SMS arrive (other than broadcasting SMS and level 0 SMS), the screen will
Call 24ard

display prompt information, such as “2 new SMS”. Then the user can press “OK” to enter inbox
sms list. Once the prompt information is removed from the idle screen, the user need to enter
“Inbox” to read SMS.
Whether a SMS will be saved or not depends on the type of the SMS:
• Broadcasting SMS and level 0 SMS will never be saved. (except broadcasting SMS on
region type);
• A Level 2 SMS will be automatically saved in the first empty position in SIM card, and
the Handset will give out prompt of new SMS arrival. If the storage space is already full
when a SMS arrives, the Handset will not accept the SMS.
•
If the SMS storage space in SIM card and phone is full, “SMS” icon will blink;
• If a SMS can’t be saved due to reasons other than “space full”, then the SMS will be
managed as a level 0 SMS.
Send SMS
The user can send SMS to other Handsets. The maximum length of one SMS is 160 Western
characters or 70 Chinese characters. In default, a SMS will be sent out as a level 2 SMS.
When editing a SMS, the content will be automatically saved if the user exits without saving.
When the user composes a new one, the SMS will be restored. If the SMS is sent successfully, the
editor will be empty.
This phone support SMS group sending function, and the user can send a message to a
maximum of 10 recipients at one time.
User defined SMS
The user can add/modify/send/delete self-define sms. The user can insert the SMS to where
the cursor is located.
Enter “Preset SMS”, the left softkey is “Option”, inludes:
Add:the user can add a new user define sms. S
Send: Enter sms editor screen, the user can edit selected user define sms and send
it.
Modify:The user can modify the selected user define sms.
Delete:The user can delete the selected user define sms, before delete, it should
prompt the user .
Delete SMS
The user can delete all SMS in different box or delete all in all box, include:
• Delete all: delete all in all box except favorite box.
Call 24ard

• Inbox
• Sentbox
• Unsentbox
• Favorite
• SMS in SIM card
• SMS in phone
• SMS before a certain date
Enter this menu, there are six options: “Delete 1 day ago”, “Delete 3 days
ago”, “Delete 10 days ago”, “Delete 1 month ago”, “Delete 3 months ago”, “Delete
6 months ago”.
Capacity
The user can check the number of the used SMS in SIM card and in phone, total number of
SIM card.
The SMS number in each box can also be listed.
SMS settings
• Service center number
The Service center number is stored in Service center and used every time when a new SMS
is sent. If the user wants to change the number, he must modify it before sending a SMS. The
number can’t be modified during the process of preparation for sending a SMS.
The SMS center number, which can be edited, is saved in the SIM card.
• Validity period
The user can set a validity period for sending SMS, for example, validity period for sending
SMS, validity period for being saved in the SMS center, etc. A series of different values (12 hours,
1 day, 1 week or maximum period) are provided under the SMS setting submenu.
• Delivery Status report
The user can select “On” or “Off” to set status: Whether to indicate the SMS has been sent
succeeded or failed.
• Reply path
The user can select “On” or “Off”. If “on”, when the recipient select “Reply”, the SMS he
sends will automatically selects the service center the sender has used.
• New entry storage
The user can select preferential storage location: SIM card or phone.
Note: If preferential storage location full, SMS will be saved in non- preferential medium,
Broadcasting SMS
Call 24ard

The broadcasting SMS has the following options:
• Reception
• If “activated”, the Handset can receive broadcasting SMS, which will be displayed
• If “closed”, then the Handset will not listen in any broadcasting message channel.
• Channel list: is used to add, modify listen-in channels
5.7.6 MMS
In the “MMS” menu, there are nine sub menus: “Write MMS”, “Inbox”, “Outbox”,“Sent
Message Box”, “Draft Box” , “Template box” and, “MMS Setting”, “Capacity” , “Exit”.
The total number of mms that saved in “Inbox”, “Outbox”,“Sent Message Box”, “Draft Box”
in all should not exceed 150.
5.7.6.1. Wirte MMS
When users want to create a new MMS, he can enter mms and select “Write mms”. In mms
editor, users can input text. Can insert pictures, sounds and new pages in their own orders.
Enter mms editor screen, the focus first on the “Subject” edit box, the user can input subject,
and then press “down” key to save subject and the focus move down on the “Recipients” edit box.
When the focus on the “Recipients” edit box, the left softkey is “Phonebook”, the right
softkey is “Back”. The user can directly input number, email or name in editing box or press left
softkey to select name from phonebook list.
After input recipients, press “Down” key to save and the focus move down to the next edit
box.
If the user wants to CC(make a Carbon Copy) to somebody or BCC(make a blind Carbon
Copy) to somebody, he can use touch pen to click the “CC” icon which behind the “Recipients”.
Once users click the “CC” icon, the “CC” and the “BCC” edit box will appear under the
“Recipients” and the “Hide CC” icon will appear behind “BCC” too. The users can click “close
CC” icon to close “CC” and “BCC”. When the user presses the “Up” and “Down” direction keys
to select “CC” or “BCC”, the key function and operation is the same as “Recipients”.
If the user wants to add mms text, he can use touch pen click mms text editor area or select
“Add text” from “Option”, and then the text editor is active, after input text, press “OK” key of
left softkey to save and back to mms editor.
When the user is editing the mms content and cursor is in the text editing box, the left softkey
is “Option”, and the right softkey is “Back”. The option is:
• Add text: Only the user still not input text on the current page, this option will appear.
• Edit text: Only the user had already inputted text in the current page, this option will
appear.
• Insert picture:Open picture folder. The user only can send picture which saved in user
local folder under file management.
• Insert audio:Open audio folder. The user only can send audio which saved in user local
folder under file management.
• Insert video: Open video folder. The user only can send video which saved in user local
folder under file management.
• Insert new page
• Previous page (only the mms include more than two pages): can view the previouse
Call 24ard

page.
• Next page (only the mms include more than two pages): can view the next page.
• Delete page(only the mms include more than two pages): can delete the current page
• Preview:The system enters the page preview screen to play the page. The detail please
refer to 5.7.6.3. Preview and playing.
• Page timing:The system enters the “Time Setting” screen where the user can set the
lasting time of a page.
• Text color: The user can set the text color of the current page.
• Text color, all slides: the user can set text color of all pages in this new mms.
• Background color: The user can set the color of the background
• Remove object:The user can delete the object which already inserted in the new mms.
In the MMS editor, the user can select different pages by pressing the “Left” and “Right”
keys. Press “Left” key is invalid if the current page is the first page; press “Right” key is invalid if
the cursor is on the last page.
After one or several objects have been inserted into the MMS, the interface of the editor and
the contents displayed on this screen are:
• Display title: “Page n/m”, “MMS size” and subject of the mms,
“m” denotes the total pages of the MMS and “n” denotes the page number of
the page that is being edited.
• The main area shows the MMS being edited.
• A bugle is shown in the editor to present a inserted sound
• An video icon is shown in the editor to present a inserted video.
• The bottom line: the left softkey is “Option” and the right softkey
is “Back” .
After finish the new MMS, the user can press “OK” key to send MMS, the detail please
refer to 5.7.6.2. MMS Sending.
Note: The new mms limited size and the object limited size which inserted in mms is as
follows:
New mms should not exceed 100k
Each picture should not exceed 50k
Video should not exceed 95k
Sound should not exceed 95k
Text should not exceed 100k
5.7.6.2. MMS Sending
After edit mms, the user can press “OK” key to send mms. When the users send a mms, enter
MMS sending screen. On this screen, the left softkey function is “OK”, the right softkey function
is “Back” and the middle key funtion is “Ok”. there are three sub menus:
Call 24ard

Send
Send mms immediately. If the user set “auto save” option on, and if sent successfully, save
this mms into “sent message box”. If sent unsuccessfully, then save this mms into “outbox”. If the
user set “auto save” option off, then don’t save.
Save
The system will save the MMS body as well as the recipient, the subject, the BCC and the
related setting into the “draft box”. If the memory is not enough, the system will prompt:
“Memory is insufficient, please clear up first!”. The system displays “Saving fails!”. Saving the
MMS, the system prompts “Saving…”. Finishing saving, the system prompts “Messages saved in
draftbox.”
Save as template
The system saves the MMS into the “Template box” as a template. Saving the MMS, the
system prompts “Saving…”. Finishing saving, the system prompts “Messages saved.”. If
memories are not enough for the MMS, the system will prompt: “Memory is insufficient, please
clear up first!”
When users send a mms, the system displays “Sending…” animation and after sending the
system displays “Message sent successfully”. If the sending is unsuccessful, the system prompts
“Message sending fails” and save the MMS into the “outbox”. If the memories in not enough, the
unsent message will not be saved and the prompt “Memory insufficient, Message saving failed!”.
After sending, if the sent MMS is a new edited MMS, the system returns to the “MMS Sending”
screen and if the sent MMS is a outbox MMS, the system returns to the “Outbox list”.
5.7.6.3. Preview and playing
The preview screen is used to preview or play an editing MMS, a new received MMS and
all mms in all box. MMS can be previewed when the “OK” key is pressed in the inbox, outbox,
Sent Message Box, template box or draft box list, when the left softkey (“Read” key) is pressed in
a new MMS notification screen or when the “Preview” is chosen in the “MMS Option” menu
when edit a new MMS.
The softkey function in a MMS preview screen is:
• For the new edited MMS, the right softkey is “Stop”.
• For template box, draft box, inbox, Sent Message Box, outbox and new
received MMS, first it will display the mms essential info (From,to, cc, subject etc.) and the
left softkey is “Next”, the right softkey is “Back”. Press left softkey to play the mms content,
and now the right softkey is “Stop”.
If the user select “Stop”, then the mms is stop and the left softkey is “Option”, include “Play”,
“Back to first page”, “Previous page”, “Next page”, “Close”.
If the page time is over and mms stopped itself, then enter option menu automatically.
5.7.6.4. Detailed info
The Detailed Info screen is used to show the detailed information of a MMS. There are two
kinds of the screen.
Call 24ard

The first kind is used to show the information of a new edited MMS or a MMS in the
draft box, template box, outbox and Sent Message Box. The contents displayed on this
screen are:
• The title displays “Detailed Info”;
• Display “Subject:” and then display the content of the subject. If the width of a text is
larger than the allowable width the text will be displayed in the next line.
• Display “Recipients” and then display the sending number or e-mail address. If the
number is already saved in Phonebook then the name is displayed. If the width of
the content is larger than the allowable width the content will be displayed in the
next line. If the recipients are more than one, the recipients are displayed one by
one and each is divided by a “;”. (The recipients are no more than 8)
• Display “CC:” (Carbon copy) and then display the names/numbers or the e-mail
addresses of the CC recipients. The rule of display is the same as the recipient line,
and the CC recipients are also no more than 8. If there is not CC recipient, there is
not content behind “CC:”.
• Display “BCC:” (Blind Carbon copy) and then display the names/numbers or the
e-mail addresses of the BCC recipients. The rule of display is the same as the
recipient line, and the BCC recipients are also no more than 8. If there is not BCC
recipient, there is not content behind “BCC:”.
• Display “Memory Size:” and after it is the memory size of the MMS. The format is
“xKB”.
• “Pages:” is displayed and then is the number of the pages including in the MMS.
• “Objects:” is displayed and then is the number of the objects including in this MMS.
• Display “Priority:” and then is the priority of the MMS.
• If the content is more than the display area, in the right a scroll bar is displayed, which
shows the current position and proportion.
• The bottom line displays the left softkey: “OK”, right softkey is “Back”.
The second kind is used to show the information of an inbox MMS or a new received
MMS. The contents displayed on this screen are:
• The title displays “Detailed Info”;
• Display “Sender:” and then display the names/numbers or the e-mail addresses of the
sender. If the width of a text is larger than the allowable width the text will be
displayed in the next line.
• Display “Subject:” and then display the content of the subject. If the width of a text is
larger than the allowable width the text will be displayed in the next line.
• Display “Memory Size:” and then display the memory size of the MMS in the format
“xKB”.
• “Pages:” is displayed and then is the number of the pages including in the MMS.
• “Objects:” is displayed and then is the number of the objects including in this MMS.
• Display “Receiving time:”. Secondly if the selected MMS has been read (downloaded)
Call 24ard

the screen displays the downloading time of the MMS in the format “dd/mm/yyyy”.
If the selected MMS has not been read the screen displays nothing.
• Display “Priority:” and then is the priority of the MMS.
• The bottom line displays the left softkey: “OK”, right softkey is “Back”.
5.7.6.5. Inbox
Enter inbox, the mms that the user received before display on the screen. The contents
displayed are:
• Title: displays “Inbox”.
• Middle of the screen: Display the mms list. To the left displays the subject of the mms.
Before subject, displays icons to show whether the message has been read and the mms
priority. If the MMS has no subject, then the system displays “No subject”. The latest mms
display on the first position of the list.
• The bottom line displays the left and right softkey functions: the left soft key is
“Option” and the right softkey is “Back”.
5.7.6.6. Sent message box
Enter Sent message box, the mms that the user sent successfully before display on the screen.
The contents displayed are:
• Title: displays “Sent Message Box”.
• Middle of the screen: To the left display the subject of mms, one MMS a line. Before
subject, displays icons to show the mms priority.
• The bottom line displays the left and right softkey functions: the left soft key is
“Option” and the right softkey is “Back”.
5.7.6.7. Outbox
Enter outbox, the mms that the user sent unsuccessfully before display on the screen. The
contents displayed are:
• Title: displays “Outbox”.
• Middle of the screen: To the left display the subject, one MMS a line. Before subject,
displays icons to show the mms priority.
• The bottom line displays the left and right softkey functions: the left soft key is
“Option” and the right softkey is “Back”.
If the user selects a mms and press “OK” or press “View” in the “Option”, then enter mms
playing screen and plays the message. The following operation please refers to 5.7.6.3. Preview
and playing.
5.7.6.8. Draft box and Template box
Enter draft box, the mms that the user saved display on the screen. The contents displayed
are:
• Title: displays “Draft box”.
• Middle of the screen: One MMS a line, to the left displays the subject of the listed
MMS. Before subject, displays icons to show the mms priority.
Call 24ard

• The bottom line displays the left and right softkey functions: the left soft key is
“Option” and the right softkey is “Back”.
Enter template box, the mms that the user saved as template display on the screen. The
contents displayed are:
• Title: displays “Template box”.
• Middle of the screen: One MMS a line, to the left displays the subject of the listed
MMS. Before subject, displays icons to show the mms priority.
• The bottom line displays the left and right softkey functions: the left soft key is
“Option” and the right softkey is “Back”.
If the user selects a mms in draft box or template box and press “OK” or press “View” in
the “Option”, then enter mms playing screen and plays the message. The following operation
is same as 5.7.6.3. Preview and playing
5.7.6.9. MMS settings
The system provides setting functions that allow users to set the MMS center and realize
some personality settings.
Enter “mms setting” menu, many options display on the screen. The left softkey is “Ok”, and
the right softkey is “Back”. The user can press “Up”/”Down” key to select an item. The sub menus
in the “Settings” menu are as follows:
MMS center
Select this menu, and press “OK” key, the user can enter the “MMS Center” editing screen
and input the center address, and the left softkey is “OK”, and the right softkey is “Back”.
Sending
Here the user can set the settings about sending, include:
Validity period
Select this menu, and press “OK” key, the user can select the time that the MMS is kept
in the MMS center. There are four choices: “1 hours”, “12 hours”, “1 day”, “1 week” and
“max”. The default time is the max, and the left softkey is “OK”, and the right softkey is
“Back”.
Read report
Select this menu, the users can choose “on” or “off” menu. The default setting is “off”.
Delivery
report
Select this menu, the users can choose “on” or “off” menu. The default setting is “off”.
Priority
The user can set the priority of the new edit MMS. The default priority is “Normal” and
the other two are high and low.
Reply charging
Select this item, and press “OK” key, system enter the “Reply charging” screen. On this
screen, there are 3 sub menus: “Reply charging”, “Reply charging deadline”, “Reply charging
size”, and the left softkey is “OK”, and the right softkey is “Back”.
¾ Reply charging: select this item, it will give 3 options: “Off”, “On”,
Call 24ard

“Text only” , and the left softkey is “OK”, and the right softkey is “Back”.
¾ Reply charging deadline: select this item, it will give 3 options: “1
day”, “1 week”, “Max” , and the left softkey is “OK”, and the right softkey is
“Back”.
¾ Reply charging size: select this item, it will give 3 options: “1 kb”,
“10 kb”, “Max” , and the left softkey is “OK”, and the right softkey is “Back”.
Show number
Select this menu, the users can choose “Yes” or “No” menu. The default setting is “Yes”.
Auto save
Select this menu, the users can choose “on” or “off”. The default setting is “off”.
Page timing
Select this menu, the users can input time in editor.
Delivery time
Select this menu, and press “OK” key, the user can select the delivery time. There are
four choices: “Immediate”, “In one hour”, “In 12 hours”, “In 24 hours”. The default setting is
the “Immediate”.
Retrieval
Select this item, and press “OK” key, system enters the “Retrieval” screen. On this screen,
there are 4 sub menus: “Home network”, “Roaming network”, “Send read report”, “Delivery
report allowed”, and the left softkey is “OK”, and the right softkey is “Back”.
¾ Home network: select this item, it will give 2 options: “Automatic”,
“Always ask” , and the left softkey is “OK”, and the right softkey is “Back”.
¾ Roaming network: select this item, it will give 3 options: “Automatic”,
“Always ask”, “Restricted” , and the left softkey is “OK”, and the right
softkey is “Back”.
¾ Send read report: select this item, it will give 3 options: “On request”,
“Always”, “Never” , and the left softkey is “OK”, and the right softkey is
“Back”.
¾ Delivery report allowed: select this item, it will give 2 options: “Yes”,
“No” , and the left softkey is “OK”, and the right softkey is “Back”.
Filters
Select this item, and press “OK” key, system enter the “Filters” screen. On this screen, there
are 10 sub menus: “Immediate server”, “Immediate limit”, “Treat as delayed”, “Max retrieval
size”, “Anonymous senders”, “Personal message”, “Advertisement message”, “Informational
message”, “Auto message”, “String message”. The left softkey is “OK”, and the right softkey is
“Back”.
¾ “Anonymous senders”, “Personal message”, “Advertisement message”,
“Informational message”, “Auto message”: select these items, it will give
2 options: “Reject”, “Allow” , and the left softkey is “OK”, and the right
softkey is “Back”.
¾ “Immediate server”, “Immediate limit”, “Max retrieval size”, “String
Call 24ard

message”: select these items, it will enter a text edit box, the user can
input string in it, and the left softkey is “OK”, and the right softkey is
“Back”.
¾ “Treat as delayed”: The users can choose “on” or “off” menu. The
default setting is “off”.
Network
Select this item, system enter the “Network” screen. On this screen, there are 8 sub menus:
“Connection type”, “Network account”, “WAP gateway”, “Login”, “Password”, “Realm”, “Secure
port”, “HTTP port”, and the left softkey is “OK”, and the right softkey is “Back”.
¾ Connection type: select this items it will give 3 options: “HTTP”, “WSP
CL”, “WSP CO” , and the left softkey is “OK”, and the right softkey is “Back”.
¾ “WAP gateway”, “Login”, “Password”, “Realm”, “Secure port”, “HTTP
port”: select these items, it will enter a text edit box, the user can input string in it. The left
softkey is “OK”, and the right softkey is “Back”.
¾ Network account: Two choices “BMCC GPRS”, “BMCC CSD”.
5.7.6.10. Capacity
Enter this menu to display the number of mms respectively saved in inbox, outbox, draft box,
sent message box, template box. And also display the used capacity and the free capacity.
5.7.6.12. MMS Recieving
When new MMS arrive, the system enters the new event screen which displays a new MMS
icon and a new MMS arrival prompt, for example: “2 new MMS”. In this screen
• If the user presses the middle key or the left softkey, the system enters the MMS
inbox. In the inbox selecting the new MMS and pressing the middle key gets the
system to download..
• If a new MMS can not be downloaded because of the network, the system will
prompt users, and set the icon in the inbox to be unread and displays an unread MMS
icon in the idle screen.
• If the “C” key, the red key or the right softkey is pressed, the system returns to the
idle screen and displays a unread MMS icon on the screen. Once the prompt
information is removed from the idle screen, the user need to enter “Inbox” to read
messages. In the inbox list the function of the middle key is downloading.
• If the system is set as “Silent”, the system doesn’t play sounds including in a MMS.
5.7.9 QQ (Java based, Provided by 3
rd
party.)
5.7.10 STK Service
STK (SIM TOOL KIT) allows the SIM card based on intelligent card to run its own
application software.
STK card can receive and send GSM message data, acting as an interface between SIM and
messages, and meanwhile, it allows the SIM card to run its own application software. These
functions are often displayed in the Handset screen, which can be activated by software. Friendly
text menus take the place of the mechanical way of “dialing-listening-answering”, thus enabling
Call 24ard

the user to carry out complicated information searching and transaction by pressing keys.
STK provides SIM card value-added services with a developable environment, that is, a
simple and operable development platform. A Handset that supports SIK card can provide
additional STK menus, contents of which are read by the Handset from the STK card and can’t be
modified by the user. Depending on the type of STK, contents of the menu may vary and may be
changed via air interfaces.
This Handset supports different STK value-added services depending on the telecom operator.
For example, Beijing Telecom currently provides the following services:
Personal communication
z Greetings
Public information services
z Weather forecast
z Flight
z News
Stock
z Stock inquiry
z Index inquiry
z Price inquiry
Customer service
z Charge inquiry
z Service consultation
z ICBC
5.8 PIM
5.8.1 Phonebook (Please refer to the Handset part)
5.8.2 Calendar & Schedule
The number of events is not exceed 1000. The content of the event is up to 1K words, and the
subject is up to 40 words.
With Calendar & Schedule, the user can create new event, view event list, delete event or
modify event contents.
When creating a new event, the user is required to input information related with the event,
and then to select whether or not to set prompt mode, and whether or not need periodical repeated
prompts. It stores the prompt date and time of each event. When the current time is the same as the
prompt time, then the Handset will prompt the user by event prompt sound, vibration and LED
and display new event arrival picture in the idle screen and display the event content.
The validate date is from 1971/1/1 to 2035/12/31
Calendar includes three types of view:
Daily view
Set one hour as a period of time (such as 0:00, 1:00, … 23:00) and list all events of the
Call 24ard

selected date (several events may occur in one period of time, if the user create many events in
same period of time, then divide several line to display each event title and the period time only
display one line and not change. ). For each piece of the list, if there is an event, then the title (the
selected line can scroll) will be displayed behind the period of time.
At the same time, Daily view displays the date and week (on days of solar terms, the name of
solar term is displayed instead) of Chinese calendar. The user can view the event list of
previous/next day by pressing Left/Right keys and move to different period of time by pressing
Up/Down keys (no loop).
For each event in a period of time, press OK key. If the event is already existed, view it; If
not, create new. And the date and time of new event is the user select day and time.
Through the option menu, the user can:
• New:
the user will be required to set title, the start date, start time, terminating time (no
earlier than the start time), contents, prompt mode and repeat mode of the event.
Before save the new event, should judge whether the terminative time is earlier
than the commercing time, if it is, then popup a info dialog to prompt “End time earlier
than the start time”.
The title of the event can’t be null.
If storage is full, the Handset will display “Space full” after the user selects “New”.
When editing date and time, the Handset will display default values of the current
date and time(the start time is the current time, and the end time should later 30 minutes
than the start time). So the user can edit or directly confirm, and then input detailed
contents of the new event.
The Handset provides the following prompt modes: On time, 5 minutes ahead, 10
minutes ahead, 1 hour ahead, 1 day ahead, 1 week ahead, No prompt.
The Handset provides the following repeat mode: No repeat, Everyday, Every
week, Every month or Every year.
• Monthly view: enter Monthly view.
• Weekly view: enter Weekly view.
• Delete: delete selected/due/all events.
• Enter date: the user can check by any date.
• Capacity: In Capacity the user is allowed to see the number of saved events and the
number of out-of-date events.
• Settings:
Default view in calendar: Monthly view/Weekly view/Daily view.
Weekly type: the user can set a commencing date of a week (Monday or Sunday).
In daily view, the right softkey is “Back”.
Weekly view
Weekly view is grid view. It is seven days of a week breadthways, 24 hours (four hours for
each row. such as 0:00-4:00, 4:00-8:00 … 20:00-24:00) lengthways. If an event occurs in a certain
Call 24ard

period of time in a certain day, then a sign will be marked on the corresponding period of time
(one event may span several periods of time, even date).
In addition, Weekly view displays which week it is and the selected date.
The user can press Left/Right key to translate to previous/next day (If it is the first day,
pressing Left key will skip to last week. If it is the last day, pressing Right key will skip to next
week). Pressing Up/Down key can translate to previous/next week.
For each day, the user can press “OK” key to enter Daily view of the corresponding date.
Through the option menu, the user can:
• Daily view: enter the daily view of the corresponding date.
• New: (same as that of the day view)
• Monthly view: enter monthly view.
• Delete: delete due/all.
• Enter date: the user can check by any date.
• Capacity: In Capacity the user is allowed to see the number of saved events and the
number of out-of-date events.
• Settings: (same as that of the day view)
• Exit: Exit from calendar.
In weekly view, the right softkey is “Monthly view”.
Monthly view
Monthly view is similar to that of Monthly Calendar. If there is a event in a day, a sign will
be marked on the corresponding day (an event may span several days).
In addition, Monthly view displays which week it is at the beginning of each line, as well as
lunar calendar and solar calendar of the selected date on top of the calendar.(both need
year,month,day show)
The user can press Left/Right key to translate to previous/next day (If it is the first day,
pressing Left key will skip to the last day of the last month. If it is the last day, pressing Right key
will skip to the first day of next month). Pressing Up/Down key can move to the same day of
different week and different month.
For each grid, the user can press “OK” key to enter Daily view of the corresponding date.
Through the option menu, the user can:
• Daily view: enter the day view of the corresponding date.
Call 24ard

• New: (same as that of the day view)
• Weekly view: enter weekly view.
• Delete: delete due/all.
• Enter date: the user can check by any date.
• Capacity: In Capacity the user is allowed to see the number of saved events and the
number of out-of-date events.
• Settings: (same as that of the day view)
• Exit: Exit from calendar.
In monthly view,the right softkey is “weekly view”.
When the user select an event and see the detailed info, on detailed info screen, the user can
press “Back” right soft key to back, and can press “Option” softkey to “add”, “modify” or “delete”
the event.
5.8.3 Notepad
The file numbers are only limited by flash.
The existing file list is displayed after entering Notepad (the list is sorted by the finishing
time of the file). If there is no file, then directely enter “Notepad Edit” screen. Each piece of the
list includes the name of the file (filename). On this screen ,the right softkey is “Back”, and the
left softkey is “Option”.
The user can perform the following operations through option softkeys:
• New: an empty file will be opened and the user can edit it.
• Open: the selected file will be opened and checked, as well as edited and
modified. If the file is exceed 64k, then the phone only can open 64k content by
read-only mode.
• Delete: delete selected files.
• Rename: rename the selected files
• Detailed info
When create or open a file to view and edit, and enter “Notepad edit” screen. The
following operation can be done through option menu as well:
• New: the current file will be saved automatically and a new file will be
created.
• Save: the user is asked to input the file name if the file is new create. If the file
is exist, then save the modification. If the user don’t input name, then use the current
system time as the file name.
• Save as: the user can save to another file. If the user don’t input name, then
use the current system time as the file name.
• Delete: delete selected text. If the user not select any text, then this option
won’t display.
• Search: Prompt the user to input a text to search and search direction. It begins
Call 24ard

to search after user’s confirmation. If found, the found string will be highlighted.
• Search next: Search from the cursor position.
5.8.4 World time
World time function helps the user find out the time of major cities in each time zone. There
must be at least one major city in each time zone.
World time function displays the names and time of two cities simultaneously. One is local
city, the other is out-of-town.
The user can select the out-of-town city by [Up]/[Down]/[Left]/[Right] key. [Left]/[Right]
key will move according to longitude and [Up]/[Down] key can select different city in a same
time zone.
When the user select an city, the left softkey “Option” include:
Set as local: The user can take the selected city as local.
daylight saving: (This option is effective for the city with daylight saving time)The
user can set/unset daylight saving time. If the select city is open daylight saving time, then
this option is “unset”, if the select city is close daylight saving time, then this option is “set”.
5.8.5 Calculator
C8000 only supports Standard calculator.
Standard calculators support the following function:
Integer, floating point numbers, positive numbers and negative numbers operation.
Calculator can execute operation of addition /subtraction /multiplication /division.
Support Clear, MC,MR,MS,M+, wherein:
• Clear: Clear the digit input editor.
• MC: Memory Clear.
• MR: Memory Read.
• MS: Memory Store.
• M+: Memory Plus.
Each operand in the edition window can have up to 9 digits.
The operational precision of floating point numbers is up to 7 digits after the radix point, and
the abundant part will be rounded up (for example, 0.123456789 is rounded to 0.1234568).
On this screen, the left softkey is “Option” include:
• Clear: Clear the digit input editor.
• MC: Memory Clear.
• MR: Memory Read.
• MS: Memory Store.
Call 24ard

• M+: Memory Plus.
No matter the user select “Clear” from option, or delete all operands, the editor should
display “0”, not null.
5.8.6 Alarm clock
This Handset has 24-hour alarm clock function. The clock function can also be activated in
power off state.
There are three groups of alarm clocks in total, and the user can activate or deactivate alarm
clocks.
In the alarm clock edit window, press OK key to move focus down, press up/down key to
choose time editbox, repeat setting of the three alarm clocks and alarm ring. When the focus on
the repeat setting combobox, press “Left”/”right” key to select repeat mode. When the focus on
the time editbox, the user can input alarm clock time in text box. As long as the repeat setting is
not set to close, then this clock is activate.There are five modes for the user to make choice (use
left/right key)
• Once: Activate the alarm clock at a set time in a certain day
• Everday: Activate the alarm clock at a set time each day
• On weekdays: Activate the alarm clock at a set time each working day (From Monday to
Friday)
• Except Sunday: Activate the alarm clock at a set time each working day (From Monday
to Saturday)
• Close
When the alarm clock time is on, then the ringer is ringing. It will persist 1 minutes till the
user press any key to stop it.
5.9 Mobile Office
5.9.1
PC sync and backup(PC)
This section please refer to <C8000 PC Download Tools URD>
5.9.2 PC sync and backup(Phone)
When MS is successfully connected with PC, data or file can be received/sent by USB
interface.
Since Phone just receives downloaded/uploaded signal passively and provides service, no
operation should be performed on MS. MS affects nothing except “Quit”.
MS screen will display “Connected with PC” animation as soon as PC is connected with MS.
【Quit】Right softkey:During connection or after connection of PC and MS, the user
can disconnect PC and MS by this key.
5.9.4 Chinese-English 2-way Dictionary
When Chinese-English 2-way Dictionary is activated, the user can search for and browse
Chinese and English words, view phonetic symbol and grammar of the search result.
Enter Chinese-English 2-way Dictionary:
• Title bar: Display Dictionary.
Call 24ard

• Input Bar: Input the word to search in Input area.
• Browse area: Display all words with the initial letters the user input. If the user does not input
any character in Input area, it will display the word list from the very beginning in Browse
area.
• [Option](Left softkey): Including Spelling Check(if the user fine Chinese word, this option
won’t be display), Page up , Page down.
• [ Back] (Right softkey):
Spelling Check is available only that the user inputs three or more letters. Otherwise it will
appear gray.
5.9.4.1 Smart identification
This dictionary provides Smart Identification function. When the user inputs English words,
the corresponding Chinese translation will be displayed on the screen, and vice versa.
5.9.4.2 Word Matching List
In the process of inputting words, all words similar to the part already input will be displayed
on the screen before the user presses [OK] key. For example, if the user wants to search for the
word “phone”. When he has input the first three letters “p”, “h” and “o”, all the words and phrases
starting with “pho” will be displayed on the screen.
If the word that the user wants to find is displayed, the user can press Up/Down key to select
the right word, then press [OK] key or double click the word in the list with a touch pen to view
it. When there is no such a word in the list, the user can input the complete word in the Input
area and press [OK] key.
If the user is not sure about the word he inputs, he can press Left softkey [Option] and select
“Spelling Check” in the pop-up menu. Please refer to 5.9.4.4 Spelling Check for details.
5.9.4.3 DJ phonetic symbols
To search for English words, this dictionary provides DJ phonetic transcriptions.
5.9.4.4 Spelling Check
The Handset provides spelling check to the word input by the users and lists all similar words,
including one extra letter, one missing letter, and one modified letter or with the prefix or suffix
deleted.
For example, when the user inputs the word “skale” and there is no such a word in the
dictionary, the user can press [Option] (Left softkey) and select Spelling Check in the pop-up
menu. Then all correct words similar to the word input by the user will be displayed in “spelling
check” screen. On this screen, you will see:
Title: Spelling check
Main area: list all the correct words similar to the word input by the user
Left softkey: ”Stop”/”OK”
Right softkey:”Back”
Call 24ard

During searching, the left softkey is empty, the right softkey is “Stop”. After the search is end,
the left softkey is “OK”, the right softkey is “Back”.
If the correct word already display, the user can press “C” or right softkey “Stop” to stop
searching, and then the right softkey change to “Back”. The user can press Up/Down key to select
a word in the list and press”OK”key or left softkey, or double click the word with the touch pen to
enter “Browser” screen to see the detailed grammer of this word.
5.9.4.5 Grammar
To look up a word, the user must be provide not only the basic information of the word, but
also the information on the grammar, past tense and past participle of the word. If the user input a
metabolic word, the dictionary should also can find it and give the prototype.
5.9.4.6 Browse
When the user is browsing the explanation of a word:
• Title bar: Display dictionary
• Toolbar: Provide shortcut operation, such as the Previous Word, the Next Word.
• Browse area: Display all grammars of the word being browsed. A scroll bar will display if
one screen is not enough. Press Up/Down key to view it.
• Left Key: Go to the previous word.
• Right Key: Go to the next word.
• [Option](Left softkey): Including Last word, Next word
• [ Back](Right softkey)
Under the title bar, there is an “input” button and a text box. In the text box, it will display the
word that the user find and view now, the Browse area displays all the grammar of this word. If
the user wants to find another word, he can use touch pen to click “input” button and then back to
previous screen, or press “C” key, right softkey to back to previous screen to find a new word.
5.9.5 Stopwatch
The Handset provides stopwatch function. Press [Start] (the left softkey) to start timing and
[Back] (the right softkey) to return to the previous page.
The commencing time is 00:00.0. Press [start] (the left softkey) or “OK”key to start timing
when the left softkey changes to “Pause” and the right softkey changes to “Clear”. Press “Pause”
(the left softkey) to pause, then the left softkey changes to “Continue”. Press “Continue” (the left
softkey) again to continue, then the left softkey changes to “Pause”. Under any circumstance,
pressing “Clear” (the right softkey) backs to initial screen. See the above Figure.
The user also can use touch pen to click “Start” button on the screen, and then the “start”
button change to “Stop”, and the “Next” button on the screen is active. During timing, press
direction key or use touch pen click “Next” can save the current time, and the stopwatch is going
on. Press direction key or Click “Next” again save the current time again. After the stopwatch is
end, the user can press direction key to view reserved records.
Call 24ard

Up to 9 group data can be saved,the user also can press number key to view the reserved
records.
5.9.6 Count-down timer
The Handset provides count-down timer function. The user can set alarm time.
when User enter count-down timer, there are two cases:1. if currently the timer is already on,
then the left softkey is "Reset" ,user can click it to stop the timer. 2. if currently the timer is off,
then the left softkey is "Start", and the focus is on the first number of the input area. User can click
it to start the timer after he set the left time.
Enter “Count-down timer”, the focus first on input area. After input time, press “OK” key to
start/reset timer. The left softkey is “STAR/Reset”, right softkey is “Back”. If the count-down
timer is on, the timer won’t stop till the user close it or the time is over even though the user exits
from timer.
If the user active the count-down timer, the time which display on the screen should update
by real time, if the time passed 1 minute, then the count-down timer time reduce 1 minute.
When the time is on, then the ringer is ringing. It will persist 30 senconds till the user press
any key to stop it. The ringer of count-down timer is same with the ringer of alarm clock.
5.10Games
5.10.1 Java Application
Java games can be downloaded from the Internet and run on the Java Virtual Machine. At
least 1~2 Java games are already preset in the Flash and more games can be downloaded from
the Internet.
Enter Java Application you will see the screen:
• Title bar: “Java”
• Browse area: Display game packages list and game folders list. The downloaded game or
game package was arranged by download time. A scroll bar will display if one screen is not
enough. Press Up/Down or Left/Right key to view it.
• Left softkey is “Option”: If users select a game package, then the “option” includes “Enter”,
“Update”, “Info”, “Setting”, “Delete”, “About”, “Move”. If the user select a game folder,
then the “Option” includes “Enter” , “Add new folder”, “Delete”, “Rename”,”Exit”.
• Right softkey is “Install”: Install a new game package.
The user can press “OK” key to enter the game package or the game folder he selected. For
each operation of left softkey “Option” please see 5.10.1.1 and the right softkey “Install”
operation please see 5.10.1.2.
5.10.1.1 Operation for a game
Enter
Select this sub menu to enter the game package or game folder that the user selected. On this
screen you will see:
Call 24ard

z Title bar: Display the path and the name of the game package or game folder that the
user entered. For example, if the user entered a folder or package named “game”
under JAVA, then the title will display “Java\game”, if the user entered a folder or a
package named “gamepackage1” under folder “game”, then the title will display
“Java\game\ gamepackage1”.
z Browse area: Display games list or sub game package/folder in this game package. A
scroll bar will display if one screen is not enough. Press Up/Down or Left/Right key
to view it.
z If the user selects a game, then the left softkey is “Launch”, if the user selects a game
package or game folder, then the left softkey is “Option”, and the items in this
“Option” please refer to above paragraphs.
z Right softkey is “Back”: Press this right soft key or press “C” key to back to the
previous screen.
Info
Select this sub menu it will display the information of the game package that the user selected.
For example, it will display the size, version, vender and content of this game package. On this
“Info” screen, you will see:
z Title bar: “Info”
z Browse area: Display the information of this game package.
z Right softkey is “Back”: Press this right soft key or press “C” key to back to the
previous screen.
Remove
Select this sub menu to delete the game package or game folder that the user selected. Before
delete, it should popup a dialog to prompt “Are you sure you want to remove… ”. Select
“Remove” or press “OK” key to delete, select “Cancel” or press “C” key to cancel and back to the
previous screen.
Update
Select this sub menu to update the game package that the user selected. Before update, it
should popup a dialog to prompt “Are you sure you want to update… ”. Select “OK” or press
“OK” key to delete, select “Back” or press “C” key to cancel and back to the previous screen.
Setting
About
Select this sub menu it will display the information of JAVA Copyright. On this “About”
screen, you will see:
z Title bar: “About”
z Browse area: Display the information of Copyright.
z Right softkey is “Back”: Press this right soft key or press “C” key to back to the
previous screen.
Rename
Call 24ard

Select this sub menu it will open the edit screen, the user can input new name for this folder.
Add new folder
Select this sub menu it will add a new folder under the current folder, the default name is
newfolder1, 2,3. The user can edit new folder name in the edit box in the bottom of the screen.
To be attention, the user just only can create one level folder and can’t create another folder
under the folder he created.
Move
The user can user this sub menus to move a game or a game package into another folder..
5.10.1.2 Install a new game
The user can install a new game from explorer or download from the Internet. Press “Install”
button to install new game.
Enter new
If the user selects “Install, then it will enter the next screen, on this screen you will see:
z Title bar: Enter new.
z Edit area: a text editor, the user can input the URL. Under edit box, the url that the
user saved before listed on the screen.
z Left softkey is “Option”: Including “Go”, “Save”, “Add from explorer”, “Clear all”.
z Right softkey is back.
If the user selects “Go” and the URL search successfully, then install the game, press
“Cancel” or “C” key to return.
If the user selects “Save”, then save the new url and dislplay on the screen. New saved url
will display in the top of the list. There are most 5 urls in the list, so if more than five, then delete
the first saved url in the list and add new saved url at the bottom of the list.
Add from explorer
If the user selects “Add from explorer”, then it will open the java game folder that is already
preset in the mobile, this folder is especially use to save the java game downloaded from PC. The
user can select an available game package press “OK” key to install. Before install the game, it
will go back to JAVA application and the user should select a folder first and then press left
softkey “Install” to install, press “Cancel” or “C” key to return.
5.10.2 Local Games
At least five embedded local games, including classical (Tetris), shooting (Planes), intellect
(Boxman), Poker (Black jack), recreational (Marbles). New games can be installed from PC.
Options of each game include:
Start: Start the game.
Set level: Select game speed and enemy number (set in need).
Stage: Select game map and gate (set in need).
Heroes: When the player breaks a record, he is asked to enter his name.
Help: Help information.
Call 24ard

5.11 System Configuration
5.12 GUI/MMI
5.12.1 panel
5.12.1.1 Six Sections
There are 6 blocks on the panel (6 types): Handset, Messages, Multimedia, Mobile Office,
Settings and User define. Preset application program is put into the first five blocks and the
downloaded programs and delete-able programs are put into User define.
5.12.2 Handwriting
This function includes simple Chinese, Traditional Chinese, English, characters and numbers.
When it is activated, Handwriting Box will appear for the user to write in Chinese characters. The
chinese will be recognized and accepted as an input word after a while. A copybook broken line
will be displayed in the center of the Handwriting Box.
This function depends on Handwriting Vendor.
Once turn on hand writing,some common used candidate character will display on the
candidate line. For different input method, the candidate character is different. The original
candidate character is as follows:
Chinese :的、一、不、是、了、我、人、在、有、这
numeric:0、1、2、3、4、5、6、7、8、9
English:a、b、c、d、e、f、g、h、i、j
phrase:的、一、不、是、了、我、人、在、有、这
symbol:. , ? !@*( ) ; :
5.13 Drivers
5.14 Other
5.14.1 Shared lib
Shared Lib provides related API and is used by developers.
5.14.2 Bootloader
BootLoader is the boot program for start-up and can be upgraded. The user can do testing in
BootLoader.
5.14.3 Testing
Testing program mainly tests hardware conditions of the system, such as RAM、LCD、KB
and SOUND etc. Press a special key (“1”~“9” ) + RESET key to enter Testing mode and
check all the hardware in order.
Call 24ard

Annex A: C8000 Menu Tree
[1] Handset
Demo (Only when there is no SIIM card)
Phonebook
Enter
PB mixed list
Add new
IP dial
Modify
Delete
Send SMS
Send name card
Speed dial
Copy to phone(SIM card)
Move to phone(SIM card)
Copy and edit
Dial
Search
By surname
By keyword
By initials
Add new number
Capacity
New entry storage
SIM card
Phone
Delete all
SIM card
Phone
Copy all
SIM to phone
Phone to SIM
Move all
SIM to phone
Phone to SIM
Call 24ard

Call list
Group settings
IP number
Own info
Modify own info
Delete own info
Send own info
Display own info
Recent Call
IP call
Send message
Delete
Save (if the number is not in Phonebook)
Call
Call meters
Last call
Last GPRS call
Call forward
Unconditional
Enable
When busy (the same as “Unconditional”)
No reply (the same as “Unconditional”)
Not reachable (the same as “Unconditional”)
Cancel all
Status
Call timers
Outgoing call timer
Incoming call timer
Reset timers
Phonebook
Voice mail
New number
Disable
Status
Call settings
Minute reminder
On
Call 24ard

Off
Any key answer
On
Off
Auto redial
On
Off
Auto answer
On
Off
Active flip
On
Off
Call waiting
GSM call
On
Off
Status
GPRS call
On
Off
Send ID
On
Off
Default
Status
Security settings
PIN code
On
Off
Call barring
Roaming calls
All incoming calls
Local calls only
All outgoing calls
International calls
On
Call 24ard

off
Inquire
Change Code
Change PIN
Call barring
Guard settings
Power on protection
On
Off
Change password
Network Settings
Preferred networks
Show preferred
Delete preferred
Add available
Add existing
Add network code
Attach GPRS
Always
During PDP session
Register again
In-flight mode
On
Off
[2] Messages
SMS
Write message
Option
Send now
Save
Save as user defined
Namelist
Send&Save
Insert user defined
Inbox
SMS list
Call 24ard

Option
Sent box
SMS list
Option
Unsent box
SMS list
Option
Reply
Forward
Delete
Save to favorites
Store number
Dial
Send
Forward
Delete
Send
Favorites box
SMS list
Option
Settings
Service center
Input number
Validity period
12 hours
1 day
Forward
Delete
Reply
Forward
Delete
Save to favorites
Store number
Dial
1 week
Maximum
Status report
On
Call 24ard

Off
Reply path
On
Off
New entry storage
SIM card(Default)
Mobile phone
User define sms
Add
Send
Modify
Delete
Delete SMS
Delete all
Inbox
Sent box
Unsent box
Favorite
SMS in SIM card
SMS in phone
Delete 1 day before
Delete 3 days before
Delete 10 days before
Delete 1 month before
Delete 3 months before
Delete 6 months before
Capacity
Voice mail
Call voice mail
Voice mail number
Broadcast SMS
Reception
On
Off
Channel list
MMS
Write MMS
Add text
Call 24ard

Edit text(if alread add text)
Insert picture
Insert audio
Insert new page
previous page (If the user insert multi pages)
Next page (If the user insert multi pages)
Delete page (If the user insert multi pages)
Preview
Page timing
Text color
Text color,all page
Background color
Remove objects
Inbox
Inbox list
Options
View
Reply
Reply to all
Forward
Delete
Delete all
Refresh
Detailed info
Back
Sent Message Box
Outbox list
Options
View
Delete:.
Delete all:
Edit:
Send now
Refresh
Back
Outbox
Call 24ard
Detailed Info
Back:

Option
View
Delete:
Delete all:
Edit
Send now
Refresh
Detailed Info:
Back:
Back
Draft box
Draft box list
Option
View
Edit message
Delete
Delete all
Send now
Refresh
Detailed info
Back
Template box
Template box list
Option
View
Create message from Template
Delete
Delete all
Refresh
Detailed info
Back
MMS settings
MMS Center
Sending
Validity period
1 hours
12 hours
Call 24ard

1 day
1week
Max
Read report
On
Off
Delivery
report
On
Off
Priority
Low
Middle
High
Reply charging
Reply charging
Reply charging deadline
Reply charging size
Show number
On
Off
Auto save
On
Off
Page timing
Delivery time
Immediate
In one hour
In 12 hours
In 24 hours
Retrieval
Home network
Roaming network
Send read report
Delivery report allowed
Filters
Immediate server
Immediate limit
Treat as delayed
Call 24ard

Max retrieval size
Anonymous senders
Personal message
Advertisement message
Informational message
Auto message
String message
Network
Connection type
Network account
WAP ga tew ay
Login
Password
Realm
Secure port
HTTP port
Capacity
WA P
Profiles list
Add
Delete
Edit
Connect/Release
WEB
Option
Forward
Backward
Homepage
Refresh
Bookmarks
Add Bookmarks
Edit
Go
Delete
Delete all
History
Go
Delete
Call 24ard

Clear all
Settings
Edit homepage
Select Profile
rename Profile
Connection
Data account
Connection Type
Timeout
Proxy address
Proxy port
Sec. proxy port
Proxy user name
Proxy password
Proxy realm
Security
Browser options
Enable CSS
Enable Refresh
Enable narrow render
Show image
Show movies
Show flash
Play sounds
Load objects with no MIME
Profiles
Rename current profile
Save current settings
Profile list
Cache
Cache mode
Clear cache
Cookies
Enable Cookies
Clear Cookies
Push settings
Push SL settings
Push security
Clear history list
Enter select mode
Set as homepage
Call 24ard

Offline pages
Quit
STK
(The menu can be available only with the SIM which has STK function for GSM
service.)
[3]Multimedia
DC
Option
Meter mode
Single(default)
Continuous
Self-timer 10 sec
White balance
Auto(default)
Sunny
Cloudy
Incandescent
Fluorescent
Image quality
Normal
Fine(default)
Super fine
Image size
1280*1024
640*480
320*240(default)
160*120
Photo effect
Off(default)
Neutral
Vivid
Sepia
Cold
Reversal
B&W
Exp.compen
Call 24ard

Night mode
On
Off
Storage location
SD card
Phone(default)
Display
On(default)
Off
DV
Option
White balance
Auto(default)
Sunny
Cloudy
Incandescent
Fluorescent
Image size
320*240(default)
160*120
Photo effect
Off(default)
Neutral
Vivid
Sepia
Cold
Reversal
B&W
MMS mode
On
Off(default)
Exp.compen
Storage location
SD card
Phone(default)
Display
Call 24ard

On(default)
Off
Record
Option
Audio player
Record again
Storage location
Send via MMS
Tag- I t
Option
Undo
Redo
Copy
Cut
Paste
New
Open
Send MMS
Save
Save as
Cancel edit
Back
Image browser
Option(For a single picture)
Browse
Delete
Edit
Send via MMS
Detailed info
Rename
Add frame effect
Option(in browser screen)
Zoom (Only in picture display screen)
Zoom in
Zoom out
Call 24ard

Fit in
Original size
Set as wallpaper
Delete
Edit
Send via MMS
Detailed info
Add frame effect
Audio player
Option
Play
Delete
Send mms
Detailed info
Rename
Flip exit
Video player
Option
Play
Delete
Select all
Send bt MMS
Detailed info
Rename
Flip exit
On
Off
[4] Mobile office
Calendar & Schedule
Day view
Option
New
Monthly view
Weekly view
Delete
Call 24ard
Selected event

Due event
All events
Input date
Capacity
Settings:
Default view
Monthly view
Weekly view
Daily view
Weekly type
Monday
Sunday
Week view
Option
New
Daily view
Month view
Delete
Enter date
Capacity
Settings:
Exit
Month view
Option
New
Daily view
Week view
Delete
Due event
All events
Default view
Weekly type
Due event
All events
Enter date
Capacity
Settings:
Call 24ard
Default view

Exit
Notepad
Option (Notepad list)
New
Open
Rename
Delete
Detailed info
Back
Option (create or open a file)
New
Save
Save as
Delete
Search
Search next
Weekly type
Chinese-English 2-way Dictionary
Enter
Option
Spelling check-up
Page up
Page down
View explain word
Option
Last word
Next word
exit
Exit
Calculator
Option
CE
MC
MR
MS
M+
Alarm clock
Clock one
Time
Call 24ard

Clock two
Clock two
Ring type
Wor ld time
Option
Set as local
Daylight saving
Stopwatch
Start
Exit
Repeat method
Once
Everyday
On weekday
Except Sunday
Close
Count-down timer
Start/Reset
Sync
[5] Settings
Sounds settings
Ringr type
Ringer list
Ring volume & alert
Vol u m e
Alert type
Message alert
Ringe
Vibrate
Light
Vo l u m e
Alert type
Ringe
Vibrate
Call 24ard
 Loading...