

Page 1
Page 2
ELECTRICAL SPECIFICATIONS
MODEL NO:
JAVA GIANT 2 (USA & CANADA)
JAVA GIANT 2 (USA & CANADA)
UNITS OVER 30 AMPS MUST BE HARDWIRED. CORDS NOT SUPPLIED. FOR ALTERNATIVE WIRING METHODS, SEE HEATER POWER WIRING DIAGRAM.
PHASE:
1 PHASE
1 PHASE
1 PHASE
1 PHASE
3 PHASE
VOLTS:
120
230
230
230
230
TOTAL
KW
1.7
6
9
18
18
NO. OF
HEATERS
1
3
3
3
3
AMPS
15
26
39
78
45
HZ.
60
60
60
60
60
RECEPTACLE
NEMA
L-5-15
L6-30R
HARDWIRED
HARDWIRED
HARDWIRED
CIRCUIT
BREAKER
15A
30A
50A
100A
60A
MECHANICAL SPECIFICATIONS
MODEL NO:
JAVA GIANT 2 (USA & CANADA)
JAVA GIANT 3 (USA & CANADA)
Height: add 4" for legs; Depth: add 2" for clearance for waterline hookup;
WIDTH
IN
14.125
20.375
FAST START UP PROCEDURE
Water Inlet Connection
This equipment is to be installed to comply with the applicable Federal, State, or local plumbing codes having jurisdiction. In addition:
1. A quick disconnect water connection or enough extra coiled tubing (at least 2x the depth of the unit) so that the machine can be moved for
cleaning underneath.
DEPTH
IN
24.25
24.25
HIGHT
IN
40.5
40.25
HOPPERS
QTY LB. COFFEE
2 5.25
3 5.25
TANK
GAL.
7.5
10.5
ART AREA
IN
13.75 x 16.75
20 x 16.75
SHIPPING
WEIGHT LB.
155
195
2. An approved back flow prevention device, such as a double check valve to be installed between the machine and the water supply.
The JAVA GIANT 2/3 (USA and CANADA) is equipped with a 3/8" Flare Water Inlet Fitting .
HIGHLY RECOMMENDED:
A WATER SHUT-OFF VALVE and A WATER FILTER, preferably a combination Charcoal/Phosphate Filter, to remove odors and inhibit lime and scale
build up in the machine. Note: In areas with extremely hard water, a water softener must be installed in order to prevent a malfunctioning of the
equipment and in order not to void the warranty.
STARTUP PROCEDURE
Caution: Make sure that the Heater Switch, located behind right hopper with door opened, is in the OFF position.
1. JAVA GIANT2/3 (USA & CANADA) - Connect the 3/8" dia copper waterline to the 3/8" flare water inlet fitting of the valve.
2. Plug the power cord into a proper receptacle.
3. Activate the Power Switch (Toggle Up). The door display panel and the green dispense buttons will light up and the tank will start filling.
Allow approximately 4-6 minutes for the tank to fill.
4. Activate the Heater Switch . Allow approximately 20-30 minutes for the water to reach a preset temperature of 195°F.
The heat up time will depend on the water inlet temperature, the input voltage and the wattage of the elements in the machine.
5. Place decanter under nozzle and press dispense switch. The machine will dispense water at the rate of 4 oz. per second.
Repeat it several times for each dispense switch to check for consistent output.
6. While the tank is heating up, remove the hoppers, load them with products and reposition them back in the machine.
When the heater light goes OFF, the tank has reached its brew temperature and the machine is ready to dispense Coffee.
Page 3
PULL DOWN TRAY
IN UP POSITION
DECANTER
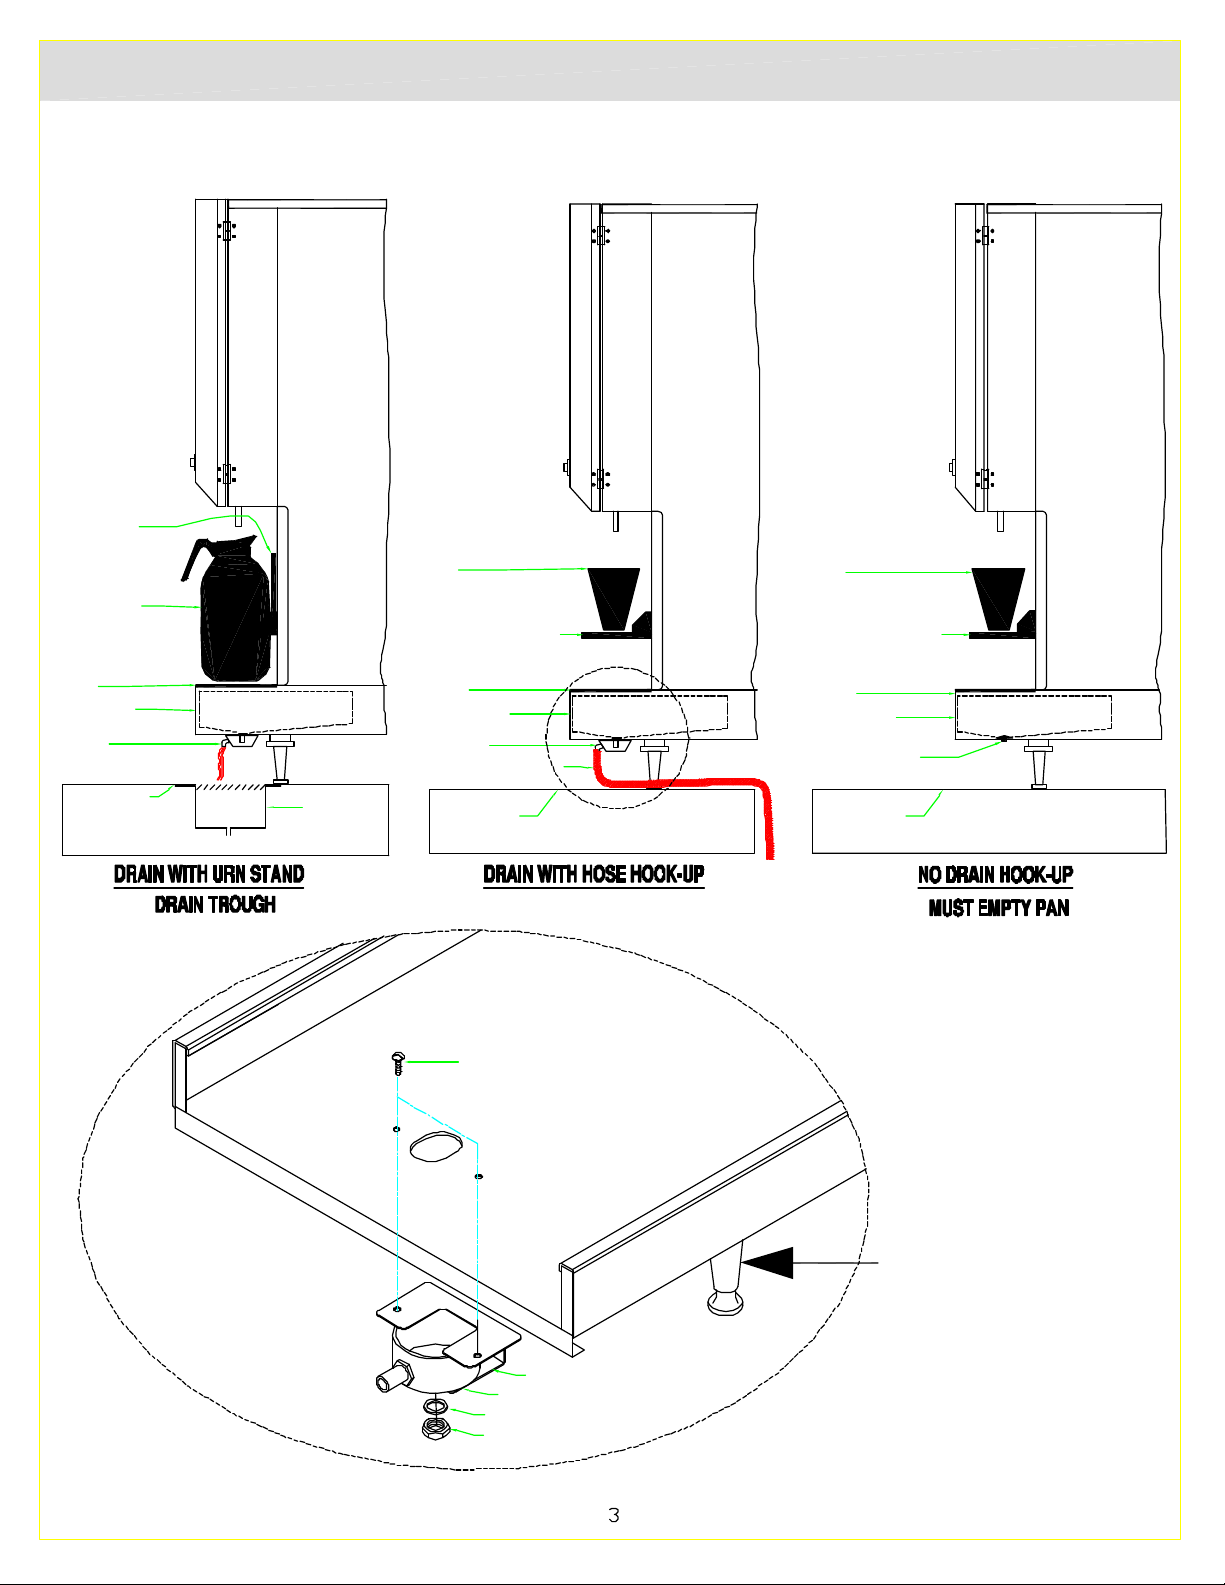
DRAIN HOOKUP INSTUCTIONS
3 OPTIONS DRAIN HOOK-UP FOR JAVA
CUP
PULL DOWN TRAY
CUP
PULL DOWN TRAY
GRILL
DRIP TRAY
DRAIN
URN STAND
TROUGH
GRILL
DRIP TRAY
DRAIN
DRAIN HOSE .5 I.D.
URN STAND
# P811A
# 10-32 x 3/8 SCREW
GRILL
DRIP TRAY
DRAIN PLUG
URN STAND
FIRST
Z:\DRAWINGS\ND000\ND80A-D-JAVA-MAN.dwg, 07/08/2002 09:08:54 AM, 1:8.12598
MOUNTING BRACKET RQ41A
DRAIN POT M478A
SPRING WASHER M479A
HEX NUT K466A
INSTALL
4" LEGS
M172A
Page 4
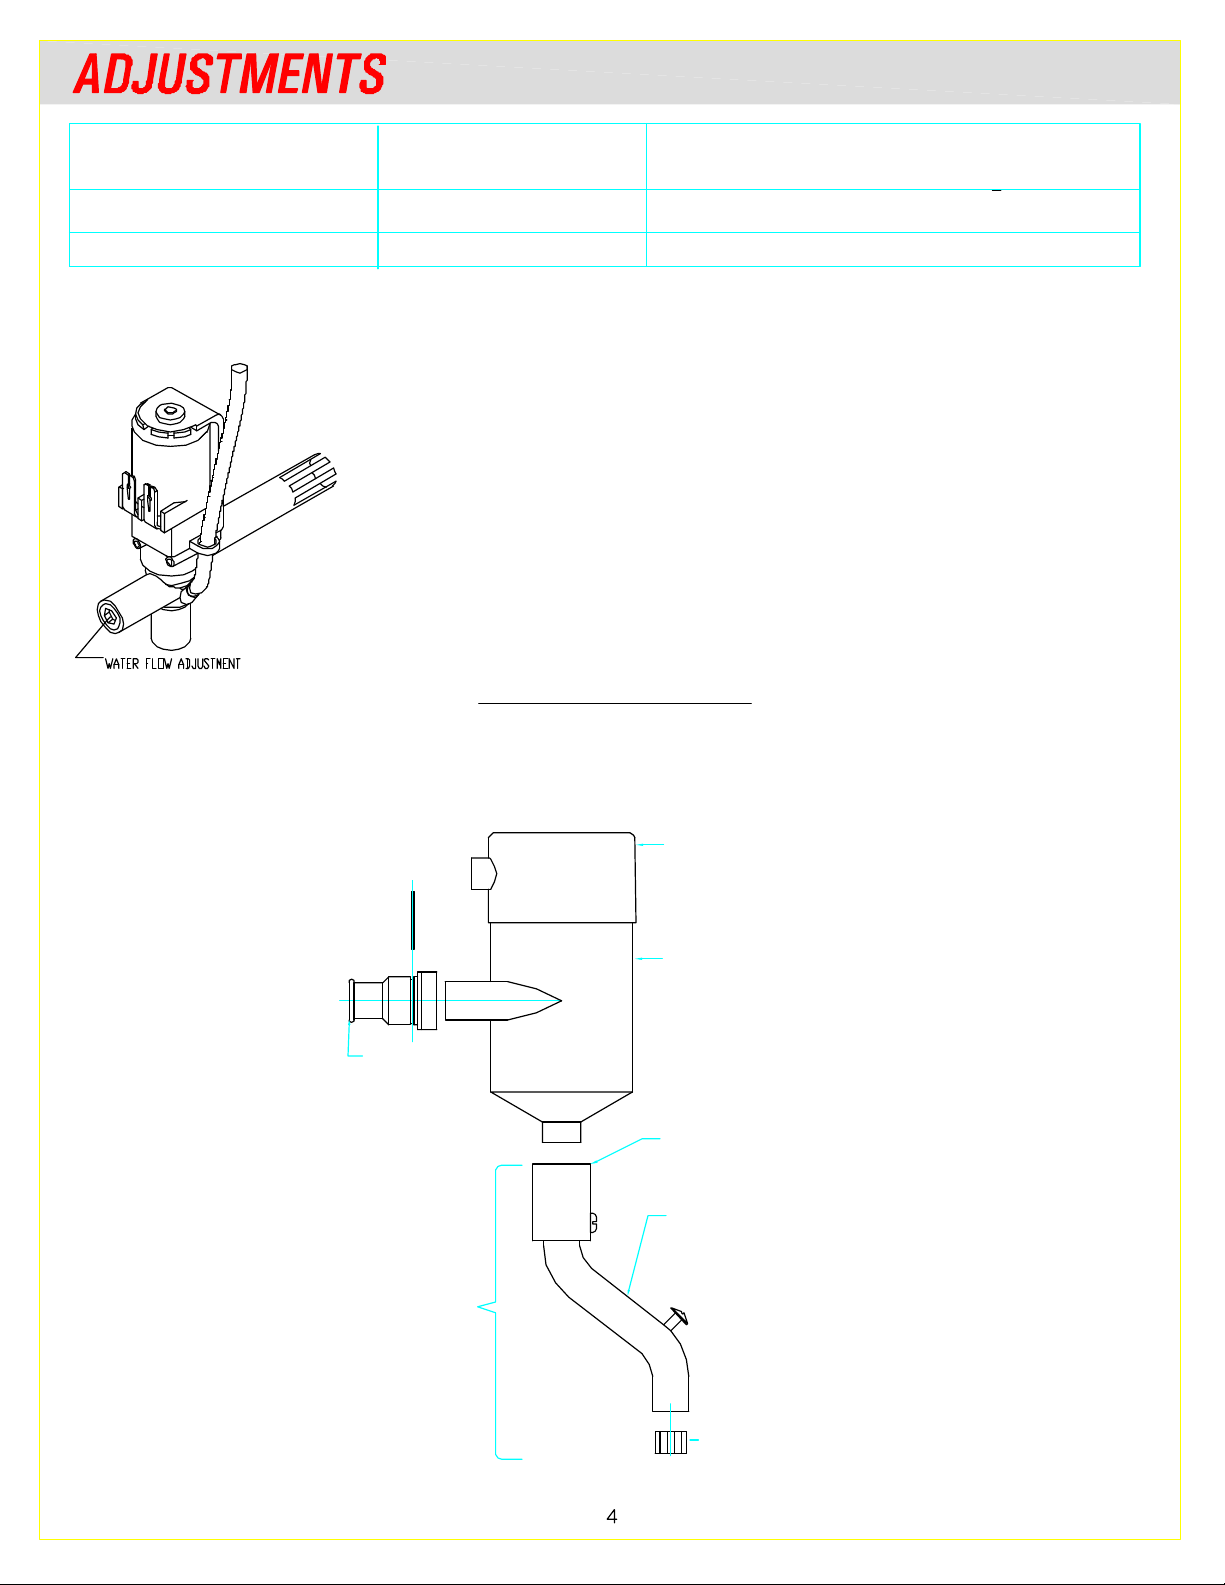
MODELS:
DISPENSE VALVE: HOT WATER FLOW RATE:
JAVA GIANT 2 (USA & Canada)
JAVA GIANT 3 (USA & Canada)
L561A 2 TO 4.5 oz. factory set at 3.8 oz./sec.
L561A 2 TO 4.5 oz. factory set at 3.8 oz./sec.
Note: To access the Water Dispense Valves, open door and remove Hoppers.
TO ADJUST HOT WATER FLOW RATE:
1. Open door and remove hoppers. Locate Dispense Valve behind hoppers, mounted on tank.
2. Locate adjustment screw on Dispense Valve.
3. Using Allen Key or flat screwdriver rotate, 1/4 turn at a time,
CLOCKWISE to decrease water flow, or COUNTERCLOCKWISE to increase water flow.
4. Check water flow output, after each 1/4 turn.
DISPENSE CUP ASSEMBLY
MIXING CHAMBER ASSEMBLY K600Q
JAVA GIANT2/3
P510A
C-CLIP
CD77A
SOCKET
K644A
DISPENSE
Z:\DRAWINGS\ND000\ND80A-D-JAVA-MAN.dwg, 07/08/2002 09:09:13 AM, 1:8.12598
NOZZLE
ASS'Y
CD61A CLEAR
CD272 BLACK
STEAM CAP
CD242 CLEAR
CD273 BLACK
MIXING CUP
K600A
EXTENSION TUBE
H333A S.S.
DISPENSING TUBE
K529A AERATOR
Page 5
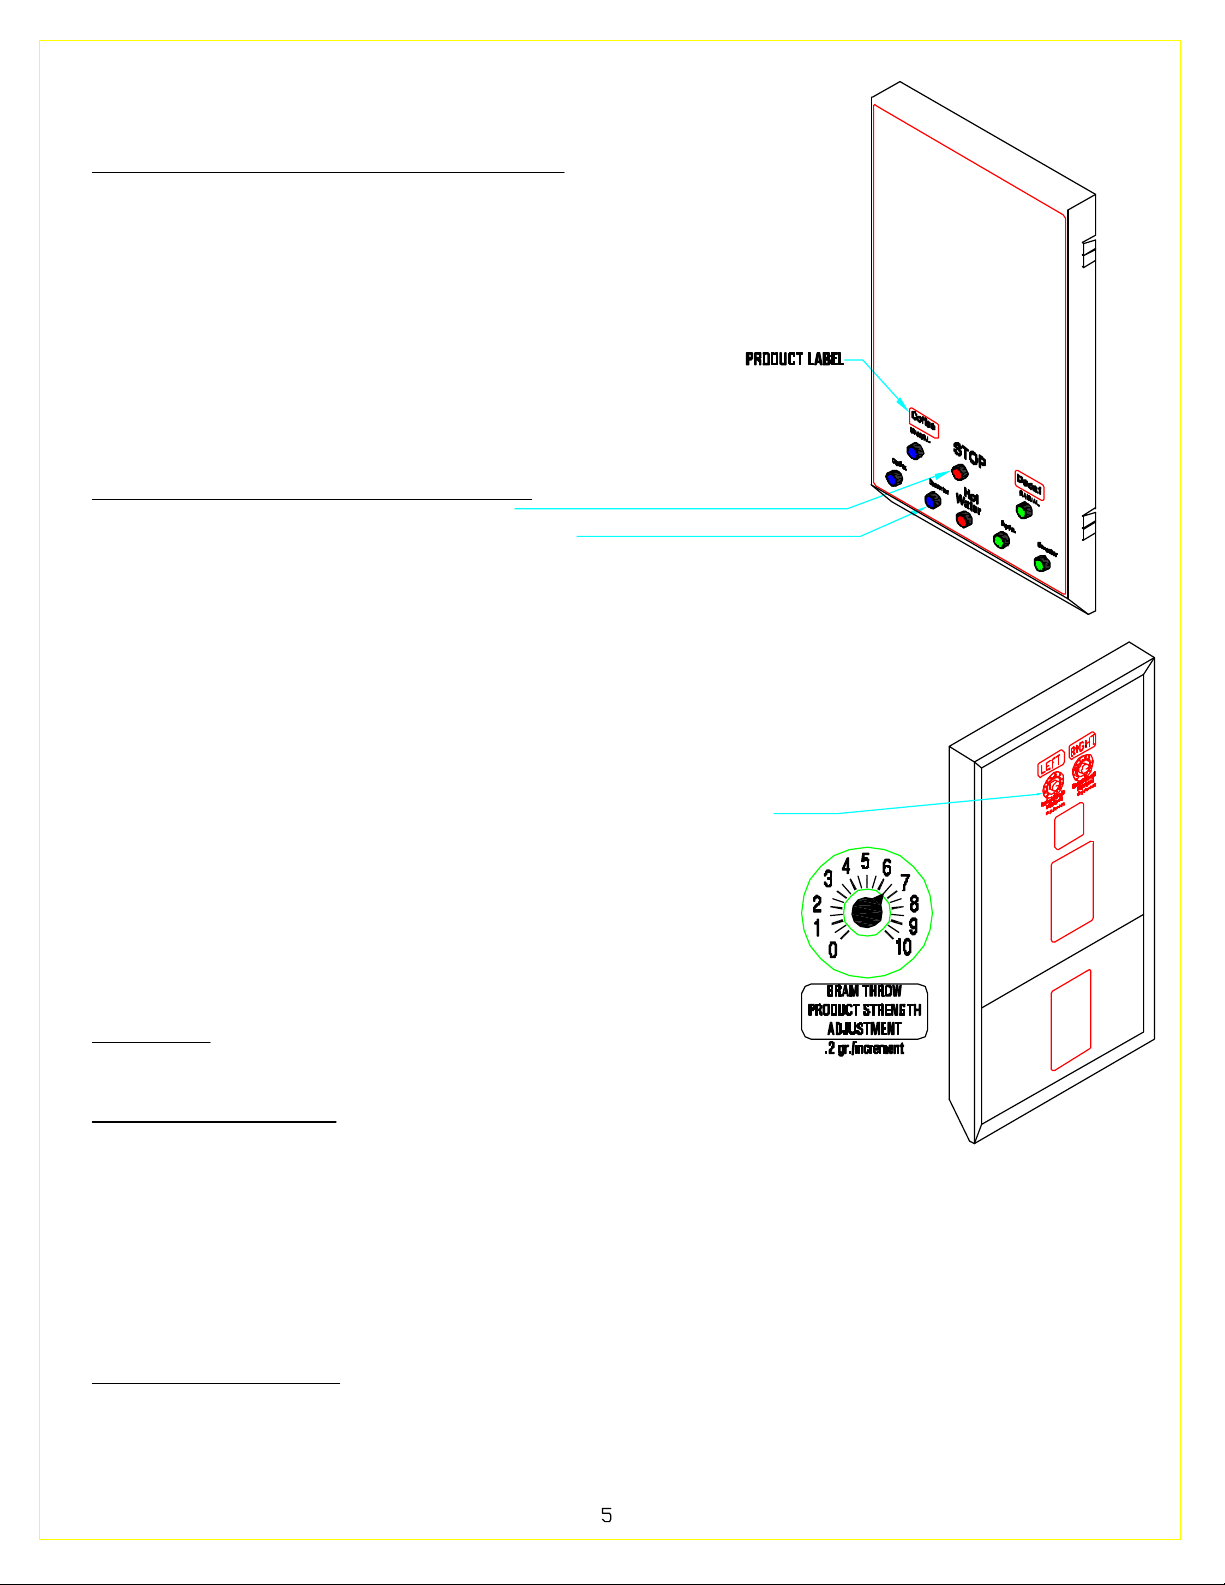
VOLUME AND DRINK SIZE ADJUSTMENTS:
PROGRAMMING INSTRUCTIONS FOR AUTOMATIC DISPENSE
1. Turn Power Switch ON (toggle switch inside door).
2. PRESS and HOLD [red] STOP Button with one hand.
3. PRESS and HOLD [green] DISPENSE Button with other hand.
4. RELEASE [red] STOP Button ONLY.
5. Continue to HOLD [green] DISPENSE Button for 5 SECONDS, then RELEASE.
6. PRESS and RELEASE [green] DISPENSE Button. Product begins dispensing.
When it reaches the "DESIRED VOLUME",
7. PRESS and RELEASE [green] DISPENSE Button to SET "DESIRED VOLUME".
DISPENSE Button can be "jogged" to top off.
8. PRESS and RELEASE [red] STOP button to LOCK IN "DESIRED VOLUME".
Repeat steps 1 to 8 for each Dispense Button.
PROGRAMMING INSTRUCTIONS FOR MANUAL DISPENSE
1. PRESS AND HOLD STOP [red] BUTTON WITH ONE HAND.
2. PRESS AND HOLD DISPENSE [green] BUTTON WITH OTHER HAND.
3. RELEASE STOP [red] BUTTON.
4 CONTINUE TO HOLD [green] DISPENSE BUTTON FOR 5 SECONDS.
5. RELEASE DISPENSE [green] BUTTON.
6. PRESS AND RELEASE STOP [red] BUTTON.
PRODUCT STRENGTH ADJUSTMENTS:
The JAVA units have variable speed control auger motors [CD151 with variable speed of 10 to 130 RPM].
The Gram Throw is factory preset between 6 and 7 (1.8 gr./oz.) for the JAVA machines.
Drink or product strength can be changed by adjusting the Auger Motor RPM [see knobs on inside door panel].
The water flow rate adjustment for the dispense valve should remain fixed.
Note: The water flow rate should not exceed 1 -1.3 oz./sec.
[see Hot Water Flow Rate Adjustments below].
CLEANING AND SANITIZING:
SANITIZING: All food dispensing units should be sanitized periodically.
All parts to be sanitized must be cleaned first.
To prepare a sanitizing solution:
ADD 2 TSP. OF LIQUID CLOROX BLEACH (5.25% CONCENTRATION) TO 1 GALLON OF WATER AT ROOM
TEMPERATURE (70° - 90°F).
Soak all parts for a minimum of 3 min. in the sanitizing solution. Note: Always start with a unopened bottle of
Clorox Bleach since the solution from an opened bottle has a short life span.
Let all sanitized parts drain and dry naturally. DO NOT WIPE THEM DRY. Before using the sanitized unit (or parts)
with food stuffs, rinse all parts thoroughly with water.
Z:\DRAWINGS\ND000\ND80A-D-JAVA-MAN.dwg, 07/08/2002 09:36:55 AM, 1:8.12598
CARE FOR STAINLESS STEEL:
Stainless Steel surfaces that come in contact with food substances, MUST BE CLEANED EVERY DAY.
WHEN CLEANING STAINLESS STEEL , ONLY A pH NEUTRAL CLEANER IS TO BE USED.
Use nylon or brass brushes (not steel wire brushes) for removing food deposit.
Many food products contain acids,alkalies, or other substances which corrode Stainless Steel.
Page 6
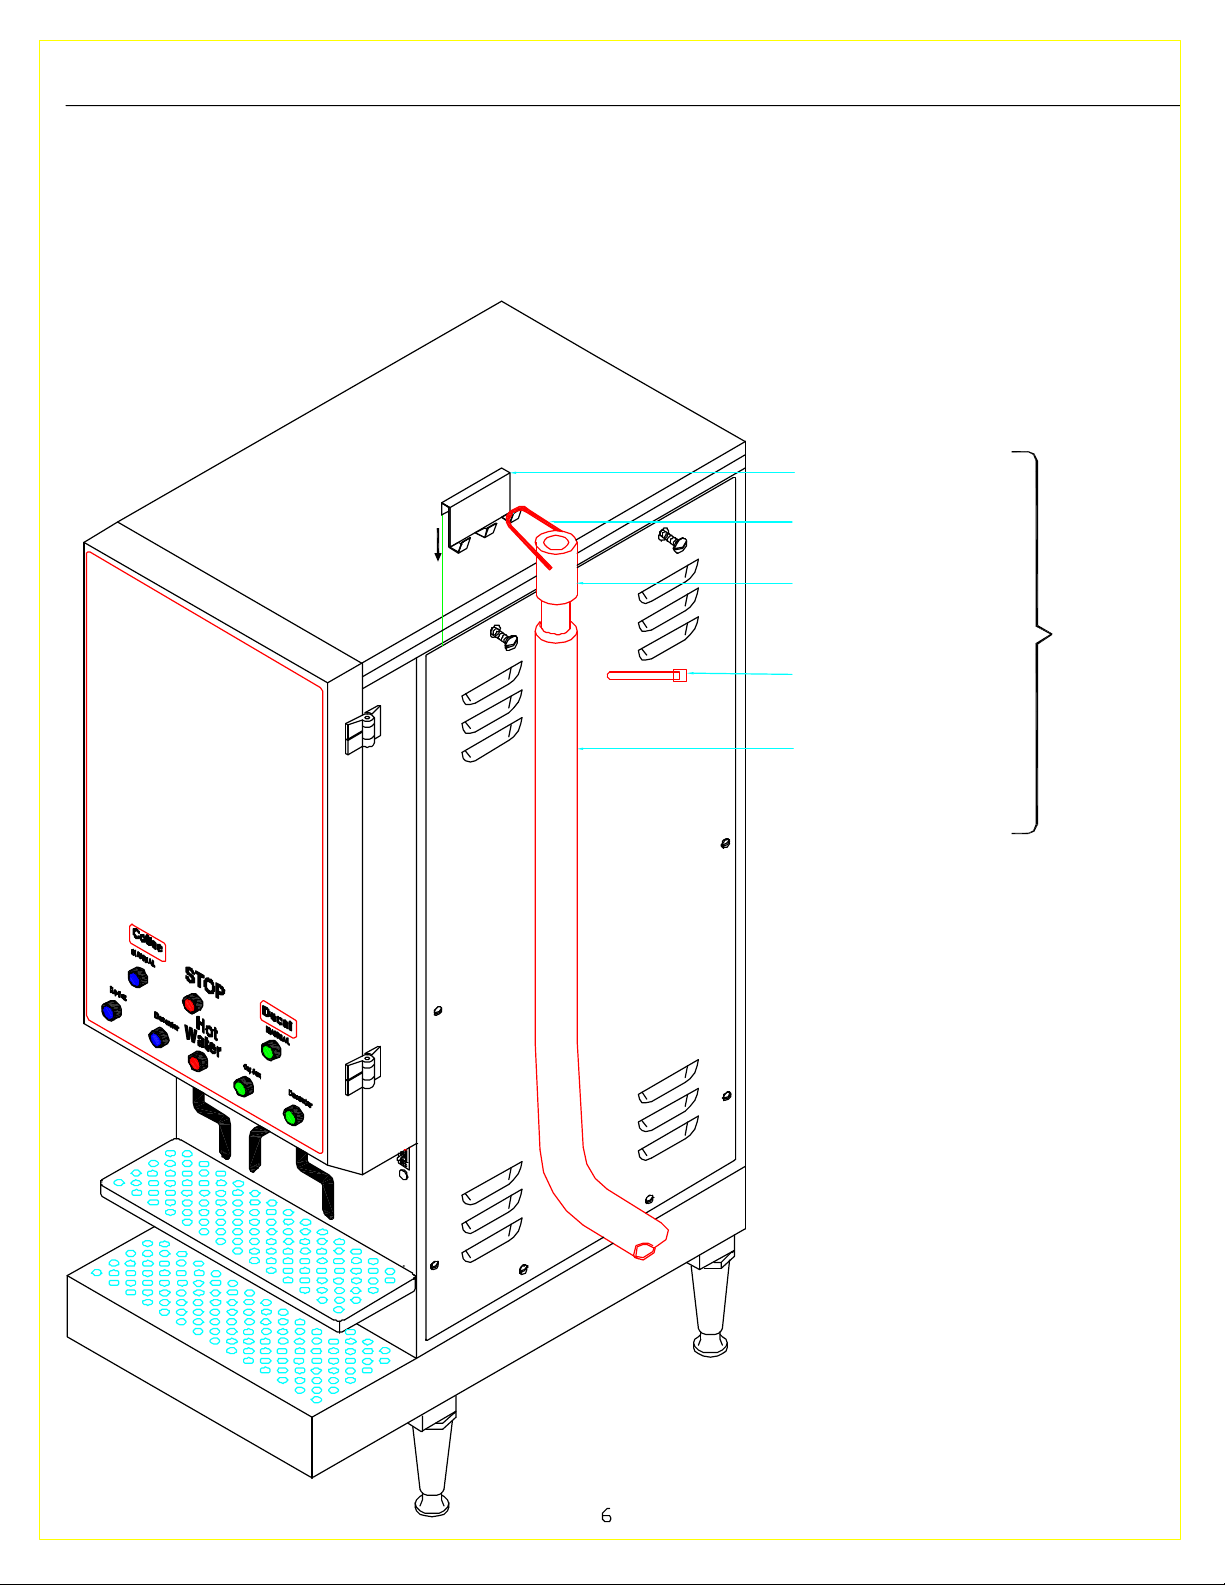
INSTRUCTIONS TO INSTALL HAND UP BRACKET FOR FILLER HOSE
1. LOOSEN THE TWO TOP SCREWS.
2. PULL OUT RIGHT SIDE PANEL, ABOUT 1/2" BY THE LOUVERS.
3. SLIDE IN HOSE HANGER, AS SHOWN.
4. TIGHTEN LOOSENED SCREW.
HOSE HANGER RV53A
WIRE HOOK K595A
FILLING SPOUT K584A
TIE WRAP B093A
SILICONE TUBE
1" ODx1/8"x24"
M645A
HOSE
KIT
K584Q
Z:\DRAWINGS\ND000\ND80A-D-JAVA-MAN.dwg, 07/08/2002 09:09:47 AM, 1:8.12598
Page 7

DESCRIPTION AND LOCATION OF COMPONENTS JAVA GIANT 2/3
HOPPER COVERS
HOPPER ASS'Y
41
4
25
1
14
8
LABEL AREA
JAVA 2
LABEL AREA
20
JAVA 3
3
8
5
8
3
PRODUCT LABEL
DISPENSE BUTTON
ND61A [JAVA 2]
ND60A [JAVA 3]
PILOT LIGHT
FOR HEATER
DROP SHELF
DRIP TRAY
STOPSTOPSTOP
3
DRAIN
HEATER SWITCH
Z:\DRAWINGS\ND000\ND80A-D-JAVA-MAN.dwg, 07/08/2002 09:10:05 AM, 1:10.8346
DOOR LOCK
RINSE SWITCH
POWER SWITCH
PULL DOWN SHELF
URN STAND W/DRAIN TROUGH
FRONT VIEW
POTENTIOMETERS [2]
PRODUCT STRENGTH
GRAM THROW
INSTRUCTION LABELS
MAGNET
DOOR LOCK
DOOR LATCH
PULL OUT TRAY PAN
W/ DRAIN
AND GRILL
DRAIN
PULL DOWN TRAY
UP POSITION
DECANTER
GRILL
DRIP TRAY
RIGHT SIDE VIEW
11.25"
9.5"
URN STAND WITH DRAIN TROUGH
FRONT VIEW
1.75"
CUP
PULL DOWN TRAY
DOWN POSITION
GRILL
DRIP TRAY
DRAIN
6.5"
3"
6
CUP [8 OZ.]
JUG [1 LT]
DECANTER [1/2 GAL]
Page 8

DESCRIPTION AND LOCATION OF COMPONENTS JAVA JR - PC (CANADA)
LABEL AREA
HOPPER ASS'Y [P]
11
SWITCH PANEL LABEL
NG16A [JAVA JR-PC]
HEATER SWITCH
MAGNET
DOOR
LATCH
JAVA JR-PC
FRONT DOOR
VIEW
POTENTIOMETERS [2]
PRODUCT STRENGTH
GRAM THROW
INSTRUCTIONS
LABELS
TIMER KNOB
COVER RS27A
32
4
Z:\DRAWINGS\ND000\ND80A-D-JAVA-MAN.dwg, 07/08/2002 09:10:19 AM, 1:7.93008
22
RINSE SWITCH
POWER SWITCH
FACIA BOTTOM CAP FRONT SE64A
FACIA BOTTOM CAP REAR SE63A
CUP [8 OZ.]
GRILL & TRAY W/DRAIN
DECANTER 1/2 GAL]
Page 9

SPARE
PARTS
1
2 √
3 √
4 √
5 √
6 √
7
8 √
9 √
10
11 √
12 √
13 √
14
15 √
16 √
17
18 √
19 √
SCREW, S.S., 1/4 - 20 x 5/8
HEATER-JAVA2 [208V AC, 5KW-G289A] [230V AC, 5KW-G287A]
HEATER-JAVA3 [208V AC, 6KW-G300A] [230V AC, 6KW-G281A]
GASKET, TANK HEATER
ELBOW TUBE-BREATHER, WATER INLET, DRAIN
RUBBER GASKET, FOR SCREW (ITEM 1 P446A)
RUBBER GASKET, FOR FLOAT SWITCH
HIGH LEVEL FLOAT SWITCH 70.V.A
LOW LEVEL FLOAT SW. [LONG TUBE+FLOAT SWITCH]
LEVEL CONTROL SENSOR [K402A & P410A]
TANK TOP JAVA 2 / JAVA 3
THERMOSTAT (120V)
HI-LIMIT
GASKET, SILICONE BUTT SPLICED
TANK WELDMENT ASS'Y JAVA 2 / JAVA 3
GROMMET .593 ID (COFFEE) JAVA 2 / JAVA 3
GROMMET .466 ID (WATER) JAVA 2 / JAVA 3
DISPENSE VALVE [COFFEE] JAVA 2 / JAVA 3
DISPENSE VALVE [HOT WATER] JAVA 2 / JAVA 3
TANK INSULATION JAVA 2 / JAVA 3
DRAIN HOSE, SILICONE .375 I.D. [ROLL]
DRAIN PLUG
√ - RECOMMENDED SPARE PARTS
P/N
JAVA 2 / 3
P465A
G289A/G287A
G300A/G281A
M502A
K525A
M533A
M532A
L499A
L591A
K355Q
RN16Q/RO52Q
L002A
L531A
M607A/M608A
RN21Q/RO51Q
M462A
M461A
L561A
L467A
M630A/M631A
M326A
M391A
QTY
2 / 3
7
3
3
3
3
2
1
1
1
1
1
1
1
1
1
2 / 3
2 / 3
2 / 3
1 / 2
1
1
1
JAVA 2
TANK
SHOWN
Z:\DRAWINGS\ND000\ND80A-D-JAVA-MAN.dwg, 07/08/2002 09:10:36 AM, 1:8.12598
DRAIN
WATER
INLET
Page 10

45
44
1
43
42
41
40
39
38
37
36
2
35
34
3
4
5
6
7
8
9
10
11
Z:\DRAWINGS\ND000\ND80A-D-JAVA-MAN.dwg, 07/08/2002 09:10:56 AM, 1:8.12598
33
32
31
30
29
28
27
26
25
12
13
14
15
16 17 18
19
20 21
22 23
24
Page 11

PART NO. PART NO. QTY DESCRIPTION
JAVA 2 JAVA 3
1 RN33A RR70A/RR71A 1 SIDE PANEL[S] LEFT / RIGHT
2 M326A M326A 1 SILICONE HOSE [BREATER FITTING TO DRAIN] [OD 1/2 x 3/8 ID X 40"]
M326A M326A 1 SILICONE HOSE [SOLENOID INLET VALVE TO TANK] [OD 1/2 x 3/8 ID X 16"]
3 M325A M325A 2/3 SILICONE HOSE [DISPENSE VALVE to HOT WATER NOZZLE] [OD 3/4 x1/2 ID X 17"]
M325A M325A 1/2 SILICONE HOSE [DISPENSE VALVE to DISPENSE CHAMBER] [OD 3/4 x1/2 ID X 14"]
4 K270A K270A 1 ELBOW FITTING / HOSE BARB [3/8NPT]x1/2 FITTING x 3/8 HOSE BARB
5 A4256 A4256 1 FITTING, WATER INLET , 3/8 FLARE X 3/8 NPT FTG-R90/55 [BRASS]
6 L022A L022A 1 WATER INLET VALVE/SOLENOID [L462A USE AFTER REMOVING WASHER]
7 C396A C396A 1 FUSE HOLDER 120/240 V
8 C395A C395A 1 FUSE [BUSSMAN SC15 120/240V ONLY 6 AMP]
9 B157A B157A 1 TERMINAL BLOCK [120V]
10 CG12A CG12A 1 CONTACTOR [120V SINGLE PHASE] [SQ. "D"]
11 CE187 CE187 1 TRANSFORMER LARGE- 240/120V
12 L556A L556A 2/3 SPEED CONTROL BOARD [USE W/POT. L557A] [WAS L552A]
13 CF29A CF29A 2/3 TRANSFORMERS
14 B129A B129A 2/3 RELAYS [use w/ Teach Me Timers]
15 L398A L398A 1 WATER LEVEL CONTROL CCA
16 CD224 CD224 1/2 FAN [110-115V AC, 60HZ, 110 cu in/hr]
17 CG14A CG14A 2 FAN DUCT HOSE
18 M172S M172S 1 4" LEGS & 1" FEET M042A [SET OF 4] [SUPPLY BOTH]
19 RQ64A ----- 1 SHELF [JAVA GIANT 2 ONLY]
20 RQ78A RW41A 1 GRILL
21 RQ16A RW40A 1 METAL TRAY PAN
22 C165A C165A 1 HEATER LIGHT - RED
23 CD77A CD77A 2/3 SOCKET FOR JAVA
24 K529A K529A 2/3 AERATOR
25 H333A H333A 2/3 S.S. EXTENSION TUBE NOZZLE W/ HOOK
26 K600A K600A 2/3 SILICONE EXTENSION
27 CD242 CD242 2/3 MIXING CUP F/COFFEE
28 CD61A CD61A 2/3 STEAM CUP [DISPENSE CAP]
29 L299A L446A 1 RINSE SWITCH, DOUBLE POLE JAVA 2; TRIPPLE POLE JAVA 3
30 L069A L069A 1 POWER SWITCH SINGLE [L229A FOR 120/240V]
31 CG36A CG37A 1 DOOR HARNESS ASS'Y [WAS CF19A]
CG90A CG91A 1 CABINET HARNESS
32 L584A L584A 8/13 DISPENSE PUSH SWITCH - (COMES W/ RED BUTTON)
M877A M877A 3/6 GREEN BUTTON
M876A M876A 3 BLUE BUTTON
SJ48A SJ48A 8/13 BACKUP WASHER FOR PUSH SWITCH
33 NF17A NF17A 1 START-UP PROCEDURE
34 M367A M367A 1 DOOR LATCH
35 NF25A NF25A 1 CLEANING AND SANITIZING INSTRUCTIONS
36 NF58A NF58A 1 PROGRAMMING INSTRUCTIONS FOR TEACH ME TIMER
27 L557A L557A 2/3 POTENTIOMETER, [USE W/SPEED CONTROL BD]
38 L576A L576A 4/8 TIMER "TEACH ME" PROGRAMMABLE SINGLE OR TRIPPLE L582A [1]
39 RS27A RS27A 1 TIMER KNOBS COVER
40 RN61Q RO90Q 1 DOOR WELDMENT ASS'Y
Z:\DRAWINGS\ND000\ND80A-D-JAVA-MAN.dwg, 07/08/2002 09:11:17 AM, 1:8.12598
41 L069A L069A 1 HEATER SWITCH, SINGLE POLE
42 B176A B176A 1 FAN BEHIND HOPPERS
43 CD70A CD70A 2/3 PRODUCT GUIDE - STRAIGHT [CD234/CD246 LEFT / RIGHT]
44 CD105 CD105 2/3 HOPPER ASS'Y W/NYLON AUGER [SQ-14 LB, 18"]
45 CD151 CD151 2/3 AUGER MOTOR 24V DC
Page 12

N
COFFEE
DECAF
L1
241
3
2
1
4
3
4 3
12
241
3
POT POT
241
3
WATER INLET
VALVE
RED
WHT
BLU
YEL
GRN
BLK
120V
FUSE
220V
GND
L1
L2
L3
G
GND
Page 13

Z:\DRAWINGS\NE000\ne52a.dwg, 07/08/2002 09:29:34 AM, 1:0.983246
CECILWARE CORPORATION
Page 14

Z:\DRAWINGS\NE000\NE60A.dwg, 07/08/2002 09:18:04 AM, 1:0.983282
CECILWARE CORPORATION
Page 15

Z:\DRAWINGS\NE000\NE61A.dwg, 07/08/2002 09:18:46 AM, 1:1.51271
Page 16

BLK
RED
BLUE
CONTACTOR
T1
T2
T3
L1
L2
L3
BLK
RED
R1
6KW
BLU
WHT
J1
6KW
R2
R3
6KW
[CHECK MARK INDICATES WIRING OF UNIT]
230V, 6KW, 1 PHASE, 26 AMPS
WHT
J2
BLU
REQUIRES: L1, L2, GRD
30 AMP CIRCUIT BREAKER
G
L2L1 L3
TERMINAL
BLOCK
CONNECT L1, L2 + GROUND
BLK
RED
BLUE
G
L1 L3
L2
TERMINAL
BLOCK
CONNECT L1, L2 + GROUND
BLK
RED
BLUE
GROUND
GROUND
CONTACTOR
T1
T2
T3
CONTACTOR
T1
T2
T3
L1
L1
L2
L3
L2
L3
BLK
BLK
RED
RED
6KW
R1
6KW
RED
BLUE WIRE W/ PUSH ON TERMINAL IS NOT
CONNECTED TO CONTACTOR "L3"
SUPPLIED WITH NEMA 6-30P PLUG
REQUIRES 6-30 RECEPTACLE
WHT
J1
R1
BLU
6KW
R2
R3
6KW
WHT
J2
BLU
230V, 9KW, 1 PHASE, 39 AMPS
REQUIRES: L1, L2, GRD
40 AMP CIRCUIT BREAKER
BLUE WIRE W/ PUSH ON TERMINAL IS
CONNECTED TO CONTACTOR "L3"
HARDWIRED
WHT
J1
6KW
R2
R3
6KW
WHT
J2
BLU
230V, 12KW, 1 PHASE, 50 AMPS
REQUIRES: L1, L2, GRD
60 AMP CIRCUIT BREAKER
BLUE WIRE W/ PUSH ON TERMINAL IS
CONNECTED TO CONTACTOR "L2"
G
L1 L3
L2
GROUND
TERMINAL
BLOCK
CONNECT L1, L2 + GROUND
BLK
RED
BLUE
G
L1 L3
L2
TERMINAL
BLOCK
CONNECT L1, L2, L3 + GROUND
GROUND
CONTACTOR
T1
T2
T3
L1
L3
L2
BLK
RED
R1
6KW
BLU
WHT
J1
6KW
HARDWIRED
R2
R3
6KW
230V, 18KW, 3 PHASE, 45 AMPS
REQUIRES: L1, L2, L3, GRD
WHT
J2
BLU
50 AMP CIRCUIT BREAKER
BLUE WIRE W/ PUSH ON TERMINAL IS
CONNECTED TO CONTACTOR "L3"
HARDWIRED
Page 17

WATER INLET
VALVE
WATER LEVEL
PROBES
WATER
LIQUID LEVEL CONTROL
RED
WHT
BLU
YEL
GRN
BLK
 Loading...