

Page 1
FRANCAIS
FR
ENGLISH
EN
* Voir conditions de garantie à vie limitée. / Refer to Limited Lifetime Warranty.
GALEOR
Clavier codé Radio rétro-éclairé
Illuminated RF keypad
Range: Digicode® /
Group Products
Gamme: Digicode
®
INSTALLATION MANUAL
MANUEL D’INSTALLATION
Page 2
MANUEL D’INSTALLATION
Certication FCC CFR 47
part 15 compliance
GALEOR
Clavier codé radio rétro-éclairé
Merci pour l’achat de ce produit et pour la conance que vous accordez
à notre entreprise.
1] PRESENTATION DU PRODUIT
FR
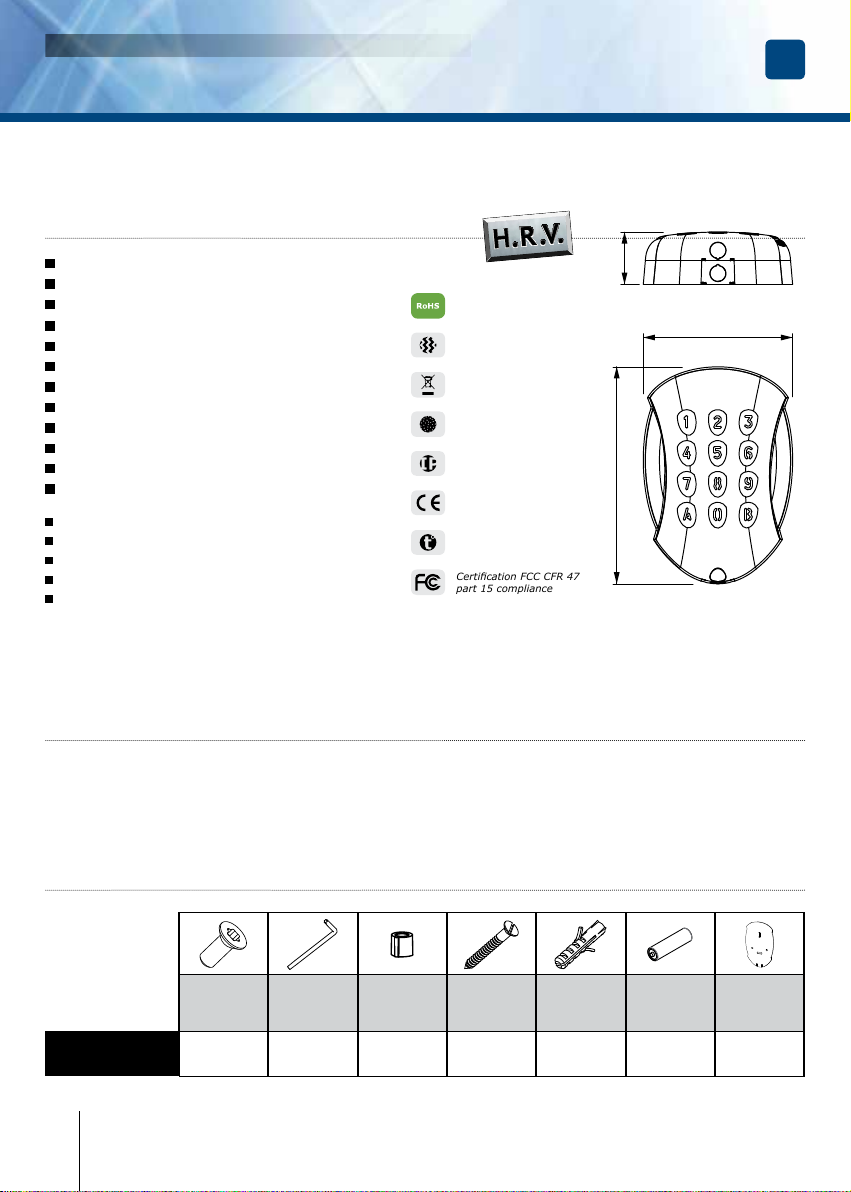
Clavier Radio sans l.
Alliage d’aluminium.
Rétro-éclairé.
Fréquence : 433,92 Mhz.
2 canaux (touche «A» et «B»).
Compatible avec les récepteurs Erone®.
Faible encombrement.
Pose en applique.
Montage avec vis Torx®.
Partiellement résiné.
22 codes d’accès 4 ou 5 termes.
1 code Maître 5 termes.
Signalisation lumineuse et sonore.
Modulation : AM/ASK.
Encodage : Code tournant Keeloq®.
Alimentation : pile lithium 3,6V - LS14500*.
Consommation :
- 28 mA en transmission,
- 0,8 uA en veille.
2] RAPPELS ET RECOMMANDATIONS
Montage
An d’optimiser la xation du GALEOR et de prévenir
les tentatives d’arrachage, privilégiez les surfaces
planes.
3] ÉLÉMENTS FOURNIS
HAUTE RESISTANCE
AU VANDALISME
27
77
Test vibrations
DEEE
Test brouillard salin
IP64
112
Certication CE
-25°C à +70°C
FCC ID : PWN1002000029
“The device complies with part 15 of the FCC Rules.
Operation is subjected to the following 2 conditions:
(1) this device may not cause harmful interference and
(2) this device must accept any interference received,
including interference that may cause undesired operation”
Composition des codes
Par soucis de sécurité, veillez à modier le code
maître usine par celui de votre choix. Lors du
changement du code maître usine et de la création
des codes utilisateurs, évitez les codes trop simples
(ex: les suites 3 4 5 6 7).
GALEOR
2 cdvigroup.com
Vis Torx
à tête fraisée
(M4x10)
coudée pour
®
vis Torx
(T20)
Cache vis
plastique
Vis
à tête fraisée
(M4x30)
Cheville
plastique
Pile
Clé mâle
®
1 1 1 2 2 1 1
Joint
d’étanchéité
* Fournie.
Page 3
MANUEL D’INSTALLATION
GALEOR
Clavier codé radio rétro-éclairé
4] MONTAGE
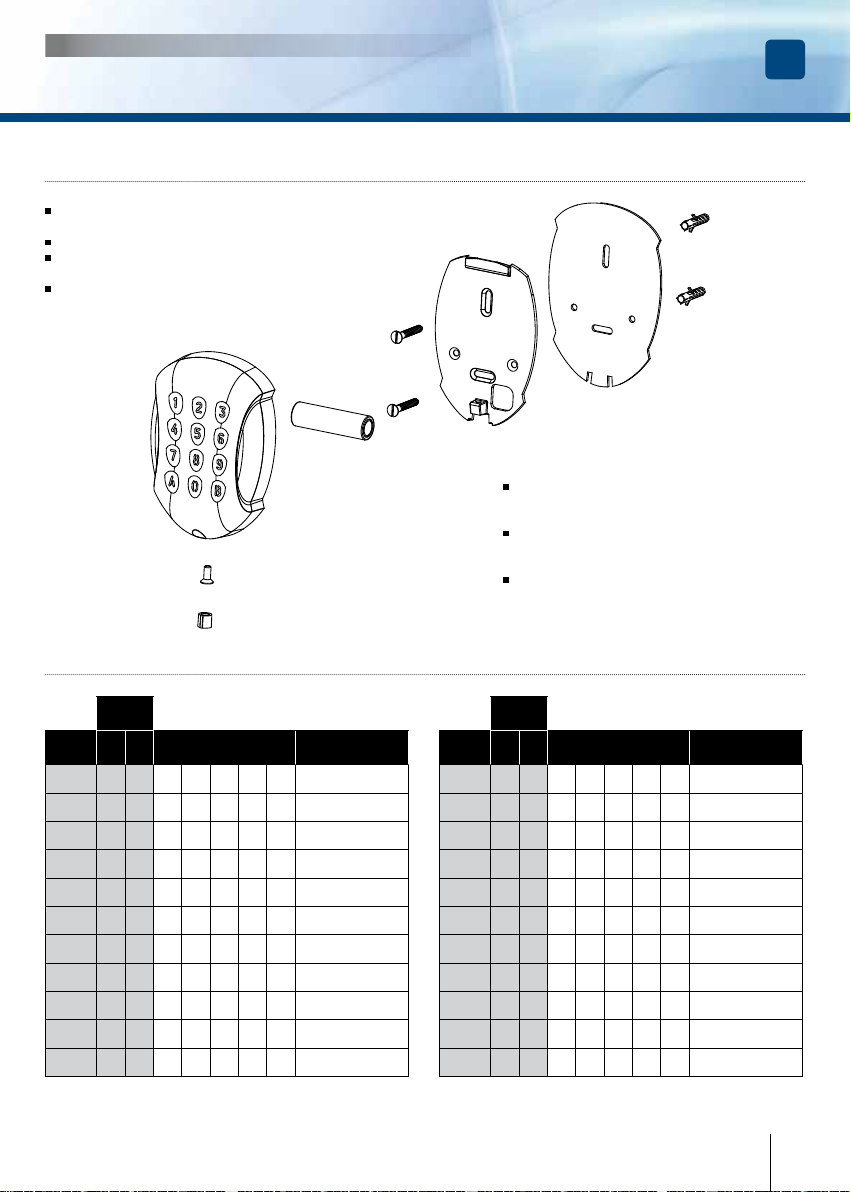
Percez les 2 trous de xation (forêt Ø 5 mm
et profondeur minimum. = 35 mm).
Positionnez les 2 chevilles plastiques dans les trous.
Collez le joint d’étanchéité sur la face arrière du socle
du GALEOR (Important).
Fixez le fond du GALEOR sur le support
de votre choix, à l’aide des vis à têtes fraisées.
FR
Enlevez la languette de protection de la pile
et xez le GALEOR à son support par le
haut avec le crochet supérieur.
Bloquez le GALEOR sur son support
par l’intermédiaire de la vis TORX
et de son outil spécique (clé mâle coudée).
Pour naliser le montage de ce produit,
placez le cache-vis.
®
5] TABLEAU UTILISATEURS
Canal
Util.* A B Code Nom/Prénom
01
02
03
04
05
06
07
08
09
10
11
* Utilisateurs
Canal
Util.* A B Code Nom/Prénom
12
13
14
15
16
17
18
19
20
21
22
cdvigroup.com
3
Page 4
MANUEL D’INSTALLATION
GALEOR
Clavier codé radio rétro-éclairé
6] PROGRAMMATION
FR
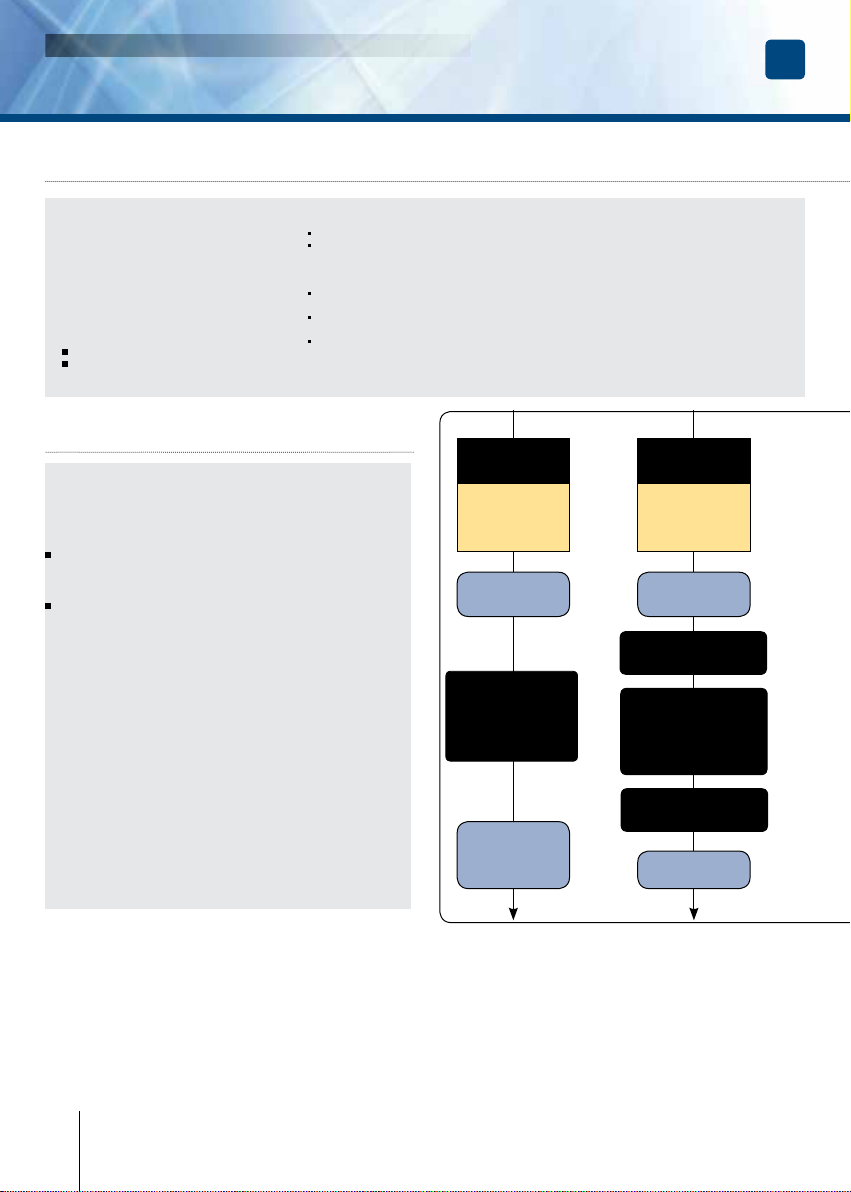
LES VALEURS DU GALEOR
SONT PAR DÉFAUT:
- Sans codes.
- Buzzer activé
- Temporisation éclairage : 3 s.
- Temporisation sécurité émission
radio : 25 secondes.
- Code maître usine : 1 2 3 4 5.
- Temporisation sécurité
programmation : 10 secondes.
- Choix des canaux :
Canal 1 = A,
Canal 2 = B.
SIGNAUX SONORES :
1 bip : En tension (Insertion de la pile)
1 long bip :
- Arrivée dans le menu,
- Validation d’un choix de programme,
- Sortie du menu.
2 bips : Entrée dans le menu de retour
à la conguration usine.
3 bips : Conrmation du retour
à la conguration usine “A+1”
4 bips :
- Conrme le retour à la conguration
usine “B+3”,
- Erreur de canal,
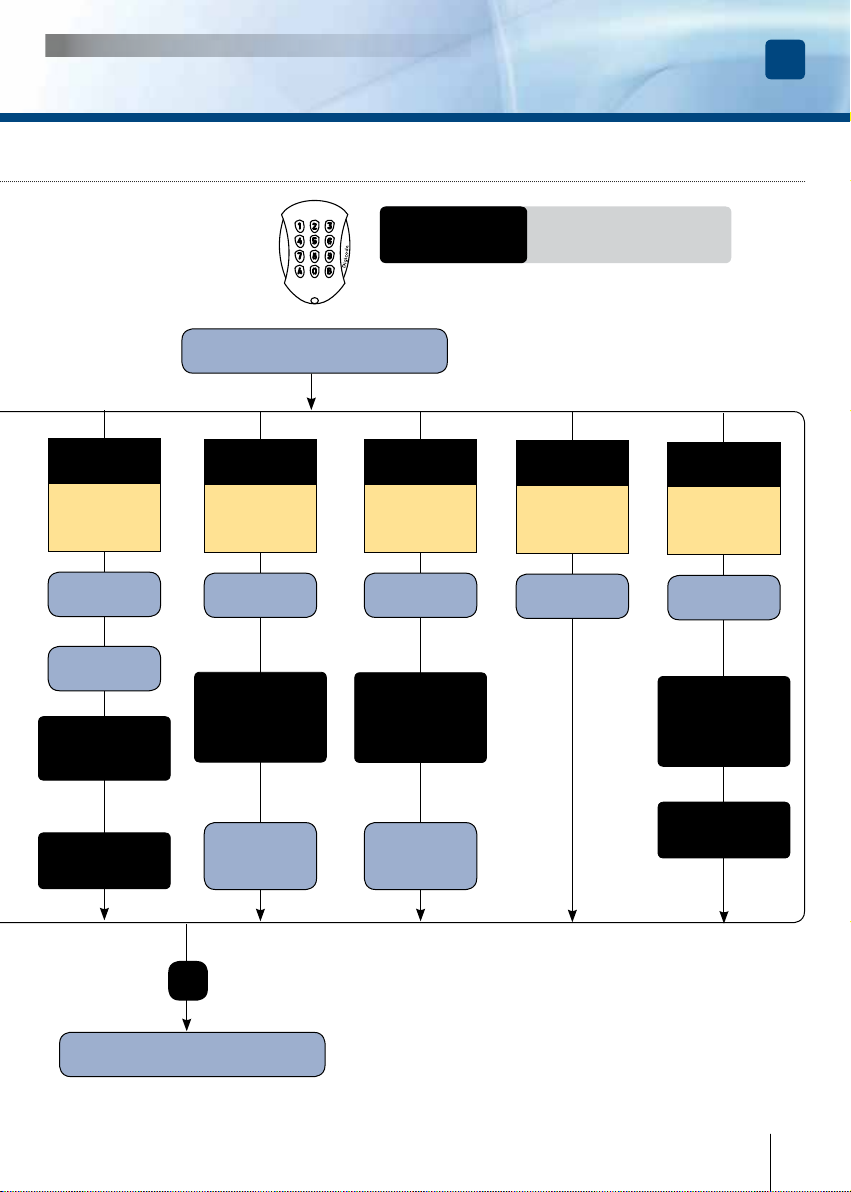
7] DÉMARRAGE
Le clavier est livré sans réglage du nombre de chiffres
du code utilisateur. A l’insertion de la batterie, les
12 touches commencent à clignoter, en attendant ce
réglage.
Appuyez sur la touche 4 pendant 4 sec.
Le réglage du code utilisateur à 4 chiffres (4 bips).
Appuyez sur la touche 5 pendant 5 sec.
Le réglage du code utilisateur à 5 chiffres (5 bips).
Après ce réglage, le clavier acceptera les codes
d’utilisateur seulement composées de 4 ou 5 chiffres.
Si aucun autre changement n’est effectué (changer
le code maître, mémorisation du code utilisateur,...),
l’extraction de la batterie du clavier permet de
réinitialiser le GALEOR et lui permet de retrouver les
réglages d’usine par défaut. Cette manipulation nécessite
de redénir le nombre de chiffres du code utilisateur.
Une fois déni le nombre de chiffres et qu’aucun
autre changement n’est été effectué, la base
de données demeure dénitive et ne peut être
modi ée sans qu’une procédure de remise aux
paramètres d’usine par défaut soit effectuée (voir
procédure “B +3”).
Modication
code Maître
A0
1 bip
Tapez les 5 termes
du nouveau CODE
MAÎTRE
1 bip = OK
(4 bips = Erreur)
- Erreur de code (Ex : Un code déjà mémorisé).
TERMES UTILISÉS ET CODES
D’OUVERTURE:
- Toutes les touches du clavier sont
autorisées pour composer les codes,
exceptés les touches A et B.
- Les codes d’ouverture de porte peuvent être
composés de 4 ou 5 termes.
- Le code maître doit être composé de 5
termes
- Le code maître ne peut pas être
utilisé comme code d’ouverture.
Programmation
code utilisateur
A1
1 bip
Tapez les termes
du CODE
UTILISATEUR
Tapez :
-“A” = canal 1 seul
-”B” = canal 2 seul
-”A et B” = Canal 1 ou 2
Tapez “0” pour
conrmer
1 bip = OK
(4 bips = Erreur)
4 cdvigroup.com
Message d’erreur
si le code Maître
tapé correspond à
un code utilisateur
en mémoire
Message d’erreur
si le code Maître tapé
correspond à un code
utilisateur en mémoire
-------- ou -------Mémoire complète
-------- ou --------
Code 12345 interdit
Page 5
MANUEL D’INSTALLATION
GALEOR
Clavier codé radio rétro-éclairé
FR
Enregistrement
du canal
sur le récepteur
A2
1 bip
La touche 5
clignote
Sélection du canal sur
le récepteur (dans les
30 sec. suivantes max.)
Tapez 2 fois
le CODE MAÎTRE
Rétro-éclairage touches éteint
sauf touche 5 allumé xe
Effacer
tous les codes
utilisateurs
A4
1 bip
Tapez A et B
en simultanée
Effacer un seul
code utilisateur
A5
1 bip
Tapez les termes
du code utilisateur
RAPPEL :
Si le clavier clignote pendant 1 sec.
au premier contact, veriez la pile.
Avec ou sans
Buzzer
Change User code
A6
1 bip
Tapez les termes
du code utilisateur
channel
A7
1 bip
Tapez A ou B
1 bip = OK
B
Sortie programmation*
1 bip = OK
(4 bips = Erreur)
Message d’erreur
si le code n’est pas
mémorisé
Si le Buzzer est
activé, cette
manipulation le
désactive, si il est
désactivé, cette
manipulation l’active
Tapez le canal A ou B
de modier
Si le canal est déjà en
mémoire il sera effacé, sinon
il sera mémorisé.
Canal supprimé = 2 Bips
Canal mémorisé = 1 Bip
cdvigroup.com
5
Page 6
INSTALLATION MANUEL
MANUEL D’INSTALLATION
GALEO
GALEOR
Illuminated RF Keypad
Clavier codé radio rétro-éclairé
FR
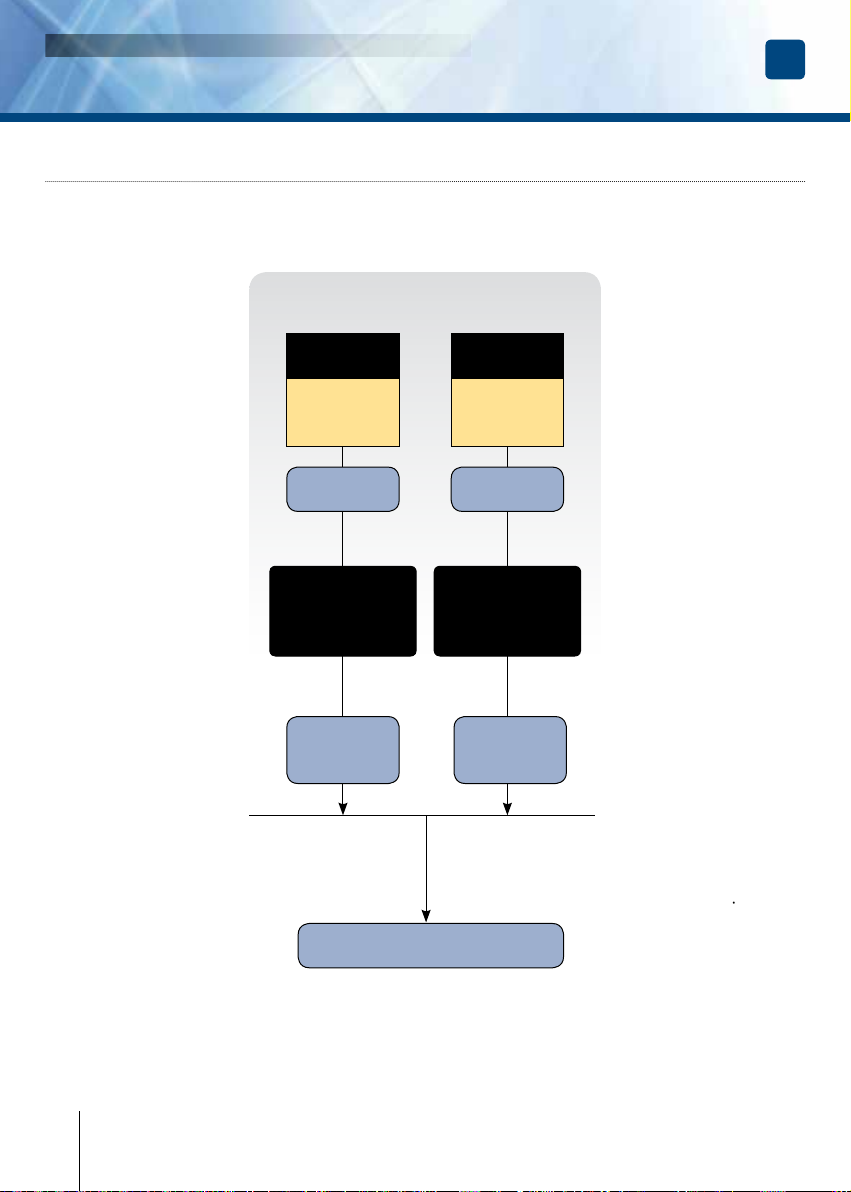
8] REMISE A ZÉRO
Pour éviter toutes les mauvaises manipulations (intentionnelles ou non), la remise aux paramètres d’usine
par défaut, ne peut être effectuée qu’avec le code maître à 5 chiffres ou à laide d’un des codes utilisateurs
mémorisés (avec 4 ou 5 chiffres). Ensuite, suivez la procédure «A +1» ou «B +3”.
REMISE A ZÉRO
Remise à zéro
du code Maître
12345
Remise à zéro
A+1
EN SIMULTANÉE
30 SECONDES
2 bips
Tapez les 5 termes
d’un code en mémoire
(dans les 20 sec.
suivantes max.)
3 bip = OK 4 bip = OK
N’affecte pas les
codes en mémoires
EN SIMULTANÉE
30 SECONDES
Tapez les 5 termes
d’un code en mémoire
(dans les 20 sec.
suivantes max.)
Suppression des
codes en mémoire,
suppression des liens
avec le récepteur et
Remise à zéro du code
Maître 12345
usine
B+3
2 bips
Standard
Note : A la n de la procédure “B +3”, le code utilisateur enregistré au préalable sera supprimé
et le clavier doit être de nouveau enregistré sur le récepteur correspondant.
6 cdvigroup.com
Page 7

INSTALLATION MANUEL
MANUEL D’INSTALLATION
GALEO
GALEOR
Illuminated RF Keypad
Clavier codé radio rétro-éclairé
FR
9] GARANTIE À VIE [EXTRAIT]*
Les sociétés CDVI garantissent que ce produit est dépourvu de tout vice caché, tant dans les matériaux
que dans sa fabrication, à la condition, qu’il soit installé conformément aux préconisations du fabricant
et qu’il n’y ait pas eu d’interventions ou de modications sur le produit. La responsabilité de CDVI se limite
à la réparation ou à l’échange du produit. CDVI n’assume aucune responsabilité concernant les dommages sur
les biens ou les personnes. Un produit reconnu défectueux par CDVI doit être retourné au service-après-vente
de CDVI, après l’obtention du numéro d’autorisation de Retour de Produit(s) Défectueux (RMA). La responsabilité
de CDVI se limite à la réparation ou au remplacement d’un produit ou pièces défectueuses, en ses ateliers.
L’une ou l’autre de ces interventions sont dénis par le service-après-vente de CDVI. Le préjudice imputable
à CDVI ne saurait en aucun cas dépasser la valeur du produit. La responsabilité de CDVI ne peut être engagée
auprès de l’acheteur, installateur, client nal ou qui que ce soit, lors de dommages consécutifs à des imperfections
ou mauvais fonctionnement du produit. Cette garantie prend effet à la date d’enregistrement du produit
auprès de CDVI, à partir de l’instant ou la date d’enregistrement est dûment complétée, dans la limite
d’un mois, après la date de livraison au client nal. Pour obtenir les détails complets de cette garantie
et enregistrer votre/vos produit(s) pour bénécier de cette « Garantie à Vie limitée ». Veuillez compléter
la carte d’enregistrement présente dans la boite du produit et nous la retourner, par email ou par courrier,
à l’adresse de l’entité CDVI la plus proche ou vous enregistrer en ligne à l’adresse www.cdvigroup.com.
Les contacts des entités CDVI sont accessibles en ligne à l’adresse www.cdvigroup.com ou au dos de la notice
d’installation.
EXCLUSIONS DE LA GARANTIE : A l’EXCEPTION DES POINTS EVOQUES PRECEDEMMENT, CDVI N’APPLIQUE
AUCUNE GARANTIE, NI DELIBEREE NI TACITE, A TOUS LES PROBLEMES INCLUANT LE CONDITIONNEMENT,
LE TRANSPORT, LEUR COMMERCIALISATION OU LES CONDITIONS D’UTILISATIONS PARTICULIÈRES.
10] NOTES
“The device complies with part 15 of the FCC Rules. Operation is subjected to the
following 2 conditions: (1) this device may not cause harmful interference and (2) this
deivice must accept any interference received, including interference that may cause
undesired operation”
RF EXPOSURE WARNING
This EUT is in compliance with MPE for general population / uncontrolled
exposure limits and it had been tested in accordance with the measurement methods
and procedures specied in FCC 47 CFR § 1.1310 and 2.1091
To satisfy FCC RF exposure requirements for mobile transmitting devices, a separation
distance of 20 cm or more should be maintained between the antenna of this device and
persons during device operation.
To ensure compliance, operations at closer than this distance are not recommended.
The antenna used for this transmitter must not be co-located in conjunction with any
other antenna or transmitter.
* Voir les conditions de garantie à vie limitée complètes sur le site cdvigroup.com.
cdvigroup.com
7
Page 8
INSTALLATION MANUEL
Certication FCC CFR 47
part 15 compliance
INSTALLATION MANUAL
GALEO
GALEOR
Illuminated RF Keypad
Illuminated RF Keypad
Thank you for buying our products and for the condence you placed
in our company.
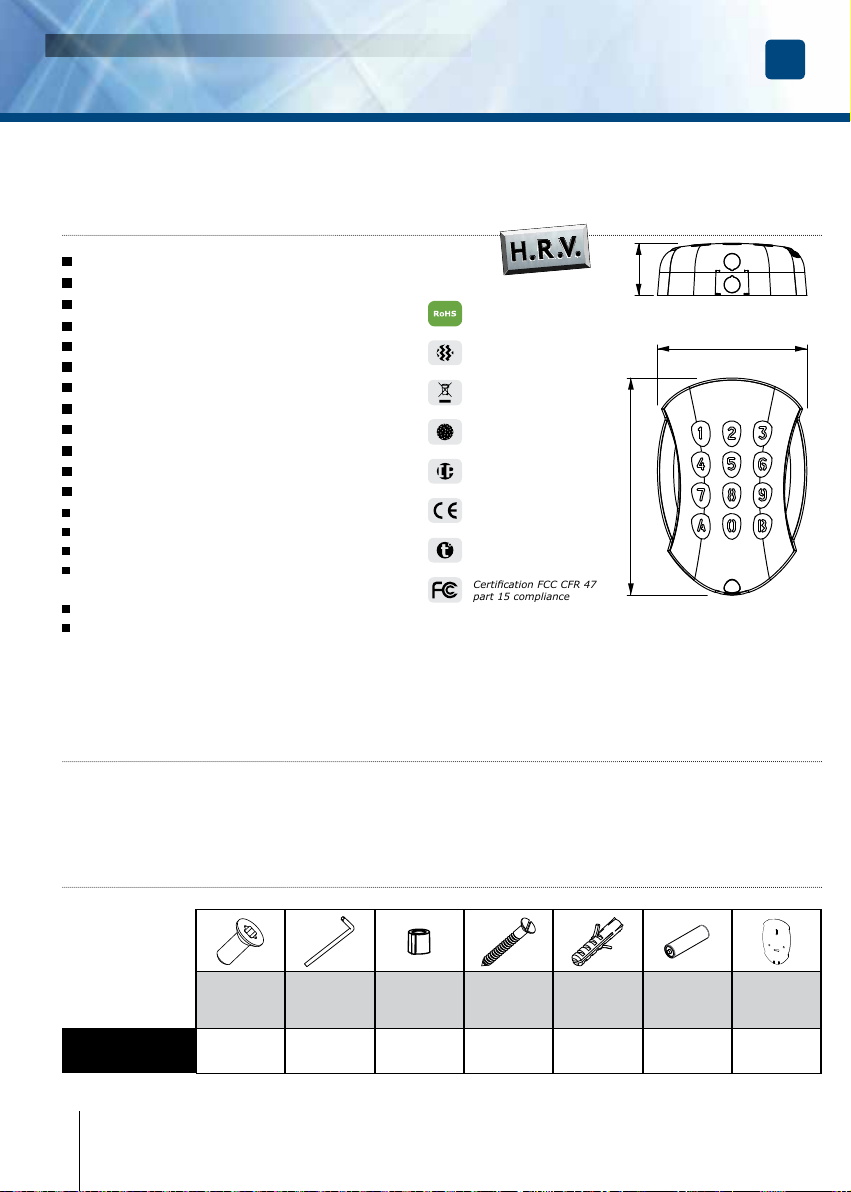
1] GENERAL INFORMATION
EN
Wireless RF keypad.
Polished heavy duty Zamak® cast alloy.
Backlit keys.
Frequency : 433,92 Mhz.
2 channels (buttons «A» and «B»).
Compatible with Erone® receivers.
Compact.
Surface mount.
Mounting with Torx® screws
Partially sealed with epoxy.
22 User codes - 4 or 5 digits.
1 Master code - 5 digits.
Audible and visual feedback.
Modulation: AM/ASK.
Encoding: Keeloq® hopping code
Dimensions (L x W x D):
GALEOR = 110 x 75 x 15mm,
Supply: Lithium battery 3,6V - LS14500.
Current consumption:
- 28 mA in transmission,
- 0,8uA in sleep-mode.
2] NOTES & RECOMMENDATIONS
Mounting recommendations
Mount the keypad on a at surface to avoid
any vandalism and to insure the best mounting.
3] MOUNTING KIT
HIGH RESISTANCE
TO VANDALISM
Environmental tests:
vibrations
WEEE
Environmental test:
Salt spray
IP64
Certication CE
-25°C a +70°C
FCC ID : PWN1002000029
“The device complies with part 15 of the FCC Rules.
Operation is subjected to the following 2 conditions:
(1) this device may not cause harmful interference and
(2) this device must accept any interference received,
including interference that may cause undesired operation”
27
77
112
Security advice
For security advice reasons, change
the factory default master code.
When selecting a master code and user code avoid
sequencial codes (example : 3 4 5 6 7).
GALEOR
* Supplied.
8 cdvigroup.com
(M4x10)
®
Torx
screw)
1 1 1 2 2 1 1
T20 Torx
Spanner
®
Cache vis
plastique
(M4x30)
mounting
screws
Plastic
anchors
Battery Foam
Page 9
INSTALLATION MANUEL
INSTALLATION MANUAL
GALEO
GALEOR
Illuminated RF Keypad
Illuminated RF Keypad
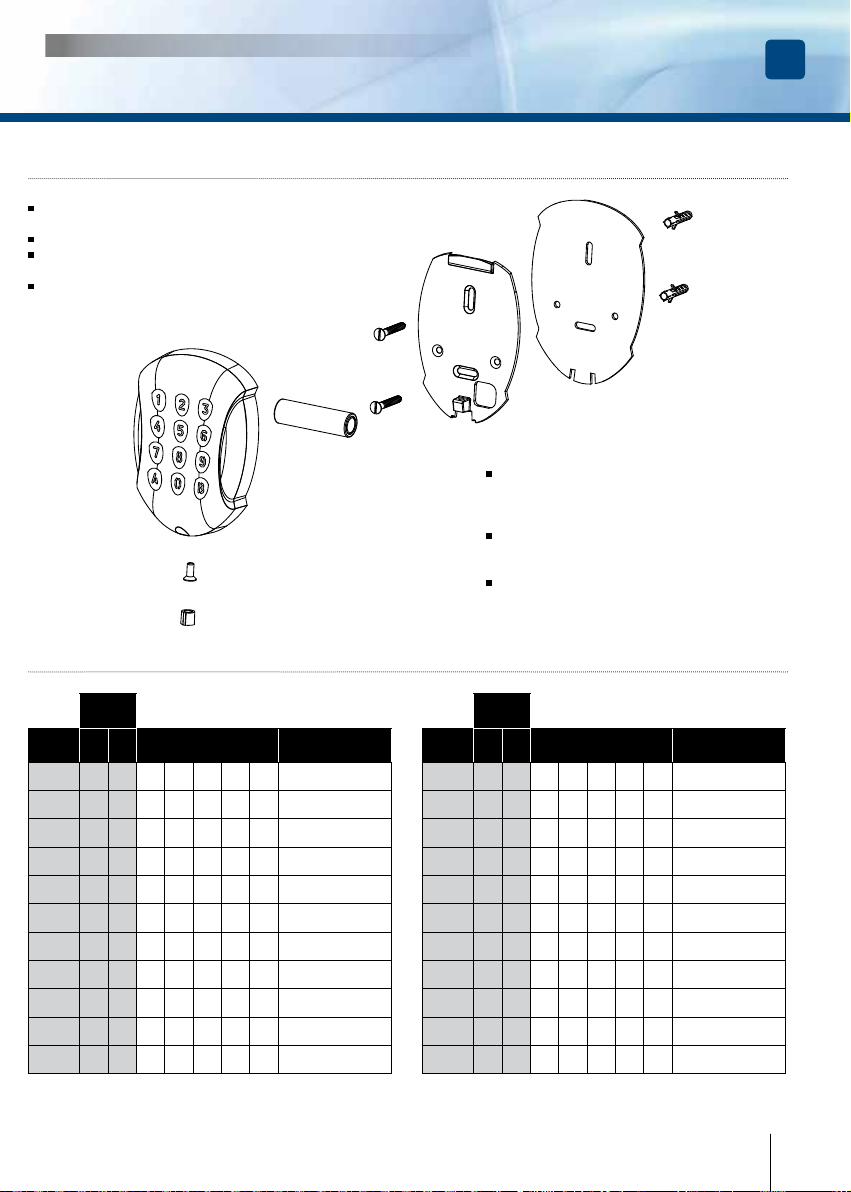
4] MOUNTING
Drill the 2 mounting holes (drill bit Ø 5 mm
and 35 MM hole depth) and the hole wiring access.
Insert the 2 plastic anchors in the holes.
Stick the foam to sealed The GALEOR on the back side
of the base (Important).
Place the back plate of the GALEOR and screw
on the wall using the supplied (M4x30)
mounting screws.
EN
5] USER CODES TABLE
Channel
User A B Code Name
01
02
03
04
05
06
07
08
09
10
11
Remove the plastic protection of the battery
and then mount the keypad on the back
plate, placing rst the top in the hooks
and then the bottom.
Fasten the GALEOR keypad to the back plate
by using the supplied (M4x10) Torx® screw
and T20 Torx® spanner hardware.
Place the screw cap at the bottom
of the keypad.
Channel
User A B Code Name
12
13
14
15
16
17
18
19
20
21
22
cdvigroup.com
9
Page 10
INSTALLATION MANUAL
GALEOR
Illuminated RF Keypad
6] PROGRAMMING
EN
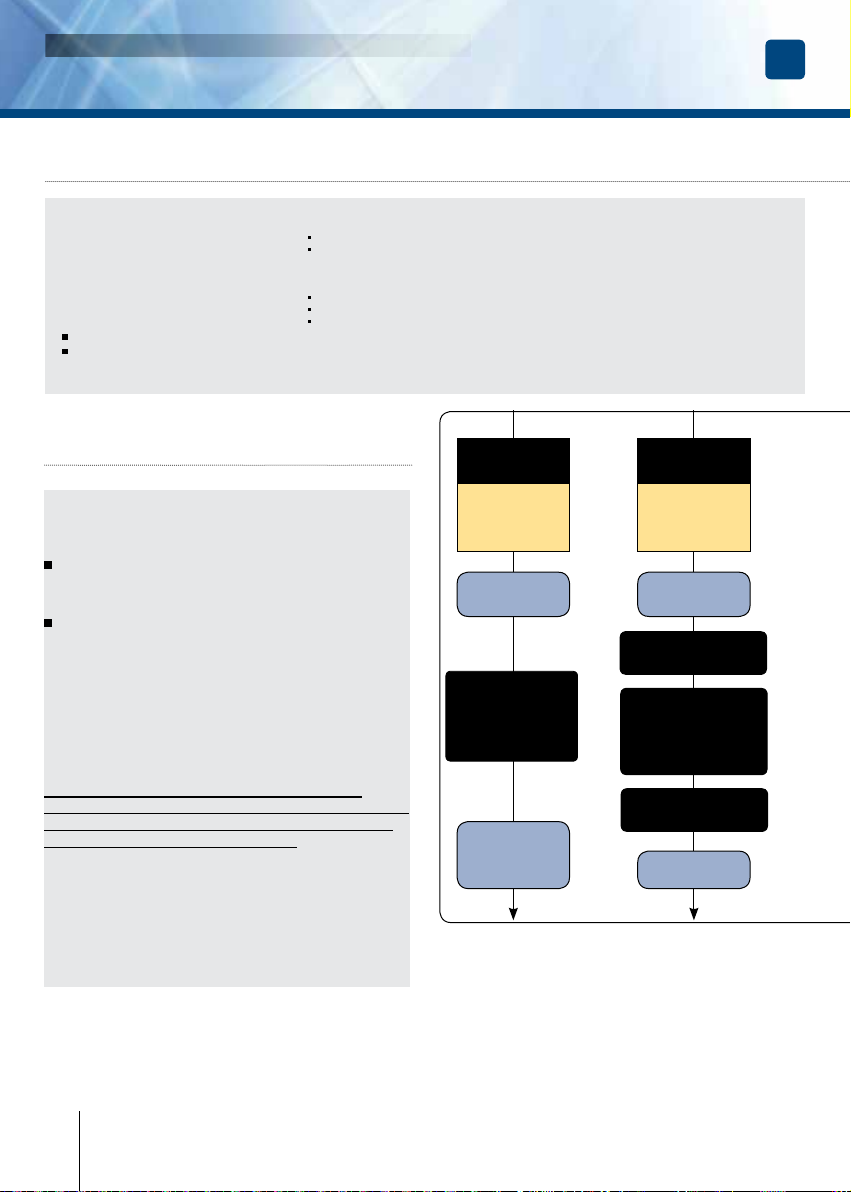
GALEOR FACTORY SETTINGS :
- No user codes.
- Buzzer ON
- Time-out backlit : 3 Sec.
- Transmission time-out :
- Factory master code : 1 2 3 4 5.
- Programming time-out
- Channel choices :
Channel 1 = A,
Channel 2 = B.
25 seconds
: 10 seconds.
AUDIBLE FEEDBACKS :
1 beep : Power-up ( battery insertion )
1 long beep :
- Enter on menu,
- Validation of a programming choice,
- Exit from a menu choice.
2 beeps : Conrm enter in factory recovery
3 beeps : conrm factory recovery “A+1”
4 beeps :
- Conrm factory recovery “B+3”,
- Error for wrong channel,
- Error for insertion of a code already
Memorized.
7] GETTING STARTED
The keypad comes without any setting for the user digit
number. At the battery insertion the 12 leds start to
blink, waiting for this setting.
PRESS the key 4 for 4 sec. to set 4-digits
user codes
PRESS the key 5 for 5 sec. to set 5-digits
user codes
After this setting, the keypad will accept only user codes
composed by 4 or 5 digits, according to the choice made.
If no change is done ( change of the master code, user
code memorization, etc ) just by removing the battery
the keypad comes back the factory settings and requires
again to set the number of digits.
Once set the number of digits and made any
change, the data-base remains denite and cannot
be changed unless a factory default procedure is
carried out ( see procedure “B+3”).
--> 4 beeps
--> 5 beeps
USING RULES AND USER CODES:
- All the buttons can be used to
compose the personal access code,
except A and B.
- The master code must be composed
by 5 digits.
- The user codes can be composed by
4 or 5 digits according to initial setting
- The master code cannot be used as
transmission code.
Change
Master code
A0
1 beep
Type the 5 digits of
the new Master code
beep
= OK
1
(4
beeps
= Error)
User code
programming
A1
1 beep
Type the digits
of the USER CODE
Then press :
-“A” = Only channel 1
-”B” = Only channel 2
-”A & B” = Channel 1
or Channel 2
Press “0” to conrm
beep
= OK
1
(4
beeps
= Error)
10 cdvigroup.com
Error message if the
Master code typed
corresponds to User
code in memory
Error message if the User
code typed corresponds to
a user code in memory
-------- or -------the memory is full
-------- or --------
is 12345
Page 11
INSTALLATION MANUAL
GALEOR
Illuminated RF Keypad
EN
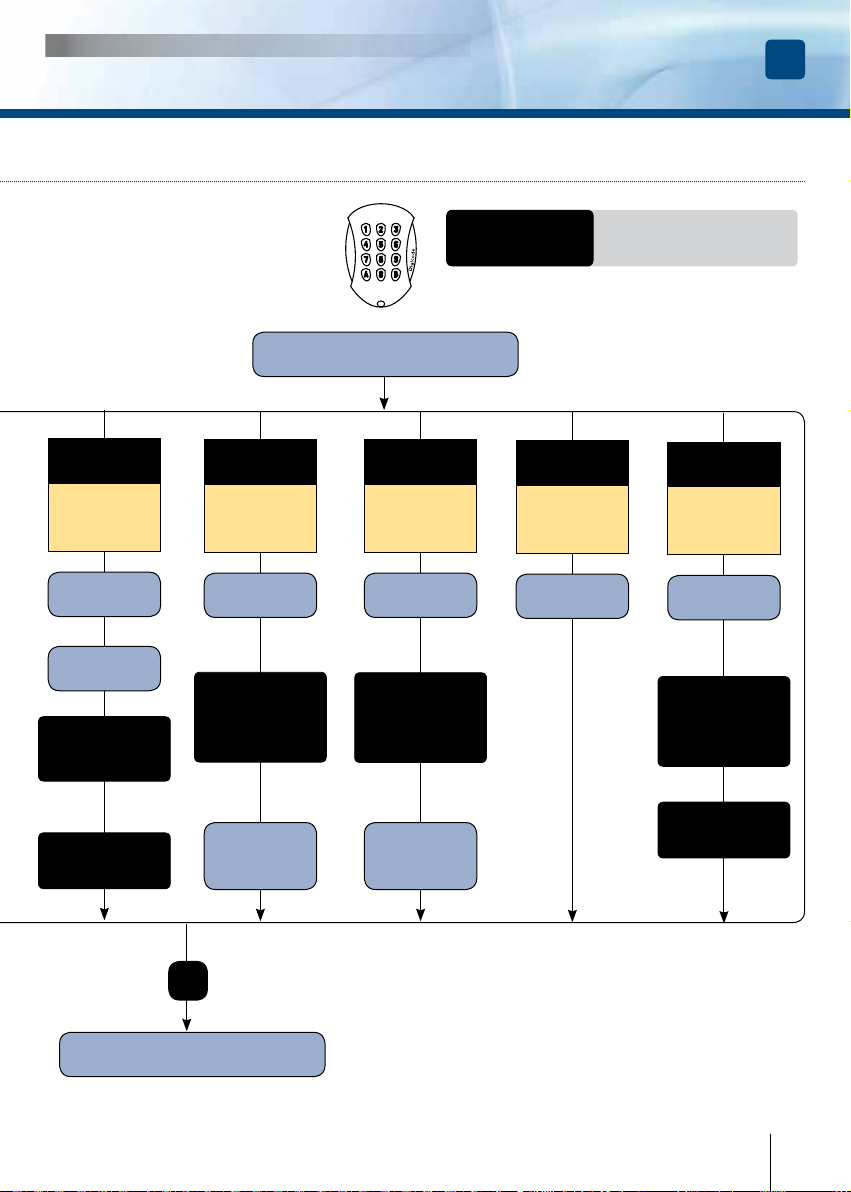
Memorization of
the channel onto
the receiver
A2
1 beep
button 5
blinks
Select the
corresponding relay
on the receiver
(within next 30 sec.)
Buttons backlit switch off
Delete all user
codes
A4
1 beep
Press A and B
simultaneously
except button 5
Delete a single
user code
A5
1 beep
Type the digits
of the USER CODE
Type 2 times the
MASTER CODE
Buzzer ON / OFF
A6
1 beep
REMINDER:
if the keypad blinks during 1 sec.
at the rst touch, check the battery.
Change User code
channel
A7
1 beep
Type the digits
of the USER CODE
beep
= OK
Press A or B
B
1
beep
= OK
1
(4
beeps
= Error)
Error message if the
code typed is not in
memory
If the buzzer is
enabled it will
be disabled and
viceversa.
If the channel was
memorized it will be deleted,
if not it will me memorized.
CH DELETED : 2 Beeps
CH MEMORIZED : 1 Beep
Programming exit*
* The programming mode is limited to 10 sec. without any action on the keypad ( no buttons pressed )
cdvigroup.com
Press the channel to
change ( A or B )
11
Page 12
INSTALLATION MANUAL
GALEOR
EN
Illuminated RF Keypad
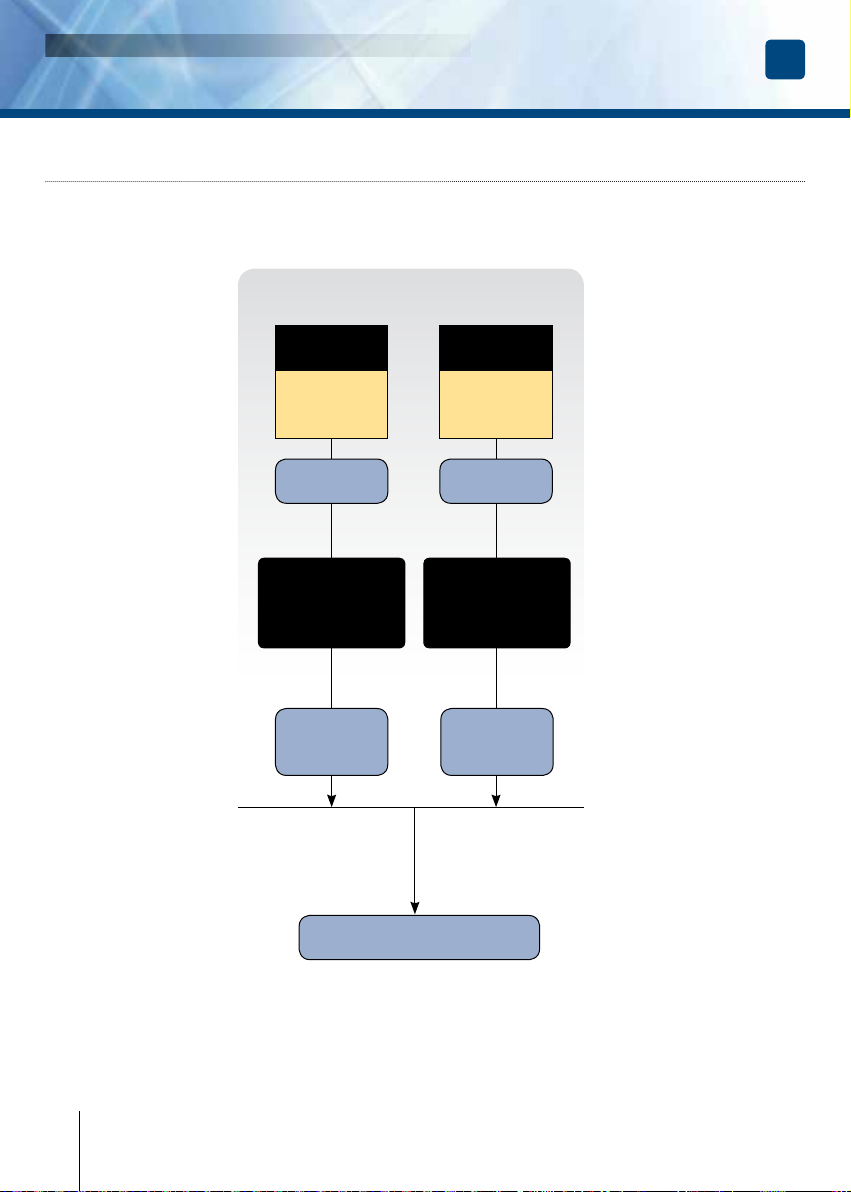
8] FACTORY RECOVERY
To avoid any damage action ( intentional or not ) the factory recovery can be carried out only by the owner
of the 5-digit Master code or knowing any User code memorized ( with 4 or 5 digits) .
According to that and the nal purpose of the recovery, follow the procedure “A+1” or “B+3”.
FACTORY RECOVER
Master code reset
to factory value
12345
A+1
SIMULTANEOUSLY
FOR 30 SECONDS
2 beeps
Within 20 sec.
type the digits of a
memorized code
3
beeps
= OK 4
Doesn’t affect
the user codes
memorized
Recover to
factory settings
B+3
SIMULTANEOUSLY
FOR 30 SECONDS
2 beeps
Within 20 sec.
type the digits of a
memorized code
beeps
= OK
Deletes all User codes memorized
on the keypad, recovers the
choice to 4 or 5 digits, deletes
the link with the receiver and
resets the Master code to 12345.
Normal mode
NOTE : At the end of procedure “B+3”, even the user code typed within the procedure will be deleted and
the keypad must be memorized again onto the corresponding receiver.
12 cdvigroup.com
Page 13

INSTALLATION MANUAL
GALEOR
EN
Illuminated RF Keypad
9] LIMITED LIFETIME WARRANTY [EXTRACT]*
CDVI warrants this product to be free from defects in material and workmanship, when it has been installed
in accordance with the manufacturer’s instructions and has not been modied or tampered with. Only product
recognized by CDVI to be defective should be returned under these warranty terms if accompanied
by an RMA (Return Material Authorization Number) provided by CDVI. CDVI, at its option, shall repair
or replace the defective product at CDVI premises or at any CDVI approved service center. This warranty
does not cover any damage due to accident, misuse, abuse or negligence. This warranty is valid only
if the product is registered, within 1 month from delivery to the nal costumer. To obtain full details of this
warranty and to register the product to commence the “Limited Lifetime Warranty”, complete the enclosed
registration card and return it, either by e-mail or post, to the relevant CDVI address or completion of the
on line registration at www.cdvigroup.com. Repair or replacement of the defective product is the exclusive
remedy. CDVI shall not be liable for any incidental or consequential damages arising from any defect in, or
malfunction of, its product. In no event the entire liability can not exceed the purchase price of the product.
The CDVI local country contact details can be found on line by visiting www.cdvigroup.com or on the back
cover of the installation manual.
DISCLAIMER OF WARRANTY: EXCEPT AS STATED ABOVE, CDVI MAKES NO WARRANTIES, EITHER
EXPRESS OR IMPLIED, AS TO ANY MATTER WHATSOEVER, INCLUDING THE CONDITION OF ITS PRODUCTS,
THE TRANSPORTATION, THEIR MERCHANTABILITY OR FITNESS FOR ANY PARTICULAR PURPOSE.
10] NOTES
“The device complies with part 15 of the FCC Rules. Operation is subjected to the following 2
conditions: (1) this device may not cause harmful interference and (2) this deivice must accept any
interference received, including interference that may cause undesired operation”
RF EXPOSURE WARNING
This EUT is in compliance with MPE for general population / uncontrolled exposure limits
and it had been tested in accordance with the measurement methods and procedures specied in
FCC 47 CFR § 1.1310 and 2.1091.
To satisfy FCC RF exposure requirements for mobile transmitting devices, a separation distance of
20 cm or more should be maintained between the antenna of this device and persons during device
operation.
To ensure compliance, operations at closer than this distance are not recommended.
The antenna used for this transmitter must not be co-located in conjunction with any other antenna
or transmitter.
* Refer to complete limited lifetime warranty on cdvigroup website.
cdvigroup.com
13
Page 14

INSTALLATION MANUAL
GALEOR
Illuminated RF Keypad
NOTES
EN
14 cdvigroup.com
Page 15

INSTALLATION MANUAL
GALEOR
Illuminated RF Keypad
NOTES
EN
cdvigroup.com
15
Page 16

Reference : G0301FR0409V02
Extranet : EXE-CDVI_IM GALEOR CMYK A5 EN-FR 02
Creator of electronic access solutions
*G0301FR0409V02*
CDVI
FRANCE + EXPORT
Phone: +33 (0)1 48 91 01 02
Fax: +33 (0)1 48 91 21 21
CDVI AMERICAS
[CANADA - USA]
Phone: +1 (450) 682 7945
Fax: +1 (450) 682 9590
CDVI BENELUX
[BELGIUM - NETHERLAND - LUXEMBOURG]
Phone: +32 (0) 56 73 93 00
Fax: +32 (0) 56 73 93 05
CDVI Group
FRANCE (Headquarter/Siège social)
Phone: +33 (0)1 48 91 01 02
Fax: +33 (0)1 48 91 21 21
CDVI
SUISSE
Phone: +41 (0)21 882 18 41
Fax: +41 (0)21 882 18 42
CDVI
CHINA
Phone: +86 (0)10 62414516
Fax: +86 (0)10 62414519
CDVI IBÉRICA
[SPAIN - PORTUGAL]
Phone: +34 (0)935 390 966
Fax: +34 (0)935 390 970
cdvigroup.com
CDVI
ITALIA
Phone: +39 0321 90573
Fax: +39 0321 908018
CDVI
MAROC
Phone: +212 (0)5 22 48 09 40
Fax: +212 (0)5 22 48 34 69
CDVI SWEDEN
[SWEDEN - DENMARK - NORWAY - FINLAND]
Phone: +46 (0)31 760 19 30
Fax: +46 (0)31 748 09 30
All the information contained within this document (photos, drawing, features, specications and dimensions)
CDVI UK
[UNITED KINGDOM - IRELAND]
Phone: +44 (0)1628 531300
Fax: +44 (0)1628 531003
DIGIT
FRANCE
Phone: +33 (0)1 41 71 06 85
Fax: +33 (0)1 41 71 06 86
could be perceptibly different and can be changed without prior notice.
Toutes les informations mentionnées à titre indicatif sur le présent document (photos, dessins, caractéristiques
techniques et dimensions) peuvent varier et sont susceptibles de modications sans notication préalable.
 Loading...