

Page 1
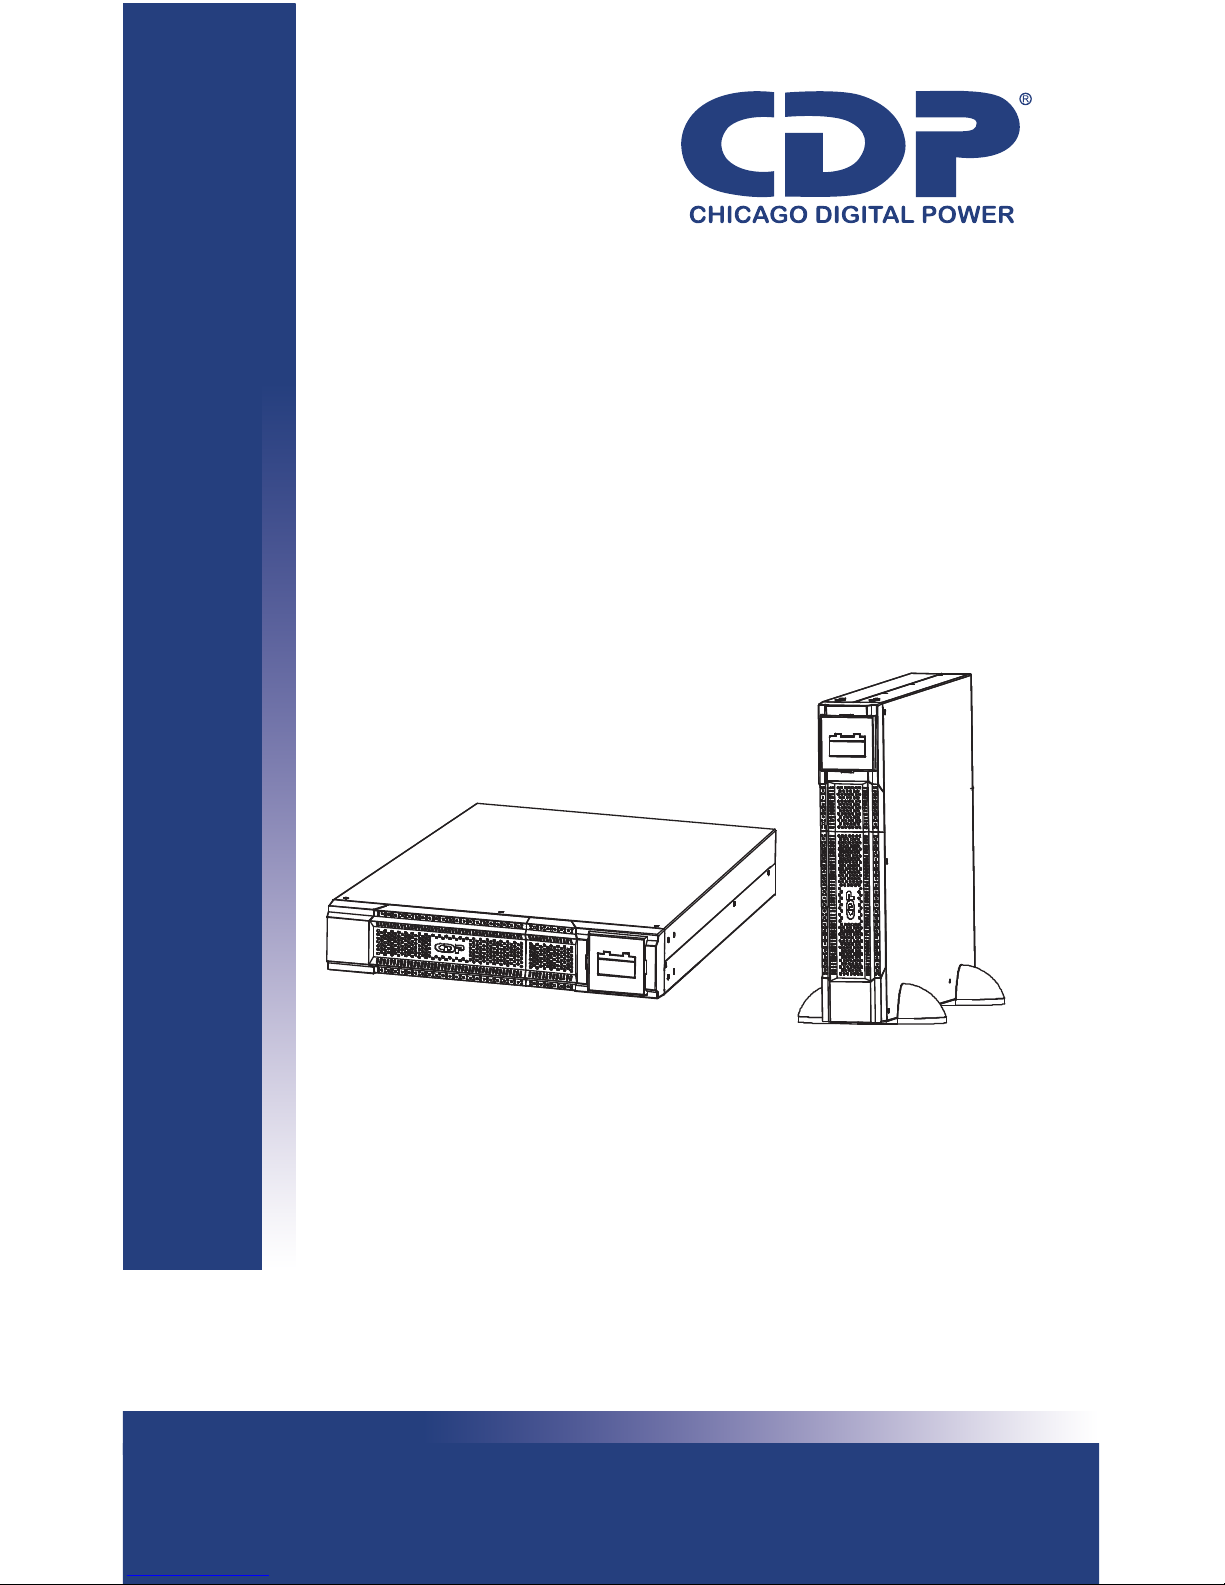
User Manual
1-3K Battery pack rack
Page 2

Page 3
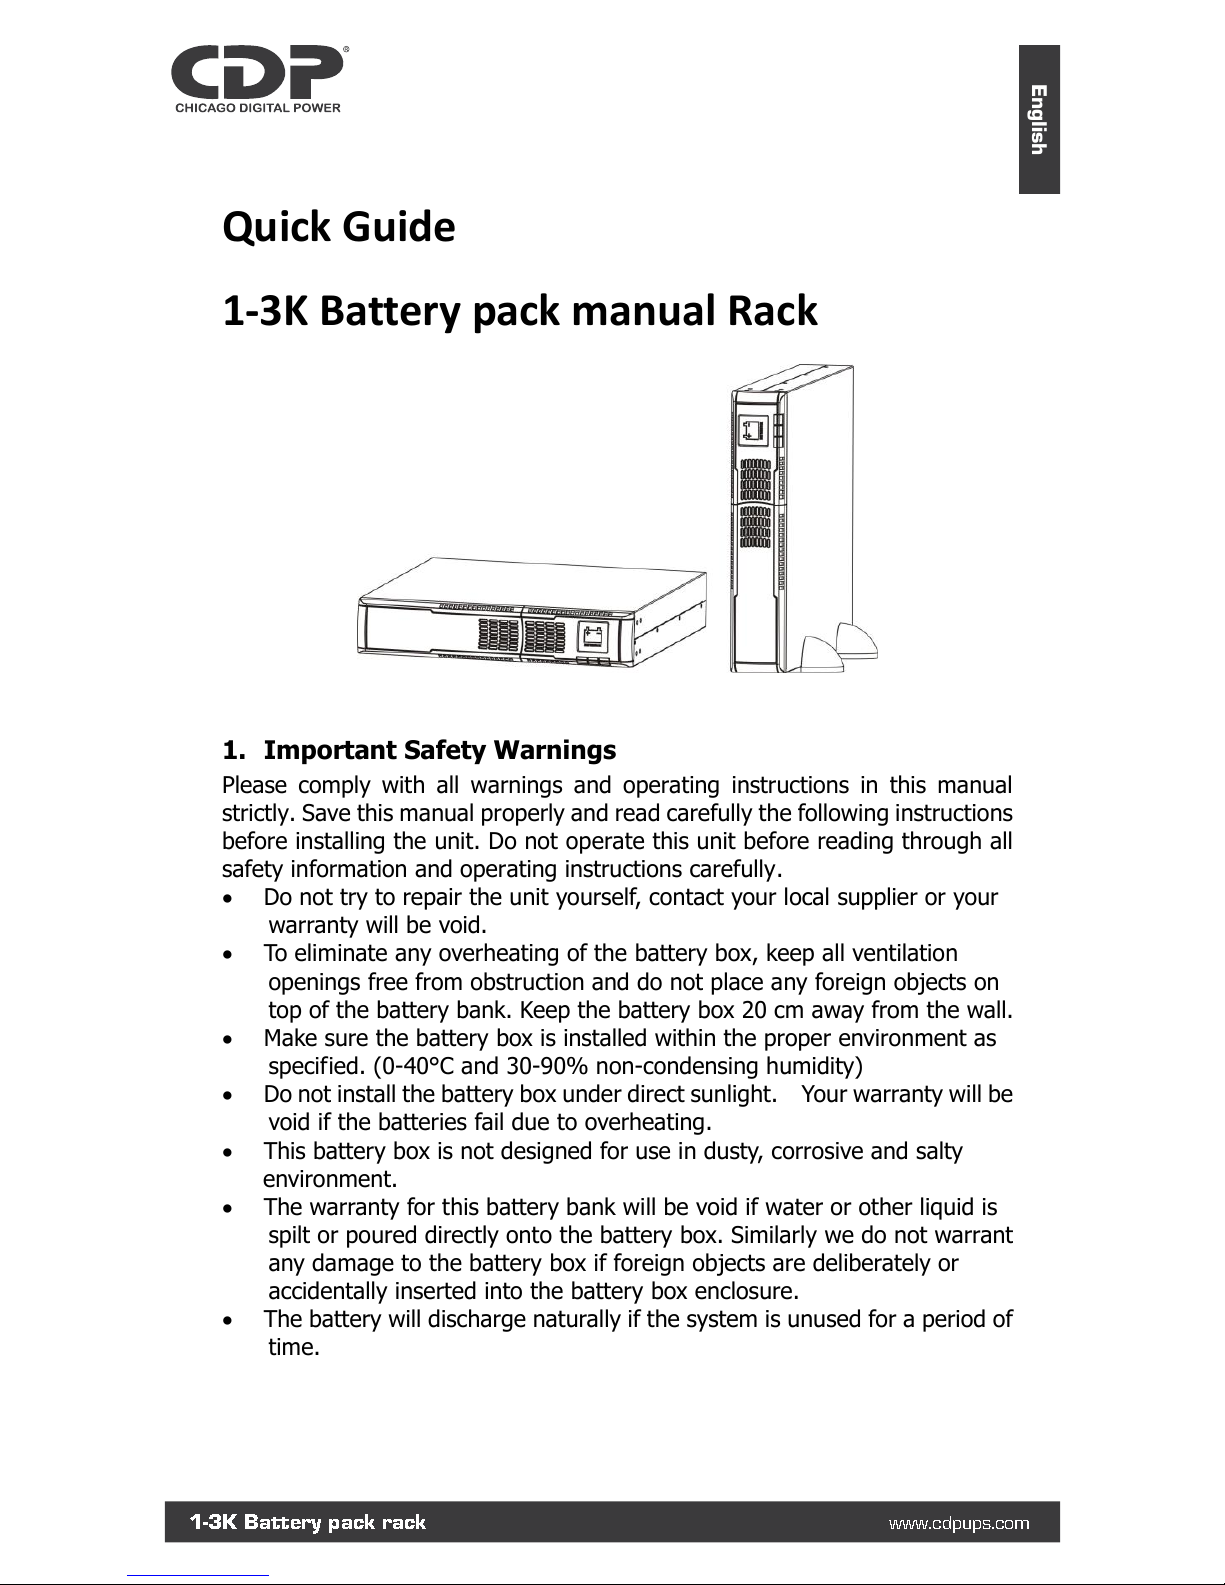
Quick Guide
1-3K Battery pack manual Rack
1. Important Safety Warnings
Please comply with all warnings and operating instructions in this manual
strictly. Save this manual properly and read carefully the following instructions
before installing the unit. Do not operate this unit before reading through all
safety information and operating instructions carefully.
Do not try to repair the unit yourself, contact your local supplier or your
warranty will be void.
To eliminate any overheating of the battery box, keep all ventilation
openings free from obstruction and do not place any foreign objects on
top of the battery bank. Keep the battery box 20 cm away from the wall.
Make sure the battery box is installed within the proper environment as
specified. (0-40°C and 30-90% non-condensing humidity)
Do not install the battery box under direct sunlight. Your warranty will be
void if the batteries fail due to overheating.
This battery box is not designed for use in dusty, corrosive and salty
environment.
The warranty for this battery bank will be void if water or other liquid is
spilt or poured directly onto the battery box. Similarly we do not warrant
any damage to the battery box if foreign objects are deliberately or
accidentally inserted into the battery box enclosure.
The battery will discharge naturally if the system is unused for a period of
time.
1-3K Battery pack rack
www.cdpups.com
English
Page 4
It should be recharged every 2-3 months if unused. If this is not done,
then the warranty will be null and void. During normal operation, the
batteries will be automatically remained in charged condition.
Servicing of batteries should be performed or supervised by trained
personnel with knowledge of batteries and the required precautions.
When replacing batteries, it is necessary to replace ALL batteries with the
same quantity, type & capacity.
CAUTION – Do not dispose of battery or batteries in a fire. The battery
may explode.
CAUTION – Do not open or mutilate the batteries. The electrolyte from
the batteries is toxic and harmful to the skin and eyes.
CAUTION – Risk of Electric Shock –Hazardous voltage may exist between
battery terminals and ground. Test before touching with bare hands.
CAUTION – A battery can present a risk of electrical shock and high short
circuit current. The following precaution should be observed when
working on batteries:
1. Remove watches, rings, or other metal objects.
2. Use tools with insulated handles.
3. Wear rubber gloves and boots.
4. Do not lay tools or metal parts on top of batteries.
5. Disconnect charging source prior to connecting or disconnecting
battery terminals.
Do not plug or unplug the battery connector if UPS works in DC
(discharging) mode.
2. Product Overview and Setup
NOTE: Before installation, please inspect the unit. Be sure that nothing inside
the package is damaged. Please keep the original package in a safe place for
future use.
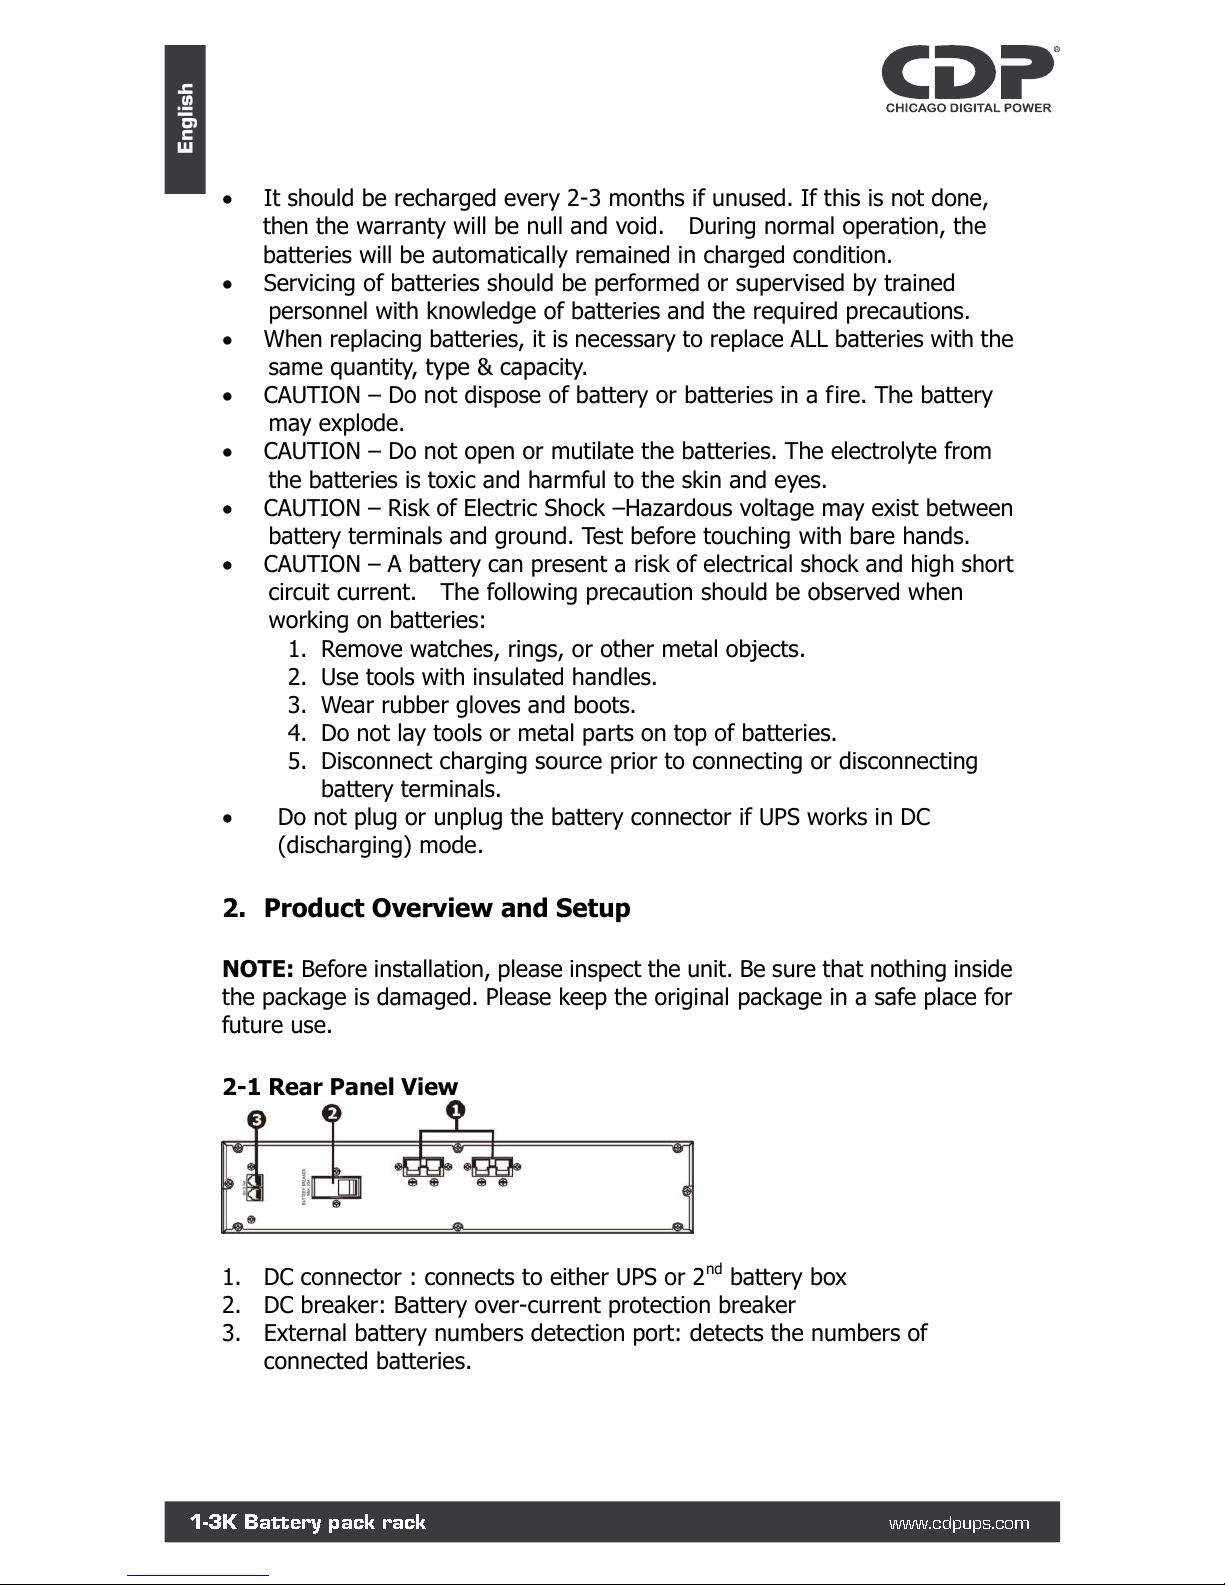
2-1 Rear Panel View
1. DC connector : connects to either UPS or 2
nd
battery box
2. DC breaker: Battery over-current protection breaker
3. External battery numbers detection port: detects the numbers of
connected batteries.
1-3K Battery pack rack
www.cdpups.com
English
Page 5
2-2 Installation and Setup with UPS
Unpacking & Inspection
1. Remove the battery box from the packing.
Note: The battery box is very heavy, be cautious when unpacking and
lifting the unit to avoid injury.
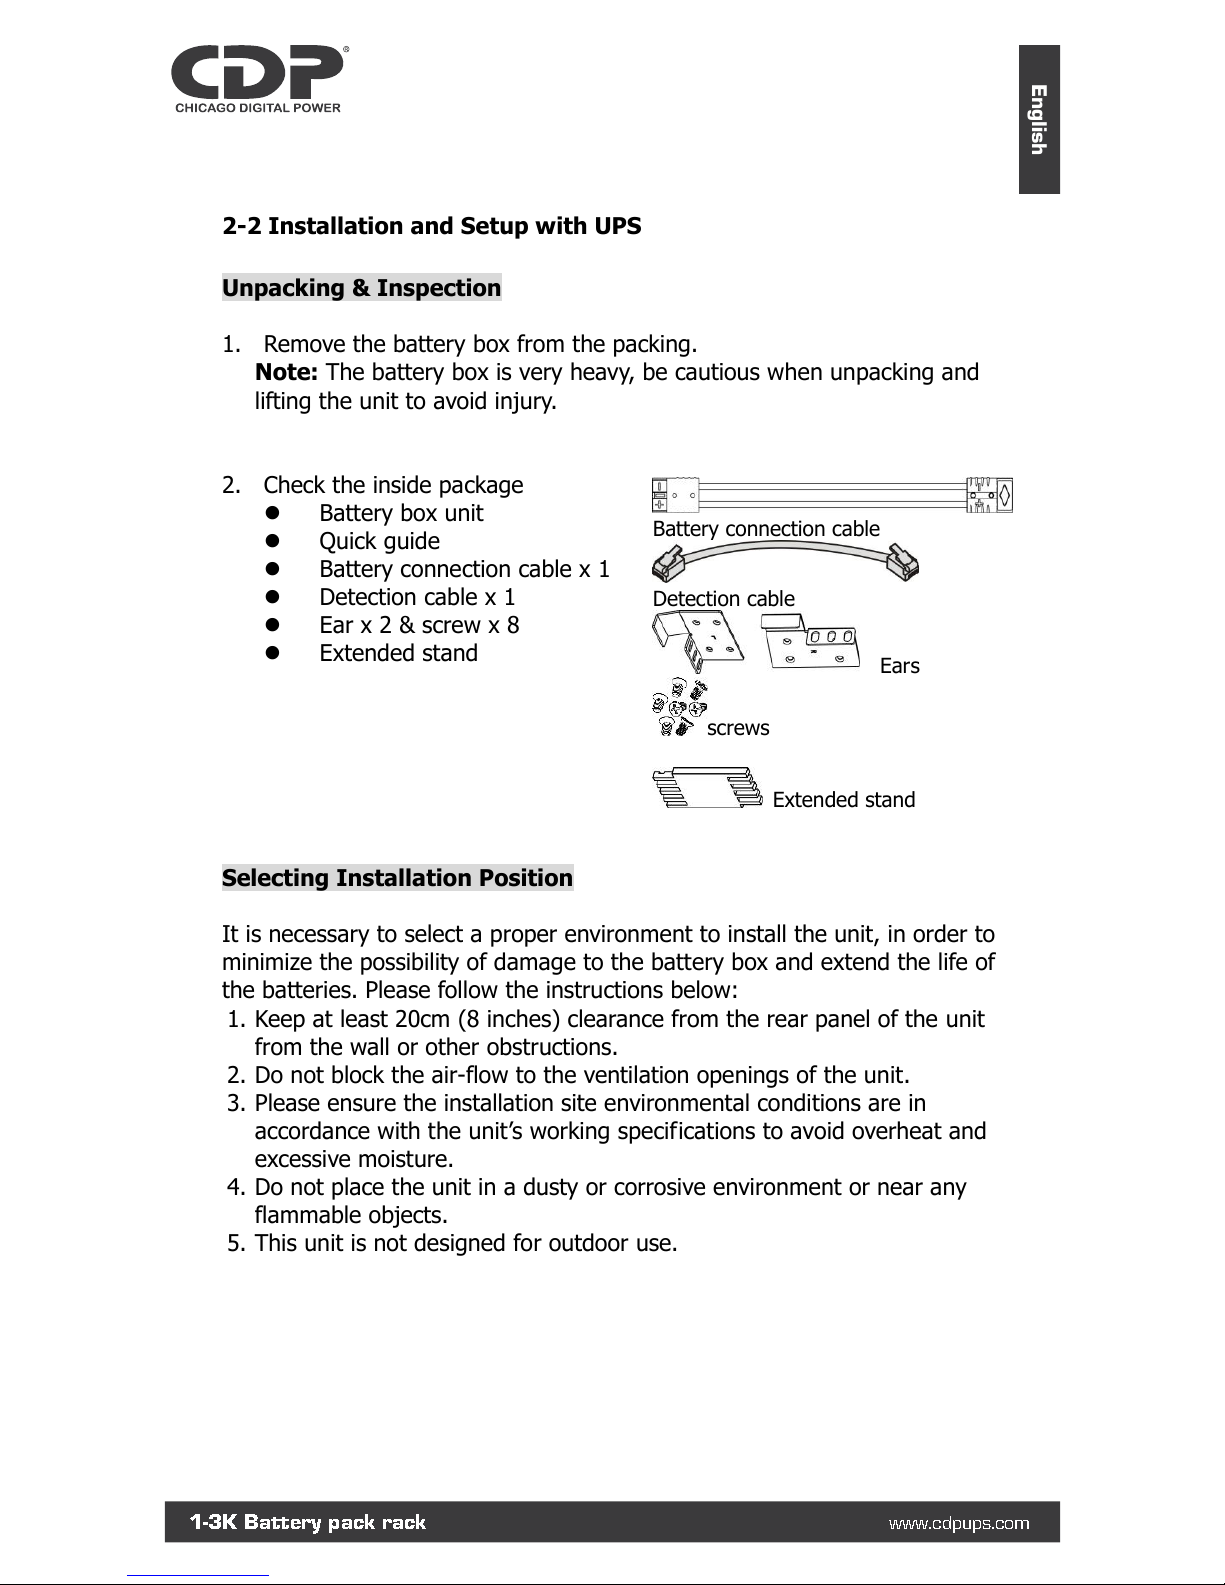
2. Check the inside package
Battery box unit
Quick guide
Battery connection cable x 1
Detection cable x 1
Ear x 2 & screw x 8
Extended stand
Selecting Installation Position
It is necessary to select a proper environment to install the unit, in order to
minimize the possibility of damage to the battery box and extend the life of
the batteries. Please follow the instructions below:
1. Keep at least 20cm (8 inches) clearance from the rear panel of the unit
from the wall or other obstructions.
2. Do not block the air-flow to the ventilation openings of the unit.
3. Please ensure the installation site environmental conditions are in
accordance with the unit’s working specifications to avoid overheat and
excessive moisture.
4. Do not place the unit in a dusty or corrosive environment or near any
flammable objects.
5. This unit is not designed for outdoor use.
Battery connection cable
Detection cable
Ears
screws
Extended stand
1-3K Battery pack rack
www.cdpups.com
English
Page 6
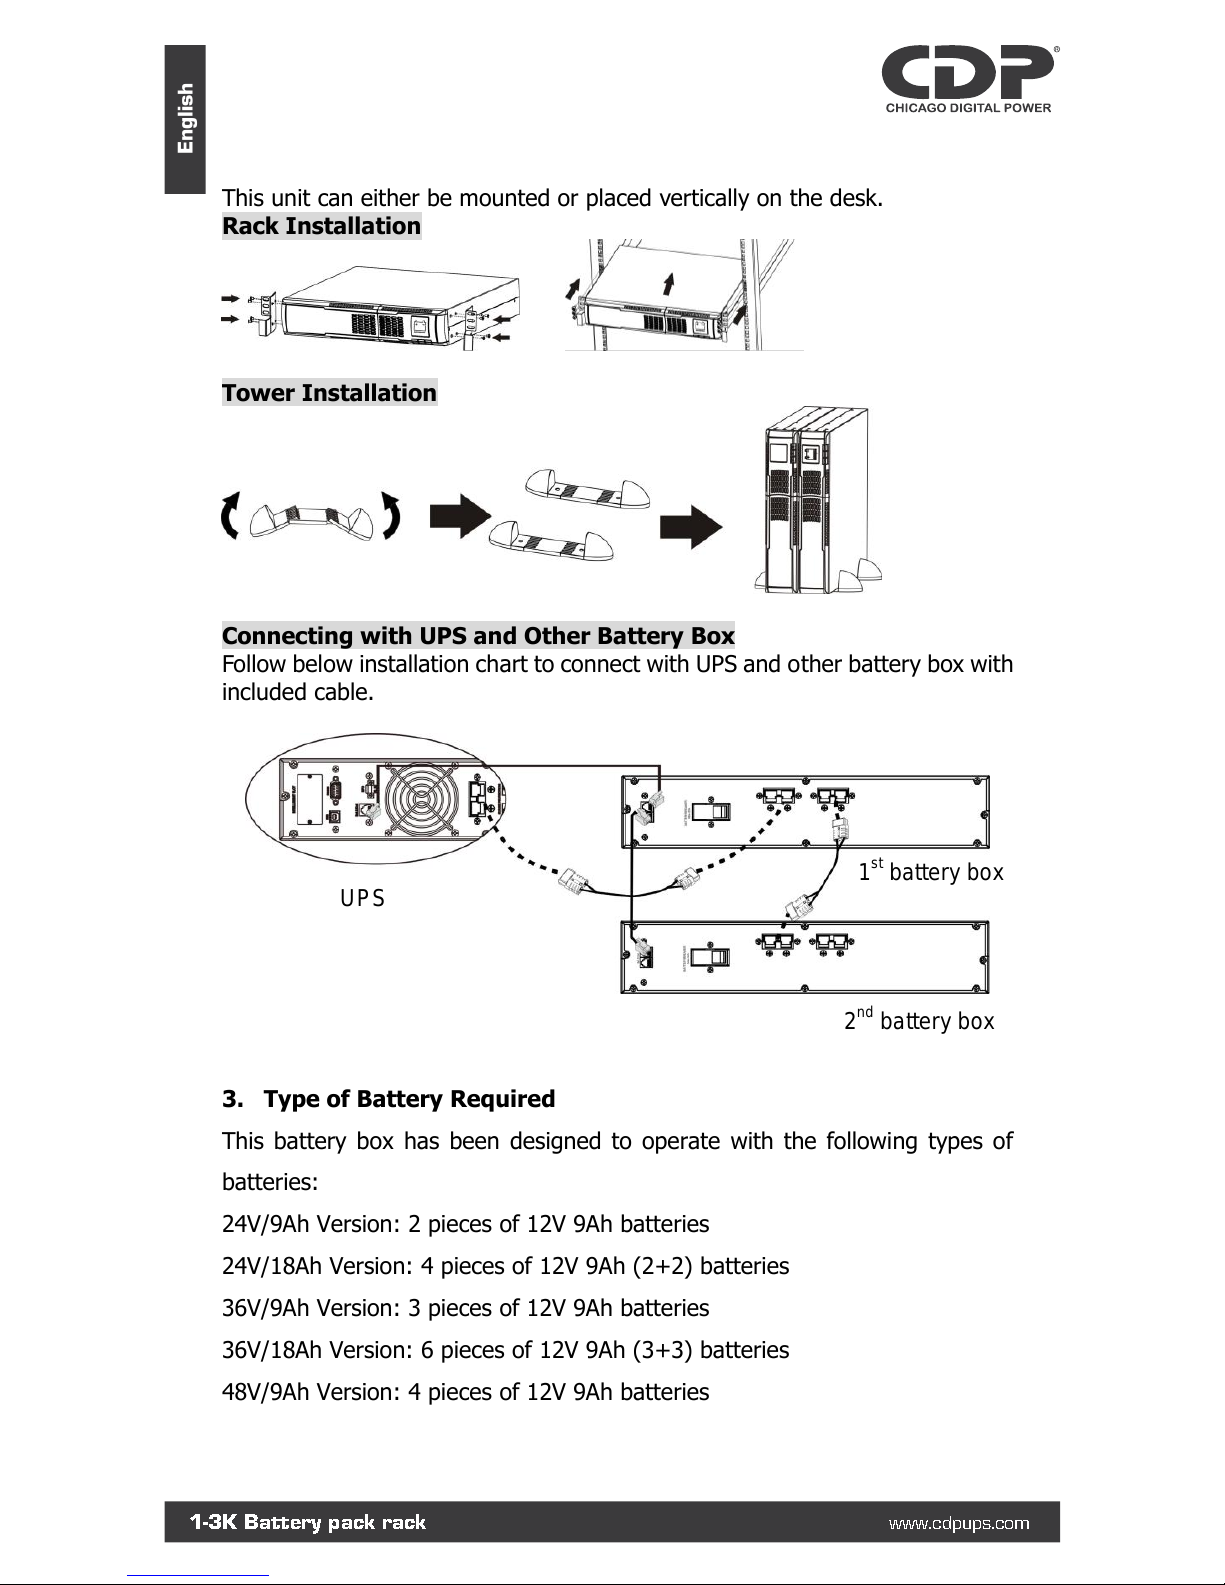
This unit can either be mounted or placed vertically on the desk.
Rack Installation
Tower Installation
Connecting with UPS and Other Battery Box
Follow below installation chart to connect with UPS and other battery box with
included cable.
3. Type of Battery Required
This battery box has been designed to operate with the following types of
batteries:
24V/9Ah Version: 2 pieces of 12V 9Ah batteries
24V/18Ah Version: 4 pieces of 12V 9Ah (2+2) batteries
36V/9Ah Version: 3 pieces of 12V 9Ah batteries
36V/18Ah Version: 6 pieces of 12V 9Ah (3+3) batteries
48V/9Ah Version: 4 pieces of 12V 9Ah batteries
UPS
2nd battery box
1st battery box
1-3K Battery pack rack
www.cdpups.com
English
Page 7
48V/18Ah Version: 8 pieces of 12V 9Ah (4+4) batteries
72V/9Ah Version: 6 pieces of 12V 9Ah batteries
72V/18Ah Version: 12 pieces of 12V 9Ah (6+6) batteries
4. Battery Installation
If your battery box is not installed with batteries, please follow
proper procedure to put batteries inside of unit.
NOTE: MAKE SURE THAT THE BATTERY BOX IS DISCONNECTED FROM THE
UPS BEFORE PERFORMING THE FOLLOWING SEQUENCE OF OPERATIONS.
Battery Box 24V
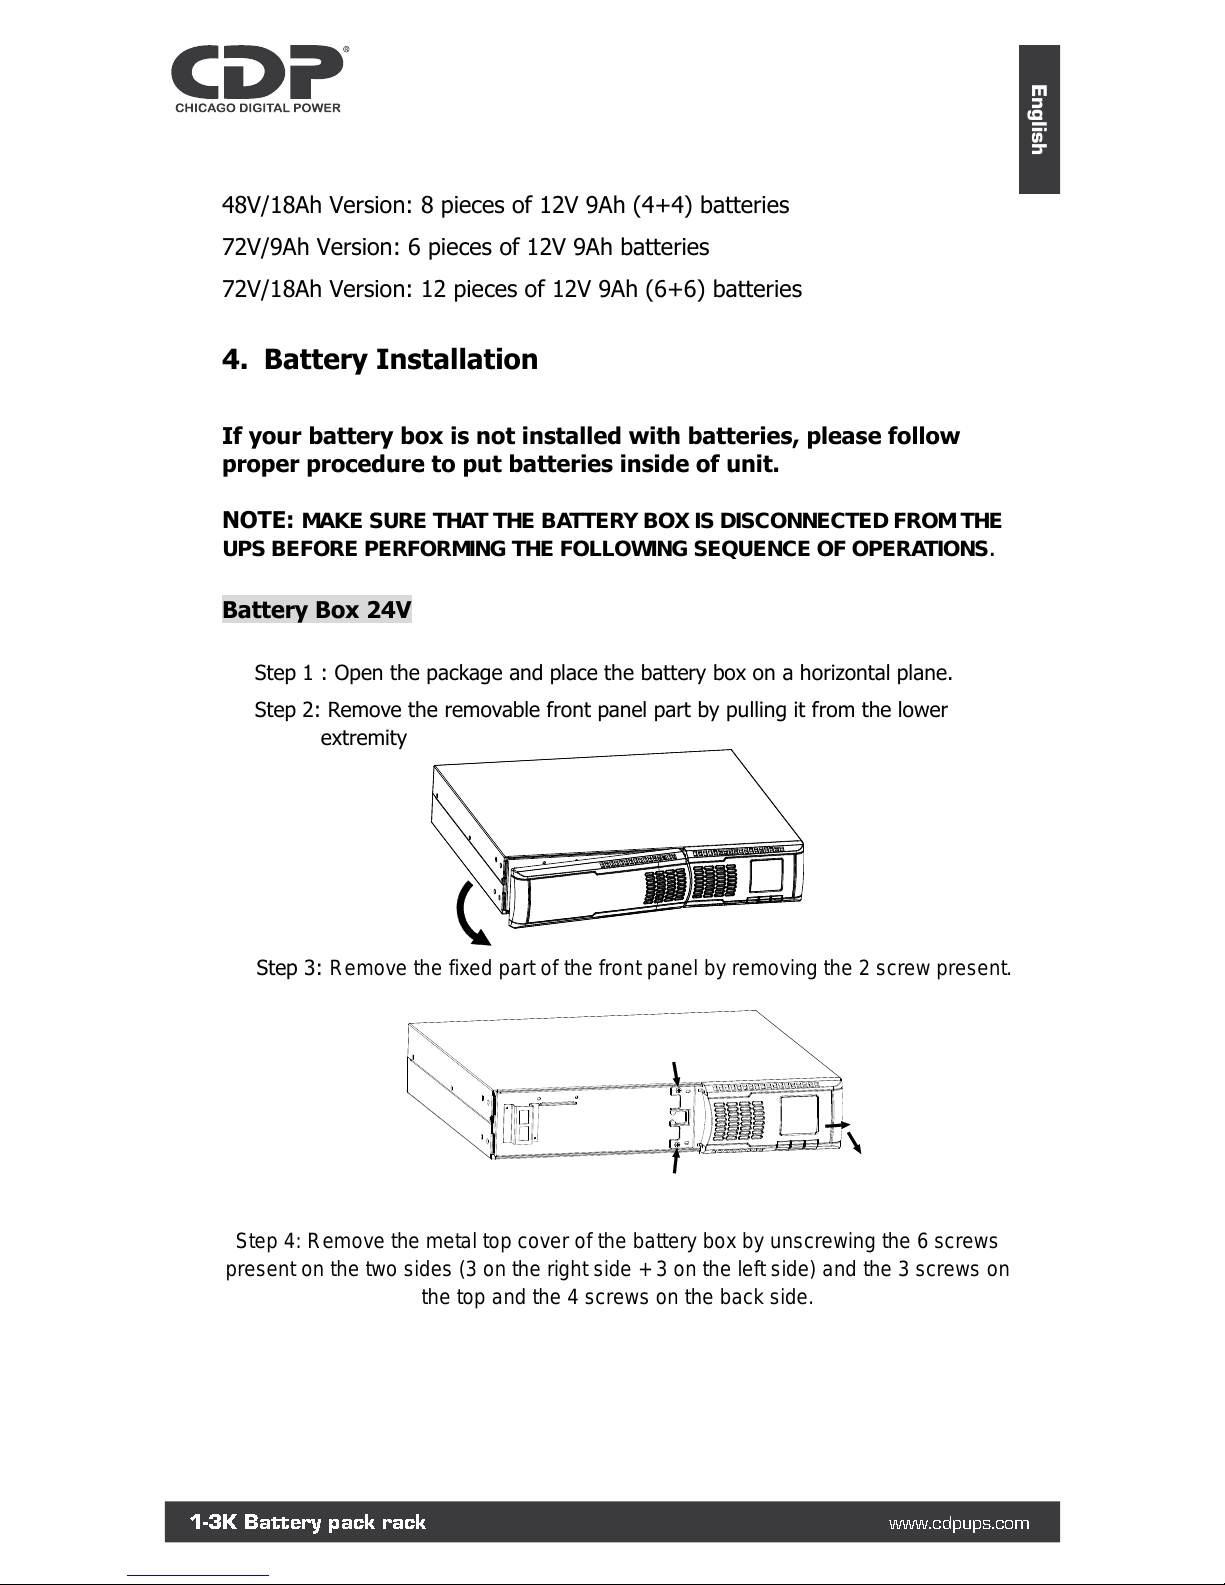
Step 1 : Open the package and place the battery box on a horizontal plane.
Step 2: Remove the removable front panel part by pulling it from the lower
extremity
Step 3: Remove the fixed part of the front panel by removing the 2 screw present.
Step 4: Remove the metal top cover of the battery box by unscrewing the 6 screws
present on the two sides (3 on the right side + 3 on the left side) and the 3 screws on
the top and the 4 screws on the back side.
1-3K Battery pack rack
www.cdpups.com
English
Page 8
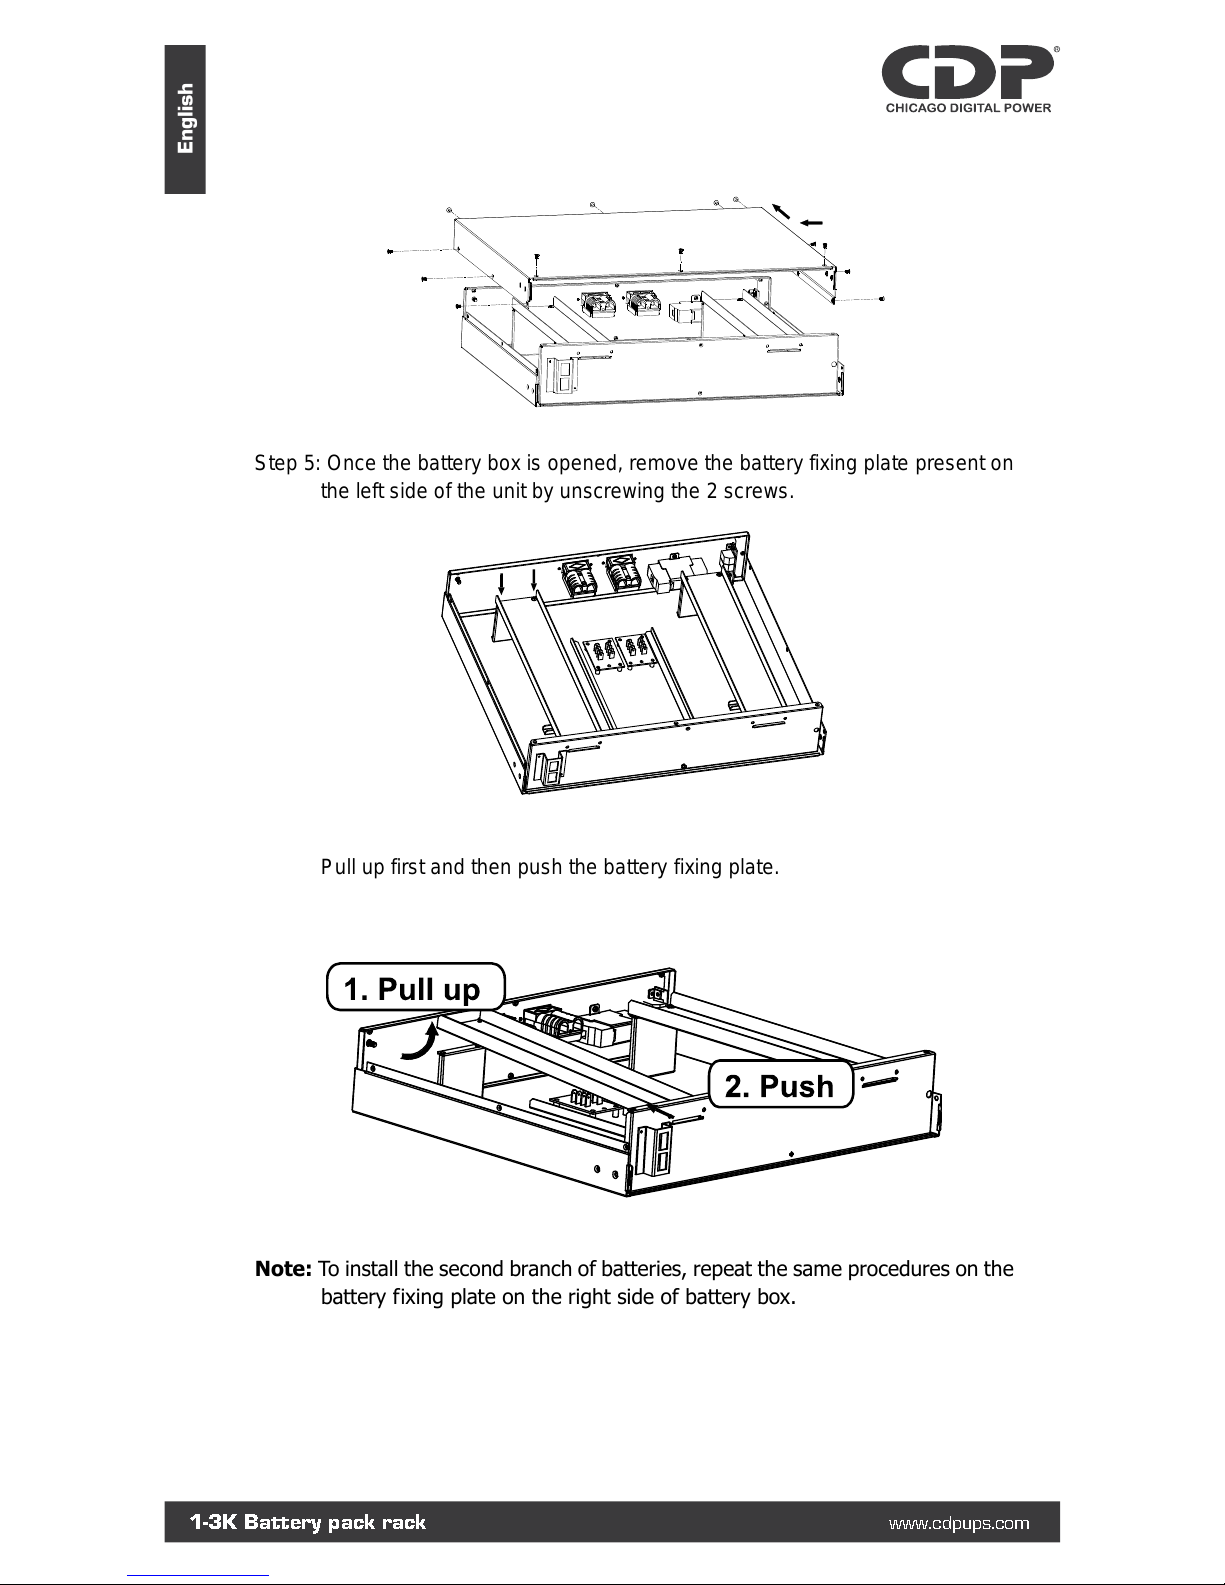
Step 5: Once the battery box is opened, remove the battery fixing plate present on
the left side of the unit by unscrewing the 2 screws.
Pull up first and then push the battery fixing plate.
Note: To install the second branch of batteries, repeat the same procedures on the
battery fixing plate on the right side of battery box.
1-3K Battery pack rack
www.cdpups.com
English
Page 9
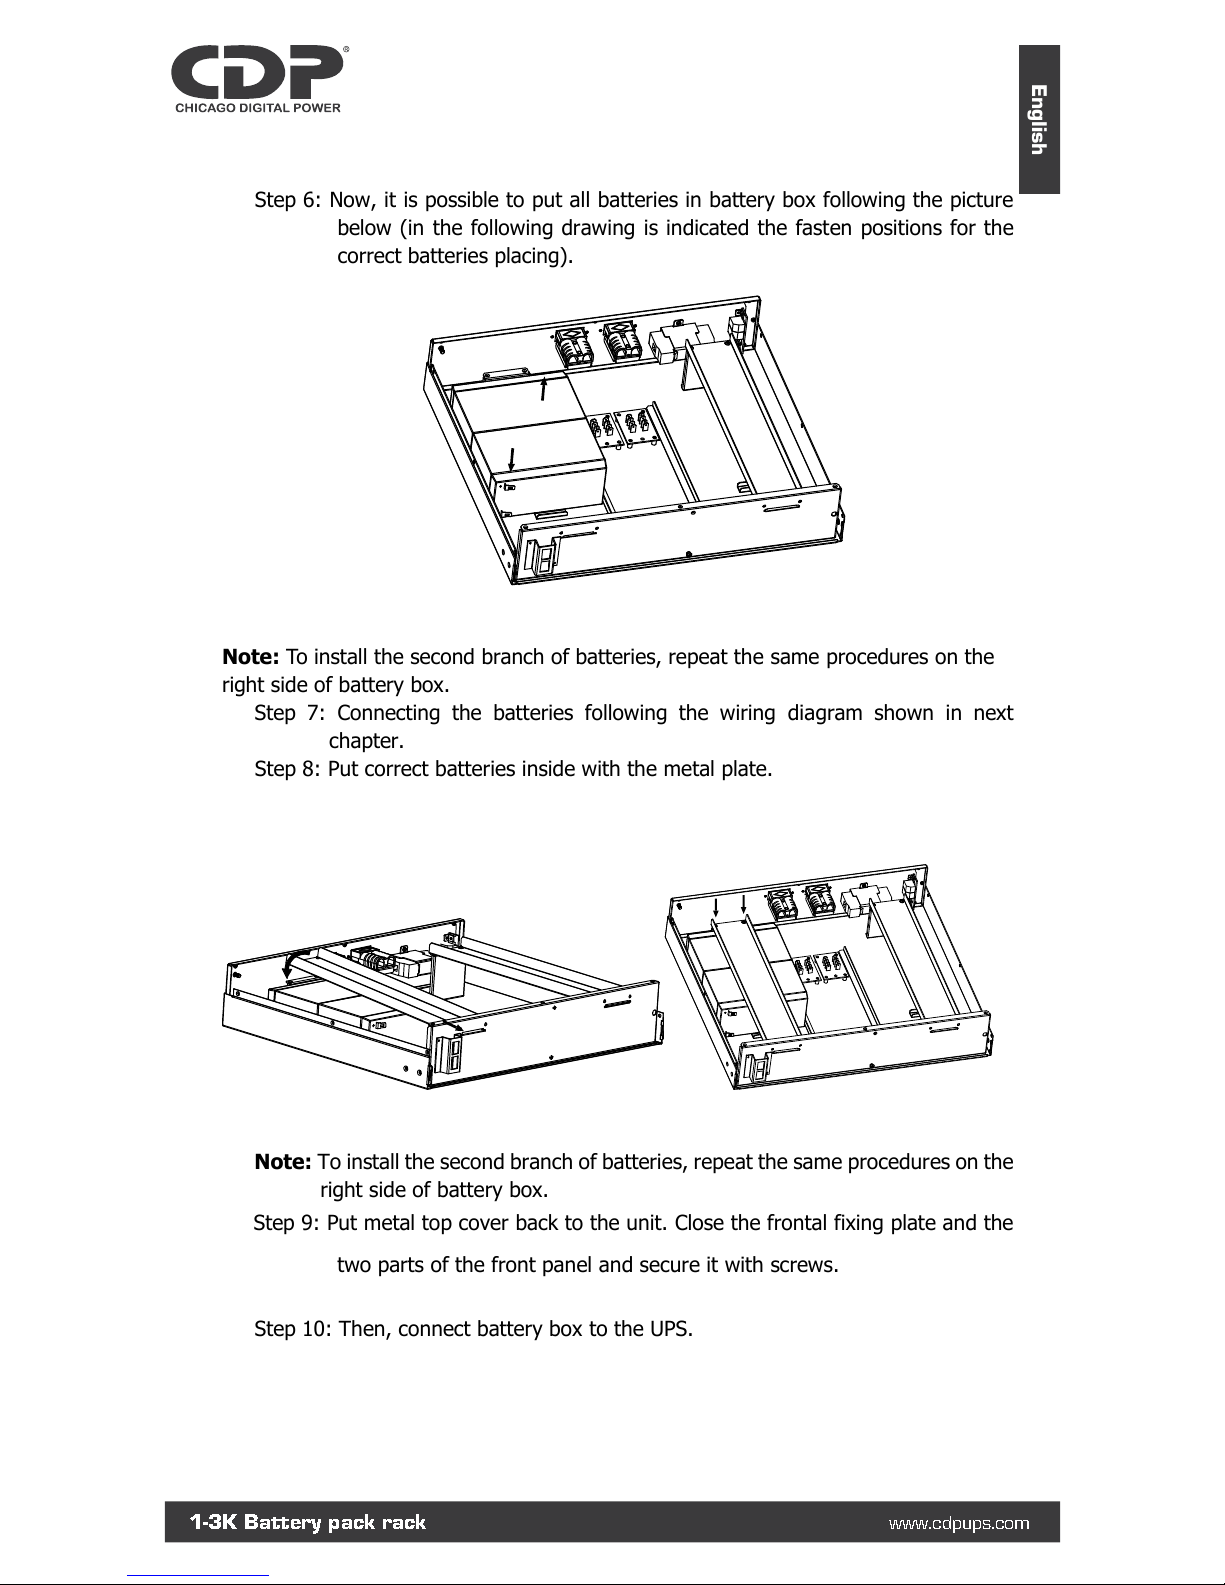
Step 6: Now, it is possible to put all batteries in battery box following the picture
below (in the following drawing is indicated the fasten positions for the
correct batteries placing).
Note: To install the second branch of batteries, repeat the same procedures on the
right side of battery box.
Step 7: Connecting the batteries following the wiring diagram shown in next
chapter.
Step 8: Put correct batteries inside with the metal plate.
Note: To install the second branch of batteries, repeat the same procedures on the
right side of battery box.
Step 9: Put metal top cover back to the unit. Close the frontal fixing plate and the
two parts of the front panel and secure it with screws.
Step 10: Then, connect battery box to the UPS.
1-3K Battery pack rack
www.cdpups.com
English
Page 10
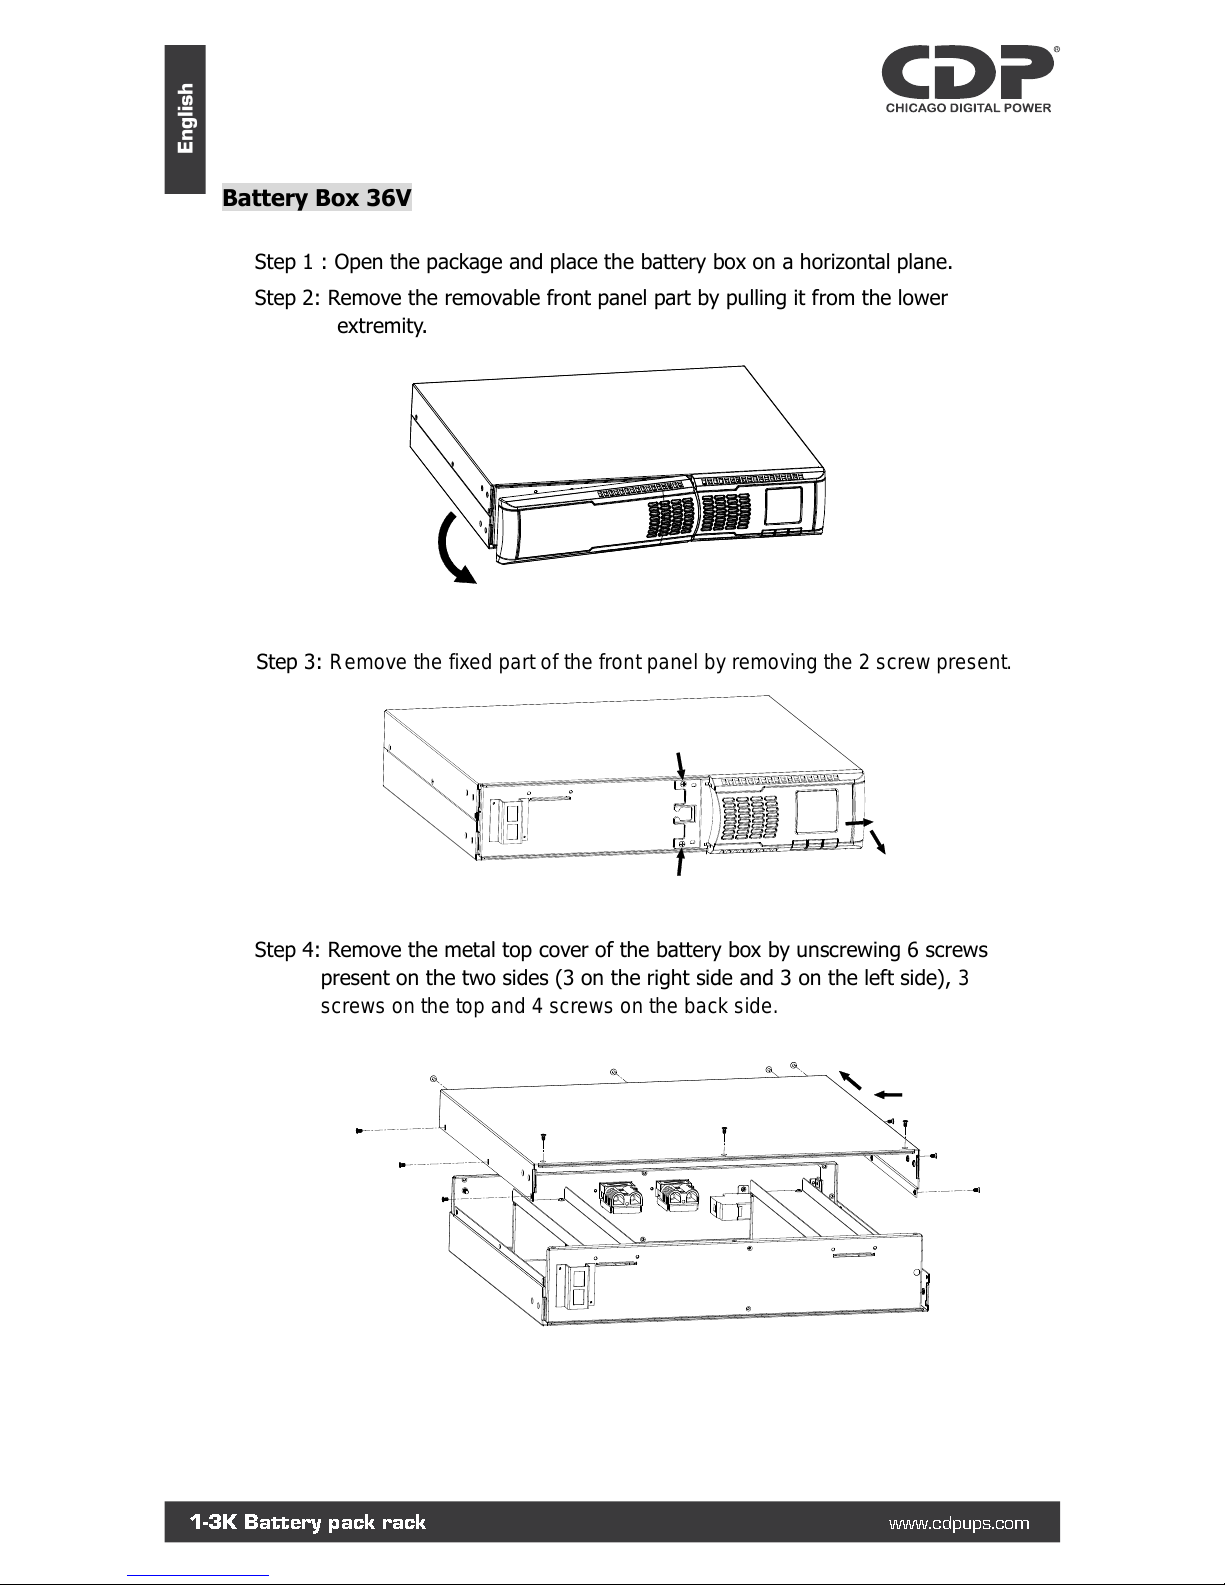
Battery Box 36V
Step 1 : Open the package and place the battery box on a horizontal plane.
Step 2: Remove the removable front panel part by pulling it from the lower
extremity.
Step 3: Remove the fixed part of the front panel by removing the 2 screw present.
Step 4: Remove the metal top cover of the battery box by unscrewing 6 screws
present on the two sides (3 on the right side and 3 on the left side), 3
screws on the top and 4 screws on the back side.
1-3K Battery pack rack
www.cdpups.com
English
Page 11
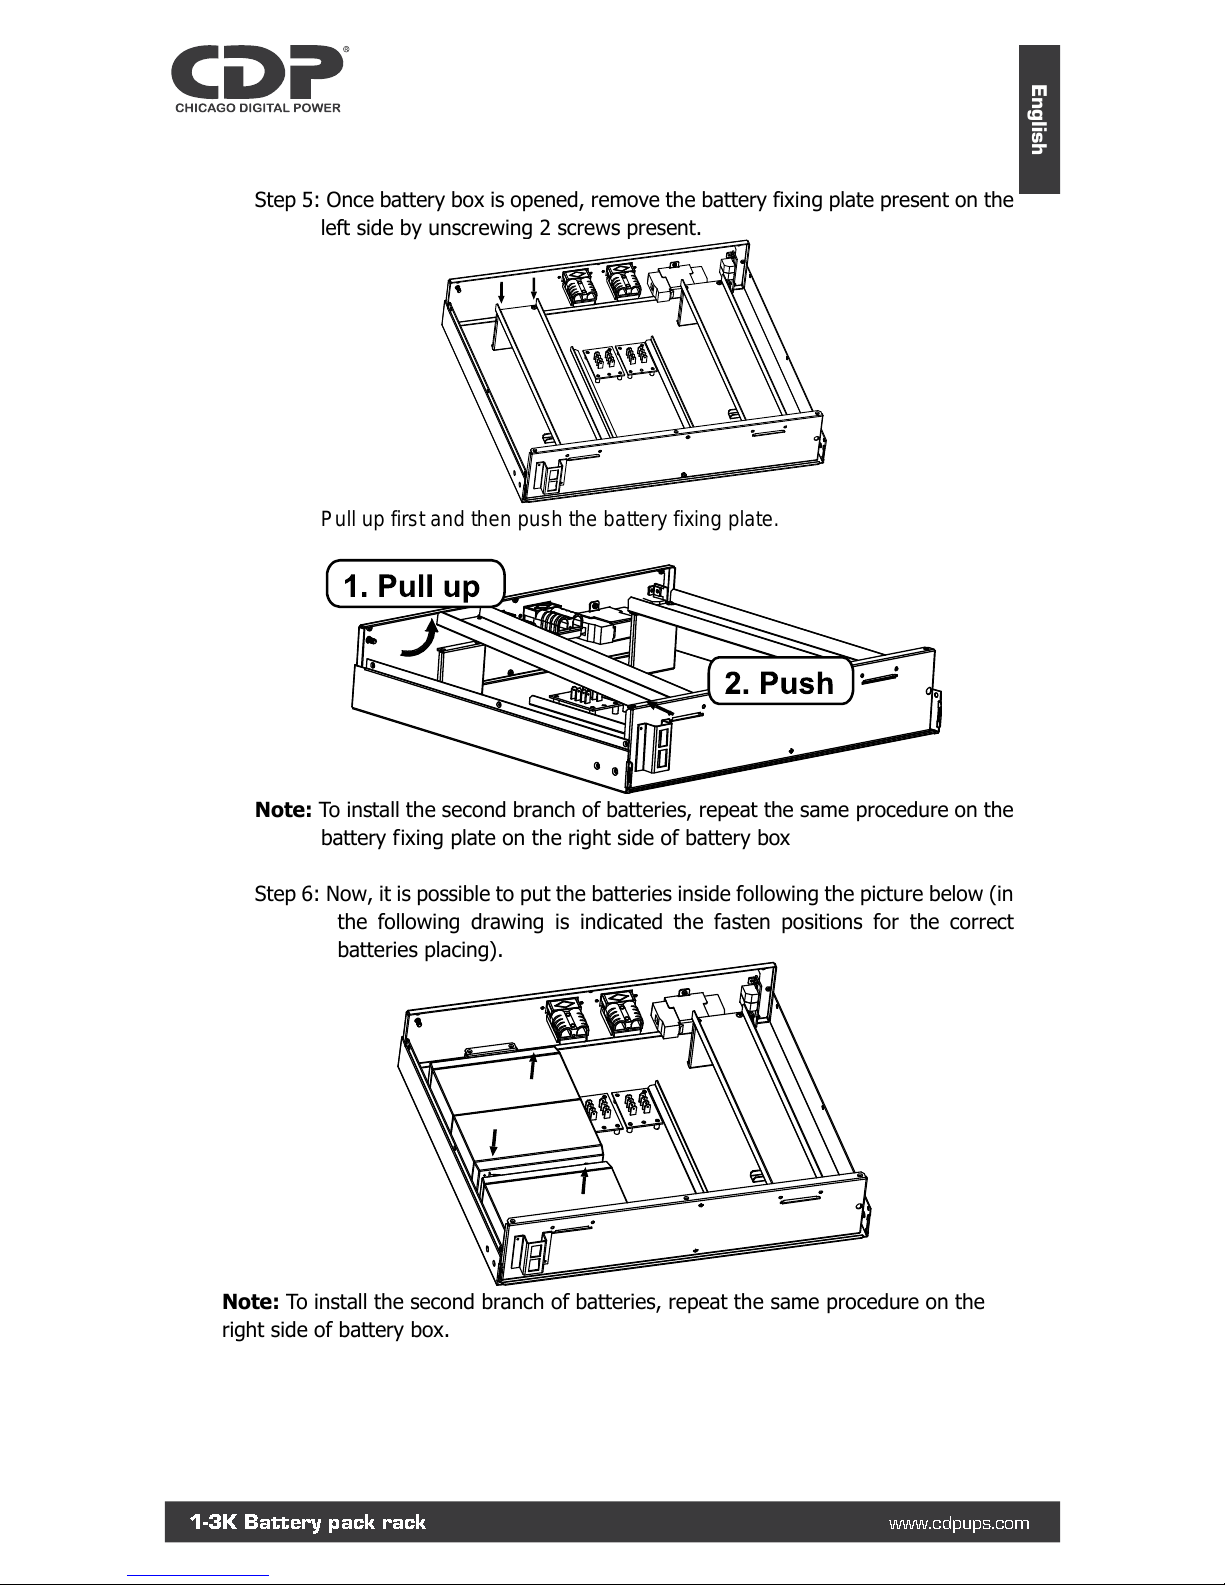
Step 5: Once battery box is opened, remove the battery fixing plate present on the
left side by unscrewing 2 screws present.
Pull up first and then push the battery fixing plate.
Note: To install the second branch of batteries, repeat the same procedure on the
battery fixing plate on the right side of battery box
Step 6: Now, it is possible to put the batteries inside following the picture below (in
the following drawing is indicated the fasten positions for the correct
batteries placing).
Note: To install the second branch of batteries, repeat the same procedure on the
right side of battery box.
1-3K Battery pack rack
www.cdpups.com
English
Page 12
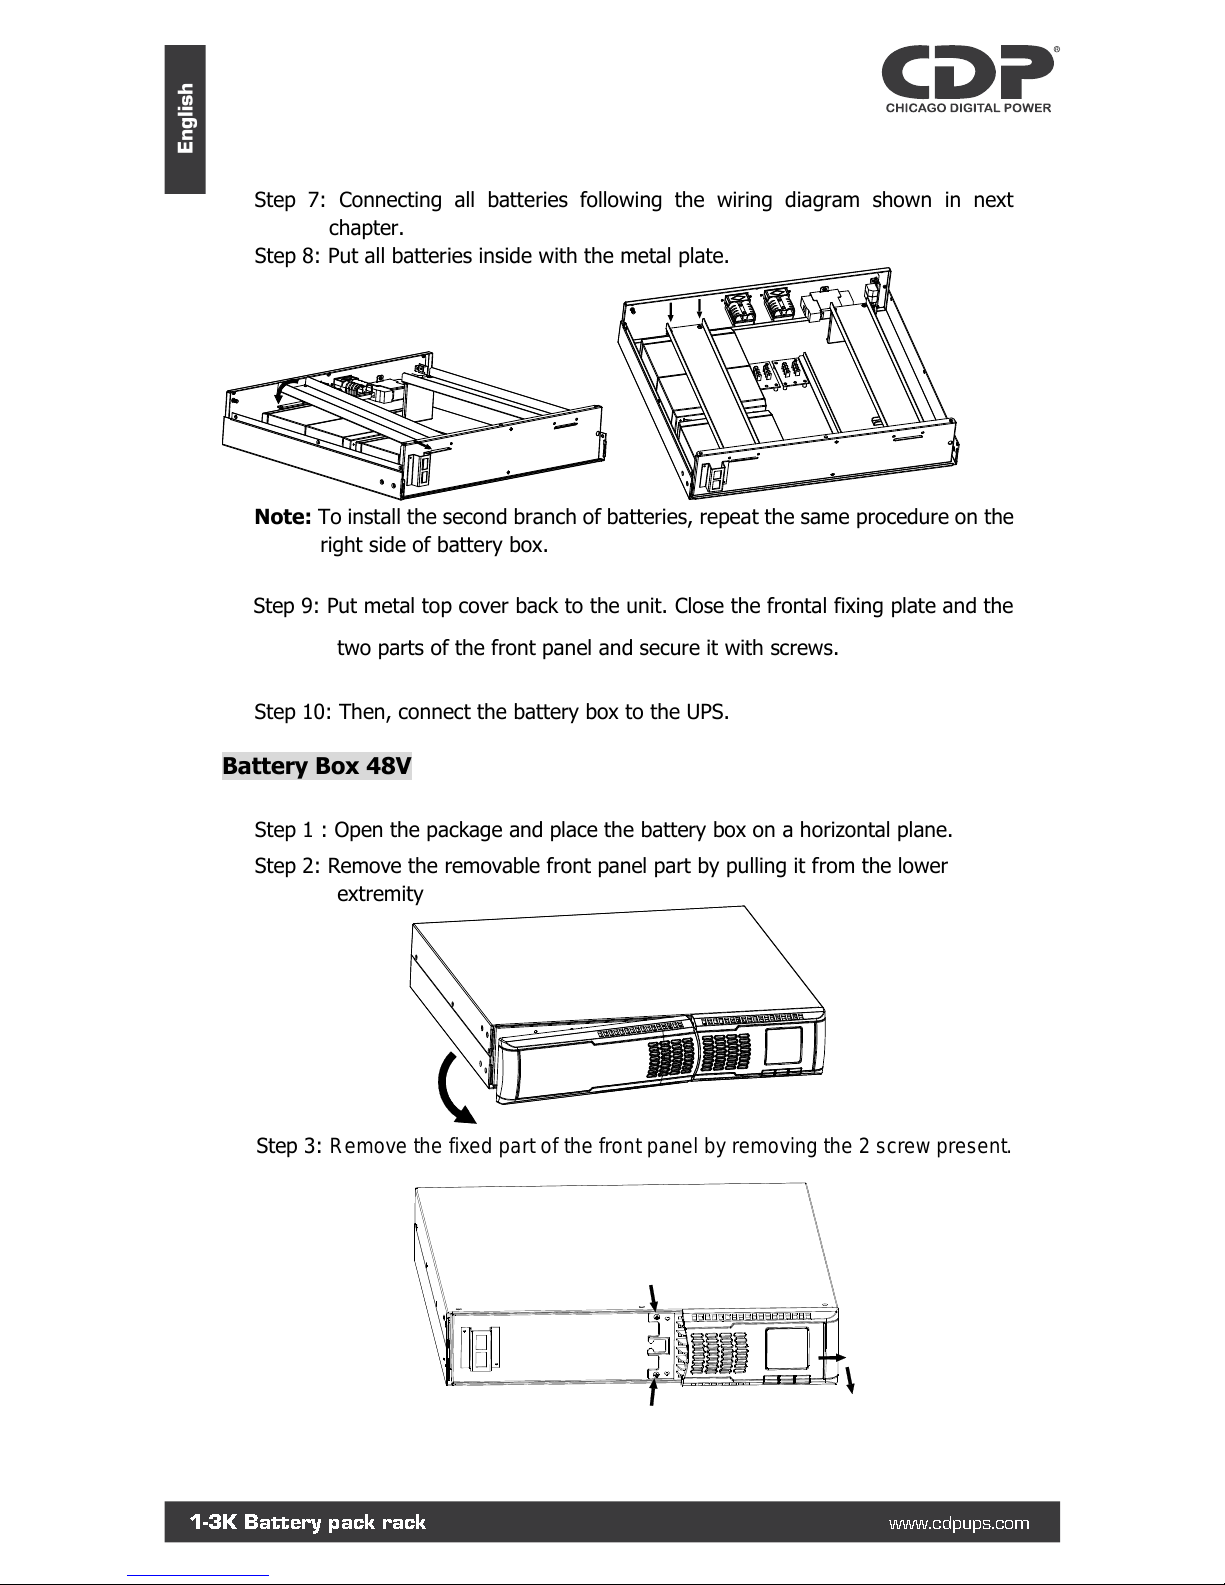
Step 7: Connecting all batteries following the wiring diagram shown in next
chapter.
Step 8: Put all batteries inside with the metal plate.
Note: To install the second branch of batteries, repeat the same procedure on the
right side of battery box.
Step 9: Put metal top cover back to the unit. Close the frontal fixing plate and the
two parts of the front panel and secure it with screws.
Step 10: Then, connect the battery box to the UPS.
Battery Box 48V
Step 1 : Open the package and place the battery box on a horizontal plane.
Step 2: Remove the removable front panel part by pulling it from the lower
extremity
Step 3: Remove the fixed part of the front panel by removing the 2 screw present.
1-3K Battery pack rack
www.cdpups.com
English
Page 13
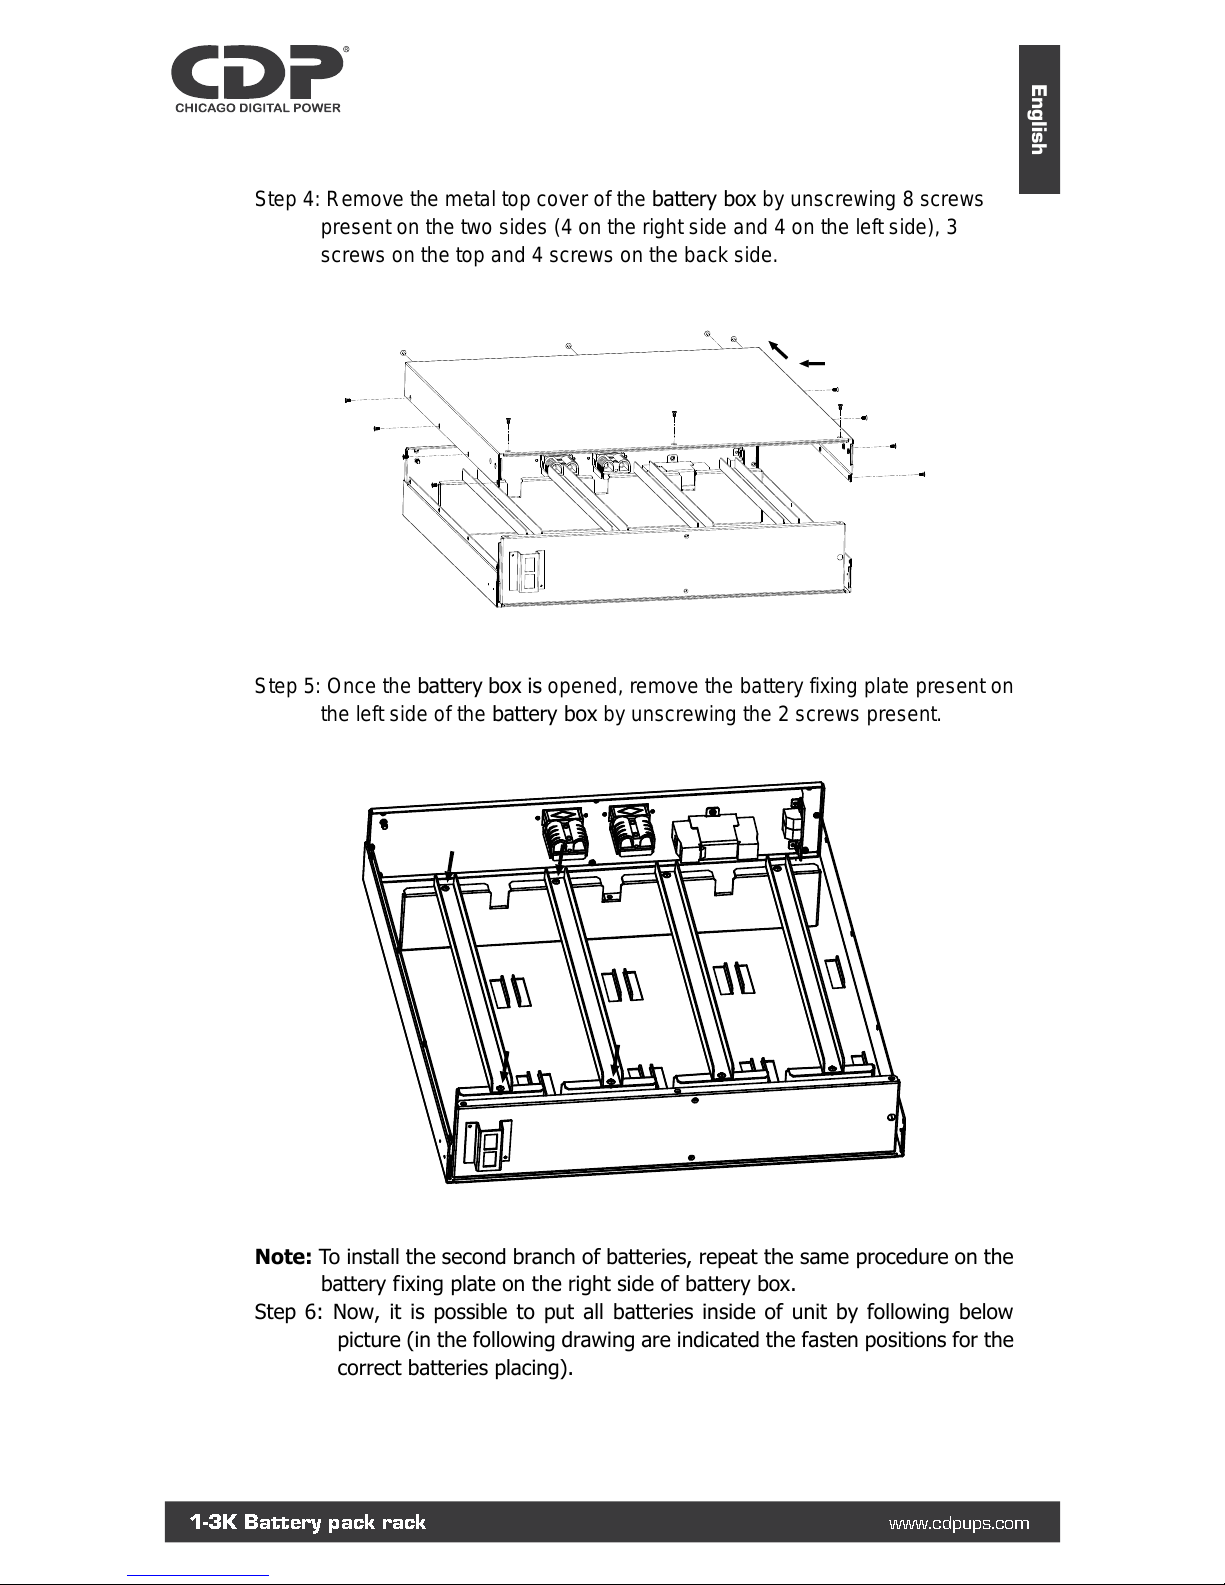
Step 4: Remove the metal top cover of the battery box by unscrewing 8 screws
present on the two sides (4 on the right side and 4 on the left side), 3
screws on the top and 4 screws on the back side.
Step 5: Once the battery box is opened, remove the battery fixing plate present on
the left side of the battery box by unscrewing the 2 screws present.
Note: To install the second branch of batteries, repeat the same procedure on the
battery fixing plate on the right side of battery box.
Step 6: Now, it is possible to put all batteries inside of unit by following below
picture (in the following drawing are indicated the fasten positions for the
correct batteries placing).
1-3K Battery pack rack
www.cdpups.com
English
Page 14
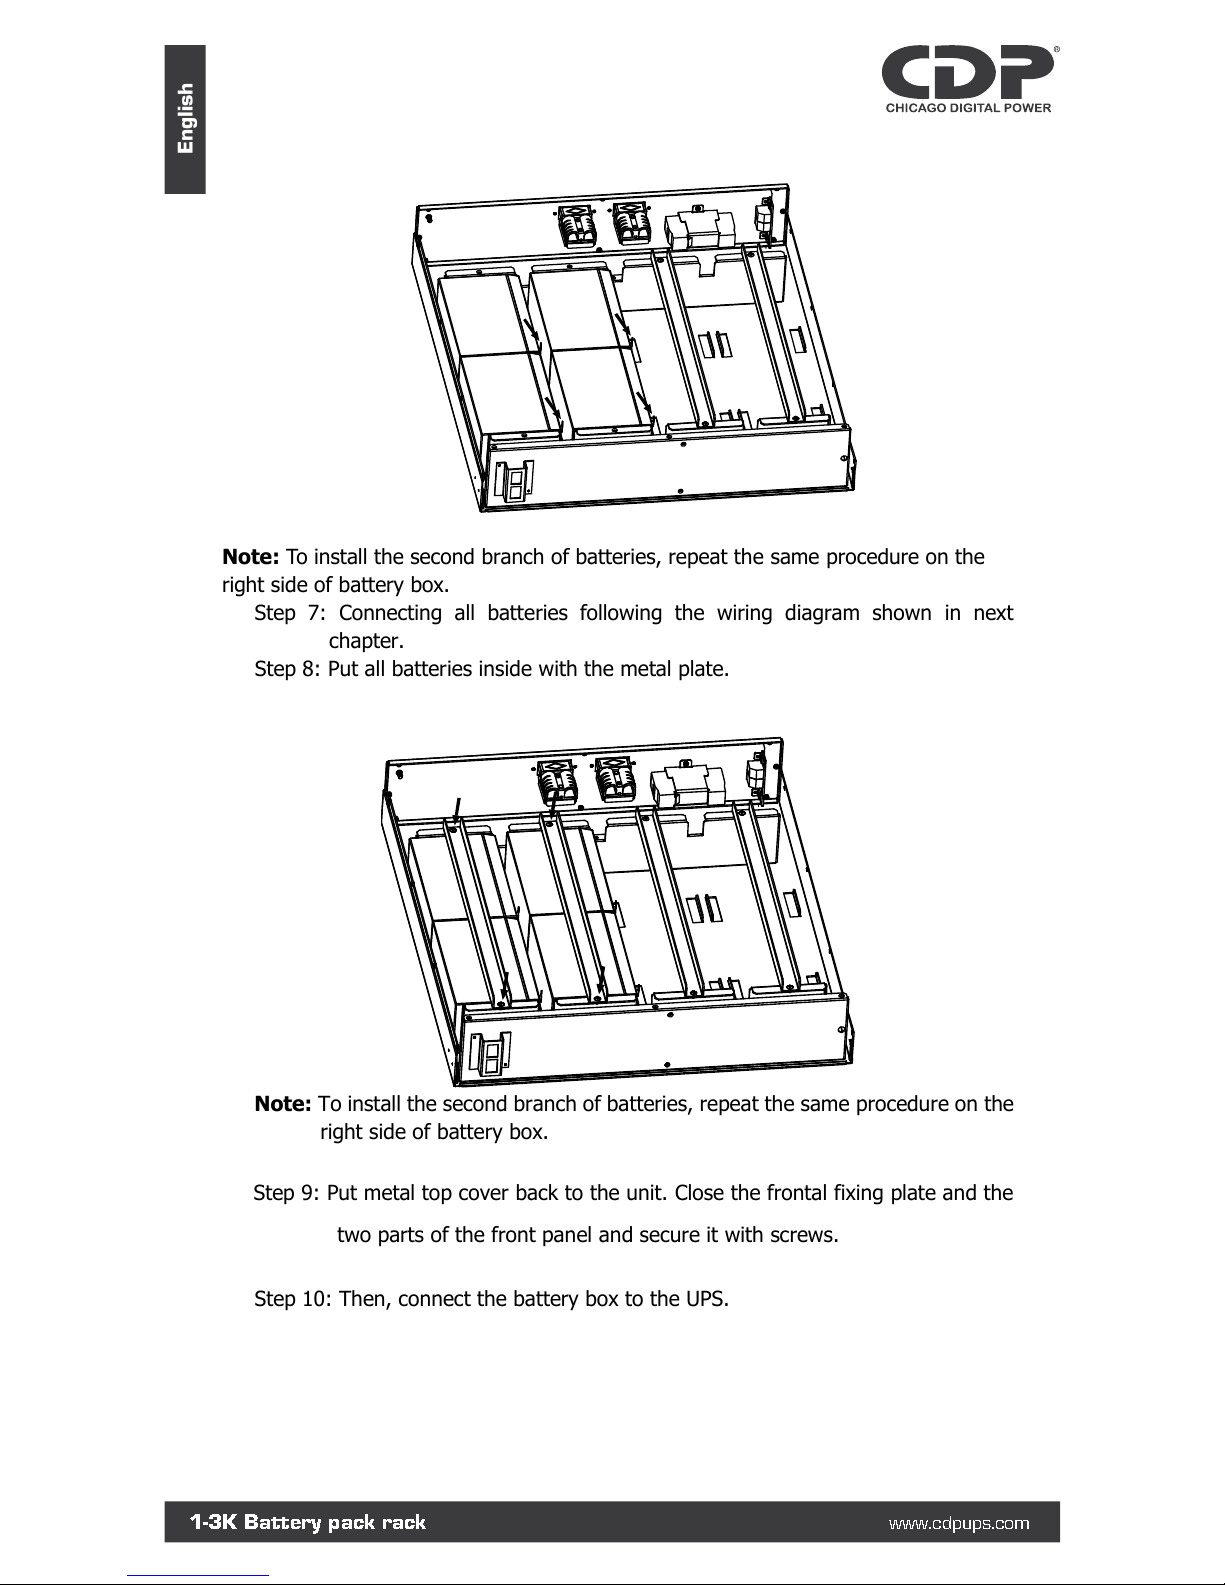
Note: To install the second branch of batteries, repeat the same procedure on the
right side of battery box.
Step 7: Connecting all batteries following the wiring diagram shown in next
chapter.
Step 8: Put all batteries inside with the metal plate.
Note: To install the second branch of batteries, repeat the same procedure on the
right side of battery box.
Step 9: Put metal top cover back to the unit. Close the frontal fixing plate and the
two parts of the front panel and secure it with screws.
Step 10: Then, connect the battery box to the UPS.
1-3K Battery pack rack
www.cdpups.com
English
Page 15
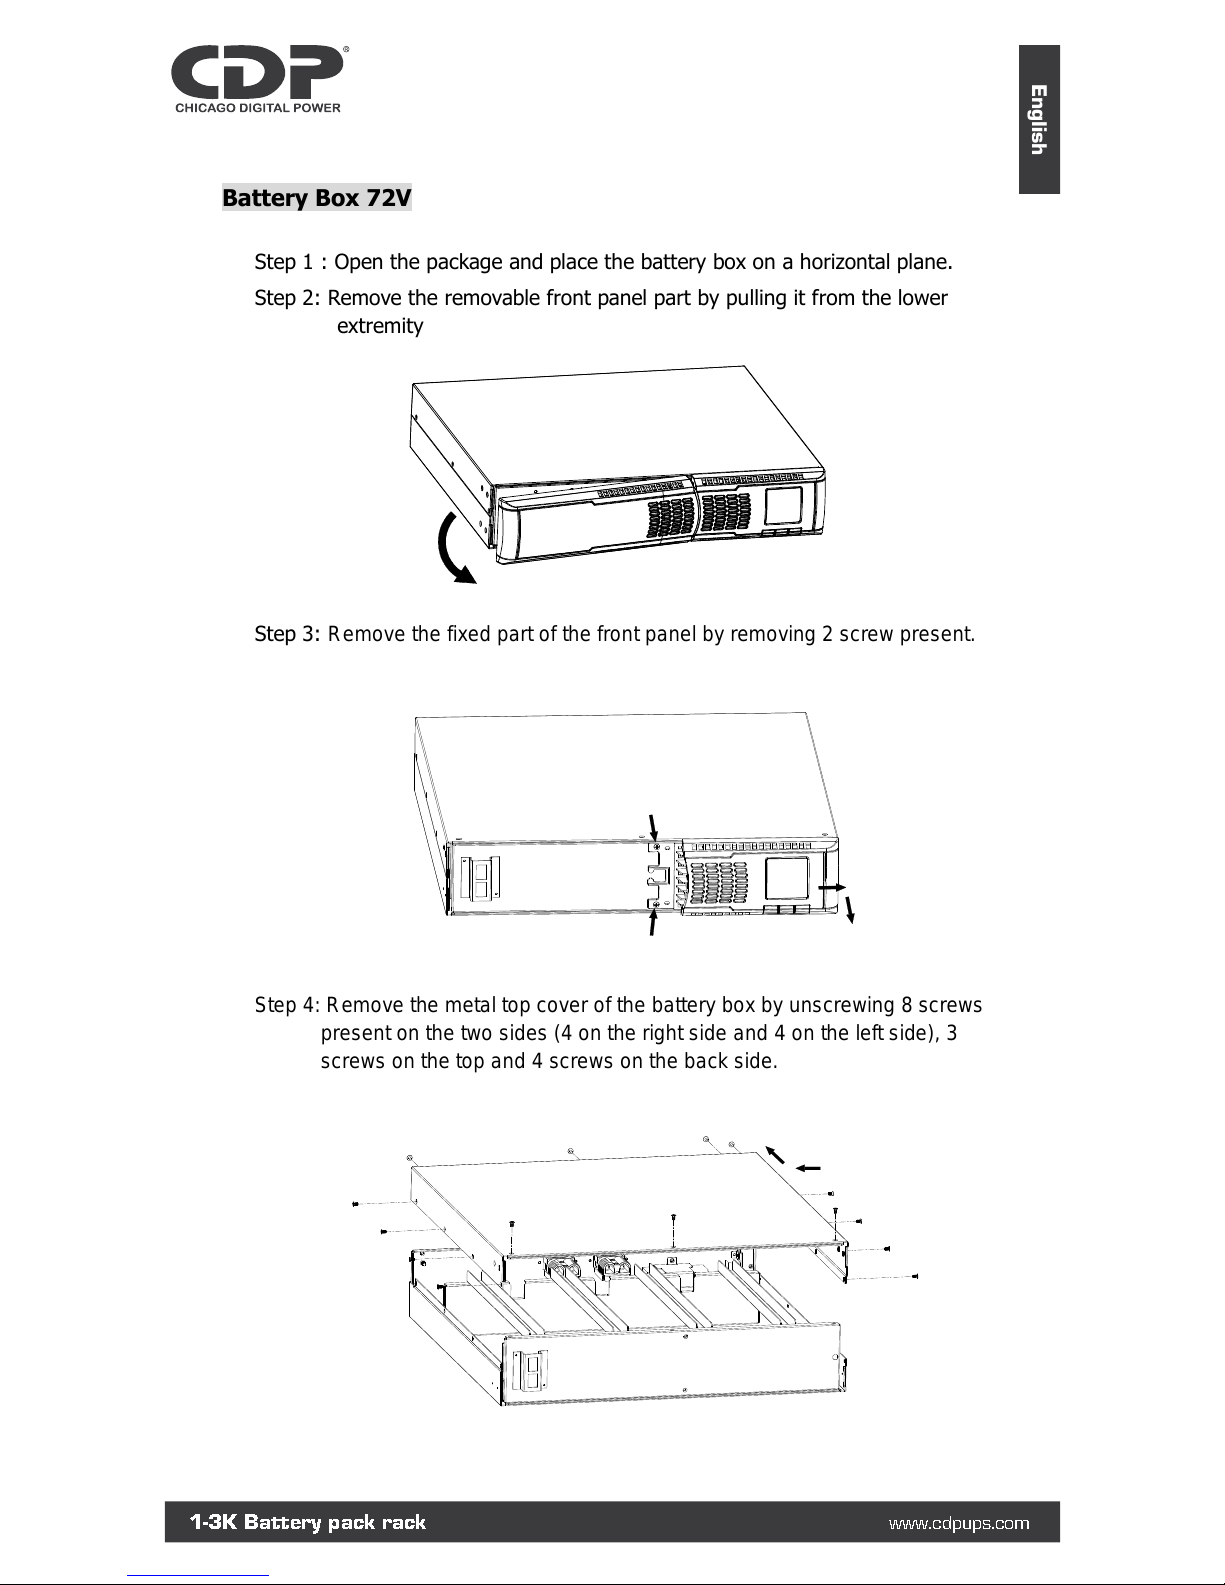
Battery Box 72V
Step 1 : Open the package and place the battery box on a horizontal plane.
Step 2: Remove the removable front panel part by pulling it from the lower
extremity
Step 3: Remove the fixed part of the front panel by removing 2 screw present.
Step 4: Remove the metal top cover of the battery box by unscrewing 8 screws
present on the two sides (4 on the right side and 4 on the left side), 3
screws on the top and 4 screws on the back side.
1-3K Battery pack rack
www.cdpups.com
English
Page 16
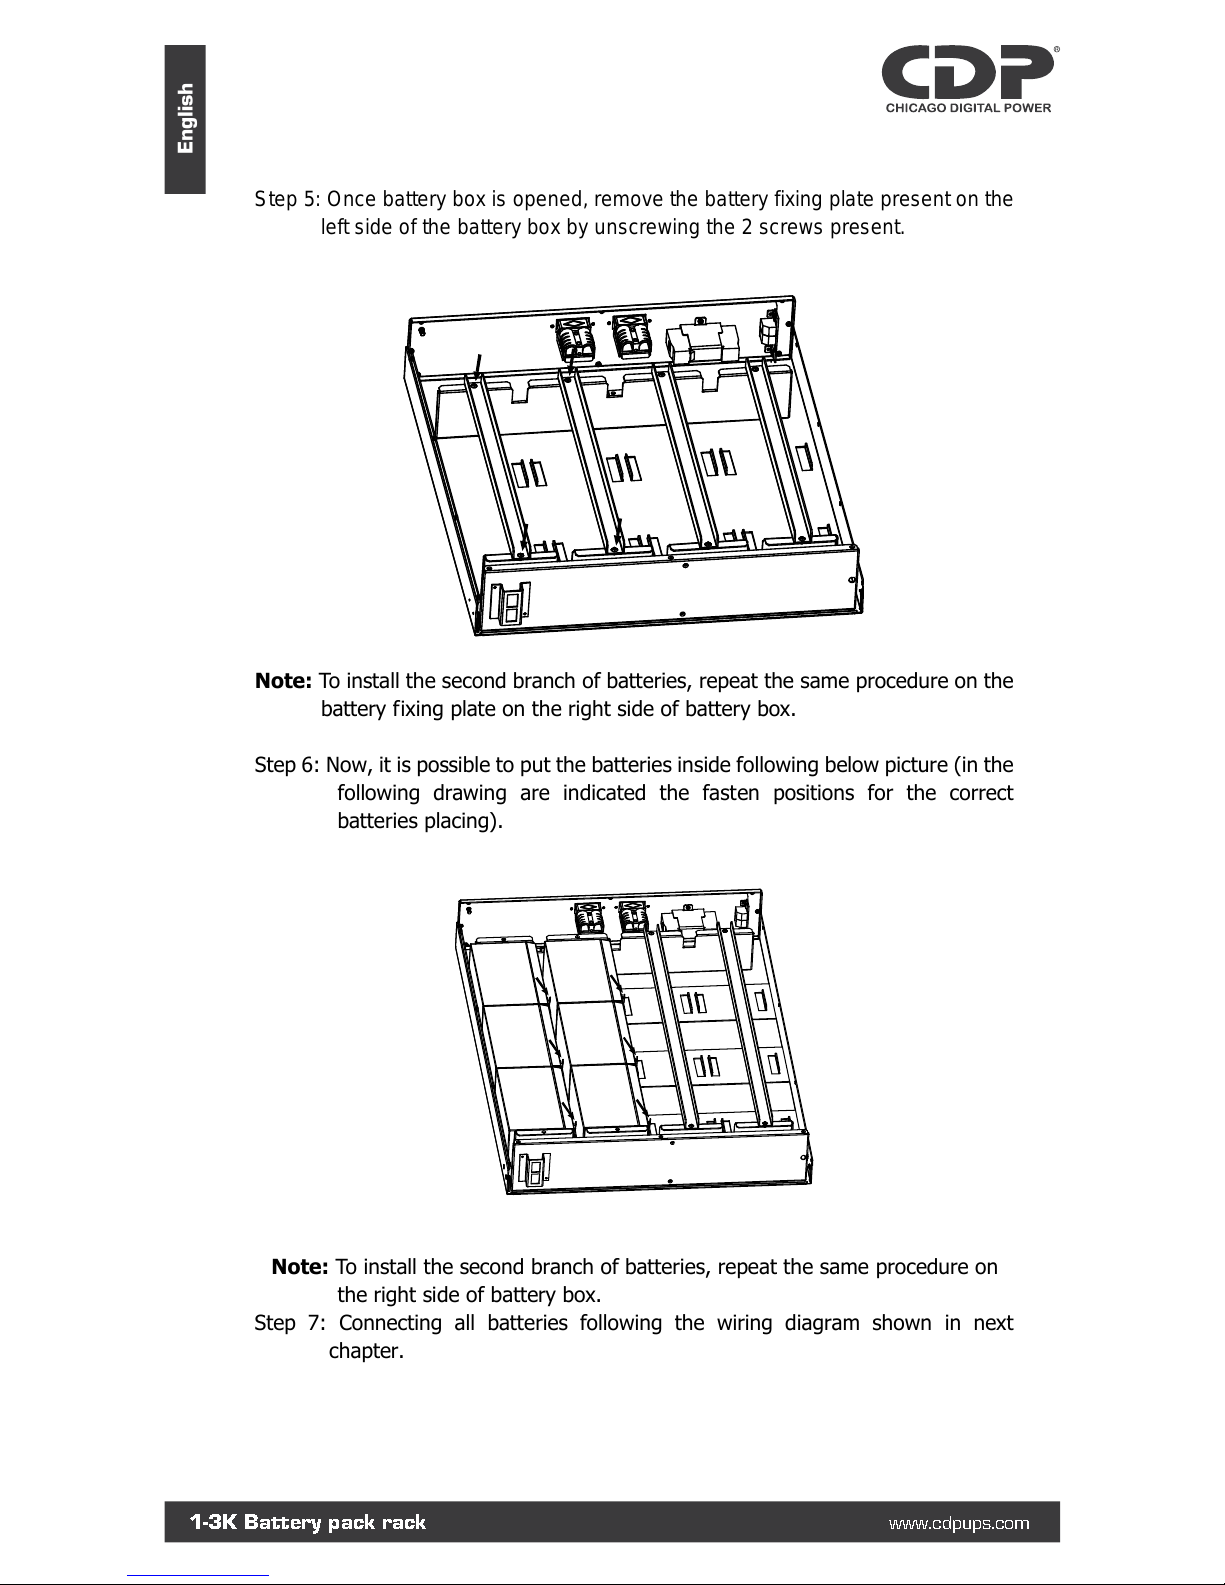
Step 5: Once battery box is opened, remove the battery fixing plate present on the
left side of the battery box by unscrewing the 2 screws present.
Note: To install the second branch of batteries, repeat the same procedure on the
battery fixing plate on the right side of battery box.
Step 6: Now, it is possible to put the batteries inside following below picture (in the
following drawing are indicated the fasten positions for the correct
batteries placing).
Note: To install the second branch of batteries, repeat the same procedure on
the right side of battery box.
Step 7: Connecting all batteries following the wiring diagram shown in next
chapter.
1-3K Battery pack rack
www.cdpups.com
English
Page 17
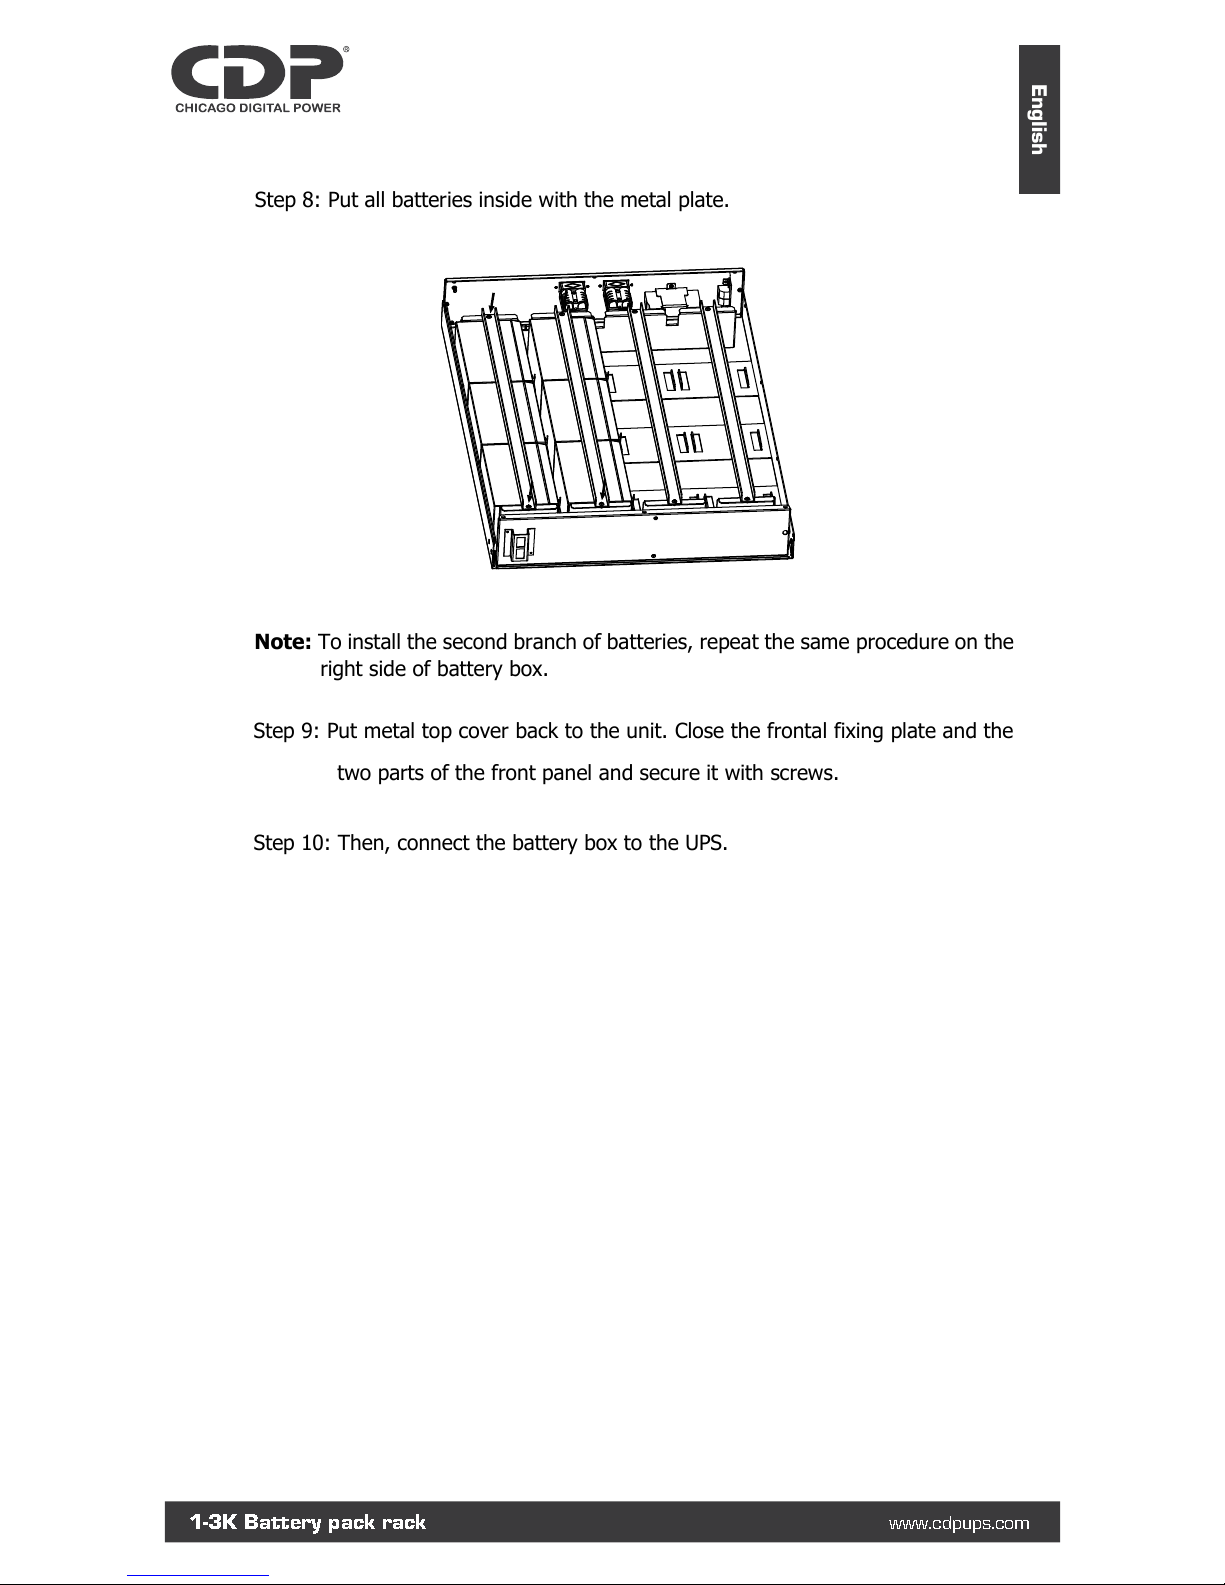
Step 8: Put all batteries inside with the metal plate.
Note: To install the second branch of batteries, repeat the same procedure on the
right side of battery box.
Step 9: Put metal top cover back to the unit. Close the frontal fixing plate and the
two parts of the front panel and secure it with screws.
Step 10: Then, connect the battery box to the UPS.
1-3K Battery pack rack
www.cdpups.com
English
Page 18
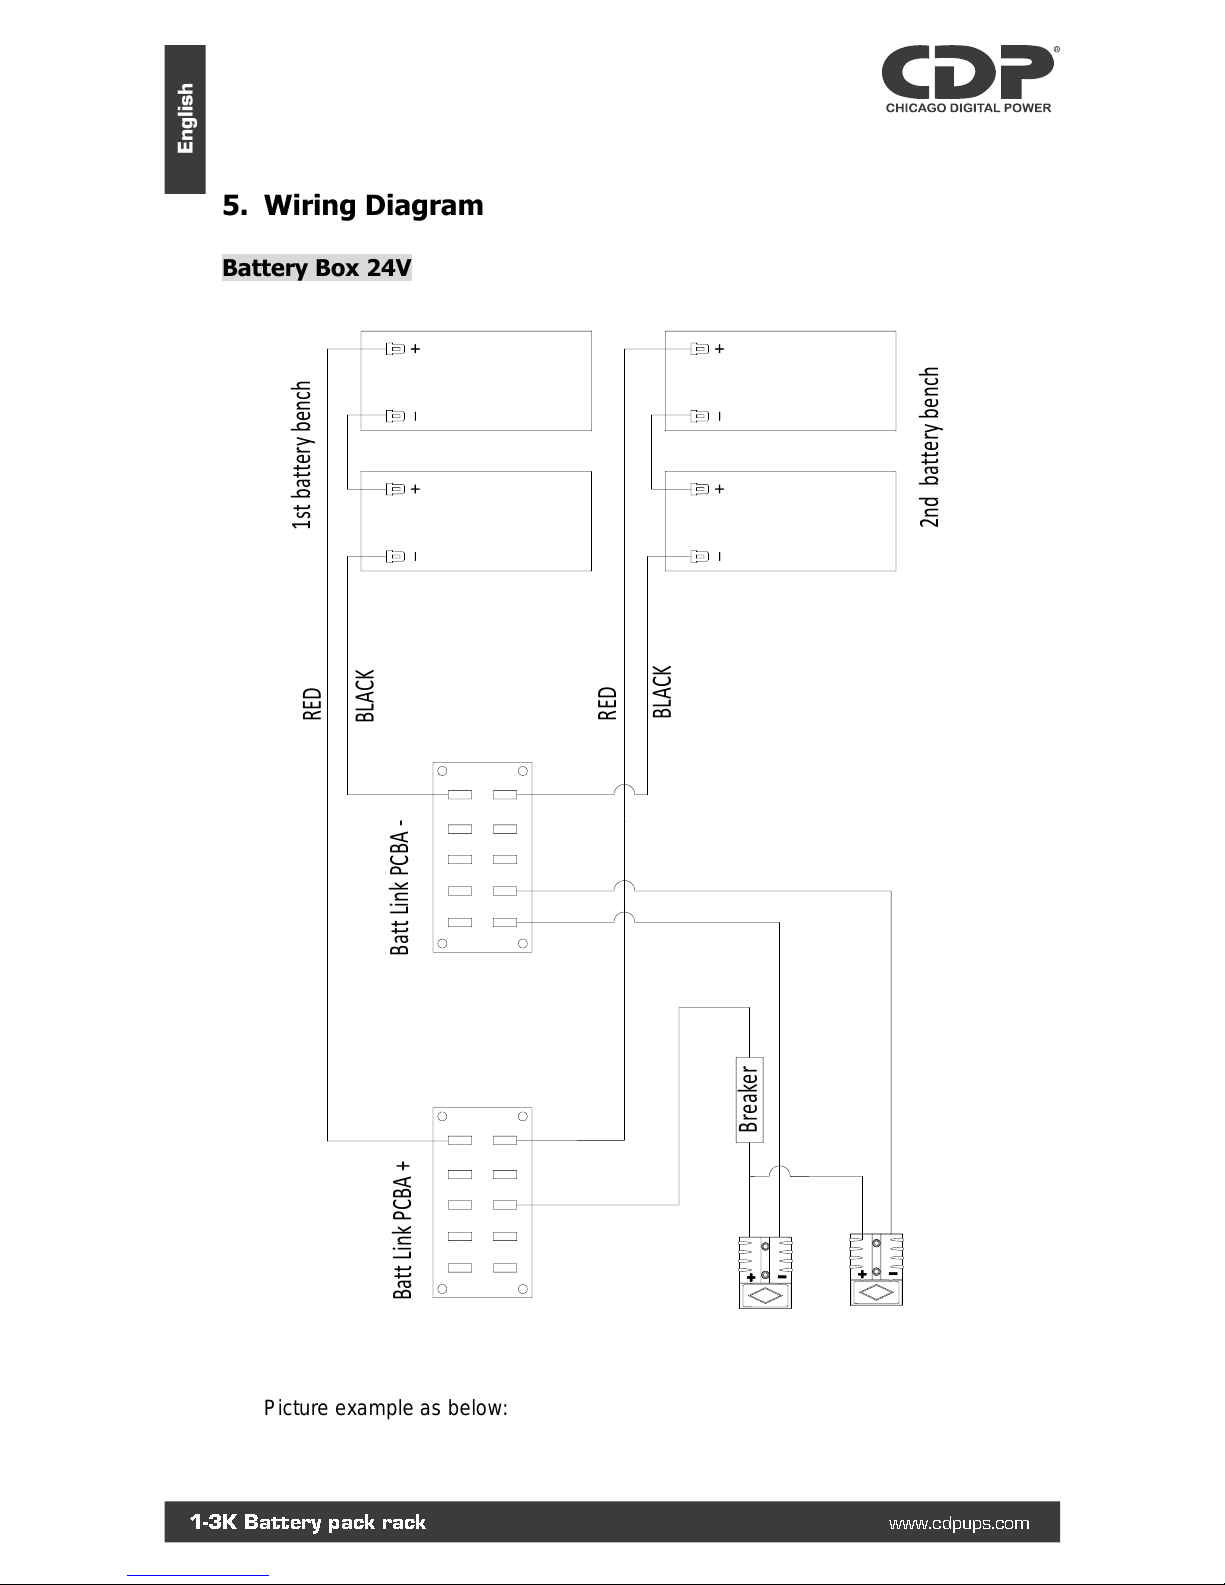
5. Wiring Diagram
Battery Box 24V
Picture example as below:
Batt Link PCBA +
Batt Link PCBA -
Breaker
1st battery bench
2nd battery bench
RED
BLACK
RED
BLACK
1-3K Battery pack rack
www.cdpups.com
English
Page 19
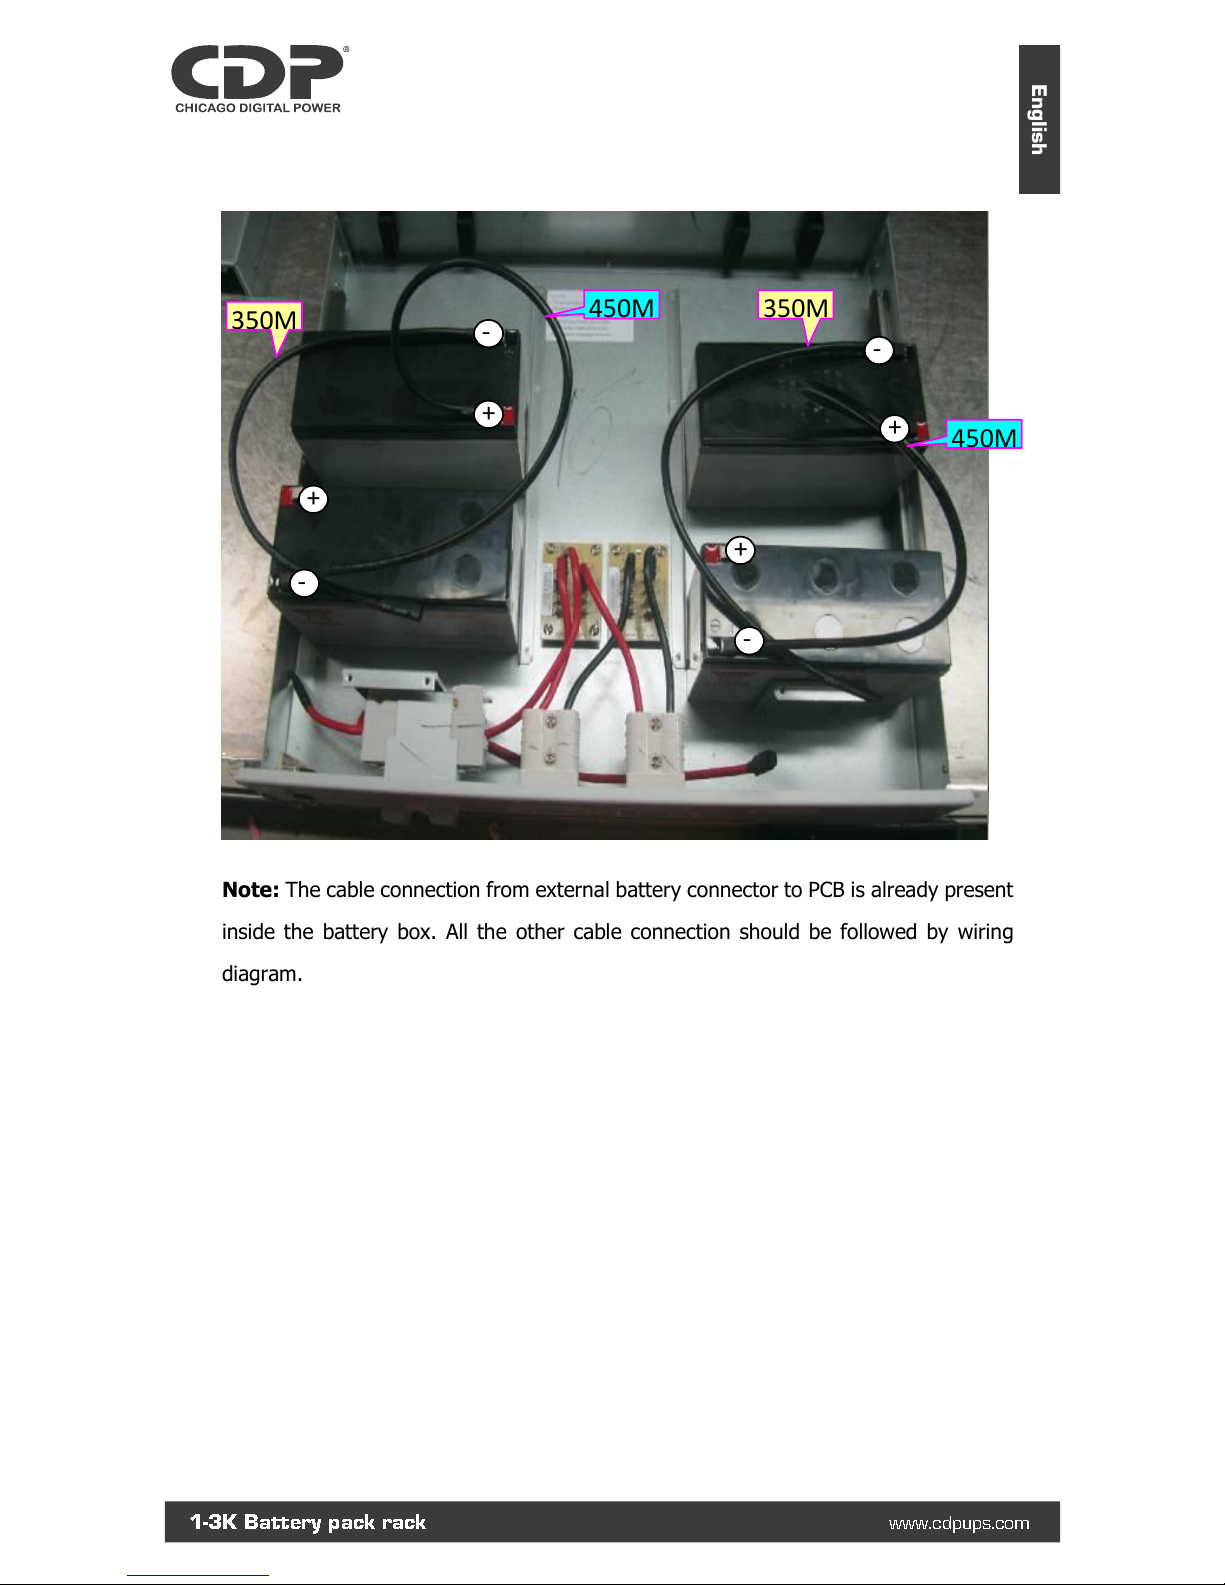
Note: The cable connection from external battery connector to PCB is already present
inside the battery box. All the other cable connection should be followed by wiring
diagram.
+
-
+ + + - -
-
1-3K Battery pack rack
www.cdpups.com
English
Page 20
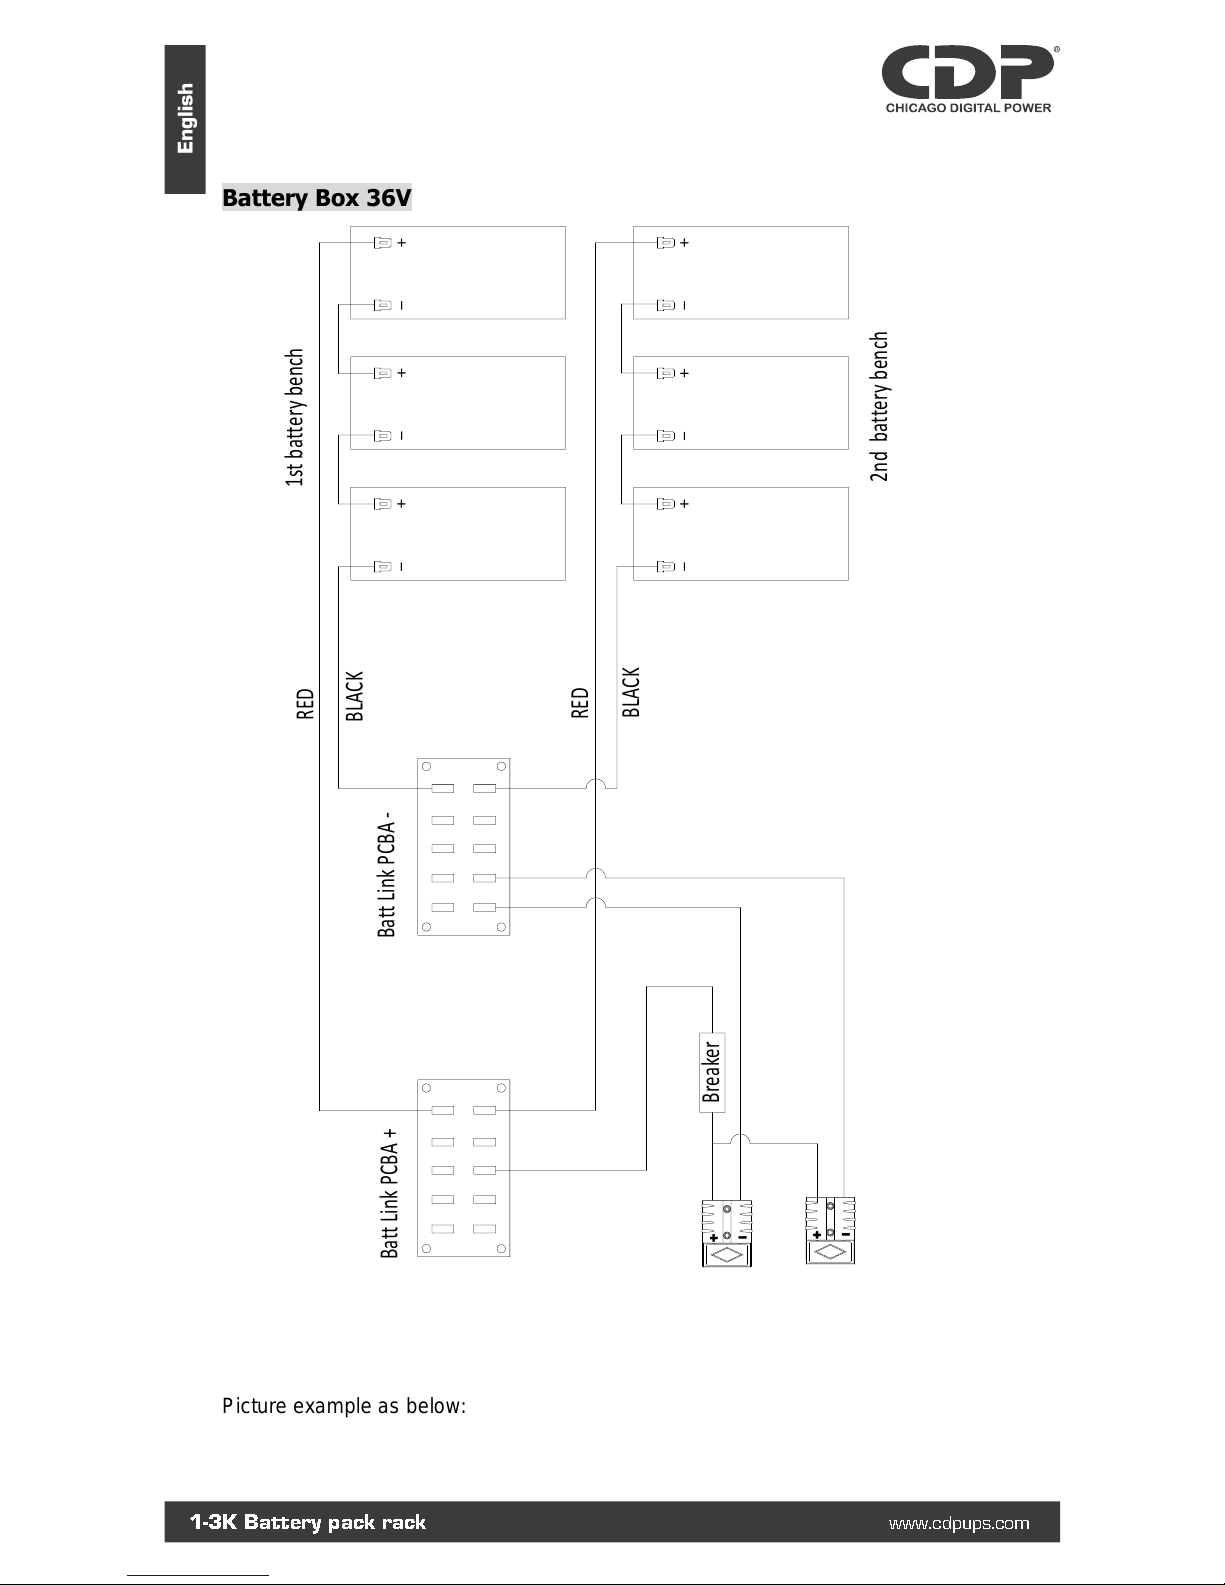
Battery Box 36V
Picture example as below:
Batt Link PCBA +
Batt Link PCBA -
Breaker
1st battery bench
2nd battery bench
RED
BLACK
RED
BLACK
1-3K Battery pack rack
www.cdpups.com
English
Page 21
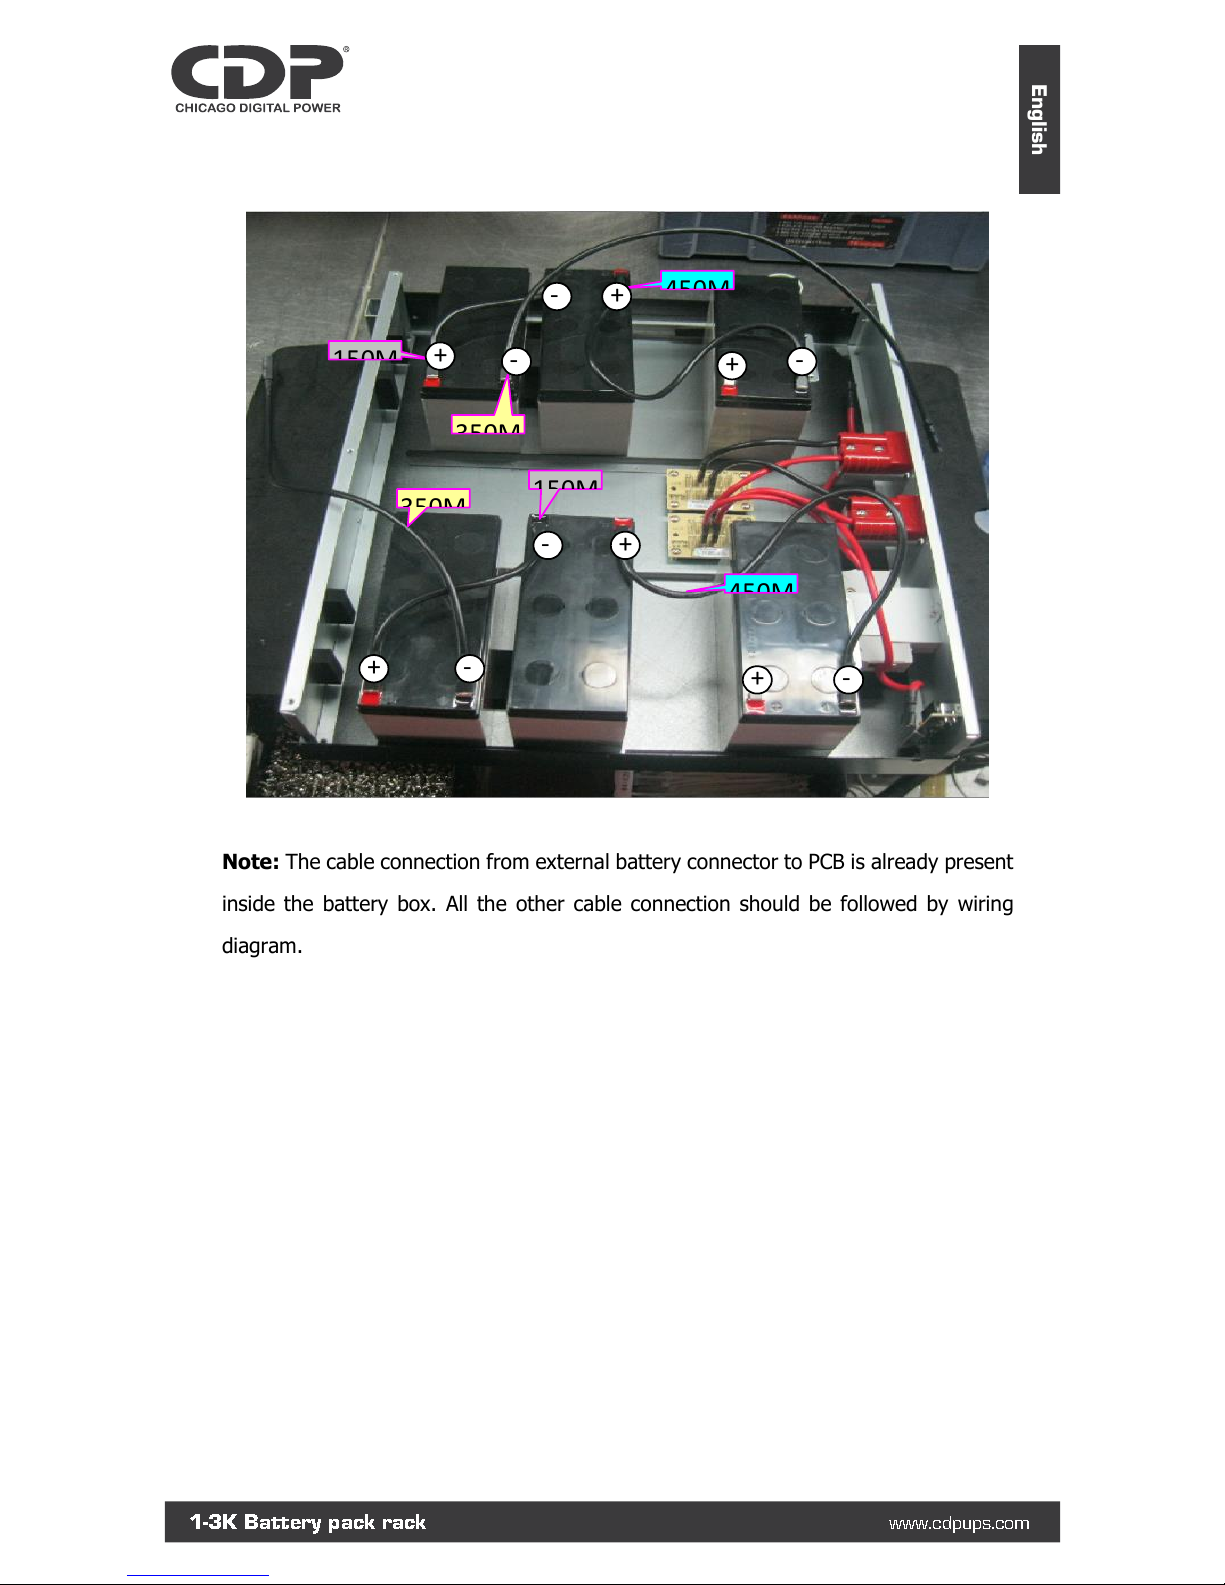
Note: The cable connection from external battery connector to PCB is already present
inside the battery box. All the other cable connection should be followed by wiring
diagram.
+ - + + + - - - - - +
+
1-3K Battery pack rack
www.cdpups.com
English
Page 22
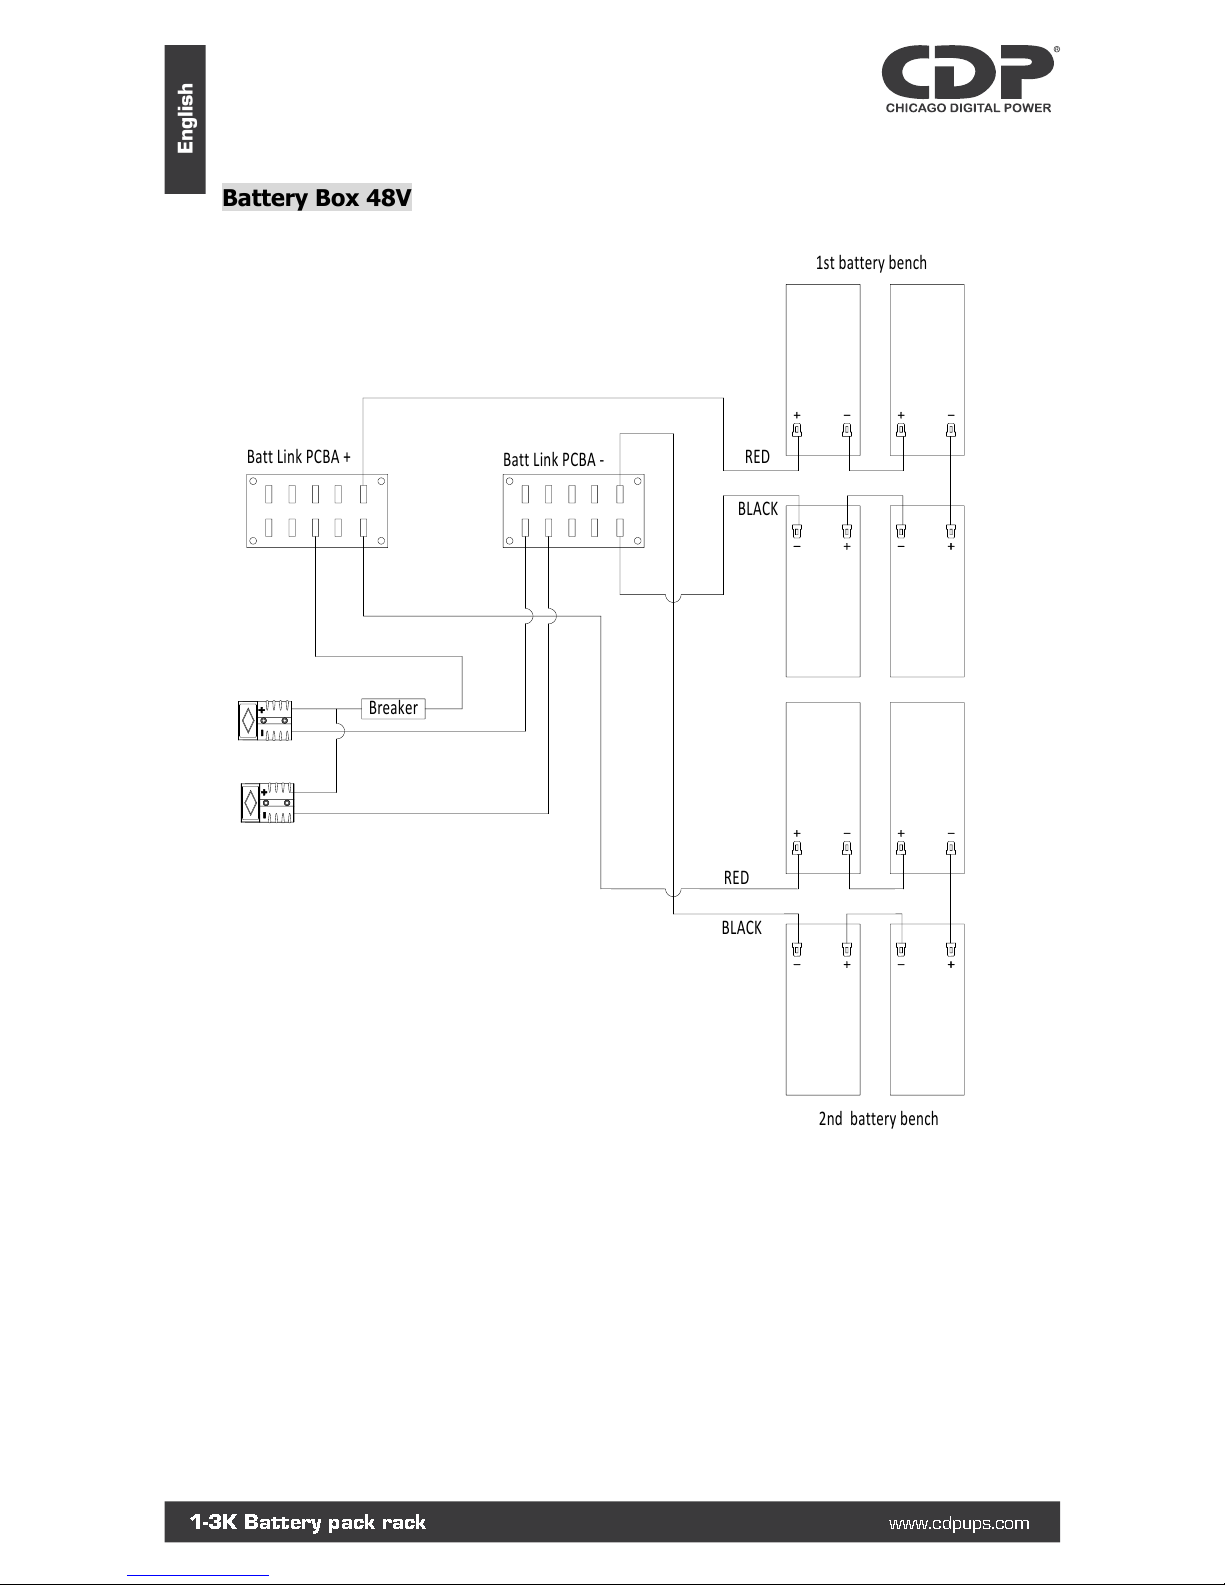
Battery Box 48V
Batt Link PCBA +
Batt Link PCBA -
Breaker
1st battery bench
2nd battery bench
RED
RED
BLACK
BLACK
1-3K Battery pack rack
www.cdpups.com
English
Page 23
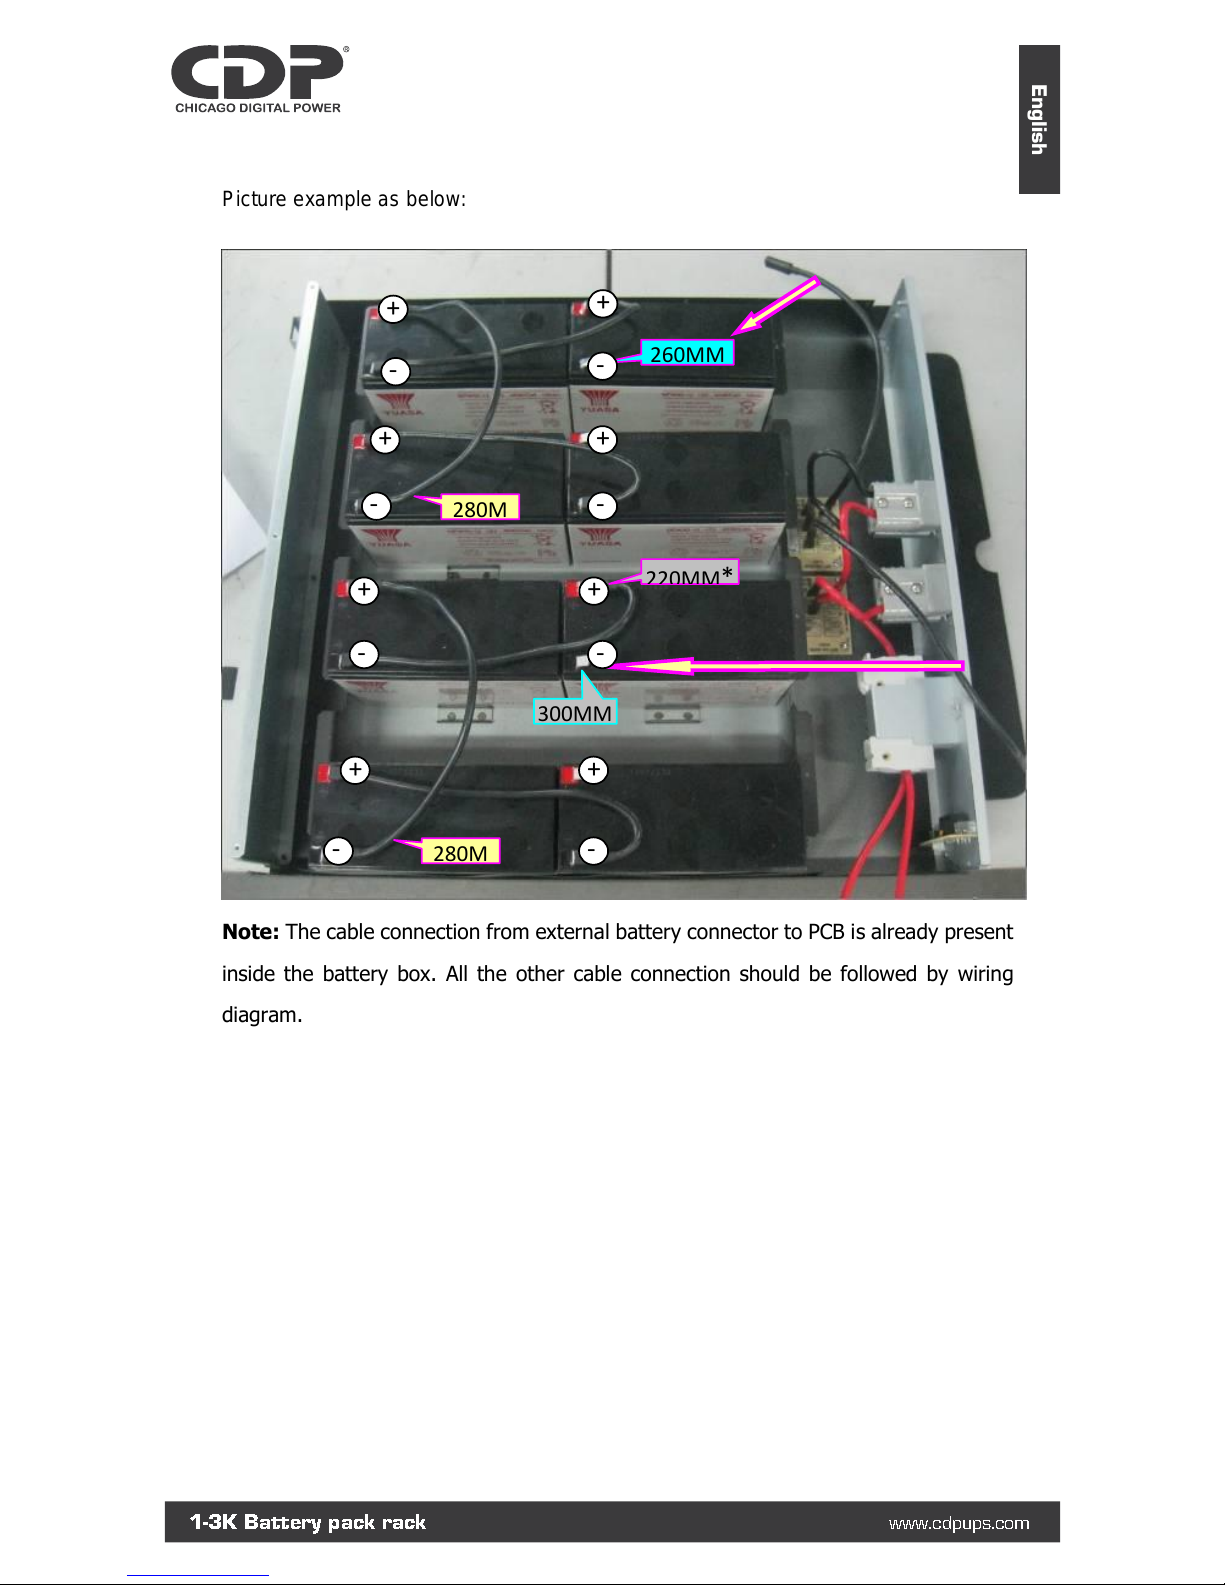
Picture example as below:
Note: The cable connection from external battery connector to PCB is already present
inside the battery box. All the other cable connection should be followed by wiring
diagram.
280M
280M
260MM
300MM
- + + + - - - + + - - + + - -
+
1-3K Battery pack rack
www.cdpups.com
English
Page 24
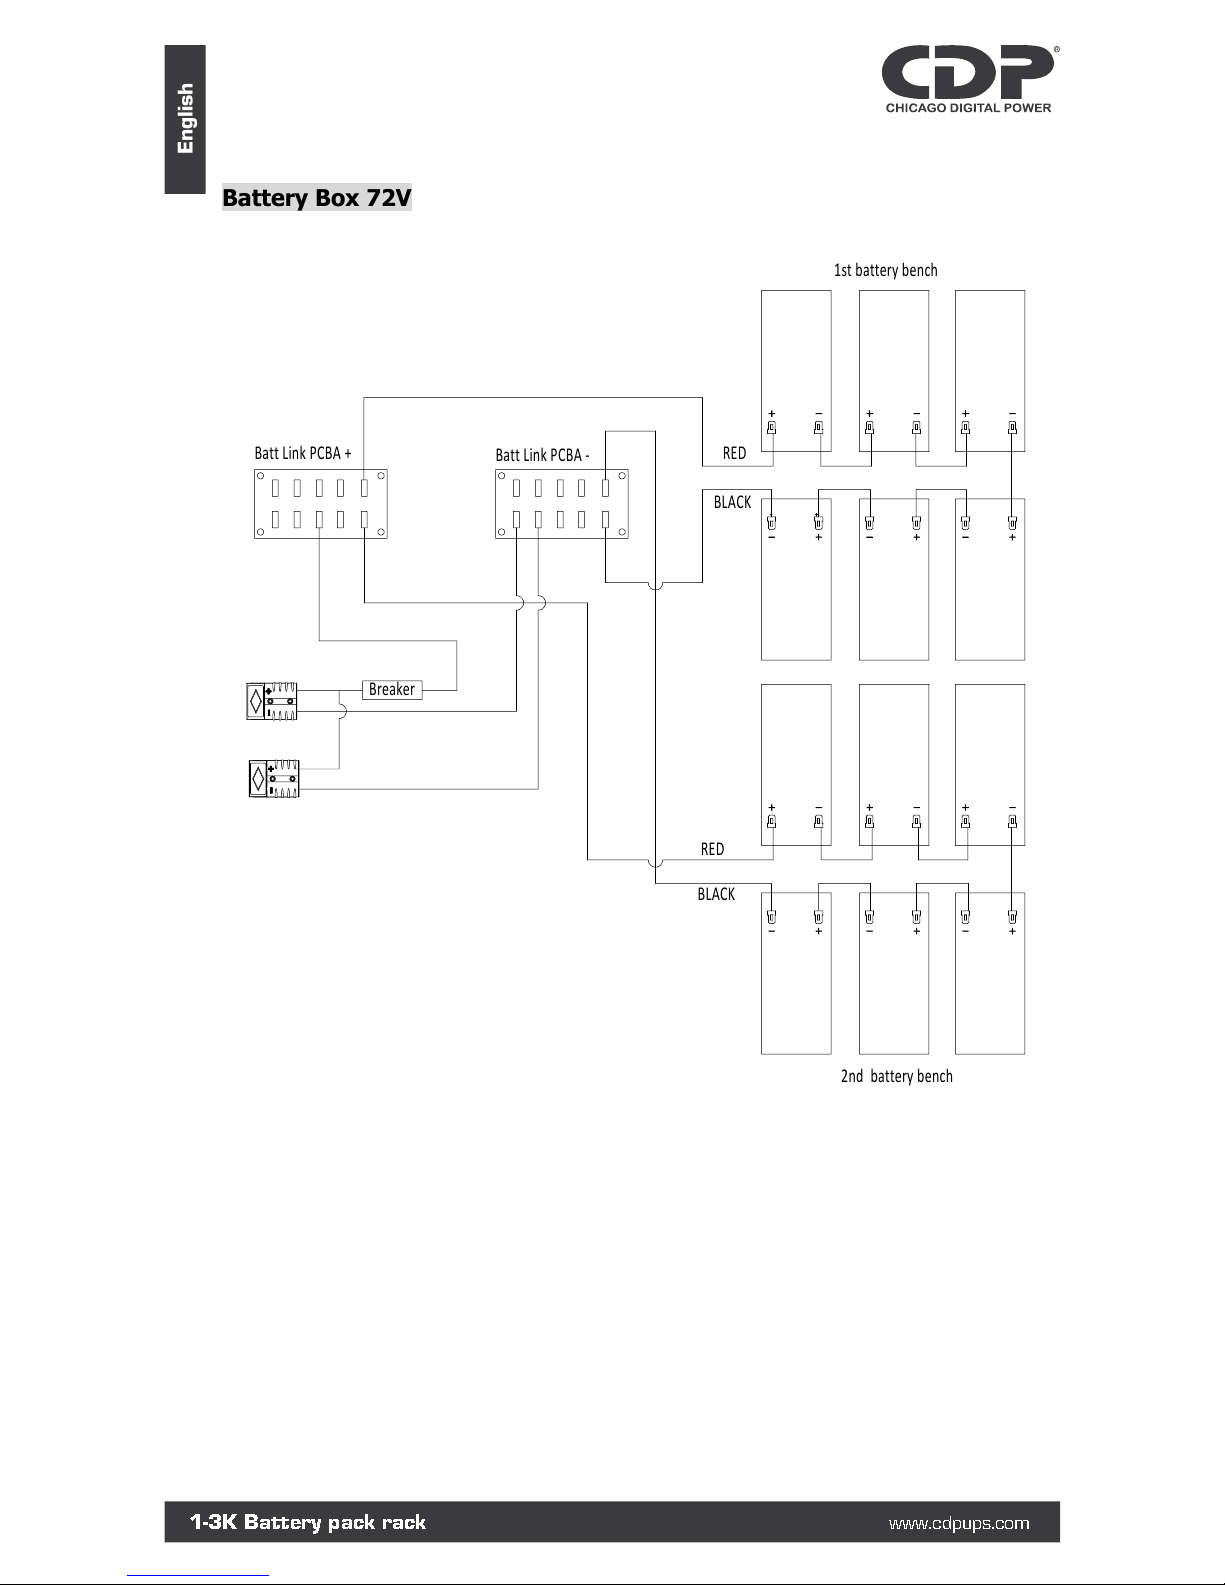
Battery Box 72V
Batt Link PCBA +
Batt Link PCBA -
Breaker
1st battery bench
2nd battery bench
RED
RED
BLACK
BLACK
1-3K Battery pack rack
www.cdpups.com
English
Page 25
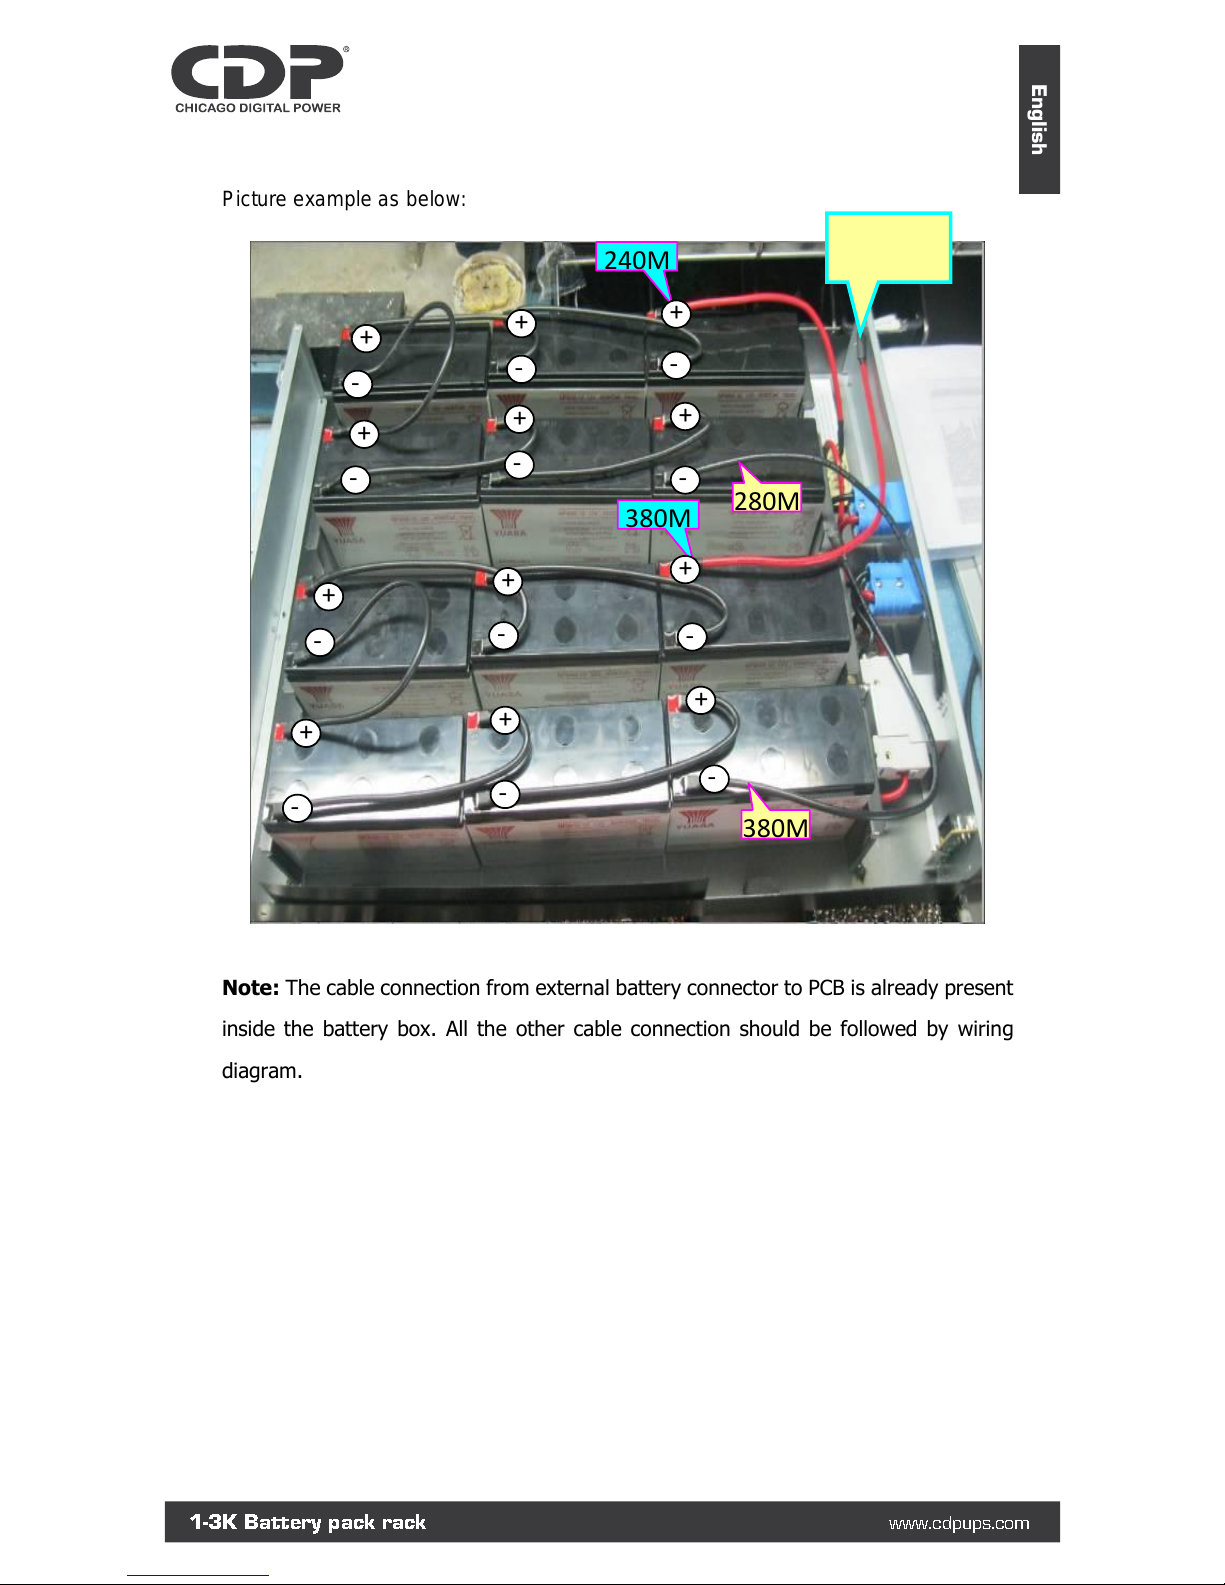
Picture example as below:
Note: The cable connection from external battery connector to PCB is already present
inside the battery box. All the other cable connection should be followed by wiring
diagram.
280M
240M
380M
380M
+
- - + + - - + + - - + + - - + + - - + + - + -
1-3K Battery pack rack
www.cdpups.com
English
Page 26
6. Storage & Maintenance
The unit contains no user-serviceable parts. If the battery service life
(3~5 years at 25°C ambient temperature) has been exceeded, the
batteries must be replaced. In this case, please contact your dealer.
Storage
Before storing, charge the unit 4 hours. Store the unit covered and
upright in a cool, dry location. During storage, recharge the battery in
accordance with the following table:
Storage Temperature
Recharge Frequency
Charging Duration
-25°C - 40°C
Every 3 months
1-2 hours
40°C - 45°C
Every 2 months
1-2 hours
Be sure to deliver the spent battery to a recycling facility or ship
it to your dealer in the replacement battery packing material.
1-3K Battery pack rack
www.cdpups.com
English
Page 27

Page 28

Bolivia: 800-100156
Colombia: 01800-5181617
Costa Rica: 800-435737
El Salvador: 800-6773
Honduras: 800-25616099
México: 001800 514 8611
Panamá: 011-00800-2268611
Perú: 0800-54674
República Dominicana: 1888-7514876
Venezuela: 0800-1627485
 Loading...