

Page 1
DIGITAL TIMER & CLOCK
MODEL PT1A
On reaching zero, the timer will start to count up, adding the time since the alarm first sounded. At the same time, the OT
To enter a new time, press CLEAR to reset the display to zero. The PT1A may be reset to zero anytime during the count
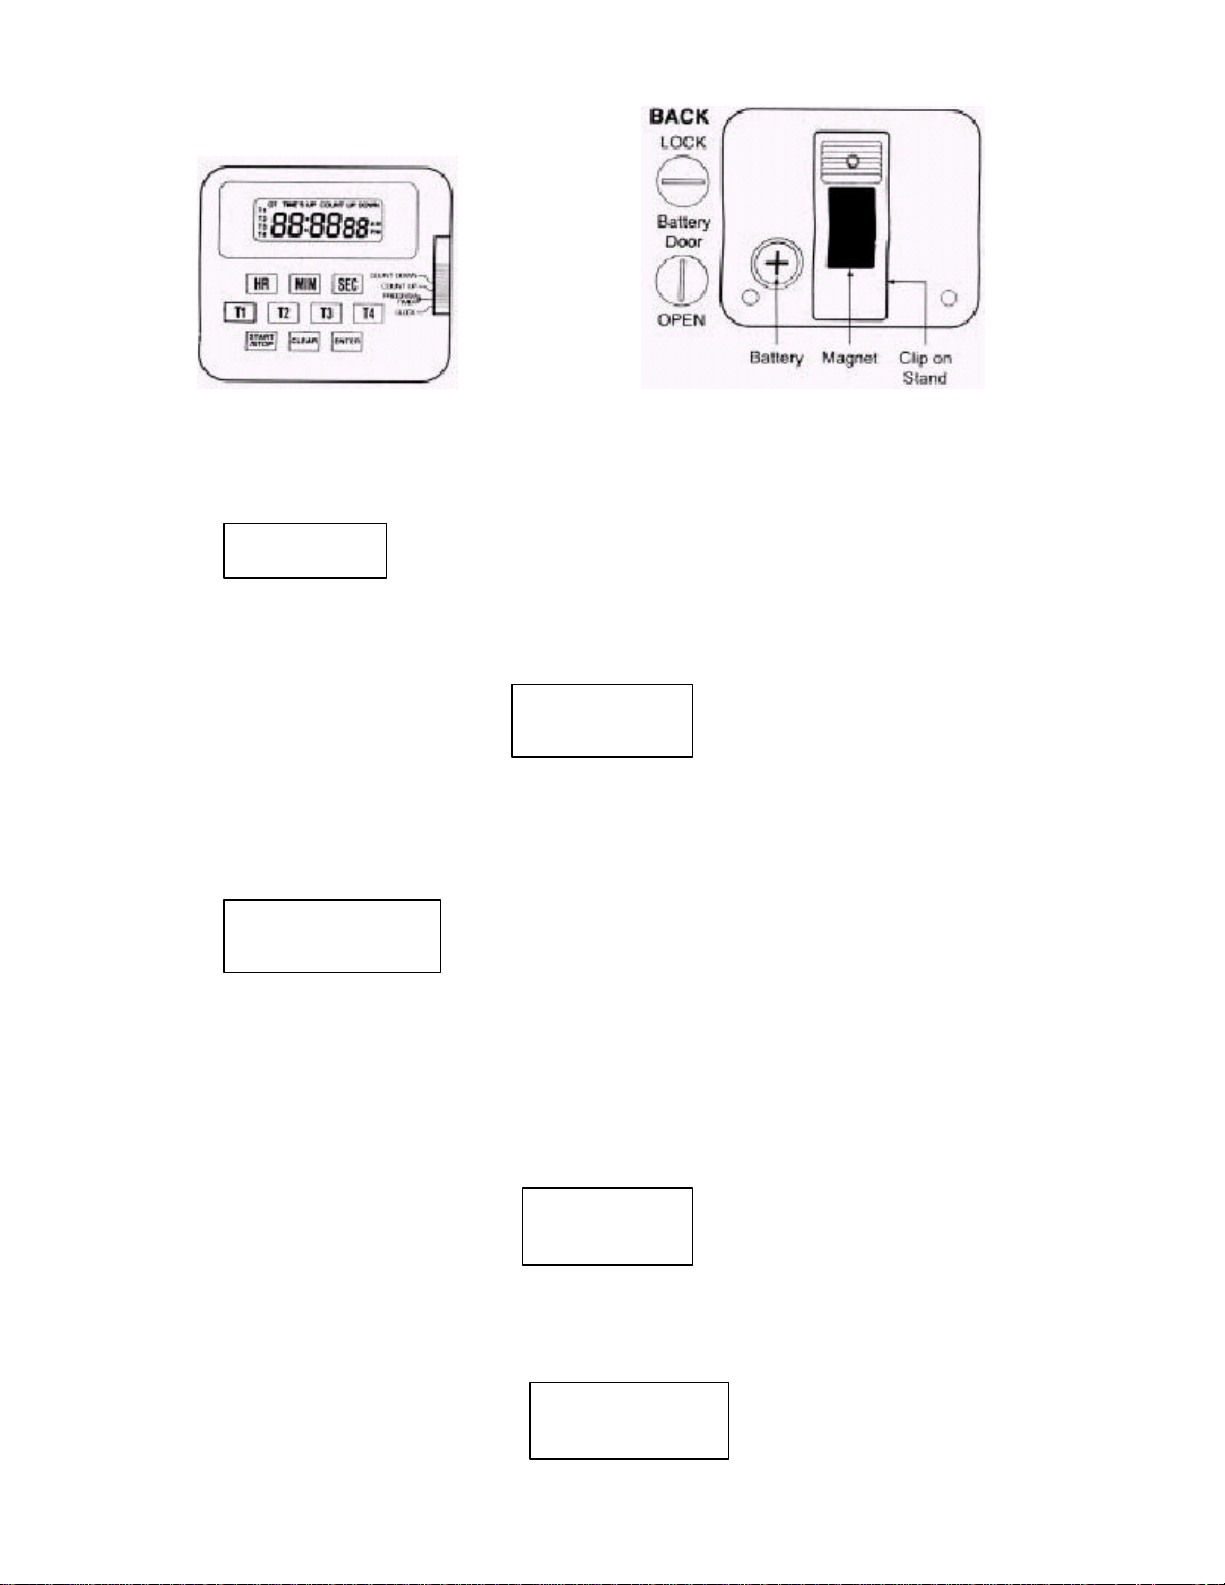
Front
A. BATTERY INSTALLATION
To insert battery (Maxell LR44 or equivalent), remove battery door by turning it to the left with a coin. Insert battery with
positive (+) side out. Replace battery door.
B. TO SET CLOCK
1. Set the slide switch to the “CLOCK” position. 12:00oo will appear after inserting battery.
12:0000AM
2. Press “ENTER” until the display flashes. This will take approximately 2 seconds.
3. Press “HR”, “MIN”, and “SEC” keys to set actual time. For fast advance of numbers, press and hold the key.
4. Press “CLEAR” to select 12 or 24-hour time.
5. Press “ENTER” to exit the time setting. The PT1A will automatically exit the time setting 3 seconds after the last entry.
C. TO START COUNT DOWN
1. Set slide switch to the “COUNT DOWN” position. Enter the desired time by pressing the HR, MIN and SEC key. For
fast advance, press and hold the key.
Count Down
18:3808
eg. Counting down from 18 hr. 38 min 8 sec.
2. Press START/STOP to start count down. The count can be interrupted by pressing the START/STOP key. The count
will resume by pressing START/STOP again.
3. When the count reaches zero the alarm will sound, and the “TIME’S UP” flag will sound.
OT TIMES UPTIMES UP COUNT UP
0:0001
eg. Upon completion of cycle, timer will start counting up.
4.
(Over Time) flag will appear.
5. Press START/STOP to stop the alarm. If the START/STOP key is not pressed the alarm will stop automatically after 60
seconds.
6.
down by first stopping the count and then pressing the CLEAR key.
NOTE: The timer will retain any time showing on the display when the slide switch is moved to another position.
D. TO START COUNT UP
1. Set the slide switch to COUNT UP.
Count Up
0:0000
2. Press the START/STOP key to start the count up. If desired the PT1A can count up from any desired time by entering
that time with the HR, MIN and SEC keys.
3. The timer can be temporarily stopped by pressing START/STOP button and cleared by pressing the CLEAR button.
4. Timer can count up to 99 hr, 59 min, and 59 sec and stop at 0:00oo. A 60-second alarm signal and TIME’S UP flag will
sound and flash simultaneously.
5. Press any button to stop alarm.
Please note the time can hold the latest display time when changing the slide switch position to different mode.
TIMES UPTIMES UP Count Up
0:0000
Page 2

The unit allows 4 different count down timer settings to be stored in memory (T1, T2, T3 and T4) with respective alarm
beeping sequence as below:
e steady. If a time had previously been entered
second alarm signal and TIME”S UP flag will sound
program timers can be started one at a time of simultaneously. The “T” number for the channels selected will be
ill sound first and the other channels will sound in order:
T4
0:20
“T1” alarm sound: BEEP in 1 second
“T2” alarm sound: BEEP BEEP in 1 second
“T3” alarm sound: BEEP BEEP BEEP in 1 second
“T4” alarm sound: BEEP BEEP BEEP BEEP in 1 second.
The 4 timers can be set TEMPORARILY or programmed into MEMORY.
T1, T2, T3 & T4 Count Down Setting
1. Set the slide switch to the “PROGRAM TIMER” position.
a.
T1 Count Down
2. Press “T1” to enter timer 1 setting. The “T1” symbol on the display will b
in “T1”, it will appear on the display. To enter a new time press CLEAR. If a preset time had been entered into “T1”
memory, press CLEAR then press ENTER to clear memory.
3. Press HR, MIN and SEC keys to set desired time. The edited time setting will remain there as long as the counting cycle
is not started/completed and user may switch to other operations.
4. To store time in memory press ENTER after setting the time. NOTE: any time already in memory will be deleted when
the new time is entered into memory.
5. Press START/STOP to start counting down. To interrupt the count press START/STOP. To resume the count press
START/STOP.
6. The TIME’S UP flag will show and a 60-second alarm will sound when the count down reaches zero. 0:00oo. Press any
key to stop the alarm.
7. Repeat above for operations of T2, T3 and T4.
COUNT UP FUNCTION
All timers (T1, T2, T3 & T4) can be used as count up timers starting from 0:0000.
1. Simply press START/STOP to start count up or to pause and restart.
T1 Count Up
eg. Display showing T1 in counting up mode.
2. Timer can count up to 99 hr 59 min 59 sec and stop at 0:00oo. A 60and flash simultaneously.
3. Press START/STOP to stop alarm
SIMULTANEOUS OPERATION
1. All 4steady. Other channels, which are counting, will have their “T” numbers flashing
T1 Count Down
T2
T3
30
eg. Display showing T1 in counting down mode, with T2, T3, & T4 activated in the background.
2. To activate 4-program timers simultaneously, hold ENTER and press START/STOP. Timers will start counting down
from the pre-set times stored in their respective memory. In case where there is no stored setting(s), timer (s) will count
up instead.
3. To stop activated program timer (s) simultaneously, hold ENTER and press START/STOP (even though they are
activated individually).
4. If 2 or more channels count to zero at the same time, channel 1 w
T2, T3, T4.
5. Press any key to stop alarm.
5 Year Limited Warranty: Any instrument that proves to be defective in material or workmanship within five years of original
purchase will be repaired or replaced without charge upon receipt of the unit prepaid at the address listed below. This warranty
does not cover damage in shipment or failure caused by tampering, obvious carelessness or abuse.
Component Design
Northwest, Inc.
P.O. BOX 10947
Portland, OR 97296
Info@cdnw.com, www.cdnw.com
 Loading...