

Page 1
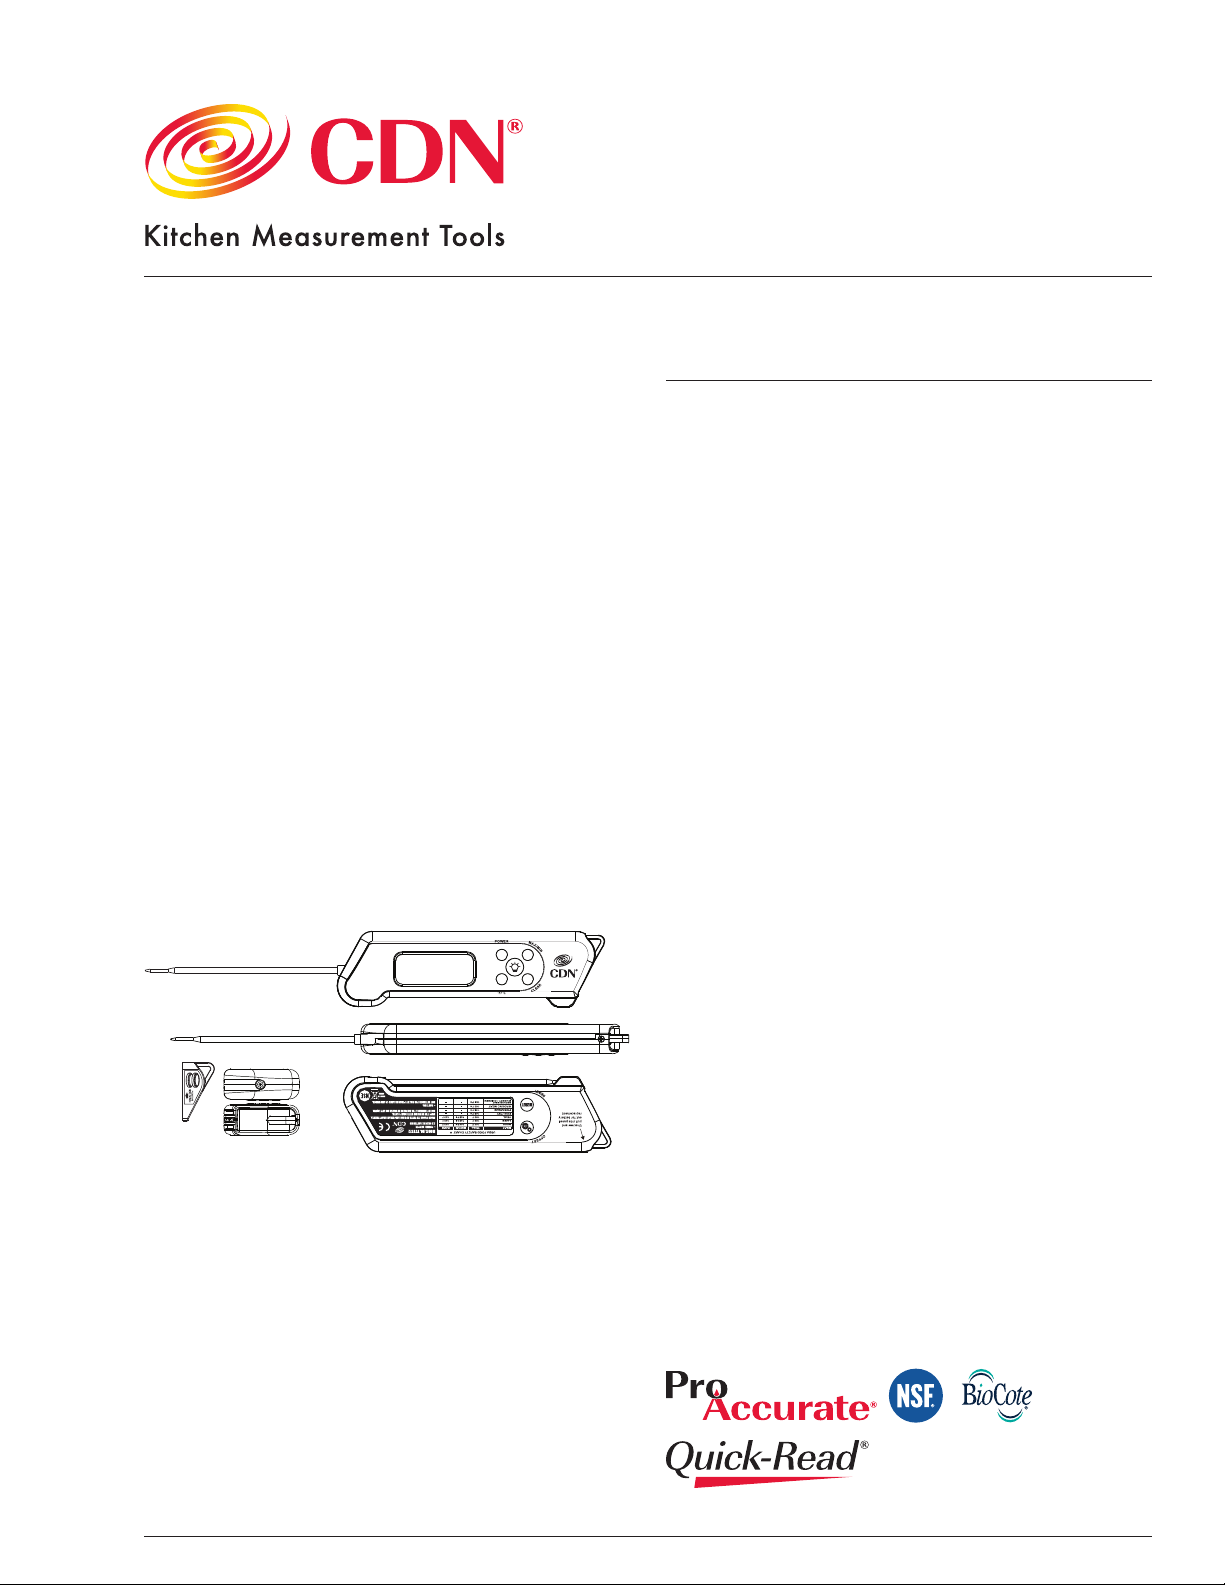
Model: TCT572
ProAccurate® Folding
Thermocouple Thermometer
-58 to +572°F/-50 to +300°C
for thin cuts of meat, sh or poultry
• NSF®Certied
• 3-6 second response
• 1.5 mm thin tip
• Backlit in blue
• 4.25”/10.8 cm probe
• Field calibration
• Water resistant
• Shatterproof
• Maximum & minimum
• Extra big digit
• Food-safe ABS plastic with BioCote® antimicrobial
technology
• 304 stainless steel probe
• On/off button
• Auto-off after 10 minutes
• Temperature guide on thermometer
• Mounting: loop
• Two 3V IEC CR2032 lithium button batteries
(included)
Get Professional Results
Every Time!
Perfect for thin cuts of meat, sh or poultry. Simply
ip down the rapid-response thermocouple probe
and insert it into food as thin as 1/8-inch. BioCote®
technology gives the water resistant housing constant,
built-in antimicrobial protection, providing a nish that
helps prevent microbes from growing on the surface.
The display features extra big digits and can be backlit
for low light conditions.
The TCT572 offers Minimum and Maximum modes.
Minimum mode displays the lowest temperature
among multiple readings. Maximum mode displays
the highest temperature among multiple readings.
Note: Remove sticker from display before use.
Page 2

Note: In the following instructions, names of the
control buttons are shown in CAPS. Function
information that appears on the display is shown
in BOLD CAPS.
Battery Installation
The thermometer beeps when the battery needs to be
replaced.
1. Power off the unit before installing the batter y.
A malfunction may occur if the power is on when
the battery is being installed. If a malfunction
occurs, press the RESET button on the back
or restart the device.
2. Using a small Phillips screwdriver, remove the screw
on the top by turning it counter clockwise.
3. Pull side panel completely out.
4. Install two CR2032 batteries observing polarity
shown in compartment.
5. Replace the battery cover.
Important: THE WATER RESISTANT FEATURE REQUIRES
MAINTAINING THE RUBBER GASKET EVENLY WITHIN
THE GROOVE.
6. Fasten the screw on the top by turning it clockwise,
being careful not to over-turn.
Operating Instructions
A. On/Off
1. Press the POWER button to turn
the thermometer on.
2. The TCT572 will automatically turn off after
10 minutes of inactivity.
3. Press the POWER button again to turn the
thermometer off and conserve battery life.
B. Temperature Scale
To select temperature reading in Fahrenheit or
Celsius:
1. Press the °F/°C button to change the scale.
The °F or °C symbol changes on the display
and a beep sounds.
C. LCD Backlight Thermometer
1. Press the LIGHT button to turn the backlight on
2. The backlight will stay on for 5 seconds.
D. Temperature Measurement
Important: THE PROBE MAY BE DAMAGED IF MEASUREMENT
TEMPERATURE IS LOWER THAN -58°F/-50°C OR HIGHER
THAN +572°F/+300°C.
Note: The TCT572 is intended for food service use — do not use
for safety related applications.
1. Flip down the probe until fully extended.
2. Insert the probe at least 0.25”/6.3 mm into
the food.
3. The current cooking temperature appears on the
display.
4. Wearing a heat resistant glove, ip the probe
back into the case when nished.
Important: DO NOT TWIST THE PROBE OR ROTATE IT IN
WRONG DIRECTION. EXCEPTIONAL STRESS ON PROBE
MAY CAUSE IT TO BREAK.
CAUTION: Probe may be HOT af ter use. Always wear a heat
resistant glove to touch the stainless steel probe during or
just after cooking. Do not touch with bare hands.
E. Maximum Mode
1. Press the MAX/MIN button once. MAX appears
on the display along with the last highest/
maximum temperature.
2. To clear the MAX/MIN reading, Press the MAX/
MIN button once, then press the CLEAR button.
“–––” appears on the display.
F. Minimum Mode
1. Press the MAX/MIN button twice. MIN appears
on the display along with the last lowest/
minimum temperature.
2. To clear the MAX/MIN reading, Press the MAX/
MIN button twice, then press the CLEAR button.
“–––” appears on the display.
G. Recalibration
1. Place the stem into a mixture of 3 parts ice and
1 part water.
2. Press the OFFSET button for 2 seconds and until
the beep sounds. The display will animate and
display 0.0 ° F/ ° C .
3. Press the OFFSET button repeatedly as needed
to offset the factory calibration from -3.2 °F/
-2.0 °C to +3.2 °F/+2.0 °C.
H. Battery Status
1. When the voltage on the battery is low,
LO ashes on the display along with the battery
status icon and numbers may blink.
2. The thermometer beeps when the battery needs
to be replaced. If batteries are not replaced,
and the battery level is critical, the unit will
continuously beep. Some users think that both
of the above indicate a defective unit, which is
not the case.
I. Reset
1. Press the RESET button to reset the thermometer
to factory defaults.
Note: Clean the thermometer probe before each use.
Important: DO NOT LE AVE THERMOMETER CASE IN HOT OVEN.
CASE IS NOT HEAT RESISTANT. HAND WASH AND DRY. DO NOT
IMMERSE HOUSING IN LIQUID.
Note for Induction Cooktops: Sometimes, the induction cooktop
magnetic eld may inter fere with digital thermometers. If there is
interference, briey turn off the induction cook top to get a digital
thermometer reading or use a dial thermometer.
Tip: Meat should be allowed to “rest” for 10 to 15 minutes after
it is removed from oven. This allows time for the meat’s internal
temperature to stabilize and the juices to redistribute. This will
result in a roast that is both juicier and easier to carve.
Page 3

Care of Your Product
• Do not submerge any par t of the thermometer in
wa ter.
• Wipe clean with a damp cloth.
• Store the thermometer at room temperature
between -4 to +149°F/–20 to +65°C.
Precautions
• Do not touch with bare hands — always wear heat
resistant gloves to touch the probe during or after
cooking.
• Dispose of used battery promptlyand keep the
batteries and thermometer away from children.
• Always read the user manual thoroughly before
operating.
• Avoid subjecting the probe or thermometer to an
open ame on the BBQ.
• Avoid submerging the probe past the junction (where
the probe meets the case) or the case itself. The
junction and/or case are not waterproof.
• Avoid subjecting the probe and/or thermometer to
temperatures over 572°F/300°C.
• Clean the probe and thermometer with warm soapy
water and dry thoroughly after use.
• Avoid cleaning the unit with an abrasive or corrosive
compound, which may scratch the plastic par ts and
corrode the electronic circuits.
• Avoid subjecting the thermometer to excessive force,
shock, dust, temperature, direct sunlight or humidity.
This may result in thermometer malfunction, shorter
electronic life span, battery damage and/or distort
parts.
• Avoid tampering with the thermometer’s internal
components, which may cause battery damage and
distort parts.
• Avoid immersing case into water or exposure to
heavy rain. The case is not waterproof.
• Do not use the thermometer in microwave oven.
Specications
Operating Range: -58 to +572°F/-50 to +300°C
Display Range: -58 to +572°F/-50 to +300°C
Power: Two 3V IEC CR2032 lithium
Page 4
USDA SAFE FOOD TEMPERATURES
* Beef, Veal, Lamb – well ...160°F ..71° C
* Beef, Veal, Lamb – medium 145°F ..63°C
* Beef, Veal, Lamb – rare ...140°F ..60°C
Poultry . . . . . . . . . . . . . . . 165°F ..74 ° C
* Pork/Ham – pre-cooked...145°F ..63°C
Ground Meat...........160°F ..71°C
* 3 minutes rest time
Antimicrobial properties are builtin to inhibit the growth of bacteria
that may affect this product.
According to EPA guidelines
we cannot claim that the
antimicrobial properties in this
product protect users or others
against bacteria, viruses, germs,
or other disease organisms. This
product does not protect users or others against food-borne
bacteria. Always clean and wash this product thoroughly
before and af ter each use.
CANDY TEMPERATURE GUIDE
Jelly .............220°F . . . . . . 104°C
Thread .......230–234°F . . 110–112°C
Soft Ball ...... 234–240°F . . .112–115°C
Firm Ball ......244 –248°F . . 118–120°C
Hard Ball .....250 –266°F . . .121–130°C
Soft Crack ....270–290°F . . .132–143°C
Hard Crack ....300–310°F . . 149 –154°C
Caramelize ....316–338°F . . .158–170° C
HIGH ALTITUDE ADJUSTMENT
FOR CANDY-MAKING
STAGE 2,000 feet 5,000 feet 7,500 feet
Soft Ball 230–236°F 224–230°F 219–225°F
Firm Ball 238 –244°F 232–238°F 227–233°F
Hard Ball 246–264°F 240 –258°F 235 –253°F
Soft Crack 266–286°F 260–286°F 255 –275°F
Hard Crack
296–306°F 290–300°F 285–295°F
The information in this document has been reviewed and is
believed to be accurate. However, neither the manufacturer
nor its afliates assume any responsibility for inaccuracies,
errors or omissions that may be contained herein. In no event
will the manuf acturer or its af liates be liable for d irect, indirect,
special, incidental or consequential damages arisen by using
this product or resulting from any defect/omission in this
document, even if advised of the possibility of such damages.
The manufacturer and its afliates reserve the right to
make improvements or changes to this document and the
products and services described at any time, without notice
or obligation.
5-Year Limited Warranty: Any instrument that proves
to be defective in material or workmanship (excluding
batteries) within ve years of original purchase will be
repaired or replaced without charge upon receipt of
the unit prepaid at: CDN, PO Box 10947, Portland, OR
97296- 0947 USA. This warranty does not cover damage
in shipment or failure caused by failure to adhere to the
accompanying instructions, inadequate maintenance,
normal wear and tear, tampering, accident, misuse,
unauthorized modication, obvious carelessness or
abuse. CDN shall not be liable for any consequential or
incidental damages whatsoever.
For mor e detailed
information on ou r
produ cts, plea se visit
www.CDNkitchen.com.
CAUTION: Avoid keeping the thermometer too close to
objects that continuously generate high heat for long
periods (i.e., hot plate). This can cause the thermometer to
overheat.
CE Note: This device could be sensitive to electrostatic
discharge. If electrostatic discharge or malfunctioning
occurs, please re-install the battery to reset this unit.
*USDA does not endorse any product, service or organization.
© 05-2017 Co mponent Design N orthwest , Inc. Made in Chi na CD9999250en - 5/17 L-DESIGN 614. 525.1472
 Loading...