

Page 1

DUPLIKEY 7 to 60
USB Keys Duplicator from 7 to 60 ports
User’s Guide
KeyDuplicator II version 2.5.0 Software
February, 2019
Centre Direct du Multimédia
BP80032, 5 rue du 8 mai 1945
91470 LIMOURS - France
Tél : (33) (0)1 64 91 46 24
Fax : (33) (0)1 64 91 46 87
Internet : http://www.cdmultimedia.fr
email : [email protected]
Page 2
I. Introduction
DupliKey systems (7 to 60 ports) are intended to simplify duplicating a large amount of USB
keys. Copies of files (located on your hard drive) run simultaneously, that is in the same time,
on all plugged keys. This results in a huge time-saver compared to the tiresome key by key
copy. In addition, our software manages copy errors, keys breakdowns, and provides a counter
for successfully duplicated keys. Different versions of this set manage other USB devices like
floppy disk drives and FlashRAM card readers. User friendly and very easy to operate,
DupliKey works with USB 3.0 as well as with USB 2.0 (it’s also compatible with USB 1.1, but
please, take care of copy time, 40 times slower than USB 2!!) Furthermore, hardware and
software as well run on PC under Windows 7, 8 and 10, 32 or 64bit version.
DupliKey is composed of a hardware part and a software part.
1) DupliKey hardware
DupliKey hardware is composed of, depending on the version:
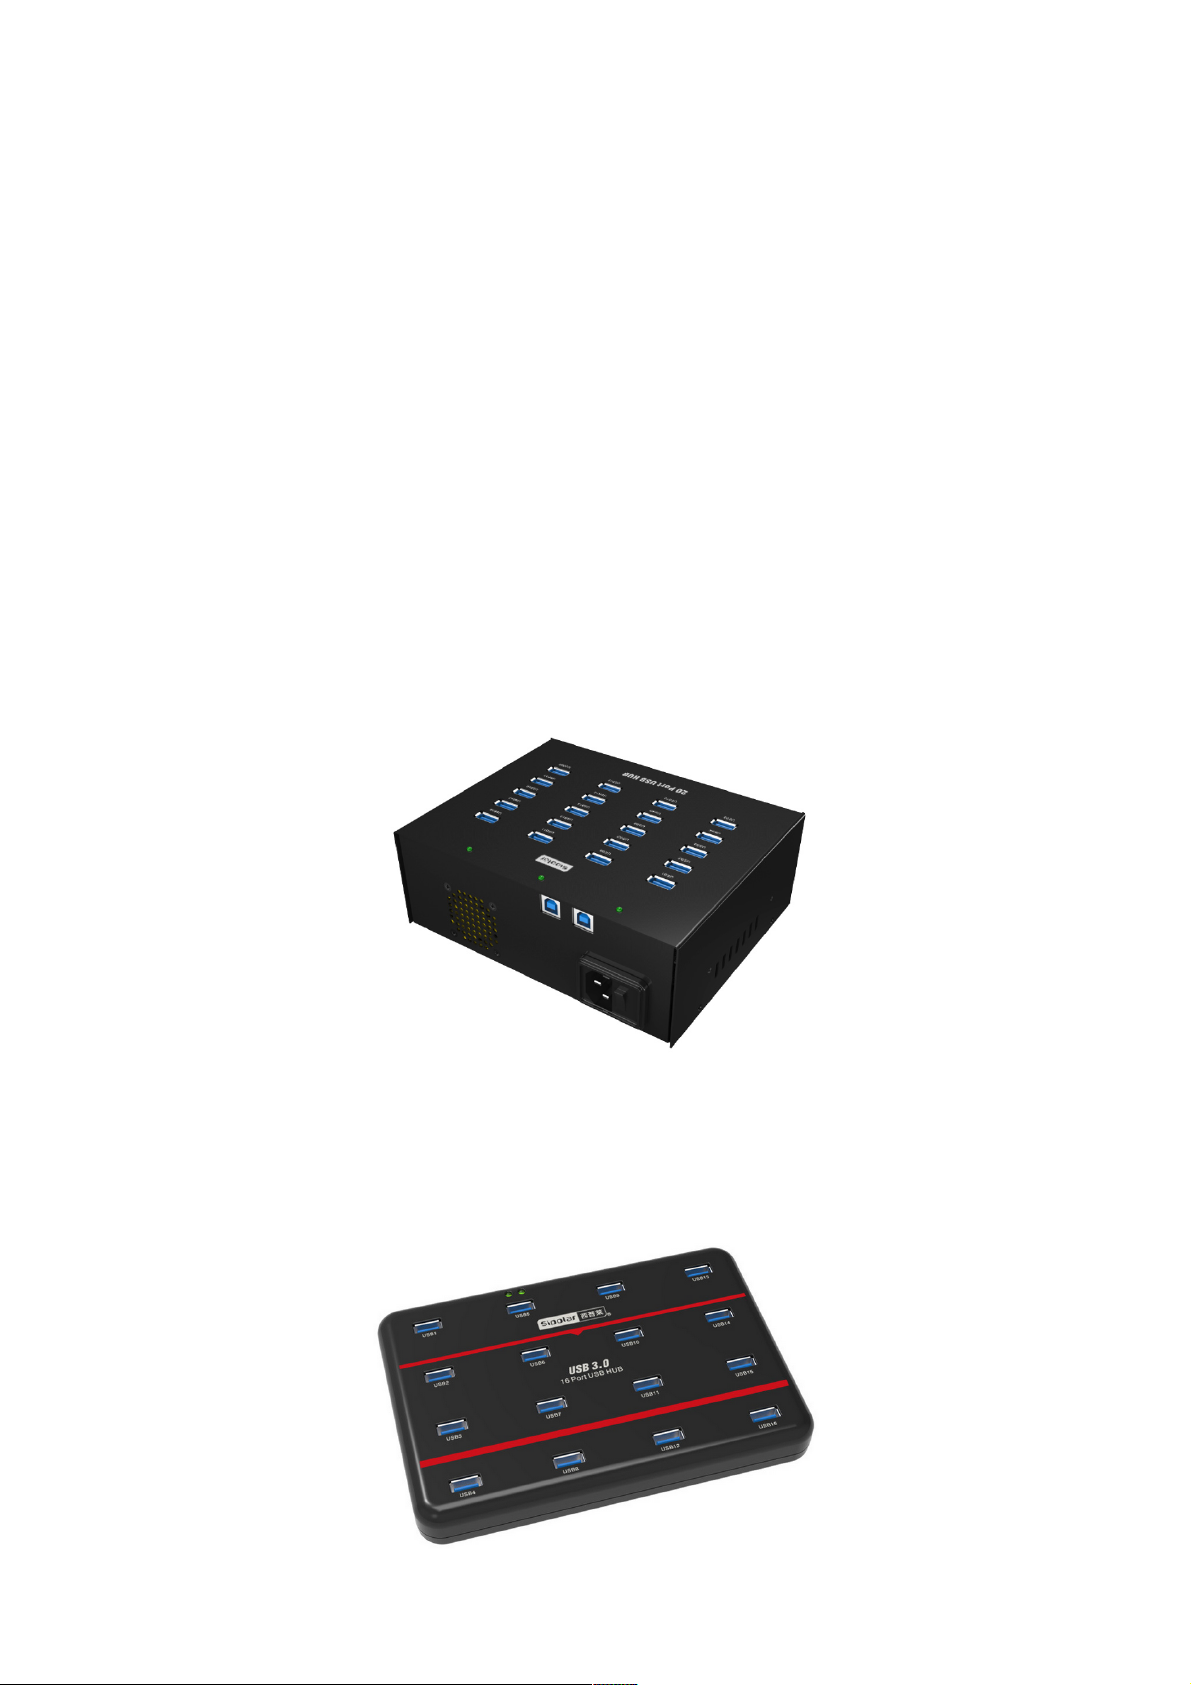
- From one to three USB3.0 hub(s) offering 20 ports each (DupliKey20, 40 or 60) with
a!built-in power supply providing 1A (A-213) or 2,1A (A-223) per port, depending on hub
model.
- One or two A-163 USB 3.0 hub(s) offering 16 ports each (DupliKey16 or 32), providing
500 mA per port,
1
Page 3
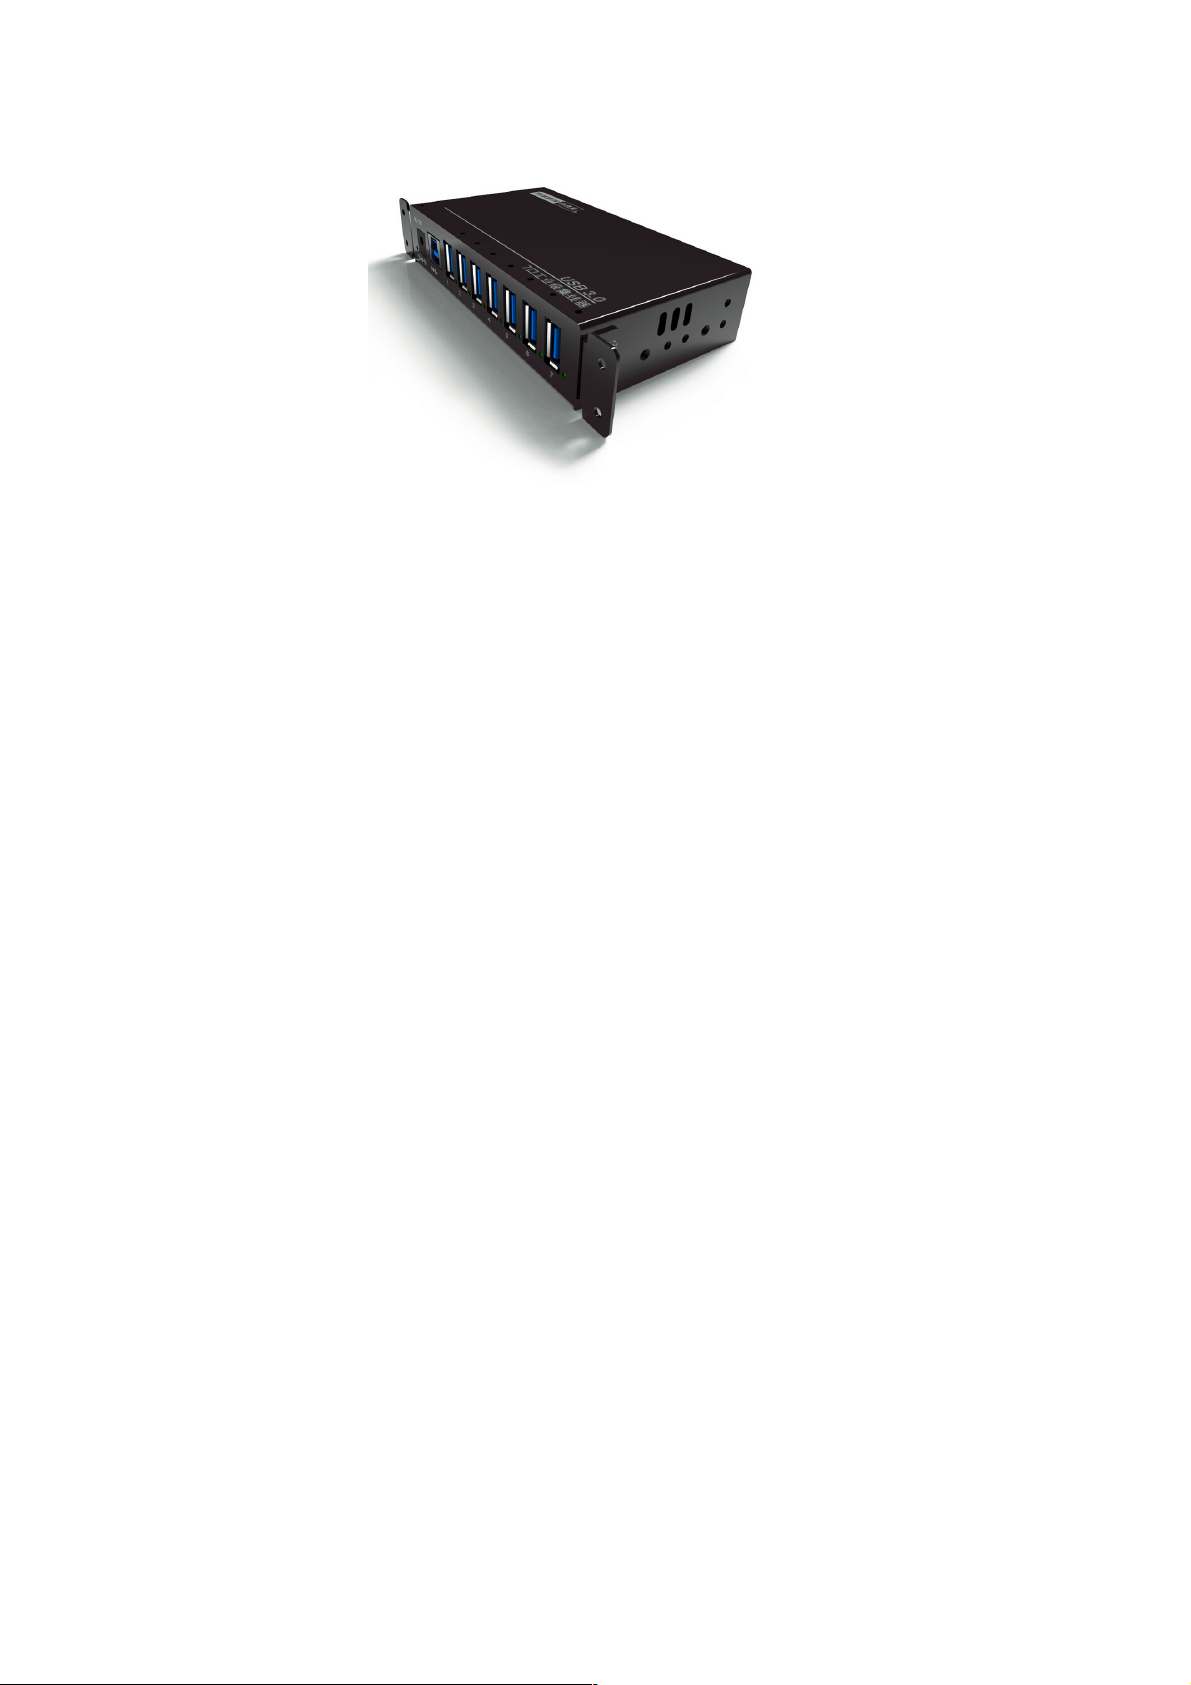
- One or two A-173 USB 3.0 hub(s) offering 7 ports each (DupliKey7 or 14), rackable,
providing 1A per port,
- One 20 ports hub plus one 16 ports hub, that is 36 ports (DupliKey36).
Each hub is auto-powered (built-in or external power supply) and provides a power-on
LED, a link LED and a LED per port (device connection and detection).
7 ports (A-173) and 16 ports (A-163) hubs are powered via an external 110-220V adaptor,
while 20 ports (A-213 and A-223) hubs have a built-in power supply.
Each hub gets its own USB 3.0 cable (7 and 16 ports), two USB3.0 cables for 20 ports
model, one meter long (≈3.28 feet). DupliKey can be connected close to your PC and
allows you to manipulate it comfortably, without moving from your chair. (Could you
imagine to plug in and unplug thousands of keys in a system placed under your desk or
somewhere else?).
Connectors are spaced enough to accept 12 mm (about 0.47”), 17 mm (0.67”) and up to
30 mm (1.18”) max thickness (respectively for 7, 20 and 16 ports versions). The width is up
to 22 mm (0.87”), 38 mm (about 1.50”) and 45 mm (1.77”) respectively for 7, 20 and 16
ports versions. «!Credit card!» keys are also easily usable.
All the independent hubs are connected to the USB 3.0 PCIe controller board. This card is
(or these cards are, depending on configurations) delivered with DupliKey and offers 2
USB3.0 ports per card.
Using integrated USB 3.0 ports of a PC tower or desktop is possible, but CDM does not
recommend nor guaranty this configuration due to potential insufficient power supply
issues on these ports.
2) KeyDuplicator II software
The hardware part would be under-used without the specific KeyDuplicator II software.
This USB devices management software is compatible with Windows 7 to 10 operating
systems, managing all files and/or folders copy process to the selected USB devices.
It!automatically recognises all USB devices plugged in DupliKey, keys, hard disk drive and
other USB mass storage devices. This specific software allows you to select the data source.
This may be a simple file, a folder or only the content of this folder. The data source can be
located anywhere on your system (internal or external hard drive, removable SCSI, USB or
FireWire device, CD, DVD, …).
You can duplicate simultaneously all target keys. In the meantime, USB keys could be
manually or automatically formatted (low level format or quick format). KeyDuplicator II
2
Page 4

provides FAT, FAT32, ExFAT, NTFS and UDF formats, as well as Mac HFS/HFS+ or Unix Ext1
to 4 (provided specific drivers or utilities are installed).
ATTENTION: For market purposes, Macintosh version of KeyDuplicator is
no longer released nor sold.
NEW IN VERSION 2.5.0: This version introduces a new duplication method
using a sector-by-sector copy. This leads to making a real clone of your
original device.
The Disk Image Copy method works with an image of your original device (Pen-drive,
HDD, SSD, …). KeyDuplicatorII 2.5.0 helps you realise this image, simply selecting the
source device. This device may be Windows, Linux or Mac formatted, simple or multiple
volumes partitioned, even with mixed partition types (i.e. FAT32+NTFS). No needs to install
specific drivers or utilities for managing non Windows devices, as Image Copy method is
able to deal with unmounted devices. At Image restoration time, a real clone of the original
device is created, so that it’s impossible to mount together the original device and one of its
clone, or two clones of the same device. In such a case, Windows OS displays an error
message saying there is a Signature conflict problem! This is a normal and expected
behaviour. We will provide, as a setup in the next release, a way to copy devices with a
signature change, in order to obtain real clones but the signature and to be able to mount
two (or more) of them without conflict.
At launch time, the whole USB tree is scanned looking for DupliKey hubs and their
configuration. The Graphic User Interface displays found DupliKey hub(s), as well as
the!number of ports.
Then, each device plug in or unplug fires an event the software analyses and displays
graphically on screen, adding or removing a pen-drive on the matching hub and port. "
In the!meantime, the line matching the number of the corresponding device is filled with
Volume name, total space, free space, used space, message (device serial number,
unformatted volume, unknown volume, progress bars for duplication and low-level format
tasks,…).
During the format/copy process, KeyDuplicator II detects all various failures like locked
keys, electrical or electronical problems, write protection status, inopportune unplug, full
volumes, … Key by key status is represented by a message. Due to the fact that each line is
linked to the device with the same number (i.e. line #10 = device #10), a simple click on
the!failed device(s) allows you to make its LED (if any) and its graphic representation
blinking and lets you see which one is (are) not correctly formatted or duplicated on
the!DupliKey system.
The copy counter adds and displays the amount of successfully copied keys. With
the!number of keys to be copied, it becomes easy to run batches of duplication and to see
the process execution. A jingle indicates the end of each duplication process. Of course this
jingle is different depending on whether the process is passed or failed.
A configuration file saves current job parameters: location of source data, number of
duplicated and to be copied pen-drives, name of duplicated volume, … This makes it very
simple to stop a duplication process and restart it later.
3
Page 5
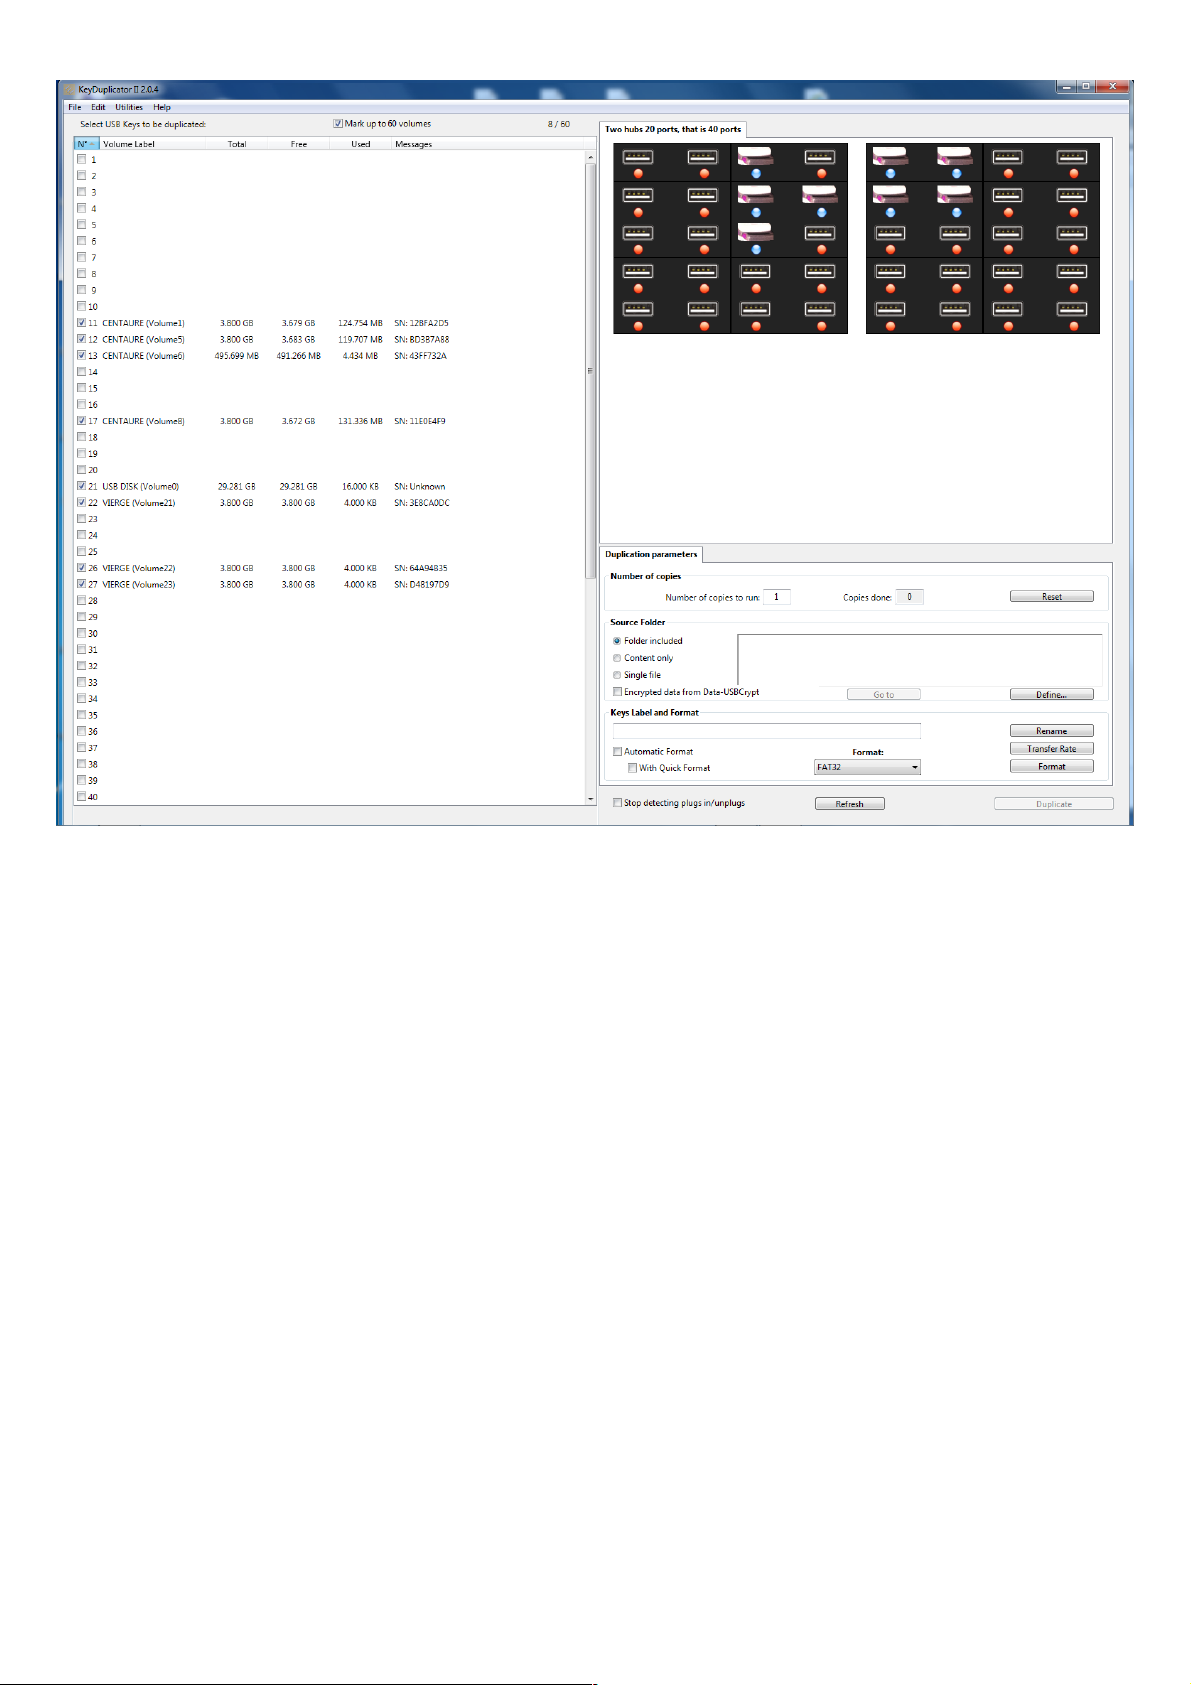
Main window of a DupliKey40, devices list and Graphic User interface
II. Installation
1) Required Configuration
• Minimum: Any Intel PC under Windows 7, 8 or 10, 2!GB!RAM minimum, one or two
free PCIe slot(s) (for USB 3.0 card(s)), screen resolution 1650 x 1080.
• Recommended: PC Intel Quad-core or more,4!GB RAM or more, one to three free
PCIe slot(s) (for USB 3.0 card(s)), screen resolution 1650 x 1080.
• Special 60 ports: PC Intel i5 ou i7, 6 GB RAM or more, three free PCIe slots (three
USB3 cards), screen height 1500 pixels or more.
2) Hardware
Install USB 3.0 PCI controller board(s) into your system (please, refer to the installation
guide of the controller board). If necessary, also install specific drivers for Windows
operating systems. When the PCI controller board is correctly detected by your system,
plug the DupliKey hardware into the installed USB 3.0 controller board. To do so, simply
connect USB 3.0 cable (or cables, according to your version) of the DupliKey hardware into
one or both external USB ports of the controller board. Power on DupliKey and reboot
your system. Now, your DupliKey system is ready to use. The last thing to do is installing
KeyDuplicator II software.
4
Page 6

3) Software
Installing KeyDuplicator II software is very easy. Insert in any USB port (including built-in
ones) the USB pen-drive included with your DupliKey system. This pen-drive contains your
KeyDuplicator II software and is also used as a Dongle. (Protection device). Please, copy
the!whole content of KeyDuplicator II folder on your system (wherever you want). Don’t
modify any content of the Dongle, nor the folder you just copied on your hard drive.
ATTENTION: Executable file KeyDuplicator II 2.x.x.exe and its Resources
and Libs folders, the KeyCopy folder (containing executable file
KeyCopy.exe and its Resources and Libs folders) must be placed together
at the same level. If you loose or accidentally delete one or several of
these!files, you can restore them from the!original pen-drive.
ATTENTION: Do not format the Dongle device, do not delete its content,
do not rename it. Modifying or deleting this device will lead to the Dongle
no longer be detected, the protection feature will be lost and
KeyDuplicator II will no longer launch.
Note : For your convenience, you may create a shortcut on your desktop, or you may place
it in the Tasks bar.
III. Activation
The KeyDuplicator II software is protected against abusive copies, based on use of a coded
USB key. Without this USB key, the software is not activated and keep waiting for
this!Dongle to be plugged in, or for the user to quit. A key detection procedure is activated
at every launch of KeyDuplicator II and many time during processing.
Note: Do not modify nor format this Dongle, do not rename it.
1) Serial number: This code is provided as a text file in the Dongle. It is unique and it is
identifying your personal software.
2) Registration window: After installing your software and the coded USB key, at the first
launch and as long as the KeyDuplicator II software is not activated, the Registration
window appears and asks you to enter your name, Company name (optional) and serial
number (see the text file in the Dongle). After typing in these informations, click in
the!«!Licence agreement!» checkbox. The «!Register!» button is activated. Click this button
to register your software. You are ready to use the KeyDuplicator II software.
Take the opportunity to read/print your licence agreement available in TEXT or PDF
formats. You will find this licence agreement into the KeyDuplicator II folder, file named
«!Licence KeyDuplicator.pdf!»
To obtain some help, propose some enhancements or report some unknown bugs, please
contact us by phone, fax, mail or e-mail ([email protected] or
[email protected]). Please, do not forget to note your name and the serial number
displayed in the Registration window.
5
Page 7
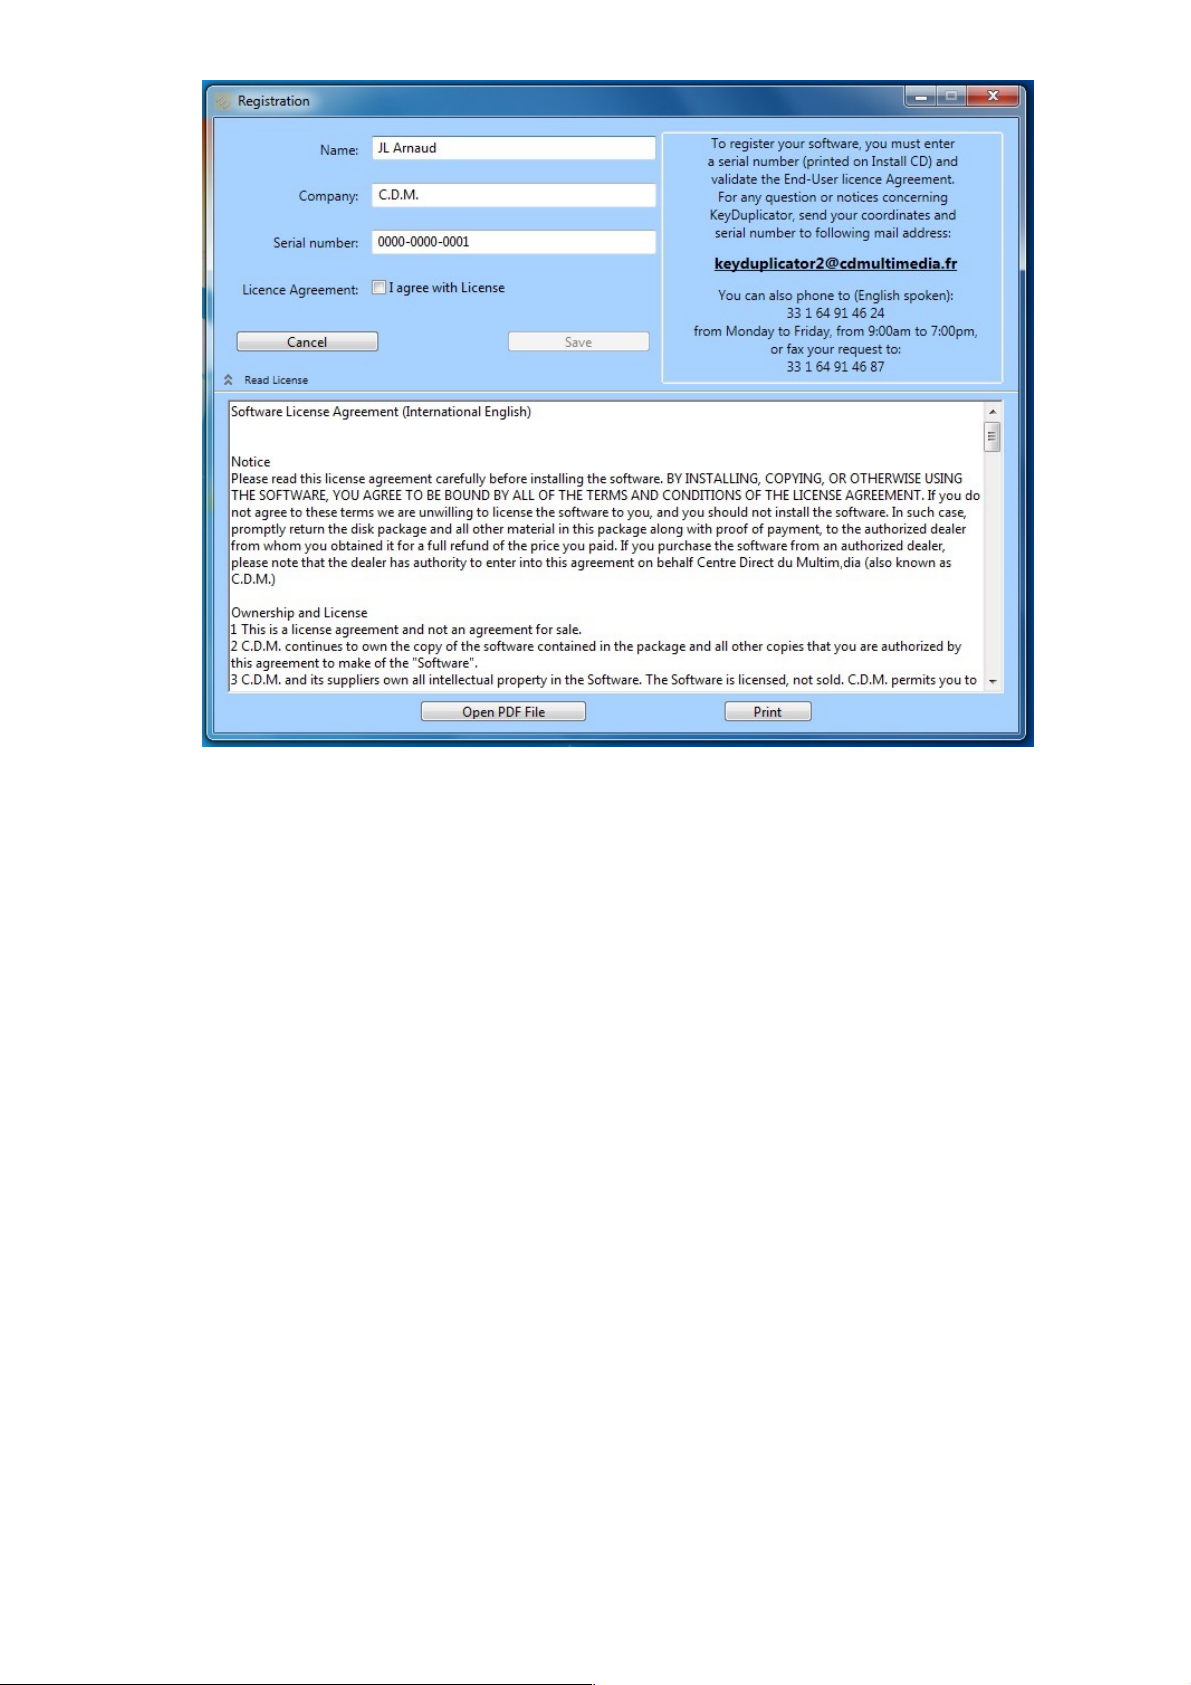
Registration window
IV. Presentation
The first step consists in powering on the connected DupliKey, before powering on
the!computer or rebooting it. This step makes you sure that all the connected devices are
correctly detected and recognised.
Run the KeyDuplicator II software. After it has been activated (see part III), KeyDuplicator II
will display its main window with the list of devices on the left and the GUI on the right.
1) The main window
The main window is displaying most of the functions and information available in
the!KeyDuplicator II software. It shows, on the left half side, all the plugged in volumes and
devices (see part concerning «!Preferences!»). The right half side displays the GUI (DupliKey
model, graphical representation of detected hardware and available ports), key counters for
successfully «!Copies done!» and «!Number of copies to run!» of the!running process, type
of data source with its path and «!Define…!», «!Go to!», «!Create Disk Image!» and «!Disk
Image Info!» buttons, volume name for labelling the duplicated USB keys, auto/manual
format checkbox with or without quick format and «!format type!» popup menu. You will
also see the «!Rename », «!Transfer Rate!» « Format », « Duplicate » et «!Refresh volumes
list » buttons.
This window is automatically resized, depending on the height of the volumes and/or
devices list. However this window is proportionally resized to the size of your screen, in
order to keep bottom buttons reachable. You can also manually resize this window height,
as you are used to do on your specific OS. In addition, it provides standard buttons
«Maximize!», «!Minimise!» and «!Hide!».
6
Page 8
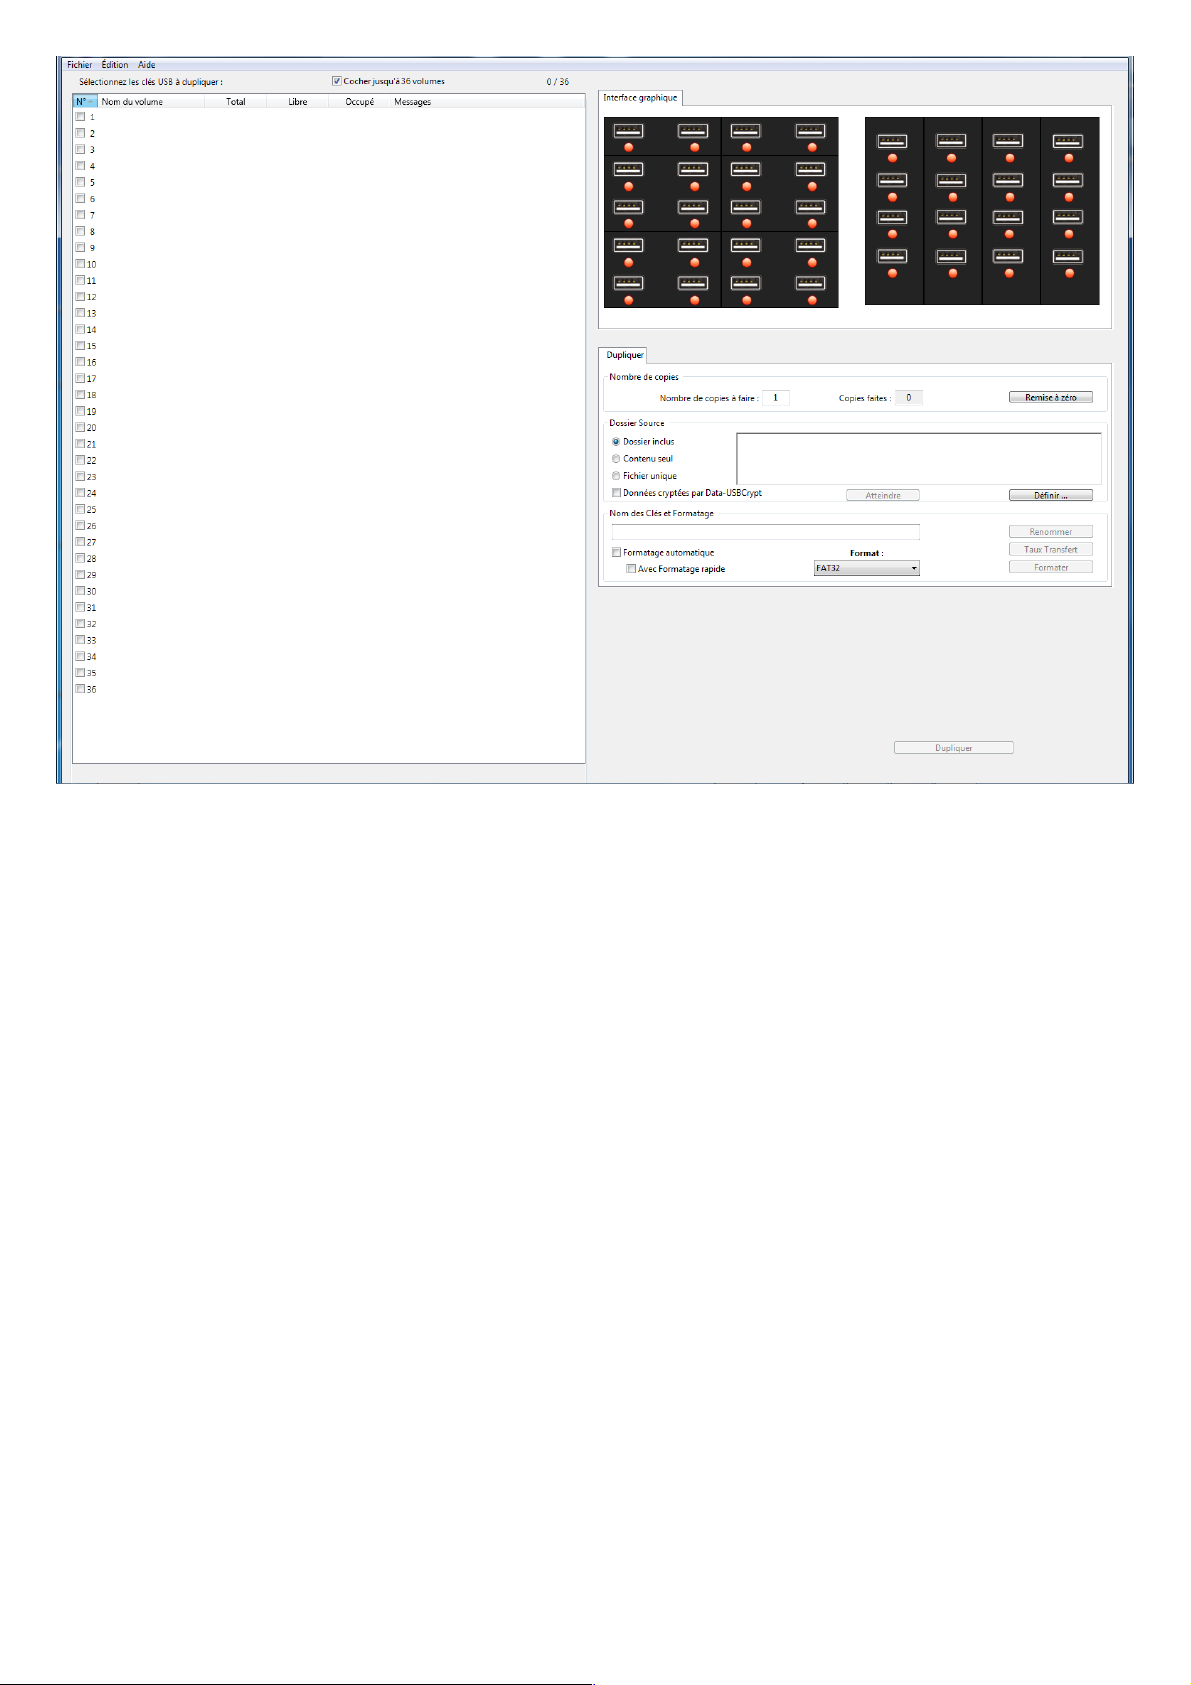
Main window of a DupliKey36 (20 ports hub + 16 ports hub)
Please note that displaying a 40 devices list needs a minimal resolution of 1650 x 1080
pixels. In case of a 60 ports configuration, the screen height should be at least 1500 pixels,
else a scroll bar appears.
• The devices list: According to the selected options in the “Preferences” window,
the!activated devices are displayed in this list. Each device is described as follow: line
number, volume name and volume letter, total space size, available space size and used
space size of the volume and a specific column for the returned messages and progress
bars. The checkbox on the left lets you select USB devices to be formatted, renamed or
duplicated. To select a device, click into its checkbox.
The « Edit/Mark up to X volumes » menu or Ctrl-T shortcut is selecting the volumes in
the list up to 60 (according to DupliKey version). Use the same way to undo this
function (« Edit/Unmark all volumes »). In addition, the “Mark up to XX volumes”
checkbox forces the automatic selection of any volume present or which will be
plugged in, within the limit of XX volumes (from 7 to 60, according to the software
version). As soon as a volume is manually unmarked, the box is also unchecked.
This!procedure avoids having to recheck manually volumes in the list, at the beginning of
each task.
Following devices are displayed in this list:
- Every USB volume correctly formatted, excluding devices without volume like CD or
DVD-ROM drives without inserted media, FlashCard reader without card. Its serial
number (if any) is displayed in the message area.
7
Page 9

- Any USB volume with unrecognised format layout (such as for example Macintosh or
Linux formatted pen, unless dedicated drivers or utilities are installed), with a
«!Unknown Volume!» message and an icon “?”,
- Any unformatted USB volume, with a «!Unformatted Volume!» message.
Internal volumes (hard disks), network volumes and the Dongle will never be listed. A
Flash Memory card reader (SD, CF or other) will be displayed only if a card is present.
Please, note that columns are width resizable (except for the first) by clicking on
the!separator line of headers. Clicking down, drag this separator toward right or left, in
order to increase or reduce column width.
Attention! Every selected volume will be concerned by the running task, in
particular for the format task. Only a write-protected volume will not be
modified or erased.
It could be useful (even essential) to find easily the “failed key(s)” thru the 7 to 60
connected ones.The first way consists in clicking on the line of the key in the main
window, pressing the "Alt" key. This will make the concerned key(s) LED blinking, if it has
one. LED stops flashing after delay expires (See Preferences to define the duration) or
by pressing the "Esc" key. The second one consists in using the "Flash checked keys" in
the Edit menu. This makes possible to see all failed keys at the same time.
Of course, this implies that used keys have a LED. For keys without LED, the GUI
fortunately is your friend. The X line of the list corresponds to the X device in the X
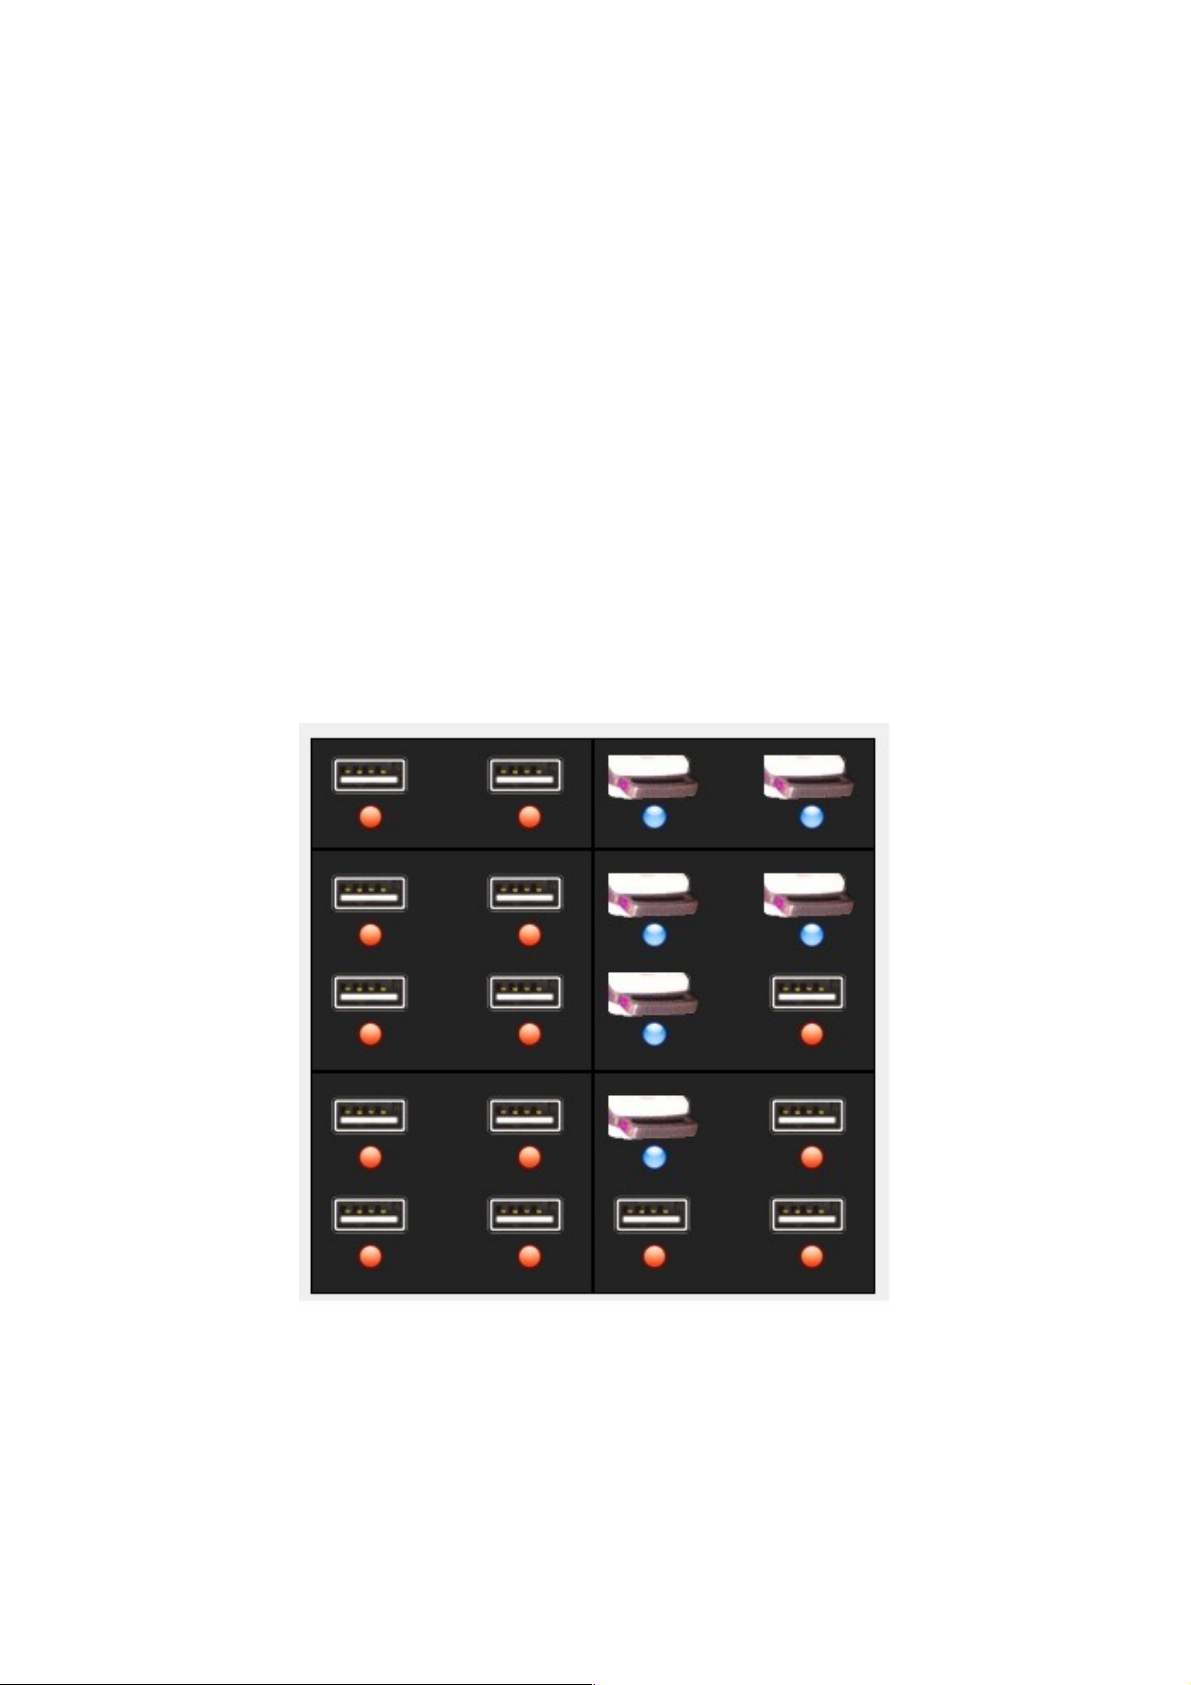
port. In addition, the location of devices is displayed the same in the GUI, with a device
icon, a red LED (no device) or blue one (device plugged in). Making one or several
devices flash, matching LEDs in the GUI alternatively get red and blue.
Notice that GUI LEDs are flashing even when no device is plugged in the port, making it
easy to locate any port on the DupliKey.
Since version 2.0.5, a faulty device is graphically displayed with an icon “Attention” (road
sign with an exclamation mark).
• Keys counters: The two fields named "Number of copies to run:" and "Copies done"
are respectively representing the number of keys you want to duplicate or format and
the number of copies successfully done from the beginning of the task.
Only the first field can be modified. Just click in it and type in the new value.
The second one is incremented by software during duplication task. Nevertheless, you
may want to "reset" it to zero, after validation of a confirmation message, or type in
manually a new value for "Copies done". Click in the field, a confirmation message is
displayed, validate then type in the new value. Validate with the Tab key (or by clicking in
another field). The new value is saved in the currently opened configuration file (Please,
see below). If no file is opened, the configuration file saving dialog is displayed.
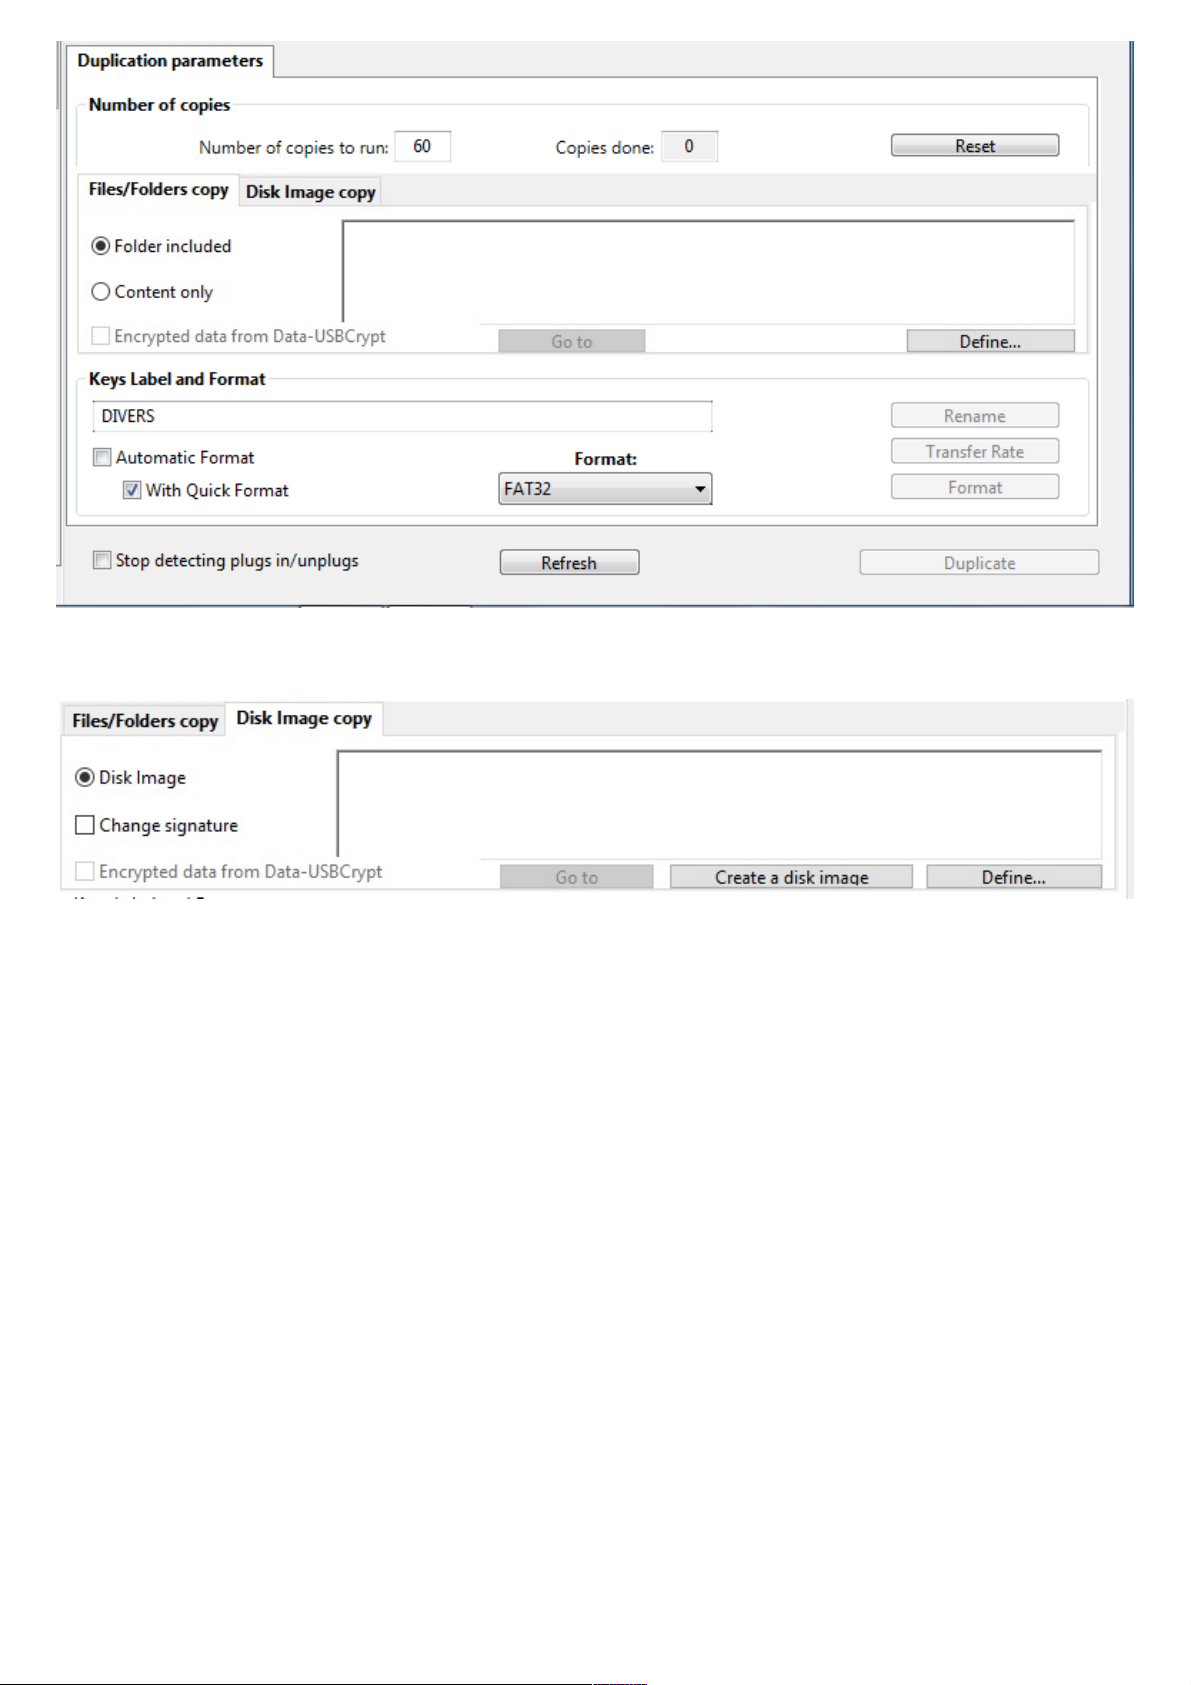
• Source folder: Using the TabPanel located in the middle of the right part of the
window, first select the copy mode tab, between “Files/Folders copy” and “Disk Image
copy”. In the “Files/Folders copy” tab, select either :
8
Page 10

- Folder included: the folder containing data is copied to the key including files, folders
and sub-folders,
- Content only: Only the content of the selected folder will be copied. The main level
folder itself is not copied on the key,
Then, click the "Define..." button or choose "Define Source..." in the file menu (Ctrl-I)
to define the path to the source file or folder to be duplicated. Select Folder dialog is
displayed, so you can select the source. Absolute path and estimated size of the
selection are displayed in the appropriate field.
In the “Disk Image copy” tab, the only option “Disk Image” is already selected.
- Use the “Create a Disk Image” button in order to read the entire content of a device
(partitions table, partitions, data). This creates a Disk Image file in the location of your
choice (commonly, in the hard drive). You will get some information about the image
and the image file.
- Use the “Define” button to select a Disk Image file (.vhd files). Again, you will get
some information about the image and its file.
In the “Disk Image information”, you have the ability either to get more information on
the selected Image file, or to get information on any Image file without selecting it as a
source.
- The «!Encrypted Data from Data-USBCrypt!» checkbox allows our end-users owning
our data encryption software to duplicate protected pen-drives. Duplicating DataUSBCrypt encrypted devices needs licences. Please, don’t hesitate to contact us for any
additional information. When this checkbox is checked, KeyDuplicator II verifies that
data source is actually Data-USBCrypt protected and unchecks the box if not.
Attention! This «!Encrypted Data from Data-USBCrypt!» option is not yet
implemented in the “Disk Image copy” mode. This will be done in the next
release.
• Key name: You can see that the name of the selected folder or file is automatically
returned as volume label of duplicated keys, unless the «!Don’t rename keys
automatically!» checkbox is checked in the Preferences window. The label appears in
the!«!Keys Label!» field, eventually filtered in order to eliminate illegal characters.
You may want to modify it, given that automatic filtering applies depending on system
limitations. Under Windows, this name has to be DOS compliant, that is 8+3 characters.
To type in the key name, click in the text field and write the name from the keyboard, in
upper- or lowercase mode. You can also use the "Cut/Copy/Paste" functions from Edit
menu (or corresponding keyboard shortcuts), navigate with arrows, select a part or
the!whole text, double-click, and so on…
Would you want to use a longer name, should you use the «!Autorun!» function
available in the «!Utilities!» menu (see VII-2).
In “Disk Image copy” mode, this field is of no interest, as this mode clones the source
with its own label (if any).
9
Page 11
Duplication parameters (Files/Folders)
Duplication parameters (Disk Image)
• Rename-Transfer Rate-Format: The "Rename" button lets you change
the!volume label of selected devices in the list. It remains disabled and greyed until
a!new name is typed in AND at least one device is selected in the list. Click this button
to rename the selected volumes, before or after the duplication process.
Note: During duplication process, keys are automatically renamed, provided that a name
is typed in field «!Keys label!». The same behaviour applies during manual or automatic
format process. So, it’s not necessary to rename them before duplication or format
operation. On the contrary, it may be necessary to prohibit modifying keys name, using
the «!Don’t rename keys automatically!» option in Preferences window (See IV-2).
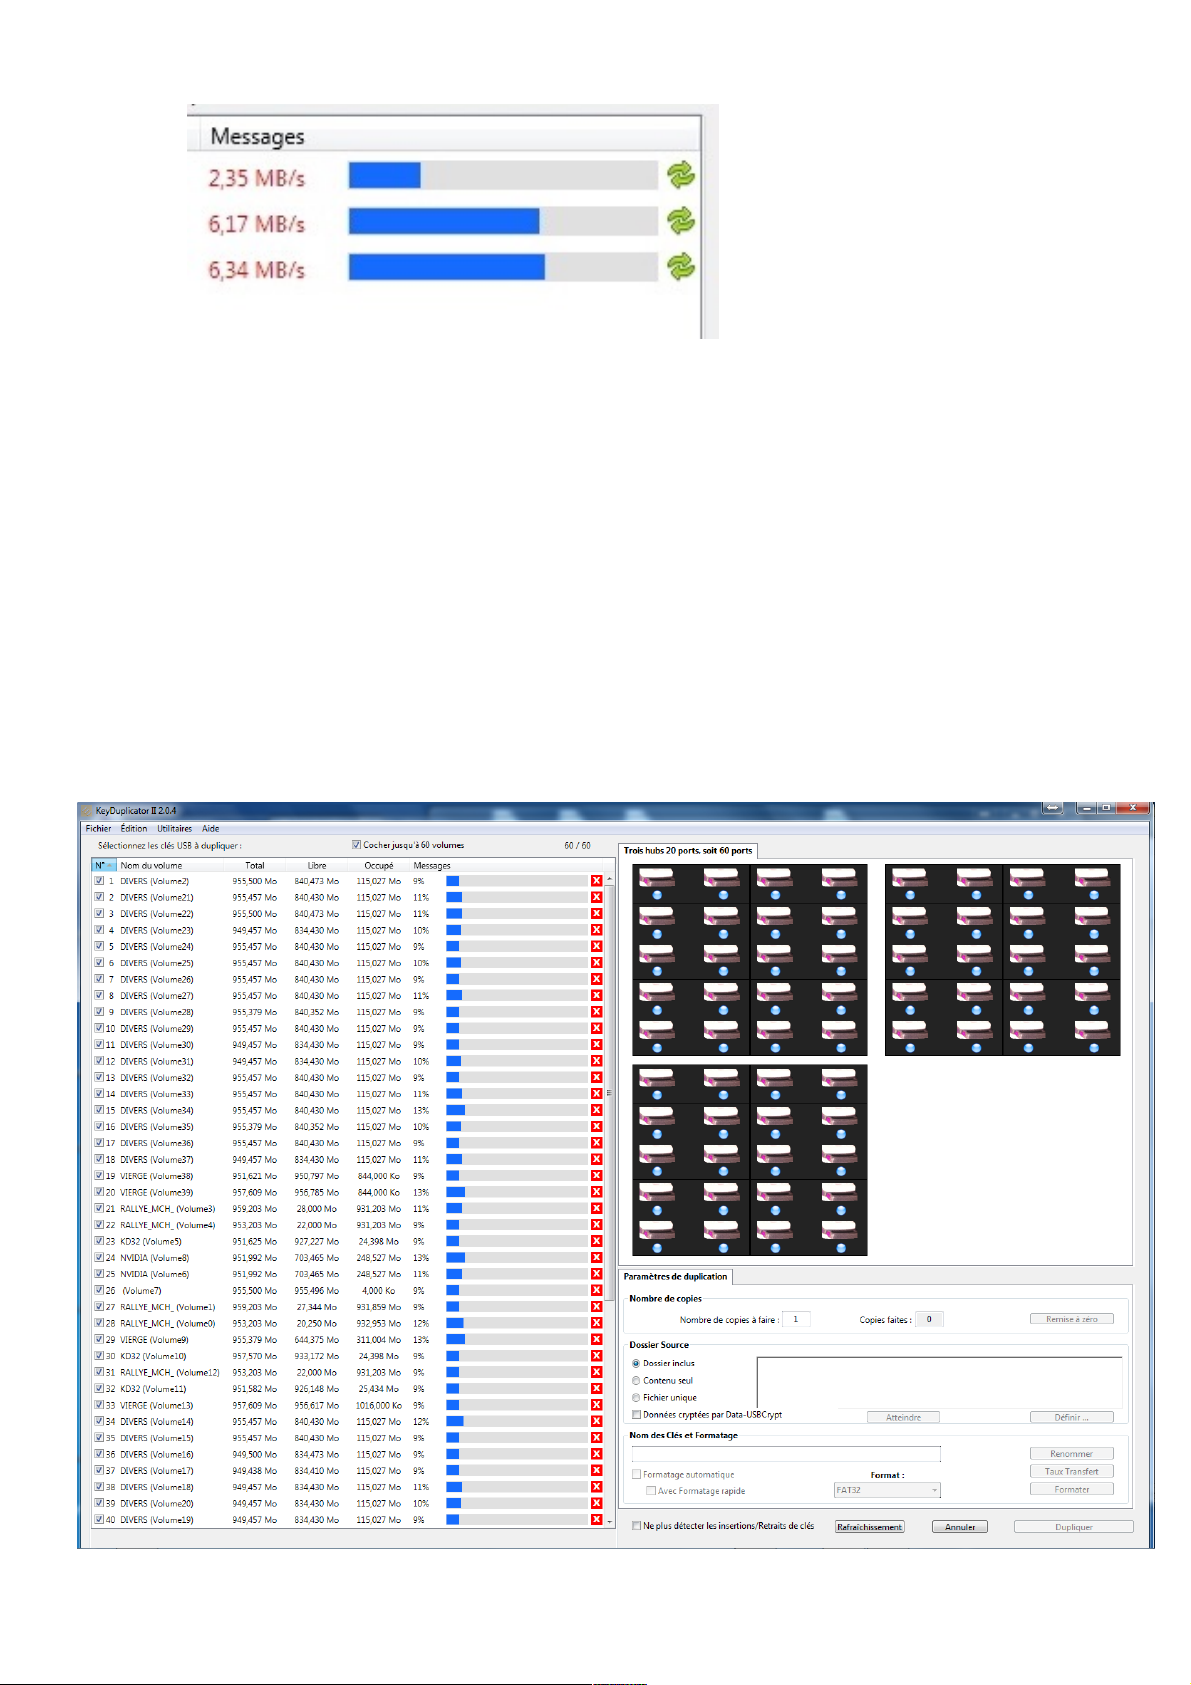
The «!Transfer Rate!» button quickly tests (in 2 seconds) the Write Data Transfer Rate
of the selected keys, that is marked keys in the list. The result is then displayed in the
«!Messages!» column of the main window, numerically and as an horizontal bar which is
proportional to the evaluated transfer rate. Please, refer to preferences (part IV-2) for
settings about transfer rate (automatic test or not, maximal bound for the rate).
The!green icon to the right of the bar is used to re-run a test of the selected key.
10
Page 12
Transfer rate test
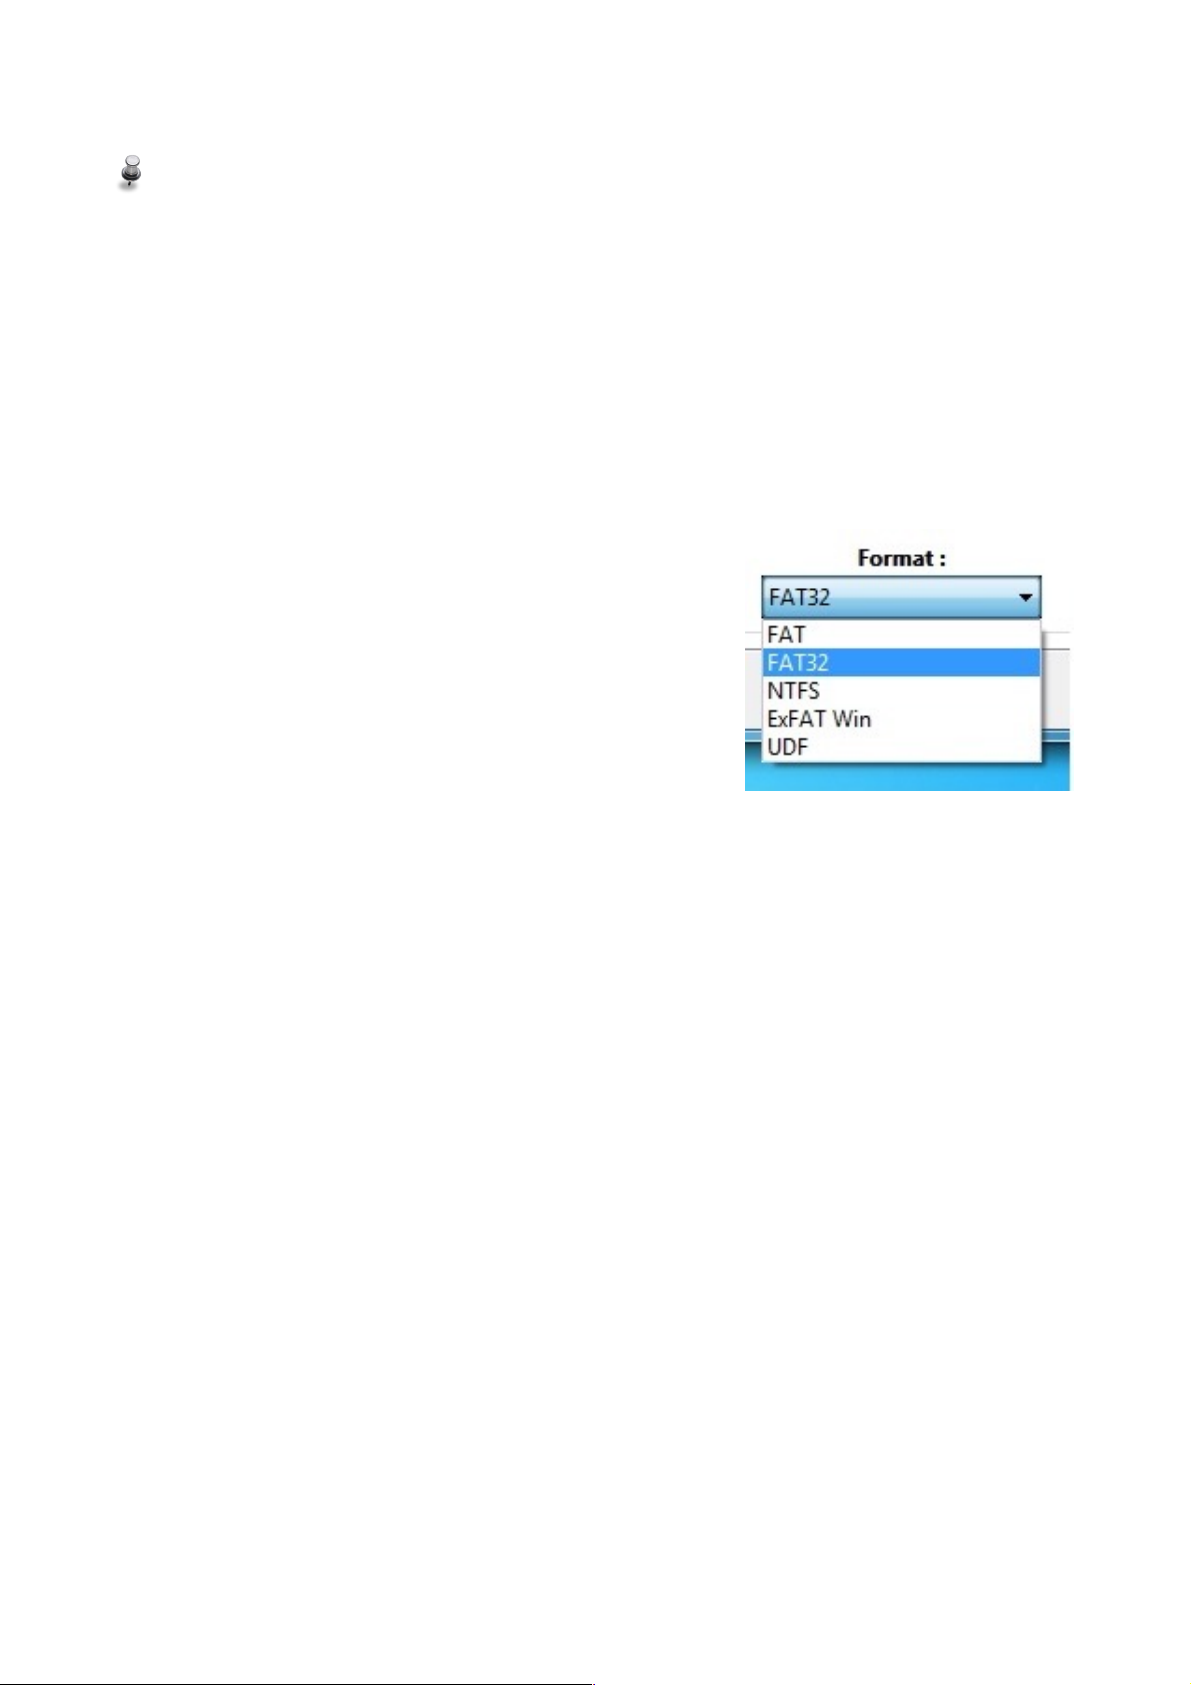
In the same way, the "Format" button allows to format all the selected keys. This button
is activated when at least one volume is selected AND checkbox « Automatic Format
» is not checked. After clicking this button, all the selected volumes will be erased after
validating a confirmation message. Type of format is defined into the "Preferences"
menu. It’s displayed and can be modified into the main window, with the “Format”
popup menu located to the right of the « Automatic format » checkbox. Please notice
that Windows recognises FAT, FAT32, ExFAT, UDF and NTFS formats. Installing
dedicated drivers or utilities, it is possible to create Mac volumes (HFS/HFS+) and Unix
ones (EXT1 to 4) under Windows.
Low-level format task running (DupliKey60)
11
Page 13
Attention! Every selected volume will be concerned by the format task, except
if it is write protected. Please be careful, do not erase important data that you
could not recover.
Quick format is really fast, a few seconds. On the contrary, low level format is a slow and timeconsuming process, it may take a few minutes (for small capacity medias), up to several tens of
minutes, even several hours, for biggest volumes (64 GB or more). During this format process
(automatic or manual), a numerical percentage and a progress bar are displayed in the line of
each selected volume, in the «!Messages!» column. A red icon on the right allows you to stop a
too long format operation, whereas the «!Cancel!» button, at the bottom of the window, stops
all running format processes.
Native formats available in Window
• Stop detecting plugs in/unplugs: While plugged in the tower, USB keys are
automatically detected by the KeyDuplicator II software. KeyDuplicator II is eventdriven by events fired when connecting and disconnecting devices. It could be necessary
to stop dealing with such events, in order to plug in an USB device without having it
detected by the software and mounted as a Volume Mount Point. Doing that, you will
keep a «!normal!» access to this device, using Windows Explorer.
Don’t forget to uncheck this checkbox and so to reactivate events detection, in order
to add devices to be duplicated.#
12
Page 14
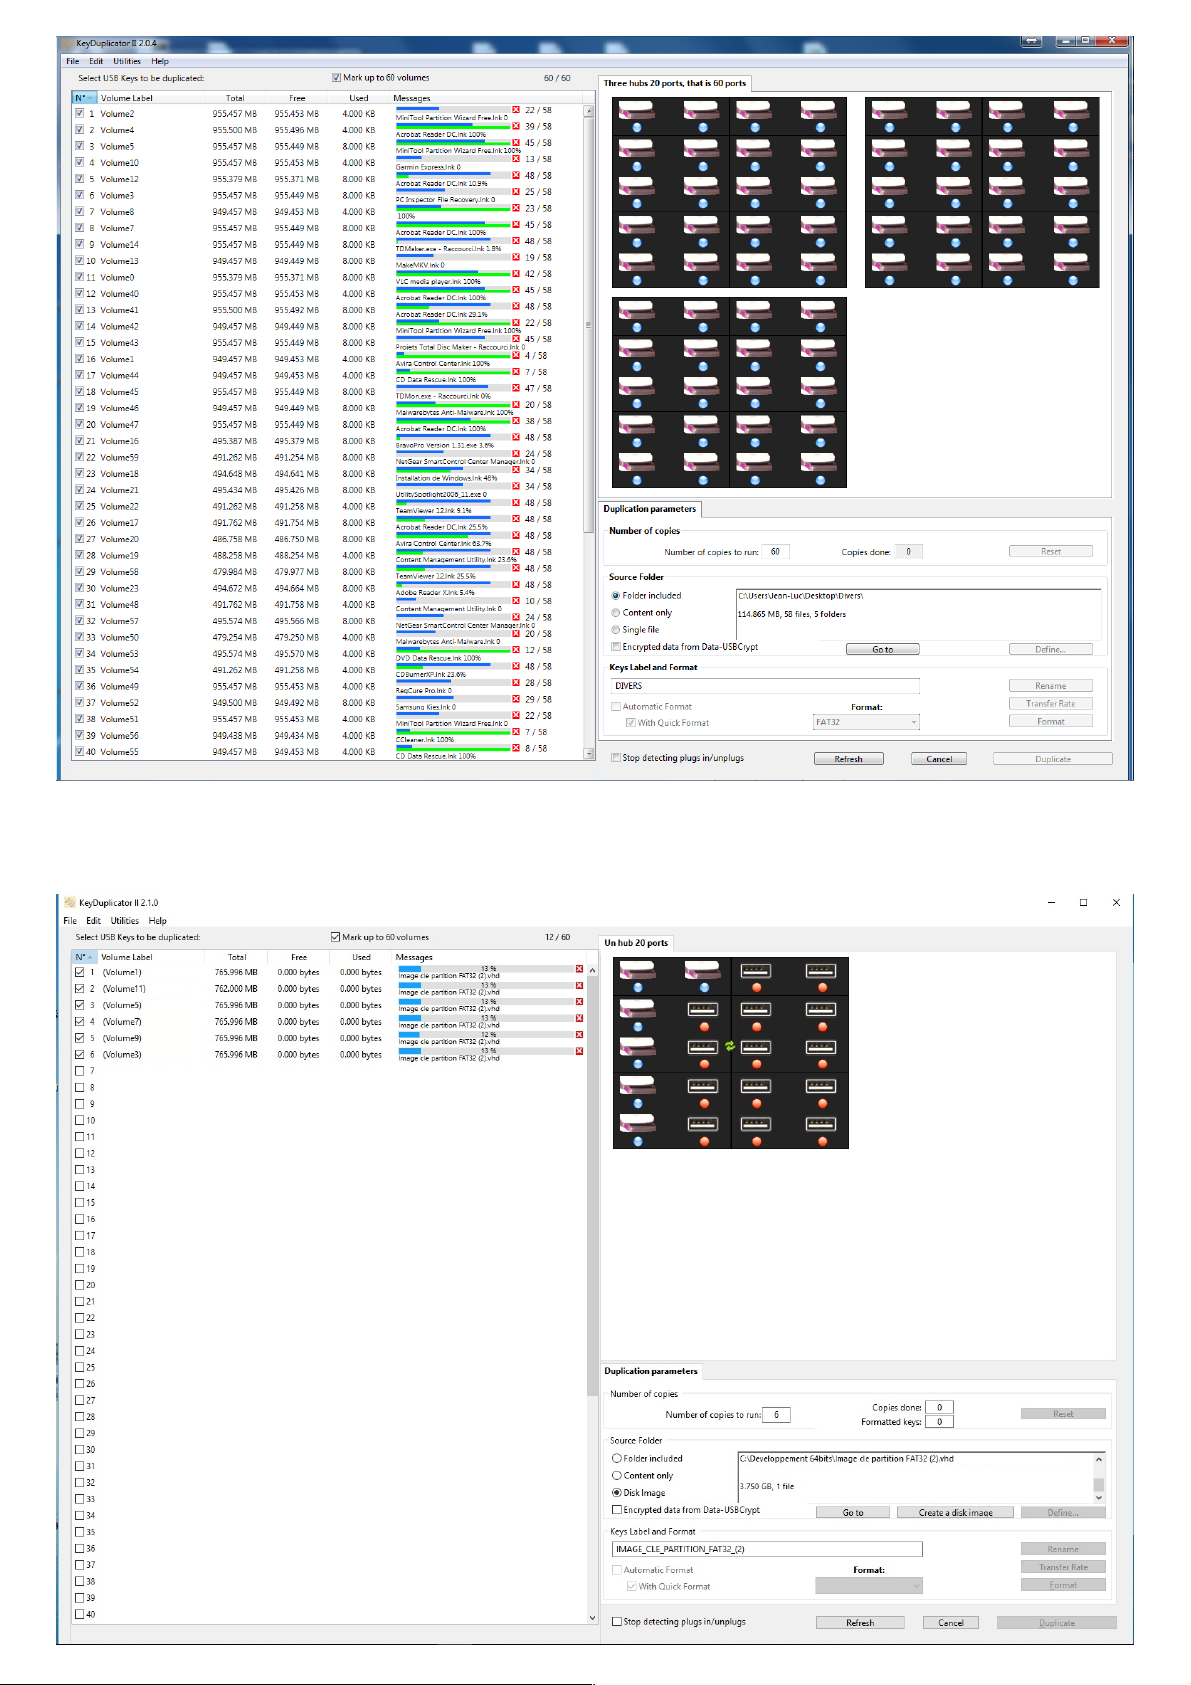
Running Files-Folders duplication (above) and Disk Image copy (below)
13
Page 15

• Duplicate: This button is activated only if at least one key is selected in the list, and
the source path is not empty. By clicking it (or using Ctrl-D), you will run
the!duplication process with the option to format before duplicate if the "auto format"
checkbox is checked. Each duplication and/or format process is (are) executed into a
stand-alone task, this allows to manage several keys in almost the same time of one key.
This also applies to format process.
After starting duplication, a progress bar appears on the same line of each selected key,
on the right side, in the «!Messages!» column. The blue part of the bar is global for
the!running process, whereas the green part displays the percentage of copy of the file
being duplicated. The file name is also displayed, as well as a numerical percentage.
In!addition, on the right, the number of copied files and the number of total files to be
copied are displayed. The red icon with a white X allows to stop duplicating the key.
This!progress bar may be replaced by an error message (in red text) when a problem
occurs during copy. The free space information is continuously updated. At the end of
the copy process, a message is displayed for each duplicated volume, indicating either
that the duplication was successfully finished, or unsuccessful with an error message.
In!addition, the «!Duplicate!» button changes to «!Continue!», unless the number of
copies to be done is reached. Unplug duplicated keys and insert new ones before
validating a new duplication by clicking the « Continue » button. If necessary, the
process may be interrupted with the « Cancel » button, i.e. in order to manage possible
errors. Error messages are displayed in red text in the volume list, on the same line as
the faulty key.
Many kind of errors may occur while running a format, rename or copy process.
KeyDuplicator II manages most of them and displays a comprehensive message about
the error type. Most of errors are concerning write protected keys, not correctly or
not recognised ones, or unplugged before the end of the process. It can also happen
that one key is full. Please, pay attention that, if a file or folder with the same name
already exists at the same level on the key, it will be automatically erased and replaced
by the new one, unless its content is strictly the same (data, creation and modification
dates, other characteristics such as visible or not, read/write protection, etc).
This allows to update very quickly the content of a pen-drive, copying only modified or
new files.
In the same manner, it’s really easy to add a folder and its sub-folders into duplicated
devices, because only modified or new items will be copied.
14
Page 16
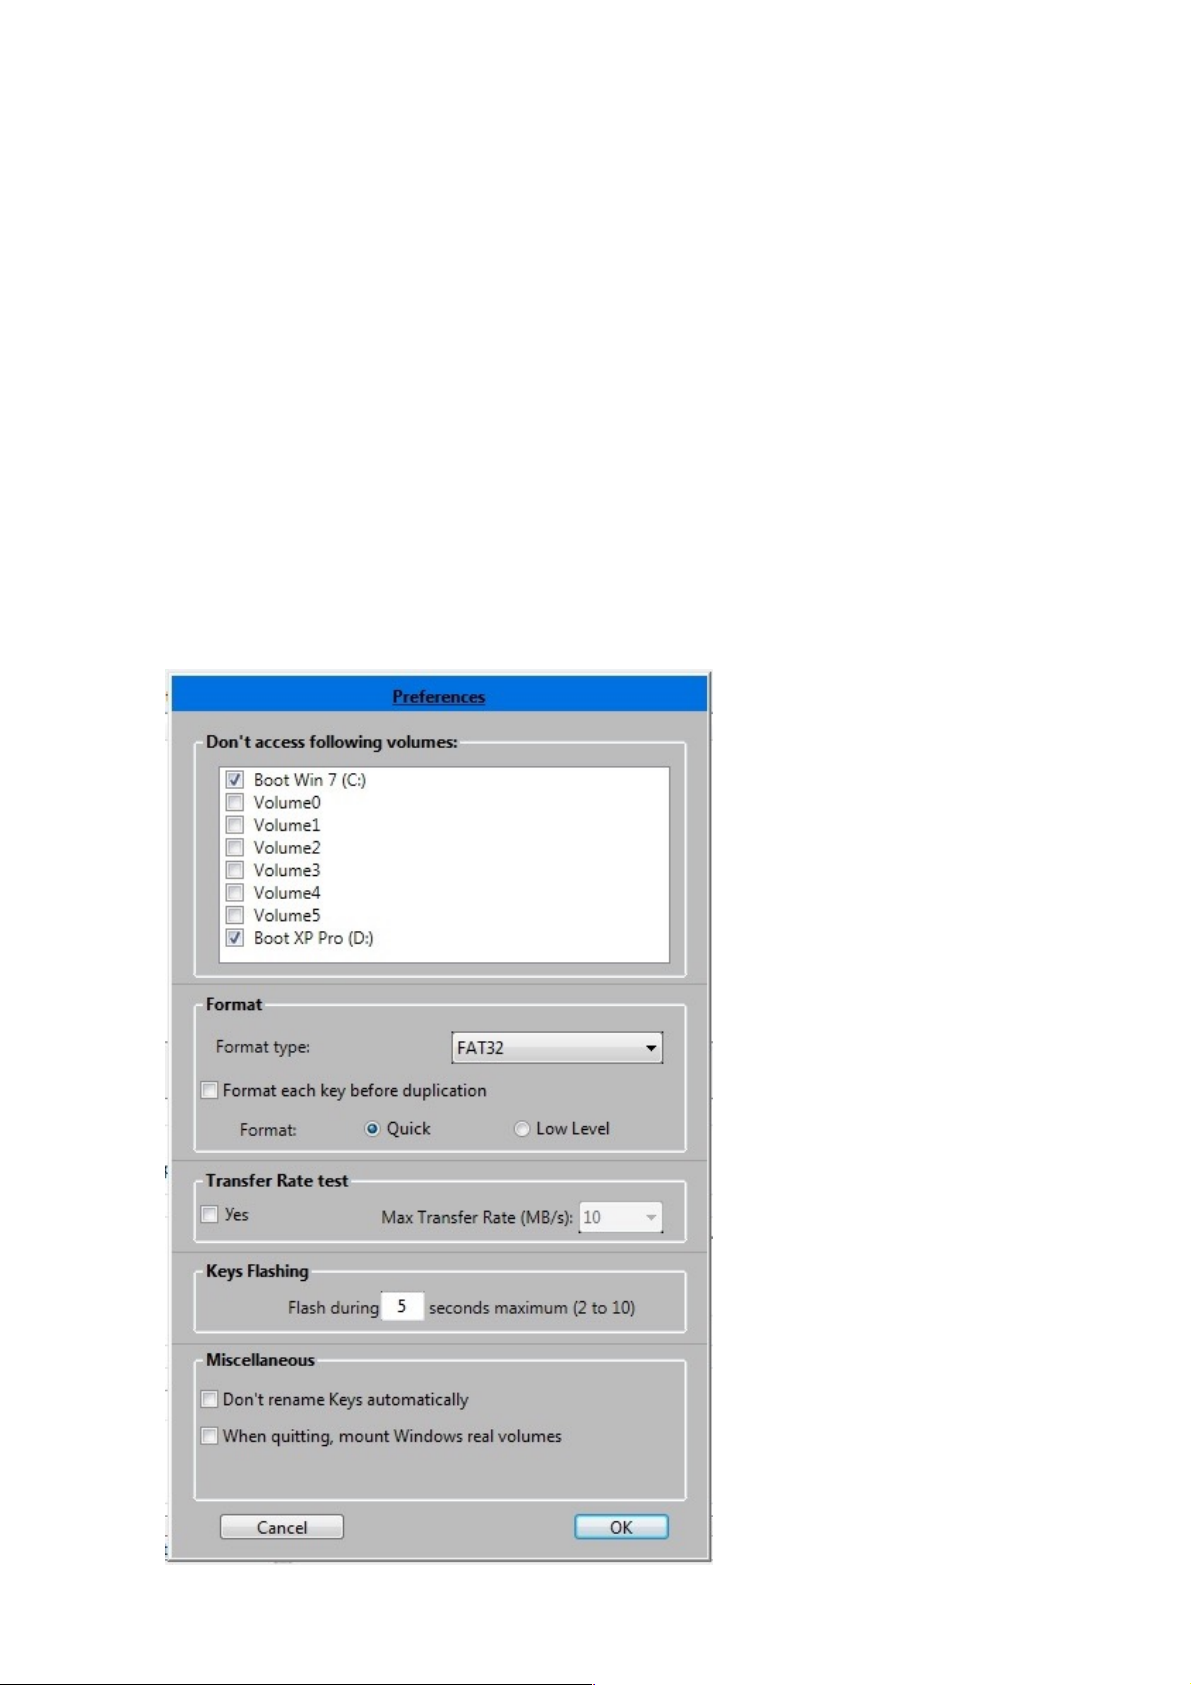
2) Preferences window
Default settings are to be set up into the "Preferences" window. Open this window by
selecting "Preferences…" into the Edit menu or Ctrl-, (Ctrl-Coma). Any modification
made in settings will be active while closing this window by the "OK" button. As
opposed, if you click the "Cancel" button, no modification will be saved.
• Don’t access following volumes: This area, coming from old versions, is no
longer used. It remains in the software for a potential future use.
• Format: This area allows you to define keys «!format!» settings. The «!Format:!»
popup menu displays the different format types available under Windows (FAT, FAT32,
NTFS and ExFAT). As previously said, other formats may be detected when the
application launches, according to drivers or utilities installed in your system.
After selecting the format type, select or deselect the «!Format each key before
duplication" checkbox, in order to systematically run or not a format process before
any other process. In addition, you may select «!Quick!» or «!Low level!» format.
The format settings are displayed in the main window of KeyDuplicator II.
!The Preferences window
15
Page 17

• Transfer Rate Test: This setting activates or not a quick transfer rate test
(2!seconds) for each key, as they are detected by the system. Please note that, on one
hand, this test runs only one time as soon as a new volume is detected, on the other
hand, it will drastically slow down the volume mount step. Activate this test only when
really necessary, in particular in order to compare keys performances and detect slow
devices (eventually faulty or bad quality). This test may be manually run, before or after
duplication, on selected keys, in order to compare their performances one to the other,
or their own performance before/after duplication.
• Keys Flashing: This setting defines in seconds the blinking time of the!USB key LED
embedded in certain devices. To do that, you just have to click on a!line in the list,
pressing down the "Alt" key to make the!selected key LED blinking. This is helpful to
find a specific faulty key. The current market trend being to implement more and more
rarely a LED in USB pens, our software provides a graphical user interface, with an easy,
physical location of keys plugged in DupliKey systems. Now, you see on screen the exact
representation of DupliKey hardware (20,16 or 7 ports, one, two or three hubs) and
the inserted devices in their exact location. A blue/red point simulates a LED and flashes
in order to locate a pen-drive.
• Don’t automatically rename keys: After activating this setup, the software will
no longer rename keys during duplication. Selecting source datas does no longer display
automatically datas folder name as new name for keys. The « Keys Label » field will stay
empty. Even if you manually type in a new name in this field, it will be ignored.
• Mount real Windows volumes when quitting: Windows Explorer is giving
each mounted volume one of the 26 letters from A: to Z:. How, in these conditions, to
manage 40 or 60 keys? The principle used in our KeyDuplicator II software leads to
invisible volumes for Windows Explorer, keys do no longer appear in the workstation.
When quitting the application, a dialog is displayed and ask you if you want to mount
volumes or not. If you mark this option, volumes will be automatically mounted (until
letter Z, additional volumes remain invisible) without opening the dialog.#
16
Page 18

3) About… window
The "About..." window can be opened by selecting the "About..." item of the "Edit"
menu. It displays following information:
➡
Complete CDM coordinates, software editor,
➡
Software version and its compilation date,
➡
Greetings,
➡
Access links to our web site, to the generic CDM e-mail address and special e-mail
address [email protected] dedicated to receiving your ideas,
suggestions, bugs report and others comments about KeyDuplicator II software. Do not
hesitate to use this address, all your suggestions or helps will be welcome.
4) Registration window
This registration window is opened at least one time automatically, during the first
launch of KeyDuplicator II after it was installed. This window displays and provides you
a!way to enter your name, Company name (optional) and serial number (see the
Dongle content). You may also read the licence and get our coordinates. After typing in
information, click the «!I agree with Licence!» checkbox. The «!Save!» button is
activated, unless you have not checked the licence agreement. Click «!Register!» button
to register your software. You are ready to use the KeyDuplicator II software. As long as
you will not type in a serial number, KeyDuplicator II will not launch.
Refer to the paragraph III for more details about Registration procedure.
Open the Registration window with «!Edit/Register…!» menu, in order to get useful
information, in particular the [email protected] e-mail address.
5) Configuration files
If you often run the same process for recurrent duplication or if you stop a running
task, the configuration file gives you the ability to save settings and parameters of this
task: type of source data, path, format type, number of duplicated keys and to be
duplicated keys, name of the key.
To save a configuration file, set all your parameters. Then select in the «!File!» menu
the!«!Save Configuration File!» item or use Ctrl-S shortcut. Enter file name and
destination of the recorded configuration file.
From the release 1.6.9, saving a configuration file is automatically proposed at the end
of the first duplication run (and at the end of each run as long as no file is saved).
Through the «!Save as …!» dialog automatically displayed on the screen, type in the
name and choose the location of your configuration file. As soon as a configuration file
exists for the task in progress, it is automatically updated (number of duplicated and to
be duplicated keys) at the end of each run.
To restore parameters, just open the configuration file, with the «!Open Configuration
File!» item of «!File!» menu or use Ctrl-O. Select the file you want to open and validate.
All previous settings will be restored.
17
Page 19

Note: During the restore process, KeyDuplicator II checks status of file or folder to be
used as data source. If file or folder has been renamed, moved or erased, then
KeyDuplicator II will ask you to select a new data source.
Attention! The software does not verify data source content. If file or
folder content has been modified, if a new file or folder has been created at
the same place, with the same name, this data source will be validated.
V. Typical duplication procedure
1. Power on your duplication system, then your computer,
2. Copy the source file into your hard disk from an USB key, a CD/DVD reader,
a!network volume, or create in your hard disk the source file with files/folders to be
duplicated. Optionally, rename this folder with the name you would like your duplicated
keys to be labelled,
3. Launch FeyDuplicator II 2.0.7 software (Ideally, create an alias on the desktop or
in the Tasks bar), and mark the box on top of the window «!Mark up to XX volumes!»,
if not already done,
4. Plug in all USB keys in the DupliKey (up to XX, according to your model),
5. Type in the total amount of duplications to be done,
6. Select your source folder in the hard disk with a click on «!Define!» in order to
select either a folder or a file (Files/Folders Copy mode), or a Disk Image (Disk Image
copy mode),
“Files/Folders copy” mode only:
7. Optionally type in a label for duplicated keys, in upper- or lowercase (please, no
accented character, nor space, nor dash). Please, note that source folder name is
returned by default,
8. Optionally mark « Automatic Format » then «!Quick format!» (strongly
recommended, low level format for a big volume may need a long time, up to one hour
and more) and choose format type. This step is useful only if target volumes need to be
formatted,
“Disk Image copy” mode only:
7. Instead of selecting a Disk Image file, you may want to create one from a device,
clicking in the “Create a Disk Image” button,
8. Optionally, use the “Disk Image information” tab to get some information about
the Disk Image you created or selected, or about other Disk Image files on your disk,
“Files/Folders copy” and “Disk Image copy” modes:
9. Start duplication, or Format+Duplication,
10. At the end of the first run, a dialog «!Saving Configuration File!» is displayed:
validate saving configuration parameters, preferably on the desktop. This little text file
will allow you to easily restart a stopped duplication batch, i.e. the next morning,
18
Page 20

11. If screen auto-refresh is not perfect (maybe your PC is to slow), click in the
«!Refresh!» button on the left bottom of the window,
12. After the first run is done, if you would like to verify keys content, please follow
steps 18 and 19a!; after verification, you will have to relaunch the application and restart
duplication, thanks to configuration parameters file you have saved on the desktop,
13. Unplug duplicated keys,
14. Plug in new USB keys,
15. Re-select «!Mark up to XX volumes!» if unmarked,
16. Start duplication with «!Continue!» (countdown is automatic),
17. Continue from step 11 to step16 as long as needed,
18. When all keys are duplicated, quit the application!using «!Close!» box (on righttop) or «!File/Quit!» menu,
19. A dialog opens: «!Do you want to mount real volumes or keep virtual ones?!»
with «!Mount real volumes!» or «!Keep virtual volumes!». You have 2 options:
a. You would like to verify keys content: Select «!Mount real volumes!» and
duplicated keys (if still plugged in) will be displayed in the workstation (Windows
Explorer),
b. You don’t have to verify keys content: Select «!Keep virtual volumes!»,
Note: This dialog will not be displayed if you marked the «!When quitting, mount
Windows real volumes!», in the Preferences window.
Attention! If you mount real volumes when quitting KeyDuplicator II, only
the 26 first devices (A: to Z:) will be mounted, including hard disks and
others peripherals already mounted in the workstation. Other devices will
remain in «!unmounted!» status and therefore invisible, unless you open
the «!KeyDup_Volumes!» folder (usually located in your boot disk, and
mandatorily in a NTFS partition).
If you exited the application without mounting real volumes, you just have to relaunch
KeyDuplicator II then to quit again clicking the «!Mount real volumes!» button in the dialog
displayed when quitting. Doing so, up to 26 devices will be mounted in the workstation.
20. Shutdown the computer, then the DupliKey system.#
19
Page 21
VI. What’s new in KeyDuplicator II 2.x.x?
KeyDuplicator is since a long time based on a special technology in order to manage more
than 26 devices (from A: to Z:) under Windows. Don't be surprised not to see any plugged
devices (USB sticks, FlashRam card readers, ...) in the Windows WorkStation, after
KeyDuplicator has been launched. Only hard disks (C:, D: and following if any) and some
devices such as floppy disk readers and CD/DVD readers/writers will be visible. All
peripherals listed in the main window of KeyDuplicator disappear from WorkStation !
Nevertheless, they all stay accessible through folders located in the «!KeyDup_Volumes!»
folder. This folder is created during the first launch of KeyDuplicator, in the first NTFS hard
disk that it will find. As a result, you must have at least one NTFS formatted partition in your
PC, condition checked by the software at its first launch time. In addition, devices that
KeyDuplicator has mounted as folders, will remain «!virtual volumes!» even after quitting
the!software, unless you have clicked the «!Mount real volumes!» button of the dialog
displayed when quitting the software, in order to make them become real volumes.
However, KeyDuplicator32 release 1.9.6 has been recently replaced by KeyDuplicator II
release 2.x.x. This was a major recasting of this application, issuing the following changes:
- Graphic User Interface (GUI) displaying on screen the used DupliKey configuration, with
location of plugged keys. The physical keys location will be drastically easier.
!!!!!The new graphic user interface (here, 20 ports)
- Event-driven detection for key plug or unplug, with appropriate update of the GUI. This has
led to the cancellation of the old USB bus scan every X seconds.
- Quick test of data transfer rate,
- Progress bars for low-level format and duplication, with percentage, number of copied files,
number of files to be copied and name of the currently copied file,
20
Page 22

- Stop icons for low level format and duplication, one per device, in addition to the global
interrupt button stopping all processes,
- Some utilities have been embedded, such as MountVol (Mountpoints management),
Autorun.inf file creation, cleaning of USB registries, duplication of encrypted data (in
connection with our Data-USBCrypt software).
- Version 2.0.5: Management of non-DupliKey hubs. This allows to use the KeyDuplicator II
2.0.5 software (and following versions) with generic hubs, even internal USB ports of your PC.
In such a case, devices are graphically displayed on a generic hub layout (5 raws of 4 ports), in
order of insertion.
- Version 2.0.6: 32 or 64 bits versions for Windows.
- Version 2.0.7:
-
Deep modification of Screen Refresh code, in order to use less CPU time and to have a
more responsive graphic user interface,
-
Correction of a display and refresh bug when at software launch,
-
Source Data size estimation in background with display refresh of information while
calculating (mainly for big volumes with a lot of files),
-
Some graphical enhancement for the running copy progress bar,
- Version 2.5.0:
-
Mainly, KeyDuplicatorII 2.5.0 provides a new copy method, the Disk Image Copy, in order
to realise a real clone of the original device with partition table, partitions and all data.
-
Some changes in the GUI in order to integrate the Disk Image Copy method and some
new options: Create Disk Image, information about Disk Image, access to unmounted
devices.#
21
Page 23
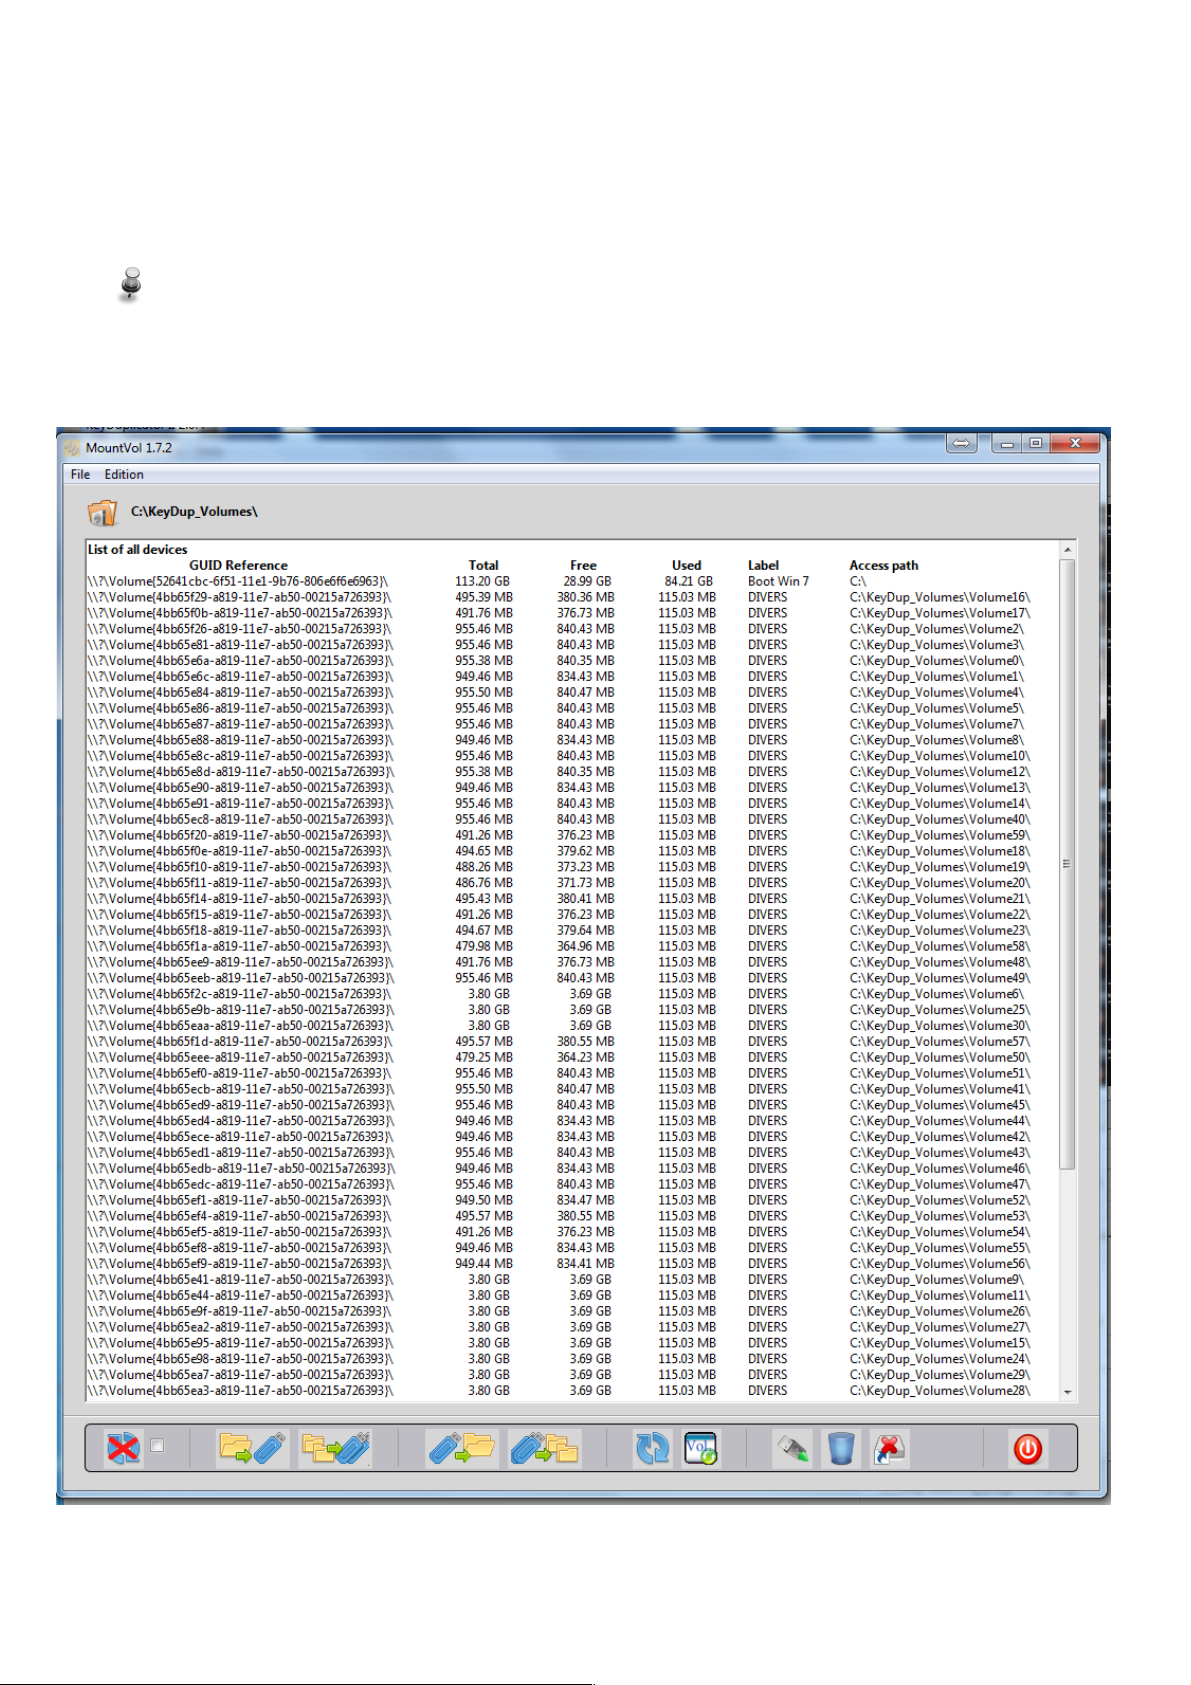
VII. Built-in utilities
1) MountVol
Attention ! If you intend to test this utility, please be very careful or
contact our hotline, given that you may damage your system configuration.
22
Page 24

Mountvol displays all actual volumes, manages the transformation from real volumes into
volume mount points and conversely, cleans up unused volume mount points.
From the left to the right, icons stand for:
- Activate/De-activate automatic scan of USB bus before each command
When this box is checked, every command starts with a USB bus scan and an update of
the volumes list.
- Transformation of a virtual volume into a real volume,
A dialog displays, allowing you to select one or several virtual volumes to be mounted
as real volume. The new created real volume gets a letter from A: to Z:. "
If no letter is available, the volume is created without mount point nor letter, it does
not appear in the Windows Explorer."
This action applied to a real volume does not modify this volume.
- Transformation of all virtual volumes into real volumes,
A dialog asks you to confirm the action. All virtual volumes will be mounted as real
volumes with a letter from A: to Z:. "
If no letter is available, the volumes are created without mount point nor letter, they
do not appear in the Windows Explorer.
- Transformation of a real volume into a virtual volume,
A dialog displays, allowing you to select one or several real volumes to be mounted as
volume mount points (virtual volumes). This transformation into mount point is not
allowed for internal hard disk drives (or volume defined on an internal hard disk drive).
- Transformation of all real volumes into virtual volumes,
A dialog asks you to confirm the action and lets you know that internal hard disk
drives and CD/DVD reader-writers are not eligibles. Virtual volumes do no longer
appear in the Windows explorer.
- Devices list,
USB bus are scanned, the devices list is cleaned then displayed with volumes main
characteristics (GUID reference , total space, free space and used space, Label, access
path).
- List of devices with volume,
USB bus are scanned, the list of devices with volume is displayed (without cleaning up
the previous list, allowing you to compare both lists) with main characteristics (GUID
reference , total space, free space and used space, Label, access path).
- Unmount/Eject a volume,
A dialog allows you to select one or several devices to be unmounted/ejected."
A message is displayed in the list with the result of the action.
23
Page 25

- Forget old mount points,
This action deletes old mount points directories and Registry parameters, for all
volumes no longer present in the system."
A dialog asks you to confirm the mount points cleanup.
- No mount point (for a given volume),
A dialog allows you to select one or several volumes for which no mount point nor
letter must be allocated. Internal hard disk drive volumes are not eligible. Volumes
without mount point do no longer appear neither in the Windows explorer, nor in the
KeyDup_Volumes directory.
- Quit MountVol,
Closes the MountVol utility and goes back to the previous window (usually,
the!KeyDuplicateur II one).#
24
Page 26
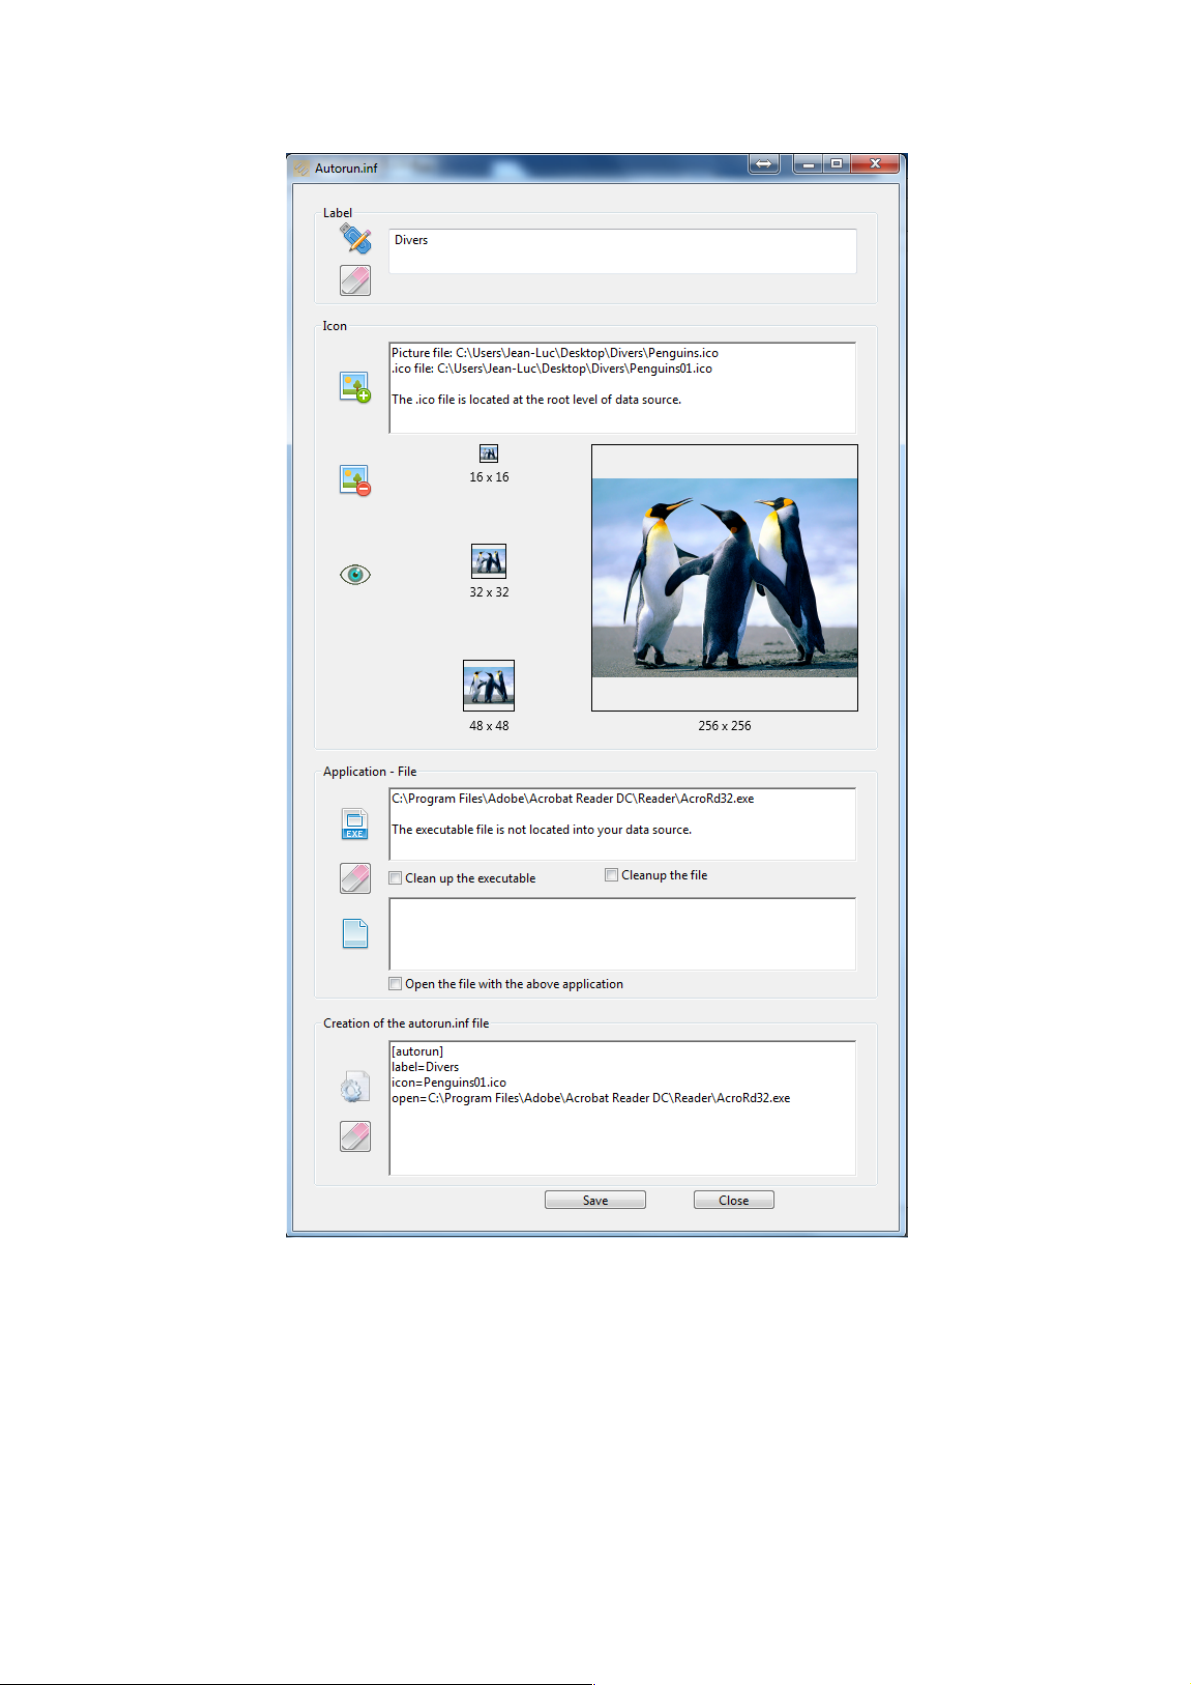
2) Autorun.inf creation
The utility for creating Autorun.inf file helps you to create this Windows System able, for
the volume on which it is located, to display a long name and/or an icon, to open a!file
(launching the matching application) or a specific application (with or without a file).
- Label
Type in the name (or Label) that you want to name your duplicated USB keys. This is
interesting only if you intend to pass besides the constraints of DOS names, that is
11!characters maximum, a lot of forbidden characters."
A label in an Autorun.Inf file should not be longer than 260 characters and may accept
special or accented characters."
Validate using either Tab, Enter, Carriage Return or by clicking in another Text field.
25
Page 27

- Icon
Clicking in this button, a file open dialog is displayed for selecting a graphic file of
type .ico or image file of type .bmp, .tiff, .jpg or .png. After selection, a second dialog
waits for you to define the destination directory for the icon file that will be created.
More preferably, the icon file should be created at the root of your data source
directory for duplication. the selected graphic file will be converted into a .ico file
(Windows icon file) and displayed with different available resolutions."
The text field will contain the full access path to the source file and the one to the new
created .ico file."
The graphical buttons “-” (minus) et “Eye” respectively cleans up the image and opens
the directory where the .ico icon file has been created.
- Application - File
This area groups information for the application and/or the file to be automatically
opened via the Autorun.inf file."
Click on the Application icon to define the access path to the application. This
application may be located either into your data source folder, or in your hard disk
drive. In the latest case, this application will be launched only if it exists in the user’s
hard disk drive, with the same access path and the same name, with needed
authorisations to open it."
"
The Document icon makes the same thing for a file. Don’t forget to check the “Open
the file with the above application” box if the previously defined application has to
open the selected file."
"
Finally, the “Eraser” icon allows you to clean up either the selected application, the
selected file, or both of them, depending on what checkboxes are marked.
- Autorun.inf file creation
As defining different items of the autorun.inf file, corresponding command lines are
created in this text field."
You can edit them manually, correct information or create other command lines."
The “Notched wheel” button creates or updates the autorun.inf file from Label, icon,
application and file areas."
The “Eraser” button cleans up all information (all areas)."
The “Save” button opens the file saving dialog which will create the autorun.inf file at
the location of your choice, most preferably at the root of the data source
directory!selected for duplication."
Finally, the”Close” button closes the autorun creation utility, after an alert dialog if your
information has not been saved.
26
Page 28
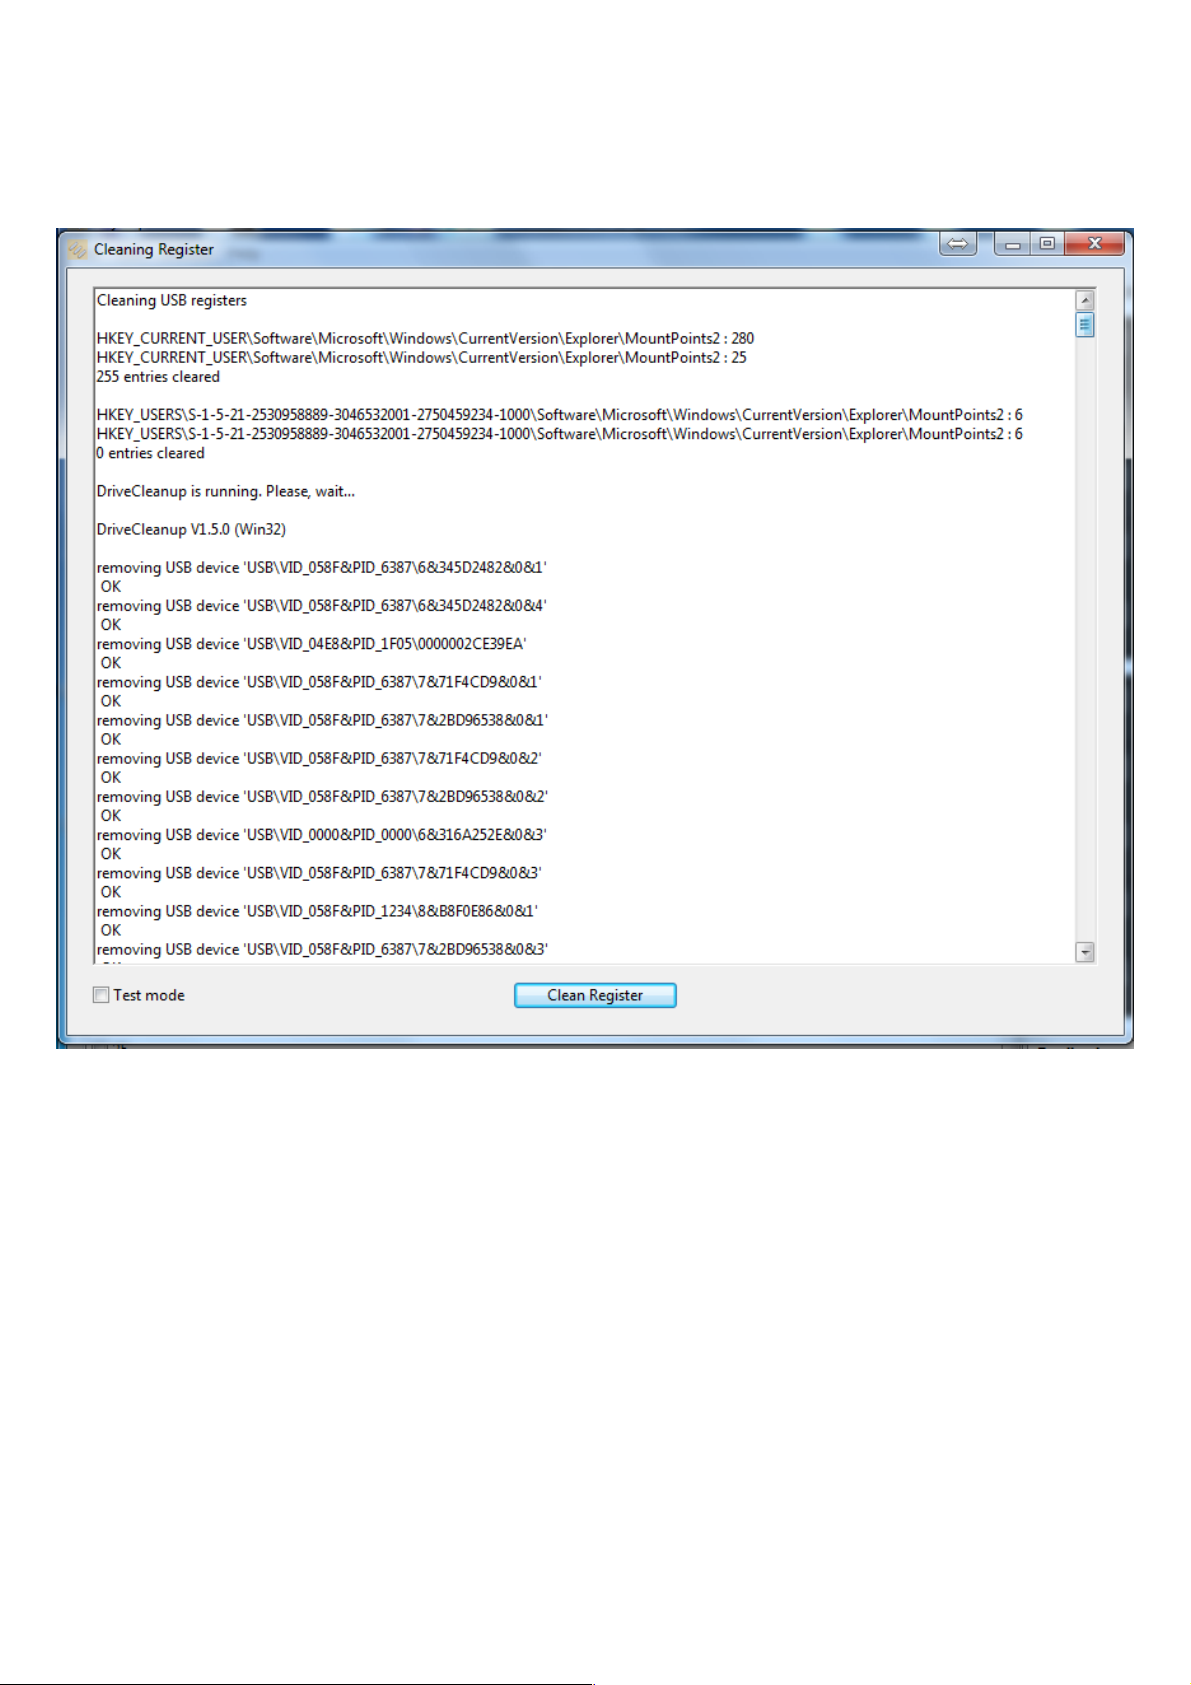
3) USB registries cleanup
This utility, as its name indicates, makes a USB bus registries cleanup, deleting all entries for
not connected devices, unused mount points and all useless USB Registry keys.
The Test mode (checkbox in the bottom left corner) simulates the operation and displays its result,
without destroying useless items. Use this mode in order to list what would be cleaned up or to
appreciate the opportunity of making a cleanup.
In normal mode (checkbox unmarked), destroying useless items is automatic, and the list of all
deleted Registry entries is displayed on screen.
It’s advised to do this cleaning at the end of the duplication instead of at the beginning.
Nevertheless, if done before the duplication, take care to quit the KeyDuplicator II application and
eventually to reboot the computer before running a duplication.
27
Page 29

VIII.Future releases 2.5.x of KeyDuplicator II
This software is continuously evolving, according to new technologies, needs or ideas sent by
end users, bugs corrections, etc. Certain innovations are considered right now:
- New licence scheme: free release via Internet, some free of charge duplications as demo test,
then licence per copy with decreasing price based on duplication quantity. This new licence
price is not yet known, it will probably be of a few Euro cents per duplication. Licences will be
sold via Internet (Paypal payment).
- Duplication or Format+Duplication auto-start, according to the number of inserted keys,
with a delay of X seconds before auto-start. The auto-start option and its delay will be
preferences parameters.
- Disk Copy from device to device, avoiding the need to create an Image file. Useful for HDD
duplication.
- Duplication duration will be estimated, taking into account keys speed and time needed for
plug/unplug operations.
- Complete log file with date, time, serial number, duplication result and any other useful
information.
- Capability to rename one or several files into all duplicated keys.
- Capability to delete one or several files into all duplicated keys.
- Automatic or manual updates available via Internet.
28
 Loading...