

Page 1
CD Automation S.r.l.
Via Picasso 34/36 - 20025 – Legnano (MI) – ITALY
Tel +39 0331 577479 – Fax +39 0331 579479
E-Mail: [email protected] - WEB: www.cdautomation.com
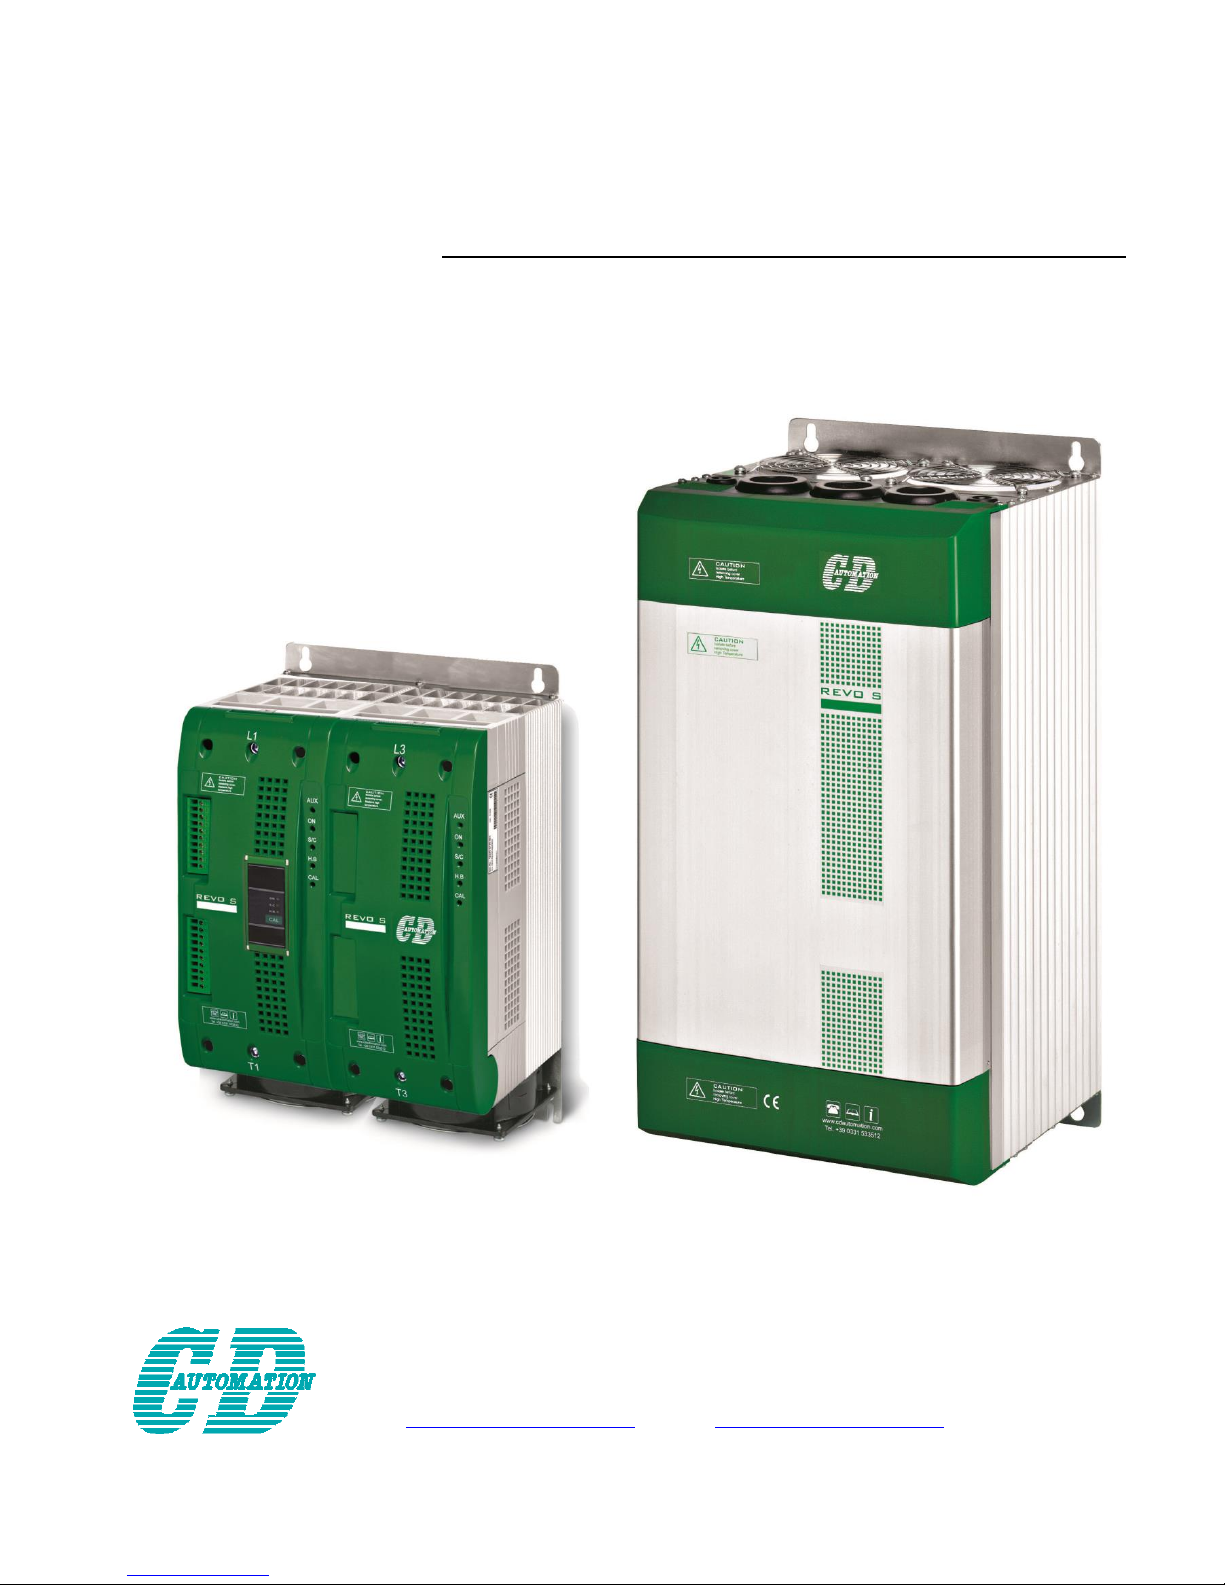
Revo
S 2Ph
Solid State Relay
from 280 to 700 A
USER’S MANUAL
Rev. 6/2016
00023
Page 2

CD Automation srl REVO S User’s Manual
2
Page 3

CD Automation srl REVO S User’s Manual
CD-Eng-REVO-S-2PH-280-700A-Solid-State-Relay
3
1 Important warning for safety .................................................................................................................................... 5
2 Basic Connections and sizing ..................................................................................................................................... 6
3 Identification and Order Code ................................................................................................................................... 7
3.1 Identification of the unit 7
3.2 Order Code 8
4 Technical Specifications ............................................................................................................................................ 9
4.1 General features: 9
4.2 Input features: 9
4.3 Output features (power device): 9
4.4 Fan Specification 9
4.5 Environmental installation conditions 10
4.6 Derating Curve 10
5 Installation .............................................................................................................................................................. 10
6 Dimensions and Weight ........................................................................................................................................... 11
6.1 Fixing holes 12
7 Wiring instructions .................................................................................................................................................. 13
7.1 Removing the cover 13
7.2 Power Terminals 16
7.3 Power cable torque (suggested) 13
7.4 Power cable dimensions (suggested) 14
7.5 Cable dimensions (suggested) of Earth and of the Command Terminals 14
7.6 Control Terminals Positions 15
7.7 Command Terminals for SSR Input only on S10 (280A) 17
7.8 Command Terminals for Analog Input or SSR input with HB S10(280A) 17
7.9 Schematic on S10 (280A) 18
7.10 Connection Diagram for 3 phases (control on 2 phases) on S10 280A 19
7.11 Commmand Terminals for SSR Input only on S14 (400-700A) 20
7.12 Command Terminals for Analog Input or SSR input with HB S14(400-700A) 20
7.13 Schematic on S14 (400-700A) 21
7.14 Connection Diagram for 3 phases (control on 2 phases) on S14 400-700A 22
8 Led status and Alarms ............................................................................................................................................. 23
9 Heater Break alarm and SCR short circuit (HB Option only) .................................................................................... 23
10 Supply the Electronic Board ................................................................................................................................... 24
11 Input setting ......................................................................................................................................................... 25
11.1 Input calibration procedure 26
12 Firing type ............................................................................................................................................................. 27
12.1 Zero Crossing (ZC) with SSR input 27
12.2 Burst Firing (BF) with Analog Input 27
12.3 Burst Firing settings 28
13 Internal Fuse ......................................................................................................................................................... 29
14 Maintenance .......................................................................................................................................................... 30
14.1 Trouble Shooting 30
14.2 Warranty condition 30
Page 4
CD Automation srl REVO S User’s Manual
CD-Eng-REVO-S-2PH-280-700A-Solid-State-Relay
4
CD Automation s.r.l.
Controllers, Drives & Automation
Via Picasso, 34/36 - 20025 Legnano (MI)- Italia
P.I. 08925720156 -Tel. (0331) 577479 - Fax (0331) 579479
Internet : www.cdautomation.com - E-MAIL: [email protected]
Dichiarazione di Conformità
Declaration of Conformity
PRODUTTORE:
PRODUCT MANUFACTURER: CD Automation S.R.L.
INDIRIZZO:
ADDRESS: Via Pablo Picasso 34//36
20025 Legnano (Mi)
Italia
Dichiara che il prodotto:
Declare that the product:
RevoS, 2ph da280 a 700A
SODDISFA I REQUISITI DELLA NORMA :
Specifica di sicurezza EN60947-1 :2008
EN60947-4-3:2001
Specifica sulle emissioni EN60947-4-3:2000
Specifica sulle Immunità EN60947-4-3:2000
FULFILS THE REQUIREMENTS OF THE STANDARD:
Electrical safety Standard EN60947-1 :2008
EN60947-4-3:2001
Generic Emission standard EN60947-4-3:2000
Generic Immunity standard EN60947-4-3:2000
CDAutomation dichiara che I prodotti sopra menzionati sono conformi alla direttiva
CDAutomation declares that The products above mentioned they am conforming to the directive
EMC 2004/108/CEE e alla direttiva Bassa Tensione (low Voltage) 2006/95/CEE
DESCIZIONE DEL PRODOTTO: Unità di controllo potenza elettrica
PRODUCT DESCRIPTION: Elettric power controll
UTILIZZO: Controllo processi termici
SCOPE OF APPLICATION: Thermal controll process
Data di emissione: 20/04/2010 Amministratore Unico e
Issued on: 20/04/2010 Legale Rappresentante
Claudio Brizzi
Page 5
CD Automation srl REVO S User’s Manual
CD-Eng-REVO-S-2PH-280-700A-Solid-State-Relay
5
1 Important warning for safety
The Thyristor unit are integral part of industrial equipments.
When it is supply, the Thyristor unit is subject to dangerous tensions. Don't remove the plastic cover.
Don't use this unit in aerospace and nuclear application.
Electric Shock Hazard (Rischi di scosse elettriche, Risque de choque électrique)
When thyristor unit has been connected to main supply voltage and is switched off, before to touch it be
secure that the unit is isolated and wait at least one minute to allow discharging internal capacitors.
Thus be secure that:
access to thyristor unit is only permitted to specialised personnel;
the authorised personnel must read this manual before to have access to the unit;
the access to the unit must be denied to unauthorised personnel.
Important warnings (Avvertenze importanti, attention)
During the operations with units under tension, local regulations regarding electrical installation should
be rigidly observed:
Respect the internal safety rules.
Don't bend components to maintain insulation distances.
Protect the units from high temperature humidity and vibrations.
Don't touch components to prevent electrostatic discharges on them.
Verify that the size is in line with real needs.
To measure voltage current etc. on unit, remove rings and other jewels from fingers and hands.
Authorized personnel that work on thyristor unit under power supply voltage must be on insulated
board
This listing does not represent a complete enumeration of all necessary safety cautions
Protection (Protezione, Protection)
The unit have IP20 protection rating as defined by the specific international. Is necessary consider the
place of installation.
Earth (Messa a terra, Terre)
For safety, the Thyristor unit with isolated heat-sink must be connected to earth.
Earth impedance should be correspondent to local earth regulation. Periodically the earth efficiency
should be inspected.
Electromagnetic compatibility (Compatibilità elettromagnetica, Compatibilité électromag.)
Our thyristor units have an excellent immunity to electromagnetic interferences if all suggestions
contained in this manual are respected. In respect to a good Engineering practice, all inductive loads like
solenoids contactor coils should have a filter in parallel
Emissions (Emissioni, Emission)
All solid-state power controllers emit a certain amount of radio-frequency energy because of the fast
switching of the power devices. The CD Automation’s Thyristor unit are in accord with the EMC norms,
CE mark.
In most installations, near by electronic systems will experience no difficulty with interference. If very
sensitive electronic measuring equipment or low-frequency radio receivers are to be used near the unit,
some special precautions may be required. These may include the installation of a line supply filter and
the use of screened (shielded) output cable to the load.
Page 6
CD Automation srl REVO S User’s Manual
CD-Eng-REVO-S-2PH-280-700A-Solid-State-Relay
6
2 Basic Connections and sizing
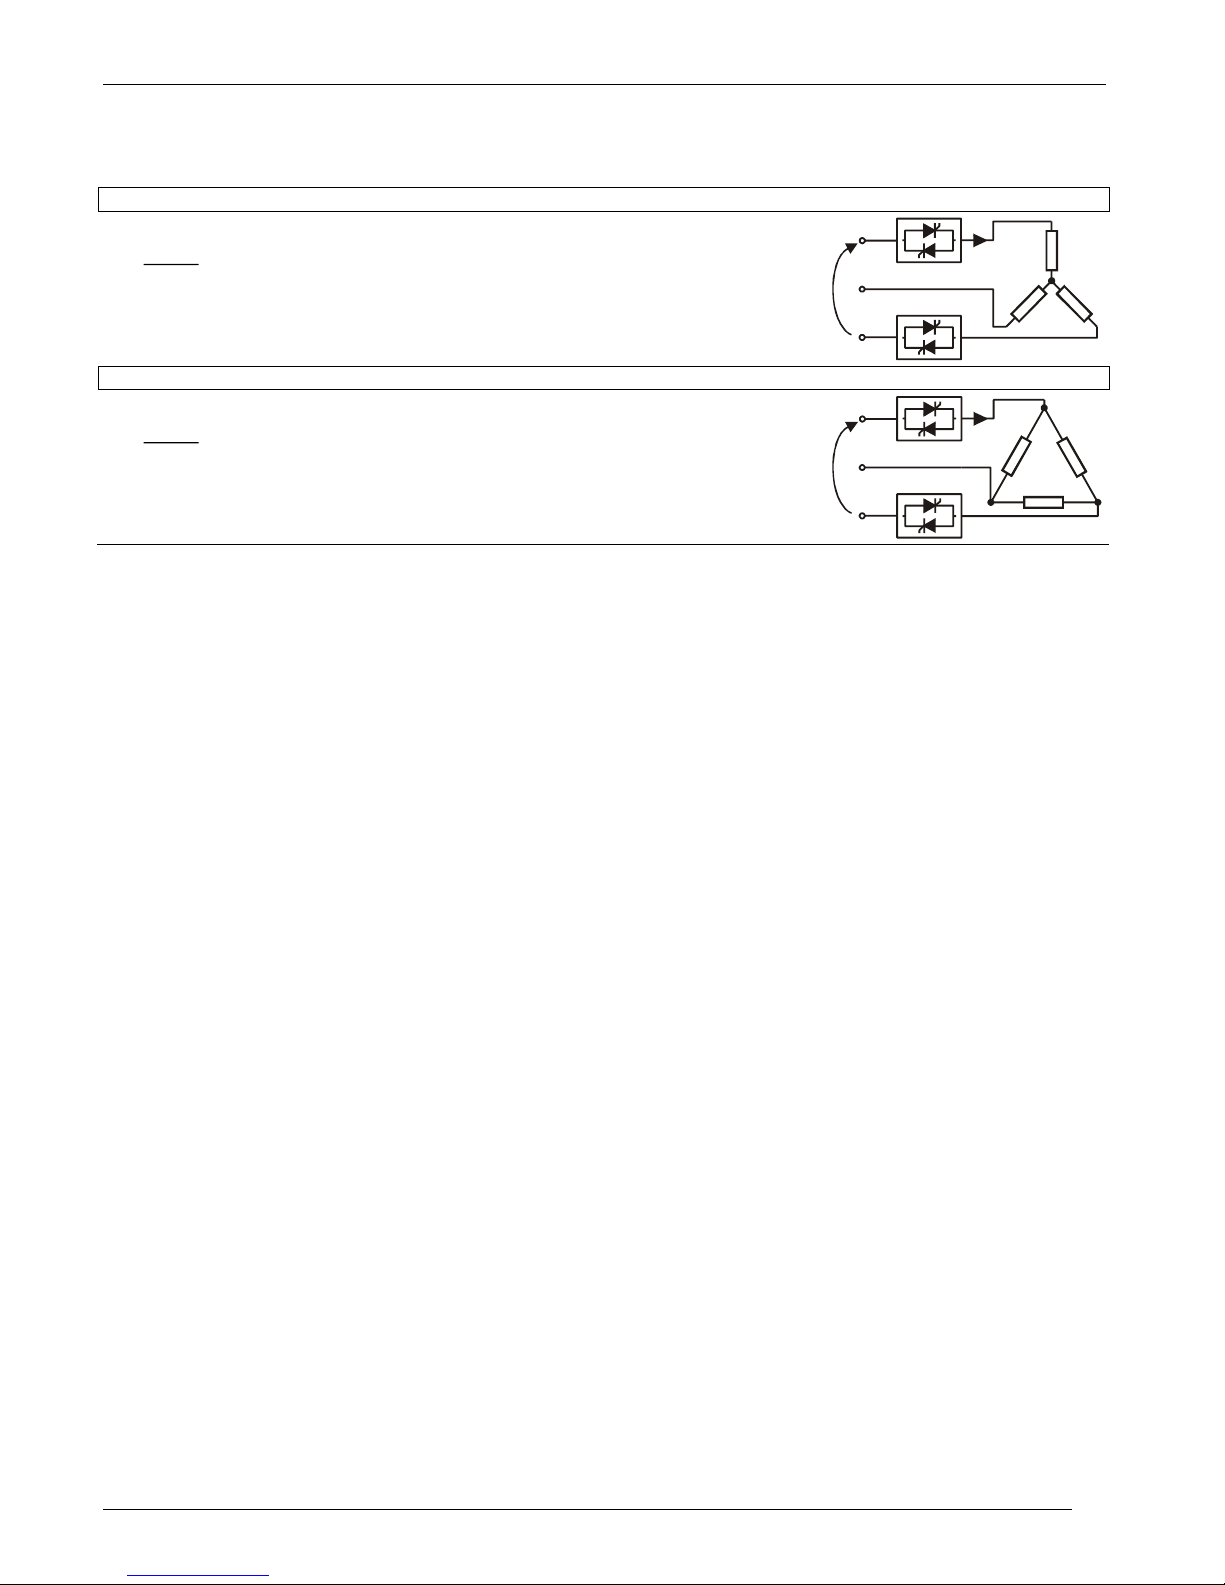
Star wiring with resistive load (control on two phases with REVO M-2PH)
V
P
I
731,
V = Nominal voltage of the load
I = Nominal current of the load
P = Nominal power of the load
V
I
Delta wiring with resistive load (control on two phases with REVO M-2PH)
V
P
I
731,
V = Nominal voltage of the load
I = Nominal current of the load
P = Nominal power of the load
V
I
Page 7
CD Automation srl REVO S User’s Manual
CD-Eng-REVO-S-2PH-280-700A-Solid-State-Relay
7
3 Identification and Order Code
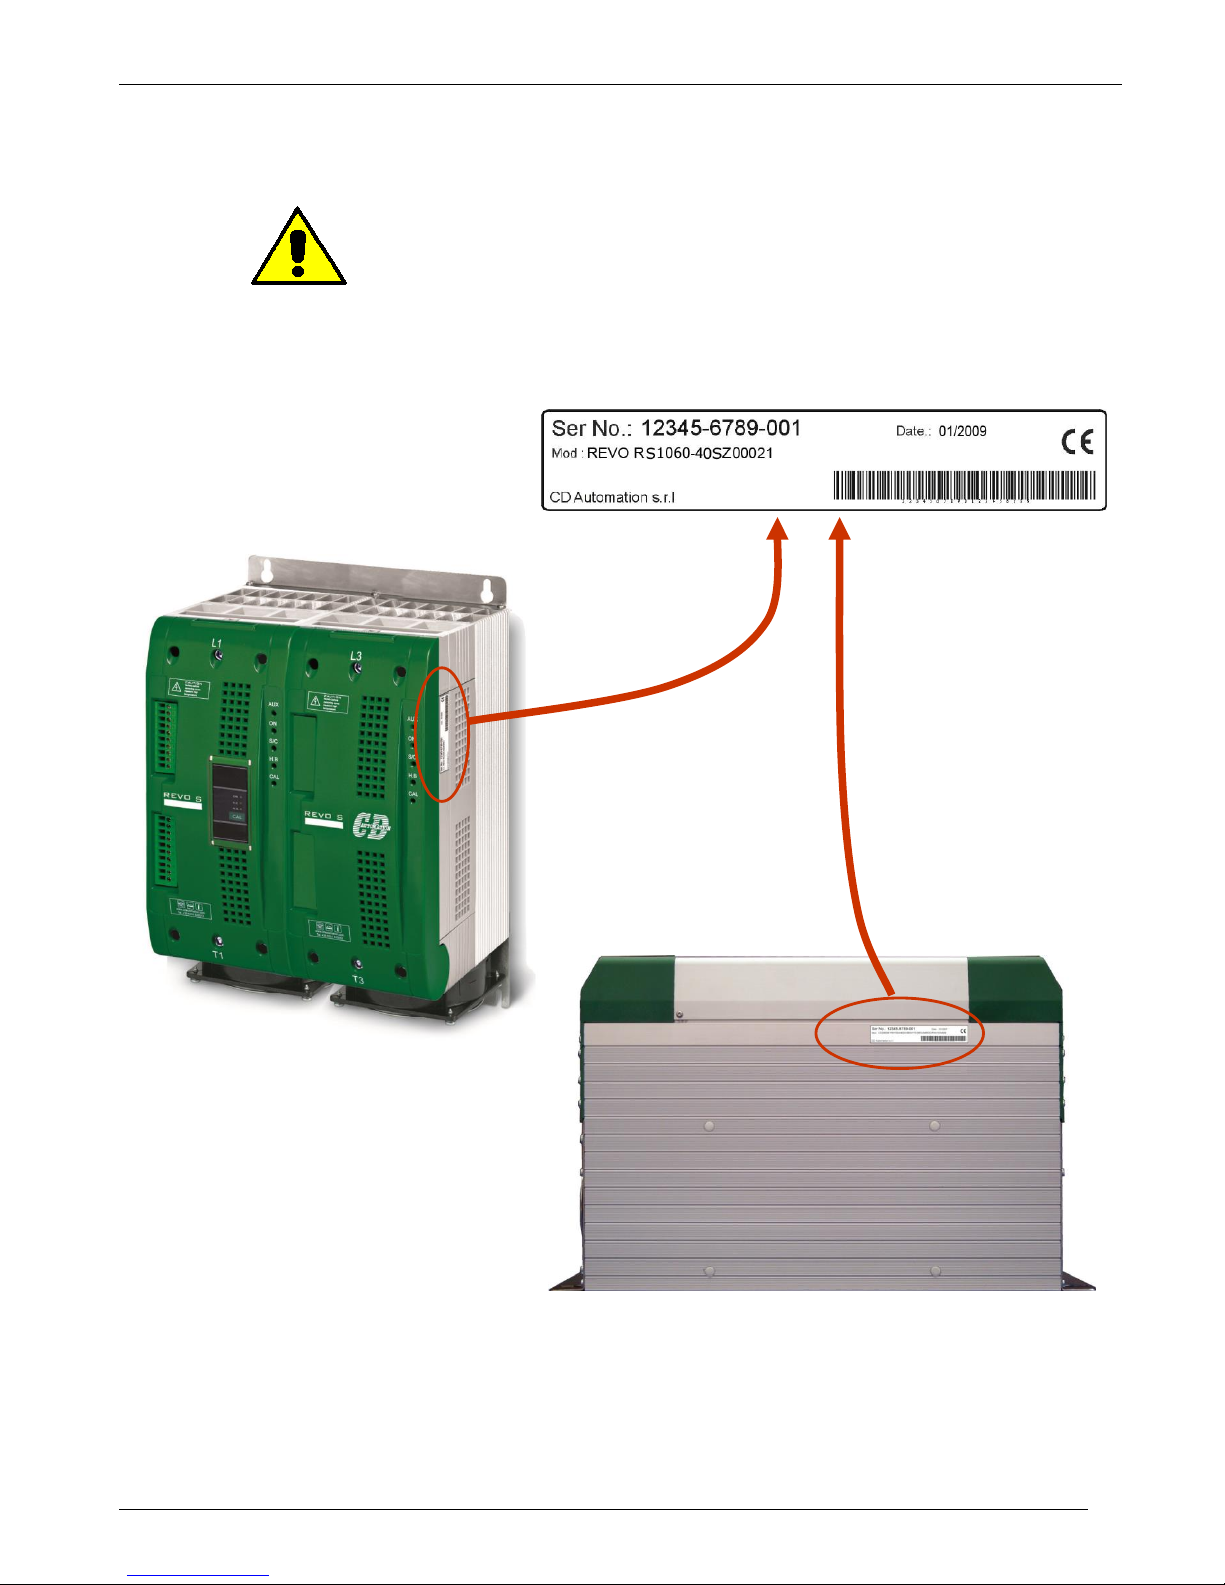
3.1 Identification of the unit
Caution: Before to install, make sure that the Thyristor unit have
not damages. If the product has a fault, please contact the dealer
from which you purchased the product.
The identification's label give all the information regarding the factory settings of the Thyristor unit, this
label is on the unit, like represented in figure.
Verify that the product is the same thing as ordered .
Page 8
CD Automation srl REVO S User’s Manual
CD-Eng-REVO-S-2PH-280-700A-Solid-State-Relay
8
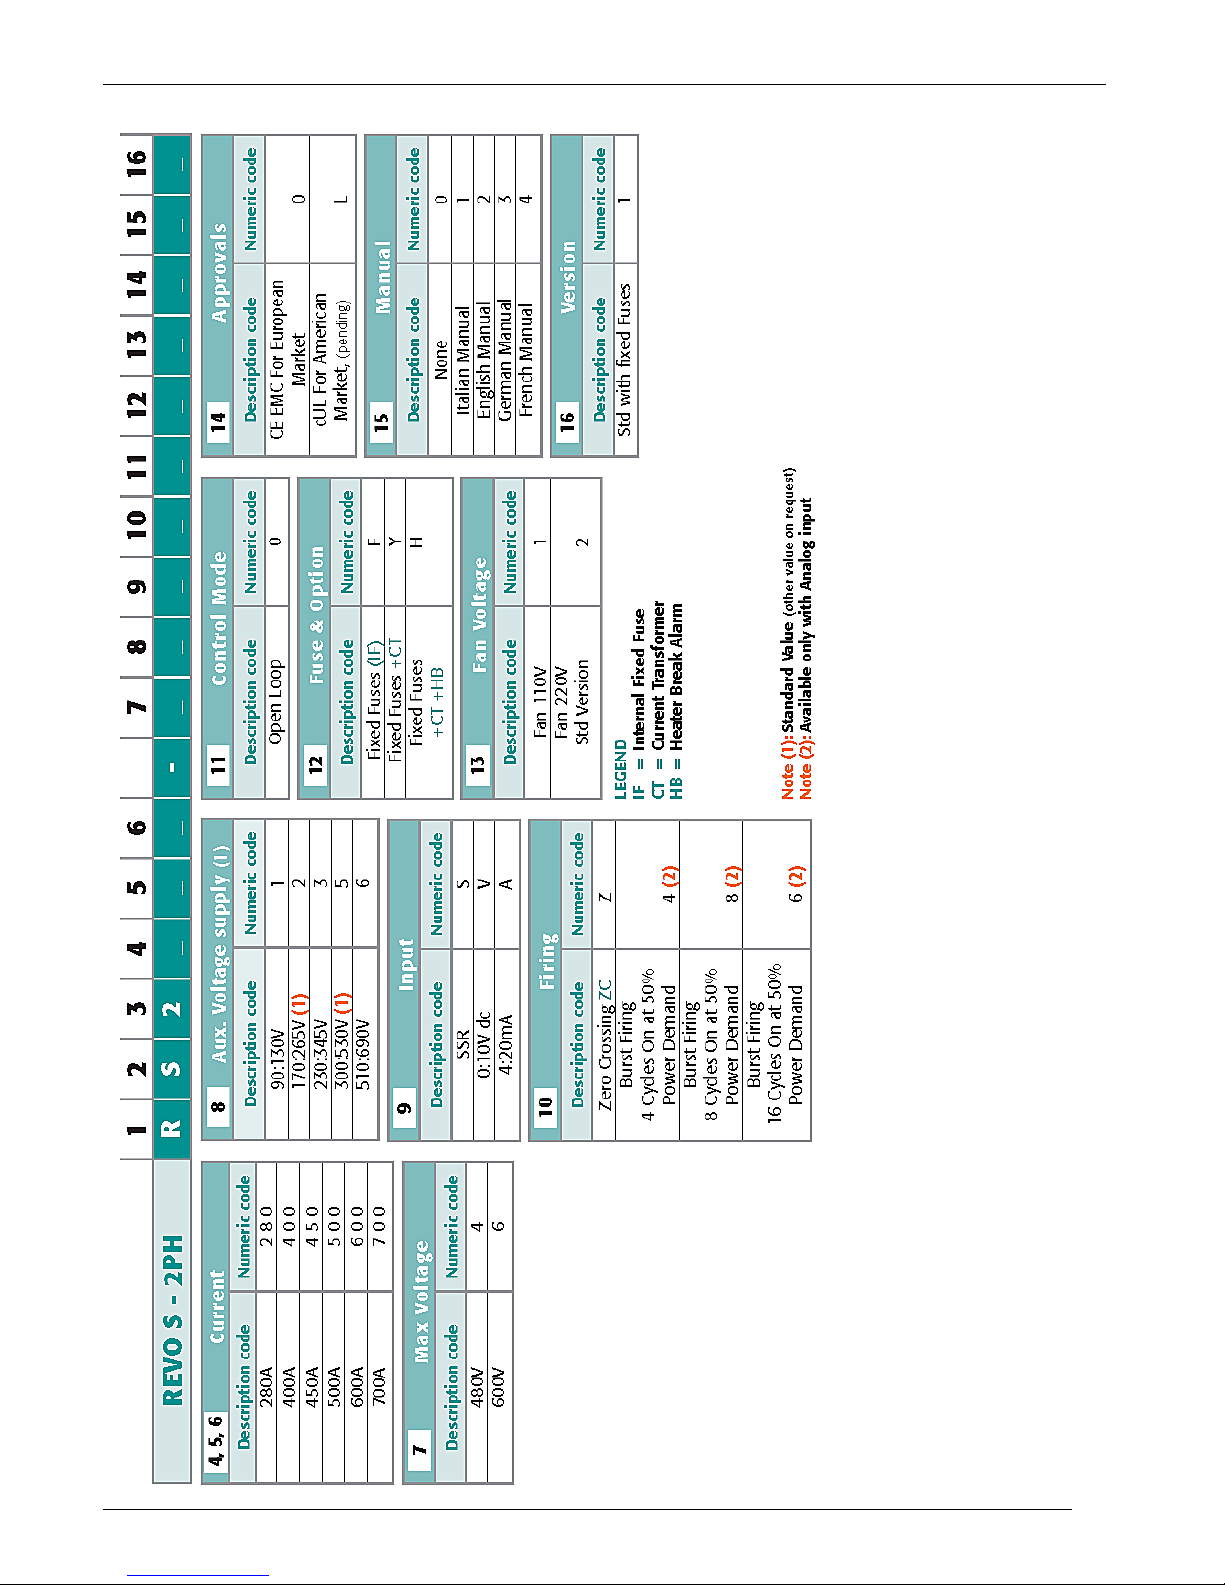
3.2 Order Code
Page 9
CD Automation srl REVO S User’s Manual
CD-Eng-REVO-S-2PH-280-700A-Solid-State-Relay
9
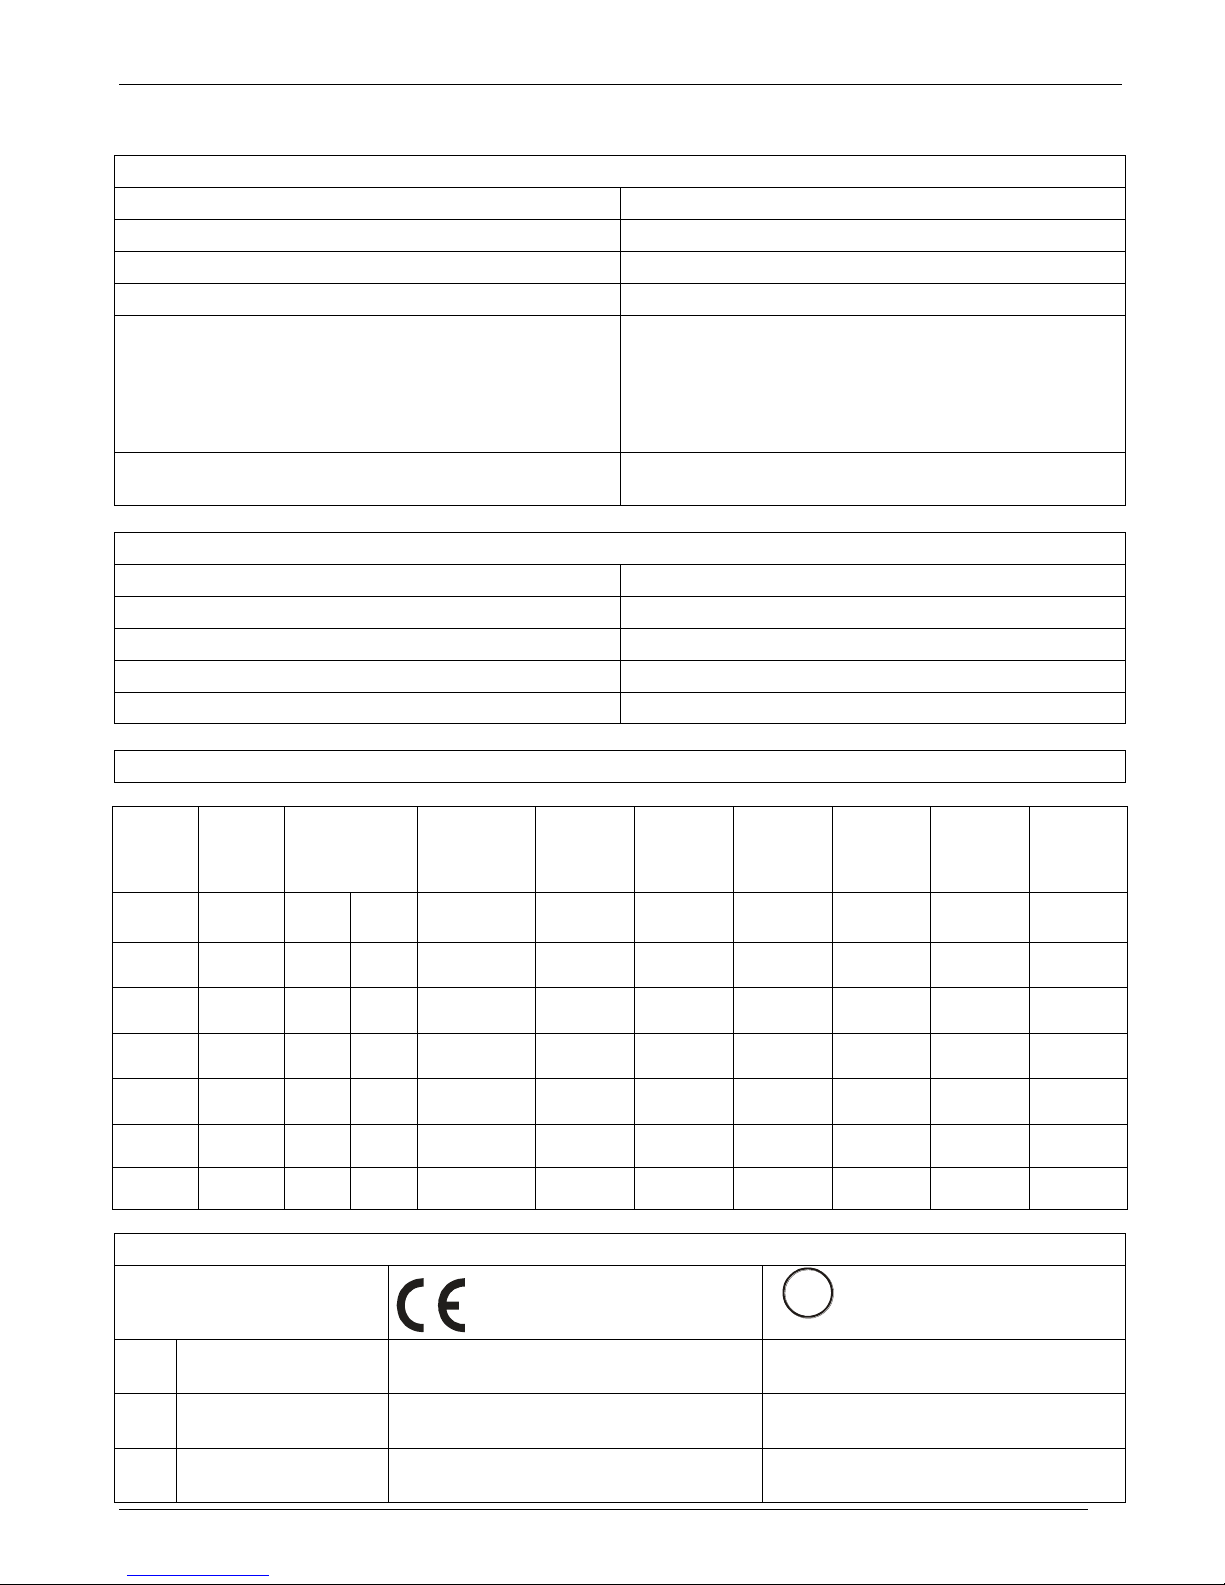
4 Technical Specifications
4.1 General features:
Cover and Socket material:
PolymericV2
Utilization Category
AC-51 AC-55b
IP Code
20
Method of Connecting
Load in Delta, Load in Star
Auxiliary voltage:
90:130V (8 VA Max)
170:265V (8 VA Max)
230:345V (8 VA Max)
300:530V (8 VA Max)
510:690V (8 VA Max)
600:760V (8 VA Max)
Relay output for Heater Break Alarm
(only with HB option):
0.5A a 125VAC
4.2 Input features:
Logic input SSR:
5 ÷ 30Vdc 5mA Max (ON 4Vdc OFF 1Vdc)
Analogic input
0 ÷ 10Vdc impedance 15 K ohm
Analogic input
4 ÷ 20mA impedance 100 ohm
POT
15 K ohm min.
Digital Input
4 ÷ 24Vdc 5mA Max (ON 4Vdc OFF 1Vdc)
4.3 Output features (power device):
Current
Nominal
Voltage
range
(Ue)
Repetitive
peak reverse
voltage
(Uimp)
Latching
current
Max peak
one cycle
Leakage
current
I2T value
max
Frequency
range
Power loss
Isolation
Voltage
(Ui)
(A)
(V)
(480V)
(600V)
(mAeff)
(10msec.)
(A)
(mAeff)
tp=10mse
c
(Hz)
I=Inom
(W)
Vac
280A
24÷600
1200
1600
300
4800
15
236000
47÷70
560
2500
400A
24÷600
1200
1600
200
7800
15
300000
47÷70
875
2500
450A
24÷600
1200
1600
200
7800
15
300000
47÷70
1021
2500
500A
24÷600
1200
1600
200
8000
15
306000
47÷70
1061
2500
600A
24÷600
1200
1600
1000
17800
15
1027000
47÷70
1178
2500
700A
24÷600
1200
1600
1000
17800
15
1027000
47÷70
1425
2500
4.4 Fan Specification
Size
Number of fans
C US
LISTED
U
L
®
Number of fans
S10
280A
Two Fans - (17W x 2) 34W
Two Fans - (17W x 2) 34W
S14
400A, 500A, 600A
Two Fans - (17W x 2) 34W
Four Fan - (17W x 4) 68W
S14
450A, 700A
Four Fan - (17W x 4) 68W
Four Fan - (17W x 4) 68W
Page 10
CD Automation srl REVO S User’s Manual
CD-Eng-REVO-S-2PH-280-700A-Solid-State-Relay
10
5 Installation
Before to install, make sure that the Thyristor unit
have not damages.
If the product has a fault, please contact the
dealer from which you purchased the product.
Verify that the product is the same thing as
ordered.
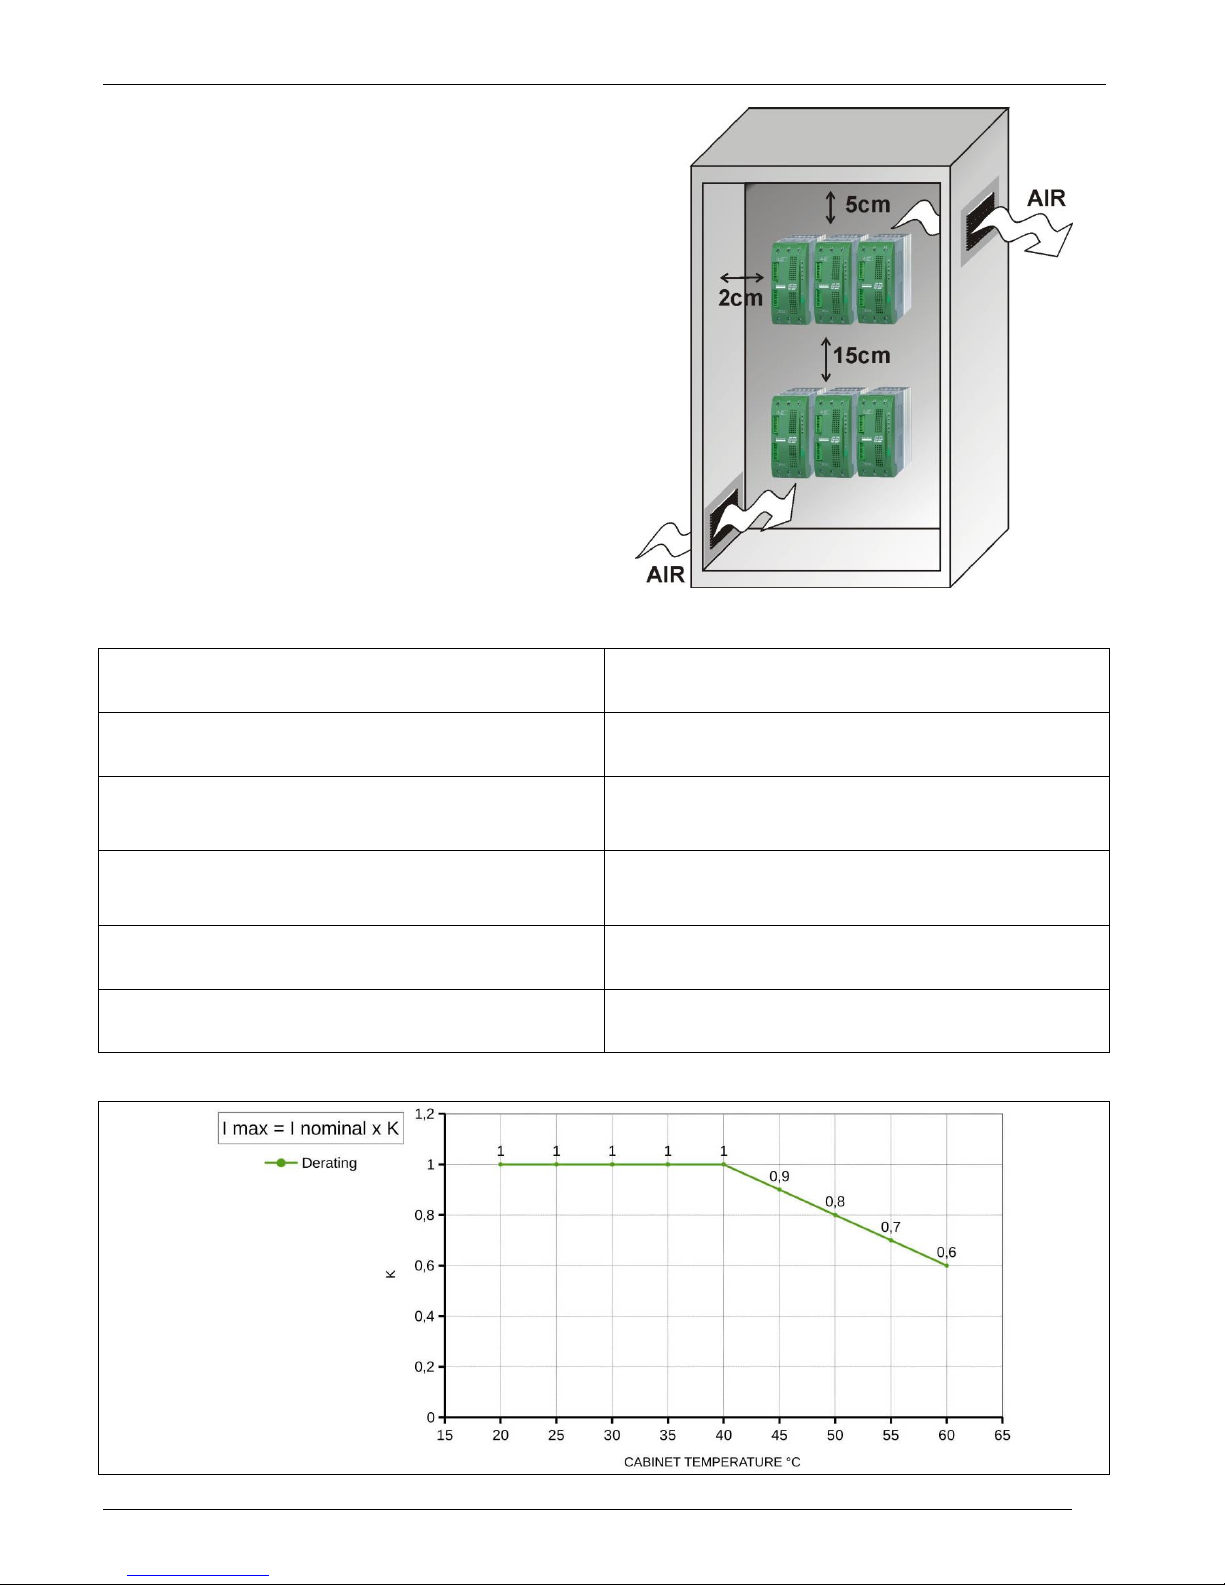
The Thyristor unit must be always mounted in
vertical position to improve air cooling on heatsink.
Maintain the minimum distances in vertical and in
horizontal as represented.
When more unit has mounted inside the cabinet
maintain the air circulation like represented in
figure.
Sometimes is necessary installing a fan to have
better air circulation.
5.1 Environmental installation conditions
Ambient temperature
0-40°C at nominal current. Over 40°C use the
derating curve.
Storage temperature
-25°C a 70°C
Installation place
Don’t install at direct sun light, where there are
conductive dust, corrosive gas, vibration or water
and also in salty environmental.
Altitude
Up to 1000 meter over sea level. For higher
altitude reduce the nominal current of 2% for each
100m over 1000m
Humidity
From 5 to 95% without condense and ice
Pollution Level
Up to 2nd Level ref. IEC 60947-1 6.1.3.2
5.2 Derating Curve
Page 11
CD Automation srl REVO S User’s Manual
CD-Eng-REVO-S-2PH-280-700A-Solid-State-Relay
11
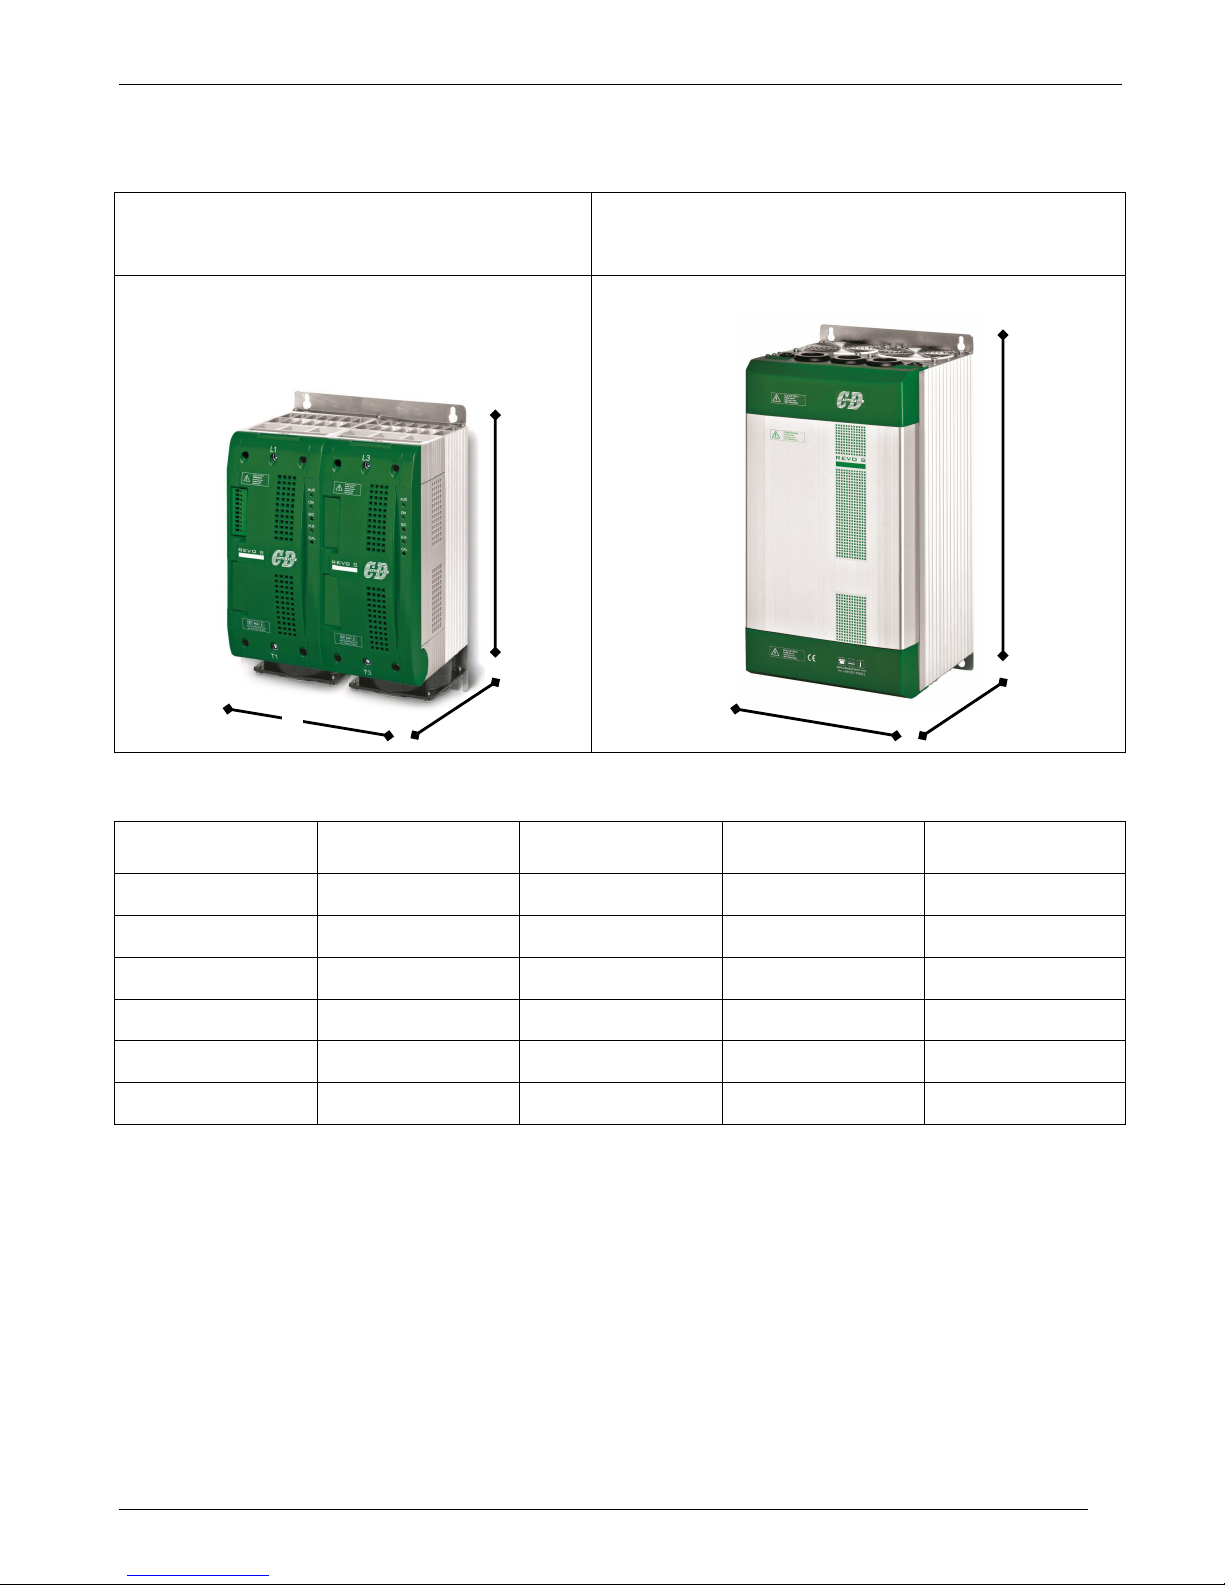
5.3 Dimensions and Weight
REVO-S 2PH
280A (S10)
REVO-S 2PH
400A÷700A (S14)
Size
W(mm)
H(mm)
D(mm)
Weight (kg)
280A (2xS10)
240
350
230
11
400A (SR15)
262
520
270
22,5
450A (SR15)
262
520
270
22,5
500A (SR15)
262
520
270
22,5
600A (SR15)
262
520
270
22,5
700A (SR15)
262
520
270
22,5
W D H W D
H
Page 12
CD Automation srl REVO S User’s Manual
CD-Eng-REVO-S-2PH-280-700A-Solid-State-Relay
12
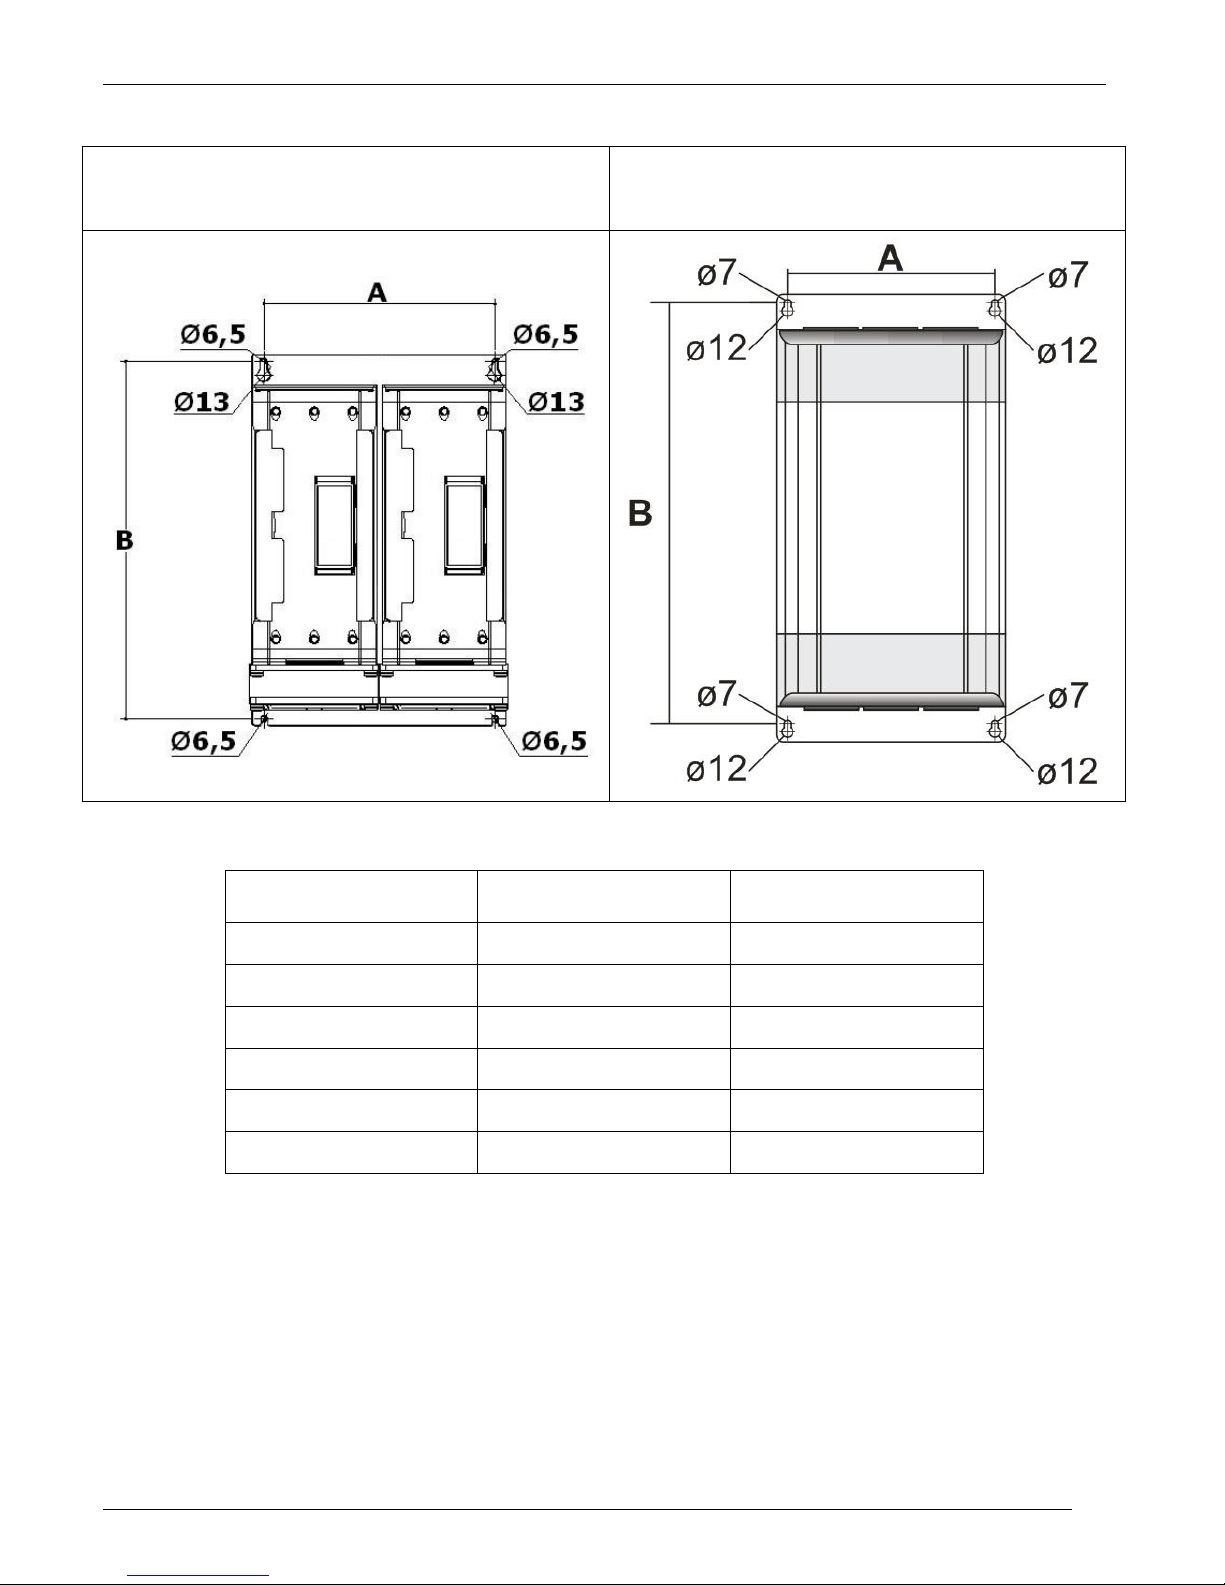
5.4 Fixing holes
REVO-S 2PH
280A (S10)
REVO-S 2PH
400A÷700A (S14)
Size
A(mm)
B(mm)
280A (S10)
215
335
400A (S14)
222
490
450A (S14)
222
490
500A (S14)
222
490
600A (S14)
222
490
700A (S14)
222
490
Page 13
CD Automation srl REVO S User’s Manual
CD-Eng-REVO-S-2PH-280-700A-Solid-State-Relay
13
6 Wiring instructions
The Thyristor unit could be susceptible to interferences lost by near equipments or by the power supply,
for this reason in accord to the fundamental practices rules is opportune take some precautions:
The coil contactor, the relays and other inductive loads must be equipped with opportune RC filter.
Use shielded bipolar cables for all the input and output signals.
The signal cables must not be near and parallel to the power cables.
Local regulations regarding electrical installation should be rigidly observed.
Use copper cables and wires rated for use at 75°C only.
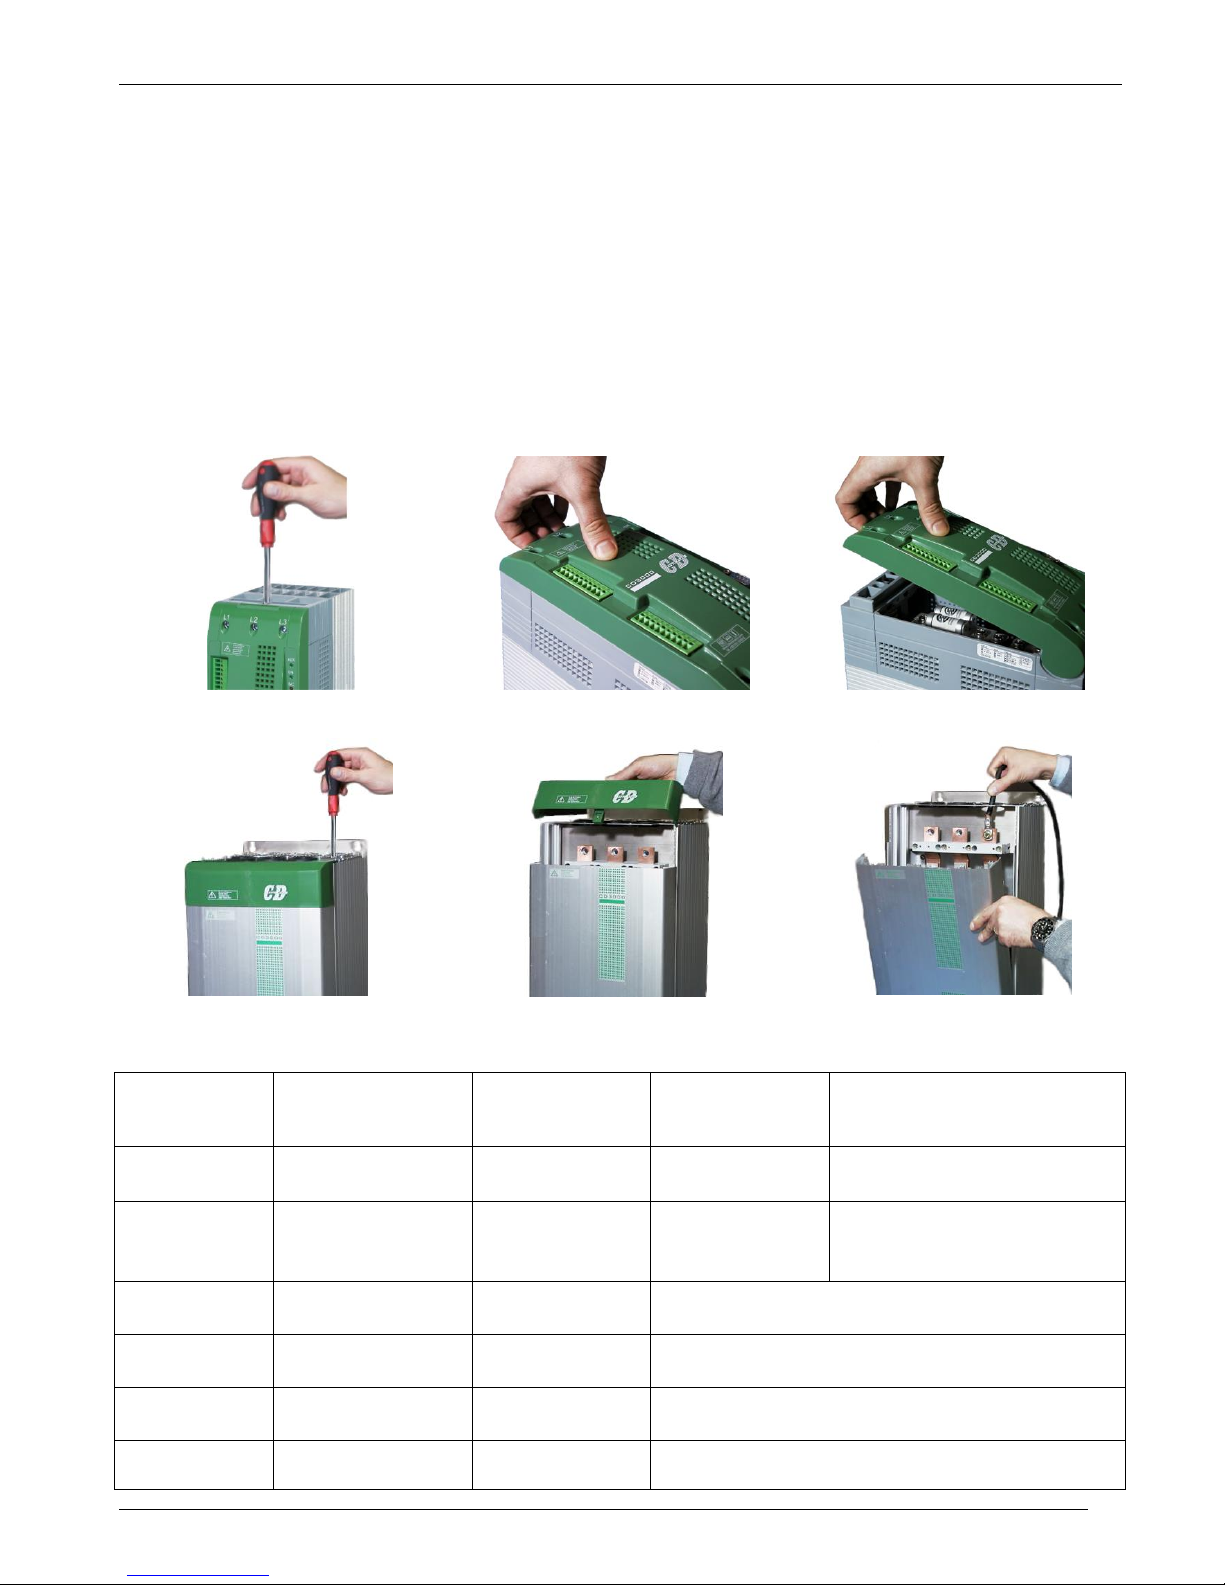
6.1 Removing the cover
Instructions for open the thyristor unit S10
Instructions for open the thyristor unit size S14
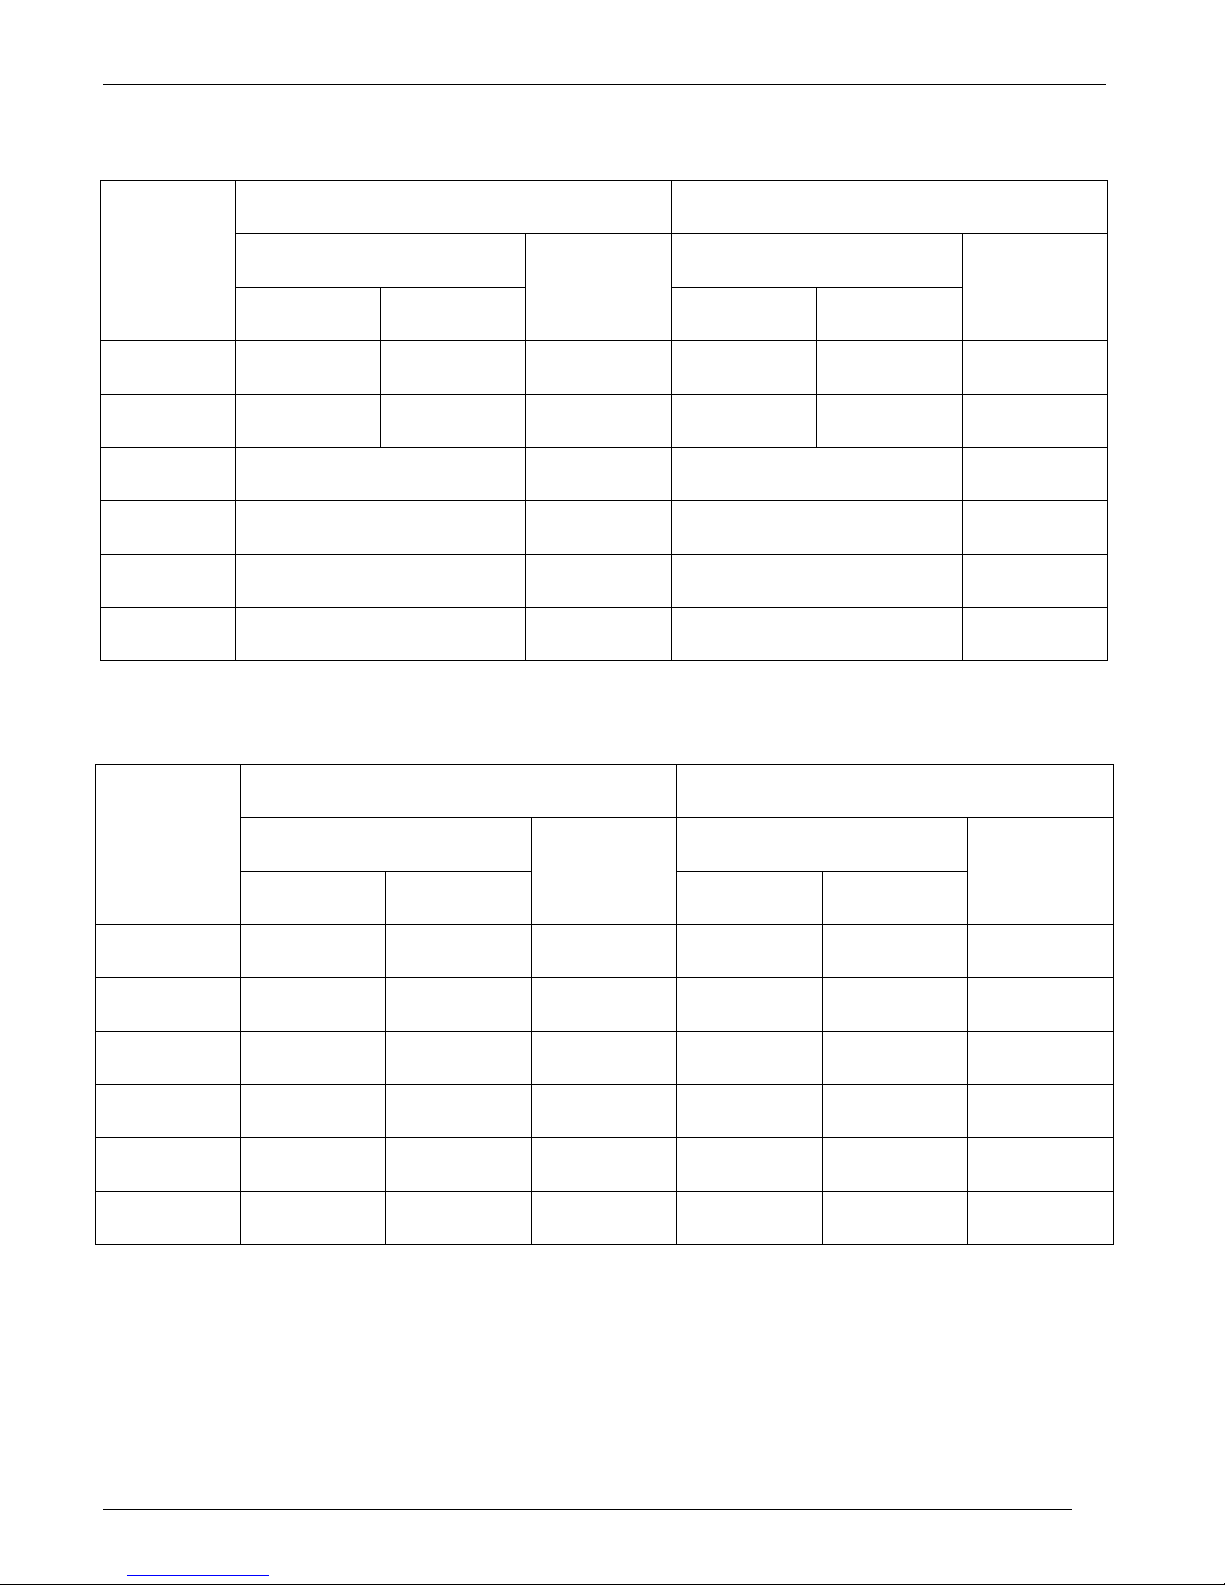
6.2 Power cable torque (suggested)
Current
Connector
Type
Torque
Lb-in (N-m)
Wire
Range
AWG / kcmil
Wire
Terminal
280A (S10)
Bus Bar
with M8 screw
265 (30.0)
2x1/0
300
UL Listed (ZMVV)
Copper Tube Crimp. Lug
400A (S14)
Bus Bar
with M10 screw
505 (57.0)
2x3/0
600
UL Listed (ZMVV)
Copper Tube Crimp. Lug
450A (S14)
Bus Bar
with M10 screw
505 (57.0)
Bus bar
30x6mm
500A (S14)
Bus Bar
with M10 screw
505 (57.0)
Bus bar
60x4mm
600A (S14)
Bus Bar
with M10 screw
505 (57.0)
Bus bar
60x5mm
700A (S14)
Bus Bar
with M10 screw
505 (57.0)
Bus bar
60x6mm
Page 14
CD Automation srl REVO S User’s Manual
CD-Eng-REVO-S-2PH-280-700A-Solid-State-Relay
14
6.3 Power cable dimensions (suggested)
Supply
Load
Current
Cable
Screw
Cable
Screw
mm²
AWG
M
mm²
AWG
M
280A (S10)
120
4/0
M8
120
4/0
M8
400A (S14)
2 x 95
2 x 3/0
M10
2 x 95
2 x 3/0
M10
450A (S14)
Bus Bar
30 x 6 mm
Bus Bar
30 x 6 mm
500A (S14)
Bus Bar
60 x 4 mm
Bus Bar
60 x 4 mm
600A (S14)
Bus Bar
60 x 5 mm
Bus Bar
60 x 5 mm
700A (S14)
Bus Bar
60 x 6 mm
Bus Bar
60 x 6 mm
6.4 Cable dimensions (suggested) of Earth and of the Command Terminals
Earth
Command Terminals
Current
Cable
Screw
Cable
mm²
AWG
M
mm²
AWG
280A (S10)
50 1 M8
0,50
18
400A (S14)
50 1 M8
0,50
18
450A (S14)
70
1/0
M8
0,50
18
500A (S14)
70
1/0
M8
0,50
18
600A (S14)
70
1/0
M8
0,50
18
700A (S14)
70
1/0
M8
0,50
18
Page 15
CD Automation srl REVO S User’s Manual
CD-Eng-REVO-S-2PH-280-700A-Solid-State-Relay
15
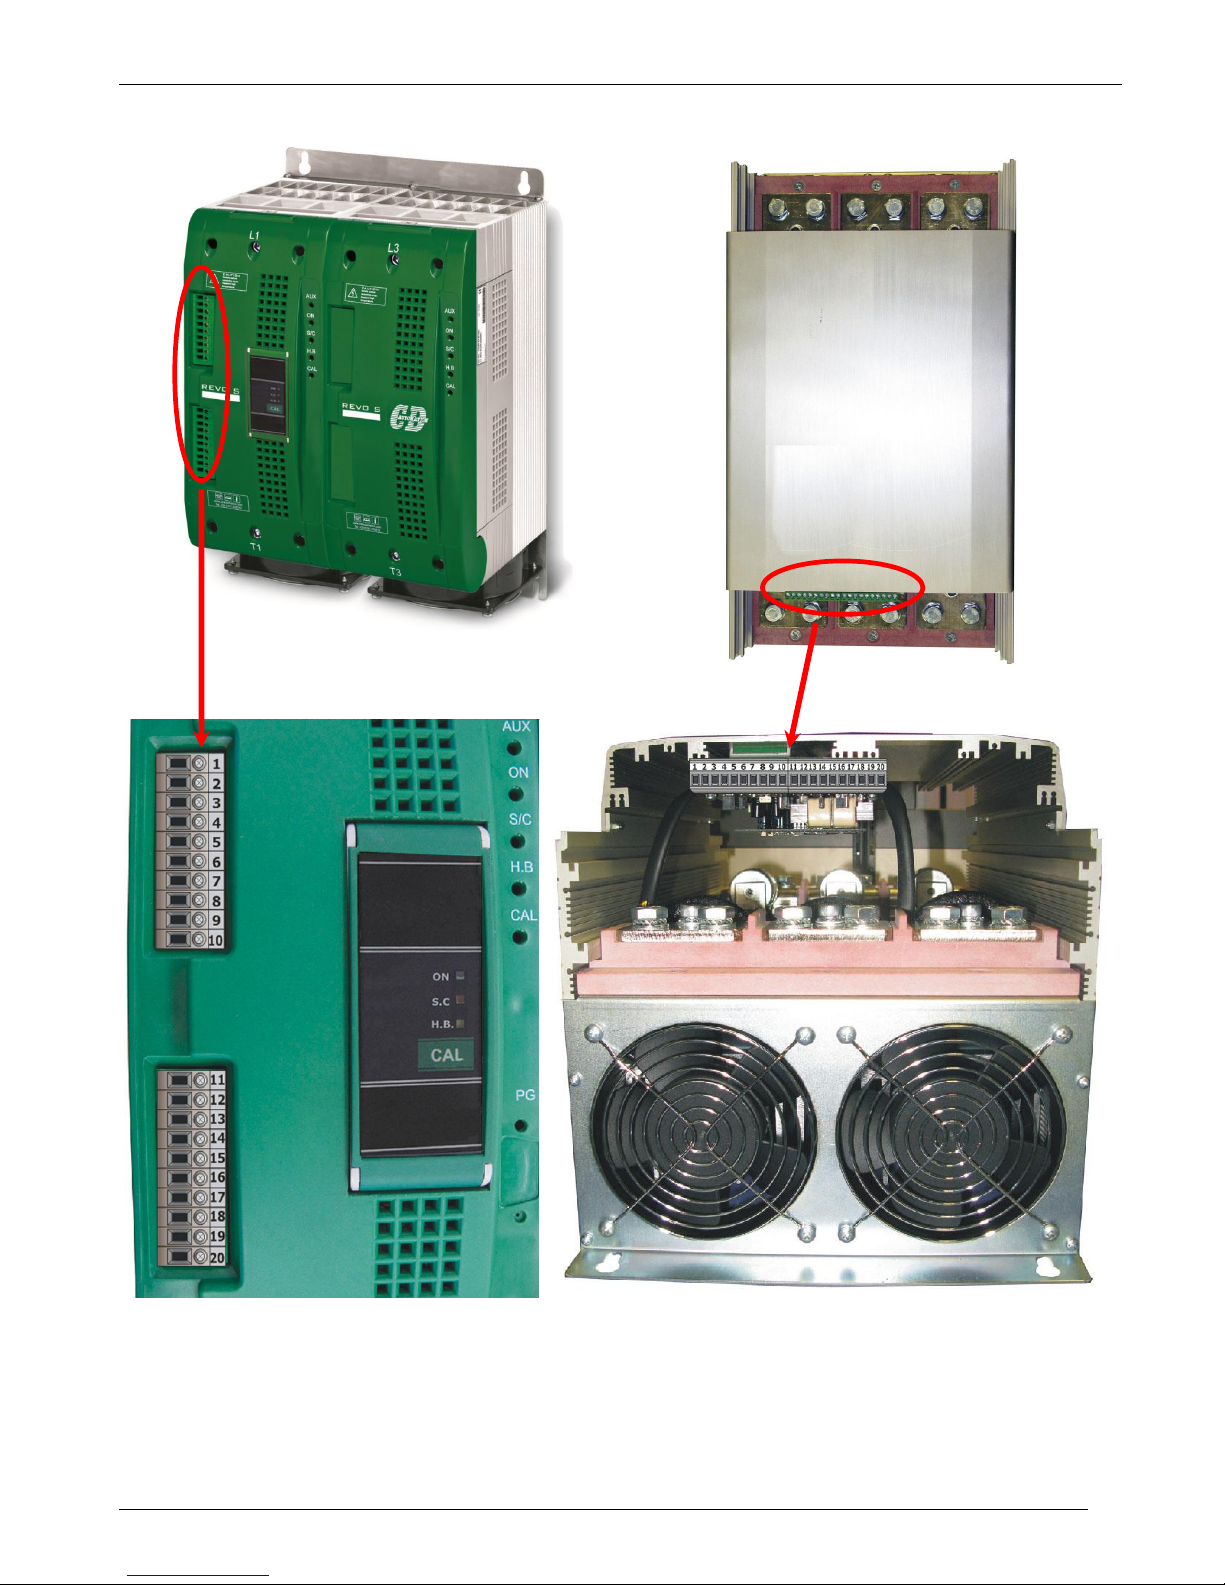
6.5 Terminals Positions
Page 16
CD Automation srl REVO S User’s Manual
CD-Eng-REVO-S-2PH-280-700A-Solid-State-Relay
16
REVO-S 2PH
280A (S10)
REVO-S 2PH
400A÷700A (S14)
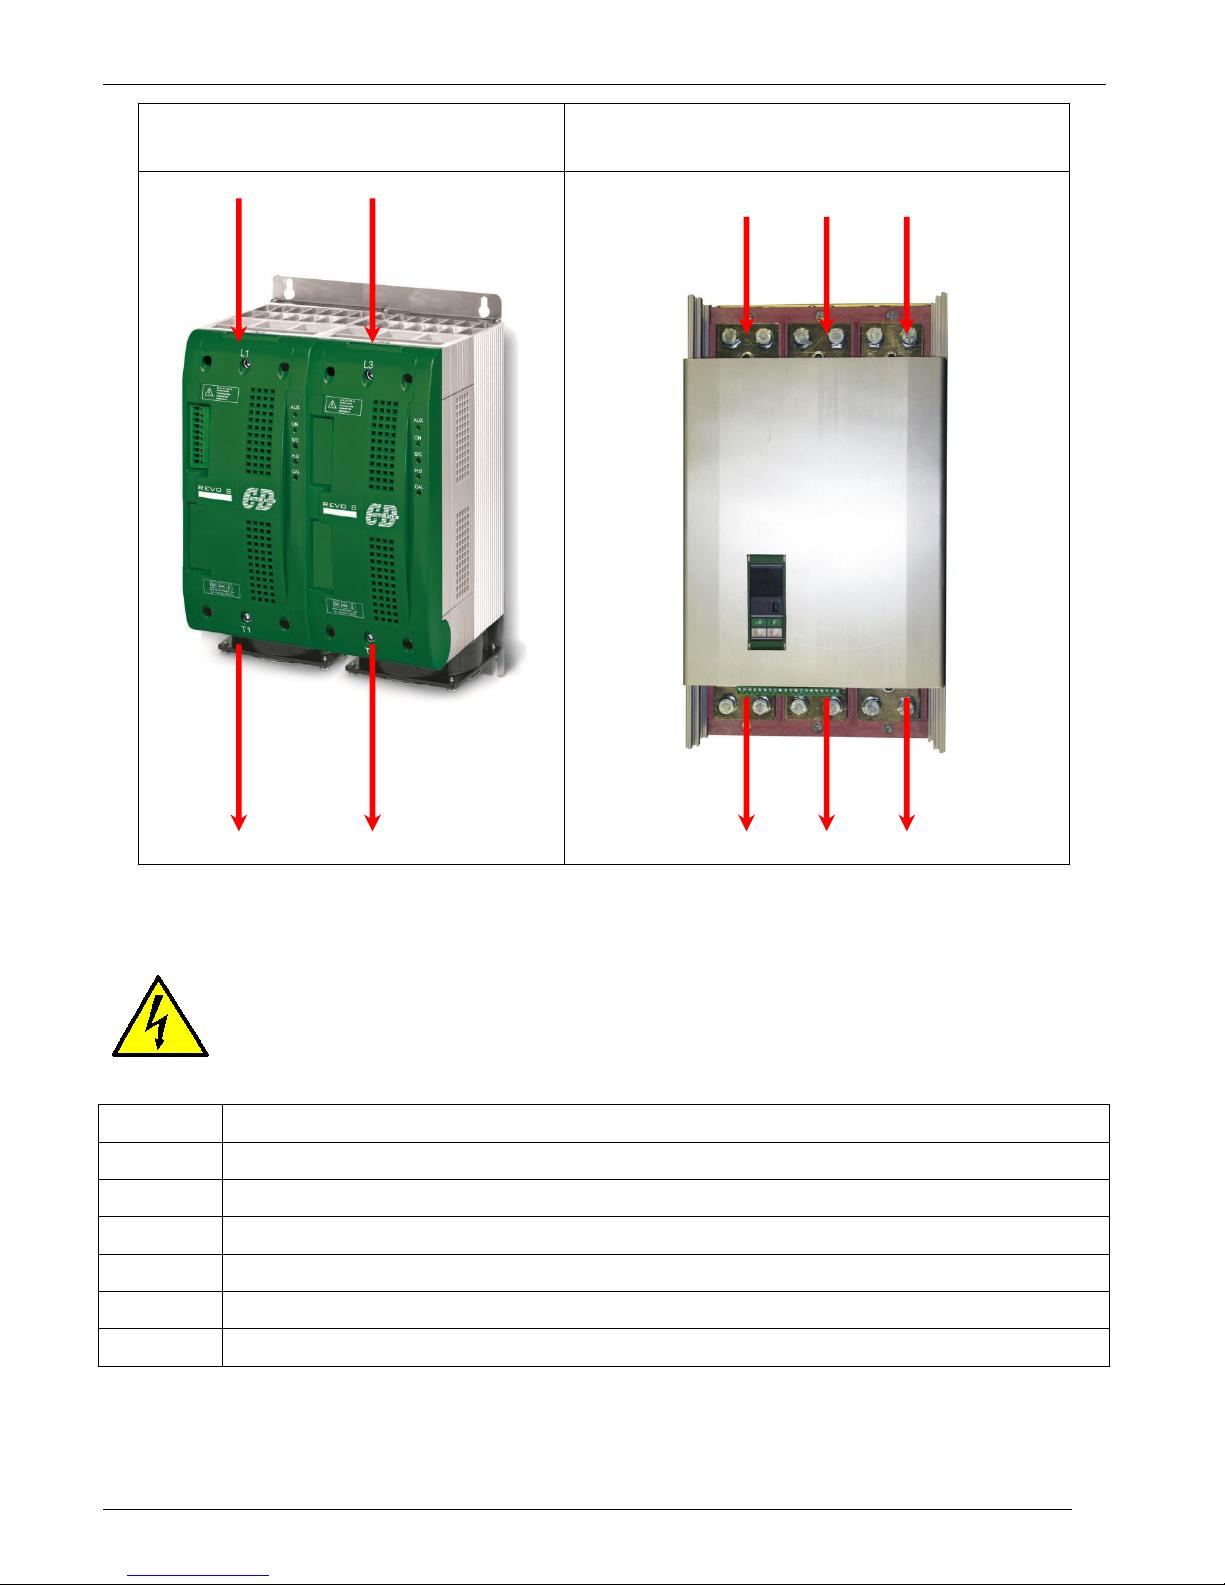
L1 L3
L1 L2 L3
T1 T3
T1 T2 T3
6.6 Power Terminals
Warning: Before connecting or disconnecting the unit check that power and control cables
are isolated from voltage sources.
Terminal
Description
L1
Line Input Phase 1
L2
Line Input Phase 2 (only S14)
L3
Line Input Phase 3
T1
Load Output Phase 1
T2
Load Output Phase 2 - Not controlled by the thyristor (only S14)
T3
Load Output Phase 3
Page 17
CD Automation srl REVO S User’s Manual
CD-Eng-REVO-S-2PH-280-700A-Solid-State-Relay
17
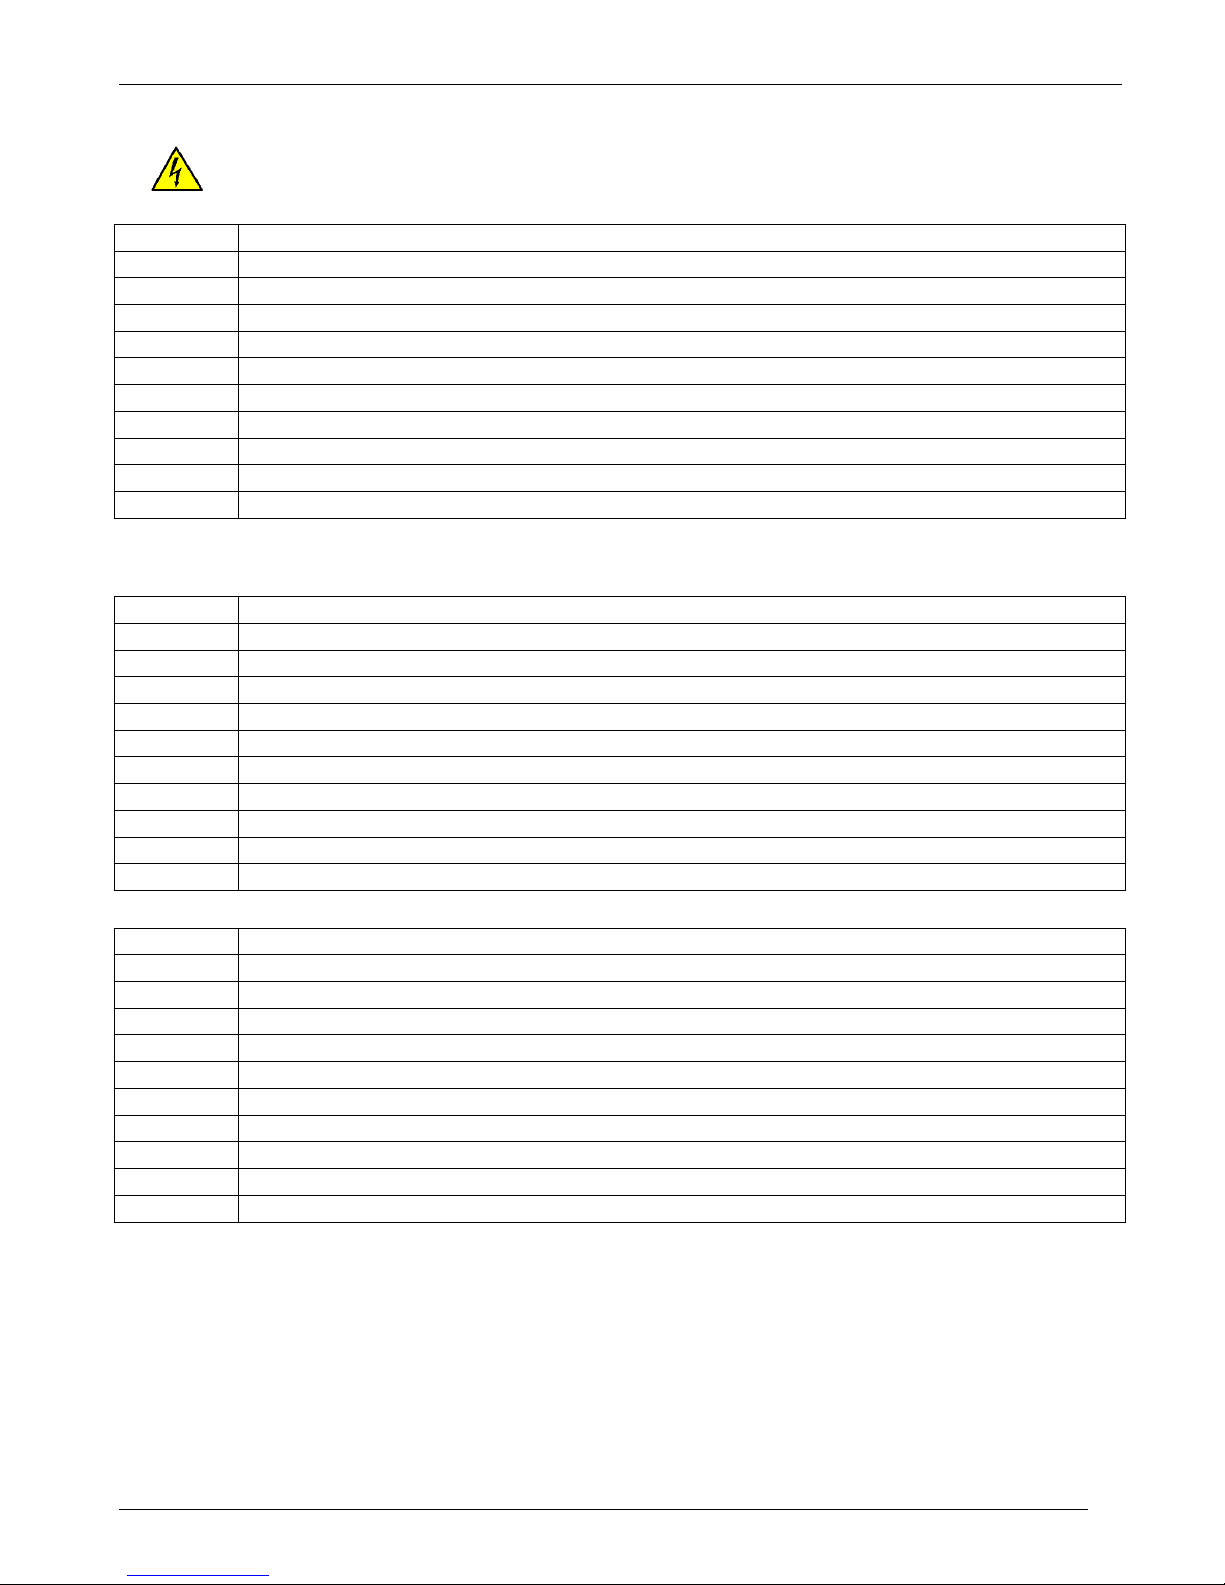
6.7 Command Terminals for SSR Input only on S10 (280A)
Warning: Before connecting or disconnecting the unit check that power and control cables
are isolated from voltage sources.
Standard Terminals
Terminal
Description
1
Aux – Voltage Supply for elettronic boards (See order code for the Value)
2
Not Connected
3
Aux – Voltage Supply for elettronic boards (See order code for the Value)
4
Not Connected
5
Fan supply voltage (230V standard – 115V option)
6
Fan supply voltage (230V standard – 115V option)
7
Not Connected
8
Not Connected
9
+ Input SSR
10
- Input SSR
6.8 Command Terminals for Analog Input or SSR input with HB S10(280A)
Terminal
Description
1
Aux – Voltage Supply for elettronic boards (See order code for the Value)
2
Not Connected
3
Aux – Voltage Supply for elettronic boards (See order code for the Value)
4
Not Connected
5
Fan supply voltage (230V standard – 115V option)
6
Fan supply voltage (230V standard – 115V option)
7
Not Connected
8
- Cal Ext. 12/24Vdc
9
+ Control Input (SSR/0-10Vdc/4-20mA)
10
- Control Input (SSR/0-10Vdc/4-20mA)
Terminal
Description
11
0V GND
12
Output +10Vdc stabilized 1 mA MAX
13
Not Connected
14
Not Connected
15
+ Cal Ext. 12/24Vdc
16
Enable
17
Not Connected
18
NC - Normally Close contact alarm relay output (HB)
19
C - Common contact alarm relay output
20
NO - Normally Open contact alarm relay output (HB)
Page 18
CD Automation srl REVO S User’s Manual
CD-Eng-REVO-S-2PH-280-700A-Solid-State-Relay
18
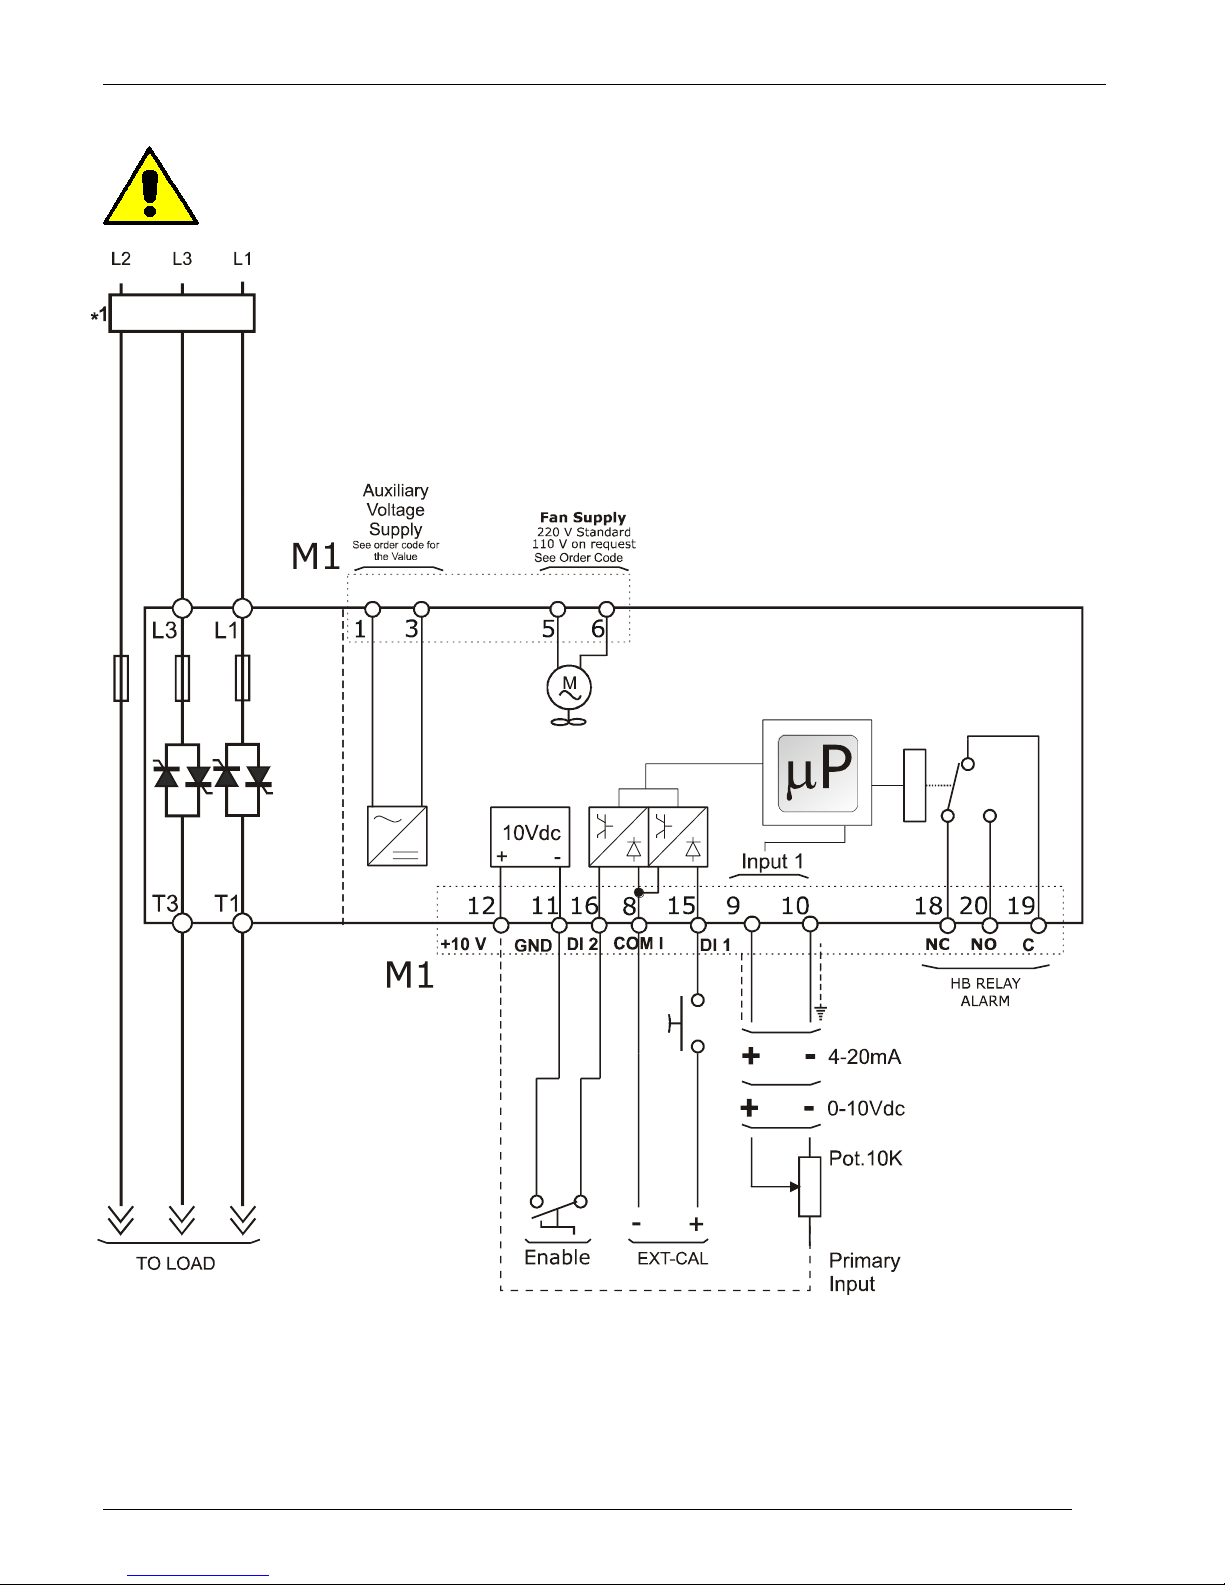
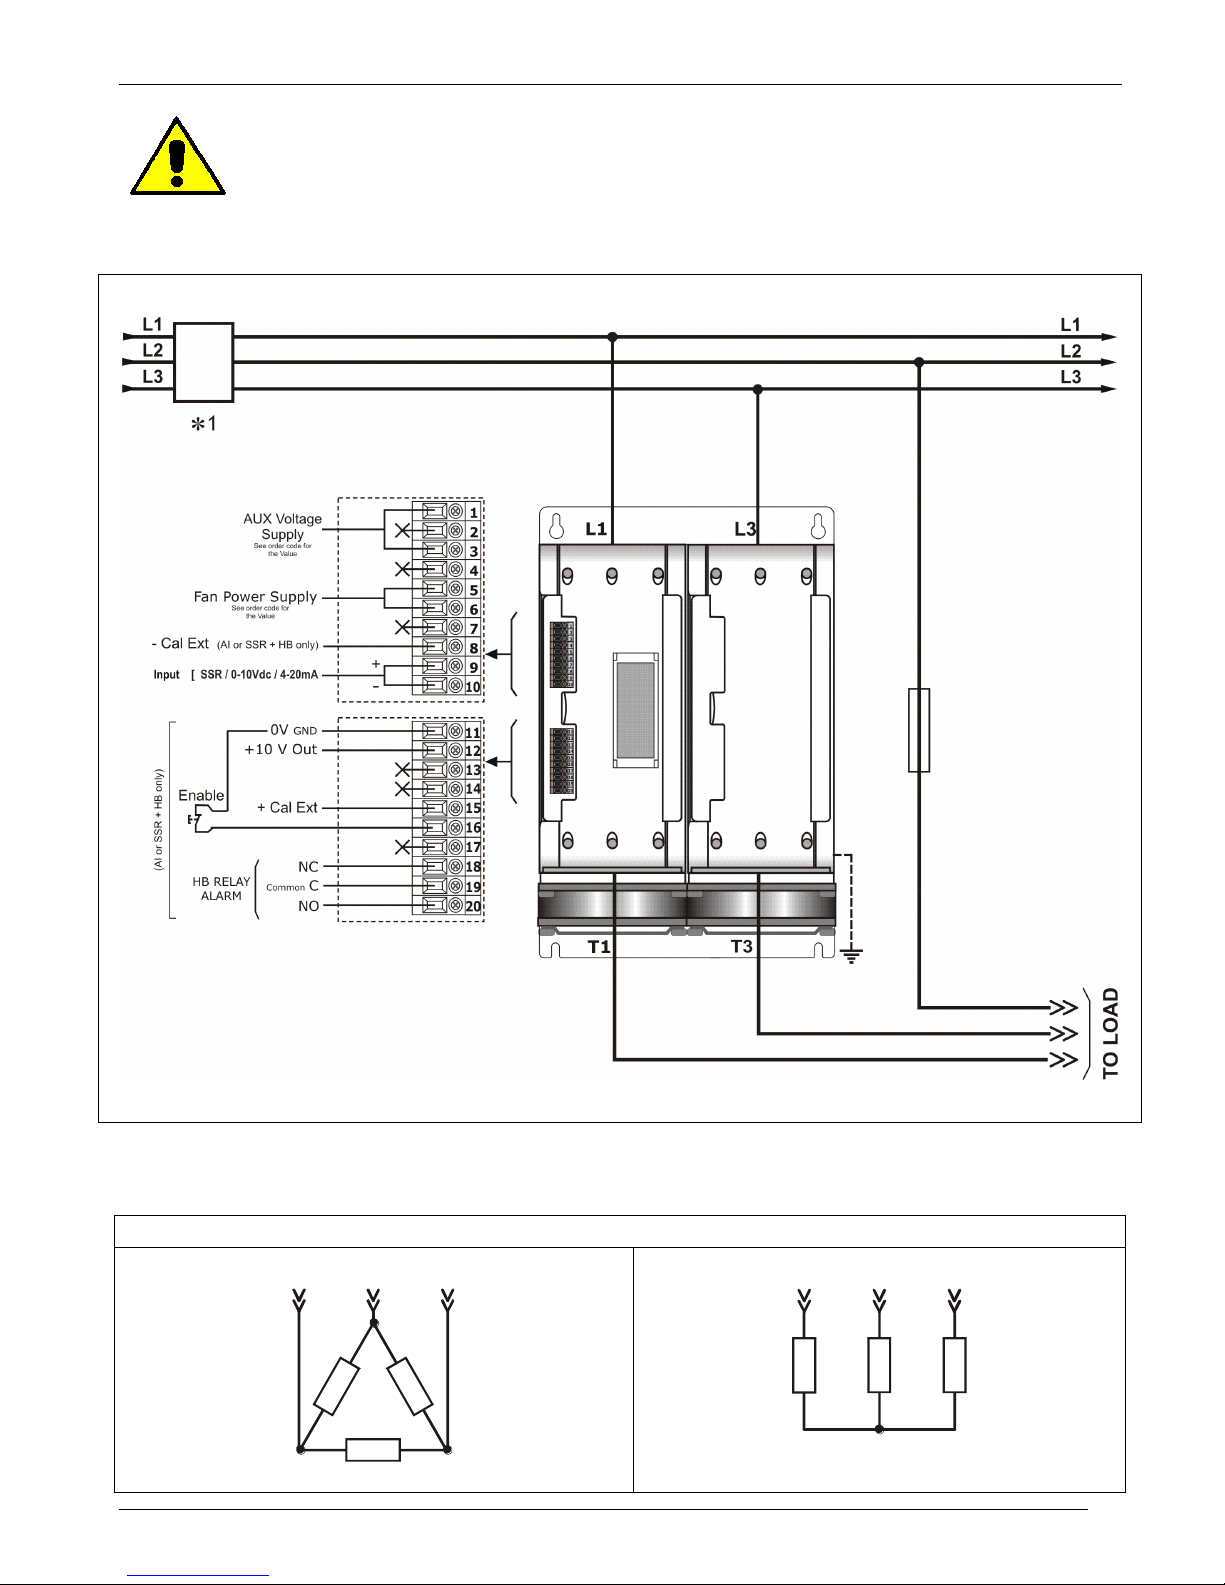
6.9 Schematic on S10 (280A)
Caution: this procedure must be performed only by qualified persons.
NOTE:
*1 The user installation must be protecting by electromagnetic circuit breaker or by fuse isolator.
The semiconductor I2t should be 20% less than power controller I2t.
Semiconductor fuses are classified for UL as supplemetar protection for semiconductor.
They are note approved for branch circuit protection.
Page 19
CD Automation srl REVO S User’s Manual
CD-Eng-REVO-S-2PH-280-700A-Solid-State-Relay
19
Caution: this procedure must be performed only by qualified persons.
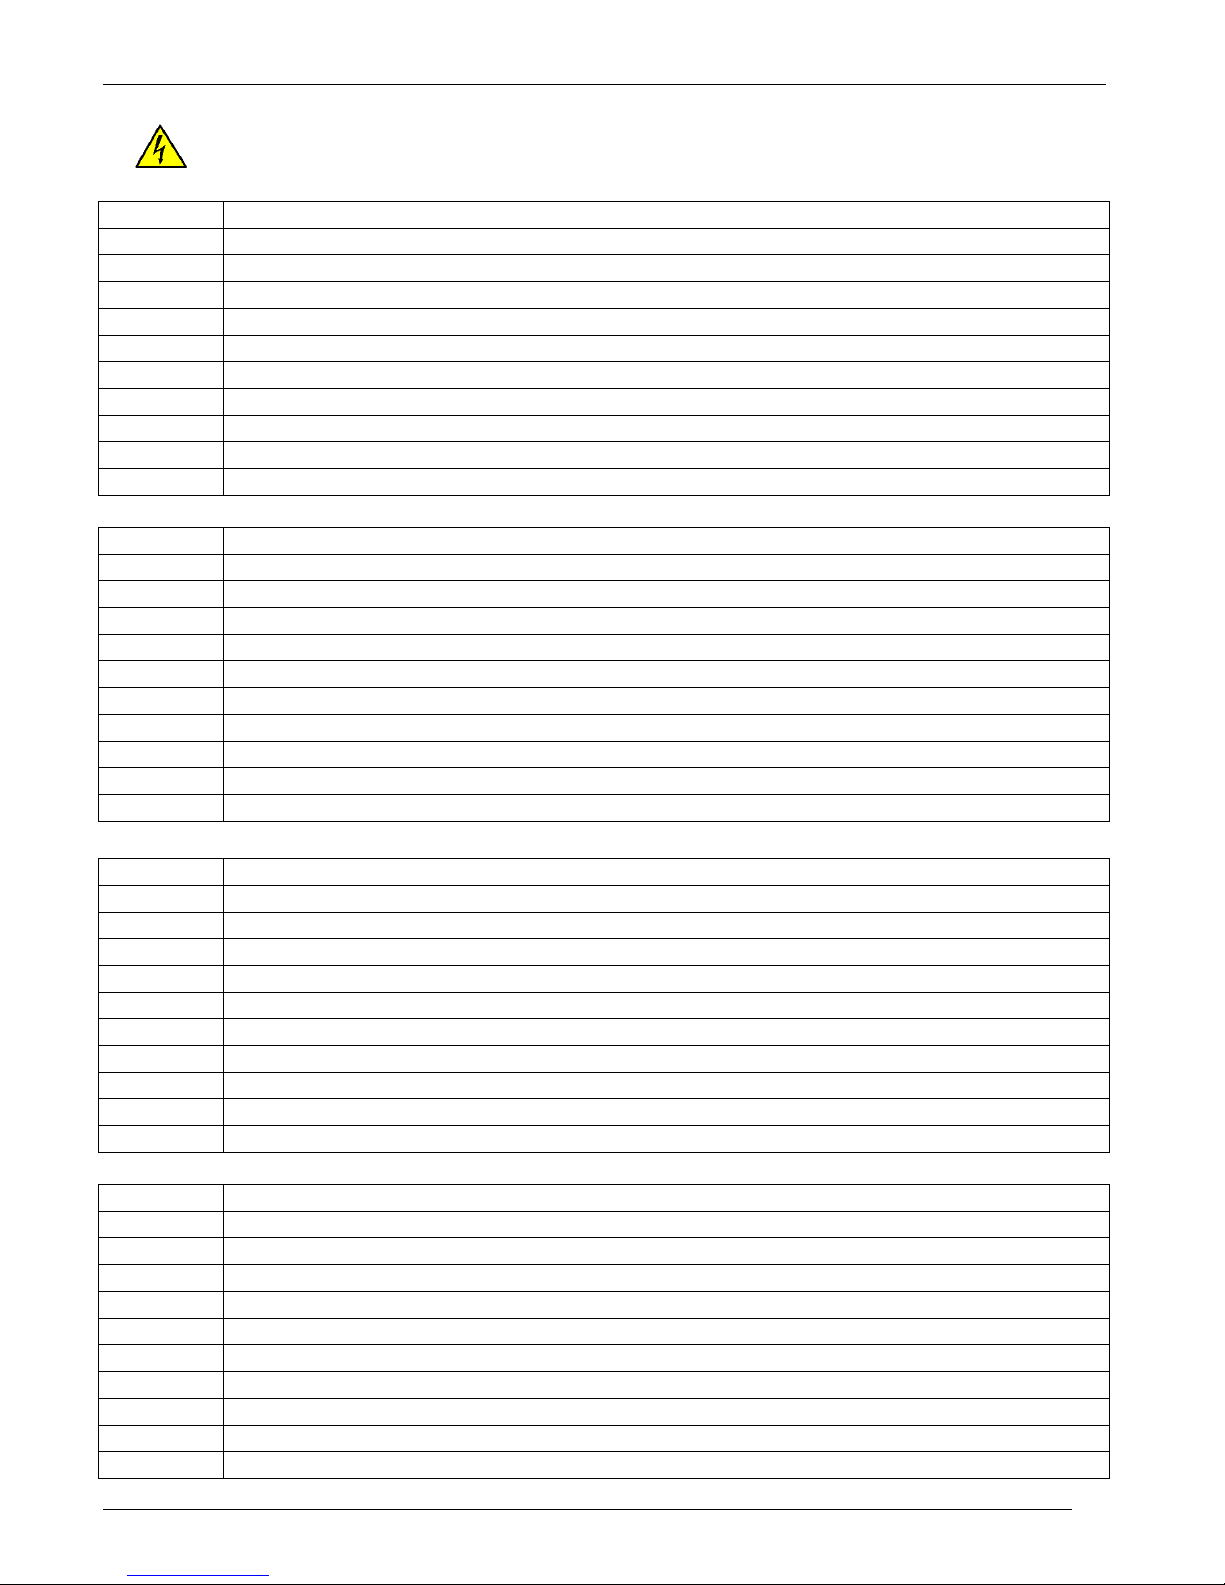
6.10 Connection Diagram for 3 phases (control on 2 phases) on S10 280A
X = not connected
*1 The user installation must be protecting by electromagnetic circuit breaker or by fuse isolator.
The semiconductor I2t should be 20% less than power controller I2t.
Semiconductor fuses are classified for UL as supplemetar protection for semiconductor.
Load Type
T1 T2 T3
T1 T2 T3
Delta
Star
Page 20
CD Automation srl REVO S User’s Manual
CD-Eng-REVO-S-2PH-280-700A-Solid-State-Relay
20
6.11 Commmand Terminals for SSR Input only on S14 (400-700A)
Warning: Before connecting or disconnecting the unit check that power and control cables
are isolated from voltage sources.
Standard Terminals
Terminal
Description
1
Not Connected
2
Not Connected
3
Not Connected
4
Not Connected
5
Not Connected
6
Not Connected
7
Not Connected
8
Not Connected
9
Not Connected
10
Not Connected
Terminal
Description
11
- Input SSR
12
+ Input SSR
13
Not Connected
14
Not Connected
15
Fan supply voltage (230V standard – 115 option)
16
Fan supply voltage (230V standard – 115 option)
17
Not Connected
18
Aux – Voltage Supply for elettronic boards (See order code for the Value)
19
Not Connected
20
Aux – Voltage Supply for elettronic boards (See order code for the Value)
6.12 Command Terminals for Analog Input or SSR input with HB S14(400-700A)
Terminal
Description
1
NO - Normally Open contact alarm relay output (HB)
2
C - Common contact alarm relay output
3
NC - Normally Close contact alarm relay output (HB)
4
Not Connected
5
Enable
6
+ Cal Ext. 12/24Vdc
7
Not Connected
8
Not Connected
9
Output +10Vdc stabilized 1 mA MAX
10
0V GND
Terminal
Description
11
- Control Input (SSR/0-10Vdc/4-20mA)
12
+ Control Input (SSR/0-10Vdc/4-20mA)
13
- Cal Ext. 12/24Vdc
14
Not Connected
15
Fan supply voltage (230V standard – 115 option)
16
Fan supply voltage (230V standard – 115 option)
17
Not Connected
18
Aux – Voltage Supply for elettronic boards (See order code for the Value)
19
Not Connected
20
Aux – Voltage Supply for elettronic boards (See order code for the Value)
Page 21
CD Automation srl REVO S User’s Manual
CD-Eng-REVO-S-2PH-280-700A-Solid-State-Relay
21
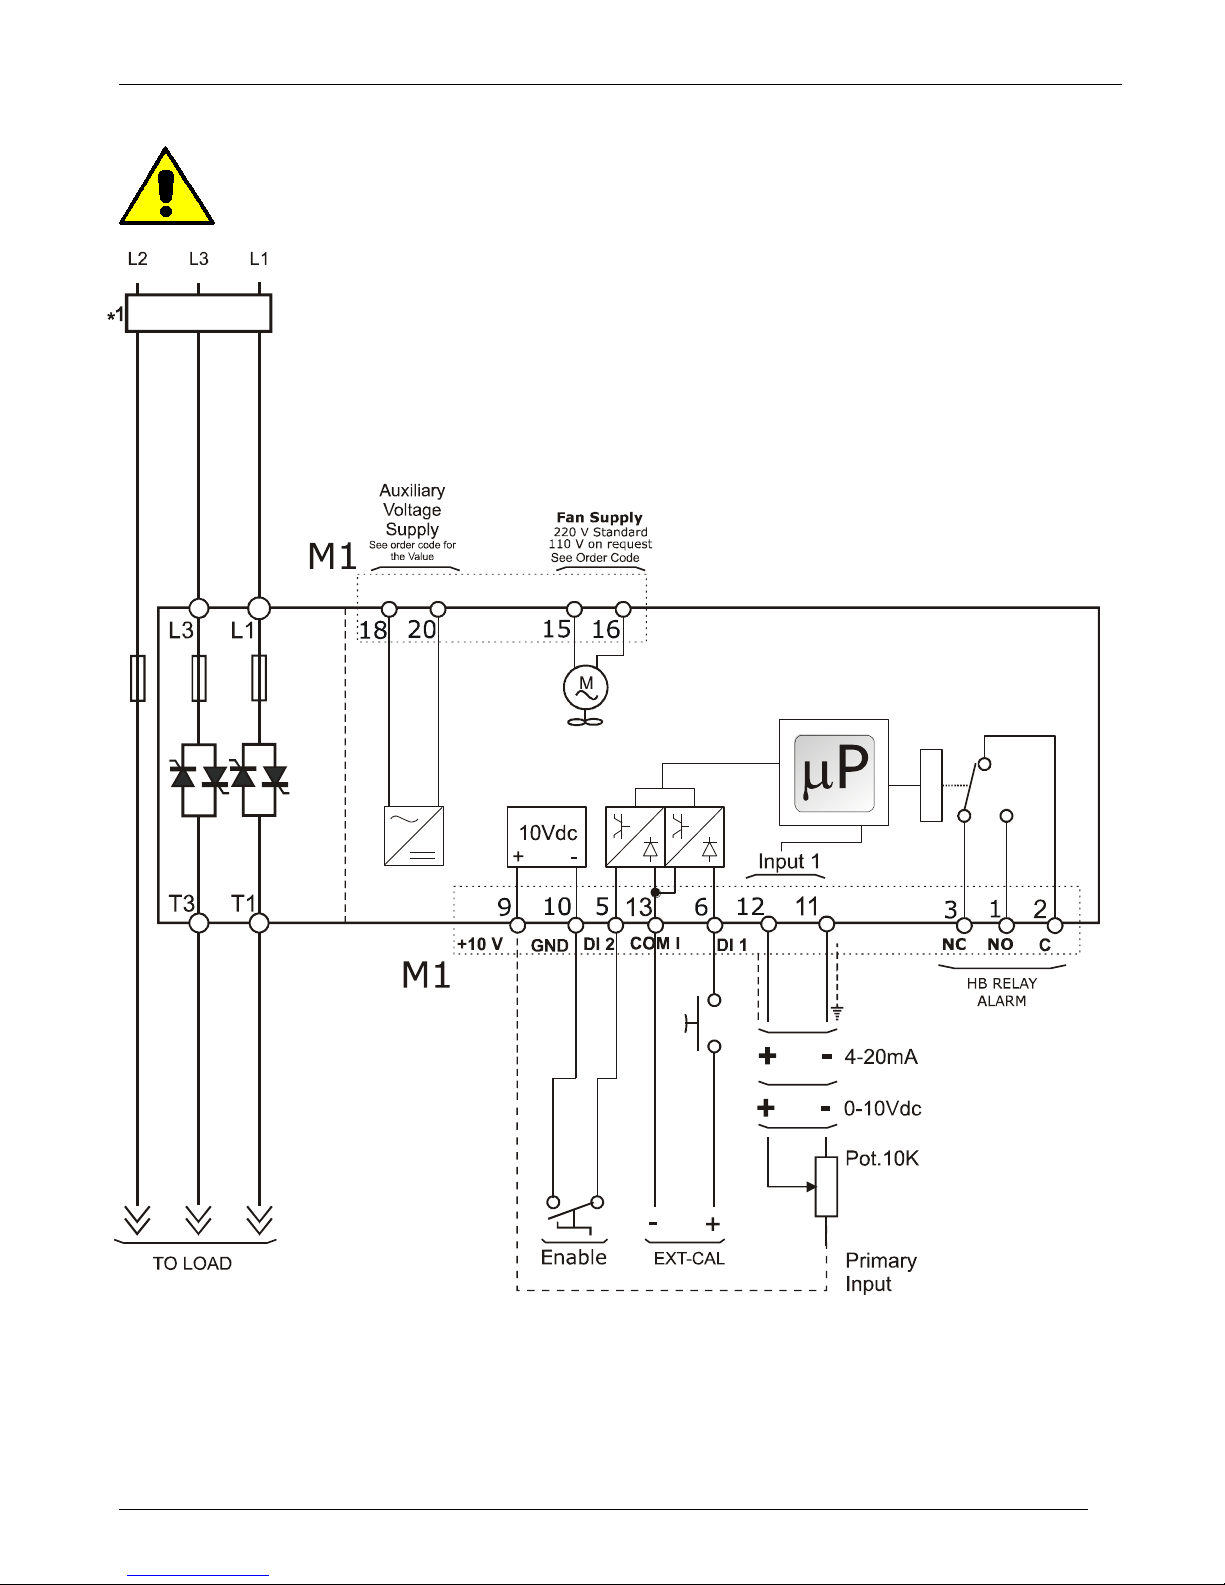
6.13 Schematic on S14 (400-700A)
Caution: this procedure must be performed only by qualified persons.
NOTE:
*1 The user installation must be protecting by electromagnetic circuit breaker or by fuse isolator.
The semiconductor I2t should be 20% less than power controller I2t.
Semiconductor fuses are classified for UL as supplemetar protection for semiconductor.
They are note approved for branch circuit protection.
Page 22
CD Automation srl REVO S User’s Manual
CD-Eng-REVO-S-2PH-280-700A-Solid-State-Relay
22
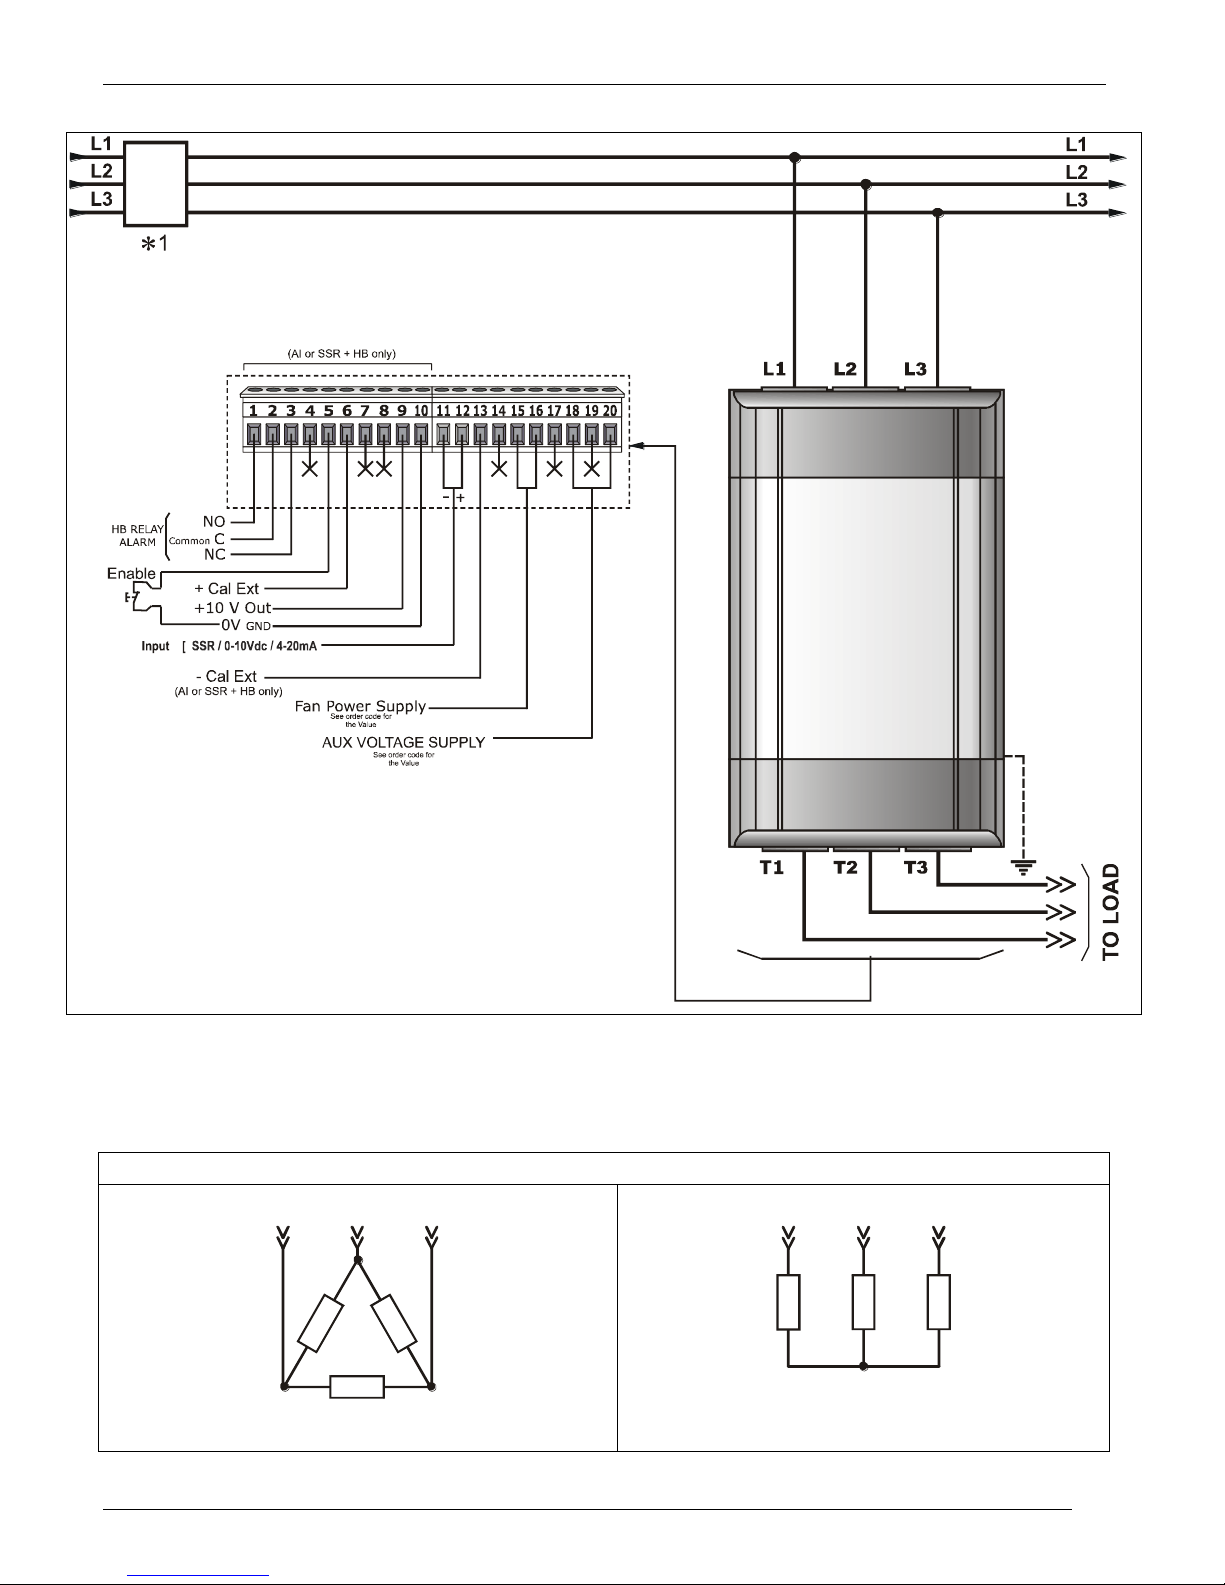
6.14 Connection Diagram for 3 phases (control on 2 phases) on S14 400-700A
X = not connected
*1 The user installation must be protecting by electromagnetic circuit breaker or by fuse isolator.
The semiconductor I2t should be 20% less than power controller I2t.
Semiconductor fuses are classified for UL as supplemetar protection for semiconductor.
Load Type
T1 T2 T3
T1 T2 T3
Delta
Star
Page 23
CD Automation srl REVO S User’s Manual
CD-Eng-REVO-S-2PH-280-700A-Solid-State-Relay
23
7 Led status and Alarms
LED
STATUS
DESCRIPTION
H.B.
S.C.
LED OFF
Load OK
LED ON (Yellow)
Load Fault (only with HB option)
LED ON (Red)
SCR short circuit (only with HB option)
ON
LED OFF
Load is NOT powered
LED ON (Green)
Load is powered
8 Heater Break alarm and SCR short circuit (HB Option only)
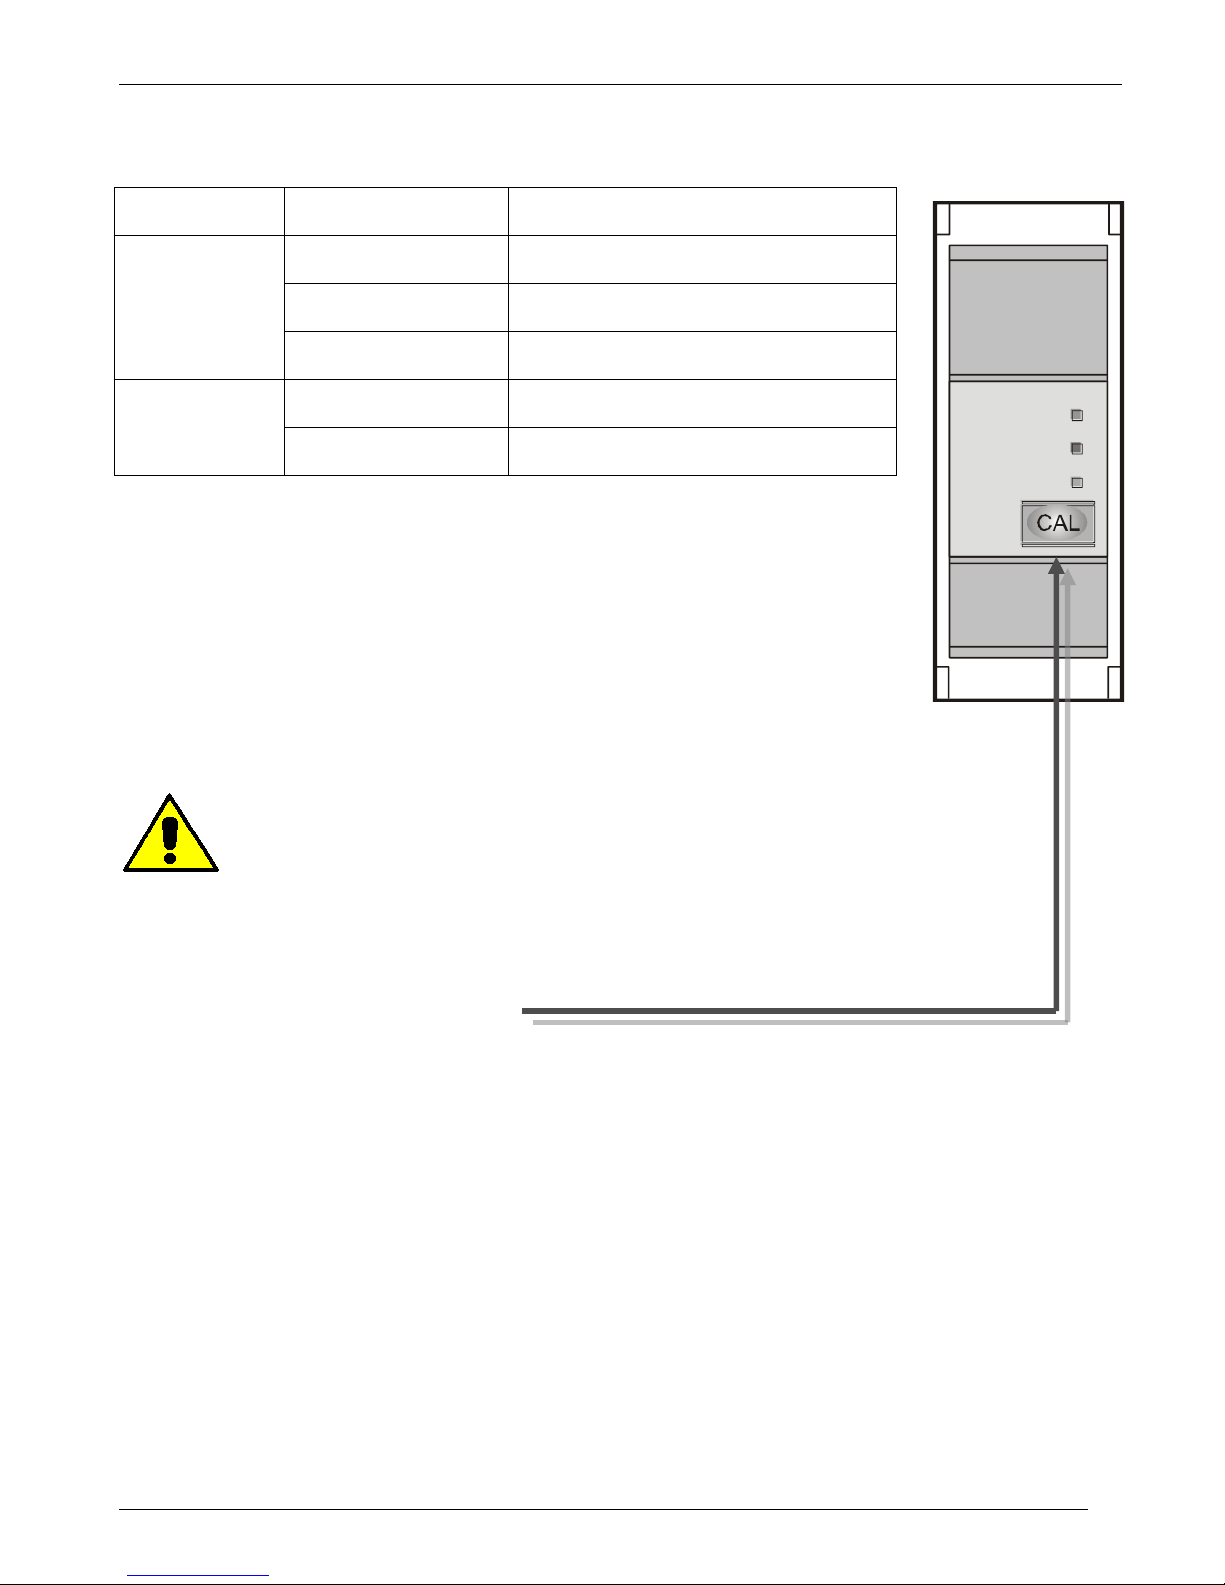
Caution: to work properly the load must be powered at least about 160msec.
The Heater Break circuit read the load current with an Internal current transformer (C.T.).
Minimum current is 10% of the current transformer size.
If load current is below this value the Heater Break Alarm doesn’t work properly.
Heater break Calibration procedure
An automatic function sets the Heater Break Alarm.
The auto setting function can be activated using the “CAL” button on front unit, or supply with 12-24Vdc
the digital input "Cal Ext." (See Connection Diagram).
The Heater Break calibration procedure is performed in this way:
The Unit gives the maximum voltage output
all LEDS are on, this means that calibration procedure is active
The current value is stored in memory
After about 15 second the unit comes back to the initial situation
If load current decreases for partial or total load failure (sensitivity 20%) the yellow LED HB become ON
and alarm relay change status.
If the unit is still in conduction with no input signal (LED green OFF) it means that there is a short circuit
on thyristors and red LED (SC) become ON.
If the load has been changed the Heater Break calibration procedure must be done again
ON
S.C.
H.B.
Page 24
CD Automation srl REVO S User’s Manual
CD-Eng-REVO-S-2PH-280-700A-Solid-State-Relay
24
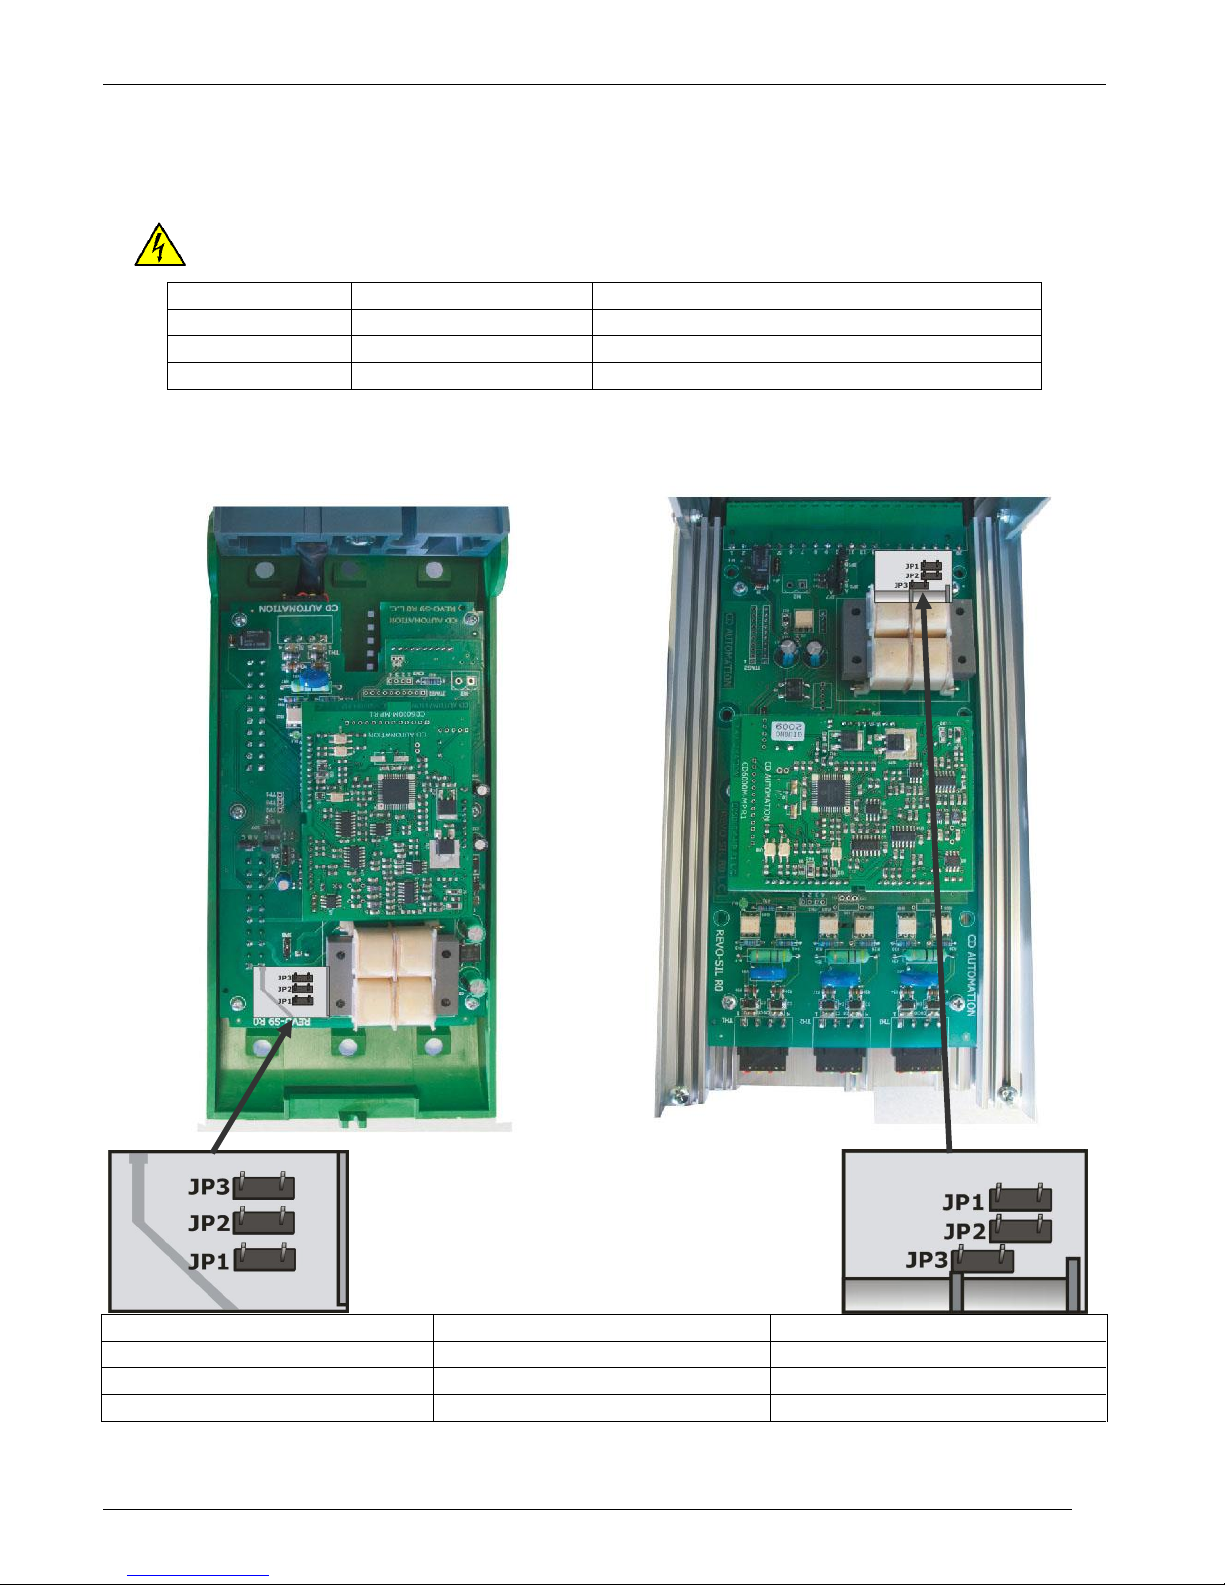
9 Supply the Electronic Board
The REVO S thyristor unit, to work, requires a voltage supply for the electronic boards. The Max
consumption is 10VA.
The voltage supply for the electronic boards is configured in line with customer requirements that are
defined in the Order Code. The Order Code is written on the identification label.
Warning: Before connecting or disconnecting the unit check that power and control cables
are isolated from voltage sources.
S10 Terminal
S14 Terminal
Description
1
18
Voltage Supply for Electronic Boards
2
19
Not Used
3
20
Voltage Supply for Electronic Boards
To change auxiliary supply voltage sold the correct link-jumper on board
The type of mounted transformer depends of the chosen Voltage in the order code.
S10 S14
Transformer Type
Link-Jumper JP1+JP2
Link-Jumper JP3
TR-605 120V
90:130V
170:265V
TR-605 230V
170:265V
300:530V
TR-605 300V
230:345V
510:690V
If the Auxiliary Voltage (written on the identification label) is different from Supply Voltage (to the load),
use an external transformer with primary equal to load voltage and secondary equal to the Auxiliary
Voltage
Page 25
CD Automation srl REVO S User’s Manual
CD-Eng-REVO-S-2PH-280-700A-Solid-State-Relay
25
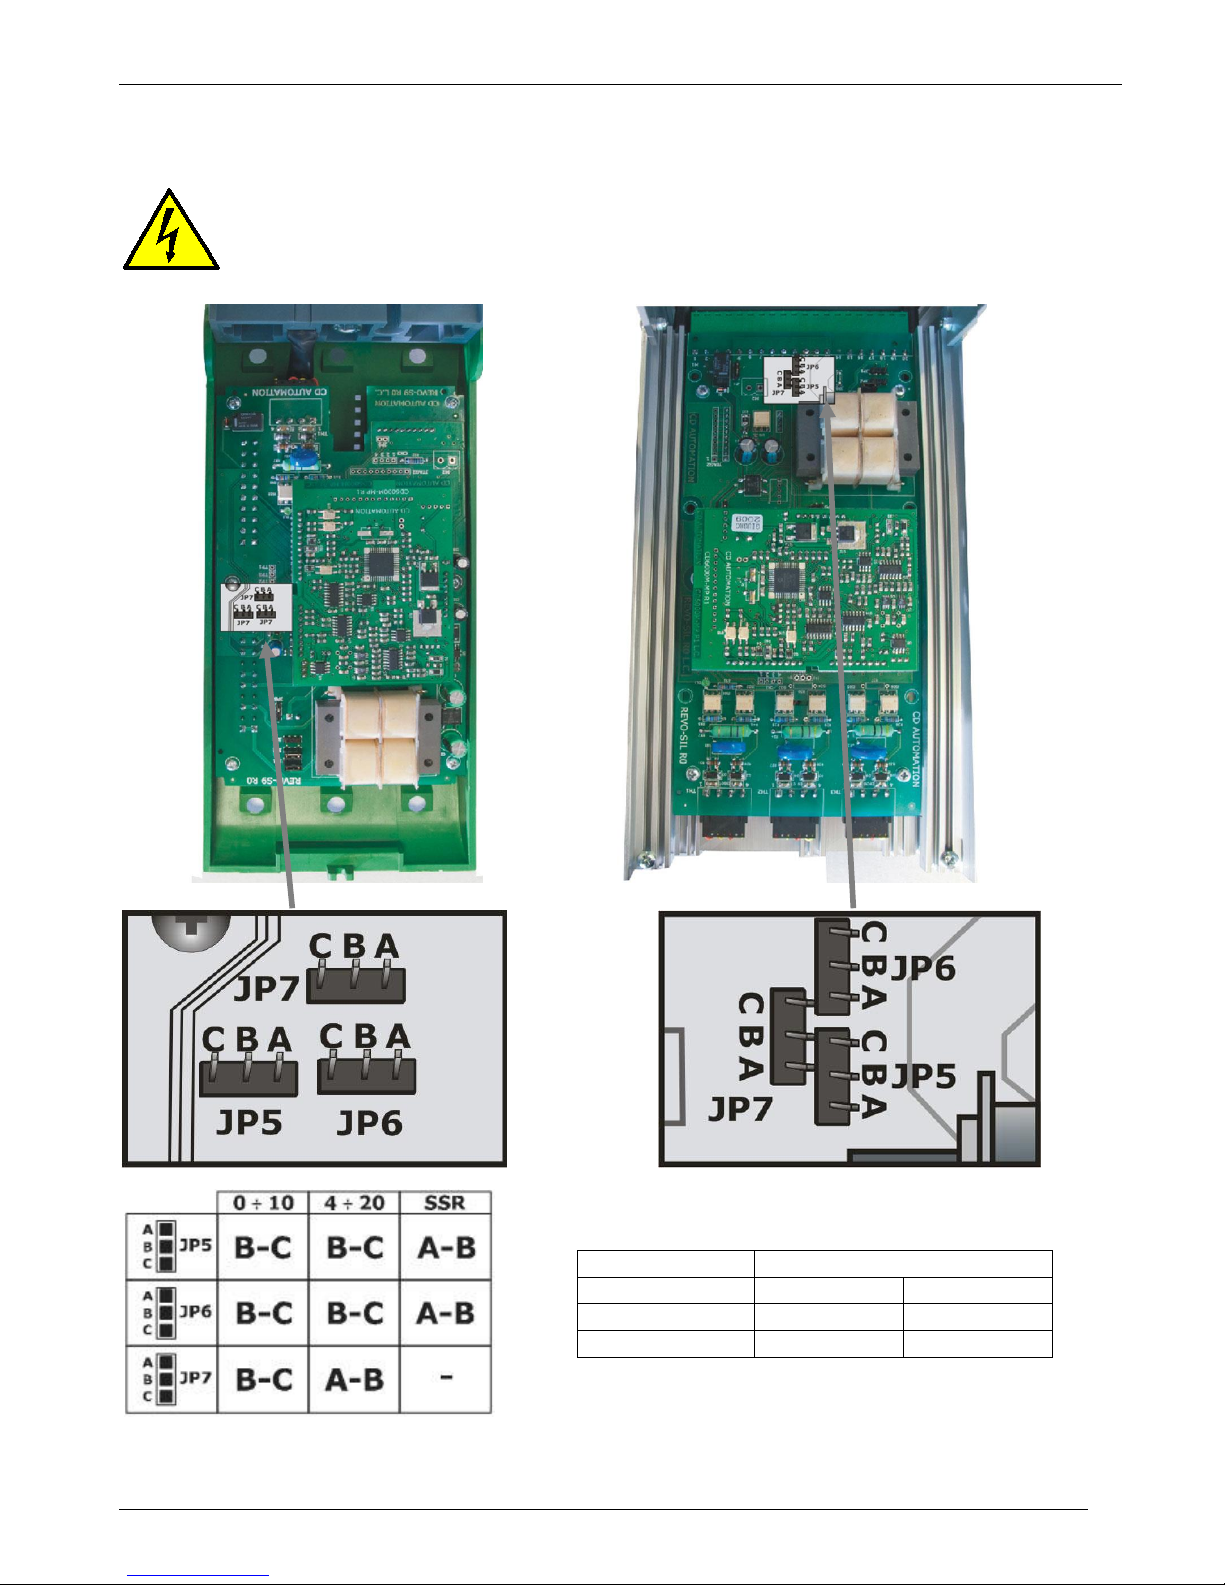
10 Input setting
The input type is already configured in line with customer requirements that are defined in the Order
Code. However, verify that the jumper are set as below represented:
Warning: Before operate, be sure that power and control cables are isolated from voltage
sources
S10 S14
Type
Input features
010V (default)
Impedance
15K
POT
Impedance
10K min
420mA
Impedance
100
0-10 Vdc/4-20 mA Jumper settings are only for Analog Input option.
Page 26
CD Automation srl REVO S User’s Manual
CD-Eng-REVO-S-2PH-280-700A-Solid-State-Relay
26
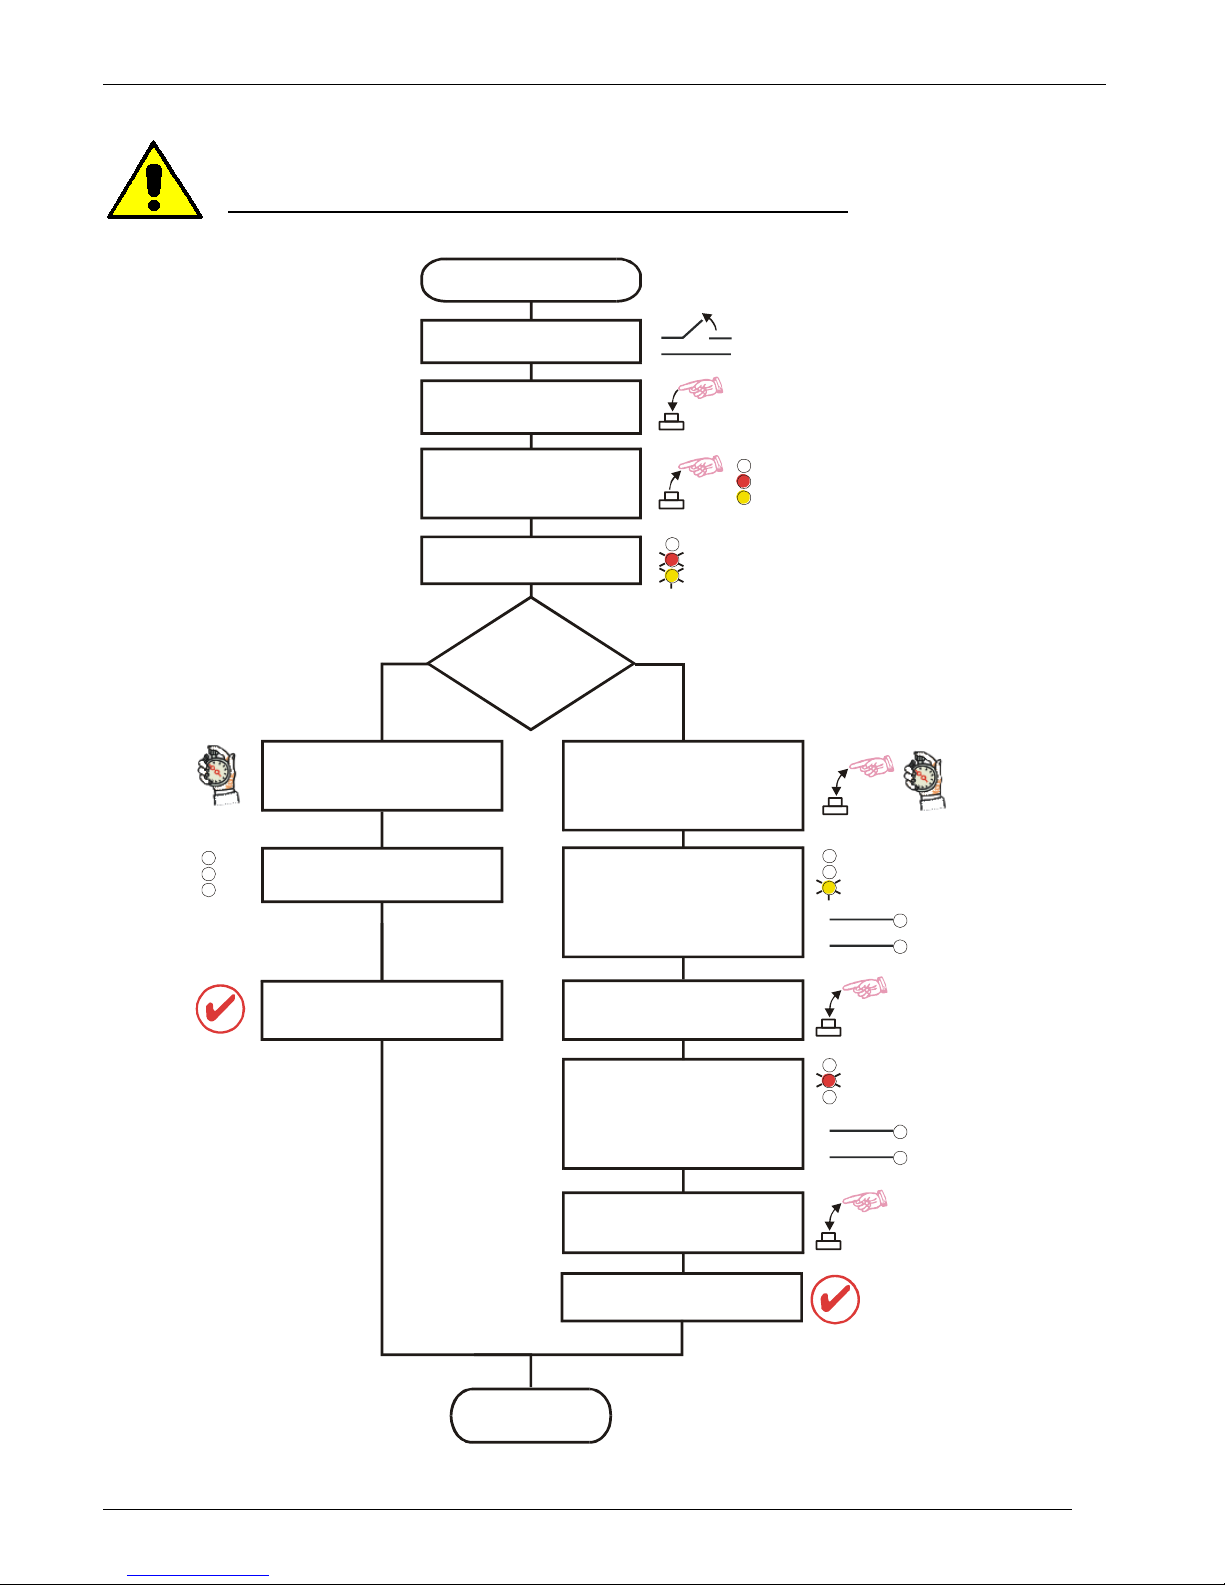
10.1 Input calibration procedure
Warning: this procedure can be done just by specialized personnel
This procedure is needed only if you change the input type
Auxiliary power supply
OFF
Start TUNE
End
TUNE
Mantain Key CAL pushed
and give the power supply
SSR Input
is tuned
Analog input
is tuned
Wait for more than 10 sec.
from start flashing
yellow and red leds
Within 10 sec. from start
flashing yellow and red leds
push again momentary
CAL Key
Yellow led only is
flashing, apply
0 input Signal
I.E.: 0V for 0-10V
4mA for 4-20mA
Now press CAL Key again
The leds will
stop flashing
Release key
when red and yellow
led are ON
Yellow and Red leds
are flashing
SSR
ANALOG
INPUT TYPE
ON
ON
ON
2sec.
S/C
S/C
S/C
H.B.
H.B.
H.B.
ON
S/C
H.B
ON
S/C
H.B
0% Signal
100% Signal
Red led only is
flashing, apply
10V for 0-10V input
or
20mA for 4-20mA input
Now press CAL Key again
Page 27
CD Automation srl REVO S User’s Manual
CD-Eng-REVO-S-2PH-280-700A-Solid-State-Relay
27
11 Firing type
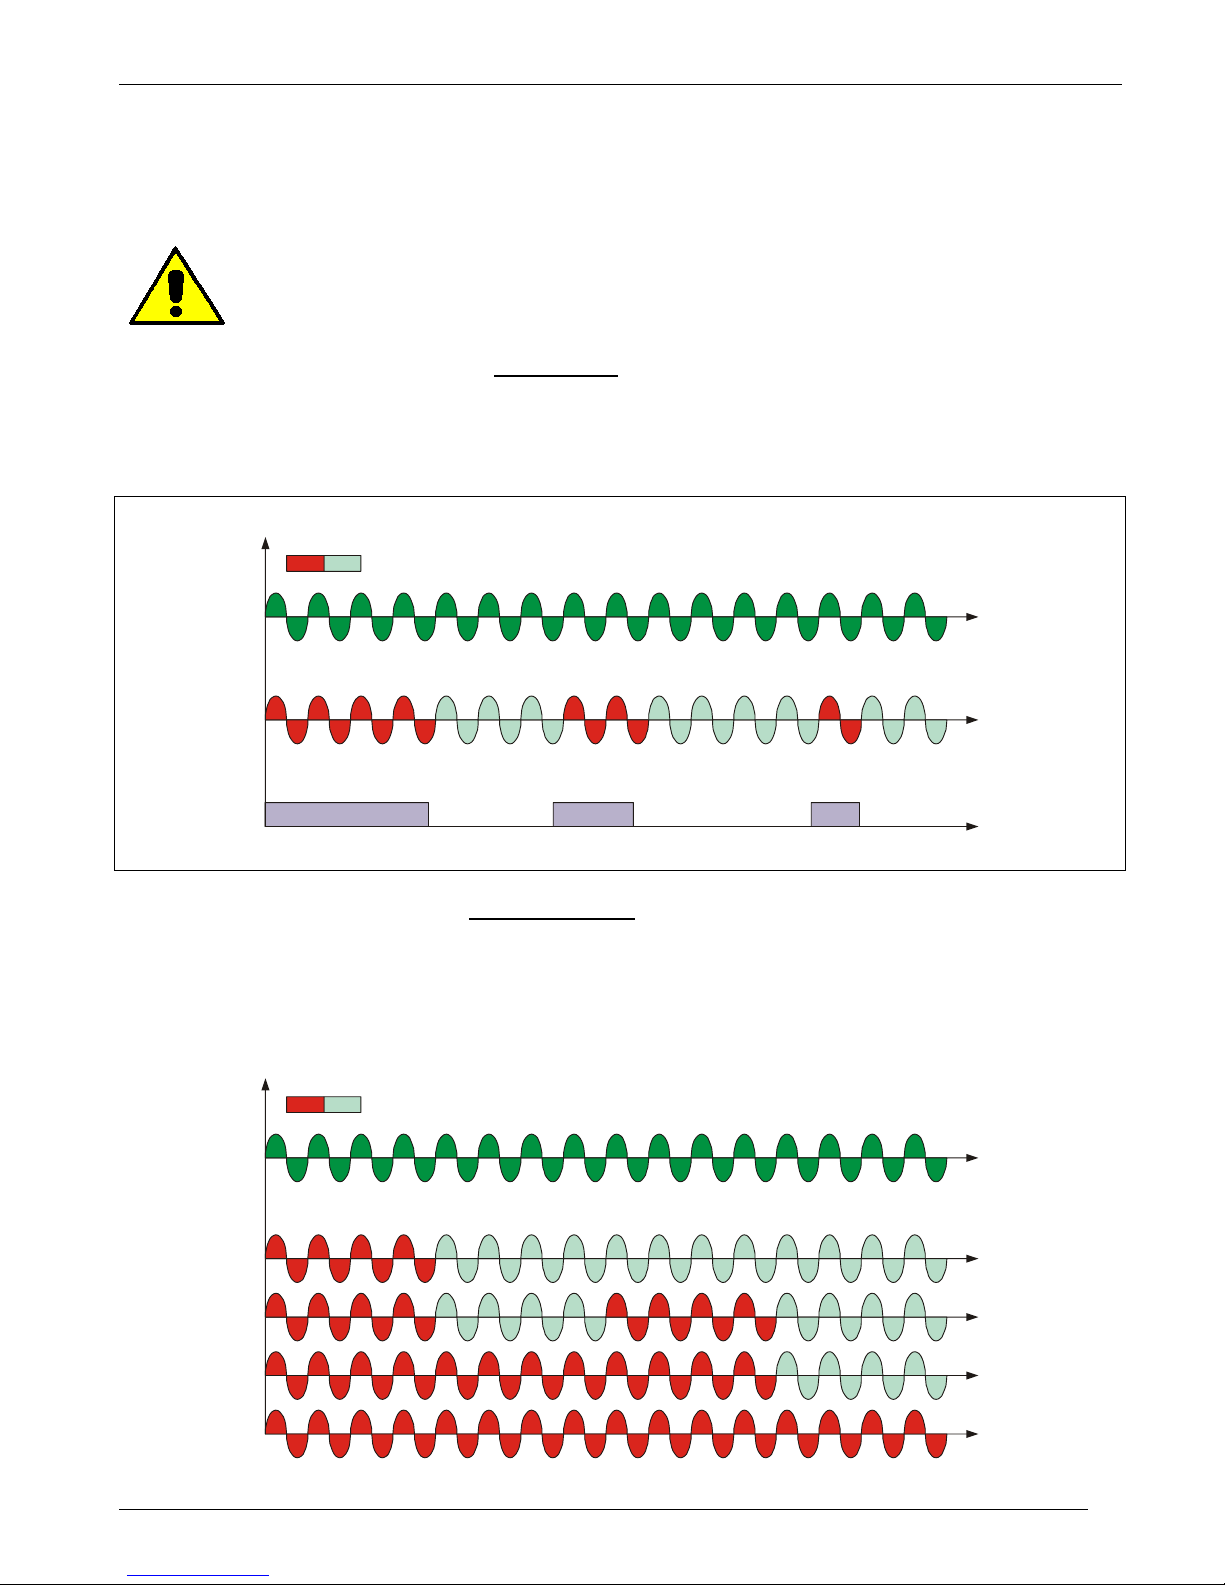
Choose a correct firing type allows to optimize the thyristor unit for the installed load.
The firing type has already configured in line with customer requirements,Zero Crossing for SSR input
and Burst firing for Analog Input.
Caution: this procedure must be performed only by qualified persons.
11.1 Zero Crossing (ZC) with SSR input
ZC firing mode is used with Logic Output from temperature controllers and the Thyristor operates like a
contactor.
The Cycle time is performed by temperature controller. ZC minimizes interferences because the
Thyristor unit switches ON-OFF at zero voltage.
VOLTAGE SUPPLY (V)
ON OFF
LOAD VOLTAGE (V)
SSR from controller
11.2 Burst Firing (BF) with Analog Input
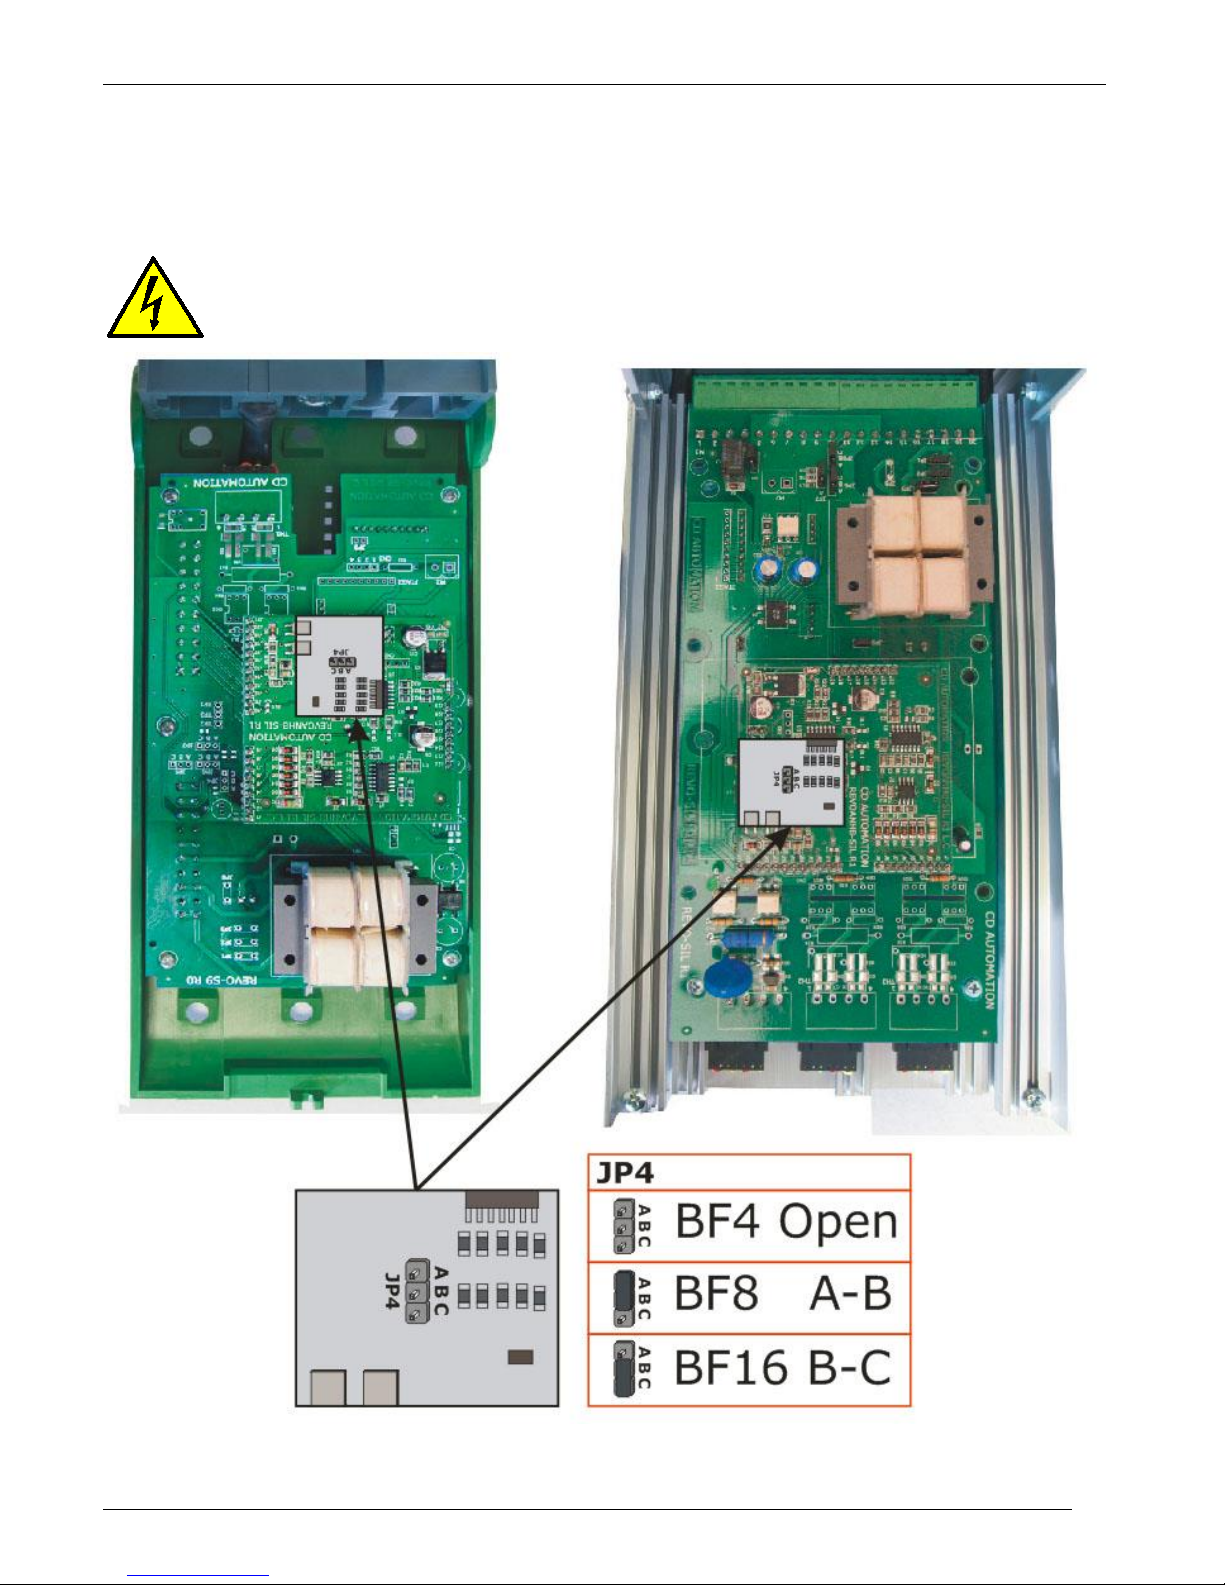
The Burst Firing is similar to the Single Cycle, but consecutive cycles ON are selectable between 2 and
255, with input signal equal at 50%.
Burst Firing is a method zero crossing that it reduces the electromagnetic interferences because the
thyristor switches at zero voltage crossing.
The example show the Burst Firing with Burst cycles: 4
VOLTAGE SUPPLY (V)
100%
ON OFF
LOAD VOLTAGE (V)
75%
50%
25%
Page 28
CD Automation srl REVO S User’s Manual
CD-Eng-REVO-S-2PH-280-700A-Solid-State-Relay
28
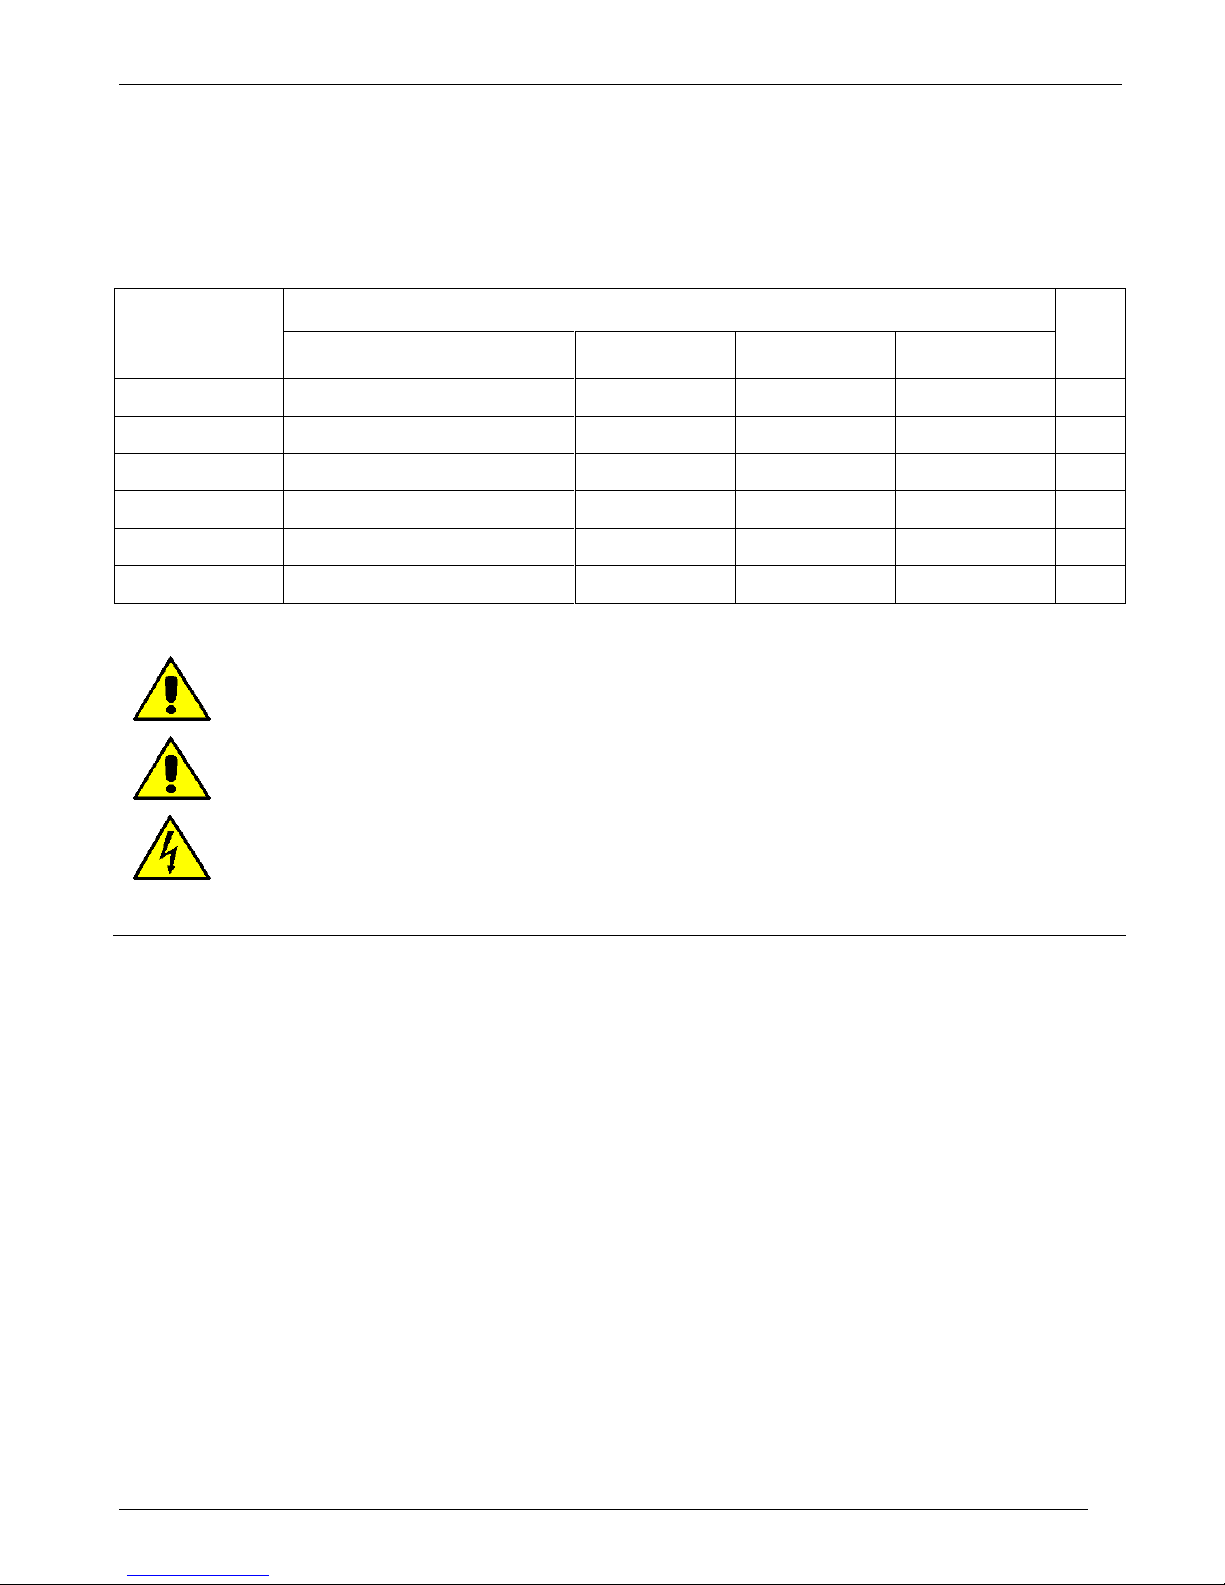
11.3 Burst Firing settings
The Burst Firing cycles is already configured in line with customer requirements that are defined in the
Order Code. However, if you wish to change the Burst Firing cycles (es. from 4 to 8) set the jumpers as
below represented:
Warning: Before operate, be sure that power and control cables are isolated from voltage
sources
Page 29
CD Automation srl REVO S User’s Manual
CD-Eng-REVO-S-2PH-280-700A-Solid-State-Relay
29
12 Internal Fuse
The thyristor unit have internal fuse extrarapid at low I²t for the thyristor protection of against the
short-circuits.
The Fuses must have I²t 20% less than thyristor's I²t. The warranty of thyristor is null if no proper fuses
are used.
200 kARMS Symmetrical A.I.C.
Size
Fuse CODE
Current
(A RMS)
I²T
(A²sec)
Vac
Qty
280A (S10)
2 x 20 559 02.200
400
52000
690
2
400A (S14)
FU550FMM
550
193500
660
2
450A (S14)
2 x FU315FMM
630
277200
660
2
500A (S14)
2 x FU315FMM
630
277200
660
2
600A (S14)
2 x FU450FMM
900
378000
660
2
700A (S14)
2 x FU450FMM
900
378000
690
2
Caution: High speed fuses are used only for the thyristor protection and can not be used to
protect the installation.
Caution: The warranty of thyristor is null if no proper fuses are used. See tab.
Warning: When it is supply, the Thyristor unit is subject to dangerous voltage, don't open
the Fuse-holder module and don’t touch the electric equipments.
Page 30
CD Automation srl REVO S User’s Manual
CD-Eng-REVO-S-2PH-280-700A-Solid-State-Relay
30
13 Maintenance
In order to have a corrected cooling, the user must clean the heat-sink and the protective grill of the
fans. The frequency of this servicing depends on environmental pollution.
Also check periodically if the screw for the power cables and safety earth are tightened correctly
(See Connection Diagram)
13.1 Trouble Shooting
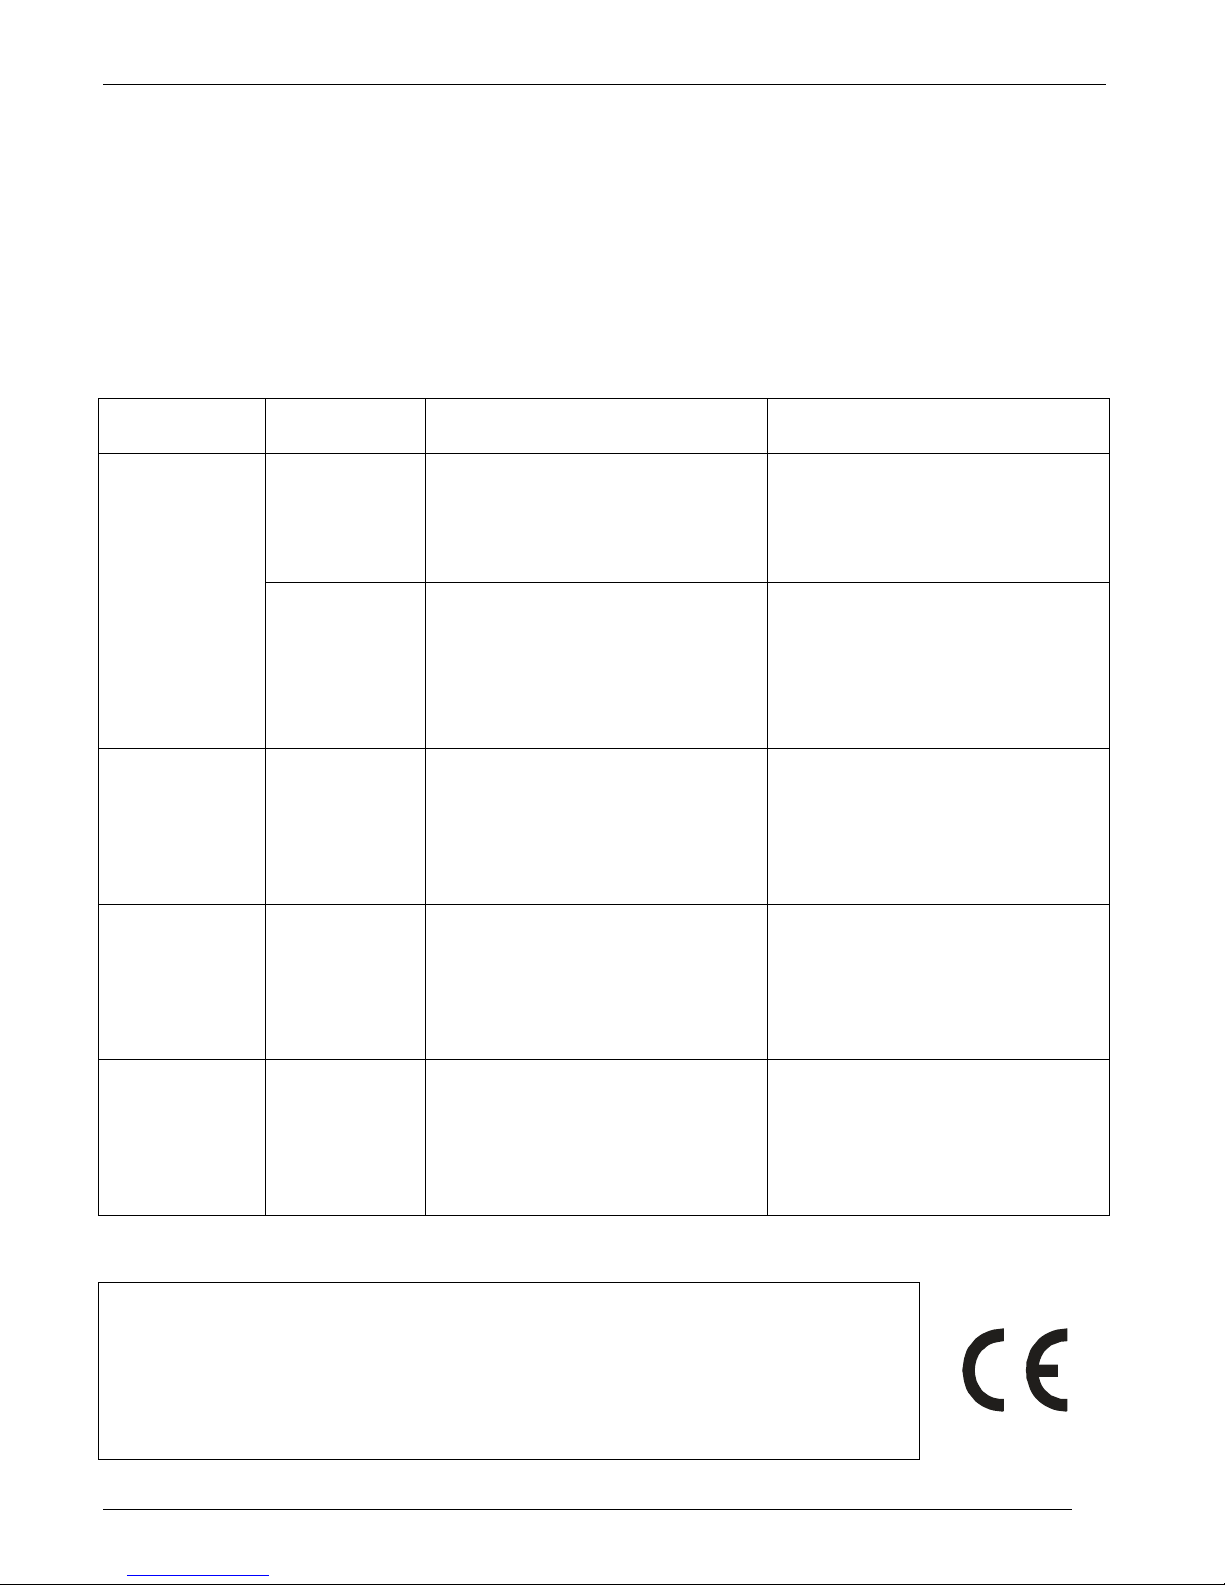
Small problems sometimes can be solved locally with the help of the below tab of trouble shooting.
If you don’t succeed, contact us or your nearest distributor.
Symptom
Indication on
front unit
Possible reasons of the
symptom
Actions
Load current
doesn’t flow
Green LED (ON)
light OFF
No Auxiliary Voltage
No input signal
Reversed polarities of input
signal
Give auxiliary voltage supply
(See Connection Diagram)
Provide to give input signal
Reverse the input signal polarity
Green LED (ON)
light ON
Fuse failure
Load connection interruption
Load failure: The yellow led (HB)
is light on (with HB option)
Thyristor fault: The red led (SC)
is light on (with HB option)
Change the fuse
Check the wiring
Check the load
Change the thyristor module
Load current flow
also without input
signal
Red LED (SC)
light on
Wrong wiring
SCR short circuit
Check the wiring
Change the thyristor module
Current flows at
nominal value but
Yellow LED
(HB/SC) is light
on
Yellow LED (HB)
light on
or
Red LED (SC)
light on
HB circuit not tuned
Current transformers not
properly wired
Make HB calibration procedure
Check current transformers
wiring
Thyristor unit
doesn’t work
properly
Auxiliary voltage supply out of
limits
Wrong input signal selection.
Wrong input signal calibration
(out of range)
Verify the auxiliary voltage
supply
Control input signal setting.
Check input setting
13.2 Warranty condition
CD Automation gives a 12 months warranty to its products.
The warranty is limited to repairing and parts substitution in our factory and does
exclude products not properly used and fuses.
Warranty does not include products with serial numbers deleted. The faulty product
should be shipped to CD Automation at customer’s cost and our Service will evaluate
if product is under warranty terms.
Substituted parts remain of CD Automation property.
Page 31

CD Automation srl REVO S User’s Manual
CD-Eng-REVO-S-2PH-280-700A-Solid-State-Relay
31
 Loading...