

Page 1
www.cda.eu
VK970BL
Compact Combination
Microwave Oven
Installation, use and maintenance
Page 2

2
Contents:
3 Important
5 Important safety warnings
6 Methods to help prevent damage to your appliance/kitchen
10 Before first use
11 Control panel
11 Microwave functions
12 Heating functions
14 Combi functions
15 Defrost functions
17 Auto programmes
18 Rapid preheating
20 Safety key lock
21 Care and maintenance
23 Installation
24 Installation diagrams
25 Installation diagrams
26 Mains electrical connection
27 Technical information
28 Troubleshooting
IMPORTANT: Please read this instruction manual carefully before
using the appliance for the first time. Keep it somewhere safe
and to hand for future reference. Follow all safety warnings/
instructions and the instructions for first use on page 10 carefully.
Page 3

3
Important
This appliance must only be used for the purpose for which it is
intended, i.e. domestic cooking. Any other use could be dangerous
and may lead to premature failure of the appliance. Please read all of
this manual’s safety warnings.
The CDA Group Ltd cannot be held responsible for injuries or losses
caused by incorrect use or installation of this product. Please note
that CDA reserve the right to invalidate the guarantee supplied with
this product following incorrect installation or misuse of the appliance.
Under no circumstances should any external covers be removed for
servicing or maintenance except by suitably qualified personnel.
User information:
• Ovens become hot during and immediately after use.
• The oven door can become very hot during operation.
• After use, please ensure that the oven is switched ‘O’.
• Keep children away from the appliance during and after use.
• Keep the oven door closed whilst grilling.
Appliance information:
Please enter the details on the appliance rating plate below for
reference, to assist CDA Customer Care in the event of a fault with
your appliance and to register your appliance for guarantee purposes.
Appliance Model
Serial Number
Page 4

4
EU Declarations of Conformity:
This oven has been designed, constructed and marketed in
compliance with safety requirements of EU Directive 2014/35/EU (LVD)
and requirements of EU Directive 2014/30/EU (EMC).
Parts intended to come into contact with food conform to 1935/2004/
EC.
IMPORTANT INFORMATION FOR CORRECT DISPOSAL OF THE
PRODUCT IN ACCORDANCE WITH EU DIRECTIVE 2012/19/EU.
At the end of its working life, the product must not be disposed
of as urban waste. It must be taken to a special local authority
dierentiated waste collection centre or to a dealer providing this
service.
Disposing of a household appliance separately avoids possible
negative consequences for the environment and health deriving from
inappropriate disposal and enables the constituent materials to be
recovered to obtain significant savings in energy and resources. As a
reminder of the need to dispose of household appliances separately,
the product is marked with a crossed-out wheeled dustbin.
Page 5

5
Important safety warnings
• This appliance can be used by children aged from 8 years and
above and persons with reduced physical, sensory or mental
capacities, or lack of experience or knowledge provided
they receive supervision and have been given instruction
concerning use of the appliance in a safe way. They must fully
understand the hazards involved and how best to avoid them.
• Children must not play with the appliance.
• Cleaning and maintenance must not be carried out by children
without supervision.
• The appliance is not intended to be operated by means of an
external timer or separate remote-control system.
WARNING! RISK OF FIRE
• Combustible items stored in the cooking compartment may
catch fire. Never store combustible items in the cooking
compartment.
• Never open the appliance door if there is smoke inside. Simply
switch o the appliance at the mains or switch o the circuit
breaker in the fuse box.
• When heating food in plastic or paper containers, keep an eye
on the appliance due to the possibility of ignition.
WARNING: Accessible parts may become during use. Children
must be kept away at all times.
WARNING: Do not harsh abrasive cleaners or sharp metal scrapers
to clean the microwave or oven door glass since they can scratch
the surfaces and result in shattering of the glass.
Page 6

6
• Do not use a microwave power level or time setting that is
higher than necessary. Follow the information provided in this
instruction manual.
• Never use the microwave to dry food.
• Never defrost or heat food with low water content (e.g. bread)
at too high a microwave power level or for long.
• Do not use the microwave to heat cooking oil on its own as it
may combust.
WARNING! RISK OF EXPLOSION
• Liquids and other food may explode when in containers that
have been sealed or lidded. Never heat such foods or liquids.
• Only use utensils that are suitable for microwave ovens. If you
are unsure, contact the manufacturer of said utensil(s).
WARNING! RISK OF SERIOUS DAMAGE TO HEALTH
• The surface of the appliance may become damaged if it is not
cleaned properly. Microwave energy may escape. Clean the
appliance on a regular basis and remove any food residue
immediately. Take care not to burn yourself.
• Always keep the cooking compartment, door seal, door
and door stop clean (see Care and maintenance for more
information).
WARNING: If the door or door seals are damaged, the oven must
not be operated until it has been repaired by a competent person.
WARNING: It is hazardous for anyone other than a competent
person to carry out any service, particularly that which involves
Page 7

7
removal of covers that give protection against exposure to
microwave energy or hazardous parts.
Microwave energy will escape from appliances that do not have
any casing. NEVER REMOVE THE CASING. For any repair work,
contact CDA Customer Care (details on rear cover of this manual).
WARNING! RISK OF ELECTRIC SHOCK
• Incorrect repairs are dangerous. Repairs, and the replacing
of damaged power leads, can only be carried out by trained
personnel.
• A defective appliance can cause electric shock or injury. In case
of any faults, switch o the appliance at the mains or switch
o the circuit breaker in the fuse box. Contact CDA Customer
Care.
• Never allow the mains lead of this or any other item/appliance
to come into contact with the appliance as it can become
very hot in use. This can lead to melting or failure of the lead
insulation.
• Never use high-pressure or steam cleaners. These can cause
electric shocks or damage to the appliance.
• Never attempt to change the bulb in the appliance. Contact
CDA Customer Care.
WARNING! RISK OF BURNS
• During use the appliance and accessories becomes very hot.
Care must be taken to avoid touching heating elements inside
the oven. Ensure proper protective gear is worn when handling
hot items.
Page 8

8
• Alcoholic vapours may catch fire in the hot cooking
compartment. Never prepare food or beverages containing
large quantities of alcohol or small quantities of those with a
high alcohol content. Open the appliance door with care.
• Foods with peel or skin may burst or explode during, or even
after, cooking. Never cook eggs in their shells nor reheat hardboiled eggs. Never cook shellfish or crustaceans. Always prick
the yoke when baking or poaching eggs. Foods with a skin or
peel such as apples, potatoes, tomatoes and sausages may
burst. Prick the peel or skin thoroughly before heating.
• The contents of feeding bottles and baby food jars must
be stirred or shaken and the temperature checked before
consumption in order to avoid burns. Ideally you should ensure
that every serving/mouthful is at a safe temperature.
WARNING! RISK OF SCALDING
• When opening the appliance door, steam and hot air will
likely escape. Open the door with care and take any safety
precautions to avoid harm. Keep children at a safe distance at
all times.
• Microwaving beverages and liquids can result in delayed
eruptive boiling. This means that the liquid reaches boiling
temperature without the usual steam or bubbles rising to the
surface. If disturbed even slightly the liquid may erupt. Extreme
care must therefore be taken when handling such items.
NEVER COVER THE BASE OR WALLS OF THIS APPLIANCE WITH
ALUMINIUM FOIL.
Page 9

9
Methods to help prevent damage to your appliance/kitchen:
• Avoid microwaving metal items.
• Never pour water into the cooking compartment. Wipe up any
spillages as soon as possible and do not let water or spillages flow
into the turntable spigot area.
• Do not store food of any kind within the appliance.
• Do not leave the appliance to cool with the door open. An open
door on a cooling appliance can damage adjacent units.
• Keep the door and door seal clean at all times.
• Never operate the microwave without food contents inside.
• Never use the appliance door for standing on, leaning on or as a
place to store objects (even oven trays temporarily).
• Never transport the appliance by the door handle.
• Keep the entire oven clean when and where possible. Failure to
maintain the oven in a clean condition could lead to serious issues
such as combustion of old foodstus or spillages, deterioration of
the surfaces and could subsequently adversely aect health or the
life/functions of the appliance.
ENSURE THAT ANY SURROUNDING FURNITURE IS RESISTANT
TO TEMPERATURES OF AT LEAST +75°C ABOVE AMBIENT
TEMPERATURE (ideally 105°C +). Insuciently resistant units can
be susceptible to peeling and/or discolouration.
Page 10
10
Before first use
Setting the time
Once connected to the mains power supply, the time display will flash
‘00.00’. Use the and sensors to set the current time between
00.00 and 23:59. Each press of either sensor will adjust the time in 1
minute increments. Holding the sensor will adjust the time in 10 minute
increments. Touch the symbol, or wait 3 seconds, and the time
shall be set.
To change the set time
With the oven on standby, press and hold the sensor for
approximately 3 seconds. There should be a beep and the time
display should flash. Set the time as per the above step.
Cleaning the manufacturing grease
Some grease may reside from the manufacturing process. As
such, the oven should be run with the appliance empty before any
foodstus are cooked.
• Touch the heating functions sensor until fan oven is selected
• Touch the switch parameter sensor and then use the plus
and minus parameter selectors to set the temperature to 230°C.
• Touch the sensor. Touch the plus and minus parameter
selectors to set the cooking time to 60 minutes.
• Touch the start sensor .
Cleaning the accessories
Remove, clean and dry the turntable, wire racks and glass tray before
using them for the first time.
Page 11
11
烟灰色透明视窗
Fig. 1
G H J
A B C D E F
K L M
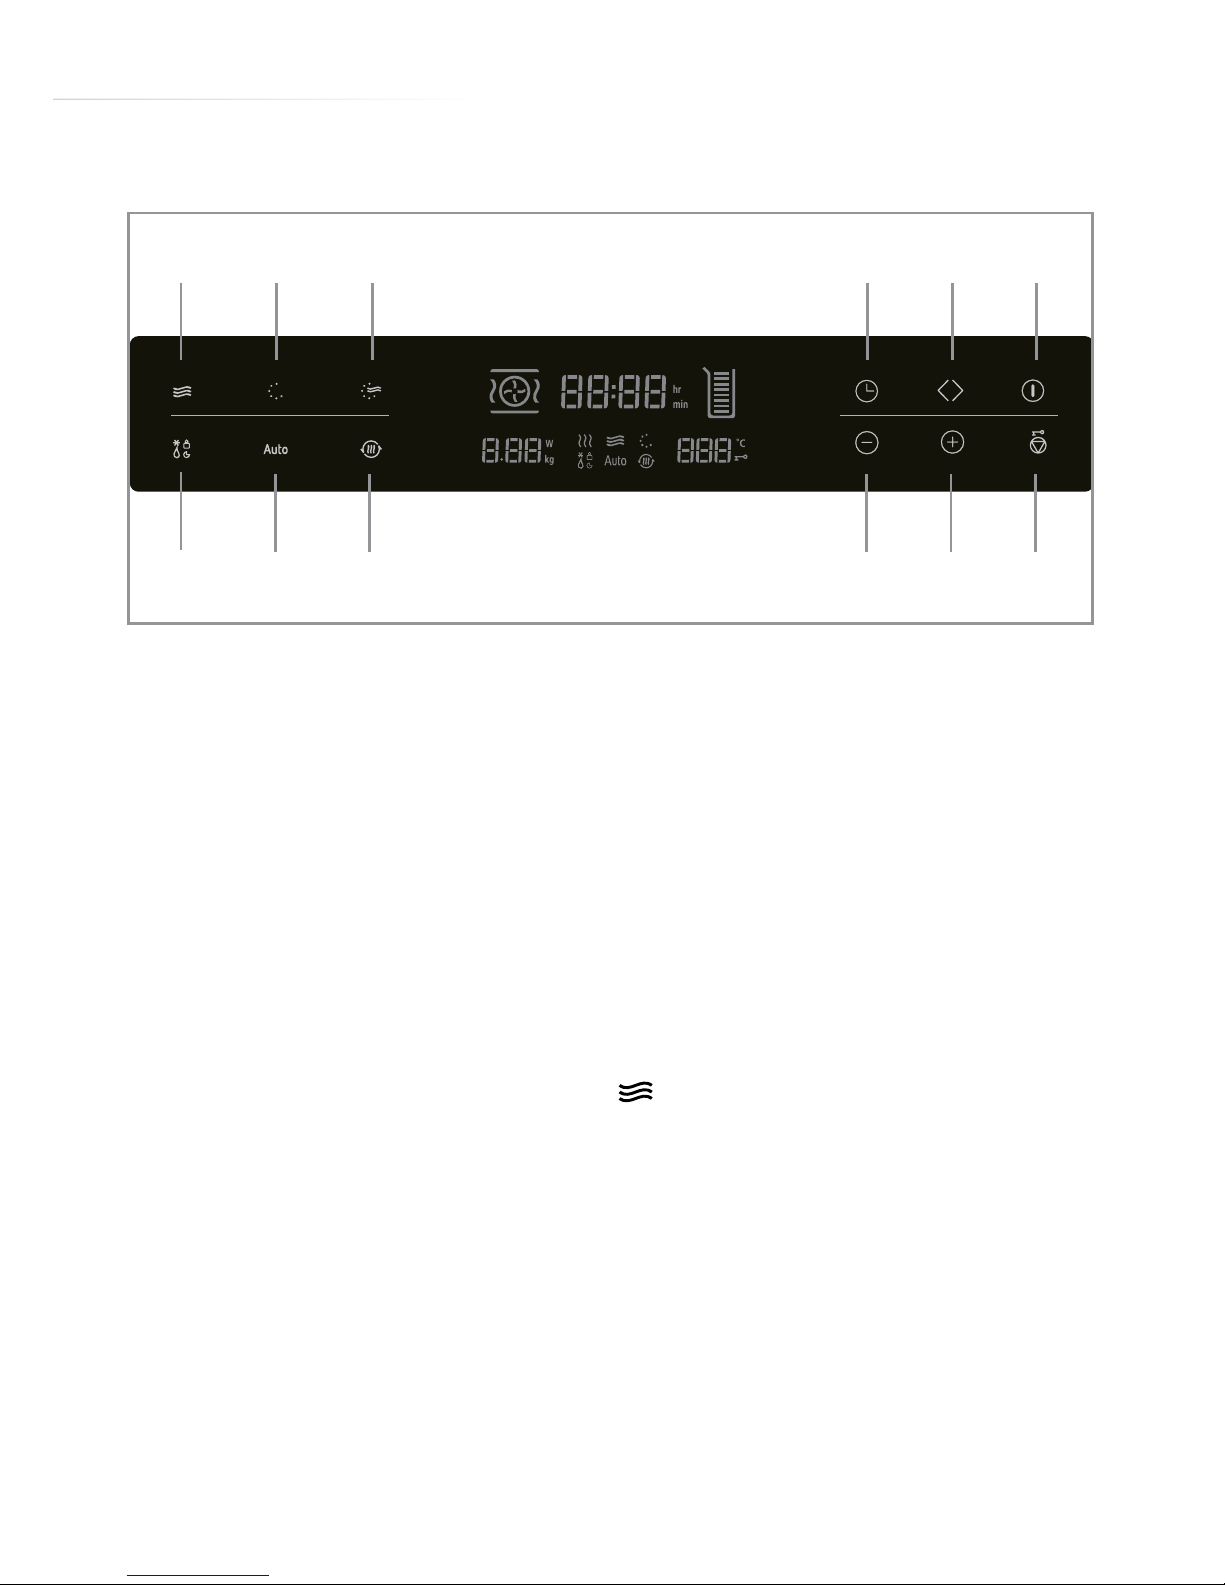
Control panel
A - Microwave function sensor
B - Heating function sensor
C - Combi function sensor
D - Clock sensor
E - Switch parameter sensor
F - Start sensor
G - Defrost function sensor
H - Auto programme sensor
J - Rapid preheating sensor
K - Parameter selector (minus)
L - Parameter selector (plus)
M - Stop sensor
Functions - Microwave
Use the microwave function sensor to select from the following
power options (alongside the power options are recommended uses):
• 900W - Reheating, cooking chicken, fish and vegetables.
• 700W - Gentler reheating, cooking mushrooms, cheese etc.
• 450W - Cooking rice or soup
• 300W - Stronger defrosting, melting butter or chocolate
• 100W - Defrosting sensitive foods, softening ice cream, rising
dough etc.
Page 12
12
• The cooking duration will be set automatically to 1 minute. To alter
the time, press the sensor. Use the and sensors to set
the desired duration. Each press of either sensor will adjust the
time in 10 second increments. Holding the sensor will, after a few
seconds, adjust the time in 1 minute increments.
• When the desired duration has been set, press the start sensor .
Pausing or stopping a function
To pause the function at any point, press the stop sensor .
To cancel the function, press the stop sensor again.
To resume cooking, press the start sensor .
Please note:
• For some time after cooking, or if you open the appliance door
during cooking, the fan may continue to run. This is not a fault.
• Condensation may appear on the door window, interior walls and
floor. This is normal and does not adversely aect microwave
operation. Wipe away any condensation after cooking.
Functions - Heating
Use the heating function sensor to select from the following
options (alongside the power options are recommended uses):
• Fan oven - Baking flans, cakes, pizza, small baked items etc.
• Grill with fan - Baked casseroles and grilled dishes.
Page 13
13
• Pizza setting - Best for pizzas and similar items.
• Grill - Ideal for steaks, sausages or bread
• The cooking duration will be set automatically to 10 minutes. To
alter the time, press the sensor. Use the and sensors to
set the desired duration. Each press of either sensor will adjust the
time in 30 second increments until 15 minutes. After that the time
will increase in 1 minute increments.
• When the desired duration has been set, press the start sensor .
Pausing or stopping a function
To pause a function at any point, press the stop sensor .
To cancel a function, press the stop sensor again.
To resume cooking, press the start sensor .
Please note: If you open the appliance door during cooking, the fan
may continue to run. This is not a fault.
Changing the cooking duration
This can be done at any time. Touch the
sensor. Use the and
symbols to set the newly desired duration. Touch the start sensor
to resume cooking.
Changing the temperature
This can be done at any time. Touch the switch parameter sensor
and then use the and sensors to set the new temperature. Wait
approximately 3 seconds and the new temperature shall be entered.
Page 14
14
Functions - Combi
Use the combi function sensor to select from the following
options (alongside the power options are recommended uses):
• Microwave & fan oven - Great for cooking most dishes quickly
and evenly.
• Microwave & grill with fan - Baked casseroles and grilled
dishes. Dishes are cooked more evenly throughout.
• Microwave & pizza setting - Best for frozen pizzas and similar
items. Dishes are cooked more evenly throughout.
• Microwave & grill - Ideal for anything that you want cooked
quickly and to have a crispy crust/topping.
Changing the cooking duration
The cooking duration will be set automatically to 10 minutes. To alter
the time, press the sensor. Use the and sensors to set the
desired duration. Each press of either sensor will adjust the time in 30
second increments until 15 minutes. After that the time will increase in
1 minute increments.
When the desired duration has been set, press the start sensor .
Changing the temperature
The heating function temperature will be set automatically to 180°C. To
+
+
+
+
Page 15
15
adjust the temperature, press the switch parameter sensor until
the temperature is flashing. Use the and sensors to set the new
temperature. This can be done at any time.
Changing the microwave power
The microwave power will be set automatically to 300W. To adjust
the power, press the switch parameter sensor until the microwave
power is flashing and then use the and sensors to set the new
power level. This can be set at either 100W, 300W, 450W or 700W.
This can be done at any time.
Pausing or stopping a function
To pause a function at any point, press the stop sensor .
To cancel a function, press the stop sensor again.
To resume cooking, press the start sensor .
Defrost functions
Use the defrost function sensor to select from the following
programmes:
• d01 - meat, poultry and fish with a weight range of 0.2 to 1.5 kg.
• d02 - bread, cake and fruit with a weight range of 0.1 to 0.5 kg.
• d03 - defrost programme with adjustable time
If using programmes d01 or d02
• With the desired programme selected, press the switch parameter
sensor . Use the and sensors to finely adjust the item’s
weight.
Page 16
16
• The time will adjust according to weight increments and is not
adjustable.
• Press the start sensor to commence defrosting.
Please note: When using programme d01 an acoustic signal will
sound. This is an indicator that the contents being defrosted needs to
be turned.
If using programme d03
• Simply press the sensor. Use the and sensors to set the
desired duration.
• Press the start sensor to commence defrosting.
Pausing or stopping a defrost function
To pause a function at any point, press the stop sensor .
To cancel a function, press the stop sensor again.
To resume cooking, press the start sensor .
IMPORTANT NOTES FOR DEFROSTING:
• Weight should be measured with all packaging removed from
the food.
• Liquids will be produced when defrosting meat or poultry. Drain
o this liquid when turning the meat and do not use it under
any circumstances nor allow it to come into contact with other
foodstus. Wash your hands thoroughly.
• Defrosted food should be left to stand for an additional 10
to 30 minutes after defrosting so that it can reach an even
temperature.
• Foods should be separated where possible (i.e. diced beef) to
Page 17
17
accelerate the aforementioned settling stage.
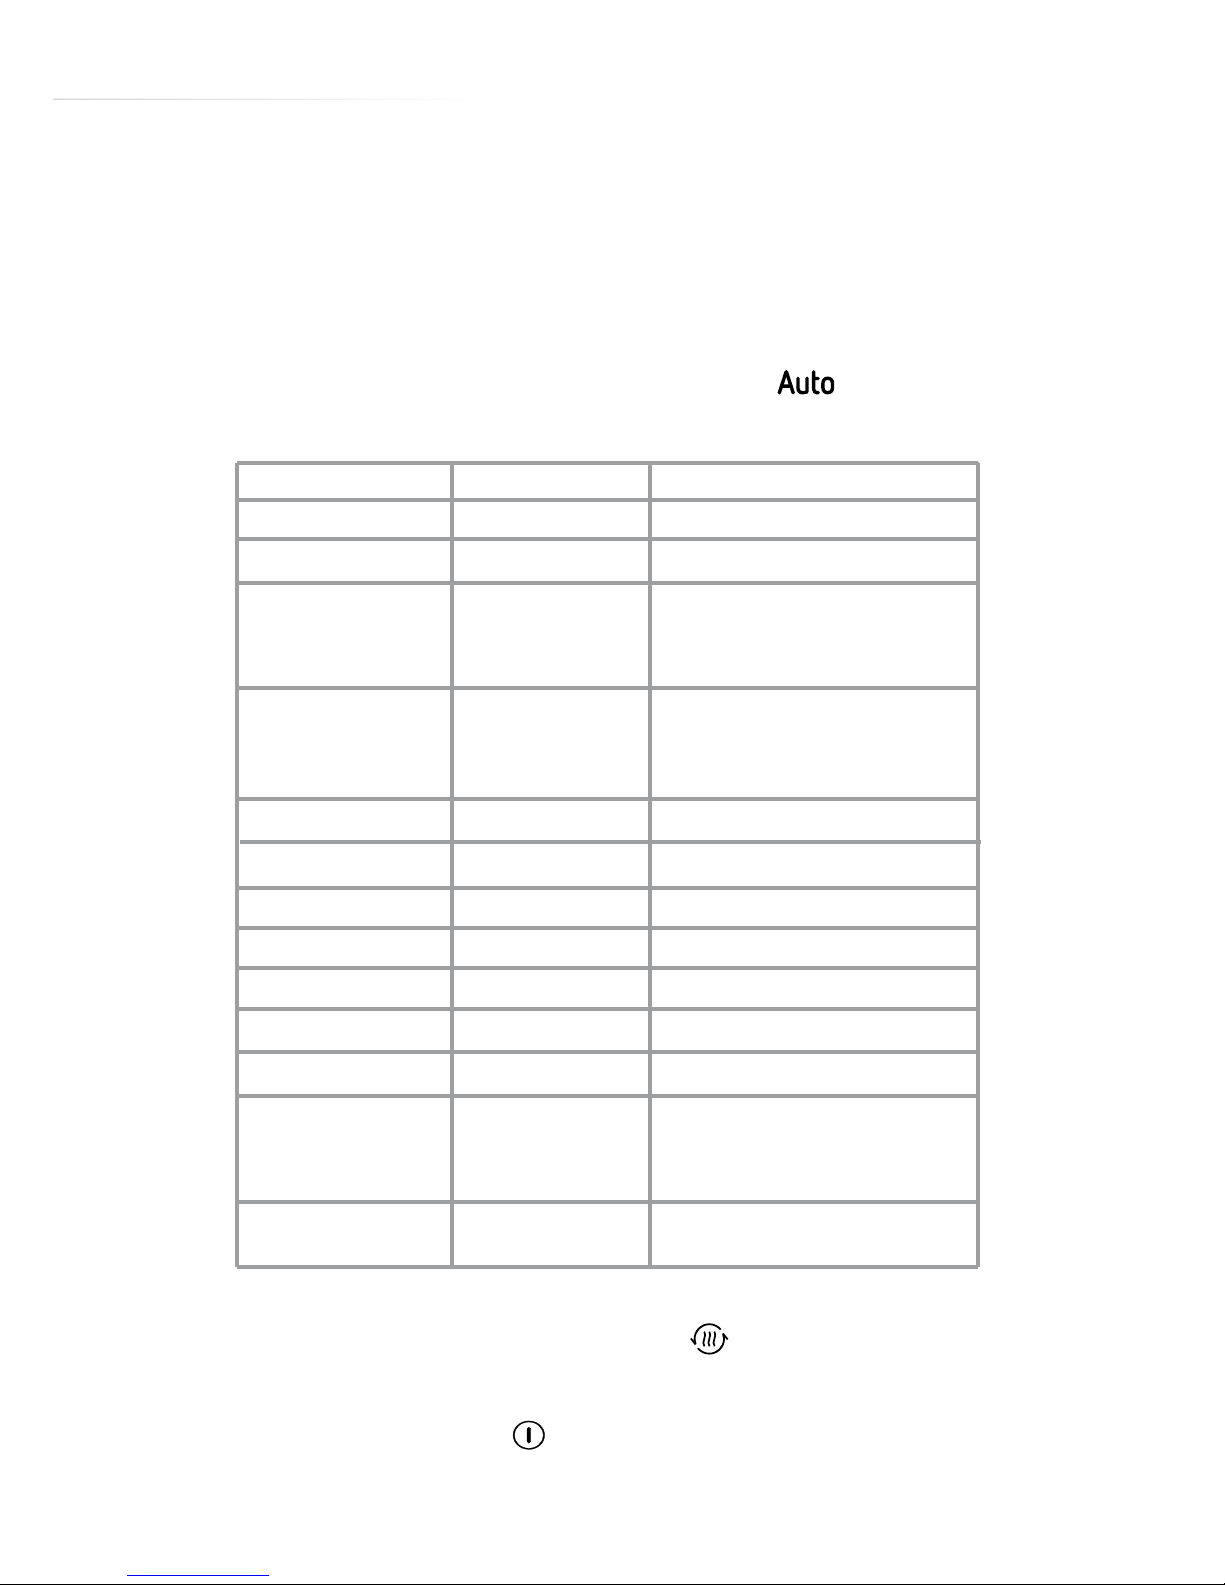
Auto programmes
The auto programmes create the optimum settings for a variety of
dishes/meals. Use the auto programme sensor to select from the
following options:
* These programmes are pre-heated. During pre-heating the cooking
time pauses and the pre-heating symbol illuminates. Once preheating is complete, an acoustic signal will sound and the symbol will
flash. Press the start sensor to commence cooking.
**The programmes with just this symbol use the microwave function.
Programme no.
Category
Item
P 01**
Vegetables
Fresh vegetables
P 03*
P 05*
P 02**
Side dishes
Potatoes-peeled/cooked
Side dishes
Potatoes-roasted
If you hear a beep,turn the food.The
combi microwave oven starts the
next fase automatically.
P 04
Poultry/Fish
If you hear a beep,turn the food.The
combi microwave oven starts the
next fase automatically.
Chicken pieces
Bakery
Cake
P 06*
Bakery
P 07*
Bakery
Apple pie
P 08**
Reheat
Drink/soup
P 09**
Reheat
P 10**
Reheat
Plated meal
Sauce/stew/dish
P 11*
P 12*
P 13*
Quiche
If you hear a beep,turn the food.The
combi microwave oven starts the
next fase automatically.
Frozen-Pizza
Frozen/oven chips
Frozen-Lasagne
Convenience
Convenience
Convenience
Page 18
18
With the desired programme selected, press the switch parameter
sensor . Use the and sensors to finely adjust the item’s
weight. The cooking time will adjust accordingly.
Press the start sensor to begin cooking. If you need to adjust the
weight again (e.g. it was entered incorrectly), simply press the switch
parameter sensor before the programme has started and adjust
accordingly.
NOTES FOR AUTO PROGRAMMES:
• Once you have started a programme, it cannot be altered. To
stop the programme or start a new one, you must cancel the
programme:
To pause a function at any point, press the stop sensor .
To cancel a function, press the stop sensor again.
To resume cooking, press the start sensor .
• The cooking duration cannot be changed for auto programmes.
• Once the pre-heat cycle has finished you will need to press the
start sensor to begin cooking.
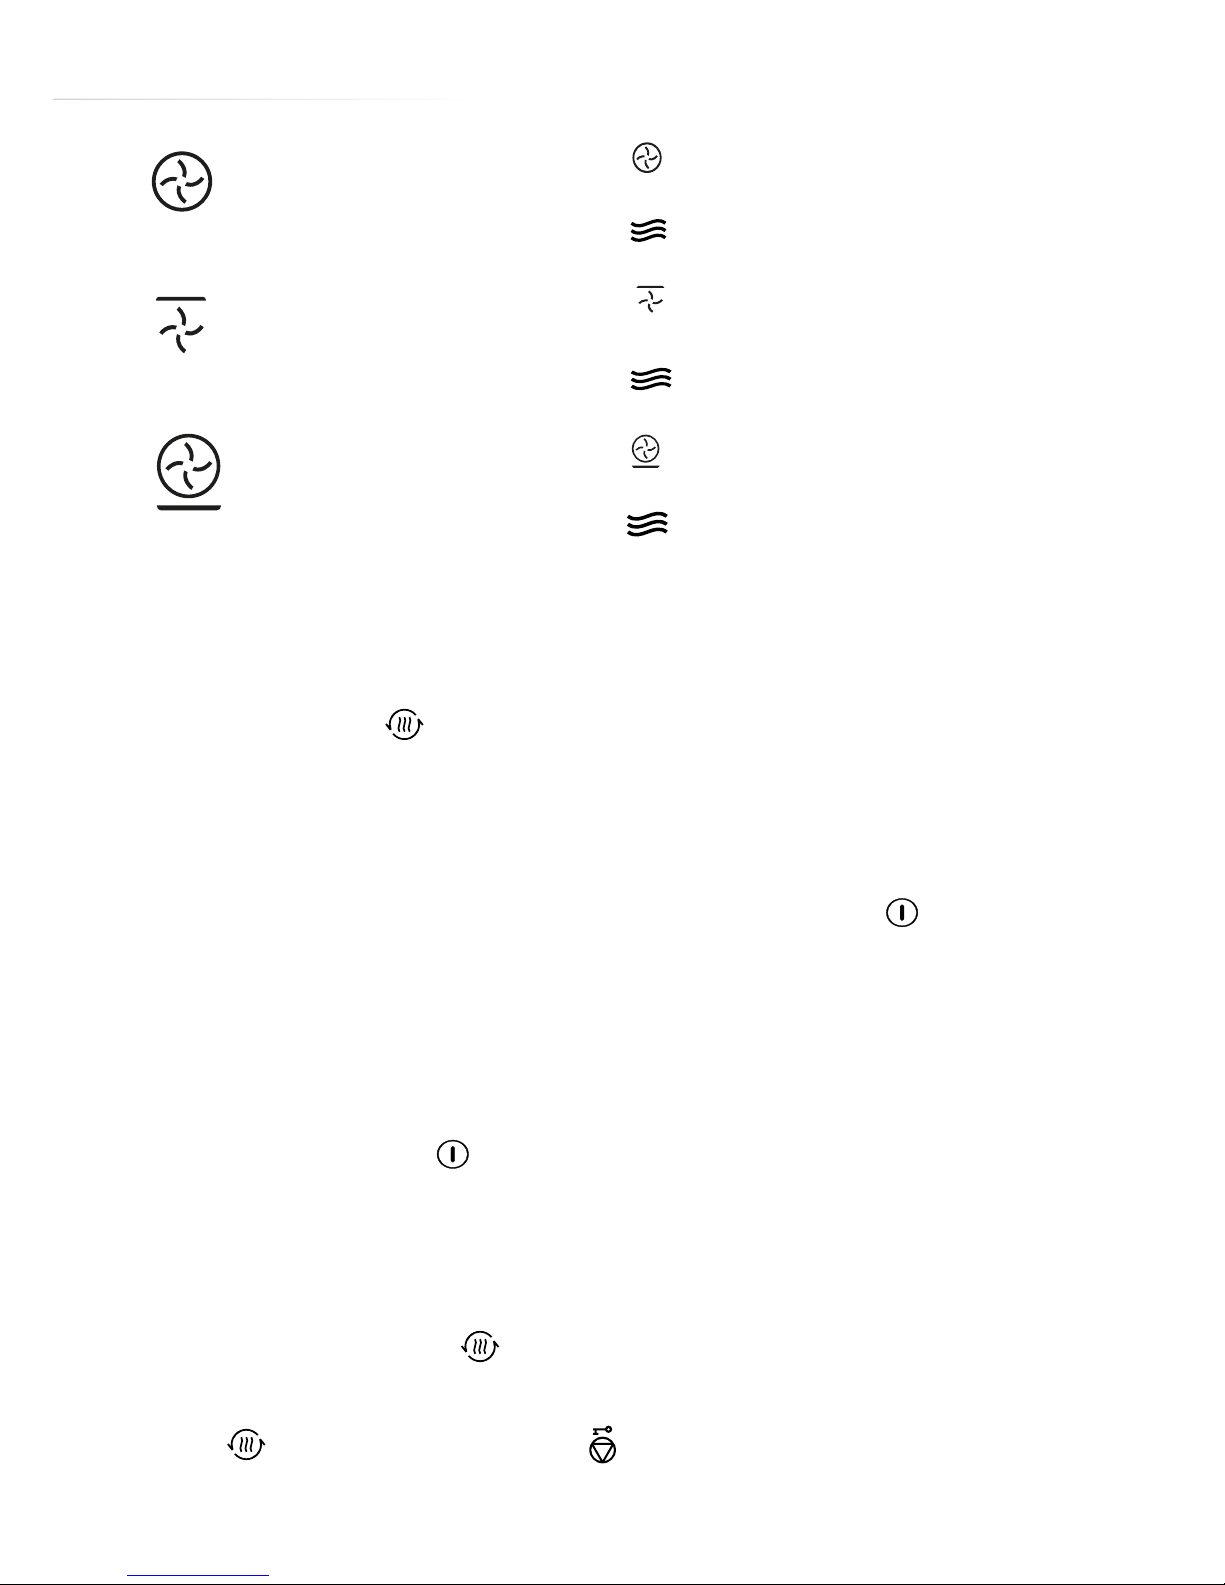
Rapid preheating
With this feature enabled, the appliance will reach the required
temperature quickly. Rapid preheating is a standard feature for
some of the auto programmes but is also an optional feature for
some of the appliance’s other cooking modes, as per the following
list:
Page 19
19
+
+
+
Fan oven Microwave & fan oven
Grill with fan Microwave & grill with fan
Pizza setting Microwave & pizza setting
Engaging rapid preheating
Set up your function as per the relevant section. Then touch the rapid
preheating sensor . The symbol should illuminate on the display.
If it does not, check that you have selected from one of the above
functions and not an ineligible one.
Do not yet insert your meal/dish. Press the start sensor .
The appliance will heat up rapidly. Once correctly heated, an acoustic
signal will sound temporarily and the rapid preheating symbol on the
display will flash. Now is the time to insert your meal/dish and then
press the start sensor to begin cooking.
Cancelling rapid preheating
If you wish to cancel during the setup stages, then simply press the
rapid preheating sensor .
To cancel during preheating, you can either press the rapid preheating
sensor , press the stop sensor , or simply open the appliance
door. Beware of hot air if performing the latter however.
Page 20

20
Safety key lock
This appliance features a safety key lock which can be engaged to
help prevent inadvertent activation.
Activating the safety key lock
No cooking time should be set and no function should be active for
the safety key lock to be activated. To activate it, touch and hold the
stop sensor for approximately 3 seconds. A key symbol should
illuminate on the display to denote that the lock is active.
Deactivating the safety key lock
Touch and hold the stop sensor for approximately 3 seconds. The
key symbol should extinguish on the display to denote that the lock is
now inactive.
Please note: It is not possible to activate the lock whilst a function or
auto programme is active due to the stop sensor serving as a pause/
cancel sensor during operation.
Page 21

21
Care and maintenance
Interior lighting
If the bulb in your appliance should fail, please contact CDA Customer
Care to arrange a service visit. The bulb and appliance must not be
serviced by anyone except a CDA authorised service agent.
IMPORTANT
• Before any cleaning or maintenance is started, the appliance
must be switched o at (and if possible, disconnected from) the
power supply.
• If the oven has been in use, let the oven cavity and the heating
elements cool down before attempting any maintenance.
• Steam cleaners must not be used when cleaning this appliance.
• Once care and maintenance is complete, ensure that all parts
are correctly replaced and dry before using the oven.
• Do not store flammable material in the oven.
• Do not allow grease or food particles to build up around the
door or seal.
Cleaning the oven exterior
As the oven has a decorative and a stainless steel surface, you should
use a non-abrasive cleaner. Any abrasive cleaner (including Cif) will
scratch the surface and could erase the control panel markings.
Cleaning inside of the oven
It is recommended that the interior of the oven be cleaned after
every use using suitable products, especially if any spillage has
occurred. The shelves can be removed and washed by hand or in the
dishwasher.
Page 22

22
Cleaning stainless steel
Stainless steel can be eectively cleaned by simply using a dilute
solution of water and mild detergent and drying to a shine with a
clean cloth. Proprietary stainless steel cleaners are available. We
recommend a clean microfibre cloth for cleaning stainless steel
surfaces.
Cleaning the grill
When used regularly, the grill element does not need cleaning as the
intense heat will burn o any splashes. The interior ceiling may need
regular cleaning, which should be done with warm water, detergent
and a sponge. If the grill is not used regularly, it should be run for 10
minutes every month to burn o any splashes, in order to reduce the
risk of fire.
Please note: You should ensure that new sponges are washed
thoroughly before use to remove any impurities and that used
sponges are cleaned prior to use.
Unpleasant odours (such as fish) can be removed by adding a few
drops of lemon juice to a cup of water and microwaving it for 1 to 2
minutes. Please take extreme care with microwaved liquids (see page
8).
IMPORTANT: Do not use the following to clean the oven or door
• Sharp or abrasive cleaning agents
• Metal or glass scrapers (even to clean the glass in the door)
• Scouring pads or hard/abrasive sponges
• Cleaning agents with high concentrations of alcohol.
Page 23
23
Installation
When correctly installed, your product meets all safety
requirements laid down for this type of product. However, special
care should be taken around the rear or the underneath of the
appliance as these areas are not designed or intended to be
touched and may contain sharp or rough edges that could cause
injury. Please wear adequate PPE (Personal Protective Equipment).
The appliance can be installed under a worktop or in a tower unit with
the appropriate dimensions for recessed installation.
Study the installation diagrams on pages 24 and 25 carefully. Take
care to ensure that you follow the ventilation requirements.
Centre the oven in the unit, ensuring that there is as much of a gap
as possible, for ventilation purposes, between the appliance and the
surrounding unit. The material of the unit supporting the appliance
must be heat resistant (or covered with a heat resistant material) to at
least 75°C above ambient temperature (ideally 105°C +).
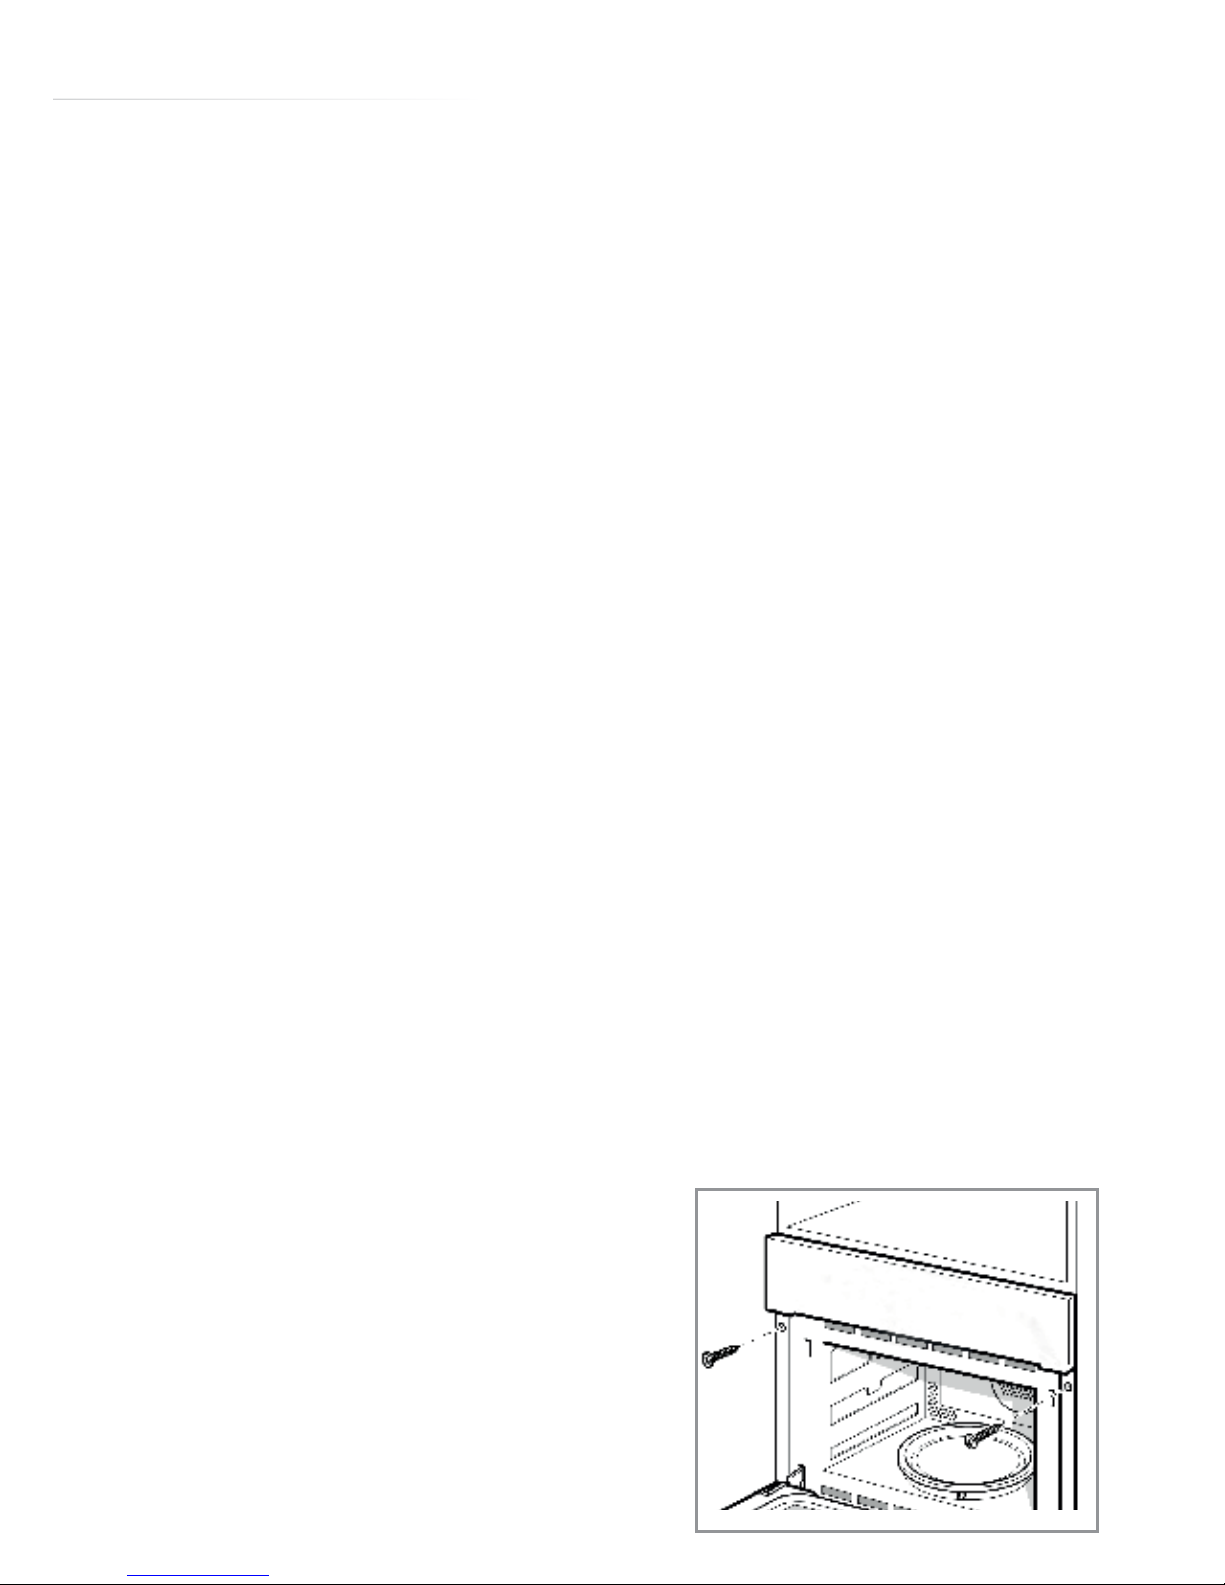
Once the appliance is in place within the unit, secure it using two
screws. There is one screw hole on either side of the appliance, just
below the control panel and behind the
door.
Do not use your appliance immediately
after moving it from a cold location, as
condensation may cause a malfunction.
Wait approximately 1-2 hours before use.
Fig. 2
Page 24
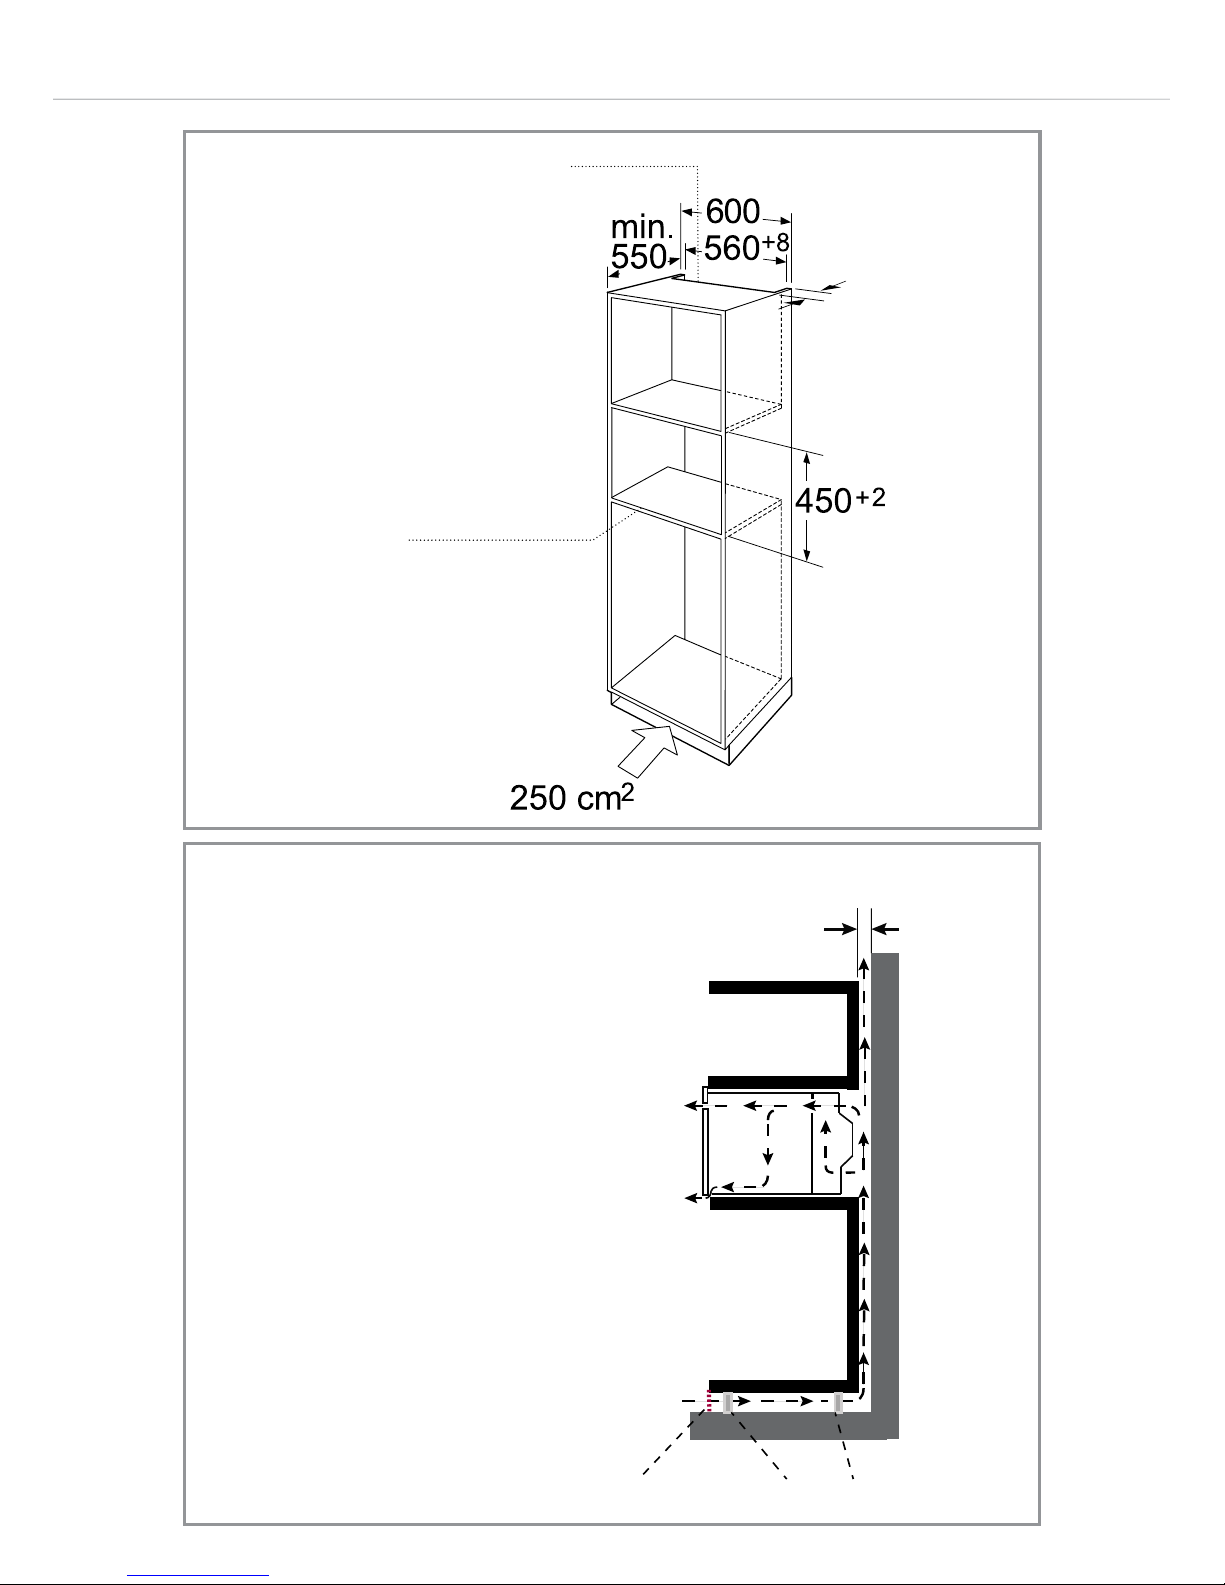
24
min 45
min 45
Ventilation openings behind.
Min. 250cm²
Back panels open
Ventilation area in the base.
Min. 250cm²
Ventilation grid/opening
Cupboard/unit feet
Ideal ventilation provisions
- the more air that can
circulate, the better.
Fig. 3
Fig. 4
Page 25
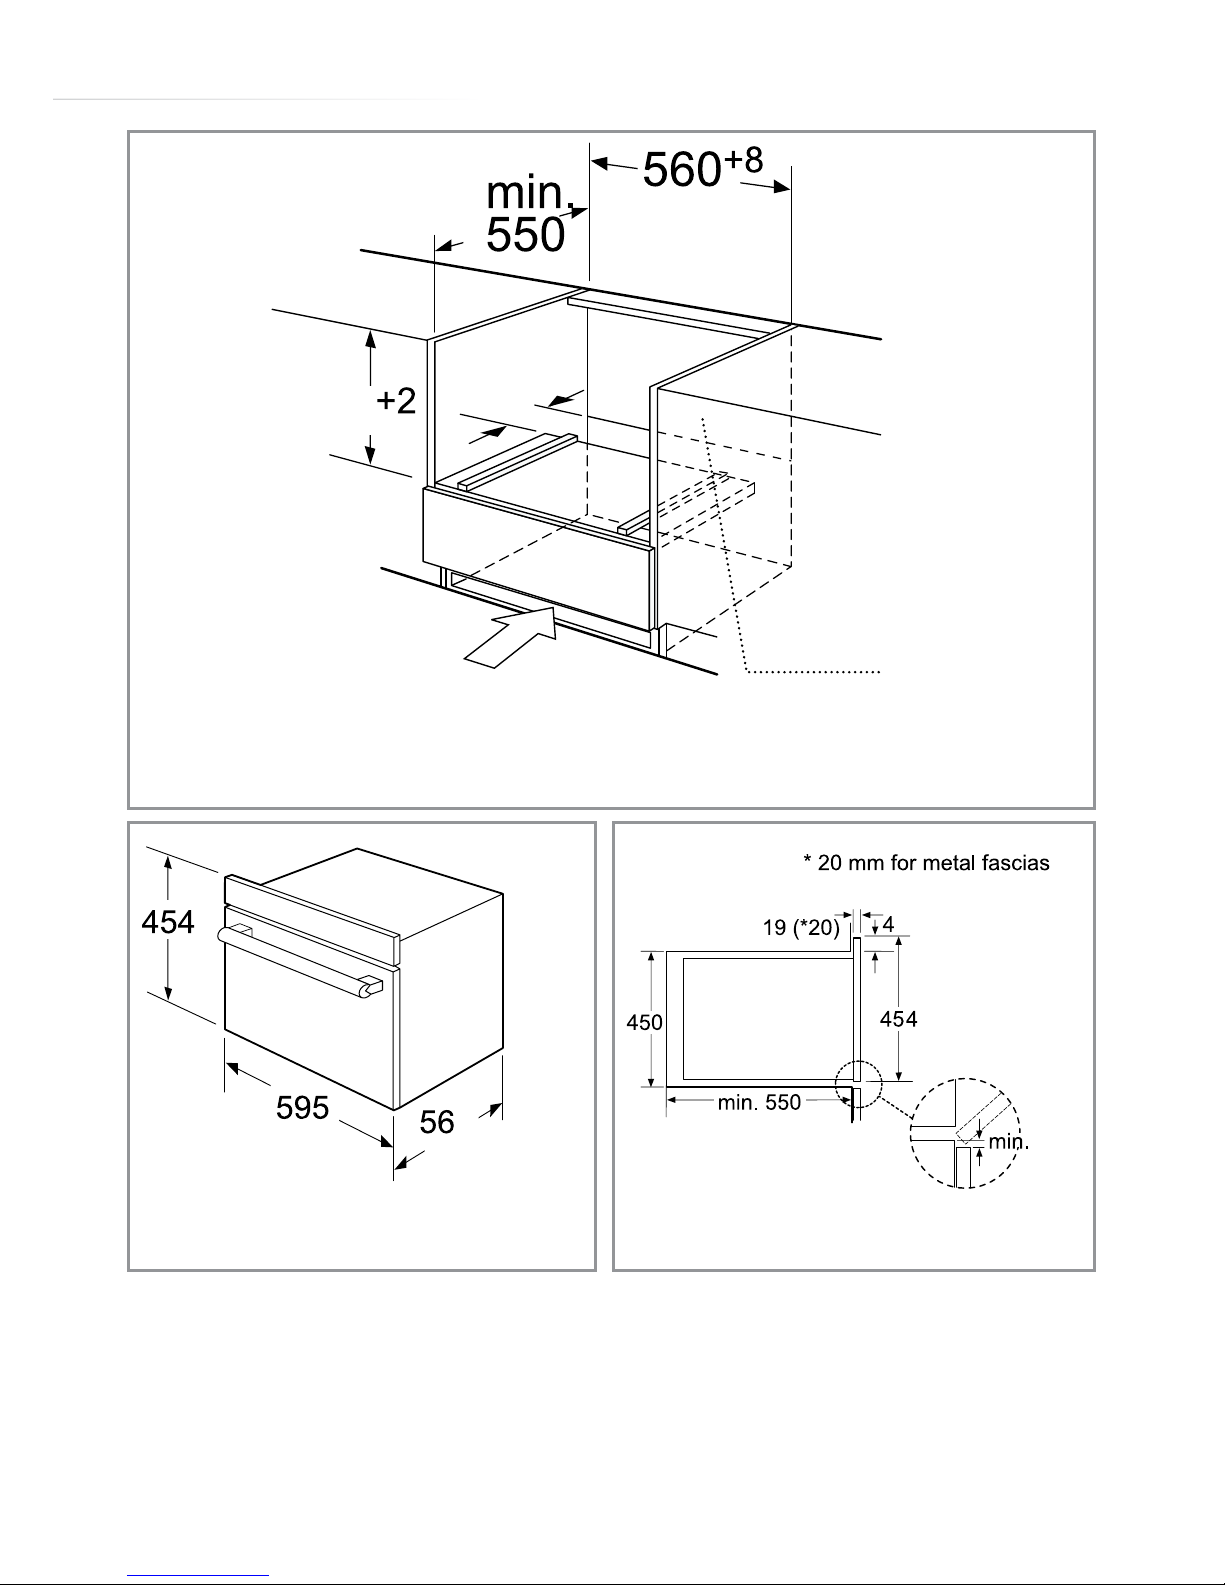
25
50
460
Ventilation area in the base.
Min. 250cm²
Back panel
open
8
10
Appliance dimensions
Door clearance
& unit measurements
Fig. 5
Fig. 6 Fig. 7
• Ensure the appliance is fully inserted into the cutout.
• Do not kink the mains lead or leave it in contact with the sides or
back.
• Secure the appliance into place as per the bottom of page 23.
• There should be a gap above the appliance for air flow.
Page 26

26
Mains electrical connection
Warning! This appliance must be earthed
This appliance is supplied with a 3 core mains cable; the wires are in
accordance with the following code:
Green and Yellow = Earth
Blue = Neutral
Brown = Live
We strongly recommend that the appliance is connected by a
qualified electrician, who is a member of the N.I.C.E.I.C. and who will
comply with the I.E.T. and local regulations.
This appliance is intended to be connected to fixed wiring and is
NOT suitable for connection to a 13A plug or a 13A supply.
This appliance is intended to be connected to fixed wiring by a
double pole switch, having a contact separation of at least 3mm in
all poles. The switch must be positioned no further than 2m from the
appliance (the mains lead is approximately 1.5 metres in length).
Please note:
• The mains cable must only be replaced by a qualified service
engineer and must be of equivalent or better rating (i.e. 1.5mm
2
,
HO5RR-F).
• The current rating of the circuit breaker protecting this appliance
Page 27

27
should be marked on the outlet.
• Assembly and electrical connection should be carried out by
specialised personnel.
• When installing this product we recommend you seek the help of
another individual.
• The mains isolation switch must be accessible after installation.
Technical information
Mains electrical voltage: 240Vac, 50Hz
Total rated electrical consumption: 3.35 kW
Microwave output: 900W, 2450MHz
Oven capacity 44L
Turntable diameter Ø 363mm
Page 28
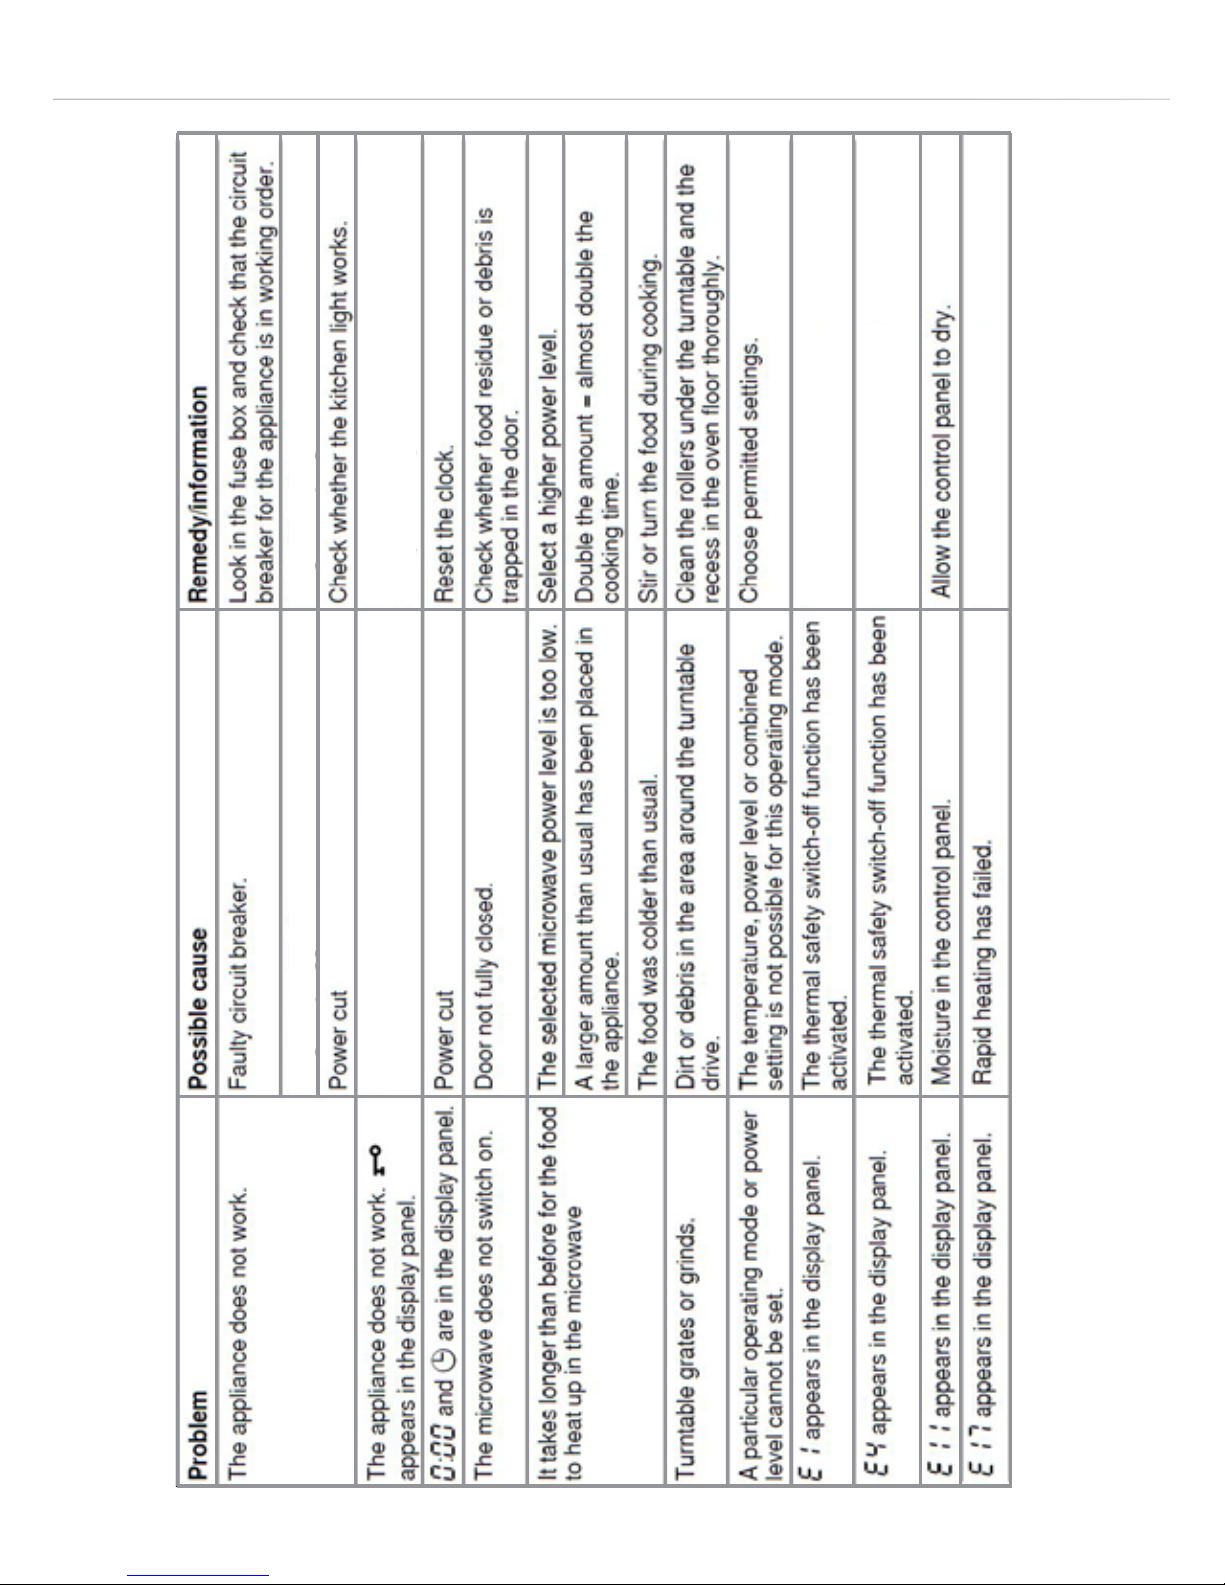
28
Safety key lock is active
Deactivate the safety key
lock as per page 20.
Contact CDA Customer Care
Contact CDA Customer Care
Contact CDA Customer Care
Have your installer check the mains wiringIssue with mains wiring
Troubleshooting
NOTE: If your appliance is cutting out mid-programme/function, it could be overheating due to
a lack of ventilation.
Page 29

29
NOTES:
Page 30

30
NOTES:
Page 31

31
NOTES:
Page 32
www.cda.eu
Customer Care Department. The CDA Group Ltd, Harby Road, Langar, Nottinghamshire, NG13 9HY
T: 01949 862 012 F: 01949 862 003 E: [email protected]
For service or queries relating to your product please contact:
The Customer Care Department on 01949 862 012 or email [email protected]
For more information please contact:
The Sales Department on 01949 862 010 or email [email protected]
 Loading...