

Page 1

Customer Care Department • The Group Ltd. • Harby Road • Langar • Nottinghamshire • NG13 9HY
T : 01949 862 012 F : 01949 862 003 E : customer.care@cda.eu W : www.cda.eu
www.cda.eu
VC801 Built-In
Coee Machine
Installation, Use and Maintenance
Page 2

2
Safety Instructions
The appliance is not intended for use by persons (including children)
with reduced physical, sensory or mental capabilities, or lack of
experience and knowledge, unless they have been given supervision
or instruction concerning use of the appliance by a person
responsible for their safety.
Children should be supervised to ensure that they do not play with
the appliance.
Cleaning and user maintenance shall not be made by children without
supervision.
Never immerse the appliance in water.
This is a household appliance only. It is not intended to be used in:
• Sta kitchen areas in shops, oces and other working
environments;
• Farm houses;
• By clients in hotels, motels and other residential type environments;
• Bed and breakfast type environments.
If the plug or power cable is damaged, it must be replaced by
customer services only to avoid all risk.
For European Markets Only:
This appliance can be used by children aged from 8 years and above
if they have been given supervision or instruction concerning use
of the appliance in a safe way and if they understand the hazard
Page 3
3
involved. Cleaning and user maintenance shall not be made by
children unless they are older than 8 and supervised. Keep the
appliance and its cord out of the reach of children aged less than 8
years.
Appliances can be used by persons with reduced physical, sensory or
mental capabilities or lack of experience and knowledge if they have
been given supervision or instruction concerning use of the appliance
in a safe way and understand the hazards involved.
Children shall not play with the appliance.
When not in use and before cleaning, always unplug the appliance.
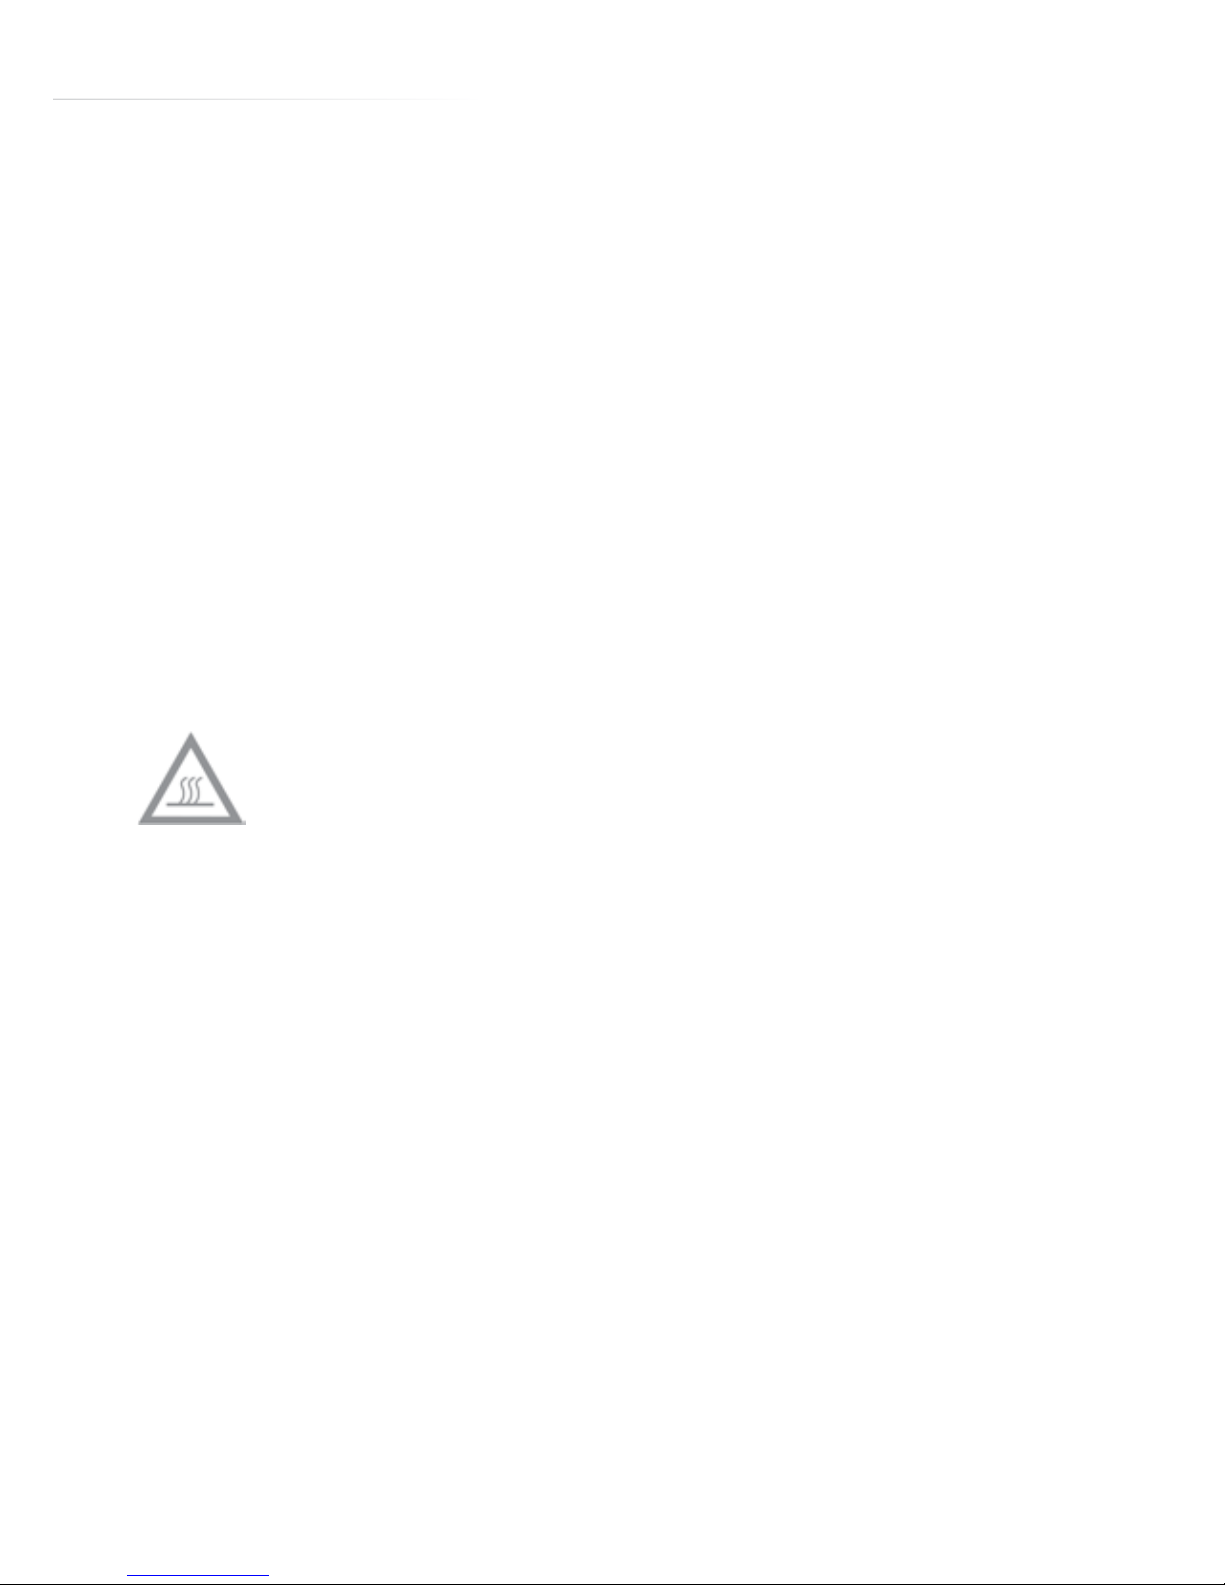
Surfaces marked with this symbol become hot during use
(the symbol is present in certain models only).
Important Notes:
This appliance is designed solely to produce coee and steam. Other
types of use are not permitted and may prove dangerous. The CDA
Group Ltd will not be held liable for any damage caused by incorrect
use of the appliance.
• Read the user instructions carefully before using the appliance for
the first time.
• To protect against fire, electrical shock and injury to persons, do not
immerse cord or plugs in water or other liquid.
• The use of accessory attachments not recommended by The CDA
Group Ltd may result in fire, electric shock or injury.
Page 4

4
• Never touch the appliance with damp hands.
• Never touch the plug with damp hands.
• Make sure the socket used is freely accessible at all times, enabling
the appliance to be unplugged when necessary.
• Unplug directly from the plug only. Never pull the power cable as
you could damage it.
• To disconnect the appliance completely, place the main switch (A23)
on the side of the appliance in the “0” position.
• If the appliance is faulty, do not attempt to repair; turn it o using
the main switch (A23), unplug from the mains socket and contact
Customer Services.
• Keep all packaging (plastic bags, polystyrene foam) away from
children.
• This appliance produces hot water; steam may form while it is in
operation. Avoid contact with splashes of hot water or hot steam.
Use knobs and handles.
• Do not grab the coee maker when it is out of the cabinet.
• Do not rest vessels containing liquids, inflammable or corrosive
materials on top of the appliance. Place accessories required to
make coee safely aside (the measure for coee may be placed in
the special holder).
• Do not rest large objects which could obstruct movement or
unstable objects on the appliance.
• Do not use the appliance when extracted. Make sure the appliance
is inactive before extracting it. The only exception is adjusting
the coee mill which must be done with the machine out (see the
section “Adjusting the Coee Mill”).
Page 5

5
• This coee machine is not designed for use with caramelised
coee beans: Use of such beans will invalidate the guarantee.
Note: This appliance has a cooling fan. This may switch on when
coee, steam or hot water is delivered. After several minutes the fan
switches o automatically.
Do not manually switch the coee machine o or disconnect the
power supply while the fan is still running.
Page 6
6
Important
The CDA Group Ltd cannot be held responsible for injuries or losses
caused by incorrect use or installation of this product. Please note
that CDA reserve the right to invalidate the guarantee supplied with
this product following incorrect installation or misuse of the appliance.
Under no circumstances should any external covers be removed for
servicing or maintenance except by suitably qualified personnel.
Appliance information:
Please enter the details on the appliance rating plate below for
reference, to assist CDA Customer Care in the event of a fault with
your appliance and to register your appliance for guarantee purposes.
Appliance Model
Serial Number
CE Declarations of Conformity:
This oven has been designed, constructed and marketed in
compliance with safety requirements of EEC Directive 2006/95/EEC
(Low voltage) and requirements of EMC Directive 2004/108/EEC.
This appliance has been manufactured to the strictest standards and
complies with all applicable legislation, including Electrical safety (LVD)
and Electromagnetic interference compatibility (EMC). Parts intended
to come into contact with food conform to EEC/89/109.4.
Page 7

7
IMPORTANT INFORMATION FOR CORRECT DISPOSAL OF THE
PRODUCT IN ACCORDANCE WITH EC DIRECTIVE 2002/96/EC.
At the end of its working life, the product must not be disposed
of as urban waste. It must be taken to a special local authority
dierentiated waste collection centre or to a dealer providing this
service.
Disposing of a household appliance separately avoids possible
negative consequences for the environment and health deriving from
inappropriate disposal and enables the constituent materials to be
recovered to obtain significant savings in energy and resources. As a
reminder of the need to dispose of household appliances separately,
the product is marked with a crossed-out wheeled dustbin.
Page 8
8
Description
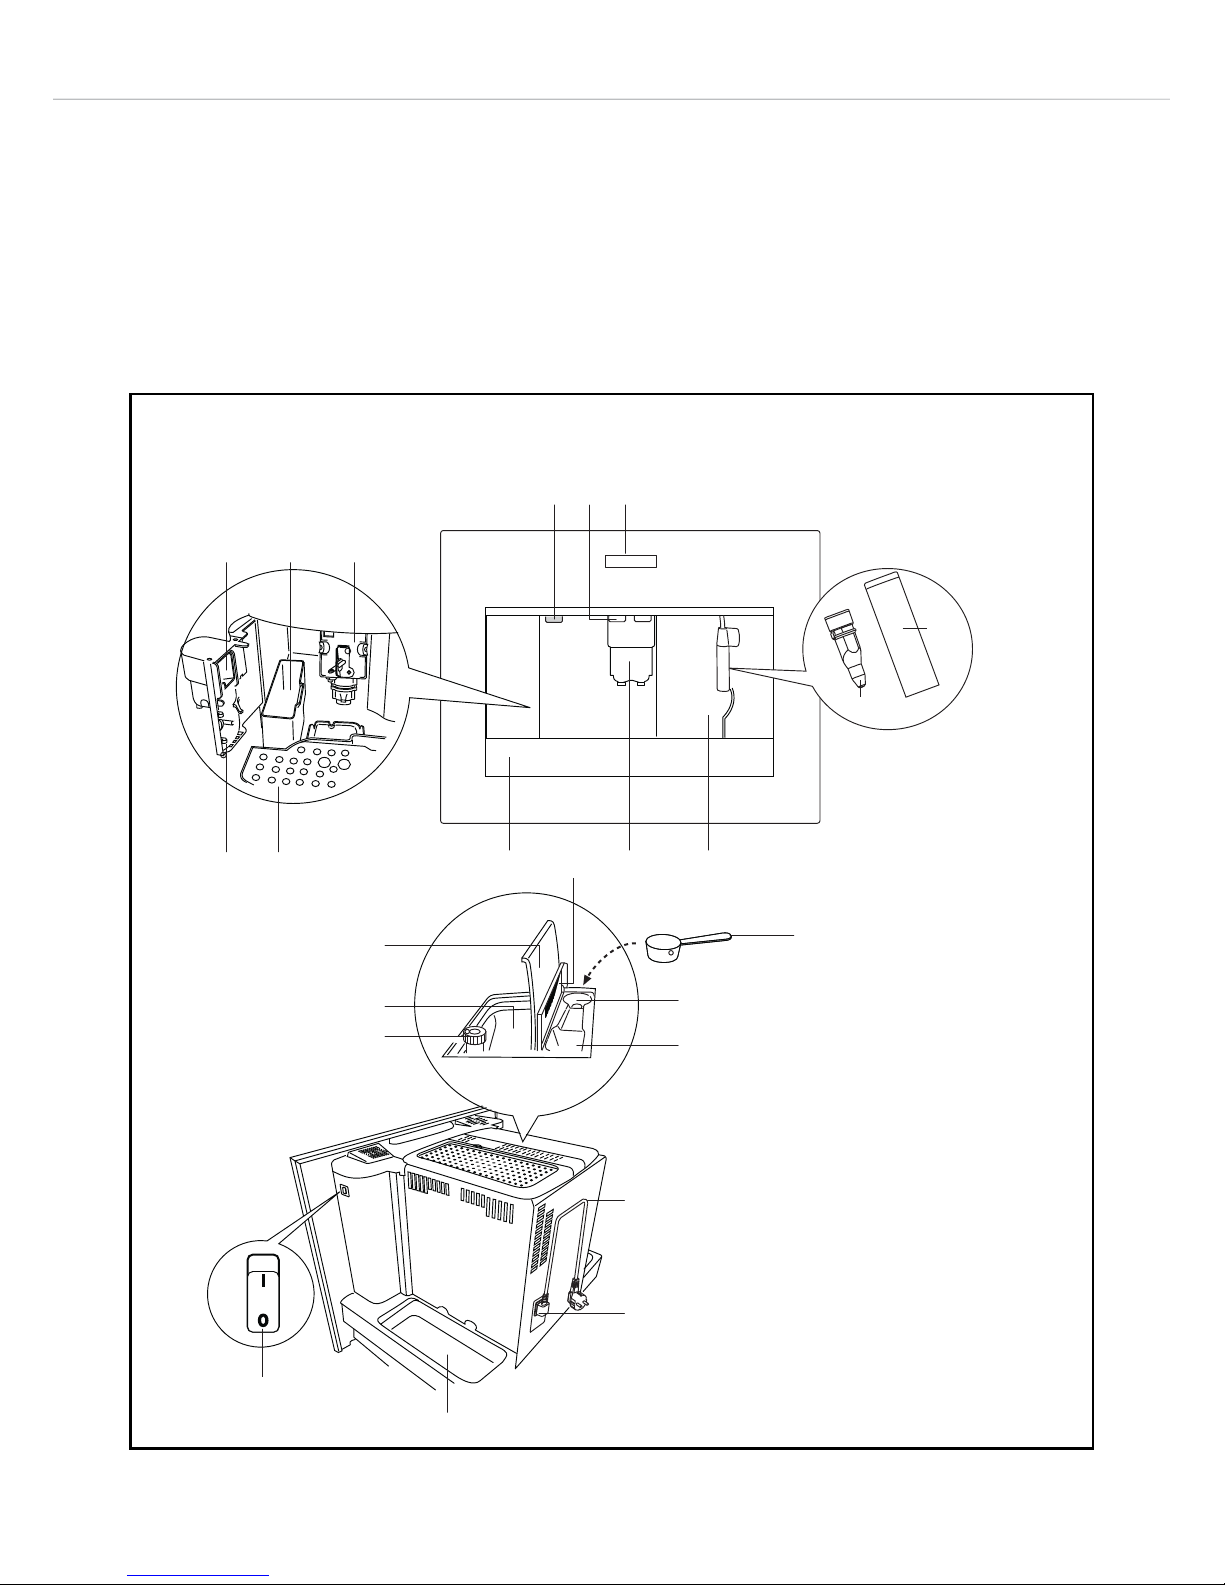
Note: Throughout this manual references in brackets refer to the
legend in this section.
Description of the Coee Machine
A
A1A2
A3
A4 A5
A12
A13A18
A20
A14
A17
A16
A15
A19
A21
A22
A23
A24
A10
A8A7 A6
A11
A9
A25
Fig. A
Page 9

9
Legend for Fig.A
A1 Cup tray
A2 Service door
A3 Coee guide
A4 Waste coee container
A5 Brewing unit
A6 Cup tray lights
A7 ON/Stand-By button
A8 Control panel
A9 IEC connector
A10 Cappuccino maker (removable)
A11 Cappuccino maker nozzle
A12 Water tank
A13 Coee spout (adjustable height)
A14 Drip tray
A15 Bean container lid
A16 Bean container
A17 Grinding adjustment knob
A18 Pre-ground coee funnel door
A19 Measure
A20 Compartment for measure
A21 Pre-ground coee funnel
A22 Power cable
A23 Main switch
A24 Tray
Page 10
10
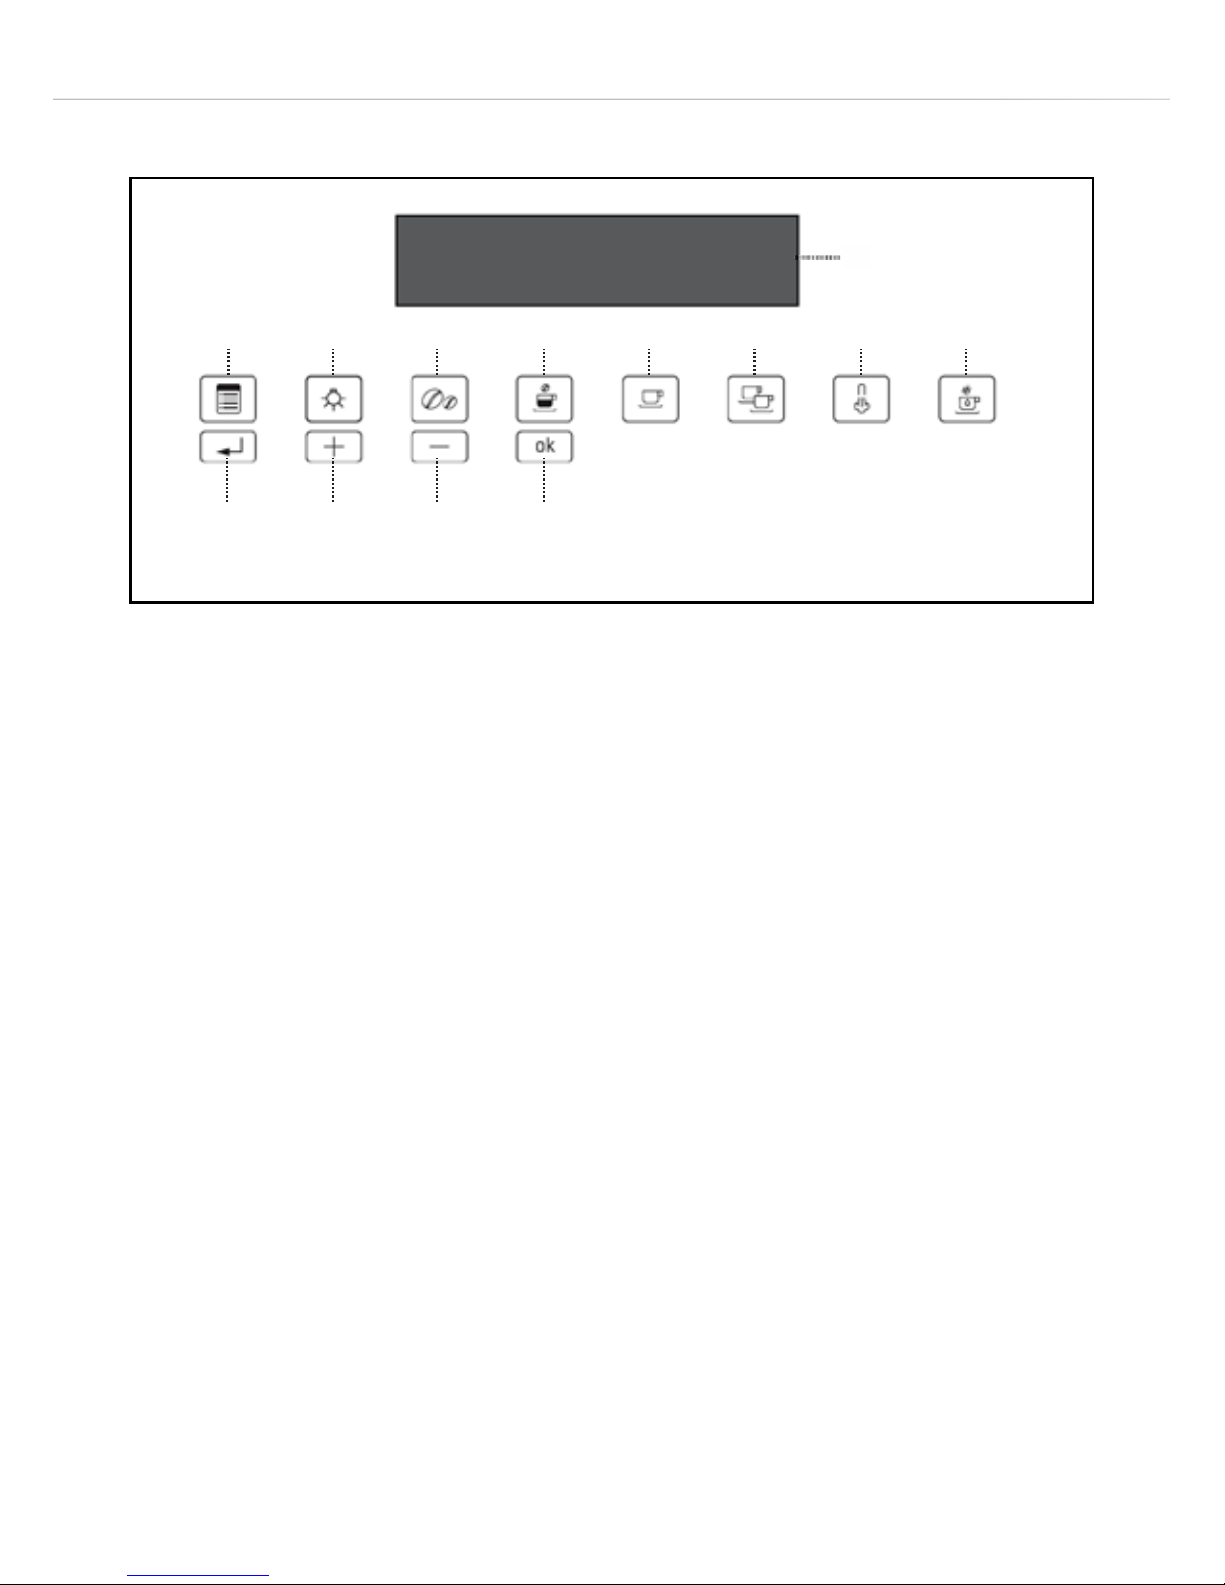
Description of the control panel
Note: Only the buttons available for use with the currently selected
function will be lit on the touch screen.
A light touch is enough to activate the buttons.
B1 Display
B2 Activate or deactivate the settings menu
B3 Switch the light (A6 on Fig.1) on and o
B4 Select the coee strength
B5 Select the size of coee (espresso, small cup, medium cup,
large cup, mug)
B6 Exit the selected mode
B7 Scroll forwards through the menu to display options available
B8 Scroll backwards through the menu to display options available
B9 Confirm the selected function
B10 Dispense a single cup of coee
B11 Dispense 2 cups of coee
B12 Operate the steam dispenser
B13 Operate the hot water dispenser
B1
B2 B3 B4 B5 B10 B11 B12 B13
B6 B7 B8 B9
Fig.B
Page 11
11
Using the Appliance for the First Time
Notes:
Coee has been used to factory test the appliance and it is therefore
completely normal for there to be traces of coee in the mill.
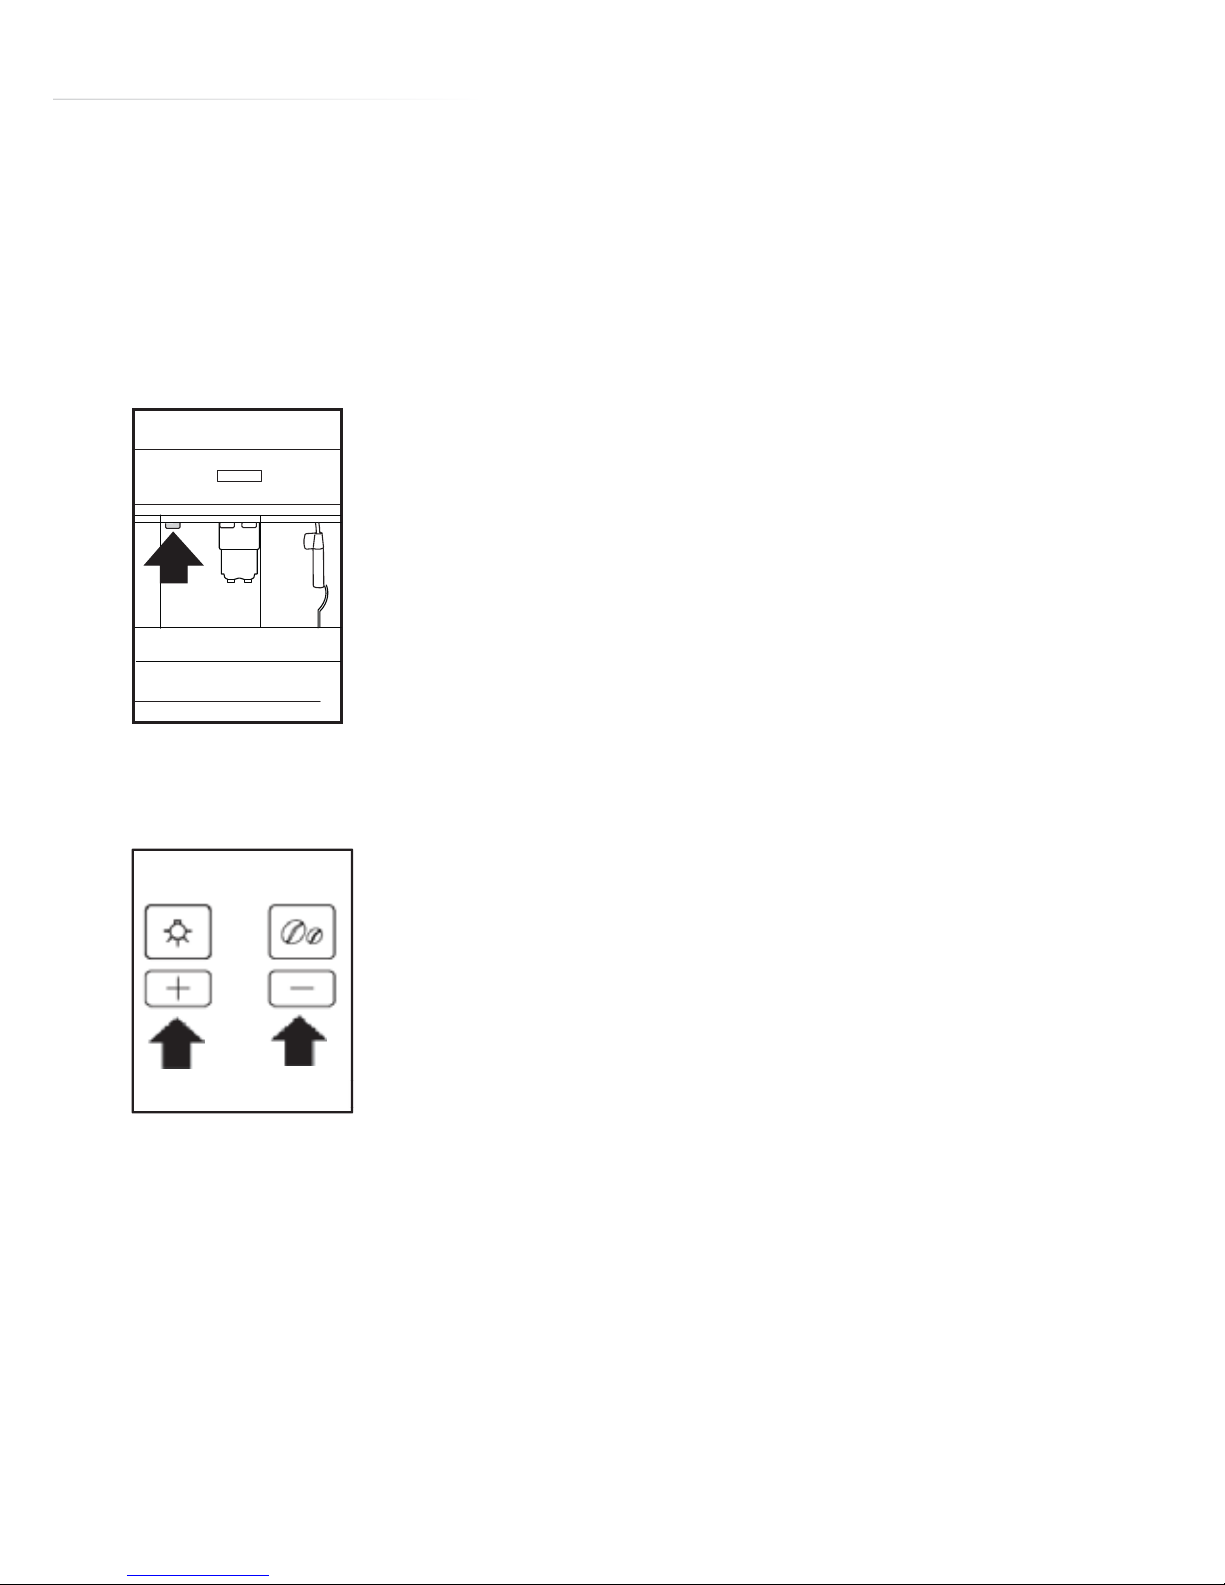
Connect the appliance to the mains supply.
Switch the appliance on using the ON/Standby
button (A7).
To Set the Required Language:
Press the Settings Menu button (B2).
Use the “+” & “-“ buttons (B7 and B8) to choose
the required language (fig. 2).
1
2
Page 12
12
To select English language:
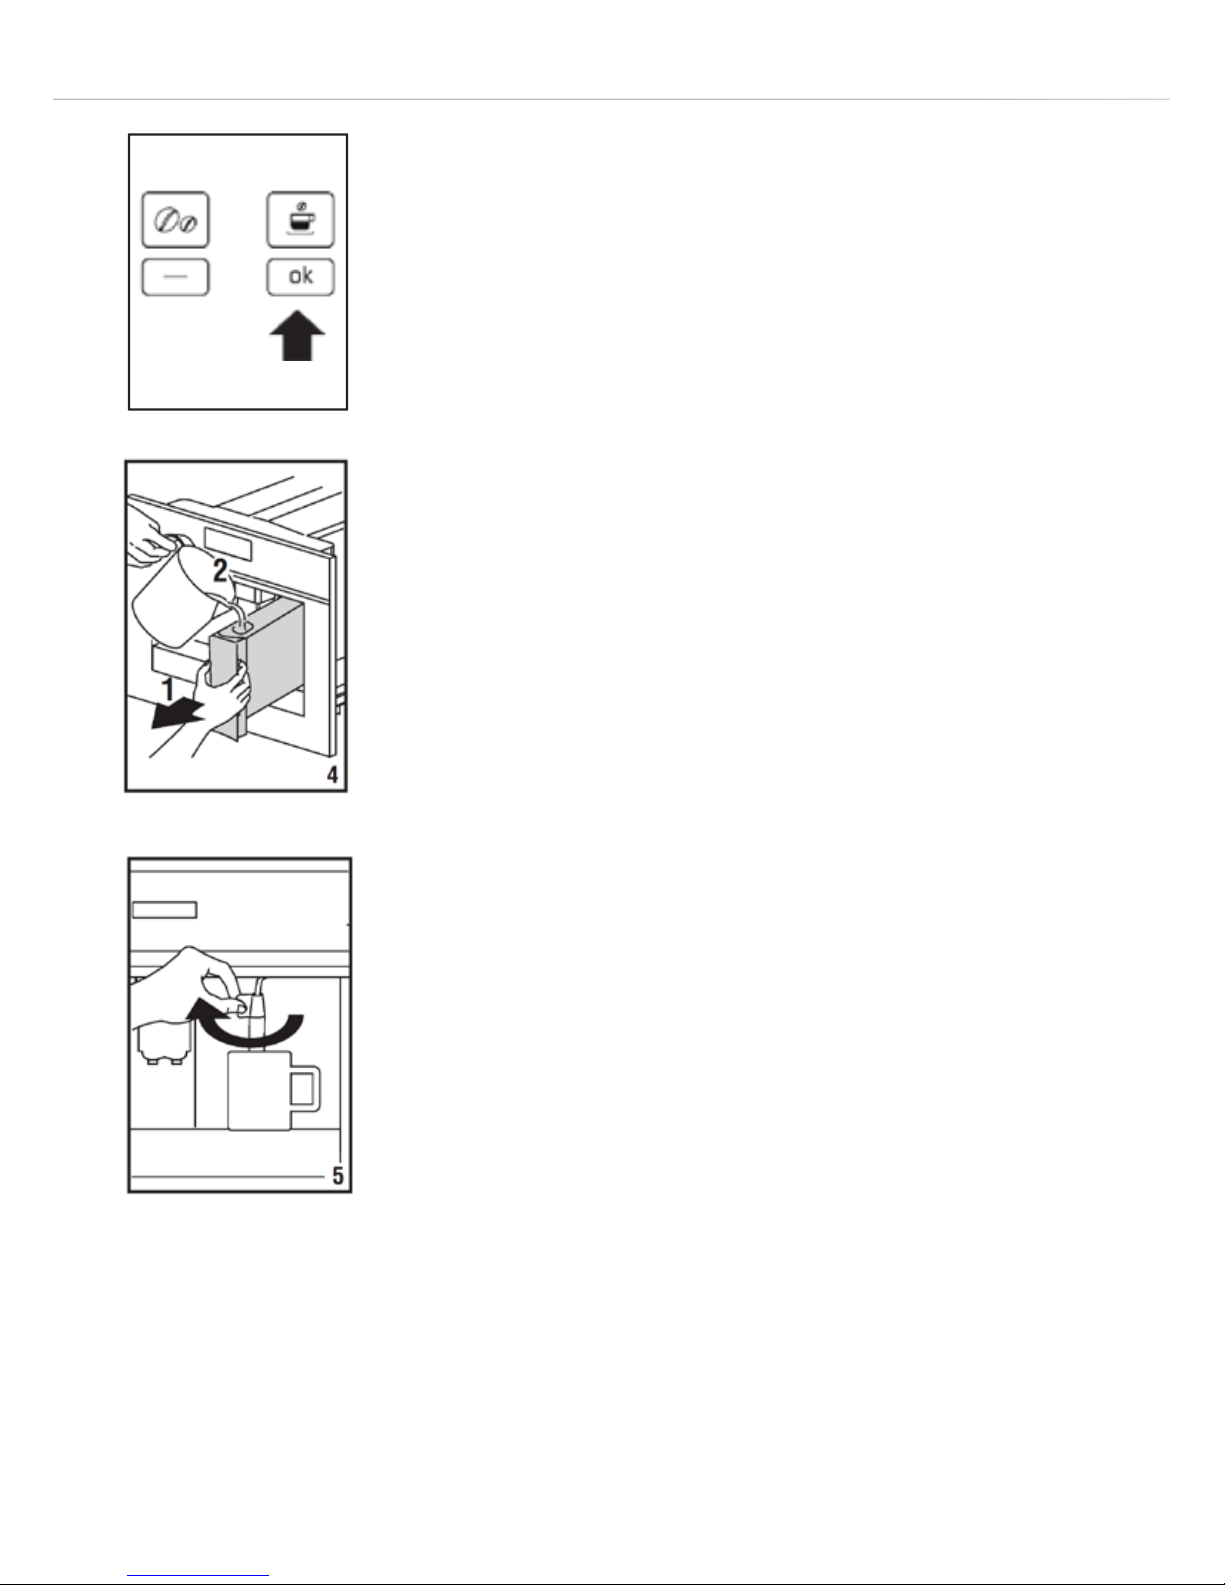
When the message “PRESS OK TO CHOOSE
ENGLISH” is displayed, press the “ok” button (B9)
(fig. 3) for 3 seconds until “ENGLISH INSTALLED” is
displayed.
Options for alternative languages are displayed in
the menu in those specific languages.
Approximately 5 seconds after first switching on
the coee machine, it displays the message “FILL
TANK”.
Extract the water tank (fig. 4), rinse and fill with fresh
water, without exceeding the MAX line.
Replace and push it in as far as it will go.
Note: When the message “FILL TANK” is displayed
the coee machine will lock and not respond to any
buttons. The machine automatically unlocks when
the tank is filled and replaced in position.
Place a cup under the cappuccino maker (fig. 5).
The appliance displays: “HOT WATER PRESS OK”.
Press the “ok” button (B9) (fig. 3) and after a few seconds a little
water comes out of the cappuccino nozzle and a little rinsing water is
ejected from the coee nozzles.
3
Page 13
13
The machine then displays “TURNING OFF...
PLEASE WAIT” and switches o.
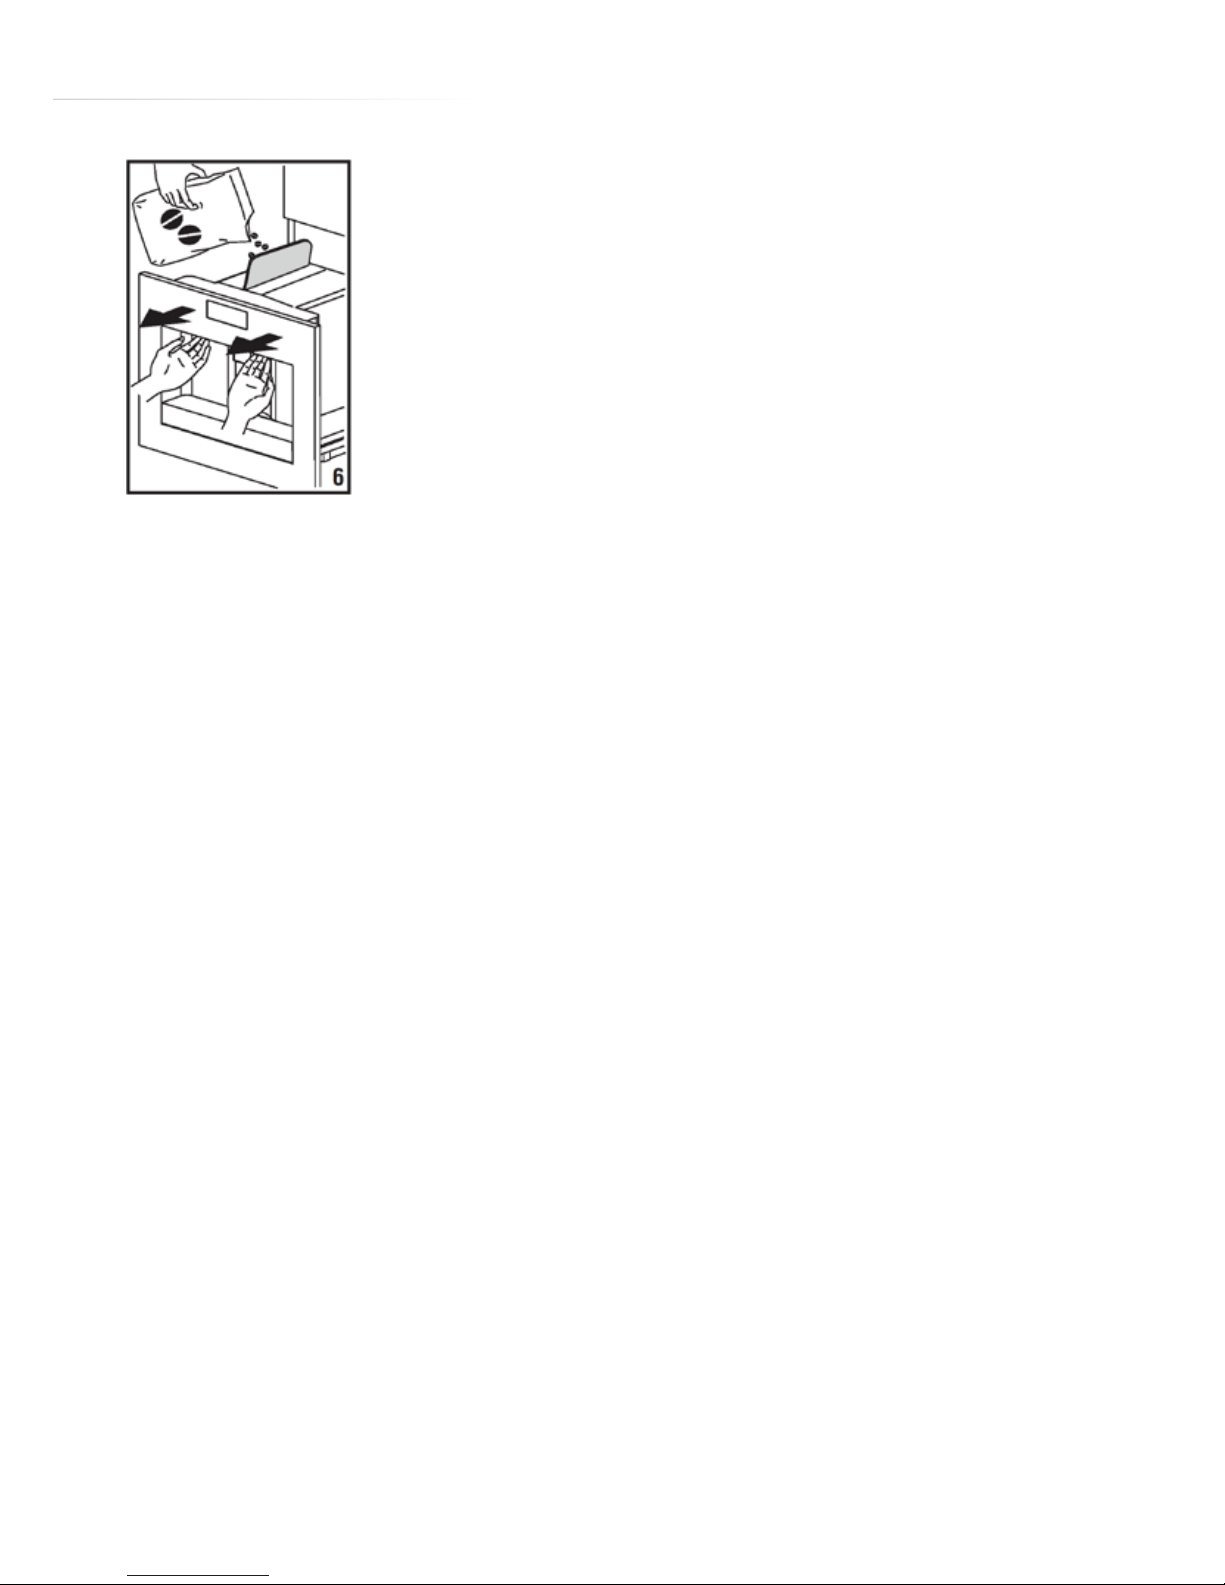
Extract the appliance by pulling it out using the
handles (fig. 6).
Open the lid and fill the container with coee
beans, then close the lid and push the appliance
back into place.
The coee maker is now ready for normal use.
Notes:
When using the appliance for the first time, you need to make 4-5
cups of coee and 4-5 cappuccinos before the appliance gives
satisfactory results.
Important: Never introduce pre-ground coee, freeze dried coee,
caramelised beans or anything else which could damage the
appliance into the bean container.
Important: Always switch o using the ON/Standby button (A7)
before either switching o the ON/OFF switch (A23) or disconnecting
the electrical power supply. This allows it to perform a SELFDIAGNOSIS cycle and rinse the coee spouts prior to switching o.
To turn it on again, press the ON/Standby button (A7) (fig. 1).
Page 14

14
Adjust the water hardness setting as soon as possible after
installation, see instructions in the “Setting Water Hardness” section
(page 35).
Turning On and Heating Up
Each time the appliance is turned on, it performs an automatic preheat
and rinse cycle which cannot be interrupted. The appliance is ready
for use only after completion of this cycle.
Danger of Scalding: During rinsing, a little hot water flows from the
coee spouts.
To turn the appliance on, press the ON/OFF/Stand-By button (A7) (fig.
1), the message “HEATING UP... PLEASE WAIT” is displayed.
When heating is complete, the message changes to “RINSING” and
hot water is rinsed through the coee spouts.
The message “MEDIUM CUP NORMAL TASTE” is displayed when the
coee machine has reached normal operating temperature.
If no button is pressed within approx. 2 minutes, the time is displayed,
if set (see the “Setting The Clock” section). If the time has not been
set, the appliance displays the last functions set.
When any button is pressed, “MEDIUM CUP NORMAL TASTE” is
displayed and the appliance is ready to make coee again.
Page 15

15
Making Coee Using Whole Coee
Beans
The appliance is preset to make coee with “normal” strength. You
can also choose coee with an “extra-mild”, “mild”, “strong” or “extrastrong” flavour. There is also a pre-ground coee option.
To choose the required Strength, press the coee
strength button (B4) (fig. 7) several times to scroll
through the options.
The current coee strength setting is displayed.
Place 1 cup under the spouts to make 1 coee (fig. 8), or 2 cups for 2
coees (fig. 9).
Lower the spouts as near as possible to the cup(s) for a creamier
coee (fig. 10).
7
Page 16
16
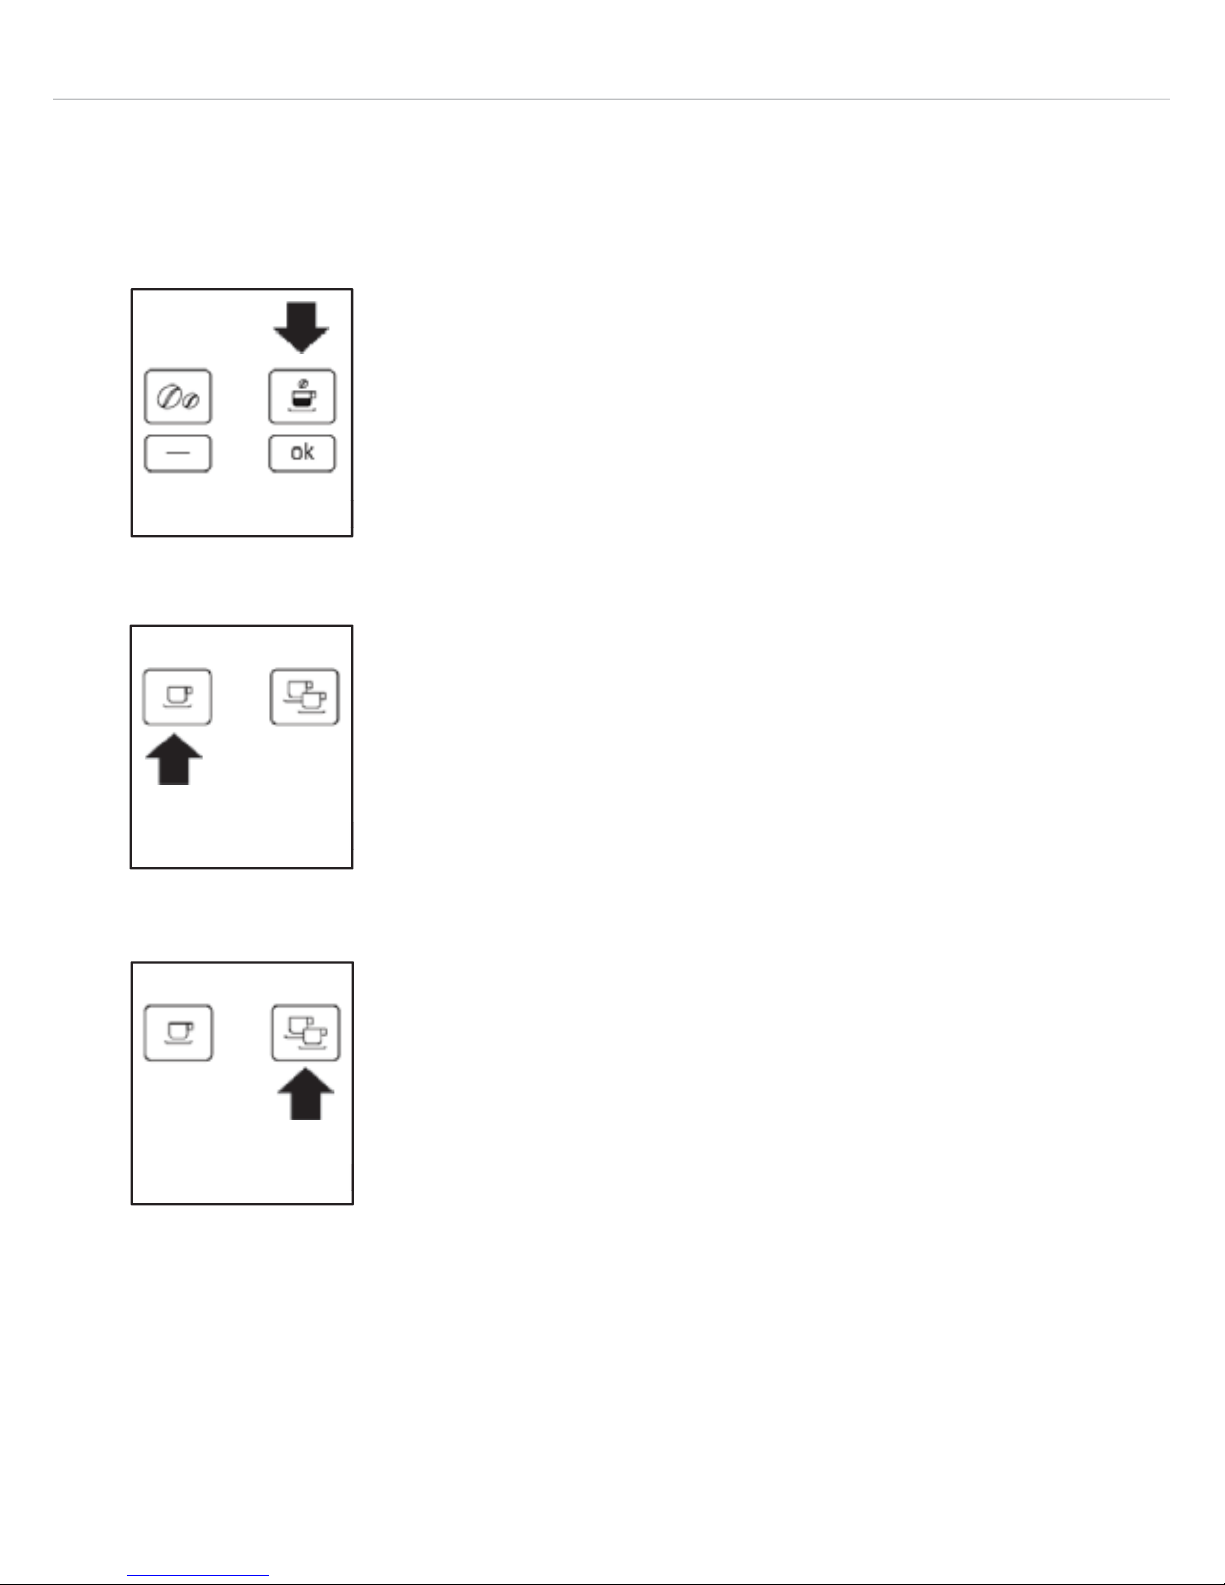
The appliance is preset to make coees of varying sizes. You can
choose between “espresso”, “small cup”, “medium cup”, “large cup” or
“mug”.
Press the cup size button (B5) (fig. 11) several times
to scroll through the options.
The current cup size setting is displayed.
Press the single cup button (B10) (fig.12) if you want
to make a single coee or the double cup button
(B11) (fig.13) if you want to make 2 coees.
The appliance now grinds the beans and starts
delivering the coee into the cup.
Once the set amount of coee has been delivered,
the machine stops delivery automatically and
expels the exhausted waste coee into the waste
coee container.
After a few seconds, the appliance is ready for use
again.
11
12
13
Page 17

17
To turn the appliance o, press the ON/Stand-By button (A7) (fig. 1).
Before switching o, the appliance performs an automatic rinse cycle
(Take care to avoid scalds).
Note 1: If the coee is delivered a drop at a time or not at all, see the
“Adjusting the Coee Mill” section.
Note 2: If the coee is delivered too fast and the cream is not
satisfactory, see the “Adjusting the Coee Mill” section.
Note 3: Tips for a hotter coee:
Proceed as described in the section “Changing And Setting Menu
Parameters”, “Rinse” function.
Unless preheated, do not use excessively thick cups as they will
absorb too much heat.
Preheat the cups by rinsing them with hot water.
Note 4: Coee delivery can be interrupted at any moment by repressing the previously selected button, which remains lit during the
operation.
Note 5: When the appliance displays “FILL TANK”, fill the tank with
water or the appliance will not deliver coee (It is normal for there to
be a little water left in the tank).
Note 6: After about 14 single (or 7 double) coees, the appliance
displays “EMPTY WASTE COFFEE CONTAINER”.
Page 18
18
Even if not full, the “EMPTY WASTE COFFEE CONTAINER” message is
displayed 72 hours after the first coee has been delivered. For the
72 hours to be calculated correctly, the machine must never be turned
o with the main switch in the “0” position.
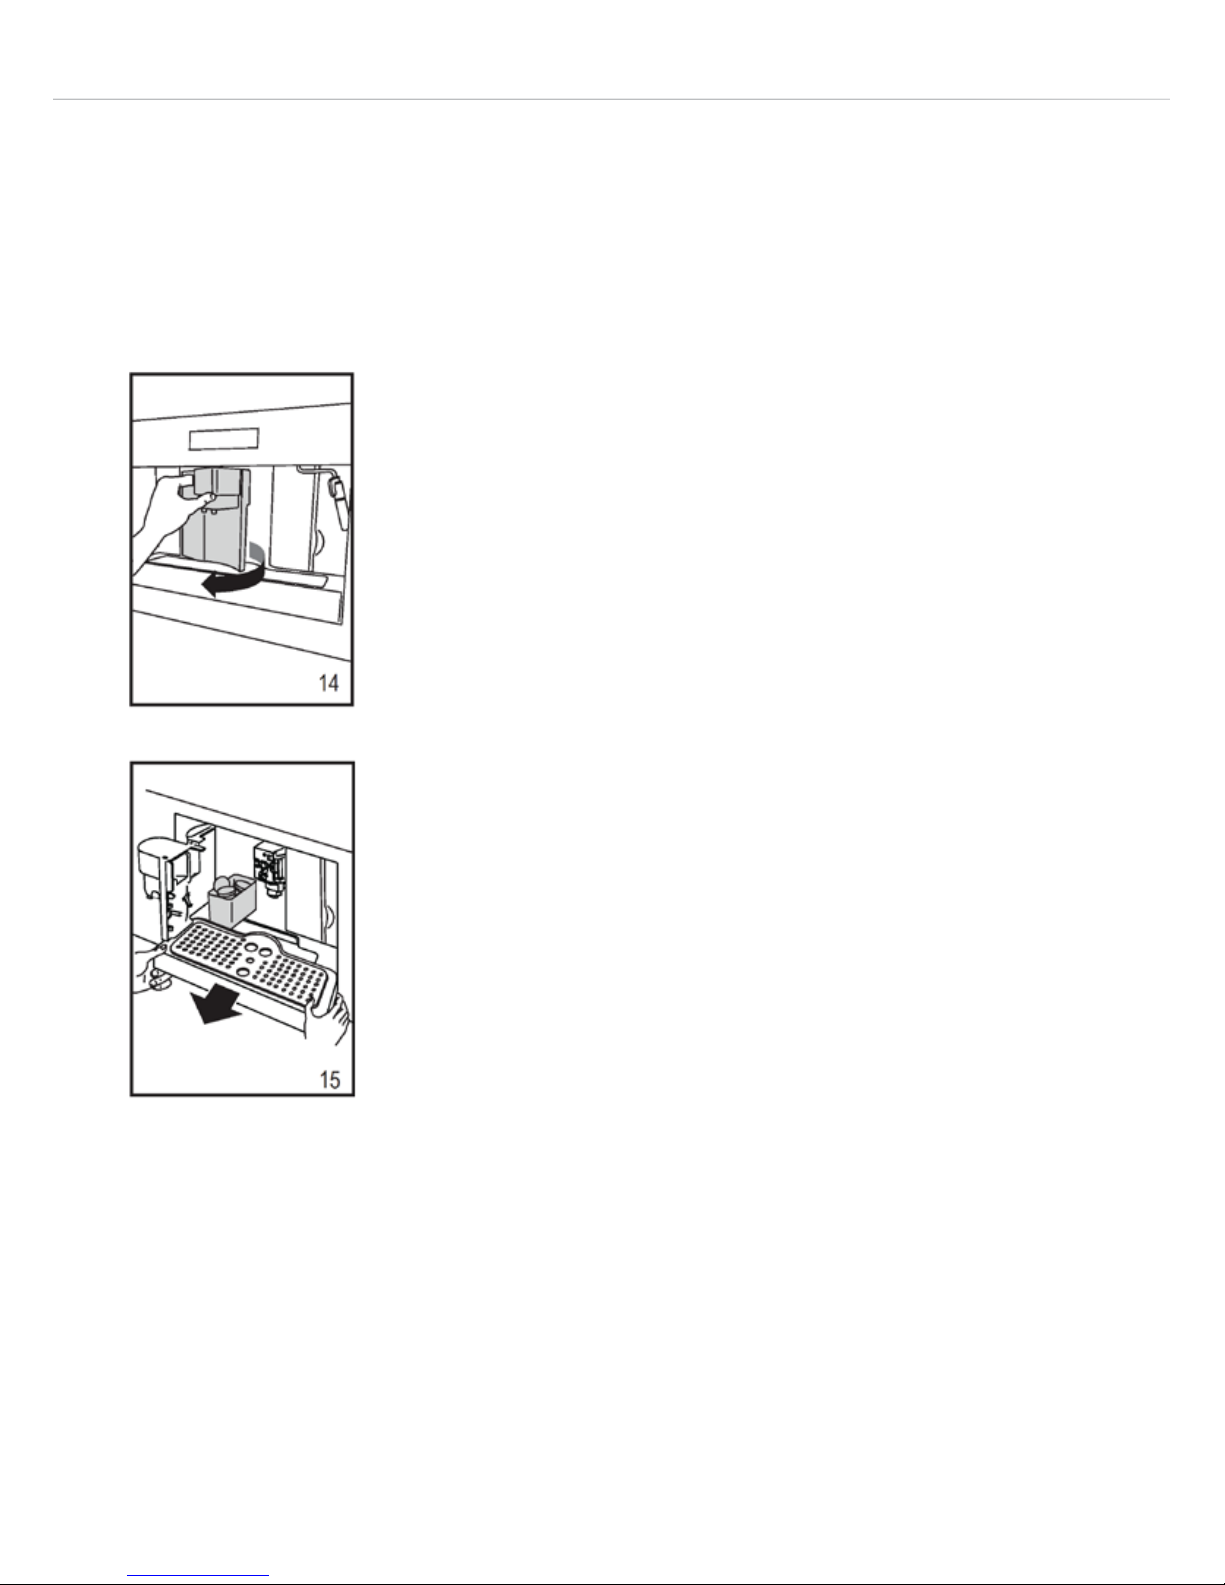
To clean, open the service door on the front of the
appliance by pulling the spout (fig. 14).
Extract the drip tray (fig. 15) and clean it.
When cleaning, always extract the drip tray
completely.
Important: When extracting the drip tray, the
waste coee container MUST always be emptied,
even if it is not completely full. If this is not done,
when you make the next coees the container may
over-fill and the machine may be clogged.
Note 7: Never extract the water tank while the
machine is delivering coee. If it is removed, it will
not be possible to make the coee and the
appliance will display “GROUND TOO FINE ADJUST MILL AND
PRESS OK” and then “FILL TANK”.
It is then necessary to check the level of water in the tank and replace
it in the appliance.
To turn the machine back on again, press the “ok” button (B9),
Page 19

19
“HOT WATER PRESS OK” is displayed. Press the “ok” button (B9)
within a few seconds and deliver water from the cappuccino maker
for about 30 seconds.
When delivery stops, the machine should be ready for use again.
Note: The coee maker may request the operation to be repeated a
number of times until the air is completely eliminated from the water
pipes.
Note: If this operation is not performed correctly or if the machine is
turned o, the basic modes may be displayed, although the problem
is in fact still present.
Changing the Quantity of Coee in the Cup
The coee machine is preset by default to automatically make the
following types of coee:
• Espresso
• Small cup
• Medium cup
• Large cup
• Mug
Page 20
20
To Change the Quantity:
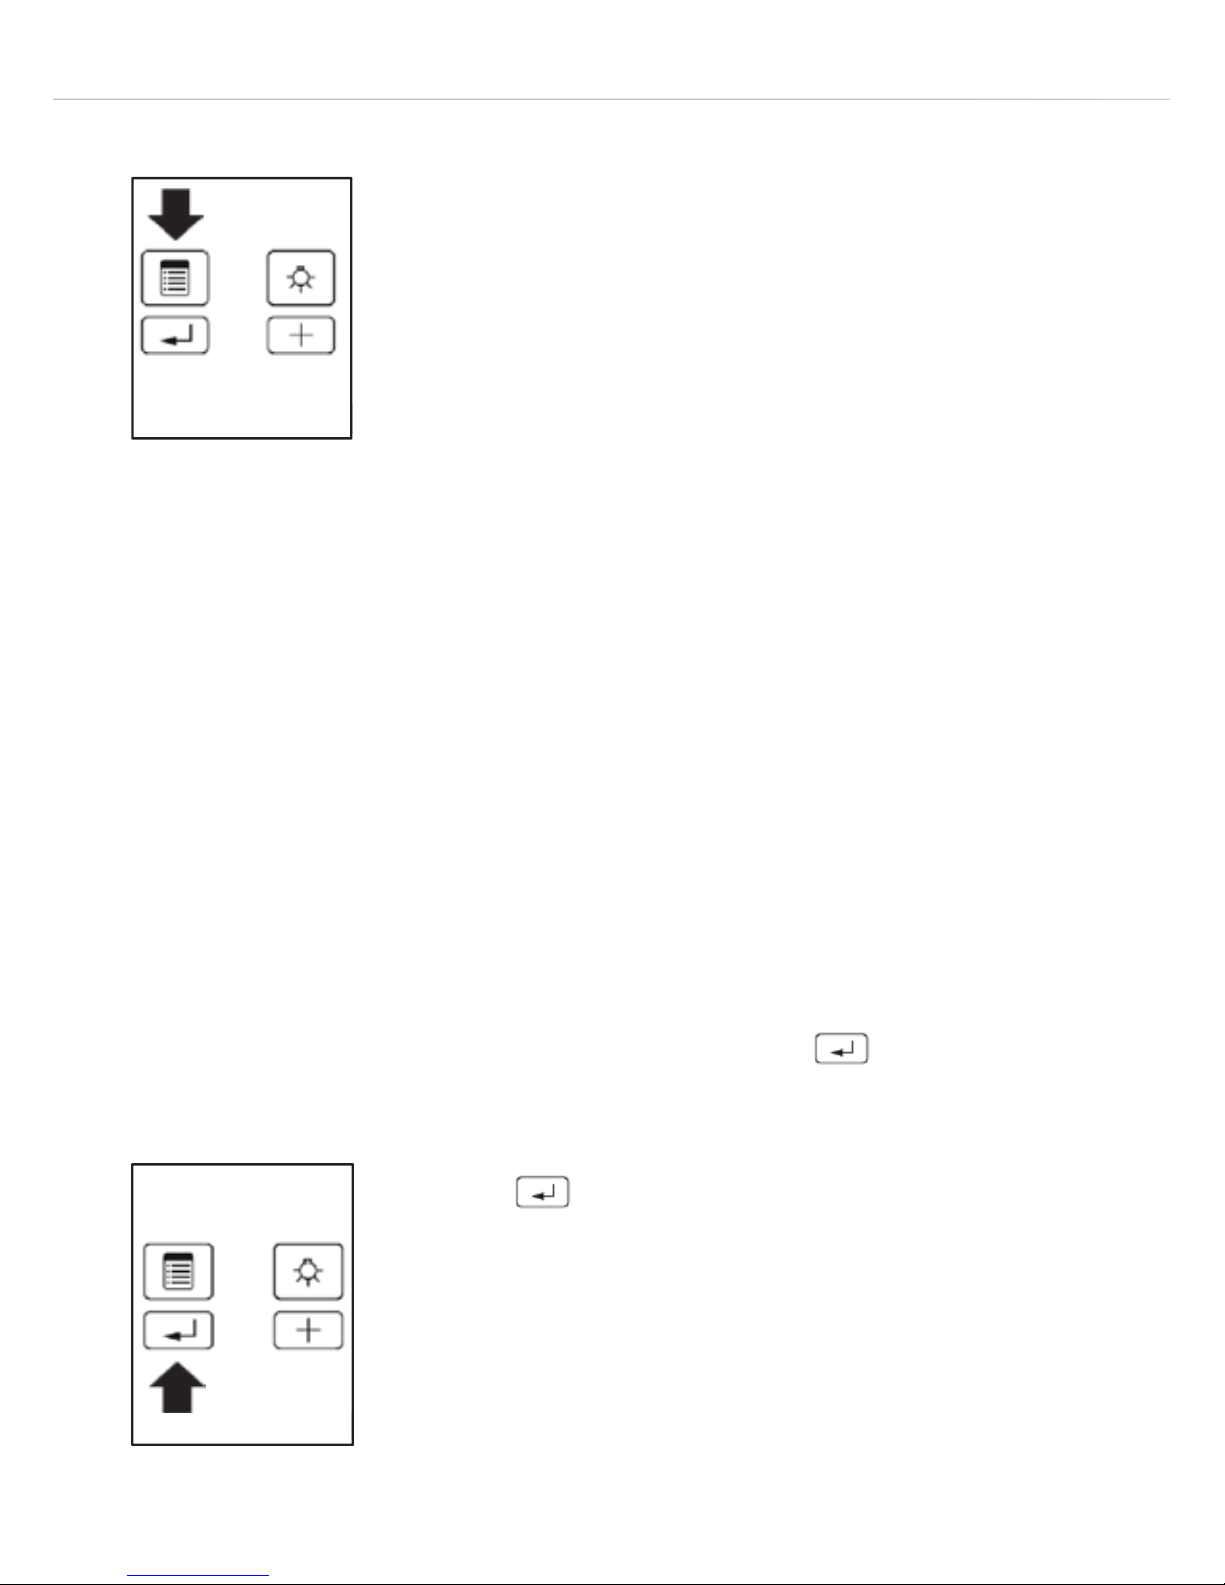
Press the Settings Menu button (B2) to enter the
menu (fig. 16).
Press the “+” & “-“ buttons (B7) and (B8) (fig.2) to
scroll through the menu until “PROGRAM COFFEE”
is displayed.
Press the “ok” button (B9) to select it.
Press the “+” & “-“ buttons (B7) and (B8) (fig.2) to scroll through the
menu until the type of coee you want to change is displayed.
Press the “ok” button (B9) to confirm the type of coee you want to
change.
Use the “+” & “-“ buttons (B7) and (B8) to change the quantity of
coee. The progress bar shows the quantity of coee selected.
Press the “ok” button (B9) again to confirm (or the button (B6) to
cancel the operation).
Press the button (B6) (fig. 17) twice to exit the
menu.
The appliance is now reprogrammed with the new
settings and is ready for use.
16
17
Page 21
21
Adjusting the Coee Mill
The coee mill is preset in the factory and should not require
adjusting. However, if after making the first few coees you find that
delivery is either too fast or too slow (a drop at a time), this can be
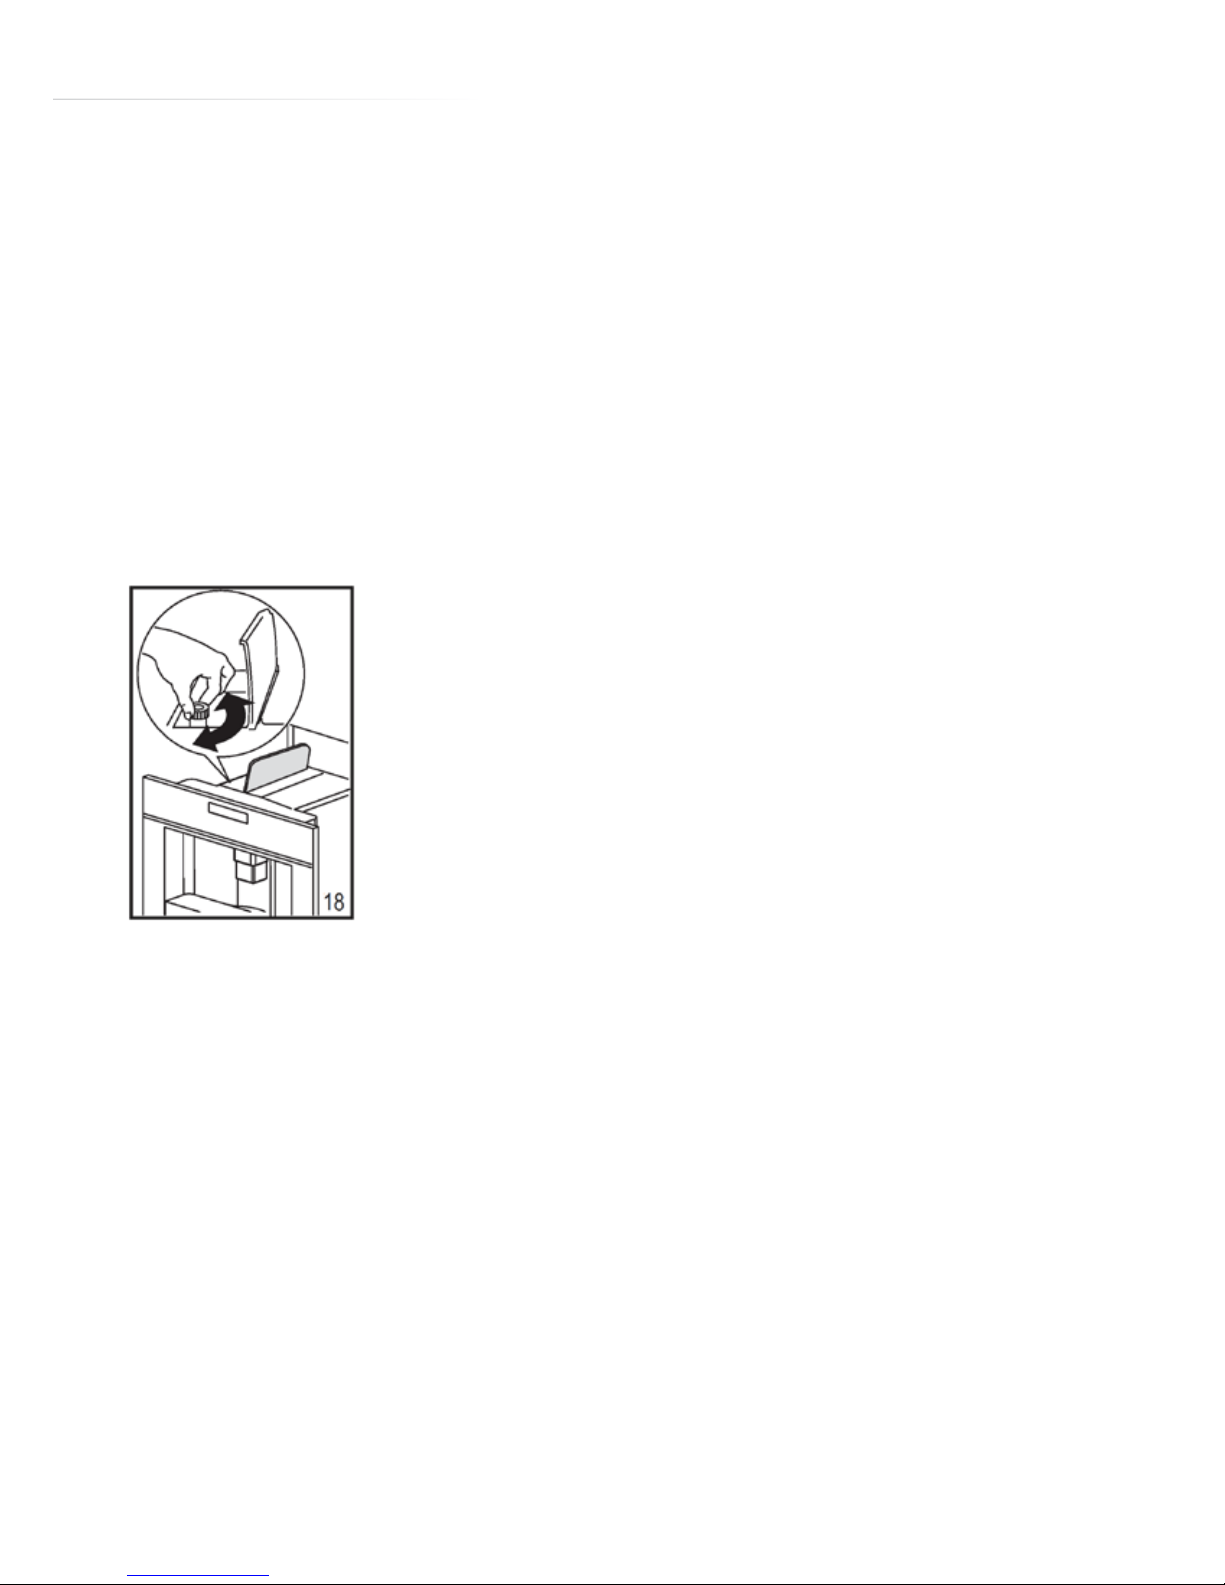
corrected by adjusting the grinding adjustment knob (fig. 18).
Important: The grinding adjustment knob must only be turned when
the coee mill is in operation.
For slower delivery and creamier coee, turn one
click anticlockwise (finer coee grinding).
For faster delivery (not a drop at a time), turn one
click clockwise (coarser coee grinding).
Page 22
22
Making Coee Using Pre-Ground Beans
Press the Coee Strength button (B4) (fig. 7), scroll
through the options and select the “pre-ground
coee” function.
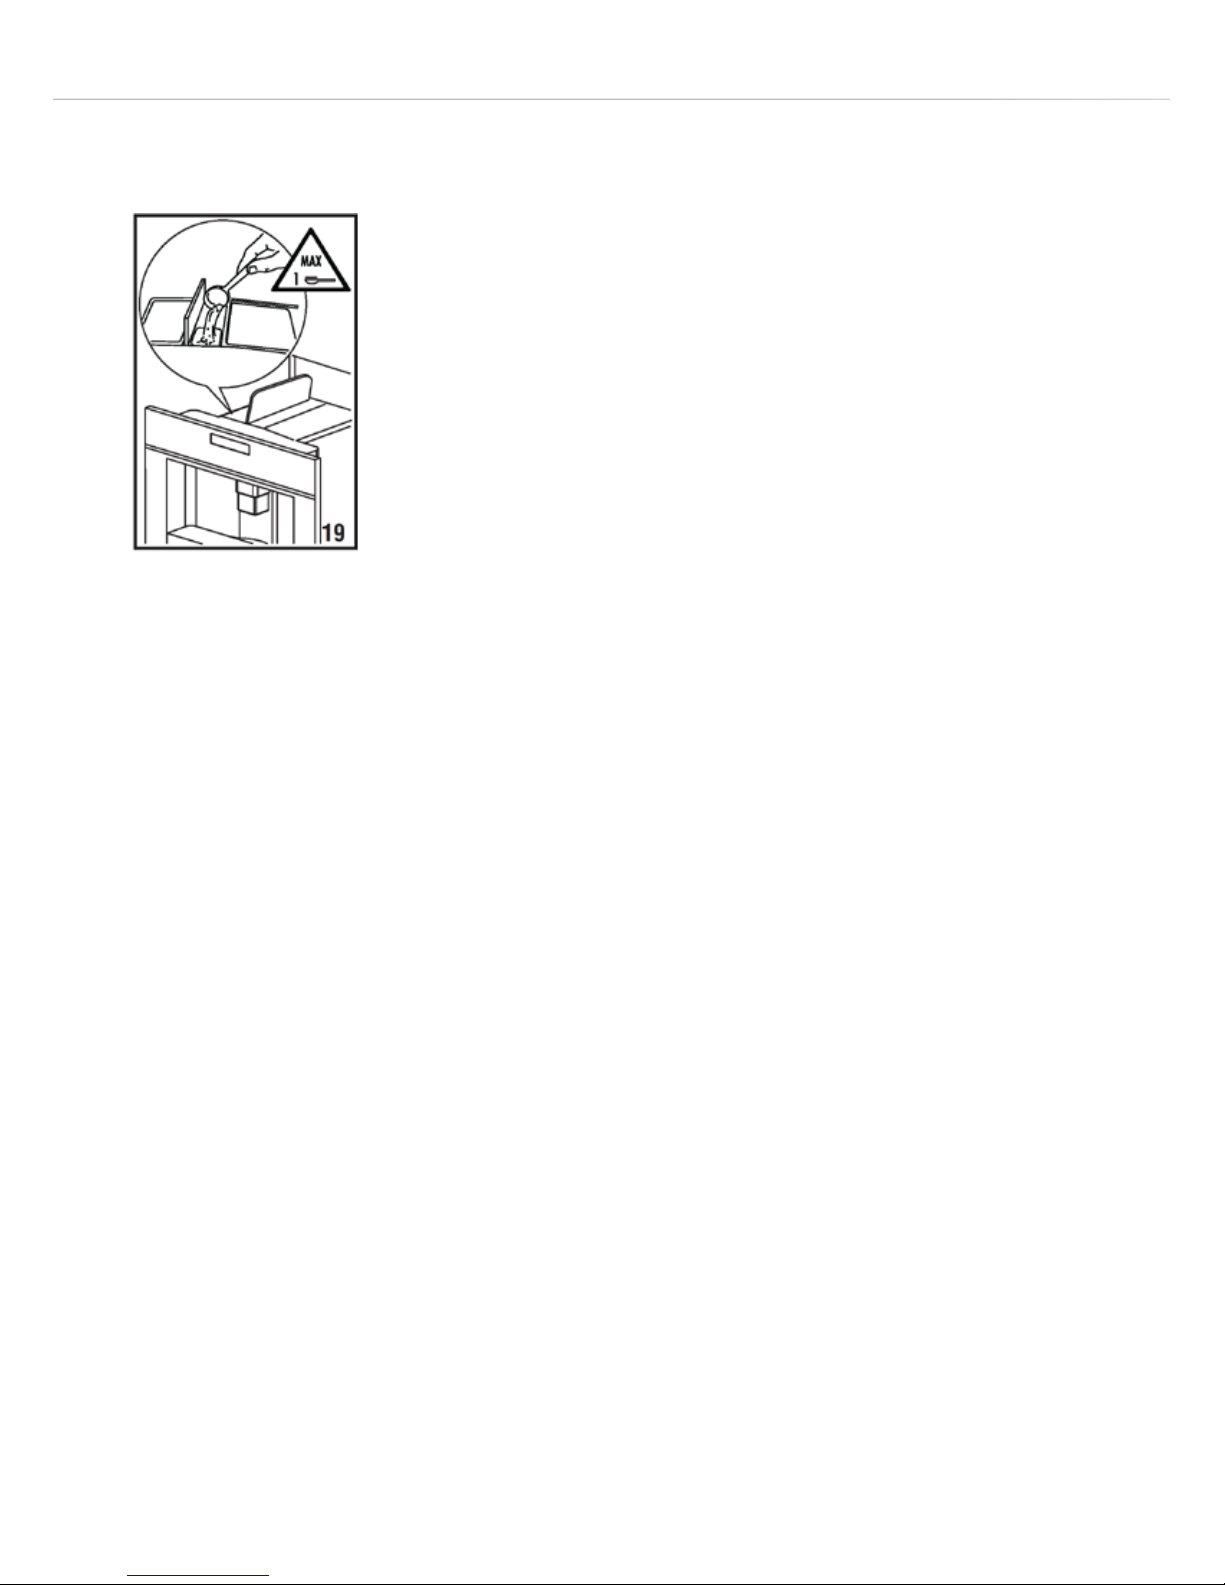
Extract the machine by pulling it forwards using the
handles. Lift the central lid, place one measure
of pre-ground coee in the funnel (fig. 19), push
the appliance in then proceed as described in the
section “Making Coee Using Coee Beans”.
Note: You can just run the machine through one single cycle at a time
(1 or 2 cups) by pressing the appropriate button.
After using the machine with pre-ground coee, to go back to making
coee using beans, deactivate the pre-ground coee function by
pressing the Coee Strength button (B4) (fig. 7).
Note 1: Never introduce pre-ground coee when the machine is
switched o or it could spread through the inside of the appliance.
Note 2: Never add more than 1 measure of pre-ground coee beans
at a time, otherwise the appliance will not make coee.
Note 3: Use the measure provided only.
Note 4: Use only pre-ground coee for espresso coee machines in
the funnel.
Page 23
23
Note 5: If more than one measure of pre-ground coee is used
and the funnel clogs, push the coee down with a blunt object then
remove and clean the brewing unit and machine as described in the
“Cleaning the Brewing Unit” section.
Delivering Hot Water
Ensure the appliance is switched on and is ready for use.
Turn the cappuccino nozzle outwards and place a container
underneath it (fig. 5).
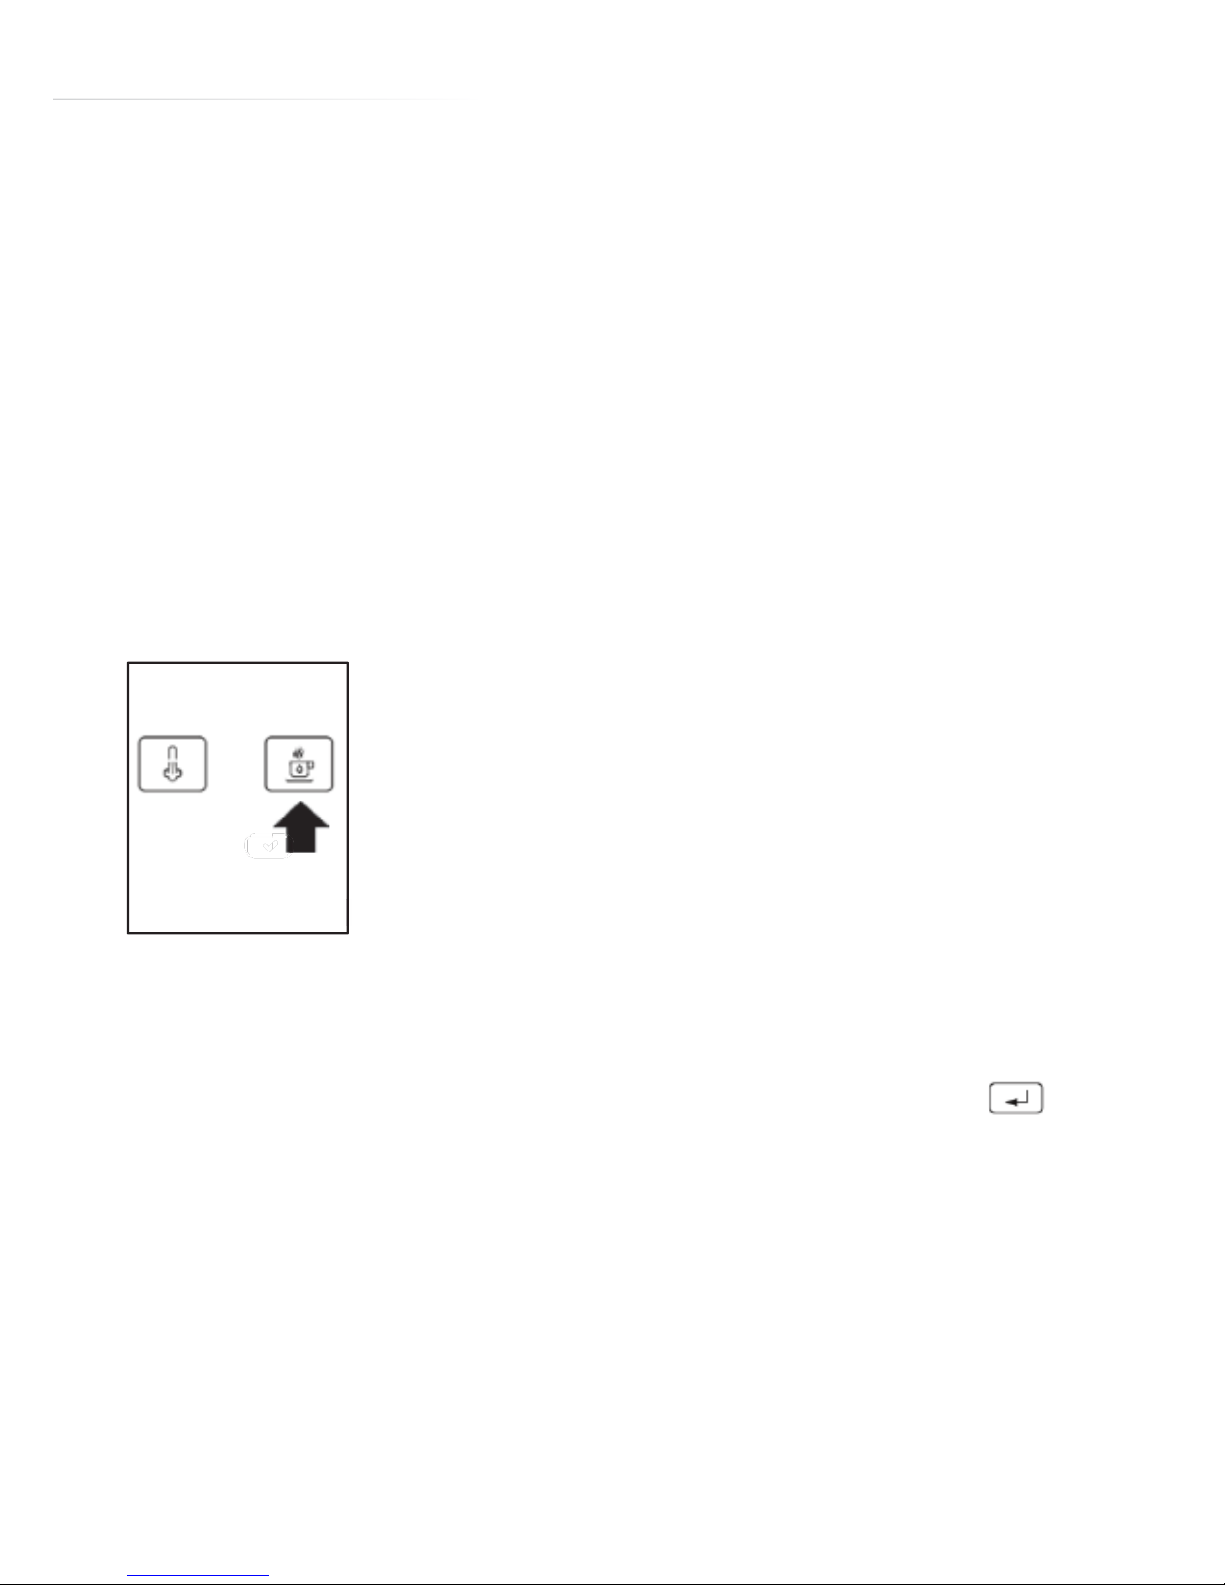
Press the Hot Water Dispenser button (B13) (fig. 20).
The appliance displays: “HOT WATER PRESS OK”.
Press the “ok” button (B9) again and hot water
is delivered from the cappuccino nozzle into the
container underneath.
You should not deliver hot water for more than 2 minutes at a time.
To interrupt, press the Hot Water Dispenser button (B13) or the
button (B6).
Hot water dispensing stops once the set quantity is reached.
20
Page 24

24
Changing the Quantity of Hot Water
The machine is set by default to automatically deliver 200ml of hot
water.
To change these quantities, proceed as follows:
Place a container underneath the cappuccino nozzle (fig. 5).
Press the Settings Menu button (B2) to enter the menu (fig. 16) then
press the “+” & “-“ buttons (B7) and (B8) (fig. 2) until “PROGRAM HOT
WATER” is displayed.
Press the “ok” button (B9) to confirm.
Select the required quantity of water by pressing the “+” & “-“ buttons
(B7) and (B8). The progress bar shows the quantity of water selected.
Press the “ok” button (B9) to confirm (or the button (B6) to cancel
the operation).
Press the button (B6) (fig. 17) twice to exit the menu.
The appliance is now reprogrammed with the new settings and is
ready.
Page 25
25
Making Cappuccino (Using the Steam
Function)
Swing the cappuccino nozzle towards the left (fig. 5).
Pour approx. 100g of milk (for each cappuccino to be made) into
a container and place it under the cappuccino nozzle. Ensure the
container is large enough to contain the froth after the milk has
doubled or tripled in volume. We recommend the use of semiskimmed milk straight from the fridge.
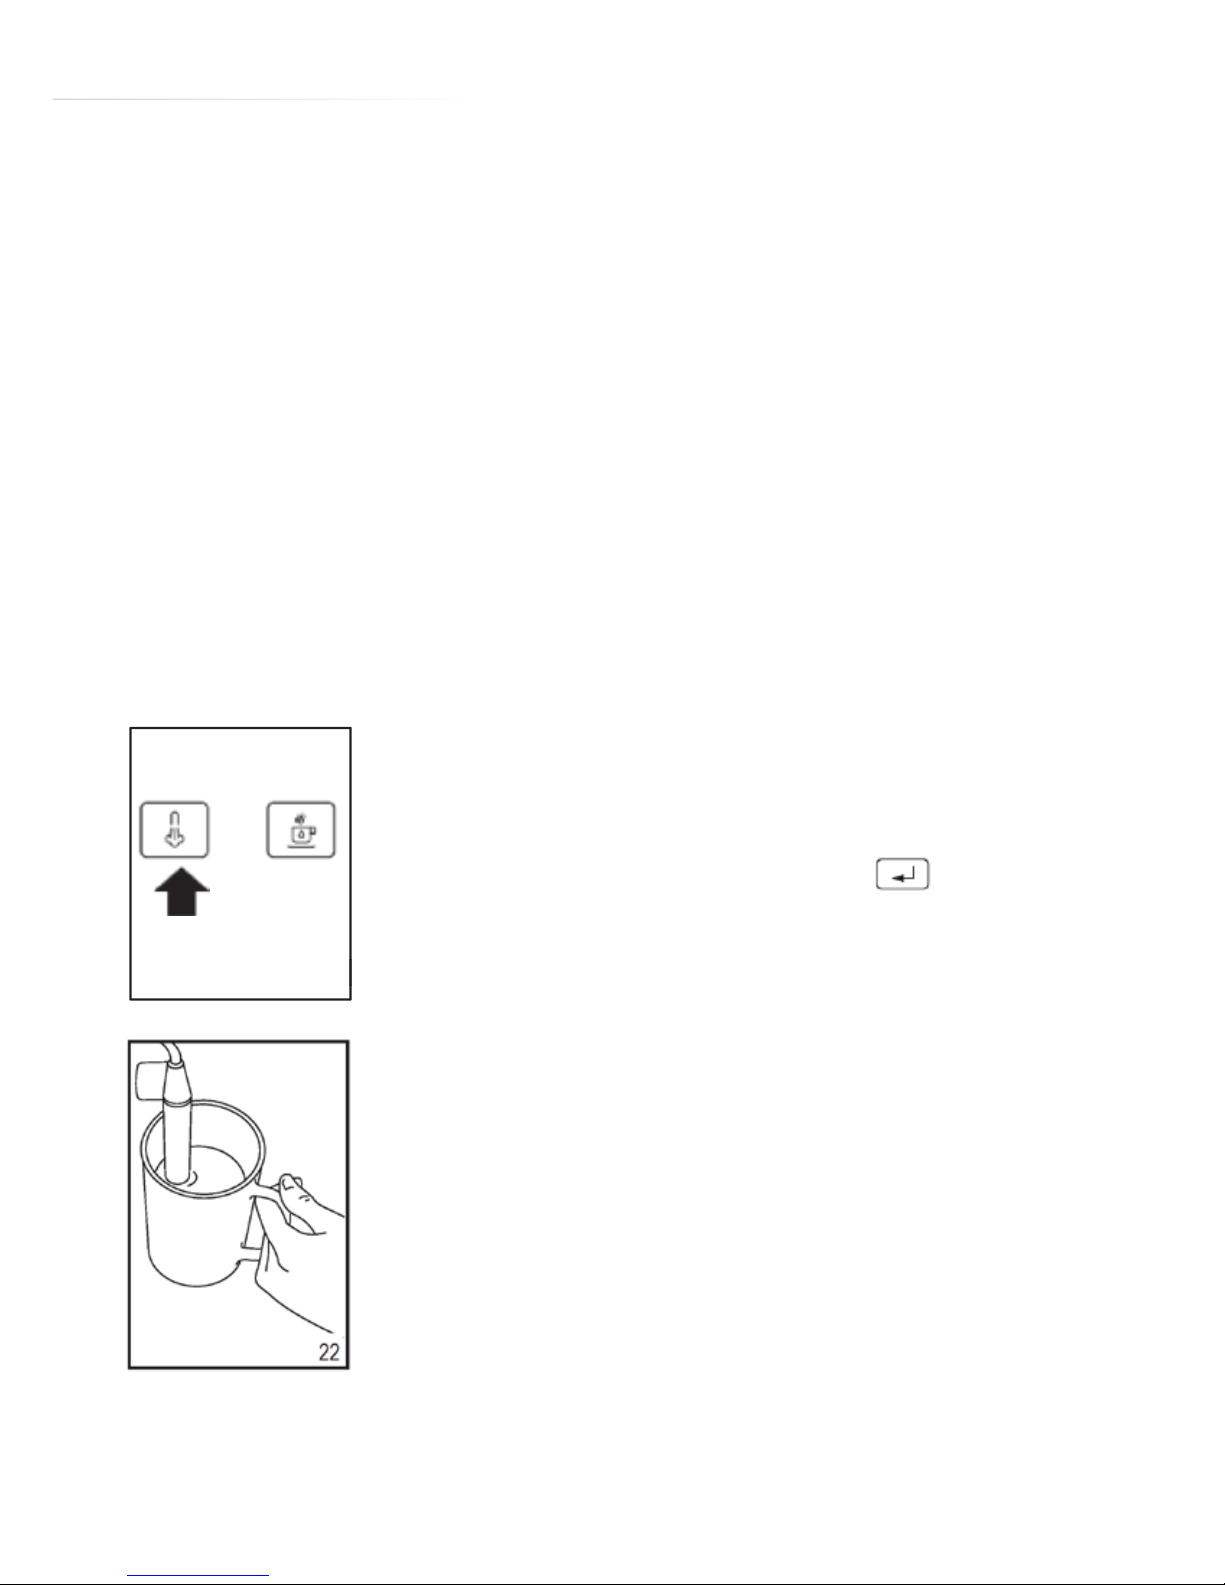
Press the Steam Dispenser button (B12) (fig. 21). “STEAM PRESS OK”
is displayed.
Press the “ok” button (B9).
To interrupt steam delivery press the Steam
Dispenser button (B12) again or the button
(B6).
Insert the cappuccino nozzle into the milk container
(fig. 22), taking care not to immerse it for more than
half its length.
For a creamier froth, insert the cappuccino nozzle
into the milk, move the container slowly up and
down.
21
Page 26

26
You should not deliver steam for more than 2 minutes at a time.
When the required temperature is reached, stop the steam delivery
by pressing the Steam Dispenser button (B12) again, or the button
(B6).
Make the coee as described above using suciently large cups then
fill them with the frothed milk prepared previously.
Important: Always clean the cappuccino system immediately after
use as described in the “Cleaning” section below.
Cleaning
Warning: Before performing any cleaning operations, the machine
must be turned o by pressing the main switch (A23) and unplugged
from the mains power supply.
Never immerse the coee maker in water.
Cleaning the Cappuccino Maker
Important: To ensure hygienic operation of the appliance, we
recommend you carry out this procedure each time you make
cappuccino, thus avoiding stale milk remaining in the nozzle.
Place an empty container under the cappuccino nozzle.
Press the Steam Dispenser button (B12) and then press the “ok” button
(B9) to discharge steam for a few seconds. This empties the steam
pipes of all traces of milk.
Page 27
27
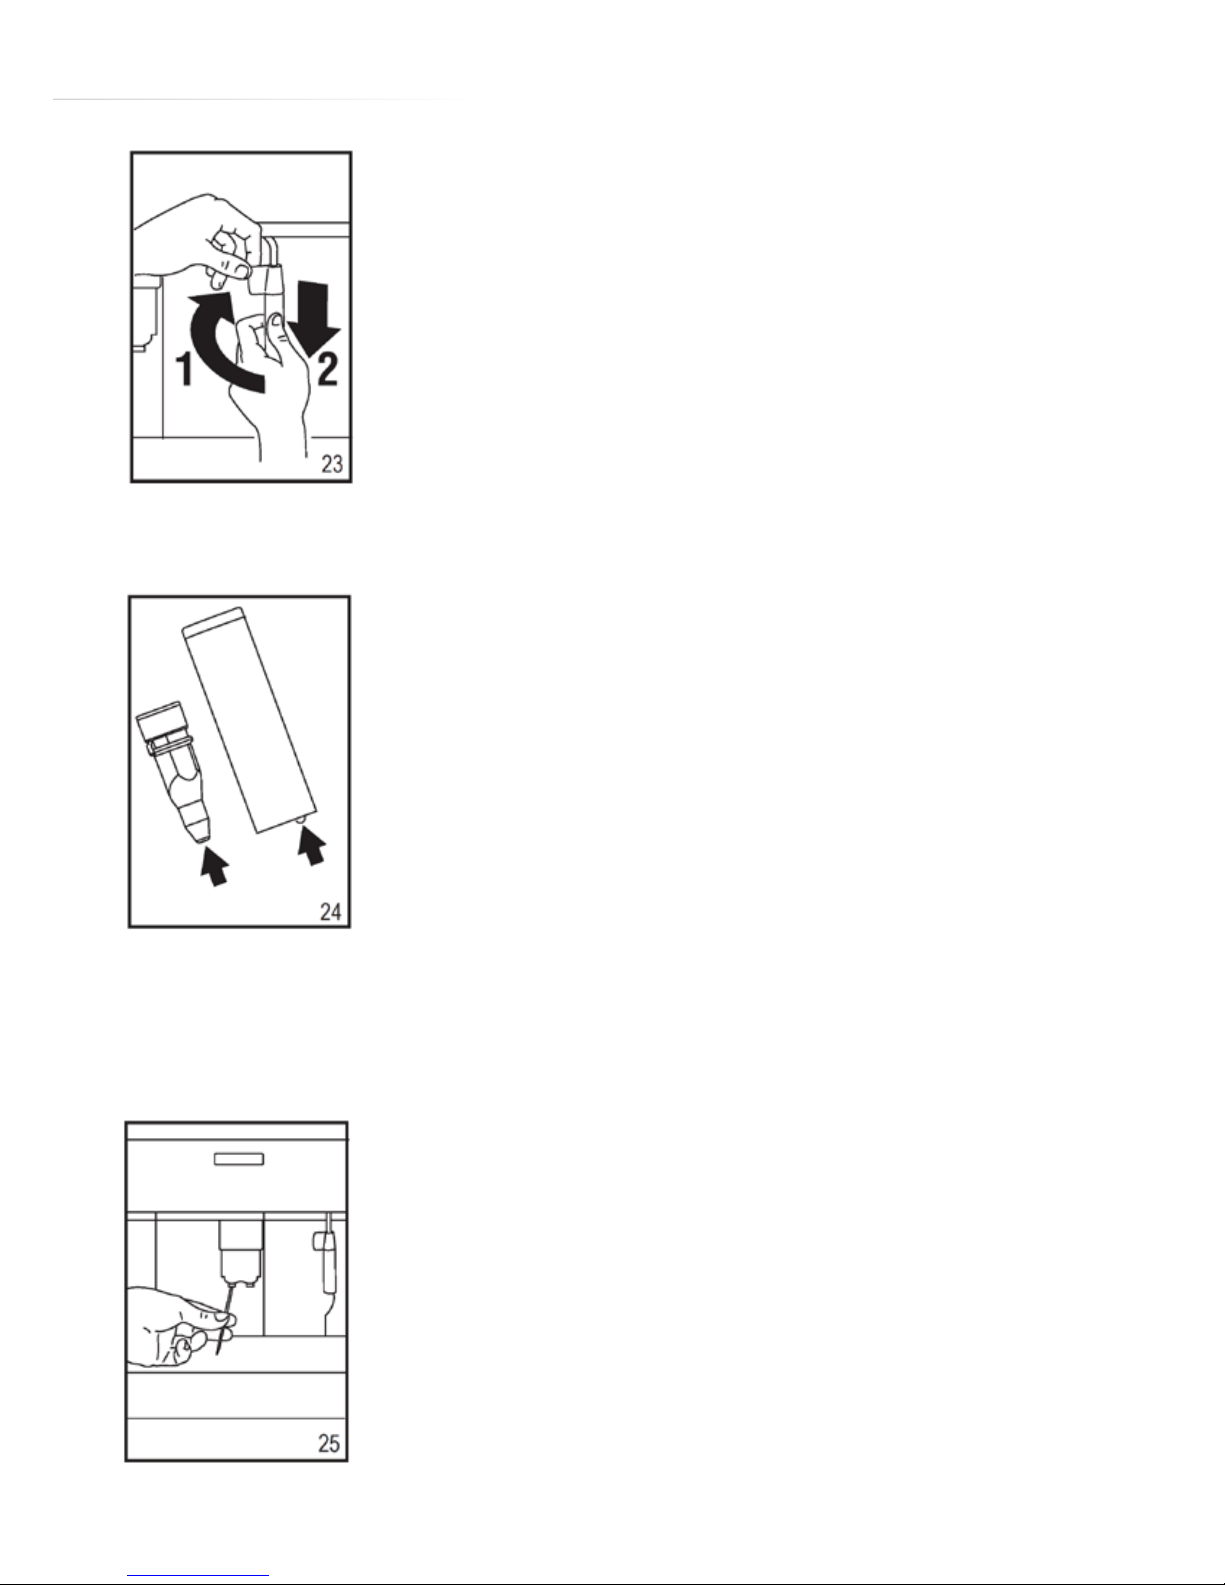
Wait for the cappuccino maker to cool down, then
holding the cappuccino maker lever firmly in one
hand, unscrew the cappuccino outer nozzle with
the other, turning it anticlockwise and removing it
downwards (fig. 23).
Remove the cappuccino maker inner nozzle by
pulling it downwards.
Wash the inner and outer nozzles thoroughly in hot water.
Make sure the holes in the inner and outer nozzle
tips (fig.24) are not blocked. If necessary, clean
with a pin or cocktail stick.
Replace the inner nozzle by inserting it upwards
onto its housing.
Replace the outer nozzle by pushing it upwards and rotating it
clockwise.
Cleaning the Coee Maker
Do not use solvents or abrasive detergents to
clean the coee maker. A soft damp cloth will
suce.
Never wash any of the components of the coee
maker in the dishwasher.
Page 28
28
The following parts of the machine must be cleaned regularly:
• Waste coee container (A4).
• Drip tray (A14).
• Water tank (A12).
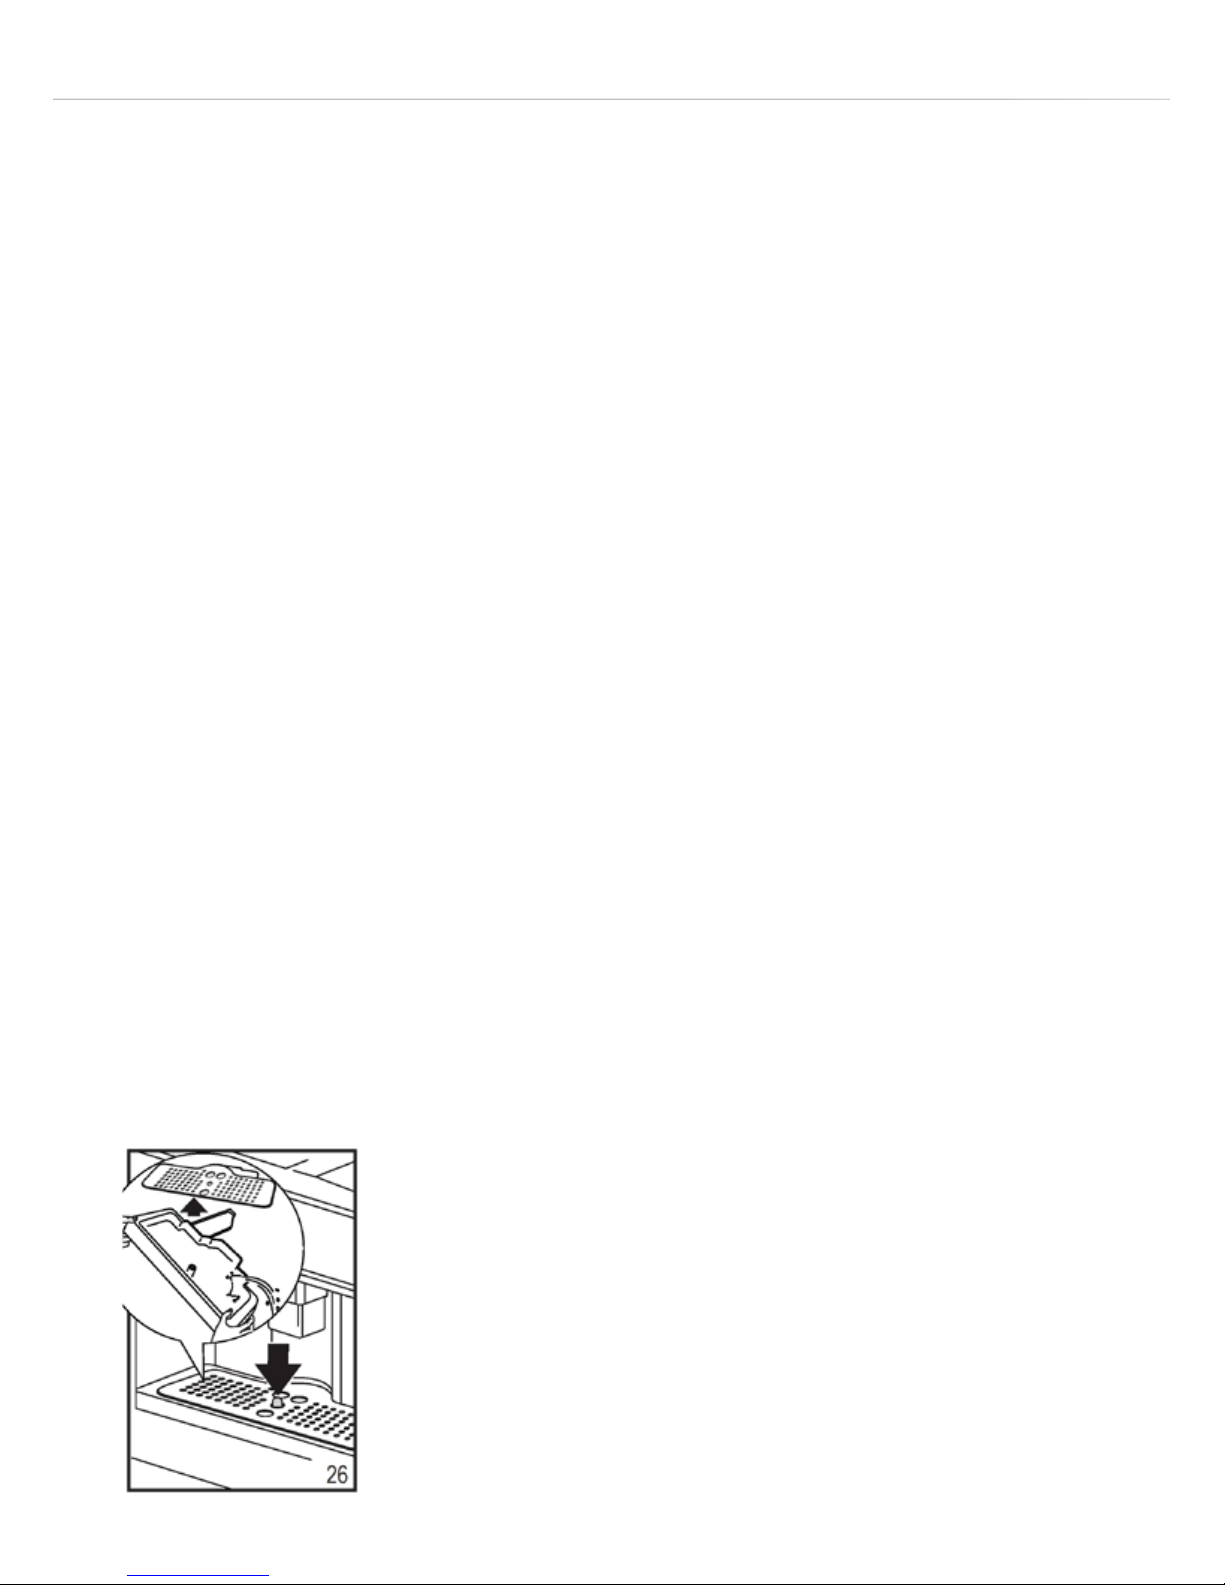
• Coee spout (A13) (Fig.25), hot water spout (A11) and
cappuccino maker spout (A10).
• Pre-ground coee funnel (A21).
• Inside of the machine, accessible after opening the service
door (A2).
• Brewing unit (A5).
Cleaning the Waste Coee Container
When “EMPTY WASTE COFFEE CONTAINER” is displayed, the waste
coee container must be emptied and cleaned.
To clean, open the service door on the front of the appliance (fig. 14),
extract the drip tray (fig. 15) and clean.
Clean the waste coee container thoroughly.
Important: Whenever the drip tray is extracted, the waste coee
container must always be emptied.
Cleaning the Drip Tray
Important: If the drip tray is not emptied the water
might overflow. This could damage the machine.
The drip tray is fitted with a level indicator (red)
showing the level of water it contains (fig. 26).
Page 29
29
Before the indicator protrudes from the cup tray, the drip tray must be
emptied and cleaned.
To remove the tray, open the service door (fig. 14) and remove the drip
tray with the waste coee container (fig. 15).
Clean the drip tray and waste coee container (A4).
Replace the drip tray and waste coee container (A4).
Close the service door.
Cleaning the Water Tank
Clean the water tank (A12) regularly (approx. once a month) with a
damp cloth and a little mild washing up liquid.
Remove all traces of washing up liquid before reusing the water tank.
Cleaning the Nozzles
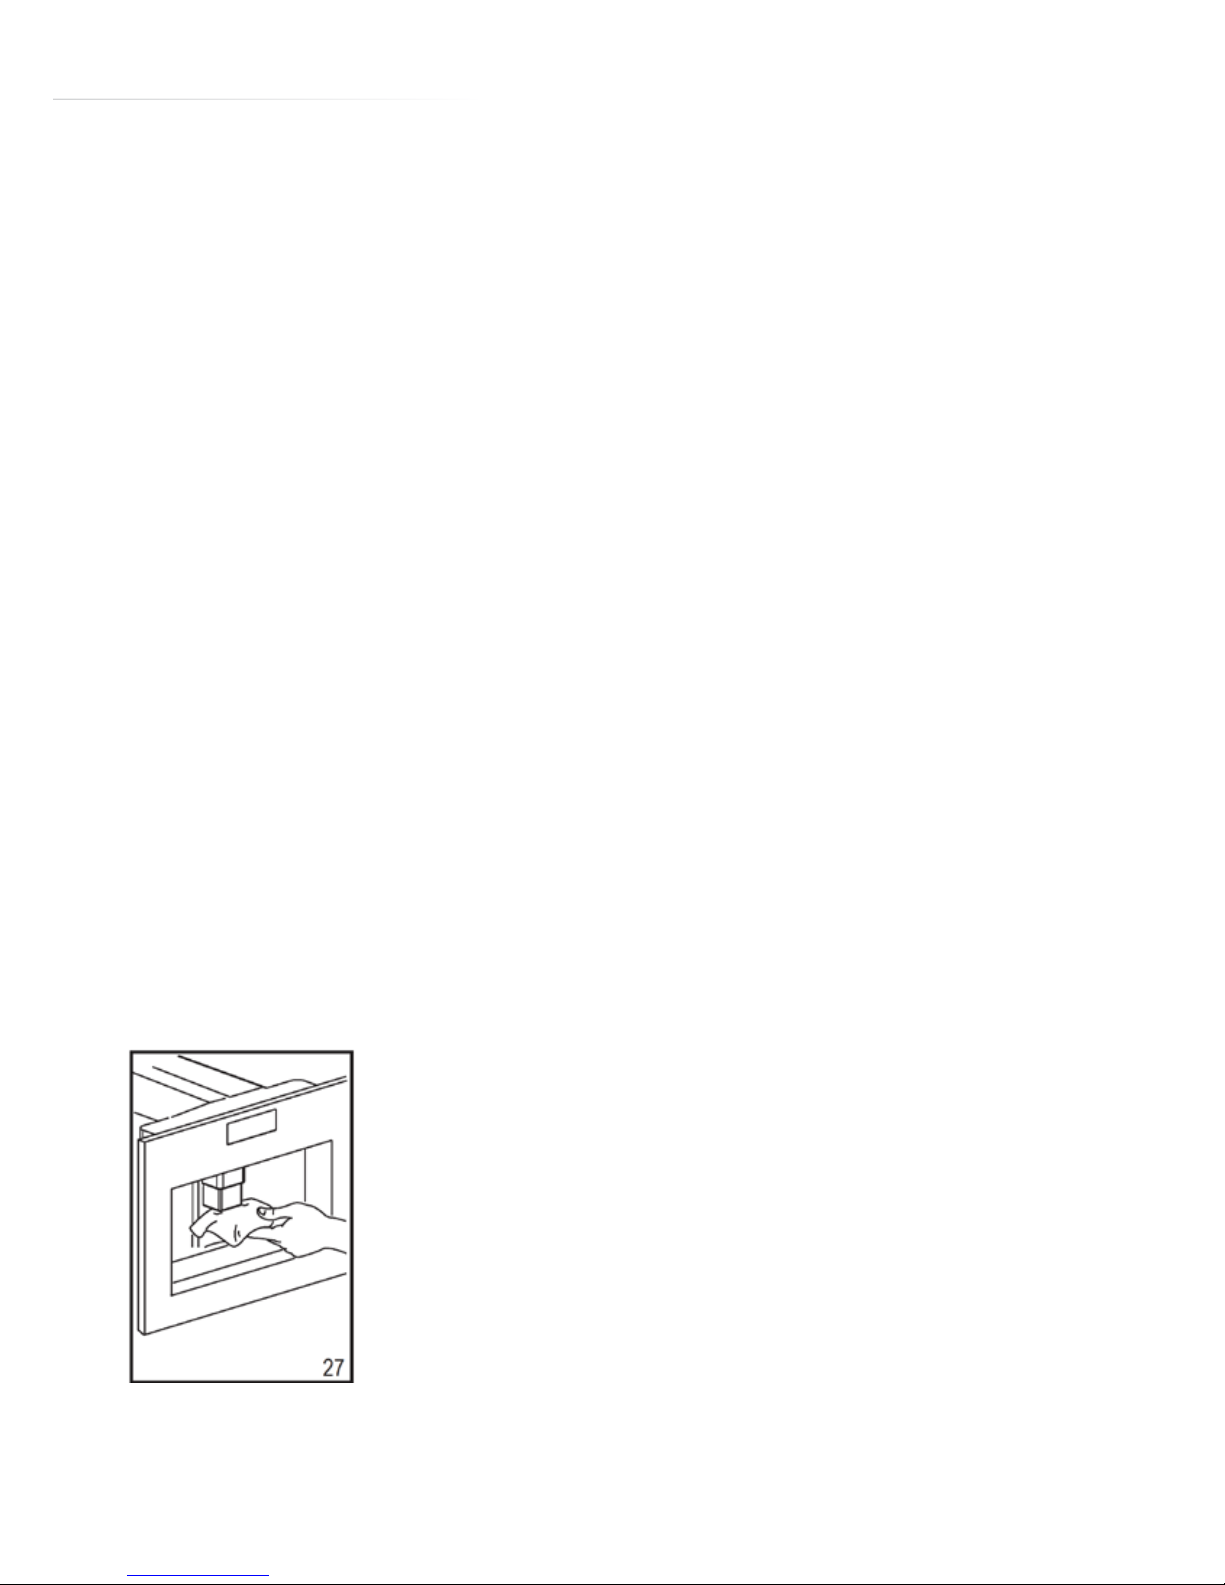
Clean the nozzles periodically using a sponge (fig.
27).
Check regularly that the holes in the coee spout
are not blocked. If necessary, remove coee
deposits with a cocktail stick (fig. 25).
Page 30
30
Cleaning the Pre-Ground Coee Funnel
Check regularly (approx. once a month) that the pre-ground coee
funnel is not blocked.
Cleaning the Inside Of The Coee Maker
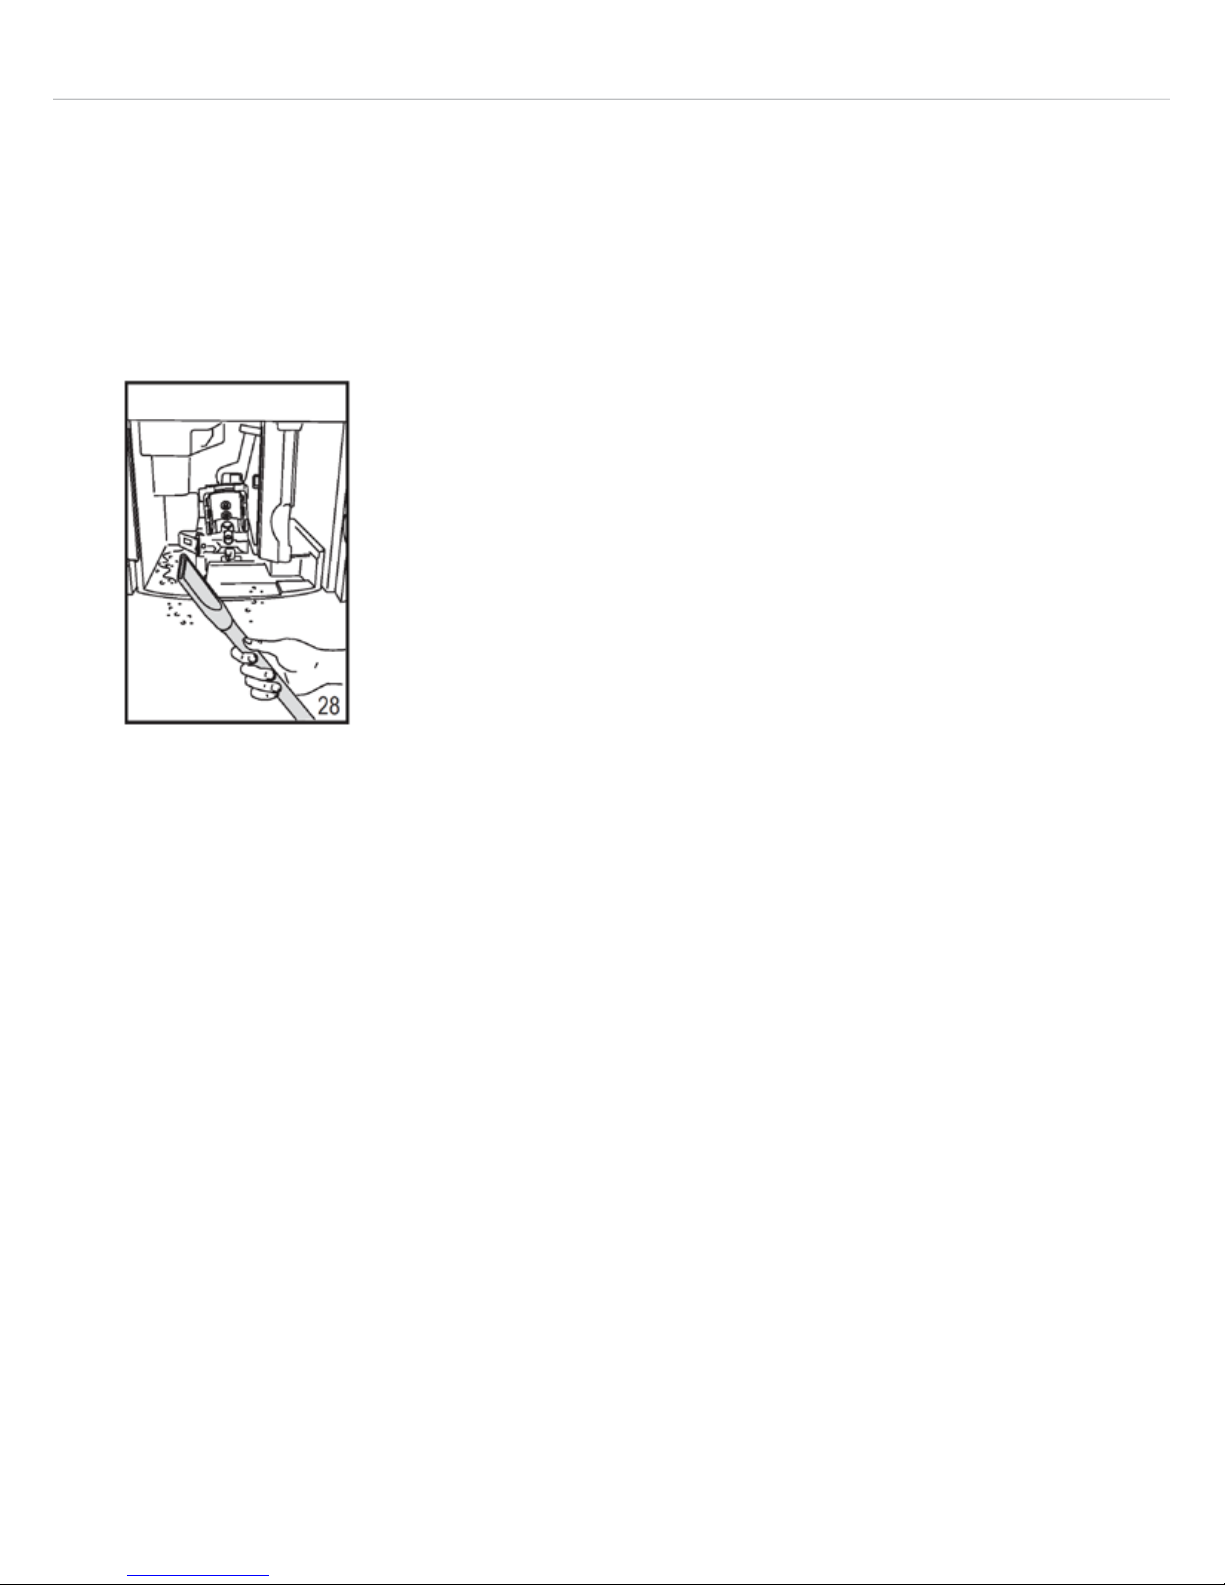
Check regularly (about once a week) that the inside
of the appliance is not dirty. If necessary, remove
coee deposits with a sponge.
Allow to dry and then remove the residues with a
vacuum cleaner (fig. 28).
Cleaning the Brewing Unit
The brewing unit must be cleaned at least once a month.
Before removing the brewing unit for cleaning, ensure the machine is
correctly turned o (see “Turning the Appliance O”).
Important: The brewing unit (A5) must not be removed when the
appliance is on. Do not use force to remove the brewing unit.
Open the service door (fig. 14).
Remove the drip tray and waste coee container (fig. 15).
Page 31
31
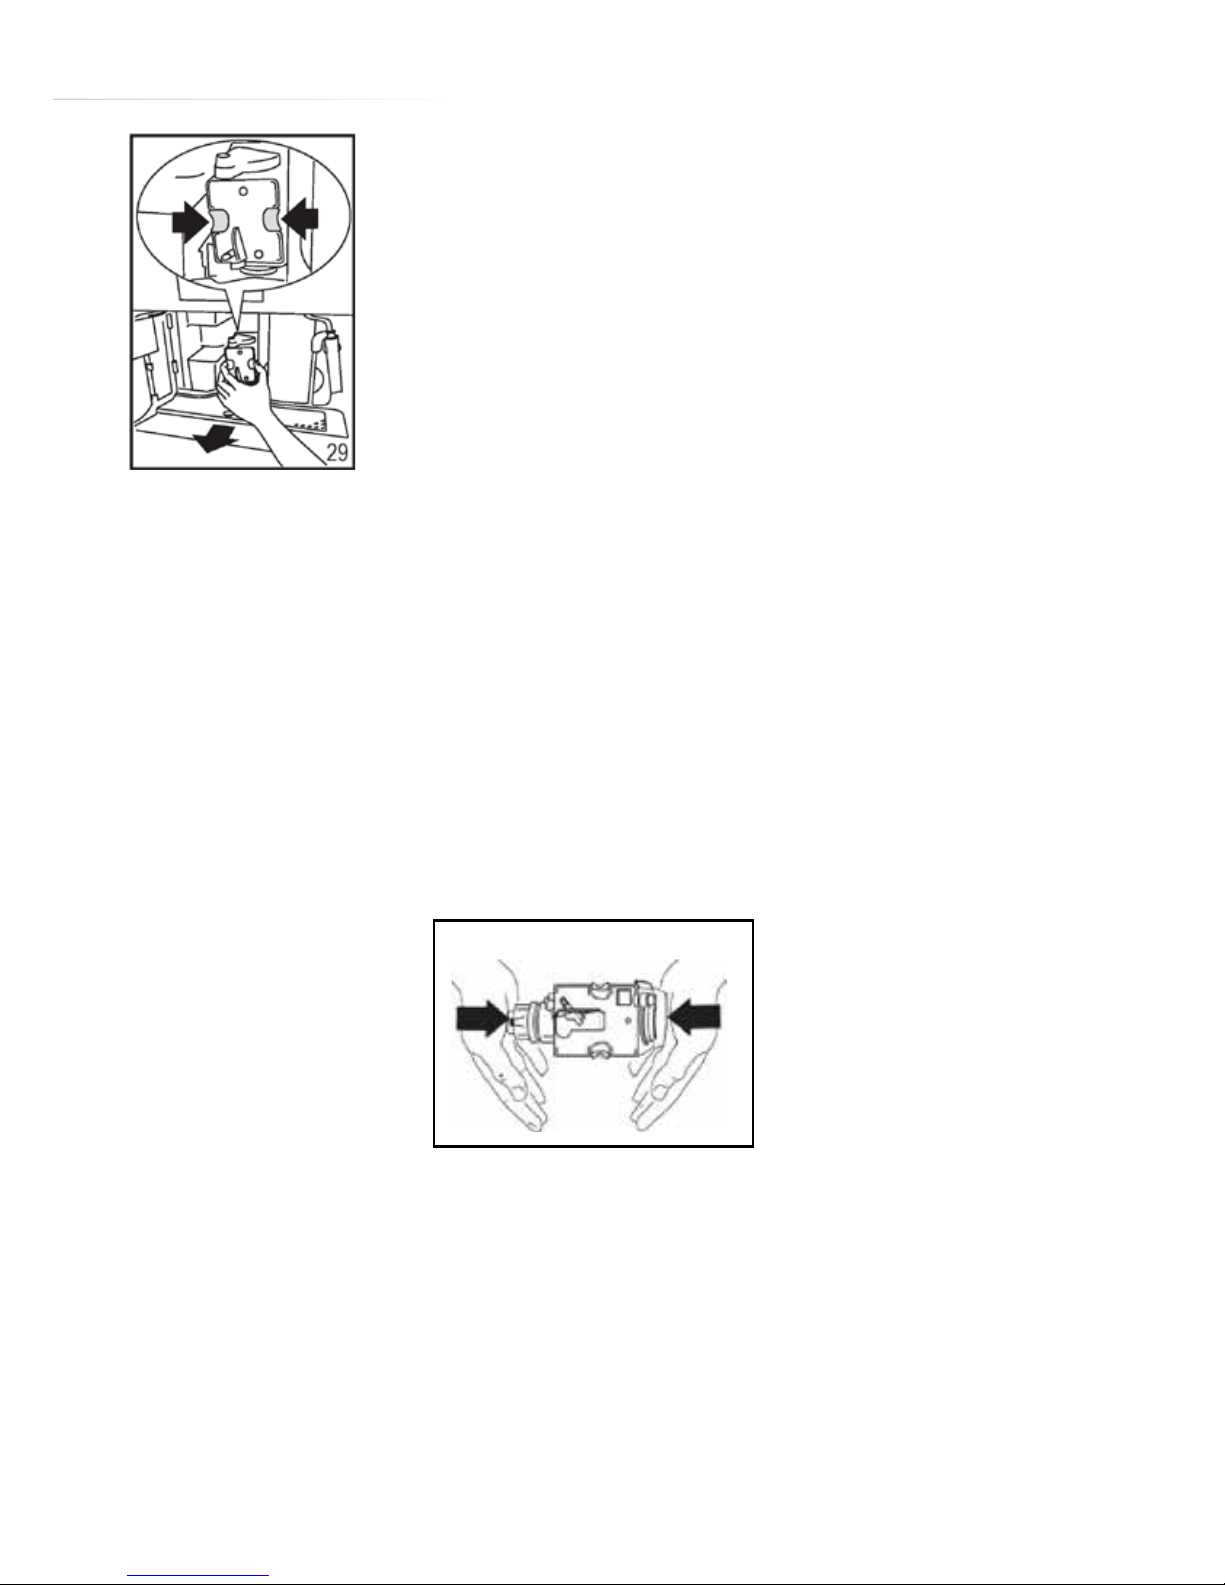
Squeeze the two red release buttons inwards and
at the same time pull the brewing unit outwards (fig.
29).
Important: Do not use washing up liquid to clean
the brewing unit. It would remove the lubricant
applied to the inside of the piston.
Soak the brewing unit in water for about 5 minutes, then rinse.
After cleaning, replace the brewing unit (A5) by sliding it onto the
internal support and pin at the bottom, then push the “PUSH” symbol
fully in until it clicks into place.
Note: If the brewing unit is dicult to insert, ensure the piston is fully
inserted by pressing it firmly from the bottom and top as shown here:
Once inserted, make sure the two red buttons have snapped out.
Replace the drip tray and waste coee container.
Close the service door.
Page 32

32
Changing and Setting Menu Parameters
When the appliance is switched on (but not producing coee/steam/
hot water), you can use the internal menu to modify the following
parameters and functions:
• Choose language
• Rinsing
• Shut-o time
• Set clock
• Start time
• Auto-start
• Temperature
• Water hardness
• Program coee
• Program jug
• Program water
• Descale
• Reset to default
• Statistics
• Contrast
• Buzzer
Page 33
33
Setting the Language
To change the language on the display, proceed as follows:
Press the Settings Menu button (B2) to enter the menu. “CHOOSE
LANGUAGE” is displayed.
Press the “ok” button (B9) to select the option.
Press the “+” & “-“ buttons (B7) and (B8) until the required language is
displayed.
Press the “ok” button (B9) to confirm.
Press the button (B6) to exit the menu.
Rinsing
This function enables you to pre-heat the brewing unit to obtain hotter
coee. Proceed as follows:
If more than 2/3 minutes have passed since the last coee was made,
before requesting another coee, the brewing unit should be preheated.
Press the Settings Menu button (B2) to enter the menu then press the
“+” & “-“ buttons (B7) and (B8) to select the “RINSING” function.
Press the “ok” button (B9). “RINSING... PLEASE CONFIRM” is
displayed.
Page 34

34
Press the “ok” button (B9) again to rinse the coee nozzles.
Deliver the water into the drip tray below, or alternatively use this
water to preheat the cup to be used, then empty it before making
coee.
Note: It is particularly useful to pre-heat the cup if making a small
coee.
Changing the Shut-O Time
The appliance is set by default to turn itself o automatically ½ hour
after the last coee has been made. This period can be adjusted to 1
or 2 hours by the user.
Press the Settings Menu button (B2) to enter the menu then press the
“+” & “-“ buttons (B7) and (B8) to select the “SHUT-OFF TIME” function.
Press the “ok” button (B9) to confirm.
Press the “+” & “-“ buttons (B7) and (B8) to select the time after which
the appliance will go o (½ hour, 1 hour, 2 hours).
Press the “ok” button (B9) to confirm.
Press the button (B6) to exit the menu.
Page 35

35
Setting the Clock
Press the Settings Menu button (B2) to enter the menu then press the
“+” & “-“ buttons (B7) and (B8) to select the “SET CLOCK” function.
Press the “ok” button (B9) to confirm.
Use the “+” & “-“ buttons (B7) and (B8) to set the hour then press the
“ok” button (B9) to confirm.
Use the “+” & “-“ buttons (B7) and (B8) to set the minutes then press
the “ok” button (B9) to confirm.
Press the button (B6) to exit the menu.
Setting an Auto-Start Time
This option programmes the time the machine will switch on
automatically.
Make sure the clock on the appliance has been set correctly.
Press the Settings Menu button (B2) to enter the menu then press the
“+” & “-“ buttons (B7) and (B8) to select the “START TIME” function.
Press the “ok” button (B9) to confirm.
Use the “+” & “-“ buttons (B7) and (B8) to set the auto-start hours then
press the “ok” button (B9) to confirm.
Page 36
36
Use the “+” & “-“ buttons (B7) and (B8) to set the auto-start minutes
then press the “ok” button (B9) to confirm.
Use the “+” & “-“ buttons (B7) and (B8) to activate the auto-start
function until “AUTOSTART” is displayed then press the “ok” button
(B9) to confirm.
The symbol appears on the display.
Press the button (B6) to exit the menu.
To Deactivate the Auto-Start Function
Press the Settings Menu button (B2) to enter the menu then press the
“+” & “-“ buttons (B7) and (B8) to select AUTO START-UP”.
Press the “ok” button (B9) to confirm.
Press the button (B6) to deactivate and the symbol will
disappear.
Changing Coee Temperature
Press the Settings Menu button (B2) to enter the menu then press the
“+” & “-“ buttons (B7) and (B8) to select the “TEMPERATURE” function.
Press the “ok” button (B9) to confirm.
Press the “+” & “-“ buttons (B7) and (B8) to select the required
temperature between “Low”, Medium” & “High”.
Page 37

37
Press the “ok” button (B9) to confirm the temperature selected.
Press the button (B6) to exit the menu.
Setting Water Hardness
The coee maker is factory set to provide a descale warning after a
certain period of use. This can be adjusted to match your local water
hardness as follows:
Remove the “Total Hardness Test” strip (supplied with the machine)
from its packaging, dip it fully into fresh tap water for a few seconds,
then remove and wait about 30 seconds (until it changes colour and
forms red squares). Note the number of red squares visible on the
test strip.
On the coee maker, press the Settings Menu button (B2) to enter
the menu then press the “+” & “-“ buttons (B7) and (B8) to select the
“WATER HARDNESS” function.
Press the “ok” button (B9) to confirm.
Press the “+” & “-“ buttons (B7) and (B8) until the number coincides
with the number of red squares on the test strip (e.g. if there are 3 red
squares on the test strip, select the message “WATER HARDNESS 3”).
Press the “ok” button (B9) to confirm.
Page 38

38
The coee maker is now programmed to provide the descale warning
when actually necessary.
Programming Coee
For instructions on programming coee, see the “Changing The
Quantity Of Coee In The Cup” section.
Programming Water
For instructions, see the “Changing The Quantity Of Hot Water”
section.
Descaling
Important: Descaler contains acids. Read and obey the safety
warnings provided by the manufacturer and given on the descaler
pack.
Note: Use the descaler recommended by the manufacturer only. Use
of other descalers invalidates the guarantee. Failure to descale the
appliance as described also invalidates the guarantee.
When “PLEASE DESCALE !” is displayed, the machine requires
descaling. Proceed as follows:
Press the Settings Menu button (B2) to enter the menu then press the
“+” & “-“ buttons (B7) and (B8) to select the “DESCALE” function.
Press the “ok” button (B9) and the appliance displays “DESCALE
PLEASE CONFIRM”.
Page 39

39
Press the “ok” button (B9). The message “ADD DESCALER PLEASE
CONFIRM” is displayed.
Empty the tank of water, pour the contents of the descaler bottle into
the tank observing the instructions given on the descaler pack, then
add water.
Position a container with a capacity of approx. 2 litres under the hot
water spout.
Press the “ok” button (B9). Descaler flows out of the hot water spout
into the container below. The appliance displays: “DESCALING”.
The descale programme automatically performs a series of deliveries
and pauses.
After approx. 20 minutes “DESCALE COMPLETE PLEASE CONFIRM” is
displayed.
Press the “ok” button (B9). “RINSING PLEASE CONFIRM” is displayed.
Empty the water tank, rinse to eliminate any descaler residues, then
fill with clean water.
Replace the tank full of clean water. “RINSING PLEASE CONFIRM” is
displayed again.
Press the “ok” button (B9) again. Hot water flows out of the spout into
the container below and “RINSING” is displayed.
Page 40

40
Wait until “RINSING COMPLETE PLEASE CONFIRM” is displayed.
Press the “ok” button (B9). “DESCALE COMPLETE” is displayed, then
“FILL TANK”. Fill the tank again with clean water.
The descale programme is now completed and the appliance is ready
to make coee again.
Note: If descaling is interrupted before completion, the process must
be started again from the beginning.
IMPORTANT: FAILURE TO DESCALE THE APPLIANCE REGULARLY
INVALIDATES THE GUARANTEE.
Resetting Default Values (Reset)
It is possible to return all user settings back to those when the
machine left the factory.
Press the Settings Menu button (B2) to enter the menu then press
the “+” & “-“ buttons (B7) and (B8) to select the “RESET TO DEFAULT”
function.
Press the “ok” button (B9) and the appliance displays “RESET TO
DEFAULT PLEASE CONFIRM”.
Press the “ok” button (B9) to reset the default values.
Page 41

41
Statistics
This displays statistics relating to the machine. To display, proceed as
follows:
Press the Settings Menu button (B2) to enter the menu then press the
“+” & “-“ buttons (B7) and (B8) to select the “STATISTICS” function.
Press the “ok” button (B9) to confirm.
Press the “+” & “-“ buttons (B7) and (B8) to verify:
• How many coees have been made.
• How many times the machine has been descaled.
• The total number of litres of water delivered.
Press the button (B6) once to exit the function or twice to exit the
menu.
Buzzer
This activates or deactivates the buzzer that sounds each time a
button is pressed or an accessory is inserted/removed.
Note: The buzzer is active by default.
Press the Settings Menu button (B2) to enter the menu then press the
“+” & “-“ buttons (B7) and (B8) to select the “BUZZER” function.
Press the “ok” button (B9), “BUZZER PLEASE CONFIRM” is displayed.
Page 42

42
Press the button (B6) to disable or the “ok” button (B9) to enable
the buzzer.
Press the button (B6) to exit the menu.
Adjusting Contrast
To increase or reduce the contrast of the display, proceed as follows:
Press the Settings Menu button (B2) to enter the menu then press the
“+” & “-“ buttons (B7) and (B8) to select the “CONTRAST” function.
Press the “ok” button (B9) to confirm.
Press the “+” & “-“ buttons (B7) and (B8) until the required display
contrast is reached. The progressive bar indicates the level of
contrast selected.
Press the “ok” button (B9) to confirm.
Press the button (B6) to exit the function or twice to exit the
menu.
Page 43

43
Turning the Appliance O
Each time the appliance is turned o, it performs an automatic rinse
cycle which cannot be interrupted.
Danger of scalds: During rinsing a little hot water flows from the
coee spouts. Avoid contact with splashes of water. To turn the
appliance o, press the ON/Standby button (A7). The appliance
performs the rinse cycle then goes o.
Note: If the appliance is not to be used for an extended period, place
the main switch on the back of the appliance in the “0” position (A23).
Technical Specification
Voltage: 220-240 V~ 50/60 Hz max. 10A
Power consumed: 1350 W
Max pressure: 15 bar
Water tank capacity: 1.8 litres
Size LxHxD: 595 x 455 x 401 mm
Weight: 23/24 kg
Page 44
44
Displayed Messages
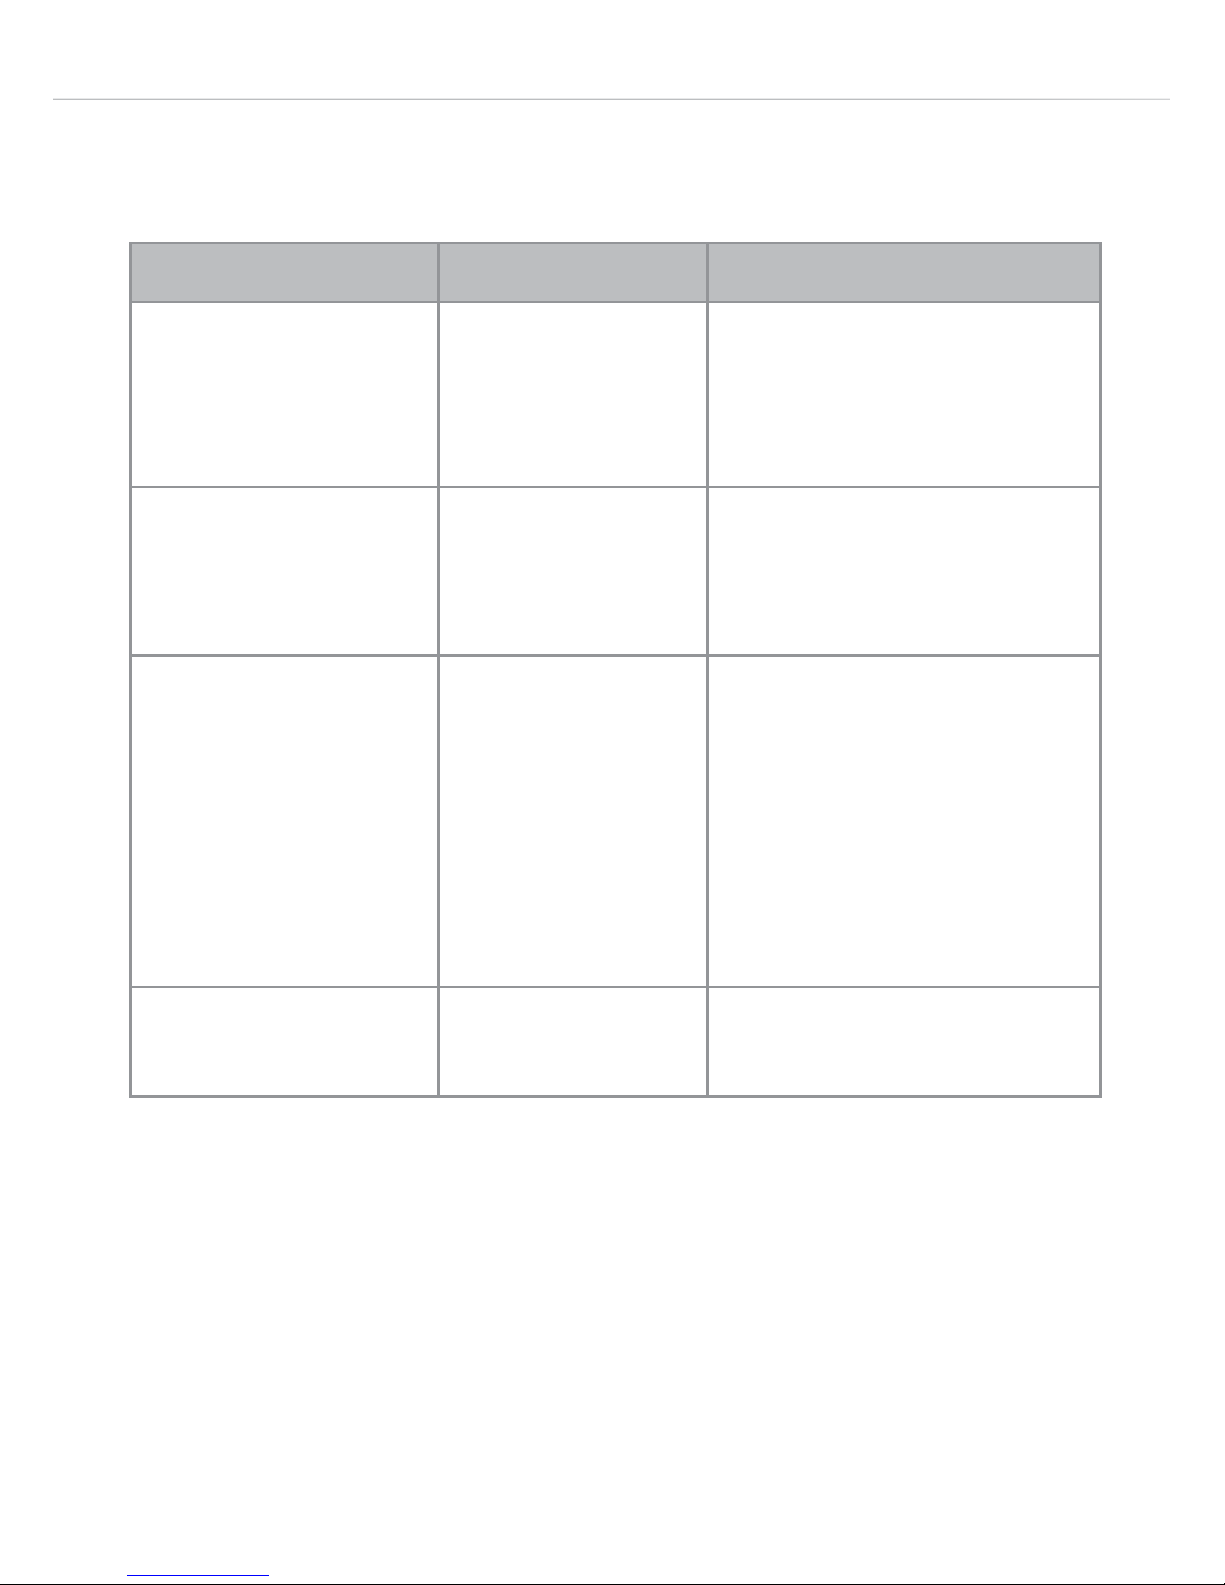
Displayed Message Possible Cause Remedy
FILL TANK The water
tank is empty
or positioned
incorrectly.
Fill the tank with water
and/or insert it correctly,
pushing it as far as it will
go.
GROUND TOO FINE
ADJUST MILL
(alternating with)
PRESS OK
The grinding is
too fine.
Turn the grinding
adjustment one click
clockwise.
GROUND TOO FINE
ADJUST MILL
(alternating with)
PRESS OK
(then)
FILL TANK
The tank has
been removed
during delivery.
Insert the tank and press
the “ok” button (B9). “HOT
WATER PRESS OK” is
displayed.
Press the “ok” button (B9)
again.
The appliance is ready to
use.
CLOSE DOOR The service door
is open.
Close the service door.
Page 45
45
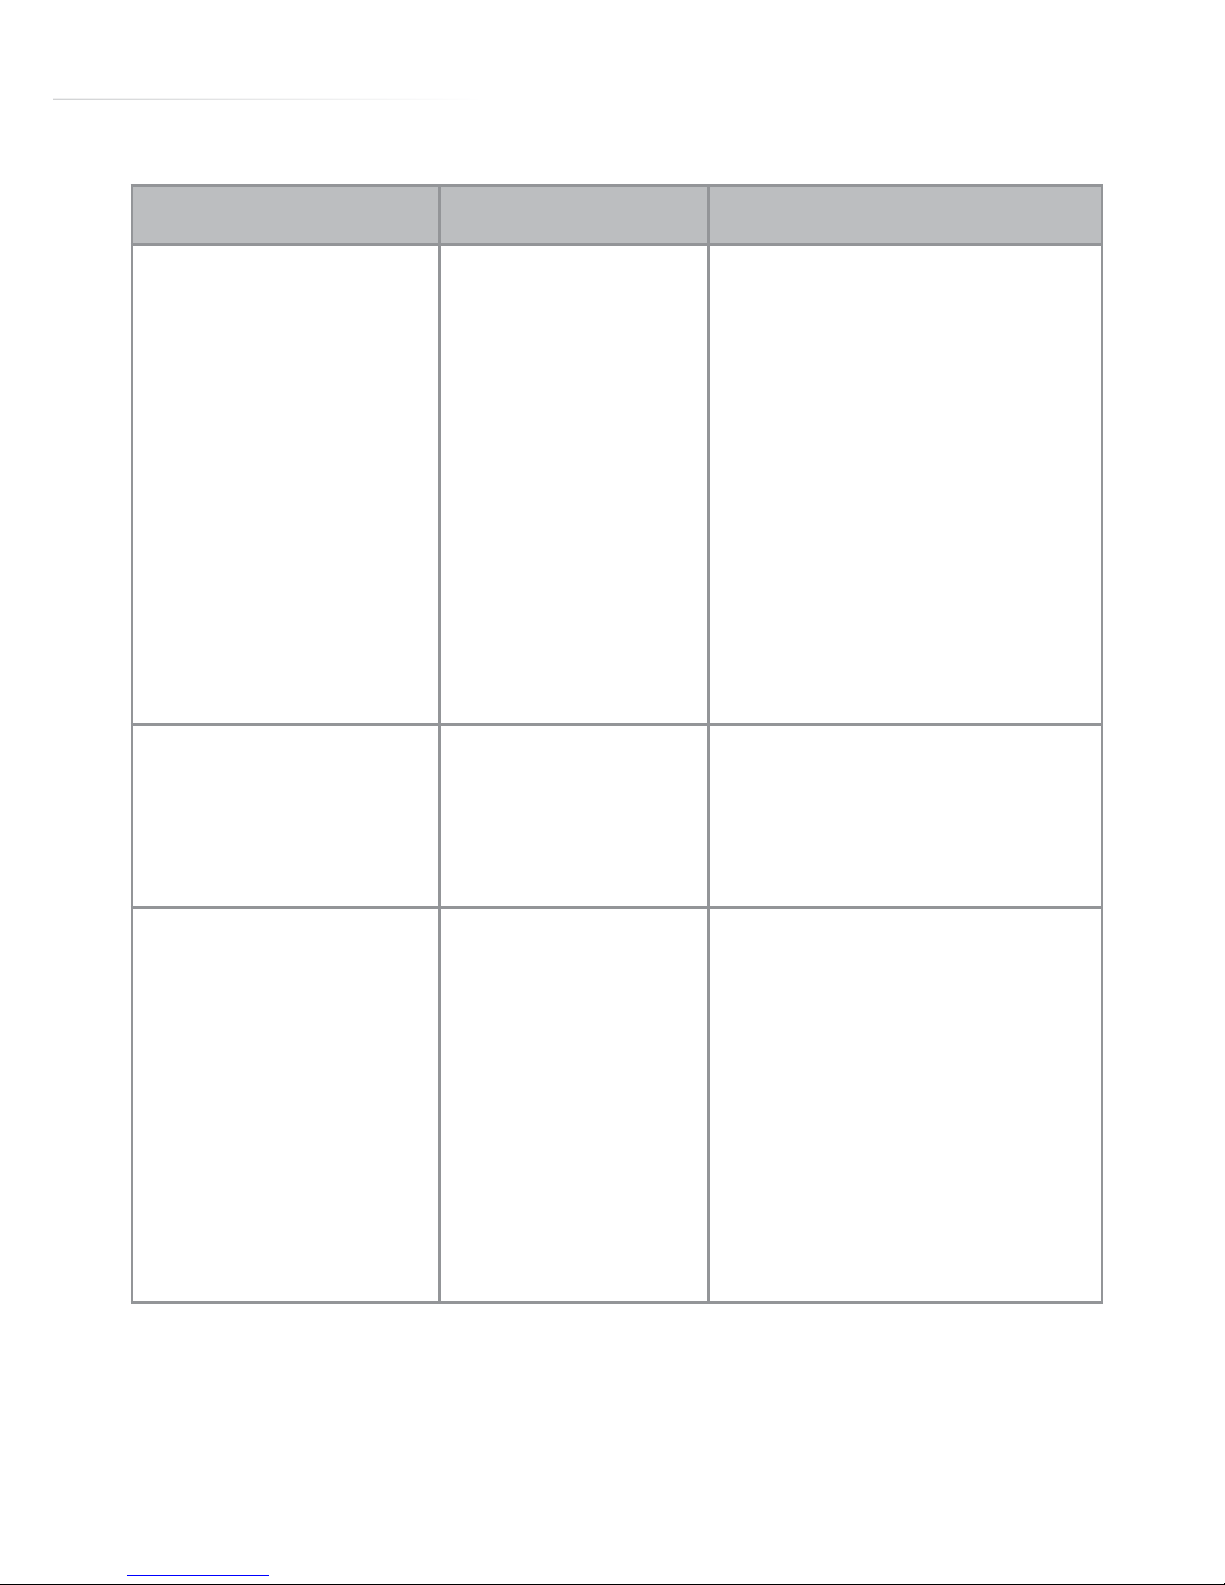
Displayed Message Possible Cause Remedy
EMPTY WASTE
COFFEE
CONTAINER
The waste coee
container (A4) is
too full or more
than 3 days have
passed since
the machine last
made coee (this
aids hygiene).
Empty the waste coee
container, clean it then
replace.
Important: when removing
the drip tray the waste
coee container must
be emptied, even if not
completely full.
If this is not done, the
waste container may
overfill, spill and block the
machine.
INSERT WASTE
COFFEE
CONTAINER
After cleaning,
the waste coee
container has not
been replaced.
Open the service door and
insert the waste coee
container.
ADD PRE-GROUND
COFFEE
The “pre-ground
coee” function
has been
selected without
placing any preground coee in
the funnel.
The funnel is
blocked.
Extract the appliance and
place pre-ground coee in
the funnel.
Clean the funnel using a
blunt object.
Page 46
46
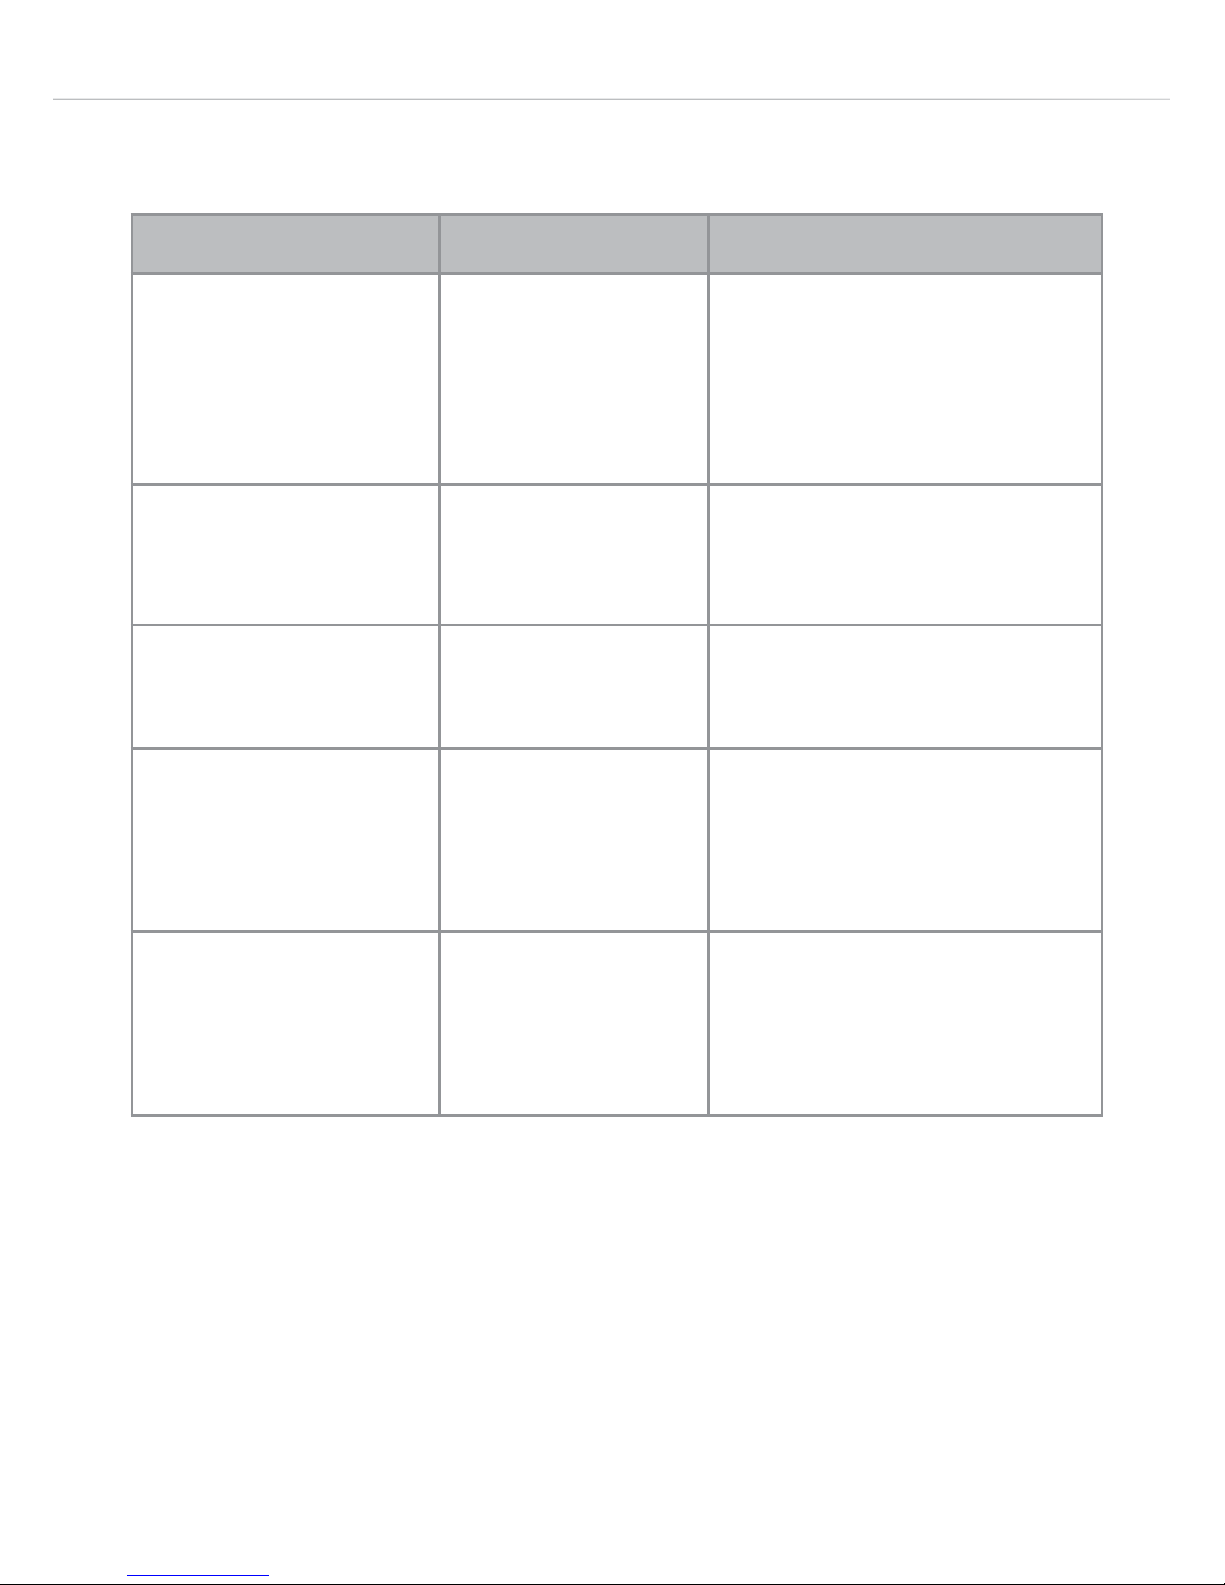
Displayed Message Possible Cause Remedy
PLEASE DESCALE! The machine must
be descaled.
The descaling procedure
described in the
”Descaling” section needs
to be performed as soon
as possible.
LESS COFFEE Too much coee
has been used.
Reduce the quantity of preground coee then make
the coee again.
FILL BEAN
CONTAINER
The coee beans
have run out.
Fill bean container.
INSERT BREWING
UNIT
The brewing unit
has not been
replaced after
cleaning.
Insert the brewing unit as
described in the section
”Cleaning the Brewing
Unit”.
GENERAL ALARM The inside of the
appliance is very
dirty.
Clean the inside of the
appliance as described in
the section “Cleaning and
maintenance”.
Page 47
47
Troubleshooting
Below is a list of some of the possible malfunctions.
If the problem cannot be resolved as described, contact Customer
Services.
Problem Possible Cause Remedy
The coee is not hot. The cups were
not preheated.
The brewing
unit has cooled
down because
2/3 minutes have
elapsed since the
last coee was
made.
The temperature
is set too low.
Warm the cups by rinsing
them with hot water.
Before making coee,
preheat the brewing unit
by selecting the “Rinsing”
function on the menu.
Change the set
temperature.
The coee is not
creamy enough.
The coee is
ground too
coarsely.
Wrong type of
coee.
Turn the grinding
adjustment one click
anticlockwise while the
coee mill is running (fig.
11).
Use a type of coee for
espresso makers.
The coee is
delivered too slowly
or a drop at a time.
The coee is
ground too finely.
Turn the grinding
adjustment one click
clockwise while the coee
mill is running (fig. 11).
Page 48
48
Problem Possible Cause Remedy
The coee is
delivered too quickly.
The coee is
ground too
coarsely.
Turn the grinding
adjustment one click
anticlockwise while the
coee mill is running (fig.
11).
Avoid turning the knob
excessively as when 2
cups are selected the
coee delivery may be too
slow.
The eect is only visible
after delivering two
coees.
Coee does not
come out of one of
the spouts.
The spouts are
blocked.
Clean the spouts with a
toothpick (fig. 25).
The coee does
not come out of
the spouts but from
around the service
door (A2).
The holes in
the spouts are
clogged.
The coee guide
inside the service
door is blocked
and cannot swing.
Clean the spouts with a
cocktail stick, sponge or
sti kitchen brush (fig. 25).
Thoroughly clean the
coee guide (A3),
particularly near the
hinges.
Water comes out of
the spouts instead of
coee.
The pre-ground
coee may be
blocked in the
funnel (A21).
Clean the funnel (A21) with
a blunt object, clean the
inside of the machine.
Page 49

49
Installation
Initial Checks
After removing the packaging, make sure the product is complete,
undamaged and that all accessories are present.
If the appliance is visibly damaged contact your supplier and do not
use it.
Important
The packing pieces (plastic bags, polystyrene foam, etc.) should be
kept out of reach of children.
Do not install the appliance in rooms where the temperature may
drop to 0°C or lower.
Adjust the water hardness as soon as possible following the
instructions in the “Setting Water Hardness” section (page 35).
Page 50
50
Built-In Installation
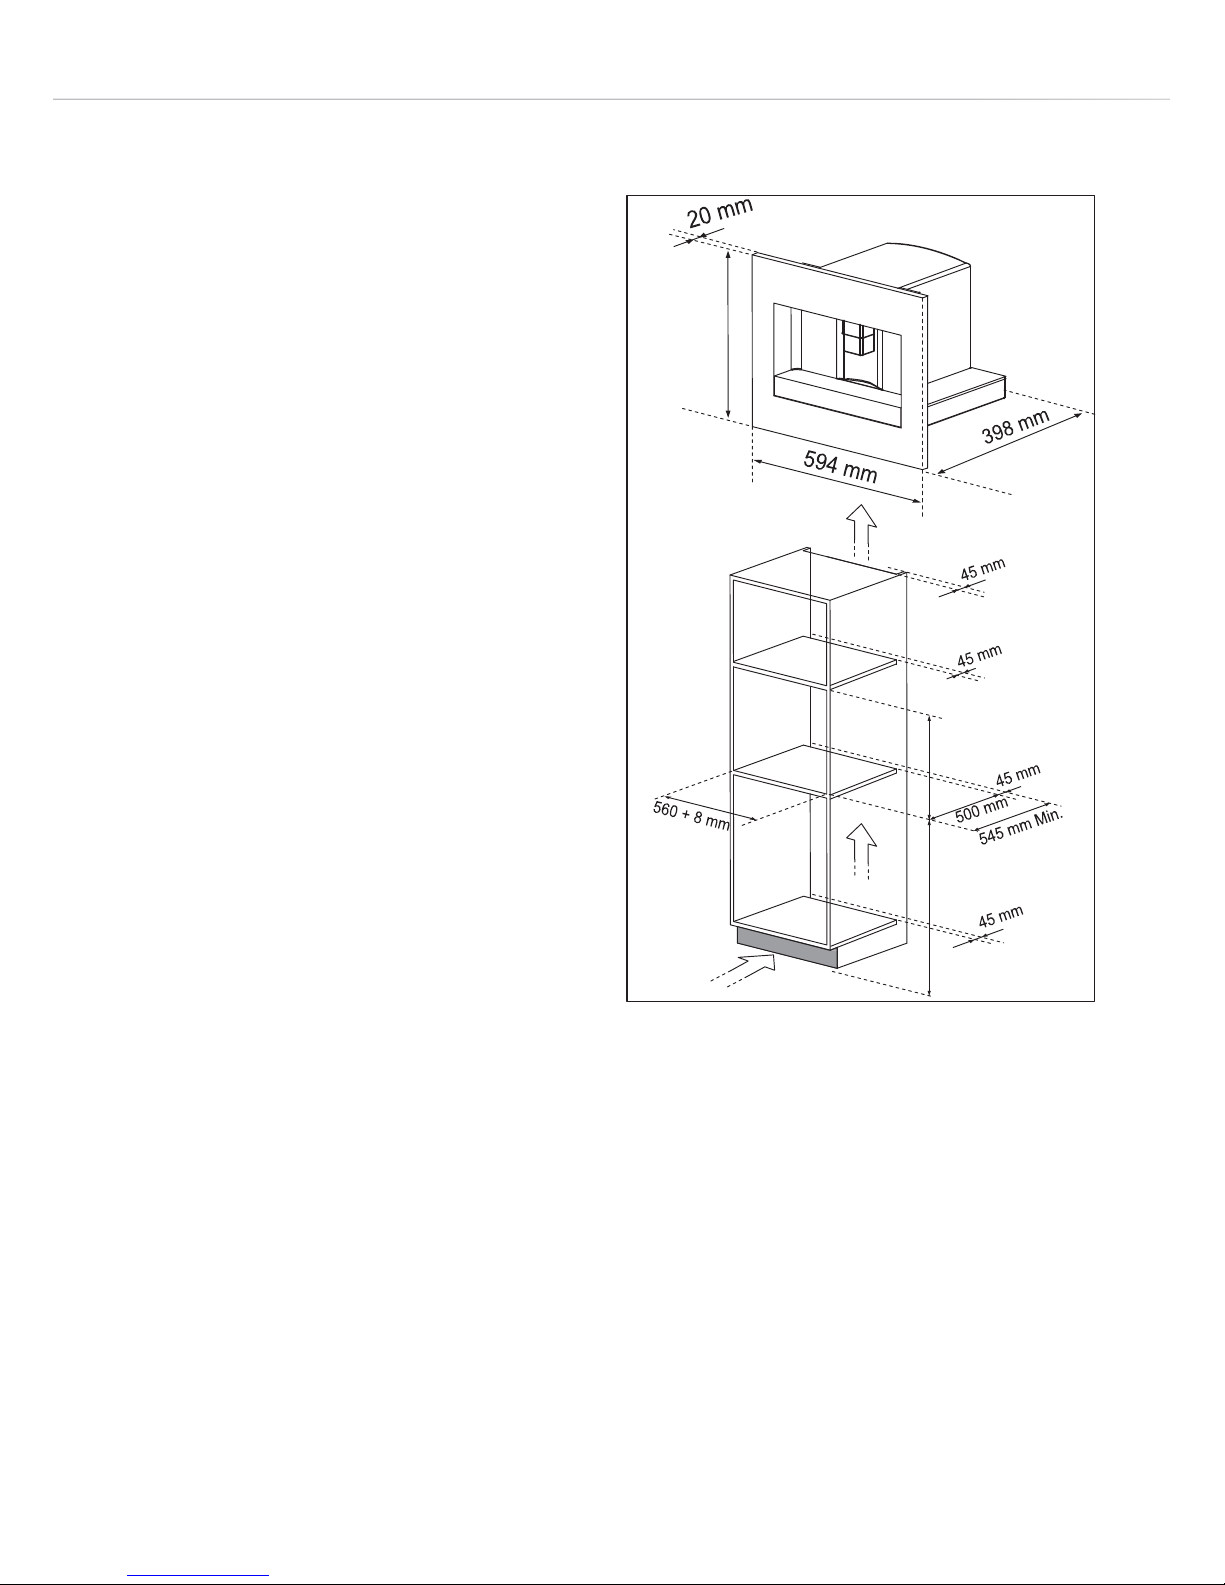
Verify the minimum
measurements required for
correct installation of the
appliance.
The coee maker must be
installed in a column and the
column must be firmly fixed to the
wall with commercially available
brackets.
Important:
• All installation or maintenance
operations must be performed
with the appliance disconnected
from the mains electricity supply.
• Kitchen furniture in direct
contact with the appliance must
be heat resistant (65°C min).
455
mm
850
mm
Mi
n
450
+
2
mm
200 cm
2
Page 51
51
x 16
x 2
x 4 x 8
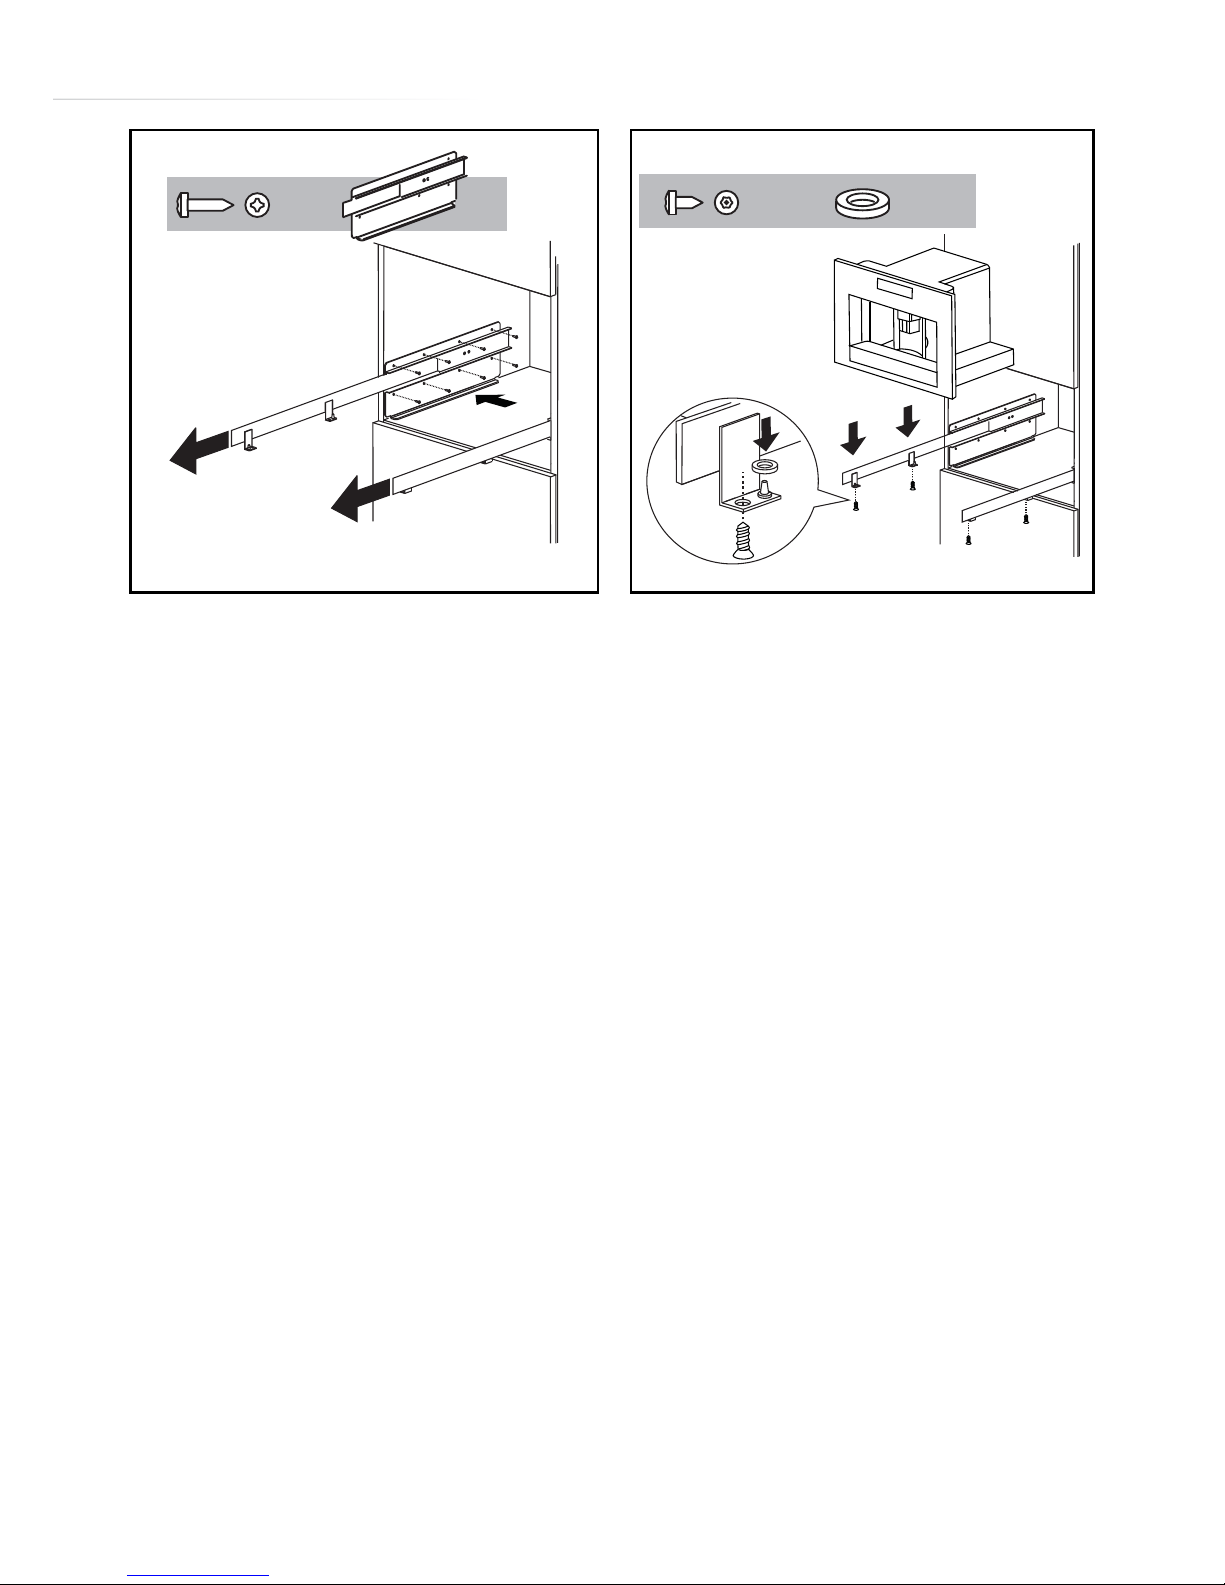
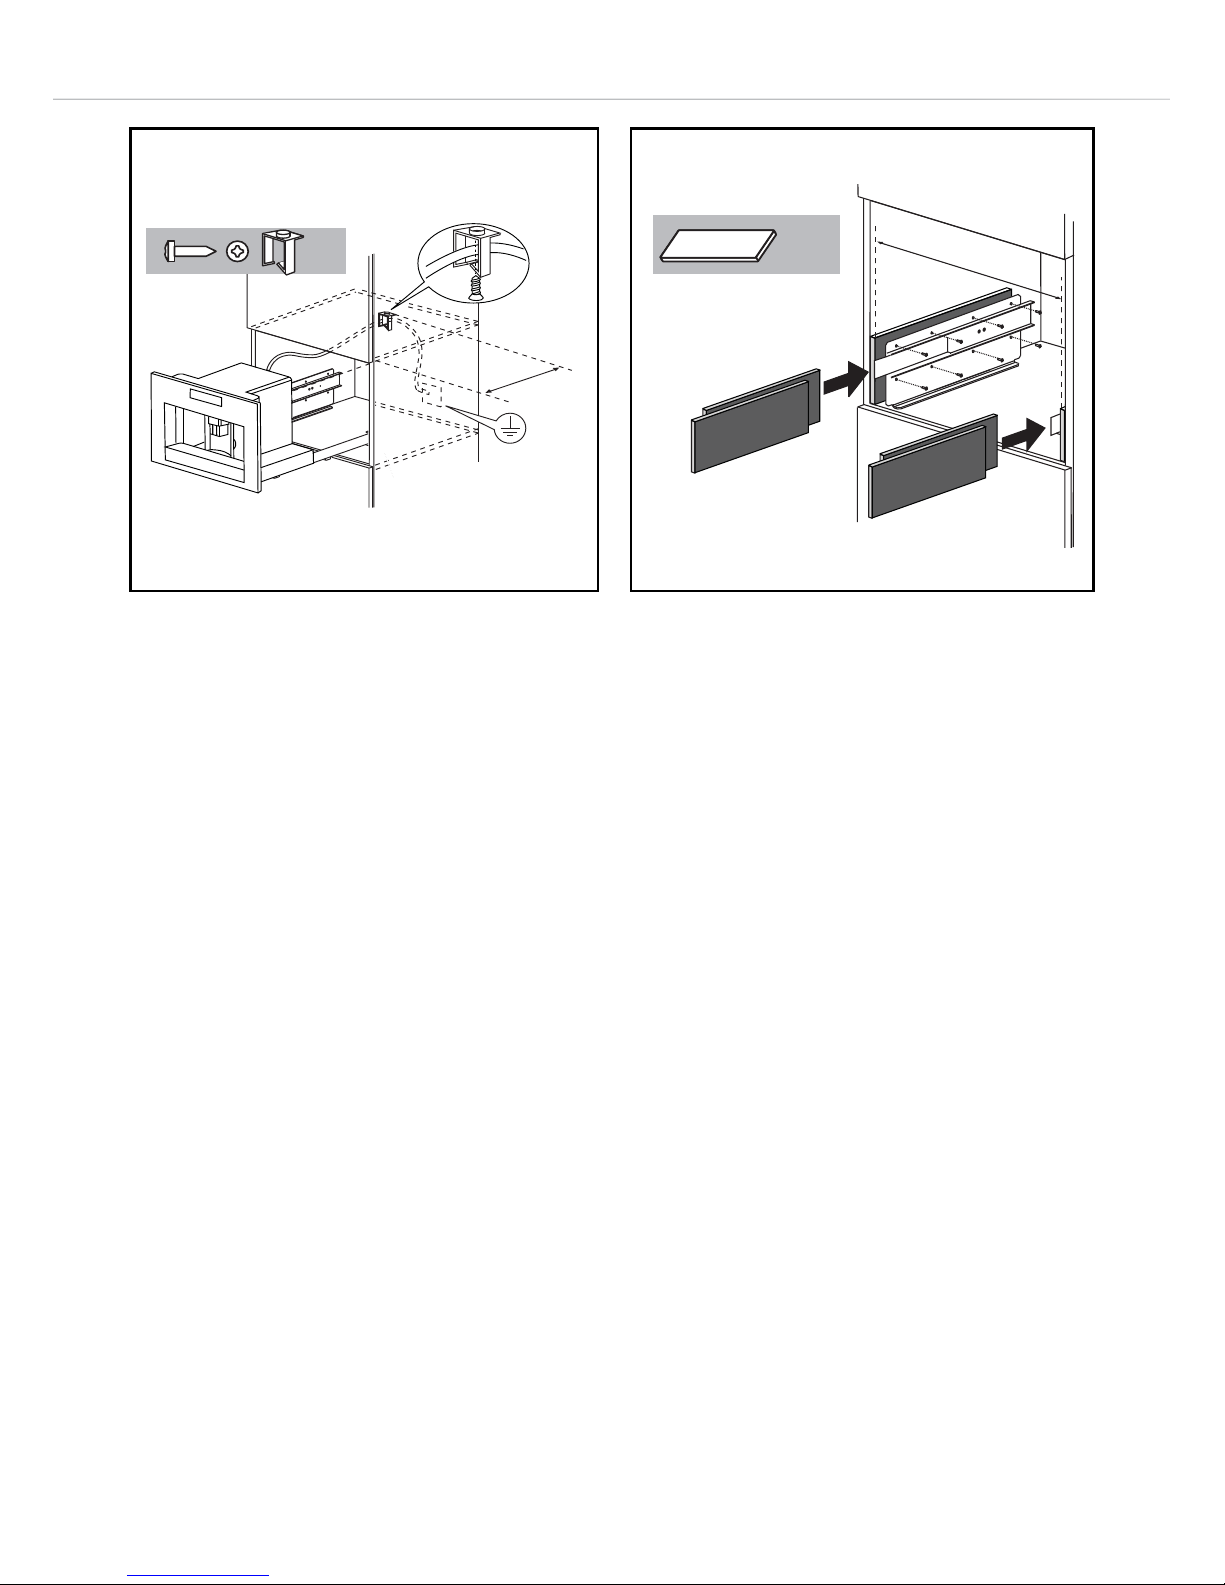
Position the rails on the sides of the cabinet as shown in the figure.
Fix with the screws, then extend the rails fully.
If the coee maker is installed over a warmer drawer, use the top
surface of this as a reference to position the rails. In this case, there
will be no lower shelf to rest the rails on.
Position the appliance on the rails, making sure the pins are correctly
inserted in the housings, then fix it with the screws supplied.
If the height of the appliance requires adjusting, use the spacer disks
provided.
Page 52
52
app rox. 3 50 mm
x 1
x 4
560 + 1 mm
Fix the power cable with the clip.
The power cable must be long enough to allow the appliance to be
extracted from the cabinet to fill the coee bean container.
If necessary, correct alignment of the appliance by positioning the
spacers supplied under or at the sides of the support.
Page 53

53
Electrical Connection (UK Only)
If Your Appliance Comes Fitted With a Plug:
The plug will incorporate a 13 Amp fuse. If it does not fit your socket,
the plug should be cut o from the mains lead, and an appropriate
plug fitted, as below. WARNING: Very carefully dispose of the cut
o plug after removing the fuse, do not insert in a 13 Amp socket
elsewhere in the house as this could cause a shock hazard. If the
plug is a moulded-on type, the fuse cover must be re-fitted when
changing the fuse using a 13 Amp Asta approved fuse to BS 1362. In
the event of losing the fuse cover, the plug must NOT be used until a
replacement fuse cover can be obtained from your nearest electrical
dealer. The colour of the correct replacement fuse cover is that as
marked on the base of the plug.
If Your Appliance Is Not Fitted With a Plug:
Please follow the instructions provided below:
WARNING - THIS APPLIANCE MUST BE EARTHED
IMPORTANT
The wires in the mains lead are coloured in accordance with the
following code:
Green and yellow: Earth
Blue: Neutral
Brown: Live
Page 54

54
As the colours of the wires in the mains lead may not correspond with
the coloured markings identifying the terminals in your plug, proceed
as follows:
The green and yellow wire must be connected to the terminal in the
plug marked with the letter “E” or the earth symbol, or coloured green,
or green and yellow.
The blue wire must be connected to the terminal marked with the
letter “N” or coloured black.
The brown wire must be connected to the terminal marked with the
letter “L” or coloured red.
Page 55

55
Notes:
E & O E. All instructions, dimensions and illustrations are provided for guidance only. CDA reserve the
right to change specifications without prior notice.
Page 56
Customer Care Department • The Group Ltd. • Harby Road • Langar • Nottinghamshire • NG13 9HY
T : 01949 862 012 F : 01949 862 003 E : customer.care@cda.eu W : www.cda.eu
www.cda.eu
Please contact our Customer Care Department for Service on the details below
Customer Care Department
The Group Ltd. • Harby Road • Langar • Nottinghamshire • NG13 9HY
T : 01949 862 012 F : 01949 862 003 E : [email protected]
Copyright © CDA 2015
 Loading...