

Page 1

Customer Care Department • The Group Ltd. • Harby Road • Langar • Nottinghamshire • NG13 9HY
T : 01949 862 012 F : 01949 862 003 E : customer.care@cda.eu W : www.cda.eu
www.cda.eu
SK510 Single
Pyrolytic Oven
Installation, Use and Maintenance
Page 2

2
Important
This appliance must only be used for the purpose for which it is
intended, i.e. domestic cooking. Any other use could be dangerous
and may lead to premature failure of the appliance.
The CDA Group Ltd cannot be held responsible for injuries or losses
caused by incorrect use or installation of this product. Please note
that CDA reserve the right to invalidate the guarantee supplied with
this product following incorrect installation or misuse of the appliance.
Under no circumstances should any external covers be removed for
servicing or maintenance except by suitably qualified personnel.
User information:
• Ovens become hot during and immediately after use.
• The oven door can become very hot during operation.
• After use, please ensure that the oven is switched ‘O’.
• Keep children away from the appliance when in use, and
immediately after use.
• Keep the oven door closed whilst grilling.
Appliance information:
Please enter the details on the appliance rating plate below for
reference, to assist CDA Customer Care in the event of a fault with
your appliance and to register your appliance for guarantee purposes.
Appliance Model
Serial Number
Page 3

3
CE Declarations of Conformity:
This oven has been designed, constructed and marketed in
compliance with safety requirements of EEC Directive 2006/95/EEC
(Low voltage) and requirements of EMC Directive 2004/108/EEC.
This appliance has been manufactured to the strictest standards and
complies with all applicable legislation, including Electrical safety (LVD)
and Electromagnetic interference compatibility (EMC). Parts intended
to come into contact with food conform to EEC/89/109.4
IMPORTANT INFORMATION FOR CORRECT DISPOSAL OF THE
PRODUCT IN ACCORDANCE WITH EC DIRECTIVE 2002/96/EC.
At the end of its working life, the product must not be disposed
of as urban waste. It must be taken to a special local authority
dierentiated waste collection centre or to a dealer providing this
service.
Disposing of a household appliance separately avoids possible
negative consequences for the environment and health deriving from
inappropriate disposal and enables the constituent materials to be
recovered to obtain significant savings in energy and resources. As a
reminder of the need to dispose of household appliances separately,
the product is marked with a crossed-out wheeled dustbin.
Page 4

4
Important
• Read the user instructions carefully before using the oven
for the first time.
• Follow the instructions for first use of the oven.
• Clean the oven regularly.
• Remove spills as soon as they occur.
• Always use oven gloves when removing shelves and trays
from the oven.
• Do not allow children near the oven when in use.
• Do not allow fat or oils to build up on the oven shelves,
grill pan or oven base.
• Do not place any cooking utensils or plates directly on the
oven base.
• Always grill with the oven door closed.
• Do not grill food containing fat without using the grill pan
grid.
• Do not cover the grill pan grid or the oven walls with
aluminium foil.
• Do not use the oven tray for roasting.
• Do not perform maintenance or cleaning of the oven
without first switching o the electricity supply. If the oven
has recently been used, allow to cool.
• Do not place hot enamel parts in water. Leave them to
cool first.
• Do not allow vinegar, coee, milk, saltwater, lemon or
tomato juice to remain in contact with enamel parts.
• Do not use abrasive cleaners or powders that will scratch
the surface of the enamel or stainless steel.
Page 5

5
• Do not attempt to repair the internal workings of your
oven.
• Do not dismantle any parts without disconnecting the
oven from the mains power supply.
• Do not use the appliance if any part is broken (for example
a glass). Disconnect it from the mains and call CDA
Customer Care.
• The cooling fan may continue to run as long as the oven is
hot, even
• During use the appliance becomes very hot; do not touch
the heating elements inside the oven.
• Children should be overseen so as to ensure that they do
not play with the appliance.
• This appliance is not intended for use by persons
(including children over age 8) with reduced physical
sensory or mental capabilities, or lack of experience and
knowledge, unless they have been given supervision or
instruction concerning use of the appliance by a person
responsible for their safety.
• Children may not perform cleaning and maintenance
unsupervised.
• Do not use harsh abrasive cleaners or sharp metal
scrapers to clean the oven door glass since they can
scratch the surface, which may result in shattering of the
glass.
• Abrasive detergents and steam cleaning equipment
should not be used for cleaning.
• The oven can require increased ventilation on pyrolytic
Page 6

6
programmes. This can be achieved either from an open
window or the use of a fan.
• Before any pyrolytic programme, remove all shelves, trays
and other accessories from the oven and clean up any
major spills to avoid the risk of fire or excessive smoke.
• Do not hang towels or cloths on the oven handle during
pyrolysis.
• Ensure the oven is cool and power to the appliance has
been turned o before removing the door. Failure to do
so could result in electrical shock or burns.
Page 7
7
Before First Use
First use
• The decorative metal finish of this appliance has been coated with a
preservative to protect it during transport and storage. This should
be removed during installation by using a non-abrasive stainless
steel cleaner, and dried thoroughly afterwards. Always follow the
instructions given with the cleaner being used.
• Before using the oven for the first time we recommend that you
clean the oven with soapy water, rinse carefully and then heat
on each of the below programmes at maximum temperature for
the specified time. A slightly unpleasant smell may be produced,
caused by grease remaining on the oven elements from the
production process.
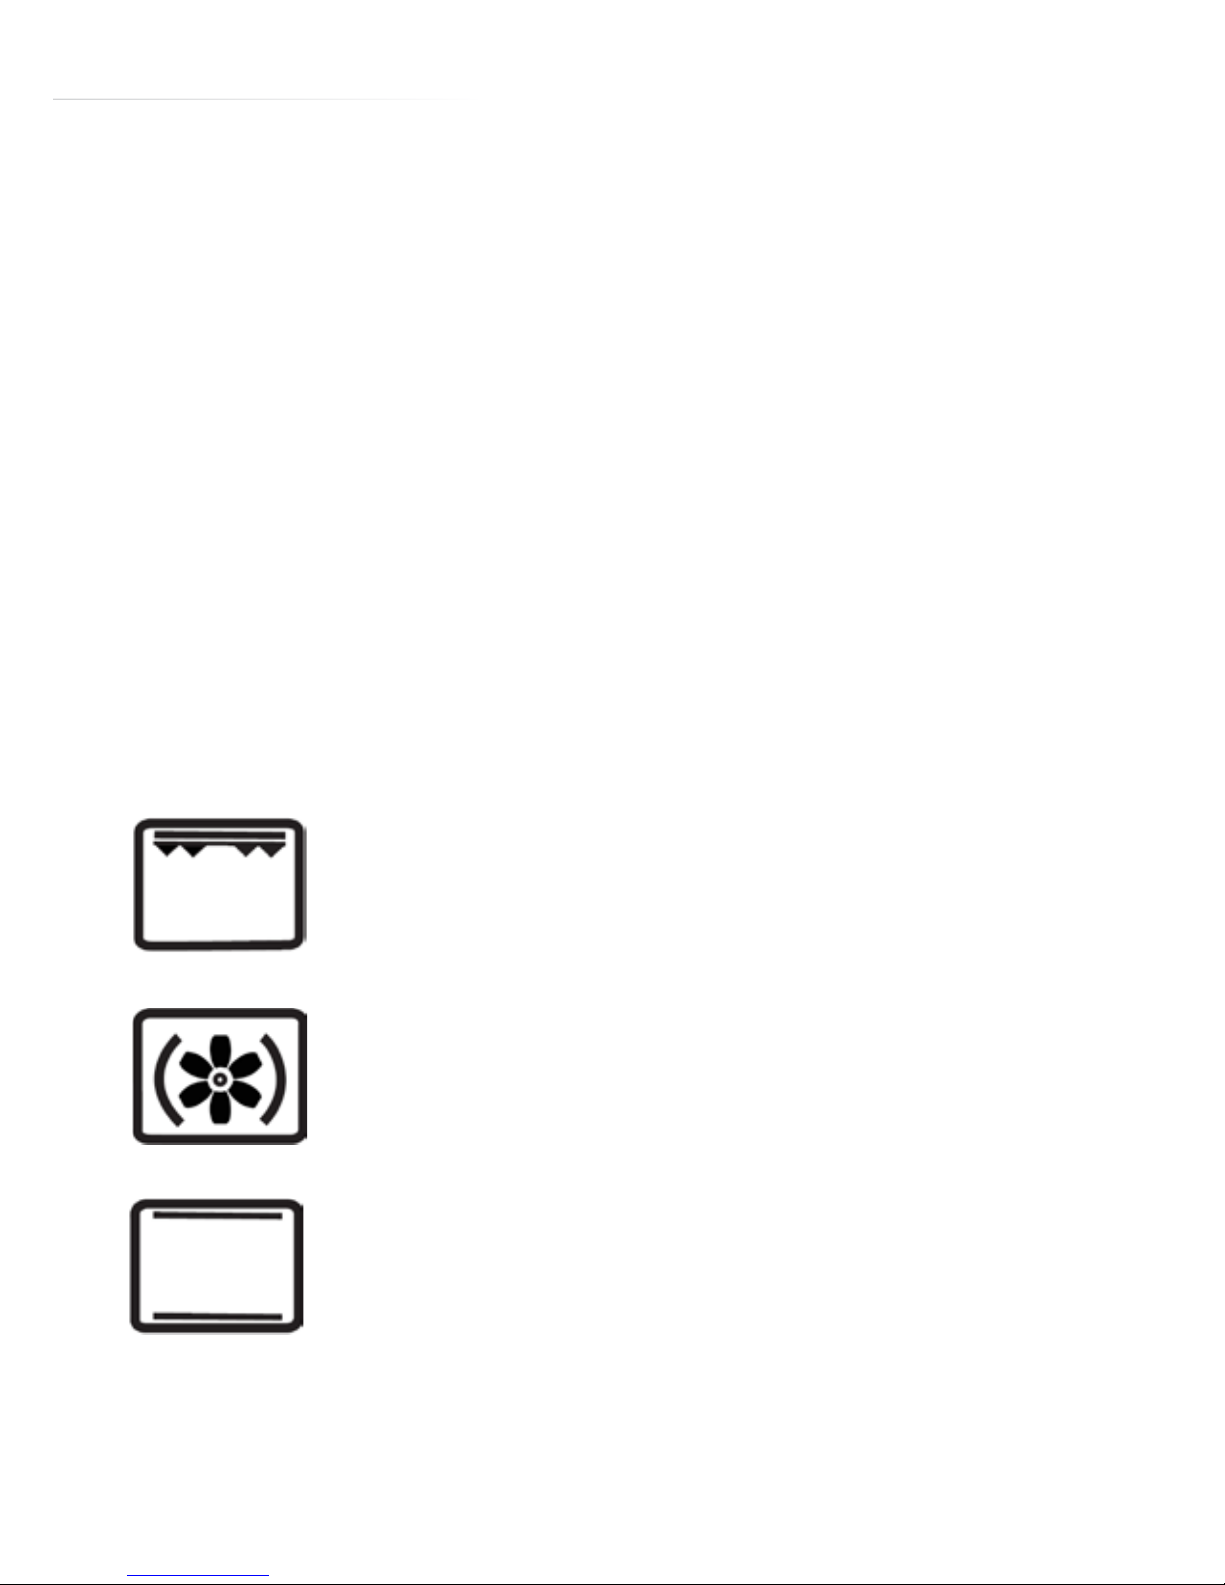
15 minutes full grill.
60 minutes fan oven.
60 minutes conventional oven
Page 8
8
Control Panel
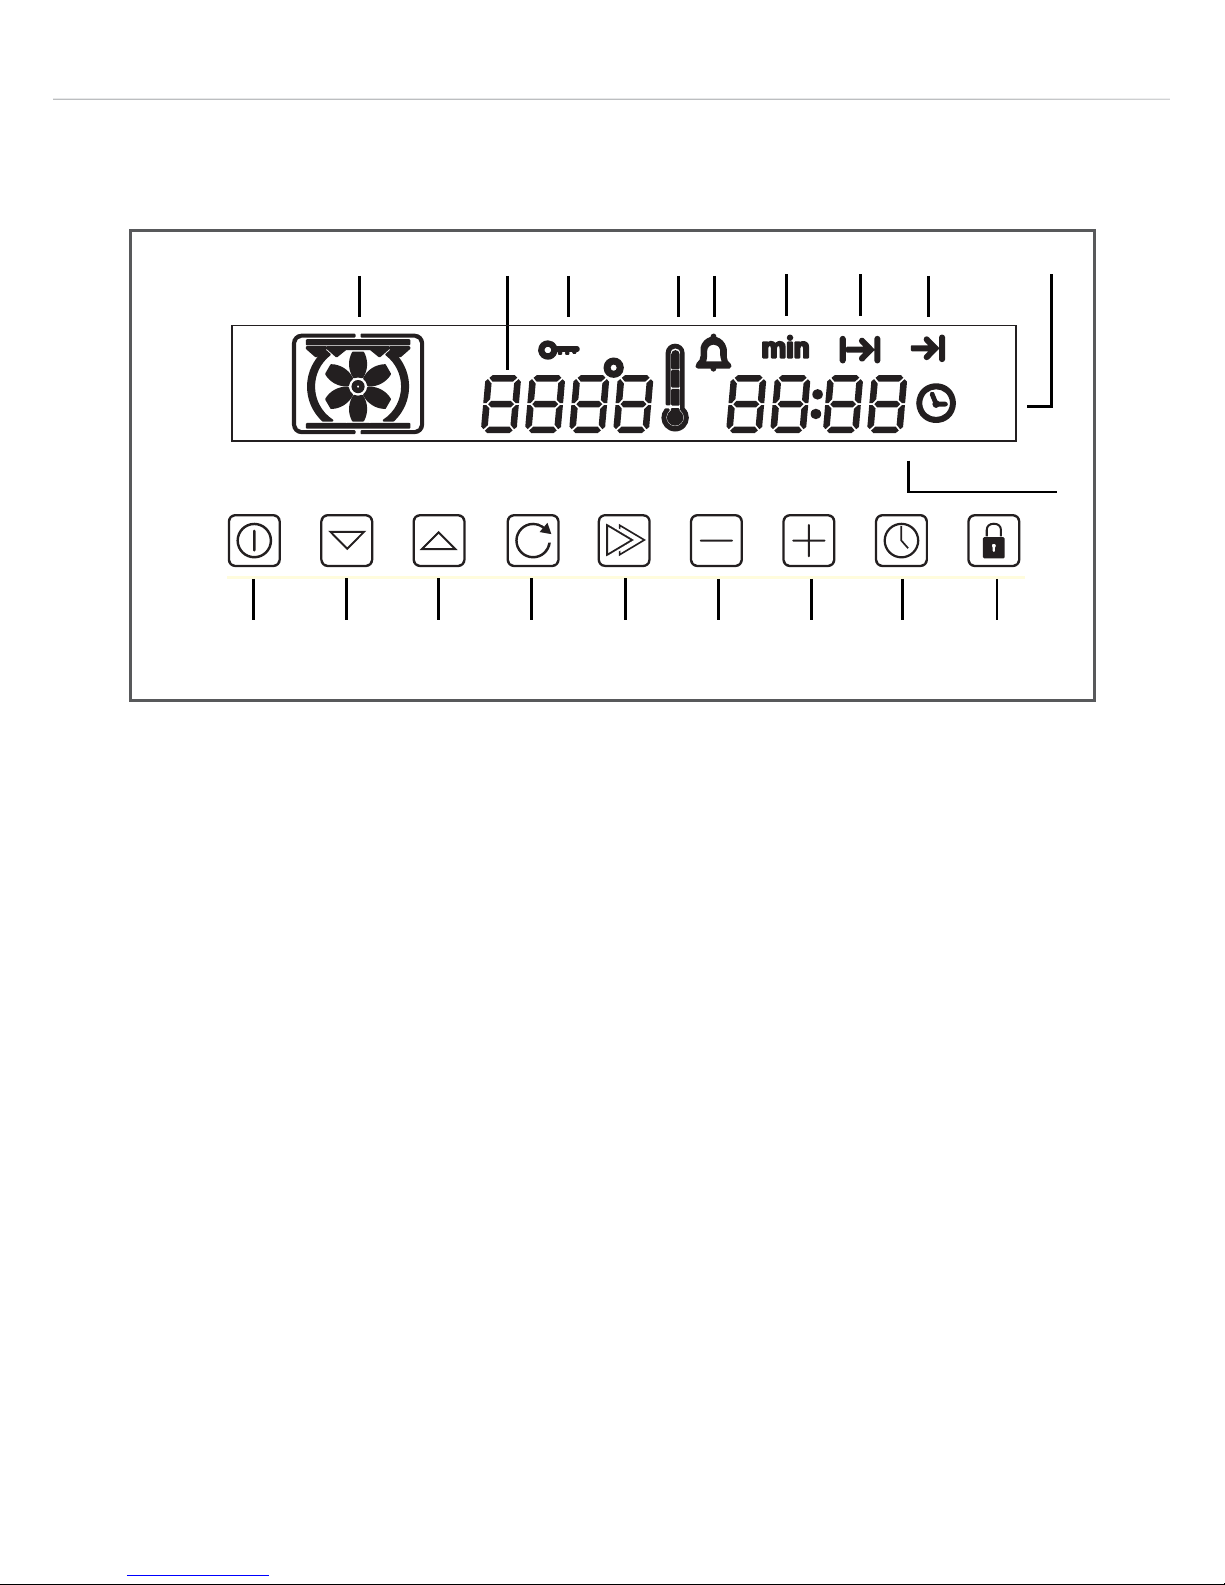
A B C D E F G H I
J
K L M N O P Q R S
A: Function Selection Indicator K: On/O key
B: Temperature display L: Function Down key
C: Key Lock symbol M: Function Up key
D: Thermometer symbol N: Memory key
E: Minute Minder symbol O: Boost/Pyrolytic key
F: Minute symbol P: “-” key
G: Cooking Time symbol Q: “+” key
H: Finish Time symbol R: Clock key
I: Clock symbol S: Key Lock key
J: Time display
Fig. 1
Page 9
9
Using the Touch
Controls
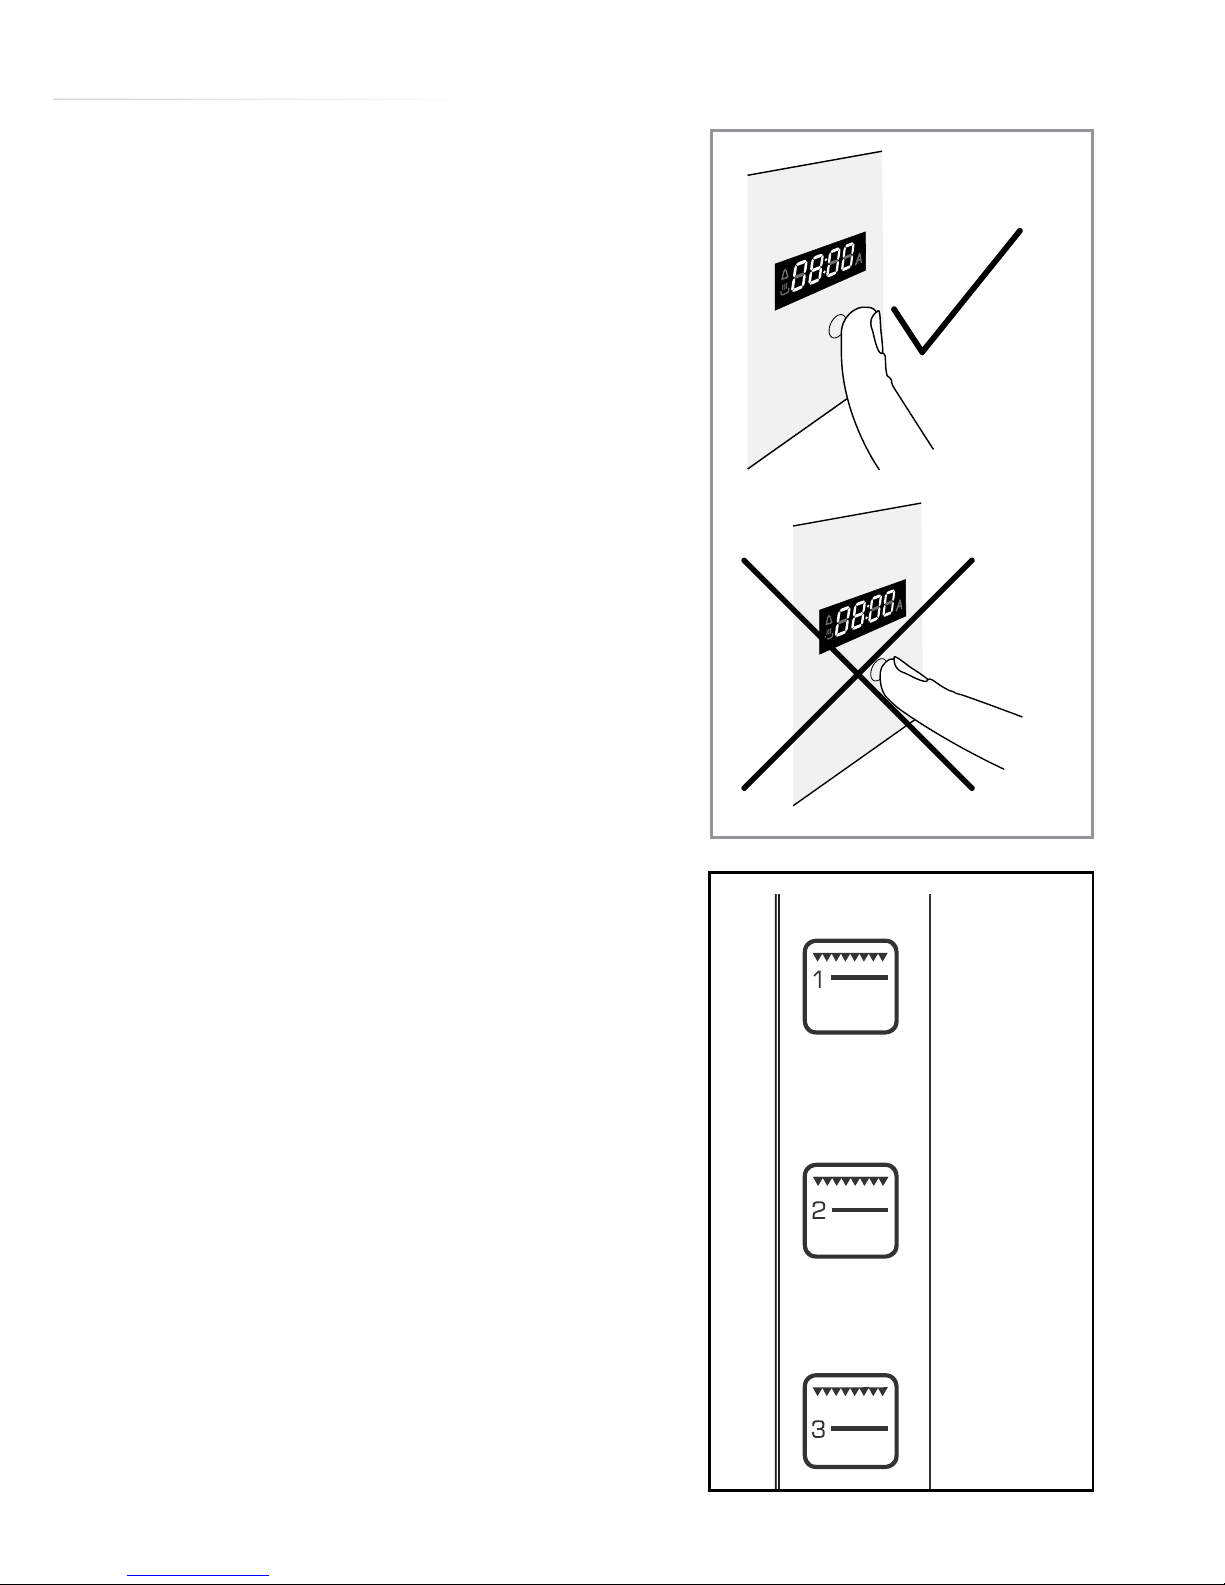
The touch controls should be used with
the flat of your finger, rather than the
fingertip.
Internal shelf positions
The shelves and grill pan can be
inserted into any one of six dierent
positions.
To refer to these they are numbered
from “1” to “6”, with “1” nearest the
grill elements at the top of the oven.
Printing on the inside of the oven
door is designed to remind you of this
numbering (Fig. 3).
Fig. 2
Fig. 3
Page 10

10
Please note:
• This oven has been fitted with a cooling fan to achieve maximum
eciency and to maintain low surface temperatures. The cooling
fan will switch on automatically when the oven switches on. It is
normal for the cooling fan to run for an hour or more after use,
depending on the duration, temperature and type of cooking
programme used.
• The oven light remains on for every cooking function.
• Do not switch o the oven if you have set a programme for
semi-automatic or automatic cooking as this will cancel the
programme.
Oven Controls and Use
To turn the oven on
If the clock display is flashing, either set the clock or wait for approx. 5
seconds until it stops flashing.
Touch and hold the “On/O” key
until the oven gives a long beep.
The function selection indicator on the display illuminates.
To turn the oven o
Touch and hold the “On/O” key
until the oven gives a long beep.
Page 11
11
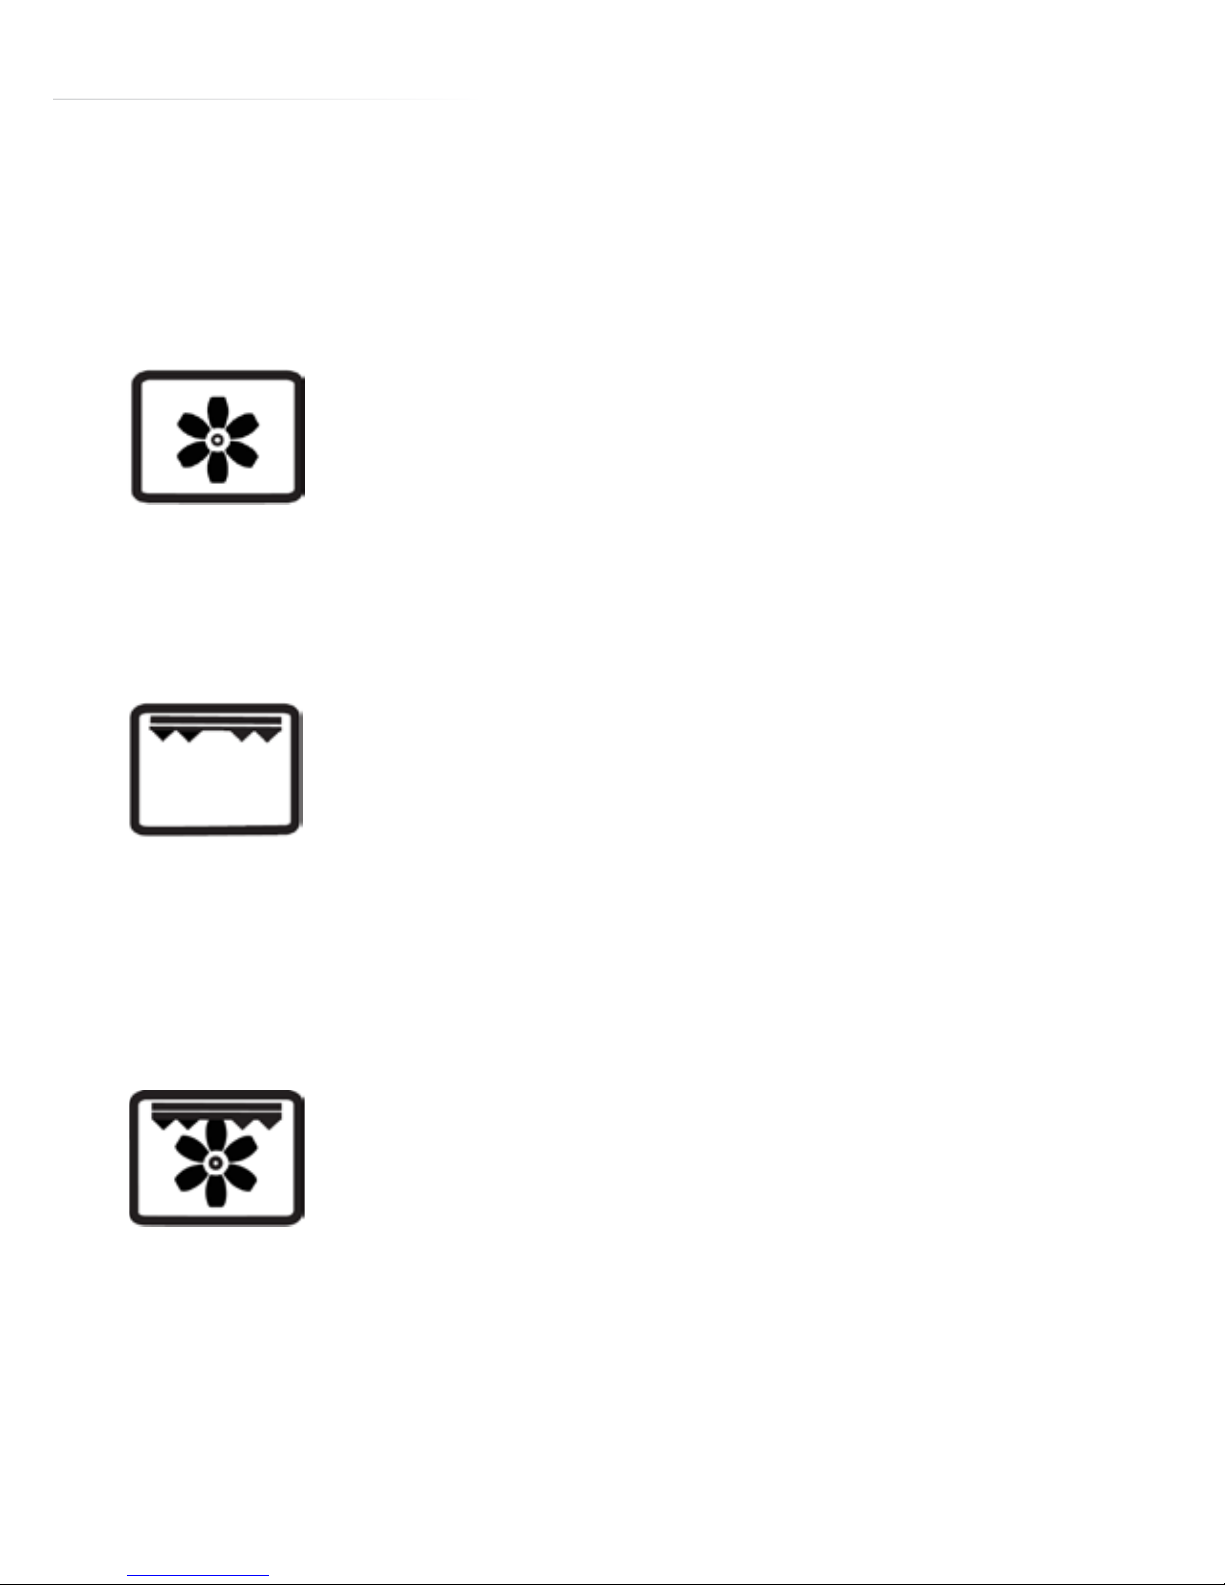
While the “Function Selection Indicator” is showing on the display,
the cooking functions are selected by using the “Function Down”
and “Function Up” keys. Going downward from the standby
position, the possible settings are:-
Defrost - Shelf position 3, 4 or 5 - Default 50°C
Using the fan and mild heat, this oven function circulates
the air around the oven cavity, speeding up the natural
defrost process. The temperature can be set between
20°C and 60°C in 1°C increments. The temperature can
be adjusted at any time by using the “+” or “-” keys.
Full Grill - Grill pan position 1, 2 or 3 - Default 180°C
This function radiates the heat from the grill element
and the top element. This fully temperature variable
grill is ideal for grilling a family meal. The temperature
can be set between 50°C and 250°C in 5°C increments.
The temperature can be adjusted at any time by using
the “+” or “-” keys.
Fanned Grill - Grill pan position 1, 2 or 3 - Default
180°C
This function uses the fan to circulate the heat from the
grill element around the food. The temperature can be
set between 50°C and 250°C in 5°C increments. The
temperature can be adjusted at any time by using the
“+” or “-” keys.
Page 12
12
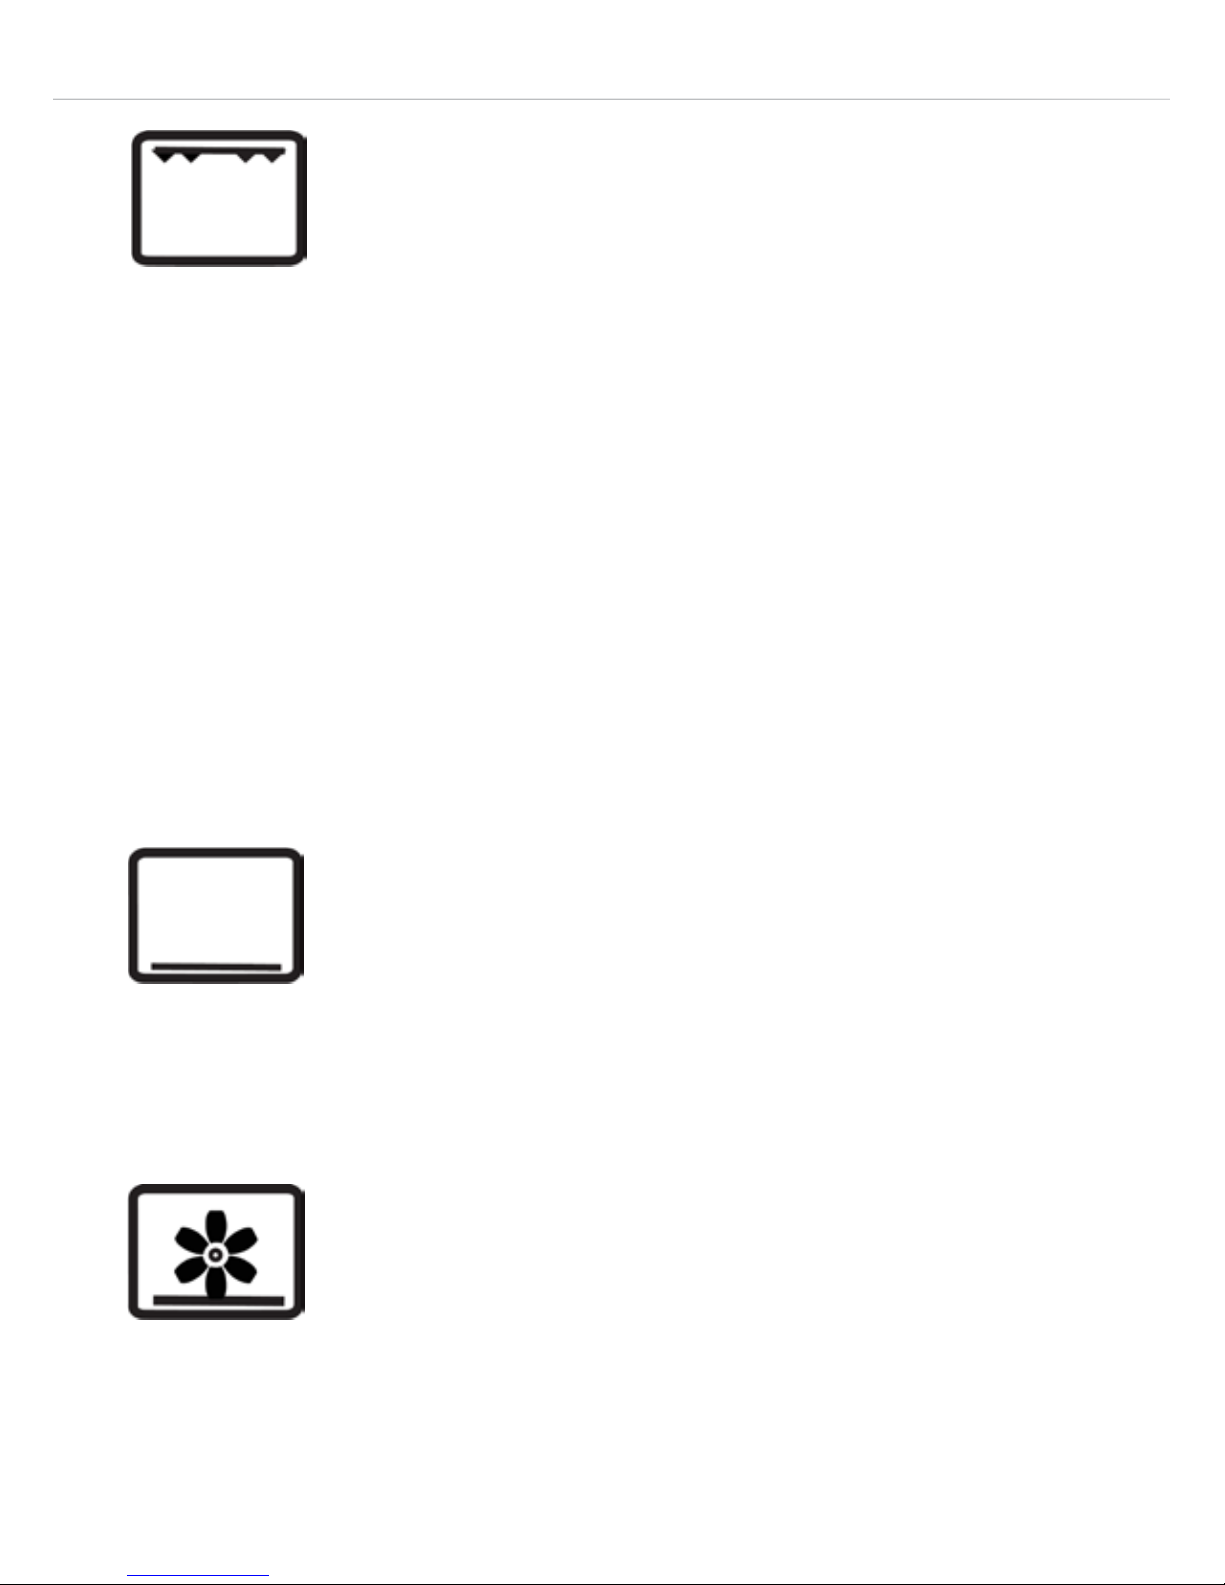
Half Grill - Grill pan position 1, 2 or 3 - Default 180°C
This grill function is the same as the full grill, but only
uses the centre of the element so is ideal for grilling
a small amount of food. The temperature can be set
between 50°C and 250°C in 5°C increments. The
temperature can be adjusted at any time by using the
“+” or “-” keys.
For each grill function please note:
• Always grill with the oven door closed.
• Put the grill pan as close to the grill as possible.
• Do not grill for more than 30 minutes at a time.
• Preheat the grill for up to five minutes with the oven door
closed.
Warming Oven - Shelf position 5 or 6 - Default 180°C
The warming oven programme allows you to prove
dough and bake blind, using just heat from below. The
temperature can be set between 50°C and 250°C in 5°C
increments. The temperature can be adjusted at any
time by using the “+” or “-” keys.
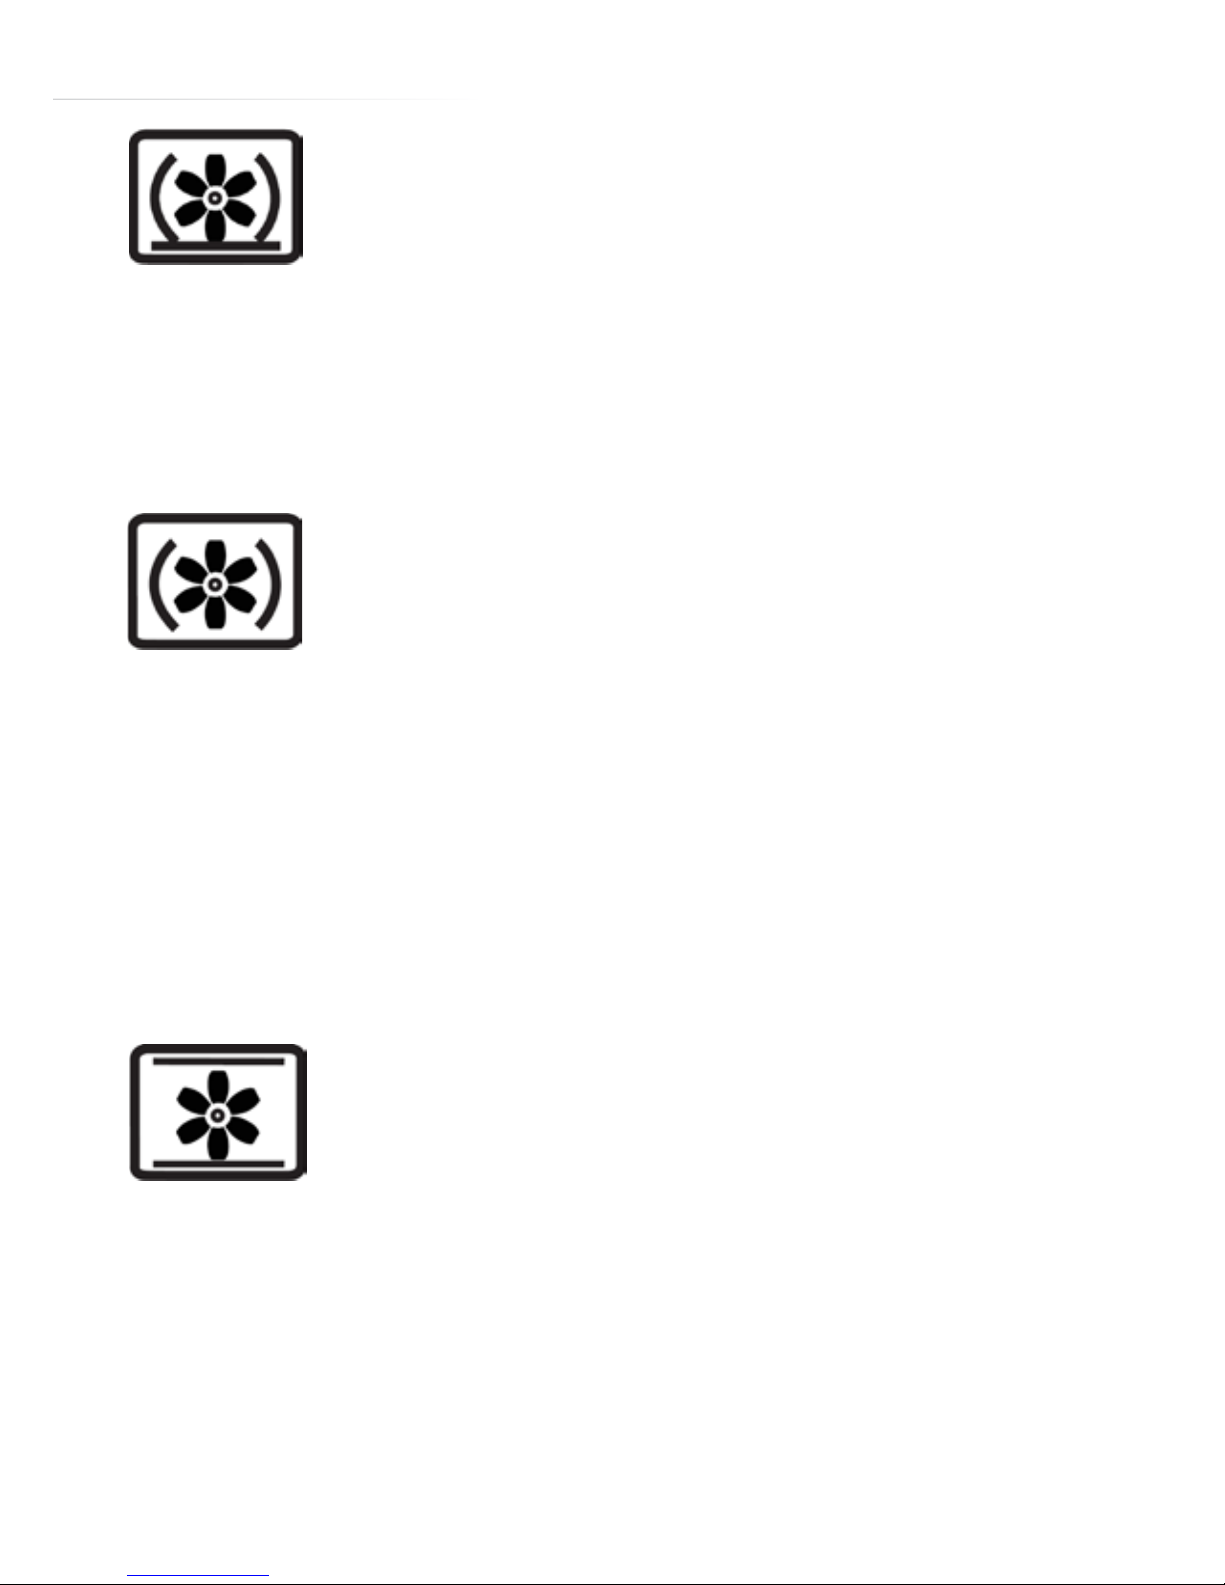
Fan With Lower Heat - Shelf position 5 or 6 - Default
180°C
This oven programme is ideal for one-pot dishes such
as casseroles. The temperature can be set between
50°C and 250°C in 5°C increments. The temperature
can be adjusted at any time by using the “+” or “-” keys.
Page 13
13
Fan Cooking With Lower Heat - Shelf position 3 or 4 -
Default 180°C
This programme uses the fan element to supplement
the heat from the oven base and is ideal for cooking
pizzas. The temperature can be set between 50°C
and 250°C in 5°C increments. The temperature can be
adjusted at any time by using the “+” or “-” keys.
Fan Oven - Shelf position 4 or 5 - Default 180°C
Using the circular element and the fan, this cooking
function blows the air into and around the oven cavity.
Temperatures are achieved quicker, reducing or even
removing the need for preheating. Both cooking
temperatures and cooking times can be reduced for
a more energy ecient cooking programme. The
temperature can be set between 50°C and 250°C in 5°C
increments. The temperature can be adjusted at any
time by using the “+” or “-” keys.
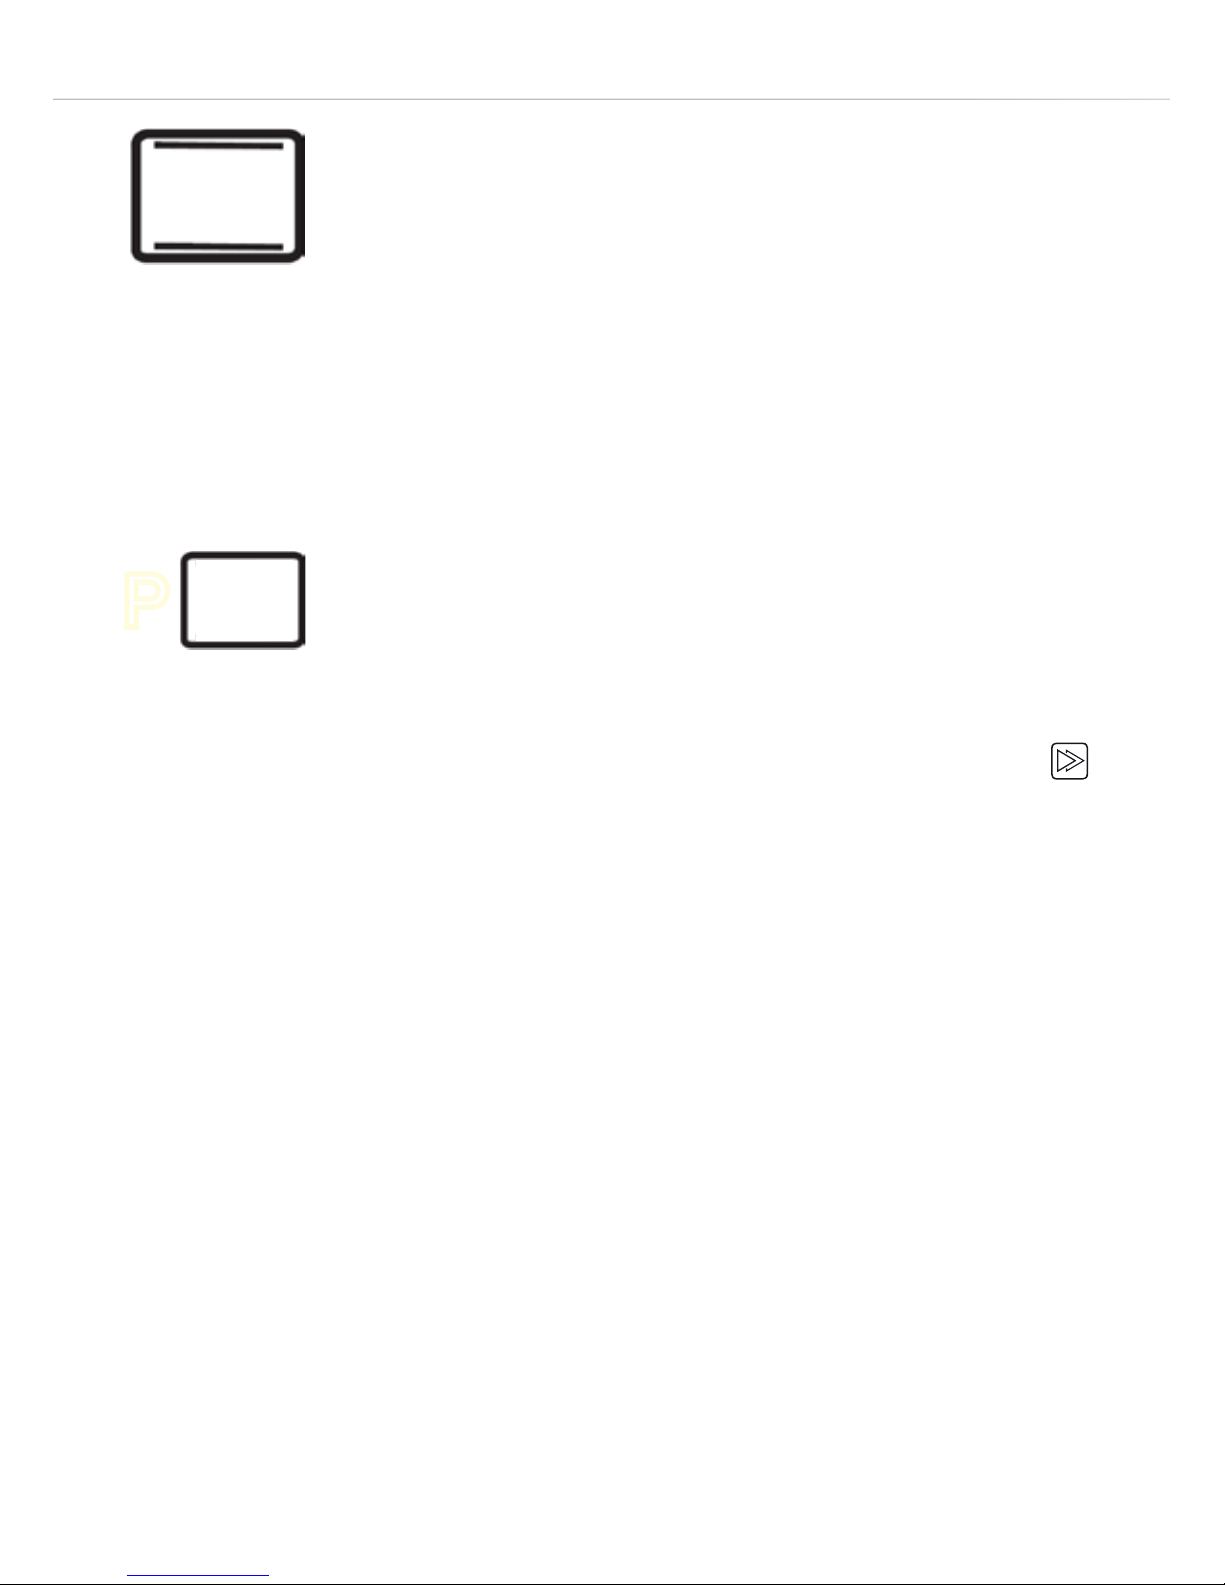
Fan Assisted Oven - Shelf position 3, 4 or 5 - Default
180°C
Using the top and bottom elements and the fan, this
cooking function distributes the heat around the oven to
give an even temperature throughout. The temperature
can be set between 50°C and 250°C in 5°C increments.
The temperature can be adjusted at any time by using
the “+” or “-” keys.
Page 14
14
Conventional Oven - Shelf position 4 or 5 - Default
180°C
This function uses the upper and lower heating elements.
Natural convection creates a perfect cooking zone in the
centre of the oven, ideal for dark fruit cakes and pastries.
The temperature can be set between 50°C and 250°C
in 5°C increments. The temperature can be adjusted at
any time by using the “+” or “-” keys.
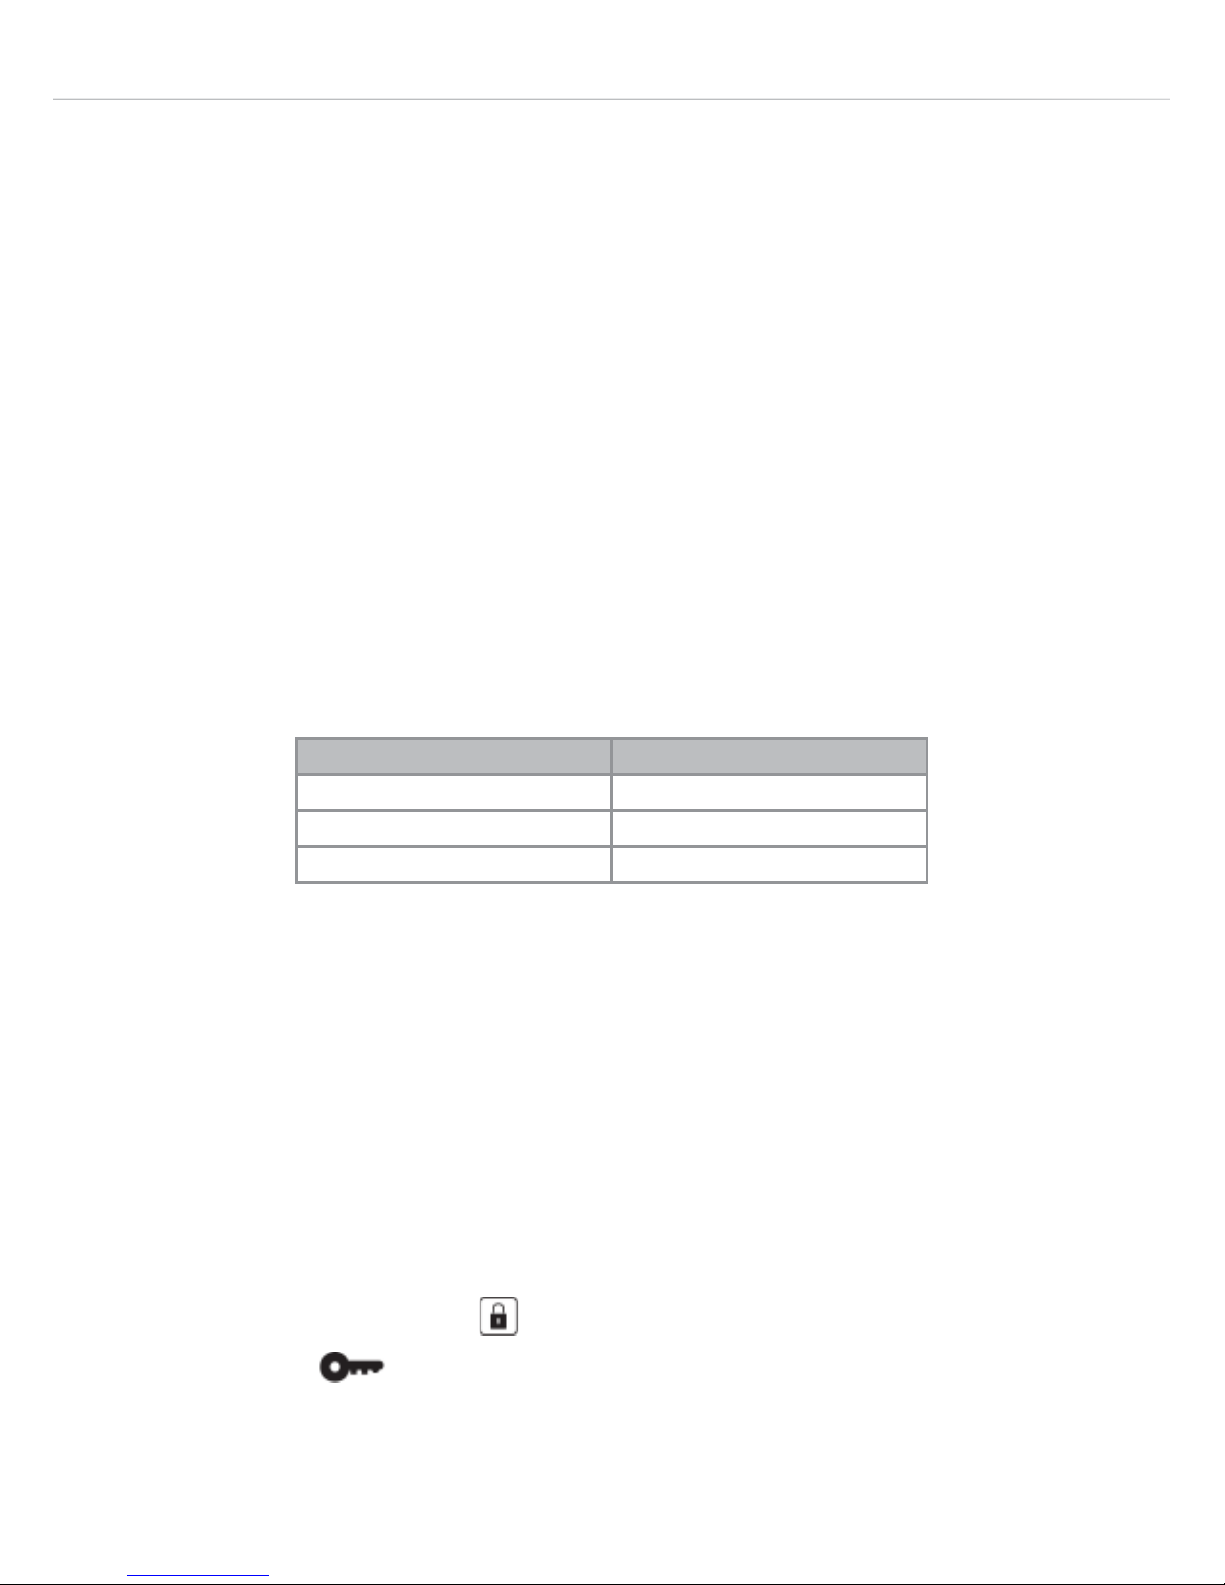
Pyrolytic Oven - No Shelves - Default 475°C
NOTE: This function has an added safety feature to
prevent it from being selected accidentally. To run the
pyrolytic function, select “Pyrolytic” on the “Function
Selector Display”, then touch the “Boost/Pyrolytic” key
for 5 seconds to confirm the selection.
This oven can clean itself by a process known as
pyrolysis, heating the cavity to a temperature of
approximately 475˚C. This will burn o the residue from
spattering and spillages caused by cooking.
Pyrolytic programmes should be used when the oven
smokes during preheating or cooking or if the oven
smells even when cold. It is not necessary to run a
pyrolytic programme after every use of the oven.
Do not wait until the oven is coated in grease to run a
pyrolytic programme.
The smoke produced by pyrolysis is broken down by
passing through a catalyser.
P
Page 15

15
Please note:
Before any pyrolytic programme, remove all shelves, trays and
other accessories from the oven and clean up any major spills to
avoid the risk of fire or excessive smoke.
During the pyrolytic process the oven exterior including the door
will become hotter than during normal cooking. Children and pets
should be kept away from the oven. Do not hang towels or cloths
on the oven handle during pyrolysis.
The programme immediately locks the door and starts the cooling
fan at a slow setting; the cooling fan speed increases to its maximum
when the oven heat builds up.
For each cooking function please note:
• After selecting a cooking function and temperature the display
flashes for 5 seconds, then when it stops flashing the function starts
to run.
• The slowly raising animation of the “Thermometer” symbol means
that the oven is heating up.
Booster Function
The oven is equipped with a booster function to heat it up to
operating temperature as fast as possible.
• After selecting the oven function and setting the temperature, as
above, touch the “Boost/Pyrolytic” key
briefly.
• The booster function works with all cooking functions, but is not
required with the pyrolytic function.
• When the booster is operating, all three sections of the
“Thermometer” symbol
flash together.
Page 16
16
• The booster will continue until the oven reaches its set temperature,
then the oven will automatically return to normal heating.
Important: Do not put any food in the oven while the booster is
operating, wait until the oven has reached temperature then insert the
food containers carefully.
Auto Cut-O Feature
There is an auto cut-o feature on all cooking functions for added
safety. Whenever the oven is running it will automatically switch o
after a set time, depending on the temperature setting.
Key Lock
The oven is equipped with a key lock to lock the controls. This can
be used when the oven is o or during cooking.
To switch on the key lock
Touch the “Key Lock” key for approximately 5 seconds, until the”Key
Lock” symbol illuminates and the oven beeps to confirm the key
lock is switched on.
Selected Temperature Time to Cut-O (hours)
20 - 120°C 24
125 - 200°C 6
205 - 250°C 4
Page 17
17
To switch o the key lock
Touch the “Key Lock” key for approximately 5 seconds, until the”Key
Lock” symbol goes out and the oven beeps to confirm the key
lock is switched o.
When the key lock is on, the symbol flashes if any key is touched.
Key lock after power outage
The key lock can be set to do one of two things after the power to the
oven is cut then re-instated:-
• Key lock automatically unlocks after power outage
• Key lock remains activated after power outage
To set your chosen preference:
• When the oven is in standby mode, touch and hold the “Memory”
key
for 5 seconds to enter settings mode.
• The display will show “1 ln 1” or “1 ln 0”. In either case the first digit
is the option selected for setting. “1” is the option for setting the
child lock preference.
• Use the “+” or “-” keys to select one of the settings for option 1:
• Touch the “Memory” key
briefly to confirm the setting.
Display Shows Option Feature
1 ln 0 The key lock unlocks after power o and on again.
1 ln 1 The key lock remains activated after power o and on again.
Page 18

18
Programming the Oven
Memory Function
The memory function can be used to save a setting that you frequently
use.
To save a setting into memory
• Select the oven function and temperature.
• While the display is still flashing, touch and hold the “Memory” key
until the oven beeps.
To run the stored function from memory
• Use the On/O key to switch the oven on.
• Touch the “Memory” key
to call up and run the function.
Note: If a new setting is saved into memory it automatically replaces
the previous one in there.
Setting the clock
The clock is preset to 00:00, and will revert to this after a power
failure.
To change the clock time
• Ensure the oven is in standby mode.
• Touch the “Clock” key
twice, so the “Clock” symbol
flashes.
• While the “Clock” symbol
is still flashing, use the “+” or “-” keys to
scroll the display to the required time.
• While the “Clock” symbol
is still flashing, touch the “Clock” key
once to confirm the setting.
Page 19
19
The minute minder
The minute minder can be used when the oven is switched on or o.
It can be set for up to 23 hours and 55 minutes.
To set the minute minder
• Touch the “Clock” key once so the “Minute Minder” symbol
flashes.
• While the “Minute Minder” symbol
is still flashing, use the “+” or
“-” keys to scroll the display to the required countdown time.
• After approx. 5 seconds the display stops flashing and the
countdown starts.
• When the time has elapsed, the oven will beep for approx. 90
seconds. The beep can be turned o by touching the “+” or “-” key.
Please note:
• At the end of the countdown, the minute minder will not switch o
the oven. Remember to turn o the oven manually.
• While the “Minute” symbol
is lit the display shows minutes and
seconds: While the “Minute” symbol is not lit the display shows
hours and minutes.
Setting the cooking time
The oven can be set to switch o automatically at a preset time up to a
maximum of 23 hours and 55 minutes from when you set it.
To set a cooking time:
• Select the oven function and temperature.
• While the display is still flashing, touch the “Clock” key
repeatedly
until the “Cooking Time” symbol
lights up.
Page 20

20
• While the “Cooking Time” symbol is still flashing, use the “+” or “-”
keys to scroll the display to the required cooking time.
• After approx. 5 seconds the display stops flashing and the cooking
starts.
• When the time has elapsed, the oven will turn o and beep for
approx. 60 seconds. The beep can be turned o by touching the
“+” or “-” key.
Please note:
At the end of the cooking programme, remember to turn o the oven
manually.
Automatic cooking
After the cooking time has been set, the finish time can also be set so
the cooking starts and finishes automatically.
To set an automatic cooking programme:
• Select the oven function and temperature.
• Set the cooking time required by following the instructions in “Setting
the cooking time” above.
• While the display is still flashing, touch the “Clock” key
repeatedly
until the “Finish Time” symbol
lights up.
• While the “Finish Time” symbol is still flashing, use the “+” or “-” keys
to scroll the display to the required finish time.
• After approx. 5 seconds the display stops flashing and the cooking
starts.
• When the time has elapsed, the oven will turn o and beep for
approx. 60 seconds. The beep can be turned o by touching the
“+” or “-” key.
Page 21
21
Please note:
At the end of the cooking programme, remember to turn o the oven
manually.
Setting the clock display illumination
The display for the clock can be set either to be illuminated all the time
or to switch o 20 seconds after the last key is touched. To set this:
• When the oven is in standby mode, touch and hold the “Memory”
key
for 5 seconds to enter settings mode.
• The display will show “1 ln 1” or “1 ln 0”. In either case the first digit is
the option selected for setting.
• Use the “Function Down”
and “Function Up” keys to choose
setting option “2”. The display will show “2 ln 1” or “2 ln 0”.
• Use the “+” or “-” keys to select one of the settings for option 2:
• Touch the “Memory” key
briefly to confirm the setting.
IMPORTANT:
When correctly installed, your product meets all safety
requirements laid down for this type of product. However, special
care should be taken around the rear or the underneath of the
appliance as these areas are not designed or intended to be
touched and may contain sharp or rough edges that could cause
injury.
Display Shows Option Feature
2 ln 1 The clock is lit all the time.
2 ln 0 The clock illumination switches o after 20 seconds
Page 22

22
Care and Maintenance
IMPORTANT
• Before any maintenance is started involving electrical parts, the
appliance must be disconnected from the power supply.
• If the oven has been in use, let the oven cavity and the heating
elements cool down before attempting any maintenance.
• Steam cleaners must not be used when cleaning this appliance.
• Once care and maintenance is complete, ensure that all parts are
correctly replaced before using the oven.
The oven exterior
As the oven has a stainless steel or enamel surface, you should use a
nonabrasive cleaner. Any abrasive cleaner (including Cif) will scratch
the surface and could erase the control panel markings. Stainless
steel can be eectively cleaned by simply using a dilute solution of
water and mild detergent and drying to a shine with a clean cloth.
Proprietary stainless steel cleaners are available. We recommend the
CDA E-Cloth available from the CDA Sales Team for cleaning stainless
steel surfaces as this has been designed to prolong the finish of your
appliance.
Inside of Oven
The oven should always be cleaned after use when it has cooled
down.
The cavity should be cleaned using a mild detergent solution and
warm water.
Page 23
23
Suitable proprietary chemical cleaners may be used after first
consulting with the manufacturer’s recommendations and testing a
sample on a small area of the oven cavity. Abrasive cleaning agents
or scouring pads/cloths should not be used on the cavity surface.
Oven door glass
As the oven door is triple glazed, the inner glasses may be removed
for cleaning both inner glasses and the inside face of the outer glass.
You may find it easier to remove the complete door to dismantle the
glass but it is not essential to do so: Door removal is explained on the
next page.
To remove the inner glass
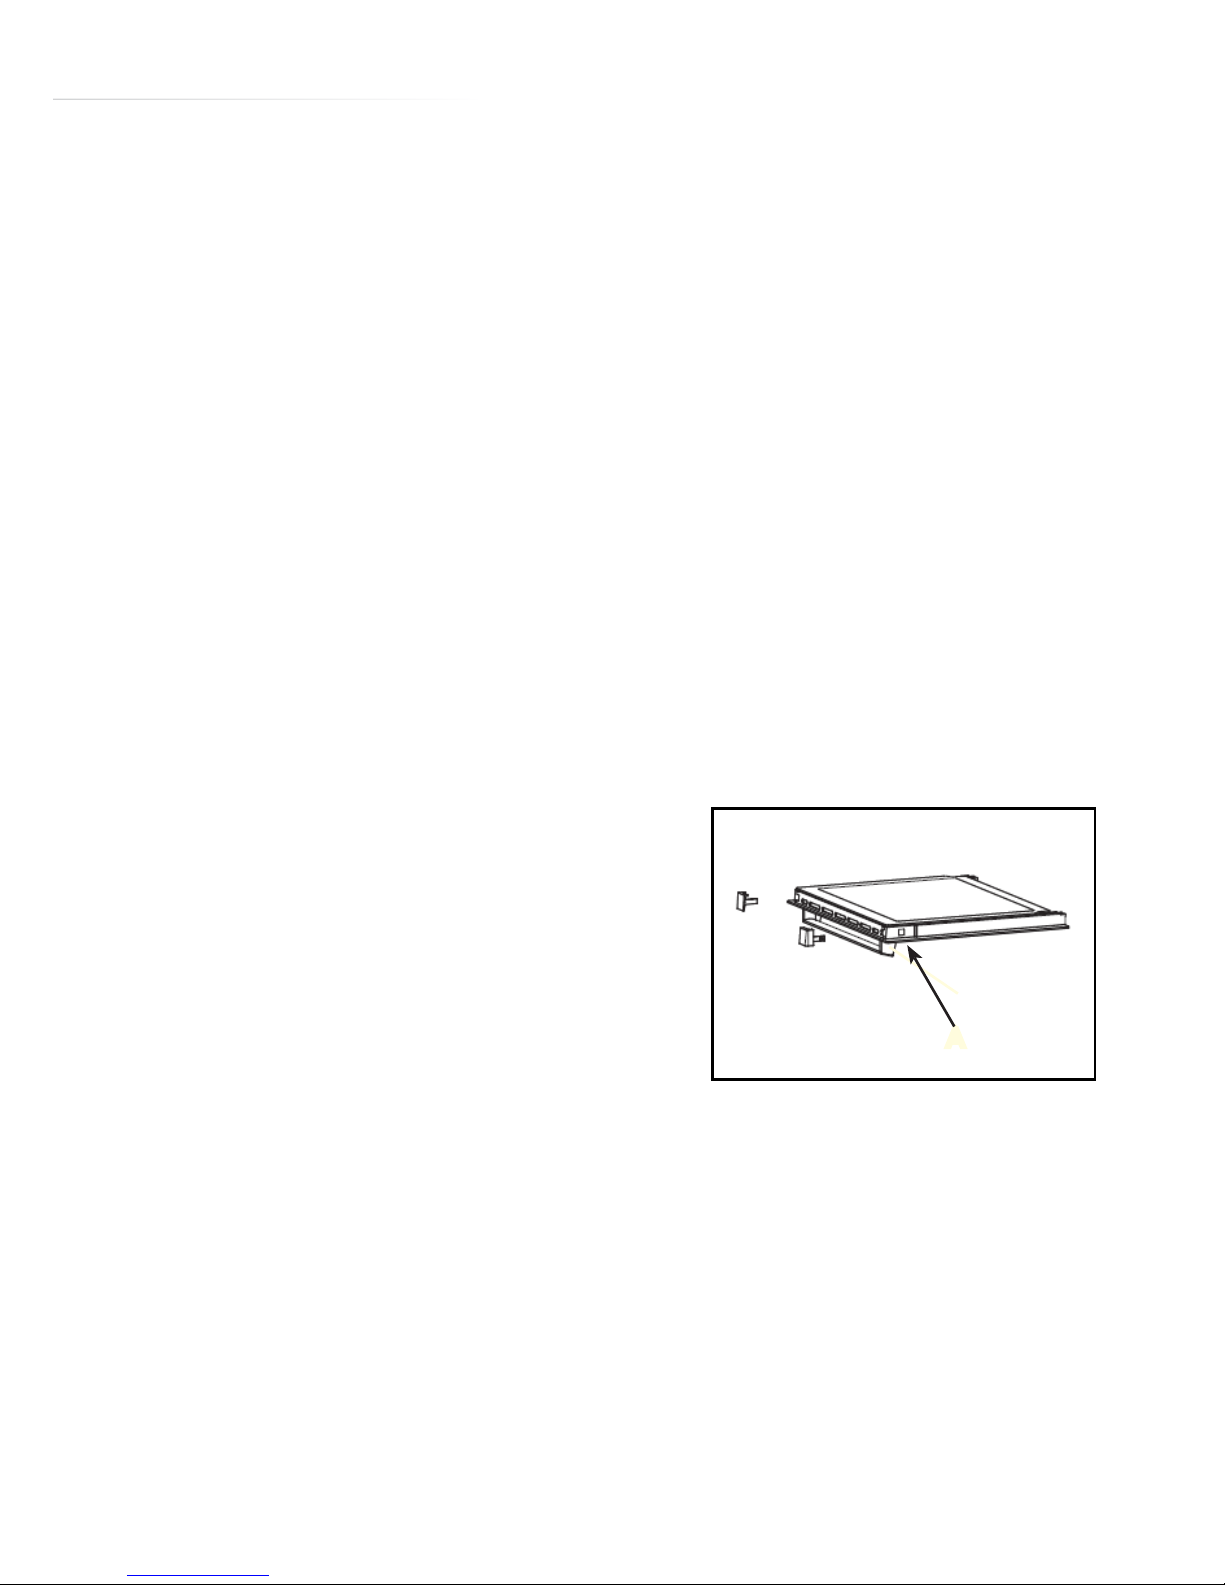
• Remove both door top corner pieces; these can be removed
by pressing the buttons shown at
position “A” in fig. 4, then sliding the
corner pieces toward you.
• Lift the edge of the glass nearest to
you slightly then slide it from its lower
clips.
• After cleaning the glass, replacement
is a reversal of the removal process.
• Take care to assemble the glass the
right way around, the printed surface
must be visible when the door is
opened.
A
Fig. 4
Page 24
24
Oven Door
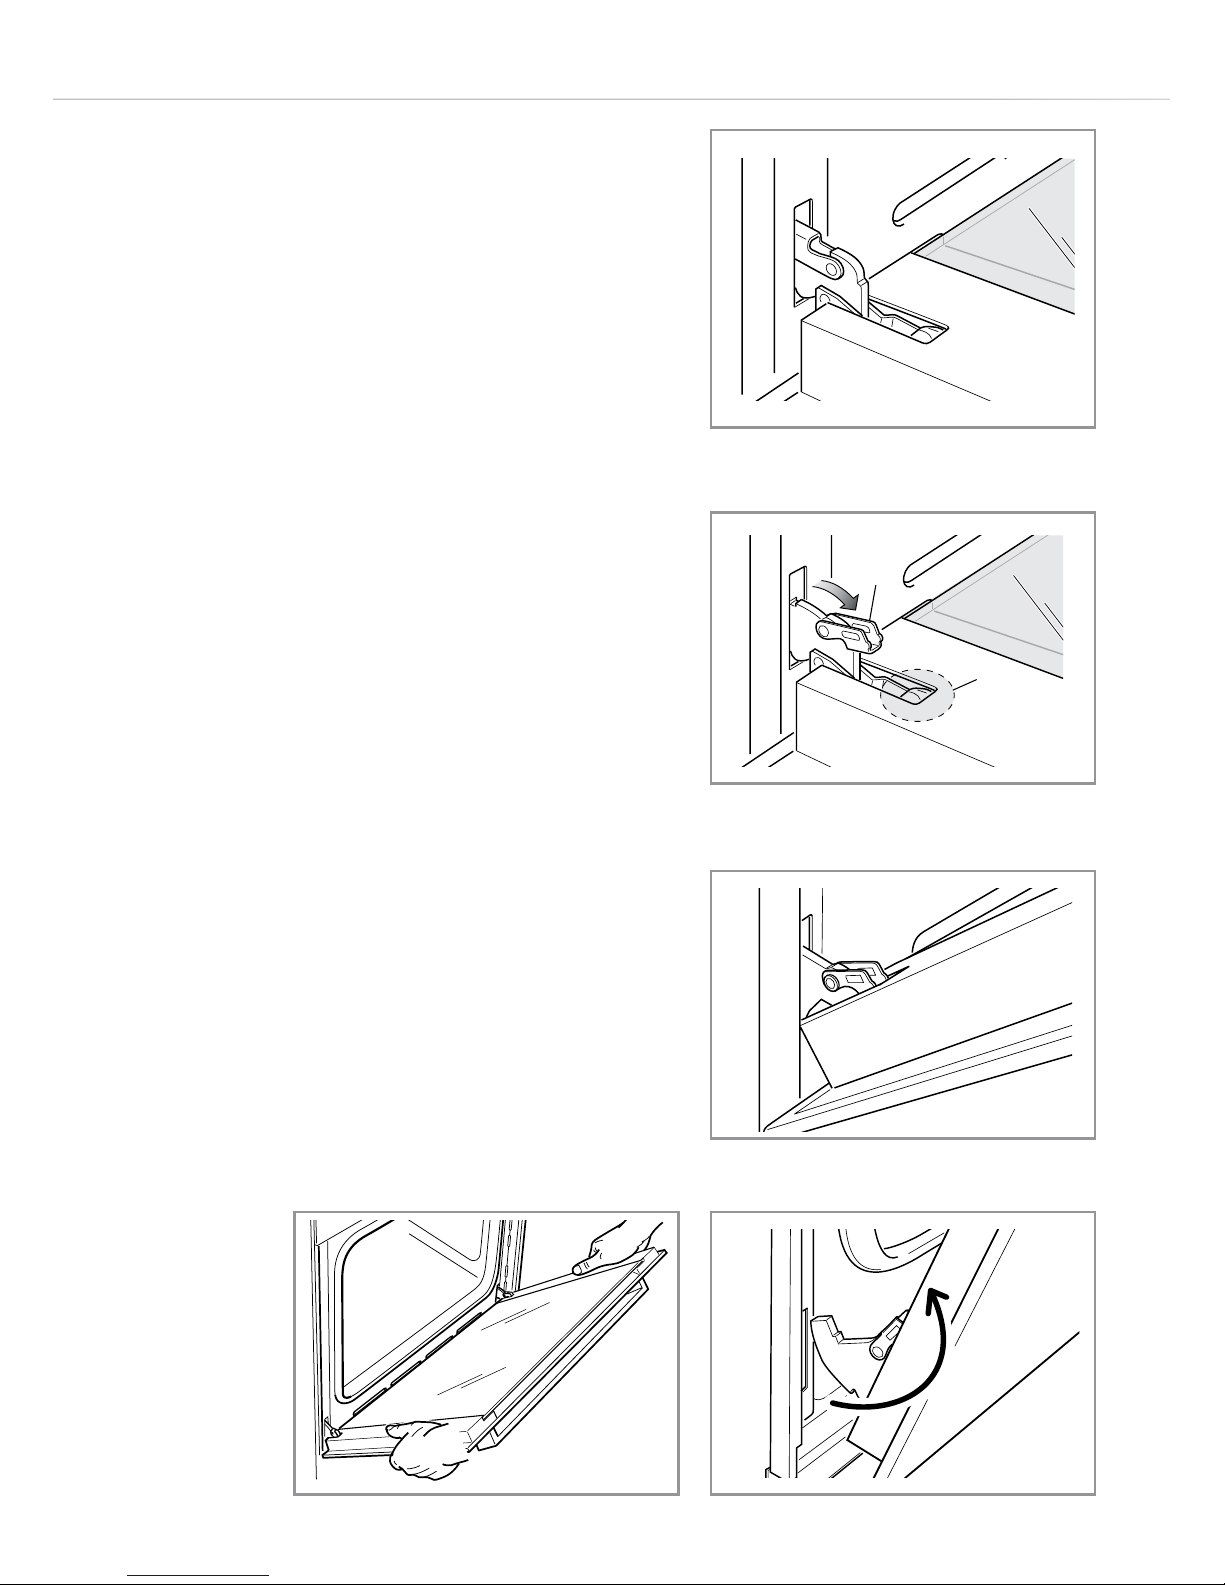
Removing the Oven Door
The oven door can easily be removed
as follows:
• Open the door to the full extent (Fig.
5).
• Open the lever “A” completely on the
left and right hinges (Fig. 6).
• Hold the door as shown (Fig. 9).
• Gently close the door (Fig. 7) until left
and right hinge levers “A” are hooked
to part “B” of the door (Fig. 6).
• Withdraw the hinge hooks from their
location following arrow “C” (Fig. 8).
• Rest the door on a soft surface.
• To replace the door, repeat the above
steps in reverse order.
Fig. 5
Fig. 7
Fig. 8
B
A
Fig. 6
C
Fig. 9
A
B
C
Page 25
25
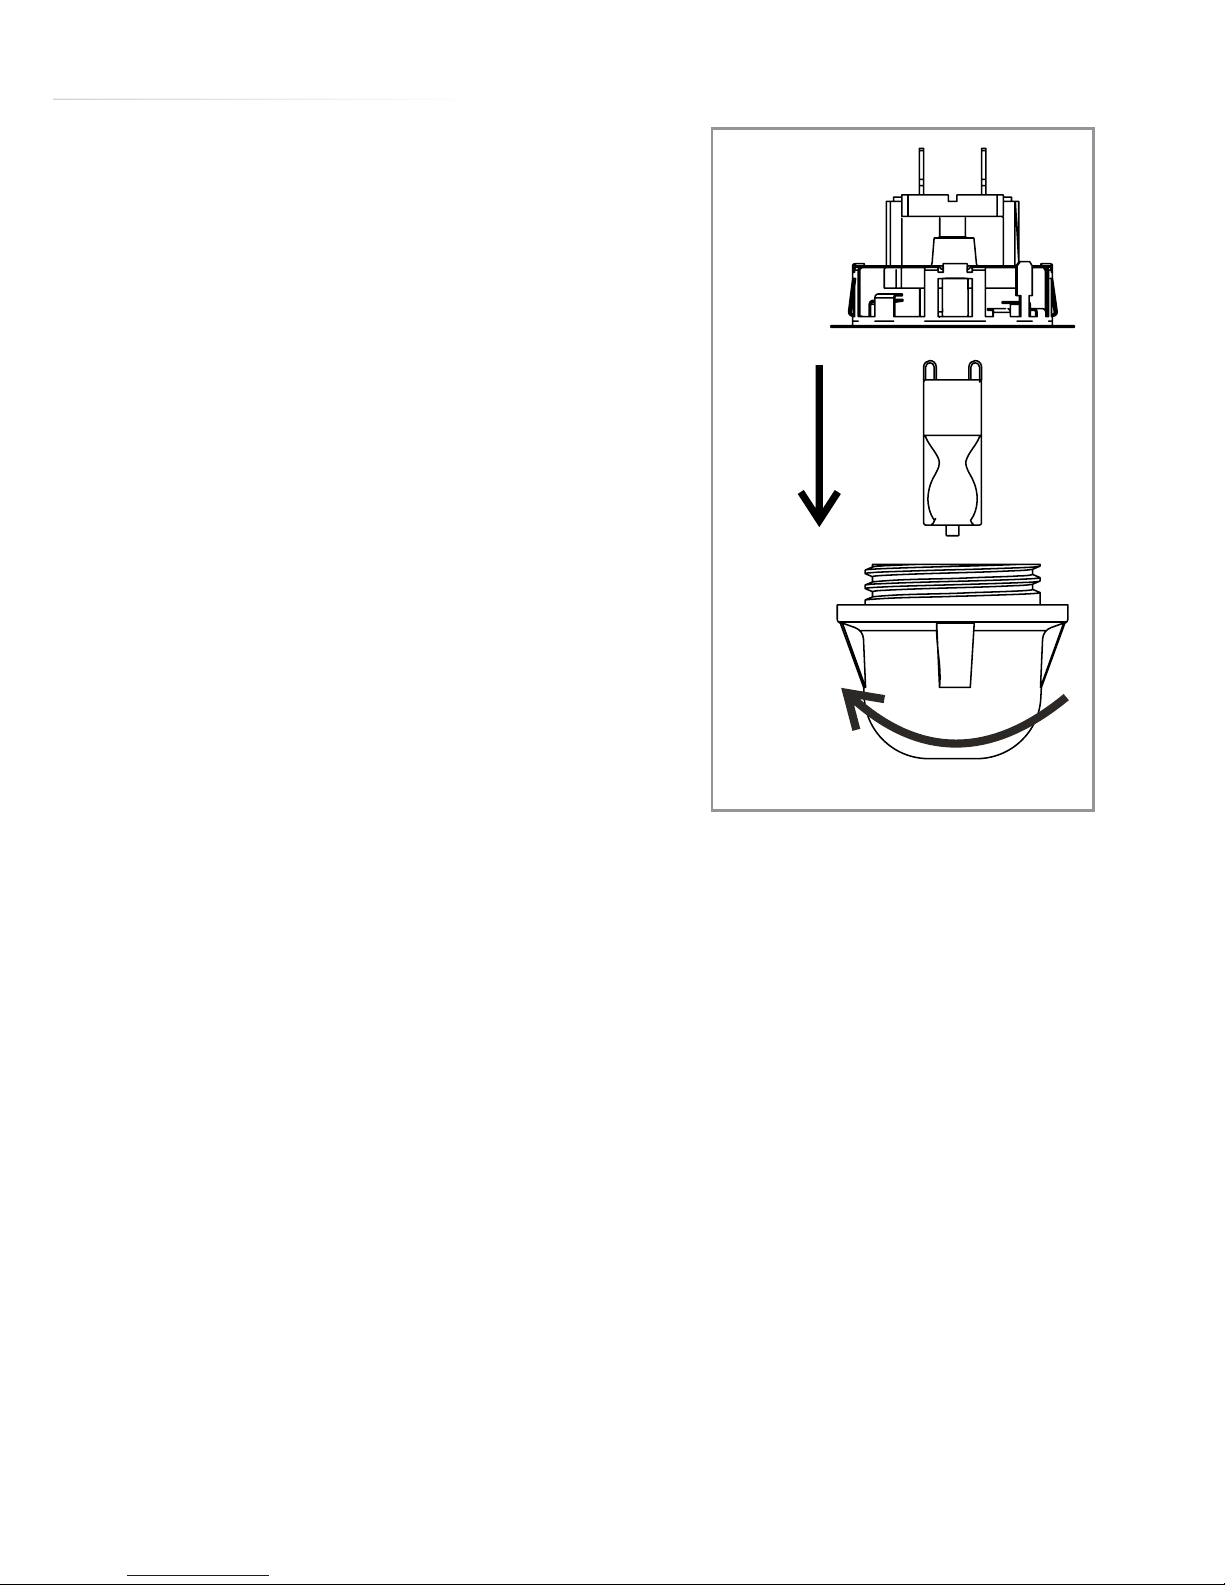
Changing the bulb
Unscrew the protective cover. We
recommend that you wash and dry the
glass cover at this point.
Carefully remove the old bulb and
insert the new bulb suitable for high
temperatures (300ºC) having the
following specifications: 230-240V,
50Hz, 25W, G9 fitting.
Refit the protective cover.
IMPORTANT
• Never use screwdrivers or other
utensils to remove the light cover.
This could damage the enamel of the oven or the lamp holder.
Remove only by hand.
• Never replace the bulb with bare hands as contamination from
your fingers can cause premature failure. Always use a clean
cloth or gloves.
Please note:
The bulb replacement is not covered by your guarantee.
Fig. 10
Page 26

26
Installation
Important
If the oven is being installed into a built under oven housing unit
ensure that the front rail at the top of the unit is not installed as it could
restrict ventilation.
Ensure that air can flow freely around the housing area. If the oven
is being installed into a fully enclosed built-under oven housing unit
it may be necessary to cut a small slot in the top of the plinth fitted
under the unit. Cut a section 400mm wide and a minimum of 15mm
high to allow air to pass under the unit. Alternatively cut a section 400
x 450mm in the base of the carcass.
Failure to allow adequate ventilation to the appliance may result in
overheating or damage to adjacent units and could invalidate the
guarantee.
This appliance is type X installation.
The walls of the kitchen units must be able to withstand temperatures
of 75˚C above ambient (typically this is between 90˚C and 100˚C).
When correctly installed ensure that there is a gap of 4mm minimum
between the sides of the oven and adjacent furniture doors.
Lift the oven carefully into position on the shelf, taking care NOT to lift
it by the door handle. If you lower the oven door, you will see 4 screw
holes, 2 on each side of the oven. The oven should then be secured
to the housing by fitting screws into these holes. Remember the
Page 27
27
40
560
600
600
560
564
595
595
547
554
20
Fig. 11
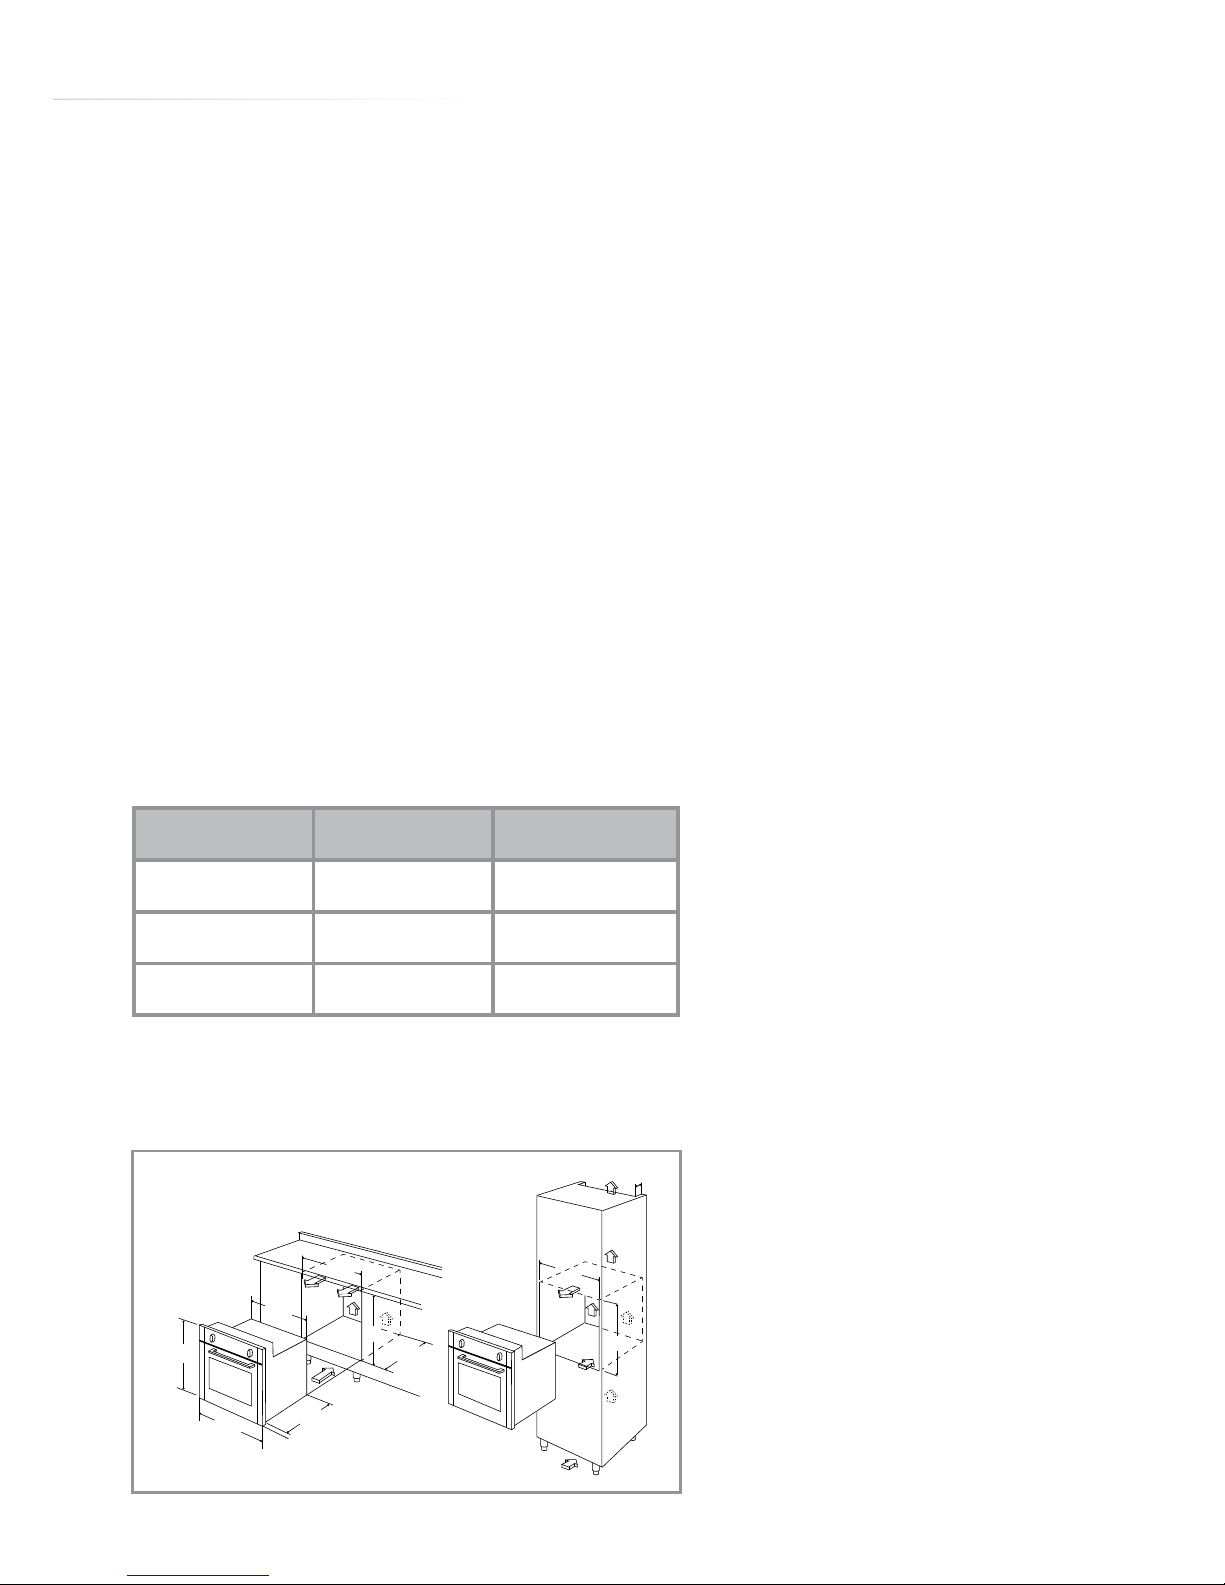
Dimensions Oven Housing
Height (mm) 595 600
Width (mm) 595 560
Depth (mm) 567 560 (min)
housing should not be free standing but be secured to the wall and/or
adjacent fittings.
How to install your oven
You will need the following housing area to fit your oven correctly.
The oven is designed to fit into a cabinet of 600mm width. The
oven can be built in or built under the kitchen units, but you must
ensure that it is properly ventilated. In the diagram the built-in oven
is ventilated by means of a space at the top of the kitchen cabinet.
There are many other methods of ventilating your oven - consult a
qualified engineer for advice.
Page 28
28
Electricity Supply to
Your Oven
Warning! this appliance must be
earthed.
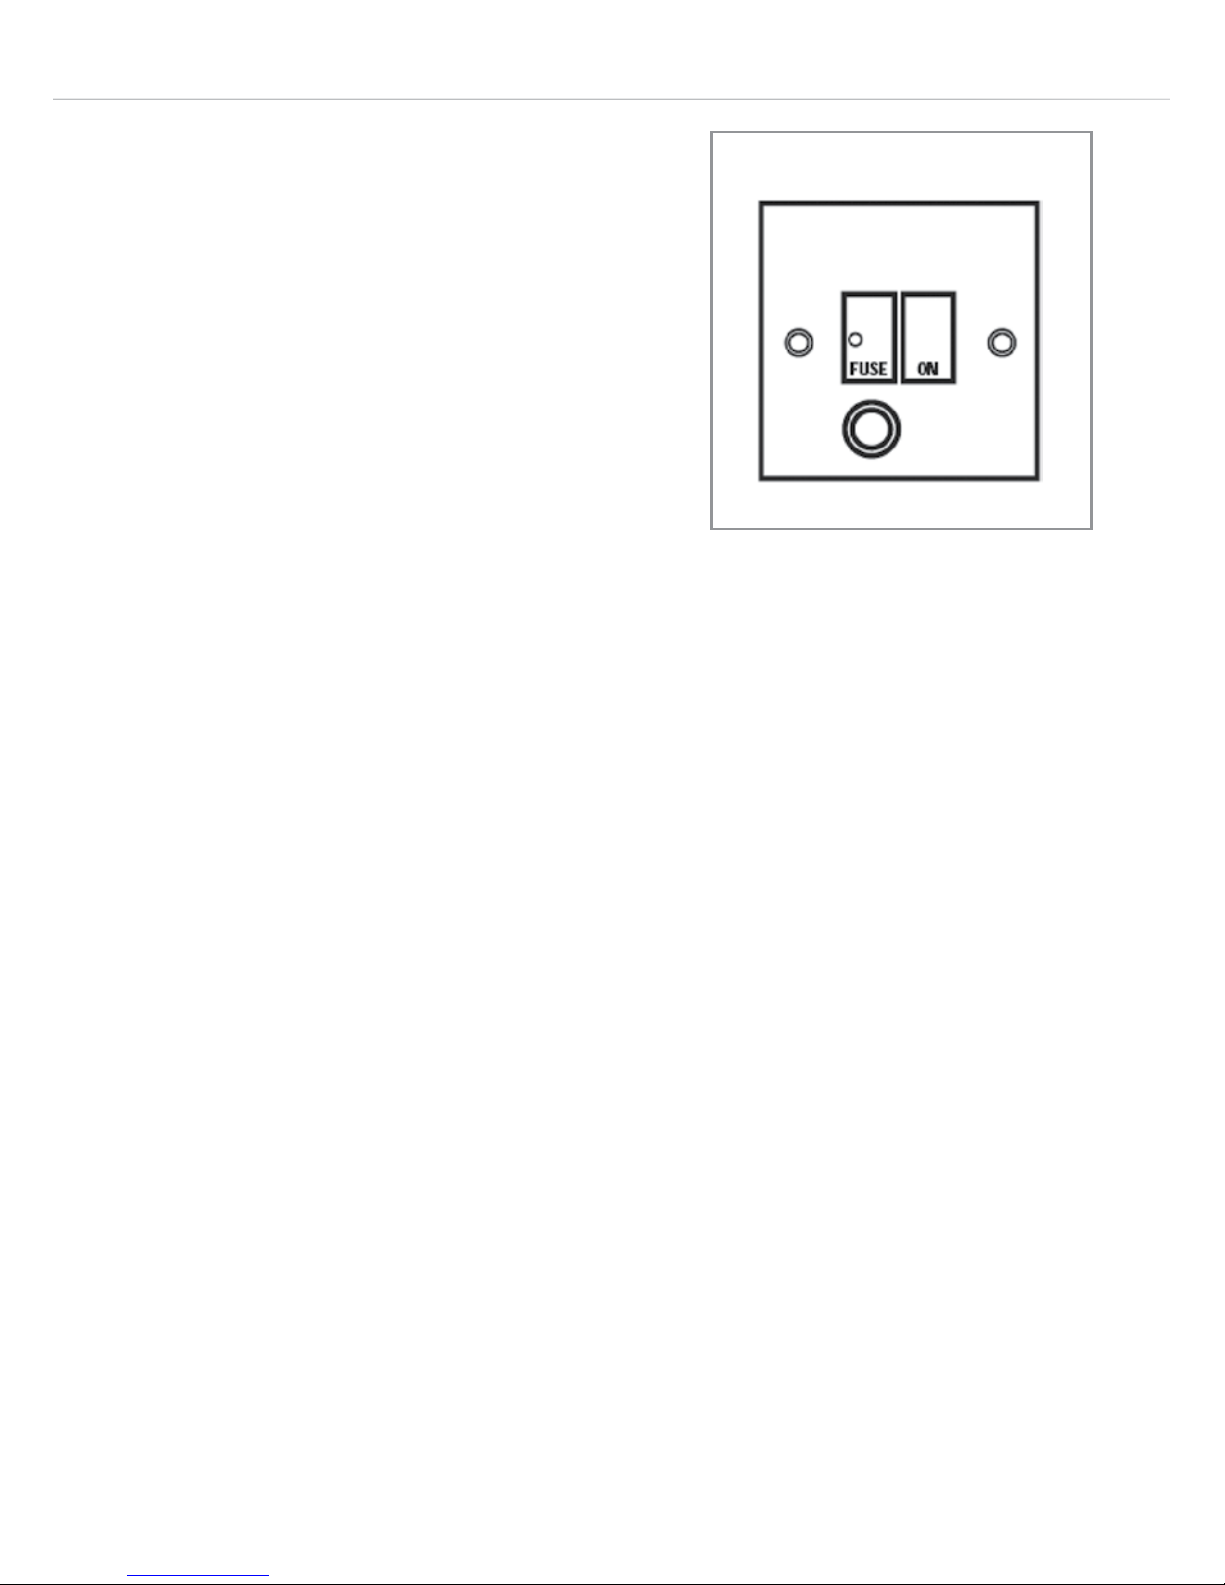
This appliance must be connected by
a competent person, using fixed wiring
via a double pole switched fused spur
outlet, protected by a 13A fuse.
We recommend that the appliance is connected by a qualified
electrician, who is a member of the N.I.C.E.I.C. and who will comply
with the I.E.T. and local regulations. The wires in the mains lead are
coloured in accordance with the following code:
GREEN AND YELLOW = EARTH BLUE = NEUTRAL BROWN =
LIVE.
As the colours of the wires in the mains lead for the appliance may
not correspond with the coloured markings identifying the terminals in
your spur box, proceed as follows:
1. The wire which is coloured green and yellow must be connected to
the terminal marked E (Earth) or coloured Green.
2. The wire which is coloured blue must be connected to the terminal
marked N (Neutral) or coloured Black.
3. The wire which is coloured brown must be connected to the
terminal marked L (Live) or coloured Red.
DOUBLE POLE SWITCHED
FUSE SPUR OUTLET
13A
Page 29

29
NOTES:
Page 30

30
NOTES:
Page 31
31
E & O E. All instructions, dimensions and illustrations are provided for guidance only. CDA reserve the
right to change specifications without prior notice.
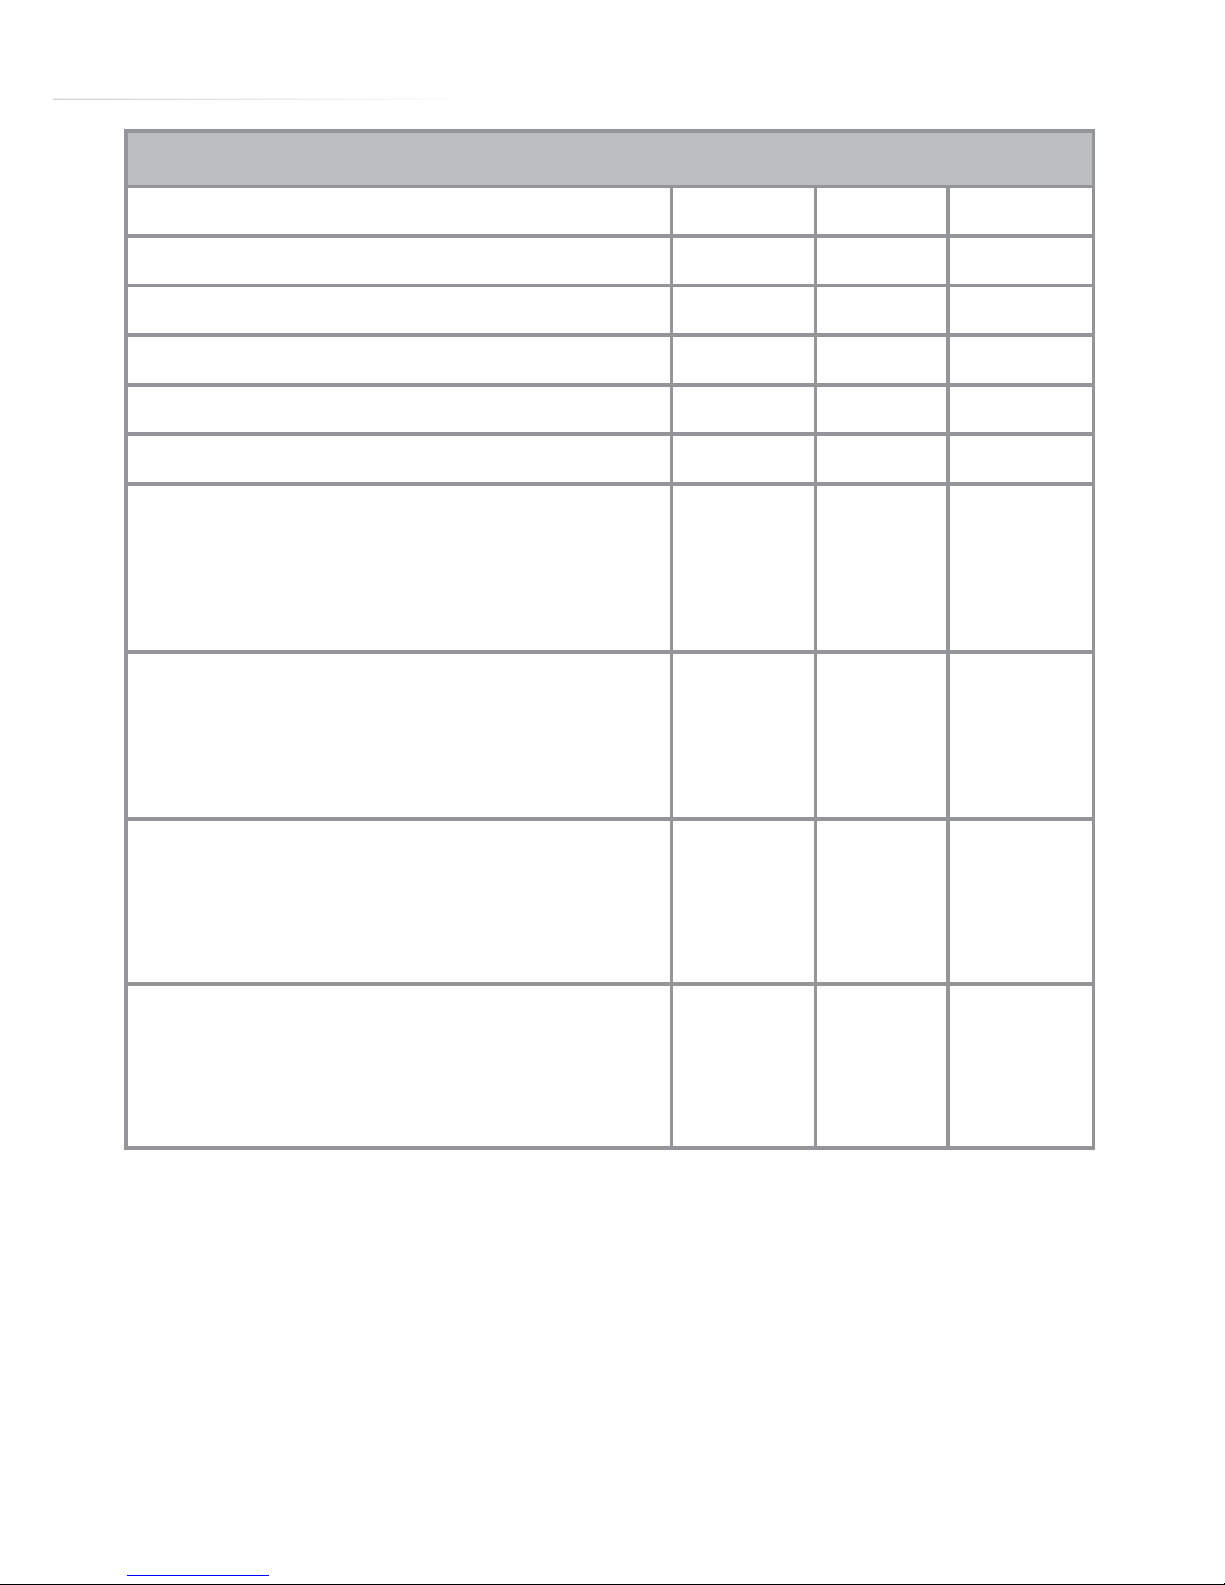
Energy Eciency Information
Attribute Symbol Value Units
Model identification SK510
Mass of the appliance M 44.0 kg
Number of cavities 1
Heat source per cavity (electricity or gas) Electricity
Volume per cavity V 56.0 L
Energy consumption (electricity) required to heat
a standardised load in a cavity of an electric
heated oven during a cycle in conventional mode
per cavity (electric final energy)
EC
Electric cavity
0.74 kWh/cycle
Energy consumption (electricity) required to heat
a standardised load in a cavity of an electric
heated oven during a cycle in fan-forced mode
per cavity (electric final energy)
EC
Electric cavity
0.73 kWh/cycle
Energy consumption required to heat a standard-
ised load in a gas-fired cavity of an oven during
a cycle in conventional mode per cavity (gas final
energy)
EC
Gas cavity
NA MJ/cycle :
kWh/cycle
Energy consumption required to heat a standard-
ised load in a gas-fired cavity of an oven during
a cycle in fan-forced mode per cavity (gas final
energy)
EC
Gas cavity
NA MJ/cycle :
kWh/cycle
Page 32

Customer Care Department • The Group Ltd. • Harby Road • Langar • Nottinghamshire • NG13 9HY
T : 01949 862 012 F : 01949 862 003 E : customer.care@cda.eu W : www.cda.eu
www.cda.eu
Please contact our Customer Care Department for Service on the details below
Customer Care Department • The Group Ltd. • Harby Road • Langar • Nottinghamshire • NG13 9HY
T : 01949 862 012 F : 01949 862 003 E : customer.care@cda.eu W : www.cda.eu
© CDA 2014
Customer Care Department • The Group Ltd. • Harby Road • Langar • Nottinghamshire • NG13 9HY
T : 01949 862 012 F : 01949 862 003 E : customer.care@cda.eu W : www.cda.eu
www.cda.eu
Please contact our Customer Care Department for Service on the details below
Customer Care Department
The Group Ltd. • Harby Road • Langar • Nottinghamshire • NG13 9HY
T : 01949 862 012 F : 01949 862 003 E : [email protected]
Copyright © CDA 2015
 Loading...