

CDA sk450 Manual For Installation, Use And Maintenance
Customer Care Department • The Group Ltd. • Harby Road • Langar • Nottinghamshire • NG13 9HY
T : 01949 862 012 F : 01949 862 003 E : service@cda.eu W : www.cda.eu
sk450 Single Ecoclean Oven
Manual for Installation, Use and Maintenance

2
Important
This appliance must only be used for the purpose for which it is
intended, i.e. domestic cooking, defrosting and reheating foods. Any
other use could be dangerous and may lead to premature failure of
the appliance.
The CDA Group Ltd cannot be held responsible for injuries or losses
caused by incorrect use or installation of this product. Please note
that CDA reserve the right to invalidate the guarantee supplied with
this product following incorrect installation or misuse of the appliance.
User information:
• Ovens become hot during and immediately after use. Ensure you
do not touch the heating elements located inside the appliance.
• The oven door can become very hot during operation.
• After use, please ensure that the appliance is switched o.
• Keep children away from the appliance when in use, and
immediately after use.
• Keep the oven door closed when in use.
Appliance information:
Please enter the details on the appliance rating plate below for
reference, to assist CDA Customer Care in the event of a fault with
your appliance and to register your appliance for guarantee purposes.
Appliance Model
Serial Number

3
CE Declarations of Conformity:
This oven has been designed, constructed and marketed in
compliance with safety requirements of EEC Directive 2006/95/EEC
(Low voltage) and requirements of EMC Directive 2004/108/EEC.
This appliance has been manufactured to the strictest standards and
complies with all applicable legislation, including Electrical safety (LVD)
and Electromagnetic interference compatibility (EMC). Parts intended
to come into contact with food conform to EEC/89/109.4
IMPORTANT INFORMATION FOR CORRECT DISPOSAL OF THE
PRODUCT IN ACCORDANCE WITH EC DIRECTIVE 2002/96/EC.
At the end of its working life, the product must be taken to a special
local authority waste collection centre or to a dealer providing
appliance recycling services. Disposing of a household appliance
separately avoids possible negative consequences for the
environment and health. It also enables the constituent materials to be
recovered, saving both energy and resources.
As a reminder of the need to dispose of household appliances
separately, the product is marked with a crossed-out wheeled dustbin.

4
Important
• Read the user instructions carefully before using the oven for the
first time.
• Follow the instructions for rst use of the oven.
• Clean the oven regularly.
• Remove spills as soon as they occur.
• Always use oven gloves when removing shelves and trays from the
ovens.
• Do not allow children near the oven when in use.
• Do not allow fat or oils to build up on the oven shelves, grill pan or
oven base.
• Do not place any cooking utensils or plates directly on the oven
base.
• Always grill with the oven door closed.
• Do not grill food containing fat without using the grill pan grid.
• Do not cover the grill pan grid or the oven walls with aluminium foil.
• Do not use the oven tray for roasting.
• Do not perform maintenance or cleaning of the oven without rst
switching o the electricity supply. If the oven has recently been
used, allow to cool.
• Do not place hot enamel parts in water. Leave them to cool rst.
• Do not allow vinegar, coee, milk, saltwater, lemon or tomato juice to
remain in contact with enamel parts.
• Do not use abrasive cleaners or powders that will scratch the
surface of the enamel.
• Do not attempt to repair the internal workings of your oven.

5
Using the Touch
Controls
The touch controls should be used with
the flat of your finger, rather than the
fingertip.
fig. 1
6
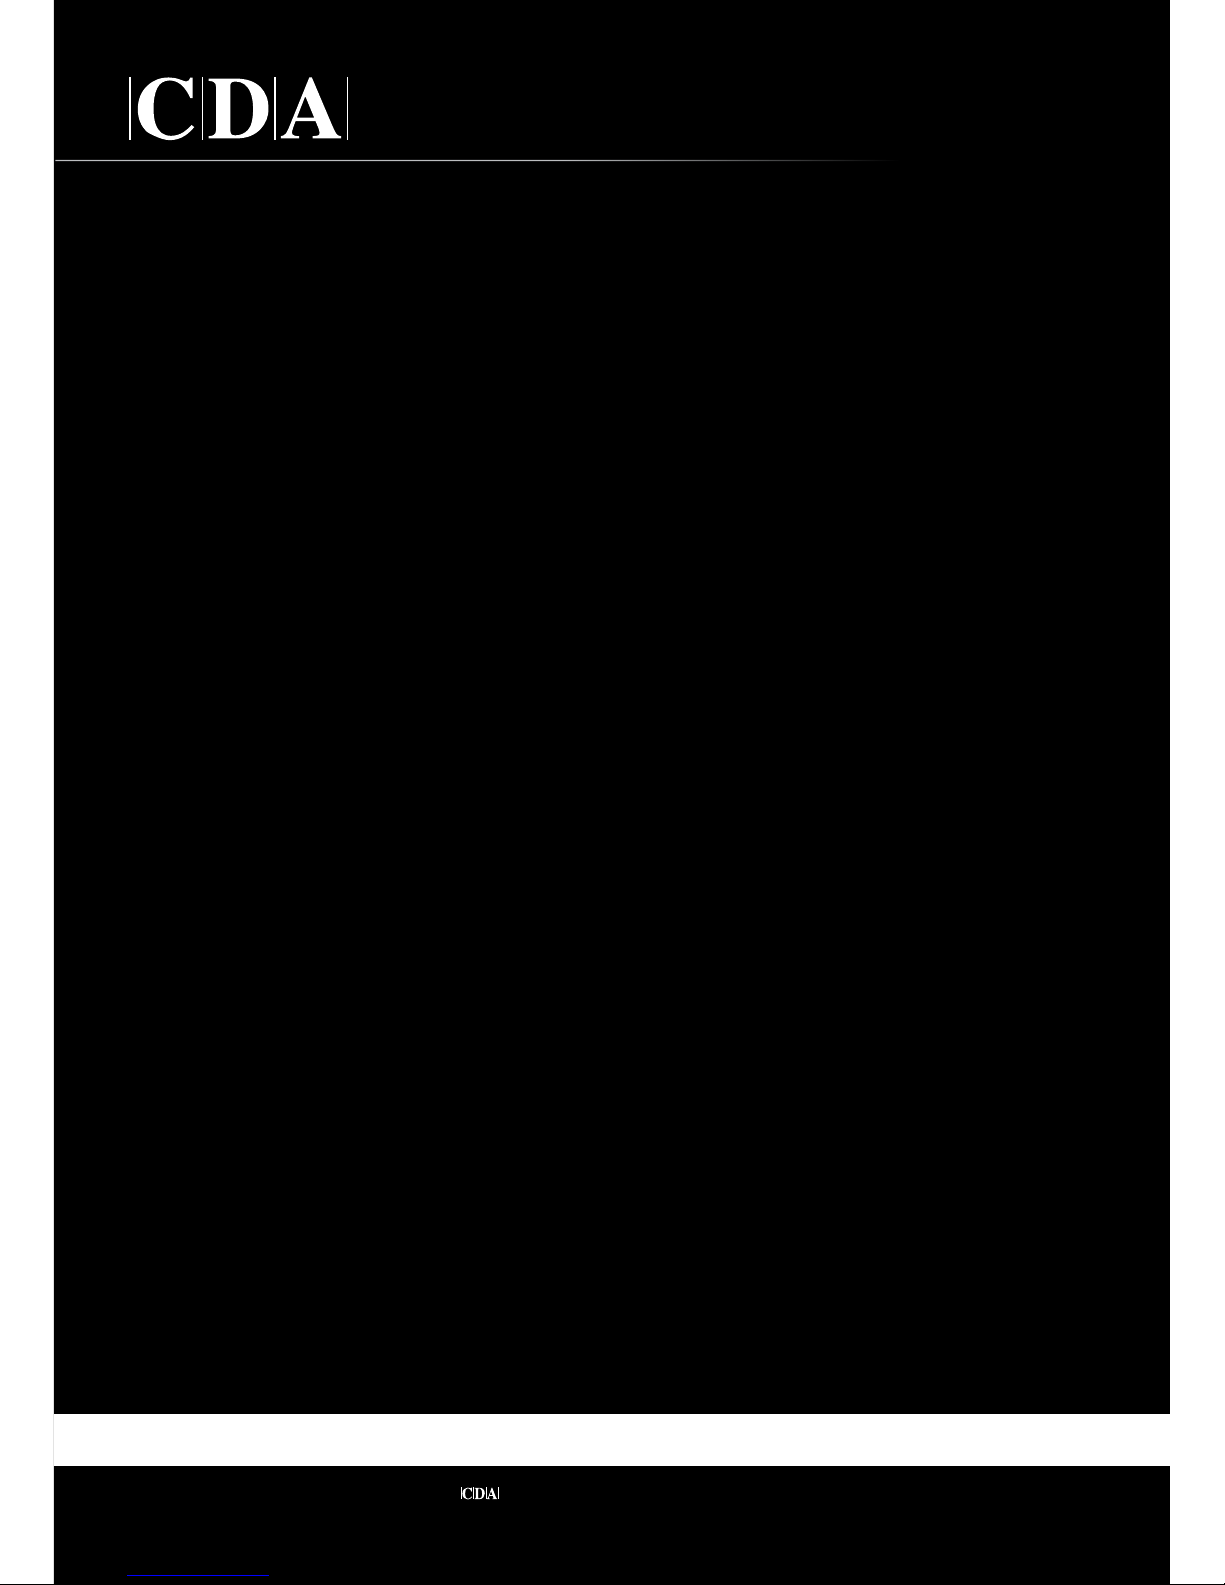
The Control Panel
A B C D E F G H
I J K L M
A: Oven light
B: Conventional oven
C: Warming oven
D: Half grill
E: Full grill
F: Fanned grill
G: Fan assisted oven
H: Fan oven
I: On/O and key lock
J: Rapid preheat
K: Oven clean
L: Stop
M: Start
fig. 2
7
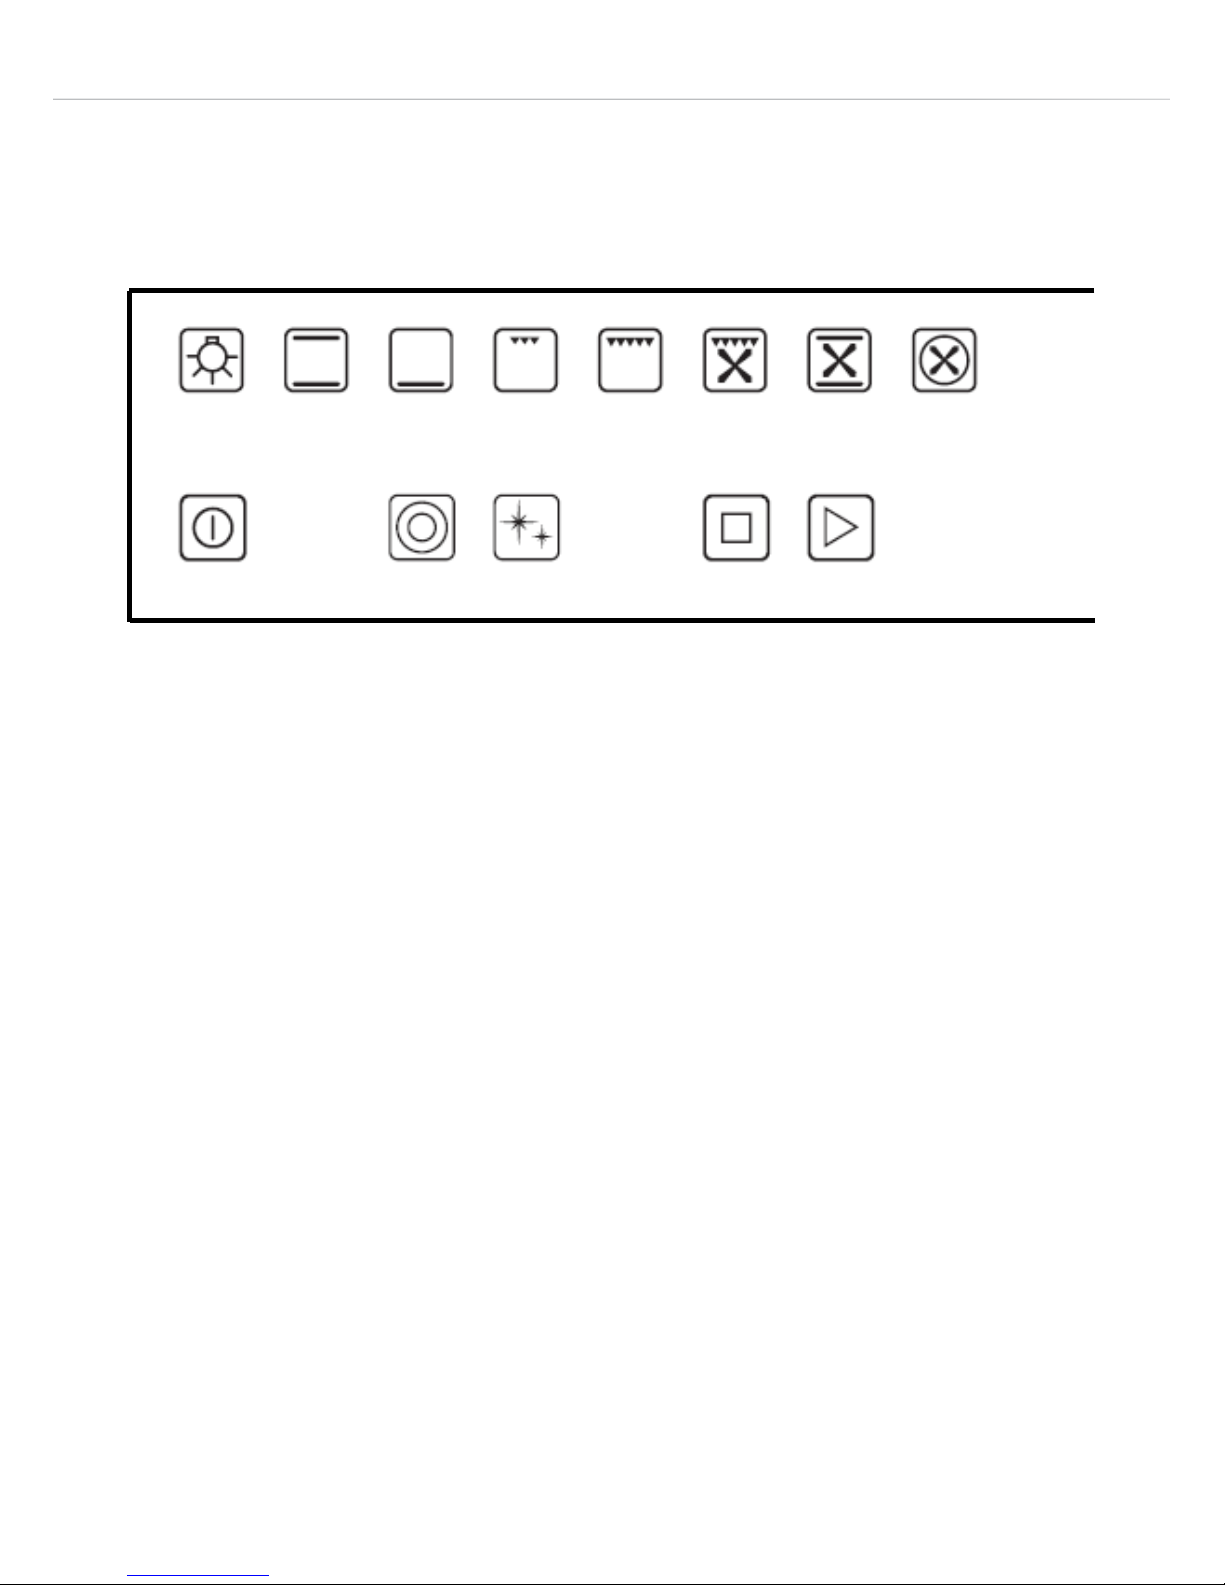
N O P Q R S T
U V W X Y Z
N: Fan oven + lower heat
O: Defrost
P: Auto recipe
Q: Confirm
R: Scroll downward / Reduce power
S: Scroll upward / Increase power
T: Digital display
U: Timer function
V: Timer - cooking time
W: Timer - end time
X: Minute minder
Y: Decrease settings
Z: Increase settings

8
Before First Use
When the oven is connected to the electrical supply for the first time,
the display will ask you to select your language: Use the
buttons to select the language you want, use the “ok” button to
confirm your choice.
The oven will remember your language preference, even after future
power outages.
After setting the language, the oven will go into “demonstration” mode
(it will also go into this mode after any power failure).
In this mode, the oven keys light up in sequence but no heating
elements are powered. The control panel is inactive so the oven will
not respond to commands.
To exit the demonstration mode, touch the “Light” key for
approximately five seconds, the control panel will revert to normal
operation and be ready for use.
You can set the clock at this stage, but it is not necessary for turning
on the oven.
Before using the oven for the first time we recommend that you clean
it with soapy water, rinse carefully and then heat on the fan oven
setting at maximum temperature for 30 minutes. A slightly unpleasant
smell may be produced, caused by grease remaining on the oven
elements from the production process.

9
General Settings & Use
Clock
To set the clock, touch the “Timer function” key for at least 3
seconds, the clock will show “00:00” with the separator dots flashing.
Use the “+” and “-” keys to set the correct time: Five seconds after
selecting the time the dots will stop flashing and the time will be set.
Key lock
This appliance is equipped with a key lock to prevent accidental
use. For safety reasons the “On/O” key
will work to switch the
appliance o when the key lock is set.
To switch the key lock on or o, touch and hold the “On/O” key
the appliance will give a brief beep when the button is first pressed
and a longer beep after three seconds, when the key lock is either
activated or deactivated. The padlock closed symbol will show in the
display when the key lock is on and the padlock open symbol when
the key lock is o.
Oven light
The oven light may be turned on and o by touching the “Oven light”
key .
Alternatively, the oven light will turn on automatically when the door
is opened then after the door is closed will stay on for approximately
three minutes before automatically turning itself o.
 Loading...