

CDA HC7621FR Installation, Use And Maintenance Manual

www.cda.eu
HC7621FR
Ceramic hob
Installation, use and maintenance

2
Contents:
3 Important
5 Important information
6 Using your hob
8 Operating time limiter
9 Triple zone function
9 Dual zone function
10 Auto-heat function
11 Timer/Minute minder
13 Safety key lock
14 Residual heat indicators
14 Ecient use of your hob
16 Care and maintenance
17 Cleaning guide
18 Troubleshooting
20 - 24 Installation
20 Installation - preparation
22 How to install the hob
24 Mains electrical connection
27 Energy eciency information
3
Important
The CDA Group Ltd cannot be held responsible for injuries or losses
caused by incorrect use or installation of this product. Please note
that CDA reserve the right to invalidate the guarantee supplied with
this product following incorrect installation or misuse of the appliance
or use in a commercial environment.
This appliance is not designed to be used by people (including
children) with reduced physical, sensorial or mental capacity, or
who lack experience or knowledge about it, unless they have had
supervision or instructions on how to use the appliance by someone
who is responsible for their safety.
Under no circumstances should any external covers be removed for
servicing or maintenance except by suitably qualified personnel.
Appliance information:
Please enter the details on the appliance rating plate below for
reference, to assist CDA Customer Care in the event of a fault with
your appliance and to register your appliance for guarantee purposes.
Appliance Model
Serial Number
EU Declarations of Conformity
This appliance has been manufactured to the strictest standards and
complies with all applicable legislation, including Electrical safety
(LVD) 2014/35/EU and Electromagnetic interference compatibility
4
(EMC) 2014/30/EU. Parts intended to come into contact with food
conform to 1935/2004/EC.
IMPORTANT INFORMATION FOR CORRECT DISPOSAL OF THE
PRODUCT IN ACCORDANCE WITH EU DIRECTIVE 2012/19/EU.
At the end of its working life, the product must be taken to a special
local authority waste collection centre or to a dealer providing
appliance recycling services.
Disposing of a household appliance separately avoids possible
negative consequences for the environment and health. It also
enables the constituent materials to be recovered, saving both energy
and resources. As a reminder of the need to dispose of household
appliances separately, the product is marked with a crossed-out
wheeled dustbin.
Please note:
• Ceramic hobs become hot and remain hot during and immediately
after use. Do not touch the hob until it has been allowed to cool.
• Keep children away from the appliance when in use.
• Never use the hob top for storage.
• Pan handles should never stand out beyond the edge of the
worktop. This will help to avoid children reaching them.
• Do not lean over the hob when it is in use.
• Follow the cleaning instructions carefully.
• Ensure the base of the saucepan is clean and dry before placing it
on the hob.
• Avoid hard shocks from cookware – the vitroceramic glass surface
is highly resistant but not unbreakable.

5
• Do not place hot lids flat on the hob top. A “suction” eect could
cause damage to the hob.
• Do not drag cookware across the hob top: in the long term, this
could cause damage to the hob.
• Do not store cleaning or flammable products in the unit below the
hob.
• Always use appropriate cookware.
• Do not cook unopened tins of food directly on the hob.
• Never put cooking foil or plastic materials on the ceramic surface
when the hob is hot. These materials could melt and cause
damage to the hob.
• This hob (Class 3) has been designed for use only as a cooking
appliance. Any other use should be considered incorrect and
therefore dangerous.
Important
• Do not use the hob if the glass surface is cracked or damaged to
prevent the risk of electric shock. Disconnect it from the power
supply.
• Ensure that the power cable of a connected electrical appliance
near the hob is not in contact with the cooking zones.
Please note:
• When connecting the hob to the power and switching it on for the
first time the cooking zone displays may show the letter " ". This is
not a fault and the letter " " should disappear after approximately
one hour. Please see page 14 for more information.
• The safety key lock may be active. Simply press and hold the
safety key lock sensor (2) for three seconds to deactivate it.
6
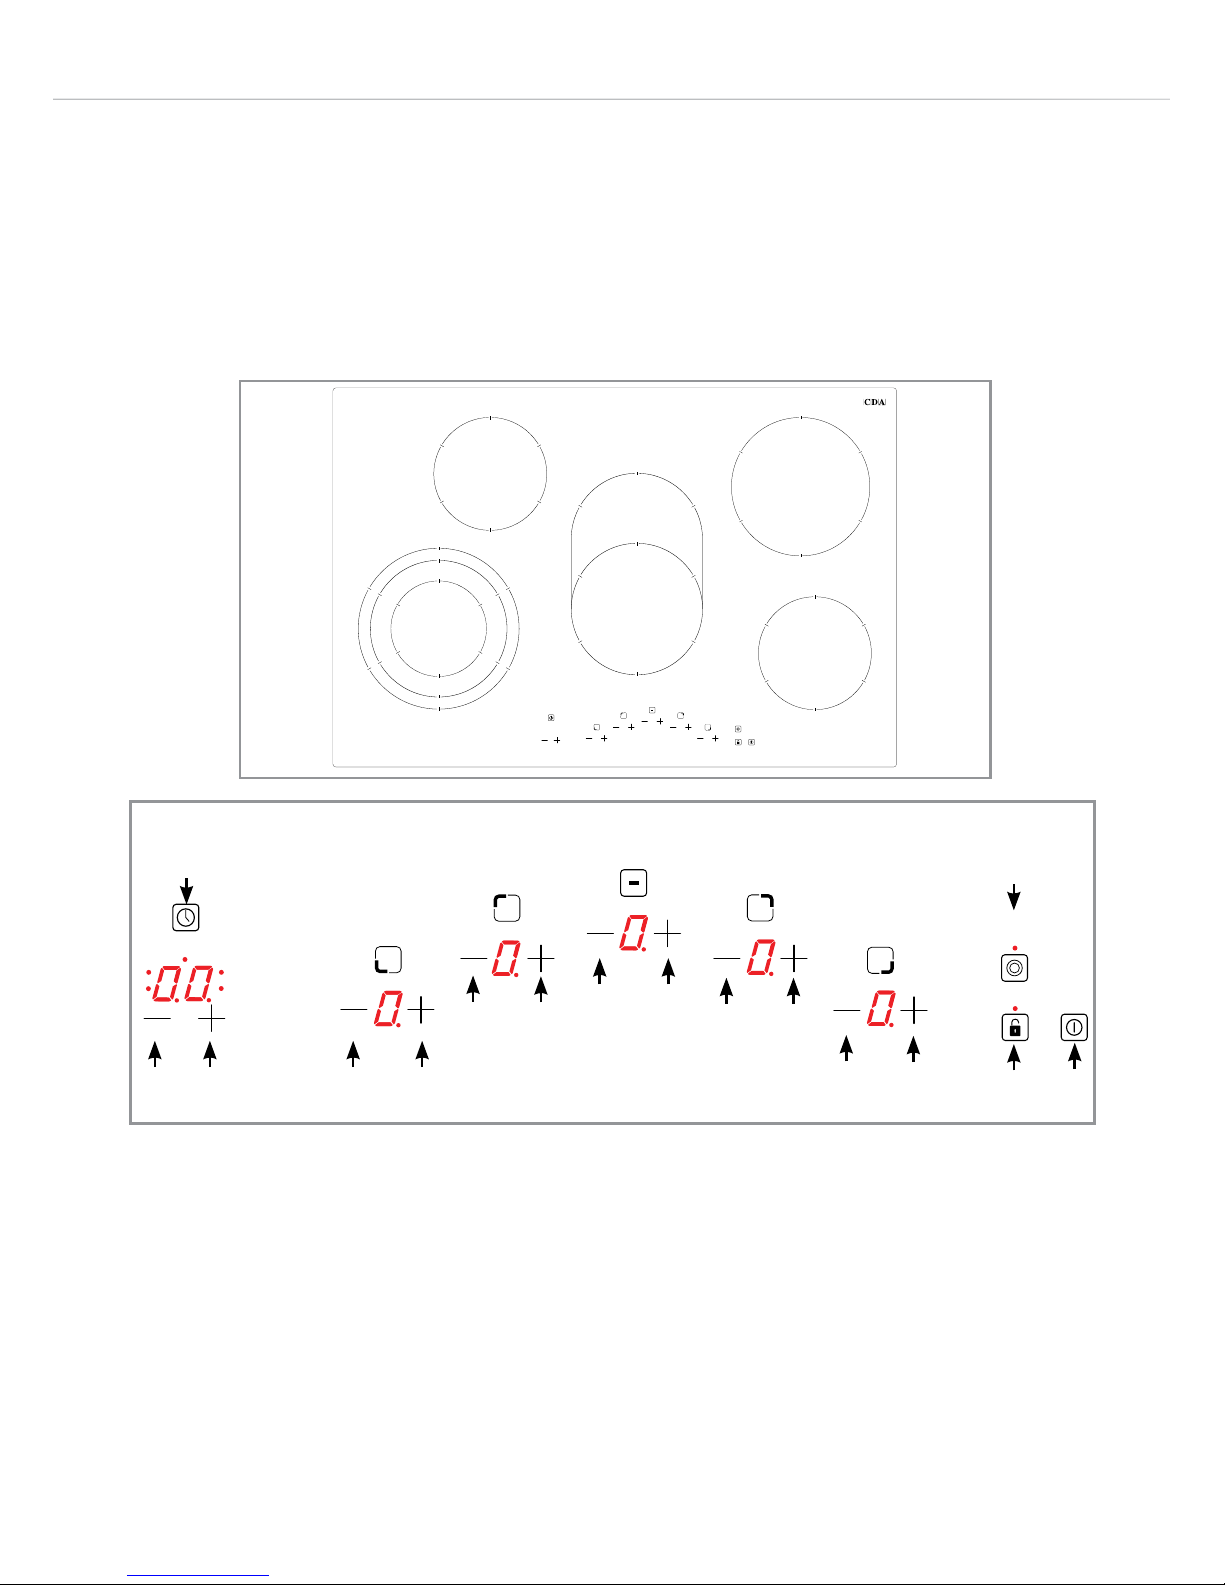
Using your hob
Zones:
1. Front left 2.3kW Ø210/175/120 mm 4. Back right 1.8kW Ø180 mm
3. Central 2.2kW Ø170 x 265 mm
2. Back left 1.2kW Ø145 mm 5. Front right 1.2kW Ø145 mm
Control panel:
1. On/o sensor 5. Timer plus setting sensor
2. Safety key lock sensor 6. Timer minus setting sensor
3. Zone plus setting sensor 7. Timer sensor and display
4. Zone minus setting selector 8. Triple zone sensor
Fig. 1
1
2
3
4
Fig. 2
5
1
4
2
4
3
4
4
4
6
7
8
3
3
3
3
5

7
To switch the hob on
• To switch the power on, touch and hold the on/o sensor (1) for
approximately two seconds. The hob will beep and all five cooking
zone indicators will show ‘0’.
Please note: If a power level is not set within ten seconds, the hob
will switch o automatically.
After switching the mains supply on to the hob, or if the mains supply
is interrupted and then restored, the safety key lock may be activated.
The safety key lock LED will be on to indicate this. Simply press and
hold the safety key lock sensor (2) for approximately two seconds to
deactivate the satey key lock and proceed to use the hob as normal.
The safety key lock also activates after 60 seconds if the appliance
if switched o via the 'On/o sensor' (1). This is to help to prevent
accidental use. Simply follow the same step as above to deactivate
the safety key lock.
To set the power level
• After switching the hob on, simply select the desired heat setting
using the '+' or '-' selectors for that zone. The power level ranges
from 1 (minimum) to 9 (maximum). The hob will then begin heating.
You can also press the '-' selector first to jump straight to power
level 9.
To turn the power o to a zone
• To switch o a zone you can use the zone's '-' selector to return the
heat setting to 0 or alternatively you can press both the '+' and '-'
8
selectors simultaneously for that zone. The cooking zone indicator
will display a '0' to confirm that the zone is now inactive.
• If switching o multiple zones, the above steps need to be taken
for each zone. When all the zones are at '0', the hob will switch o
automatically after approximately ten seconds.
• Alternatively, to switch o the hob immediately, touch and hold the
'On/o sensor' (1) for approximately two seconds.
Please note: Any zones that are still hot to the touch will display an
" " provided the mains power supply is not interrupted.
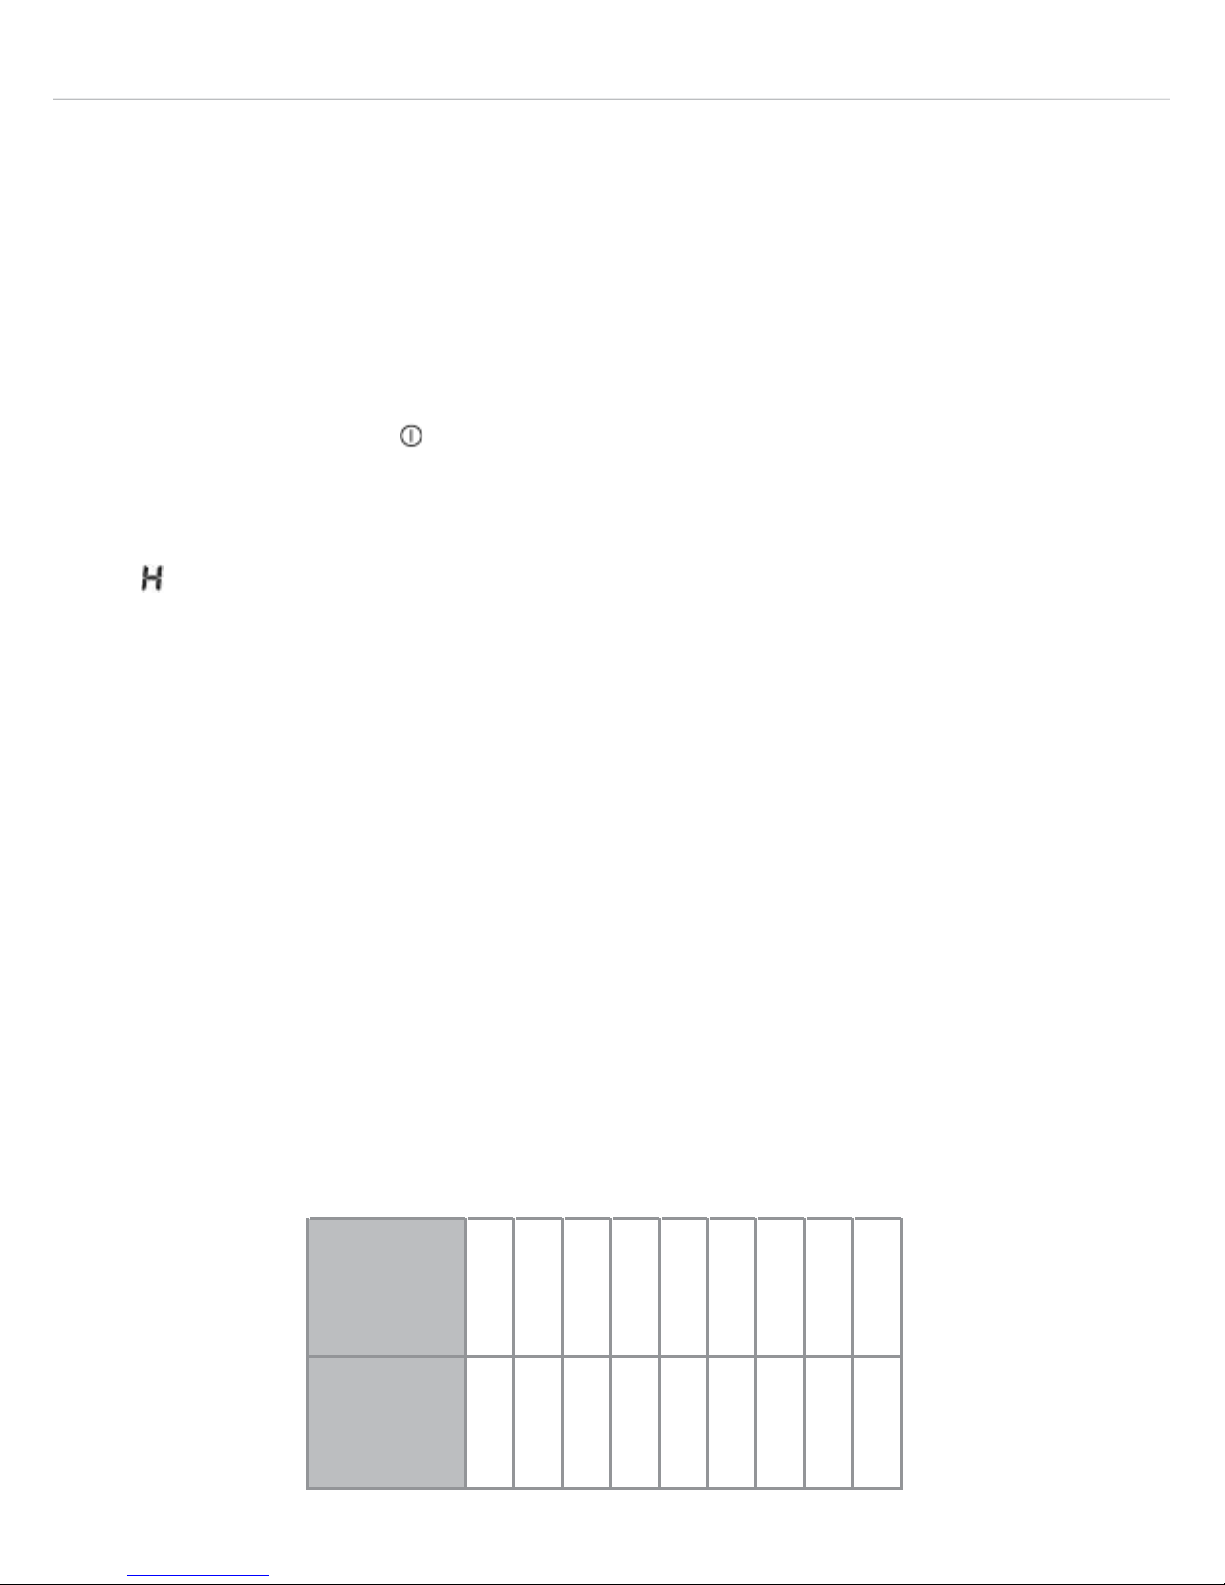
Operating time limiter
Each zone has an operating time limiter to increase overall eciency
and to prevent the hob from being left on indefinitely. If a zone's heat
setting is not changed for a specific duration then the associated zone
is automatically switched o and residual heat indicator activated.
Zones can still be used as normal in accordance with the operating
instructions. The operating time limiter is set according to the last
selected heat setting. The maximum operating times for each setting
can be found below.
10
1
Zone Power Level
Maximum
Operating Time
(hours)
2
3
4 5 6 7
8 9
5 5 4 3 2 2 2 1

9
Triple zone function
The front-left zone is equipped with a triple zone function that allows
you to extend the heating area for the zone. In normal use, the zone
functions with just the smaller inner ring until the triple zone function is
activated.
To activate the triple zone function
• Simply set a power level on the front-left zone and then press the
triple zone sensor (8) once to activate the middle zone and press it
again to also activate the outer zone. The LEDs above the triple
zone sensor (8) will illuminate accordingly (one for when the double
zone is active and two for when the triple zone is active).
To deactivate the triple zone function
• Simply press the triple zone sensor (8) for a third time. Both LEDs
either side of the triple zone sensor (8) should extinguish and the
zone will return to operating on the inner zone only.
Dual zone function
The central zone is equipped with a dual zone function that allows
you to extend the heating area for the zone. In normal use, the zone
functions with just the lower circular ring until the dual zone function is
activated.
To activate the dual zone function
• Simply set a power level on the central zone and then press the
triple zone sensor (8) once to extend the zone. An LED above the
triple zone sensor (8) will illuminate to show you that the dual zone
 Loading...