

Page 1
Page 2

EU Declarations of Conformity:
This appliance has been designed, constructed and marketed in
compliance with safety requirements of EU Directive 2014/35/EU
(Low voltage) and requirements of EU Directive 2014/30/EU (EMC).
IMPORTANT INFORMATION FOR CORRECT DISPOSAL OF THE
PRODUCT IN ACCORDANCE WITH EC DIRECTIVE 2012/19/EU.
Page 3
Page 4

4
• Steam cleaners must not be used when cleaning this appliance.
• The performance of your extractor will vary depending on a number
of factors. These include: type of extraction, length of ducting, room
volume, ventilation available and cleanliness of the filters.
Note:
For best performance, you should switch on the extractor 15 minutes
before starting to cook and leave it to run for approximately 15
minutes after the end of cooking.
Page 5
5
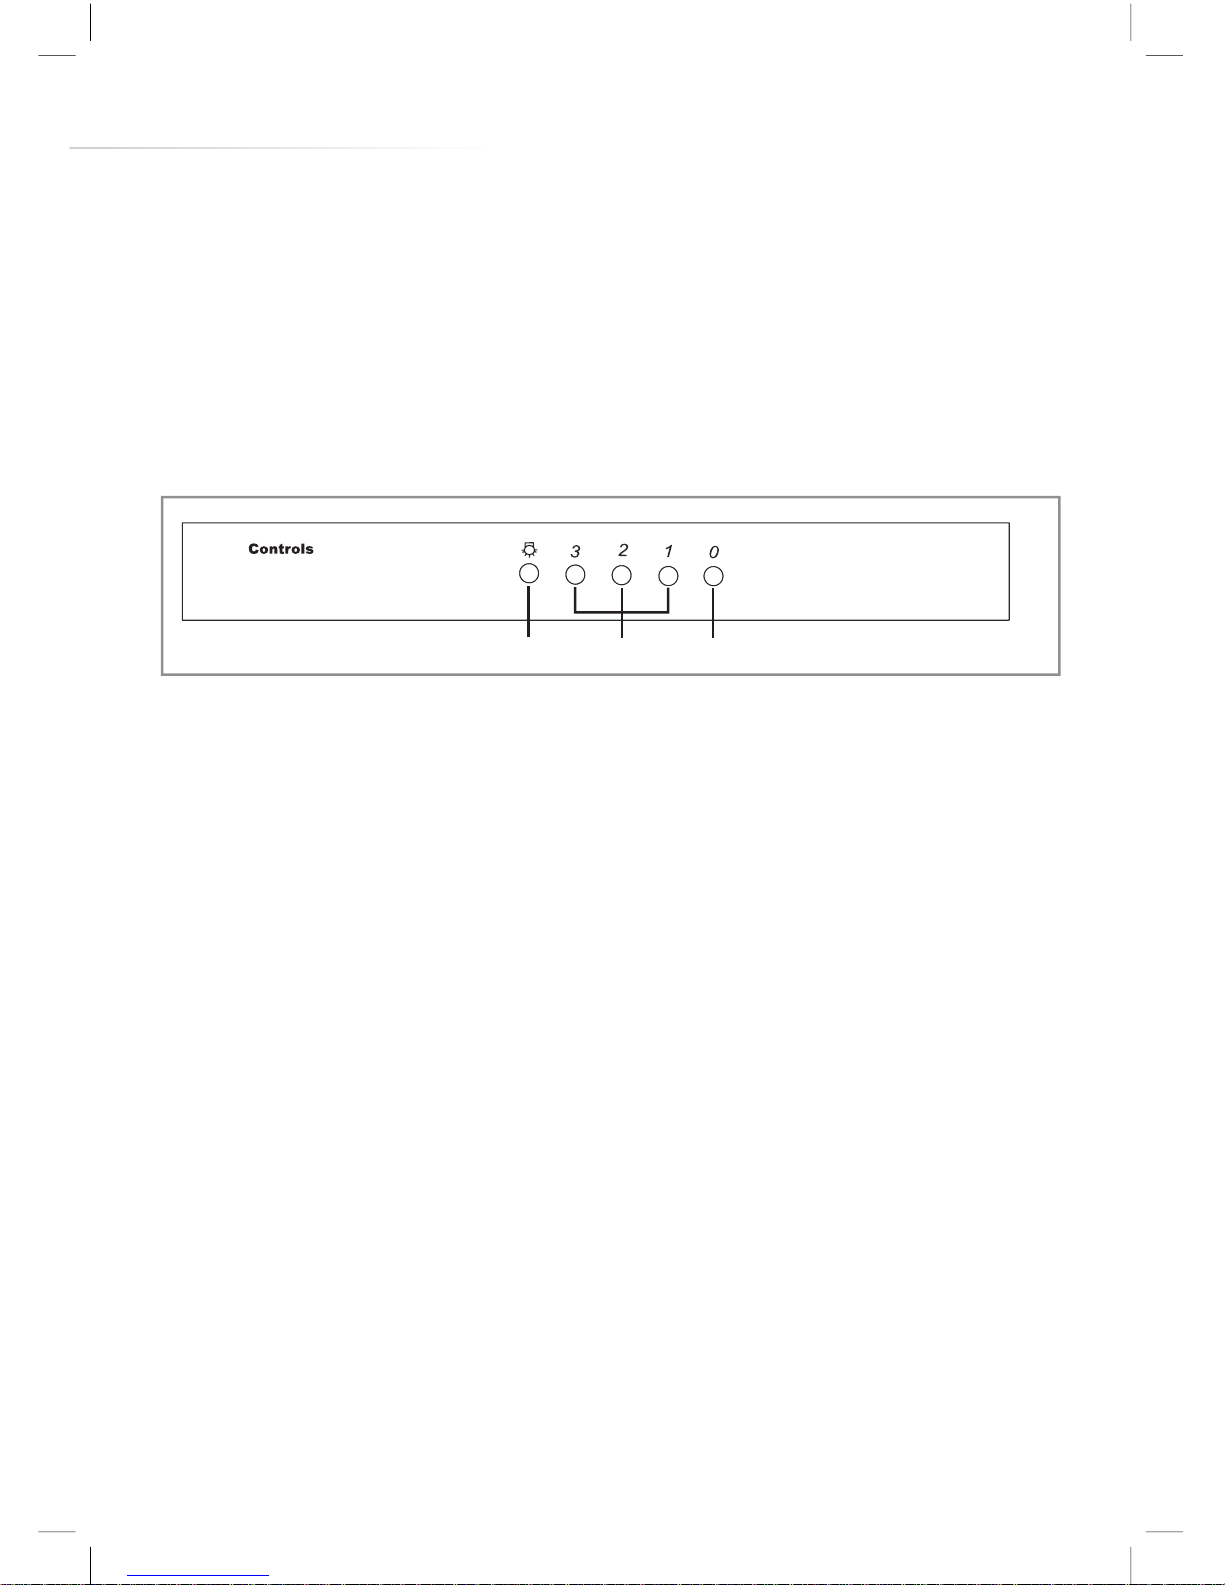
Using Your Extractor (ECA Range)
Control Panel
A - Light button
B - Speed level buttons
C - Power o button
To switch the extractor light on or o:
• Press button “A”.
To switch on the extractor or to change the speed at any time when
the extractor is running:
• Press the relevant “B” button for the first, second or third speed level
as required.
To switch the extractor o:
• Press button “C”.
Fig. 1
A B
C
Page 6

Page 7

7
Care and Maintenance
IMPORTANT : DO NOT PERFORM
MAINTENANCE OR CLEANING OF
THE EXTRACTOR WITHOUT FIRST
SWITCHING OFF THE ELECTRICITY
SUPPLY.
Cleaning
You should use a nonabrasive cleaner.
Any abrasive cleaner (including Cif) will
scratch the surface and could erase the
control panel markings.
You can clean your extractor eectively
by simply using a dilute solution of
water and mild detergent and drying to
a shine with a clean cloth, for example
the CDA E-Cloth.
Cleaning the grease filter
The grease filter should be kept clean
to minimise the risk of fire.
At least once a month you should
remove the grease filter and clean
it with hot soapy water. You can also wash the grease filter in a
dishwasher, ensuring that you place it in an upright position to prevent
damage from other items in the dishwasher.
Fig. 4
Fig. 5
Fig. 3
Page 8

In re-circulating mode, air is vented
back into the kitchen through the
opening in the cooker hood.
This method is advised if you are
not using your hob intensively.
Re-circulated air requires the use
of charcoal filters to remove odours.
Page 9

2W
Page 10

10
Mains Electricity Connection
THIS APPLIANCE MUST BE CONNECTED TO THE MAINS SUPPLY
BY A COMPETENT PERSON, USING FIXED WIRING VIA A DOUBLE
POLE SWITCHED FUSED SPUR OUTLET AND PROTECTED BY A
3A FUSE.
We recommend that the appliance is
connected by a qualified electrician,
who is a member of the N.I.C.E.I.C. and
who will comply with the I.E.T. and local
regulations.
The wires in the mains lead of this
appliance are coloured in accordance
with the following code:
Green & Yellow = Earth
Blue = Neutral
Brown = Live
As the colours of the wires in the mains lead for the appliance may
not correspond with the coloured markings identifying the terminals
connecting to the fused spur, proceed as follows:
• The wire which is coloured green and yellow must be connected to
the terminal marked “E” (Earth) or coloured green.
• The wire which is coloured blue must be connected to the terminal
marked “N” (Neutral) or coloured black.
• The wire which is coloured brown must be connected to the
terminal marked “L” (Live), or coloured red.
Note: Use a 3A Fuse.
DOUBLE POLE
SWITCHED
FUSED SPUR OUTLET
USE A 3 AMP FUSE
Page 11

114W
Page 12

12
Mounting Your
Extractor
Your extractor can be used to filter and
recycle the air within your kitchen, or to
extract the air outside.
When installing this appliance over a
CDA hob, the clearance between the
extractor and the hob must be equal
to or exceed 550mm. This instruction
overrides the instructions supplied with
the CDA hob. (The height should be
measured from the top of the hotplates
or burners).
Where the extractor is to be installed
above a non-CDA hob, the instructions
supplied with the hob may dictate that
the height required above the hob is
greater than 550mm.
IN THE ABSENCE OF ANY INSTRUCTIONS SUPPLIED WITH A
GAS HOB, THE MINIMUM DISTANCE BETWEEN THE HOB AND
EXTRACTOR MUST BE AT LEAST 760mm.
The width of any hob must not be greater than the width of the
extractor installed above it.
Fig. 6
Gas: 550mm minimum
Electric: 550mm minimum
ECA EVA
A 138 138
B 282282
C 85 85
D 75 75
A
B
C
D
Page 13

13
Installation
The metal casing of this appliance has been coated with a
preservative to protect it during transport and storage. This
should be removed during installation by using a non-abrasive
stainless steel cleaner. Always follow the instructions given with
the cleaner being used.
When correctly installed, your product meets all safety
requirements laid down for this type of product. However, special
care should be taken around the rear of the appliance as these
areas are not designed or intended to be touched and may contain
sharp or rough edges that could cause injury.
Ducting and Ventilation
For best performance and lowest noise output, we recommend the
use of 125mm ducting. 100mm ducting may be used but this will
reduce performance and increase the noise of the extractor.
Page 14

Page 15

15
Fix ducting and seal joints.
Adjust and secure the chimney.
Fit ducting adaptor
Fig. 11
Fig. 11
Fit the ducting adaptor.
Fig. 12
oun
tthel
ower chimney
ig. 13
Mount the chimney.
Fig. 13
Adjust and secure the upper chimney
Fig. 14
Fig. 14
ix ducting (seal joint)
Fi
g
.12
Page 16

16
NOTES
Page 17

17
NOTES
Page 18

18
NOTES
Page 19

19
E & O E. All instructions, dimensions and illustrations are provided for guidance only. CDA reserve the
right to change specifications without prior notice.
Attribute Symbol Value Units
Model identification ECA60EVA60, EVA70
& EVA90
Annual Energy Consumption AEC
Hood
45.2 45.2 kWh
Time increase factor f 1.3 1.3
FDE
Hood
19.0 19.0
EEI
Hood
68.0 (B) 68.0 (B)
Measured airflow at Best Q
BEP
186.5 186.5 m3/h
Measured Pressure at Best P
BEP
326 326 Pa
Maximum airflow Q
MAX
350 350 m3/h
Measured electric power at Best W
BEP
89.0 89.0 W
Nominal lighting power WL 4 4 W
Average illumination of the
lighting system on the cooking
surface
E
Middle
530 300 Lux
Measured power consumption in
standby
P
S
-- 0.7 W
Measured power consumption
P
O
0 0.47 W
Sound power level L
WA
64 64dBA
GFE
Hood
37 (G)37 (G)%
LE
Hood
132.5 (A) 75 (A) %
Page 20

 Loading...