

Page 1

English
English
2
ICT-03
CONTENTS
1 MACHINE DESCRIPTION P. 3
• Front view and overall view P. 3
• Control buttons and Display panel P. 3
• Safety instructions and precautions P. 4
• Correct use P. 4
• Technical safety P. 4
• Usage safety P. 5
2 OPERATION P. 6
3 INSTALLATION P. 7
CONTENTS
4 IMPORTANT INSTRUCTIONS FOR FIRST TIME USE! P. 10
5 ADDING WATER AND COFFEE P. 11
• Filling the water tank P. 11
• Filling the coffee bean container P. 11
6 OPERATION AND USE P. 11
• Switch-on P. 11
• Programming the machine P. 11
• Setting the grind P. 13
• Selecting the type of espresso P. 13
• Adjusting the espresso dose P. 13
• Setting 1 or 2 coffees P. 13
7 GRINDING P. 14
• Preparing espresso P. 14
• Hot water P. 14
• Preparing cappuccino P. 14
8 CARE AND CLEANING P. 14
• Water tank P. 14
• Hot water/steam dispenser P. 14
9 DESCALING THE MACHINE P. 15
10 TROUBLE-SHOOTING P. 15
11 TECHNICAL DATA P. 16
12 DISPOSAL OF ELECTRICAL APPLIANCES P. 16
ICT-03
2
Page 2
English
3
ICT-03
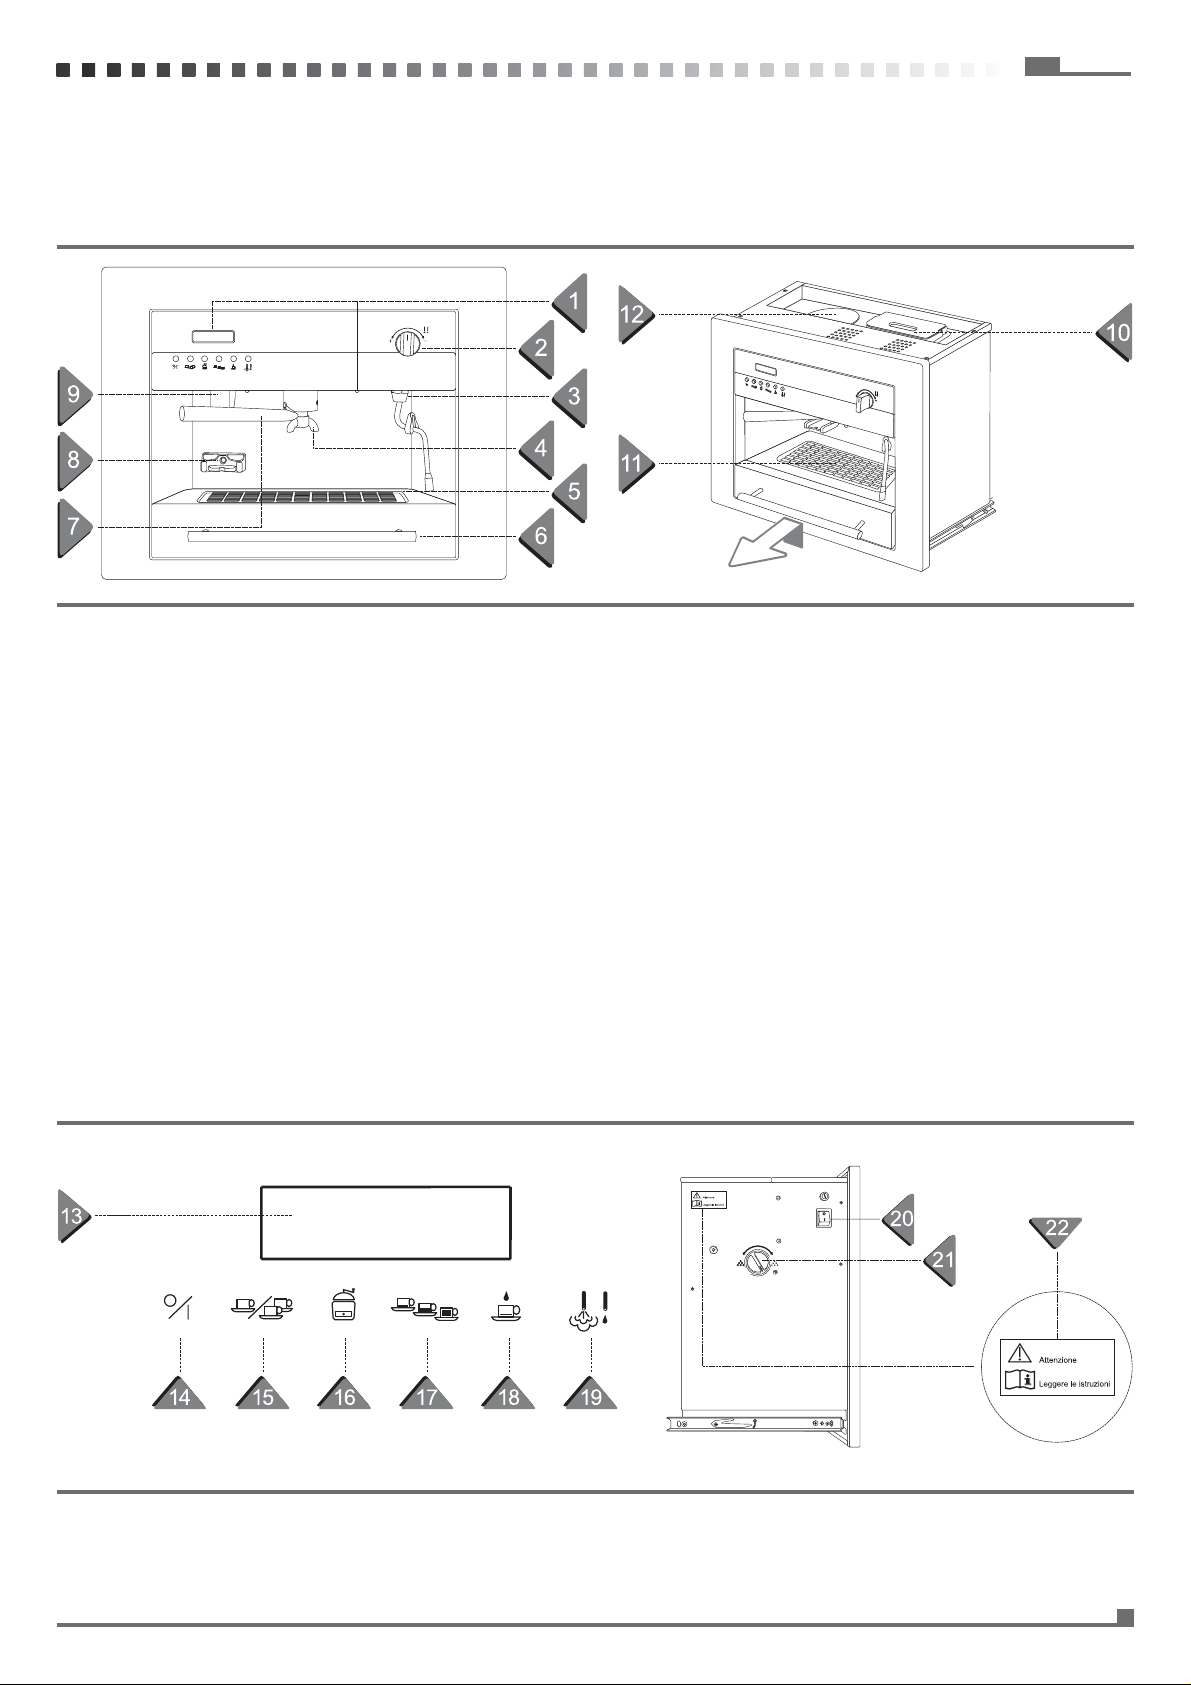
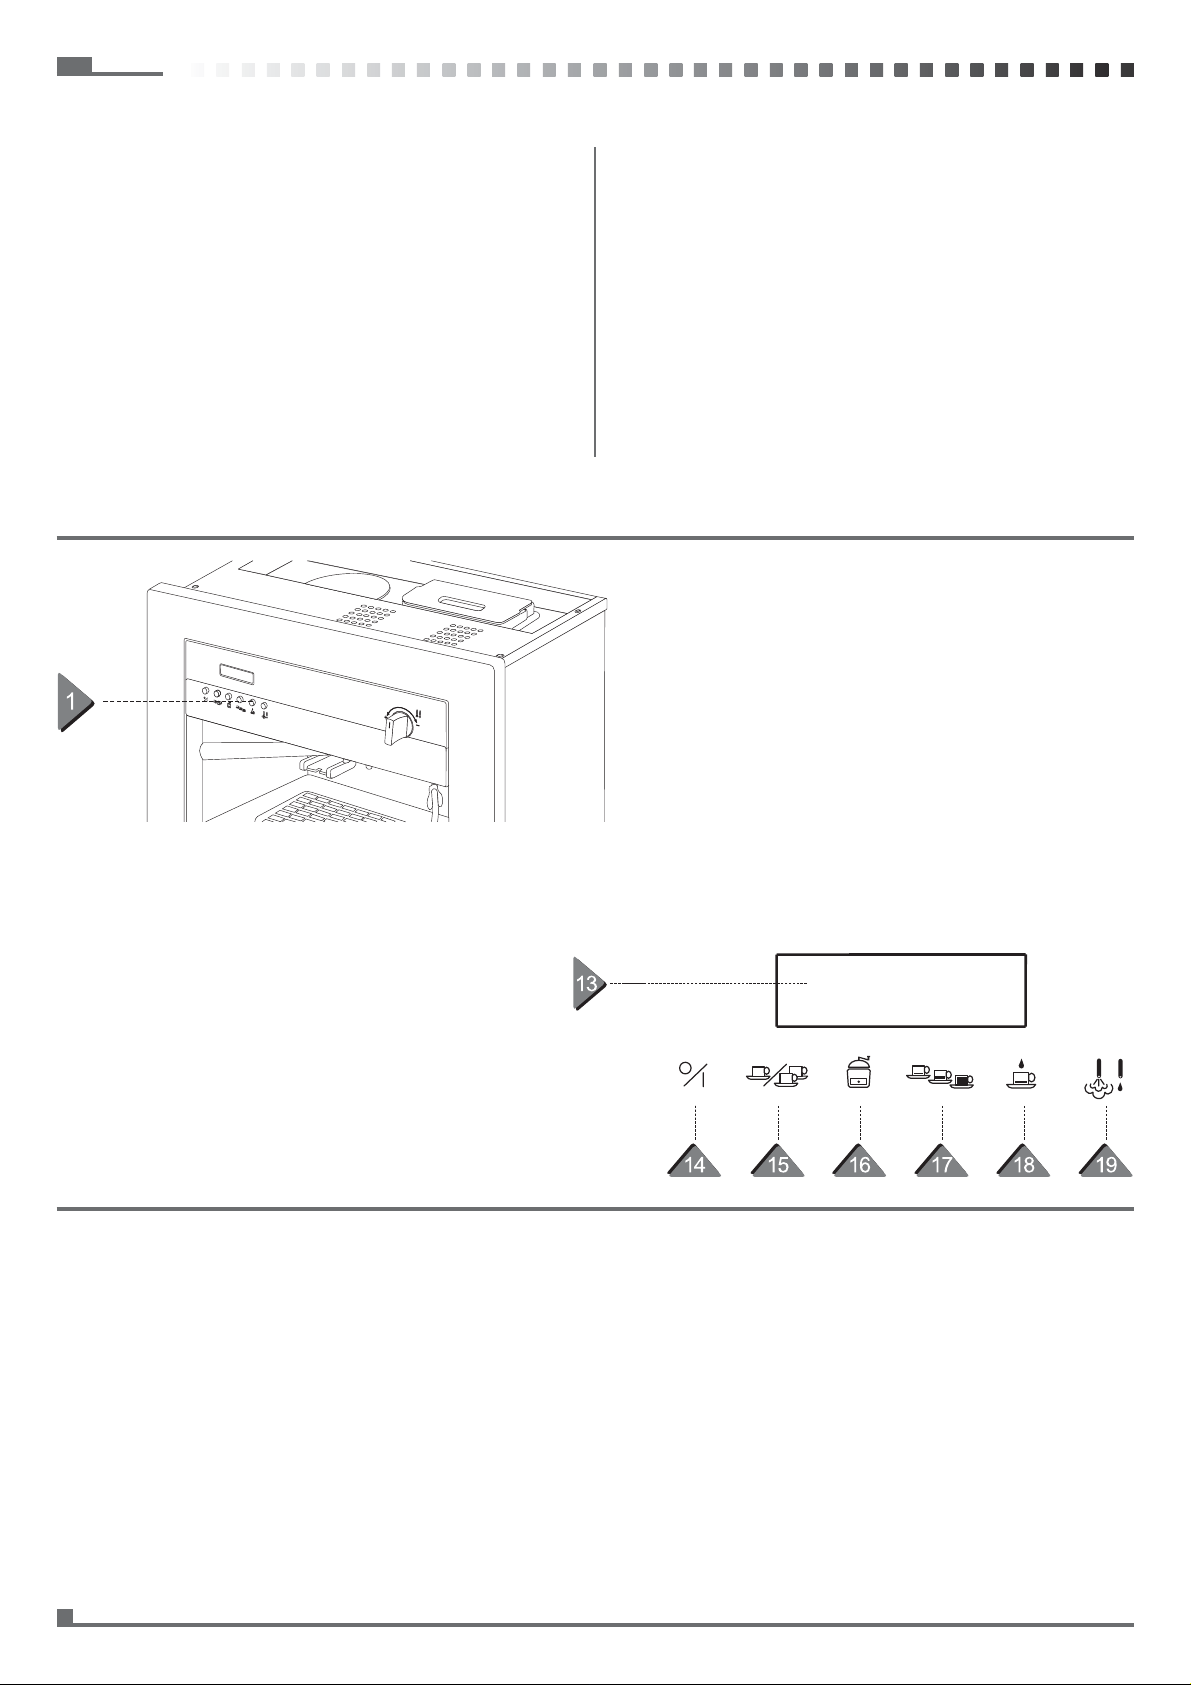
1 MACHINE DESCRIPTION
1 MACHINE DESCRIPTION
FRONT AND OVERALL VIEW
English
01. Touchpad
02. Steam knob
03. Hot water/steam dispenser
04. coffee dispenser
05. drip grille
06. steam nozzle
07. fi lter holder handle
08. holder for grinding
09. coffee grinder spout
10. water tank
11. drawer
CONTROL BUTTONS AND DISPLAY PANEL
12. Coffee container
13. display
14. on/off button
15. 1 or 2 cup button
16. Grinder button
17. short, medium, long button
18. coffee button
19. steam/water button
20. main switch
21. grind adjuster
22. technical label
ICT-03
3
Page 3

English
English
4
ICT-03
IMPORTANT SAFEGUARDS
IMPORT ANT SAFEGU ARDS
SAFETY INSTRUCTIONS AND WARNINGS
This machine complies with current safety regulations. Incorrect
use of the machine may cause harm.
Read these instructions carefully before using the machine. They
contain important information on safety, use and maintenance, to
provide protection and to avoid damages to the machine.
1 Read all instructions
2 Do not touch hot surface, use handles or knobs
3 To protect against fi re, electrical shock and injury to persons do
not immerse cord or plugs in water or other liquid
4 Close supervision is necessary when any appliance is used by
or near children.
5 Unplug from outlet when not in use and before cleaning. Allow
unit to cool before putting on or taking off parts, and before cleaning the appliance.
6 Do not operate any appliance with damaged cord, plug, after
the appliance malfunctions, or has been damaged in any manner. Return appliance to the nearest authorized service facility
for inspection, repair or adjustment
7 The use of accessory attachments not recommended by the ap-
pliance manufacturer may result in fi re, electric shock or injury
8 Do not use outdoors
9 Do not let cord hang over edge of table or counter, or touch hot
surfaces
10 Do not place on or near a hot gas or electrical burner, or in a
heated oven
11 Always attach plug to appliance fi rst, then plug cord into the wall
outlet. To disconnect, turn any control off. Then remove plug
from wall outlet.
12 Do not use appliance for other than intended use
13 To reduce the risk of fi re, do not place any heating or cooking
appliance beneath the appliance
14 To reduce the risk of fi re, do not mount unit over or near any
portion of a heating or cooking appliance
15 To reduce the risk of electrical shock, do not mount over a sink
1 6 To reduce the risk of fi re, do not store anything directly on top of
the appliance surface when the appliance is in operation.
CORRECT USE
• This machine is designed solely for preparing espresso, cap-
puccino, long coffee and for boiling water for tea and other hot
drinks.
Other types of use are not permitted and may prove dangerous.
The manufacturer will not be held liable for any damage caused
by incorrect use of the machine.
• The machine may also be built into a cabinet (special accessory). It is not suitable for outdoor use. Due to the weight of the
machine, the cabinet must be secured fi rmly to the wall.
• Installation, maintenance and repair works must only be carried
out by qualifi ed persons. Any installation, maintenance and re-
pair works carried out incorrectly may cause considerable danger to the user, for which the manufacturer will not assume any
liability.
• The machine should only be disconnected from the electrical
supply when:
- The main switch of the electrical supply is disconnected;
- The fuse for the house electrical supply is removed;
- The plug to the machine is taken out of the electrical socket.
To disconnect the machine from the electrical supply, unplug
without pulling on the cable.
“TO REDUCE THE RISK OF INJURY, DO NOT DRAPE CORD OVER
THE COUNTER TOP OR TABLE TOP WHERE IT CAN BE PULLED
ON BY CHILDREN OR TRIPPED OVER UNINTENTIONALLY”
POWER CORD HAS TO BE: UL approved, type SJO/SJT
16AWGx3C moulded plug, max length 4-1/2ft (1.4Mt)
• A short power-supply cord (or detachable power-supply cord) is
to be provided to reduce risks resulting from becoming entangled in or tripped over a longer cord.
• Longer detachable power-supply cord or extension cord are
available and may be used if care is exercised in their use
• If a long detachable power-supply cord or extension cord is used
the marked electrical rating of the detachable power-supply cord
or extension cord should be at least as great as the electrical
rating of the appliance.
• If the appliance is of the grounded type, the extension cord
should be a grounding-type 3-wire cord.
• The longer cord should be arranged so that it will not drape over
the counter op or table top where it can be pulled by children
or tripped over. An appliance that utilizes a detachable powersupply cord shall be provided with: the appropriate detachable
power-supply cord as indicated in supply connections, instructions that advise the consumer that the appropriate detachable
power-supply cord is not provided, and specify which detachable
power-supply cord or cords are appropriate. If long and short detacable power-supply cords are available, the instructions shall
include information regarding the problems attendant with each.
• Under no circumstances should the machine casing be opened. Touching the voltage cables or changing the electrical and
mechanical structure may cause danger of electric shock. It may
also affect the operation of the machine.
The manufacturer declines all responsibility for persons or
property if the above instructions are not observed in full.
• If the machine has to be installed with other appliances, it must
be separated from them with a shelf.
TECHNICAL SAFETY
• Before connecting the machine to the electricity supply, check
the electrical information (voltage and frequency) on the data
sheet with that of the electricity supply thoroughly.
This data should be exactly the same to avoid damaging the
machine. In case of doubt, contact a qualifi ed electrician.
• The electrical safety of the machine is only guaranteed if it is
connected to a regulation earth wire. It is very important to check this carefully. In case of doubt, have the electricity supply
checked by a qualifi ed electrician.
The manufacturer will not be held liable for any harm or damage
caused due to a lack or malfunctioning of the earth wire (e.g.
risk of electric shock).
• Only operate the machine when installed so as to avoid contact
with electric parts. For the assembly , dismantling and daily maintenance of the machine, always make sure it is disconnected
from the electrical supply.
• The machine should not be connected to the electrical supply
with extension cables, as these do not provide the necessary
safety for the machine (e.g. danger of overheating).
4
USE
Warning! Danger of burning! Liquids leaving the dispensers
are boiling!
• Children should only use the machine while under supervision.
Children’s skin is more sensitive to high temperatures.
They may burn themselves! Remember too that espresso cof-
fee is not a children’s drink.
• When using the machine for the fi rst time, rinse the pipes to get
rid of any deposits and to ensure hygiene.
• Only fi ll the water tank with drinking water at room temperature
or chilled. Hot or boiling water or any other liquid may damage
the operation of the machine. It is advisable to replace the water
daily to prevent bacterial growth.
• Only pour coffee beans into the coffee container. If ground coffee
is poured into the container, it may damage the grinder.
• Sugar damages the machine!
Do not fi ll the machine with coffee beans treated with caramel,
sugar or similar substances, instant coffee or other substances
containing sugar.
ICT-03
Page 4

English
English
5
ICT-03
SAVE THESE INSTRUCTIONS
• Boiling water and steam may cause burning, so these functions
should be performed with the utmost care. Never direct the steam
dispenser towards parts of the body. It may cause burning!
• Always ensure that the steam selector is disconnected when no
steam is required, otherwise, steam may escape unintentionally .
It may cause burning!
• The water/steam dispenser gets very hot during use. Only hold
the dispenser by the handle. It may cause burning!
• Depending on the lime content of the water, the machine should
be descaled regularly with a citric acid solution. In areas of very
hard water, the water pipes should be descaled more frequently.
The manufacturer will not be held liable for any damage
caused by inadequate descaling.
Follow the mixing instructions indicated on the descaling pack.
Otherwise, the machine may get damaged.
• Do not lean on the open drawer of the coffee machine, as this
may damage the machine.
• If the coffee machine is installed near an oven with a self-cleaning function, disconnect the coffee machine during self-cleaning, otherwise it may get damaged.
The manufacturer cannot be held liable for any damage caused by
failure to observe the safety instructions and warnings.
SAVE THESE INSTRUCTIONS
This machine complies with the safety regulations currently in force. Incorrect use of the machine may lead to personal injury and
damage to objects.
Please read all the instructions carefully before using the machine
as they contain important information on safety and the use and
maintenance of the machine. This will protect you and prevent damage to the machine.
CORRECT USE
• The machine is designed exclusively for preparing espresso and
cappuccino, as well as boiling water for tea and other hot beverages. Other types of use are not permitted and could be dangerous. The manufacturer declines all responsibility for damage
caused by improper and/or or incorrect use of the machine.
TECHNICAL SAFETY
• Before connecting the machine to the power mains, check carefully to make sure that the voltage and frequency ratings shown
on the rating plate correspond to those of the electrical system.
These values must absolutely correspond in order to avoid
damage to the machine. In case of doubt, contact a qualifi ed
electrician.
• The electrical safety of the machine is guaranteed only if it is
connected to a standard earth conductor. It is very important to
verify this information with the utmost attention, and in case of
doubt have the electrical system checked by a qualifi ed electri-
cian. The manufacturer declines all responsibility for any damage caused to people or things due to the lack or malfunction of
the earth conductor (for example: risk of electrocution).
• Put the machine into operation only after complete installation
in order to avoid contact with the electrical components. Before
carrying out assembly , disassembly, or daily maintenance of the
machine, always make sure to disconnect the power cable from
the electrical outlet.
• The connection of the machine to the power mains must not be
made using extension cables, as they do not guarantee the necessary safety of the machine (for example: risk of overhea-
ting).
• The machine can also be fl ush-mounted in a wall unit (special
accessory). It is not suitable for outdoor use. Considering the
heavy weight of the machine, it is essential for the unit to be
adequately secured to the adjacent wall.
• If the power cable is damaged, it must be replaced by the manufacturer, its technical service, or by a qualifi ed electrician, in
order to prevent any risk.
• All installation, maintenance, and repair operations must be carried out by qualifi ed personnel only. Incorrect installation, main-
tenance, and repairs may lead to serious dangers to the user, for
which the manufacturer declines all responsibility.
• The machine is disconnected from the power mains only when:
- the main switch of the electrical system is switched off;
- the fuse of the home electrical system is completely discon-
nected;
- the power plug of the machine is completely removed from the
electrical outlet.
To disconnect the machine from the power mains, grasp the
plug and remove; do not pull on the power cable.
• Do not open the machine casing for any reason. Touching the
voltage cables or modifying the electrical or mechanical structure may lead to electrocution. This could also cause disturbance
in the operation of the machine. The manufacturer declines all
responsibility towards persons or things due to failure to
observe the instructions above.
• In the event that the machine has to be installed in combination
with another appliance, it must be separated from the other appliance by a solid intermediate shelf.
USAGE SAFETY
Warning! Danger of burning! The liquids that come out of the
dispensers are extremely hot!
• Children may access the machine only under adult supervision.
Children’s skin is more sensitive to high temperatures.
Danger of burning!
Remember, too, that espresso coffee is not a suitable beverage
for children.
• The fi rst time the machine is put into operation, it is necessary
to rinse the pipes to eliminate any deposits and to ensure hygiene.
• Fill the water tank only with room temperature or cold potable
water. Hot or boiling water or any other liquid can damage the
operation of the machine. We recommend changing the water
daily to prevent the germ proliferation.
• Place only whole coffee beans in the coffee container. Ground
coffee poured into the container can damage the operation of the
grinder.
• Sugar damages the machine!
Never use coffee beans that are treated with caramel, sugar,
or other similar substances, instant coffee, or any substances
containing sugar.
• Boiling water and steam can cause burning; therefore, please
use these functions with the utmost attention. Do not turn the
steam dispenser towards any parts of your body . Danger of bur-
ning!
• Always make sure that the steam selector is disengaged when
steam is not needed. Otherwise, steam could be dispensed inadvertently. Danger of burning!
• The hot water/steam dispenser becomes very hot during use.
Grasp the dispenser only by the coupling. Danger of burning!
• Depending on the lime content of the water, the machine should
be descaled regularly using a liquid solution of citric acid. In zones where the water is very hard, it will be necessary to descale
the water pipes more often.
The manufacturer declines all responsibility for any damage
caused by insuffi cient descaling.
Follow the mixture ratio indicated on the package of the desca-
ling product; otherwise the machine could be damaged.
• Do not put weight on the open door of the coffee machine, as this
could damage the machine.
The manufacturer declines all responsibility for any damage caused by failure to follow the safety instructions and precautions.
ICT-03
5
Page 5
English
English
6
ICT-03
Fig. 1A
Fig. 1B
2 DESCRIPTION AND OPERATION
2 DESCRIPTION AND OPERATION
The coffee machine has two water heaters, one for the water and
one for the coffee. This makes it possible to prepare boiling water
for tea, or use the steam for cappuccino and prepare the espresso.
Differently from the norm, in this espresso machine the beans can
be ground at the moment and only when necessary . This provides
the best aroma of the coffee because it is freshly ground.
If the container used, glass or cup, has a smaller volume than the
dosage programmed by the machine, coffee dispensing can be
interrupted at any time by pressing key “12” (Fig. 1A/B), allowing
the user to decide on the preferred dose.
The grinding level can also be set, choosing a coarser or fi ner grind
depending on user preference, by turning the dial situated on the
left side of the machine.
The boiling water dispensed is particularly suitable for preparing
tea because the temperature is ideal.
The boiling water from the dispenser can also be used for preheating the cups.
Fig. 1B
Fig. 1A
ICT-03
6
Page 6

English
7
ICT-03
3 INSTALLATION
3 INSTALLATION
Fig. 2A
IMPORTANT NOTE:
The installation of the appliance must be carried out exclusively by
qualifi ed personnel in compliance with the regulations in force.
Considering the heavy weight of the machine, it is essential that the
furniture unit be suitably secured to the wall.
1. Check to make sure that the opening for housing the machine
has the correct dimensions (Fig.2A/B).
English
Fig. 2A
ICT-03
7
Page 7

English
English
8
ICT-03
Fig. 2B
Fig. 2B
8
ICT-03
Page 8

English
English
9
ICT-03
Fig. 3
Fig. 4
2. Remove the machine from the base by unhooking it from the
lateral guides using the levers (Fig. 3), raising the lever of the right-hand guide and lowering the lever of the left-hand guide (1).
3. Slide the base of the machine into the unit all the way back (2).
4. Attach the base to the shelf using the 10 holes and the screws
provided (Fig.4).
Note : If the sides of the base are not fl ush with the sides of the
unit, use the shims provided (3).
5. Close the machine guides all the way.
6. Connect the plug to the power outlet following the safety regulations in force. Important : The power outlet must be accessible
after the machine has been installed.
7. Insert the machine in the unit, taking care that the machine guides are correctly inserted in the guides on the base, and slide
the machine in leaving the necessary space for reaching and
connecting the power plug.
8. Close the machine by sliding it all the way back.
9. Fill the water tank and the coffee container.
10. Supply power to the machine using the main switch situated on
the left side of the machine (page 3 Fig. 18)
The manufacturer declines any responsibility towards persons or objects, as well as for the proper operation of the machine, due to failure to follow the instructions given above.
Fig. 3
ICT-03
Fig. 4
9
Page 9

English
English
10
ICT-03
4 IMPORTANT INSTRUCTIONS FOR FIRST TIME USE!
4 IMPORTANT INSTRUCTIONS FOR FIRST TIME USE!
Instructions additional to the instruction booklet, which must be
read prior to using the machine.
The manufacturer declines all responsibility for damage caused
by improper or incorrect use and failure to follow the instructions
provided in the instruction booklet and given here below.
1. Extract the machine by lifting the handle of the drawer and pulling it towards you.
2. Fill the water tank and the cof fee container following the instructions on page 10 of the instruction booklet.
3. Supply power to the machine using the main switch (18) located
in the upper part of the left side of the machine.
4. Close the machine.
5. Switch on the machine using the key
COFFEE 1 SHORT
WATER
6 The machine will automatically fi ll the water circuits. During fi l-
ling you will hear a sound intermittently for several seconds.
COFFEE 1 SHORT
WATER
8. Dispense 2 coffees to fi ll the grinder and the water system.
9. The machine is now ready for use.
10
ICT-03
Page 10

English
English
11
ICT-03
6 OPERATION AND USE
5 ADDING WATER AND COFFEE BEANS IN THE RESPECTIVE CONTAINERS
5 ADDING WA TER AND COFFEE BEANS IN THE RESPECTIVE CONT AINERS
FILLING THE WATER TANK
The water tank needs to be refi lled when the display shows:
COFFEE
WATER LOW
To ensure the best result in making espresso, in addition to using
good quality coffee, it is also essential to use good water. We therefore recommend emptying the water tank frequently and refi lling
it with fresh water. Avoid leaving the water in the tank for excessively long periods.
IMPORTANT: Use only cold potable water with hardness less than
7°F.
• Open the machine by raising the drawer handle and pulling ou-
tward.
• Fill the tank up to 4 cm (1 9/16 inches from the top).
• Close the machine.
N.B. When the water tank is almost empty , the message “ WATER
LOW “ will appear on the display panel
Note: The tank can be removed for cleaning.
FILLING THE COFFEE BEAN CONT AINER
The coffee bean container needs to be refi lled when the display shows:
COFFEE LOW
WATER
Fill the coffee bean container using only beans for espresso coffee.
Any other substance, including ground coffee, can damage the
coffee grinder.
Do not use beans treated with caramel, sugar, or similar substances, instant coffee, or any beverage containing sugar. Sugar can
damage the machine.
• Open the machine by raising the drawer handle and pulling outward.
• Remove the lid of the coffee bean container.
• Fill the container with beans up to 2 cm (3/4 inches) from the
top.
• Put the lid back on the container.
• Close the machine.
6 OPERATION AND USE
SWITCH-ON
Switch the machine on using the key
After a few seconds, the following message appears on the display
panel:
Welcome message
HELLO
COFFEE 1 SHORT
WATER
During the heating phase, the words COFFEE and WATER fl ash.
The machine is ready for use only when they have stopped
fl ashing.
The display also shows the type of coffee selected (short/medium/
long) as well as the choice of making one or two coffees at the
same time.
PROGRAMMING THE MACHINE
To enter programming mode, with the machine off press the key
for 3 seconds until the display panel shows:
PROGRAMMING
Use the keys
grammed, which are, in order of appearance:
Pressing the key
Use the keys
lated to the hour fl ash.
After setting the hour, press the key
to select the functions to be pro-
CLOCK
the display panel shows:
20:30
to set the hour. Initially the two digits re-
Various functions can be adjusted and programmed, as indicated
below:
ICT-03
The two digits related to the minutes fl ash. Set the minutes by
11
Page 11

English
English
12
ICT-03
pressing the keys
AUTOMATIC SWITCH-ON
Press the key
and the display panel shows:
AUTO ON
07.30
Use the keys
to set the time you want the machine to
switch on automatically.
Automatic switch-on can be activated or de-activated by pressing
the key (with the machine off). The display will show an * next
to the time
AUTOMATIC SWITCH-OFF
Press the key
and the display panel shows:
AUTO OFF
22.10
DISPLAY LANGUAGE
Press the key
and the display panel shows:
DISPLAY
ITALIANO
Use the keys
to select the desired language.
Available languages are English, Spanish, Italian, French and German.
WATER HARDNESS
Press the key
the display panel shows:
WATER HARDNESS
00°dh
Use the keys to set the hardness of the water after
using the special measuring kit to establish the correct number
(0,5,10,15,20,25°dh) to be entered.
(1°dh=1.786°F=1.250°e=17.86ppm=0.1786mmol/lt)
DESCALING
Use the keys
to set the time you want the machine to
switch off automatically.
AUTO SHUT DOWN
Press the key
and the display panel shows:
AUTO SHUT DOWN
15min
Use the keys
to set the minutes (15-30-45-60-75-90
min) after which the machine switches off automatically. 0=OFF.
ENERGY SAVINGS
Press the key
and the display panel shows:
ENERGY SAVINGS
15min
DESCALING
20Lt 50%
The display shows the number of litres of water that have been dispensed and the theoretical level of lime scale build-up expressed as a percentage (100% indicates that you need to carry out descaling). This
parameter is calculated based on the water hardness and the number
of litres of water dispensed. The lime scale indicator will reset after a
descaling cycle has been carried out.
COFFEE COUNTER
Press the key and the display panel shows:
COFFEE
2240
The display indicates the number of coffees that have been made
since the fi rst use. This number is not resettable.
GROUND COFFEE QUANTITY
Press the key
and the display panel shows:
Use the keys
to set the minutes (15,30,45,60,75,90 min)
after which the machine goes into “energy savings” mode. In this
phase, the temperature of the water heater is lowered to reduce
consumption.
Press the key
to restore the machine to a ready status
quickly.
12
GROUND COFFEE
0
Using the keys
you can change and set the quantity of
ground coffee to make the fl avour of the coffee the desired stren-
gth. The scale of variation ranges from -5 to +5 (0.1 sec.). The 0
position corresponds to the optimal factory setting.
ICT-03
Page 12

English
English
13
ICT-03
Fig. 5
COFFEE TEMPERATURE
Press the key
Using the keys
of the coffee. The scale of variation ranges from 14° to +50° F (da
-10 °C a +10 °C). The 0 position corresponds to the optimal factory
setting.
HOT WATER TEMPERATURE
Press the key
Using the keys
the hot water. The scale of variation ranges from 14° to +50° F (da -10
°C a +10 °C). The 0 position corresponds to the optimal factory setting.
and the display panel shows:
COFFEE TEMPERATURE
0
you can change and set the temperature
and the display panel shows:
WATER TEMPERATURE
0
you can change and set the temperature of
IMPORTANT !! After setting the new grind, it is necessary to
dispense at least 2 coffees.
SELECTING THE TYPE OF ESPRESSO
Fig. 5
Using the key you can select from among the following
types of espresso dose:
SHORT
NORMAL
LONG
ADJUSTING THE ESPRESSO DOSE
STEAM TEMPERATURE
Press the key
Using the keys
of the steam. The scale of variation ranges 14° to +50° F (-10 °C a
+10 °C). The 0 position corresponds to the optimal factory setting.
Press the key
and the display panel shows:
STEAM TEMPERATURE
0
you can change and set the temperature
to exit the programming function.
SETTING THE GRIND
A number of factors help you to understand whether the grinding
level needs to be adjusted:
• If the coffee is dispensed too quickly, this means that the beans
have been ground too coarsely.
• If the coffee comes out in slow drips, this means that the beans
have been ground too fi nely. A very important factor for ensuring
a good coffee is the right setting for the grinding level, which is
factory-set but can also be modifi ed as follows:
• Open the machine.
• Carefully turn the dial located on the left side of the machine “A”
(Fig.5).
To change and memorize the quantity of coffee, proceed as follows:
• During the infusion, press and hold the key
quantity (coffee dose) is reached.
The display shows the message “MEMO ?”
COFFEE 1 SHORT
WATER MEMO ?
If you want to memorize the dosage of coffee just made, proceed
as follows:
• To memorize, as soon as the infusion is fi nished, use the key
to select the type of coffee (short, medium, or long) on
which to memorise the new setting.
• Press and hold the key again until you hear the beep of
confi rmation.
Now the new quantity of coffee is memorized and associated with
the type of coffee selected.
until the desired
SETTING 1 OR 2 COFFEES
With this machine you can prepare a single coffee or 2 coffees
simultaneously.
Make your selection using the key
Turning the dial clockwise produces a fi ner grind; turning it anti-
clockwise produces a coarser grind.
Note: Turn the dial min. 3 complete turns, clockwise or anticlockwise, to obtain a change in the degree of grinding, fi ner or
coarser.
ICT-03
13
Page 13

English
English
14
ICT-03
7 GRINDING
8 CARE AND CLEANING
Fig. 7
Fig. 7A
Fig. 7B
7 GRINDING
Put the fi lter holder down the grinder spout an press button ,
the grinder will grind the programmed dose.
PREPARING ESPRESSO
• Fix the fi lter holder on the group.
• Position the cup or cups under the dispenser spout.
• Make sure that the word “COFFEE” has stopped fl ashing, which
means water temperature reached.
• Press the key
automatically , but it can also be stopped beforehand by pressing
the same key again.
to start the dispensing. Dispensing stops
HOT WATER
• Switch on the water heater for preparing hot water using the key
and wait till the word “WATER” has stopped fl ashing.
• Position the cup or other container under the nozzle.
• Turn the knob of tap “A” (Fig.7) anti-clockwise to dispense the
hot water.
PREPARING CAPPUCCINO
• Select the steam function using the key
• Wait till the word “STEAM” stops fl ashing on the display.
• Before positioning the container under the steam nozzle, turn the
dial “A” (Fig.7) clockwise to fl ush out the water remaining in the
pipes.
• Prepare a medium coffee in a cappuccino cup.
• Fill the 50 cl jug milk with about 10 cl of milk. This is the quantity
for preparing one cappuccino. We recommend preparing frothed
milk for one cappuccino at a time.
• Introduce the steam nozzle into the milk container so that the
spout is positioned on the bottom of the container (Fig. 7A).
• Turn the steam dial anti-clockwise to release the steam and heat
the milk for a few seconds.
• Important: Do not heat the milk excessively. Overheated
milk no longer produces froth.
• After a few seconds, position the spout of the nozzle at the surface of the milk (Fig. 7B).
• When the desired froth is obtained, close the steam tap.
• Pour the milk delicately into the cup previously fi lled with coffee.
N.B.: If the machine is switched off with the steam or water function activated, this function remains in memory when it is switched
back on the next time.
Fig. 7
8 CARE AND CLEANING
The appliance must not be immersed in water or other liquids for
cleaning.
Let the coffee machine cool down before proceeding with cleaning.
Danger of burning !
Do not use steam appliances for cleaning the machine.
Do not use any detergent substances containing soda, acids, or
chlorides! These substances will ruin the surface of the machine.
Regular cleaning guarantees the effi cient operation and long life of
your espresso coffee machine.
Remove the grille and tray from the machine and clean both the
front panel and the inside compartments with a soft sponge dampened with a sanitising detergent solution.
Dry with a soft cloth to avoid scratching.
Fig. 7A
Fig. 7B
WATER TANK
It is preferable to empty the water tank daily and refi ll it, when pos-
sible just before preparing coffee, with cold potable water.
Wash the water tank by hand using a sanitising detergent solution.
HOT WATER/STEAM DISPENSER
Clean the hot water/steam dispenser with a soft sponge using only
water, preferably hot water. To remove any incrustations, we recommend washing the components in the dishwasher. The steam
spout can be unscrewed for washing in the dishwasher. When it is
used for frothing milk, it is advisable to release some steam fi rst to
fl ush out any remaining residues of milk or froth.
14
ICT-03
Page 14

English
15
ICT-03
9 DESCALING THE MACHINE
9 DESCALING THE MACHINE
10 TROUBLE-SHOOTING
English
When the message “DESCALING” appears on the display
with the machine off, it is time to descale your machine using
specifi c products that are appropriate for coffee machines.
Attention – Very Important!
Do not use lemon-based products for descaling. These products contain citric acid, which in contact with calcium at high
temperatures forms a chemical reaction, creating calcium citrate that could lead to the total obstruction of the water circuits.
Proceed as follows:
Open the drawer and remove the water from the tray and any coffee grounds from the container. Re-close the drawer without replacing the grille, and position the steam nozzle so that the water that
comes out of it falls into the tray.
• Switch on the machine and wait till the words WA TER and STEAM
have stopped fl ashing.
• Switch off the machine and go into programming mode by pressing
the key
• Select the descaling function using the keys
and “DESCALING” appears on the display panel.
• Press and hold the two keys together and then press
• The machine prepares for descaling. When you hear the beep of
confi rmation, the message DESCALING STAGE 01 appears on
the display.
until the displays shows “PROGRAMMING”.
DESCALING STAGE 01: Fill the tank halfway full with the descaling product then press button
DESCALING STAGE 02: open the steam tap
DESCALING STAGE 03: machine starts to delivery water from
nozzles
DESCALING STAGE 04: refi ll water tank with fresh water, Press
button
DESCALING STAGE 05: machine starts cleaning cicle
Close the steam tap. Fill the water tank, and wait for the coffee
and water temperatures to be reached. The machine is ready for
normal operation.
The manufacturer declines all responsibility for any damage
caused by failure to carry out descaling.
IMPORT ANT: machine provided with direct water supply mast
be plumbed according to regional rules, with main tap, retaining valve, 150micron fi lter.
10 TROUBLE-SHOOTING
The machine does not switch on.
- Front panel not completely closed.
- No electricity.
The coffee does not come out or only comes out in slow drips.
- Lack of water in the tank.
- Coffee grind too fi ne.
- Coffee Machine pipes obstructed.
The coffee comes out too fast and is not creamy.
- Coffee grind too coarse.
- Coffee too old.
- Coffee blend.
The milk froth does not form.
- Check that the fl ow of steam is suitable.
Loud noise of the pump when dispensing.
- Lack of water in the tank.
- Insuffi cient pressure in the fi lter holder due to a coarse grind.
AUTO-DIAGNOSTICS
The electronic circuits manage and recognize various alarms and
operating anomalies.
These are indicated as fl ashing on the display panel
2. With the machine on:
Solution: Before calling in the technical service, try opening and
re-closing the machine.
3. With the machine on:
Solution: Check the water tank and open the water dispensing
tap, letting water out from the steam nozzle until the symbol stops
fl ashing (circuit refi ll).
4. With the machine on:
Solution: Check for the presence of foreign bodies in the grinder
(stones, impurities, other foreign bodies).
Turn the grind adjustment knob anti-clockwise (coarse grind) all
the way. Remove any impurities by running the grinder for a few
seconds. Then re-adjust the grind to the previous position.
For any other operating anomaly, contact your nearest service center.
1. With the machine off:
CLOSE TAP
Solution: Close the tap.
ICT-03
15
Page 15

English
English
16
ICT-03
11 TECHNICAL DATA
12 DISPOSAL OF ELECTRICAL APPLIANCES
11 TECHNICAL DATA
• External dimensions: H.458 x L.595 x D.320 mm
• Flush-mount dimensions: H.450 x L.568 x D.315 mm
• Operating voltage: 220-240 V~ 50/60Hz, 110V~60Hz
• Pump pressure: 15 bar
• Pump power: 48 W
• Coffee water heater power: 1000 W
• Steam water heater power: 600 W
• Grinder power: 100 W
• Max power: 1700/1100 W
• Water tank capacity: approx. 2.5 l
• Coffee tank capacity: approx. 350 g
• Coffee water heater heating time: approx. 2 min.
• Gross weight: 36.9 kg
Net weight: 32.6 kg
12 DISPOSAL OF ELECTRICAL APPLIANCES
CE This appliance complies with Directive 73/23
• regarding electrical safety standards EN 60335-1 (ed. 2002
– Safety of household and similar electrical appliances) and
EN 60335-2-15 (ed. 2002 – Particular requirements for appliances for heating liquids).
• EMC 89/336 and the respective standards:
55014-1
55014-2
61000-3-2
61000-3-3
European Directive 2002/96/CE on electrical waste and electronic equipment (WEEE) requires that electrical appliances not be disposed
of as unsorted municipal waste. Used appliances must be collected separately to optimize the reclamation or recycling of the component
materials and prevent potential harm to human health and to the environment.
The symbol of the cancelled garbage bin is displayed on all these products to remind users of the obligation of separate collection.
For further information on the correct disposal of electrical appliances, please contact your local authorities or the retailer.
16
ICT-03
Page 16

 Loading...