

Page 1
www.cda.eu
CTE61
Extractor
Installation, use and maintenance
Page 2

2
Contents:
3 Important
5 Important information
6 Using your extractor
7 Care and maintenance
9 Troubleshooting
10 - 13 Installation
10 Installation - height
11 Installation - preparation and ducting
12 Installation - mounting the extractor
14 Mains electrical connection
17 Energy eciency information
Page 3
3
Important
The CDA Group Ltd cannot be held responsible for injuries or losses
caused by incorrect use or installation of this product. Please note
that CDA reserve the right to invalidate the guarantee supplied with
this product following incorrect installation or misuse of the appliance
or use in a commercial environment.
This appliance is not designed to be used by people (including
children) with reduced physical, sensorial or mental capacity, or
who lack experience or knowledge about it, unless they have had
supervision or instructions on how to use the appliance by someone
who is responsible for their safety.
Under no circumstances should any external covers be removed for
servicing or maintenance except by suitably qualified personnel.
Appliance information:
Please enter the details on the appliance rating plate below for
reference, to assist CDA Customer Care in the event of a fault with
your appliance and to register your appliance for guarantee purposes.
Appliance Model
Serial Number
EU Declarations of Conformity:
This appliance has been manufactured to the strictest standards and
complies with all applicable legislation, including Gas safety, Electrical
Page 4

4
safety (LVD) and Electromagnetic interference compatibility (EMC).
IMPORTANT INFORMATION FOR CORRECT DISPOSAL OF THE
PRODUCT IN ACCORDANCE WITH EU DIRECTIVE 2012/19/EU.
At the end of its working life, the product must be taken to a special
local authority waste collection centre or to a dealer providing
appliance recycling services.
Disposing of a household appliance separately avoids possible
negative consequences for the environment and health. It also
enables the constituent materials to be recovered, saving both energy
and resources. As a reminder of the need to dispose of household
appliances separately, the product is marked with a crossed-out
wheeled dustbin.
Page 5

5
Please note:
• Under no circumstances should the extractor be
connected to any gas ventilation system, flue system or
hot air ducting system.
• Do not vent the extractor into an attic or loft space.
• Only house the extractor in rooms with adequate
ventilation. Remember that the extractor is powerful and
whatever air is extracted needs to be replaced.
• Do not tile the extractor in. It should be removable for
service or maintenance.
• Do not use silicone sealant to secure the hood to the wall.
• You must be able to isolate the extractor from the mains
electrical supply after installation.
• This appliance has been designed to be used in a room
with a volume of less than 36m³.
• Steam cleaners must not be used when cleaning this
appliance.
• The performance of your extractor will vary depending
on a number of factors. These include: type of extraction,
length of ducting, room volume, ventilation available and
cleanliness of the filters.
Page 6
6
Using your extractor
For best performance, you should switch on the extractor 15 minutes
before starting to cook and leave it to run for approximately 15 minutes
after the end of cooking.
Controls
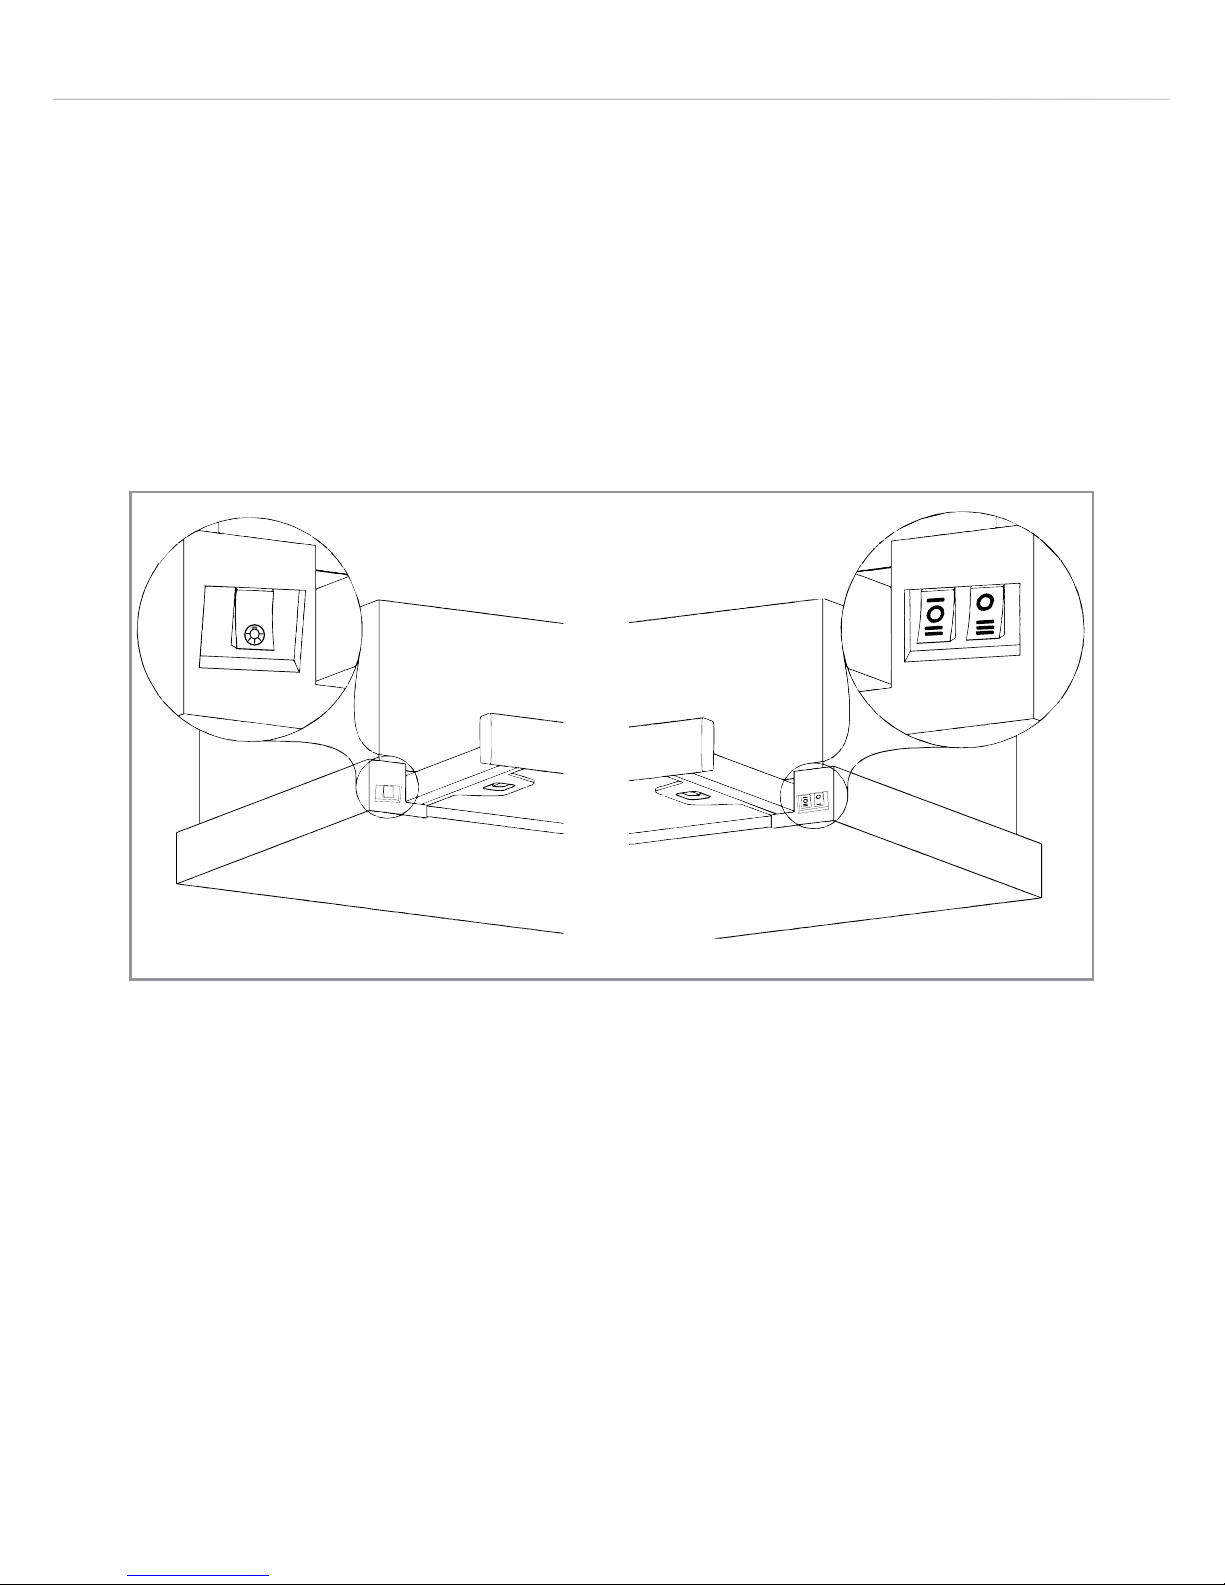
A - Lamp switch B - Left speed switch C - Right speed switch
To switch the extractor on and adjust speed
Slide open the canopy and activate either switch B or switch C (Fig. 1).
Switch B, the left speed switch, has three positions; speed 1, speed 2
and o. Switch C, the right speed switch, has two positions; speed 3
and o.
To switch the extractor o
Simply close the sliding canopy (the extractor will resume when the
canopy is re-opened). However, if leaving the appliance o for a long
time, ensure that the left speed switch is in the o (centre) position and
the right speed switch is in the o position.
Fig. 1
A
B C
Page 7

7
To switch the lights on
Slide open the canopy and activate the lamp switch (A). Fig. 1 shows the
switch in the o position.
To switch the lights o
Simply close the sliding canopy. The lights will come back on when the
canopy is re-opened. However, if leaving the appliance o for a long
time, ensure that the lamp switch is in the o position.
Care and maintenance
IMPORTANT: DO NOT PERFORM MAINTENANCE OR CLEANING
OF THE EXTRACTOR WITHOUT FIRST SWITCHING OFF THE
ELECTRICITY SUPPLY.
Cleaning
You should use a nonabrasive cleaner. Any abrasive cleaner
(including Cif) will scratch the surface and could erase the control
panel markings.
You can clean your extractor eectively by simply using a dilute
solution of water and mild detergent and drying to a shine with a clean
cloth, for example a micro-fibre Cloth.
Cleaning the grease filters
The grease filters should be kept clean to minimise the risk of fire.
At least once a month you should remove and clean the grease
filters with hot soapy water. You can also wash the grease filters in
a dishwasher, ensuring that you place them in an upright position to
prevent damage from other items in the dishwasher.
Page 8

8
To remove the grease filters, push in the button on the handle and
then pull down on the filter at the front. When you have released it at
the front, then you can pull the filter out completely.
After rinsing and drying, reassemble the grease filters to the hood by
reversing the removal process.
Please note:
Cleaning the grease filters in the dishwasher may lead to
discolouration. This is normal and does not constitute a fault with the
appliance.
Changing the charcoal filter (re-circulating mode only)
To ensure best performance of your extractor, you should replace
the charcoal filters every four to six months, depending on use. The
charcoal filters are an optional accessory. These are available from
the CDA Sales team on 01949 862010 under code CHA34.
To attach the charcoal filters:
• Remove the grease filters as described above.
• Align the slots on the charcoal filter with the notches on the side of
the motor. Place the filter onto the motor and turn clockwise slightly.
The filter should hold firmly in place. Repeat with the other side.
• Finally, replace the grease filters.
Page 9

9
Troubleshooting
Please note:
Your extractor is equipped with a motor protection device that will
switch o the motor to prevent damage from overheating. This may
happen during cooking when most or all of a hob’s zones/burners are
being used simultaneously, or if your extractor is installed incorrectly,
lower than the recommended height.
This is normal, and the extractor will work again once the motor has
cooled suciently.
If your extractor is not working:
1. Check that the mains supply has not been switched o.
2. Check that the fuse in the spur has not blown.
3. Check that a speed switch is active and the canopy is open.
If your lights are not working:
1. Check that the mains supply has not been switched o.
2. Check that the fuse in the spur has not blown.
3. Check that the lamp switch is on and the canopy is open.
4. If the extractor still extracts, then it’s possible both bulbs have gone.
Contact CDA Customer Care
A: Customer Care Department, The CDA Group Ltd, Harby Road,
Langar, Nottinghamshire, NG13 9HY
Page 10
10
Installation - height
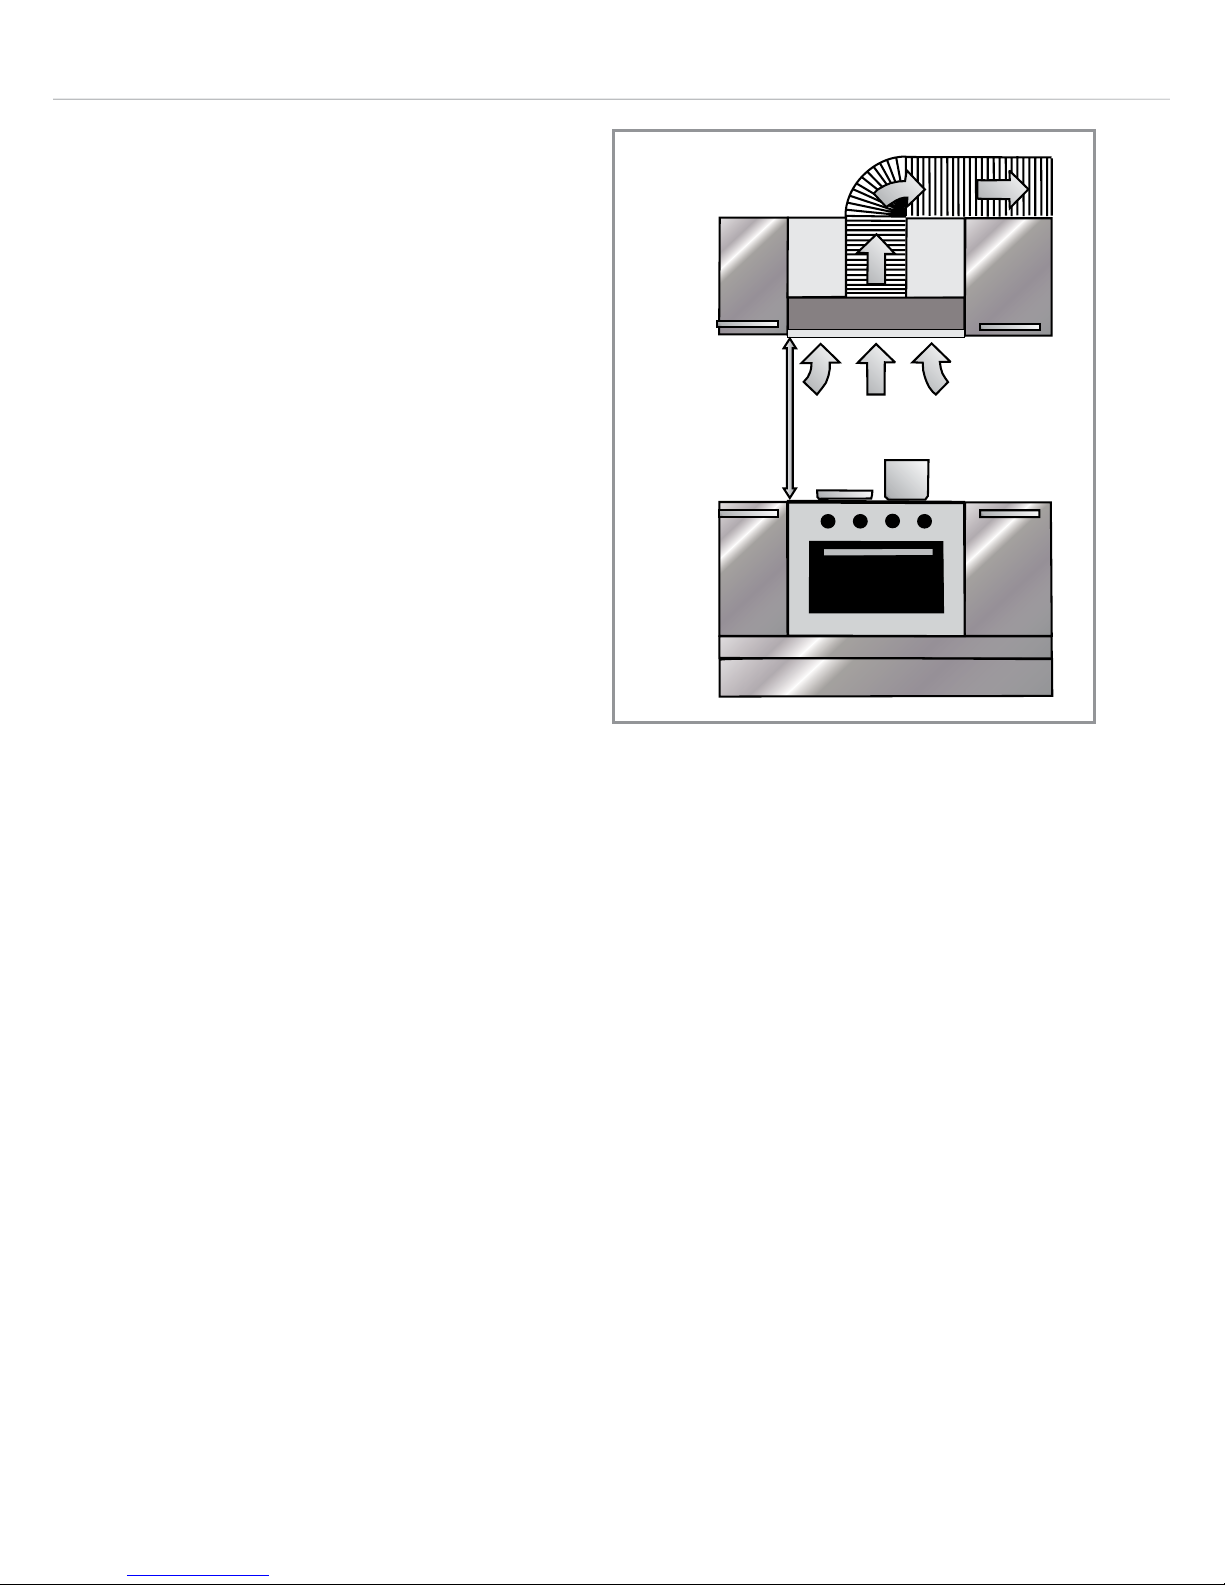
When the extractor is to be
installed above a CDA electric
hob, the minimum distance
between the hob and extractor
must exceed 650mm.
When the extractor is to be
installed above a CDA gas hob,
the minimum distance between
the hob and extractor must
exceed 750mm.
If the instructions provided with your gas hob state that the required
distance between the hob and extractor must be greater than 750mm,
then that is the distance that should be observed; this is a legal
requirement and may lead to your hob being disconnected from the
gas supply and the installation being reported under RIDDOR.
Note: The height should be measured from the top of the hob’s
burners to the grease filter.
• IN THE ABSENCE OF ANY INSTRUCTIONS SUPPLIED WITH
THE GAS HOB, THE MINIMUM DISTANCE BETWEEN THE HOB
AND EXTRACTOR MUST BE AT LEAST 760mm.
• The width of any hob must not be greater than the width of the
extractor installed above it.
• Always bear servicing in mind. The extractor should always be
easily accessible or removeable after installation.
CDA Electric
hob - 65cm
CDA Gas
hob - 75cm
Fig. 2
Page 11

11
Installation - preparation and ducting
The metal casing of this appliance has been coated with a film to
protect it during transport and storage. This should be removed
during installation and any adhesive removed by using a nonabrasive stainless steel cleaner. Always follow the instructions
given with the cleaner being used. Please ensure that there is no
power being supplied to the appliance whilst you do this.
Ducting
For best performance and lowest noise output, we recommend
the use of 120mm ducting. Lesser diameter ducting may not fit the
outlet (115mm), may reduce performance and increase the noise of
the extractor. Wherever possible use rigid circular pipe which has a
smooth interior, rather than the expanding concertina type ducting.
The lengths of the ducting without performance being aected are as
follows:
• 4 metres with 1 x 90° bend.
• 3 metres with 2 x 90° bends.
• 2 metres with 3 x 90° bends.
Please note:
• We recommend that you seek the help of another individual when
installing this product.
• We recommend that you wear PPE when handling this extractor.
• The fixings supplied are suitable for most installations. It is the
responsibility of the installer to ensure that the fixings are suitable.
• Cover any hob, or surface below the area in which the extractor
is to be installed, so that no damage befalls it.
Page 12
12
Installation - mounting the extractor
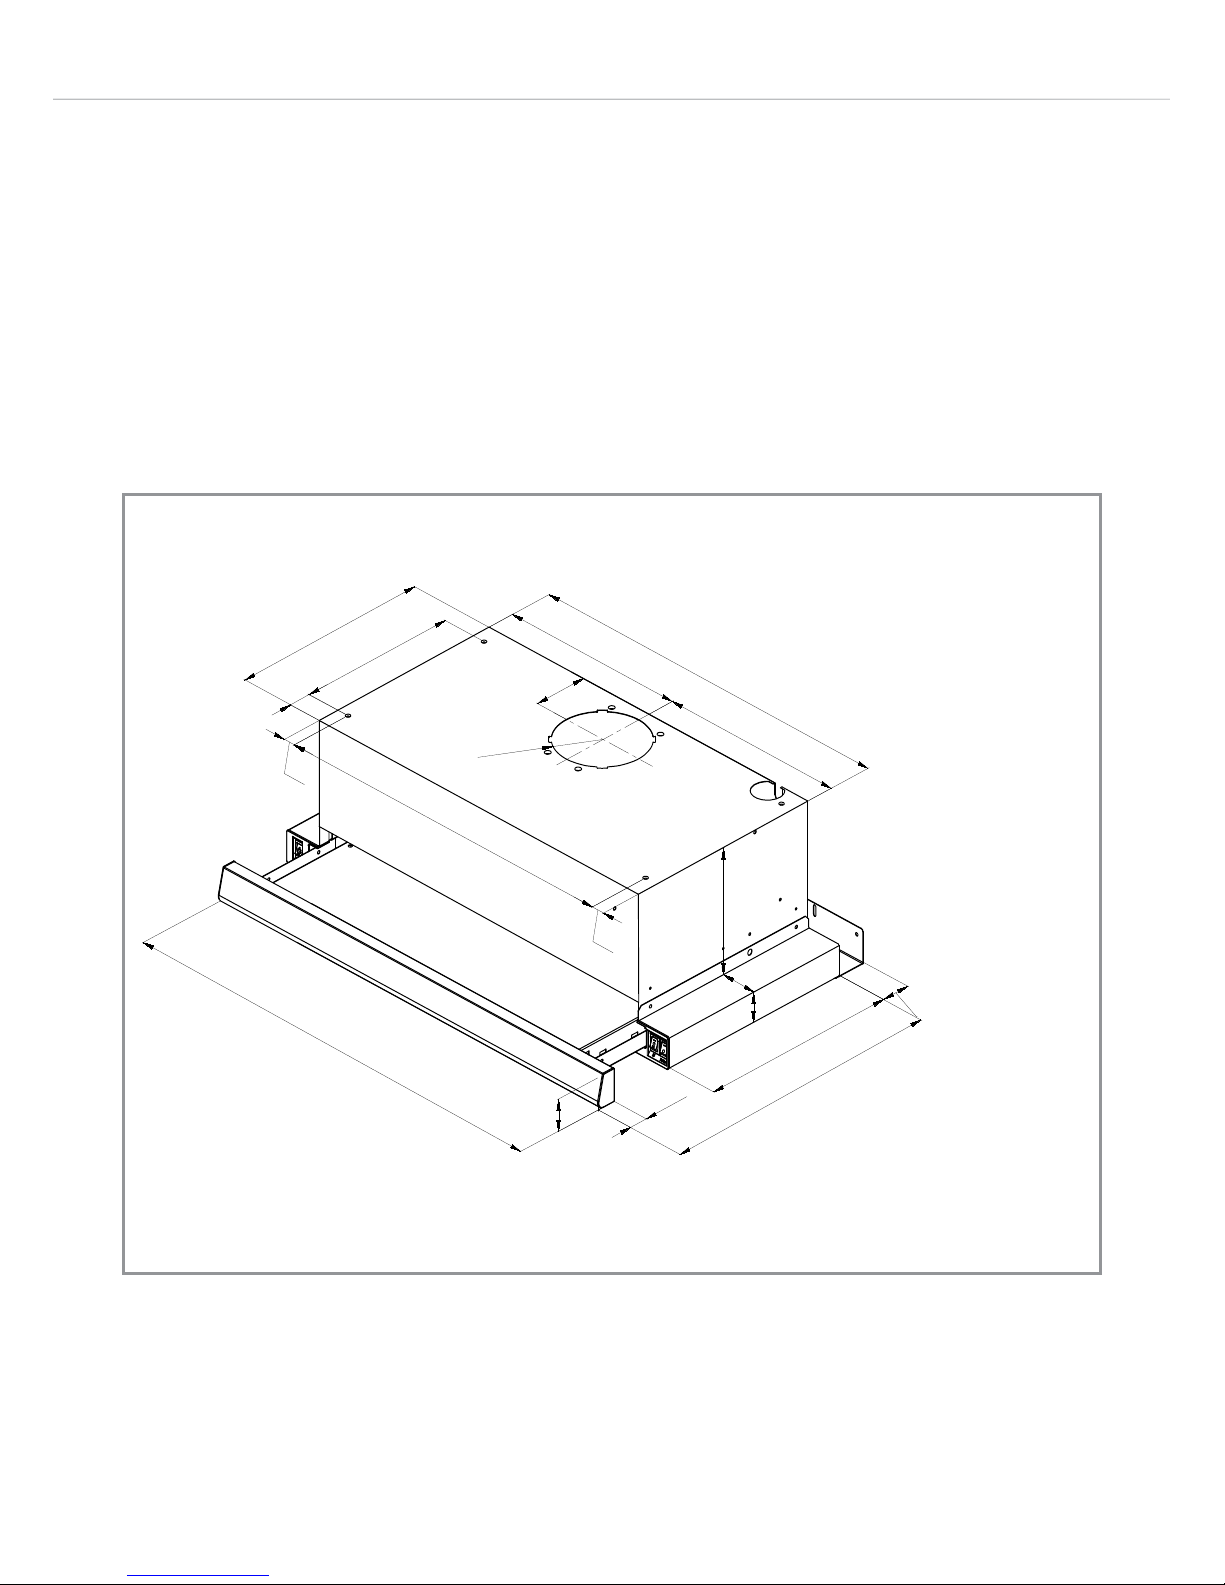
This extractor is designed to be installed within a bridging unit and is
not suitable for direct wall mounting. It is intended to be held in place
within the unit by four screws through a support shelf. The positions of
these screws, and the ducting outlet cutout, are shown on a template
supplied with the appliance. In the unlikely event of the template
being missing, the below measurements may aid you.
To achieve a flush fit with a decor door on the bridging unit, adjust the
depth of the cutout by an amount equal to the dierence between
either 18 or 25.6mm and the thickness of the decor door. Please note
that the canopy lip is shaped. The upper edge, which the decor
door will meet, is 18mm thick.
462
Ø118mm
500
223
134
600
40
26
284
Max38 Min23
50
250
250
19
19
Max430 Min310
78,5
40
30
279
Fig. 3
Page 13
13
Using the template supplied, drill out the mounting screw holes, the
ducting outlet and a route for the mains lead, if required. Attach the
ducting adapter, supplied with the appliance, to the extractor.
Remove the grease filters to stop them being damaged. Attach the
ducting to the extractor and then fit the extractor into the unit, routing
the ducting first. Whilst the person helping is supporting the unit, fit
four screws through the unit shelf and into the extractor top. Ensure
that the extractor is firmly in position and re-fit the grease filters.
A bracket has been supplied to cover a gap between the unit/wall
and the back of the extractor. This attaches to the extractor via holes
near the lamp covers and then to the unit/wall. It oers adjustment.
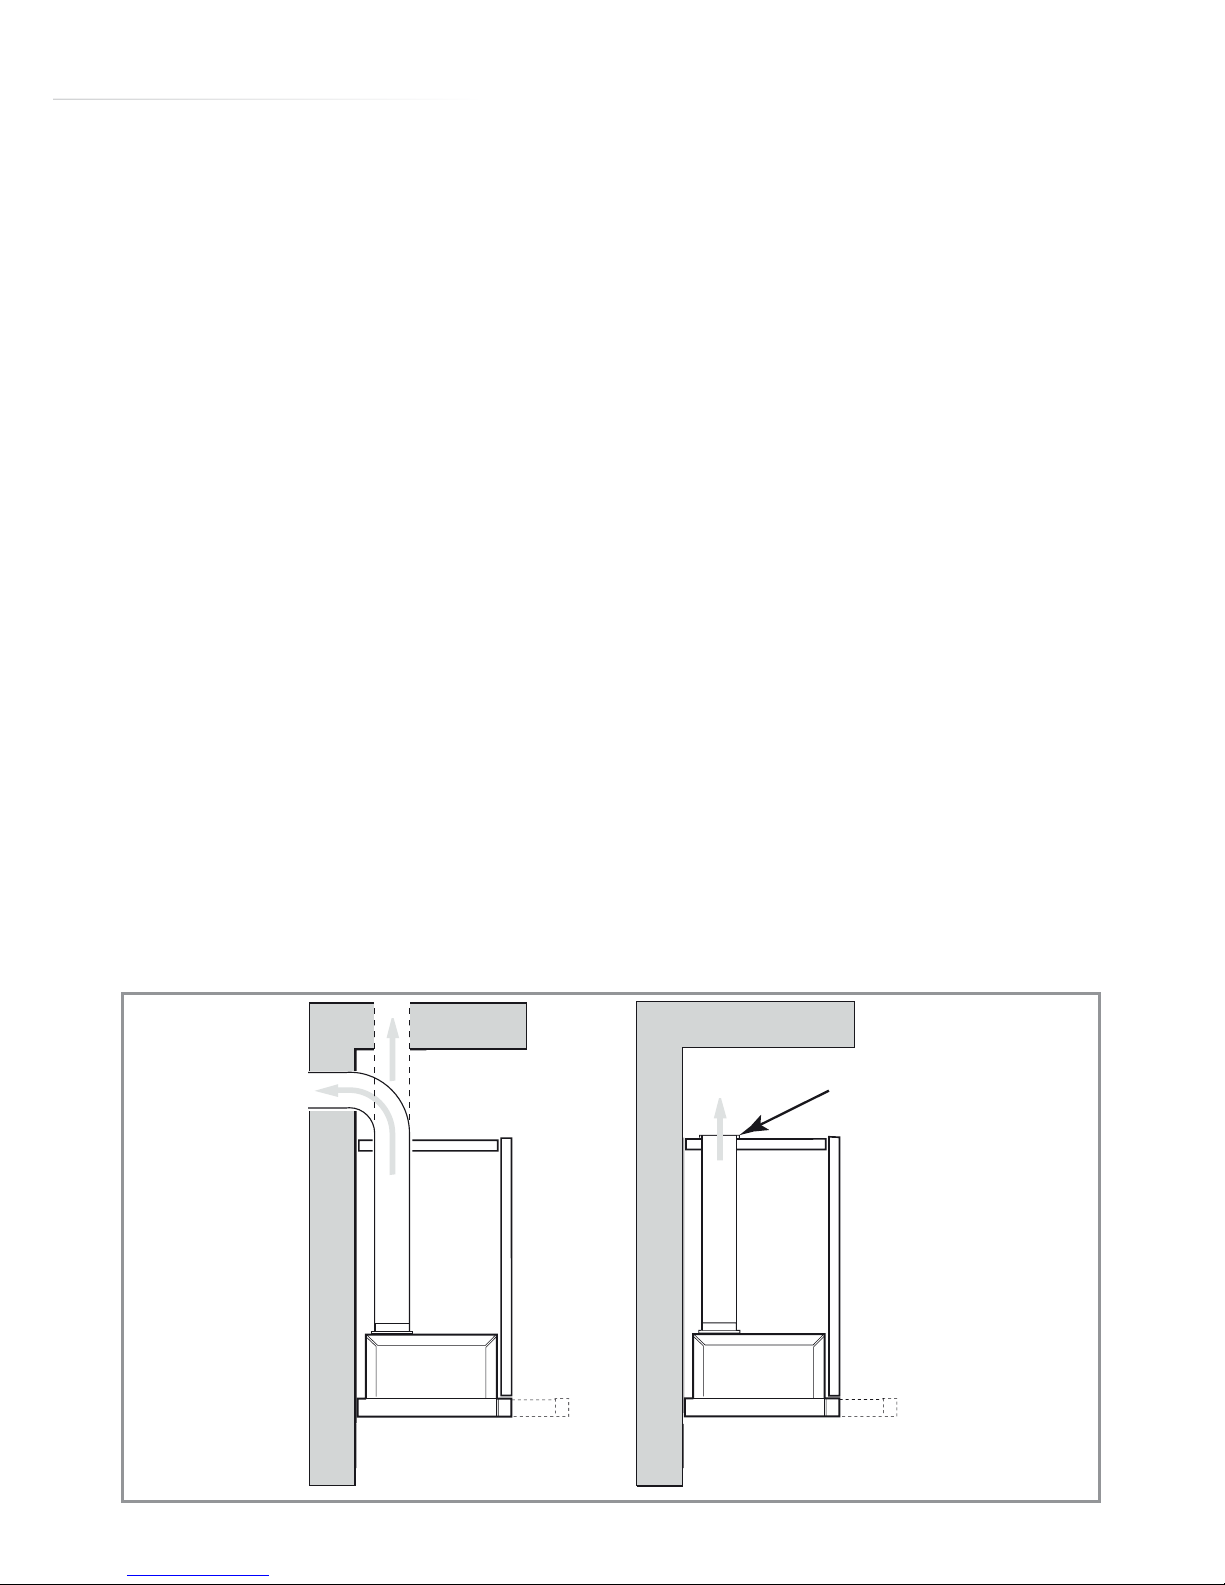
Please note: If you are recirculating the air back into the kitchen,
then ducting should be used to channel the air out of the unit. An
example is shown below in Fig. 4. A non-return flap or similar should
be employed to prevent debris etc. falling into the ducting.
Fig. 4
Ducting out Recirculating
Vent, grille
or similar
non-return
mechanism
Page 14
14
Mains electrical connection
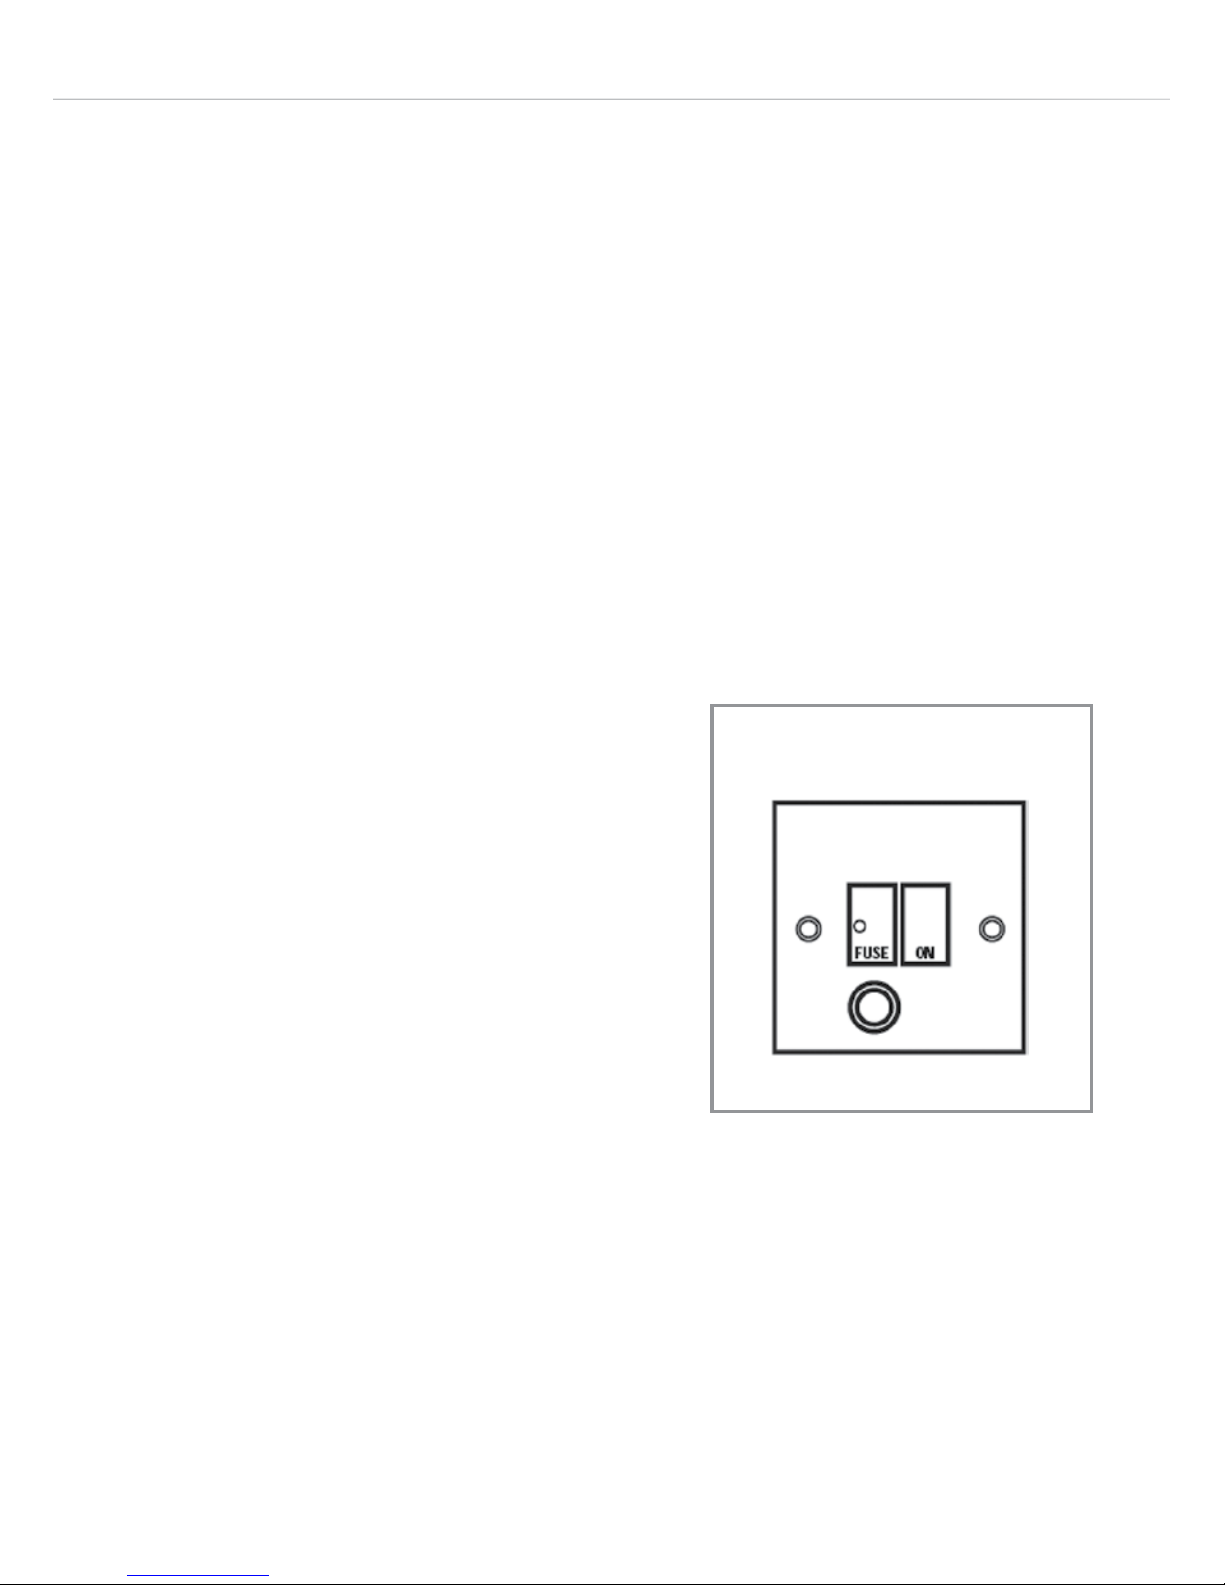
THIS APPLIANCE MUST BE CONNECTED TO THE MAINS SUPPLY
BY A COMPETENT PERSON, USING FIXED WIRING VIA A DOUBLE
POLE SWITCHED FUSE SPUR OUTLET AND PROTECTED BY A 3A
FUSE.
We recommend that the appliance is connected by a qualified
electrician, who is a member of the N.I.C.E.I.C. and who will comply
with the I.E.T. and local regulations.
The wires in the mains lead of this appliance are coloured in
accordance with the following code:
Green & Yellow = Earth
Blue = Neutral
Brown = Live
As the colours of the wires in the
mains lead for the appliance may not
correspond with the coloured markings
identifying the terminals connecting to
the fuse spur, proceed as follows:
• The wire which is coloured green and yellow must be connected to
the terminal marked E (Earth) or coloured green.
• The wire which is coloured blue must be connected to the terminal
marked N (Neutral) or coloured black.
• The wire which is coloured brown must be connected to the termi-
nal marked L (Live) or coloured red.
DOUBLE POLE
SWITCHED
FUSED SPUR OUTLET
USE A 3 AMP FUSE
Page 15

15
Note: Use a 3A Fuse.
Assembly and electrical connection should be carried out by
specialised personnel.
The isolation switch and fuse for this appliance should be easily
accessible after installation is complete.
Electrical information
Mains electrical voltage: 230-240Vac
Total rated power consumption:
116W
Page 16

16
NOTES:
Page 17

17
E & O E. All instructions, dimensions and illustrations are provided for guidance only. CDA reserve the
right to change specifications without prior notice.
NOTES:
Page 18
www.cda.eu
Customer Care Department. The CDA Group Ltd, Harby Road, Langar, Nottinghamshire, NG13 9HY
T: 01949 862 012 F: 01949 862 003 E: [email protected]
For service or queries relating to your product please contact:
The Customer Care Department on 01949 862 012 or email [email protected]
For more information please contact:
The Sales Department on 01949 862 010 or email [email protected]
 Loading...