

Page 1

Ceramic
Hobs
CD 66
Before operating this hob,
please read these instructions carefully
Users Operating Instructions
Page 2

2
Dear Customer,
Thank you for choosing one of our products.
The warnings and tips given below are intended to
protect your safety and that of others. They will also help
you make the most of your appliance.
Keep this booklet in a safe place. It will be useful if you,
or anyone else, have any doubts about use of the
appliance.
This appliance must only be used for the purpose
for which it was designed, i.e. for cooking foods.
Any other use should be considered incorrect and
therefore dangerous.
The manufacturer declines all responsibility for
damage caused by improper, incorrect or
irresponsible use of the appliance.
TIPS FOR THE USER
✓
During and immediately after use some parts of the hob can reach very high
temperatures. Do not touch them.
✓
Keep children away when the hob is in use.
✓
After using the hob make sure that the knobs are turned off.
Page 3

3
WARNINGS FOR THE USE OF ELECTRICAL APPLIANCES
When using any electrical appliance some important rules must always be followed.
In particular:
✓
do not touch the appliance with wet or damp hands or feet
✓
do not use the appliance with bare feet
✓
this appliance should only be used by responsible adults.
IMPORTANT WARNINGS AND TIPS
✓
When unpacking the appliance make sure that it is not damaged. If you have any
doubts, do not use the appliance but consult your supplier or an engineer.
✓
The packing materials (plastic bags, expanded polystyrene, nails, bands etc.) must
not be left within easy reach of children, because they are a possible source of danger.
✓
The packaging material is recyclable and is marked with the recycling symbol .
✓
Do not try to alter the technical properties of the appliance, because this could be
dangerous.
✓
The manufacturer cannot be considered responsible for damage caused by
improper, incorrect or irresponsible use of the appliance.
✓
Before disposing of any unwanted appliances it is recommended that all potentially
hazardous parts be made harmless.
✓
The appliance should be installed and all the electrical connections made by a
qualified engineer in compliance with local regulations in force and following the
manufacturer's instructions.
CE Declaration of conformity
✓
This hob is intended to come into contact with food products and conforms with
European Directive 89/109/EEC.
✓
This hob has been designed for use only as a cooking appliance. Any other use (e.g.
heating rooms) should be considered incorrect and therefore dangerous.
✓
This hob has been designed, constructed and put on to the market in conformity
with:
- Safety requirements of the "Low Voltage" Directive 73/23/EEC;
- Protection requirements of the "EMC" Directive 89/336/EEC;
- Requirements of Directive 93/68/EEC.
Page 4
4
Quick-light hotplate Ø 145 - 1200 W 2
Quick-light hotplate Ø 180 - 1700 W 1
Quick-light hotplate Ø 195 - 1900 W 1
“ON” indicator light 1
Hotplate and residual heat indicator 4
Voltage 230 V~ 50 Hz
Maximum absorbed power 6,0 kW
Technical Data
General Dimensions
Width 575 mm
Depth 505 mm
Depth Below Mounting Surface 52 mm
Cut-out Dimensions
Width 560 mm
Depth 490 mm
DIMENSIONS
Page 5
5
✓
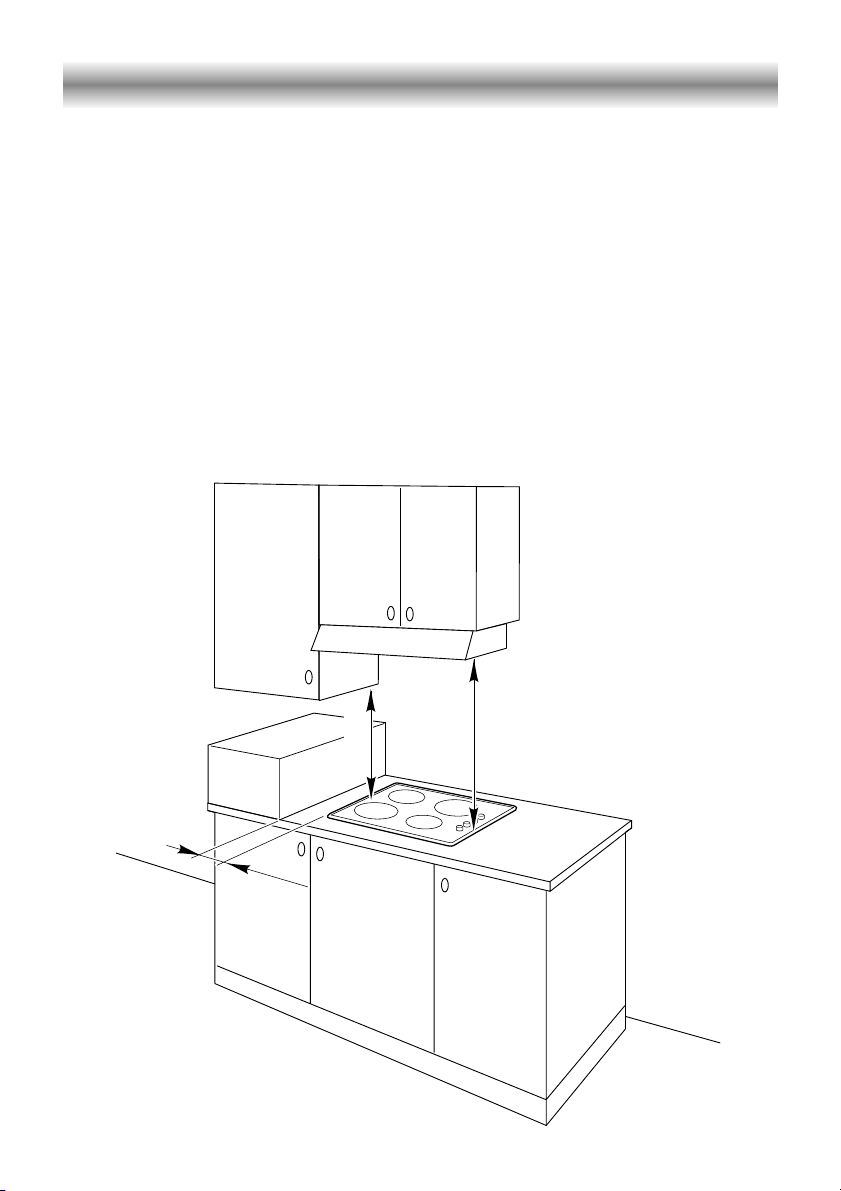
Minimum distance of hob to back wall 50 mm.
✓
Minimum distance of hob from any vertical surface either side of the hob 50 mm.
✓
Minimum height of a cabinet directly above hob if not fitting a hood 900 mm.
✓
Minimum of 650 mm from the hob to a cooker hood.
✓
Do not fit above refrigeration products.
This appliance has type “Y” overheating surrounding surfaces protection and must be kept
no less than 50 mm away from any side wall which exceeds the height of the cooktop.
650 mm
450 mm
50 mm
Fitting your hob
Figure 1
Page 6

6
2. Apply the adhesive seal around the edge of the hob ensuring that the ends do not
over lap or leave a space. (Fig. 3).
Adhesive
side
HOW TO INSTALL YOUR HOB
1. The hob requires a space in the kitchen work surface as shown in the diagram
(Fig. 2) below:
575
505
560
490
52
Figure 2
Figure 3
Page 7

7
NOTE: A partition should be fitted a minimum of 4 cm below the base of the hob if
the cupboard is to be used for storage. Never place perishable foods in the cupboard
below the hob.
3. Place the hob in the work top cut out and secure it in position by using the brackets
as indicated in Fig. 4 - (3 cm work top) or Fig. 5 - (4 cm work top).
Figure 4
Figure 5
4 cm
min
3 cm
4 cm
4 cm
min
Page 8

8
WARNING!
This appliance must be earthed.
Your hob must be installed by a qualified electrician in line with all electrical
and installation requirements published
by the Institute of Electrical Engineers.
To connect the feeder cable to the hob
it is necessary to carry out the following
operations:
✓
Unscrew the shield “A” at the bottom
of the hob.
✓
Position the straps “C” onto terminal
board “B” (fig. 6) according to the
diagram in fig. 7.
✓
Insert the feeder cable of suitable sec-
tion (see below) through the hole of
the shield “A”.
✓
Connect the phase wires to terminal
board “B” according to the diagram in
fig. 7 and the earth wire to clamp “D”.
✓
Secure the feeder cable with cable
clamp “E”.
✓
Refit the shield “A”.
A
double pole switch must be provided
no further than 2 metres from the
appliance to the electrical supply.
All supply current and earth conductors
must be able to withstand an ambient
temperature of 75°C.
The appliance must be connected using
6 mm
2
cable (not supplied) in accordan-
ce with the following code:
GREEN or GREEN
AND YELLOW = EARTH
BLACK or BLUE = NEUTRAL
RED or BROWN = LIVE
As the colours of the wires in the cable
of this appliance (not supplied) may not
correspond with the COLOURED
markings identifying the terminals in the
socket proceed as follows:
✓
The wire which is coloured GREEN and
YELLOW must be connected to the
terminal which is marked with letter (E)
or by the Earth symbol or coloured
GREEN or GREEN and YELLOW.
✓
The wire which is coloured BLUE must
be connected to the terminal which is
marked with the letter (N) or coloured
BLACK.
✓
The wire which is coloured BROWN
must be connected to the terminal
which is marked with the letter (L) or
coloured RED.
NOTE: This appliance is intended to be
permanently connected to fixed wiring.
If you are using the hob for the first time,
or after a period of disuse, you should set
the controls to position 1 for approximately 30 seconds, to dry out any humidity.
Electric Supply Requirements
Connection of cables inside the hob
Figure 6
Figure 7
IMPORTANT:
This appliance requires a 30 amp supply.
B
D
A
E
C
12345
PE
NL
Page 9

9
The ceramic surface of the hob allows a fast transmission of heat in the vertical
direction, from the heating elements underneath the ceramic glass to the pans set
on it.
The heat does not spread in the horizontal direction, so that the glass stays “cool”
only a few centimeters from the cooking plate.
This model features 4 quick-light star hotplates.
The hotplates are controlled by 7-position switches (0 - 6).
The heat power can be increased by steps from “0” (off) to “6” (max).
How Your Quick light Hob Operates
Figure 8
Page 10

10
The ceramic hob has the temperature control knobs located on the right hand side of
the hob.
These knobs are wired as follows (Fig. 9):
1 Rear right plate
2 Rear left plate
3 Front left plate
4 Front right plate
The hob is provided with a signal lamp (5) which lights up when the hob is switched
on.
The hob also features 4 warning lamps (6) which are wired to the corresponding plate.
They warn of any remaining heat in a hotplate and switch off when the temperature of
the relevant cooking-plate falls below 60 C°.
1
2
3
4
5
6
Figure 9
Page 11

11
1
2
3
4
5
6
0
Before you switch the hob on make
sure that it is clean.
To switch a cooking plate on you must
turn the relevant control knob anticlockwise.
When the hob is on, the signal lamp “5”
of fig. 6 is lit-up.
When the temperature of a cooking
plate is over 60°C, the relevant warning
lamp “6” of fig. 9 is also lit-up to warn of
heat on the surface of the hob.
This lamp also stays on after the cooking
plate has been switched off to show
that the hob surface is still hot.
This residual heat lasts for a rather long
time after the cooking plate has been
switched off.
During this spell of time you should
avoid touching the hob surface
over the cooking plate; please pay
special attention to children.
The lamp will switch off automatically as
soon as the surface temperature of the
cooking plate falls below 60°C.
QUICK-LIGHT HOTPLATE
Incorporating 3 heating elements you
can control and light up all together or
separately by a 7 position switch.
Reaches the working temperature very
quickly.
The side figure (11) shows this hotplate
working on 3 different settings.
Use of Ceramic Hob
Figure 10
Figure 11
Page 12

12
COOKING HINTS:
✓
To reduce the cooking time, you can turn the control knob to the max when you
switch the plate on.
After a short time you will set the control knob to the required position for the
cooking.
✓
You should use pots and pans with flat bases.
The diameter of the pan should match that of the cooking plate (or be slightly
bigger) to make the most of the energy.
✓
Since the cooking surface stays hot for a certain time after the plate has been
switched off, you can switch it off minutes before the end of cooking.
TYPE OF COOKING
Switched OFF
For melting operations
(butter, chocolate).
To keep food hot and to
heat small quantities of
liquid (sauces, eggs).
To heat bigger quantities;
to whip creams and sauces.
(vegetables, fruits, soups).
Slow boiling, i.e.: boiled
meats, spaghetti, soups,
steam cooking of roasts,
stews, potatoes.
For every kind of frying,
cutlets, uncovered cooking,
i.e.: risotto.
Browning of meats, roasted
potatoes, fried fish, omelettes, and for boiling large
quantities of water.
Fast frying, grilled steaks,
etc.
0
Position
of switch
1
2
3
2
3
4
4
4
5
6
Heating
Cooking
Roasting-frying
1
2
3
4
5
6
Cooking plate controlled by a 7
position switch
Figure 12
Page 13

13
1. Never put aluminium foil or plastic
materials on the ceramic surface when
the hob is hot.
2. Make sure that the hob is clean before
you use it.
3. Remember that the plates will remain
hot for approximately half an hour after
the plate has been switched off.
4. Before you switch the hob on, make
sure that you know which knob
controls the required hot plate. We
advise you to set the pan over the
cooking plate before switching it on.
5. Pan handles should never protrude
over the front of the worktop. This will
ensure that children cannot reach
them.
6. Do not use pans with rough bases as
these may scratch the hob surface.
7. DO NOT use the hob if the glass
surface is broken or cracked in any
way. Please disconnect the appliance
from the mains and contact our AfterSales Service.
8. Do not lean over the cooking plate
when in use.
9. Follow the cleaning instructions
carefully.
10. Always ensure that the base of your
saucepan is clean and dry before
placing on the hob.
11.Never use the glass surface for
storage.
12.
WARNING:
Hobs become very hot with use,
and retain their heat for a long time
after cooking has finished (about 30
minutes).
Children should be supervised at all
times and be prevented from
touching the hot surfaces until such
time as the appliance has cooled.
DISTORTED
PANBASE
WRONG
DISTORTED
PANBASE
WRONG
LEVEL
PANBASE
CORRECT
WRONG
WASTING
POWER
WRONG
WASTING
POWER
CORRECT
COMPLETE USE
OF THE HEAT
Safety Hints
Figure 13
Page 14

14
It is very important that the pans used on the hobs are made of a suitable material and
have the correct base as follows:
✓
The base should be flat and smooth.
Any rough part on the pan base could scratch the hob surface.
✓
Choose pans which are the same size as the hotplates and with bases that are as
non reflective as possible. eg. dull and dark.
✓
Only pans recommended for use on ceramic hobs should be used.
Pans made of the following materials can cause problems:-
Cast Iron – The base may be rough which will scratch the hob.
Toughened – If the pan becomes too hot, the hob may overheat and reduce cooking
Glass efficiency.
Copper – Can easily distort and will therefore not form a good contact between base
and hob which will result in uneven cooking.
Cookware
Page 15

15
Before you begin cleaning make sure that the hob is switched off.
Remove spillages and other types of incrustations.
Dust or food particles can be removed with a damp cloth.
If you use a detergent, please make sure that it is not abrasive or scouring. Abrasive
or scouring powders can damage the glass surface of the hob.
All traces of the cleaner have to be removed with a damp cloth.
Dust, fat and liquids from food that has boiled over must be removed as soon as
possible.
If they are allowed to harden they become increasingly difficult to remove.
This is especially true in the case of sugar/syrup mixtures which could
permanently pit the surface of the hob if left to burn on it.
If any of these products has melted on the ceramic surface, you should remove it
immediately (when the surface is still hot) by using a scraper to avoid any permanent
damage to the surface of the hob.
Avoid using any knife or sharp utensil as these may damage the ceramic surface.
Do not use steel wool or an abrasive sponge which could scratch the surface.
Cleaning Your Hob
Figure 13
Page 16

1101406
ß5
Ceramic Hobs
 Loading...