

Page 1
User's manual Manual del usuario Manuel de l'utilisateur
Customer Service
US: 1-800-645-2986
Servicio de atención al Cliente
US: 1-800-645-2986
Service à la clientèle
Canada: 888-645-2986
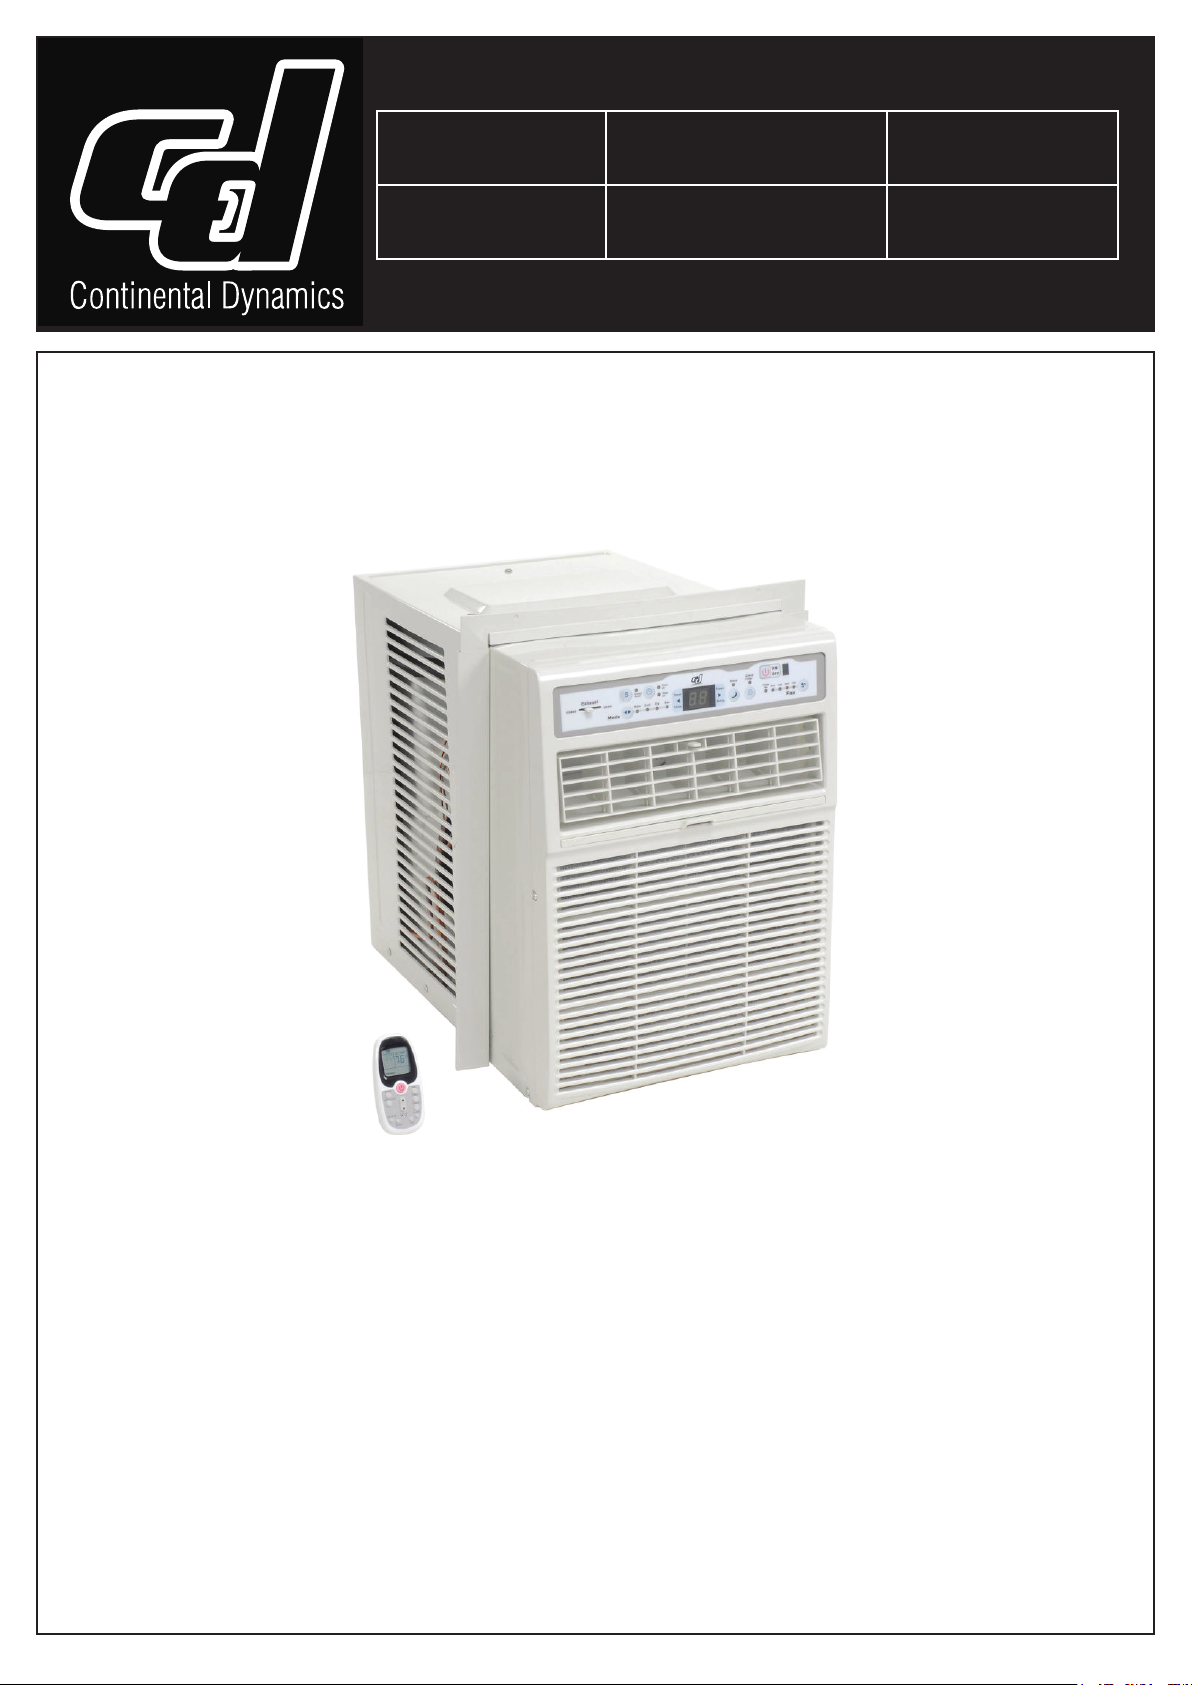
Casement Window Air Conditioner
Models 292461 & 292312
TABLE OF CONTENTS
Safety Instructions .................................. 1-3
Installation Instructions ........................... 4-12
Standard Sounds .................................... 13
Air Conditioner Features ......................... 13-15
Maintenance and Cleaning ..................... 15-16
Troubleshooting ...................................... 16-17
Read this manual thoroughly prior to installation, operation or maintenance.
Keep these instructions in a safe location for future reference. For questions, visit
globalindustrial.com or contact Customer Service at 1-800-645-2982.
Page 2
IMPORTANT SAFETY INSTRUCTIONS
READ THIS MANUAL
Inside you will find many helpful hints on how to use and maintain your air conditioner
properly. Just a little preventive care on your part can save you a great deal of time
and money over the life of your air conditioner. You'll find many answers to common
problems in the chart of troubleshooting tips. If you review our chart of Troubleshooting
Tips first, you may not need to call for service at all.
To prevent injury to the user or other people and property damage, the following
instructions must be followed. Incorrect operation due to ignoring of instructions may
cause harm or damage. The seriousness is classified by the following indications.
WARNING
CAUTION
This symbol indicates the possibility of death or serious injury.
This symbol indicates the possibility of injury or damage to property.
Never do this.
WARNING
!!
Plug in power plug
properly.
Otherwise, it may cause electric
shock or fire due to excess heat
generation.
!!
breaker and a dedicated
power circuit.
Incorrect installation may cause
fire and electric shock.
!!
!!
Always ensure effective
grounding.
Incorrect grounding may cause
electric shock.
!!
Unplug the unit if strange
sounds, smell, or smoke
comes from it.
It may cause fire and electric
shock.
!!
Keep firearms away.
It may cause fire.
!!
Ventilate room before operating air conditioner if there is
a gas leakage from another appliance.
Do not operate or stop the
unit by inserting or pulling
out the power plug.
It may cause electric shock or fire
due to heat generation.
Do not operate with wet
hands or in damp
environment.
It may cause electric shock.
Do not allow water to run
into electric parts.
It may cause failure of machine
or electric shock.
Do not use the socket if it is
loose or damaged.
It may cause fire and electric
shock.
Do not use the power cord
close to heating appliances.
It may cause fire and electric
shock.
Always do this.
Do not damage or use an unspecified power
cord.
It may cause electric shock or fire.
If the power cord is damaged, it must be replaced by the
manufacturer or an authorised service centre or a similarly
qualified per son in order to avoid a hazard.
Do not direct airflow at room occupants only.Always install circuit
This could damage your health.
!!
Do not modify power cord length or share the
outlet with other appliances.
It may cause electric shock or fire due to heat generation.
Do not open the unit during operation.
It may cause electric shock.
Do not use the power cord near flammable gas
or combustibles, such as gasoline, benzene,
thinner, etc.
It may cause an explosion or fire.
Do not disassemble or modify unit.
It may cause explosion, fire and, burns.
It may cause failure and electric shock.
1
Page 3
IMPORTANT SAFETY INSTRUCTIONS
CAUTION
When the air filter is to be
removed, do not touch the metal
parts of the unit.
It may cause an injury.
Do not use strong detergent
such as wax or thinner but use
a soft cloth.
Appearance may be deteriorated
due to change of product color or
scratching of its surface.
!!
Stop operation and close the
window in storm or hurricane.
Operation with windows opened
may cause wetting of indoor and
soaking of household furniture.
!!
Always insert the filters securely.
Clean filter once every t wo w eeks.
Operation without filters maycause
failure.
Do not put a pet or house plant
where it will be exposed to direct
air flow.
This could injure the pet or plant.
Do not clean the air conditioner
with water.
Water may enter the unit and
degrade the insulation. It may
cause an electric shock.
!!
When the unit is to be cleaned,
switch off, and turn off the circuit
breaker.
Do not clean unit when power is on
as it may c ause fi re an d el ectric sh ock,
it may cause an injury.
!!
Hold the plug by the head of the
power plug when taking it out.
It may cause electric shock and
damage.
!!
Ventilate the room well when
used together with a stove, etc.
An oxygen shortage may occur.
Do not use for special purposes.
Do not use this air conditioner to
preserve precision devices, food,
pets, plants, and art objects.It may
cause deterioration of quality, etc.
!!
!!
Ensure that the installation bracket of the
outdoor appliance is not damaged due
to prolonged exposure.
If bracket is damaged, there is
concern of damage due to falling
of unit.
!!
Turn off the main power
switch when not using the
unit for a long time.
It may cause failure of product or
fire.
Do not place obstacles around
air-inlets or inside of air-outlet.
Do not place heavy object on the power
cord and ensure that the cord is not
compressed.
It may cause failure of appliance
or accident.
!!
Use caution when unpacking and
installing. Sharp edges could cause injury.
There is danger of fire or electric
shock.
!!
If water enters the unit, turn the unit off at the power
outlet and switch off the circuit breaker. Isolate
supply by taking the power-plug out and contact a
qualified service technician.
CAUTION
This appliance is not intended for use by persons
(including children) with reduced physical ,sensory
or mental capabilities or lack of experience and
knowledge, unless t hey h aveb eengi vensu pervision
or instruction concerning use of the appliance by
a person responsible for their safety.
Children should be supervised to ensure that they
do not play with the appliance.
If the supply cord is damaged, it must be replaced
by the manufacturer, its service agent or similarly
qualified persons in order to avoid a hazard.
2
Do not drink water drained
from air conditioner.
It contains contaminants and
could make you sick.
The appliance shall be installed in accordance
with national wiring regulations.
Do not operate your air conditioner in a wet room
such as a bathroom or laundry room.
The appliance with electric heater shall have at
l east 1 m eter s pace to th e co mbustible materials.
Contact the authorised service technician for
repair or maintenance of this unit.
Contact the authorised installer for installation
of this unit.
Page 4
IMPORTANT SAFETY INSTRUCTIONS
NOTE:
The power supply cord with this air
conditioner contains a current detection
device designed to reduce the risk of fire.
Please refer to the section Operation
of Current Device for details.In the event
that the power supply cord is damaged,
it cannot be repaired-it must be replaced
with ac ordf romt heP roductM anufacturer.
WARNING
Avoid fire hazard or electric shock. Do not
use an extension cord or an adaptor plug.
Do not remove any prong from the power
cord.
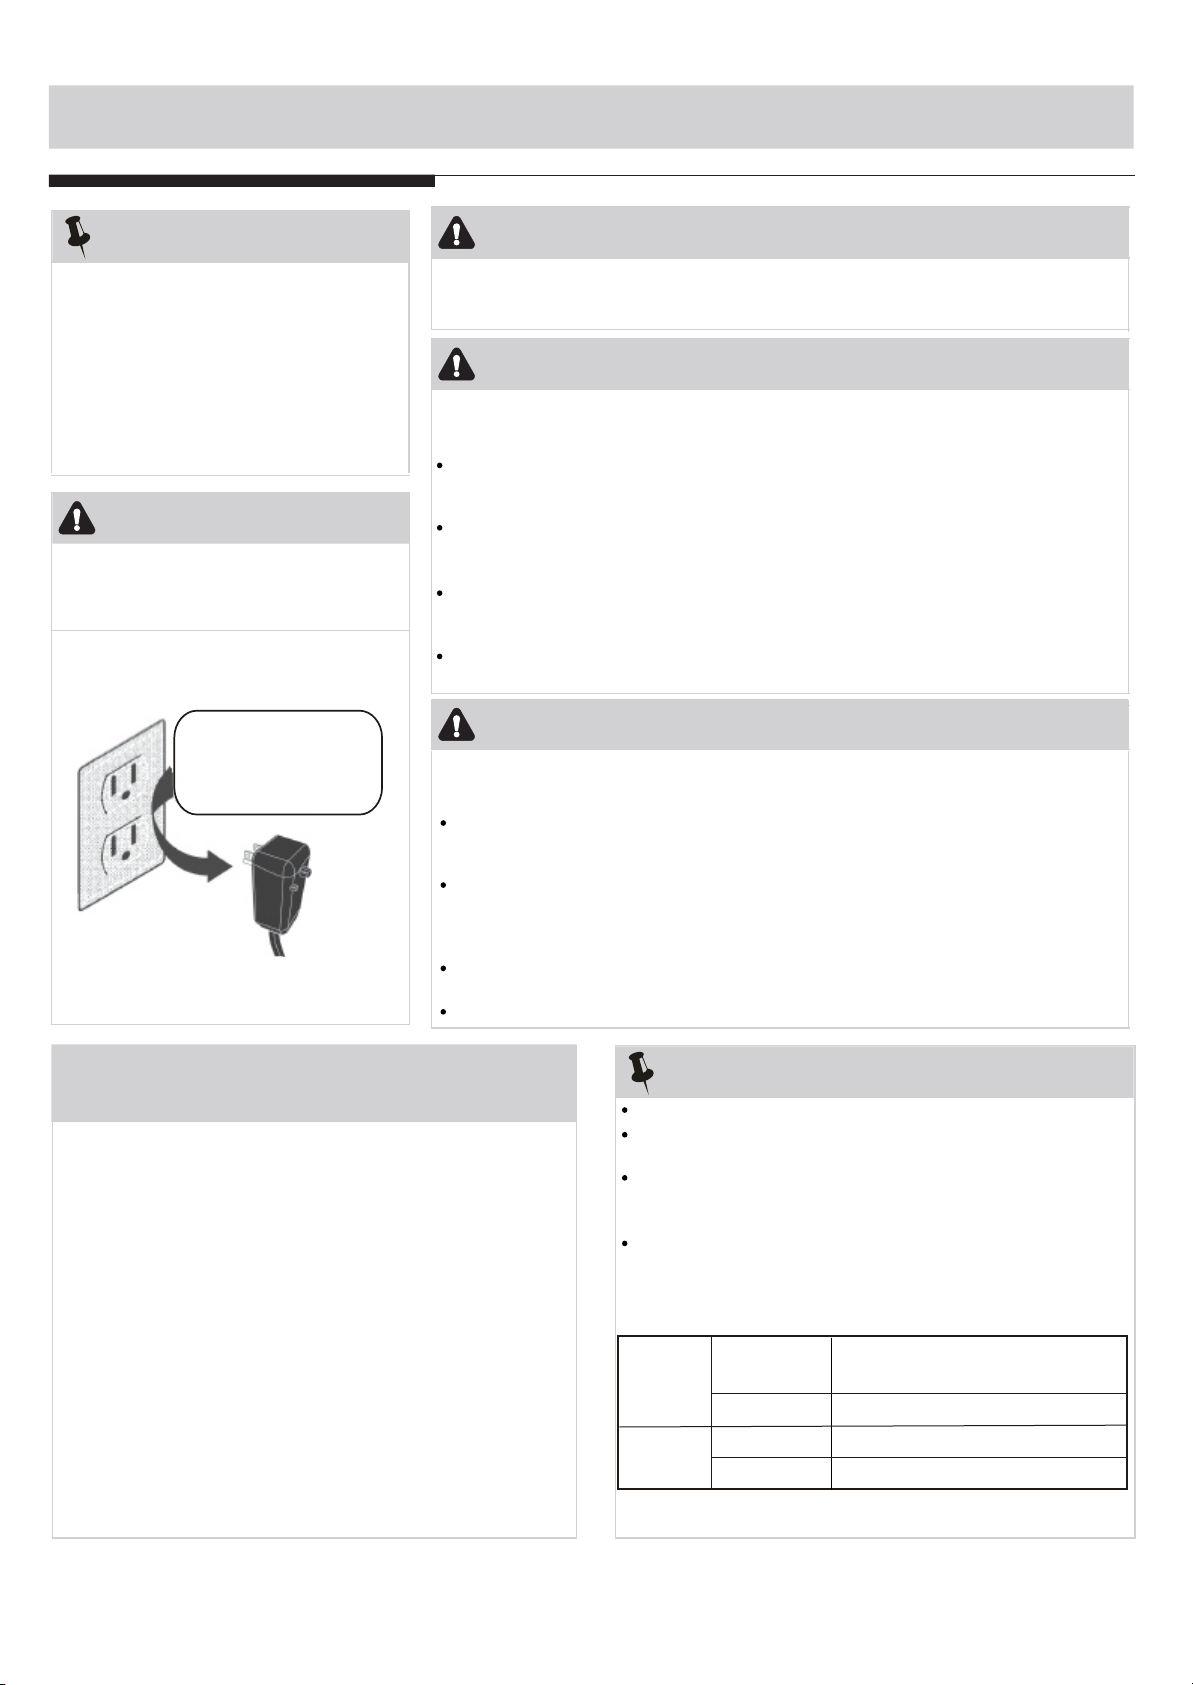
Grounding type wall
receptacle
Do not, under any
circumstances, cut,
remove, or bypass
the grounding prong.
Power supply cord
with 3-prong grounding plug
and current detection device
WARNING
For Your Safety
Do not store or use gasoline or other flammable vapors and liquids in the vicinity
of this or any other appliance.
WARNING
Prevent Accidents
To reduce the risk of fire, electrical shock, or injury to persons when using your
air conditioner, follow basic precautions, including the following:
Be sure the electrical service is adequate for the model you have chosen. This
information can be found on the serial plate, which is located on the side of the
the cabinet and behind the grille.
If the air conditioneri s t o b e in stalled in a w indow, yo u w ill pr obably w ant to cl ean
both sides of the g lass f irst.I f th e w indowis a tri ple-track ty pe w ith a sc reen pa nel
included, remove the screen completely before installation.
Be sure the air c onditionerh as b een s ecurely a nd c orrectly in stalled a ccording to
the installation instructions in this manual. Save this manual for possible future
use in removing or installing this unit.
When handling the air conditioner, be careful to avoid cuts f rom s harp m etal f ins
on front and rear coils.
WARNING
Electrical Information
The complete electical rating of your new room air conditioner is stated on the
serial plate. Refer to the rating when checking the electrical requirements.
Be sure the air conditioner is properly grounded. To minimize shock and fire
hazards, proper grounding is important. The power cord is equipped with a
three-prong grounding plug for protection against shock hazards.
Your air conditioner must be used in a properly grounded wall receptacle. If the
wall receptacle you intend to use is not adequately grounded or protected by a
time delay fuse or circuit breaker, have a qualified electrician install the proper
receptacle. Ensure the receptacle is accessible after the unit installation.
Do not run air conditioner without side protective cover in place.This could
result in mechanical damage within the air conditioner.
Do not use an extension cord or an adapter plug.
Operation of Current Device
(Applicable to the unit adopts current detection
device only )
The power supply cord contains a current device that senses
damage to the power cord. To test your power supply cord do
the following:
1. Plug in the Air Conditioner.
2. The power supply cord will have TWO buttons on the plug
head. Press the TEST button, you will notice a click as the
RESET button pops out.
3. Press the RESET button, again you will notice a click as
the button engages.
4. The power supply cord is now supplying electricity to the
unit. (On some products this it also indicated by a light on
the plug head.)
NOTE:
Do not use this device to turn the unit on or off.
Always make sure the RESET button is pushed in for
correct operation.
The power supply must be replaced if it fails reset when
either the TEST button is pushed, or it cannot be reset. A
new one can be obtained from the product manufacturer.
If power supply cord is damaged, it cannot be repaired. It
MUST be replaced by one obtained from the product
manufacturer.
NOTE:This air conditioner is designed to be operated
under condition as follows:
OO OO
Cooling
operation
Heating
operation
Outdoor temp:
Indoor temp:
Outdoor temp:
Indoor temp:
64-109 F/18-43 C (64-125 F/18-52 C
for special tropical models)
O
62-90 F/17-32 C
O
23-76 F/-5-24 C
O
32-80 F/0-27 C
O
O
O
Note: Performance may be reduced outside of these
operating temperatures.
3
Page 5
INSTALLATION INSTRUCTIONS
BEFORE YOU BEGIN
Read these instructions completely
and carefully.
IMPORTANT- Save these
instructions for local inspector s use.
IMPORTANT- Observe all
governing codes and ordianaces.
Note to Installer- Be sure to leave these
instructions with the Consumer.
Note to Consumer- Keep these
instructions for futrue reference.
Skill level- Installatio of this appliance
requires basic mechanical skills.
Completion time- Approximately 1 hour.
We recommend that two people install
this product.
Proper installation is the responsibility
of the installer.
Product failure due to improper installation
is not covered under the Warranty.
You MUST use all supplied parts and use
proper installation procedures as described
in these instructions when installing this air
conditioner.
NOTE:
These instructions describe installation in a typical
wood framed window with a wood SLIDE-BY sash, or
installation ina m etalC ASEMENT w indow.M odification
may be necessary when installing in windows made
differently than those shown in these instructions.
A high widow accessory kit is available for window
heights up to 62 (1575mm).
If cold water pipe is interrupted by plastic,
non-metallic gaskets, or other insulating
materials, DO NOT use for grounding.
Check with a qualified electrician if you are
in doubt as to whether the appliance is properly grounded.
DO NOT modify power supply cord plug. If it
does not fit outlet, have a proper outlet
installed by a qualified electrician.
DO NOT have a fuse in the neutral or
grounding circuit. A fuse in the neutral, or
grounding circuit could result in an electrical
shock.
DO NOT use an extension cord with this
appliance.
Failure to follow these instructions could result
in electrical shock, serious injury, or death.
Observe all local governing codes
and ordinances.
Do not, under any circumstances,
remove the power supply cord
grounding prong.
NOTE: If codes permit, and a separate grounding
wire is used; it is recommended that a qualified
electrican determine that the grounding path is
adequate and not interrupted by plastic, nonmetallic gaskets, or other insulating materials.
Receptacle wiring
Receptacle wiring should be a minimum of 14
gauge. Use copper wire only. It is your responsibility
to provide proper and adequate receptacle wiring,
installed by a qualified electrician.
Electrical requirements
A time delay fuse or time delay circuit breaker is
also required. A separate circuit, serving only this
appliance, MUST be provided.
Preparing for Installation
NOTE:
Save Carton and these Installation Instructions for future
reference. The carton is the best way to store unit during
winter, or when not in use.
When handling unit, be careful to avoid cuts from sharp
metal edges and aluminum fins on front and rear coils.
Meeting Electrical Requirements
WARNING
Electrical Shock and Personal Injury Hazard
Electrical ground is required on this appliance.
DO NOT ground to a gas line.
Installation Tips
For wood-frame casement windows: It may be
necessary to construct a frame, using at least 1-inch thick
wood, with a 15-1/2-inch wide opening.
For brick or cement building construction: It may
be necessary to put a wood stool strip under AC, for
mounting purposes.
Tools Required:
Flat-head screwdriver;Phillips-head screwdriver
Carpenter s level;Tape measure
Fine tooth saw;Electric or hand drill
4
Page 6
INSTALLATION INSTRUCTIONS
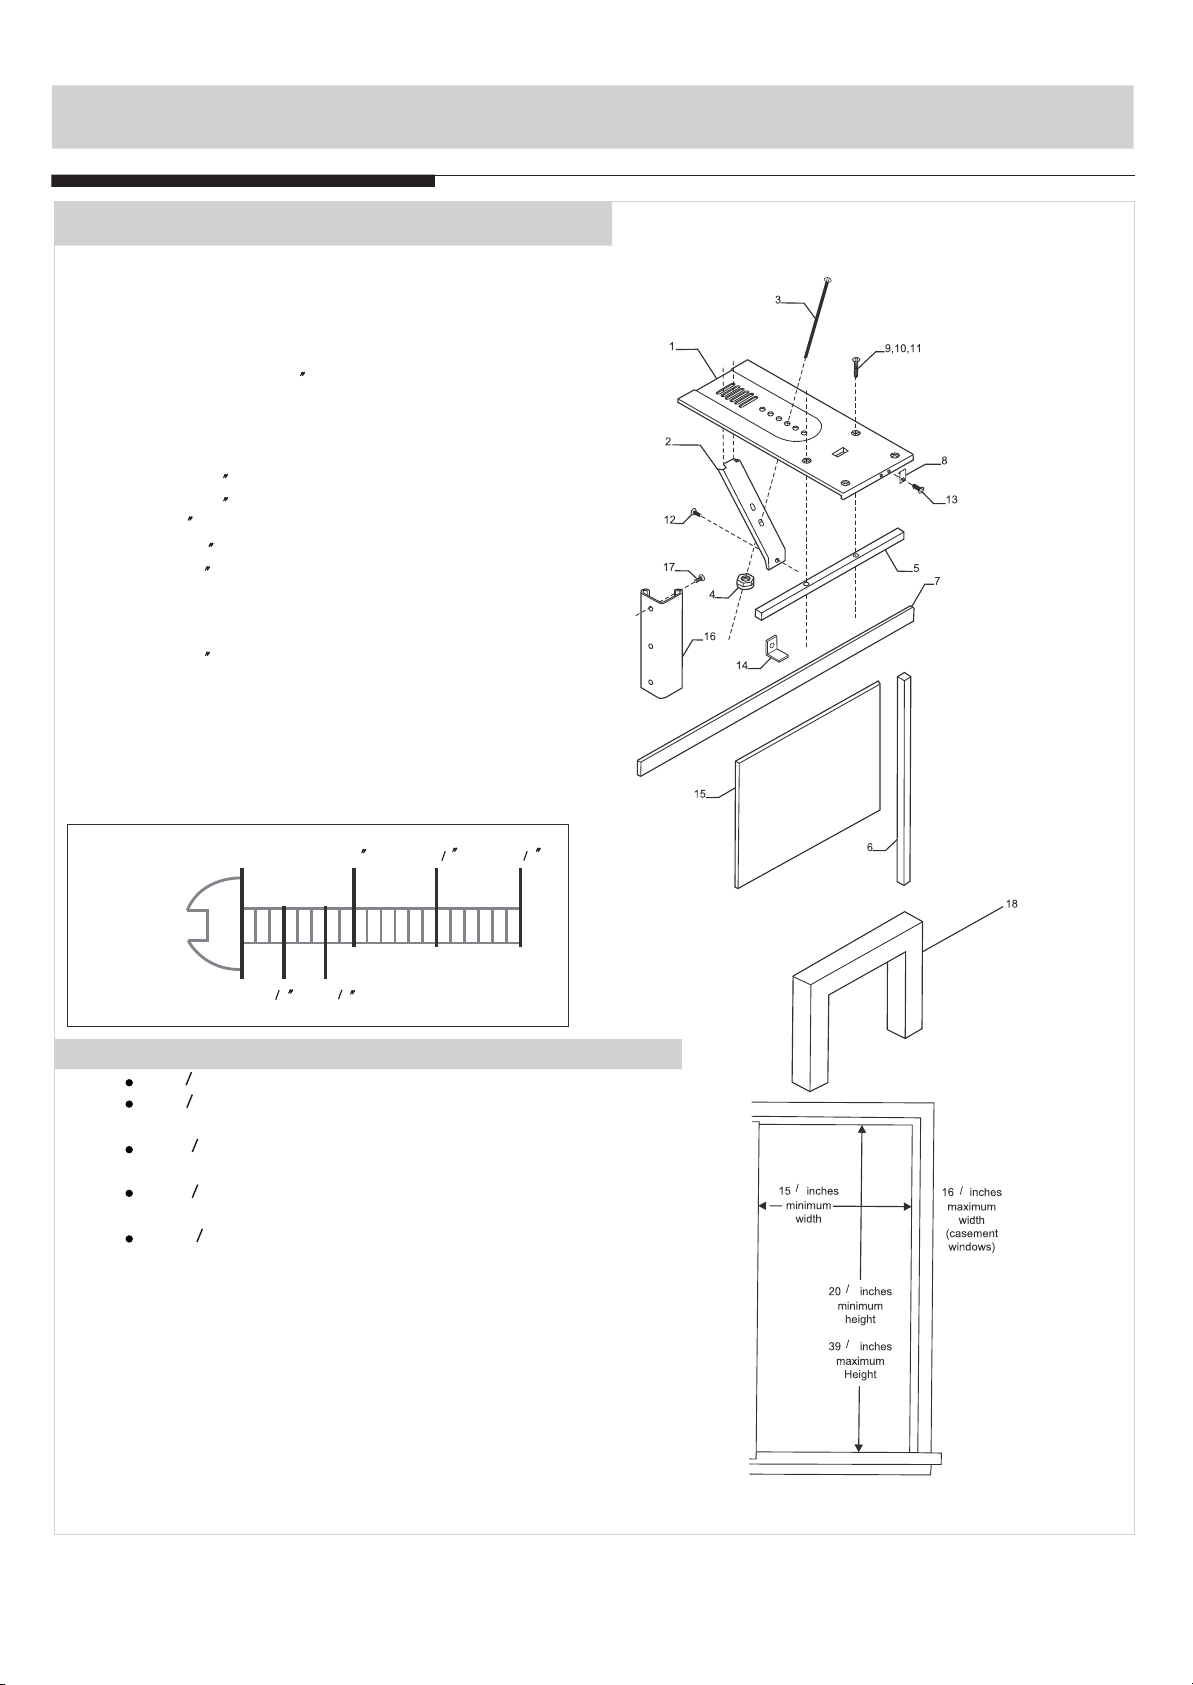
1. Make sure you have all the necessary parts.
Installation kit contents:
1. Platform(1)
2. Support brace(1)
3. Adjustment bolt(1)
4. Hex flange nut - 1 / 4 (1)
5. Track seal(1)
6. Side channel seal(1)
7. Foam seal strip/Sash seal
8. Safety bracket(1)
9-11.Screw-2-1/2 (2), or
Screw-1-3/4 (2), or
Screw-1 (2)
12. Screw-3/4 (6)
13. Screw-3/4 self-threading(7)
14. Window locking bracket(1)
15. Plastic window panel(1)
16. Side channel(2)
17. Screw-3/8 (6)
18. Panel frame/seal assembly(1)
NOTE: Use scale below to measure length
of your screws. The scale will come in handy
when separating screws for installation.
Identify Screws
By Length
3 8
(10mm)
(25mm)
1
3 4
(19mm)
(44mm)
1 3 4
(63mm)
2 1 2
2. Choose a proper sized window, as shown right.
15-1 2 inches minimum width
16-1 4 inches maximum width(for casement
windows)
21-1 4 inches minimum height (with window
panel retainer)
20-5 16 inches minimum height (window panel
retainer removed)
39-7 16 inches maximum height
NOTE: Height measurement must be of a clear opening
above mounting platform. In some cases, due to a variety
of stop and track arrangements, the above dimensions
may vary slightly. If necessary, installation can be made
by alternating window jambs.(See Alternate Window Jamb
Applications.) (continued)
1
2
5
16
7
16
1
4
5
Page 7
INSTALLATION INSTRUCTIONS
1
4
11
16
Alternate screw location
(depending on the stool depth)
Platform tab
Window track
Window seal
6
Page 8
INSTALLATION INSTRUCTIONS
7
Page 9
INSTALLATION INSTRUCTIONS
1
8
Page 10
INSTALLATION INSTRUCTIONS
9
3
4 or 1
3
4 or 1
or
Page 11
INSTALLATION INSTRUCTIONS
10
Page 12
INSTALLATION INSTRUCTIONS
11
Page 13
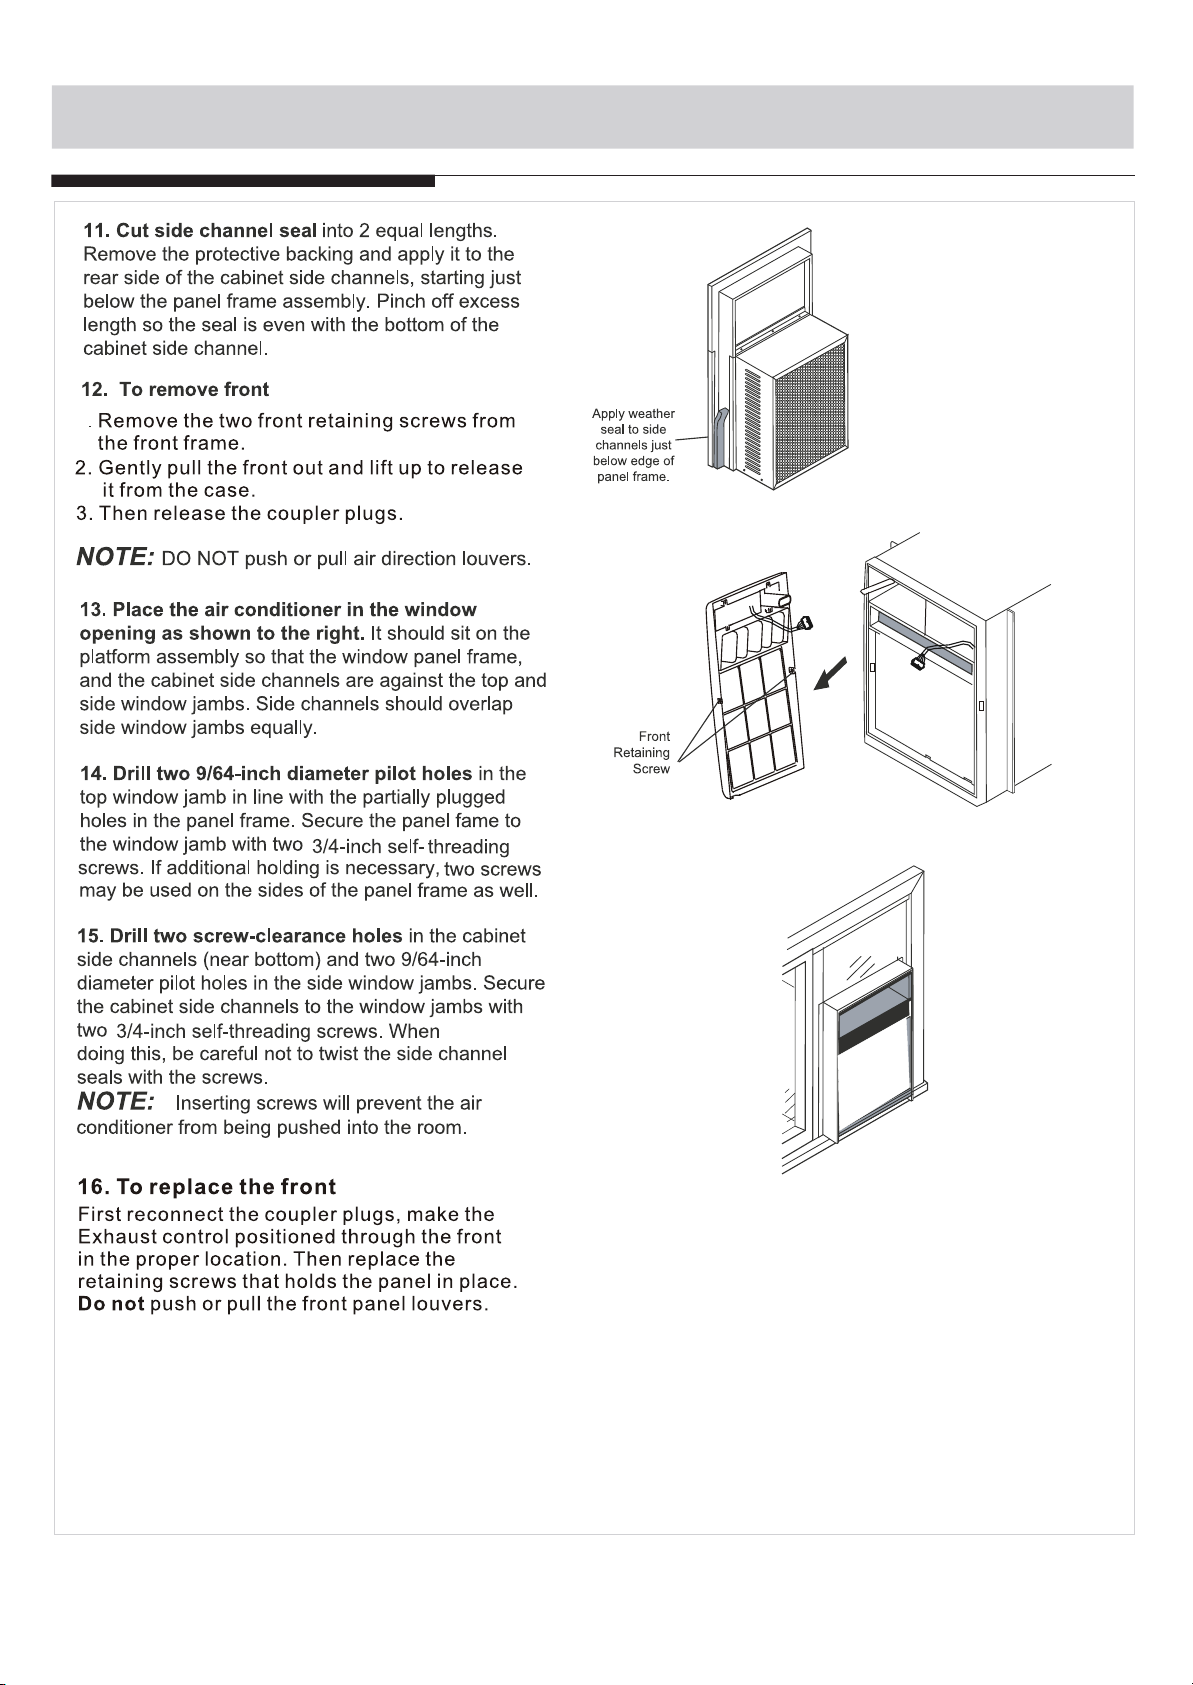
INSTALLATION INSTRUCTIONS
1
12
Page 14
NORMAL SOUNDS
High Pitched Chatter
High efficiency compressors
may have a high pitched chatter
during the cooling cycle.
Vibration
Unit may vibrate and make noise
because of poor wall or window
construction or incorrect installation.
Sound of Rushing Air
At the front of the unit, you may
hear the sound of rushing air
being moved by the fan
Pinging or Switching
Droplets of water hitting condenser
during normal operation may cause
Gurgle/Hiss
Gurgling or hissing noise may
be heard due to refrigerant
passing through evaporator
during normal operation.
pinging or switching sounds.
NOTE:
All the illustrations in this manual are for explanation purpose only. Your air
conditioner may be slightly different. The actual shape shall prevail.
AIR CONDITIONER FEATURES
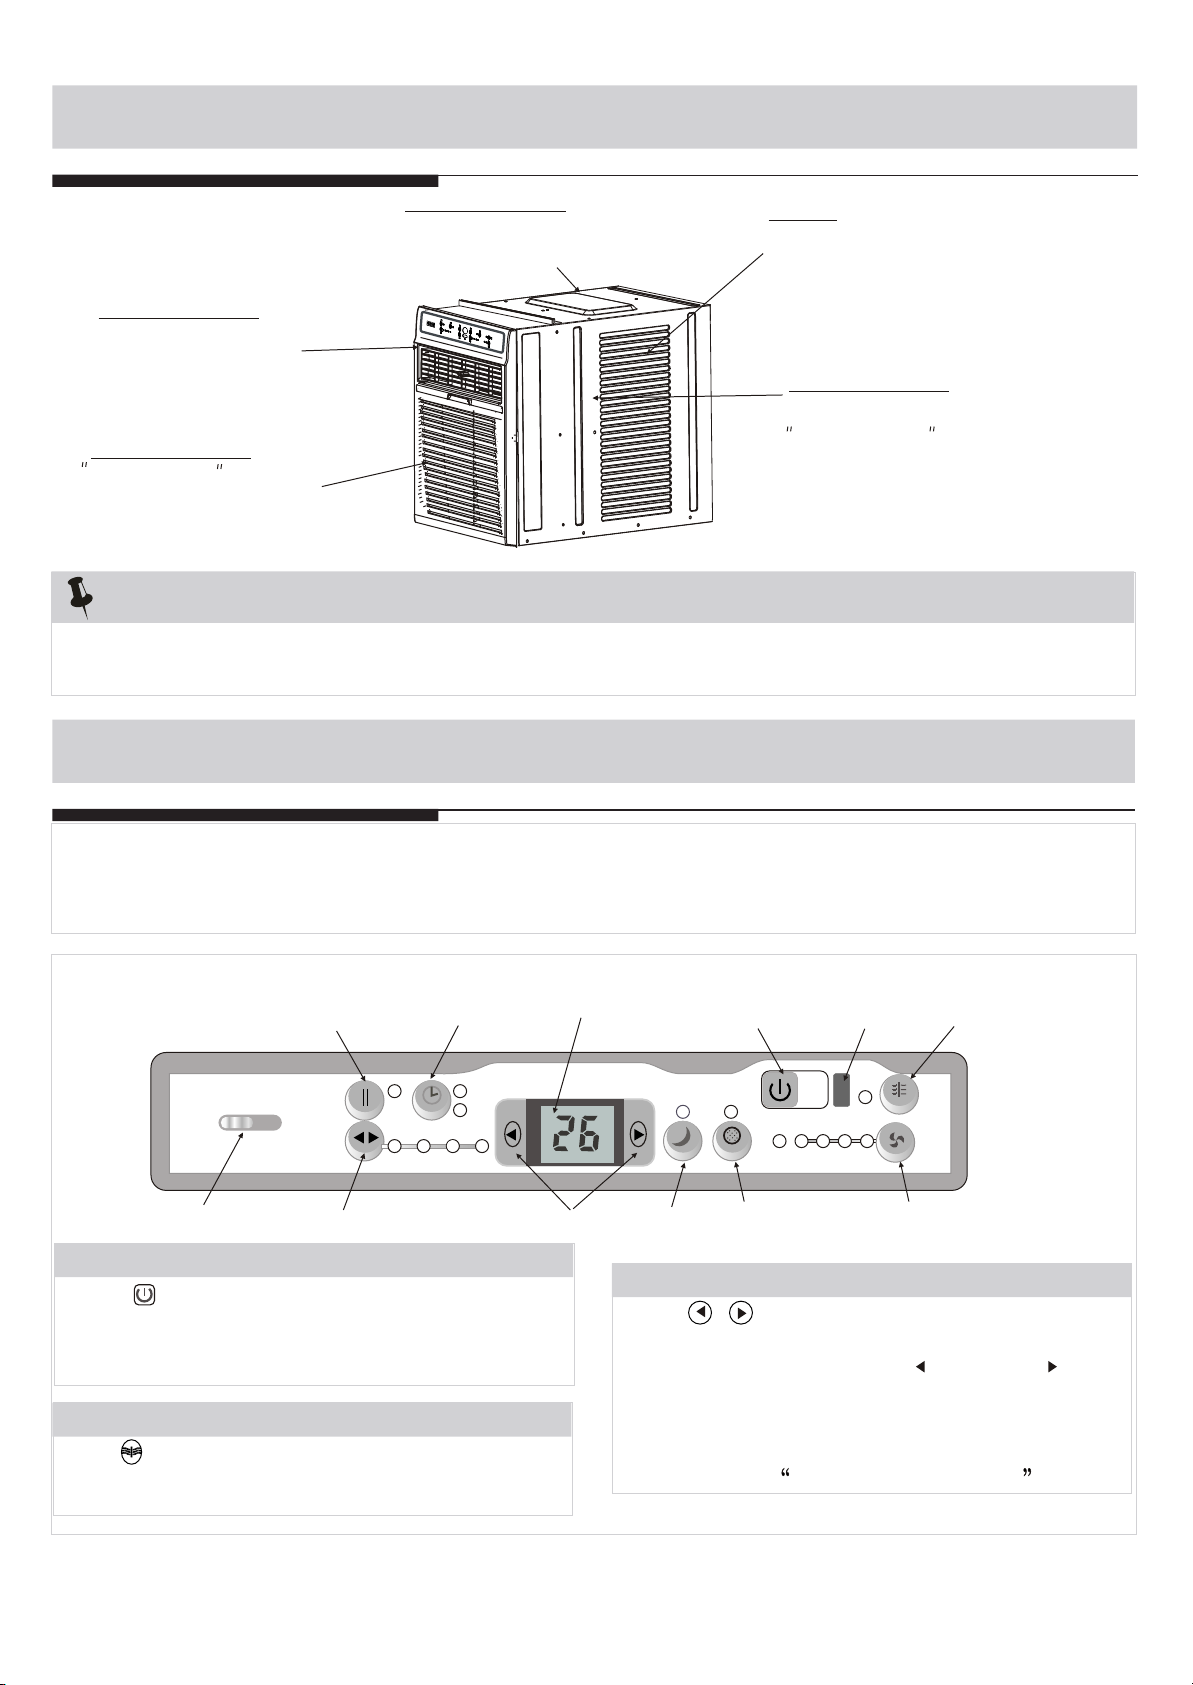
ELECTRONIC CONTROL OPERATING INSTRUCTIONS
Before you begin, thoroughly familiarize yourself with the control panel as shown below and all its
functions, then follow the symbol for the functions you desire. The unit can be controlled by the unit
control alone or with the remote.
Exhaust
closed
Exhaust Selector
Energy Saver
Mode
open
Mode
Sets Mode
Activates Timer
Energy
S
Saver
Auto Cool Dry Fan
UNIT CONTROL PANEL
Timer
off
Timer
on
DISPLAYS
TEMPERATURE
OR TIME OR ERROR CODES
Timer
Temp.
Temp./Timer
Adjustment
Sleep
Timer
Temp.
Sleep Mode
Turns Unit
On/ Off
Check
Filter
Follow
Auto
Me
Activates Check
Filter
Remote Signal
Receptor
ON/
OFF
Low High
Med
Fan
Clean
Air
Sets Fan
Speed
Clean Air
Feature
(on some models)
TO TURN UNIT ON OR OFF:
Press ON/OFF button tot urn u nito n o r o ff.
TO CHANGE TEMPERATURE SETTING:
NOTE:The uni t wil l initia te a utomatically the Energy
Saver function under C ool, Dry, Auto(only Au to-Cooling
and Auto-Fan) modes.
CLEAN AIR FEATURE: (on some models)
Press Clean Air button,the ion generator is
energized and will help to removep ollen an dimp urities
from the air, and trap them in the filter.
Press / UP/DOWN button to change
temperature setting.
NOTE:Press or hold either UP( ) or DOWN ( ) button
until the desired temperature is seen on the display.
This temperature will be automatically maintained
anywhere between 62 F(17 C) and 86 F(30 C). If
you want the display to read the actual room
temperature, see To Operate on Fan Only section.
OO OO
13
Page 15
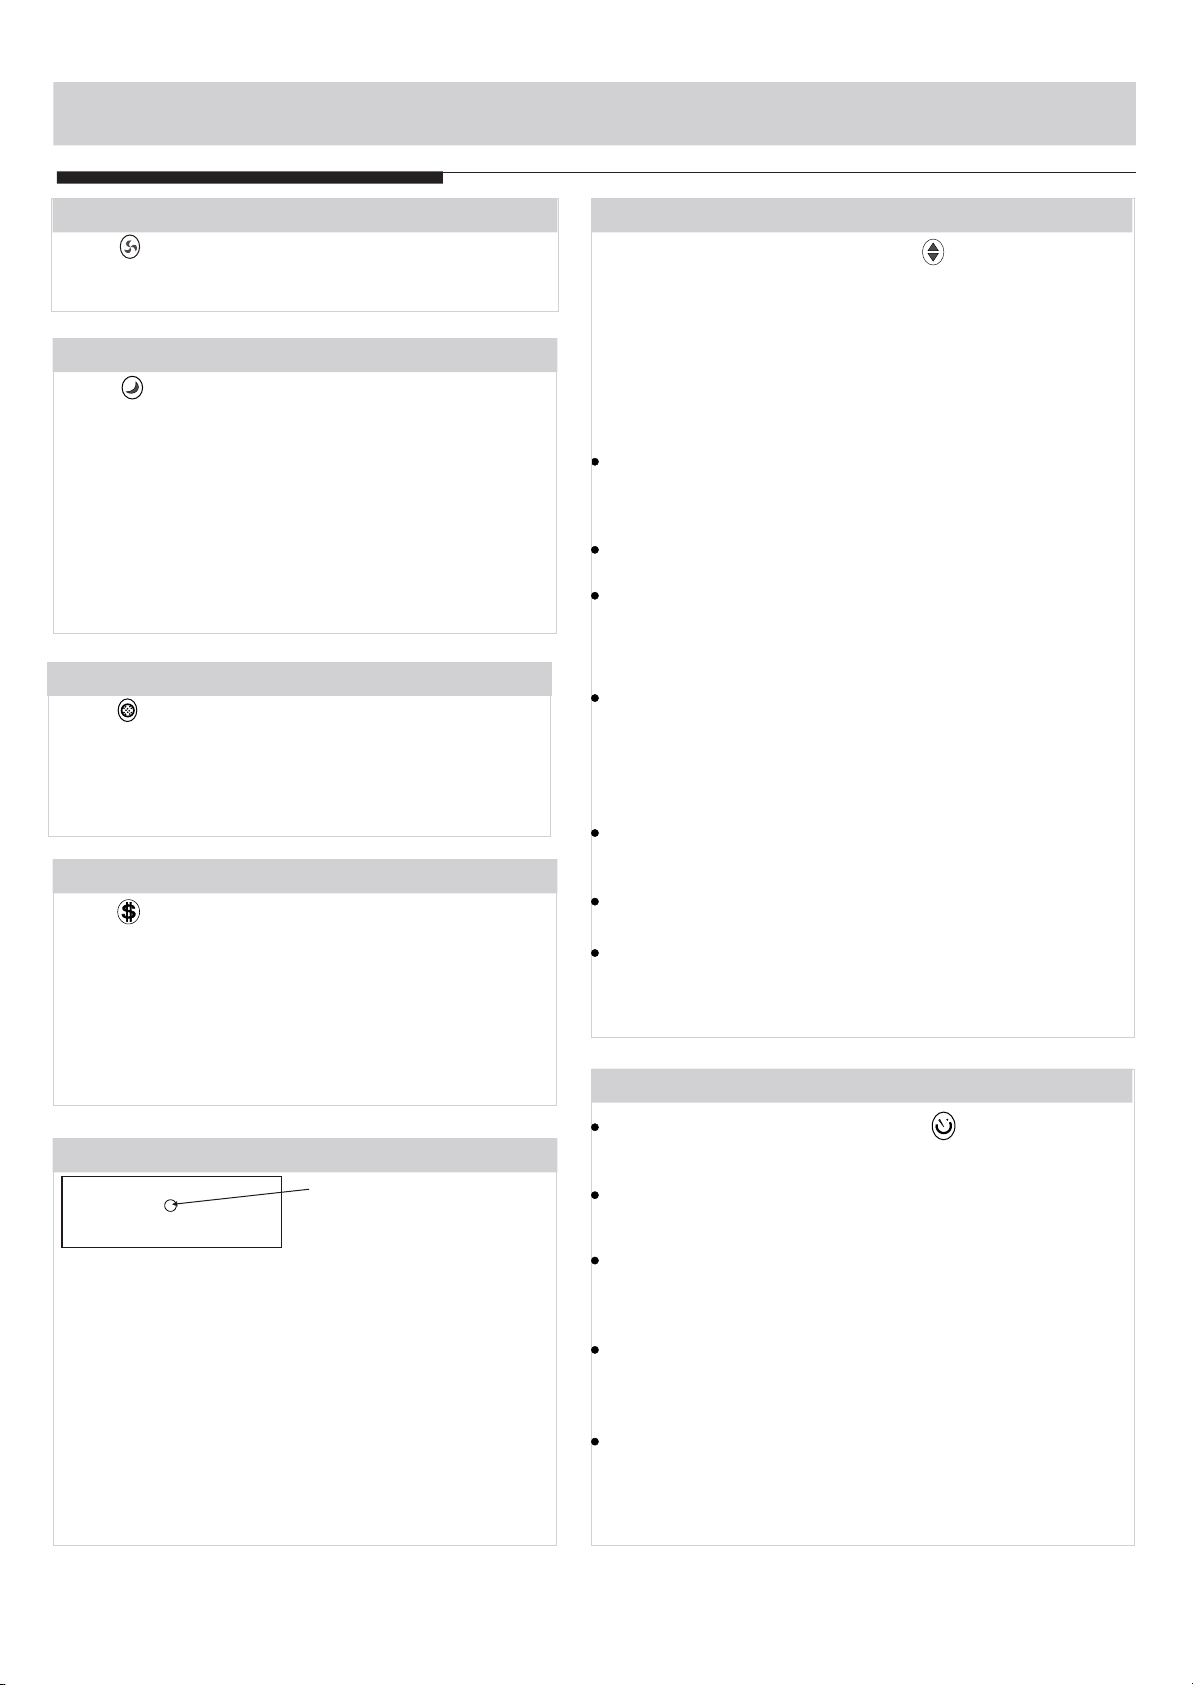
AIR CONDITIONER FEATURES
TO ADJUST FAN SPEEDS:
Press to select the Fan Speed in four steps-Auto,
Low, Med or High. Each time the button is pressed,
the fan speed mode is shifted.
SLEEP FEATURE:
Press Sleep button to initiate the sleep mode. In
this mode the selected temperature will increase by
OO
2 F/1(or 2) C 30 minutes after the mode is selected.
The temperature will then increase by another 2 F/
1(or 2) C after an additional 30 minutes. T his n ew
O
O
t emperature w ill be maintained for 6 hours before it
returns to the originally selected temperature. This
ends the Sleep mode and the u nit w ill c ontinue t o
o perate as originally programmed. The Sleep mode
program can be cancelled at any time during
operation by pressing the Sleep button again.
CHECK FILTER FEATURE:
Press Check filter button to initiate theis feature.
This feature is a reminder to clean the Air Filter for
more efficient operation. The LED(light) will illumi nate after 250 hours of operation. To reset after
cleaning the filter, press the Check Filter button and
the light will go off.
ENERGY SAVER FEATURE:
Press Energy saver button to initiate this function.
This function is available on COOL, DRY, AUTO
(only AUTO-COOLING and AUTO-FAN) modes.The
fan will continue to run for 3 minutes after the
compressor shuts off.The fan then cycles on for 2
minutes at 10 minute intervals until the room
temperature is above the set temperature, at which
time the compressor turns back on and Cooling
Starts.
TO SELECT THE OPERATING MODE:
To choose operating mode, press Mode button.Each
time you press the button, a mode is selected in a
sequence that goes from Auto, Cool, Dry and Fan. The
indicator light beside will be illuminated and remained
on once the mode is selected.
The unit will initiate automatically the Energy Saver
function under Cool, Dry, Auto(only Auto-Cooling and
Auto-Fan) modes.
To operate on Auto feature:
When you set the air conditioner in AUTO mode, it will
automatically select cooling, heating(cooling only models
without), or fan only operation depending on what
temperature you have selected and the room temperature.
The air conditioner will control room temperature
automatically round the temperature point set by you.
In this mode, the fan speed cannot be adjusted, it starts
automatically at a speed according to the room
temperature.
To operate on Fan Only:
Use this function only when cooling is not desired,such
as for room air circulation or to exhaust stale air(on
some models). (Remember to open the vent during this
function, but keep it closed during cooling for maximum
cooling efficiency.) You can choose any fan speed you
prefer.
During this function, the display will show the actual
room temperature, not the set temperature as in the
cooling mode.
In Fan only mode ,the temperature is not adjusted.
To operate on Dry mode:
In this mode, the air conditioner will generally operate
in the form of a dehumidifier. Since the conditioned
space is a closed or sealed area, some degree of
cooling will continue.
TIMER: AUTO START/STOP FEATURE:
FOLLOW ME FEATURE:(on some models)
Light flashing
Follow
Me
This feature can be activated from the remote
control ONLY. The remote control serves as
a remote thermostat allowing for the precise
temperature control at its location.
To activate the Follow Me feature, point the remote
control towards the unit and press the Follow Me
button. T
he remote display is actual temperature at
its location. The remote control will send this signal
to the air conditioner every 3 minutes interval until
press the Follow Me button again.
If the unit does not
receive the Follow Me signal during any 7 minutes
interval, the unit will beep to indicate the Follow Me
mode has ended.
When the unit is on or off, first press Timer button, the
TIMER ON indicator light illuminates. It indicates the Auto
Start program is initiated.
When the time of TIMER ON is displayed
,press the Timer
button again, the TIMER OFF indicator light illuminates.
It indicates the Auto Stop program is initiated.
Press or hold the UP or DOWN button to change the Auto
time by 0.5 hour increments, up to 10 hours,then at 1 hour
increments up to 24 hours.The control will count down the
time remaining until start.
The selected time will register in 5 seconds, and the system
will automatically revert back to display the previous
temperature setting or room temperature when the unit is
on.(when the unit is off,there is no display.)
Turning the unit ON or OFF at any time or adjusting the
timer setting to 0.0 will cancel the Auto Start/Stop timed
program.
14
Page 16
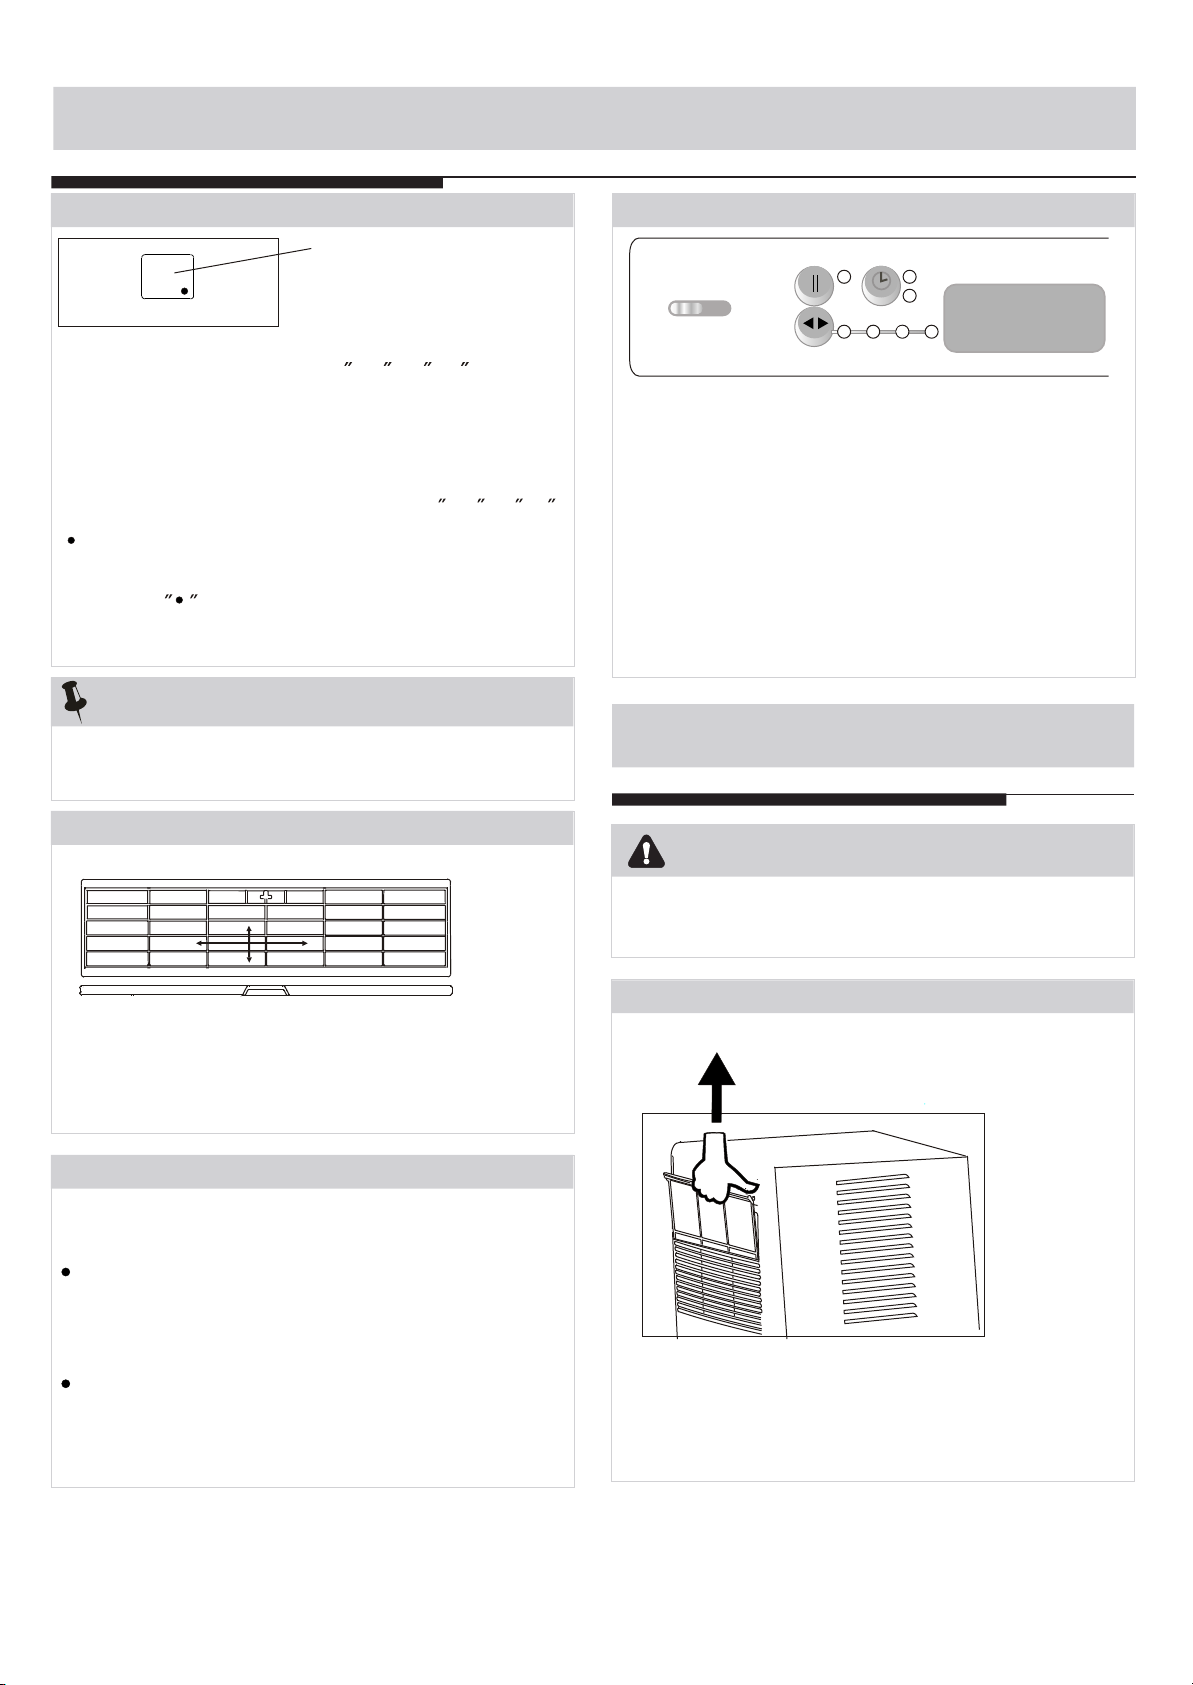
AIR CONDITIONER FEATURES
DISPLAYS:
Displays
DISPLAYS:
Shows the set temperature in C or F and the
Auto-timer settings.While on Fan only mode,it shows
the room temperature.
Error codes:
AS-Room temperature sensor error-Unplug the unit
and plug it back in.If error repeats, call for service.
NOTE:In Fan only mode,it will display LO or HI .
-Evaporator temperature sensor error-Unplug the
unit and plug it back in.If error repeats, call for
service.
NOTE: is displayed as shown in the left picture.
HS -Electric heating sensor error-Unplug the unit and
plug it back in.If error repeats, call for service.
OO
NOTE:
If the unit breaks off unexpectedly due to the power
cut, it will restart with the previous function setting
automatically when the power resumes.
Exhaust Control
Timer
off
Timer
on
closed
Exhaust
open
Mode
Energy
S
Saver
Auto Cool Dry Fan
This Exhaust Control allows the air conditioner to
either circulate inside air (Closed) or exhaust air to
the outside (Open).
The Closed position is used when maximum cooling
is desired. It may also be used for air recirculation
without cooling when the air conditioner is set in any
FAN position.
The Open position removes stale air from the room
and exhausts it to the outside. Fresh air is drawn in
through normal passages in the home.
CARE AND CLEANING
Air Directional Louvers
4-Way Louvers
The 4-Way air directional louvers allow you to
direct air flow up or horizontal, left or right
throughout the room as needed. To adjust the
air directional louvers side-to-side, use the center
handle as you move it side-to-side.
ADDITIONAL THINGS YOU SHOULD KNOW
Now that you have mastered the operating procedure,
here are more features in your control that you should
become familiar with.
The Cool circuit has an automatic 3 minute time
delayed start if the unit is turned off and on quickly.
This prevents overheating of the compressor and
possible circuit breaker tripping.The fan will
continue to run during this time.
The control is capable of displaying temperature in
degrees Fahrenheit or degrees Celsius. To convert
from one to the other, press and hold the Left and
Right Temp/Timer buttons at the same time, for 3
seconds.
CAUTION
Clean your air conditioner occasionally to keep it looking
new. Be sure to unplug the unit before cleaning to
prevent chock or fire hazards.
Air Filter Cleaning
The air filter should be checked at least once a month to see
if cleaning is necessary. Trapped particles in the filter can
build up and cause an accumulation of frost on the cooling
coils.
15
Page 17
CARE AND CLEANING
Air Filter Cleaning
Take the filter by the center and pull up and out.
Wash the filteru sing l iquid d ishwashing d etergent a nd w arm
water. Rinse filter thoroughly. Gently shake excess water
from the filter. Be sure the filter is thoroughly dry before
replacing. Or, instead of washing you may vacuum the filter
clean.
Note: Never use hot water over 40 C(104 F) to cl ean th e
a i r fil ter. Never attempt to operate the unit without the air
filter.
NOTE:
To prevent rust or electrical connections from being
damaged, store air conditioner in an upright position and in
a dry place.
Cabinet Cleaning
Be sure to unplug the air conditioner to prevent shock or fire
hazard. The cabinet and front may be dusted with an oil-free
cloth or washed with a cloth dampened in a solution of warm
water and mild liquid dishwashing detergent. Rinse thoroughly
and wipe dry.
Never use harsh cleaners, wax or polish on the cabinet front.
Be sure to wring excess water from the cloth before wiping
around the controls. Excess water in or around the controls
may cause damage to the air conditioner.
Plug in air conditioner.
Winter Storage
If you plan to store the air conditioner during the winter,
remove it carefully from the window according to the
installation instructions. Cover it with plastic or return it to
the original carton.
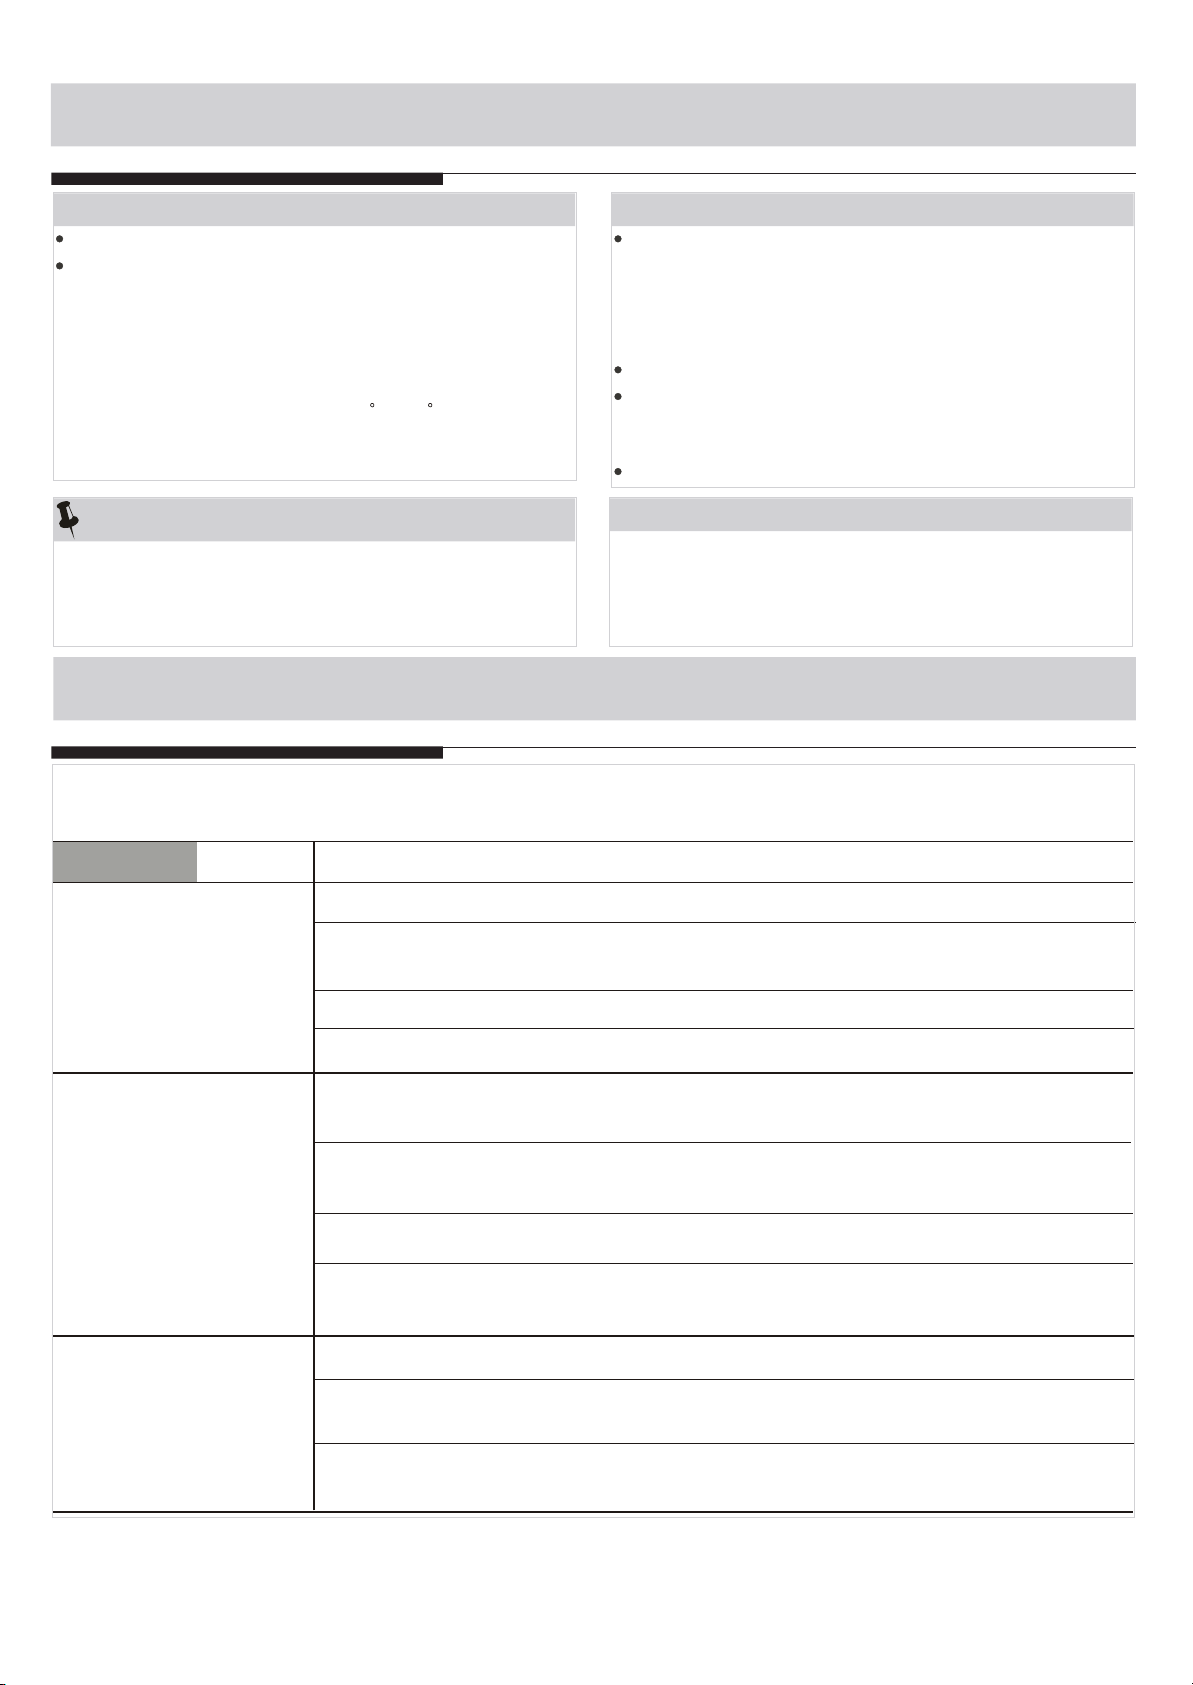
TROUBLESHOOTING TIPS
Before calling for service, review this list. It may save your time and expense. This list includes common
occurrences that are not the result of defective workman-ship or materials in this appliance.
Problem
Air conditioner
does not start
Air from unit does
not feel cold
enough
Air conditioner
cooling, but room
is too warm- ice
forming on cooling
coil behind
decorative front.
Solution
Wall plug disconnected. Push plug firmly into wall outlet.
House fuse blown or circuit breaker tripped. Replace fuse with time delay type or
reset circuit breaker.
Plug Current Device Tripped. Press the RESET button.
Power is OFF. Turn power ON.
Room temperature below 62 F(17 C ). Cooling may not occur until room temperature
rises above 62 F(17 C).
OO
OO
Temperature sensing behind air filter element touching cold coil. Keep it from the cold
coil.
Set to a Lower temperature.
Compressor stopped when changing modes. Wait for 3 minutes after set to the COOL
mode.
Outdoor temperature below 64 F(18 C). To defrost the coil, set FAN ONLY mode.
OO
Air filter may be dirty. Clean filter. Refer to Care and Cleaning section. To defrost,
set to FAN ONLY mode.
Thermostat set too cold for night-time cooling. To defrost the coil, set to FAN ONLY
mode. Then, set temperature to a Higher setting.
16
Page 18
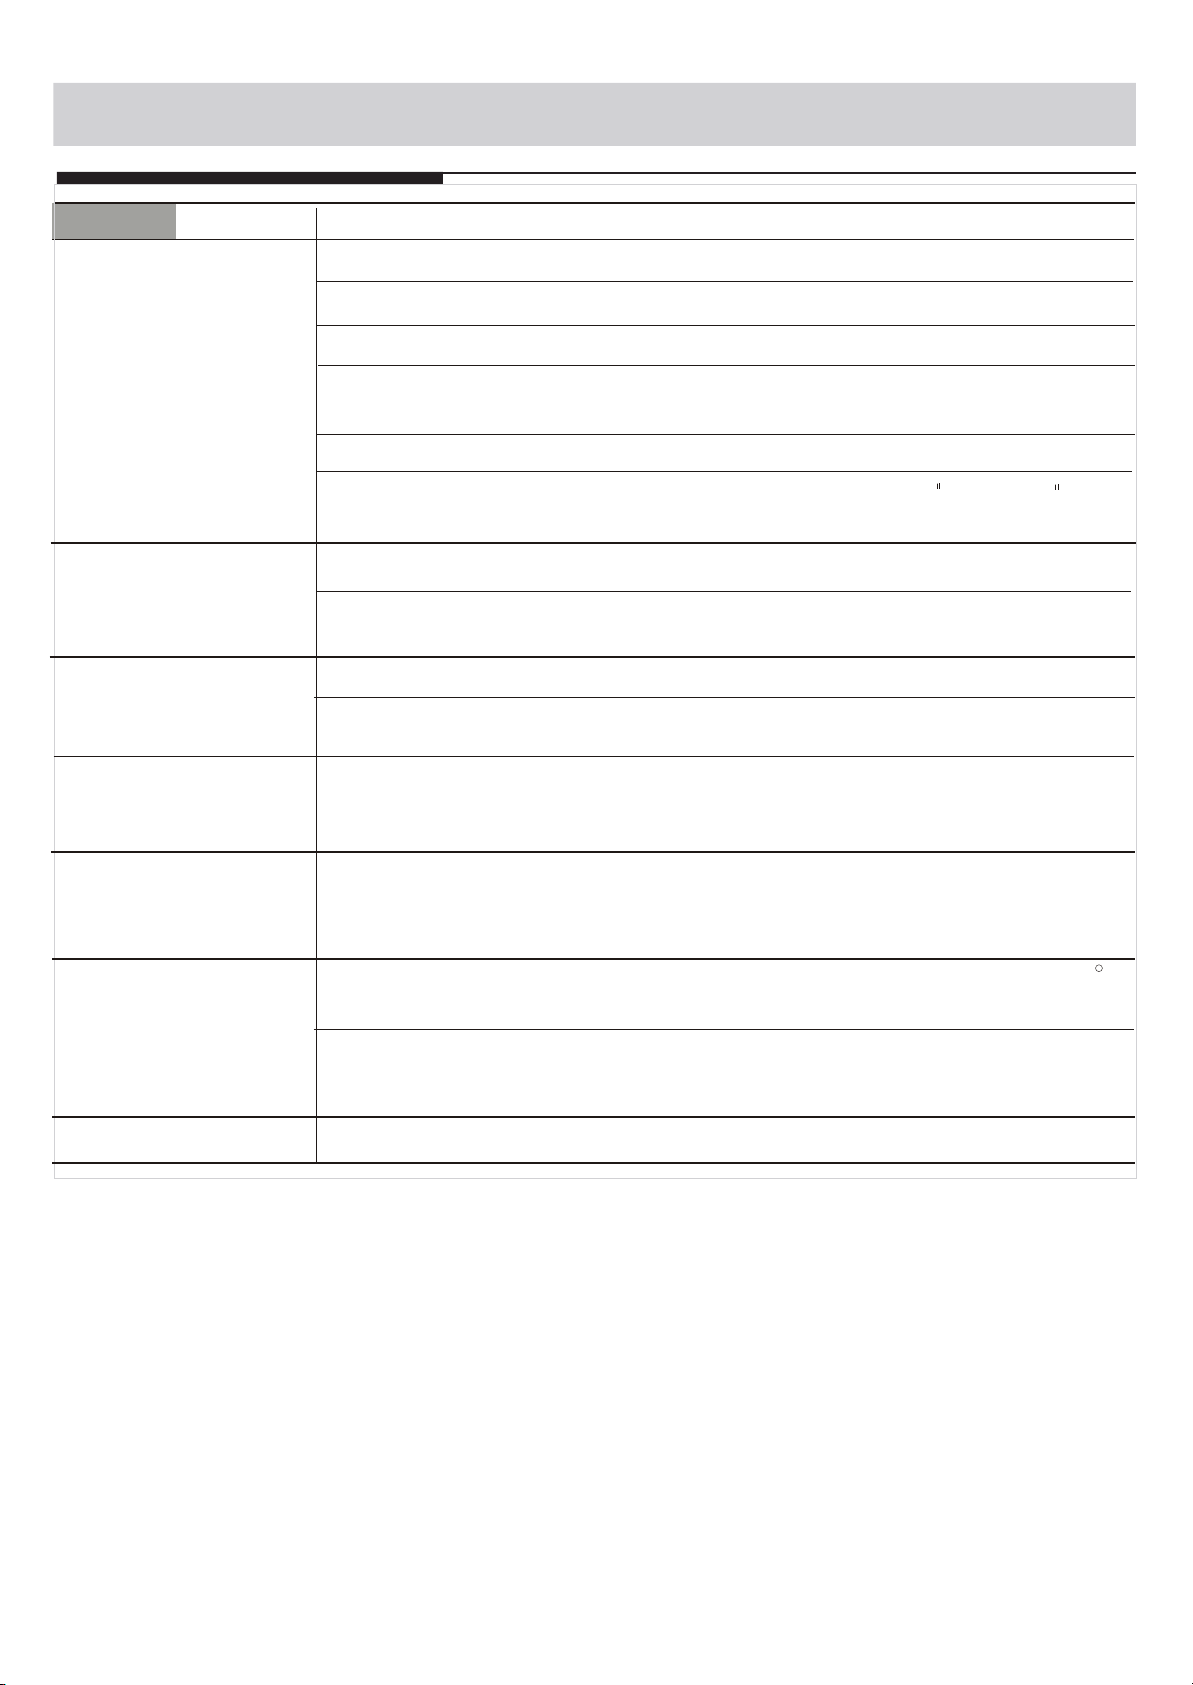
TROUBLESHOOTING TIPS
Problem
Air conditioner
cooling, but room
is too warm- NO
ice forming on
cooling coil behind
decorative front.
Air conditioner turns on
and off rapidly
Noise when unit is
cooling
Water dripping
INSIDE when
unit is cooling.
Solution
Dirty air filter- air restricted. Clean air filter. Refer to Care and Cleaning section.
Temperature is set too High, set temperature to a Lower setting.
Air directional louvers positioned improperly. Position louvers for better air distribution.
Front of units is blocked by drapes, blinds, furniture, etc. - restricts air distribution.
Clear blockage in front of unit.
Doors, windows, registers, etc. Open- cold air escapes. Close doors, windows, registers.
Unit recently turned on in hot room. Allow additional time to remove Stored heat from
walls, ceiling, floor and furniture.
Dirty air filter- air restricted. Clean air filter.
Outside temperature extremely hot. Set FAN speed to a Higher setting to bring air past
cooling coils more frequently.
Air movement sound. This is normal . If too loud, set to a slower FAN setting.
Window vibration - poor installation. Refer to installation instructions or check with installer.
Improper installation. Tilt air conditioner slightly to the outside to allow water drainage.
Refer to installation instructions - check with installer.
Water dripping
OUTSIDE when
unit is cooling.
Remote Sensing
Deactivating
Prematurely
(some models)
Room too cold
Unit removing large quantity of moisture from humid room. This is normal during
excessively humid days.
Remote control not located within range. Place remote control within 20 feet & 180 ,
radius of the front of the unit.
Remote control signal obstructed. Remove obstruction.
Set temperature too low. Increase set temperature.
17
 Loading...