

Page 1
HD D
V
R User’s Manual Ver 2.1.0
0
Page 2
HD D
V
O
o
o
n
-
p
r
y
a
e
u
e
T
I
o
C
T
T
P
T
c
e
T
c
P
e
n
n
R
T
E
T
L
a
C
o
c
V
s
D
e
g
u
d
u
o
a
S
T
h
/
T
g
l
y
g
,
R
O
O
T
gh
a
E
S
h
m
d
s
r
R
g
c
a
D
m
a
P
4
e
D
n
M
d
g
S
E
N
C
w
e
c
S
l
O
o
r
m
D
p
a
m
y
e
n
s
S
E
D
o
D
n
v
a
k
R
S
a
d
R
s
n
gh
p
e
s
k
R
t
g
e
S
o
b
/
t
r
D
R
t
g
u
m
c
n
e
o
n
d
y
V
a
d
o
O
a
g
e
g
p
r
m
g
a
a
c
s
d
R
c
y
d
O
e
e
e
d
P
u
r
f
i
t
r
k
s
i
R
n
g
R User’s Manu
AB
Welc
• Rec
eve
• HD
DVR, FHD-D
to-o
• The
DVR Server
Client Applic
• The
ate the HD-
ope
• Full
the
• Liv
incl
• Ext
• CC
(GU
man
ual backup c
opti
The
• CC
• CC
CO
UT THE
me to the C
rding for up
t recording;
erate DVR a
implement
ccompanyin
viewing is s
de time and
nsive sched
V SERVICES
), allowing y
ns.
CTV SEVICE
V SERVICES
V SERVICES
YRIGH
l
CCTV S
TV SERVICE
to eight Cas
ontinuous
R and Hybri
nd client app
oftware run
ation softwa
VR, FHD-DV
d networkin
client appli
pported on
ate, event li
ling features
HD-DVR, FH
u quick and
n be perfor
DVR series
DVR Remote
DVR BACKU
© 201
RVICE
INC. Digita
register / P
otion detecti
HD-DVR se
lication syste
on the HD-
e runs on a
and Hybrid
capabilities
ation.
variety of cl
st.
allow custo
-DVR and H
efficient acc
ed using a
lso support
CLIENT (CM
S/W and VI
& TRA
INC DV
Video Surve
S devices,
n, alarm; a
ies are a hi
.
VR, FHD-DV
ersonal com
HD-DVR Seri
llow remote
ient platform
izing of wee
brid HD-DV
ss to all setu
umber of op
the followin
/Remote Cli
WER.
EMARK
SYSTE
illance Syste
ystem health
d scheduled
h-performan
R and Hybrid
uter (PC) a
es DVR serv
administrati
, Versatile h
day, weeke
series provi
p and operat
ical, external
PC-based a
nt S/W)
M
..
status and c
recordin
e, Hybrid ty
HD-DVR Se
d allows you
r system fro
n, playback,
h-speed se
i
d, and speci
es a graphi
ions function
, and mappe
pplications:
.
onfiguration,
e PC-based,
ies DVR syst
to log on an
your local
and export
rch operatio
l event reco
al user inter
. Scheduled
network dr
Ver 2.1.0
multi-
easy-
m.
C.
sing
ns
ding.
ace
or
ve
he
writt
● CC
Servi
● Re
IM
Befor
Retai
Whe
dama
WA
O R
MOIS
EXP
ontents of t
n consent of
VSERVICES
es, Inc. Trad
ote Client s
ORTAN
proceedin
this manua
unpacking
e is evident
NING
DUCE THE
URE. DO N
ANATION
he li
the use
that m
is manual m
CCTV Servic
INC. and H
marks.
w (CMS(Ce
INFOR
, please rea
with the ori
our digital re
DO NOT IN
ISK OF FIR
T INSERT A
F GRAPHI
tning flash
r to the pres
y be of suffi
ay not be c
s, Inc.
-DVR, FHD-
tral Monitori
ATION
and obser
inal bill of s
corder, chec
TALL OR OP
OR ELECT
Y METALLIC
SYSMBOL
ith arrowhe
nce of un-in
ient magnitu
pied or repr
VR and Hy
Station) S
e all instruc
le for future
for missing
ERATE THIS
IC SHOCK,
OBJECT TH
d symbol, wi
sulated “dan
e to constit
duced in an
rid HD-DVR
W) is a CCT
ions and w
reference an
or damaged
PRODUCT. C
O NOT EXP
OUGH VENT
hin an equil
erous volta
te a risk of
manner or
Series DV
Services, In
rnings conta
, if necessar
items. If any
ontact your
SE THIS PR
ILATION GRI
teral triangl
e” within th
lectric shock
form withou
systems a
. Trademar
ined in this
, warranty
item is missi
ealer for ass
ODUCT TO
LLS.
, is intended
product’s e
to persons.
the prior
e CCTV
s.
manual.
ervice.
, or if
n
stance.
AIN OR
to alert
closure
1
Page 3

HD D
V
A
t
o
u
Texc
The
EUsmi
P
D
a
A
P
P
O
S
D
R
u
o
a
T
d
h
:
o
d
C
s
T
O
T
e
R
a
u
D
w
g
–
o
v
Q
q
a
e
e
y
n
d
T
m
U
n
n
o
o
e
e
i
n
r
a
e
t
g
t
Y
u
y
m
e
s
a
s
T
y
e
e
V
v
y
a
o
o
W
t
n
m
p
u
p
e
e
e
.
o
e
g
i
p
d
q
v
g
l
j
s
t
c
e
m
e
s
t
n
h
p
e
y
g
v
e
o
n
t
t
t
l
m
o
t
o
e
y
e
g
c
r
e
n
c
h
t
a
d
r
s
l
y
k
a
h
e
r
o
o
q
h
m
u
g th
n
f
a
b
v
c
l
g
e
v
a
ge
b
m
o
p
c
m
p
u
R
i
s
e
c
h
r
t
t
a
c
h
i
u
o
o
o
u
e
v
r
k
c
c
R User’s Manu
l
Ver 2.1.0
PRE
S
by
no
To
All
(r
IN
CL
IM
REA
oper
1.
2.
3.
4.
5.
6.
7.
he excl
presence
accompa
AUTION
FETY: Shoul
the qualified
going to be
disconnect t
w adequate
s, blankets,
ALLATION
essive dust
unit is not
ANNING:
e a mild hou
ht damage
ORTAN
INSTRUCTI
ted.
TTACHMEN
manufactur
OWER SOU
source indic
home, cons
monitor or e
OWER COR
equipment
BJECT AND
throu
in a fire or e
ERVICING
removing c
qualified ser
AMAGE RE
servicing to
-
When the
-
If liquid h
If the vid
-
If the vid
-
adjust onl
adjustme
a qualifie
EPLACEMEN
sed replace
riginal part.
amation poi
of importa
nying the pr
r mechanical
esigned to b
the finish of
r as they ma
quipment de
h ope
nings as the
lectric shock.
Do not att
vers may ex
UIRING SER
any liquid
personnel b
used for sev
e cord, pull
air circulatio
etc.) or nea
Do not inst
lean the uni
ehold deter
SAFET
NS – All the
S – Do not
CES – Video
ted on the
lt your vid
S – Do not
here person
LIQUID EN
ice personn
ualified ser
power-suppl
s spilled, or
o product h
o product d
those contr
t of other co
technician t
PARTS –
ent parts sp
nauthorized
t within an
t operating
duct.
r solid objec
fore operati
ral days or
t out by the
to prevent i
materials (c
ll the unit in
vibration.
waterproof.
with a slight
ent. Never u
he unit.
GUARD
safety and o
se attachm
result in th
monitor or
arking label
o monitor
igned to op
llow anythin
walking on
RY - Never
may touch
Never spill li
mpt to ser
ose you to
l.
ICE – Unplu
ice personne
cord or the
ects have
ob
s been expo
es not opera
ols that are
ntrols may r
restore the
hen replace
ecified by th
substitution
equilateral
and mainte
fall into the
it any furt
ore.
lug. Never
nternal heat
rtains, drap
an extremel
Exposure to
ly damp soft
se stron
erating instr
nts not reco
risk of fire,
quipment sh
If you are
r equipmen
rate from ba
to rest on t
t will abuse
ush objects
angerous vo
uid of any k
ice video
dangerous v
video moni
under the f
plug has be
fallen into th
ed to rain or
e normally b
overed by th
sult in dama
video produ
ent parts a
manufactur
may result i
sol
riangle is in
ance (servi
cabinet, unpl
er. Unplug t
ull the cord i
build-up. Do
ries) that m
hot or humi
rain or wate
cloth.
ents such a
uctions shou
mmended b
electric shoc
ould be oper
ot sure of t
dealer or l
tery power r
he power co
he cord.
of any kind
tage points
ind on the pr
onitor or e
ltage or ot
or or equip
llowing cond
n damaged.
e video prod
water.
y followin
operating i
e and will o
t to its norm
e required,
r or that ha
n fire, electri
tended to a
ing) instruct
the unit a
u
e unit from t
tself.
not place th
y block the
area or in
may dama
thinners or
d be read be
the video
or injury to
ated only fro
e type of p
ocal power
efer to the o
d. Do not lo
into video
r short-out
oduct.
uipment yo
er hazards.
ent from the
itions:
ct.
e operating
structions a
ten require e
l operation.
e sure the s
e the same
shock or ot
ert the use
ion in the li
nd have it ch
he wall outle
unit on surf
entilation ho
n area subje
e the unit.
enzene as t
fore the appl
onitor or eq
persons.
m the type
wer supplied
company. F
erating instr
ate video m
onitor or eq
arts that cou
rself as op
efer all ser
wall outlet a
nstructions,
an imprope
xtensive wor
rvice techni
haracteristi
er hazards.
to the
terature
ecked
if it is
ces
les.
t to
ey
iance is
ipment
f power
to your
r video
uctions.
nitor or
ipment
ld result
ning or
icing to
nd refer
by
ian has
s as the
2
Page 4

HD D
V
A
M
M
D C
C
C
C
AWG
a
T
S
O
AF
G
T
G
E
U
E
C
R
L
R
N
A
L
N
U
A
A
C
A
E
L
D
.
A
D
O
F
H
A
A
B
O
.
.
.
.
.
.
.
.
.
.
.
.
A
.
.
.
.
.
F
.
.
.
.
.
.
.
.
O
.
.
.
.
.
.
.
.
.
.
.
.
.
.
.
.
.
.
.
.
.
.
.
.
.
.
.
.
.
T
.
.
.
.
.
.
.
.
.
.
.
.
.
.
.
.
.
.
.
.
.
.
.
.
.
.
.
.
.
2
2
2
2
3
3
3
4
4
4
4
4
4
5
5
5
R User’s Manu
l
Ver 2.1.0
I
I
1
1
1
2
2
2
2
3
3
3
3
3
3
4
4
4
4
4
F
BOUT
CCTV
PORTANT INF
PORTANT
S
VR SYSTEM
HAPTER 1.
.1. B
ASIC FEA
.2 .U
NPACKIN
.3. S
YSTEM
HAPTER 2.
.1.M
AIN SCRE
.2. B
ASIC FUN
.3. PTZ C
.4. A
ONT
DDITIONA
HAPTER 3.
.1. U
NDERSTA
.2. R
ETRIEVAL
.3. S
MART SE
.3. A
DVANCED
.4. A
DDITIONA
.5. P
ERFORMI
HAPTER 4.
.1. M
NUAL B
.2. S
CHEDULE
.3 C
ONCURRE
.4. D
IRECT BA
.5. B
CKUP VI
Q. ..............
ARRENTY
ROSSARY
. .....
. .....
AB
ERVICES INC
RMATION
ETYGUARD
CONTENTS
ETTING ST
URES
............
....................
R
AR CONNECTI
SING THE
N DESCRIPTI
TIONS
. .........
OL PANEL
FUNCTIONS
ETRIVAL O
DING SEARC
R
ECORDED
RCH
. ............
S
EARCH
SEARCH FUN
G EXPORT(S
SING THE
CKUP
. ...........
BACKUP
T BACKUP
KUP
. ............
WER
. ...........
.....................
.....................
.....................
. .....
....................
. ...
....................
...................
....................
....................
ON
VR SYSTEM
....................
.....
....................
. .
....................
D
....................
. .......
....................
CTIONS
VE AS)
ACKUP SO
....................
. .......
....................
....
....................
....................
....................
....................
....................
....................
E
VR S
YSTEM
RTED. .......
...............
N
................
RECORDE
SCREEN
T
. .....
. ..............
. ........
. ........
F C
.
....................
....................
....................
....................
....................
....................
....................
....................
....................
....................
....................
....................
....................
D IMAGE ....
....................
....................
....................
....................
....................
....................
TWARE ......
....................
....................
....................
....................
....................
....................
....................
....................
NT
.....................
.....................
.....................
.....................
.....................
.....................
.....................
.....................
.....................
.....................
.....................
.....................
.....................
.....................
.....................
.....................
.....................
.....................
.....................
.....................
.....................
.....................
.....................
.....................
.....................
.....................
.....................
.....................
.....................
EN
....................
....................
....................
....................
....................
....................
....................
....................
....................
....................
....................
....................
....................
....................
....................
....................
....................
....................
....................
....................
....................
....................
....................
....................
....................
....................
....................
....................
....................
S
....................
....................
....................
....................
....................
....................
....................
....................
....................
....................
....................
.................. 1
.................. 1
................. .
..................
..................
..................
..................
..................
..................
................. .
..................
..................
..................
..................
..................
..................
..................
..................
1
1
2
3
4
5
6
7
8
9
9
5
8
1
2
6
7
0
4
9
3
4
5
7
7
9
2
3
4
3
Page 5

HD D
V
G
S
T
R
R User’s Manual
Ver 2.1.0
T
A
N
G
D
4
Page 6

HD D
V
e
s
yanaimp
0
2
3
4
5
6171819
a
F
u
d
t
R
y
n
T
m
o
T
m
y
d
T
m
n
n
m
a
v
e
o
n
s
i
q
e
n
e
e
T
s
c
o
e
t
t
e
E
d
m
g t
n
6
5
V
m
a
a
e
c
a
r
t
iag
e
t
D
o
g
d
n
e
m
k
t
o
a
o
g
w
s
e
s
a
d
R
3
1
x
ge
r
r
w
t
n
o
2
c
e
c
e
o
s
n
o
o
A
a
m
B
w
n
R
D
o
d
(
s
n
e
w
k
g
m
g
f
w
a
a
t
c
i
k
a
s
a
o
V
C
m
c
o
T
s
e
n
e
a
e
r
i
o
o
e
t
r
m
d
p
c
g
d
k
m
u
a
h
m
u
r
a
o
o
U
v
s
p
m
s
e
g
r
m
m
a
e
v
w
e
c
a
a
n
n
h
tag
v
a
g
g
R User’s Manu
1.1
BASIC
Th
Sy
tem for Sec
pla
log CCTV. I
ressive featu
1
.
1
. Display Sc
2
. Recorded
. Display Sp
3
. Users' eas
4
. Check and
5
. Outstandi
6
. Efficient Fi
7
This file s
. Convenien
8
convenie
. Image pri
9
1
Video foot
format (sa
1. 16 Chann
1
● When m
● Recordin
1
1
● Makes f
● Index f
● Run a
1
The syst
functions
1
1
Digital Vi
s back the
Camera In
he syste
event or c
he syste
the store
he syste
. Archived I
. Pre/post a
● Recordi
● This en
. Easy to us
● Gives a
. Various N
he tran
. One up to
camera lo
. Remote n
moving lin
. Remote vi
. Analog ou
spot moni
. Multi-serv
l
EATUR
eo Recor
rity and ma
igital video i
implements
res, makin
put: Hybrid i
eens: 1, 4,
esolution: 3
eed: 480 fps
change of
Control Ca
Image Qu
provides v
nstantly sav
le System.
stores data
stem efficien
data is effe
t User Interf
allows use
ce, a VCR s
ting: Saved
es can b
e can be s
e).
ls of Motion
tion detecti
interval an
larm recordi
takes plac
ures the enti
e Search Fun
nding the ti
uick overvie
ature to boo
d Search da
twork Functi
m provides t
as well as th
mission can
16 Channel
ally and rem
tification fun
e, enlar
wing by eith
puts on Soft
ors the can
r so 1 busin
ed s
S
er (DVR) i
nufactured b
ages in a f
a user frien
he CCTV SE
put - up to
, 9, 10, 13,
2X240, 704
(real-time) b
ideo Arran
era and IP p
lity and Sea
rious search
d data.
on baskets
tly aligns dat
tively protec
ce.
s to operate
yle playback
mage file ca
backed up
ored in 1 of
etector fun
n occurs, th
frame rate
function.
0-8 frames
re event was
ction Timelin
e and date
w as to wher
mark event
a of DVR (A
ns.
he remote m
e two-way v
lso be enabl
udio record
tely, two w
ction (email,
creen, and e
er LAN for re
are Based
equentially s
ss owner ca
the core of
CCTV SE
shion that si
ly Graphical
VICES INC
2 channels
6, 20, 25 an
240, 704x48
ards NTSC
ment in Live
oducts statu
ch Methods.
conditions a
hich are the
a and maxim
ed.
it with simpl
control, and
be printed
nto any bac
ways, usin
tions.
system im
ontrol durin
before and a
recorded as
and Calend
f an event e
e and when
for quick re
alog) and IP
nitoring, re
ice commun
ed using a te
and playbac
y audio oper
text transmi
ail)
mote surveill
oards and 1
itch.
watch up t
the Digital
VICES IN
nificantly i
User Interfa
VR the obvi
f normal CC
36 camera
0
frames per s
Monitoring b
at Tree Me
nd an excell
disk space p
izes the spe
mouse ope
Gives the ab
ith conventi
-up device f
a Backup Vi
ediately star
an event fo
ter and alar
ell as recor
ar.
sy to locate.
ctivity took
trieval at a la
as the same
ording, sear
cation throu
lephone mo
k at playbac
tions.
sion) and va
nce and re
Analog outp
8 locations
ideo Surveill
. The DVR
proves on t
e (GUI) co
us choice.
V camera pl
plit screens.
cond).
y Virtual Mat
u.
nt image qu
artitioned int
d of data pr
ation in a G
lity to retrie
nal Printers.
r long-term
wer (Backu
s recording i
optimized i
event take
ing lead-tim
lace.
ter time.
way.
hing, sendin
h a network
em and dive
recorded i
rious type of
ote manage
t for hardw
t one time
ance with R
collects, sa
e defects of
plemented
s 4 SDI cam
ix·.
lity for sear
certain are
cessing. In
I environme
e informatio
torage.
), or using t
mages onto
e saving.
place.
up to the e
, and contro
in real time.
se networks.
age with co-
alarms. (bee
ent.
re based bo
Ver 2.1.0
cording
es, and
existin
ith very
ras.
hing an
s.
ddition,
t for
quickly.
e AVI
he HDD.
ent.
llin
working
p sound,
rds, for
5
Page 7
HD D
V
V
DInsLC
oPle
a
K
f
m
i
a
V
n
e
f
a
)
t
e
a
w
/
n
/
o
a
1.2
D
H
R User’s Manu
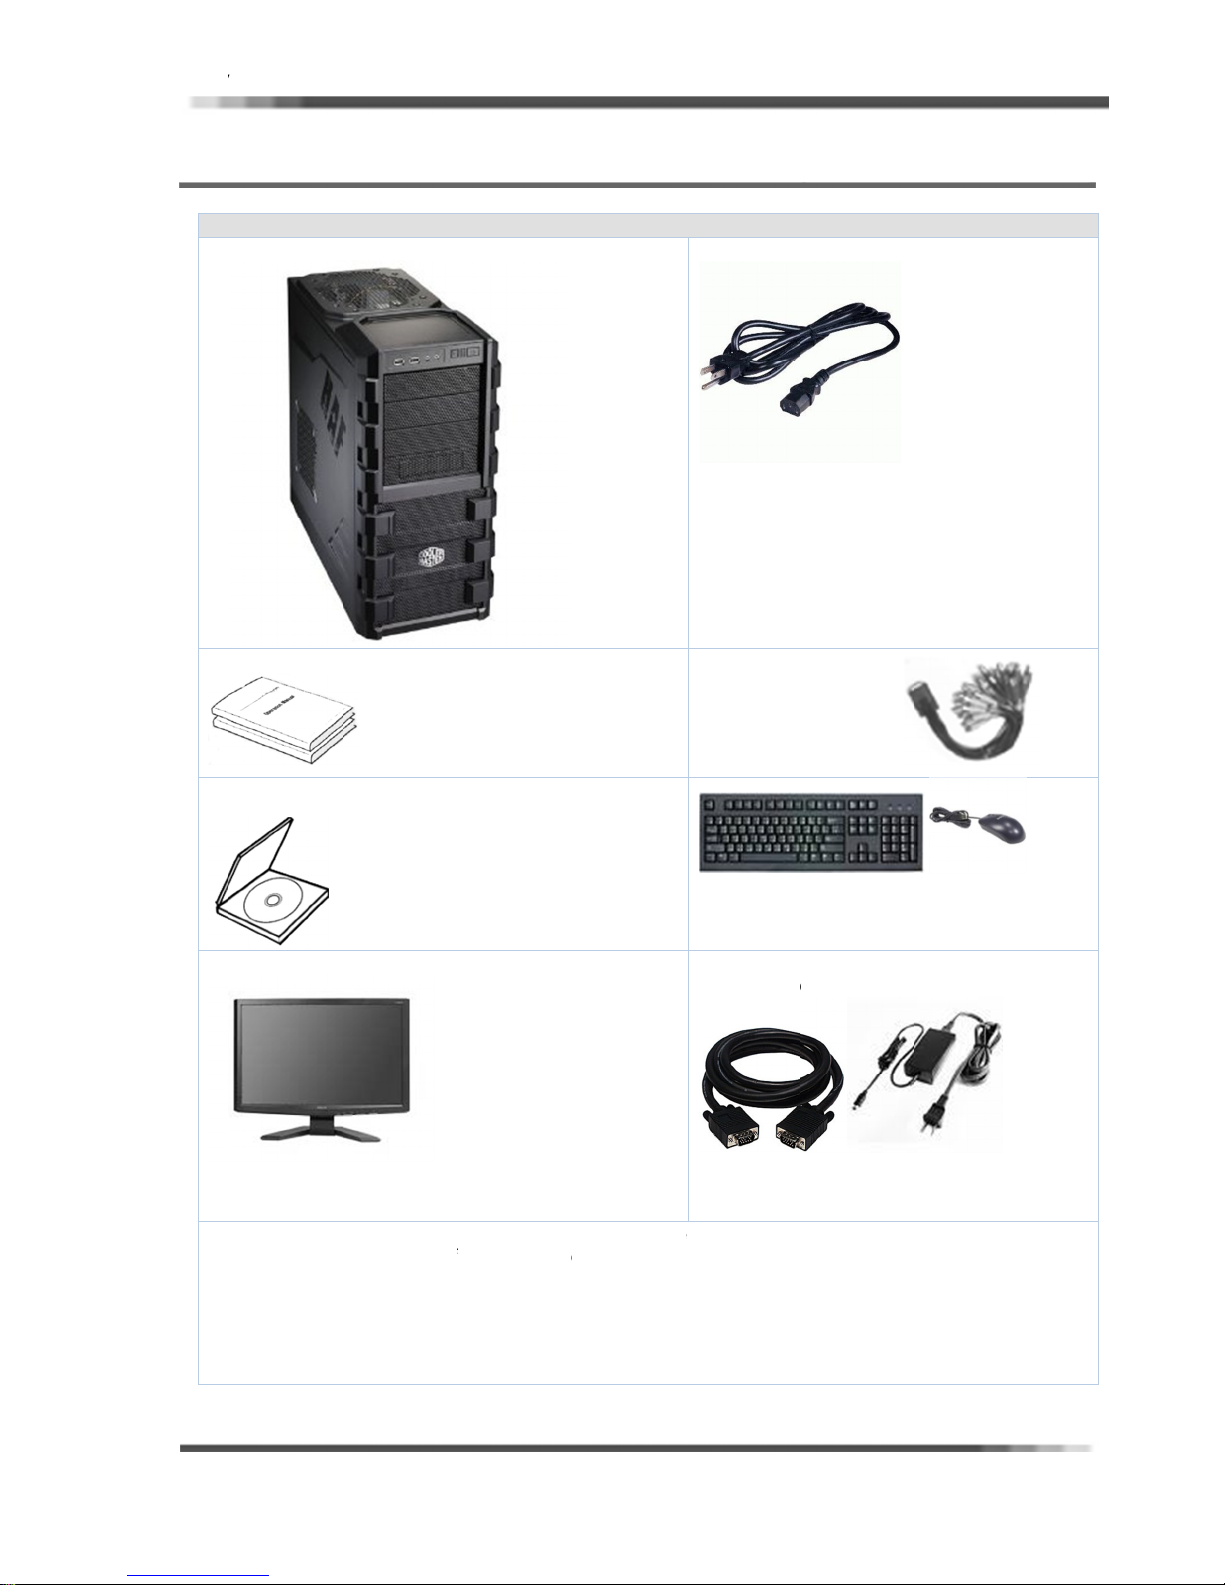
UNPAC
R Set Con
DVR syste
l
ING
iguration
(1SET)
System Po
er cable
Ver 2.1.0
C
tallation CD
D Monitor(S
mponents c
ase unpack
D
-Manual
-Driver
-Setup S/W
ze depend o
n be chang
a system in
R User’s M
order entry
d according
lat and not w
nual
o option sele
t place. Ple
Video
Key Board
Monitor co
LCD monit
ction.
se check all
input pigtail
Mouse
nect cable
or Power Ad
components
ptor
are in the pa
ckage.
6
Page 8
HD D
V
V
V
a
C
C
I
R User’s Manu
l
Ver 2.1.0
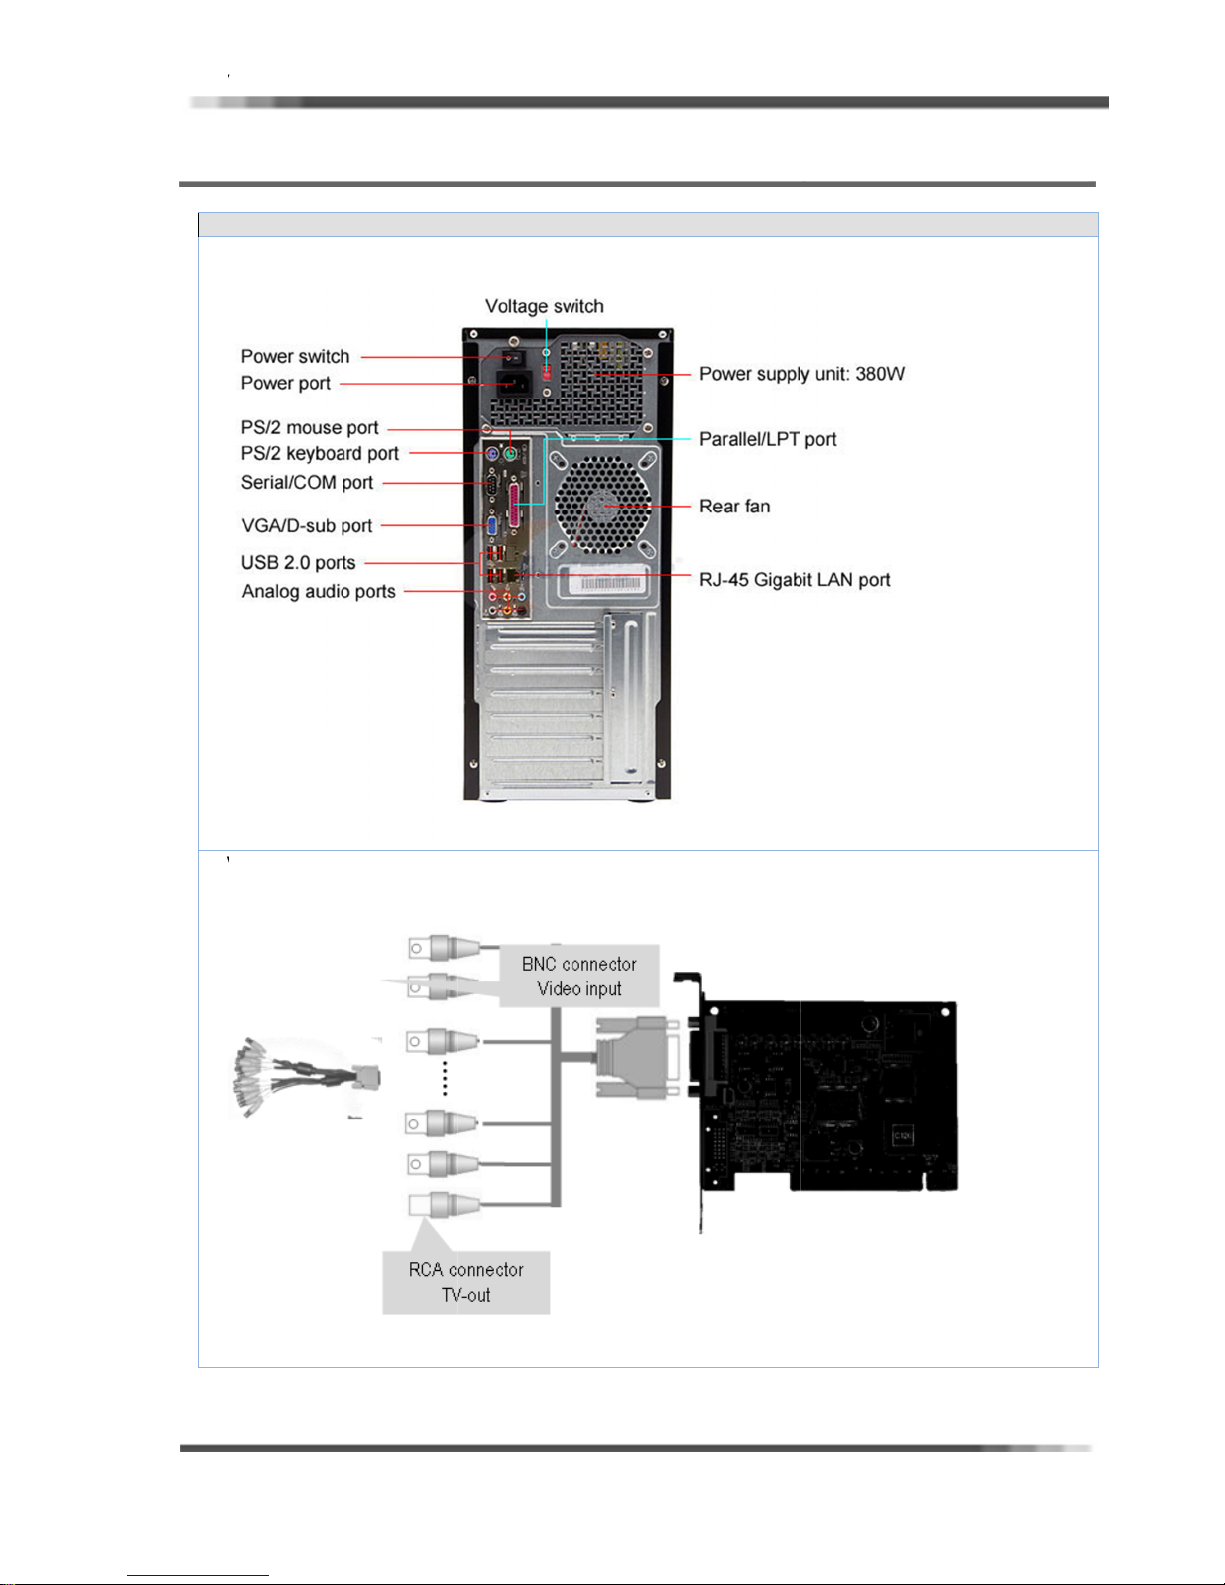
1.3
D
SYSTE
R SYSTEM
M REAR
REAR INTE
CONNE
RFACE
TION
D
R SYSTE
M REAR
ONNECT
ON
7
Page 9

HD D
V
U
D
N
S
T
S
R User’s Manual
Ver 2.1.0
I
Y
8
Page 10
HD D
V
p
s
G
s
achaUse
aFUN
D
a
C
t
i
T
u
p
m
t
s
T
a
d
n
o
D
c
2
D
.
C
d
f
a
t
e
r
m
I
i
T
s
u
c
t
m
c
p
t
R
A
n
m
C
butt
r
R
o
t
n
a
e
T
d
M
ea
t
O
o
D
The
d
u
s
F
e
g
s
s
m
s
d
s
C
u
r
B
r
e
.
u
5
u
d
2-1
DVR
the
LO
De
un
R User’s Manu
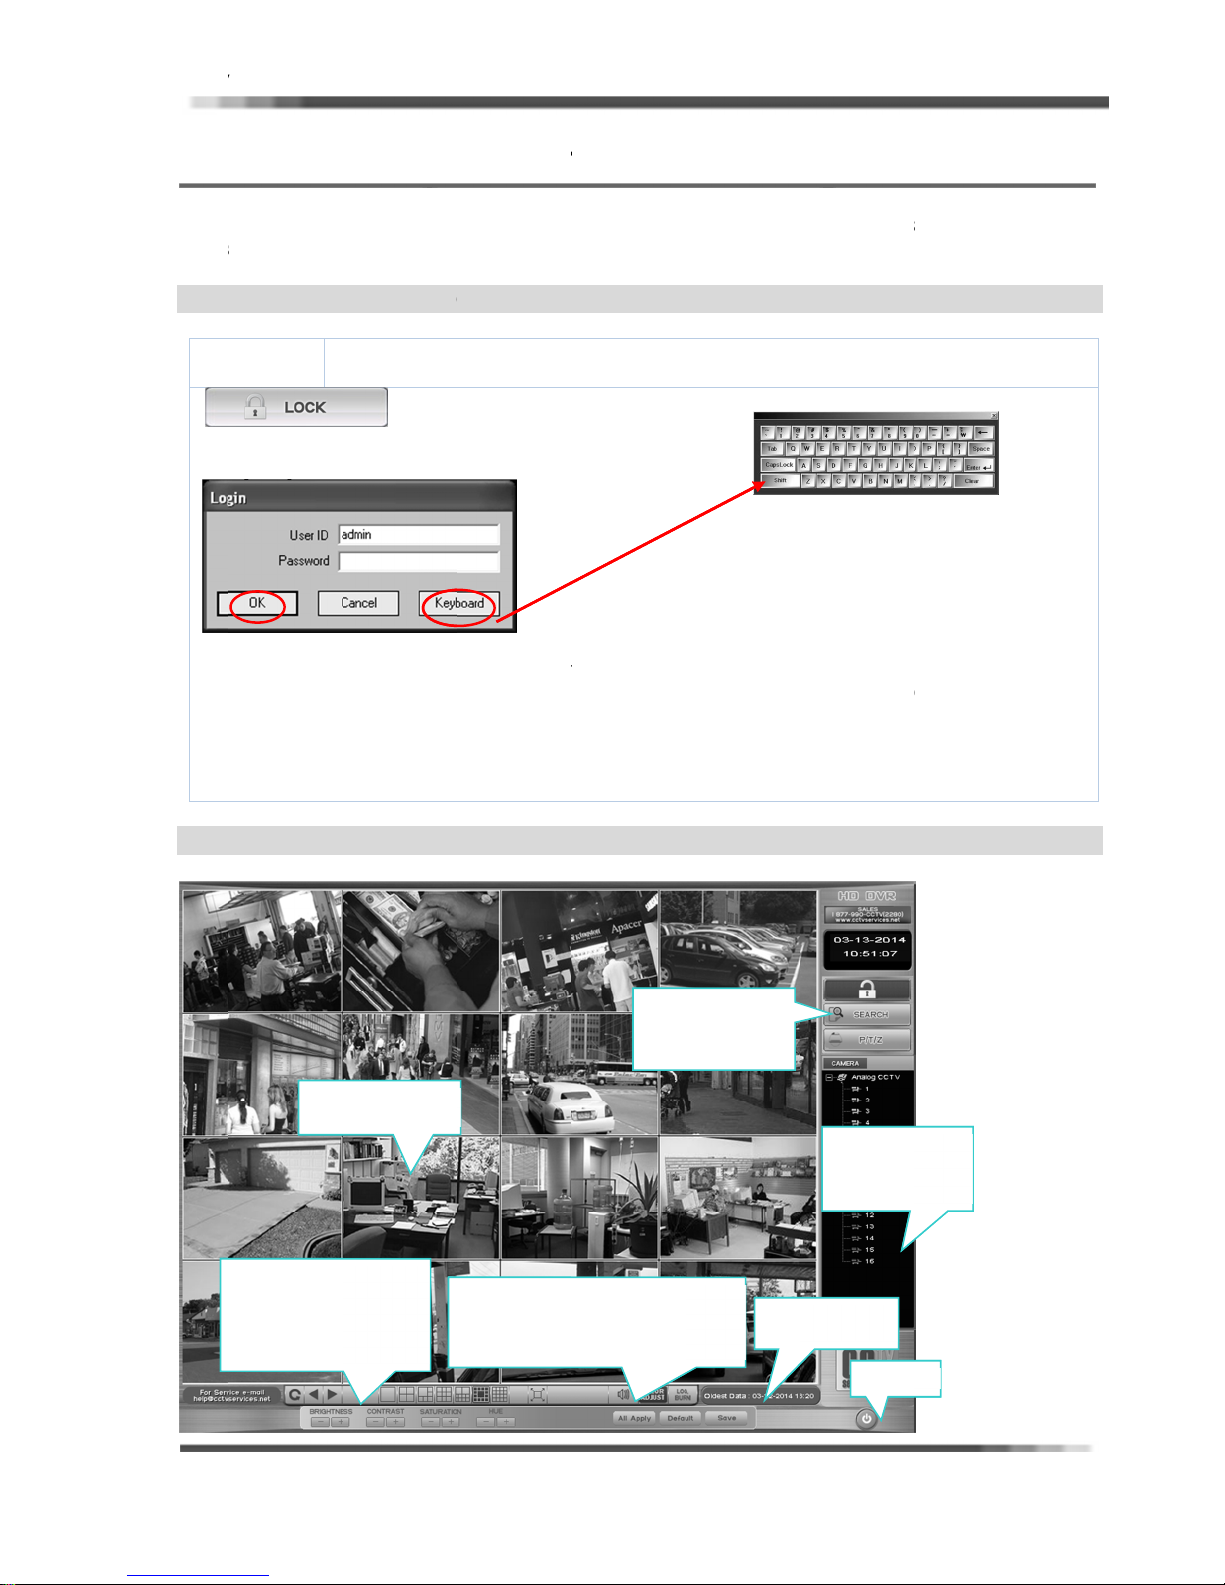
MAIN S
rogram star
ystem boot
IN TO DV
cription
uthorized o
nges, you
l
REEN
s automatica
ng process
R MAIN S
o access the
ser name an
LOCK
eration, For
ust unlock
ESCRIP
lly once the
REEN
features of t
password.
is setup to
use front b
irst.
ION
ystem powe
e CCTV SE
prevent fr
tton and se
s up, the foll
VICES INC
m
up
ID:
Ad
ID: 19
wing Main
VR, you mu
built in Ad
admin, Pas
ed default A
5, 393 / Pa
creen appea
t log in with
inistrator us
word: 1111
ministrator
sword: 19
Ver 2.1.0
s after
a valid
r
ser,
. 393
Fill
Ch
UN
r authentica
in the ID, Pa
o operate
be assigne
User authe
nging SETU
CTION butt
ERSTAN
Live
field
ions prompt
sword, and
nd configur
an Administ
tications pro
P values /
ns, Making
ING THE
image View
ppear after
hen click on
all but the
ator user ac
pt will be a
ndependent
nitial file sys
MAIN SC
licking on th
he OK butto
ost basic fe
ount.
pearing wh
SEARCH, P
em (and ad
EEN
Func
KEYL
PTZ,
e UNLOCK b
n to log in.
tures of the
n you acces
Z control,
ing HDD )
tion button
CK, Search,
tton,
CCTV SERVI
the below f
ront SPLIT
Came
informatio
CAMERA
CES DVR, yo
nctions,
buttons, Ad
a
n and
utton
must
itional
Screen Split
field
Split button(1~
16), (36: HD-3
Page, Full , Aut
ontrol
16ch:HD-
), Move
dditional Fu
Live Audio, I
Backup, DVR
D Burning
ction field
age Adjust,
roperties, Log
ns ar
anual
view,
Old
st recorded
Ima
es info
Exit
9
Page 11
HD D
V
C
L
a
I
O
u
E
aFr
Thaca
D
u
ODV
r
N
N
M
T
a
a
M
e
r
y
M
r
M
r
A
r
A
r
A
r
O
I
o
e
m
t
t
o
b
b
o
U
N
g
n
a
g
c
N
7
N
a
x
N
y
x
E
a
x
E
a
x
E
a
x
s
o
T
t
h
n
t
t
c
e
v
y
o
o
e
w
b
t
n
4
a
s
t
1
t
-
o
1
o
1
o
1
u
e
d
t
m
n
s
t
a
e
o
g
d
-
w
w
a
w
a
c
c
c
r
m
a
n
t
e
b
V
o
a
g
i
h
3
e
a
a
e
r
o
e
w
gh
r
t
r
a
g
n
w
C
e
.
o
o
o
o
o
t
o
p
n
a
f
t
c
Eing
q
A
g
g
g
g
g
MAI
R User’s Manu
N FUNCT
l
ON BUTT
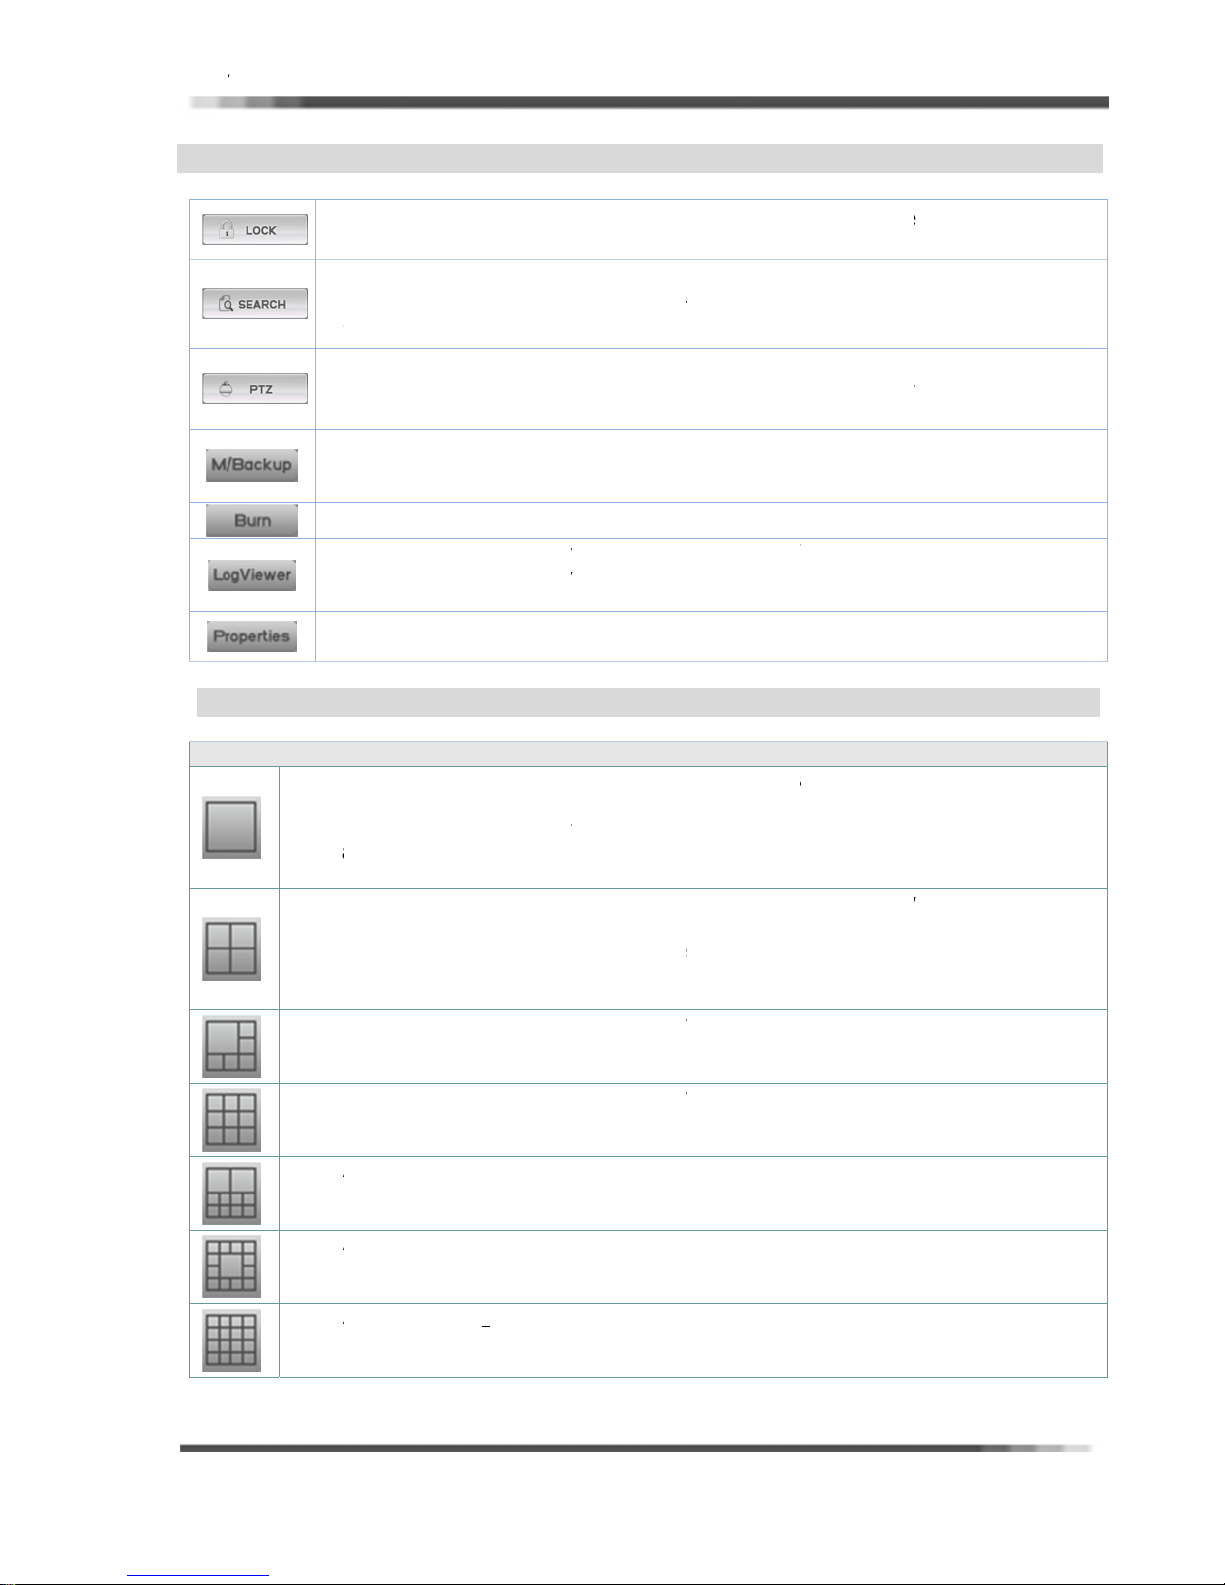
CK button:
L
(
nlock) the wi
NS
n order to u
ndows functi
e windows f
n keys in th
nctions afte
DVR syste
r starting th
.
system, firs
Ver 2.1.0
enable
S
REEN CO
SP
IT SCREE
S
h
P
M
re
(
B
L
fo
P
1 CA
there
his c
the m
clickin
4 CA
It can
at on
came
displa
6 CA
area.
came
9 CA
area.
came
10 C
area.
came
13 C
area.
came
16 C
area.
came
ARCH butt
rd disk driv
eedom Syste
Z button: T
s a PTZ ca
mera mode,
BACKUP bu
corded onto
etail refer t
rn button:
G Viewer
R system ca
lder in DVR f
operties bu
TROL B
BUTTON
ERA SCREE
is only a sin
n be done i
in viewing
the single
ERA SCREE
show either
time. To s
a select sect
ed, if 5, 6,
ERA SCREE
It will displ
a display bo
ERA SCREE
It will displa
a display bo
MERA SCRE
It will displ
a display bo
MERA SCRE
It will displ
a display bo
MERA SCRE
It will displ
a display bo
n:
his but
. Pressing t
s live viewi
his button is
era select i
or selecting i
ton: This ba
he HDD driv
Chapter 4)
urning CD di
utton: This
n built the s
lder at the
tton: checkin
TTONS
: This Butt
le view of on
one of two
rea, and 2)
amera selec
: This butto
cameras 1-4
elect which
ion. For ex
, or 8 is pres
: This but
y cameras
.
: This but
cameras 1
.
N: This butt
y cameras
N: This butt
y cameras
N: This butt
y cameras
.
on is presse
e search bu
so the ca
only for use
in the mai
in any multi
kup Button i
to your sys
rectly on the
iewer file loc
stem.log, ev
perating.
system inf
n will chan
camera.
ays; 1) By
y clicking an
.
will show 4
(quad A), 5
multi scree
mple, if the
ed quad B
on will sho
-6 or any c
on will sho
10 or any c
n will show
-10 or any
n will show
-13 or any
n will show
-16 or any
to view im
tton will ope
eras are still
with pan til
viewing ar
screen with
pressed to
em partition
main screen.
ted at the D
nt.log, Moti
rmation
e the camer
ouble clickin
e one t
ima
cameras in t
8 (quad B),
n is viewed;
either 1, 2,
ill be display
6 cameras
meras that
9 cameras
meras that
10 cameras
ameras that
13 cameras
ameras that
16 cameras
ameras that
es that we
n another pr
recording.
zoom cam
a by either
the RED hi
ackup impo
area.
VR folder in
n.log, Newo
as in the m
an image i
ime so it is h
e main vie
9-12 (quad
click any ca
, or 4 is pr
d and so on
t one time
the user ch
t one time
the user ch
at one time
the user ch
at one time
the user ch
at one time
the user ch
e recorded
ram on to
ras. If your
atching it i
light.
tant data th
he program
.log files in
in viewing a
any multi s
ighlighted R
area.
), or 13-16(
mera numbe
ssed quad
in the main
oses to dra
in the main
oses to dra
in the main
oses to dra
in the main
oses to dra
in the main
oses to dra
nto the
of the
system
n the 1
t were
older.
he Log
rea so
reen in
D, then
uad D)
r in the
will be
viewing
into a
viewing
into a
viewing
into a
viewing
into a
viewing
into a
10
Page 12
HD D
V
c(ExAUT
LDo
Q
n
a
A
r
A
r
A
r
e
g
N
scam
1
N
I
W
)
s
W
)
B
S
e
d
f
Wto
W
o
D
D
E
a
x
E
a
x
E
a
x
d
6
O
v
d
,
)
e
E
e
s
o
g
e
h
c
n
o
1
o
1
o
1
t
c
n
v
S
o
(
d
m
i
s
i
L
T
u
u
c
c
c
a
i
d
a
n
a
u
s
n
r
h
R
r
t
)
c
e
a
e
u
Nang
v
o
o
o
h
a
n
s
n
s
n
c
g
g
g
e
o
8
e
4
t
o
n
e
Ac
PR
FU
R User’s Manu
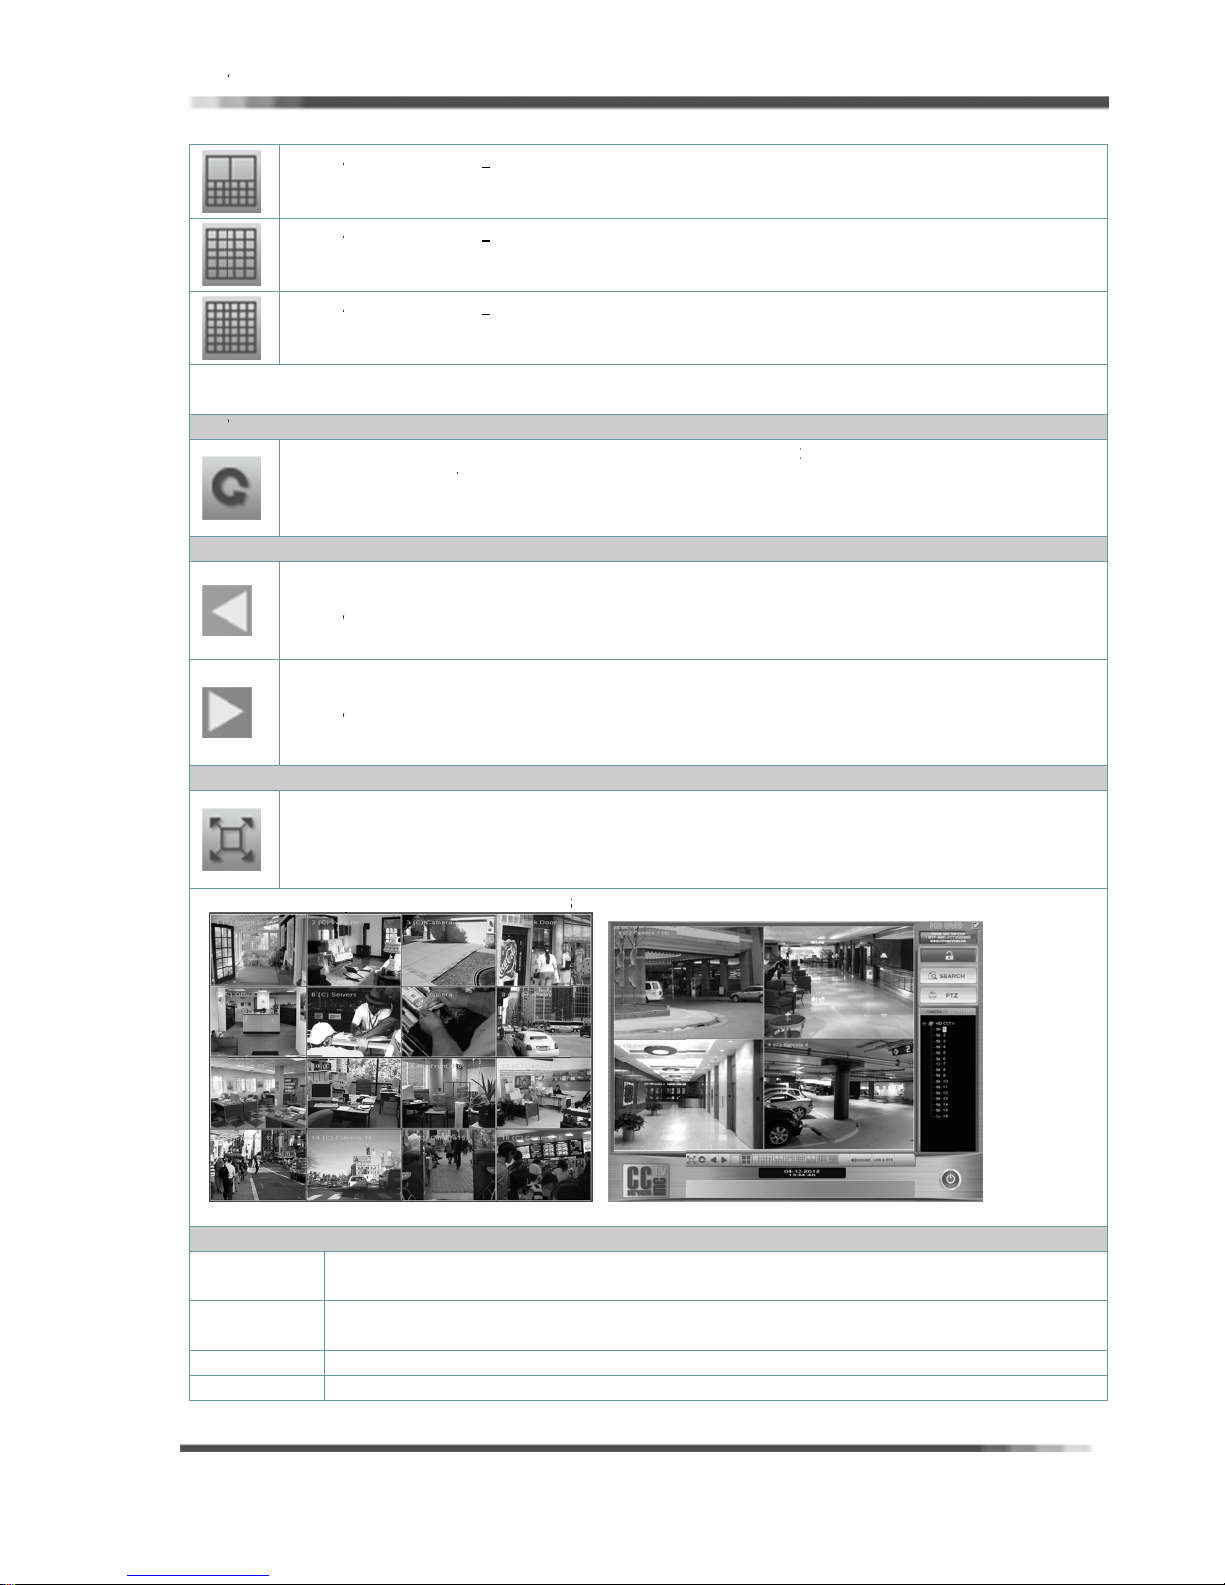
20 C
area.
came
25 C
area.
came
36 C
area.
came
ording to us
, When usin
O SEQUE
AUTO
pre
for
EVIOUS &
PREV
chann
EX)
Mode
NEXT:
other
EX)
Mode
L SCREEN
FULL
words
not b
Provi
uble click an
l
MERA SCRE
It will displ
a display bo
MERA SCRE
It will displ
a display bo
MERA SCRE
It will displ
a display bo
d Board Mo
4ch Board,
CING BUTT
SEQUENCE:
et time inter
era displaye
, 4, 6 and 9
EXT SCREE
UOS: Show t
els or others
hen users se
, it goes to 1
Show the N
)
hen users se
, it goes to 5
UTTON:
CREEN: Thi
the entire c
displayed a
ing more scr
where on t
N: This butt
y cameras
.
N: This butt
y cameras
.
N: This butt
y cameras
.
el, some but
, 9, 10, 16 s
N
Pressing the
als. The si
in the main
10 camera
N BUTTON
he PREVIOU
camera 2 o
~4 (Quad M
XT channel
camera 1 o
~8(Quad Mo
button will
mputer mon
ain until the
en area to d
e screen to
n will show
-20 or any
n will show
-25 or any
n will show
-36 or any
ons are not
reen layout
Auto button
le auto mo
viewing are
iews.
channel (in
n full screen,
de).
in one chan
n full screen,
e).
ake the mai
tor will displ
left mouse b
isplay image.
how previou
20 cameras
ameras that
25 cameras
ameras that
36 cameras
ameras that
ctive.
cons are not
will sequent
e is used fo
will automa
one channel
it goes to ca
el) or next s
it goes to ca
n viewing ar
y the camer
tton is click
screen with
at one time
the user ch
at one time
the user ch
at one time
the user ch
active.)
ially switch t
monitoring
ically seque
or previous
mera 1. Whe
reen divisio
mera 2. Whe
a the entire
s only. The
d anywhere
interface.
in the main
oses to dra
in the main
oses to dra
in the main
oses to dra
he camera vi
single scre
ce. You can
creen divisi
n seeing 5~
(in 4 chann
n seeing 1~
creen. In o
toolbar butt
on the scree
Ver 2.1.0
viewing
into a
viewing
into a
viewing
into a
ews for
n. The
do this
n (in 4
(Quad
ls or
(Quad
her
ns will
.
u
ick change
Step1
Step2
Spl
its screen
O
e Screen
rom split s
hile on mult
quickly cha
hen double-
t
previous sc
ouble-Click t
ouble-Click t
reen to a s
iple screen vi
e to SING
click the LEF
reen.
he LEFT mo
he LEFT mo
ngle scree
ew, double c
E camera sc
mouse butt
se button: C
se button:
lick LEFT mo
een.
on on the SI
e to one
eturn to pre
se button o
GLE camera
Screen.
ious splits S
the desired
Screen, it b
reen.
camera
comes
11
Page 13
HD D
V
a
N
T
e
s
e
stim
I
The
s
O
S
E
m
T
e
R
E
T
t
a
A
N
C
e
N
D
V
O
n
D
y
n
e
t
a
D
d
m
R
&
n
e
T
e
m
S
nng
i
n
C
s
O
g
O
n
C
o
s
n
s
e
g
h
a
O
s
n
s
f
t
o
o
e
s
t
r
,
e
n
e
g
R User’s Manu
l
Ver 2.1.0
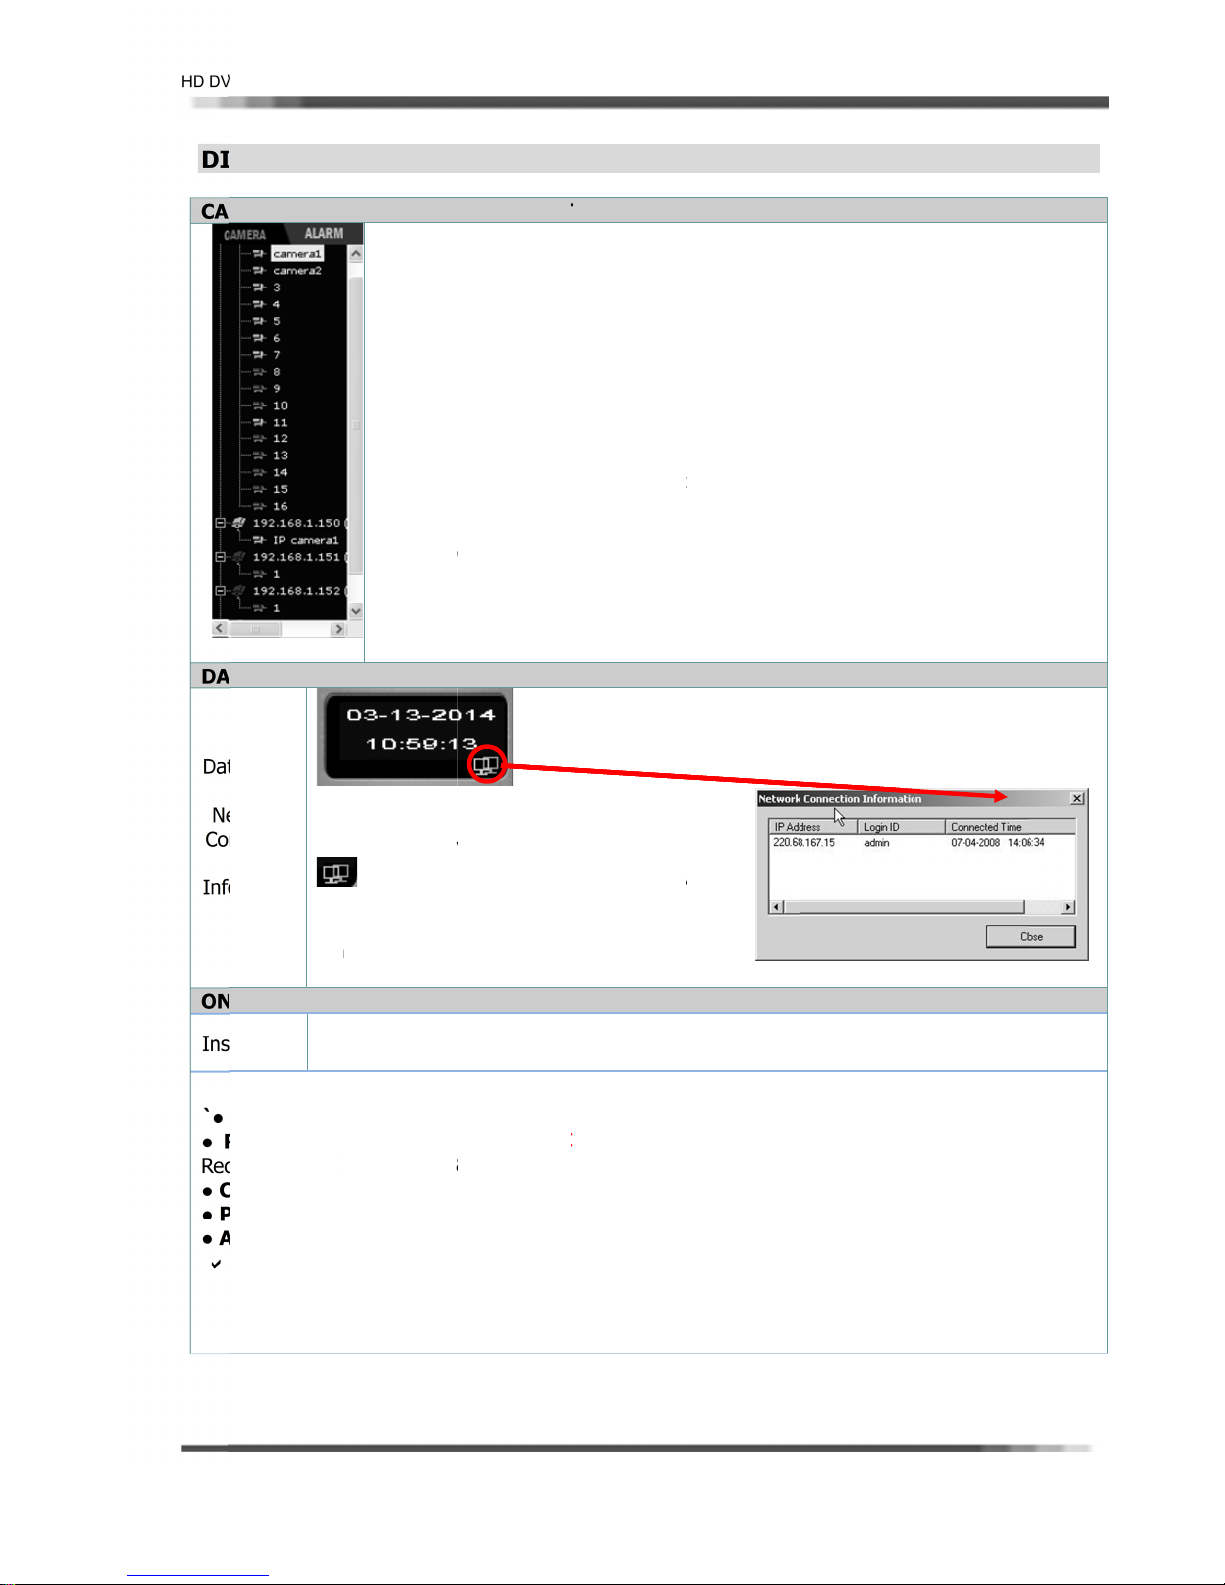
SPLAY IN
ERA STAT
E/TIME I
DICATO
S LIST TR
Displays
It shows
usage st
• CCTV C
GREE
RED:
• IP Cam
GREE
RED:
YELL
On the si
Camera
DICATOR
E INDICA
op-down, hi
he attached
tus.
MERA
: Normal Ca
amera Signa
ra or Video
: Normal Ca
isconnected
(
ideo signal
W: Try to co
le camera
umber.
OR
rarchical ma
CAMERA info
era signal.
l Loss
erver
mera si
from the Net
loss)
nect from t
mode, you c
nagement of
rmation, VID
nal.
work
e Network(s
an select ind
DVR camera
EO LOSS sta
ill Video sign
ividual came
.
us, and cam
al loss)
a by clickin
ra
on the
e/Time
/
twork
nectio
n
[N
It
rmatio
n
aft
(di
SCREEN D
ruction
is
CAMERA N
ecording
ording, [C&
amera Na
TZ: When P
udio: When
Red Bord
Line in that
hi
s shows the
twork Con
how currentl
Client con
r click on th
play it brigh
e/date indic
SPLAY(OS
OSD consis
uperimpose
: Shows ca
tatus: [R]
]Continuous
e (Descript
Z camera is
Audio is co
r Line : Wh
channel.
ata/Time
nection Ico
connected
ection statu
CONNECTI
ly) on the ri
tor.
) INDICAT
s of camera
on each pa
era number
ecording, [
Event Rec
ion) : Show
connected a
nected, [A] i
n Event is s
nformation
]
lient Statu
will be appe
N INDICAT
ht area in
R
Number, De
e.
in that chan
] Continuou
rding, [S&M]
the Name o
d setup, [P]
shown.
tup in each
s.
aring
R
cription, Rec
el
Recording,
Sensor & M
each chann
is shown.
channel, it s
rding status
[M]Motion R
tion Recordi
l
hows Red Bo
PTZ and Au
cording, [S]
rder
dio that
Sensor
12
Page 14
HD D
V
gDig
T
o
e
cmov
e
This
t
a
F
h
P
h
u
f
C
O
O
T
s
h
e
p
y
h
t
ju
a
r
h
L
m
t
t
h
o
e
d
S
h
R User’s Manu
2-2
DIG
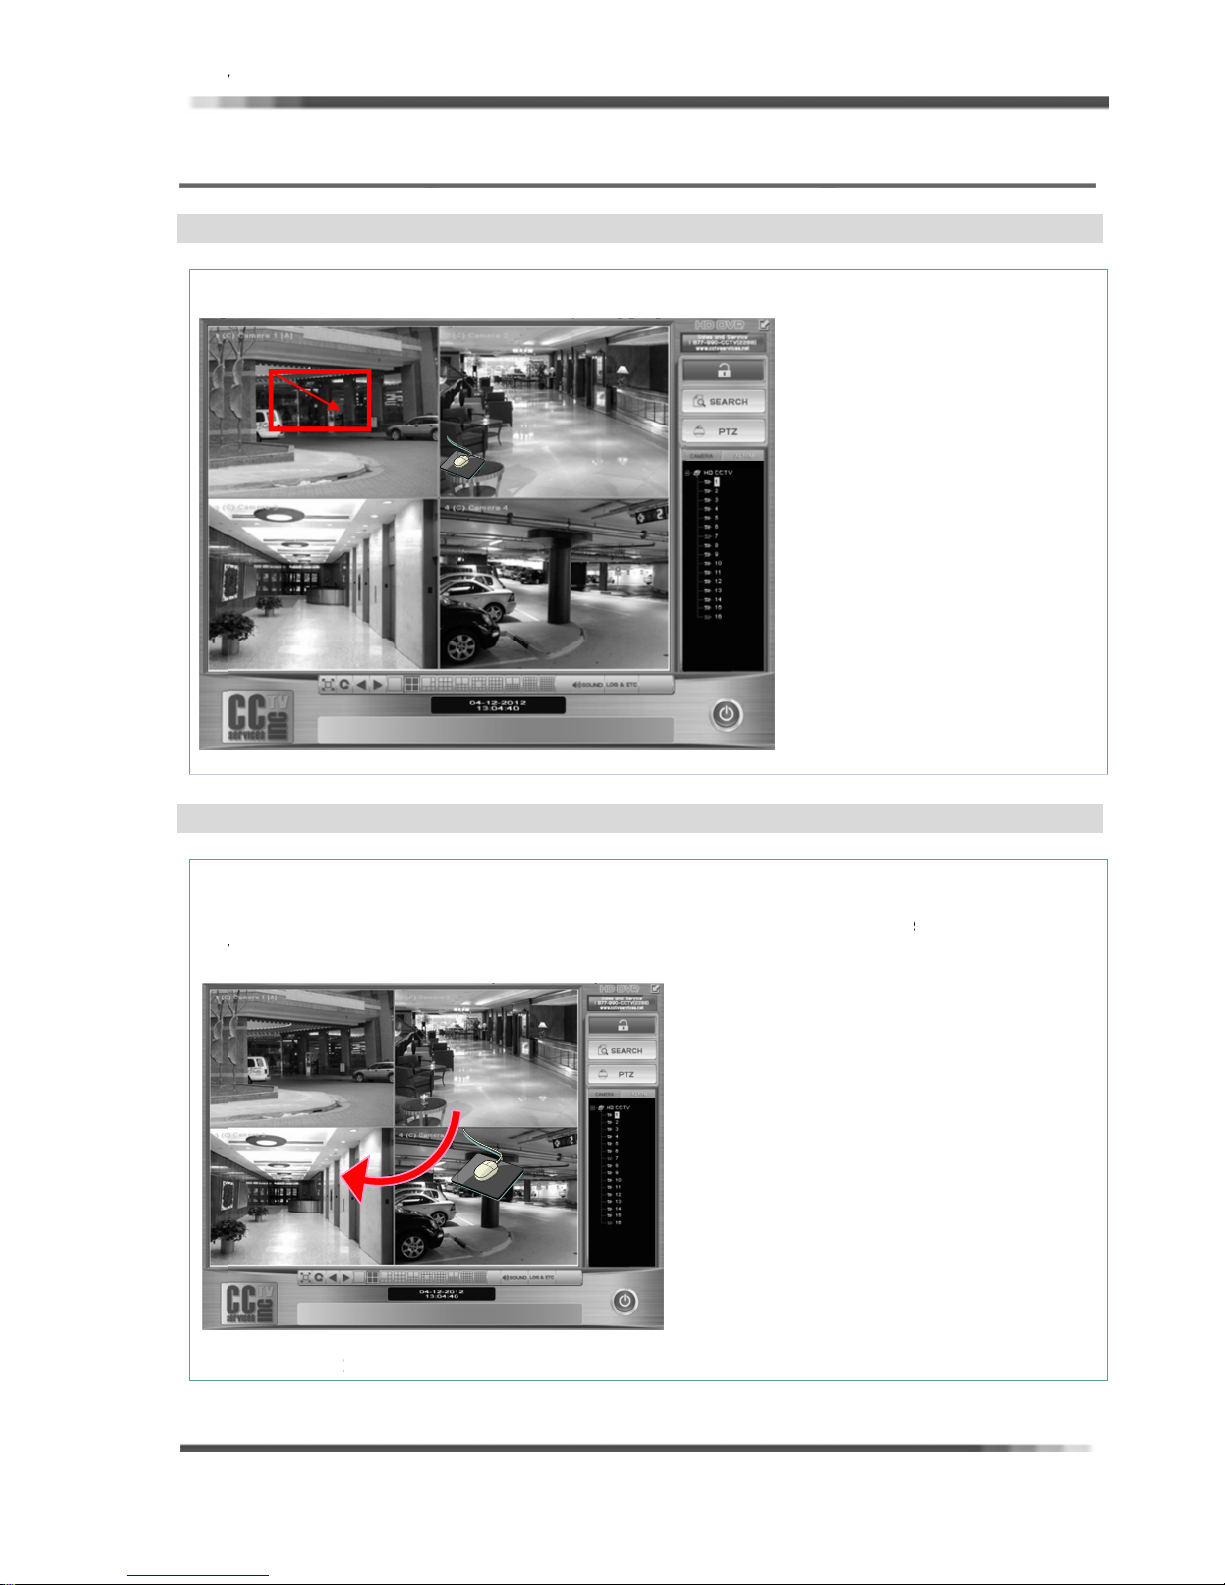
ITAL ZOO
Di
ital Zoom, W
ital zoom for
BASIC
l
UNCTI
MING
en clicking
certain area
NS
ne Channel
is available b
opup, you c
dragging
n see 16:9
ive screen p
pup.
Ver 2.1.0
VIR
Ch
scr
Cli
Rel
Vir
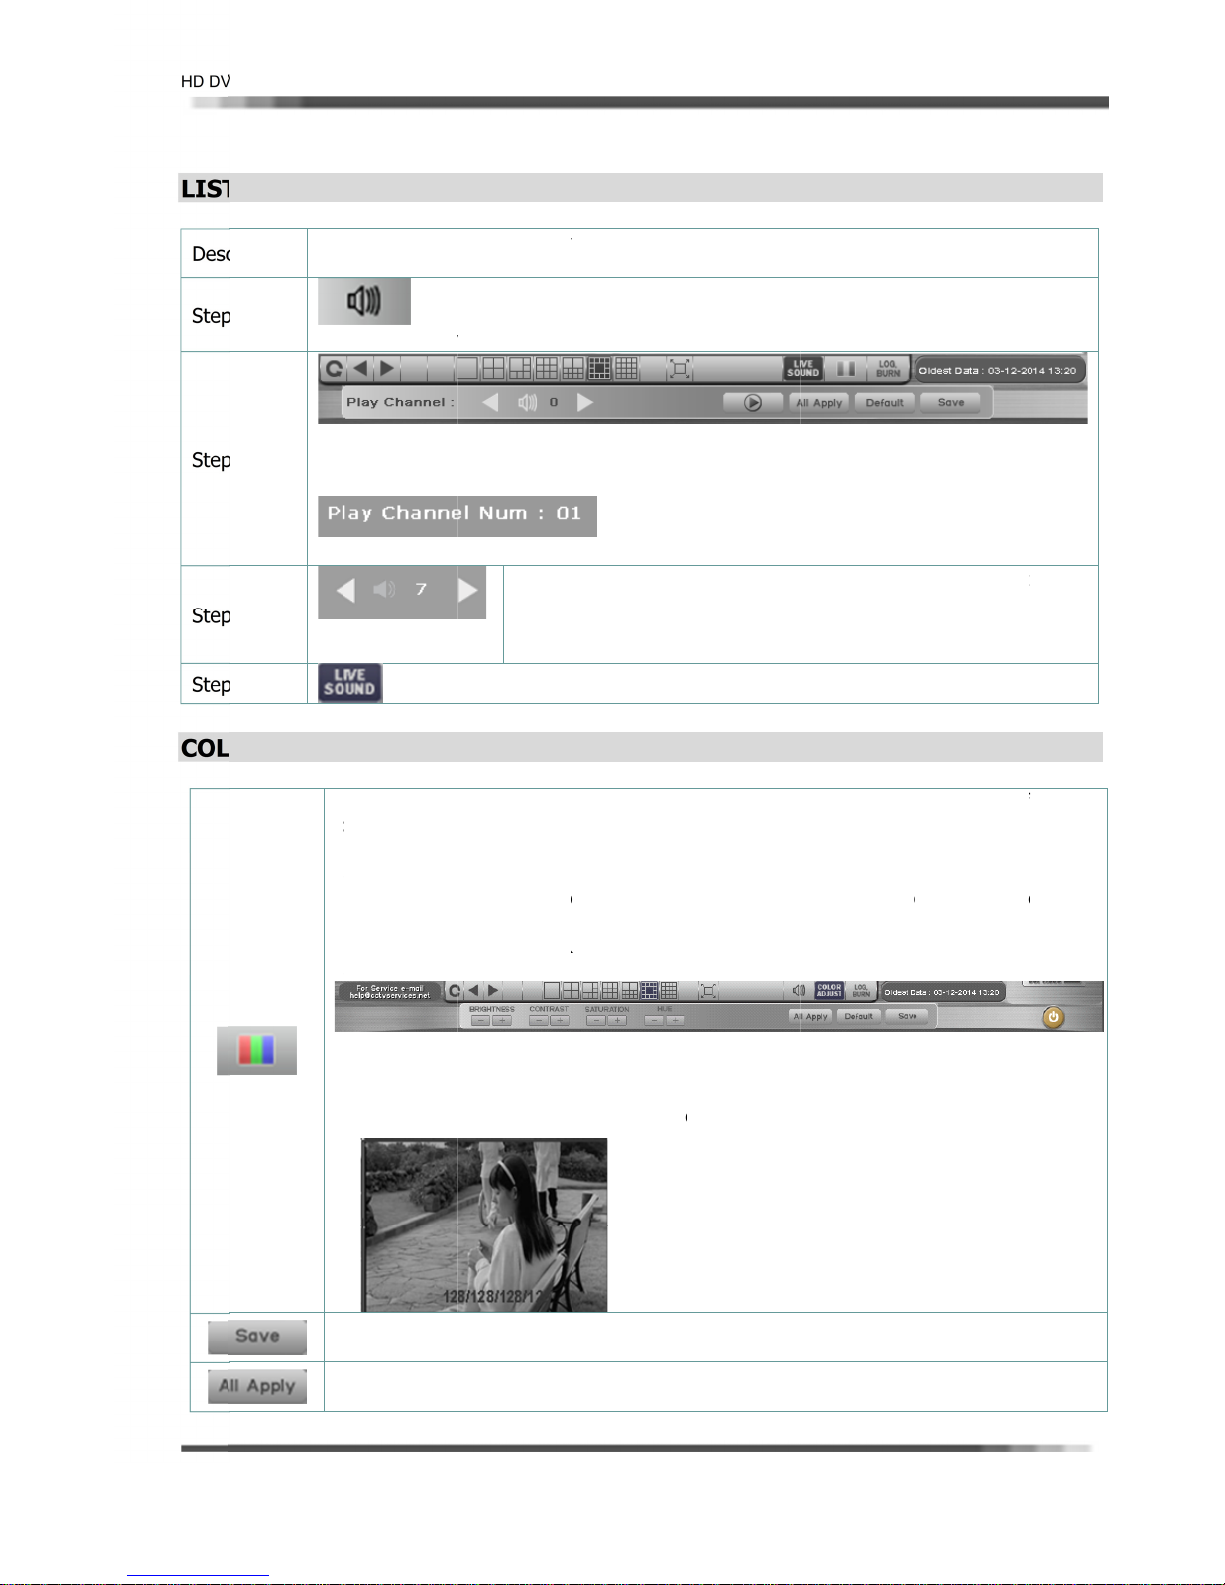
UAL DIS
ose the one
en.
k and hold t
e camera.
ase the mo
does not in
ual Display
LAY MA
of screen fir
e left mouse
se button w
luence the r
hange.
RIX
t, and then t
button and
en you have
cording; it
e chosen sc
hen dreg the
repositioned
st changes t
een can be
mouse poin
the camera
e position s
oved to the
er in the dir
o the desire
own in the
location of t
ction you wa
location.
creen splits.
e
nt to
It is
13
Page 15
HD D
V
T
c
p
p
p
p
a
V
v
T
h
o
c
t
S
AcTsTyW
s
BCS
H
W
W
O
t
i
eScLiv
h
O
h
l
O
n
t
g
w
S
N
w
w
w
v
i
m
t
s
T
o
)
U
u
s
w
o
R
d
e
h
t
v
a
l
e
e
n
g
e
a
o
a
m
e
L
r
n
a
o
e
a
n
t
t
o
u
e
v
e
n
n
gh
v
b
u
o
u
h
n
u
S
b
t
r
m
O
r
o
e
e
M
ge
c
c
n
n
e
n
g
LIS
Des
Ste
Ste
R User’s Manu
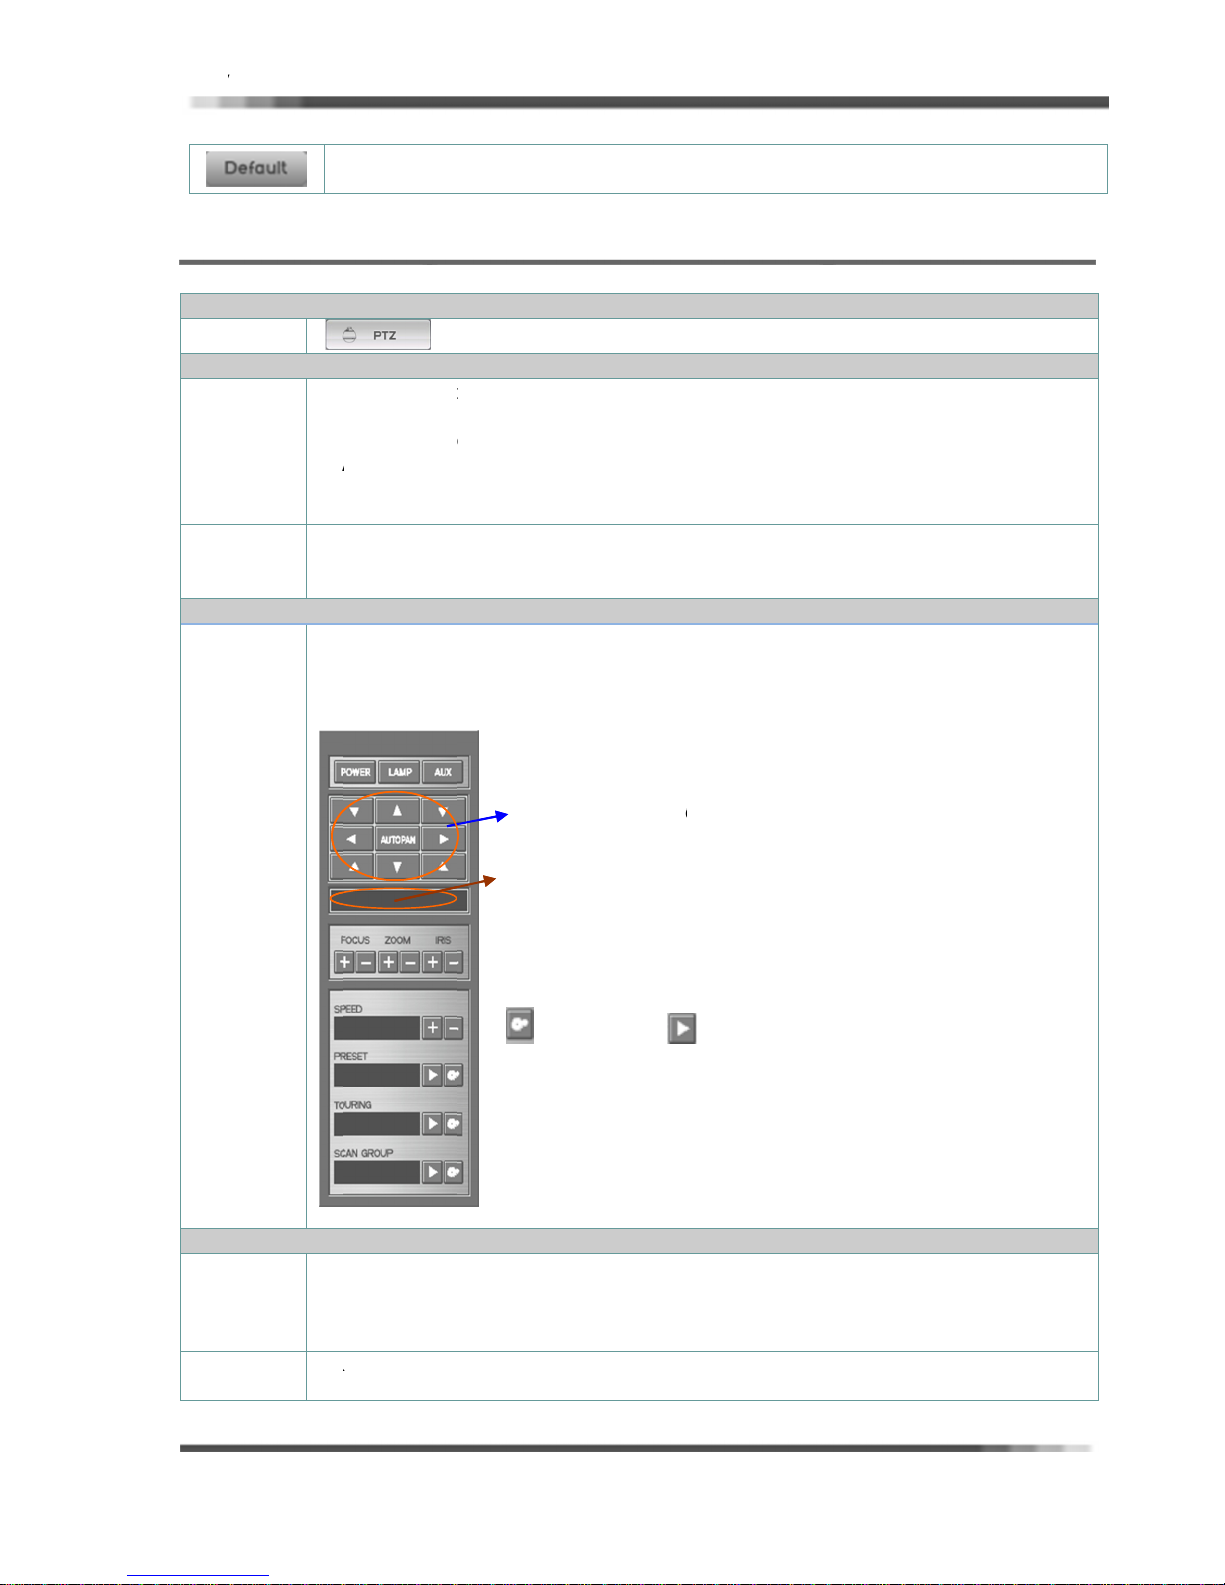
EN TO LI
ription
1
2
Gi
W
St
Cli
l
E AUDI
e the instruc
o listen to L
S
en click on t
p button.
on the ST
ion to get Li
ve Sound, f
lect the Ca
reen.
e Audio con
e Play butto
P button to
e Sound w
rst users ha
era channel
rol dialog wi
, will be list
top if you n
ith live viewi
e to setup.
nd Click on
ll appear on
ning to audi
ed to stop a
in the Mai
he AUDIO b
he screen. (
after Play
dio.
Screen.
tton in the
hown next p
utton chan
Ver 2.1.0
ain
e.
a
s to
Ste
Ste
COL
3
4
OR ADJU
se
up in each c
TMENT
DJUST COL
amera.
he lighting i
easons, with
hese simple
our recordin
hen click on
creen. (Sho
RIGHTNES
ONTRAST:
ATURATIO
UE: Up/Do
annel
If you
the m
Sound
ick on the A
C
R: This men
the camera
changes in
o use contr
environmen
the ‘COLO
n below).
: Up/Down,
Up/Down, A
: Up/Down,
n, Adjust th
need volume
o cha
n
nitored plac
DIO button
will allow y
view will ch
eather, and
l bars ensur
t.
’ button, CO
Adjust the B
Adjust the S
Hue Values
Users ca
e gain val
ust the Co
see availabl
up or down,
ue, users ha
( gain ‘0’ m
ain to closi
u alter the i
nge throu
any other
that your ca
OR ADJUST
ightness Val
trast Values
turation Val
of Video.
channel wi
clicking on d
e to use Mic
ans No Co
the AUDI
dividual cha
out the day,
ariances.
meras are pr
utton will b
es of Video.
f Video.
es of Video.
h Audio whi
own, up butt
ophone dire
pensation in
listening fu
acteristics of
with the cha
perly adjust
appearing i
h is
on.
tly in
ction.
each
e of
d for
the
hen users
hen users
ant to save t
ant to apply
is value, us
his value to
rs can use t
all channels,
is.
users can us
this.
14
Page 16
HD D
V
c
S
c
c
a
W
N
O
oPTZ
U
Acam
P
i(Re
T
S
C
o
p
suse
R
C
w
P
e
t
d
o
s
C
t
R
e
o
e
f
.
G
P
ge
gh
T
r
P
s
e
c
n
R
P
a
/
d
u
T
T
b
S
r
r
m
m
g
p
t
o
r
V
m
0
P
g
w
o
A
o
n
n
u
o
u
n
e
w
A
v
e
t
R
T
►
n
c
o
t
u
o
0
D
.
m
a
r
a
s
R User’s Manu
l
Ver 2.1.0
2-3
USI
Des
TIP
Des
S
PTZ
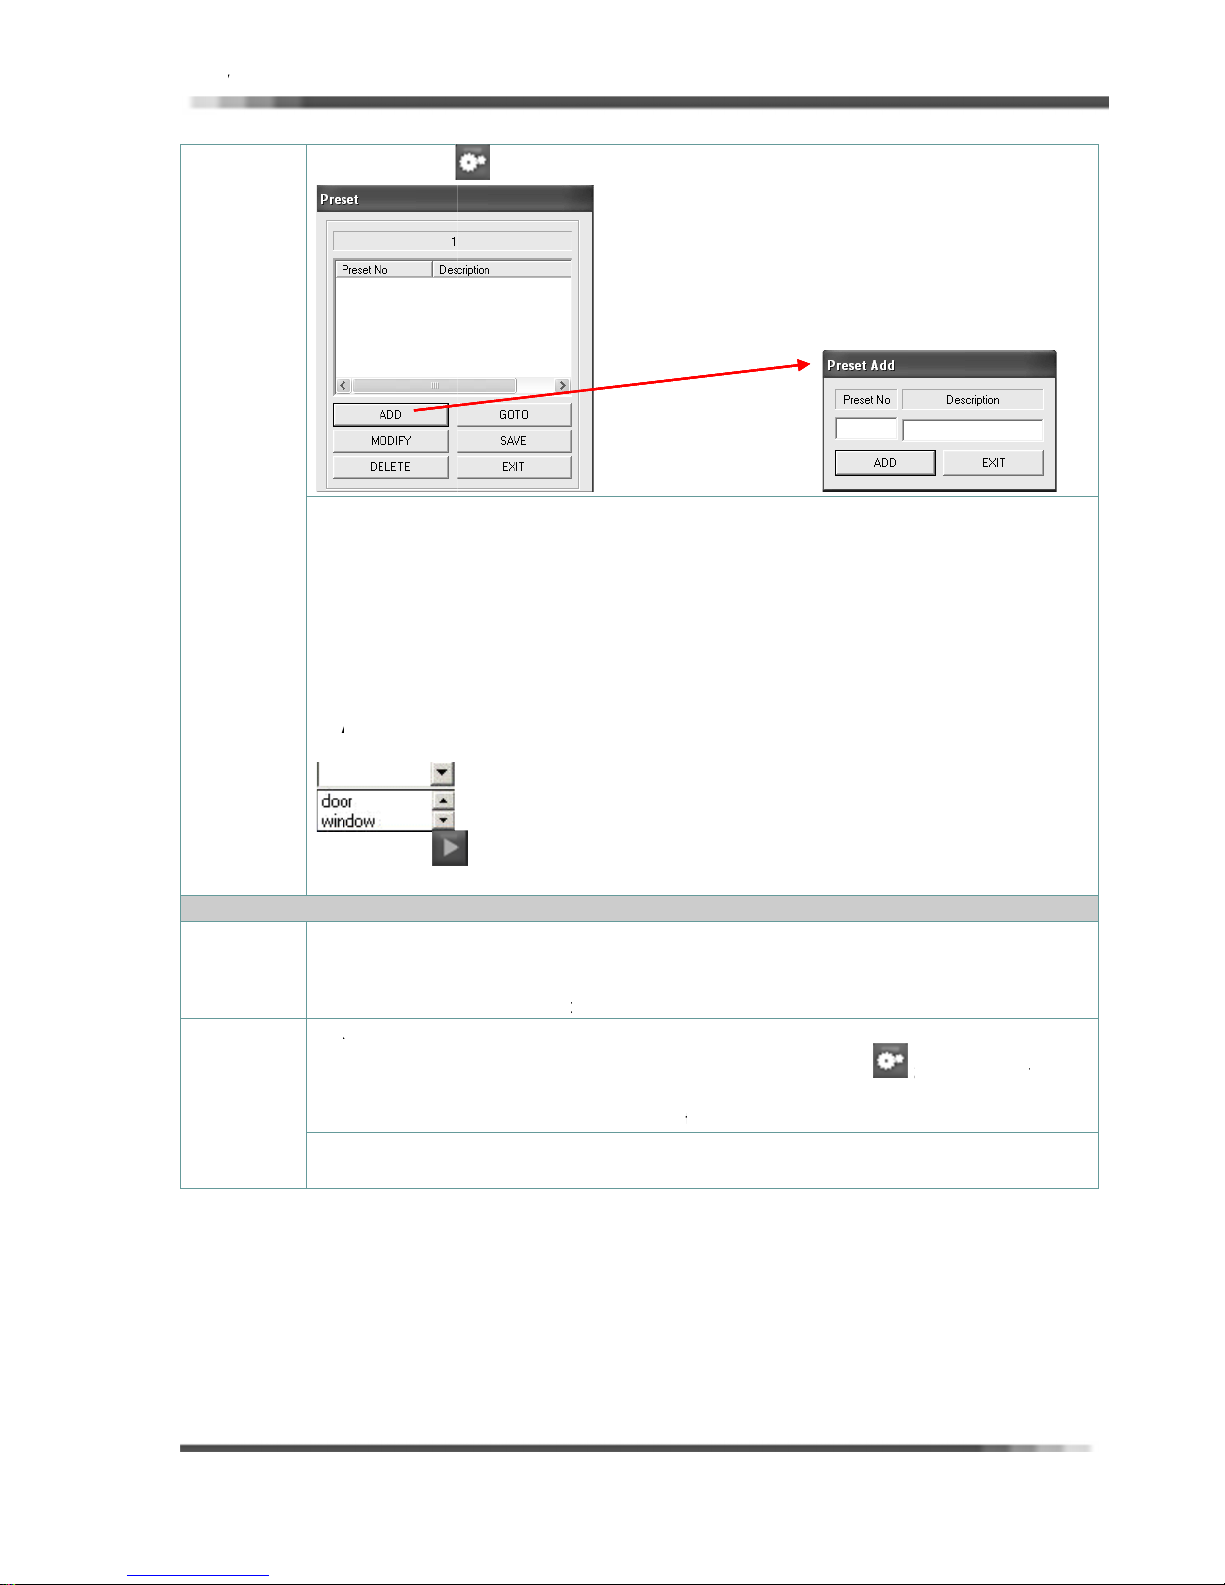
PTZ CO
NG PTZ
ription
OF PTZ C
ription
etup
PANEL BU
hen users
TROL
NTROL
All
ws users wi
presets, an
sers have t
ccording to
era, DVR sy
in
TZ Setting.(
A t
ck inside the
fer to PT se
TON DESC
1.
elect chann
2.
ontrol using
ntrol Butt
[C
ant to chan
ANEL
Us
rs can opera
h access ri
tours.
setup the P
PTZ control i
tem not wo
amera 1 =
box indicate
ting in Cam
IPTION
l No, just cli
below butto
ns]
• POWE
• LAMP
• AUX :
• PTZ Di
• Auto-
• PTZ C
• Iris +
• Focus
• Zoom
• Spee
all values t
te PTZ came
ts to operate
Z on the DE
n DVR syste
king at “ID=
TZ ID 1)
PT SET on
ra Tab)
king on left
s.
: Camera
: Camera Li
Auxiliary Po
rection Contr
an : Auto P
mera Selecti
- Button.
in/out Butto
in/out Butto
up/down B
DEFAULT
as when ent
camera lens
ICE of SETU
, Do not se
” due to DV
the Camera
/right(◄
ower On/Off.
ht On/Off.
er On/Off.
ol Panel.
N On/Off
n.
.
tton
alues.
ring this bu
control feat
P dialog bef
up the “ID=
system “I
ab in SETUP
) button.
ton.
res and to p
re using PTZ
” on to PTZ
=0” not av
ogram
.
ilable
PTZ
PRESET
Des
ription A
reset is a us
(ca
mera’s auto
itioning and
po
this feature
P
OGRAMIN
1.
lick on the
Set
• PRESE
• PRESE
• TOUR
• TOUR
• Scan G
• Scan G
-defined ca
ocus option
programmin
( Refer to A
A PRESET,
TZ button af
p Button,
Button.
Setup Butt
utton
ETUP button
oup Button
oup Setup B
era positio
ust be turn
using Pelco
pendix)
do the follo
er chosen C
Execute Bu
n
tton
using PTZ a
d off). Only
D, P, or supp
ing:
MERA CHAN
tton
d focus co
cameras that
rted third-p
NEL.
mands the
support
rty protocol
can
15
Page 17
HD D
V
g
E
c
g
Tour
a
g
C
M
P
C
h
U
H
C
A
C
ccam
ppre
The
l
R
T
The
T
m
A
gr
d
t
T
c
n
o
Z
G
r
a
o
g
n
e
n
o
e
e
k
o
e
U
d
a
S
t
TO
o
a
.
h
b
e
d
hing
o
c
m
t
t
r
a
d
a
t
w
o
r
s
)
S
r
s
t
gr
o
a
k
e
a
u
S
e
N
e
t
R User’s Manu
l
Ver 2.1.0
Pro
PTZ
Pres
ramin
et
lick on the
2.
3.
ove the ca
4.
reset ADD d
5.
lick on the
be
listed on the
en you pro
W
6.
sers can ad
7.
ave to save
8.
lick Exit but
RT PRESE
ST
1.
hoose the a
button i
era to want
ialog appeari
DD button t
Preset list fi
am the sam
presets ma
programmed
on to exit pr
tivated Pres
the PRESET
click on t
d place
.(Shown a
activate pr
ld in Preset
Preset No, t
same pr
Preset, just
ramming
t position in
field on PTZ
e ADD butt
ove) fill in P
set and Exit
ialog.
e last No is
gress. (3~5
lick on the
ode in the P
the Preset li
Panel. Pres
n
eset No and
button, Activ
saved.
.
AVE button.
eset dialog.
t field.
t dialog app
Description.
ted Preset
aring,
O will
PR
SET TOUR
Des
ription A
Pro
raming
Pres
et and
Cli
on the
era accordi
reset tour all
sets.
DVR-2000
At
east one PT
P
OGRAMIN
SE
UP the seve
on
the Touring
“Tour” dial
o
Programmin
PRESET R
to activate
ows a camer
r DVR-3000
preset mus
PRESET
al PRESET p
rea in PTZ P
box opens
Preset Tour,
N button to
preset posi
to move th
eries DVR c
be set in or
UR
sition first,
nel.
(Shown nex
do the follo
esting Prese
ion.
ough a pro
n store up t
er to create
nd then Clic
t page)
ing:
position, wil
ammed seq
four preset
preset tour.
on the
l be Move th
ence of PTZ
tours.
SETTINIG bu
tton
16
Page 18
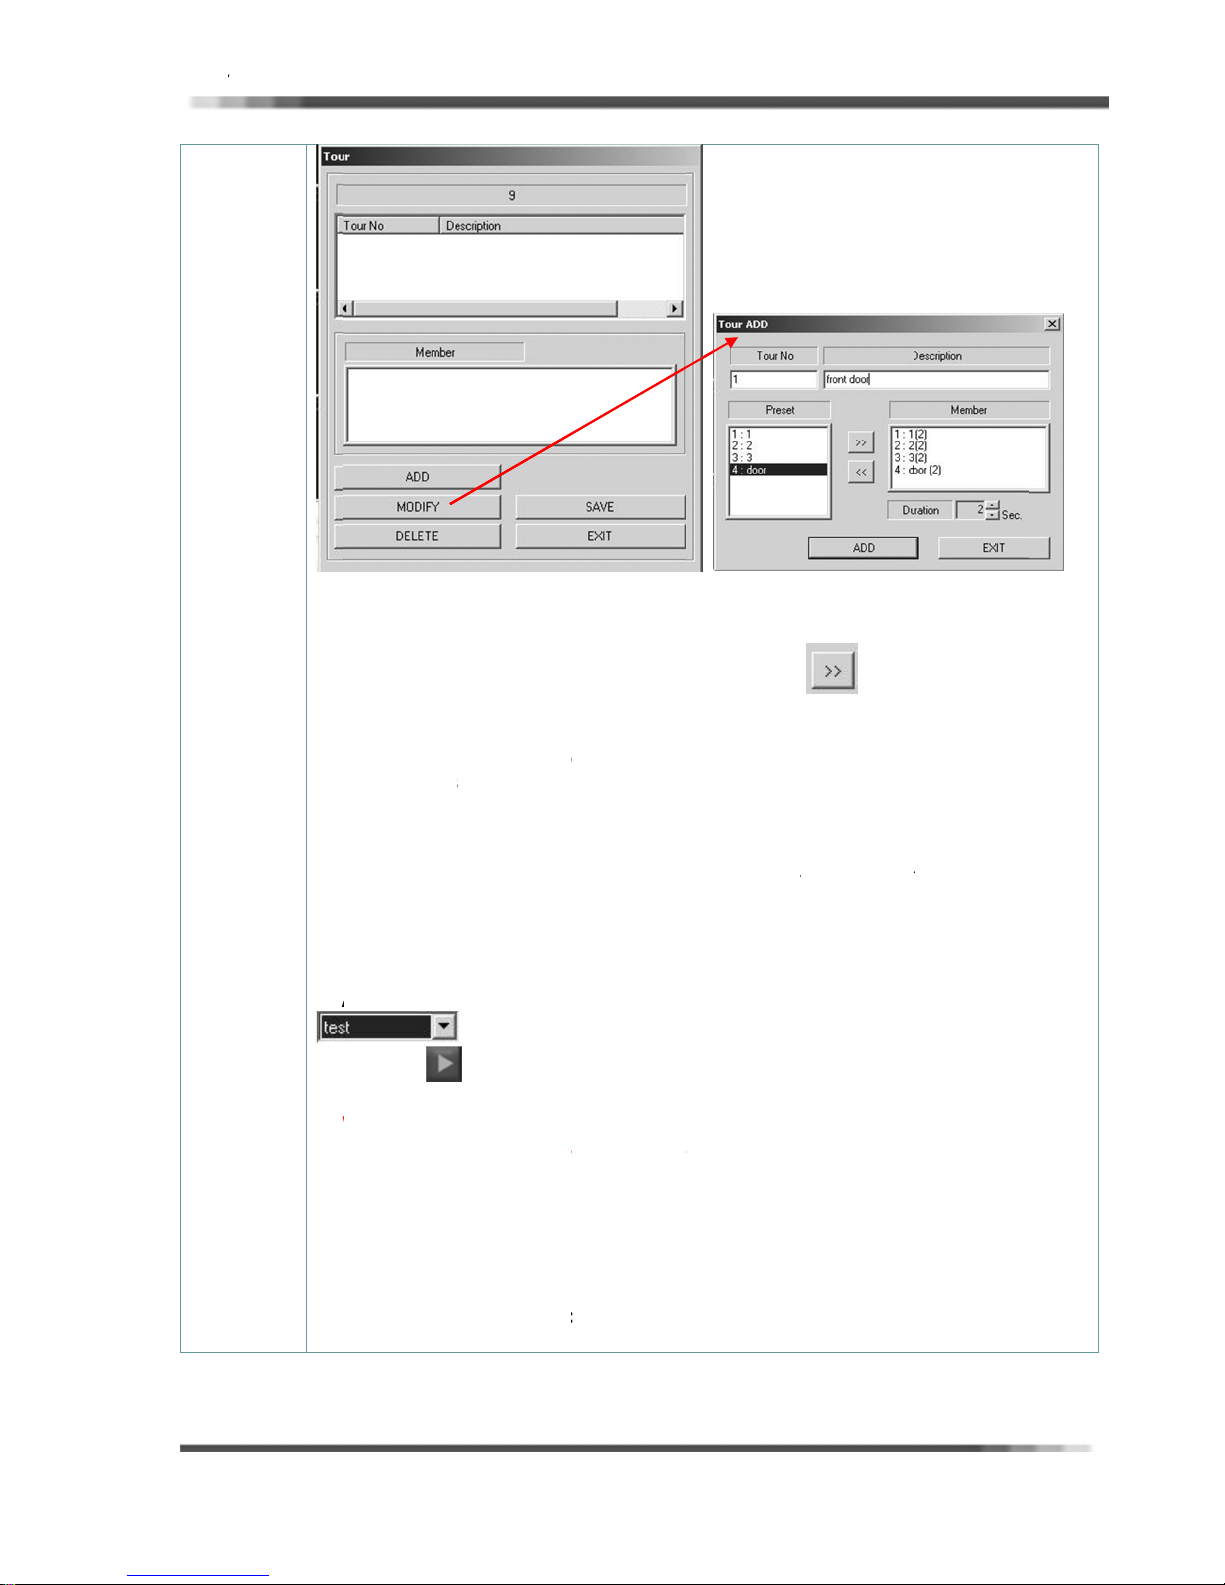
HD D
V
a
A
c
c
Wsevour
O
emo
S
R
P
P
D
T
a
r
T
g
s
c
n
u
e
o
n
N
o
u
m
d
ga
ct
H
p
l
d
e
f
e
g
t
a
u
r
m
c
t
o
D
a
u
c
c
e
O
o
a
w
s
a
d
t
m
n
a
u
A
king
e
ju
s
k
u
n
t
t
u
ov
.
o
n
h
c
u
To
u
t
o
s
e
gr
g
u
n
e
g
R User’s Manu
l
Ver 2.1.0
a. Tour A
b. Fill in
c. Select
When
If need
d. Click o
e. Activat
f. Have t
g. Click o
tour on
the Du
Chosen
ourin
the To
D dialog ap
the Tour dia
OUR NO an
nd Add Pres
ation Time o
preset will b
programmin
et this as 2,
heck camer
the ADD b
r dialog.
d Preset tou
save progra
the Exit to
earing after
og. (Shown l
DESCRIPTI
t in list by cl
touring.
move on t
need sever
he preset D
position, ju
tton to activ
will be liste
med Prese
lose progra
lick on the
eft)
N.
ic
on the
Tou r Me mb
l Touring
elling time i
t double clic
te preset to
on the Tour
, just click o
ming tour.
DD button t
butto
r field.
st making t
set as 5 se
ing, it starts
r and Exit b
list field in
the SAVE b
add preset
and then d
e same pro
onds.
testin
of to
tton to retur
ur dialog.
tton.
to a
fine
ess.
ring.
to
ST
RT TOURI
Cli
k on the
ac
ording to pr
hen users
eral PTZ ca
Touring is
[N
TICE]
Pl
ase check a
vement exa
a.
elected PTZ
b.
ight Protoc
c.
TZ camera
d.
ower.
G
Choose the
tour run bu
rammed t
se PTZ and
eras at the s
one by S/W
in below if
ly.
camera is in
ol.
/W conne
listed Tour o
ton to starts
ur.
ome camer
me time, us
sers can not
the List to s
tion.
the Tour lis
touring, , wil
with Prese
ers can not
et right m
pport or not
field in PTZ
l be moving
Receiver, h
se Touring.
ement after
panel.
he camera
wever, when
This is beca
checking th
usin
use
17
Page 19
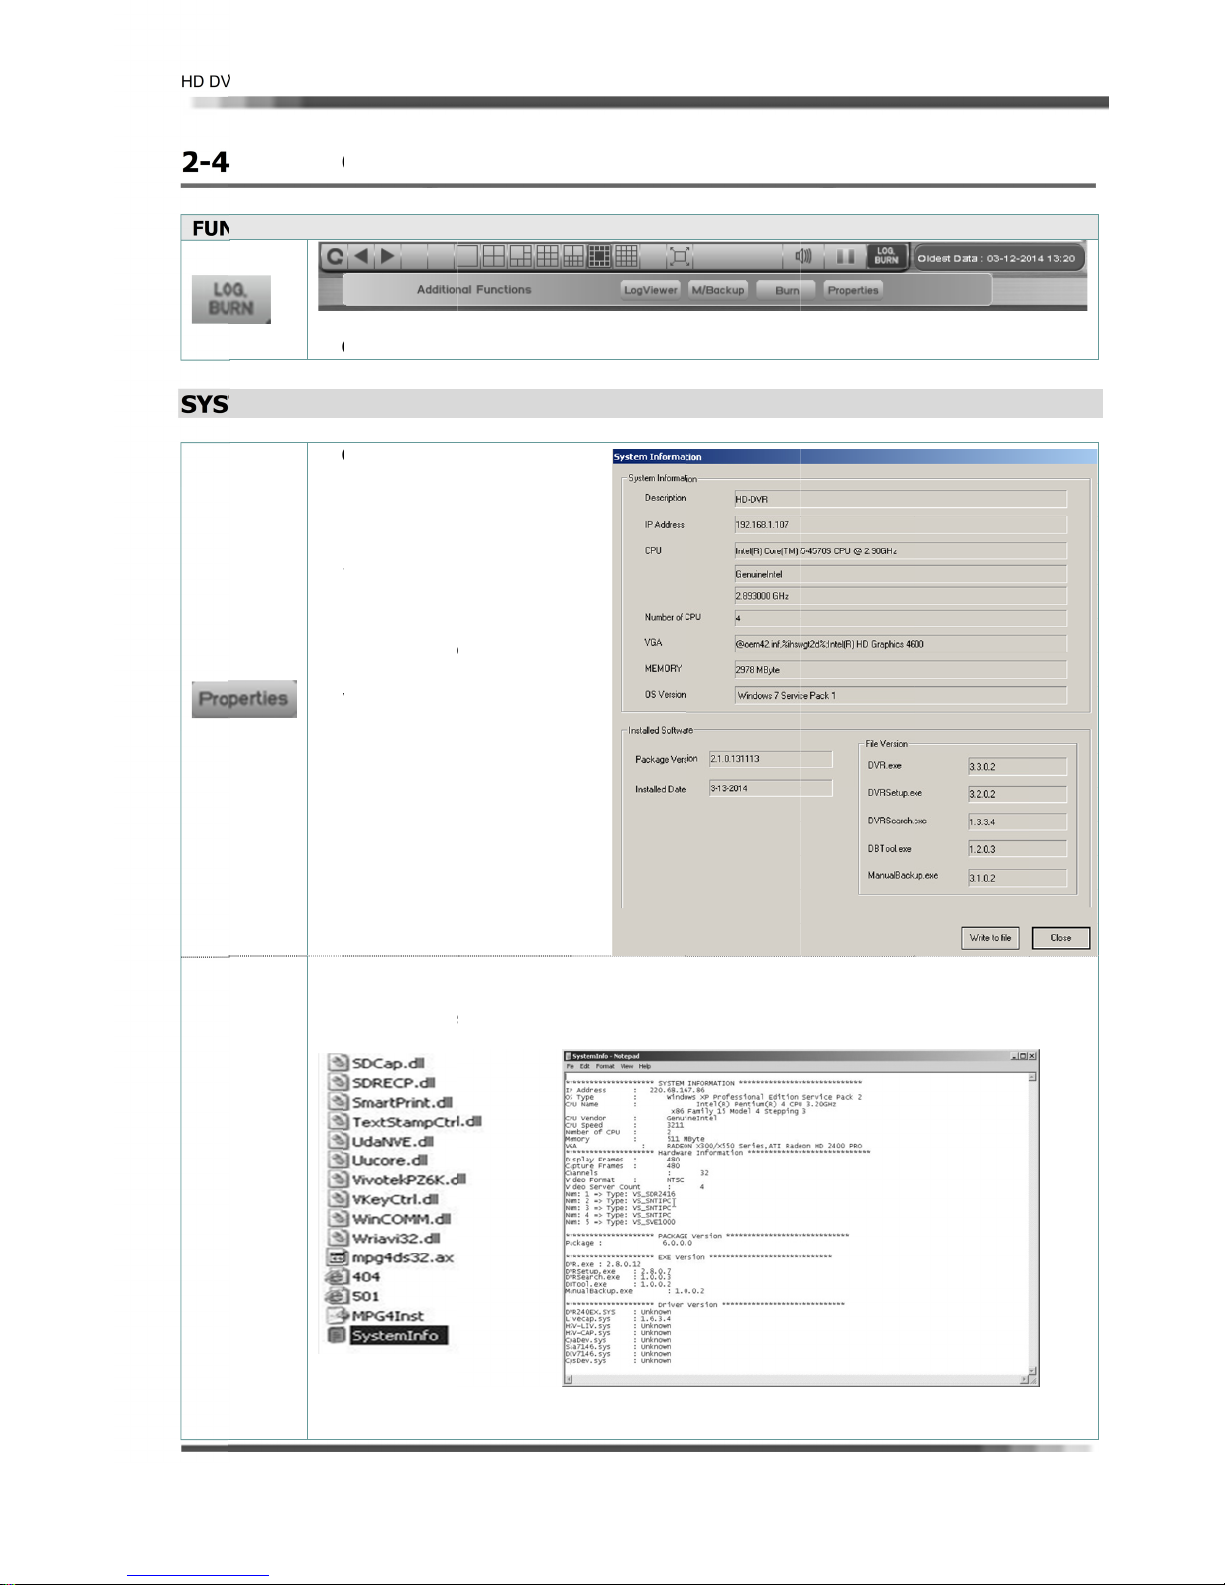
HD D
V
N
T
a
O
A ThiPRO
P
OsysSysappPRDVnexWRcop
o‘syC:\
e
U
L
o
u
t
t
S
e
E
o
e
s
i
e
N
F
C
n
f
n
a
V
s
R
o
h
2-4
FU
R User’s Manu
ADDITI
CTION IN
l
NAL F
DDITIONA
NCTIO
BUTTON
S
IELD
Ver 2.1.0
SYS
EM PRO
PR
inf
‘ex
s area functi
PERTICES /
ERTIES
PERTIES b
tem informa
tem informa
earing after
ORPERTIE
R Main Scre
t page)
ITE TO SAV
y this file f
rmation’ ch
steminfo ‘fil
program file
below)
ns are easy
MANUAL BA
tton: DVR
ion display.
ion will be
click on the
button in th
n. (Shown
button for
r ‘System
cking
e is saved i
\dvr (shown
use at the m
KUP / LOG
e
in screen,
IEWER / BU
RN
OTICE]
[N
ase check th
Pl
All
of DVR syst
s syseminfo
m transactio
ile if DVR sy
is saved on
tem failed t
this file.
function or
alt.
18
Page 20
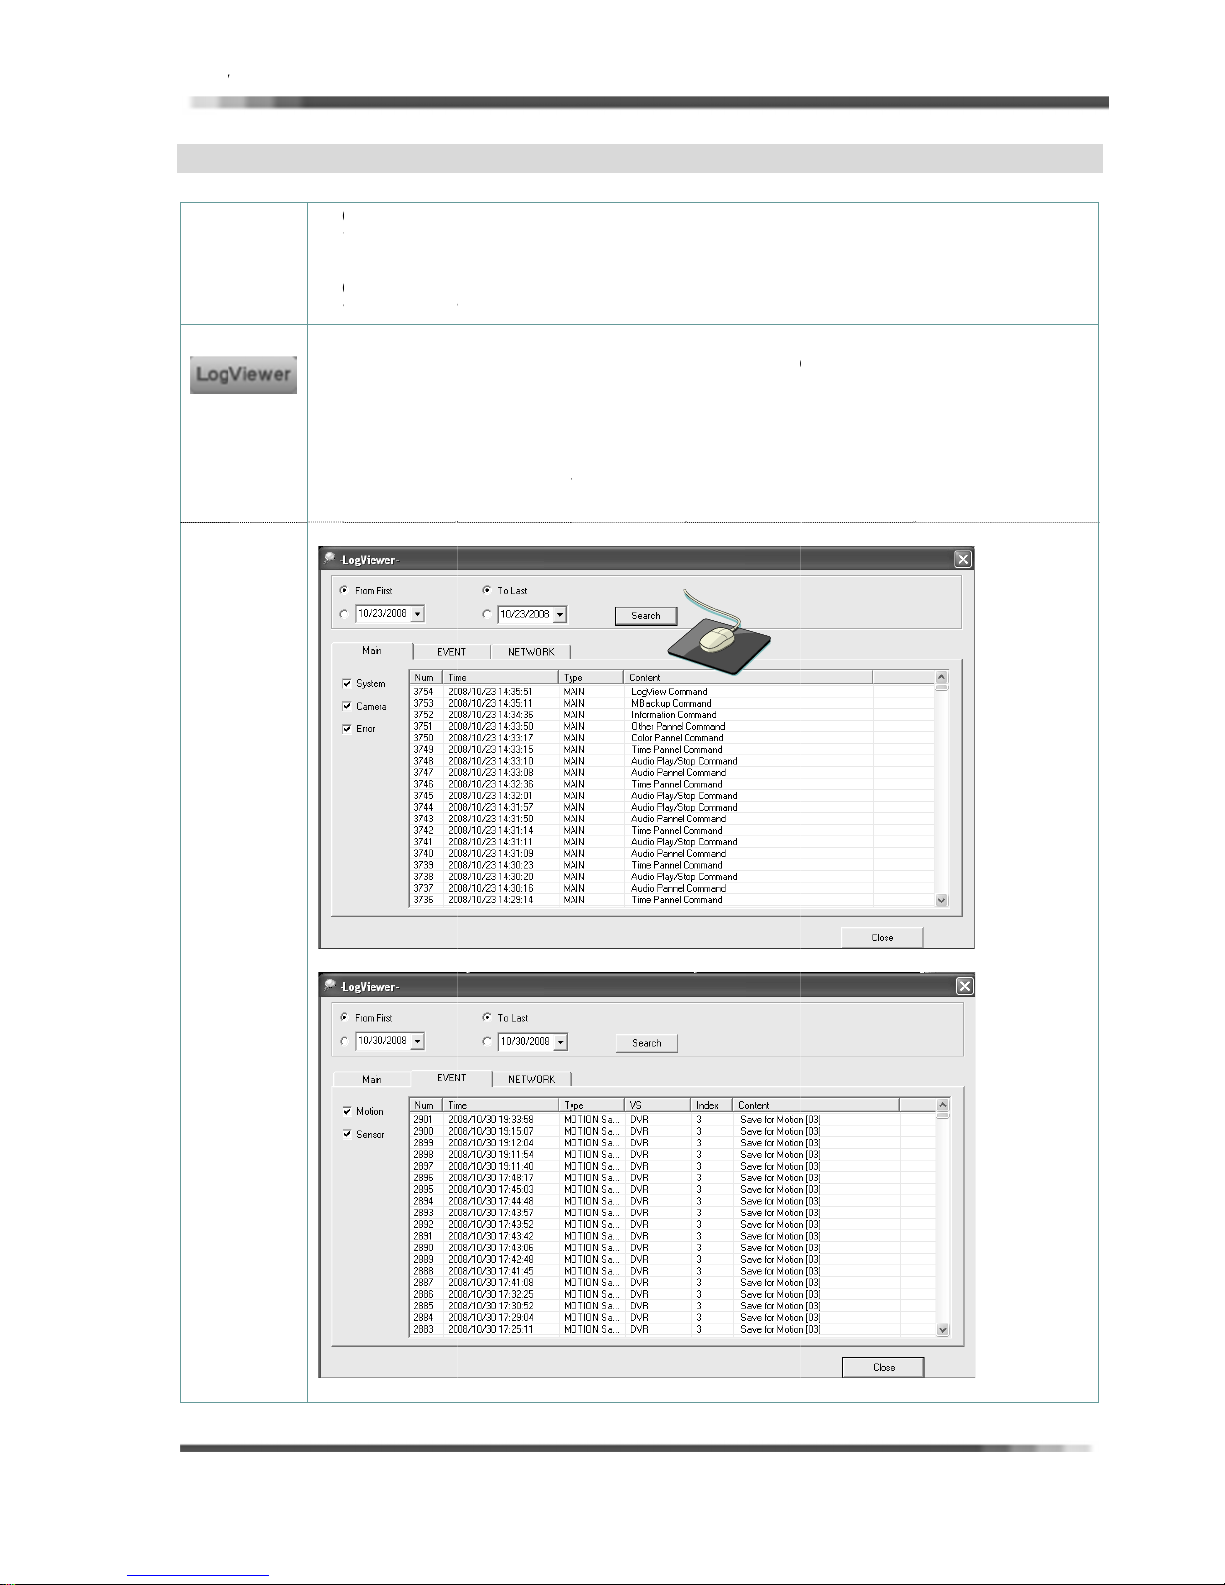
HD D
V
G
c
a
GDVdurLOGOT
a
a
V
E
o
g
a
f
e
e
Y
M
K
e
,
w
h
g
g
a
t
E
N
t
n
t
p
t
g:
R
Y
e
h
e
W
f
R User’s Manu
LO
VIEWER
Des
ription
l
LO
R system cre
HER button
Ho
1.
2.
MAIN : S
3.
Se
(M
VIEW butt
ing DVR pro
VIEWER di
to viewing
Choose th
Choose th
EVENT :
NETWOR
Click on th
rching Start
in Log: Sho
n is pressed
ates the Log
ram runnin
log will be
ield. (Shown
log files, do
log view sta
Search field
STEM / CAM
OTION / SE
: CONNECT
SEARCH bu
and appeari
n below)
to view DVR
files on the
.
ppearing af
below)
he followin
rt date and ti
Main, Event
RA / ERRO
SOR
/ NOTIF
ton.
the check
system log fi
rogram files
er click on t
me, END dat
, Network.
d log inform
les.
folder / DVR
e LOGVIE
e and time.
ation.
folder / Log
ER button
Ver 2.1.0
older
on the
(E
ENT Log: S
own below)
(N
TWORK Lo
: Shown nex
page)
19
Page 21
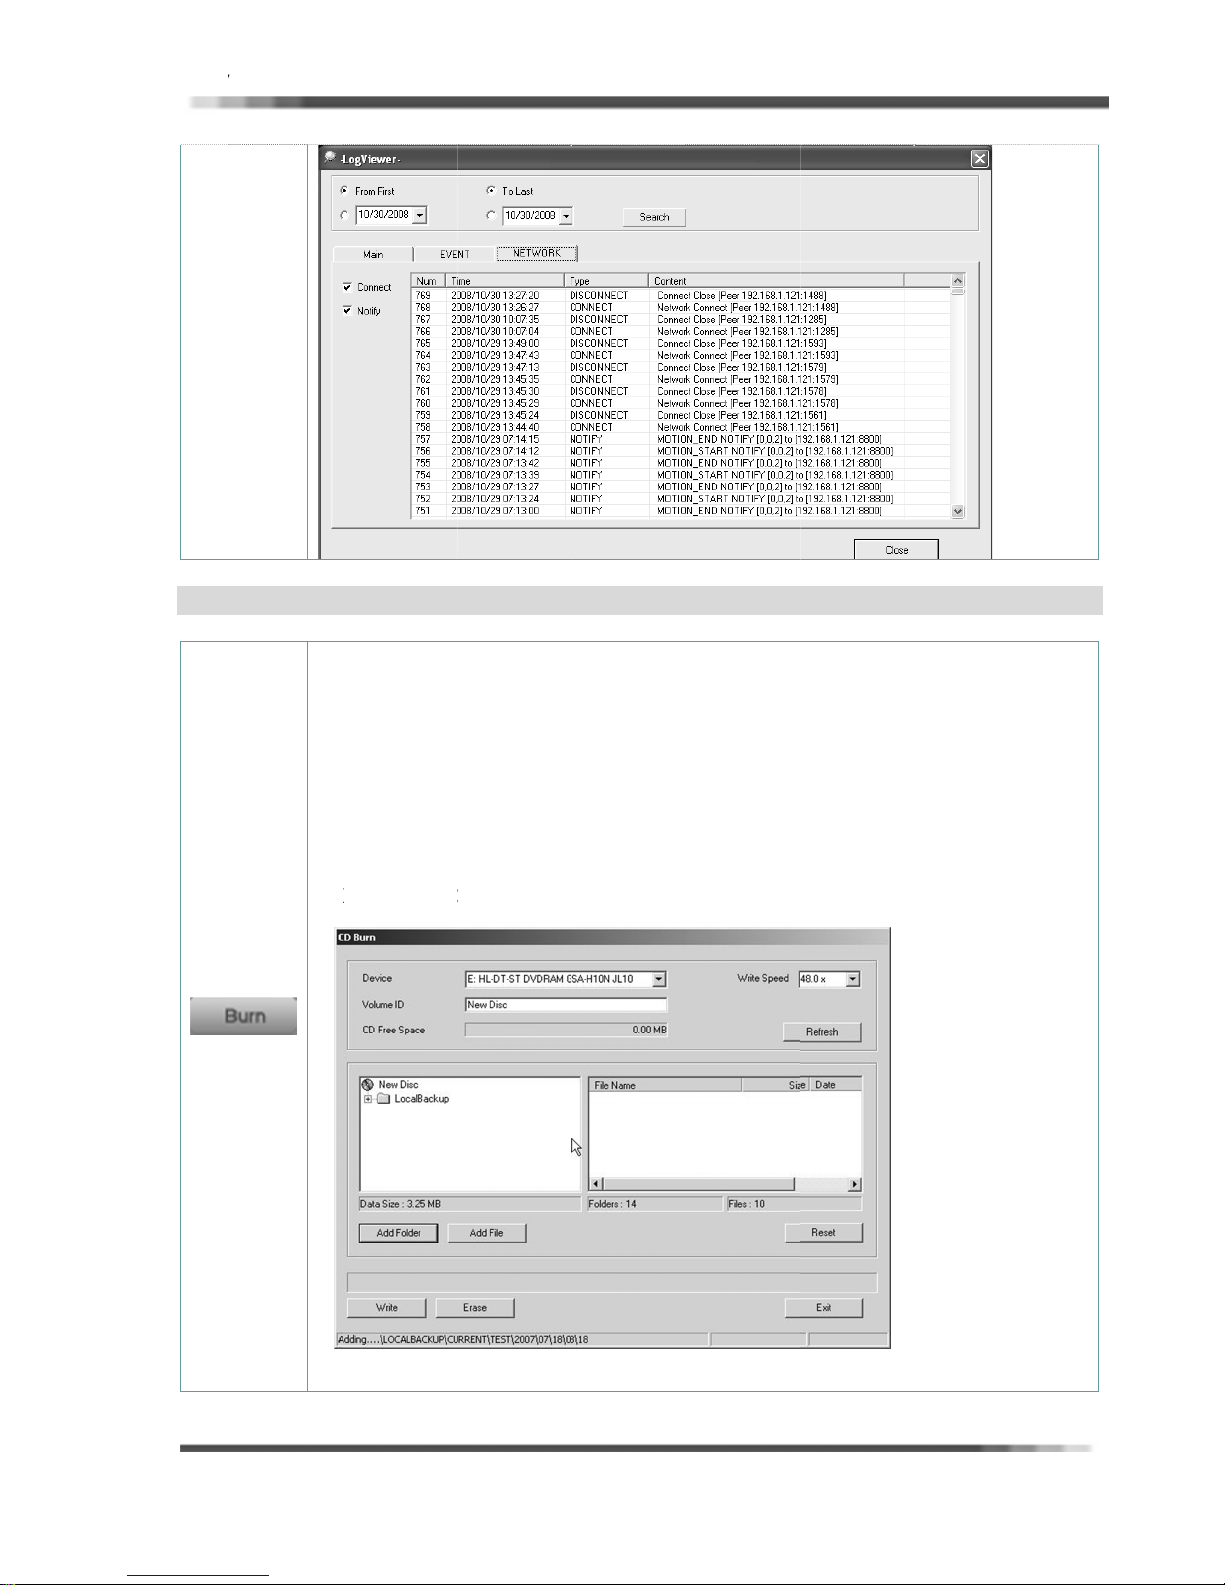
HD D
V
R
a
U(ToCDthe
AdAdREWRERburEXNo
o
h
g
d
c
B
d
C
t
g
e
e
o
o
r
g
o
t
H
s
-
n
n
U
t
r
a
BU
R User’s Manu
N
B
l
RN button f
burn CD,
BURN Dialo
OTHER butt
d Folder: A
d File: Sele
SET: Clear a
ITE: Start
ASE: Delete
ning selecte
IT: closing
tice: Check
r CD burnin
ave to sav
will be app
on field. (Sh
ding folder
t the data fo
dded files or
urning.
the data in
data.
D burn dialo
he file size t
directly on
files onto
aring in the
wn below).
n the CD.
burning.
folder.
CD-RW,DVD
.
burn in CD
he DVR mai
DD)
creen, whe
RW media,
before Burn i
screen.
click on the
se this but
n CD and bu
CD BURN bu
on If not w
n.
Ver 2.1.0
tton in
nt to
20
Page 22

HD D
V
a
E
E
A
E
D
R User’s Manu
l
Ver 2.1.0
R
R
D
I
D
A
E
L
21
Page 23
HD D
V
s
n
w
e
r
a
R
m
e
n
I
e
t
f
Thth
W
h*N
h
o
Thre
ftryap
e
A
c
w
a
s
O
y
i
e
D
T
s
m
R
p
e
t
t
y
e
c
b
g
d
g
m
2
e
o
e
s
t
t
w
n
o
i
p
T
g
o
p
e
p
f
e
m
a
d
O
e
e
R User’s Manu
l
Ver 2.1.0
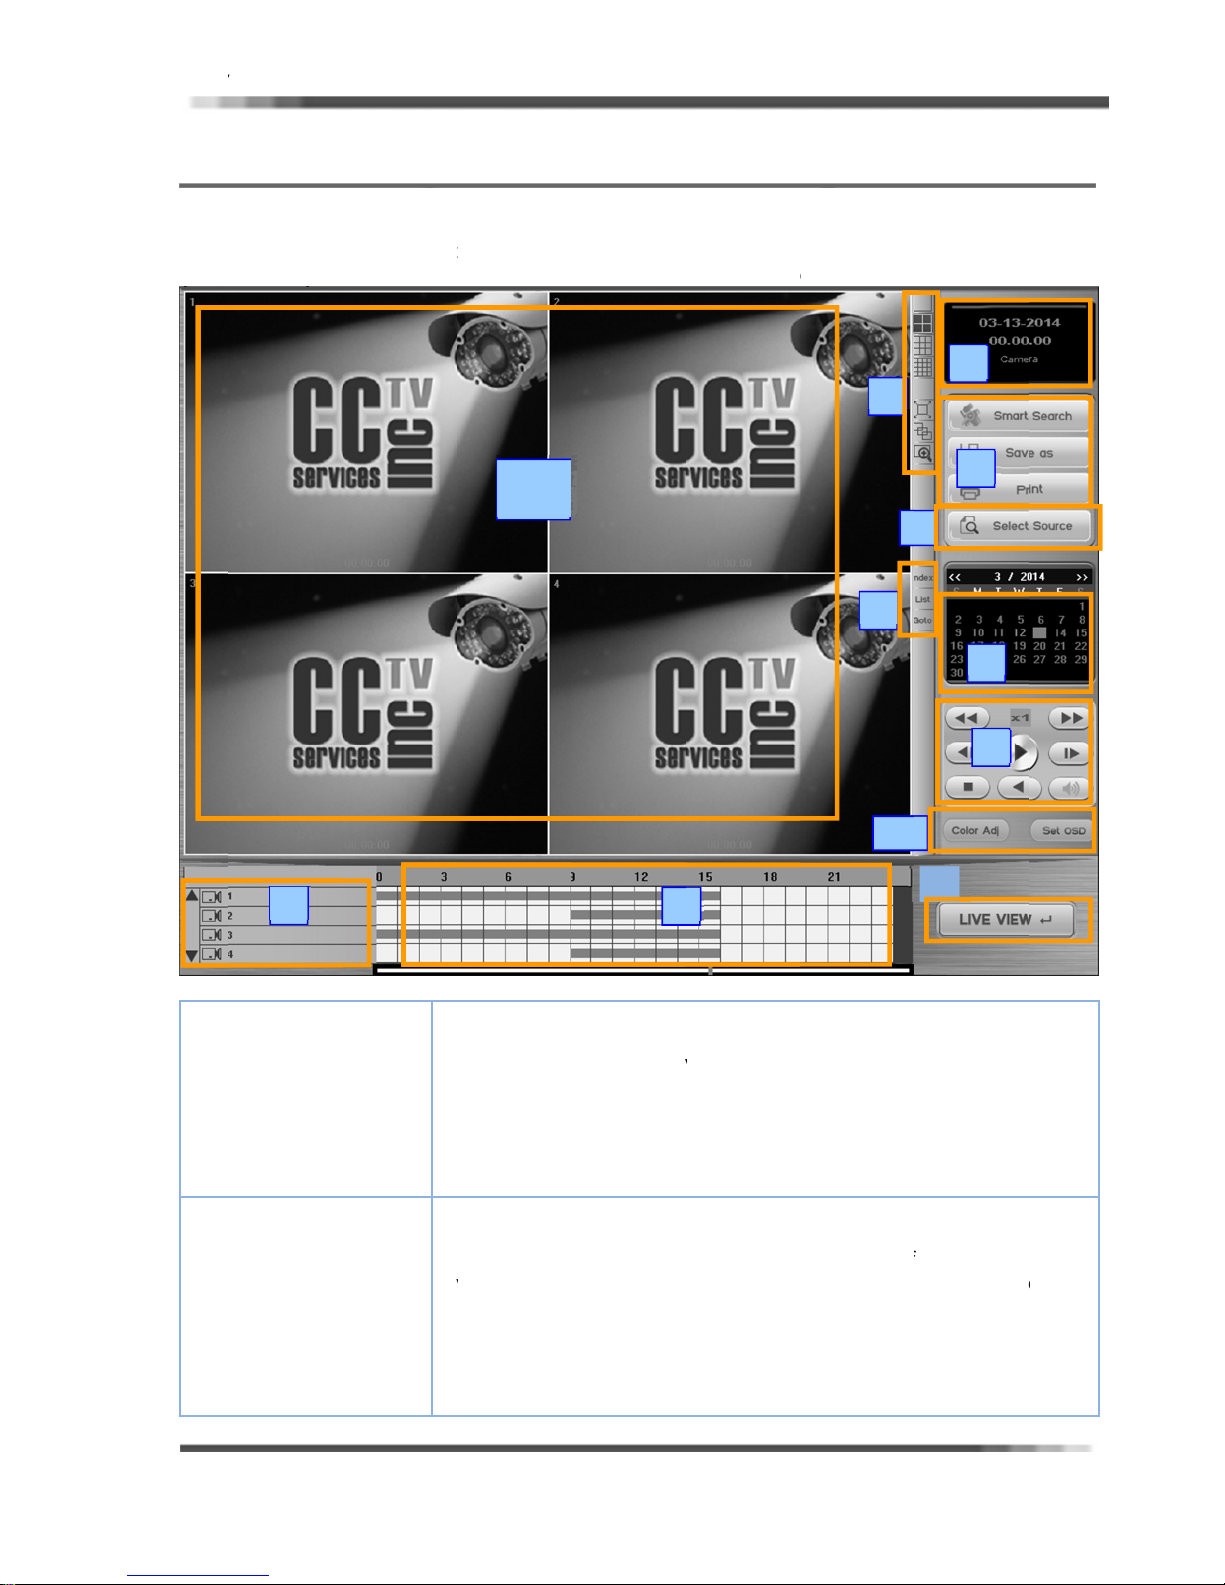
3-1
Enter
Whe
(Sho
UNDE
the search
click on the
n below) Th
STAND
ode and op
SEARCH but
name and
NG SE
ns the Sear
on in the Vie
unction of e
10
RCH SC
h SCREEN,
ing Main Sc
ch button ar
EEN
roviding acc
reen, Search
described b
ss to search
screen will a
elow.
6
8
features.
pear.
4
7
9
1
5
1. R
Info
2. Pl
ayback Time
3
corded data
mation Cale
dar
Line
e calendar i
at are YELL
HITE are da
t
e month are
ote: The s
c
anges the y
If
a date conta
Recorded
N
e Timeline
corded throu
o
day footage
ing to find,
propriate ca
*
Notice that
presents mili
r
how the da
W, a r e d a ys
s without an
to select diff
ngle arrow
ar.
ins recorded
ata: WHITE
able gives a
hout the da
was recorde
imply click o
era and tim
every
tary time for
reen
e you wish t
hat have vid
video foota
rent month
changes the
data, the da
, Current Da
rief overvie
y. Th e gree
. In order t
n the green l
e.
line is for a
at.
11
view is sele
o footage.
e. The arr
and years.
month and
e will be dis
e: RED
as to wher
lines corres
locate the
ine that corr
different ca
12
cted. The d
he days that
ws on the si
the double
layed YELL
motion was
ond to what
ootage you a
sponds to th
era and th
ys
are
es of
arrow
W,
time
re
clock
22
Page 24

HD D
V
A
m
n
PZOO
U
o
E
o
I
d
C
u
E
a
O
i
r
R
u
t
C
y
██
██████
██
Th
y
e
Ti
Tse
Itim
Mca
o
ThPAmToNoZOclm
r
a
e
o
hcoSe
a
o
t
s
o
r
h
n
e
o
h
,
y
m
m
n
P
n
t
i
m
k
r
o
t
u
ge
t
r
e
d
e
R
a
e
t
m
b
giv
s
e
p
i
t
n
n
g
f
I
e
r
a
p
t
t
y
y
t
s
d
t
f
w
e
e
C
e
w
a
a
o
k
y
e
A
a
o
i
h
o
v
h
r
u
o
y
x
s
n
t
m
d
o
o
o
e
w
a
e
e
v
V
3. C
Ca
4. I
5. Pl
6. S
7. F
8. B
9. S
Butt
10.
Win
11.
Set
12.
R User’s Manu
MERA SCR
era Label
formation W
ayback Cont
LITS, PANO
M, FULL butt
NCTIOIN B
ok Mark But
LECT SOUR
n
mage displa
ow
olor adjust,
p button
xit button
l
[
Color for e
White: No
Green: Co
Yellow: M
Orange: S
Blue: Con
Pink: Sen
Each Dark C
LL and
ndow
ol Panel
is scroll ba
s
stem. Click
r
mainder of t
It
shows the i
me/Date/Fil
he play butt
lected on t
Pl
ay by Frame
NGLE butto
S
e.
ULTI button
meras in pla
pl
ayback 4 ca
te: The ca
N
AMA,
on
e subseque
NORAMA:
otion of a si
use this fea
te: You can
OM: Specif
ick of the mo
agnify the re
P
ttons
ons
E S
If
OSD Pl
int, Save, S
C
n Book mar
lect the Sto
U
pdate all rec
you double
ntinue to do
c
ayback ima
n screen text
O
T
e EXIT but
ntinue reco
arch mode.
ch Recorde
Data
ntinuous Rec
tion Record
ensor Recor
inuous & Ev
or & Motion
lor means
and Camer
and hold th
e cameras.
formation of
Size/Recordi
n will begin
e camera ti
revere Play
n: The single
(4/9/16):
back at the
eras, 9 cam
era in the to
t cameras w
anorama bu
le camera i
ure, click pa
also change
c areas may
use, and dra
d box to the
art Search,
ing certain r
age drive of
rded image
he click the
ble click the
color adjus
display posi
on will take
ding while
d Mode]
orded Data
d Data
ed Data
nt Recorded
Recorded Da
ecorded with
label will
e tab, then
recorded da
ng Mode
he playing o
e line. For
y frame, pe
icon is for r
es you the a
same time.
ras, 16 cam
left corner
ll automatic
tton is a pl
nine individ
orama butt
the playbac
be selectivel
ing it to cr
ull screen
mage Color
corded data
ecorded dat
nd reload
icture, the si
picture until
ment by Col
ion setup by
ou back to l
ou are sea
Data
a
Audio
how the ot
rag up and
a.
the video fr
ard Play, re
d up/down,
viewing only
bility to view
lick the eac
ras.
ill be the fi
lly fill-in in n
yback featu
ual frames,
n, then play.
speed when
“zoomed” b
ate a red bo
djust Tool
.
.
ze will increa
you reach it
r Adj butto
Set OSD bu
ve viewing
rching recor
er cameras
down to sh
m where yo
erse play, f
Stop, Audio
one camera
4, 9, or 16
button to
st camera se
merical ord
re that sho
ne frame at
using this f
y holding th
x, will effecti
se. You can
maximum si
,
ton
ode. The D
ed images
Ver 2.1.0
n the
w the
u have
rward
play
at a
lected.
r.
s the
time.
ature.
right-
ely
ze.
R will
in the
23
Page 25
HD D
V
s T
To R
a
I
RvW
C
R
a
a
C
v
C
T
T
D
T
E
e
e
n
p
o
x
a
h
U
o
D
a
e
H
c
g
d
a
u
t
ge
e
h
w
r
s
o
s
t
w
a
u
C
o
d
h
C
T
c
ring
s
w
a
e
R User’s Manu
l
Ver 2.1.0
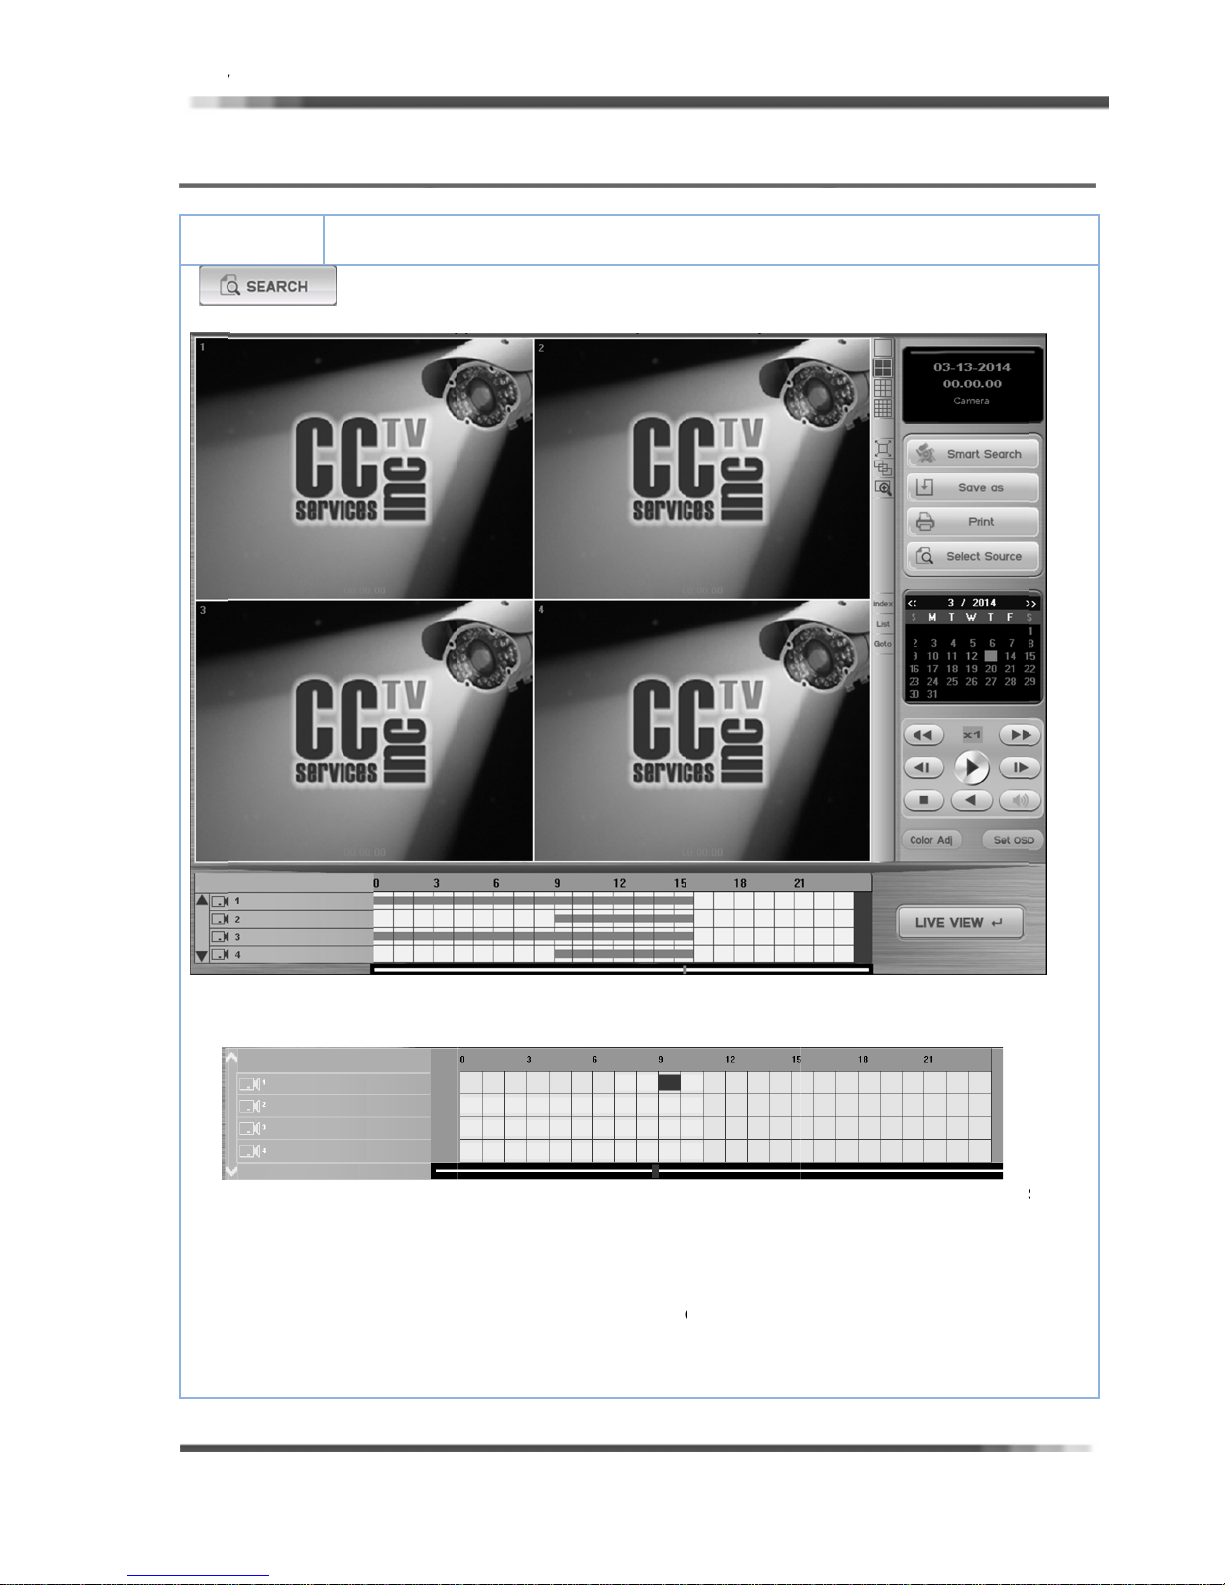
3-2
De
he
RETR
cription
Search Main
EVAL R
ecorded vid
ideo, record
hen click o
screen will a
CORDE
o can be pl
d video is vi
the SEARC
pear on to s
DATA
yed back on
wed from th
button in t
reen. (Sho
e channel a
camera vie
e DVR main
n below)
a time on t
window on
screen,
e screen. Li
the screen.
ke live
etrieval Reco
a.
b.
N
c.
d.
e.
rded data, d
hoose the E
ecorded dat
mes of eac
t
ble.
lick on the
iew.
lick on the T
he Yellow c
ime Line
isplay the re
able.
the followin
isting Recor
time inform
camera are
p/Down b
me Line in
lor Changes
corded ima
:
ed data info
tion appear
displayed in
tton on the l
he playback
to RED col
data on to
mation indic
on the Stat
the CAM1 -
eft side, and
Time Line.
or in the ch
creen accor
ted on the
s Time Line
AM16 areas
choose the
sen hour a
to chose
alendar.
able.
on the statu
amera you
ea in the Pl
n hour on th
Time
ish to
yback
Time
24
Page 26
HD D
V
u
T
h
u
b
r
b
r
a
C
v
P
a
e
w
H
i
w
t
o
u
n
o
b
w
n
u
p
e
y
e
c
i
P
e
d
g
c
p
a
m
v
R User’s Manu
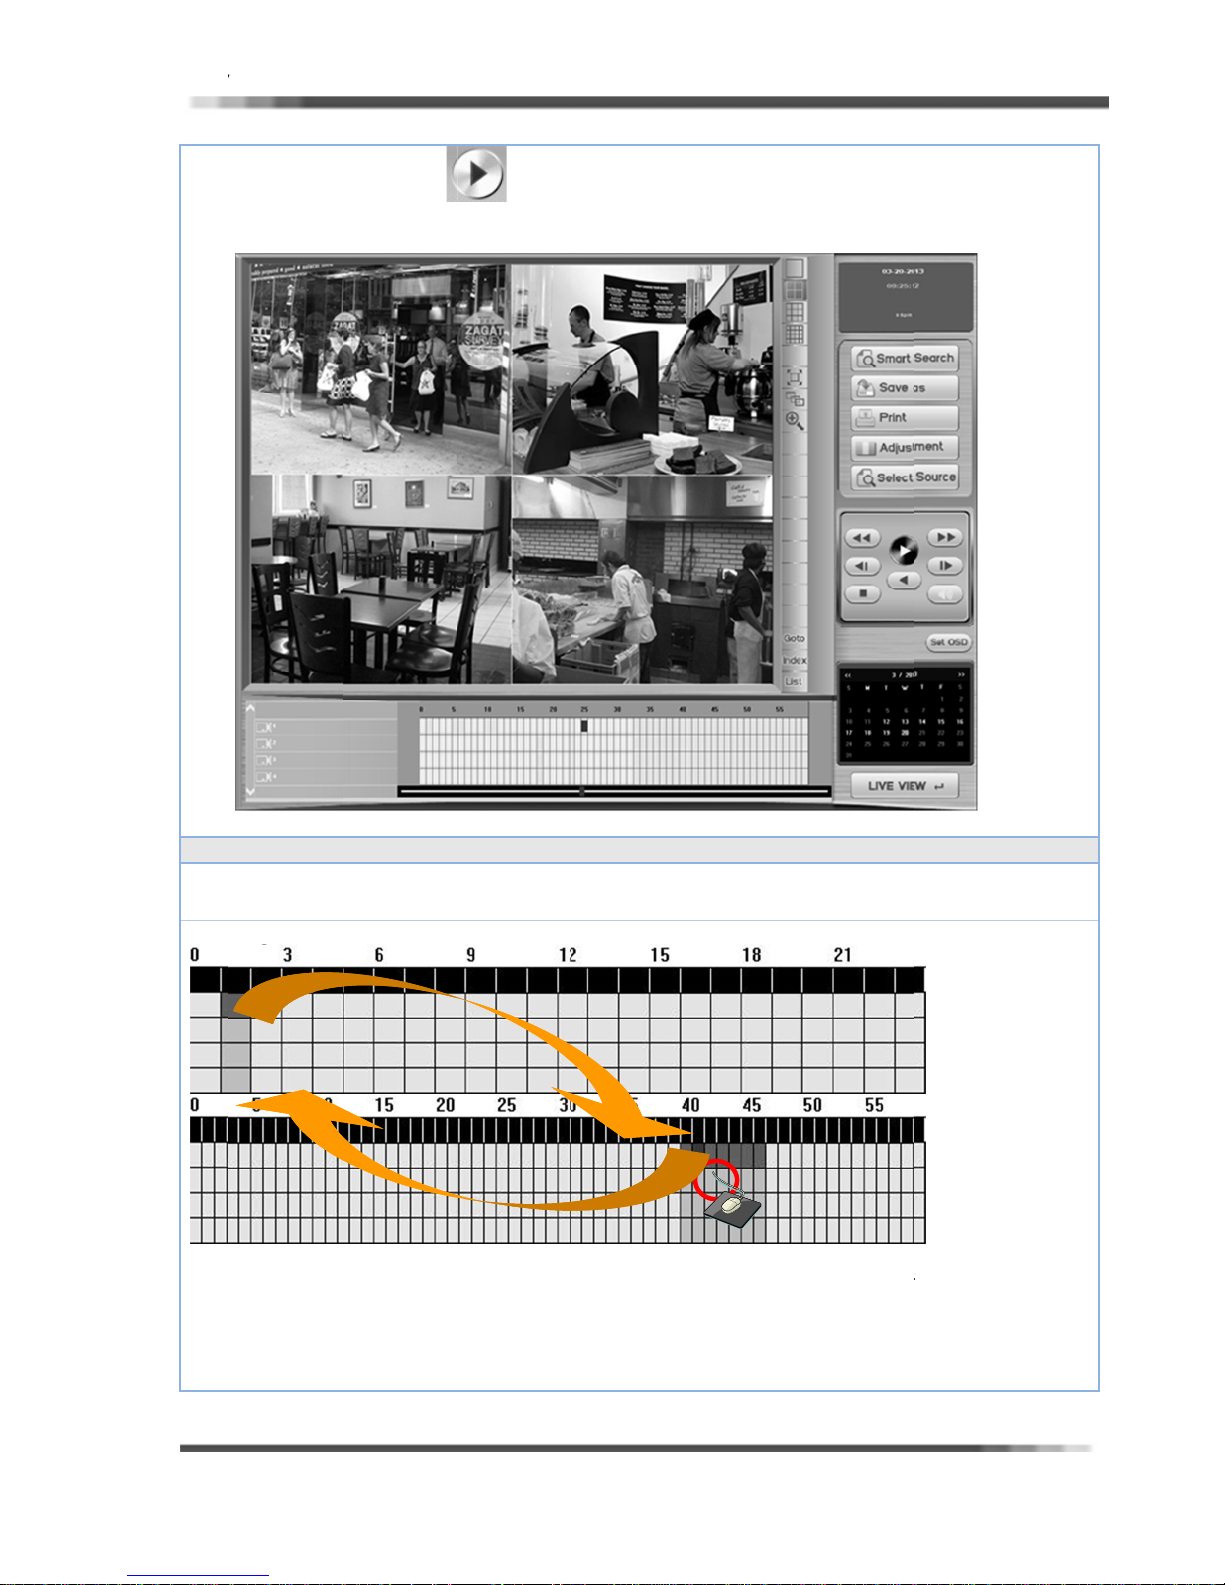
f.
l
lick on the
ideo on the
Play
indow. (Sho
utton to pla
n below)
back in the
lay button
anel, play b
Ver 2.1.0
ck the
The above
Ho
r/Minute T
In H
our zone, R
minutes as
by 5
o c
ange from
Ho
r to Minute
Dou
le-clicking ri
inte
vals.
Min
ute to Hour
le-clicking r
Dou
hou
intervals.
icture show
ble
d Line is sh
ell.
our to Min
:
ht mouse o
:
ht mouse
he data whe
wn by 3 ho
te:
the Hour
n the minut
click on th
rs for easy
layback time
playback t
Yellow dat
hecking, an
line to chan
me line to
.
In Min zone
e from hour
hange from
, Red Line is
intervals to
minute inter
shown
inute
als to
25
Page 27
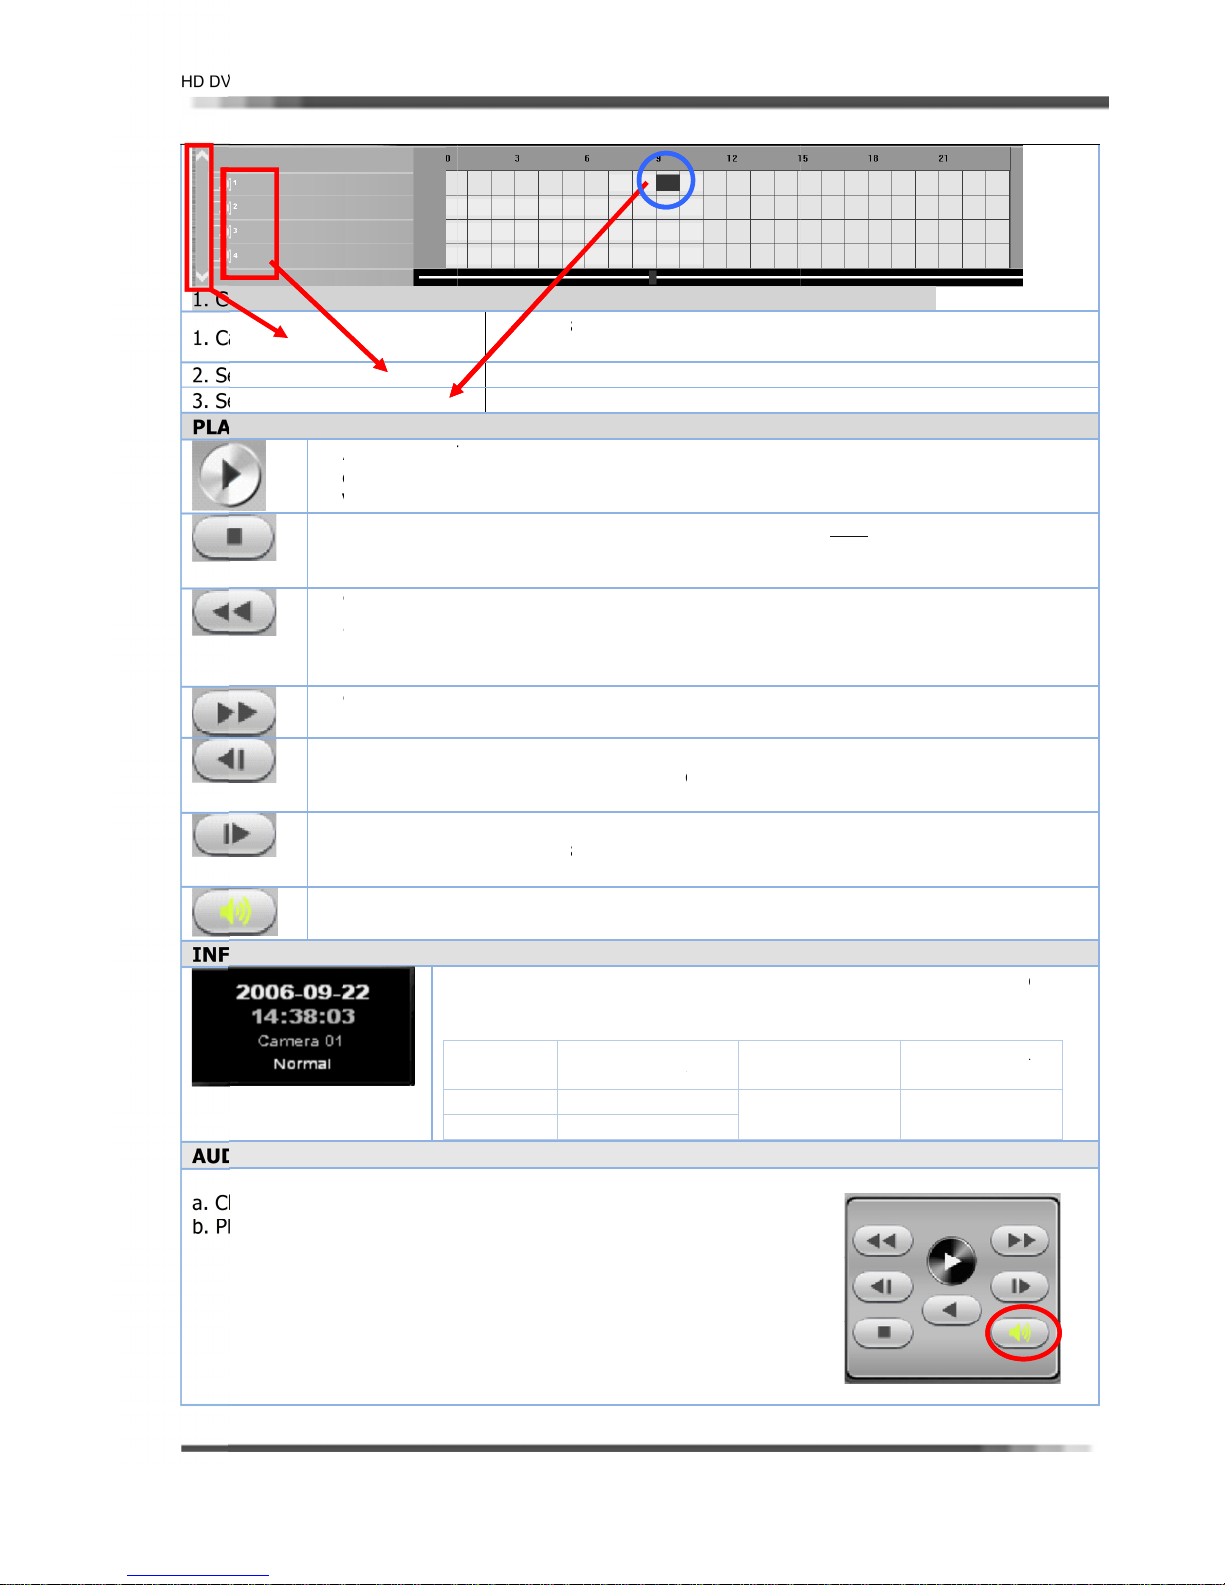
HD D
V
a
a
e
ePLA
O
AUD
l
a
N
A
eREV
T
o
PfasSpema
Pnex
Rbacthe
Ea tmo
AT
Au
d
u
T
b
C
t
u
t
,
L
u
m
u
e
e
ThCa
N
M
S
I
w
t
e
s
D
o
o
o
b
t
r
5
e
A
l
x
T
s
y
e
,
C
M
S
G
a
d
n
n
n
t
p
o
a
d
u
eick
n
r
a
c
w
u
o
d
o
m
v
o
o
f
r
o
/
ge
x
o
n
w
t
e
a
o
n
t
o
e
g
g
g
o
y
t
t
e
y
d
r
a
C
E
S
M
k
u
n
p
2
c
a
w
g
&
1. C
1. C
2. S
3. S
INF
R User’s Manu
meral Move
mera Move
lect camera
arch Pointer
YBACK PA
PL
sel
S
to
st
S
S
P
N
So
RMATION
IO PLAY
l
(Up/Down b
name or NO
EL
Y button:
cted on the
ERSE PLAY
OP button:
where the vi
p when the
EED DOWN
ter play.
ed Down B
ximum 8X.
EED UP but
t click 4x up
EVIOUS P
kward. To
frame 1 fra
XT PLAY b
ime. In ord
ve one fram
und play bu
WINDOW
THE RETR
tton) 2. Sel
Camera
the Up/
It point
It point
he play butt
camera timel
utton: This
licking the s
deo was sta
imeline hits
button: Wh
tton, the PL
on: When C
next click 8
AY button:
se this featu
e down
tton: This bu
r to use thi
forward
tton at a pla
is shows th
mera Name
ormal(R)
otion(R)
ensor(R)
EVAL IMA
ct camera n
are Groupe
own Butto
ut the curre
ut the curre
n will begin
ine.
utton is to
op button st
ted. For ex
PM; the re
n Clicking b
Y goes slow
ing butto
up from no
his button
re you must
tton will allo
feature, yo
back the rec
Y/M/D an
Recorded M
ontinuous R
otion REC
ensor REC
E
me or NO 3.
4, users mo
.
t SEARCH H
t SEARCH H
he playing o
lay the video
ps the foota
mple, if you
timeline ba
tton, the fo
r down to 2
, the foota
mal play. (R,
llows you t
click the ico
you to vie
must click
rded image
H/M/S of r
de as well.
EC Norm
Sens
Motio
Search Poin
e to next Gr
ur / Min.
ur / Min.
the video fr
footage in r
e AND brin
start playin
will return t
tage will pla
4/8 times af
will play fas
2,x4,x8).
manually vi
every time
the recorde
his icon eve
data
corded Dat
l & Event
r &
er
oup just clic
m where yo
verse
s the timelin
at 4 PM a
4 PM.
slower dow
er Speed U
er first click
w frame by
ou want to
data one fr
y time you
in searchin
ontinuous
vent REC
ensor &
otion REC
Ver 2.1.0
on
have
e back
d click
n from
max
x up,
frame
hange
me at
ant to
, and
a. C
ick on the
b. Pl
ay the recor
dio button
ed image wi
hen playbac
h AUDIO.
k recorded i
age data.
26
Page 28
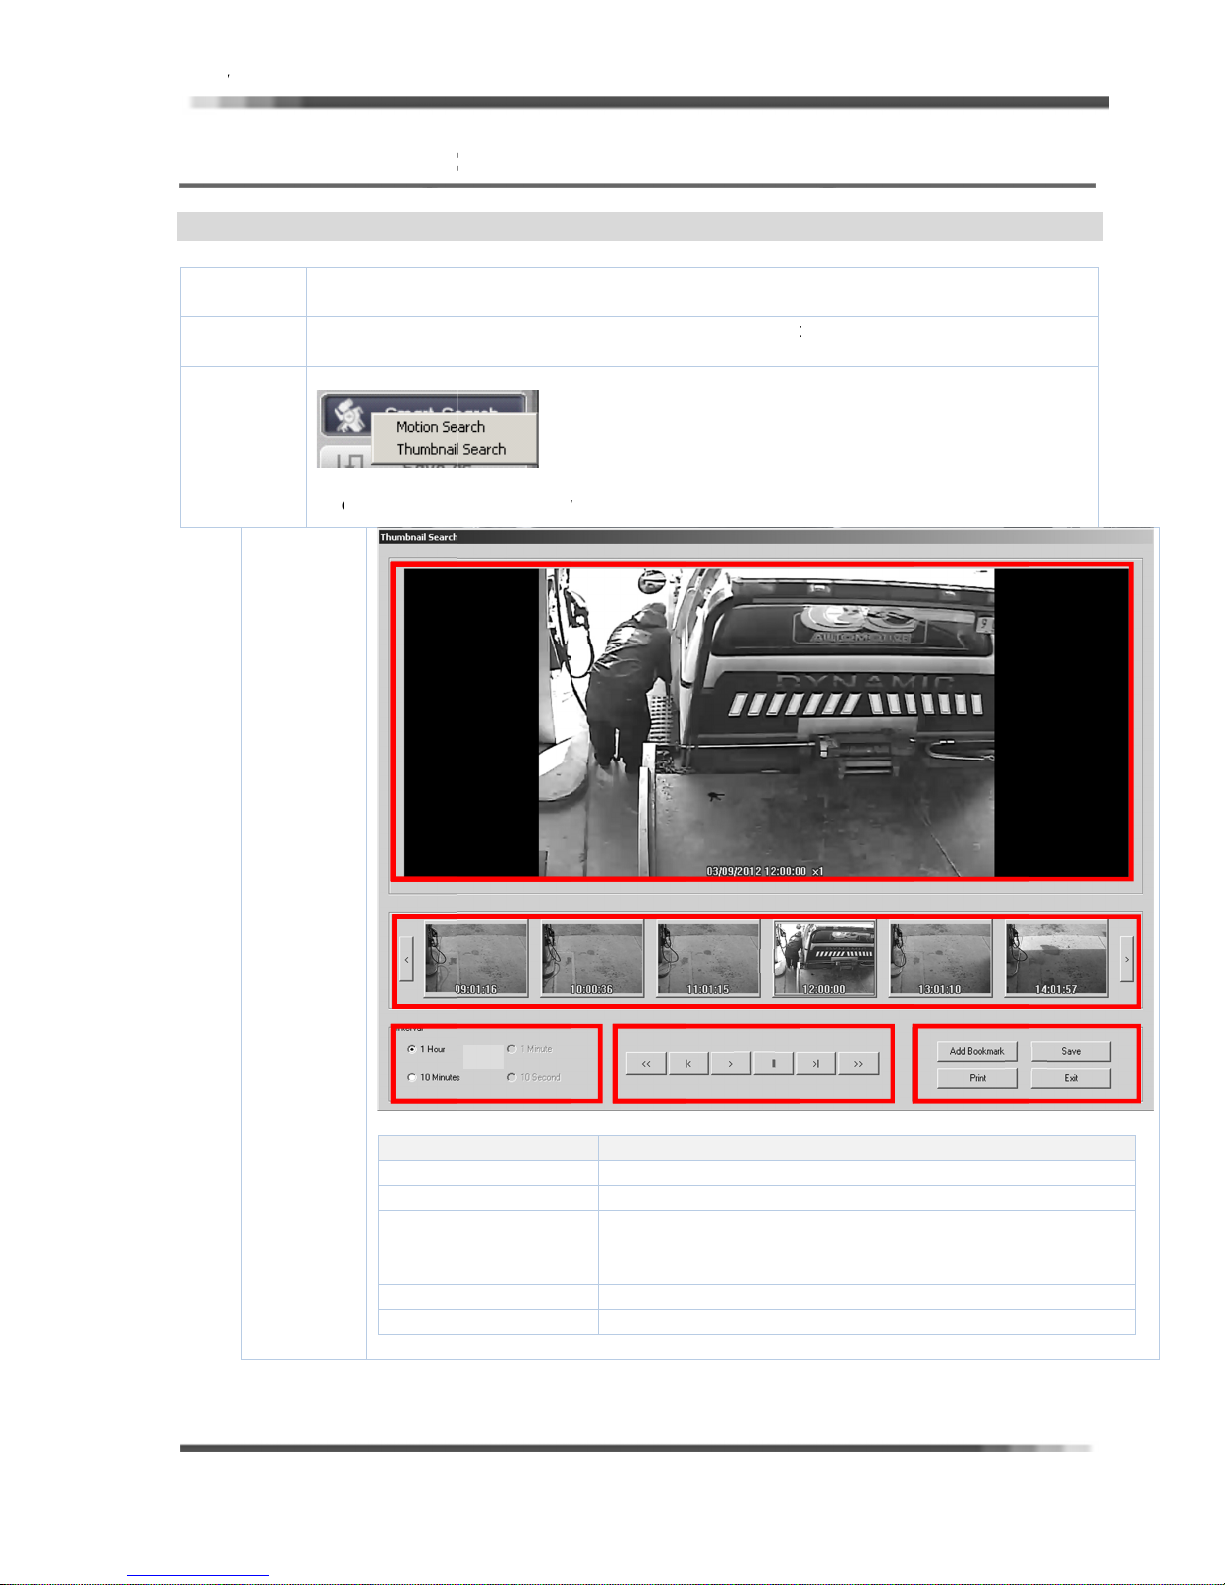
HD D
V
U
c
a
T
S
Thu
o
T
a
T
e
C
c
s
h
g
i
m
p
o
y
o
n
t
h
w
e
o
g
h
h
g
>
k
R
e
h
e
e
o
h
a
b
,
e
e
n
f
e
a
R User’s Manu
l
Ver 2.1.0
3-3
TH
Des
S
S
SMAR
MBNAIL
ription
tep1
tep2
m
se
Sel
scr
SEAR
EARCH
mbnail sear
re easily by
o
access the M
rch feature t
o
o Thumbna
ect the Thu
en will be a
H
h is a functi
howing ever
tion Detecti
e user will
l search, do
bnail searc
pears(belo
n that helps
hour’s stop
n you will n
eed to click
he followin
after click
screen)
users to find
ed to open t
n the SMA
on Smart S
the videos, t
he search fe
T SEARCH
arch button
ey are look
ture. Once i
utton.
Thumbnail
or
n the
search
Step3
Item
(1)
(2)
(3)
(4)
(5)
Search a
Shows t
Shows t
choosin
(Hour=
Playbac
Selected
nd enlarge t
umbnail vid
e fist videos
the video it
10min=>1m
button for s
image for b
Description
umbnail vid
os
in the select
shows every
in=>10seco
lected some
ok mark or s
os
d time. Whe
10 min’s vid
ds)
nail images
ave
n
os.
rea.
27
Page 29
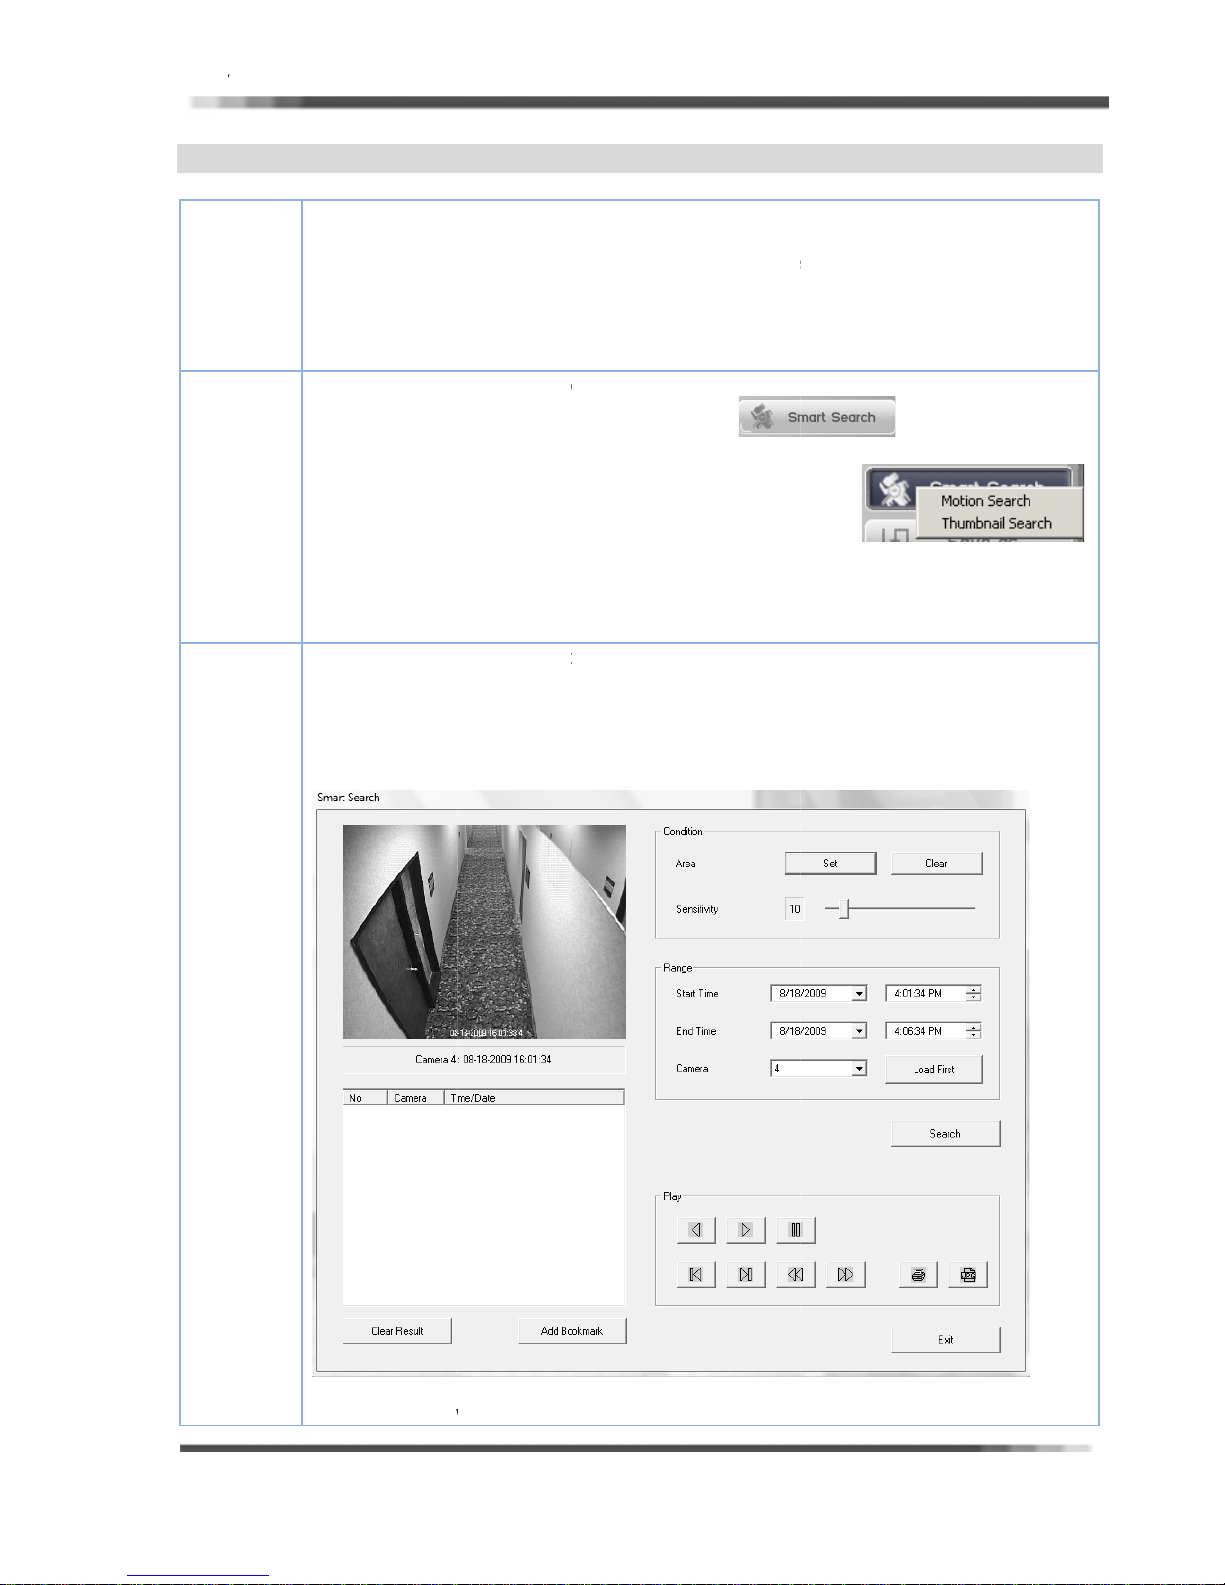
HD D
V
T
c
tSt
a
R
The
t
s
n
e
T
tOncMot
m
u
sOnc
nOnc
w
c
m
e
f
n
t
h
e
n
n
a
h
a
m
s
a
w
f
e
r
c
a
o
e
S
h
o
t
c
h
c
d
c
u
n
o
a
m
e
e
h
e
c
n
w
o
u
g
t
a
n
t
t
t
t
e
e
e
b
T
o
e
a
M
m
h
o
n
s
e
r
N
h
a
o
l
i
u
g
MO
Des
1) S
R User’s Manu
ION SEA
tha
in
ription
ep 1
the
the
we
scr
sea
but
Fro
the
wo
Fir
left
mi
l
CH
advanced S
allows a us
mart search
user to defi
footage for
t on in tho
enshots will
o
access the M
rch feature t
on.
e you have
ion Detectio
this scree
Date, the St
ld like watc
t, you will ne
e the date h
mouse butto
ute to deter
e you have
art Search
r to find a c
eature. The
e specific ar
he time spe
se specific
assist you.
otion Detecti
e user will n
ntered into
portion of t
, you can ch
rt Time and
.
ed to select
s been sele
n and click t
ine the exa
elected the
eature is a
rtain event
e are two p
as of a ca
ified. They
reas the us
n you will n
ed to click o
MART Searc
e search.
ose the tim
End Time in
he date from
ted you will
e up and do
t time you w
ate, time yo
ew addition
f any camer
rts to this ne
eras recordi
will then be
er has defin
ed to open
n the
, you will be
you want to
hosen came
the top righ
eed to selec
n areas by
uld like to s
will continu
o the CCTV
at anytime
w function.
and the s
able to revi
ed. To do
he search fe
S
in the
search for
ra from whic
that you wo
the time. T
he correspo
arch for cho
to the next
SERVICES I
y utilizing t
he first part
ftware will
w any moti
this, the fo
ture. Once
ART SEARC
otion by sele
camera yo
uld like.
do this, use
ding hour an
en camera.
step.
Ver 2.1.0
C DVR
e built
allows
nalyze
n that
lowing
n the
H
ctin
your
d
ep2
No
that you h
pro
eed and dra
ve all your
boxes aro
orrespondin
nd the areas
times, tim
that we wou
and date s
ld like to sea
lected we n
ch for.
eed to
28
Page 30
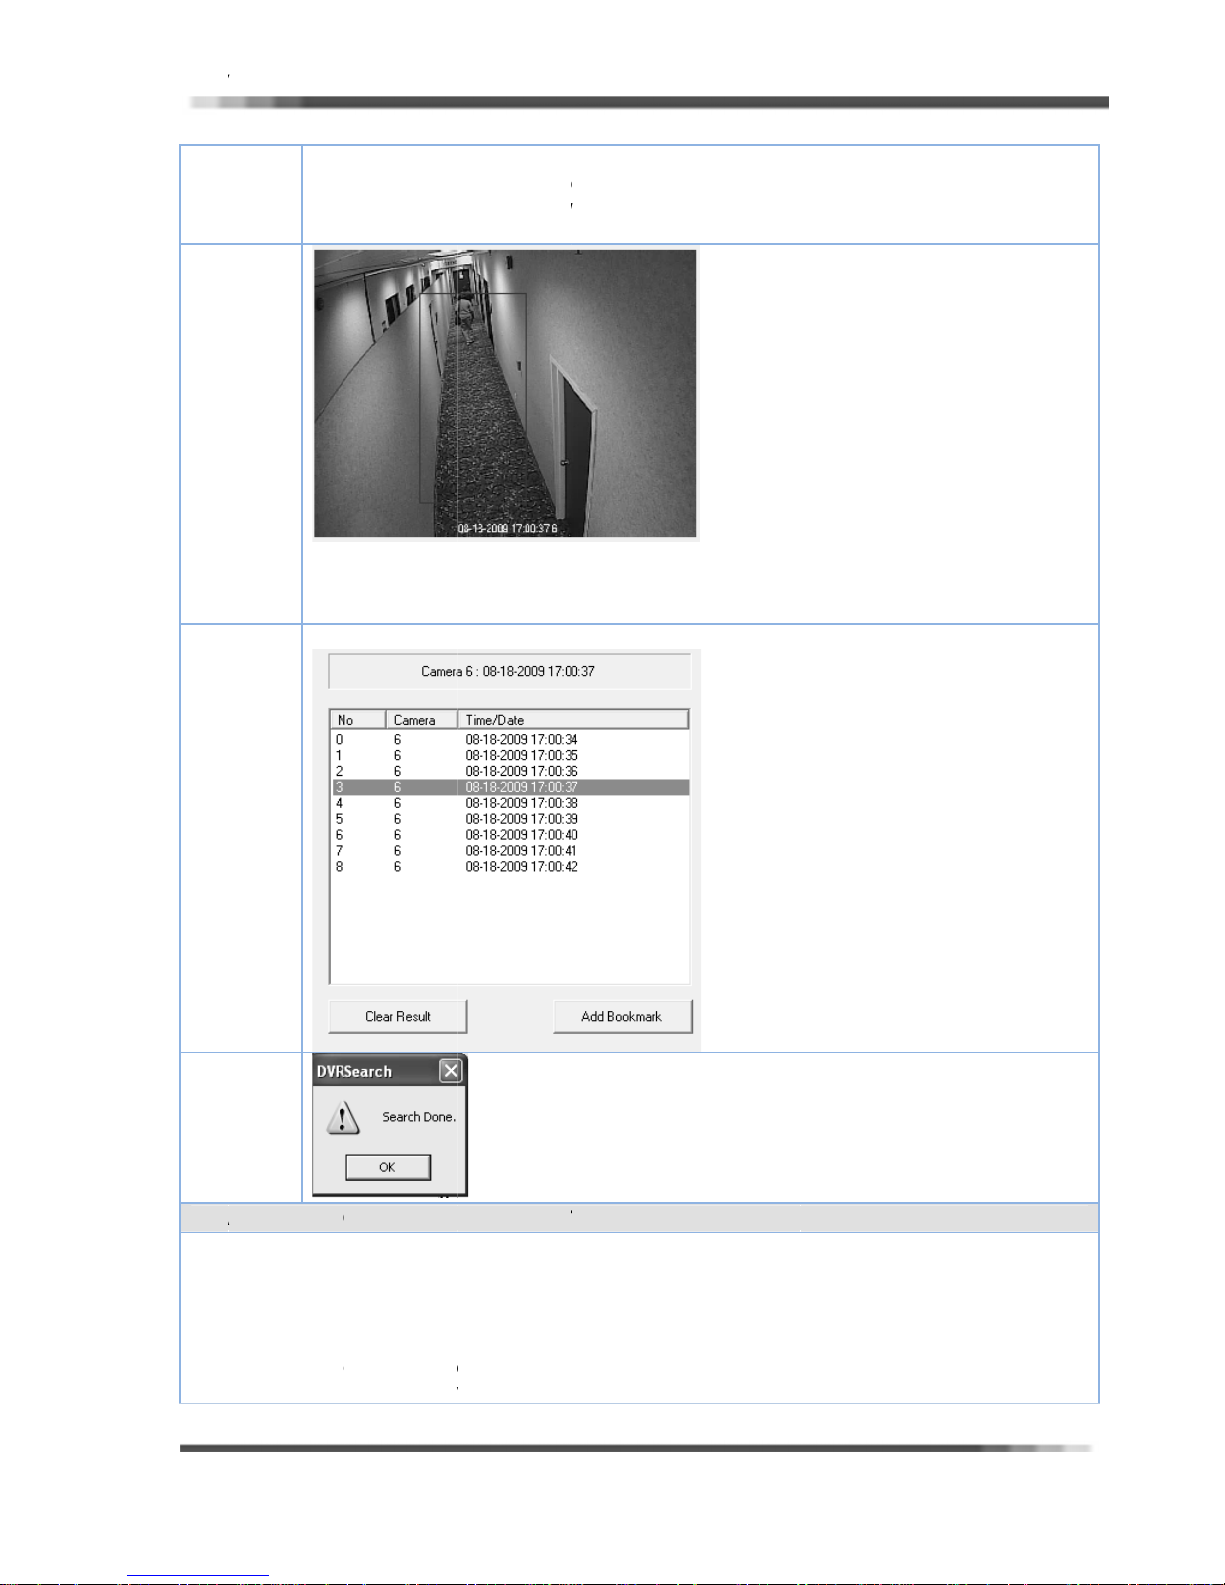
HD D
V
tStStPLA
b
e
l
l
l
t
W
a
a
m
w
x
u
O
e
D
o
b
n
n
e
e
e
N
m
B
e
v
u
e
w
g
,
t
s
s
T
d
k
h
a
e
n
e
s
m
ge
n
m
a
h
c
b
gre
t
u
h
a
a
d
v
a
w
o
d
b
S
R User’s Manu
By
are
fro
you
ep2
No
Ne
sen
Yo
l
holding dow
that would
where you
will be seei
that the ar
t Click on th
sitivity.
will now se
the left mo
like to choos
did the dra
.
a is selected
SEARCH bu
a detailed li
se button o
from. Onc
ing over the
The picture
ton to start
t of every ti
the camer
the area is
picture. The
above will s
earch after
e an object
view, you d
chosen, a
following pic
ow what yo
hosen Searc
passed throu
raw a box o
en box will
ure will sho
have just d
area and a
h the RED
Ver 2.1.0
er the
ppear
what
ne
.
usted
ox.
ep 3
ep3
YBACK FR
Play
ack Search
1. S
lect the one
2. C
ick on the A
3. C
ick on the ch
4. C
ick Play butt
5. S
art the play
hen clicking
M MOTIO
d image fro
of list in the
D button to
osen list on t
n on the Sm
ack video aft
the motion e
Search fini
EVENT LIS
bookmark,
Motion chec
ookmark, c
he Motion se
rt search di
r appearing
ent list, vid
hed messa
o the followi
ing list field.
osen list will
ection field.
log.
search scree
o playback
appear afte
ng:
be added on
n.
essage will
r finished se
the book m
e shown an
rch.
rk list field.
can play.
29
Page 31
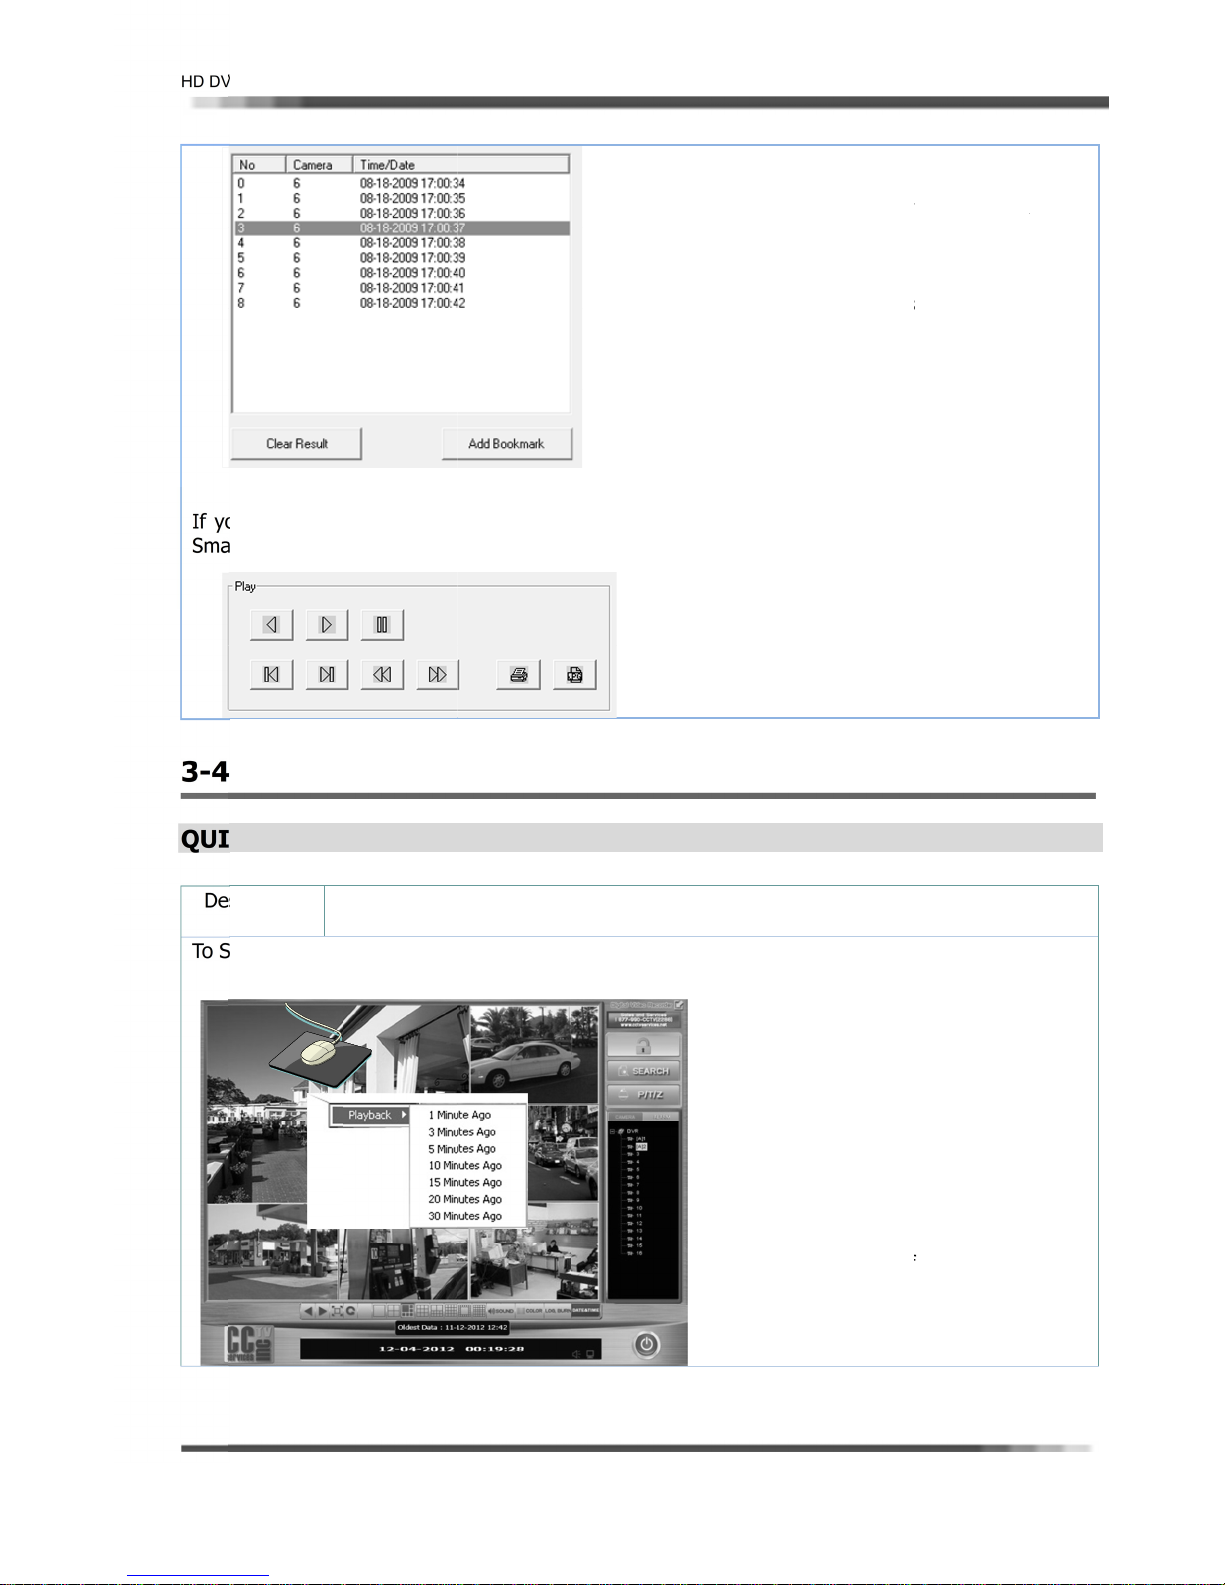
HD D
V
o
Q
s
T
a
N
C
Q
S
a
J
A
h
u
g
k
e
r
C
C
e
C
e
u
b
u
o
n
A
h
y
s
o
n
a
r
k
s
a
d
t
t
f
o
S
W
o
w
g
Th
f
k
c
a
n
i
b
r
m
b
R User’s Manu
If y
Sma
rt search dial
u need to P
l
rint or save
og.
PG file, Clic
1.
2.
Motion S
3.
Motion S
4. J
the Play
on Print bu
hoose the o
lick on the
lection field.
hoose the l
lection field.
st click on t
utton to pla
tton or JPG
e of date in
dd button
isted one o
he chosen lis
back.
ave button
he list field.
o bookmar
bookmark
t, and then
n the Play
Ver 2.1.0
on to
in the
lick on
rea in
3-4
UI
De
o S
ADVA
K SEAR
cription
earch and Pl
CED SE
H
uick Searc
earch when
yback video
a. Click Ri
RCH
made for
sers need u
using the Qu
ht mouse bu
asy and q
ent search.
ick Search, d
tton on the c
ick search
the followi
hosen camer
b.
playback d
c.
to playbac
on the cho
d.
zone will pl
screen inst
Click spee
up.
n the Main
:
channel.
op down me
on drop do
en time ran
ayback on th
ntly.
up button i
creen w/o e
ill be appear
nu. (Shown
se the time
o
n menu and
e.
e chosen ti
e Quick Play
you need to
tering
ng
elow)
ange
click
e
ack
speed
30
Page 32
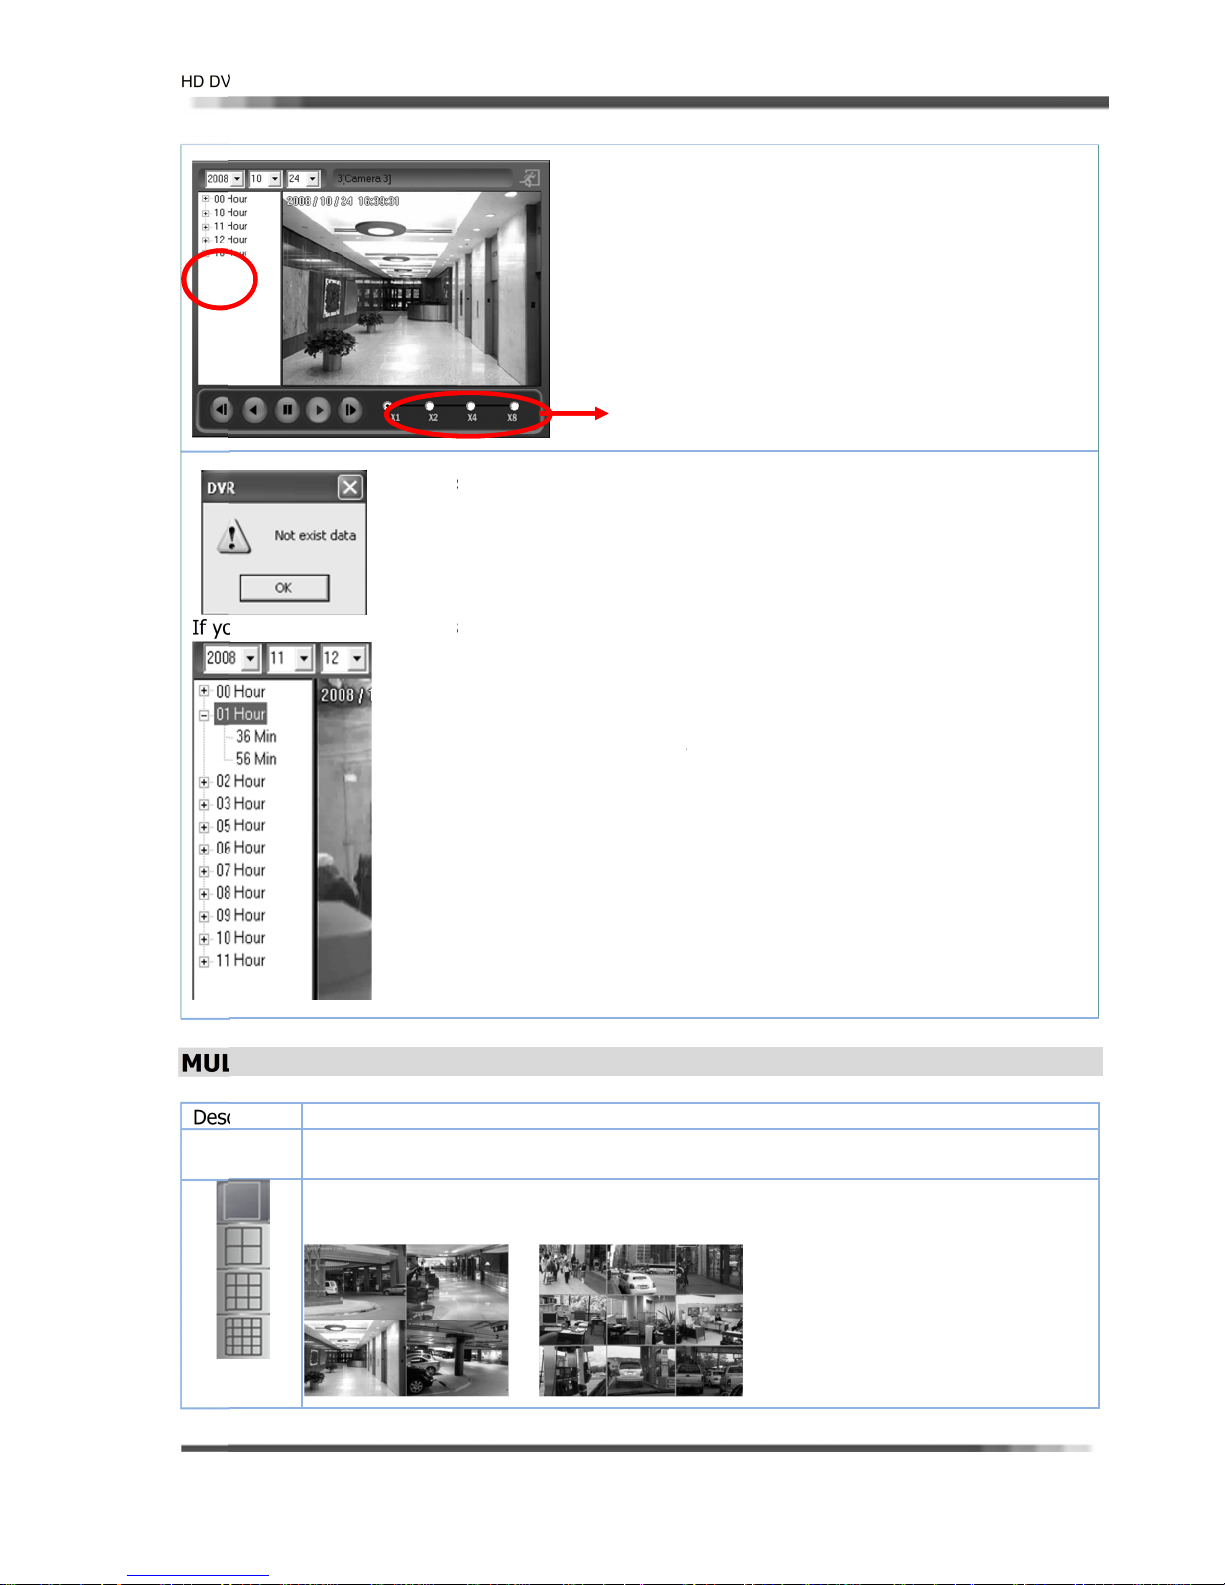
HD D
V
o
L
c
a
b
L
e
L
s
s
b
t
s
r
A
h
4
Y
w
s
d
e
g
o
c
h
r
p
n
,
e
t
Q
n
t
l
t
d
d
o
o
h
a
m
e
e
m
e
b
e
R User’s Manu
l
Adjust Pl
ayback Spee
Ver 2.1.0
If y
MU
Des
u need play
TPLE SP
ription Us
MU
the
Not exi
left)
ack in other
a. Dou
b. Minu
c. Choo
d. The
e. Click
IT PLAYB
rs can searc
TI button (
same time.
t data mes
time zone,
le clicking on
e drop down
e the minut
ecorded ima
on EXIT butt
CK
and playba
/9/16) gives
Click the eac
age will ap
o the followi
chosen year
menu will b
time range
e data will p
n to close
multi-chan
you the abili
button to p
ear if recor
:
date and h
appearing.
o playback
layback on t
uick search
el data
y to view 4,
layback 4 ca
ed data do
ur. (Shown b
n drop down
e screen
fter the stop
9, or 16 ca
eras, 9 cam
s not exist.(
low)
menu
playback.
eras in play
ras, 16 cam
Shown
ack at
ras.
on the PLA
Clic
tiple modes
Mul
button afte
ill be playba
chosen Spli
ck.
s button. (4/
9/16).
31
Page 33
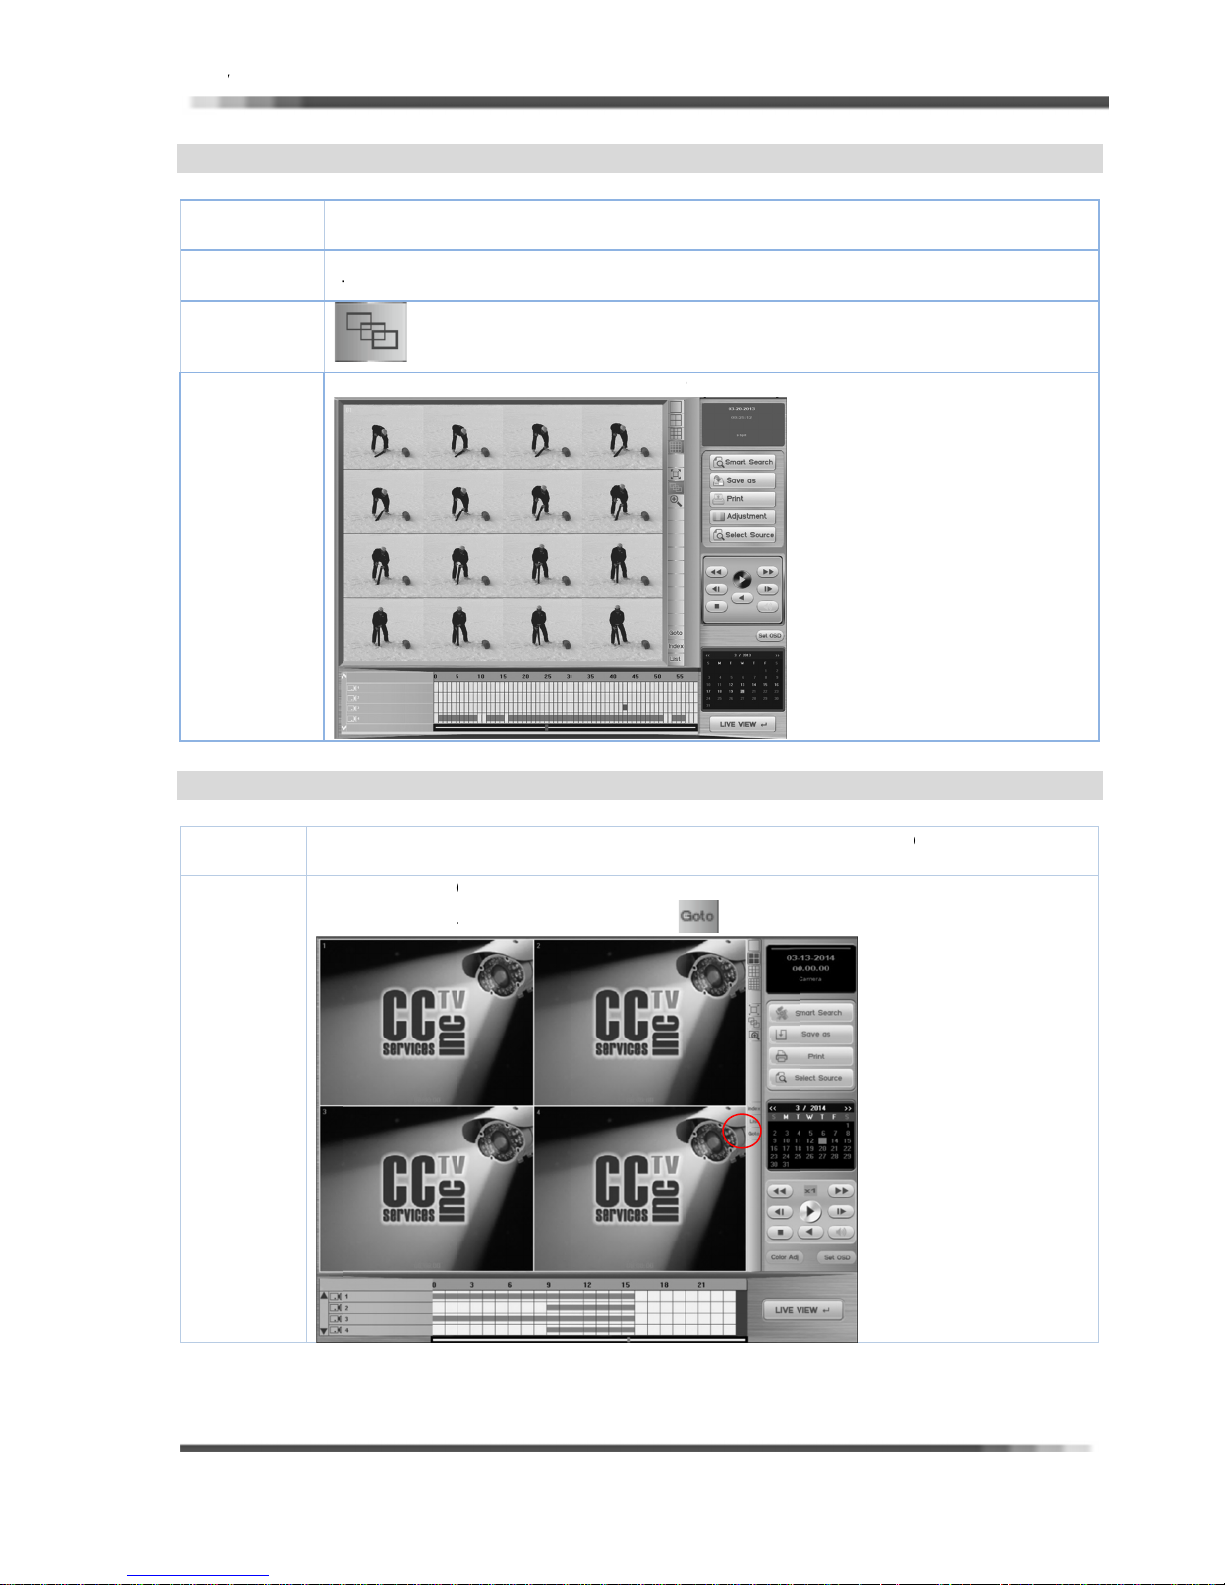
HD D
V
N
sSS
o
r
T
c
a
P
P
1
T(T
C
S
The
e
T
K
f
a
m
L
o
a
O
r
a
r
~
o
o
a
l
o
m
m
e
n
e
o
a
t
u
e
H
o
c
4
u
r
PA
De
R User’s Manu
ORAMA
cription
tep1
l
LAYBAC
ANORAMA a
6 individual
o use this fe
o do the sa
playback fe
rames, one f
ture, Step 1
e thing to H
ture that sh
ame at a ti
5 is the sa
our/Min Zon
ws the moti
e.
e as one ch
Search)
n of a singl
nnel SEARC
camera in
.
Ver 2.1.0
’ 9, or
Pan
Sea
GO
Des
tep2
rama
ch
O(TIME
ription
lick on the P
EARCH)
GOTO butt
sel
cted camer
o
access the G
Click
on the PANO
AY button t
n will go t
, recorded d
TO, you wi
RAMA butto
Panorama P
the playing
te and time.
l need to op
.
lay back. (Sh
position of
n the search
own below)
he video fr
feature. On
m where yo
e in the sea
have
ch
S
tep1
ture the use
fea
will need to
click on the
GOTO b
tton.
32
Page 34
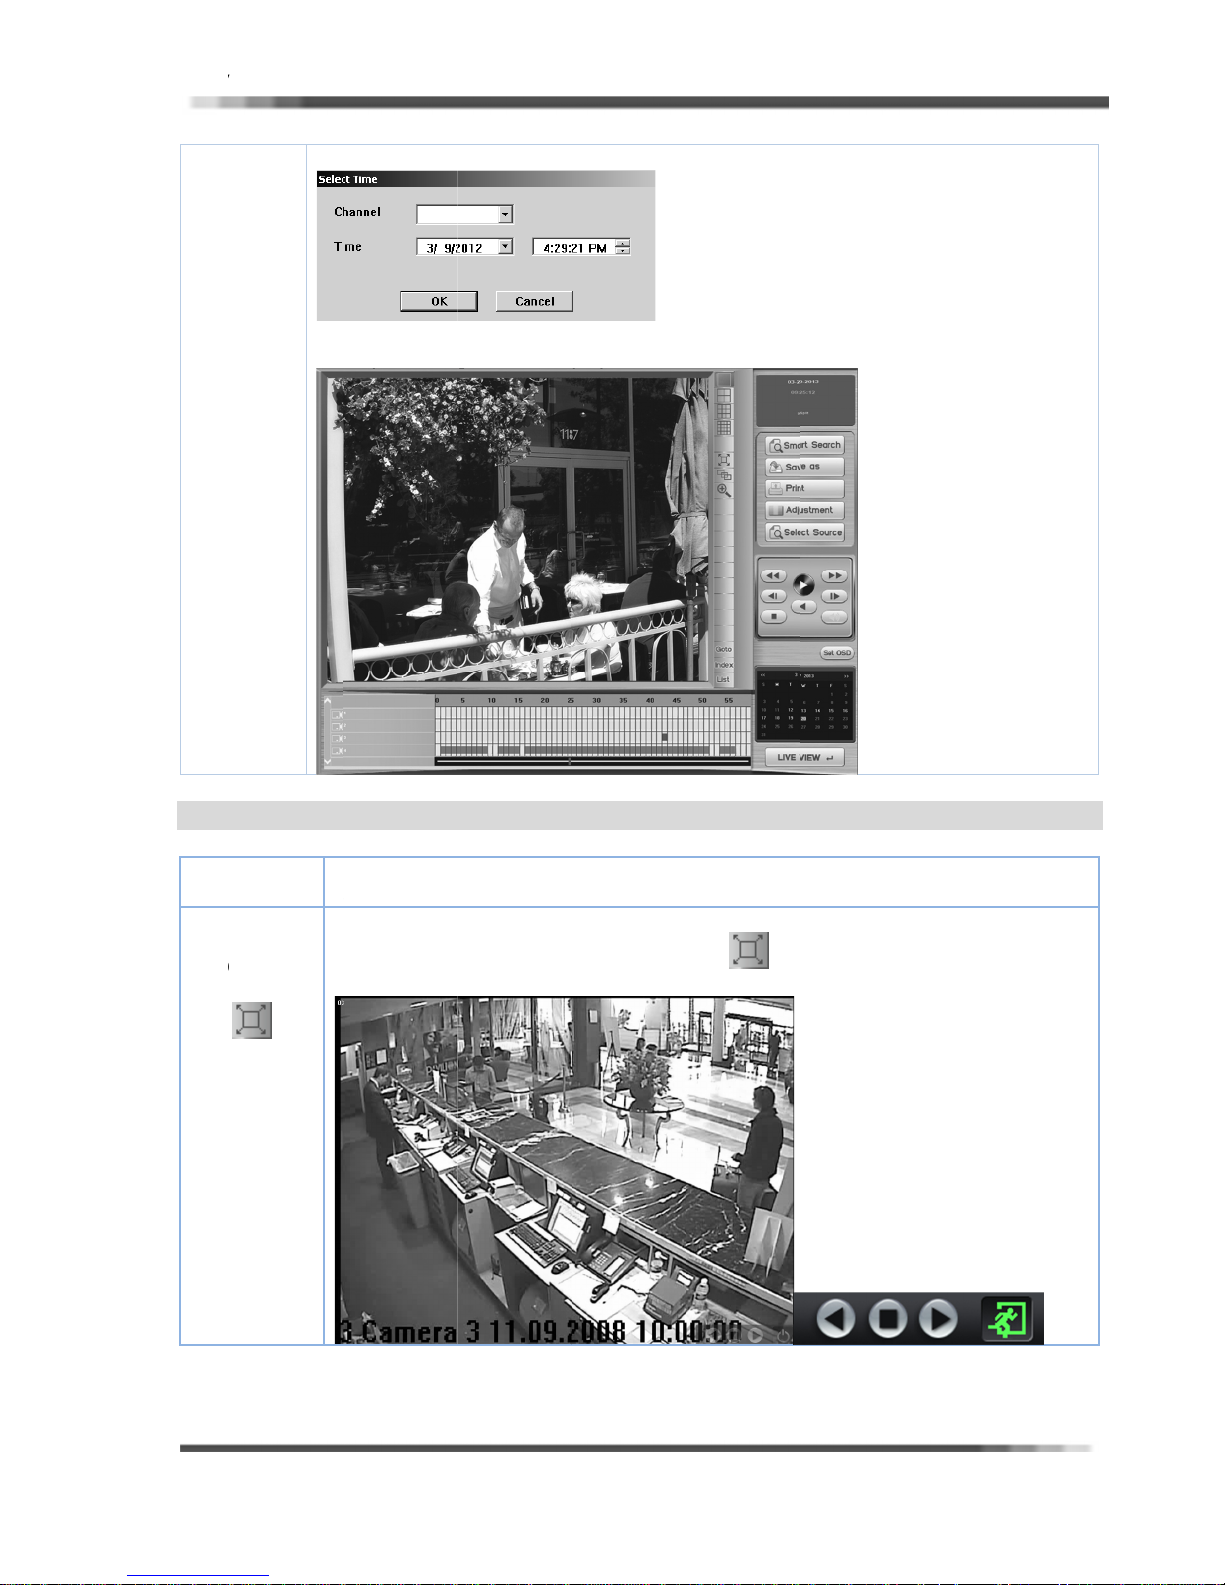
HD D
V
L
sSC
b
a
e
F
s
F
d
o
C
g
s
n
s
a
m
d
d
r
p
d
c
C
e
y
L
go
e
n
t
o
h
a
e
R User’s Manu
l
Ver 2.1.0
S
tep2
l be appears
Wil
Fill
in the Chan
ctly and ima
dir
Select time d
nel(camera
e will be di
ialog(Shown
o), Date an
play on to sc
below)
time and
reen.
lick “OK”
to image l
cation
FUL
De
SCREEN
cription
FULL
REEN
utton
PLAYBA
ULL SCREEN
plits mode.
ULL: The full
one watchin
t
the regular
playback fe
button will
in full screen
earch metho
ture that dis
ake the recor
you must cli
.
lay full scre
ed video pla
k the FU
n image wh
in full scree
L screen but
n playback t
. Once you
on again to r
e one
re
turn
33
Page 35
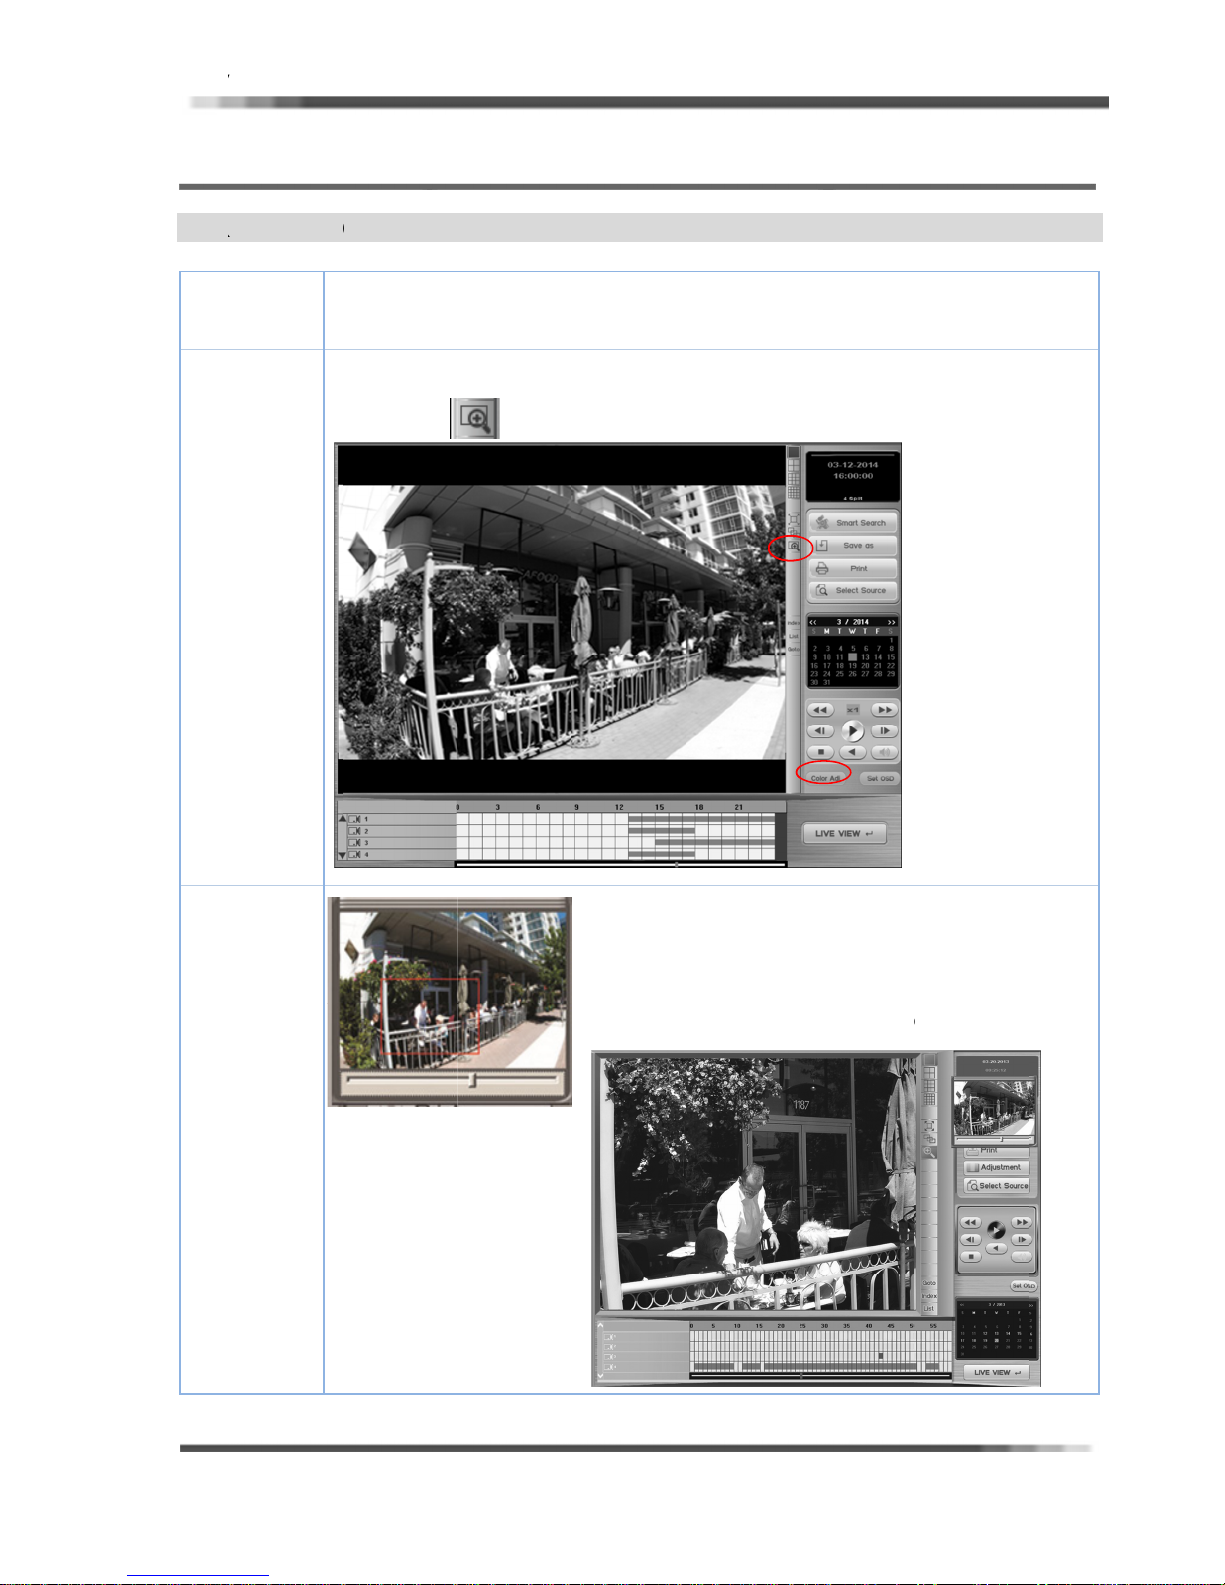
HD D
V
R
s
S
S
a
O
O
TNm
S
S C
A
n
t
b
h
U
e
s
c
Z
N
c
h
o
p
a
q
i
e
o
n
a
w
g
m
u
(
a
o
ge
e
3-5
PA
De
R User’s Manu
ADITI
TIAL ZO
cription
tep 1
l
NAL SE
MING
o search wa
.B This func
ovement in
tep 1~3 is t
earch)
lick on the
RCH F
ted images
ion is very u
ig place.
e same as 1
Partial
NCTIO
asily by sear
eful in searc
h Search.(T
OOM button.
S
hing in <Enl
ing and find
do the sam
arged> ima
ing wanted i
thing to Ho
es.
ages or
r/Min Zone
Ver 2.1.0
tep 2
Will be ap
Select Enl
Square like
Selected s
earing the z
rged area i
left Picture
uare image
om window.
the image
t zoom wind
ill be enlar
see left)
nd Draw th
w..
d.
34
Page 36
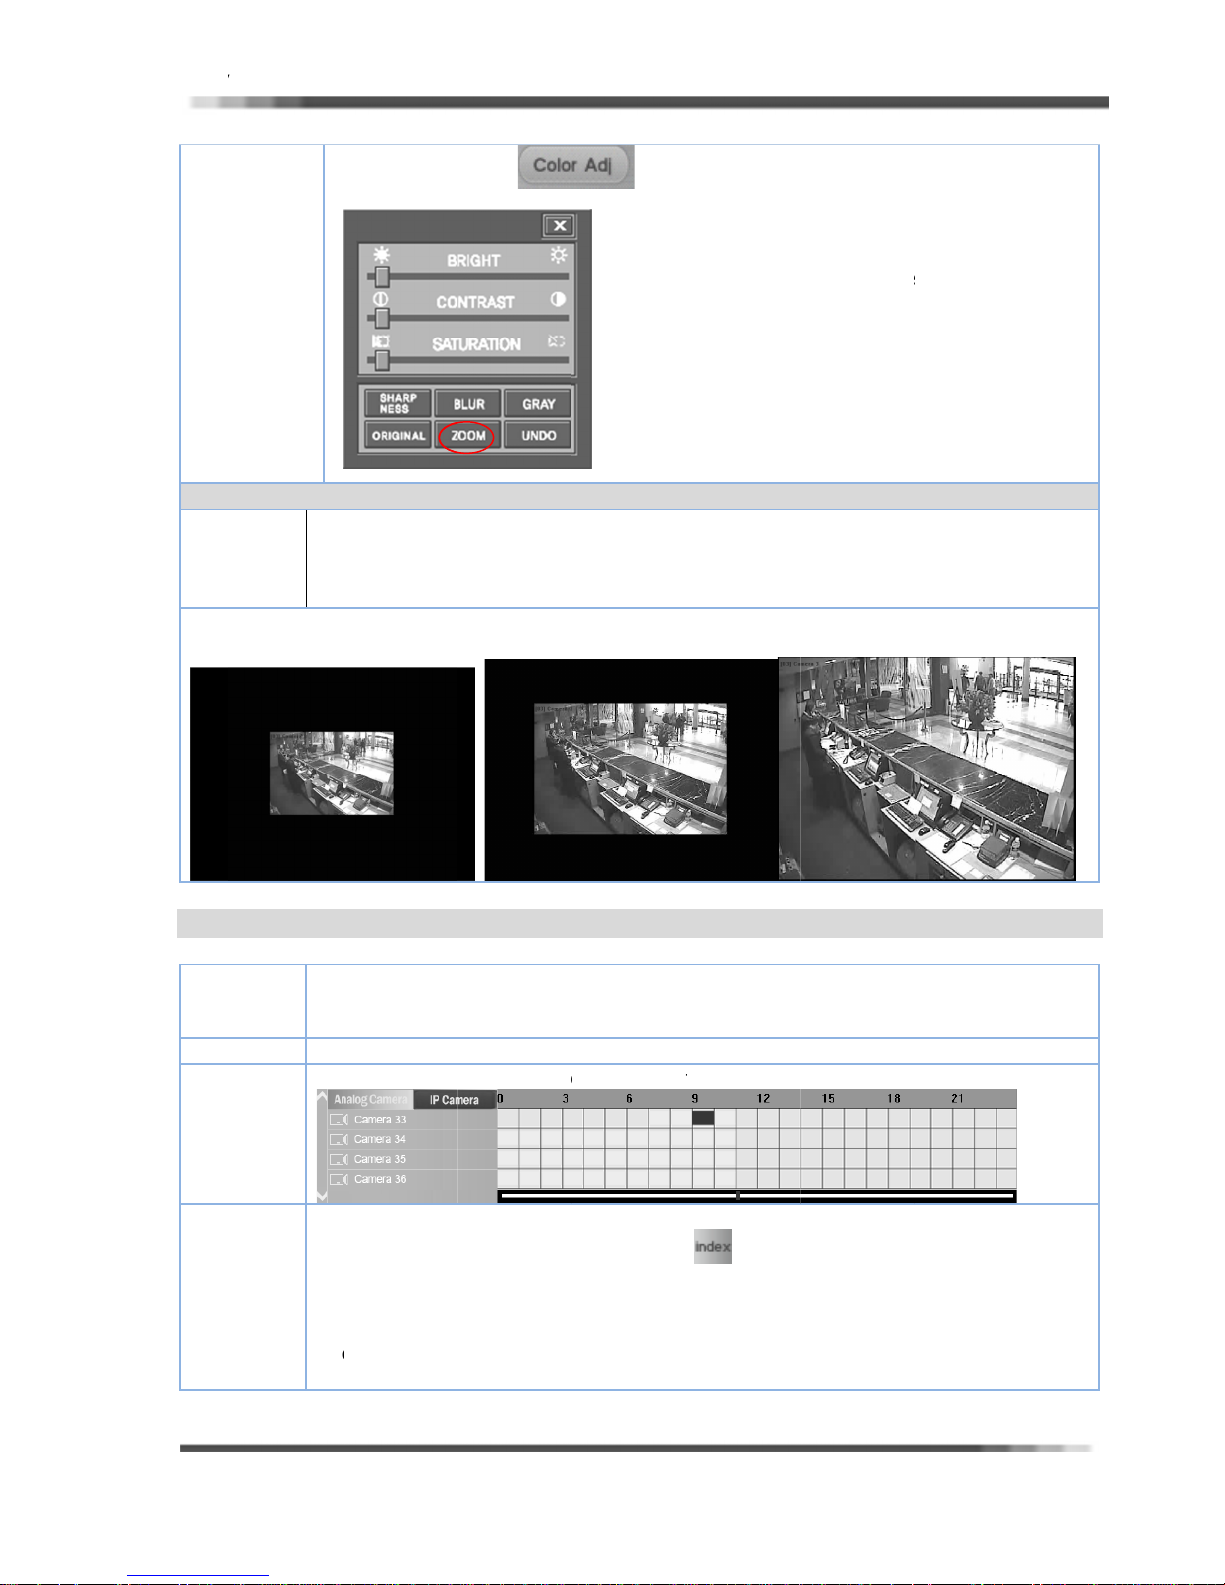
HD D
V
O
c
m
b
O
c
a
A
a
rwo
e
The
T
e
c
T
a
c
d
y
ge
a
u
w
n
u
m
g
o
F
g
o
i
n
o
A
Ad
o
x
l
e
t
e
m
m
e
e
e
a
B
o
a
e
4
t
u
t
h
o
p
o
i
e
o
p
a
/
d
n
o
a
a
t
b
R User’s Manu
l
Ver 2.1.0
ZO
M IN/OUT
Des
ription
Zoo
up only for
Dou
le click the l
nother zoom
ing by
COLO
R Adjust pan
l,
COLOR
on the
window.
djust panel
ustment
(Shown bel
ppears on th
utton on th
w)
e screen afte
Search mai
r click
On
single displa
e. An ima
im
If
ecorded dat
, left button
may be ma
are high res
double-click
nified no m
lution (704
on mouse m
re than thre
480 or 720x
y be used t
times. (x1,
80), zoom u
magnify the
x1.5, x2)
function n
t
rking.
quarter size
ft button mo
(352x240(CI
se to 1.5X, a
) resolution)
ain Double c
recorded da
ick to 2X, Do
a.
ble click to 1
X.
BO
Des
S
S
S
KMARK
ription
tep1 St
tep2
tep3
ma
Lo
Search allo
rked time wi
hi
s feature is
p 1~5 is the
ate the timel
o
create book
.
b.
.
.
s you to bo
dow to mult
sed in conju
same as 1ch
ine at the bo
ark, do the
kmark a vid
ple.
ction with th
Search.(To d
k mark poin
following:
Click on th
Add book
Fill in infor
button.
Book mark
mark list fi
o region for
e export fea
o the same t
t you want t
Index
ark dialog a
ation and c
d date and t
ld.
one camera
ure.
hing to Hour
bookmark.
button.
pearing.
mment, and
me will be a
nd apply th
Min Zone Se
the click on
ded on the
t book
rch)
he OK
ook
35
Page 37
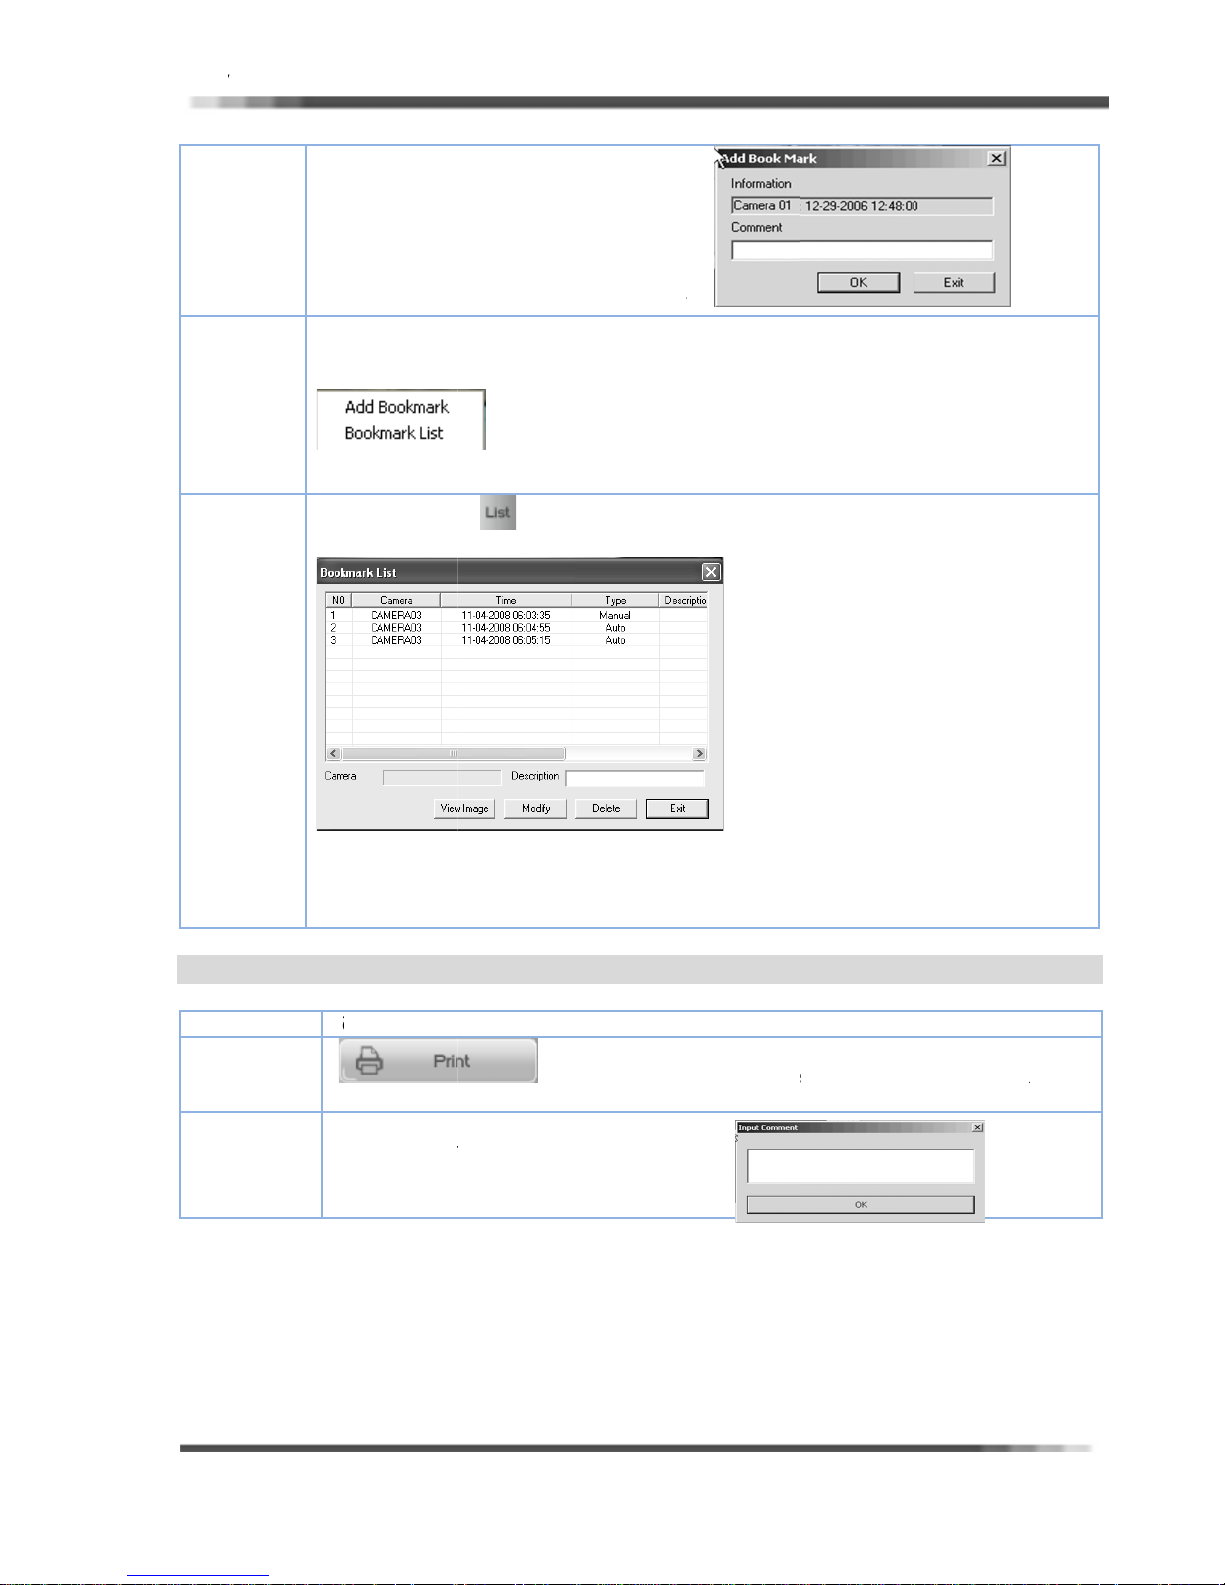
HD D
V
o
N
s
S
S
a
c
NJus
t
h(Sh
A
t
n
p
To
b
P
D
t
O
T
n
s
h
a
m
r
e
w
w
f
t
o
s
e
d
b
S
ge
m
r
g
b
o
m
m
t
g
k
B
b
b
k
s
K
g.
c
r
o
i
u
r
m
R
On
R User’s Manu
Cli
O
be
screen
l
k on the Exi
SCREEN B
t click RIGH
appearing o
button to cl
OK MARK
button mou
to screen.
se book mar
e on the ch
k.
sen image.
ookmark dro
p down men
Ver 2.1.0
will
Bo
PRI
De
kmark
list
T
cription
En
er simple de
W
en click on t
own below)
u
to is book m
ton.
bu
If
eed show i
dis
lay the reco
print the s
(Shown l
cription to I
e List
rked at the
age on book
ded image o
arched ima
ft)
entify Book
utton, book
mart Search
marked posi
n to search s
. The image
ark, and cl
ark list will
. Manual is
ion, Just clic
creen accord
Size depend
ick on the O
e appearin
ook marked
ing on the
ing bookma
on Resoluti
button.
by book ma
hosen book
ked position.
n
k
ark,
tep1
utton. (Sho
RINT dialog
tep2
escriptions o
o
n the OK but
Co
n below)
ill be appea
printed ima
on.(Shown
ment dialo
after fill in
e, then Clic
elow)
will be appe
aring after cl
ick on the P
INT
36
Page 38
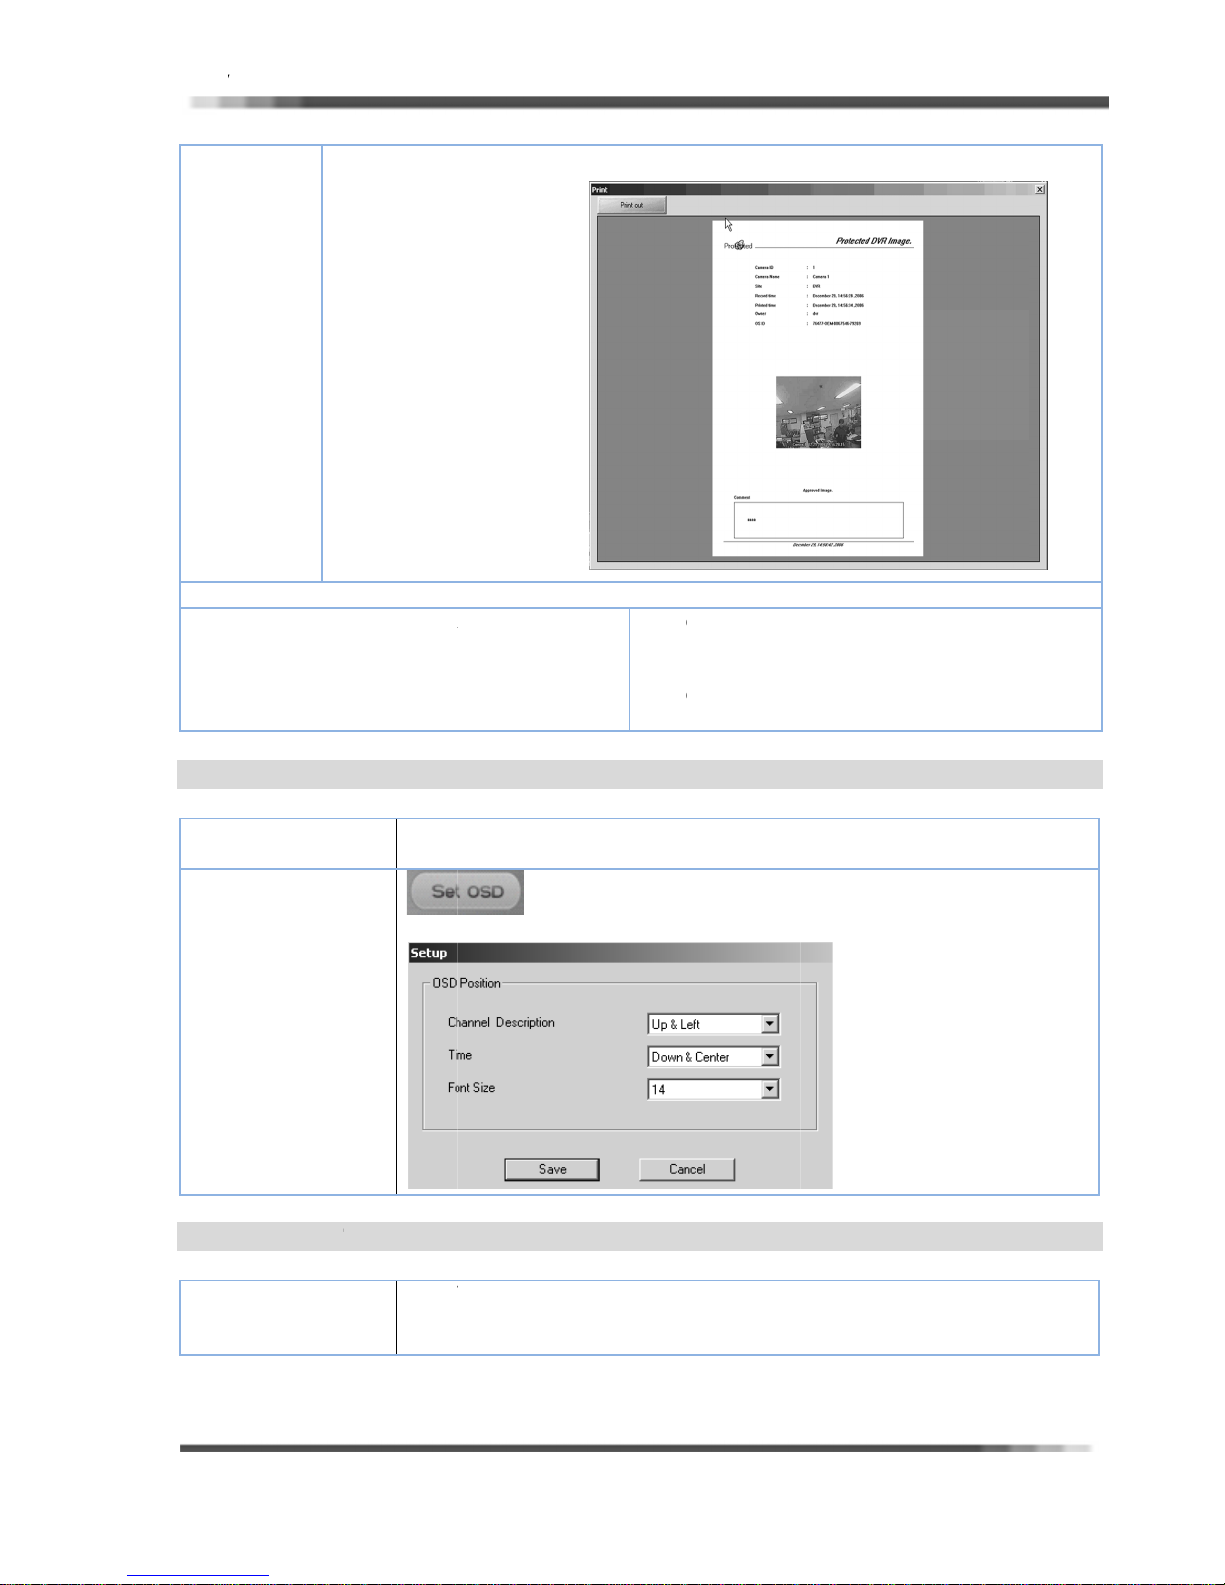
HD D
V
S
r
i
a
i
e
r
U
U
a
C
g
a
o
o
T
A
T
R
R
a
f
d
g
T
T
f
dadjust
T
f
d
.
o
s
p
r
d
S
d
o
e
o
d
g
o
e
m
n
a
g
e
r
a
i
r
t
r
o
e
E
e
R User’s Manu
l
Ver 2.1.0
Info
1. S
2. N
3. S
4. R
5. P
SET
tep3
mation of Pr
nature: Gu
me and ID
te installed,
corded time
inted time:
P OSD T
Description
lick on the P
d
escription
inted Image
ranteed DV
f the camer
wner, site in
: Time recor
ime the ima
XT POSI
recor
INT button
Image.
.
ormation.
ed by the sy
e is printed..
ION
his
eature will
ed image It
ing OSD dis
Click
n the print
6. Co
7. O
8. Vi
tem.
allow you t
s only for th
on the ‘Set
lay position
9. Co
ialog after c
mputer User
and Serial N
eo Image.
mments.
adjust th
one still fra
OSD’ butto
n the playb
nfirming the
Name.
O.
OSD displ
e you are v
on the Sea
ck image.
image and
y position
ewing.
ch Main scr
n the
en for
ADJ
STMEN
COLOR
Description
his
indivi
video
ature will al
ual still fram
It is only fo
low you to a
e. The chan
the one still
ust the bri
es you mak
frame you a
htness, con
will not car
e viewing.
rast and HU
y over to th
of an
entire
37
Page 39
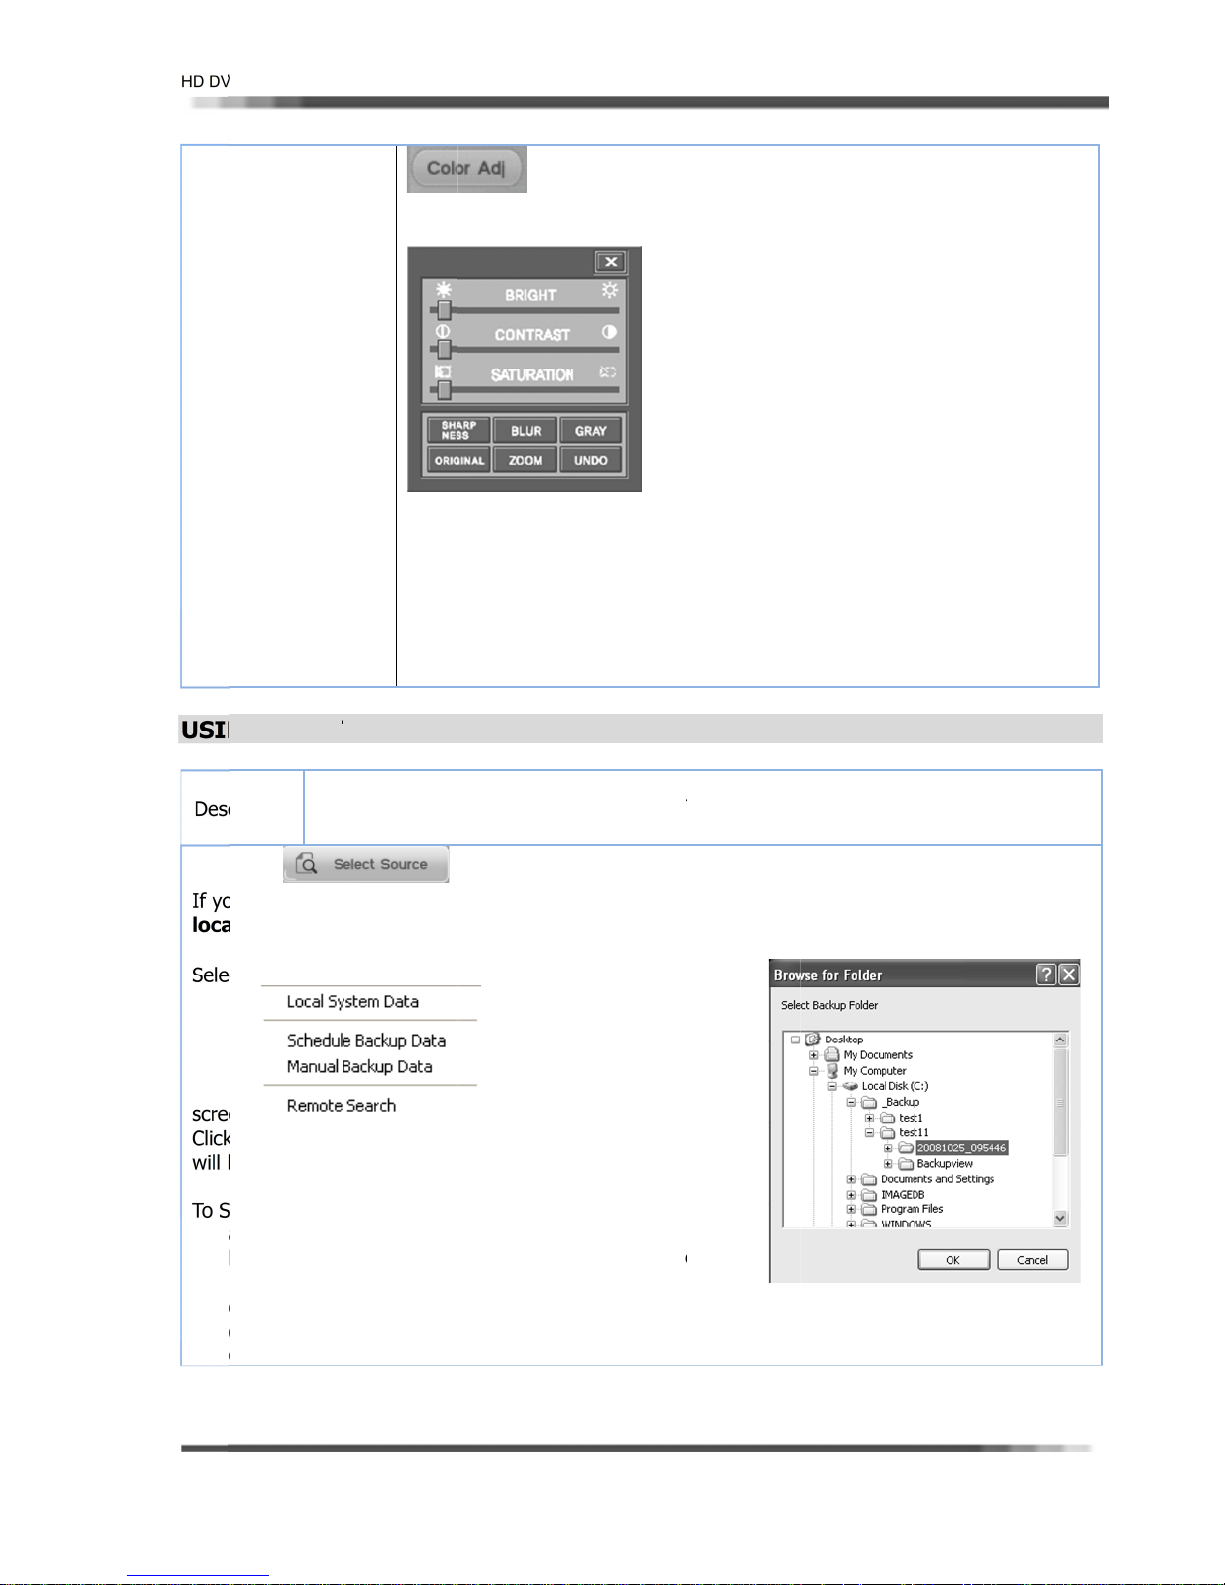
HD D
V
a
T
d
p
D
r
e
a
e
h
o
h
t
r
t
gh
r
p
:
Y
n
O
E
o
D
c
t
m
m
o
u
o
f
n
a
king
gh
s
p
c
E
a
r
g
S
g
o
a
p
i
o
e
o
g
To
n
d
o
w
e
m
e
n
o
m
n
e
g
h
a
a
d
_
k
e
g
R User’s Manu
l
adjus
Bri
Cont
HUE
Shar
Blur
GRA
Origi
UND
Clic
playback
tness : Bri
ast : Contra
: Color Value
ness : Shar
Blur
: White/Bla
al : Go to o
: Cancel :
on the ‘Col
image.
tness comp
t correction
Compensati
ness/Undo
k Change: U
inal data
ri
xit
r Adj’ butt
nsation
n
ndo, Exit
n on the Se
rch Main scr
Ver 2.1.0
en for
G SELEC
ription
u need to u
tion of file
t source d
n.
local Syst
e updating
earch record
. Choose t
. Browse f
. Choose t
. Click on
. Existing
Up
screen.
SOURC
ating all rec
date all re
B, click on
op down
m data tab
ll recorded i
d data by S
e one of so
r Folder dial
e location o
he OK butto
ecorded dat
BUTTON
rded image
efault data f
orded ima
he SELECT
enu will be
for updatin
age and rel
urce button,
rce data loc
will be ap
data Disk w
to close Bro
information
nd reload,
om file DB i
e and reloa
OURCE but
appearing
all recorded
ad.
do the follo
tion type.
earing on th
th folder na
wse for Fold
appearing o
easy go to
Local Syste
or searchi
ton on the S
n the
e,
ima
ing:
e
e, default fo
r dialog on t
the Calenda
recorded dat
at a runnin
recorde
arch screen.
lder is ‘
Bac
e dialog.
r. (YELLOW
location
Search.
data from
up.
color)
other
38
Page 40
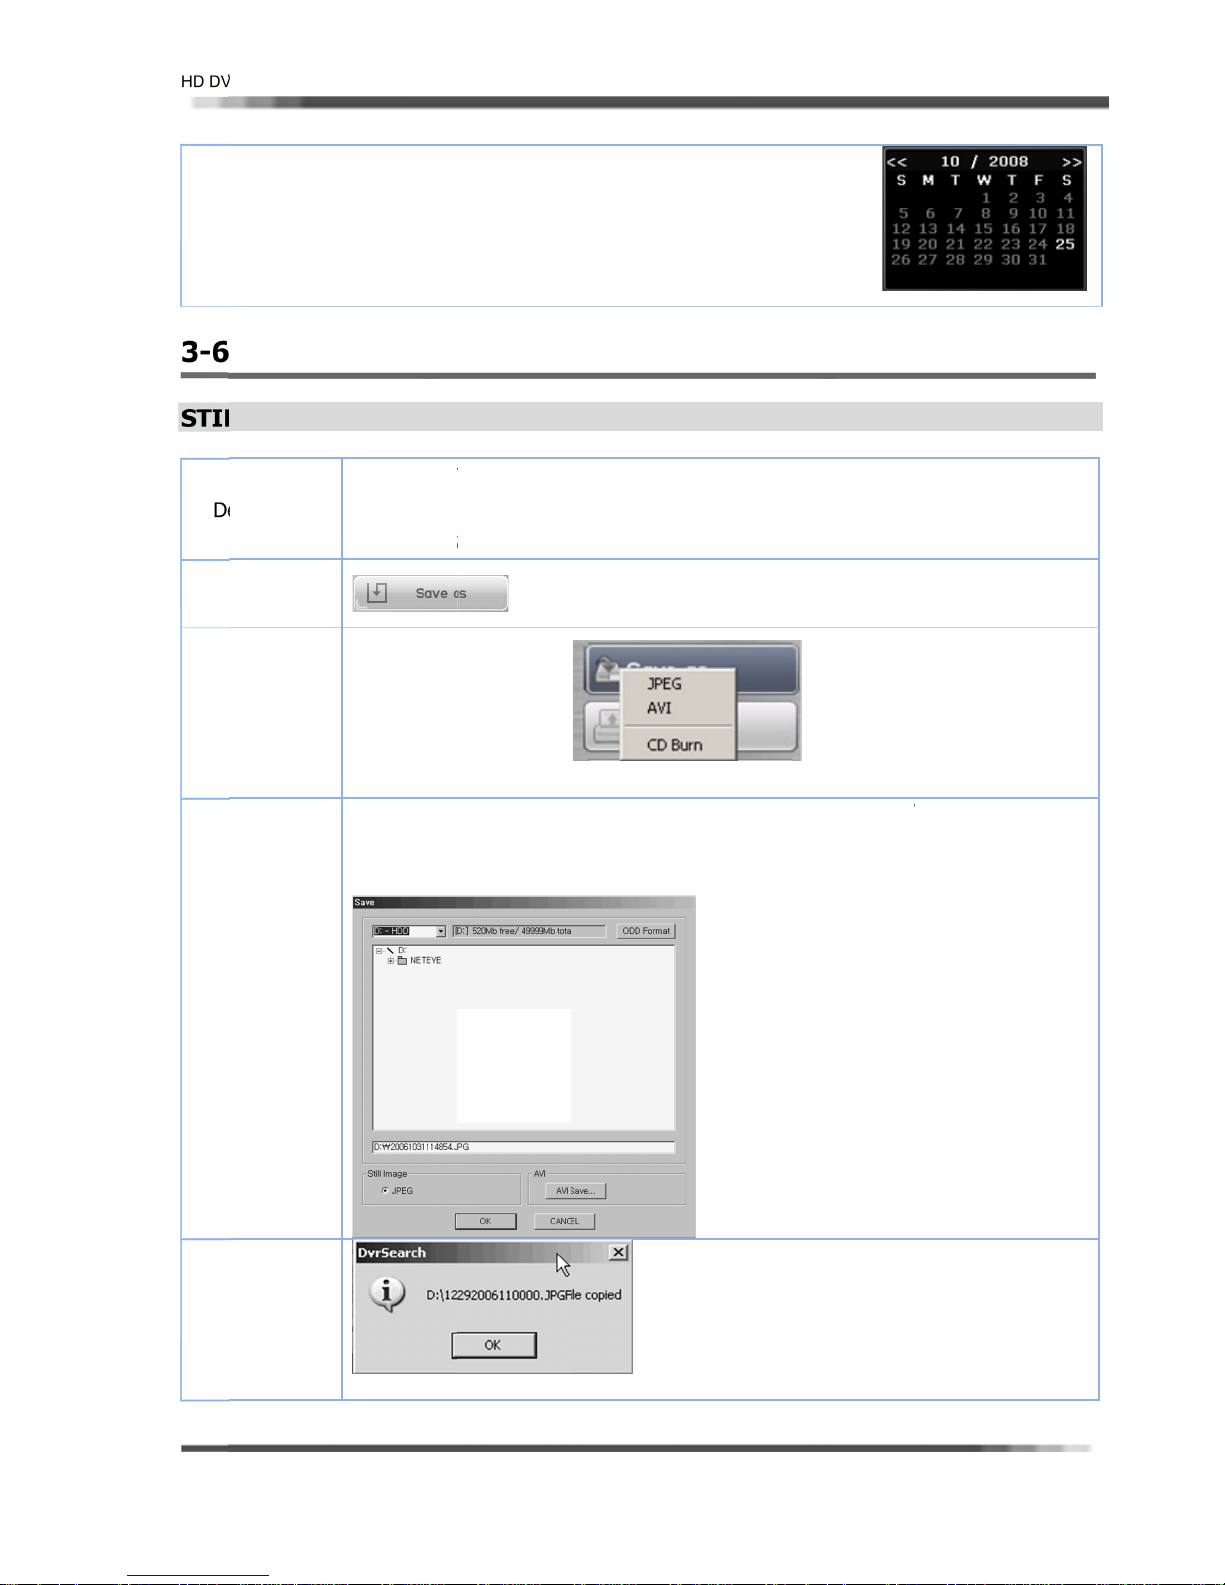
HD D
V
L
e
a
o
R
(
a
T
O
t
d
m
fo
t
E
w
s
e
p
C
O
i
l
E
u
m
n
k
ge
B
t
a
G
b
a
s
d
f
u
R
g
w
y
e
D
a
n
V
w
i
v
c
R User’s Manu
l
Ver 2.1.0
3-6
STI
D
f. Foll
PERFO
L IMAGE
scription
Step1
Step 2
wing step s
MING
JPEG) F
Save curren
DISK (inclu
DVR Syste
Saved JPG
Clicking on
SAVE as JP
the drop do
menu
Click on the
(File name i
A tick insid
Folder of Dr
me as SEAR
HE EXP
RMAT
image as a
ing external
can Save a
rmat type fi
SAV
men
n
he
G in
SAVE button
made auto
the round i
ive after clic
H and PLAY
RT
bmp or JPEG
USB Drive.
mages onto
es have a W
AS JPEG or
after clickin
after choose
atically, but
dicates JPE
on the OK
ACK progre
format to a
he HDD or F
termarking
SAVE AS AVI
on SAVE b
the DISK D
can be chan
, and then
utton.
s.
iskette or d
DD, USD HD
eature.
will be appe
tton. (Show
IVE and SA
ed as user
ill save the
stination Dri
, USB stick.
r on to drop
below).
E Folder.
ants.)
mage on to
e
down
hosen
Step3
Step4
JPEG file co
ied messa
will appear
fter the cop
is done.
39
Page 41
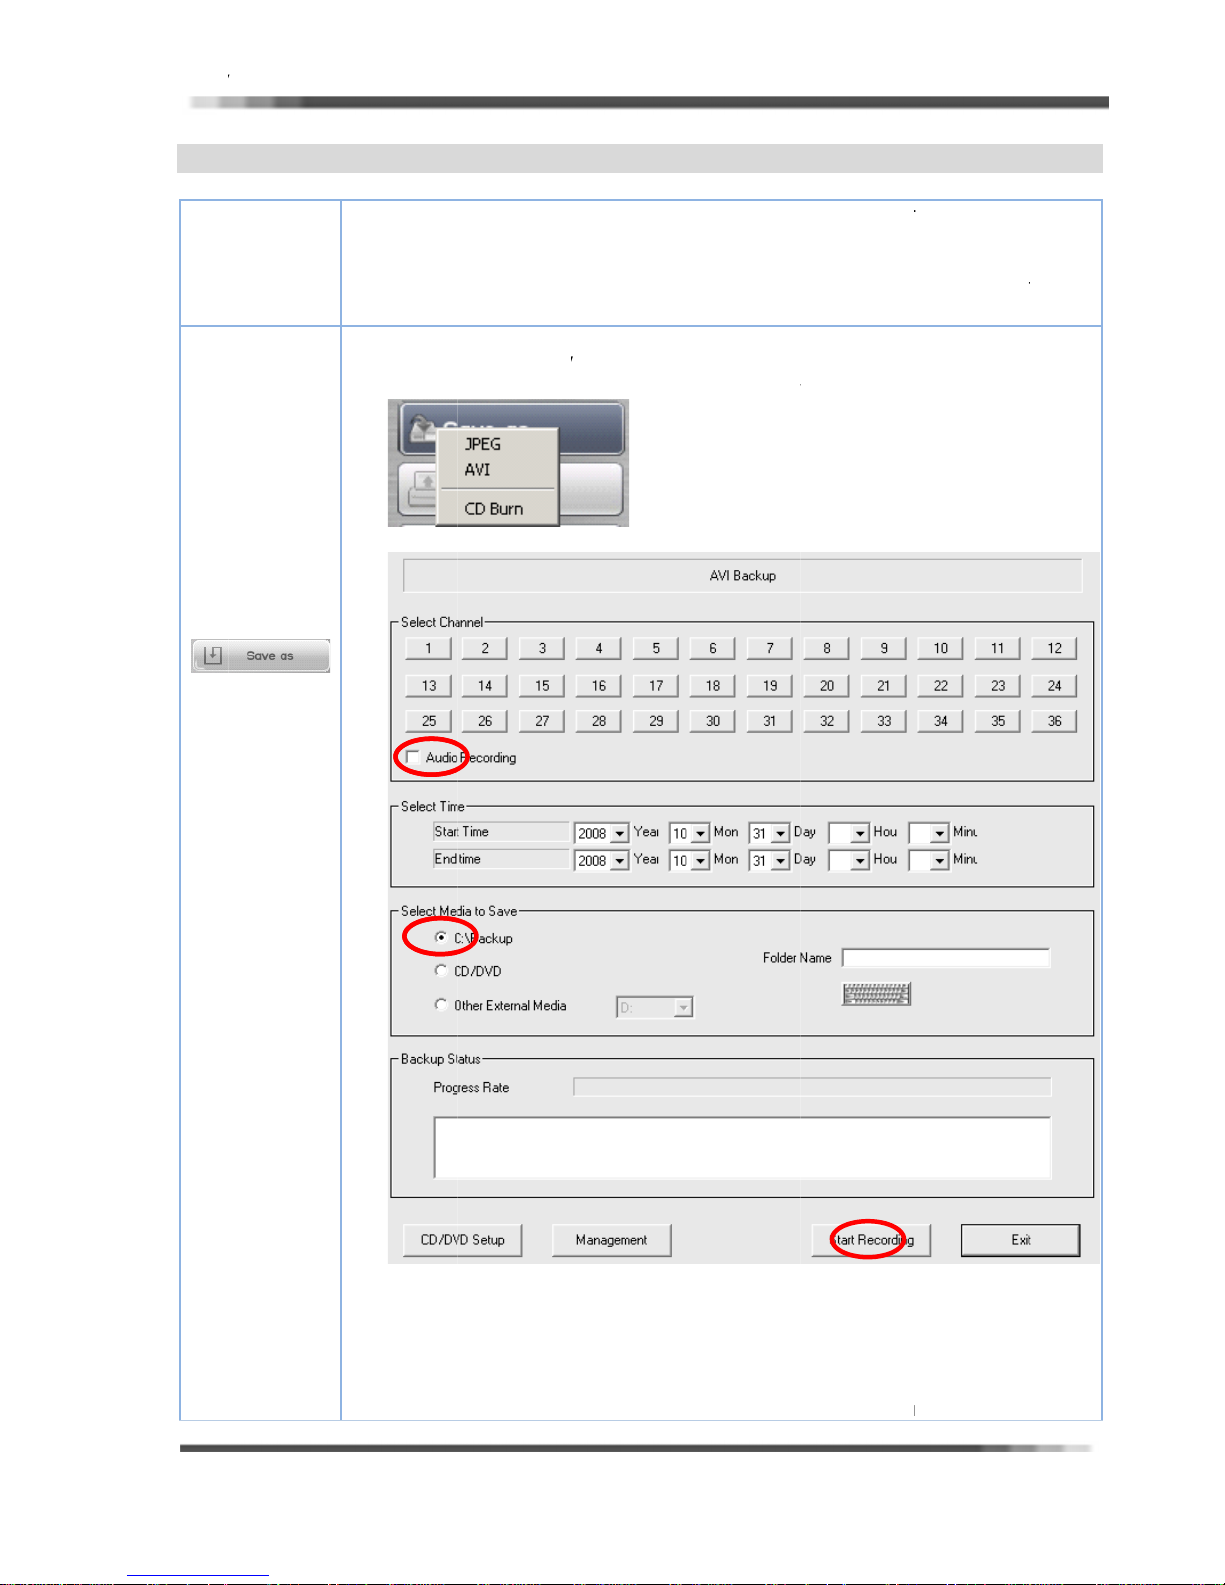
HD D
V
c
a
O
g
T
u
b
T
k
k
c
h
m
d
h
V
e
e
n
e
p
w
V
t
t
N
g
o
s
W
o
r
c
t
e
m
a
t
AVI
Des
R User’s Manu
VIDEO F
ription
l
RMAT
Save is a w
overwritten.
es of a
ima
o save a f
drop down
o the save
a. Clic
b. Cho
y that you
You can t
particular ca
ll motion vi
ox, choose t
as AVI, do t
on the SA
ose the Sav
an save vid
en save the
era to a flo
eo file follo
he Save as A
e following:
E button on
as AVI on
o the foota
footage on
py disk or c
the same
I.
he SEARCH
he drop dow
e to hard d
to a compa
mpact disk.
tep, but in
indow scre
n menu.(Sho
ive so it will
t disc, or s
he Save as
n.
wn below)
Ver 2.1.0
not be
ve still
ype in
c. AVI
d. Cho
e. Set
f. Clic
backup dialo
ose the Cam
Start Time a
on the AUD
will appear.
ra Channel.
d Set End Ti
IO RECORDI
(Shown bel
me.
G for Audio
w)
record with i
age.
40
Page 42
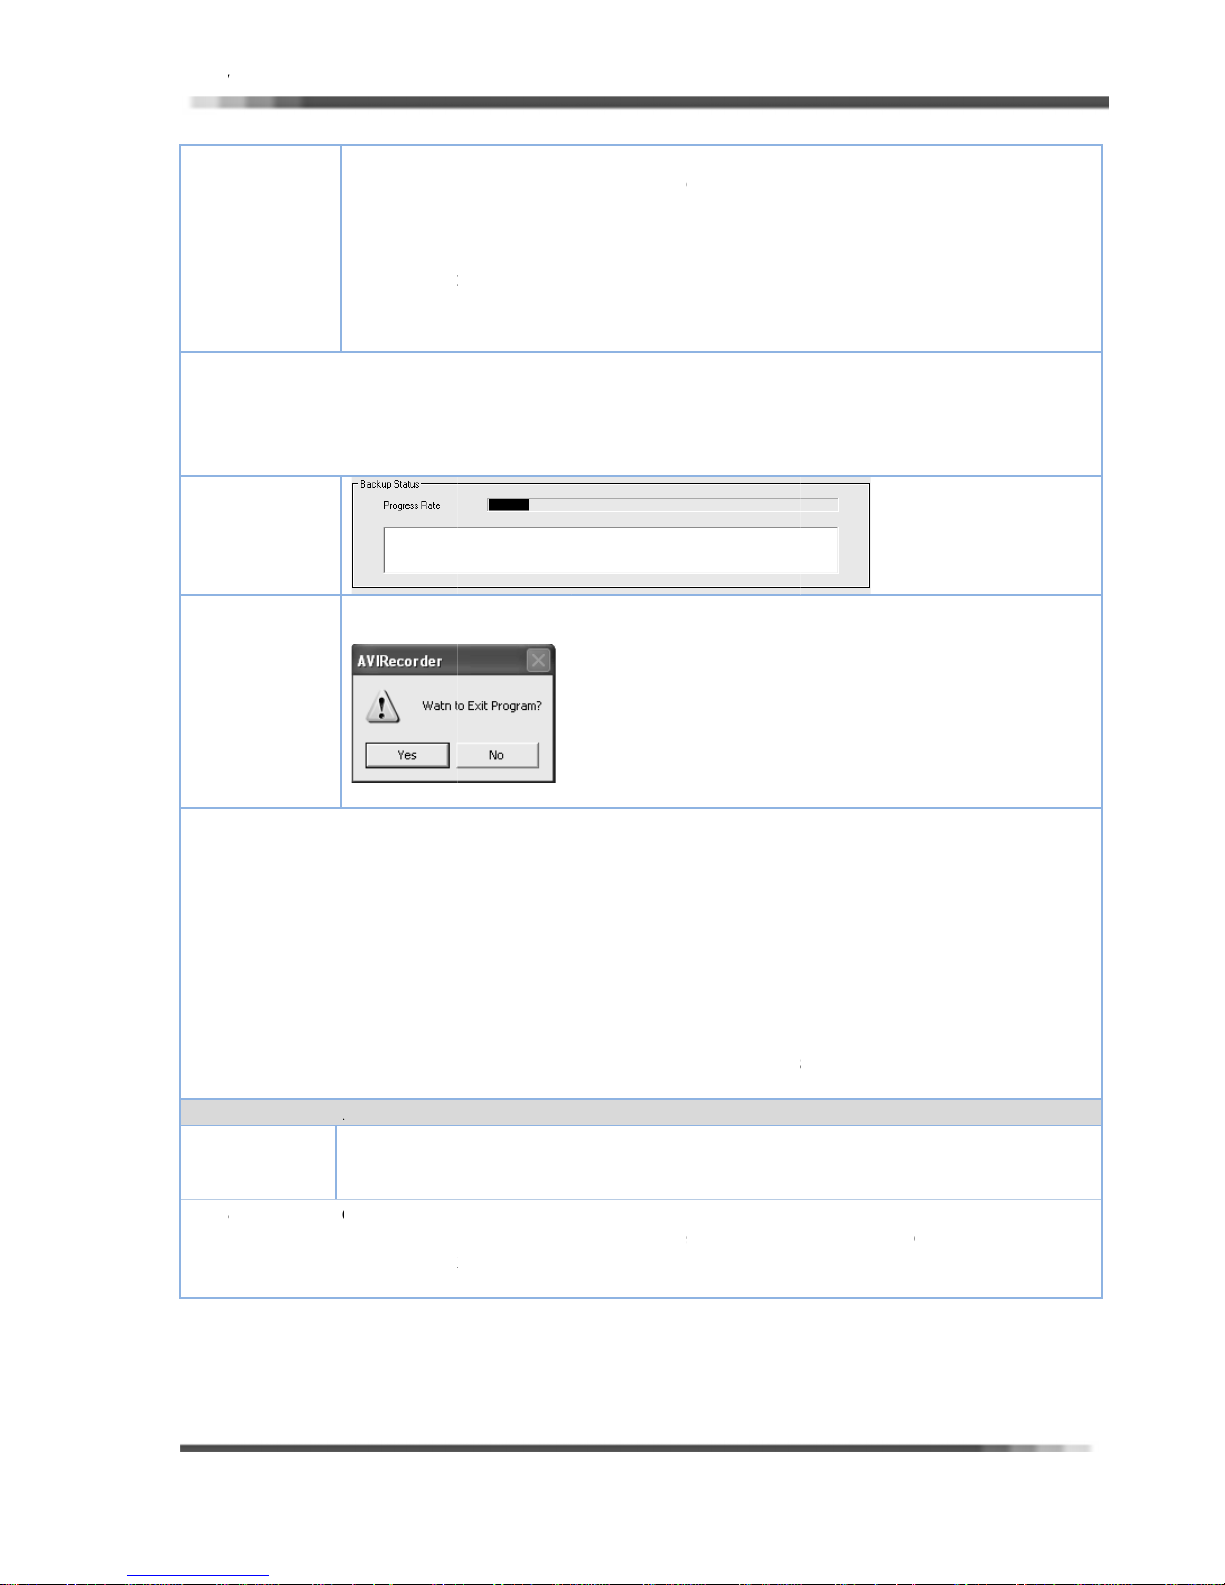
HD D
V
O
t
n
O
k
e
x
War
A
aSAVDe
a
e
a
a
a
w
o
D
u
d
d
b
g
M
y
R
o
p
a
t
d
m
g
t
n
d
m
o
t
W
t
e
a
h
a
E
m
p
k
i
a
e
p
o
u
d
i
b
e
p
r
t
p
A
M
a
y
t
v
h
e
s
D
n
e
a
o
b
E
a
m
S
s
a
m
e
j
i
d
w
O
.
t
d
l
e
o
c
d
t
V
g
W
R User’s Manu
l
Ver 2.1.0
[N
TICE]
Audi
o Synchroniz
o synchroniz
Audi
his is done
But
So i
Motion rec
In
Au
g. Cho
Click on
ress ra
Pro
AVI file (full
tion Functio
tion with Vi
hen at least
rding, Audio
he motion re
io Synchron
ose the Medi
e.
na
the Start R
e bar will ap
motion vide
.
eo is done a
1 fps is save
Synchronizat
cording, audi
zation canno
to save, if
cording bu
ear after clic
clip) will sa
tomatically.
,. So users
on cannot b
o synchroniz
t be perfect.
ou need the
ton, AVI for
ing on the
e to the cho
ave to save
perfect.
tion with vi
folder name,
at creating
TART REC
en folder.
t least 1 fps
eo automati
fill in the fol
ill starting.
RDING but
ally.
er
on,
Exit progra
Backup dial
dialog will
. (Shown b
e appearing
low)
after click on
the EXIT bu
ton in the A
I
[N
TICE]
Bac
up Media
1.D
fault: Backu
2. E
ternal: Back
W
hen users na
In
this <time/
hen users di
3.
e saved , all
VI
File Play
Window
Usin
lled in the s
inst
ED FOLDE
scription
Man
ement dial
Sav
d AVI backu
Also
display the
Click on the
p in the roo
VD: CD R/R
CD/
p in USB ex
med the fold
ate> folder,
not name t
ackup data
edia Player,
YES button t
, C:\_backu
,DVD R/RW
ernal HDD o
r, all backup
ll backup da
e folder , <t
re saved as
users can
o exit Save a
in Local H
other exter
files are sav
a are saved
ime/date> f
<time/date>
lay backup
s AVI.
D(Can be us
al storage.
d in the <ti
s <time/dat
lder is made
.file.
AVI File
ed again)
e/date> fol
>.file.
and in this a
us
t double-clic
er when bac
l data
when
kin
kup.
MP is
stem.
MANAGEM
To ma nage
playback.
will be ap
data save o
vailable bac
NT
ent saved
earing after
n to others
up media sp
VI files in
click MANAG
edia or folde
ce.
backup med
MENT butto
r and delete
a, which is
n. (Shown n
it on this dial
very useful
xt page
.
to AVI
41
Page 43
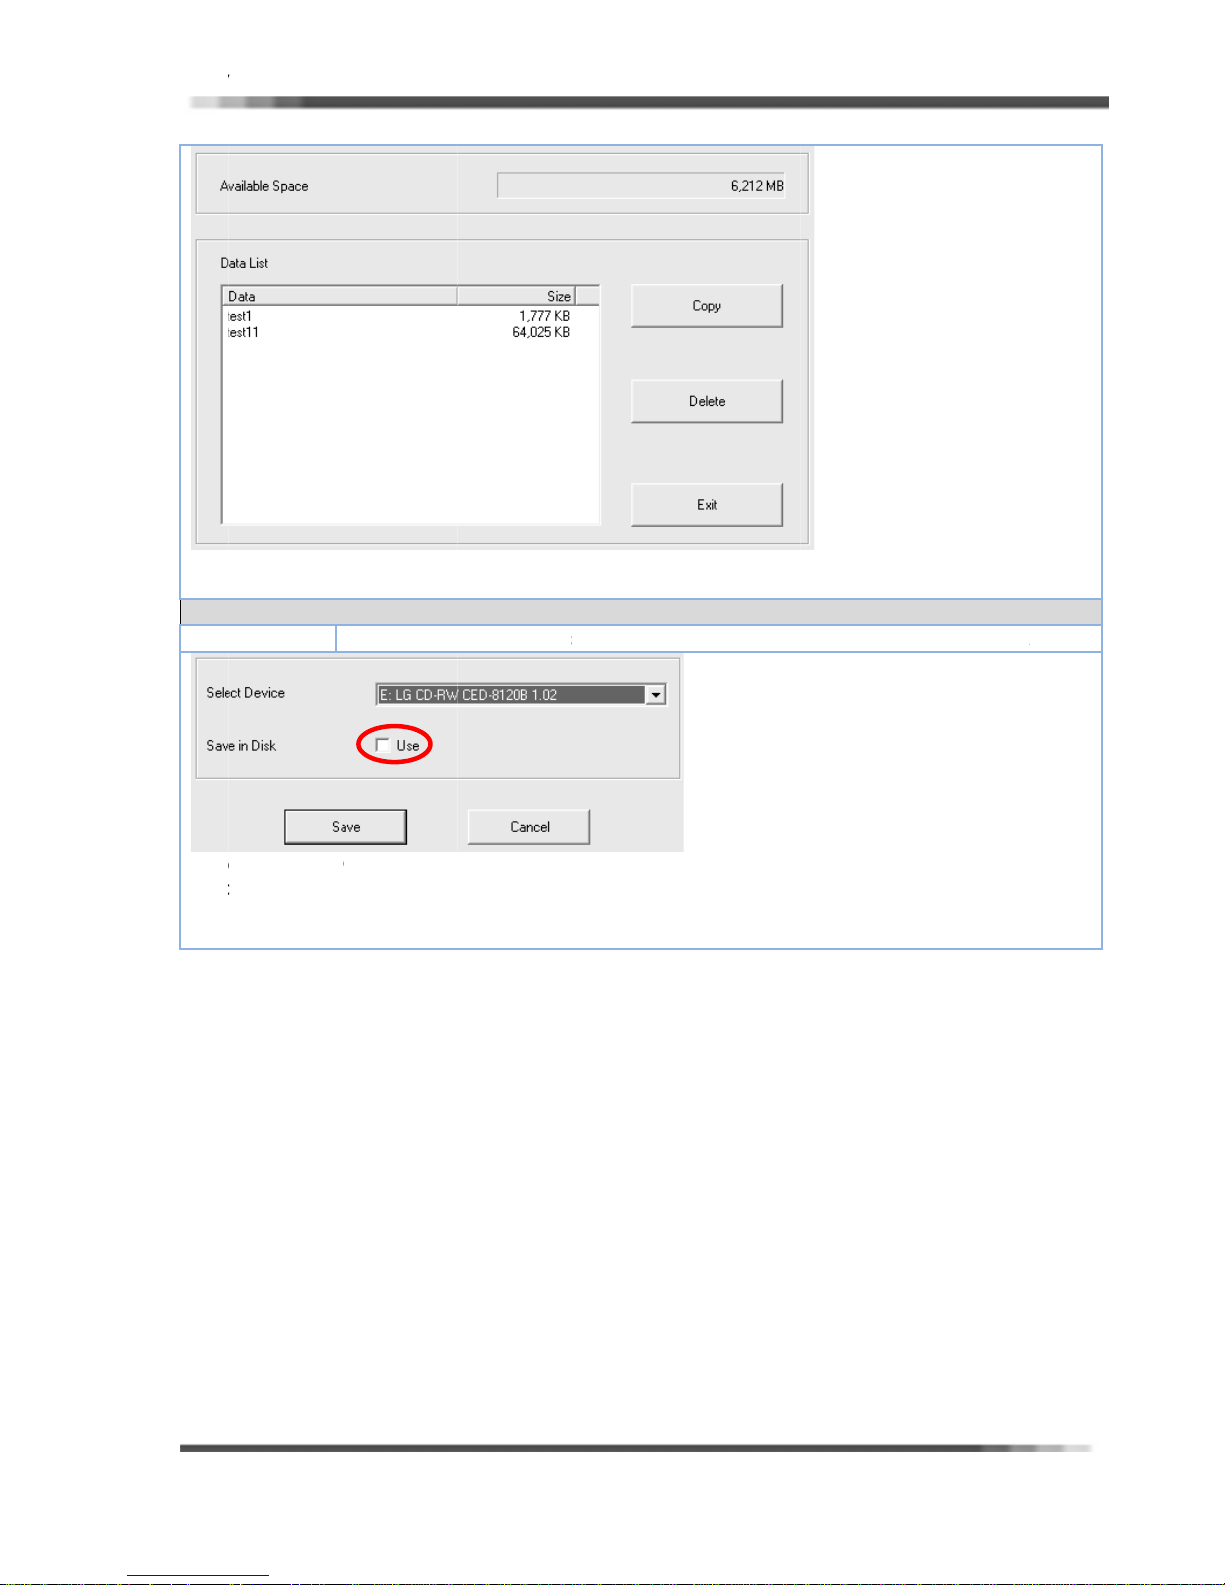
HD D
V
k
/De
c
c
k
a
b
P
D
b
e
s
D
o
e
s
e
h
t
D
k
Clic
CD
R User’s Manu
on the Exit
DVD SETU
scription
l
utton to clo
Specify CD/
e managem
VD media, u
nt dialog.
e or not sav
e on to selec
ed media at
the AVI bac
Ver 2.1.0
up.
Sele
A ti
Clic
t used CD/
k inside the
on the Sav
VD device.
ox indicates
button to cl
Save in Disk,
se.
when you c
osen media
evice.
42
Page 44

HD D
V
U
B
N
U
T
S
W
R User’s Manual
Ver 2.1.0
I
C
K
/
43
Page 45
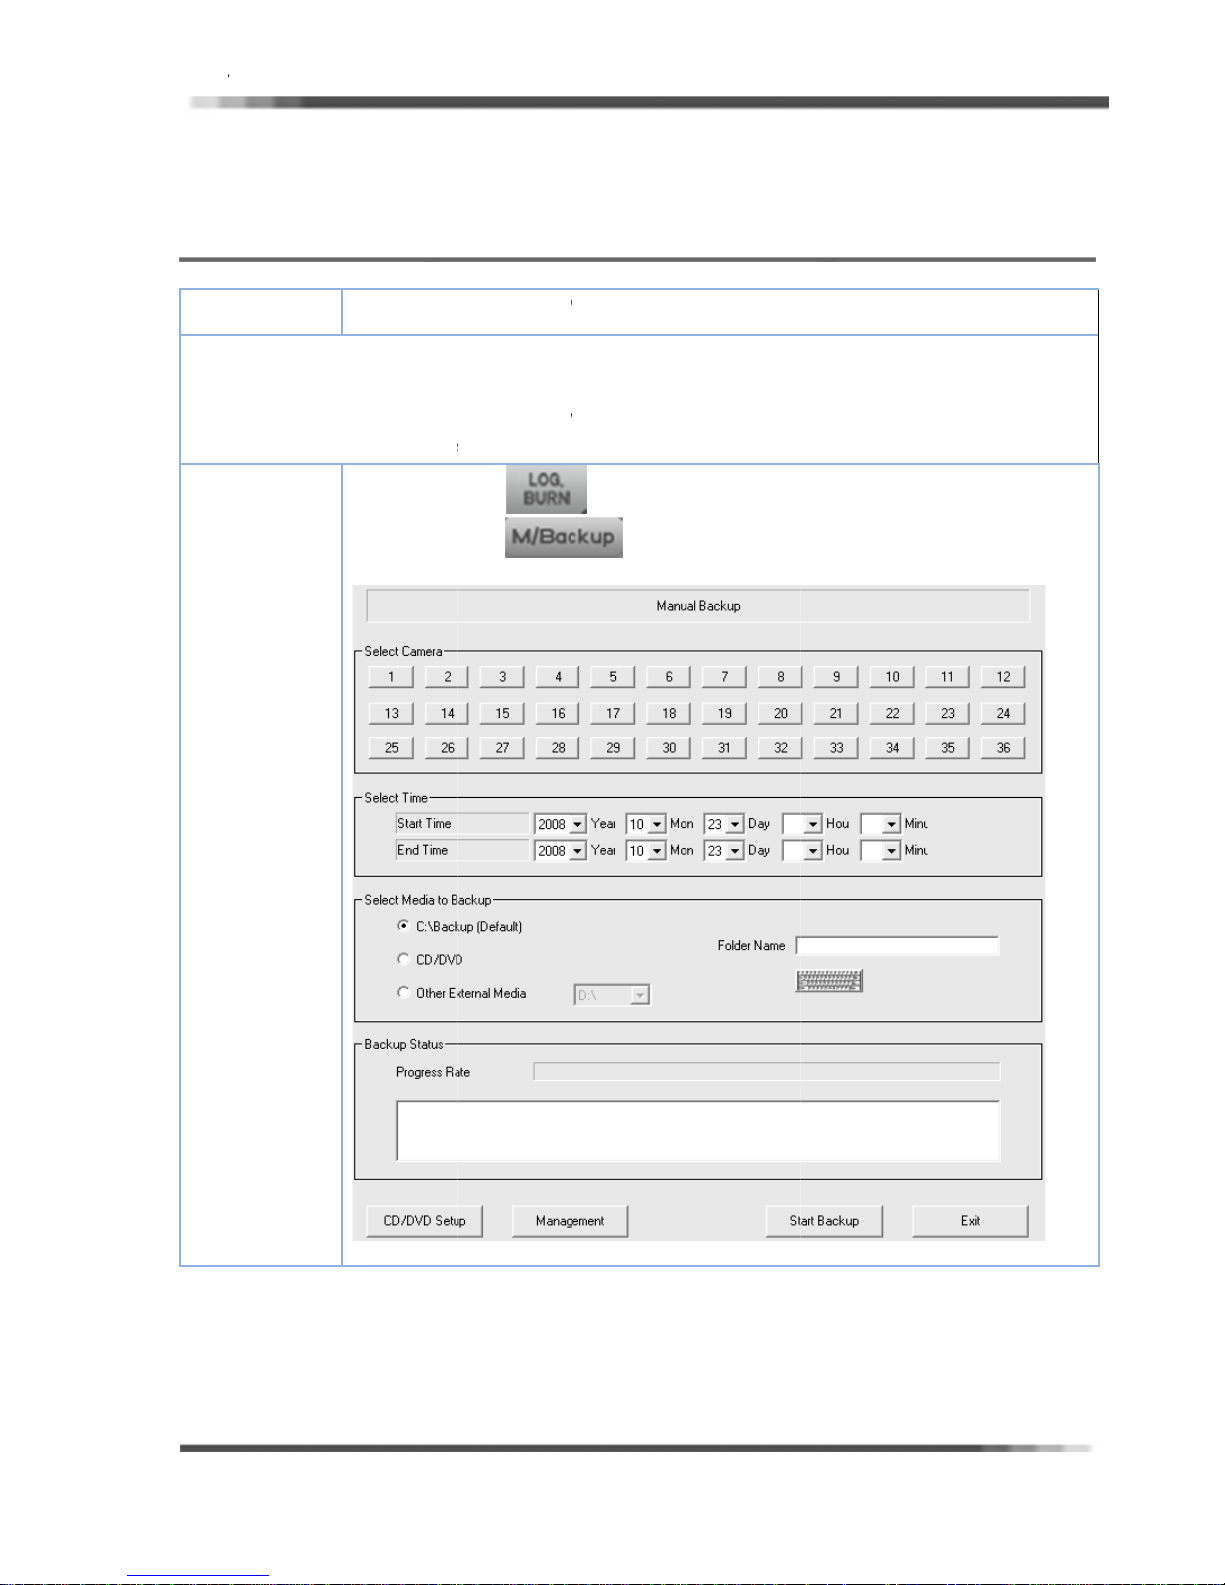
HD D
V
T
e
e
AvWh
s
(
a
o
e
A
d
m
e
R
r
B
K
u
V
e
e
o
o
k
b
.
W
l
V
d
r
s
N
u
b
d
D
u
h
s
k
o
e
n
e
d
her
file di
rectly just id
4-1
D
It
in
fir
R User’s Manu
are 3 kinds
MANU
scription
is recommen
ailable Me
en using so
this case us
t(CD-R, CD-
l
f Backup fo
ntifying the
L BAC
Users can
minute perio
ded to backu
ia: HDD, D
e Backup d
rs have to i
/W, DVD) b
Manual, Sch
ackup Date.
UP
se this to
d with Audio
p the selecte
D, DAT, CD
vices, users
nstall this S.
fore backup
edule, and A
ackup the d
d data (base
R/W, Exte
have to use
in the sy
I backup. M
ata recorde
on time, mi
nal USB H
specific S.W
tem. More
oreover user
in specific
n, or specific
D, Networ
which is sup
sers have t
can backup
camera, tim
filtered)
Drive
ported by a
format this
Ver 2.1.0
all data
, and
evice,
media
Step1
Backup
Dialog)
First Click
Next, click
Manual bac
n the
n the
up dialog wi
LOG,BUR
Back
l be appear
N button in t
p button on
elow as,
he Main scre
the other fu
n.
ction field.
.
44
Page 46
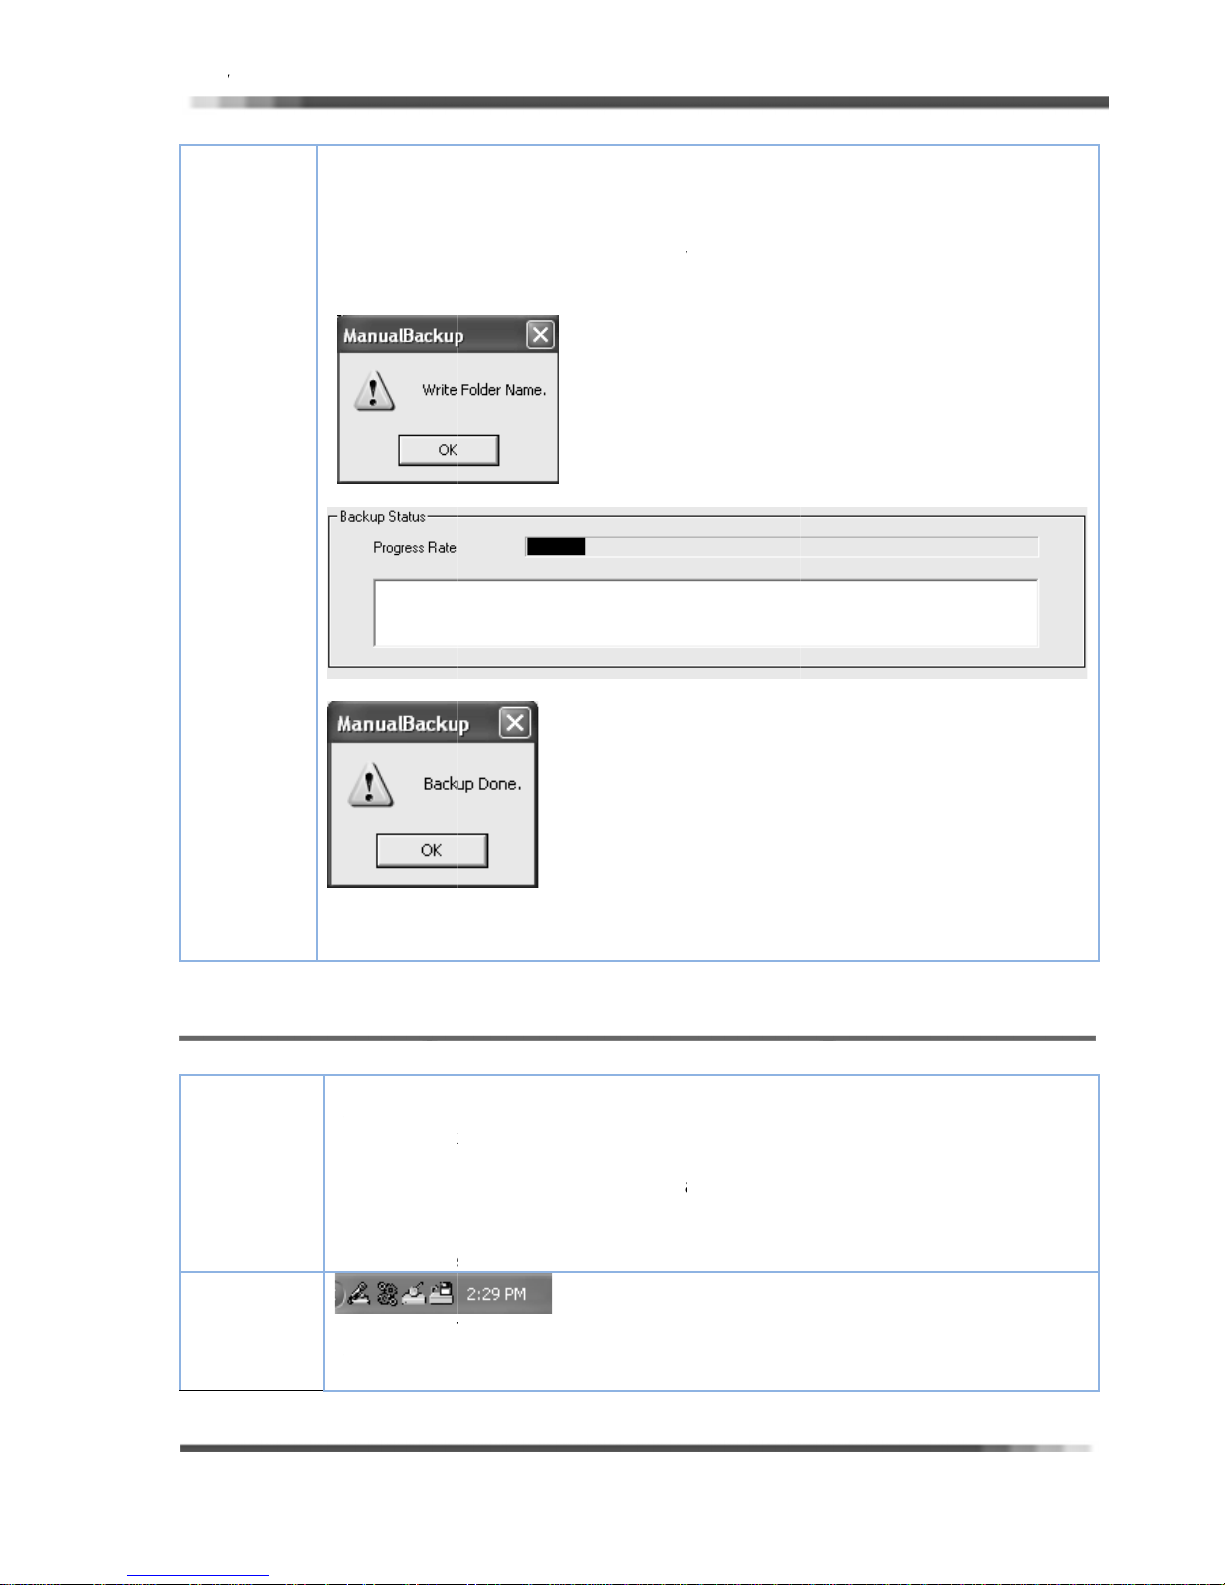
HD D
V
S
s
S
c
B
a
To
a
Wdo
D
U
s
S
※
CsS
a
a
T
M
e
l
g
b
m
t
hick
X
C
k
m
k
g
T
c
e
t
k
e
n
a
k
o
a
o
c
c
o
d
p
B
h
n
E
v
m
t
t
a
g
u
a
e
u
u
w
o
t
d
A
o
B
a
r
p
V
e
e
U
n
b
c
a
a
c
t
gh
)
c
a
u
t
P
s
R User’s Manu
l
Ver 2.1.0
tep2
Manual B
a.
Chose the C
Choose the
b.
Choose the
c.
Backup Fold
Fill in the fo
d.
ssage dialo
M
e.
Backup will
B
ckup Done
ill be return
ne dialog.(s
Cl
on the E
ckup, do th
mera Chan
ime: Set St
edia to Bac
r in Drive C/
der name on
appear (Sh
e progress
essage dial
o Manual ba
own above)
IT button to
following:
el.
rt Time and
up: Default i
CD,DVR Dri
to folder na
wn below) if
fter click on
g appear af
kup main di
closing Manu
End Time.
s ‘_Backup F
e / Other Ex
e area.
not fill in fol
he START B
er backup d
log after clic
al backup.
lder’ in Driv
ernal Media(
er name.
CKUP butto
ne ,
on the OK
C.
SB HDD etc
.
utton on ba
kup
4-2
De
S
SCHE
cription
et up
hedule
ackup
ULE BA
sers can ma
etup date/ti
When bac
pace messa
Users can n
o run Auto
check the I
When Syst
lick right but
creen.
chedule bac
KUP
e automatic
e for selecte
up Drive spa
e will be sh
ot use Sche
matic Backu
on in Tray
m starts, Sc
on Mouse o
up sub drop
backup usin
d data.
e is not eno
wn.
ule Backup
, Start Sch
ar)
edule Back
the Sched
down menu
Schedule
h to save
and Concur
dule Backu
p runs by D
le icon in th
ill be appea
ackup to ba
ll selected d
ent Backup
has to be a
RLoader au
bottom ri
ring. (Shown
kup the dat
ta, Not Eno
t the same
tive status.(
omatically.
t of Window
below)
in
h
ime.
lease
45
Page 47
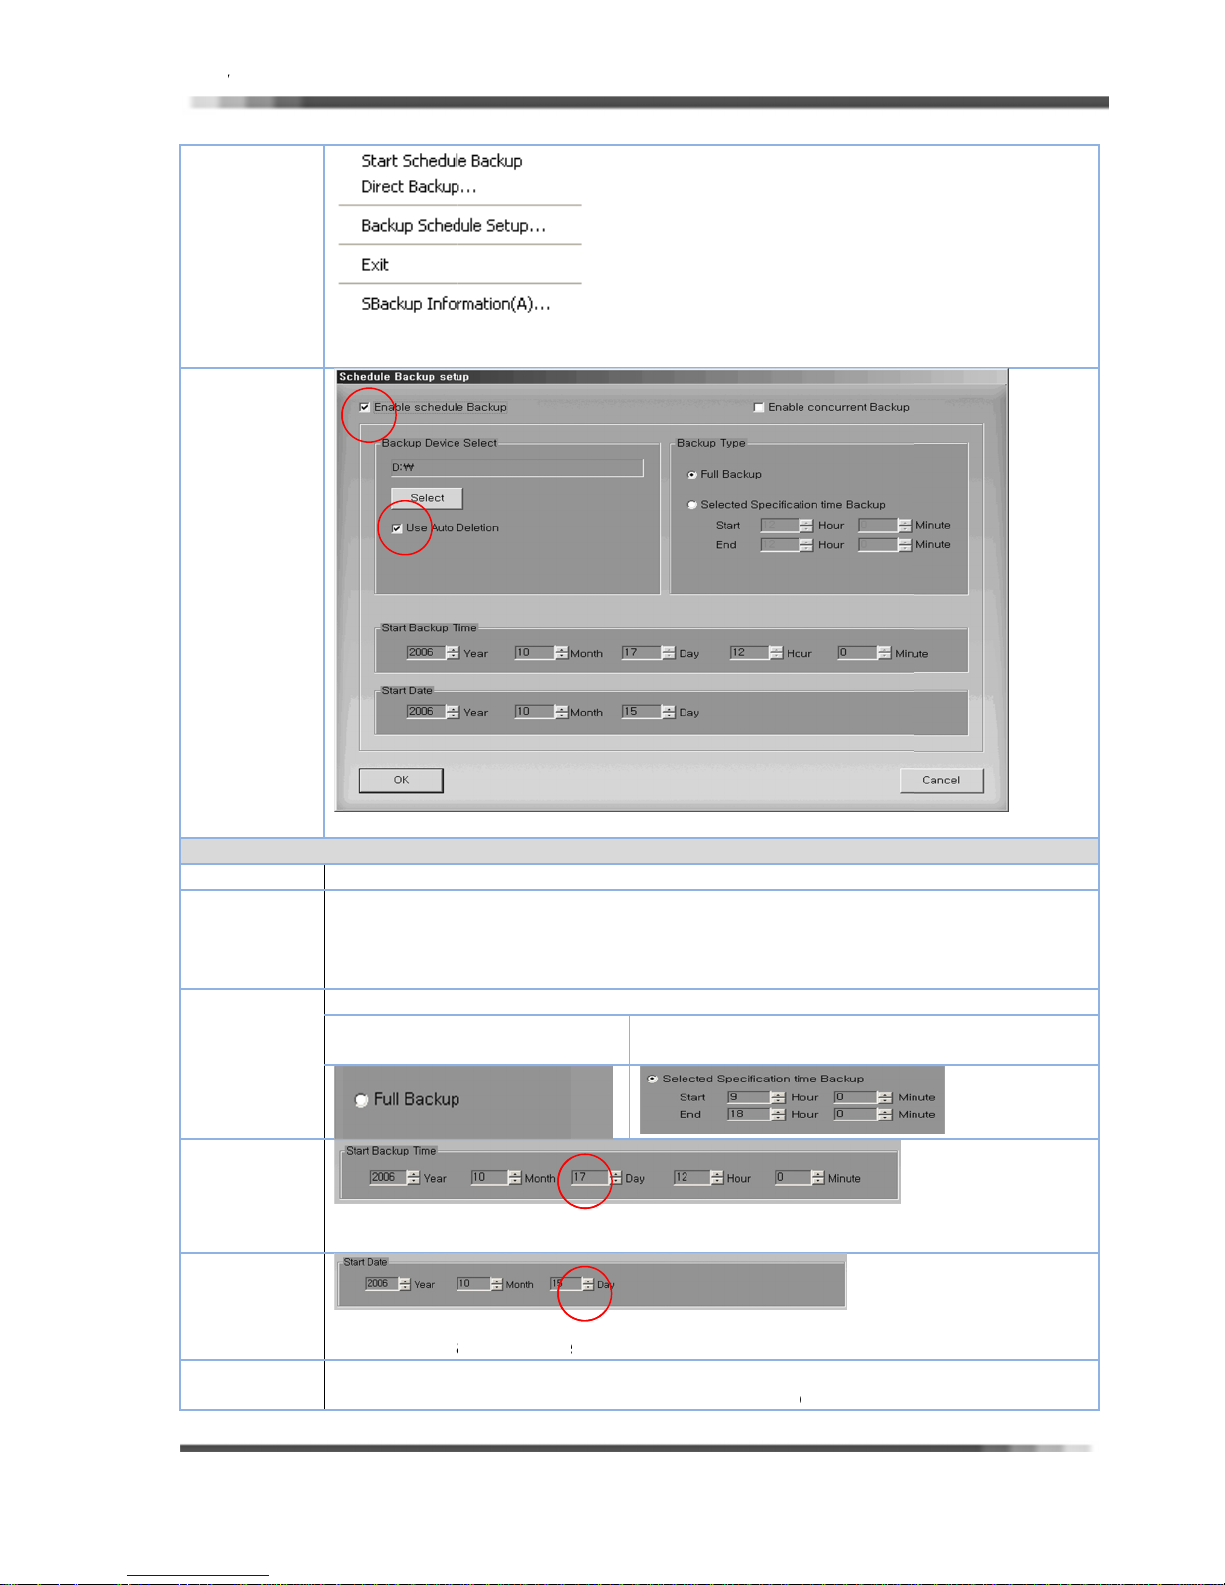
HD D
V
t
k
e
c
k
e
o
k
o
k
S
SSS
S
S
a
S
S
P
A
1
2
C
F
C
C
C
A
d
l
h
e
e
e
e
a
2
t
t
a
O
k
B
t
-
.
a
e
e
y
a
e
t
u
l
c
k
e
k
a
h
n
v
n
h
f
t
c
c
e
b
p
e
[Au
Bac
Typ
1. S
Bac
(Sel
Peri
Bac
2.C
Bac
R User’s Manu
omatic
up
]
hedule
up
cted
d
up)
ncurrent
up
l
CHEDULE B
ETUP in the
CKUP dialog
rop down m
will be appe
enu. (Shown
ring when c
below).
osen BACKU
P SCHEDULE
Ver 2.1.0
SEL
ECT BACKU
tep1
tep2
tep3
tep4
(
In Full
ckup)
B
tep5
tep6
TIME(Inc
tick inside t
) Click on th
) A tick insid
Auto Del
full, and ov
hoose the B
ull Backup(
hoose the S
(
tart Time fo
hoose the S
(
From the dat
lick on the
When Bac
uding Full
e box indica
Select butt
the box ind
tion is auto
rwrites data
ckup Type.
4 hours)
art Backup
r Schedule B
art Date.
of this tim
K button to
up is done b
ackup )
es Schedul
on and selec
cates Use A
delete the o
Sele
(Bac
Time.
ckup is don
, data is Bac
xit.
Schedule B
Backup e
Backup Dri
to Deletio
ldest data w
ted Specifi
up the data
for the firs
up automati
ckup, users
abled.
e.
if need it.
en selected
cation Tim
rom Start to
time)
ally)
can see this
Drive HDD s
Backup
End Time)
y Backup Vi
ace is
wer.
46
Page 48
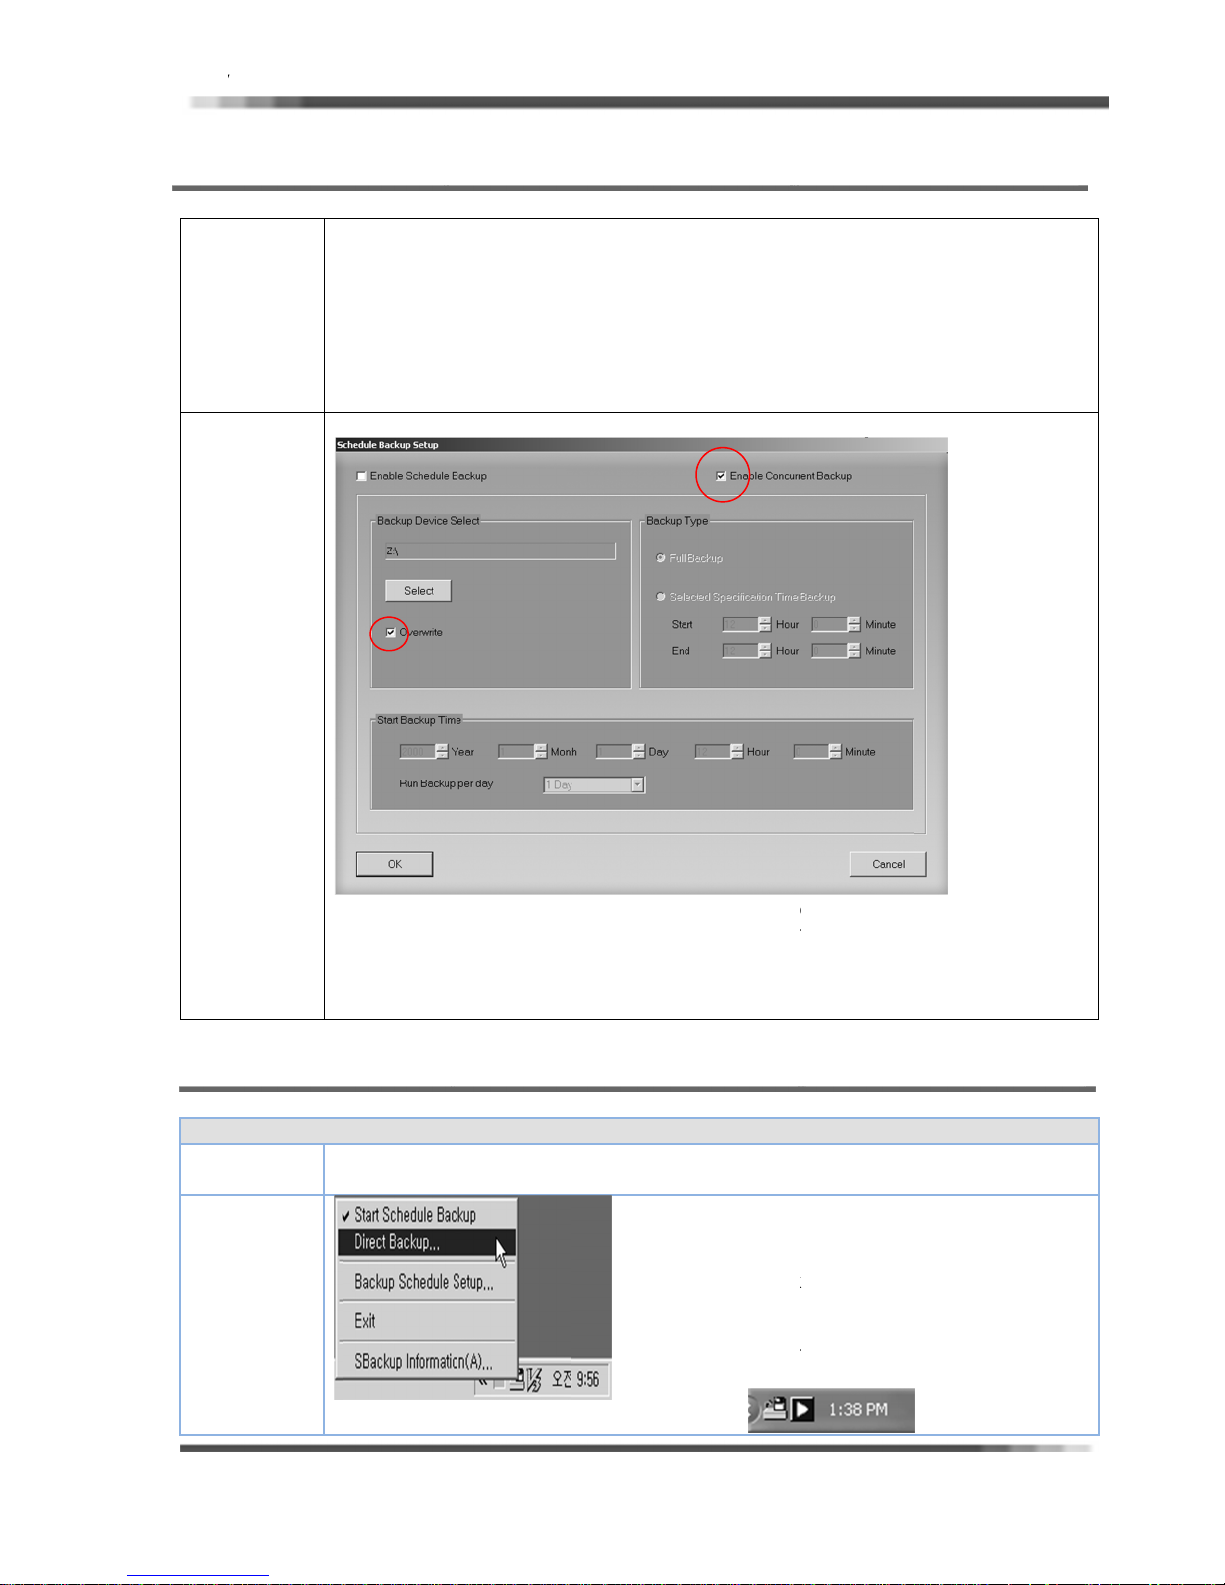
HD D
V
s
s
eDes
s
a
U
C
234
T
U
H
B
n
e
e
B
a
k
e
d
o
p
U
r
c
D
o
d
t
a
u
f
a
s
ge
C
t
v
t
a
n
o
t
s
n
H
e
a
d
w
o
k
c
B
d
e
e
C
t
b
c
w
c
D
e
e
B
i
B
u
r
G
U
4-3
De
R User’s Manu
CONC
cription
l
RRENT
To u s e Co
recommend
done by onc
oncurrent
saved in HD
HDD Drive (
users can b
ImageDB.
1. A tic
ACKUP
current ba
d to use Big
in a day.
ackup is the
D. Briefly sp
normally in
ckup this re
inside the b
kup, Sched
Size HDD a
system to b
eaking, our
:) as Ima
corded data
ox indicates
le Backup(i
ter calculati
ckup the da
ystem save
DB, so whe
in selected
oncurrent
cluding Full
n of selecte
a at the sam
the record
users use
DD drive a
Backup ena
ackup ), us
data Size.
time when
d data in s
oncurrent
the same t
bled.
Ver 2.1.0
rs are
This is
data is
lected
ackup,
me as
In
4-4
Dir
In
truction
DIREC
ct Backup
cription
truction
. Click on th
. A tick insi
Disk
. After click
With Backu
BACK
sers can bac
owever, use
Select butt
e the box in
n the OK bu
Viewer, use
P
kup the data
s can not se
n and selec
icates □ O
ton to exit, i
rs can see b
at the same
rch for the d
Backup Driv
erwrite for
automatical
ckup data.
speed as PC
ata before B
Drop
(sho
butt
Bac
Next
after
e.
overwriting
ly starts Con
Copy Speed,
ckup.
own menu
n left) after
n mouse on
up running I
lick on the
chosen it.
after full in
urrent Back
ill be appea
click the RI
the schedule
on.
IRECT BACK
ackup
p.
HT
P tab
47
Page 49
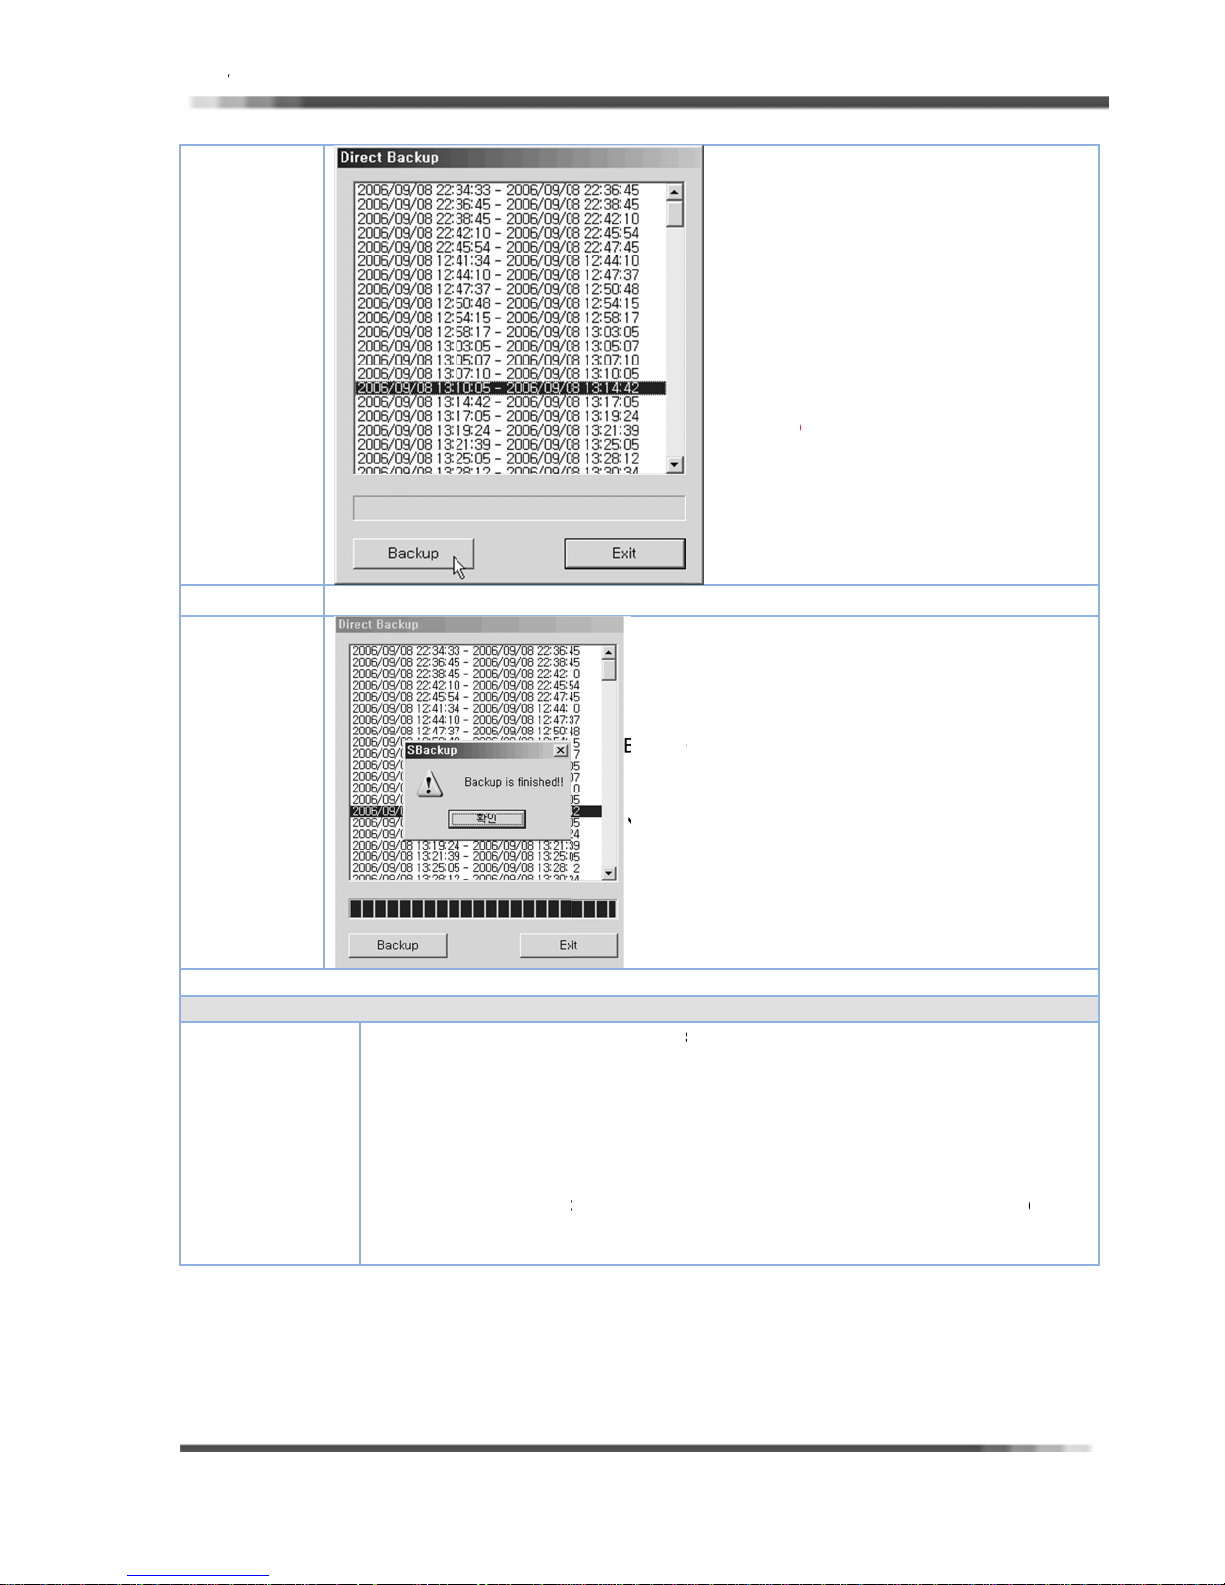
HD D
V
SSS
sMan
D
a
B
t
l
e
F
e
r
s
B
u
r
ge
o
u
c
b
.
c
e
s
s
u
]
h
o
DYMD
u
e
i
)
e
g
t
s
u
e
r
d
c
f
,
v
p
e
r
t
n
o
s
c
0
a
d
R User’s Manu
tep1
l
Click
Rec
left)
YM
cha
So
bas
Sh
data
on the Back
rded data Ti
after chosen
/Record Sta
/Record En
nnels.
sers can ba
ed on this in
ift(Select All)
up button o
Dialog. (Sh
date.
t Time ~
Time for all
kup all the d
ormation.
Ctrl(Select
Ver 2.1.0
the
wn
ata
everal
tep2
tep3
U
ers can see
ual Data Fi
escription
ackup will b
his by Backu
e Backup (
Pleas
Expert o
It is very
ImageD
[Please
HDD p
Users h
to backup
Mana
starting, ch
p Viewer.
iles Copy)
be careful
Manager
imilar like Di
.
se this in b
oblems!
ave to repla
HDD in trou
r needs this
sen data ba
Backup
compl
Plea
saved
in using thi
ses this in
rect Backup,
elow cases
e systems w
led system.
kup on to d
done messa
tely.
e check the
folder.
s Backup, i
rgent case
but the only
en some sy
fault data sa
e will be ap
backup folde
is recomm
like HDD p
difference is
tems have a
e folder.
ear after Ba
r (Ex, 20061
nded that
oblems.
o backup m
problem, an
kup
17) in
nually
have
48
Page 50
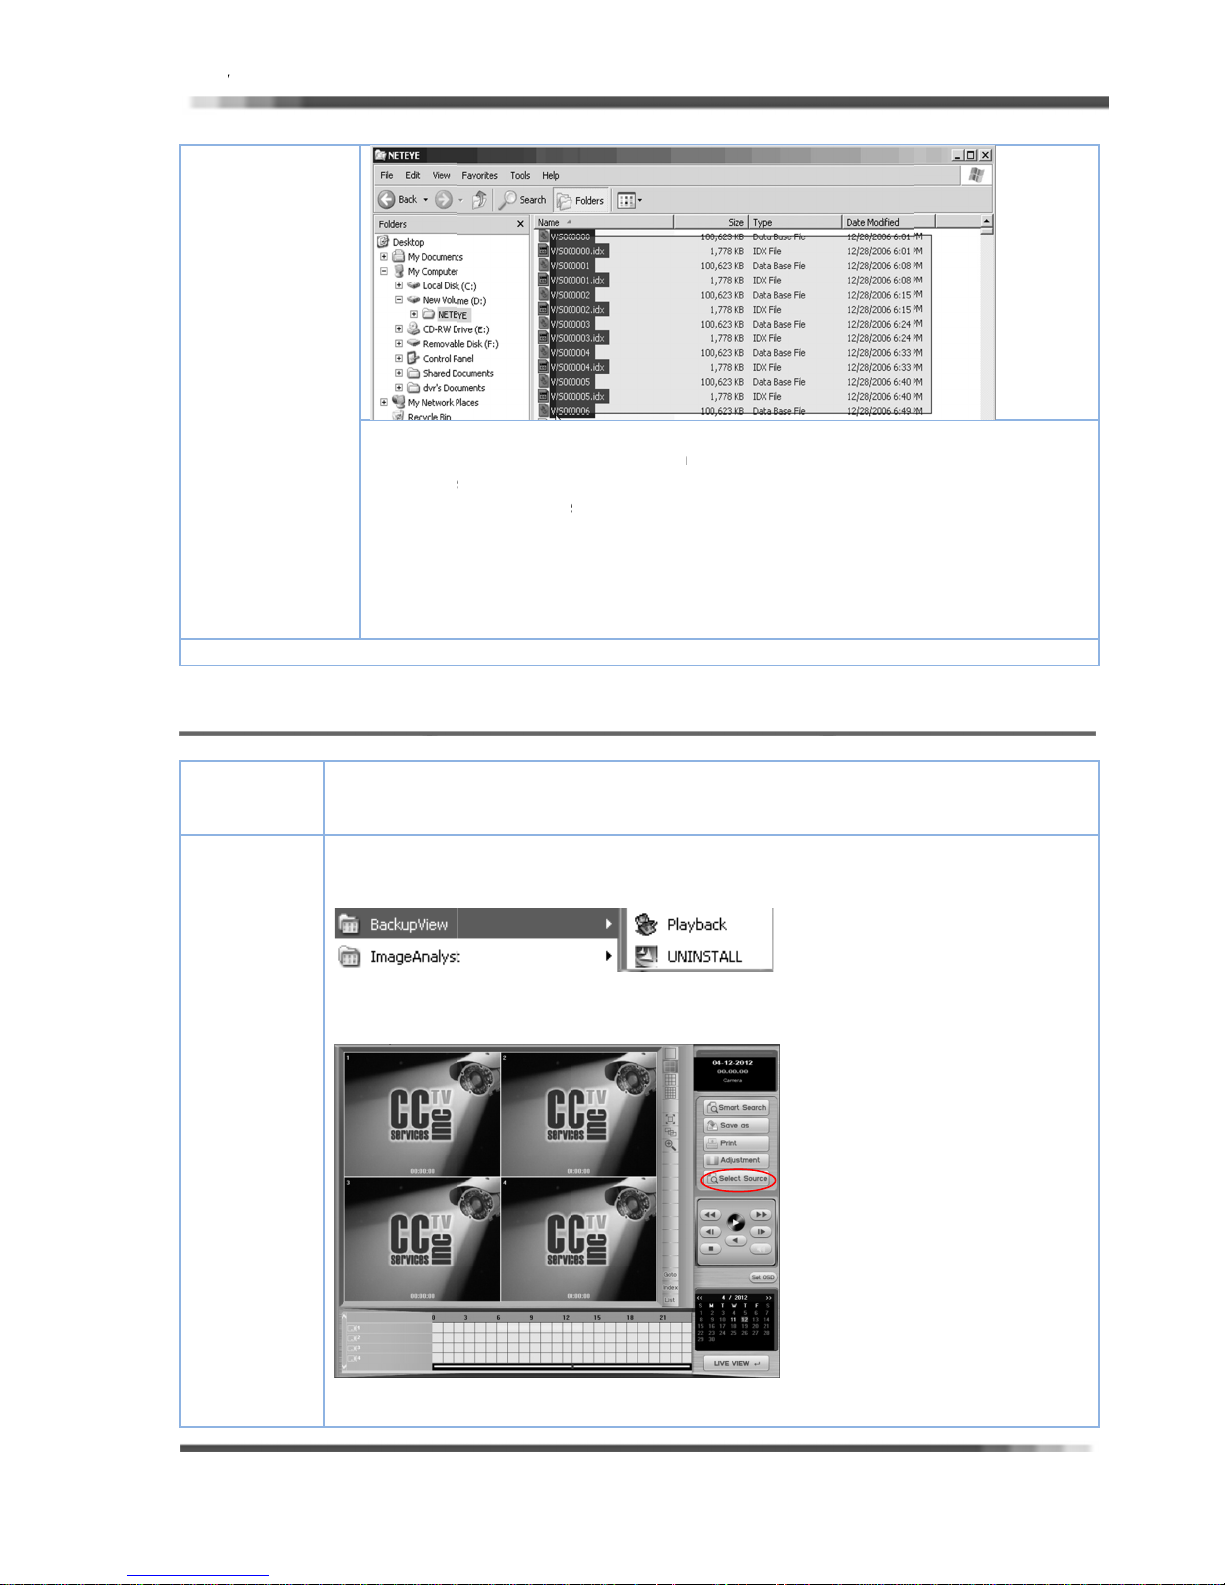
HD D
V
IUs
s
s
a
b
U
U
B
RRC
fBC
B
W
e
y
o
S
h
w
E
V
t
>
a
d
s
e
n
c
e
g
W
t
V
d
n
k
w
v
o
d
d
b
A
u
x
s
y
g
a
c
p
b
e
p
u
e
a
R User’s Manu
nstruction
l
Ver 2.1.0
4-5
De
ers can see
BACK
cription
1. Open
2. Search
3. Choos
4. With S
files easil
Have t
(Ex, W
4. Copy t
(Please
ackup data
P VIEW
se Backup
ackup, Direc
Window Me
un 1)Start
un 2) Run B
:\Program Fi
[
NOTICE]
not installe
I
ackup view
indow Explo
DVR folder i
the Files to
hift, Ctrl k
to copy.
select Ima
000017 /
em to ….
copy this no
ith Backup
R
iewer when
Backup, an
dia Player ca
Program >
ckup Viewer
les\DVR\Bac
Backup vie
/w is one of
rer
ImageDB m
opy in IMAG
y (like Wind
e file and in
S000017.i
<move>)
iewer.
monitor and
Files Copy
be used in
DVR >Back
directly.
upView.e
s/w, Please
iewer s/w
ade director
EDB folder.
w), or Dra
ex together
x )
see AVI Ba
y Manual.
VI backup
p View.
e …Just Dou
install first b
.
& Drop,
s a couple
kup, Manua
laying as wel
ble-Click
fore using b
sers can sel
l Backup, Sc
l.
ackup view.
ct the
hedule
In
truction
lick on Sel
ackup Disk
ct Source
button
for
earch and
layback the
Backup dat
from
49
Page 51
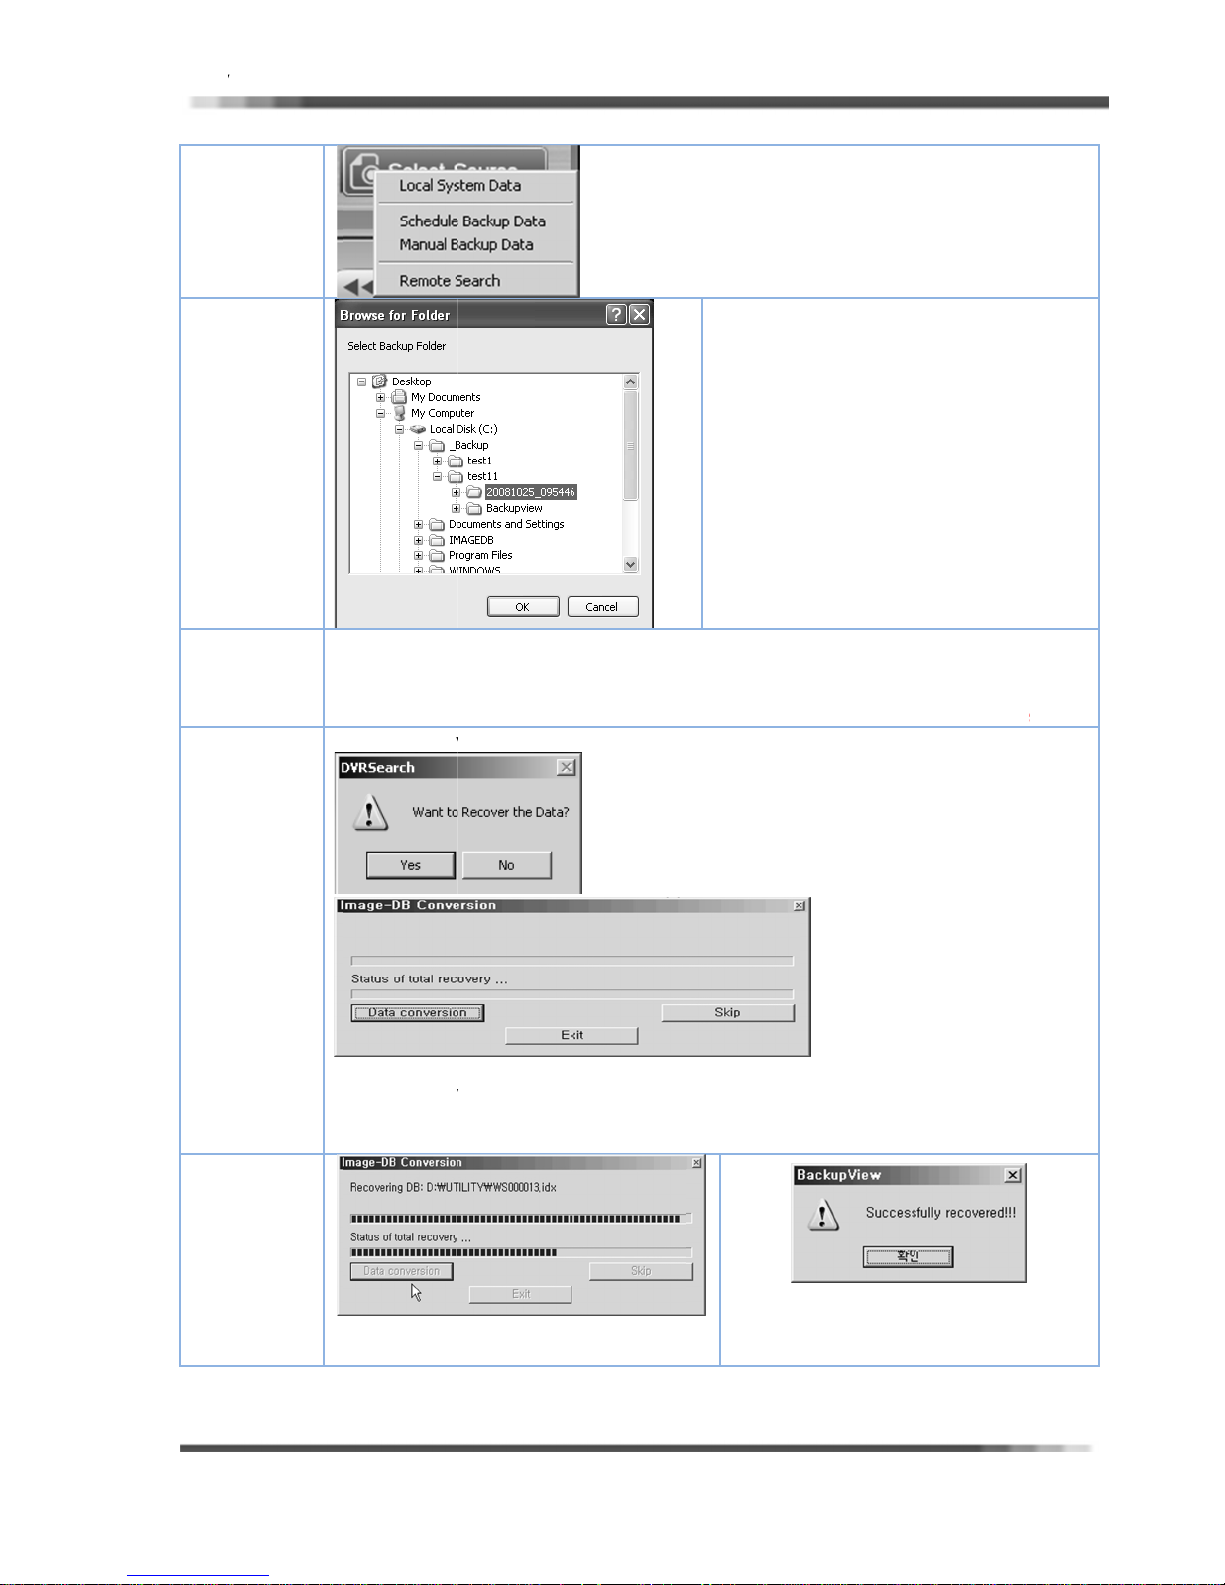
HD D
V
SSS
S
a
F
S
R
C
a
l
v
D
v
a
c
o
o
s
r
b
s
u
c
s
c
e
K
t
s
t
D
e
v
b
s
W
h
p
,
b
d
s
n
g
e
V
o
u
e
s
R User’s Manu
l
Ver 2.1.0
tep1
tep2
or Manual B
tep 3.
For Schedu
Copy, users
equired reco
ckup, users
e Backup, C
have to Rec
er the Data
an see back
ncurrent Ba
very Proces
Dialog, Click
Will be app
Users hav
Backup fo
on the O
Left Pic
on the
S/W.
p data direc
kup, and
(Step3) to s
on Yes
ear the Reco
to search a
lder exactly.
button.
ure shows t
earch butto
ly on Backu
irect Backup
e the data
er the data
nd designate
hen findin
e image wh
n in Backup
Viewer with
and Mana
y Backup Vi
ialog.
the
, click
n click
iew
ut
l Files
wer.
tep3
lick on the
This Reco
as Dat file
ata Conver
ery procedu
to save the
ion button.
e needs, be
ackup time.
ause in the
To see this u
ackup proce
sers have to
s the data i
recover this
saved
to see
this.
tep4
finished
Dat
Conversion
tatus
Conversio
50
Page 52
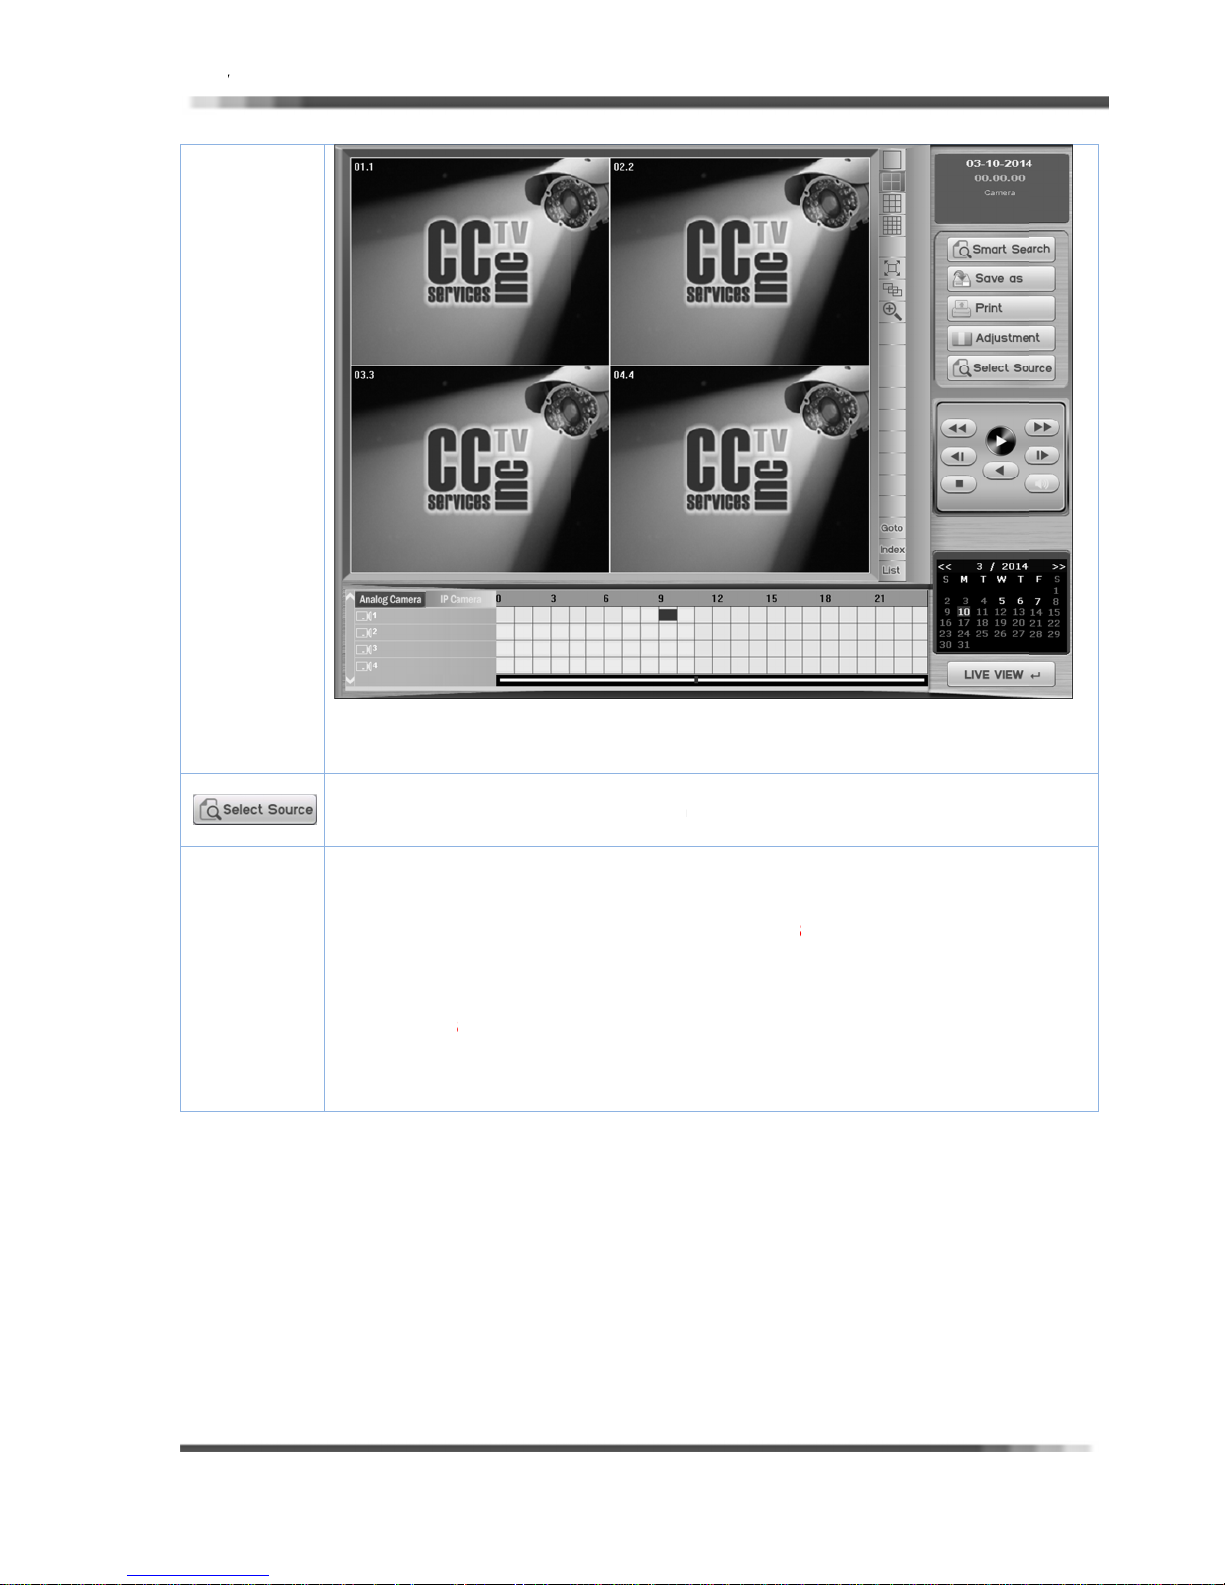
HD D
V
S
N
Rmos
a
123 W‘S
D
e
a
w
c
r
h
E
c
B
t
e
a
c
h
d
c
a
D
s
o
i
d
u
.
P
f
e
r
c
i
r
(
e
R
B
n
f
a
t
n
t
h
C
t
a
n
c
g
h
R User’s Manu
tep5
l
Ver 2.1.0
OTE
(
ed are
t FAQs)
. Click on th
. Search the
. next step s
hen users
elect Sour
etails refe
Users have
In above ca
date form t
date from.(
not play Ba
another PC
When the
make it as
Yellow dat
recorded dat
me as Sear
ant to searc
e’ button an
to 3.3.5 Se
to install Ba
se, when D
e same as
X. When PC
kup files….u
in the date f
ackup Drive
he same. An
(which has
by camera,
h process.
other Back
do the sam
lect Source
kup Viewer
te form is di
VR PC. Pleas
DVR date fo
ers have to
rm DMY)
s different in
users have
the recorded
time, and m
p data, use
e procedure
ackage to s
ferent in DV
e note that
m is YMD, a
hange date
Backup PC
to recover th
data) in the
nute on the
s can search
(Step1~4) a
e backup da
PC , users
ackup folder
d another P
orm YMD (i
nd Backp Pl
is even if Ma
calendar.
ime table.
this by just
d monitor.
a in another
ave to chan
follows the P
is DMY, use
is backup in
y PC, users
ual Backup.
licking
PC
e the
C DVR
rs can
ave to
51
Page 53
HD D
V
A
w
p
Vide
oRem
r
w
a
Q
Q
Q
123
4
Q
1
2
Q
Q
1
2
Q
123 4
Q
h
l
Q
h
T
Q
1
2
4
Q
123
Q
1
2
3
o
Vo
i
M
o
c
P
U
C
c
r
S
T
g
t
M
r
r
R
S
c
r
r
<
s
E
C
r
s
e
m
P
c
r
D
N
r
<
W
r
U
c
P
/
h
e
t
M
e
f
m
u
e
u
d
r
n
c
f
o
h
o
f
t
t
c
V
D
s
n
f
n
e
a
l
t
d
<
n
.
c
e
S
o
m
B
c
l
4
5
o
d
o
m
a
a
D
n
n
a
n
m
r
D
P
n
n
o
e
r
>
i
M
t
c
r
V
n
r
E
r
M
o
a
r
o
S
o
o
n
C
w
n
p
n
d
t
L
e
s
d
t
d
D
F
Po
Dis
PTZ
Rec
Sea
Bac
Prin
Net
R User’s Manu
Q
er
lay
o
rding
ote
ch
kup
t
ork
l
<
01> When D
1.
Check the c
2.
Check the
3.
When using
<
02> When d
1.
Check the
2.
Check the c
3.
Check the B
<
03> When C
. Check the
. Check the
. Check the
. Check the
<
04> When C
. Check the
. Check the
Check the
<
05>When P
1.
Check the ri
(
Please refer
2.
Change the
<
06> When <
. Check the
. Check the
chedule of
<
07> When <
. Check the
. Check the
. Check the
recording.
. Check the
<
08>When u
C
eck the RS
If
not running,
C
ick Start > P
<
09>When u
C
eck the Dat
(
he Date For
<
10> When <
. Check the
. Check the
. Check the
<
11> When C
. Check the
. Check the
. Check the
<
12> When 2
. Check the
. Check the
. Check the
VR power O
nnection of
ltage (115V
Multi-Tab, c
splay is not
onitors Pow
nnection be
rightness of
amera Imag
onnection o
ower of Ca
se Camera
amera stat
amera imag
ameras stat
ight Status o
et Advance
Z is not wo
ht connectio
o PTZ H/W
connection o
otion Rec
ight setup of
ight setup of
ecording. C
ensor Rec
onnection o
ight Sensor
ight setup of
Holiday> se
ers can not
ngine.exe ru
an you exe
ograms > D
ers can not
Form (Y/M/
(Y/M/D) ha
rint> does
onnection o
ight Driver i
efault Print
lient (CMS)
etwork Cab
ight <IP setu
Use> of Ne
ay-Audio
ight work of
nlock of <Bl
onnection a
n, Does not
ower Cable
230V).(Swit
eck the pow
coming.
r and DVR
ween DVR a
onitor.
s are not c
cable of Ca
era.
in DEVICE S
s whether it i
comes in
s first, and
f Video Type
System dial
king norma
of RS-422/
onnection in
RX-422/48
rding> is n
Motion Area
Schedule of
eck the Holi
rding> is n
Sensor and
ype and nor
Schedule of
up for that d
Remote Se
nning in the
ute the RSE
R > RSEngi
monitor <B
) of DVR a
to be the sa
ot work no
Printer and
stallation in
r Setup whe
re not conn
e connectio
p> in <Netw
work i in <N
oes not wo
Agent client
ocking>(of F
d setup of
boot up sys
her)
r and conne
ystem Powe
nd Monitor.
ming.
eras and D
etup tab in D
s normal or
/W or abno
hange them.
NTSC /PAL,
og in SYST
ly.
85 converte
Installation
converter.
t working n
in Camera t
Motion Reco
day setup fo
t working n
Camera in <
al connecti
Sensor Rec
te
rch(Cant no
VR system.
ngine.exe o
e.
ckup> data.
d another P
me as DVR)
mally.
VR and Po
C DVR for p
several pri
ected.
.
rk> Setup.
twork> Setu
k normally.
>
rewall) in wi
icrophone,
em.
tion.
.
R board.
VR.
ot.
mal (warpe
and camera
M Setup tab
and PAN/TI
anual)
rmally.
b, Setup.
rding in
that date.
rmally.
ensor> and
n.
rding in Sch
t found file
the DVR fol
(to monitor
er On/Off
rinter.
ters are use
.
dow XP sp2.
) status..
ype too.
in DVR.
T
<Relay>.
dule of
ystem ;-1)
er.
the Backup
Ver 2.1.0
ata)
52
Page 54

HD D
V
W
m
V
T
T
T
P
R
o
d
r
m
e
c
c
M
T
e
x
e
t
a
A
w
o
v
v
a
r
e
s
o
h
o
n
n
o
i
t
n
Y
e
g th
a
v
n
n
l
t
a
A
o
d
n
s
w
d
o
a
n
d
a
e
o
t
e
o
o
d
p
w
o
m
m
a
o
e
a
i
t
S
C
l
e
t
i
r
g
ge
n
s
m
t
h
a
e
d
t
o
c
s
m
n
T
g
s
n
t
e
e
m
e
e
d
g
s
w
s
e
p
e
d
e
C
o
n
n
e
h
w
o
y
s
s
n
s
g
e
p
C
e
a
i
s
n
u
o
e
u
h
g
a
u
e
u
o
s
o
e
n
t
P
h
r
E
g
R User’s Manu
l
Ver 2.1.0
ARR
CCTV
SERVICES
work
CCT
SERVICES
1) C
2) T
his warranty
he warranty
3)
4)
o obtain ser
5)
o obtain ser
6)
urchaser mu
7)
egarding all
T
here are no
nnected car
c
RMA
(Return M
rranty repair
If wa
n Merchandi
Retur
er to have y
In or
depa
tment and o
purch
ase date. All
ain unit. Any
the
describe t
Pleas
CCTV
es professio
Servi
Servi
es professio
of R
A, explanati
and s
hipping cost
he r
FedE
).
Pleas
make sure
I und
erstand that
hat incurs o
cost
verba
l. In the eve
CCTV
SERVICES II
anship for a
TV Services
Services. Y
paired or re
NT
ill repair or r
period of on
INC. Warra
extendin
nly covers f
does not co
ice the origi
ice the origi
st include ful
accessories,
dvanced repl
ier service p
rchandise
is required,
e Authorizati
ur Merchan
btain a RMA
the parts a
missing part
e problems
ur contact
als. After a
als will deci
n will be foll
f necessary,
placement u
he return ad
in the event
n a order pl
t the shipm
NC has the ri
place, with
e year after
nty Statem
is warranty
ilures due t
er damages
al purchaser
al purchaser
name, ship
hey are no
acements on
rtner.
uthorizati
The Dealer
n (RMA) Nu
ise repaired
number. Thi
d/or access
and/or acc
hich you h
person will
n internal th
e to accept i
wed. CCTV
ccording to
it will be de
ress is deliv
my shipmen
ce by princ
nts are retu
ht to char
ut charge, a
he date of in
nt
nly to the ori
defects in
ue to norma
must presen
must send t
ing address
arranty nor
products an
n)
ust contac
ber, and pr
nd/or repla
s warranty i
ries that co
ssories will
ve with CC
mmediately
h inve
orou
as RMA or
ervices con
CTV Service
ivered to th
rable by ov
s the custo
pals or repr
ned or refus
all shipping
y merchandi
tallation or
inal purcha
aterials and
l everyday u
a sales rec
e product/s
nd telephon
xchange an
defective it
CCTVSERVI
vide the foll
ed by warra
valid for o
es with the
ot be accept
V Services p
forward you
tigation wit
ot and issue
act person
s Warranty p
customer b
rsea carrier
er is respon
sentatives i
d by the cu
and handlin
se proved d
elivered.
er.
orkmanshi
age.
ipt / proof of
repaid to C
number for
returns.
ms will be r
ES Service
wing inform
ty, you must
e year, start
product mu
d for warra
roduct to yo
r problem t
the provid
RMA numbe
ill inform yo
olicy.
carrier serv
ervice.
ible for all s
the compa
tomer, throu
costs.
fective in m
by the man
purchase.
TV Services
our referenc
turned via o
provider to
tion.
contact our
ng from the
t be sent al
ty repair.
r contact p
experience
d descriptio
r. If it is not
of the RMA
ice (like a U
ipping and
ny, either w
h UPS, Fed
terial or
facturer.
r
btain a
hipping
inal
ori
ng with
rson of
d CCTV
, CCTV
he case
number
S, DHL,
andling
itten or
x, DHL.
53
Page 55

HD D
V
T
a
R
o
t
n
t
i
a
n
T
s
c
e
c
e
d
c
t
g
D
H
t
e
o
c
c
N
S
v
r
C
c
n
o
o
t
v
oWid
s
i
i
m
v
o
W
a
m
v
s
P
t
o
w
t
e
n
m
u
n
e
/
a
w
r
h
m
o
V
6
o
e
R User’s Manu
l
Ver 2.1.0
GL
AN
SSA
ADSL
AGP
AVI
BNC
CCTV
CD-R
CD-RW
CPU
DAT
DVD-RAM
GB
GUI
HDD
HDSL
HTTP
ISDN
JPEG
KB
LAN
MB
MPEG4
N/C
N/O
NTSC
PAL
PC
PCI
PSTN
PTZ
RAM
RCA
TCP/IP
USB
VGA
WAN
Y
A
udio Video I
Bay
net Neill Con
Join
Photograph
Phase Alter
Digi
Nation
ran
Asymmetri
Accel
terleave (Mi
celman conn
Close
Compa
Compa
Cen
Di
al Versatile
Grap
High bit-ra
HyperT
Integrated
c Experts Gr
Lo
Moving Pi
l Television
ating Line (
Pe
Peripheral
Public Swit
Pa
Rand
Radio C
mission Con
Uni
Vide
Digital Sub
rated Graph
rosoft’s mult
ctor, or so
d Circuit Tele
ct Disk - Rec
t Disk – Re-
ral Processor
ital Audio T
isk – Rando
Gigabyte
hic User Inte
ard Disk Dri
e Digital Sub
xt Transfer
Service Digi
up (video c
Kilobyte
al Area Net
Megabyte
ctures Exper
N
ormally Clos
ormally Ope
ystem Com
ideo broadca
sonal Comp
omponent I
hed Telepho
, Tilt and Zo
m Access M
rporation of
rol Protocol
versal Serial
Graphic Ad
e Area Net
criber Line
c Port
media comp
etimes Britis
vision
rdable
ritable
Unit
pe
Access Me
rface
e
scriber Line
rotocol
al Network
mpression f
ork
s Group 4
d
n
ittee(525 T
st standard
ter
terconnect
ne Network
om
mory
America
Internet Pr
Bus
ptor
ork
ession forma
Naval Conn
ory
rmat) IS 109
-lines)
25 TV-lines)
tocol
t)
ctor
18-1
54
Page 56
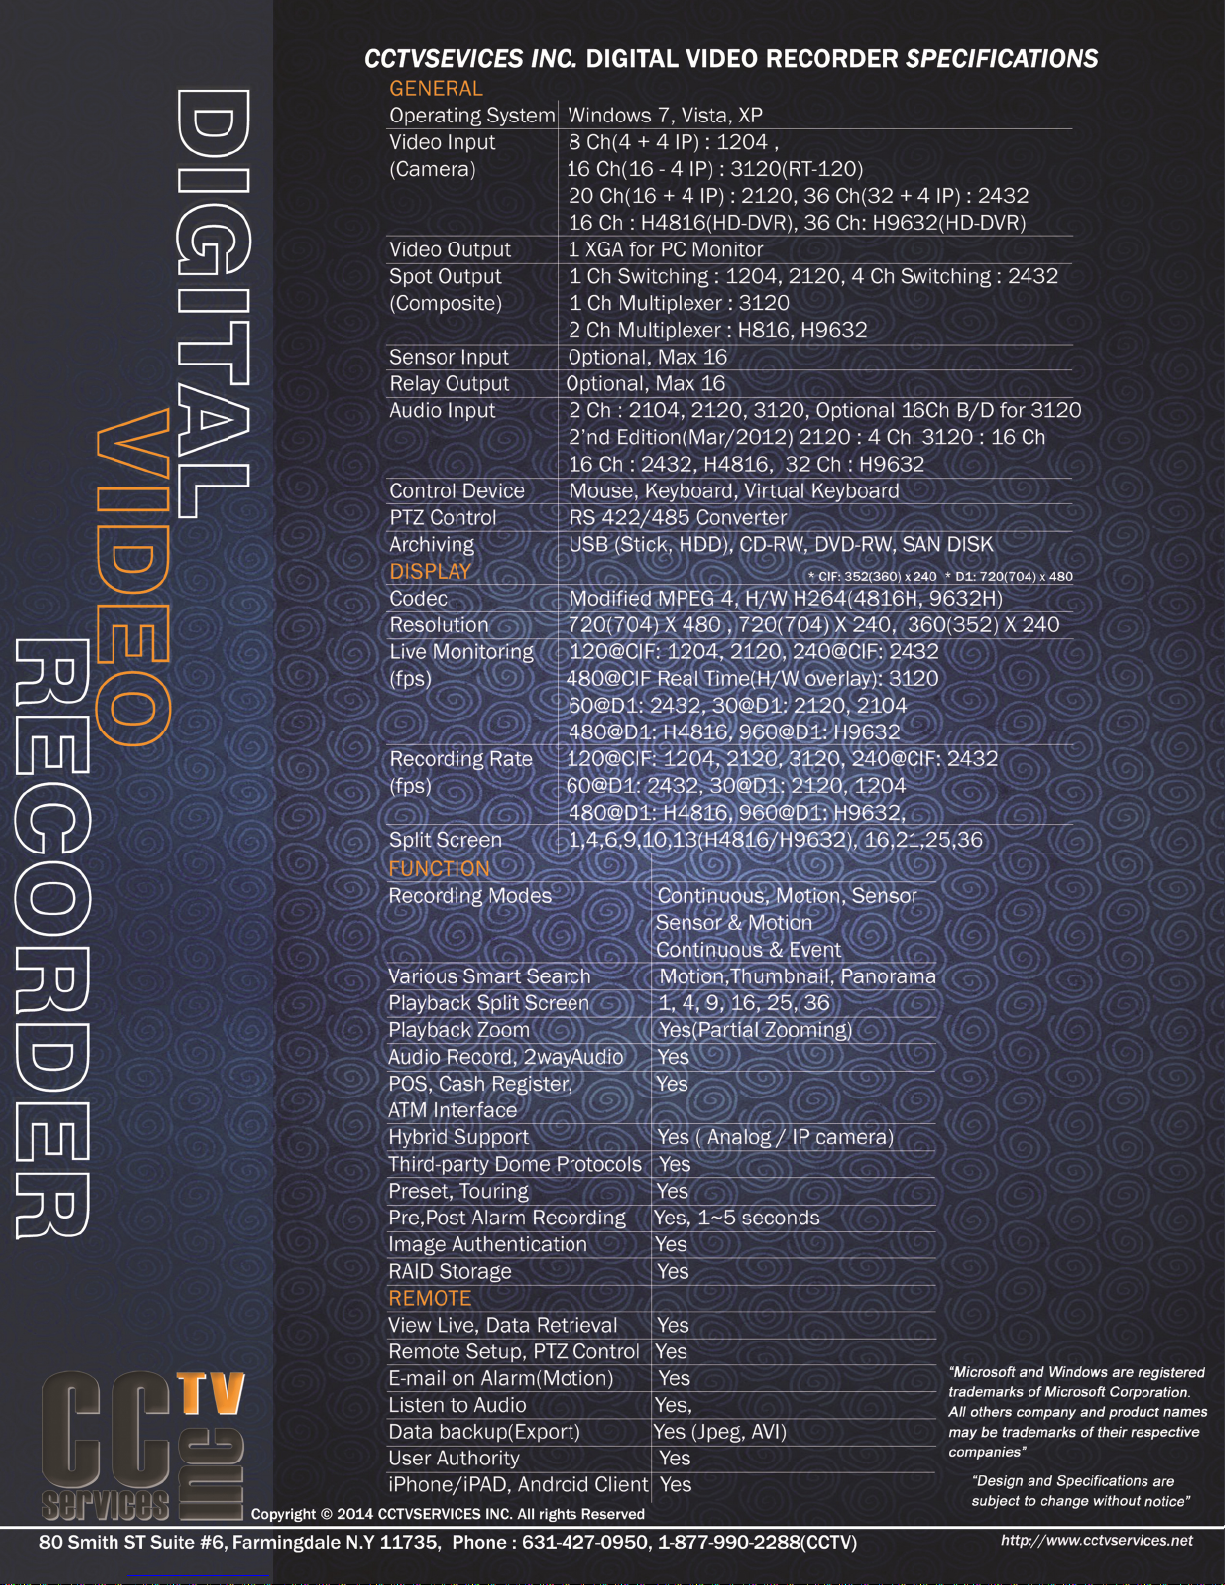
HD D
V
R User’s Manual Ver 2.1.0
55
 Loading...