

CCTV Discover JE-D7004, JE-D7008 User Manual
1

4/8-channel H.264 DVR User Manual
i
Notes .................................................................................................................... iii
Chapter 1 Overview ............................................................................................ 1
1.1 Introduction .............................................................................................. 1
1.2 Packaging and accessories ....................................................................... 1
1.3 Main features ........................................................................................... 1
1.4 Technical parameters ................................................................................ 2
1.5 Product appearance and interface definition ............................................ 3
1.6 Remote controller ..................................................................................... 5
1.7 Mouse ....................................................................................................... 6
Chapter 2 Quick installation ............................................................................... 7
2.1 HDD Installation ...................................................................................... 7
2.2 Boot .......................................................................................................... 7
2.3 System login ............................................................................................. 7
2.4 Shortcut menu .......................................................................................... 8
Chapter 3 Advanced settings ........................................................................... 10
3.1 Main menu ............................................................................................. 10
3.2 Recording mode ..................................................................................... 11
3.3 Video search ........................................................................................... 12
3.4 Backup ................................................................................................... 13
3.5 Hard disk management ........................................................................... 14
3.6 Basic setup ............................................................................................. 15
3.7 Advanced ................................................................................................ 18
3.8 Domain name application ...................................................................... 24
3.9 Port forwarding ...................................................................................... 28
Chapter 4 DVR network ................................................................................... 31
4.1 Functional characteristics ....................................................................... 31
4.2 Installation and download of controls .................................................... 31
4.3 IE log-in ................................................................................................. 32
4.4 Real-time preview .................................................................................. 32
4.5 Record playback ..................................................................................... 33
4.6 Recording mode ..................................................................................... 33
4.7 Alarm setup ............................................................................................ 34
4.8 PTZ control ............................................................................................ 34
4.9 Network setup ........................................................................................ 34

4/8-channel H.264 DVR User Manual
ii
4.10 System setup ........................................................................................ 35
4.11 Host info ............................................................................................... 35
Chapter 5 Client software & Player .............................................................. 36
5.1 Client software ....................................................................................... 36
5.2 Video Player ........................................................................................... 36
Appendix 1. Q&A ........................................................................................ 41
Appendix 2 hard disk space occupation calculation .................................... 43

4/8-channel H.264 DVR User Manual
iii
Notes
The power supply of this DVR is provided through DC12V3A adapter, please
check the power outlet before installation and ensure it can meet the
requirements of adaptor;
Do not place the DVR at a place subject to rain or moisture;
Do not install the DVR at a place subject to violent vibration;
Do not install the DVR at a place subject to direct sunlight, and be far away from
heat and high temperature environment;
The DVR’s back panel shall be 15cm or more away from other objects or wall, to
facilitate fan cooling;
The DVR shall work under temperature, humidity and voltage according to its
technical specifications;
The space where DVR installed shall not be stored with corrosive chemicals that
may produce volatile gases, to avoid to affect the DVR’s life;
The DVR shall be installed in a space without much dust, and the environment
should be kept clean and tidy;
Proper grounding shall be installed during operation;
DVR should be installed to ensure the proper connectivity with other devices.
Please buy hard disk from official channel to meet DVR’s long time and much
data reading and writing requirements.

4/8-channel H.264 DVR User Manual
1
Chapter 1 Overview
1.1 Introduction
This product is a consumer-oriented 4/8-channels CIF/Half-D1/D1 real-time network
DVR,and adopt the industry's most advanced SOC technology and standard H.264
encoding method, so that the image quality is higher, network transmission effect is
better and system is more stable; the body is made under stylish appearance design
and sophisticated manufacturing process, the 1U standard chassis is suitable for
small-scale monitoring places such as shop, supermarket, residential, school, hotel,
Internet cafe, family and other civilian sites where require more on video quality,
network transmission and real-time playback.
1.2 Packaging and accessories
Following parts are included in the package:
~ One IR remote controller
~ A pair of remote controller batteries
~ One piece of product certificate
~ One piece of product instruction
~ One piece of SATA hard disk data cable(installed in the host)
~ One DC12V3A power adapter
~ Support HDD(already installed) and a set of mounting screws.
~ One piece of HDD power cable (already installed in the host)
~ One piece of CD.
1.3 Main features
~ Standard H.264 video compression format
~ 16-bit true-color semi-transparent graphical menu interface, menu options tip
~ A variety of recording modes: manual, timing, movement and alarm recording
~ Optimized four-channel simultaneous playback (single playback for eight-channel
ones)
~ A variety of backup (U disk, mobile hard disk, network)
~ One USB2.0 for data backup, one USB1.1 for the mouse operation
~ Multi-functional operation, recording, playback, monitor, backup and network
transmission can be realized at the same time
~ Dual stream technology
~ Support network to implement multi-screen real-time browsing, parameter setting,
copy or playback
~ Support mobile phone monitoring
~ Support event classification and precise time search and playback
~ Defaulted parameter value fast recovery
~
Flexible USB interface for mouse

4/8-channel H.264 DVR User Manual
2
1.4 Technical parameters
Features Description
Operating system Embedded LINUX OS
Video compression H.264
Video/Audio input 4/8 channels BNC
Video/ Audio output 1 channel BNC
Display 1/4/8-channel
Multiplex operation Live, recording, network, ,mobile phone
surveillance simultaneously
Recording mode Timer/manual/motion detection/alarm
Recording frame rate PAL25fps NTSC30fps
Recording quality Hight,normal,low
Recording resolution CIF/Half-D1/D1 frame rate adjustable
Recording playback 1/4/8 channel playback simultaneously
(Optional playback channel)
Support remote file playback rapid play by
times (Fast Backward)Play by frame etc.
Recording backup Support U-disk backup, moved hard disk
backup, network backup, backup by files,backup
by time
Network transmission 4/8 channels real-time network transmission
with CIF resolution
Capture function Support,
Email alarm Send pictures to the designated Email
PTZ control Support
PTZ protocol PELCO-D,PELCO-P
PIP Support
Zoom Support
HDD Support 1 SATA HDDcapacity to 2T
Network and protocol 1 RJ-45 10/100M via Ethernetsupport TCP/IP
DHCPDNSDDNSNTP etc.
IE browser Support
Client software Support
Dual stream Supportmain and secondary interchange
Group play Support five users online access
Multi-language Support
Mobile phone surveillance Support
Windows,symbian,iPhone,blackberry,Android
SDK package Available
Mouse interface USB1.1
Backup interface USB2.0
Remote controller Support
User authority Support multi-level user authority distribution
Power DC12V/3A
Working temperature 0℃-50℃
Working humidity 10%90%
4/8-channel H.264 DVR User Manual
3
1.5 Product appearance and interface definition
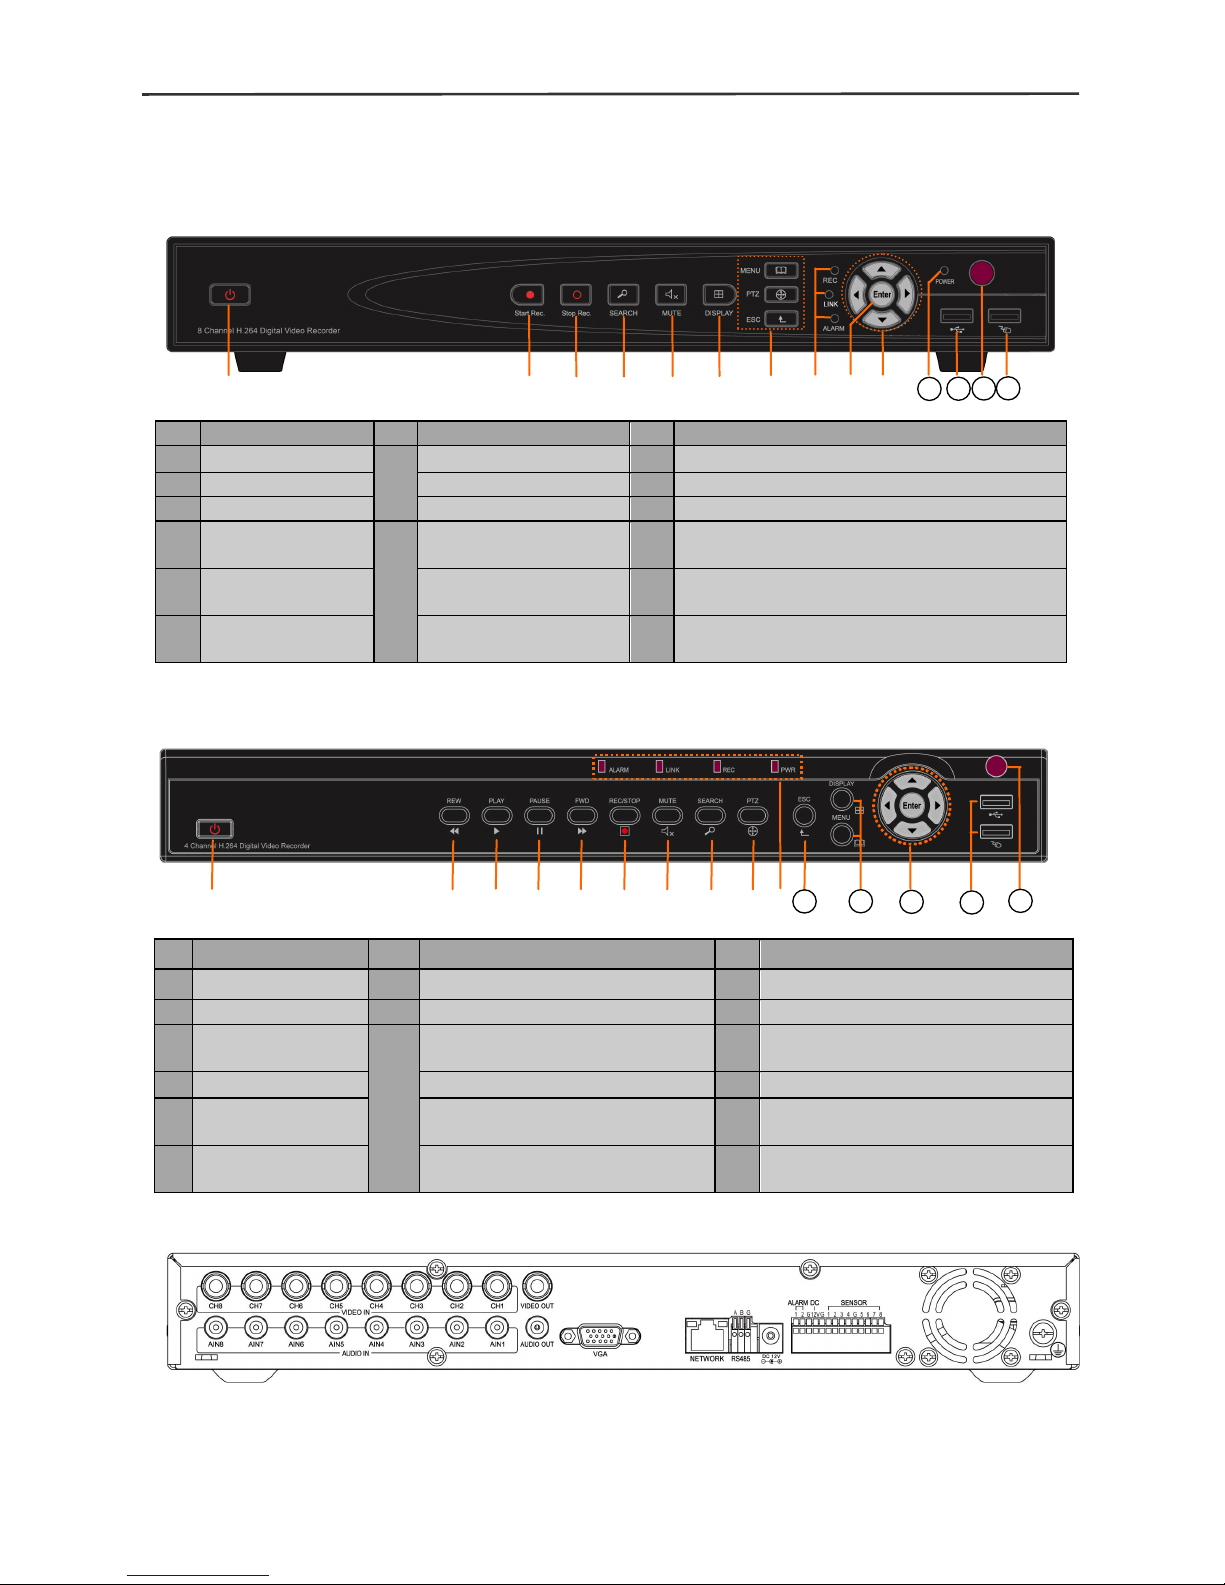
1.5.1 Front panel
Front panel 1
Front panel 2
1.5.2 Back panel
No.
Definition No.
Definition No.
Definition
1
Power switch
7
MENU: Main menu 9
Confirm
2 Manual recording
PTZ: PTZ control 10 Directional keys: up, down, left and right
3 Stop recording
ESC: Exit/Return 11
Power LED
4
Video search
8
REC: Video recording
indicator
12
2.0 USB interface, which can be accessed
to USB disk for backup or upgrade
5
Mute
LINK: Network
connection indicator
13
Remote control infrared receiver
6
Display mode
ALARM: Alarm
indicator
14
USB mouse interface
No.
Definition No.
Definition No.
Definition
1
Power switch 7
Mute 9
PTZ control
2
Rewind 8
Video search 11
Exit/Return
3
Play
10
ALARM:Alarm indicator 12
DISPLAY:Display mode~
MENU:Main menu
4
Pause LINK:Network connection indicator 13 up, down, left , right and Confirm
5
Foward REC: Video recording indicator 14
USB PORT: Used for connecting
USB to backup, upgrade and mouse
6
Manual start/stop
recording
PWR: Power LED 15 Remote control infrared receiver
11
12 13 14
12
15
11
13
14

4/8-channel H.264 DVR User Manual
4
No. Physical interface
Interface description
1 1~4/8CH Video in
Connect analog video(camera) signal input, standard BNC
connector( 4 channel has 4 BNC connector)
2 Video out CVBS output and connect the monitor
3 1~4/8CH Audio in Connect active audio signals, such as pickup
4 Audio out Connect the audio output
5 VGA Connect VGA monitor, such as computer monitor
6 NETWORK Connect the Ethernet
7 RS485 Connect the RS485 interfaces in equipments like PTZ
8 DC12V Power interfaceDC 12V/3A
9 ALARM Connect alarm switch output
10
SENSOR 18
Connect alarm switch input, 4-channel equipment 4-alarm inputs,
8-channel equipment 8-alarm inputs
11
Grounding: To eliminate electrostatic from body
4/8-channel H.264 DVR User Manual
5
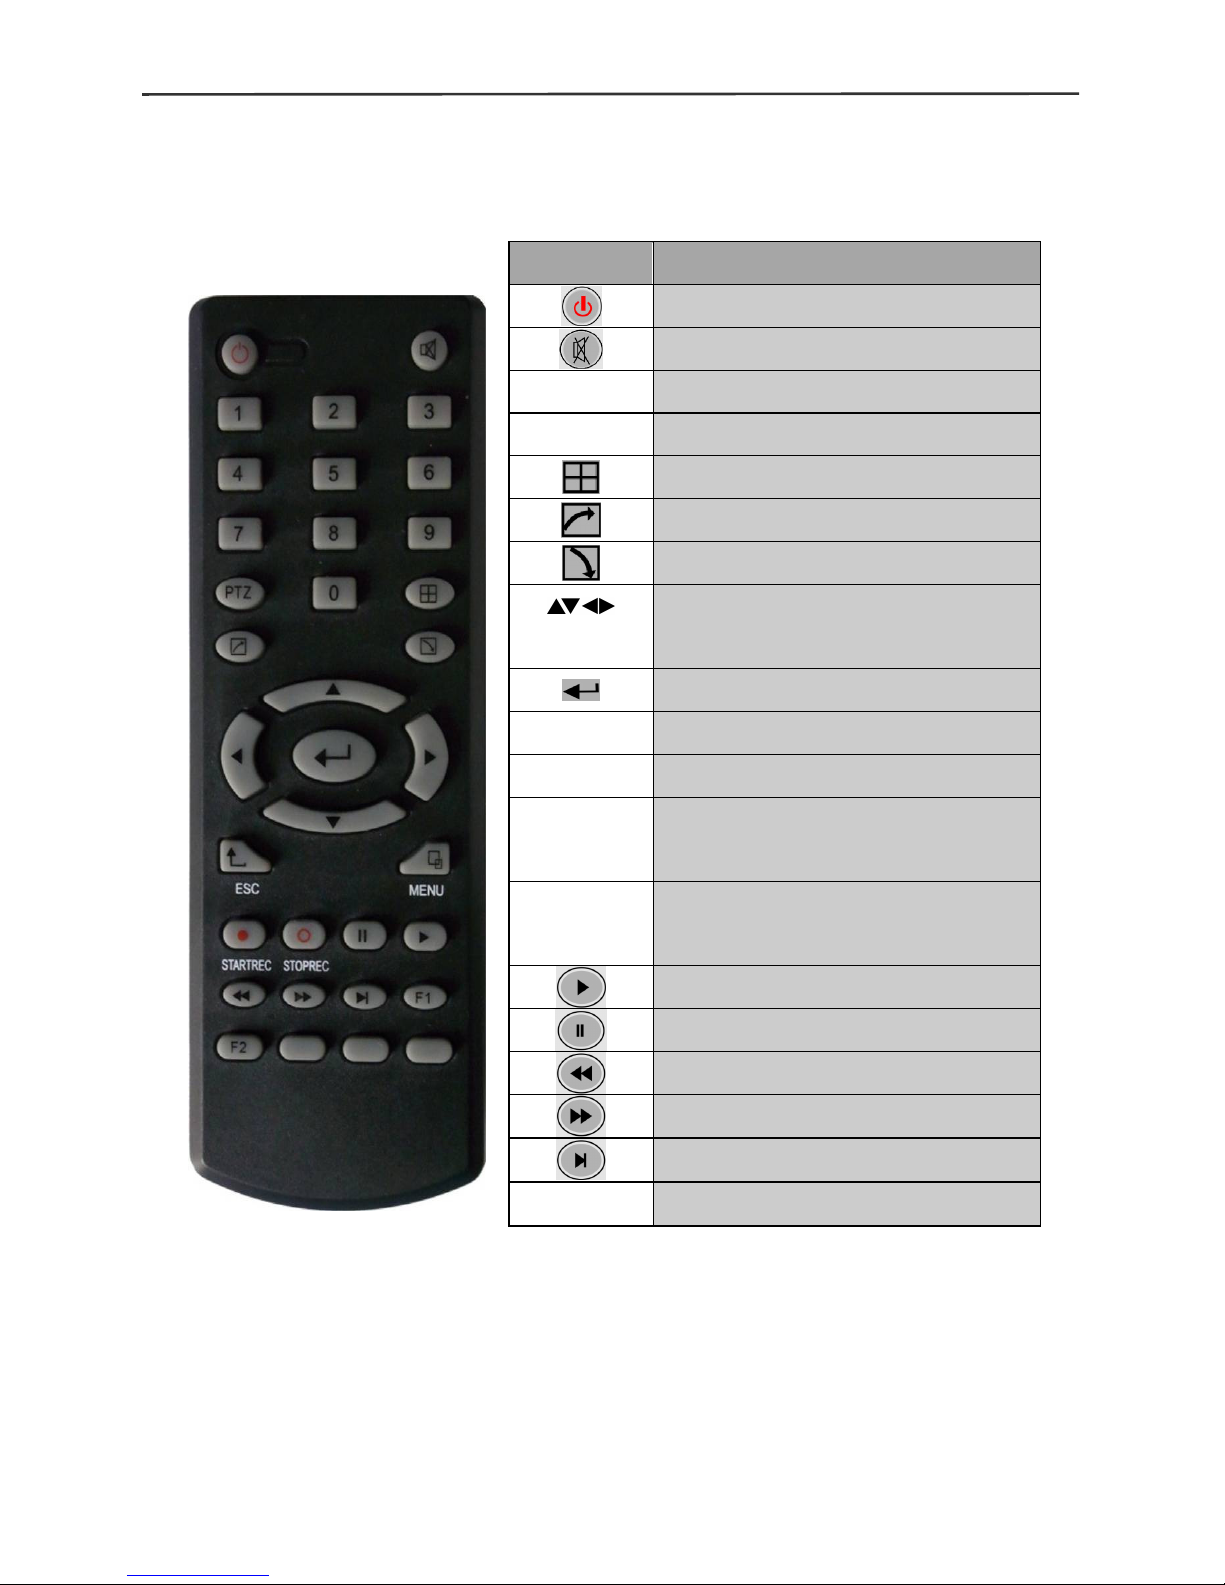
1.6 Remote controller
For reference only, the real product shall prevail.
Key Functional definition
Spare keys
Spare keys
0~9 Channel selection; number keys
PTZ PTZ Control
Single and multi-split screen
Quit shortcut menu
Shortcut menu
Direction buttons: Next, on the left
and right
OK
ESC Exit / Return
MENU Enter the main menu
STARTREC Start recording (please refer to 2.4.6
for the method)
STOPREC Stop recording (please refer to 2.4.6
for the method)
Video Search
Stop playing
Fast backward
Fast forward
Frame movement
F1, F2
Spare key

4/8-channel H.264 DVR User Manual
6
1.7 Mouse
This equipment supports USB1.1 mouse, so the user can operate with mouse (mouse
operation is as same as WINDOWS operating setting) to realize menu functions. It is
just ok to insert the mouse with USB interface to the mouse interface in this equipment.
Mouse
action
Function
Right button
Enter system main menu: real-time screen preview, single mouse left
click
Double
mouse left
click
Single left click the functional menu icon, and enter menu setting page
The image in a channel can be enlarged by double click real-time
monitoring and playback screen, it can be recovered into monitoring
and multi-split image after double click again
Click the left
mouse
button
Access to volume adjustment, color adjustment and PTZ control
menu. The volume adjustment, color adjustment and PTZ control can
set only one channel, please select corresponding screen if
multi-screen mode is on prior to setting.
If you single click mouse button in volume adjustment and PTZ
control:
PTZ control is available if clicking direction or "+ and -" icon;
There is a volume bar in volume control interface. Move mouse to a
position and click right button, the corresponding volume will be
shown in the right side of the volume bar, click "×" to exit;
The operations like color adjustment can be referred to above volume
adjustment.
If there are many options in the option box, click the left button and
drop-down menu will be shown.
Fast forward and fast backward function can be realized by left
clicking in video playback interface.
Click the left button or right button can activate the soft keyboard in
input box, clicking right button can switch English and Chinese input
state; the number, symbol and English word capitalization can be
realized only by clicking.
The Chinese spell is also available via the soft keyboard input when
Chinese input, its input method is as same as remote control; left
button can be used for turning page.
Mouse
movement
Click left button and move can adjust the parameters in volume
adjustment and color adjustment interface, there is corresponding
parameter display in right side when movement.
Click left button and move the motion box can set the dynamic
detection zone in motion detection zone.

4/8-channel H.264 DVR User Manual
7
Chapter 2 Quick installation
2.1 HDD Installation
Hard disk installation must be carried out by technicians to avoid damage to the
equipment and hard disk. The DVR mainframe must be powered off before operation.
This equipment supports hard disk with SATA hard disk interface. Seagate brand hard
disk is recommended.
Installation procedures are as follows:
A. Open the equipment and a hard disk support can be seen.
B. Connect the hard disk data and power cable well
C. Put the hard disk into support, and align the hard disk’s screw hole with the support.
D. Fix the hard disk on the support with screw, and cover the DVR.
Note: the newly fixed hard disk can be served for video recording after formatted
on the mainframe.
2.2 Boot
Connect the DC12V3A power adapter to the power cord socket in back panel, and
press the power button in front panel, the recorder will be on, power indicator
“POWER” is on, the monitor will display 4/8-channel monitoring image. If non-formatted
hard disk exists in the equipment, hard disk formatting information will be shown. If
boot-record mode is on, or boot time is in the setting time, the system will start
automatic recording function, the “REC” indicator will be on to indicate the system is
working normally.
Note:
1.If hard disk is failed to be installed when DVR mainframe is power on, or the newly
installed hard disk is failed to be formatted on the mainframe, the red “H” logo will be
shown in video pre-view picture.
2.The newly installed hard disk must not be used until formatted in the equipment as
follows: Main Menu HDD HDD Format. The system will be restarted after
completion of formatting.
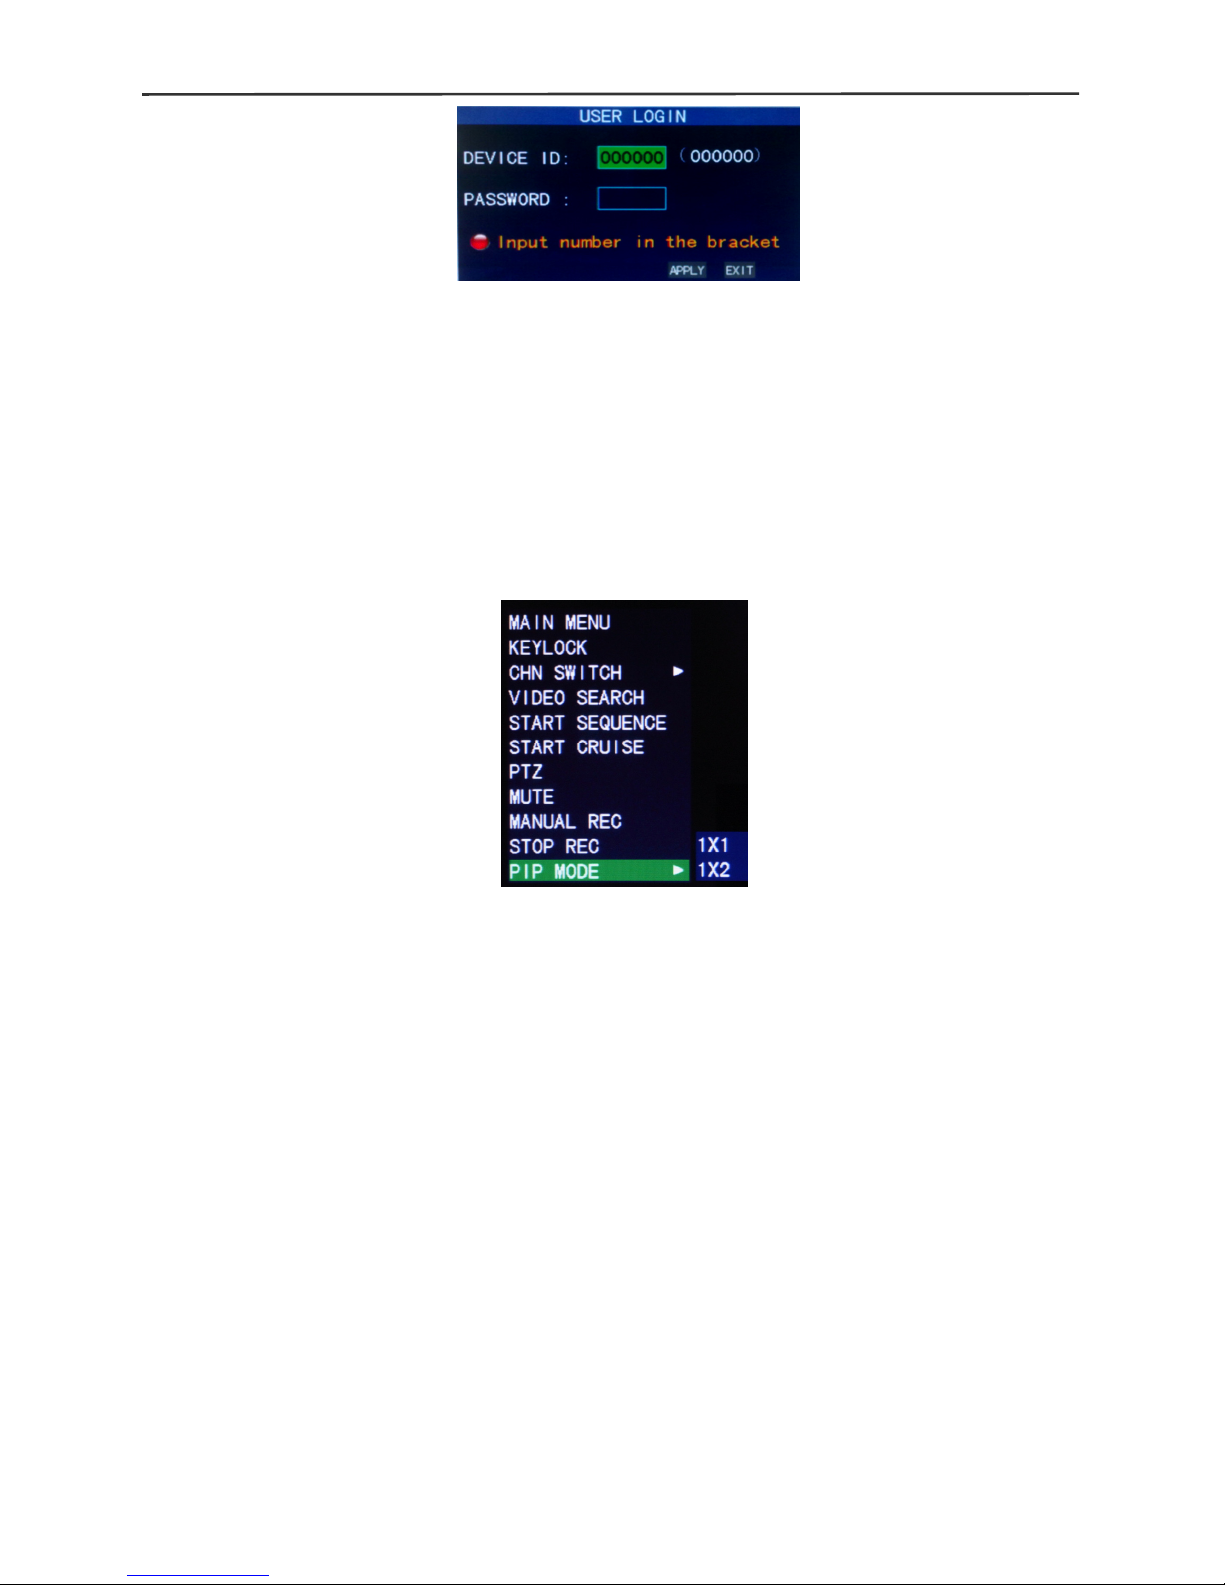
2.3 System login
The DVR initial code is 000000 without any password, the user can log in main menu
directly. For better safety of equipment operation, the administrator can enter system
“Basic Settings” – “User Password” to change the code and password of this
equipment. You can set ordinary user password and administrator password, the
administrator has all the operating privileges, ordinary users only have limited choices,
and they can only monitor and video search/ playback. (the mainframe will match
automatically when you enter password, and different permissions will be given
according to different passwords).
If you want to operate in mainframe menu after password is set, the system will display
“user login” interface:
4/8-channel H.264 DVR User Manual
8
Equipment code: it is just ok to enter equipment code “000000” displayed on right side
in corresponding input box. The defaulted code will be guided to the number box when
mouse operation; we recommend to set mainframe password when remote controller is
operating many equipments, to divide through targeted equipment code input, or the
remote controller will disturb the adjacent mainframe.
2.4 Shortcut menu
Click right button in the interface after system startup, quick operations are available to
DVR system in the pop-up menu, it can set or control parameters including main menu,
lock, video search, PTZ control and video recording.
2.4.1 Main menu
Click "Main Menu" to enter the main menu interface, please see 3.1.
2.4.2 Lock
When the password function is on (please see 2.3), click right button in monitoring
interface, and select "Lock" in the pop-up menu, the system interface can be locked
immediately, password is required to log in if operation to mainframe menu is needed.
2.4.3 Channel switching
8-channel DVR can choose eight-channel, front four-channel and back four-channel.
4-channel DVR can choose to switch 4-channel and one-channel.
2.4.4 Video search
Please see Chapter 3.
2.4.5 Start Sequence
Start video channel automatic switching function. (Right-click to exit)
2.4.6 Start Cruise
PTZ preset start cruising capabilities. (right click again to opt out cruise)
Note: This feature can only be valid after set up PTZ control parameters and
preset points.
4/8-channel H.264 DVR User Manual
9
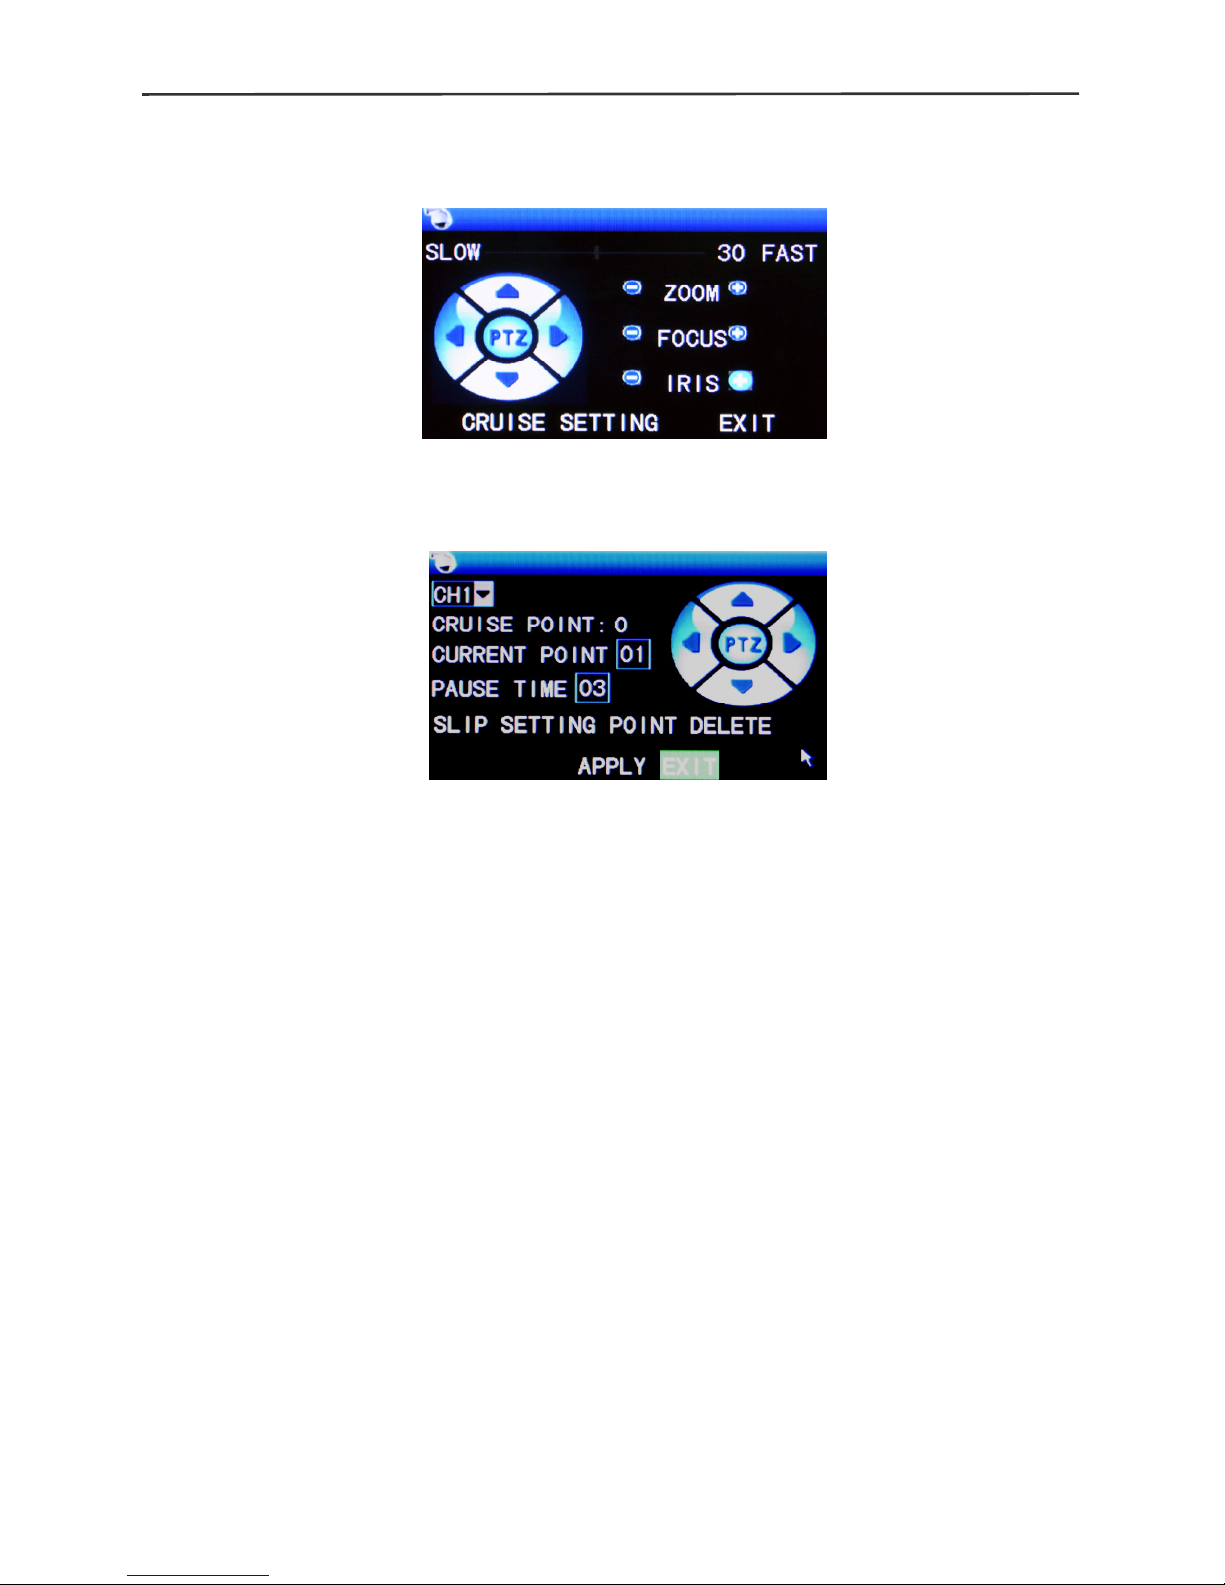
2.4.7 PTZ Control
Click right button in main interface and select “PTZ control”, following interface will
pop-up:
PTZ speed (fast or slow) can be controlled in this interface, zoom, focus and aperture is
also controllable.
Cruise setting:
Step 1 Select the PTZ channel
Step 2 Set the retention time (s)
Step 3 Adjust the arrow keys to the position which need to be monitored
Step 4 Press SETTING POINT .Repeat steps 2-4 to set the second location
Step 5 Select the APPLY button to save the settings
----END
Note: 1, If you need to set up more points, repeat steps 2-5
2, to view the point has been set, in the current point enter the number, select SLIP 3,
to delete the point has been set, enter the number, select delete
2.4.6 MUTE
2.4.7 Manual recording/stop recording
If “timing record” is on (please see Chapter 3), and recording is not set in this period,
"manual recording" and "timing record" is effective. When boot-record mode is on, this
function is not available.
2.4.9 ZOOM
In the single-channel full-screen mode, can be done by dragging the mouse to
marquee area to enlarge
4/8-channel H.264 DVR User Manual
10
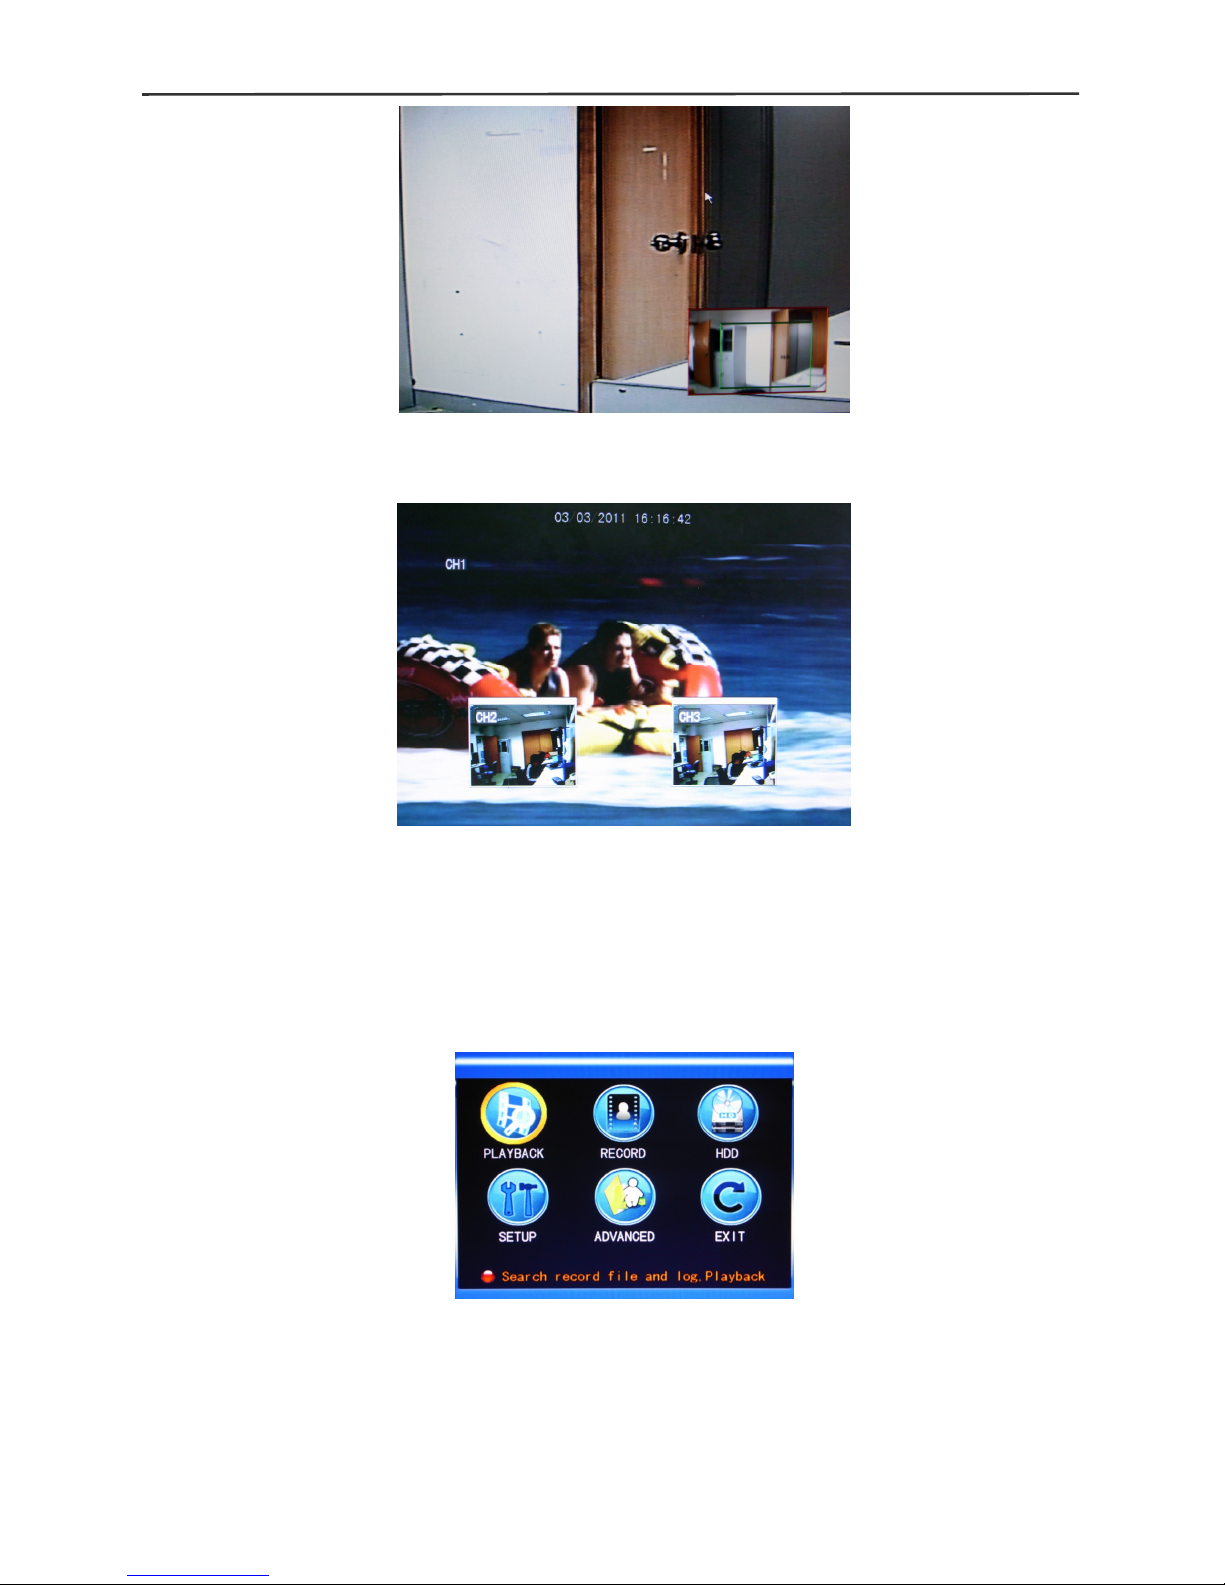
2.4.10 PIP
In the single-channel full-screen mode, you can see floating images of other channels.
Chapter 3 Advanced settings
3.1 Main menu
The main menu has the “PLAYBACK”, “RECORD”, “HDD”, “BASIC”, “ADVANCED” and
“Exit” options, as shown below:
Note: The setup of all the submenus below will not be effective until “Enter” is pressed.
The setup of this menu will be invalid if you exit directly. A significant characteristic of
this product is when you move the cursor to any option, the prompting message of this
option will be displayed automatically in the lower part of the screen.
4/8-channel H.264 DVR User Manual
11
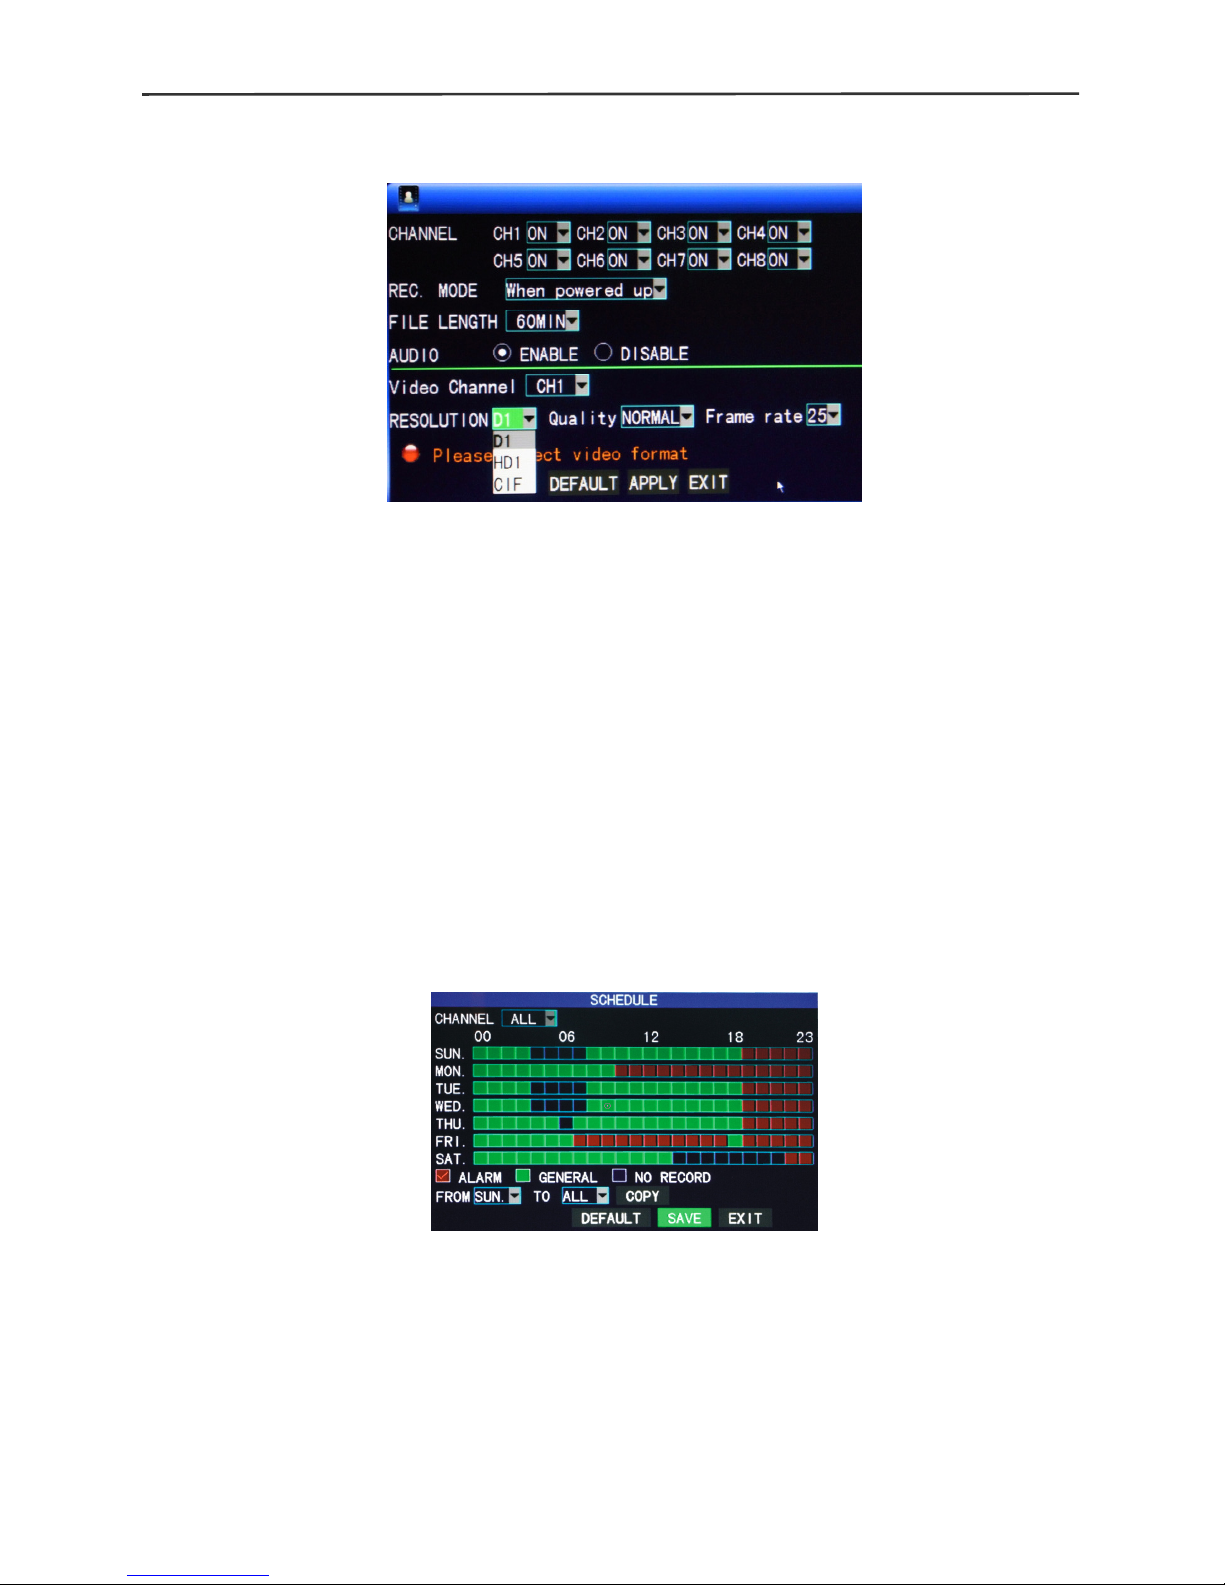
3.2 Recording mode
Enter the Recording Mode screen from “Main Menu”—“Record”, as shown below:
Channel: used to select if the video recording function is enabled for the corresponding
recording channel.
RESOLUTION: available in the 3 levels of D1704*576, HD1704*288and CIF
352*288(Note: This option is available for 4-channel DVR only, and the resolution
of 8-channel DVR is CIF by default .)
QUALITY: available in the 3 levels of high, normal and low, corresponding to the 3 data
stream standards of high, normal and low bit rates.
Frame rate: adjust frame rate
AUDIO: switching on or off audio recording.
REC.MODE: available in the two modes of startup recording and timing recording.
When powered up: starting recording when this unit is energized (It works only if
the corresponding channel is enabled in the “Channel” option.)
BY TIME: performing recording as scheduled. When “timing recording” is selected,
the “Record Time Configuration” button will appear on the right. Move the cursor here
and press “Enter” to enter the Record Time Configuration screen, as shown below:
Channel: You may choose either “All” or a single channel.
Time configuration: First select from the 3 modes of alarm recording, general
Recording and no recording for your desired recording mode for a certain lattice,
and configure specific recording time lattices (each lattice represents 1hr). Each
lattice can be configured into different recording modes by marking them into
different colors, such as red, green and background color, which represent alarm
recording, general recording or no recording within each hour respectively.
FILE LENGTH: Left-click or press “Enter” to select the File length, with the 4 options of
 Loading...