

CCTV SDVR004A, SDVR194B, SDVR198B, SDVR196B Quick Manual
0
4‐8‐16 INPUTS H264 STAN
D‐
ALONE
DIGITAL VIDEO RE
CO
RDER
ART. SDVR004A
SDVR194B
SDVR198B
SDVR196B
Quick Guide
This manual is to help you set up your DVR in a basic manner and playback or remote access
your DVR. Please see the User Manual on included CD for more detailed instructions.
Via Don Arrigoni, 5 24020 Rovetta S. Lorenzo (Bergamo)
http://www.comelitgroup.com e‐mail:export.department@comelit.it

1
Table of Contents
1. Important Safeguards and Warnings .......................................................................................2
2. Package Contents ...................................................................................................................2
3. Hard Disk Installation...............................................................................................................2
4. Front Panel ..............................................................................................................................3
5. Rear Panel (please take actual machine model as quasi) .......................................................4
6. Remote Controller ...................................................................................................................6
7. Basic Operation .......................................................................................................................6
7.1 Login System.....................................................................................................................6
7.2 Live View ...........................................................................................................................6
7.3 Status and Tool Bar ...........................................................................................................7
7.4 HDD Management.............................................................................................................7
7.5 Record Setting...................................................................................................................7
7.5.1 Manual Recording ...................................................................................................8
7.5.2 Schedule Recording ................................................................................................8
7.6 Video Playback..................................................................................................................8
7.7 File Back Up ......................................................................................................................9
7.8 PTZ Control—(optional).....................................................................................................9
7.9 Network Settings—(optional) .............................................................................................9
8. Web Operation (products with LAN function) ........................................................................10
9. Wap Connection (products with LAN function) ...................................................................... 11
10. Mobile Phone Support (products with LAN function)............................................................ 11
11. How to use Auto ID………………………………………………………………………………….12
2
1. Important Safeguards and Warnings
Don’t place heavy objects on the DVR. Avoid dropping or striking the DVR.
Keep the DVR in a normal room environment, between 0oC ~ +45oC, away from any direct
heat source like direct sun light. Please do not install the DVR in a damp, smoky, or dusty
environment. Do not let solids or liquids fall into or infiltrate the DVR.
Please install the DVR on a flat surface.
Use within the power and surge protection rating.
Don’t disassemble or try to repair the DVR by yourself. Attempts to do so will void
manufacturer’s warranty!
2. Package Contents
Y
our DVR package should come with the following items:
DVR
Remote Control
Power Adapter and Power Cord
CD (with full manual and DVR software)
This Quick Guide
Mouse (optional)
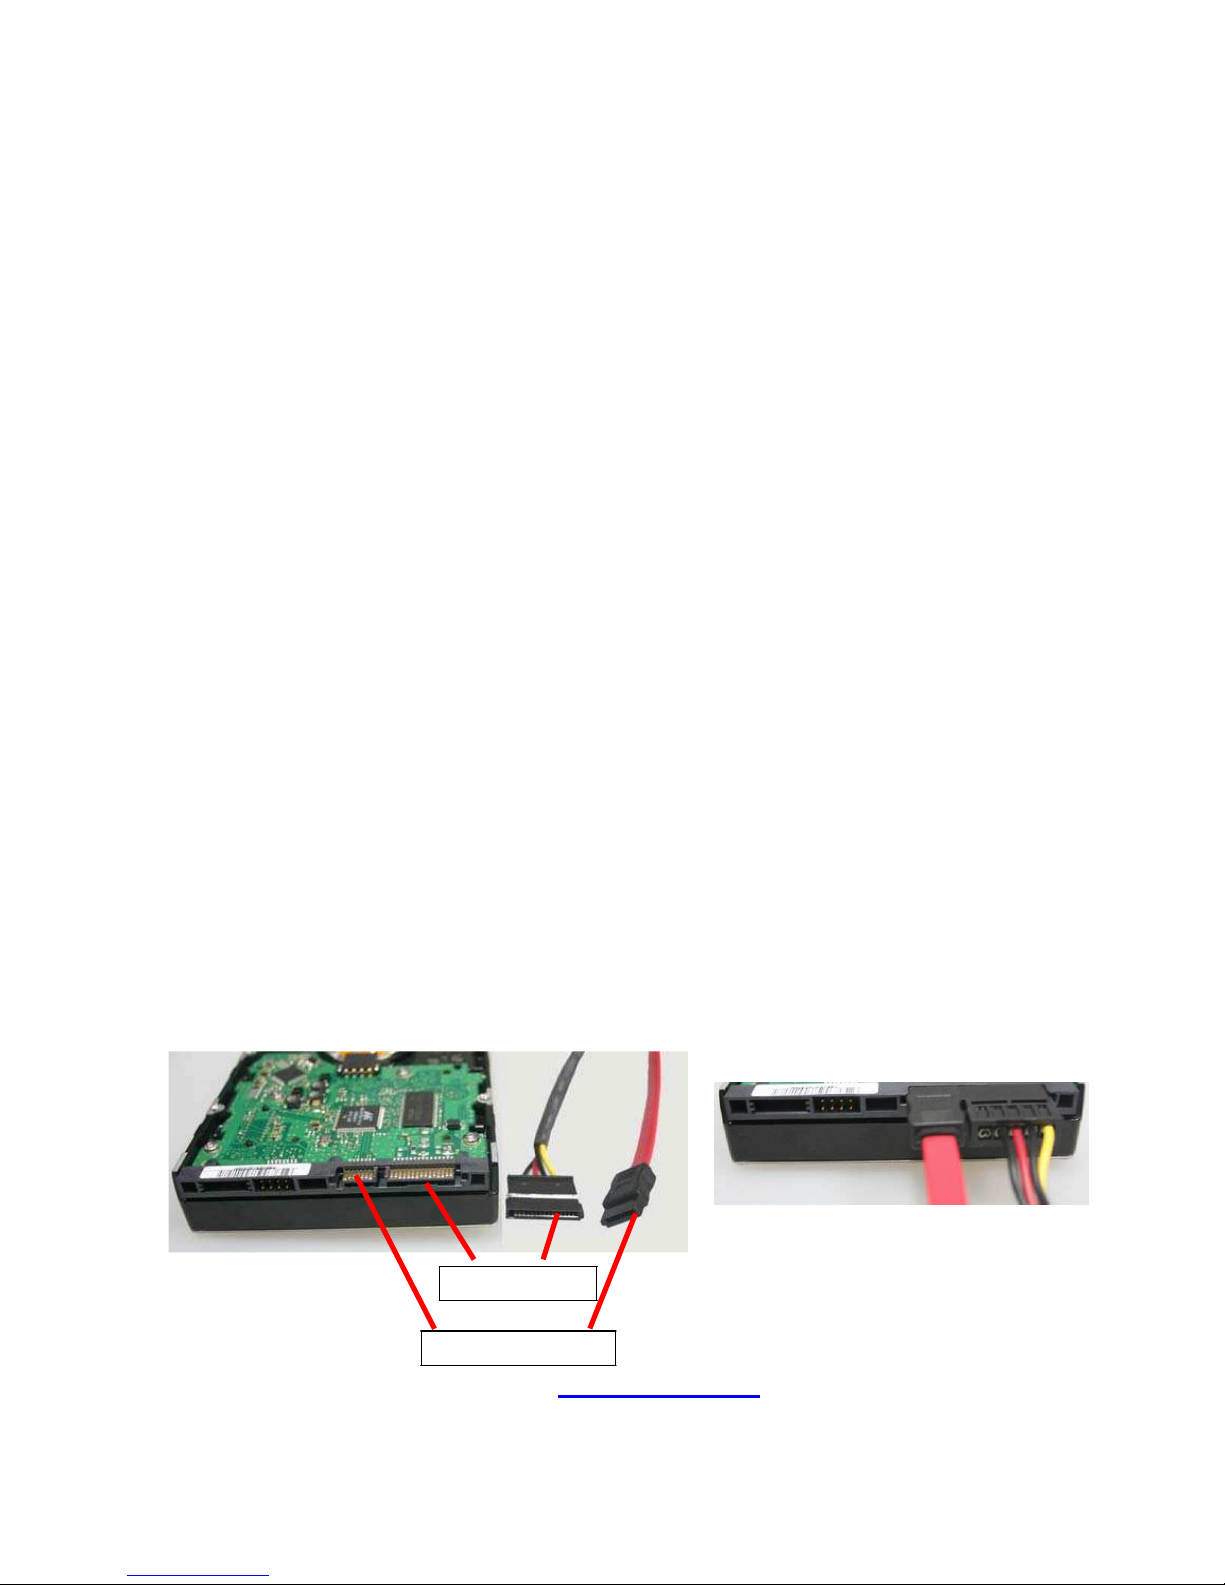
3. Hard Disk Installation
Your HDD needs to be installed before you can start recording. Some DVRs come with
pre-installed hard drive. Please install HDD as following:
1) Open case by removing screws from back and sides of DVR.
2) Please connect the HDD in the standard way, screwing the HDD into the HDD brackets or
DVR base. All necessary cables are delivered with the DVR. Use instructions that came with the
hard drive for exact wiring and installation. Please connect the power cable to the appropriate
socket, and the data cable to its corresponding connector.
3) Close case and re-screw the screws to secure.
Power connector
Data connector
NOTE: format the HDD before first use (7.4 HDD Management).
3
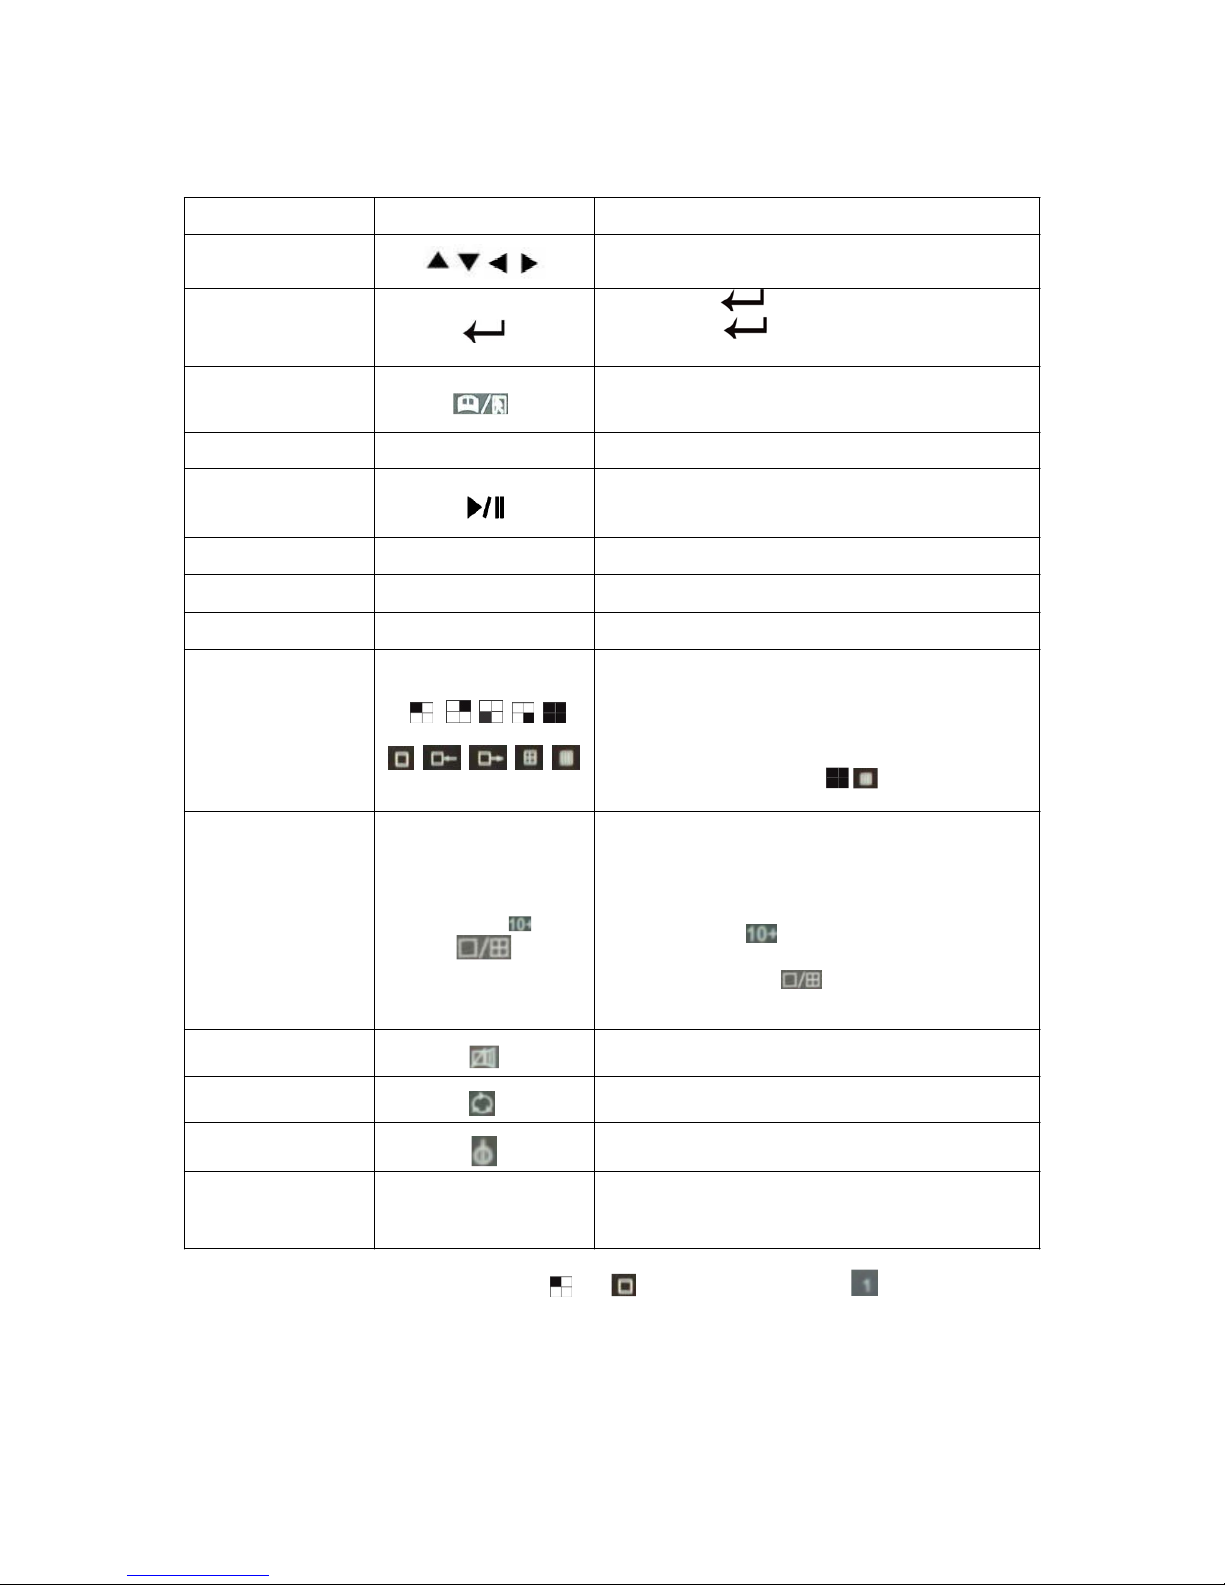
4. Front Panel
(some products have this function, please take actual machine mode as quasi)
Type Name Introduction
Control Buttons
Use arrow buttons to move among the menu
items
Press Enter ( ) to confirm your choice. On
Enter
live view the [ ] button is used as PTZ
control key
Menu/Exit
Access tool bar/ Hide tool bar/ Exit menu/ Exit
sub menu
Rewind ◄◄ Rewind video during playback
Opens video search and playback menu. When
Play/Pause
the playback mode is activated, press this button
to play/pause playback
Stop ■ Stop playback
Fast Forward ►► Fast forward video during playback
REC ● Start or Stop manual recording
Channel Selecting
Button (4CH/8CH)
Using these buttons you can choose to output
video on your monitor either as a full-screen view
of each of the cameras individually (channels 1
through 4/8 depending on the model) or from all
channels simultaneously ( / ).
Channel Selecting
Button (16CH)
Number 0~9
Buttons/
Using the number buttons you can choose to
output video on your monitor either as a
full-screen view of each of the cameras
individually (channels 1 through 9) or you can
combine button “ ” with other buttons to select
channels among Channel 10 and Channel 16.
Pressing the button “ ” to switch display
modes.
Mute ON/Mute Off Turn on or turn off sound
Spot View Using this button to enable auto sequencing
Power Off Turn off the DVR
LEDs
Power LED/ REC LED/
Net LED
LED lights indicate your connection to the power
supply, recording status and net status.
Note: on live view press the button or or numerical button ten times when
there is no tool bar, to switch the main menu between BNC video output and VGA video
output.
4
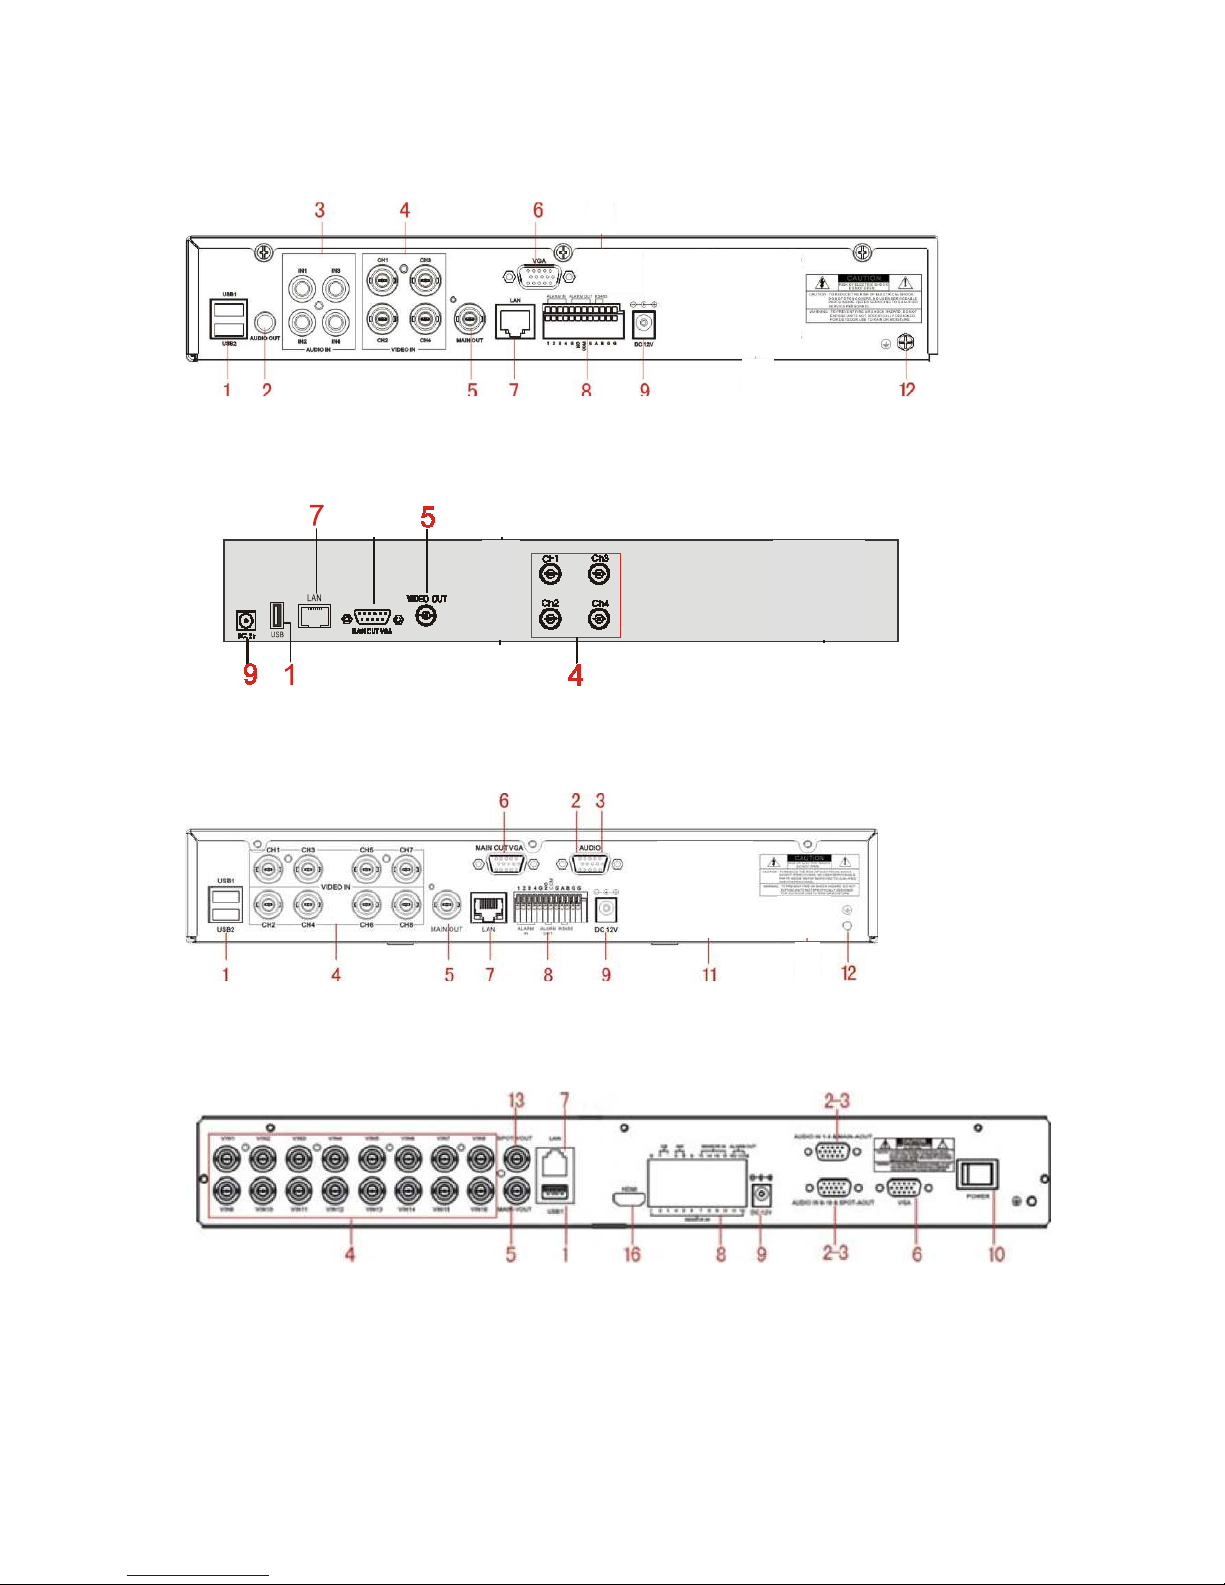
5. Rear Panel
(please take actual machine model as quasi)
Art. SDVR194B
Art. SDVR004A
6
Art. SDVR198B
Art. SDVR196B
 Loading...