

Page 1
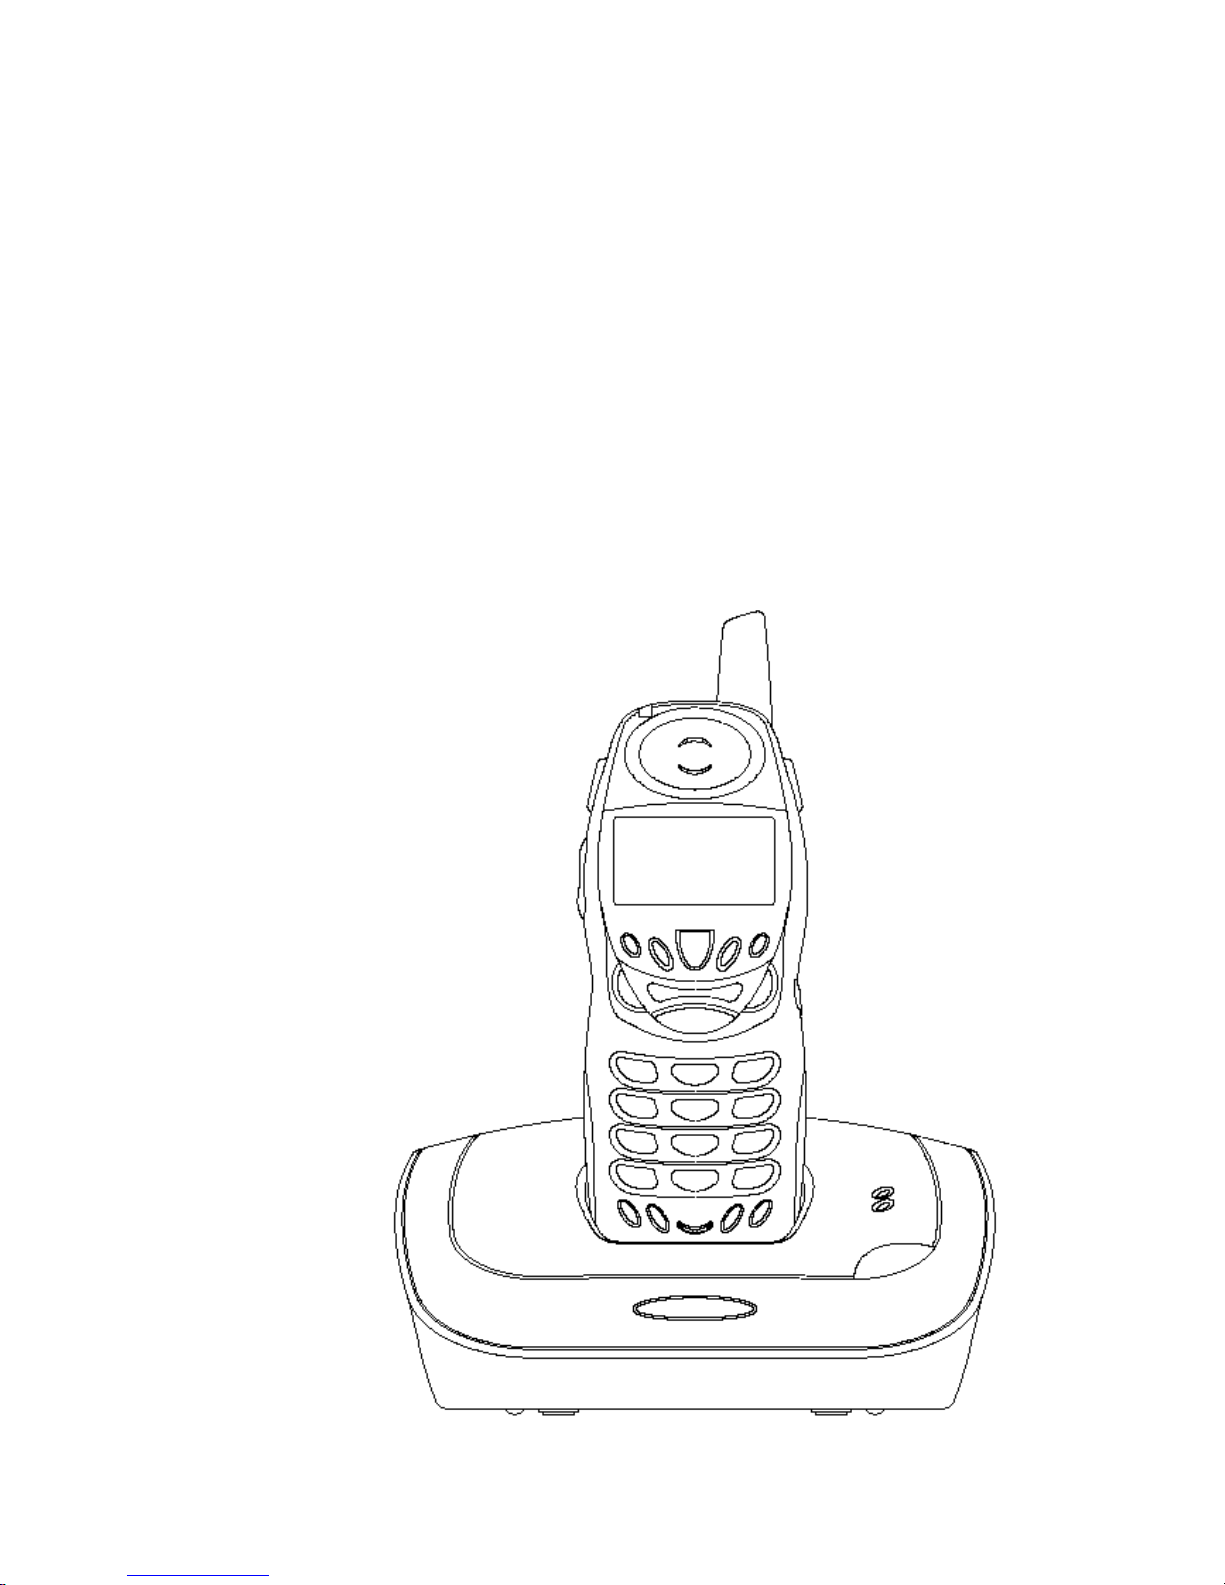
MD220
5.8GHz Digital Cordless Phone with Basic
Caller ID Type 2.0/2.5
User’s Guide
Page 2

QUIPMENT APPROVAL INFORMATION
E
Your telephone equipment is approved for connection to the Public Switched
Telephone Network and is in compliance with parts 15 and 68, FCC Rules and
Regulations and the Technical Requirements for Telephone Terminal
Equipment published by ACTA.
1. Notification to the Local Telephone Company
On the bottom of this equipment is a label indicating, among other information,
the US number and Ringer Equivalence Number (REN) for the equipment. You
must, upon request, provide this information to your telephone company.
The REN is useful in determining the number of devices you may connect to
your telephone line and still have all of these devices ring when your telephone
number is called. In most (but not all) areas, the sum of the RENs of all devices
connected to one line should not exceed 5. To be certain of the number of
devices you may connect to your line as determined by the REN, you should
contact your local telephone company.
A plug and jack used to connect this equipment to the premises wiring and
telephone network must comply with the applicable FCC Part 68 rules and
requirements adopted by the ACTA. A compliant telephone cord and modular
plug is provided with this product. It is designed to be connected to a
compatible modular jack that is also compliant. See installation instructions for
details.
Notes
This equipment may not be used on coin service provided by the
telephone company.
Party lines are subject to state tariffs, and therefore, you may not be able
to use your own telephone equipment if you are on a party line. Check
with your local telephone company.
Notice must be given to the telephone company upon permanent
disconnection of your telephone from your line.
If your home has specially wired alarm equipment connected to the
telephone line, ensure the installation of this product does not disable your
alarm equipment. If you have questions about what will disable alarm
equipment, consult your telephone company or a qualified installer.
2. Rights of the Telephone Company
Should your equipment cause trouble on your line which may harm the
telephone network, the telephone company shall, where practicable, notify you
that temporary discontinuance of service may be required. Where prior notice
1
Page 3

is not practicable and the circumstances warrant such action, the telephone
company may temporarily discontinue service immediately. In case of such
temporary discontinuance, the telephone company must: (1) promptly notify
you of such temporary discontinuance; (2) afford you the opportunity to correct
the situation; and (3) inform you of your right to bring a complaint to the
Commission pursuant to procedures set forth in Subpart E of Part 68, FCC
Rules and Regulations.
The telephone company may make changes in its communications facilities,
equipment, operations or procedures where such action is required in the
operation of its business and not inconsistent with FCC Rules and Regulations.
If these changes are expected to affect the use or performance of your
telephone equipment, the telephone company must give you adequate notice,
in writing, to allow you to maintain uninterrupted service.
INTERFERENCE INFORMATION
This device complies with Part 15 of the FCC Rules. Operation is subject to the
following two conditions: (1) This device may not cause harmful interference;
and (2) This device must accept any interference received including
interference that may cause undesired operation.
This equipment has been tested and found to comply with the limits for a Class
B digital device, pursuant to Part 15 of the FCC Rules. These limits are
designed to provide reasonable protection against harmful interference in a
residential installation. This equipment generates, uses, and can radiate radio
frequency energy and, if not installed and used in accordance with the
instructions, may cause harmful interference to radio communications.
However, there is no guarantee that interference will not occur in a particular
installation. If this equipment does cause harmful interference to radio or
television reception, which can be determined by turning the equipment off and
on, the user is encouraged to try to correct the interference by one or more of
the following measures:
Reorient or relocate the receiving antenna (that is, the antenna for radio or
television that is “receiving” the interference).
Reorient or relocate and increase the separation between the
telecommunications equipment and receiving antenna.
Connect the telecommunications equipment into an outlet on a circuit
different from that to which the receiving antenna is connected.
2
Page 4

If these measures do not eliminate the interference, please consult your dealer
or an experienced radio/television technician for additional suggestions. Also,
the Federal Communications Commission has prepared a helpful booklet,
“How To Identify and Resolve Radio/TV Interference Problems.” This booklet
is available from the U.S. Government Printing Office, Washington, D.C.
20402. Please specify stock number 004-000-00345-4 when ordering copies.
CAUTION / WARNING: Changes or modifications not expressly approved by
Market Direct could void not only the user’s authority to operate the equipment,
but also the limited warranty.
EARING AID COMPATIBILITY
H
This telephone system meets FCC standards for Hearing Aid Compatibility.
US NUMBER IS LOCATED ON THE CABINET BOTTOM
REN NUMBER IS LOCATED ON THE CABINET BOTTOM
(HAC)
FCC RF Radiation Exposure Statement
This equipment complies with FCC RF radiation exposure limits set forth for an
uncontrolled environment. This equipment should be installed and operated
with a minimum distance of 20 centimeters between the radiator and your body.
This transmitter must not be c0-located or operated in conjunction with any
other antenna or transmitter.
For body worn operation, this phone has been tested and meets the FCC RF
exposure guidelines when used with the belt clip supplied with this product.
Use of other accessories may not ensure compliance with FCC RF exposure
guidelines.
3
Page 5

ABLE OF CONTENTS
T
EQUIPMENT APPROV AL INFORMA T ION
INTERFERENCE
HEARING AID COMPATIBILITY (HAC)
INTRODUCTION
HANDSET LAYOUT
BASE LAYOUT
BEFORE YOU BEGIN
PARTS CHECKLIST
TELEPHONE JACK REQUIREMENTS
IMPORTANT INSTALLATION INFORMATION
IMPORTANT INSTALLATION GUIDELINES
INSTALLING THE PHONE
CONNECTING THE AC
POWER
CONNECTING THE TELEPHONE LINE
INSTALLING THE HANDSET BATTERY
INSTALLING BASE UNIT BATTERIES
WALL MOUNTING THE BASE
TELEPHONE SETUP
PROGRAMMABLE MENUS
LANGUAGE
LOCAL AREA CODE
REGIONAL AREA CODE
HANDSET NAME
RINGER VOLUME
RINGER TONE
VIP MELODY
VOICE MAIL NUMBER
INFORMATION SERVICES NUMBER
VIBRATE CALL ALERT
HANDSET REGISTRATION
DEFAULT
TELEPHONE OPERATION
CHARGE INDICATOR
VOICE MAIL WAITING INDICATOR
MAKING A CALL
ANSWERING A CALL
INFORMATION
(ELECTRICAL)
REDIAL
FLASH
VOLUME
MUTE
PAG E
FROM BASE
PAG ING
CALLER (CID)
CALL WAITING CALLER ID
REVIEW CID RECORDS
DELETE A CID RECORD
DELETE ALL CID RECORDS
CHANGING THE NUMBER FORMAT
MEMORY
STORING A NAME AND NUMBER IN MEMORY
REVIEWING AND DELETING STORED
NUMBERS
SHORT-CUT KEYS FOR TELCO FEATURES
CANCEL CALL WAITING BUTTON
INFO BUTTON
REP DIAL BUTTON
VOICE MAIL BUTTON
AUTO REDIAL BUTTON
CALLER ID 2.5 (CALL WAITING DELUXE)
ANSWER
BUSY
CONFERENCE
VOICE MAIL
HOLD
DROP
HOLD STATE
CONFERENCE CALL STATE
BELT CLIP AND OPTIONAL HEADSET
ATTACHING THE BELT CLIP
CONNECTING AN OPTIONAL HEADSET TO
THE HANDSET
CHANGING THE BATTERY
BATTERY SAFETY PRECAUTIONS
4
Page 6

DISPLAY MESSAGES
TROUBLESHOOTING TIPS
CORDLESS PHONE SOLUTIONS
CALLER ID SOLUTIONS
GENERAL PRODUCT CAR E
CAUSES OF POOR RECEPTION
SERVICE
INDEX
LIMITED WARRANTY
LIMITATION OF WARRANTY
5
Page 7

NTRODUCTION
I
CAUTION:
that should always be followed. Refer to the IMPORTANT SAFETY
INSTRUCTIONS provided with this product and save them for future reference.
When using telephone equipment, there are basic safety instructions
Congratulations on purchasing this Caller ID Cordless Phone. This system
operates in the 5.8GHz frequency range, and is unique to conventional
cordless telephones. You can place a fully featured cordless handset
anywhere an electrical power line is available.
Features:
5.8 GHz digital technology
Caller ID 2.0/2.5
Call Waiting ID Deluxe
Up to 50 phonebook memory
This telephone has been designed to be simple to use, however, you can
reach its full potential more quickly by taking a few minutes to read this
instruction book. This telephone is a multifunction product for use with Call
Waiting and Caller ID services available from your local telephone company.
Your caller ID Call Waiting phone allows you to:
View the name and telephone number of a caller while you are on the
phone (Call Waiting Caller ID).
Identify callers before you answer the phone.
View the time and date of each incoming call.
Record up to 40 Caller ID messages sequentially in the handset.
Know who called while you are on the other line or when you were away.
Screen unwanted calls, eliminate harassment from annoying calls, or to
get prepared before answering a call.
6
Page 8
IMPORTANT: Because cordless phones operate on electricity, you should have at least one
phone in your home that is not cordless, in case the power in your home goes out.
IMPORTANT:
separate services available from your local telephone company: the standard Name/Number
Caller ID Service to know who is calling when the phone rings and Call Waiting Caller ID
Service to know who is calling while you are on the phone.
INSTALLATION NOTE: Some cordless telephones operate at frequencies that may cause
interference to nearby TVs, microwave ovens, and VCRs. To minimize or prevent such
interference, the base of the cordless telephone should not be placed near or on top of a TV,
microwave oven, or VCR. If such interference continues, move the cordless telephone further
away from these appliances. Certain other communications devices may also use the 5.8 GHz
frequency for communication, and, if not properly set, these devices may interfere with each
other and/or your new telephone. Typical devices that may use the 5.8 GHz frequency for
communication include wireless audio/video senders, wireless computer networks,
multi-handset cordless telephone systems, and some long-range cordless telephone systems.
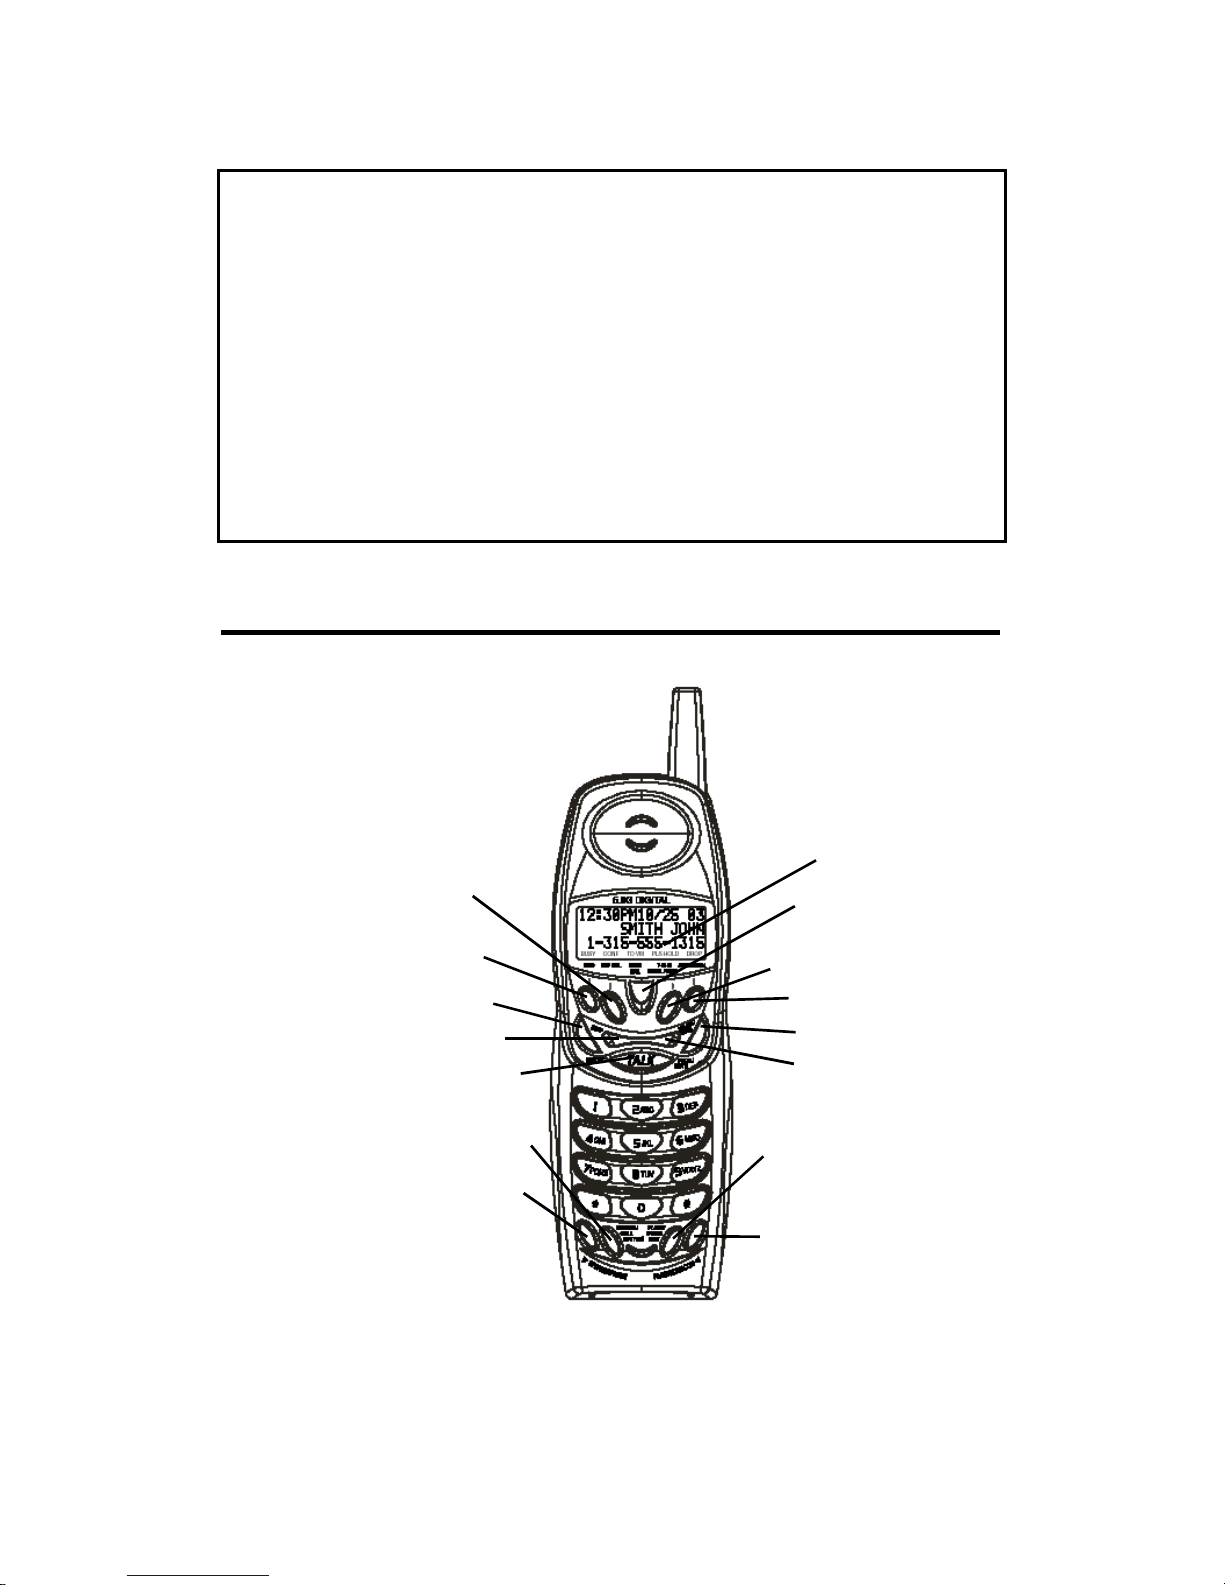
ANDSET LAYOUT
H
In order to use all of the features of this telephone, you must subscribe to two
Rep Dial Button
Info Button
Memory Button
Conf Button
Talk Button
Cancel Call Waiting Button
Speakerphone Button
Display
Voice Mail Button
7-10-11/Redial/Pause Button
Auto Redial Button
Prog/Mute Button
Delete/Hold Button
Flash/3 Way/Exit Button
Page/Intercom Button
7
Page 9
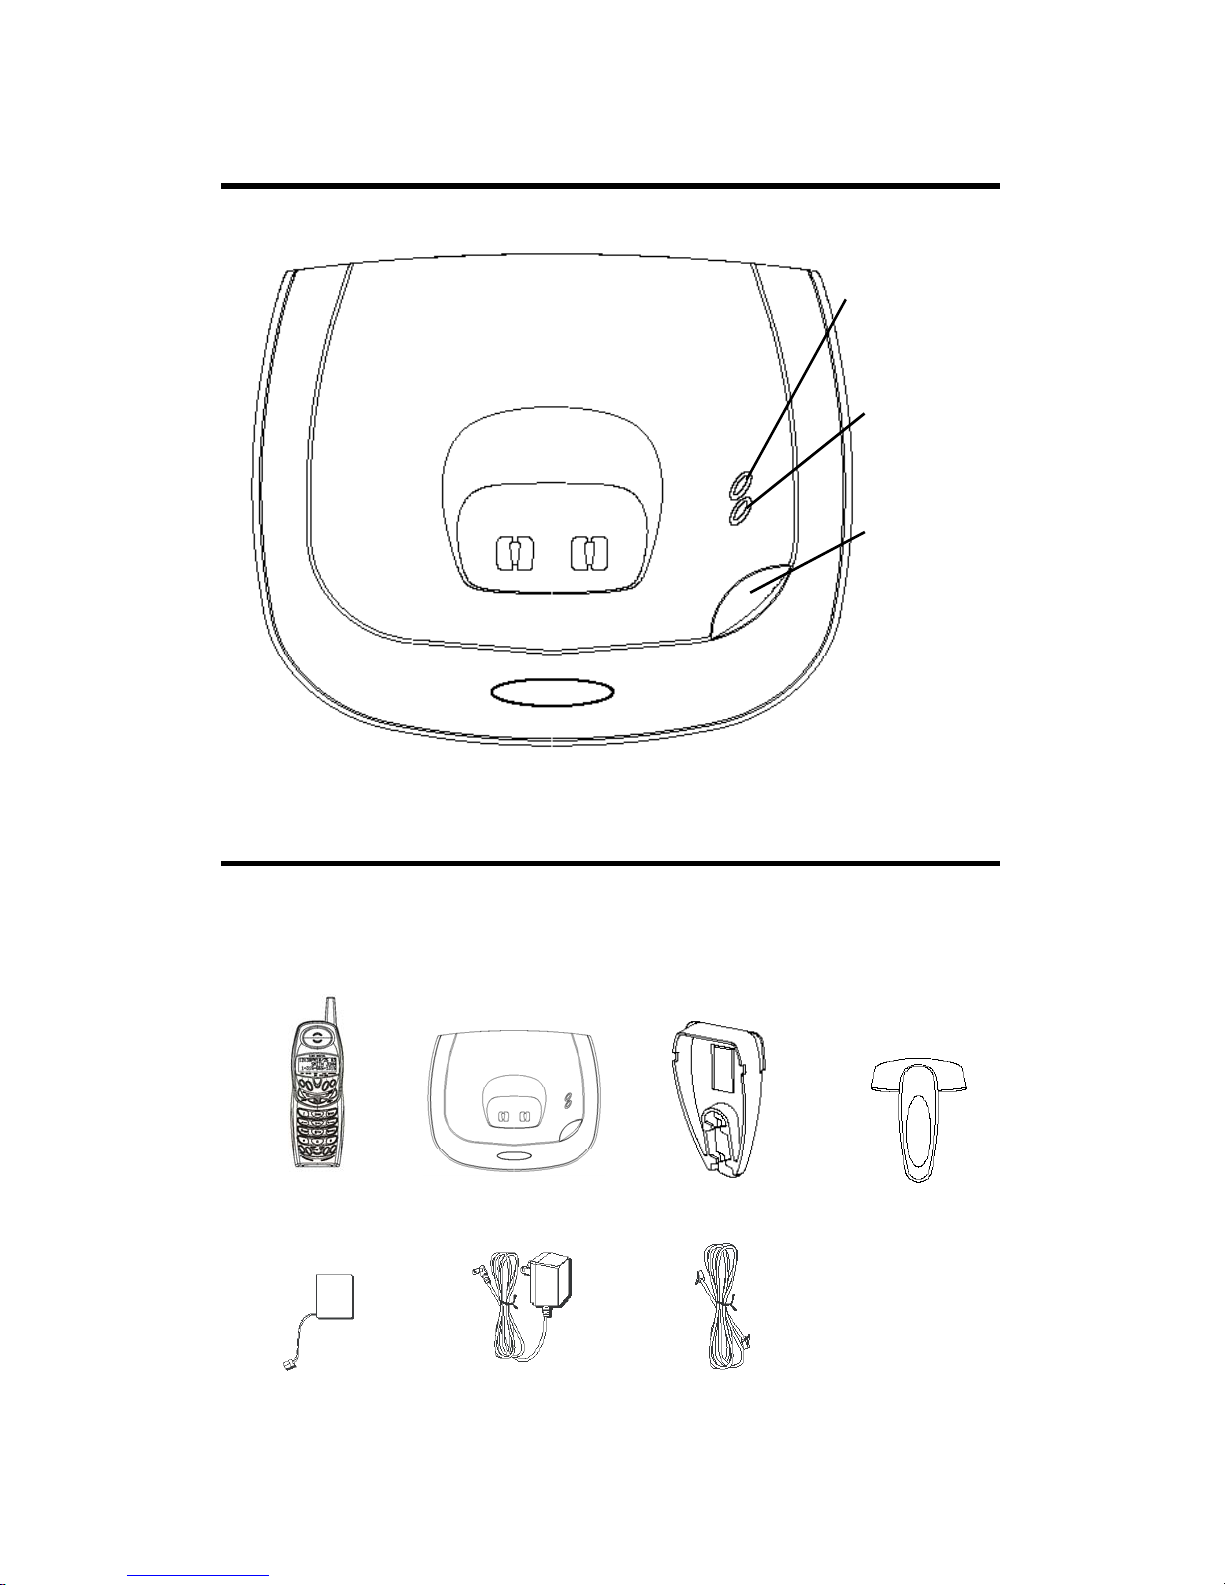
ASE LAYOUT
B
In Use/Voice Mail
LED
Charge/Page
LED
Page/Intercom
Button
EFORE YOU BEGIN
B
P
ARTS CHECKLIST
Make sure your package includes the items shown here.
Handset
Handset Battery
Base
AC Power Supply
Wall Mount
Telephone Line Cord
Belt Clip
8
Page 10

ELEPHONE JACK REQUIREMENTS
T
To use this phone, you need an RJ11C (CA11A) type
modular telephone jack, which might look like the one
pictured here, installed in your home. If you don’t have a
modular jack, call your local phone company to find out how
to get one installed.
MPORTANT INSTALLATION INFORMATION
I
Never install telephone wiring during a lightning storm.
Never install telephone jacks in wet locations unless the jack is specifically
designed for wet locations.
Never touch non-insulated telephone wires or terminals, unless the
telephone line has been disconnected at the network interface.
Use caution when installing or modifying telephone lines.
Temporarily disconnect any equipment connected to the phone such as
faxes, other phones, or modems.
MPORTANT INSTALLATION GUIDELINES
I
Install telephone near both a telephone (modular) jack and an electrical
power outlet.
Avoid sources of noise, such as a window by a busy street, and electrical
noise, such motors, microwave ovens, and fluorescent lighting.
Avoid heat sources, such as heating air ducts, heating appliances,
radiators, and direct sunlight.
Avoid areas of excessive moisture or extremely low temperature.
Avoid dusty locations.
Avoid other cordless telephones or personal computers.
9
Page 11
NSTALLING THE PHONE
I
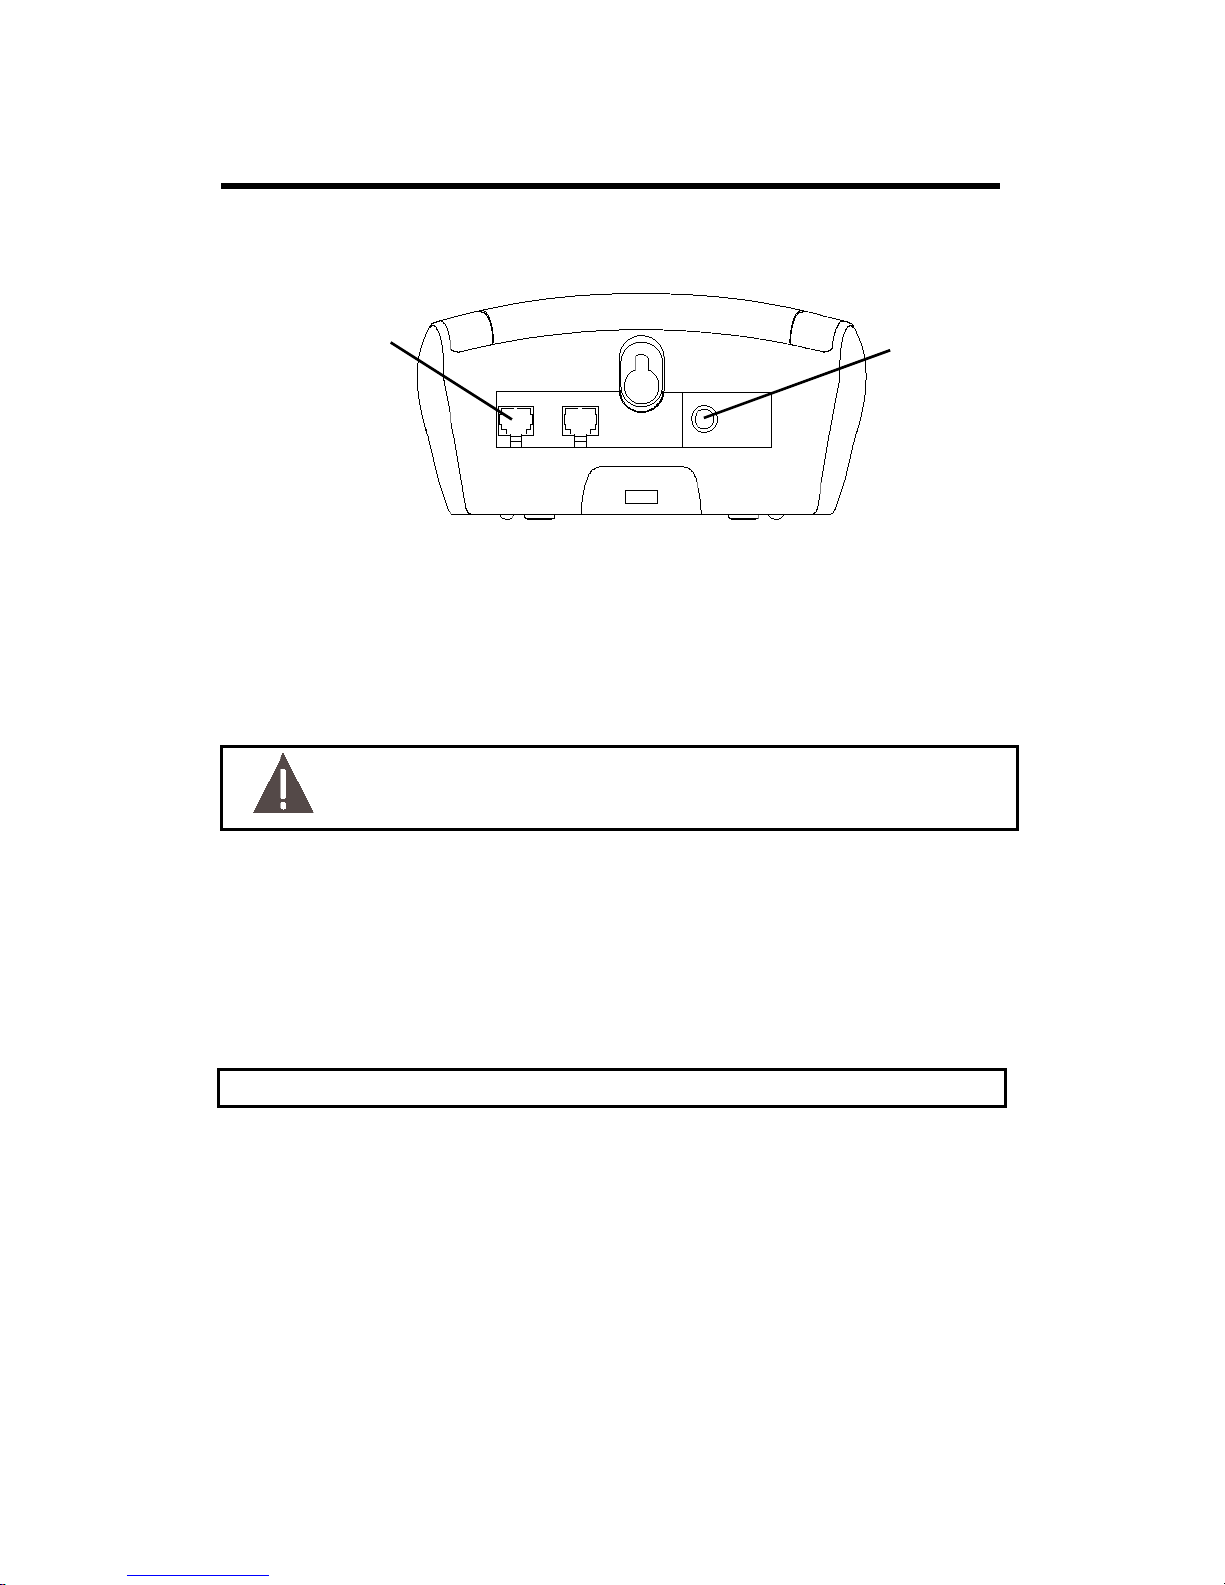
Choose the best location to install your base. Your base should be placed on a
level surface such as a desk or table top, or you may mount the base on a wall.
Connect with
telephone line
cord and plug it
into a modular
wall jack
Connect with
power adaptor
and plug it into
an AC outlet
CONNECTING THE AC (ELECTRICAL) POWER
Plug the power supply cord into the power jack on the back of the base and the
other end into an electrical outlet. When the handset is placed on the cradle
the charge indicator turns on to indicate the battery is charging.
CAUTION:
supply that came with this unit. Using other power supplies may damage the unit.
Use only the Input: AC 120V 60Hz Output: DC9V 700mA power
CONNECTING THE TELEPHONE LINE
On the base, plug the one end of the telephone line cord into the jack on the
back of the base and the other end into a modular phone jack.
INSTALLING THE HANDSET BATTERY
NOTE: You must connect the handset battery before use.
1. Push down on the top of the battery compartment cover (located on the
back of handset) and remove the cover.
2. Lift the battery pack and connect its plug to the jack inside the
compartment.
3. Close the battery compartment by pushing the cover up until it snaps into
place.
4. Place the handset in the charging cradle.
Allow handset to charge for 12 hours prior to first use. If you don’t properly
charge the handset, battery performance is compromised.
10
Page 12
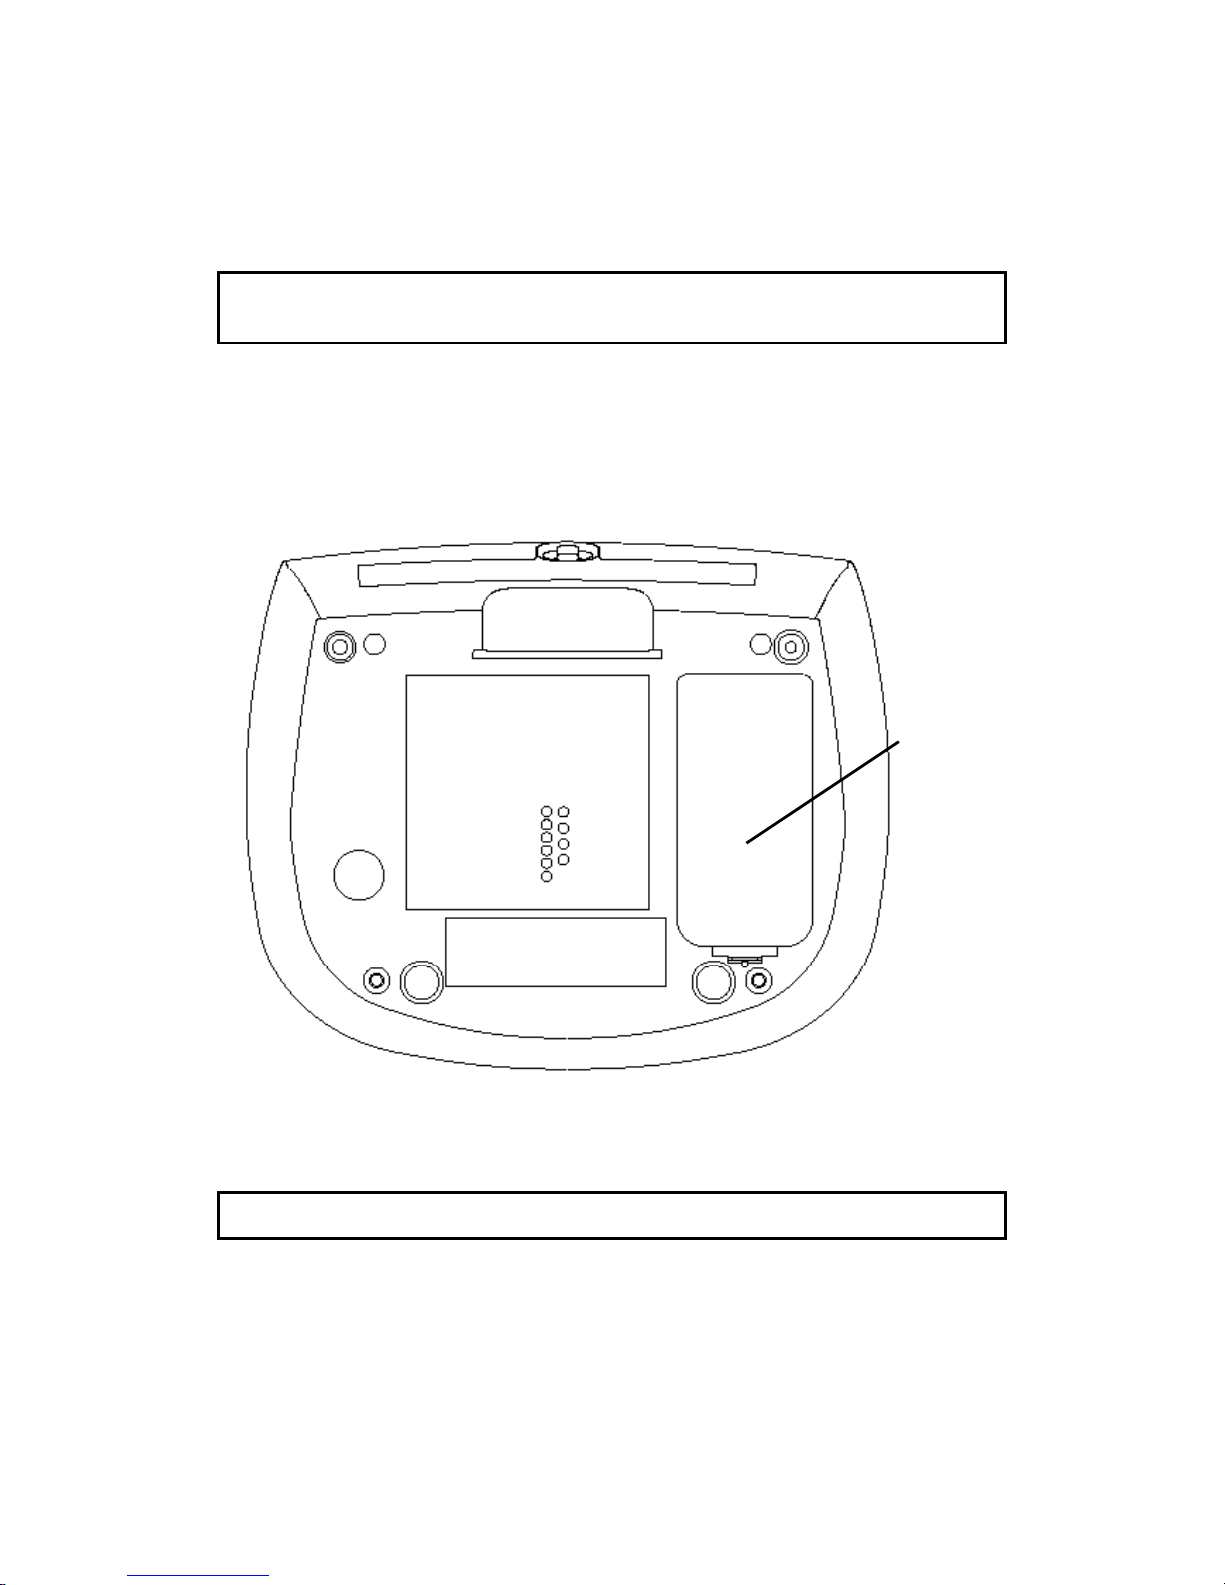
Remark: The handset is dual-face chargeable. You can place the handset on
the cradle with either one side facing you to proceed charging.
INSTALLING BASE UNIT BATTERIES
NOTE: AA size batteries are not included in the package.
NOTE: Alkaline AA size batteries are recommended to use.
Batteries inserted in the base unit allow you to use the telephone when the
adaptor is damaged or there is no power supply.
1. Open the battery door at the bottom of the base.
2. Insert four AA size batteries.
3. Close the battery door.
Battery Door
WALL MOUNTING THE BASE
NOTE: For the best result, leave the phone on a flat surface during initial charging before you
hang the phone on the wall.
1. Turn the base over.
2. Attach the wall mounting pedestal by first inserting the tabs on the open
edge of the pedestal into the slots on the lower portion of the bottom of the
base. Then push down and snap the pedestal into place.
3. Slip the mounting holes (on the back of the pedestal) over the wall plate
posts and slide the unit down into place. (Wall plate not included).
11
Page 13
TELEPHONE SETUP
ROGRAMMABLE MENUS
P
There are twelve programmable menus available on the handset: Language,
Local Area Code, Regional Area Code, Handset Name, Ringer Volume, Ringer
Tone, VIP Melody, Voice Mail Number, Information Services Number, Vibrate
Alert, Handset Registration and Default. When you program these settings,
make sure the phone is not in talk mode.
ANGUAGE
L
1. Press the [PROG/MUTE] button to go into the program menu.
2. Press
3. Press the [PROG/MUTE] button again to go into the LANGUAGE
sub-menu.
4. Press 1, 2, 3 or
point to the latest selection.
5. Press [PROG/MUTE] button again. You will hear a confirmation tone.
NOTE:
and return to program menu.
NOTE: Press the [FLASH/3 WAY/EXIT] button inside program menu will keep the current
setting and return to the standby screen.
NOTE:
▲or ▼button until ►is pointing to LANGUAGE.
DEFAULT
►LANGUAGE
LOC. AREA CODE
1 ENGLISH 2 FRA 3 ESP shows in the display.
►
1 ENGLISH
2 FRA 3 ESP
▲,▼ to choose the preferred language. The ►icon will
Press the [FLASH/3 WAY/EXIT] button inside sub-menu will keep the current setting
Default is ENGLISH
OCAL AREA CODE
L
1. Press the [PROG/MUTE] button to go into the program menu.
12
Page 14
LANGUAGE
LOC. AREA CODE
►
REG. AREA CODE
2. Press
or ▼button until ►is pointing to
▲
LOC. AREA CODE
.
3. Press the [PROG/MUTE] button again to go into the LOCAL AREA CODE
sub-menu.
SET LOCAL AREA CODE - - - shows in the display.
4. You can enter 3-digit local area code.
SET LOCAL AREA
CODE - - -
5. Press the [PROG/MUTE] button again. You will hear a confirmation tone.
NOTE: Press the [FLASH/3 WAY/EXIT] button inside sub-menu will keep the current setting
and return to program menu.
NOTE: Press the [FLASH/3 WAY/EXIT] button inside program menu will keep the current
setting and return to the standby screen.
If the Local Area Code matches with the CID number, then the unit will only dial the last
NOTE:
seven digits of the CID during redial.
NOTE: The Local Area Code can set to blank by pressing [DELETE/HOLD] button.
NOTE:
Default is - - -.
EGIONAL AREA CODE
R
1. Press the [PROG/MUTE] button to go into the program menu.
2. Press
▲or ▼button until ►is pointing to REG. AREA CODE.
LOC. AREA CODE
► REG. AREA CODE
HANDSET NAME
3. Press the [PROG/MUTE] button again to go into the REGIONAL AREA
CODE sub-menu.
SET REGIONAL AREA CODE
SET REGIONAL
AREA CODE 1 - - -
shows in the display.
4. Enter 3-digit area code.
13
Page 15
5. Press
▲or ▼
to set up 6 different Regional Area Codes.
6. Press the [PROG/MUTE] again. You will hear a confirmation tone.
NOTE: Press the [FLASH/3 WAY/EXIT] button inside sub-menu will keep the current setting
and return to program menu.
NOTE: Press the [FLASH/3 WAY/EXIT] button inside program menu will keep the current
setting and return to the standby screen.
The Regional Area Code can set to blank by pressing [DELETE/HOLD] button.
NOTE:
NOTE: Default is - - -.
ANDSET NAME
H
1. Press the [PROG/MUTE] button to go into the program menu.
2. Press
▲or ▼button until ►is pointing to HANDSET NAME.
REG. AREA CODE
► HANDSET NAME
RINGER VOLUME
3. Press the [PROG/MUTE] button again to go into the HANDSET NAME
sub-menu. HANDSET NAME shows in the display.
HANDSET NAME
4. Use the handset keypad to enter a name (up to 15 characters). More than
one letter is stored in each of the number keys. For example, to enter Bill
Smith, press the 2 key twice for the letter B. Press the 4 key 3 times for the
letter I. Press the 5 key 3 times for the letter L. Wait for 1 second. Press
the 5 key 3 times for the second letter L, and press the 1 key to insert a
space between the first and last name. Press the 7 key 4 times for the
letter S; press the 6 key once for the letter M; press the 4 key 3 times for
the letter I; press the 8 key for the letter T; press the 4 key twice for the
letter H.
5. Press the [PROG/MUTE] button to confirm setting. You will hear a
confirmation tone.
NOTE: Press the [FLASH/3 WAY/EXIT] button inside sub-menu will keep the current setting
and return to program menu.
NOTE:
setting and return to the standby screen.
NOTE: Maximum number of characters for handset name is 15.
NOTE:
Press the [FLASH/3 WAY/EXIT] button inside program menu will keep the current
Default is BLANK.
14
Page 16
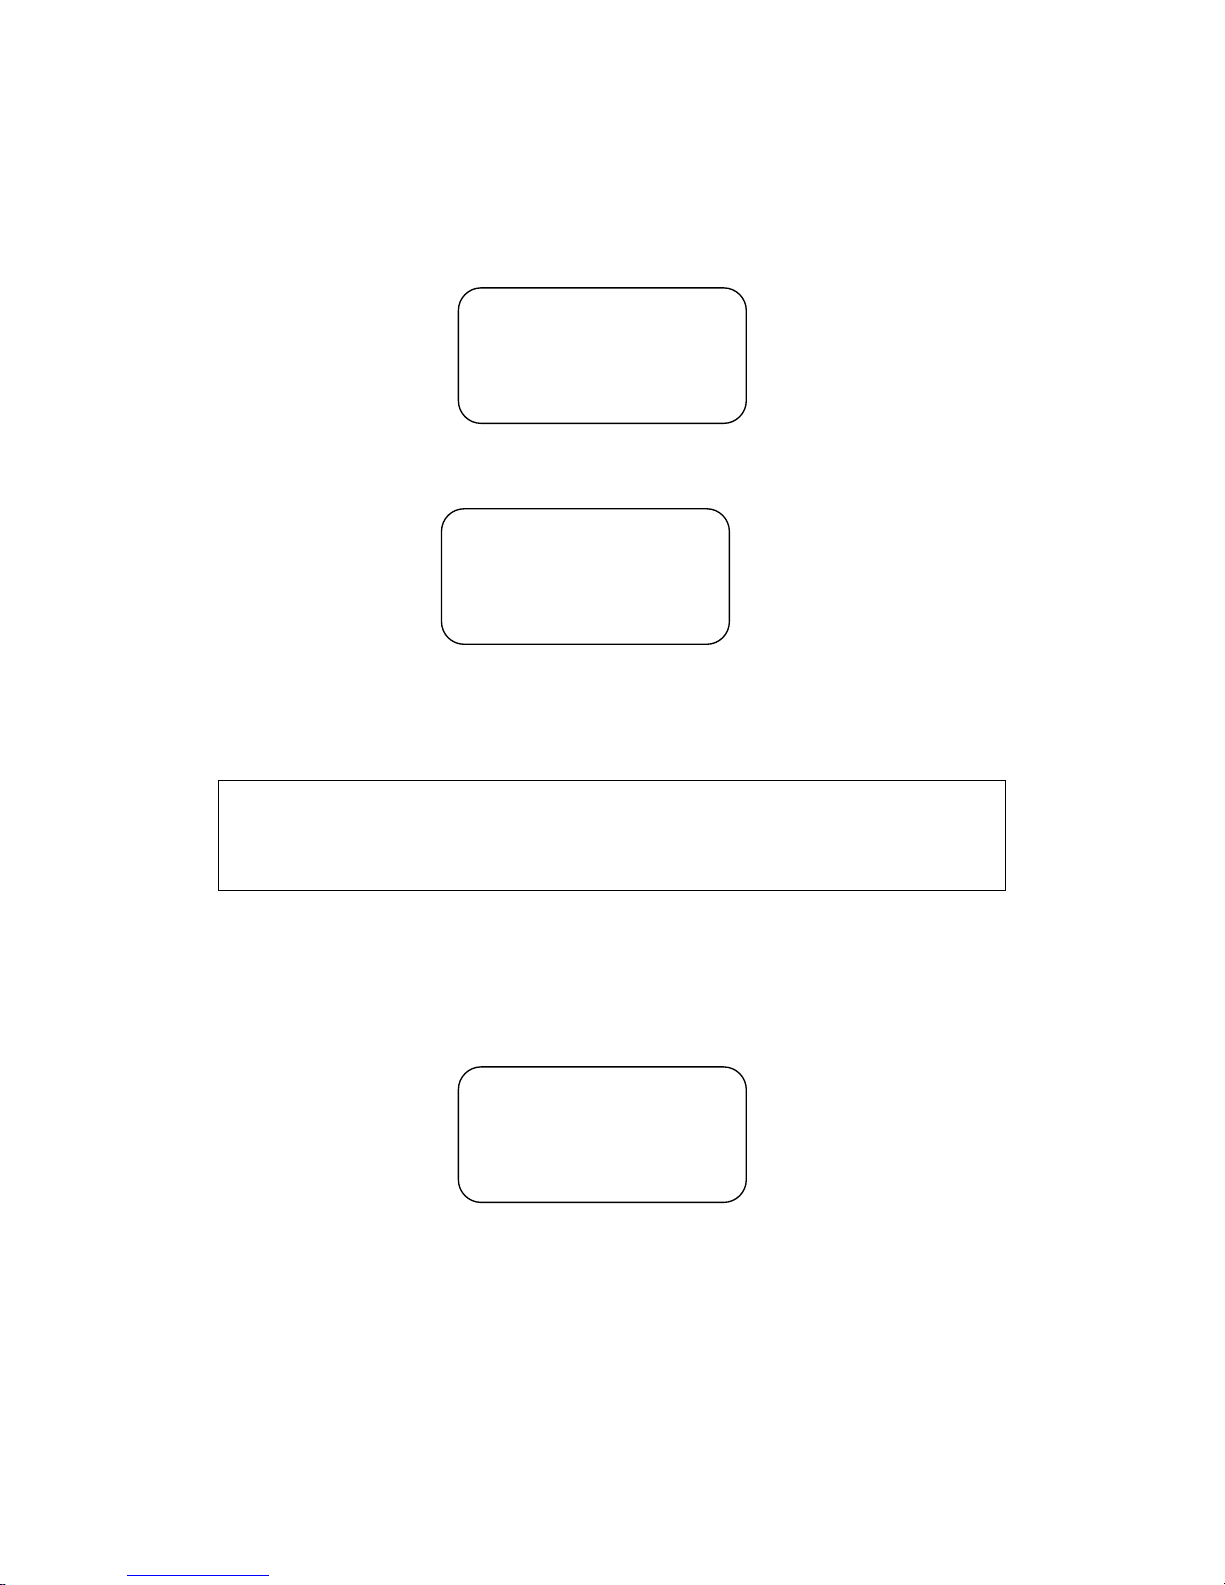
INGER VOLUME
R
1. Press the [PROG/MUTE] button to go into the program menu.
2. Press
▲or ▼button until ►is pointing to RINGER VOLUME.
HANDSET NAME
► RINGER VOL UM E
RINGER TONE
3. Press the [PROG/MUTE] button again to go into the RINGER VOLUME
sub-menu.
SET RINGER VOL
SET RINGER VOL
shows in the display.
►HIGH
4. Press ▲or ▼ to choose the ringer volume (HIGH, MEDIUM, LOW or
OFF).
5. Press the [PROG/MUTE] button again. You can hear a confirmation tone.
Press the [FLASH/3 WAY/EXIT] button inside sub-menu will keep the current setting
NOTE:
and return to program menu.
NOTE: Press the [FLASH/3 WAY/EXIT] button inside program menu will keep the current
setting and return to the standby screen.
NOTE: Default is HIGH.
RINGER TONE
1. Press the [PROG/MUTE] button to go into the program menu.
2. Press
3. Press the [PROG/MUTE] button again to go into the RINGER TONE
sub-menu.
▲or ▼button until ►is pointing to RINGER TONE.
RINGER VOLUME
► RINGER TONE
VIP MELODY
SET RINGER TONE shows in the display.
15
Page 17
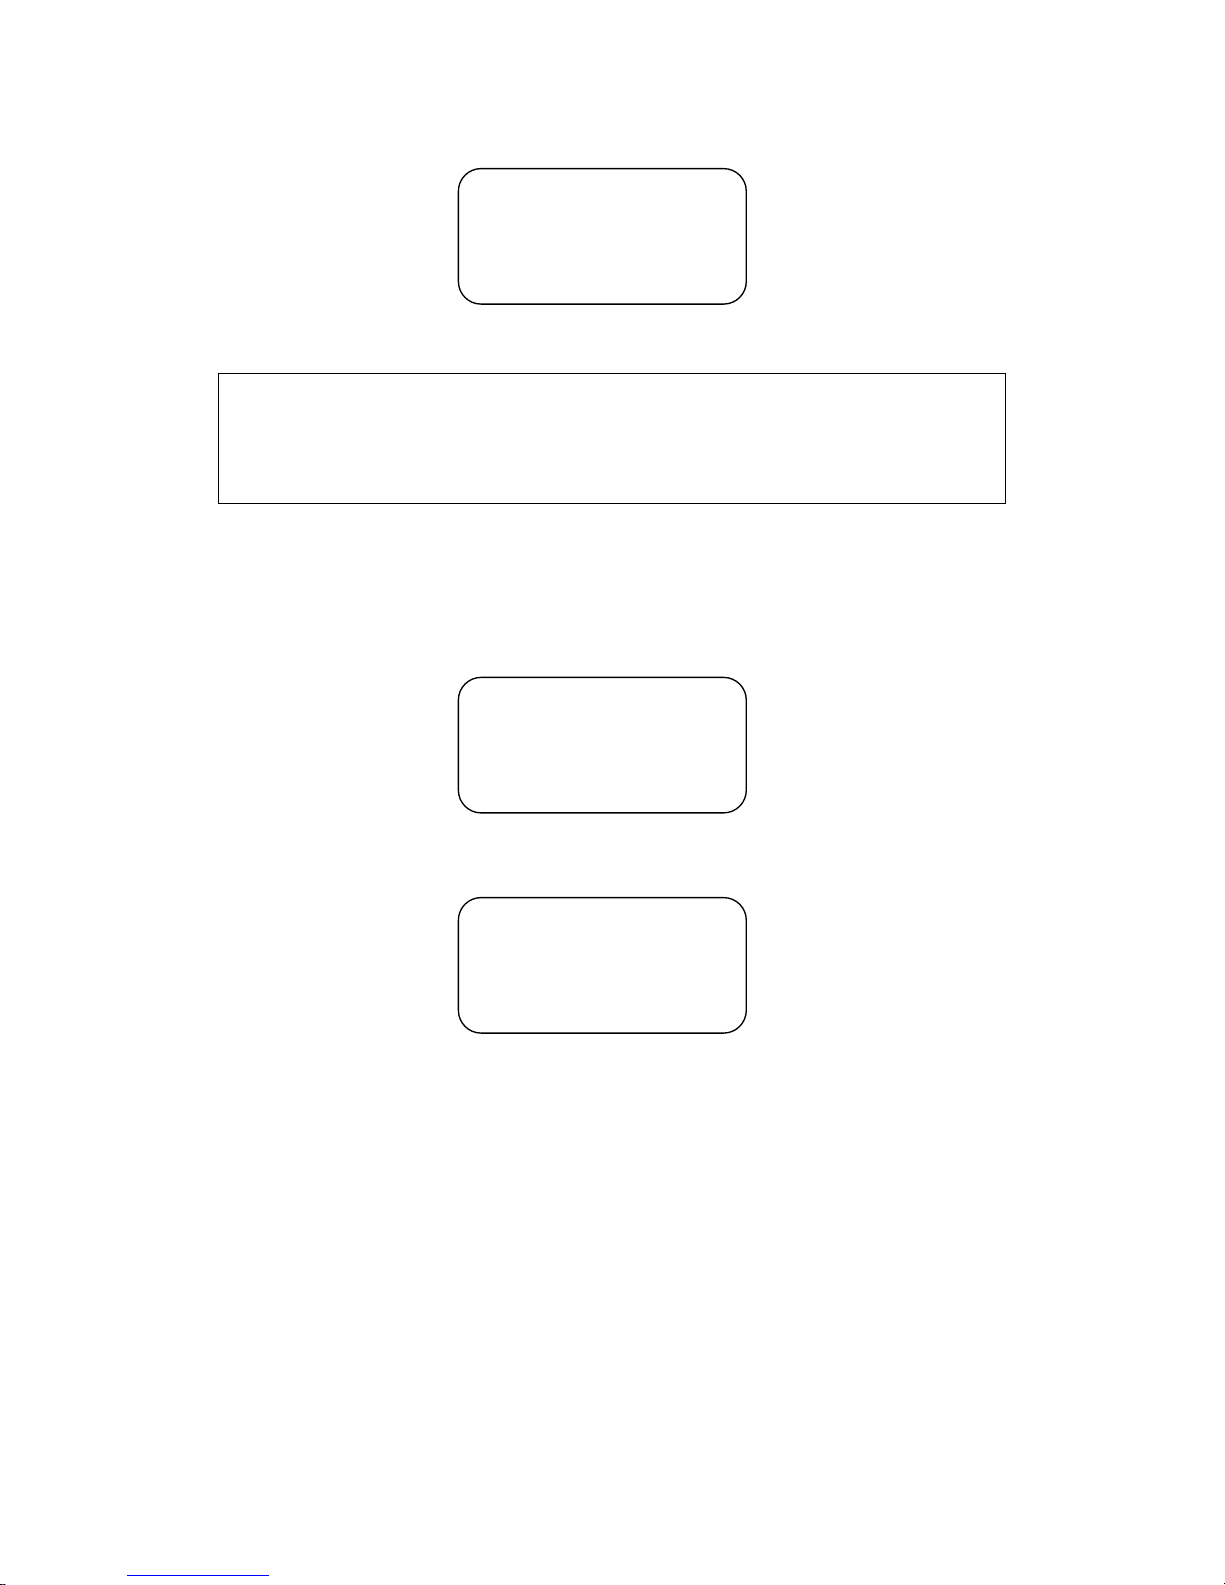
SET RINGER TONE
►STANDARD 1
4. Press ▲or ▼ to choose the preferred ringer tone.
5. Press the [PROG/MTUE] button again. You can hear a confirmation.
NOTE: Press the [FLASH/3 WAY/EXIT] button inside sub-menu will keep the current setting
and return to program menu.
NOTE:
setting and return to the standby screen.
NOTE: There are totally 2 Standard Ringers and 8 Melody Ringers available.
NOTE:
Press the [FLASH/3 WAY/EXIT] button inside program menu will keep the current
Default is STANDARD 1.
VIP M
ELODY
1. Press the [PROG/MUTE] button to go into the program menu.
2. Press
▲or ▼button until ►is pointing to VIP MELODY.
RINGER TONE
► VIP MELODY
VOICE MAIL#
3. Press the [PROG/MUTE] button again to go into the VIP MELODY
sub-menu.
SET VIP MELODY
4. Press 1, 2 or ▲,▼ to choose Yes or No. The
shows in the display.
SET VIP MELODY
1 YES
►2 NO
►icon will point to the latest
selection.
5. Press the [PROG/MUTE] button again to select the choice.
6. Choose NO to deactivate the VIP melody. It will return to program menu.
- OR –
7. Choose YES to activate the VIP melody.
8. A VIP Melody sub-menu is shown. Press ▲ or ▼ key to choose a VIP
Melody location. (Totally 10 VIP Melody locations available)
16
Page 18
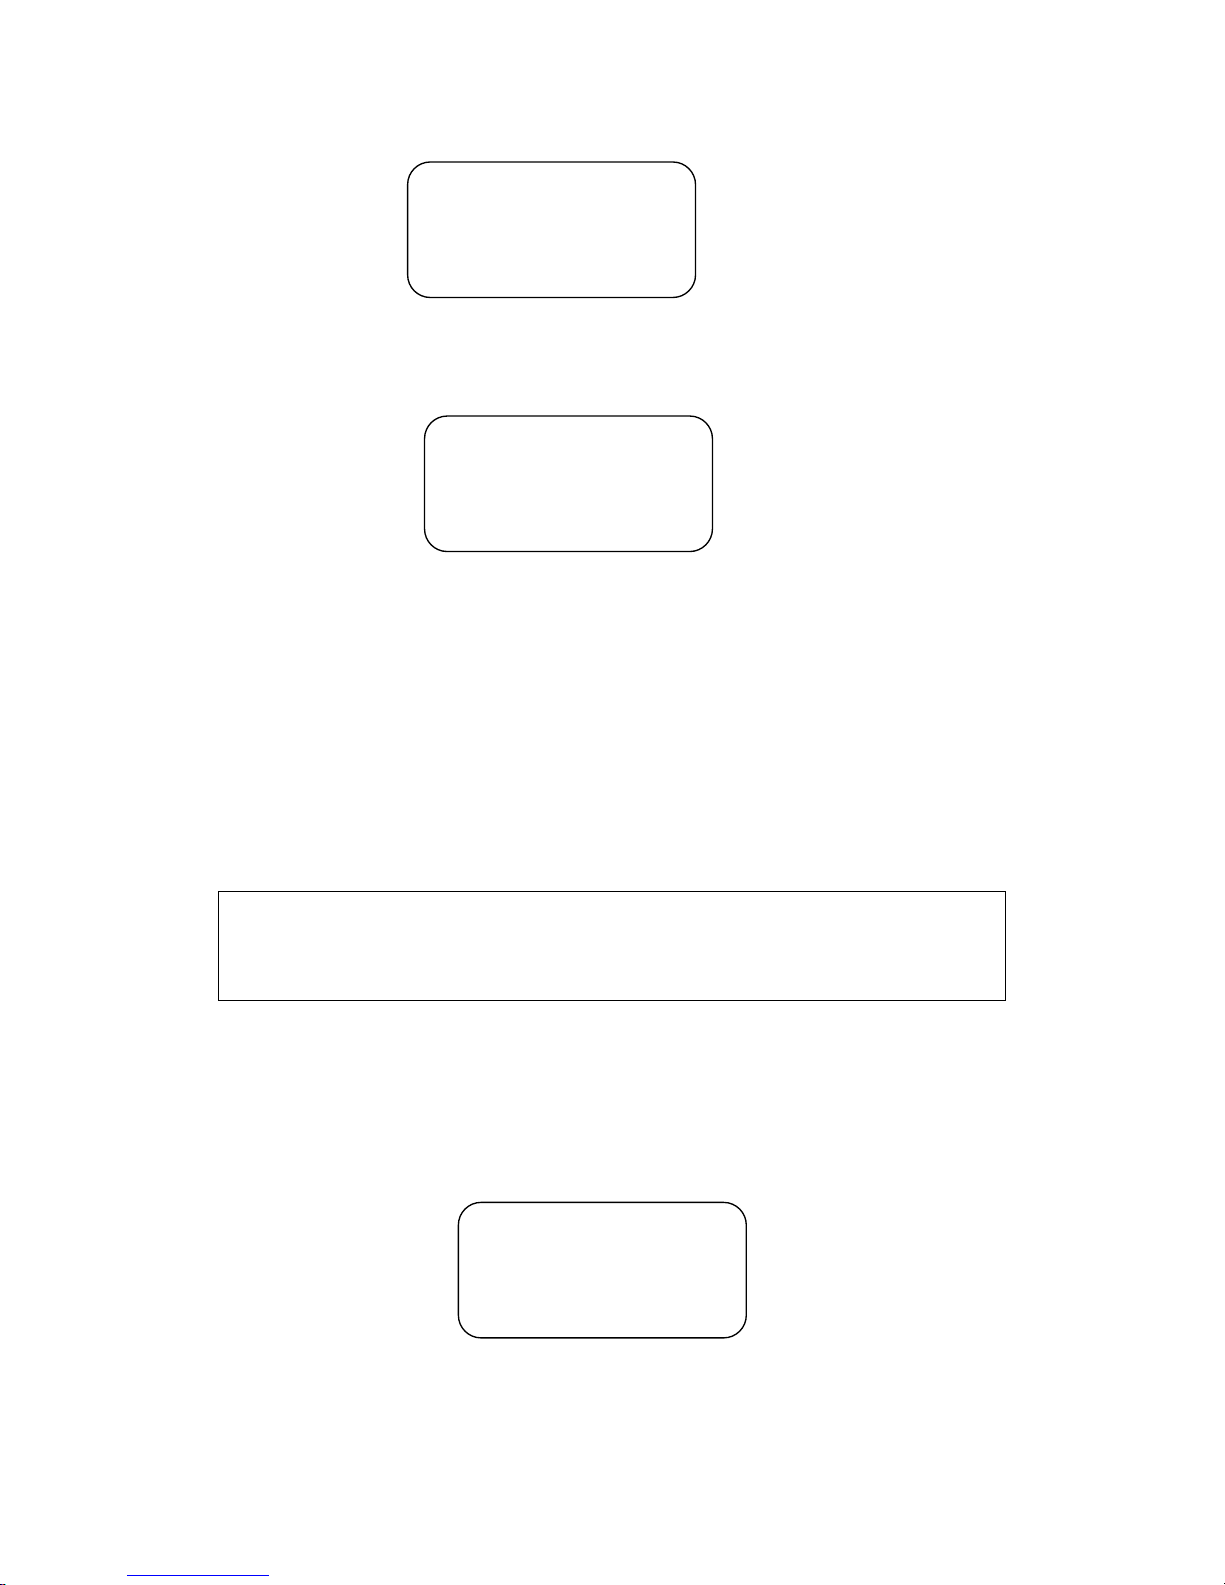
VIP 1
** EMPTY **
9. Press the [PROG/MUTE] button again to set VIP Melody. If there is no
entry in the phonebook, you can hear a warning beep after pressing the
[PROG/MUTE] button and the following screen will be displayed.
NO USER MEMORY
10. Make sure there is at least one entry in the phonebook. Press the
[PROG/MUTE] button again after step 6.
SELECT MEMORY displays on
the screen. Then you will see the record(s) in the phonebook.
11. Press ▲ or ▼ key to choose which entry to be used with this selected VIP
Melody. Press the [PROG/MUTE] button again to confirm.
12. Then
VIP MELODY shows in the display.
13. Press ▲ or ▼ key to choose which ringer to be used for this VIP Melody.
Press the [PROG/MUTE] button again to confirm.
14. The setup for one VIP Melody is finished. It returns to the program menu.
Press the [FLASH/3 WAY/EXIT] button inside sub-menu will keep the current setting
NOTE:
and return to program menu.
NOTE: Press the [FLASH/3 WAY/EXIT] button inside program menu will keep the current
setting and return to the standby screen.
NOTE: Default is NO.
VOICE MAIL NUMBER
1. Press the [PROG/MUTE] button to go into the program menu.
2. Press
▲or ▼button until ►is pointing to VOICE MAIL#.
3. Press the [PROG/MUTE] button again to go into the VOICE MAIL
NUMBER sub-menu.
VIP MELODY
► VOICE MAIL#
INFO SVCS#
SET VOICE MAIL# shows in the display.
17
Page 19
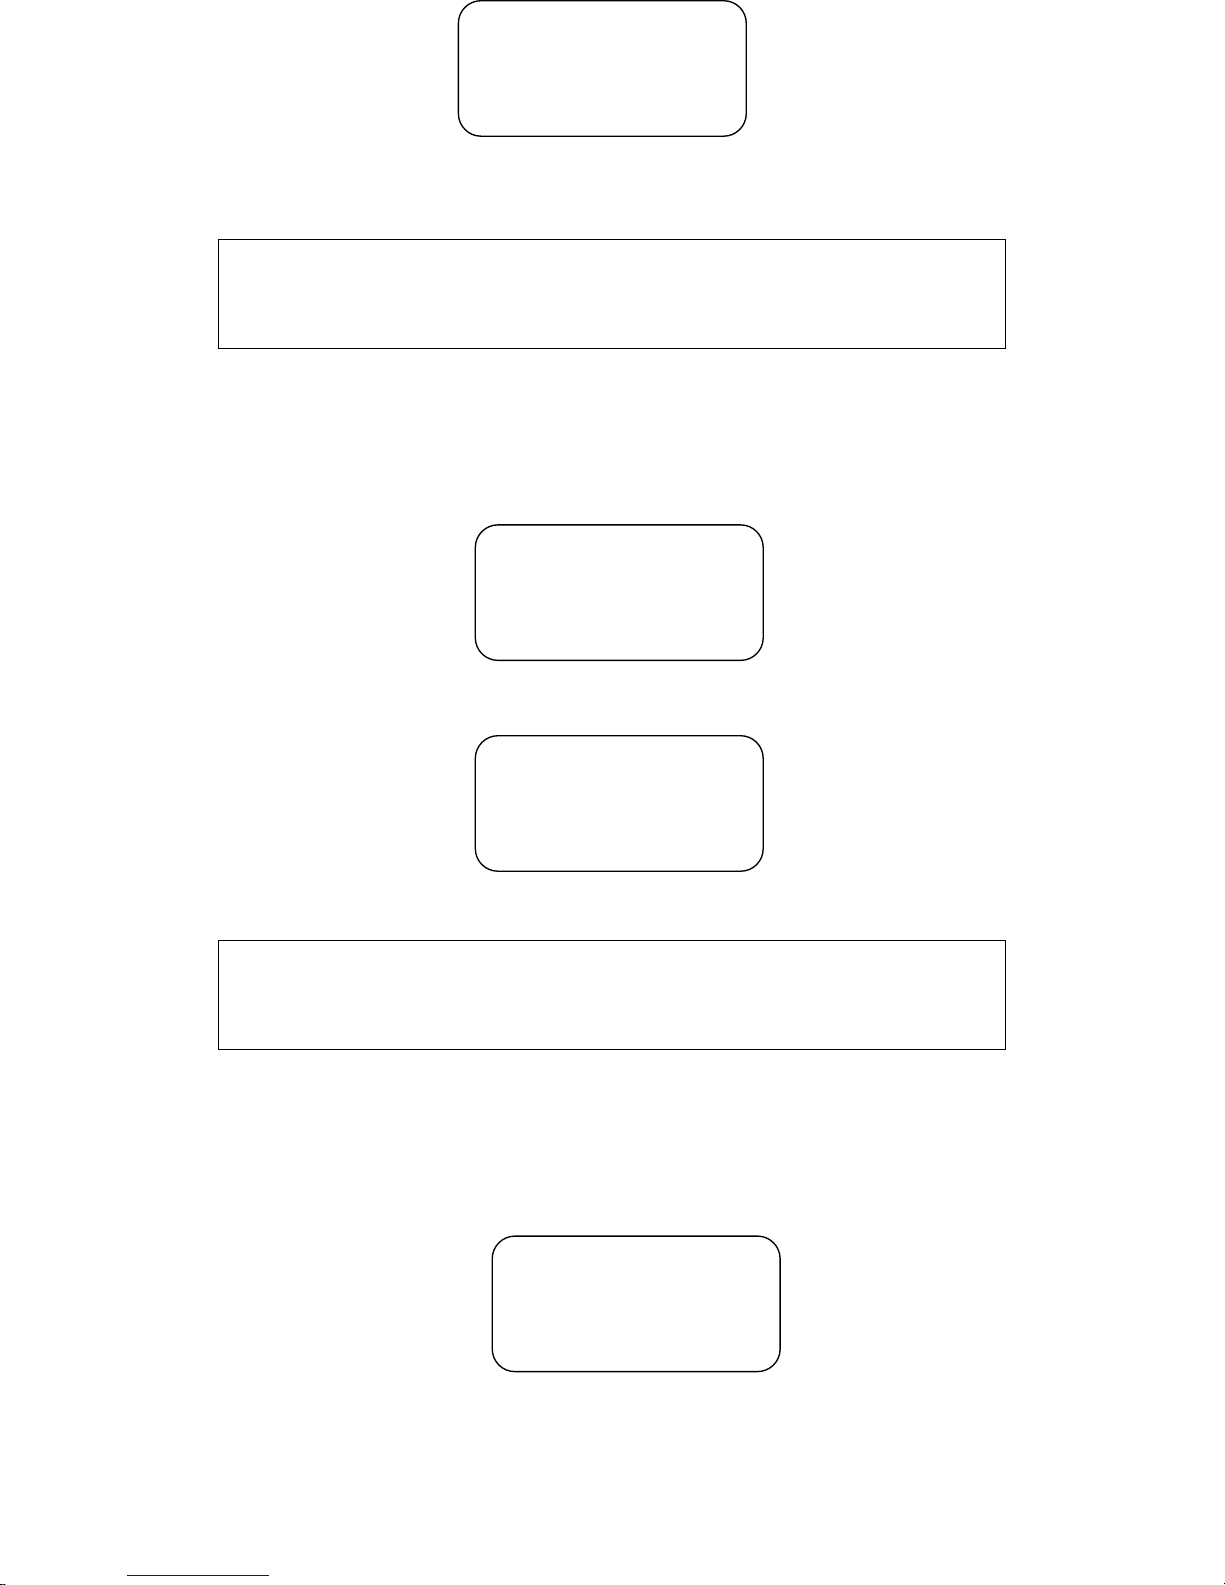
SET VOICE MAIL#
4. You can enter the voice mail service number (Max. 20 digits)
5. Press the [PROG/MUTE] button again. You can hear a confirmation tone.
Press the [FLASH/3 WAY/EXIT] button inside sub-menu will keep the current setting
NOTE:
and return to program menu.
NOTE: Press the [FLASH/3 WAY/EXIT] button inside program menu will keep the current
setting and return to the standby screen.
NOTE: Default is BLANK.
INFORMATION SERVICES NUMBER
1. Press the [PROG/MUTE] button to go into the program menu.
2. Press
▲or ▼button until ►is pointing to INFO SVCS#.
VOICE MAIL#
► INFO SVCS#
VIBRATE ALERT
3. Press the [PROG/MUTE] button again to go into the INFORMATION
SERVICES NUMBER sub-menu.
4.
You can enter the information services number (Max. 11 digits)
SET INFO SVCS# shows in the display.
SET INFO SVCS#
411
5. Press the [PROG/MUTE] button again. You can hear a confirmation tone.
NOTE: Press the [FLASH/3 WAY/EXIT] button inside sub-menu will keep the current setting
and return to program menu.
NOTE: Press the [FLASH/3 WAY/EXIT] button inside program menu will keep the current
setting and return to the standby screen.
NOTE:
Default is 411.
IBRATE CALL ALERT
V
1. Press the [PROG/MUTE] button to go into the program menu.
2. Press
▲or ▼button until ►is pointing to VIBRATE ALERT.
3. Press the [PROG/MUTE] button again to go into the VIBRATOR CALL
ALERT sub-menu.
INFO SVCS#
► VIBRATE ALERT
REGISTRATION
SET VIBRATOR
shows in the display.
18
Page 20
SET VIBRATOR
4. Press 1, 2 or
1 OFF
▲,▼ to choose between ON and OFF. The ►icon will point to
►2 ON
the latest selection.
5. Press [PROG/MUTE] button again. You will hear a confirmation tone.
NOTE: Press the [FLASH/3 WAY/EXIT] button inside sub-menu will keep the current setting
and return to program menu.
NOTE: Press the [FLASH/3 WAY/EXIT] button inside program menu will keep the current
setting and return to the standby screen.
Default is OFF.
NOTE:
ANDSET REGISTRATION
H
1. Press the [PROG/MUTE] button to go into the program menu.
2. Press
▲or ▼button until ►is pointing to REGISTRATION.
VIBRATE ALERT
► REGISTRATION
DEFAULT
3. Press the [PROG/MUTE] button again to go into the REGISTRATION
sub-menu.
REGISTRATION
shows in the display.
REGISTRATION
1 YES
►2 NO
4. Press 1, 2 or
to choose between YES and NO. The ►icon will point
▲,▼
to the latest selection.
5. If YES is selected, follow the instruction showing on the screen to register
the handset.
6. Press [PROG/MUTE] button again. You will hear a confirmation tone.
Press the [FLASH/3 WAY/EXIT] button inside sub-menu will keep the current setting
NOTE:
and return to program menu.
NOTE: Press the [FLASH/3 WAY/EXIT] button inside program menu will keep the current
setting and return to the standby screen.
NOTE: You are recommended to register the handset before first use.
NOTE: Default is NO.
19
Page 21
EFAULT
D
1. Press the [PROG/MUTE] button to go into the program menu.
2. Press
3. Press the [PROG/MUTE] button again to go into the DEFAULT sub-menu.
DEFAULT SETTING
4. Press 1, 2 or
to the latest selection.
5. Press [PROG/MUTE] button again. You will hear a confirmation tone.
NOTE: Press the [FLASH/3 WAY/EXIT] button inside sub-menu will keep the current setting
and return to program menu.
NOTE: Press the [FLASH/3 WAY/EXIT] button inside program menu will keep the current
setting and return to the standby screen.
NOTE: Default is NO.
▲or ▼button until ►is pointing to DEFAULT.
REGISTRATION
► DEFAULT
LANGUAGE
shows in the display.
DEFAULT SETTING
1 YES
▲,▼ to choose between YES and NO. The ►icon will point
►2 NO
ELEPHONE OPERATION
T
For hands-free operation and convenience, your system is equipped with a
speakerphone.
For the best speakerphone performance, avoid the following:
Areas with high background noise. (The microphone might pick up these
sounds.)
Surfaces affected by vibration.
Recessed areas such as in a corner, under a cupboard, or next to a
cabinet, which can generate an echo effect.
HARGE INDICATOR
C
When the charge indicator is lit, the handset is correctly seated in the cradle
20
Page 22
and is charging. The indicator flashes when the base pages the handset, or
when you receive an incoming call.
OICE MAIL WAITING INDICATOR
V
When there is voice mail waiting in the telephone service provider, the Voice
Mail LED on the base will light up. After listening to the voice mail, the Voice
Mail LED will be off.
AKING A CALL
M
1. Pick up the handset and press the [TALK] button.
TALK
2. When you hear a dial tone, dial a telephone number.
1234567
TALK 00:05 VOL3
3. When finished, press the [TALK] button again to hang up.
OR
1. Dial the phone number first, then press the [TALK] button.
1234567
2. When finished, press the [TALK] button again to hang up.
If you make a mistake press the [DELETE/HOLD] button to backspace and erase the
NOTE:
wrong number(s).
NOTE: For pre-dialing, 32 digits can be entered in maximum.
ANSWERING A CALL
1. When the phone rings, pick up the handset and press the [TALK] button.
2. When finished, press the [TALK] button or place the handset back in the
21
Page 23

cradle to hang up.
REDIAL
1. Press the [TALK] button on the handset.
2. Press the [7-10-11/REDIAL/PAUSE] button to redial the last number you
called (up to 32 digits). If you get a busy signal, and want to keep dialing
the number, press the [7-10-11/REDIAL/PAUSE] button to dial the number
directly.
FLASH
Use the [FLASH/3 WAY/EXIT] button on the handset to activate custom calling
services, such as call waiting or call transfer, which are available through you
local phone company.
TIP: Don’t use the [TALK] button to activate custom calling services such as call waiting, or
you will hang up the phone.
OLUME
V
When the phone is ON, press ▲or ▼buttons to adjust the volume of the
handset’s earpiece to a comfortable listening level.
There are 4 settings to choose from. VOL 1 is the minimum volume level and
VOL 4 is the maximum.
MUTE
Use the [PROG/MUTE] button during a phone conversation to speak privately
and off-line with a third party.
1. Press the [PROG/MUTE] button on the handset.
display and the party on the telephone cannot hear your external
conversation.
1234567
MUTE 00:05 VOL3
2. Press the [PROG/MUTE] button again when finished.
MUTE shows in the
22
Page 24

OLD
H
1. Press the [DELETE/HOLD] button on the handset to hold the far end.
2. Press the [TALK] button to un-hold and take the line again.
HOLD shows in the display.
1234567
HOLD 00:05 VOL3
PAGE
AGING FROM BASE
P
This feature helps to locate a misplaced handset.
1. Press the [PAGE/INTERCOM] button on the base. All registered handsets
beep for one minute. Then
2. To cancel the page, press the [TALK] or [FLASH/3 WAY/EXIT] button on
the handset or the [PAGE/INTERCOM] button on the base.
ALLER
C
Caller ID (CID) is a service available from your local telephone company. For
caller ID to work on this system, you must subscribe Caller ID service from
your local telephone company.
This unit receives and displays information transmitted by your local phone
company. This information can include the phone number, date and time; or
the name, phone number, date and time. The unit can store up to 40 calls for
later review.
ID (CID)
PAGING FROM BASE
shows on the display.
23
Page 25
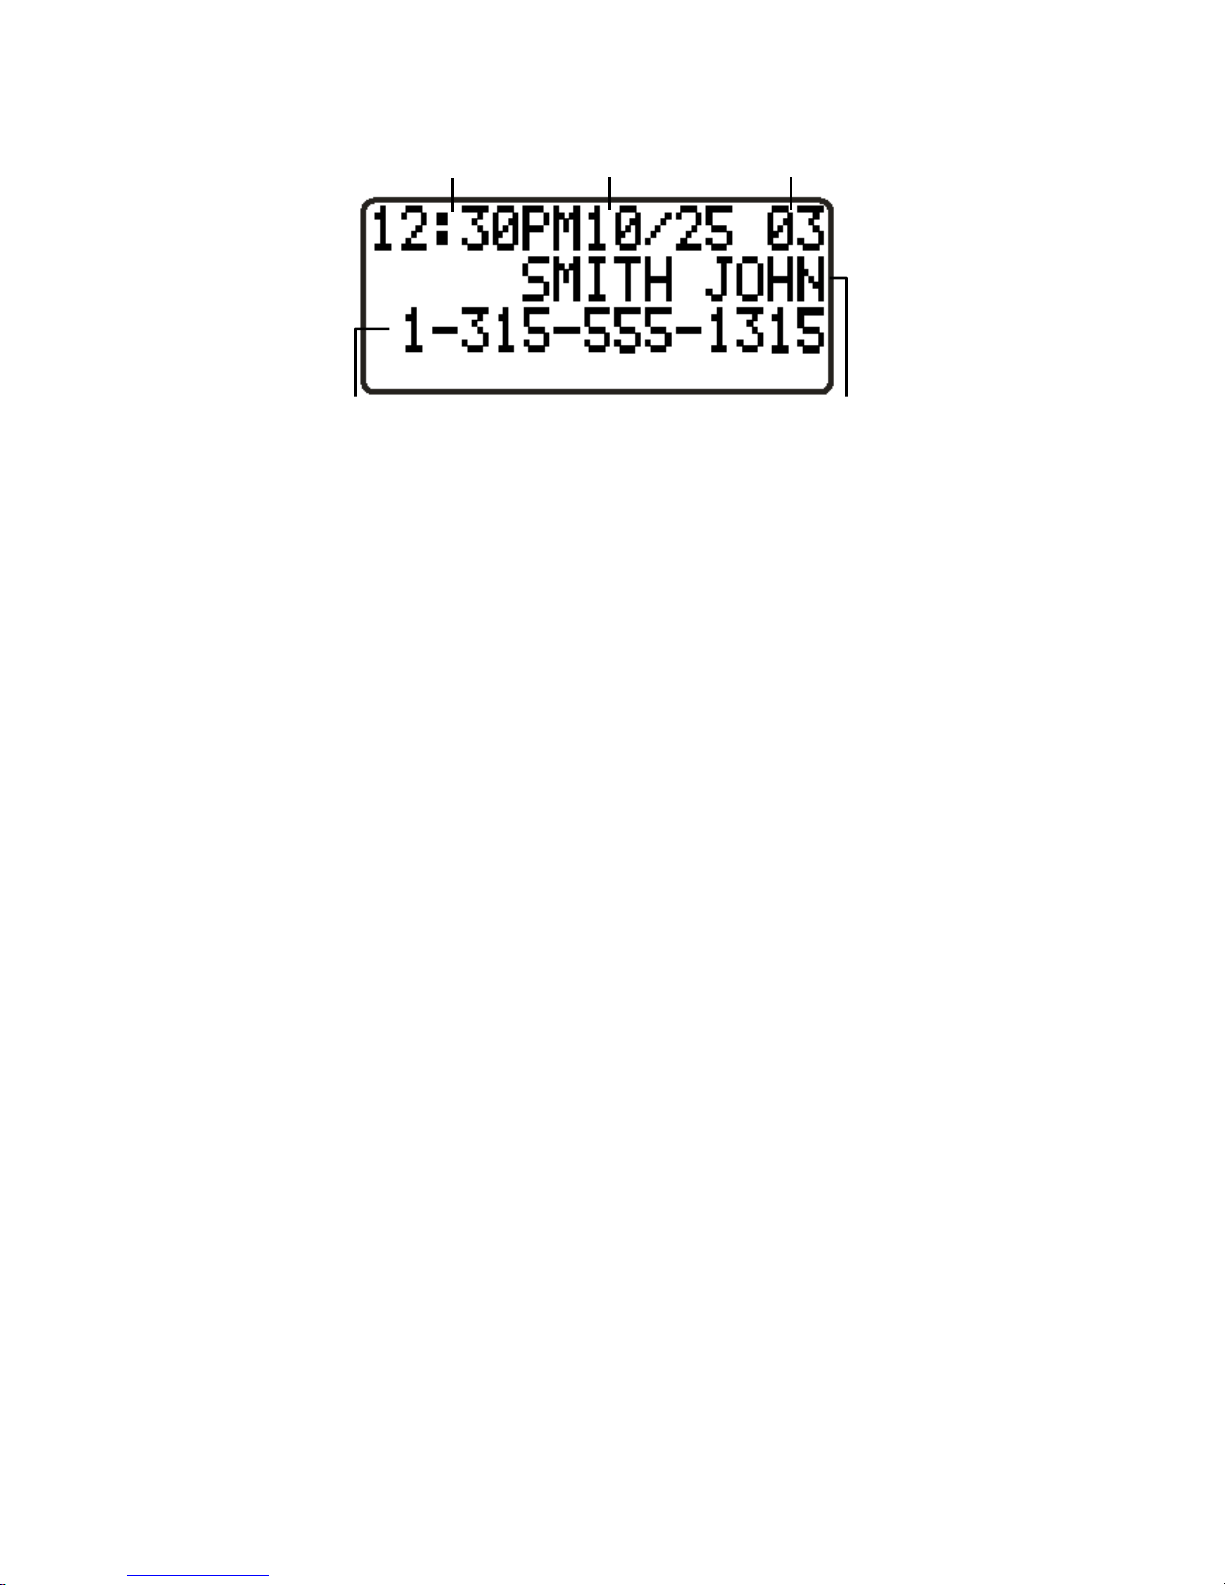
Time
Date
Number of calls
Caller ID phone number
Caller ID name
ALL WAITING CALLER
C
To receive Caller ID (CID) information from a Call Waiting call, you must
subscribe to the combined Call Waiting Caller ID service from your local
telephone company. Call Waiting Caller ID service allows you to see CID
information for an incoming call while you are on the telephone.
EVIEW
R
As records are received and stored, the display is updated to let you know how
many calls you have received.
1. Make sure the phone is not in talk mode.
2. Press the
newest.
3. Press the
oldest.
CID R
ECORDS
button to scroll through the call records from the oldest to the
▼
▲button to scroll through the call records from the newest to the
ID
DELETE A CID R ECORD
1. Make sure the phone is not in talk mode.
2. When reviewing the most current record, press the [DELETE/HOLD]
button on the handset. The display shows
3. Press the [DELETE/HOLD] again to confirm. The display shows
DELETED.
DELETE?.
24
Page 26

ELETE ALL
D
1. Make sure the phone is not in talk mode.
2. Press the
3. Press and hold the [DELETE/HOLD] button for 3 seconds. The display
CID R
or ▼buttons until a CID record displays.
▲
ECORDS
shows
4. Press the [DELETE/HOLD] button again to erase all records. The display
shows
DELETE ALL?.
NO CALLS.
CHANGING THE NUMBER FORMAT
The [7-10-11/REDIAL/PAUSE] button lets you change the format of a
telephone number. Available formats are:
7-digit 7-digit telephone number.
10-digit 3-digit area code + 7-digit telephone number.
11-digit long distance code “1” + 3-digit area code + 7-digit
telephone number.
1. Make sure the phone is not in TALK mode.
2. Use the
call back.
3. Press [7-10-11/REDIAL/PAUSE] button on the handset to select another
format.
4. Press [TALK] button to dial the number.
5. Repeat step 3, if necessary, until the correct number format is selected.
or ▼ buttons on the handset to scroll to the number you want to
▲
MEMORY
Store up to 50 20-digit numbers in memory for quick dialing.
STORING A NAME AND NUMBER IN MEMORY
1. Press the [MEMORY] button on the handset.
2. Press the desired memory location (01-50). If the memory location is
MEMO# - -
SELECT MEMORY
01-50
25
Page 27

occupied, the memory location and stored name and number appear on the
screen. If the memory location is empty,
3. Press the memory button again. The display shows
EMPTY appears in the display.
ENTER NAME.
4. Use the handset keypad to enter a name (up to 15 characters). More than
one letter is stored in each of the number keys. For example, to enter Bill
Smith, press the 2 key twice for the letter B. Press the 4 key 3 times for the
letter I. Press the 5 key 3 times for the letter L. Wait for 1 second. Press the
5 key 3 times for the second letter L, and press the 1 key to insert a space
between the first and last name. Press the 7 key 4 times for the letter S;
press the 6 key once for the letter M; press the 4 key 3 times for the letter I;
press the 8 key for the letter T; press the 4 key twice for the letter H.
NOTE: If you make a mistake press the [DELETE/HOLD] button to backspace and erase the
wrong character(s) or number(s).
5. Press the [MEMORY] button again to save the name. Then display shows
ENTER TEL NUMBER.
6. Use the handset keypad to enter the area code followed by the telephone
number (up to 20 digits, including pause(s)) and press the [MEMORY]
button again to save your selection. The unit beeps to confirm.
7. To enter another name and number in a different memory location, return to
step 1 and repeat the process.
NOTE: You can save the number that is in the redial memory by pressing
[7-10-11/REDIAL/PAUSE] button when entering the numbers.
NOTE: When entering numbers, Pause (P) can be entered by pressing # key two times
quickly.
EVIEWING AND DELETING STORED NUMBERS
R
1. Make sure the phone is not in TALK mode.
2. Press the [MEMORY] button on the handset.
3. Use the
▲or ▼button on the handset to scroll to the desired memory
location, or use the keypad to enter the desired memory location.
4. If you want to delete the information, press the [DELETE/HOLD] button on
the handset while the entry displays. The display shows
5. Press the [DELETE/HOLD] button again to confirm. The display shows
DELETED**.
**
6. If the [DELETE/HOLD] button is pressed for 3 seconds after step 4, the
display shows
confirm deleting all record(s). The display shows **
DELETE?
- OR -
DELETE ALL?. Press the [DELETE/HOLD] button again to
DELETED**.
26
Page 28

SHORT-CUT KEYS FOR TELCO FEATURES
There are several special keys on the handset for calling Telco features.
ANCEL CALL WAITING BUTTON
C
1. Press [CANCEL CALL WAITING] button at both on-hook and off-hook
state will cancel the Call Waiting service in your telephone company
2.
CANCEL CALL WAITING
CANCEL
CALL WAITING
3. Press the [TALK] button to return to standby screen.
NFO BUTTON
I
1. Press the [INFO] button on the handset will automatically dial to the
Information Service Number entered in program menu.
INFO SERVICE displays on the screen.
2.
3. Press the [TALK] button to return to standby screen.
NOTE:
You can change the Information Service Number in program menu at anytime.
displays on the screen.
411
INFO SERVICE
EP DIAL BUTTON
R
1. Press the [REP DIAL] button to re-dial the previously dialed number.
REPEAT DIAL
27
Page 29

2. If the called number is still busy, press [TALK] or [SPEAKERPHONE] to
put the phone on-hook. The telephone company will try to connect to the
designated number.
3. There will be a special ringer tone to show the phone is connected
successfully.
4. Press the [TALK] button to return to standby screen.
OICE MAIL BUTTON
V
1. Press the [VOICE MAIL] button on the handset will automatically dial the
Voice Mail Number entered in program menu.
2.
VOICE MAIL
3. Press the [TALK] button to return to standby screen.
UTO REDIAL BUTTON
A
1. Press the [AUTO REDIAL] button to dial the last received number.
2. If the number is busy, press [TALK] or [SPEAKERPHONE] to put the phone
on-hook. The telephone company will try to connect to the designated
number.
3. There will be a special ringer tone to show the phone is connected
successfully.
4. Press the [TALK] button to return to standby screen.
displays on the screen.
VOICE MAIL
AUTO REDIAL
28
Page 30
ALLER
C
If you subscribe Caller ID 2.5 service from the telephone company, you will
have the additional Call Waiting functions shown below.
When Caller ID 2.5 information is received, a Waiting State menu and the
Caller ID will be displayed on the screen.
NSWER
A
1. Press the [FLASH/3-WAY/EXIT] button to hold the far-end party and
connect to the waiting party.
2. Hold state is available. (Detail description in other section)
3.
ANSWER displays on the screen.
ID 2.5 (C
ALL WAITING DELUXE
12:30PM 10/25 03
SMITH JOHN
BUSY CONF TO VM PLS HOLD DROP
1-123-456-7890
ANSWER
)
4. Return to normal display screen after 3 seconds.
USY
B
1. Press the [INFO] button to connect the waiting party to a specified
2.
3. Return to normal display screen after 3 seconds.
C
1. Press the [REP DIAL] button to join the waiting party together with the
announcement and remain connecting to the far-end party.
TELL BUSY
ONFERENCE
existing connection.
displays on the screen.
TELL BUSY
29
Page 31

2. Conference Call state is available.
CONFERENCE displays on the screen.
3.
CONFERENCE
(Detail description in other section)
4. Return to normal display screen after 3 seconds.
VOICE MAIL
1. Press the [VOICE MAIL] button to forward the waiting party to a preset
destination and remain connecting to the existing party.
TO VOICEMAIL displays on the screen
2.
TO VOICEMAIL
3. Return to normal display screen after 3 seconds.
HOLD
1. Press the [7-10-11/REDAIL/PAUSE] button to connect the waiting party to
a HOLD announcement.
2. Hold state is available. (Detail description in other section)
3.
PLEASE HOLD displays on the screen.
PLEASE HOLD
4. Return to normal display screen after 3 seconds.
ROP
D
1. Press the [AUTO REDIAL] button to disconnect the far-end party and get
connected to the waiting party.
30
Page 32

2.
DROP
3. Return to normal display screen after 3 seconds.
OLD STATE
H
Below sub-menu is displayed if Hold state is available.
displays on the screen.
DROP
RETURN
CONFERENCE Press [3] to connect the on-hold party and the far-end party
DROP
ONFERENCE CALL STATE
C
Below sub-menu is displayed if Conference Call state is available.
DROP FIRST Press [5] to disconnect the first calling party.
DROP LAST
Press [1] to toggle between the held party and the far-end
party.
in a 3-way conference call.
Press [7] to connect to the on-hold party and disconnect the
far-end party.
1 Return 7 Drop
3 Conference
Press [4] to disconnect the last calling party.
4 Drop Last
5 Drop First
31
Page 33
ELT CLIP AND OPTIONAL HEADSET
B
A
TTACHING THE BELT CLIP
1. Insert the sides of the clip into the slots on each side of the handset.
2. Snap the belt clip.
CONNECTING AN OPTIONAL HEADSET TO THE HANDSET
The handset can be used with an optional headset for hands free operation.
1. Connect the headset to the headset jack on the side of the handset. The
handset receiver and microphone are disabled when the headset is
connected.
2. Adjust the headset to rest comfortably on top of your head and over your
ear. Move the microphone to approximately two to three inches from your
mouth.
3. Press the [TALK] button to answer a call or make calls using the headset.
4. To return to normal operation, unplug the headset from the jack.
HANGING THE BATTERY
C
CAUTION:
compatible with this unit.
1. Make sure the telephone is not in TALK mode before you replace battery.
2. Remove the battery compartment cover.
3. Disconnect the cord attached to the battery pack from the jack inside the
battery compartment and remove the battery pack from the handset.
4. Reconnect the battery pack and insert it in the battery compartment.
5. Put the battery compartment cover back on.
6. Place handset in the base or handset charge cradle. If you don’t charge
the handset battery properly (for 12 hours) when you first set up the phone
and/or when you install a new battery pack, the battery’s long-term
performance is compromised.
ATTERY SAFETY PRECAUTIONS
B
Do not burn, disassemble, mutilate, or puncture. Like other batteries of
To reduce the risk of fire or personal injury, use only the battery that is
32
Page 34

this type, toxic materials could be released which can cause injury.
To reduce the risk of fire or personal injury, use only the battery listed in
the User’s Guide.
Keep batteries out of the reach of children.
Remove batteries if storing over 30 days.
DISPLAY MESSAGES
The following messages show the status of the phone, provides Caller ID
information, or helps you to set up and use your phone.
ERROR Caller information is interrupted during
transmission, or the phone is excessively noisy.
ENTER TEL NUMBER
ENTER NAME Prompt telling you to enter the name for one of the
DELETE ALL?
DELETE CALL ID? Prompt asking if you want to erase a Caller ID
DELETED
END OF LIST Indicates that there is no additional information in
NEW Indicates call or calls have not been reviewed.
UNKNOWN NAME/
CALLER/NUMBER Caller ID or the CID information was not sent.
PAGING FROM BASE Indicates the page button on the base is pressed.
BLOCKED CALL The caller’s number is blocked from transmission.
BLOCKED NAME
LINE IN USE Indicates the telephone line is in use.
OUT OF RANGE Indicates the handset is too far away from the
Prompt asking if you want to erase all Caller ID
Prompt confirming the Caller ID record is erased.
Prompt telling you to enter a telephone number in
one of the 50 memory locations.
50 memory locations.
records.
record.
Caller ID memory.
The incoming call is from an area not serviced by
The callers’ name is blocked from transmission.
base.
LOW BATTERY
EMPTY Indicates a memory location is vacant.
NO CALLS Indicates no calls have been received.
ROUBLESHOOTING TIPS
T
C
ORDLESS PHONE SOLUTIONS
Indicates the battery needs to be charged.
33
Page 35

No dial tone
Check or repeat installation steps:
Make sure the base power cord is connected to a working electrical outlet.
Make sure the telephone line cord is connected to the base and the wall
jack.
Connect another phone to the same wall jack; if it doesn’t work, the
problem might be your wiring or local service.
The handset may be out of range of the base. Move closer to the base.
Make sure the battery is properly charged (12 hours).
Make sure the battery pack (in the handset) is properly installed.
The handset should beep when you press the [TALK] button, and the
charge/in use indicator on the base should be lit when the handset rests in
the cradle. If not, the battery may need to be changed.
Handset does not ring
Make sure the RINGER VOLUME setting is not OFF.
The handset may be out of range of the base. Move closer to the base.
You may have too many extension phones on your line. Try unplugging
some phones.
Check for dial tone.
You experience static, noise or fading in and out.
The handset may be out of range of the base. Move closer to the base
Relocate the base. Make sure the base is not plugged into an outlet with
another household appliance.
Charge the battery.
Unit beeps
Clean charging contacts on handset and base with a soft cloth or an
eraser.
See solutions for “No dial tone”.
Charge battery for 12 hours or replace the battery.
Memory dialing doesn’t work
Did you program the memory location key(s) correctly?
Did you follow proper dialing sequence?
ALLER
C
No Display
Charge the battery (for 12 hours). Or replace the battery.
Make sure that the unit is connected to a non-switched electrical outlet.
Disconnect the power converter from the outlet and plug it in again.
ID S
OLUTIONS
34
Page 36

You must subscribe to the standard Name/Number Caller ID service from
your local telephone company to receive CID information.
Caller ID Error Message
The unit displays this message if it detects anything other than valid Caller
ID information during the silent period after the first ring. This message
indicates either the presence of noises on the line, or that an invalid
message has been sent from the telephone company.
ENERAL PRODUCT CARE
G
To keep your telephone working and looking good, follow these guidelines:
Avoid putting the phone near heating appliances and devices that
generate electrical noise (for example, motors or fluorescent lamps).
DO NOT expose to direct sunlight or moisture.
Avoid dropping the unit and other rough treatment.
Clean with a soft cloth.
Never use a strong cleaning agent or abrasive powder because this will
damage the finish.
Retain the original packaging in case you need to ship the phone at a later
date.
Periodically clean the charge contacts on the handset and base with a soft
cloth.
AUSES OF POOR RECEPTION
C
Aluminum siding.
Foil backing on insulation.
Heating ducts and other metal construction that can shield radio signals.
You’re too close to appliances such as microwaves, stoves, computer, etc.
Atmospheric conditions, such as strong storms.
Base is installed in the basement or lower floor of the house.
Base is plugged into AC outlet with other electronic devices.
Baby monitor is using the same frequency.
Handset battery is low.
You’re out of range of the base
Microwave oven is using the same frequency.
35
Page 37

ERVICE
S
This product is warranted to be free from manufacturing defects for a period of
one year from the original date of consumer purchase. This warranty is limited
to the repair or replacement of this product only and does not extend to
consequential or incidental damage to other products that may be used with
this unit. This warranty is in lieu of all other warranties expressed or implied. If
the unit should be defective with the warranty period, please call Customer
Service Department at 1-888-839-0834.
36
Page 38

NDEX
I
A
ANSWER
ANSWERING A CALL
ATTACHING THE BELT CLIP
AUTO REDIAL BUTTON
B
BASE LAYOUT
BATTERY SAFETY PRECAUTIONS
BEFORE YOU BEGIN
BELT CLIP AND OPTIONAL HEADSET
BUSY
C
CALL WAITING CALLER ID
CALLER (CID)
CALLER ID 2.5 (CALL WAITING DELUXE)
CALLER ID SOLUTIONS
CANCEL CALL WAITING BUTTON
CAUSES OF POOR RECEPTION
CHANGING THE BATTERY
CHANGING THE
CHARGE INDICATOR
CONFERENCE
CONFERENCE CALL STATE
CONNECTING AN OPTIONAL HEADSET TO THE
HANDSET
CONNECTING THE AC (ELECTRICAL) POWER
CONNECTING THE TELEPHONE LINE
CORDLESS PHONE SOLUTIONS
D
DEFAULT
DELETE A CID RECORD
DELETE ALL CID RECORDS
DISPLAY MESSAGES
DROP
E
EQUIPMENT APPROVAL INFORMATION
F
NUMBER FORMAT
FLASH
G
GENERAL PRODUCT CARE
H
HANDSET LAYOUT
HANDSET NAME
HANDSET REGISTRATION
HEARING AID COMPATIBILITY (HAC)
HOLD
HOLD STATE
I
IMPORTANT INSTALLATION GUIDELINES
IMPORTANT INSTALLATION INFORMATION
INDEX
INFO BUTTON
INFORMATION SERVICES NUMBER
INSTALLING BASE UNIT BATTERIES
INSTALLING THE HANDSET BATTERY
INSTALLING THE PHONE
INTERFERENCE INFORMATION
INTRODUCTION
L
LANGUAGE
LIMITED WARRANTY
LIMITATION OF WARRANTY
LOCAL AREA CODE
M
MAKING A CALL
MEMORY
MUTE
P
PAG E
PAGING FROM BASE
PARTS CHECKLIST
PROGRAMMABLE MENUS
R
REDIAL
37
Page 39

REGIONAL AREA CODE
REP DIAL BUTTON
REVIEW CID RECORDS
REVIEIWING AND DELETING STORED NUMBERS
RINGER TONE
RINGER VOLUME
S
SERVICE SHORT-CUT KEYS FOR TELCO
FEATURES
STORING A NAME AND NUMBER IN MEMORY
TELEPHONE OPERATION TELEPHONE SETUP
TROUBLESHOOTING TIPS
V
VIBRATE CALL ALERT
VIP MELODY
VOICE MAIL
VOICE MAIL BUTTON
VOICE MAIL NUMBER
VOICE MAIL WAITING INDICATOR
VOLUME
T
TELEPHONE JACK REQUIREMENTS
W
WALL MOUNTING THE BASE
38
Page 40

IMITED WARRANTY
L
What your warranty does not cover:
Customer instruction. (Your Owner’s Manual provides information
regarding operating instructions and user controls. Any additional
information, should be obtained from you dealer.)
Installation and setup service adjustments.
Batteries.
Damage from misuse or neglect.
Products which have been modified or incorporated into other products.
Products purchased or serviced outside the USA.
Acts of nature, such as but not limited to lightning damage.
LIMITATION OF WARRANTY:
The warranty stated above is the only warranty applicable to this product.
All other warranties, express or implied (including all implied warranties of
merchantability of fitness for a particular purpose) are hereby disclaimed.
No verbal or written information given by Market Direct, it’s agent, or
employees shall create a guaranty or in any way increase the scope of
this warranty.
Repair or replacement as provided under this warranty is the exclusive
remedy of the consumer. Market Direct shall not be liable for incidental or
consequential damages resulting for the use of this product or arising out
of any breach of any express or implied warranty on this product. This
disclaimer of warranties and limited warrant are governed by the laws of
the State of Massachusetts. Except to the extent prohibited by applicable
law, any implied warrant of merchantability or fitness for a particular
purpose on this product is limited to the applicable warranty period set
forth above.
Market Direct, 143 York Road, Mansfield, MA02048, USA
Model MD220
(Rev 0)
Printed in China
39
 Loading...