

Page 1
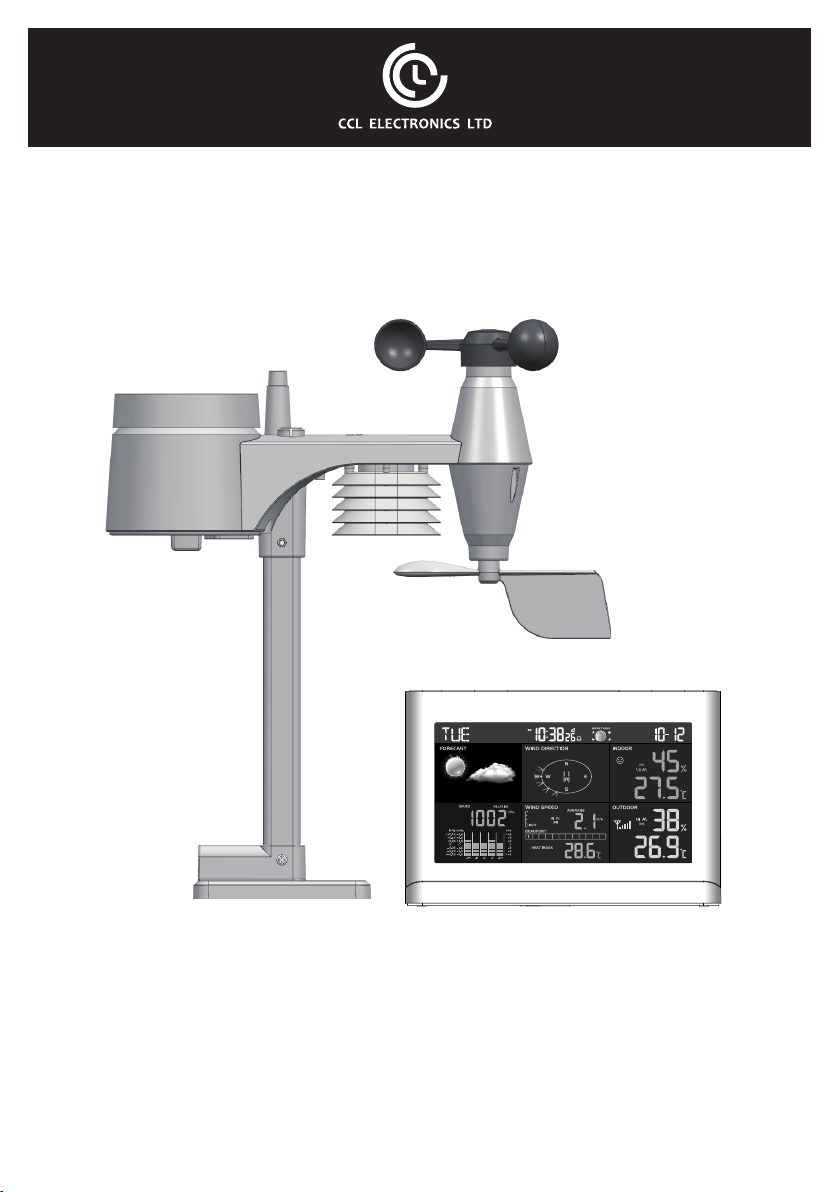
PROFESSIONAL Colour WEATHER STATION
WITH 5-IN-1 SENSOR
Model: C8479B
USER MANUAL
1
Page 2

CONTENTS
INTRODUCTION…………………………………………………………………………………………….3
OVERVIEW…………………………………………………………………………………………….........4
LCD DISPLAY...................................................................................................................................5
INSTALLATION................................................................................................................................7
WEATHER FORECAST..................................................................................................................9
BAROMETRIC/ATMOSPHERIC PRESSURE................................................................................10
RAINFALL......................................................................................................................................10
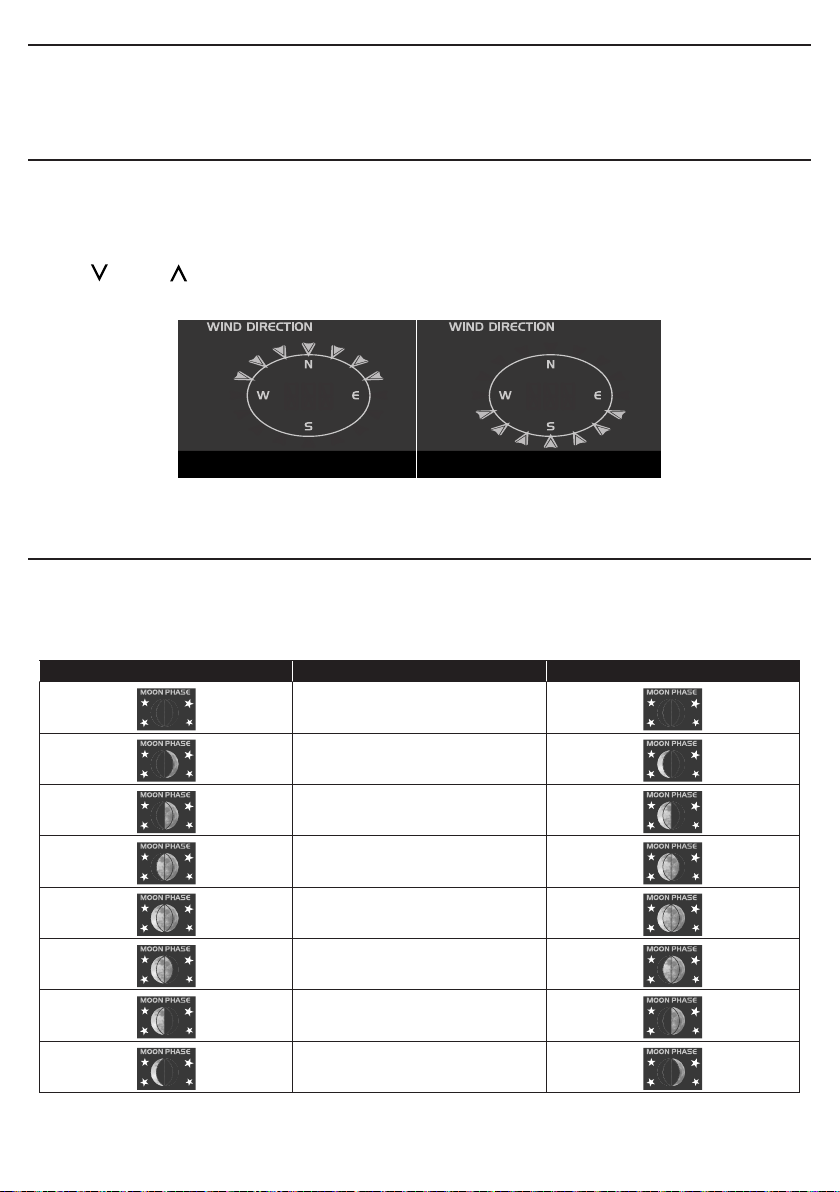
WIND SPEED/WIND DIRECTION..................................................................................................11
WIND CHILL/HEAT INDEX/DEW-POINT........................................................................................12
HISTORY DATA (ALL RECORDS IN THE PAST 24 HOURS).......................................................13
MAX/MIN MEMORY FUNCTION....................................................................................................13
HI/LO ALERT..................................................................................................................................13
WIRELESS SIGNAL RECEPTION.................................................................................................14
TEMPERATURE & HUMIDITY........................................................................................................14
DATA CLEARING...........................................................................................................................15
POINTING 5-IN-1 SENSOR TO THE SOUTH................................................................................15
MOON PHASE...........................................................................................................................15
MAINTENANCE.............................................................................................................................16
TROUBLESHOOTING...................................................................................................................16
PRECAUTIONS..............................................................................................................................16
SPECIFICATIONS..........................................................................................................................18
2
Page 3

INTRODUCTION
Thank you for your purchase of this delicate 5-in-1 professional outdoor sensor with colour display.
The wireless 5-IN-1 sensor contains a self-emptying rain collector for measuring rainfall,
anemometer, and wind vane, temperature and humidity sensors. It is fully assembled and
calibrated for your easy installation. It sends data by a low power radio frequency to the display
main unit up to 150m away (line of sight).
The colourful display main unit displays all the weather data received from the 5-IN-1 sensor
outside. It remembers the data for a time range for you to monitor and analyze the weather status
for past 24 hours. It has advance features such as the HI / LO Alert alarm which will alert the user
when the set high or low weather criteria are met. The barometric pressure records are computed
to give users forthcoming weather forecast and stormy warning. Day and date stamps are also
provided to the corresponding maximum and minimum records for each weather details.
The system also analyzes the records for your convenient viewing, such as the display of rainfall
in terms of rain rate, daily, weekly and monthly records, whereas wind-speed in different levels.
Different useful readings such as Wind-chill, Heat Index, Dew-point, Comfort level are also
provided.
With Radio-controlled / Atomic clock feature built-in, the system is truly a remarkable personal
Professional Weather Station for your own backyard.
Note:
This instruction manual contains useful information on the proper use and care of this product.
Please read this manual through to fully understand and enjoy its features, and keep it handy for
future use.
3
Page 4
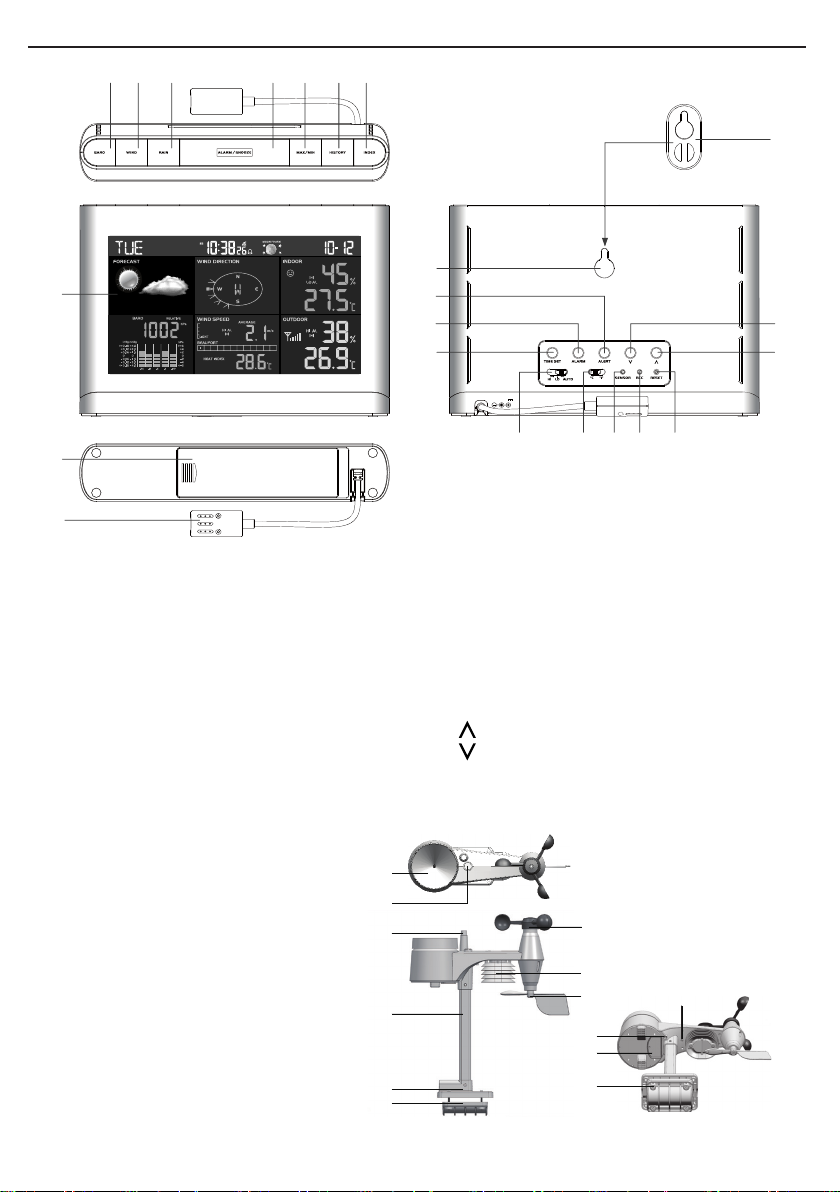
OVERVIEW
10
21
20
1 2 3 74 5 6
22
CONSOLE
11
8
12
13
14
DC 4.5V 300mA
9
15
16 17 18 19
1. [ BARO ] key 12. [ ALERT ] key
2. [ WIND ] key 13. [ ALARM ] key
3. [ RAIN ] key 14. [ TIME SET ] key
4. [ ALARM / SNOOZE ] key 15. [ HI / LO / AUTO ] dimmer slide switch
5. [ MAX / MIN ] key 16. [ °C/°F ] slide switch
6. [ HISTORY ] key 17. [ SENSOR ] key
7. [ INDEX ] key 18. [ RCC ] key
8. LCD display 19. [ RESET ] key
9. AAA battery compartment
10. Power jack / Temperature sensor
20. [ ] key
21. [ ] key
11. Wall-mounting hole 22. Extend wall mount holder
WIRELESS 5-IN-1 SENSOR
1. Rain collector
2. Balance indicator
3. Antenna
4. Wind cups
5. Mounting pole
6. Radiation shield
7. Wind vane
8. Mounting base
9. Mounting claim
10. Red LED indicator
11. [ RESET ] key
12. Battery door
13. Screws
1
2
11
12
13
4
6
7
10
3
5
8
9
4
Page 5
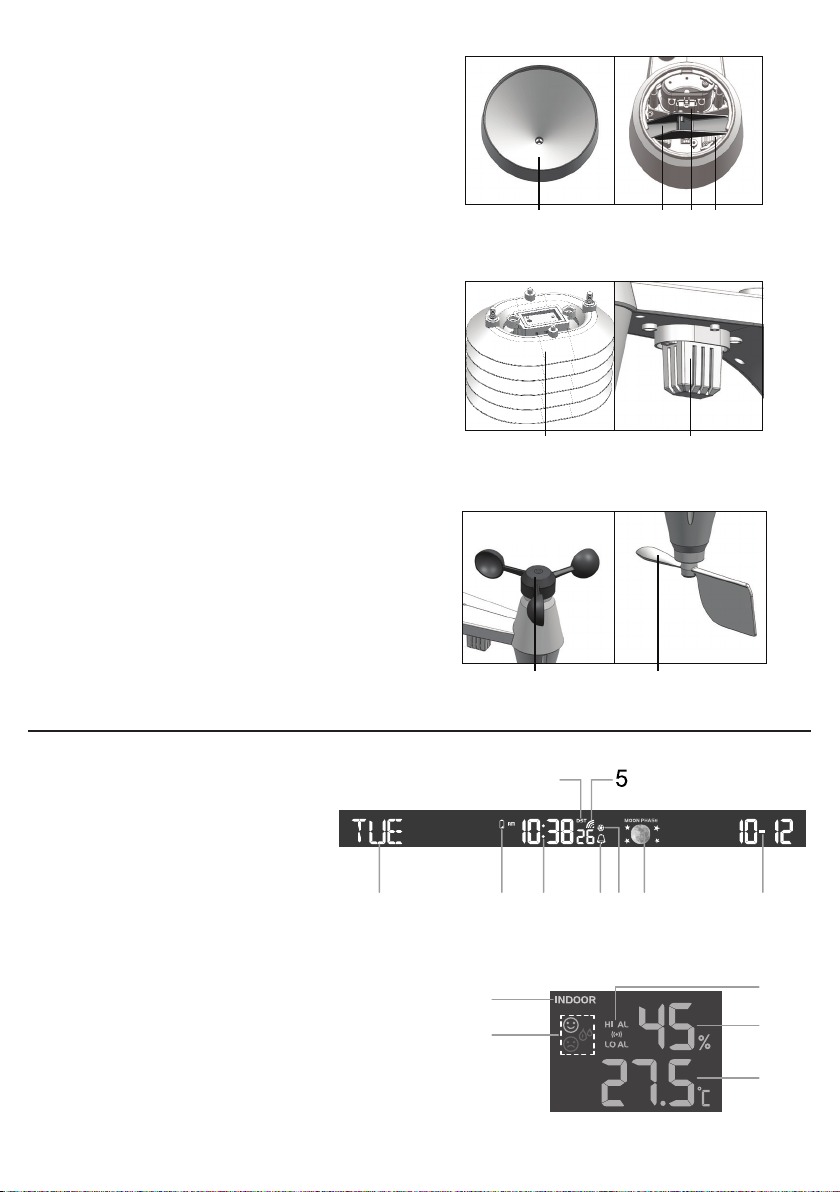
RAIN GAUGE
1 2 3 4
1
2
1 2
1. Rain collector
2. Tipping bucket
3. Rain sensor
4. Drain holes
TEMPERATURE AND HUMIDITY SENSOR
1. Radiation shield Sensor casing
2. Temperature and humidity sensor
WIND SENSOR
1. Wind cups (anemometer)
2. Wind vane
LCD DISPLAY
NORMAL TIME AND CALENDAR SECTION
1. Day of the week
2. Low battery indicator for main unit
3. Time
4. DST
5. RCC signal strength indicator
6. Alarm
7. Ice pre-alert "on"
8. Moon phase
9. Date
INDOOR TEMPERATURE AND HUMIDITY
1. Indoor indicator
2. Comfort Zone
3. HI/LO Alert and Alarm
4. Indoor humidity
5. Indoor temperature
1 2 3
1
2
4
6 8 97
3
4
5
5
Page 6
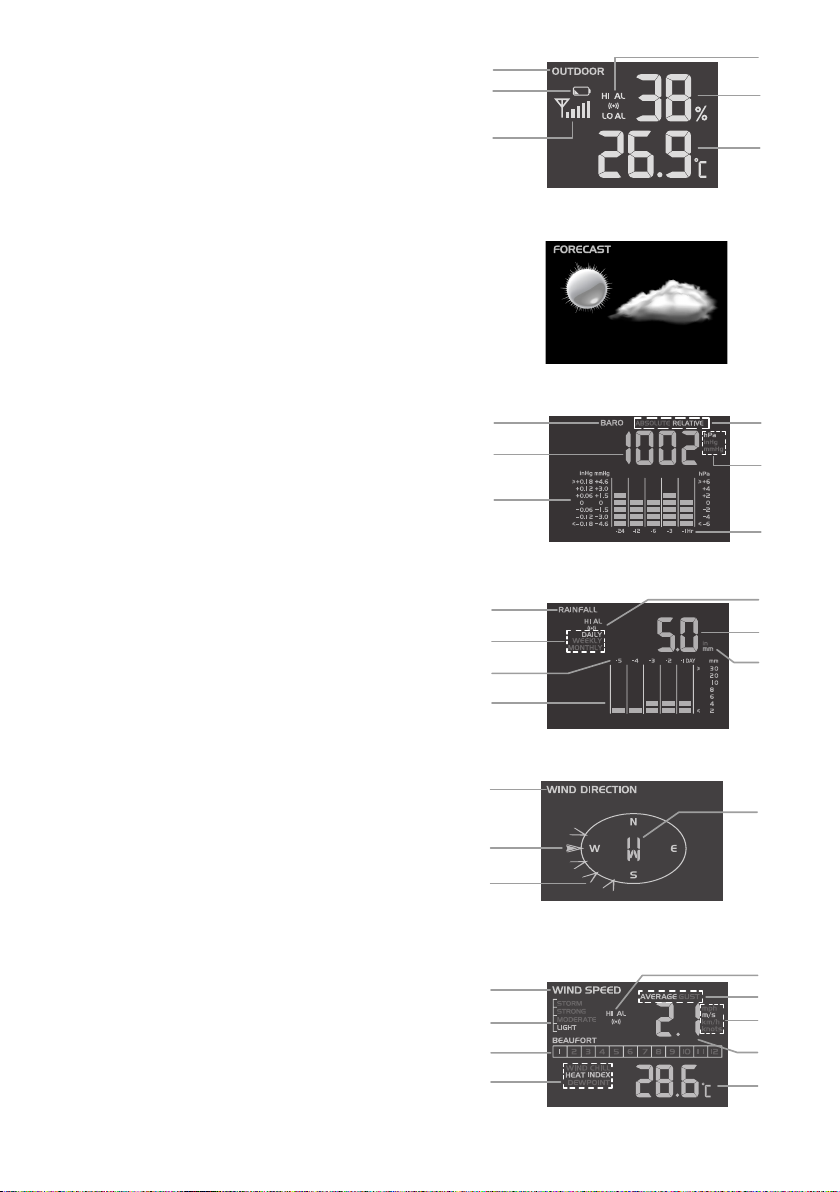
OUTDOOR TEMPERATURE AND HUMIDITY
1. Outdoor indicator
2. Outdoor sensor low battery indicator
3. Outdoor signal strength indicator
4. Hi/LO Alert and Alarm
5. Outdoor humidity
6. Outdoor temperature
WEATHER FORECAST
Weather forecast icon
BAROMETER
1. BARO indicator
2. HISTORY
3. Barometer reading
4. ABSOLUTE/RELATIVE indicator
5. Barometer measurement unit(hPa/inHg/mmHg)
6. Hourly records indicator
RAINFALL
1. RAINFALL indicator
2. Time range record indicator
3. Day records indicator
4. HISTORY
5. Hi Alert and Alarm
6. Current rainfall rate
7. Rainfall unit (inch/mm)
1
2
3
1
2
4
5
6
4
5
3
6
1
2
3
5
6
7
4
WIND DIRECTION
1. WIND DIRECTION indicator
2. Current wind direction indicator
3. Wind direction indicator during the last hour
4. Current wind direction reading
WIND SPEED / WIND CHILL / HEAT INDEX / DEW POINT
1. WIND SPEED indicator
2. Wind speed levels
3. Beaufort levels
4. WIND CHILL / HEAT INDEX / DEW POINT indicator
5. Hi Alert and Alarm
6. AVERAGE / GUST wind indicator
7. Wind speed unit (mph / m/s / km/h / knot)
8. Wind speed reading
9. WIND CHILL / HEAT INDEX / DEW POINT reading
6
1
4
2
3
1
2
3
4
5
6
7
8
9
Page 7
INSTALLATION
WIRELESS 5-IN-1 SENSOR
Your wireless 5-IN-1 sensor measures wind speed, wind direction, rainfall, temperature and humidity for you.
It’s fully assembled and calibrated for your easy installation.
BATTERY AND INSTALLATION
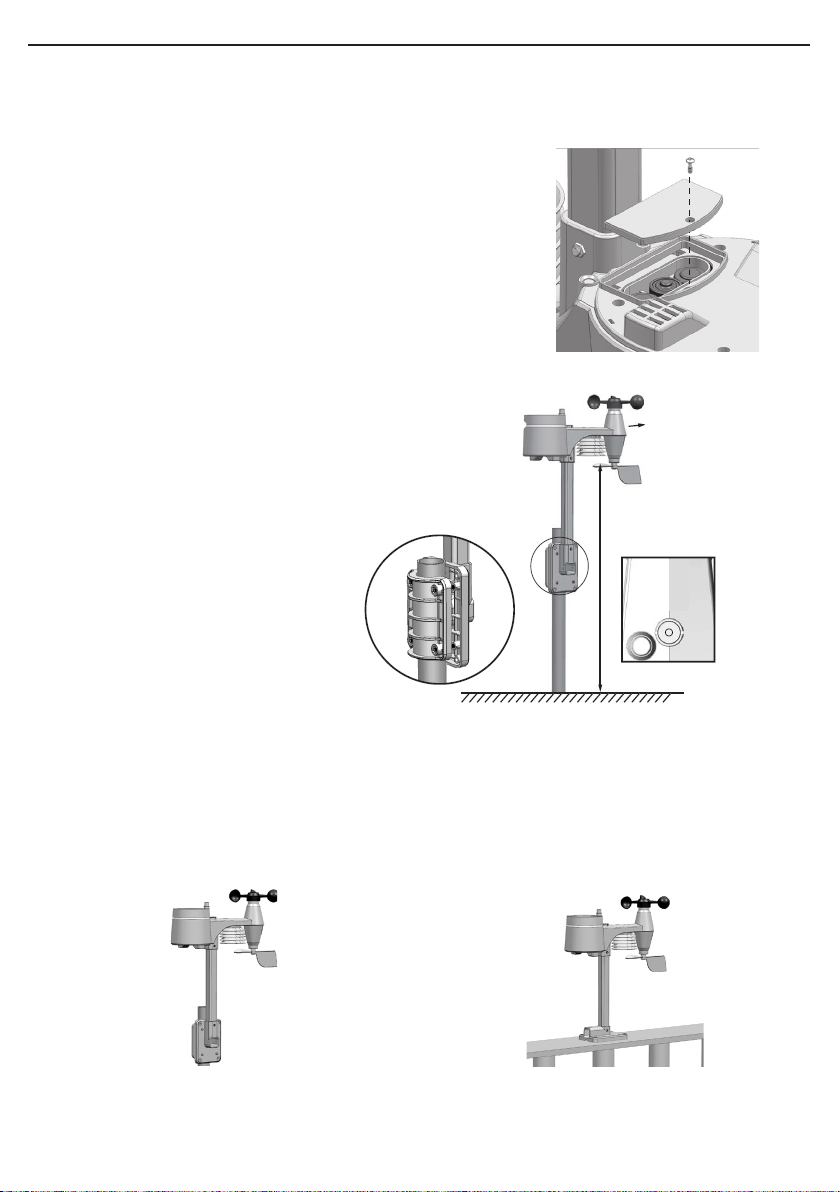
Unscrew the battery door at bottom of unit and insert the batteries
according to the +/- polarity indicated.
Screw the battery door compartment on tightly.
Note:
1. Ensure the water tight O-ring is properly aligned in place to
ensure water resistant.
2. The red LED will begin ashing every 12 seconds.
Install the wireless 5-IN-1 sensor in
an open location with no obstructions
above and around the sensor for
accurate rain and wind measurement.
Install the sensor with the smaller end
facing the North to properly orient the
wind direction vane.
Secure the mounting stand and bracket
(included) to a post or pole, and allow
minimum 1.5m off the ground.
Points to
NORTH
1.5 meter off
the ground
MOUNTING GUIDELINES
1. Install the wireless 5-IN-1 sensor at least 1.5m off the ground for better and more accurate wind
measurements.
2. Choose an open area within 150 meters from the LCD display Main Unit.
3. Install the wireless 5-IN-1 sensor as level as possible to achieve accurate rain and wind measurements.
4. Mount the wireless 5-IN-1 sensor with the wind meter end pointing to the North to correctly orient direction
of the wind vane.
A. Mounting on pole (Pole Diameter 1"~1.3"
(25~33mm)
B. Mounting on the railing
7
Page 8
CONSOLE
BACKUP BATTERIES INSTALLATION
1. Remove the battery door on the bottom of the main unit.
2. Insert a 3 new AAA batteries.
3. Replace the battery door.
4. Once the batteries are inserted, all the segments of the LCD will be shown briey before entering the radio-
controlled time reception mode.
5. The RC clock will automatically start scanning for the radio-controlled time signal in 8 seconds.
Note:
- If no display appears on the LCD after inserting the batteries, press [ RESET ] key by using a pointed object.
- In some cases, you may not receive the signal immediately due to the atmospheric disturbance.
PAIRING OF WIRELESS 5-IN-1 SENSOR WITH DISPLAY MAIN UNIT
After insertion of batteries, the Display Main Unit will automatically search and connect the wireless 5-IN-1
sensor (antenna blinking).
Once the connection is successful, antenna mark and readings for outdoor temperature, humidity, wind speed,
wind direction, and rainfall will appear on the display.
CHANGING BATTERIES AND MANUAL PAIRING OF SENSOR
Whenever you changed the batteries of the wireless 5-IN-1 sensor, pairing must be done manually.
1. Change the batteries to new ones.
2. Press [ SCAN ] key.
3. Press [ RESET ] key on the sensor.
Note:
- Pressing [ RESET ] key at bottom of wireless 5-IN-1 sensor will generate a new code for pairing purpose.
- Always dispose old batteries in an environmentally safe manner.
RADIO CONTROLLED/ATOMIC CLOCK FUNCTION
When the unit receives RCC signal, a sync-time symbol will appear on the LCD, and synchronizes daily.
Note:
1. The strength of radio-controlled time signal from the transmitter tower may be affected by geographical
location or building around.
2. Always place the unit away from interfering sources such as TV set, computer, etc.
3. Avoid placing the unit on or next to metal plates.
4. Closed areas such as airport, basement, tower block, or factory are not recommended.
SIGNAL STRENGTH INDICATOR
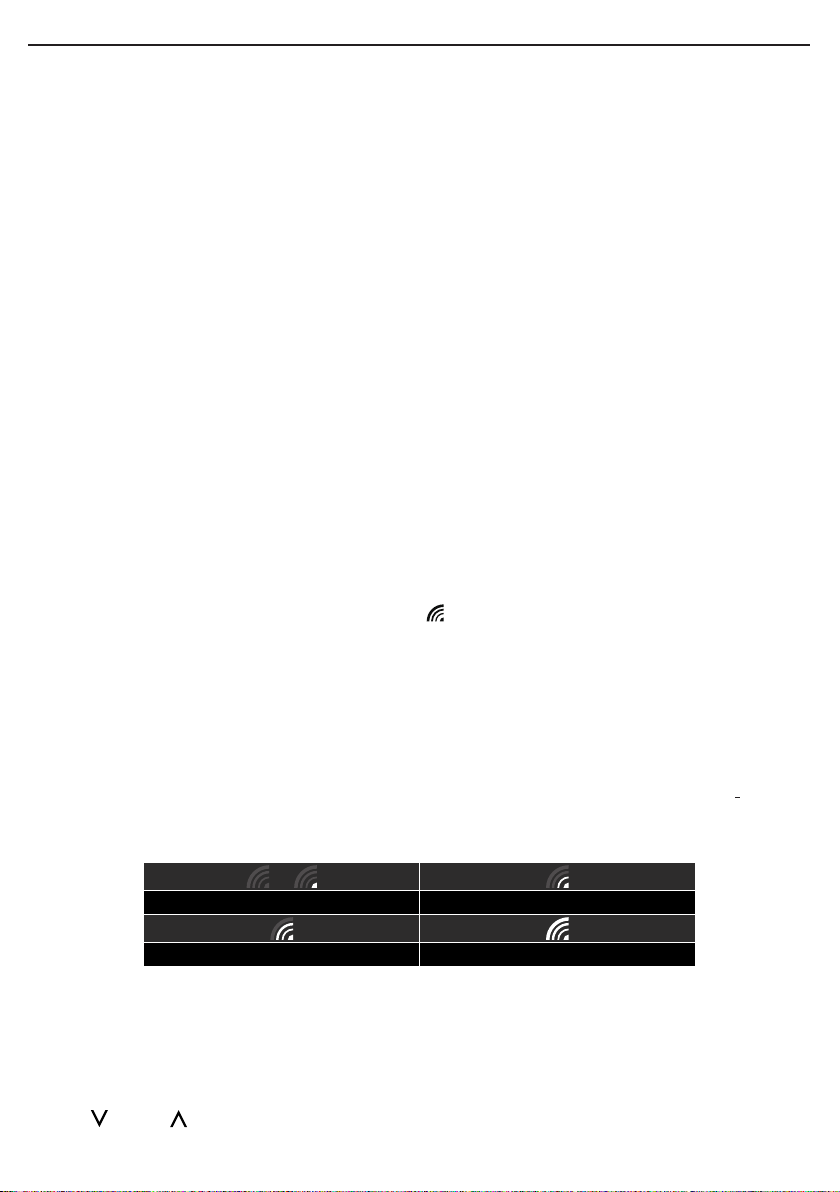
The signal indicator displays signal strength in 4 levels. Wave segment ashing means time signals are being
received. The signal quality could be classied into four types:
or
No signal quality Weak signal quality
Acceptable signal quality Excellent signal quality
TIME SETTING
The unit automatically set itself accordingly to the Radio Controlled Clock signal it received. To set the clock/
calendar manually, rst disable the reception by holding the RCC key for 8 seconds.
TO MANUALLY SET THE CLOCK / TIME ZONE SELECTION
1. Press and hold [ CLOCK ] key for 2 seconds until 12 or 24 Hr ashes.
2. Use [ ] key / [ ] key to adjust, and press [ CLOCK ] key to proceed to the next setting.
8
Page 9
3. Press [ CLOCK ] key again to step the setting items in this sequence: Hour format Hour Minute
Second Year Month Date Hour offset Language DST AUTO/OFF.
Note:
- The unit will automatically exit setting mode if no key was pressed in 60 seconds.
- The hour offset is for DCF and MSF version. Its range is between -23 and +23 hours.
- DST (Daylight Saving Time) feature is set to Auto (factory set).The clock has been
programmed to automatically switch when the daylight saving time is in effect. User can set the DST to OFF to
disable the feature.
DISABLE / ENABLE RCC SIGNAL RECEPTION
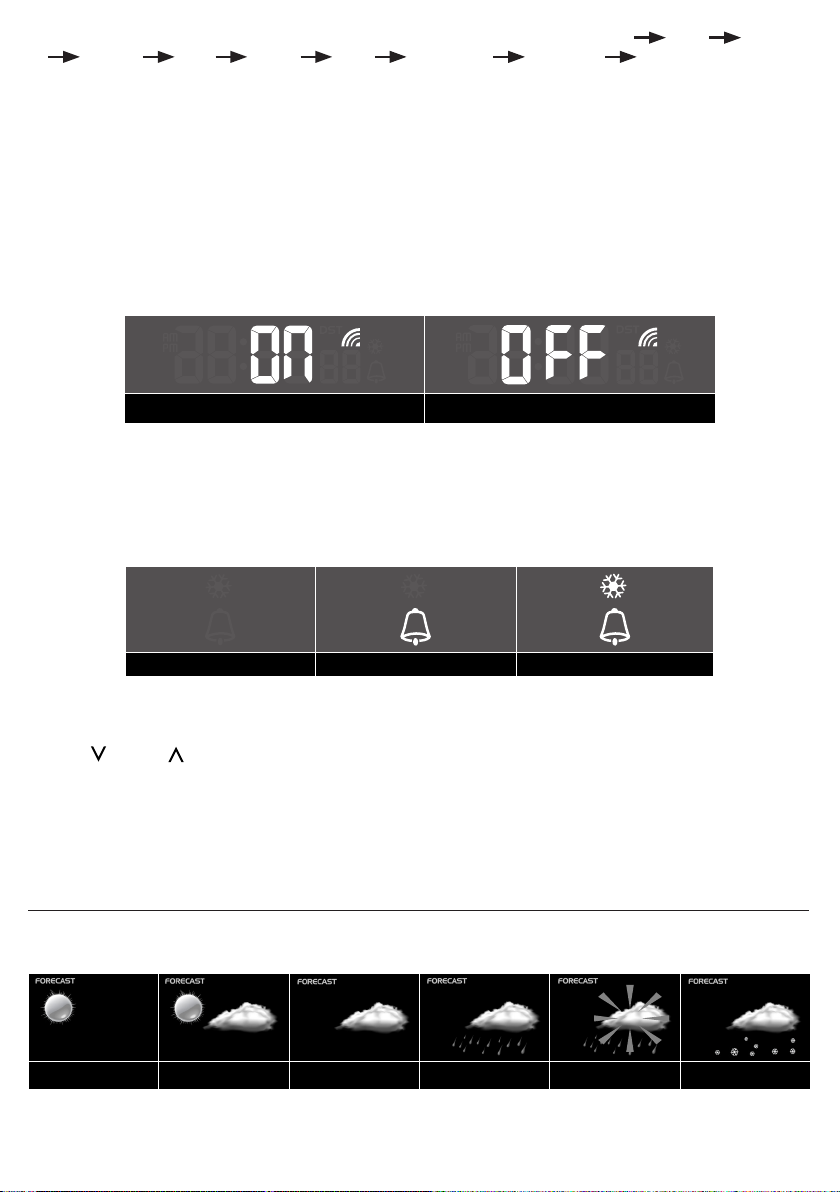
1. Press and hold the [ RCC ] key 8 seconds to disable the reception.
2. Press and hold the [ RCC ] key 8 seconds to enable automatic RCC reception.
RCC on RCC off
TO TURN ON / OFF ALARM CLOCK (WITH ICE-ALERT FUNCTION)
1. Press the [ ALARM ] key anytime to show the alarm time.
2. Press the[ ALARM ] key to activate the alarm.
3. Press again to activate alarm with ice-alert function.
4. To disable the alarm, press until the alarm icon disappears.
Alarm off Alarm on Alarm with ice-alert
TO SET THE ALARM TIME
1. Press and hold the [ ALARM ] key for 2 seconds to enter alarm setting mode HOUR will begin to ash.
2. Use [ ] key / [ ] key to adjust HOUR, and press the [ ALARM ] key to proceed to set MINUTE.
3. Repeat 2 above to set MINUTE, and then press the [ ALARM ] key to exit.
Note:
- Pressing the[ ALARM ] key twice when alarm time is being displayed will activate the temperature-adjusted
pre-alarm.
- The alarm will sound 30 minutes earlier if it detects outside temperature is below -3°C.
WEATHER FORECAST
The device contains sensitive pressure sensor built-in with sophisticated and proven software that predicts
weather for the next 12 ~ 24 hours within a 30 to 50 km (19-31 miles) radius.
Sunny/Clear Slightly Cloudy Cloudy Rainy Rainy/Stormy Snowy
9
Page 10
Note:
- The accuracy of a general pressure-based weather forecast is about 70% to 75%.
- The weather forecast is meant for the next 12 hours, it may not necessarily reect the current situation.
- The weather icon will ash on display when the rainstorm comes.
- The SNOWY weather forecast is not based on the atmospheric pressure, but based on the outdoor
temperature. When the outdoor temperature is below -3°C (26°F), the SNOWY weather indicator will be
displayed on the LCD.
BAROMETRIC/ATMOSPHERIC PRESSURE
TO SELECT THE DISPLAY MODE
Press and hold the [ BARO ] key for 2 seconds to toggle between:
- ABSOLUTE the absolute atmospheric pressure of your location
- RELATIVE the relative atmospheric pressure based on the sea
TO SET RELATIVE ATMOSPHERIC PRESSURE VALUE
1. Press and hold the [ BARO ] key for 2 seconds until ABSOLUTE or RELATIVE icon ashes.
2. Press [ ] key / [ ] key to switch to RELATIVE mode.
3. Press the [ BARO ] key once again until the RELATIVE atmospheric pressure digit ashes.
4. Press [ ] key / [ ] key to change the value.
5. Press the [ BARO ] key to save and exit the setting mode.
Note:
- The default relative atmospheric pressure value is 1013 hPa (29.91 inHg), which refers to the average
atmospheric pressure.
- When you change the relative atmospheric pressure value, the weather indicators will change along with it.
- The relative atmospheric pressure is based on the sea level, but it will change with the absolute atmospheric
pressure changes after operating the clock for 1 hour.
TO SELECT THE MEASUREMENT UNIT FOR THE BAROMETER
1. Press the [ BARO ] key to enter unit setting mode.
2. Use the [ BARO ] key to change the unit between inHg / mmHg / hPa.
3. Press the [ BARO ] key to conrm.
RAINFALL
TO SELECT THE RAINFALL DISPLAY MODE
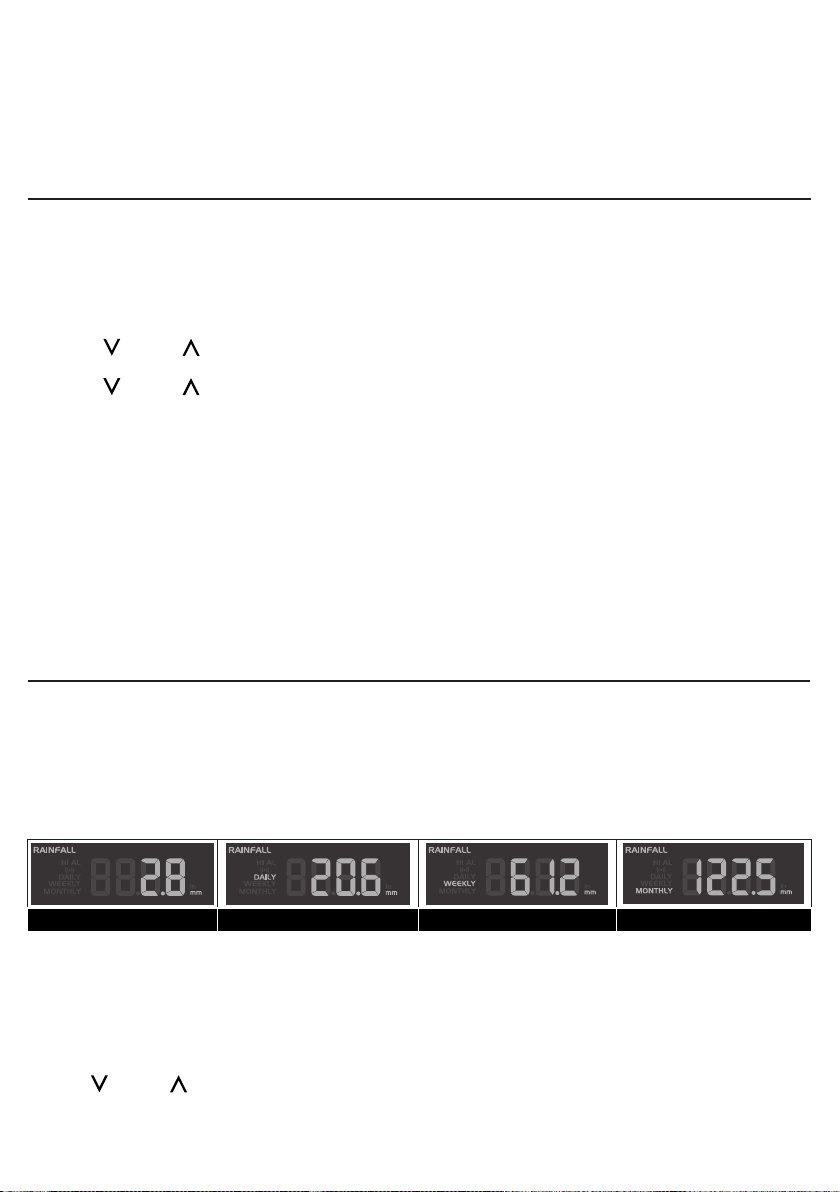
The device displays how many mm/inches of rain are accumulated in an hour time period, based on current
rainfall rate. Press the [ RAINFALL ] key to toggle between:
- RATE Current rainfall rate in past an hour
- DAILY The DAILY display indicate the total rainfall from midnight
- WEEKLY The WEEKLY display indicate the total rainfall from the current week
- MONTHLY The MONTHLY display indicate the total rainfall from the current calendar month
Rainfall rate Daily rainfall Weekly rainfall Monthly rainfall
Note:
Rain rate is updated every 6 minutes, at every hour on the hour, and at 6, 12, 18, 24, 30, 36, 42, 48, 54 minute
past the hour.
TO SELECT THE MEASUREMENT UNIT FOR THE RAINFALL
1. Press and hold the [ RAINFALL ] key 2 seconds to enter unit setting mode.
2. Use [ ] key / [ ] key to toggle between mm (millimeter) and in (inch).
3. Press the [ RAINFALL ] key to conrm and exit.
10
Page 11
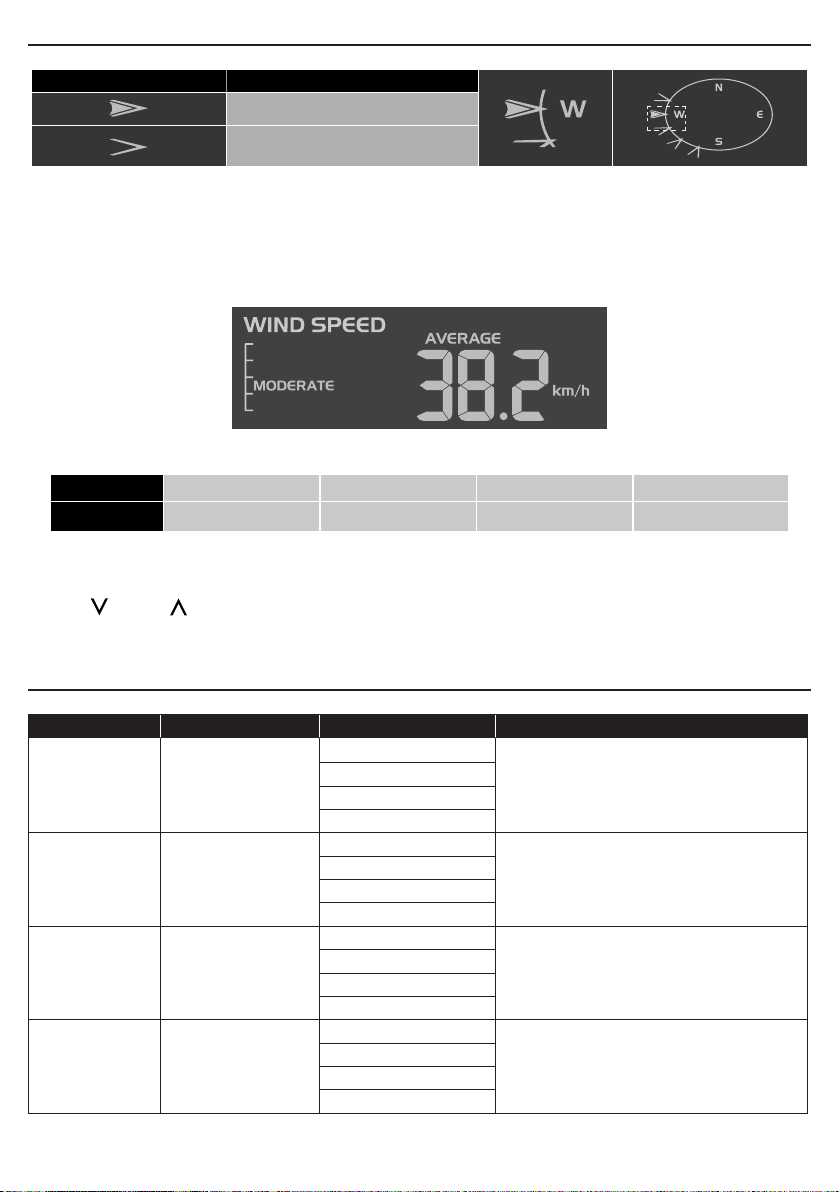
WIND SPEED/WIND DIRECTION
TO READ THE WIND DIRECTION
Wind Direction Indicator Meaning
Real-time wind direction
Wind directions appeared in last 5
minutes (max 6 indicator mark)
TO SELECT THE WIND DISPLAY MODE
Press the [ WIND] key to toggle between:
- AVERAGE The AVERAGE wind speed will display the average of all wind speed numbers recorded in the
previous 30 seconds
- GUST The GUST wind speed will display the highest wind speed recorded from last reading
The wind level provides a quick reference on the wind condition and is indicated by a series of text icons
Level LIGHT MODERATE STRONG STORM
Speed 1 ~ 19 km/h 20 ~ 49 km/h 50 ~ 88 km/h > 88 km/h
TO SELECT WIND SPEED UNIT
1. Press and hold the key for 2 seconds to enter unit setting mode.
2. Use [ ] key / [ ] key to change the unit between mph (miles per hour) / m/s (meter per second) / km/h
(kilometer per hour) / knots.
3. Press the key to conrm and exit.
BEAUFORT SCALE
Beaufort scale is an international scale of wind velocities from 0 (calm) to 12 (Hurricane force).
Beaufort Scale Description Wind Speed Land Condition
< 1 km/h
0 Calm
1 Light air
2 Light breeze
3 Gentle breeze
< 1 mph
< 1 knot
< 0.3 m/s
1.1 ~ 5.5 km/h
1 ~ 3 mph
1 ~ 3 knot
0.3 ~ 1.5 m/s
5.6 ~ 11 km/h
4 ~ 7 mph
4 ~ 6 knot
1.6 ~ 3.3 m/s
12 ~ 19 km/h
8 ~ 12 mph
7 ~ 10 knot
3.4 ~ 5.4 m/s
Calm. Smoke rises vertically.
Smoke drift indicates wind direction.
Leaves and wind vanes are stationary.
Wind felt on exposed skin. Leaves rustle. Wind
vanes begin to move.
Leaves and small twigs constantly moving, light
ags extended.
11
Page 12
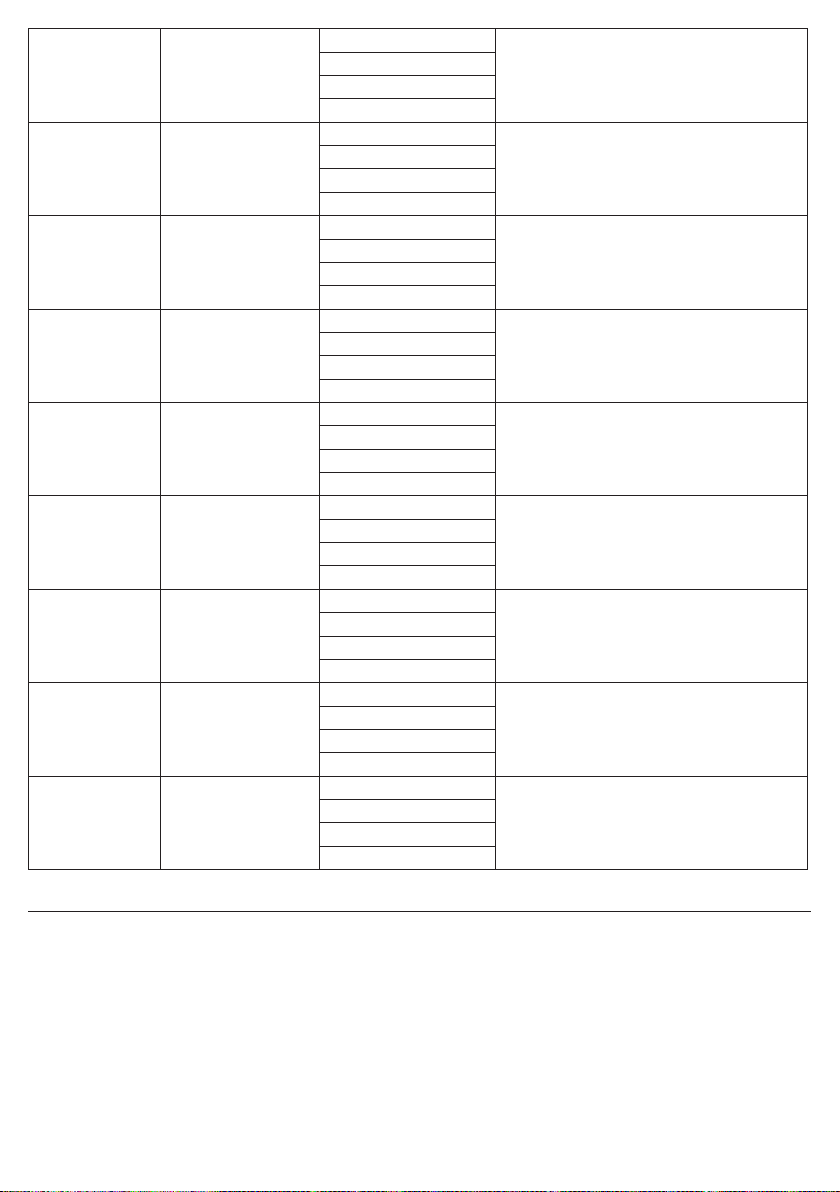
4 Moderate breeze
5 Fresh breeze
6 Strong breeze
7 High wind
8 Gale
9 Strong gale
10 Storm
11 Violent storm
12 Hurricane force
20 ~ 28 km/h
13 ~ 17 mph
11 ~ 16 knot
5.5 ~ 7.9 m/s
29 ~ 38 km/h
18 ~ 24 mph
17 ~ 21 knot
8.0 ~ 10.7 m/s
39 ~ 49 km/h
25 ~ 30 mph
22 ~ 27 knot
10.8 ~ 13.8 m/s
50 ~ 61 km/h
31 ~ 38 mph
28 ~ 33 knot
13.9 ~ 17.1 m/s
62 ~ 74 km/h
39 ~ 46 mph
34 ~ 40 knot
17.2 ~ 20.7 m/s
75 ~ 88 km/h
47 ~ 54 mph
41 ~ 47 knot
20.8 ~ 24.4 m/s
89 ~ 102 km/h
55 ~ 63 mph
48 ~ 55 knot
24.5 ~ 28.4 m/s
103 ~ 117 km/h
64 ~ 73 mph
56 ~ 63 knot
28.5 ~ 32.6 m/s
≥ 118 km/h
≥ 74 mph
≥ 64 knot
≥ 32.7m/s
Dust and loose paper raised. Small branches
begin to move.
Branches of a moderate size move.
Small trees in leaf begin to sway.
Large branches in motion. Whistling heard in
overhead wires. Umbrella use becomes difcult.
Empty plastic bins tip over.
Whole trees in motion. Effort needed to walk
against the wind.
Some twigs broken from trees.
Cars veer on road. Progress on foot is seriously
impeded
Some branches break off trees, and some small
trees blow over. Construction /temporary signs
and barricades blow over.
Trees are broken off or uprooted, structural
damage likely.
Widespread vegetation and structural damage
likely.
Severe widespread damage to vegetation and
structures. Debris and unsecured objects are
hurled about.
WIND CHILL / HEAT INDEX / DEW POINT
TO VIEW WIND CHILL
Press the [ INDEX ] key repeatedly until WIND CHILL displays.
Note:
The wind chill factor is based on the combined effects of temperature and wind speed. The wind chill displayed
is calculated solely from temperature and humidity measured from the 5-IN-1 sensor.
TO VIEW HEAT INDEX
Press the [ INDEX ] key repeatedly until HEAT INDEX displays.
12
Page 13
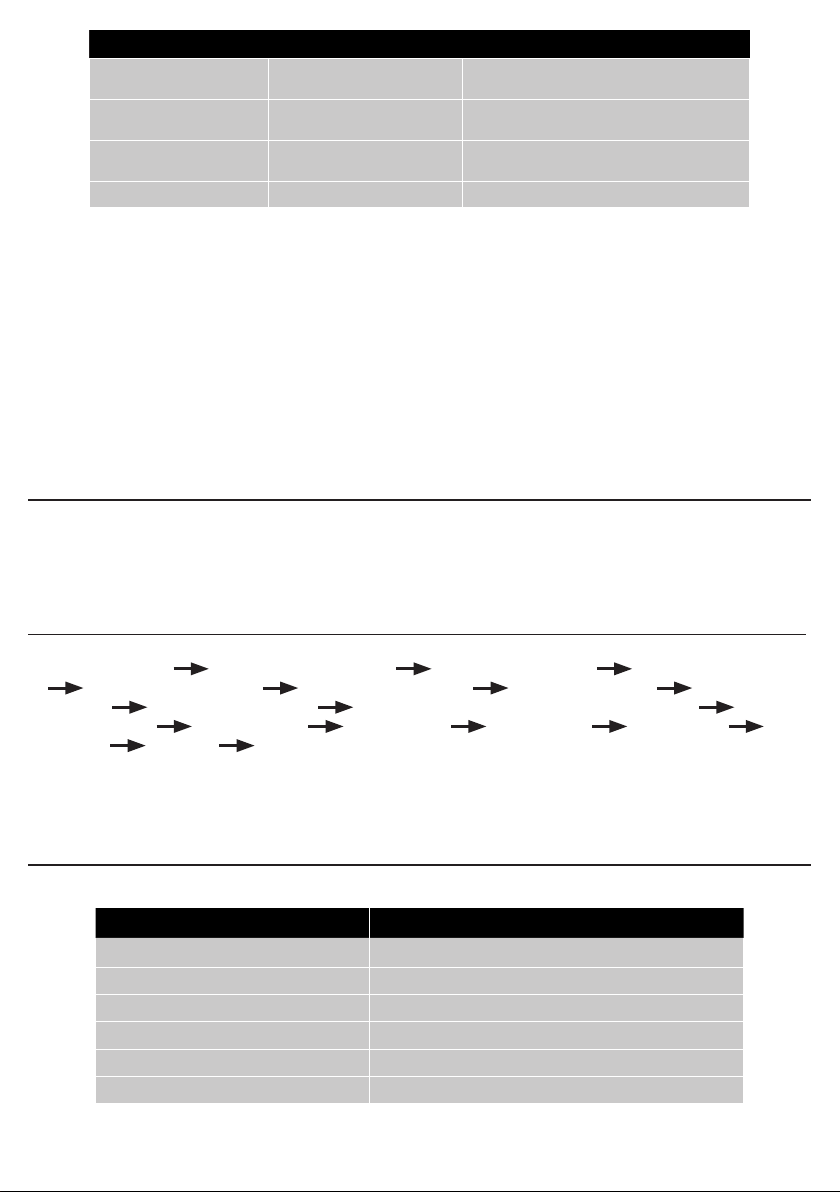
Heat Index range Warning Explanation
27°C to 32°C
(80°F to 90°F)
33°C to 40°C
(91°F to 105°F)
41°C to 54°C
(106°F to 129°F)
≥55°C (≥130°F) Extreme Danger Strong risk of dehydration / sun stroke
Note:
Heat index is only calculated when temperature is 27° C (80° F) or above, and based solely from the
temperature and humidity measured from the 5-IN-1 sensor.
TO VIEW DEW POINT
Press the [ INDEX ] key repeatedly until DEW POINT displays.
Note:
The dew point is the temperature below which the water vapor in air at constant barometric pressure
condenses into liquid water at the same rate at which it evaporates. The condensed water is called dew when
it forms on a solid surface. The dew point temperature is calculated from the outdoor temperature and humidity
measured at the outdoor 5-in-1 sensor.
HISTORY DATA (ALL RECORDS IN THE PAST 24 HOURS)
The main unit will record past 24 hours weather data automatically that included past indoor and outdoor
temperature & humidity, baro, wind chill, wind speed and rainfall records.
1. Press the [ HISTORY ] key to check past 1 hour history records.
2. Press [ HISTORY ] key repeatedly to show past 2, 3, 4 , 5.......24 history weather records.
MAX/MIN MEMORY FUNCTION
1. Press the MAX/MIN key to check the maximum/minimum records. The checking orders will be: Outdoor
max temperature Outdoor min temperature Outdoor max humidity Outdoor min humidity
Indoor max temperature Indoor min temperature Indoor Max humidity Indoor min
humidity Outdoor max wind chill Outdoor min wind chill Outdoor max heat index Outdoor
min heat index max dew point min dew point Max pressure Min pressure Max
average Max gust Max rainfall.
2. Press and hold the [ MAX/MIN ] key for 2 seconds to reset the maximum and minimum records.
Note:
When maximum or minimum reading is displayed, the corresponding timestamp will be shown.
Caution Possibility of heat exhaustion
Extreme Caution Possibility of heat dehydration
Danger Heat exhaustion likely
HI/LO ALERT
HI/LO alert are used to alert you of certain weather conditions. Once activated, the alarm will turn on and
amber LED starts ashing when a certain criterion is met. The following are areas and type of alert provided:
Area Type of Alert available
Indoor temperature HI and LO alert
Indoor humidity HI and LO alert
Outdoor temperature HI and LO alert
Outdoor humidity HI and LO alert
Rainfall HI alert
Wind speed HI alert
(Daily rainfall since midnight)
13
Page 14
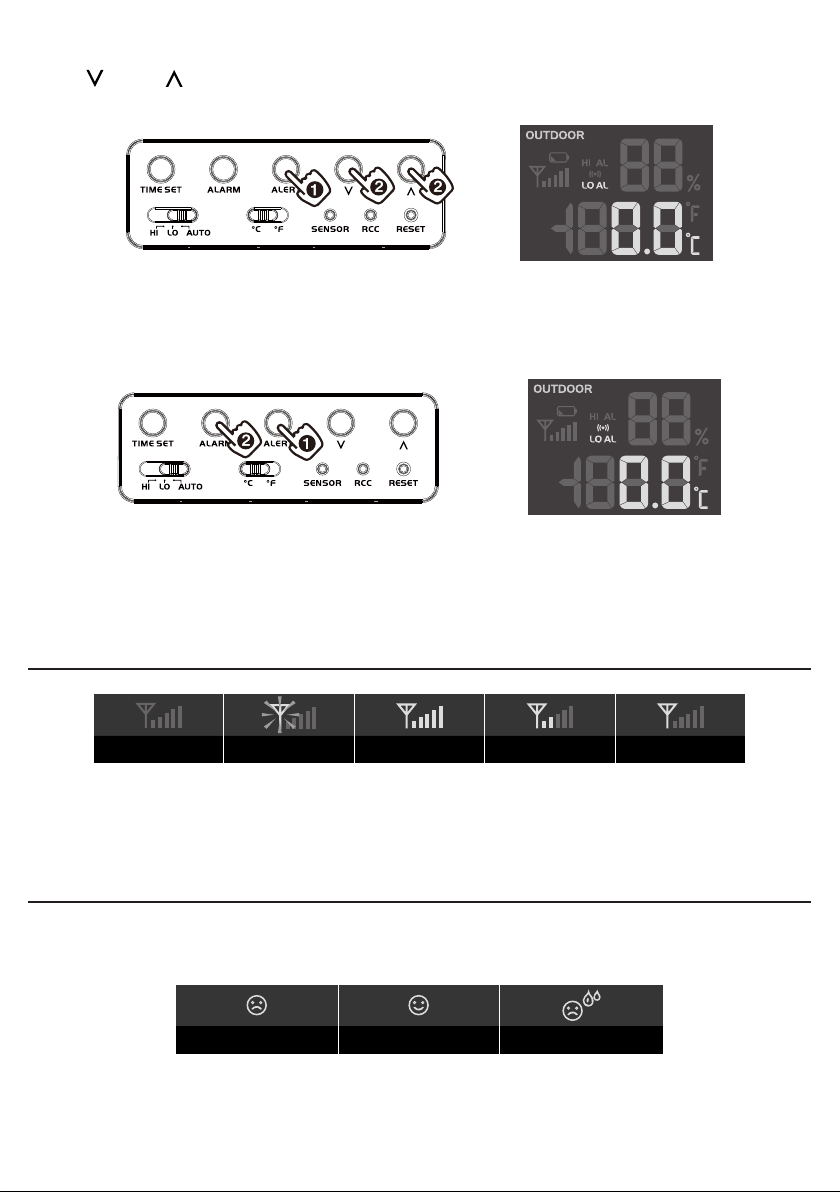
TO SET THE HI/LO ALERT
1. Press the [ ALERT ] key until the desired area is selected.
2. Use[ ] key / [ ] key to adjust the setting.
3. Press the [ ALERT ] key to conrm and continue to next setting.
TO ENABLE / DISABLE THE HI / LO ALERT
1. Press the [ ALERT ] key until the desired area is selected.
2. Press the [ ALARM ] key to turn the alert on or off.
3. Press the [ ALERT ] key to continue to next setting.
Note:
- The unit will automatically exit setting mode in 5 seconds if no key is pressed.
- When ALERT alarm is on, the area and type of alarm that triggered the alarm will be ashing and the alarm
will sound for 2 minutes.
- To silence the Alert alarm beeping, press the [ ALARM / SNOOZE ] / [ ALARM ] key, or let the beeping
alarm automatically turn off after 2 minutes.
WIRELESS SIGNAL RECEPTION
No sensor Signal searching Strong signal Weak signal Signal lost
The 5-IN-1 sensor is capable of transmitting data wirelessly over an approximate operating of 150m range (line
of sight). Occasionally, due to intermittent physical obstructions or other environmental interference, the signal
may be weaken or lost. In case that the sensor signal is lost completely, you will need to relocate the Display
main unit or the wireless 5-IN-1 sensor.
TEMPERATURE & HUMIDITY
COMFORT INDICATION
The comfort indication is a pictorial indication based on indoor air temperature and humidity in an attempt to
determine comfort level.
Too cold Comfortable Too hot
Note:
- Comfort indication can vary under the same temperature, depending on the humidity.
- There is no comfort Indication when temperature is below 0°C(32°F) or over 60°C (140°F).
14
Page 15
DATA CLEARING
During installation of the wireless 5-IN-1 sensor, the sensors were likely to be triggered, resulting in erroneous
rainfall and wind measurements. After the installation, user may clear out all the erroneous data from the
Display Main Unit, without needing to reset the clock and re-establish pairing. Simply press and hold the [
HISTORY ] key for 10 seconds. This will clear out any data recorded before.
POINTING 5-IN-1 SENSOR TO THE SOUTH
The outdoor 5-IN-1 sensor is calibrated to be pointing to North by default. However, in some cases, users may
wish to install the product with the arrow pointing towards the South:
1. First install the outdoor 5-IN-1 sensor with its arrow pointing to the South.
2. On the Display main unit, press and hold the [ WIND ] key for 8 seconds until the upper part (Northern
Hemisphere) of the compass lights up and blinking.
3. Use [ ] key / [ ] key to change to lower part (Southern Hemisphere).
4. Press the [ WIND ] key to conrm and exit.
Northern hemisphere Southern hemisphere
Note:
Changing from hemisphere setting will automatically switch the direction of the moon phase on the display.
MOON PHASE
In the Northern hemisphere, the moon waxes (the part of the moon we see that glows after the New Moon)
from the right. Hence the sun-lit area of the moon moves from right to left in the Northern Hemisphere, while
in the Southern Hemisphere, it moves from left to right. Below is the table which illustrate how the moon will
appear on the main unit.
Northern hemisphere Moon Phase Southern hemisphere
New Moon
Waxing Crescent
First quarter
Waxing Gibbous
Full Moon
Waning Gibbous
Third quarter
Waning Crescent
15
Page 16
AUTO DIMMER
- Slide to the [ AUTO ] position, and the brightness of backlight will automatically adjust based on the ambient
room lighting (dims in low light).
- Slide to the [ LO ] position for the dimmer backlight.
- Slide to the [ HI ] position for the brighter backlight.
MAINTENANCE
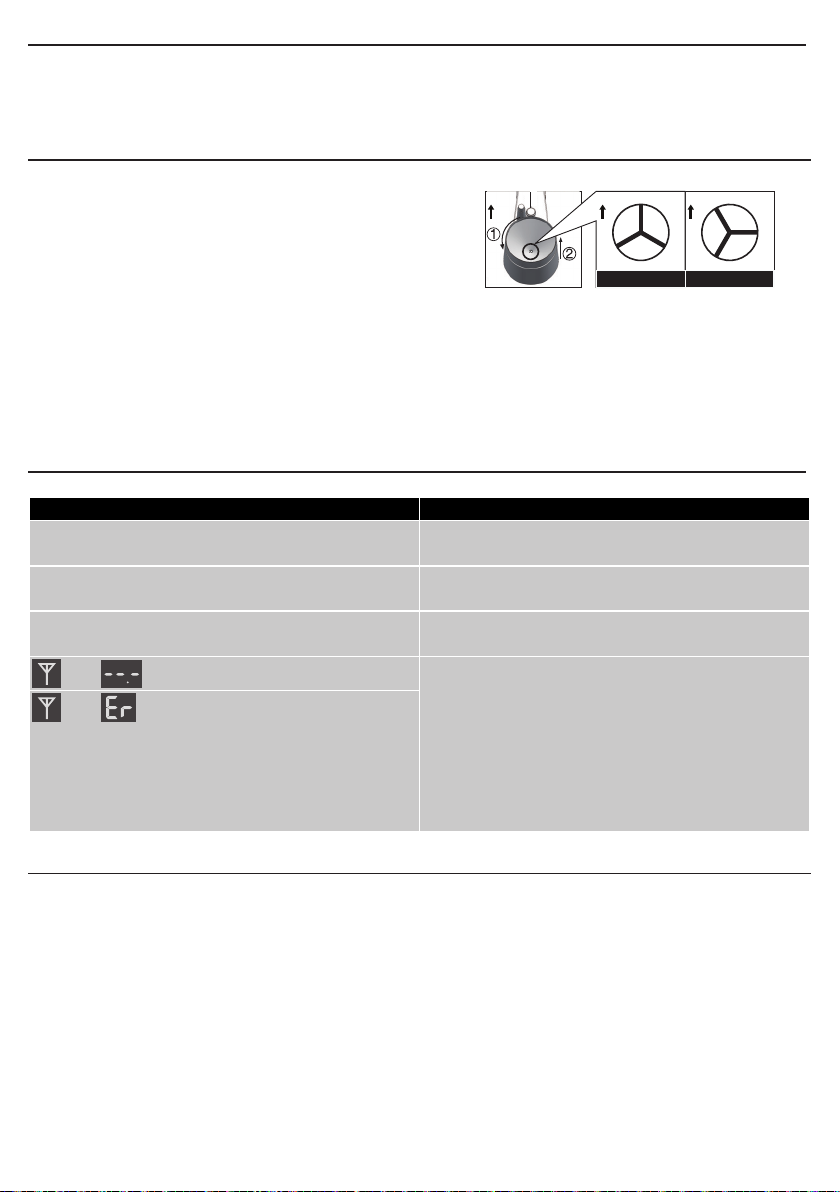
TO CLEAN THE RAIN COLLECTOR
1. Rotate the rain collector by 30° anticlockwise.
2. Gently remove the rain collector.
3. Clean and remove any debris or insects.
4. Install all the parts when they are fully clean and dried.
TO CLEAN THE THERMO/HYGRO SENSOR
1. Unscrew the 2 screws at the bottom of the radiation shield.
2. Gently pull out the shield.
3. Remove carefully any dirt or insects inside the sensor casing (Do not let the sensors inside get wet).
4. Clean the shield with water and remove any dirt or insects.
5. Install all the parts back when they are fully clean and dried.
TROUBLESHOOTING
N
N
N
“Lock” Position
N
“Unlock” Position
Problem / Symptom Solution
Strange or no measurement of Rain Sensor 1. Check the drain hole in the rain collector.
.
.
Strange or no measurement of Thermo / Hygro
Sensor
Strange or no measurement of Wind Speed and
Direction
and (Signal lost for 15 minutes)
2. Check the balance indicator
1. Check the radiation shield.
2. Check the sensor casing
1. Check wind cups (Anemometer).
2. Check the wind vane.
1. Relocate the main unit and 5-in-1 sensor
closer to each other.
and (Signal lost for 1 hour)
2. Make sure the main unit is placed away from
other electronic appliances that may interfere
with the wireless communication (TVs,
computers, microwaves).
3. If problem continues, reset both main unit and
5-in-1 sensor.
PRECAUTIONS
• Read and keep these instructions.
• Heed all warnings and follow all instructions.
• Do not subject the unit to excessive force, shock, dust, temperature or humidity.
• Do not cover the ventilation holes with any items such as newspapers, curtains etc.
• Do not immerse the unit in water. If you spill liquid over it, dry it immediately with a soft, lint-free cloth.
• Do not clean the unit with abrasive or corrosive materials.
• Do not tamper with the unit’s internal components. This invalidates the warranty.
• Only use attachments/accessories specied by the manufacturer.
• Images shown in this manual may differ from the actual display.
• Placement of this product on certain types of wood may result in damage to its nishing for which
manufacture will not be responsible. Consult the furniture manufacturer’s care instructions for information.
• The socket-outlet shall be installed near the equipment and shall be easily accessible.
• Only use fresh batteries. Do not mix new and old batteries.
16
Page 17
• Risk of explosion if battery is replaced by an incorrect type. Dispose of used batteries according to the
instructions.
• Do not dispose old batteries as unsorted municipal waste. Collection of such waste separately for special
treatment is necessary.
• The technical specications for this product and the contents of the user manual are subject
to change without notice.
• When disposing of this product, ensure it is collected separately for special treatment.
SPECIFICATIONS
CONSOLE
Dimensions (W x H xD) 202 x 138 x 38mm
Weight 530g with backup batteries
Main power DC 4.5V, 300mA adaptor
Backup battery 3 x AAA size 1.5V batteries (Alkaline recommended)
Support sensor Wireless 5-in-1 sensor (Wind speed, Wind direction, Rain gauge, thermo-hygro)
RF frequency 868Mhz (EU or UK version)
RADIO-CONTROLLED / ATOMIC CLOCK
Synchronization Auto or disabled
Clock display HH:MM:SS / Weekday
Hour format 12hr AM / PM or 24hr
Calendar DD/MM
Weekday in 5 languages EN, FR, DE, ES, IT
Time signal DCF or MSF (base on the country version)
DST AUTO / OFF
INDOOR BAROMETER
Barometer unit hPa, inHg and mmHg
Measuring range 540 ~ 1100hPa
Accuracy
Resolution 1hPa / 0.01inHg / 0.1mmHg
Weather forecast Sunny/Clear, Slightly Cloudy, Cloudy, Rainy, Rainy/Stormy and Snowy
Memory modes Max & Min from last memory reset (with time stamp), Historical data of past 24 hours
Alarm Pressure change alarm
INDOOR TEMPERATURE
Temperature unit °C or °F
Displayed range -40°C to 70°C (-40°F to 158°F)
Operating range -5°C to 50°C (14°F to 122°F)
Resolution 0.1°C or 0.1°F
Accuracy +/- 1°C or 2°F typical @ 25°C (77°F)
Memory modes Max & Min from last memory reset (with time stamp), Historical data for last 24hrs
Alarm Hi / Lo Temperature Alert
INDOOR HUMIDITY
Displayed range 20% to 90% RH (<20%: LO; > 90%: HI) (Temperature between 0°C to 60°C)
Operating range 20% to 90%RH
Resolution 1%
Accuracy
Memory modes Max & Min from last memory reset (with time stamp), Historical data for last 24hrs
Alarm Hi / Lo Humidity Alert
(700 ~ 1100hPa ± 5hPa) / (540 ~ 696hPa ± 8hPa)
(20.67 ~ 32.48inHg ± 0.15inHg) / (15.95 ~ 20.55inHg ± 0.24inHg)
(525 ~ 825mmHg ± 3.8mmHg) / (405 ~ 522mmHg ± 6mmHg)
Typical at 25°C (77°F)
20 ~ 40% RH, ± 8% RH, at 25°C (77°F)
41% ~ 70% RH, ± 5% RH, at 25°C (77°F)
71% ~ 90% RH, ± 8% RH, at 25°C (77°F)
17
Page 18
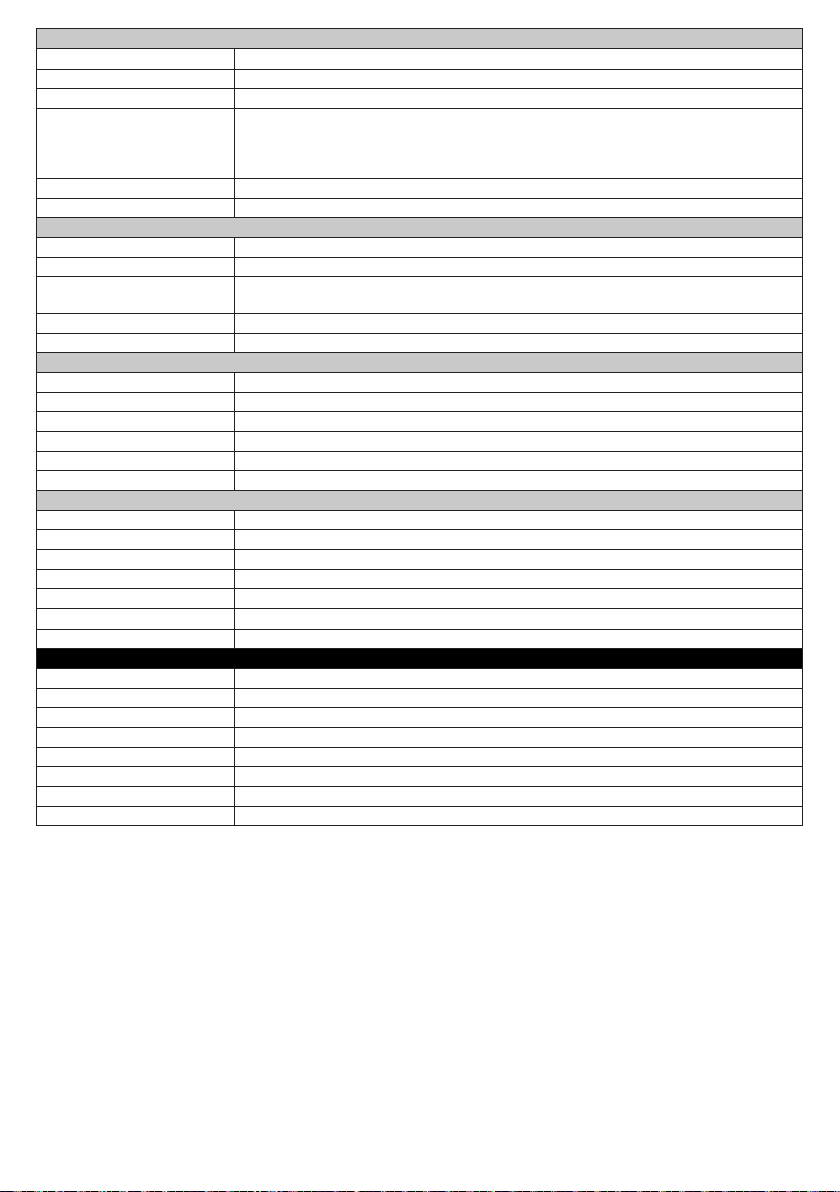
OUTDOOR TEMPERATURE (Note: Data detect from wireless 5-in-1 sensor)
Temperature unit °C or °F
Displayed range -40°C to 80°C (-40°F to 176°F)
Resolution 0.1°C or 0.1°F
Accuracy
Memory modes Max & Min from last memory reset (with time stamp), Historical data for last 24hrs
Alarm Hi / Lo Humidity Alert
OUTDOOR HUMIDITY (Note: Data detect from wireless 5-in-1 sensor)
Displayed range
Resolution 1%
Accuracy
Memory modes Max & Min from last memory reset (with time stamp), Historical data for last 24hrs
Alarm Hi / Lo Humidity Alert
RAIN (Note: Data detect from wireless 5-in-1 sensor)
Unit for rainfall mm and in
Range for rainfall 0~9999mm (0~393.7inches)
Resolution 0.4 mm (0.0157 in)
Accuracy for rainfall Greater of +/- 7% or 1 tip
Memory modes Max rainfall from last memory reset, Historical data for last 24hrs
Alarm Hi Rainfall Alert
WIND (Note: Data detect from wireless 5-in-1 sensor)
Wind speed unit mph, m/s, km/h, knots
Wind speed range 0~112mph, 50m/s, 180km/h, 97knots
Wind speed resolution 0.1mph or 0.1knot or 0.1m/s
Speed accuracy < 5m/s: +/- 0.5m/s; > 5m/s: +/- 6%
Direction resolutions 16
Memory modes Max gust speed with direction (with time stamp), Historical data for last 24hrs
Alarm Hi Wind speed Alert (Average / Gust)
WIRELESS 5-IN-1 SENSOR
Dimensions (W x H x D) 343.5 x 393.5 x 136 mm
Weight 673g with batteries
Operating temperature range -40°C to 70°C (-40°F to 158°F)
Operating humidity range 1% to 99% RH
Battery 3 x AA size 1.5V battery (Lithium battery recommended)
RF Frequency 868 MHz (EU or UK version)
RF transmission range Up to 150 meters
Transmission Every 12 seconds
55 ~ 60°C ± 0.5°C (131 ~ 140°F ± 0.9°F)
10 ~ 55°C ± 0.4°C (50 ~ 131°F ± 0.7°F)
-20 ~ 10°C ± 1.3°C (-4 ~ 50°F ± 2.3°F)
-40 ~ -20°C ± 1.9°C (-40 ~ -4°F ± 3.4°F)
0% to 100% RH
0 ~ 90% RH, ± 2.5% RH, at 25°C (77°F)
90 ~ 100% RH, ± 3.5% RH, at 25°C (77°F)
18
 Loading...