

Page 1

LX
USER MANUAL
Page 2

TABLE OF CONTENTS
1 . Y O U R L X S P E A K E R 4
B O X C O N T E N T S 4
2 . SAFETY INFORMATION 5
3 . L A B O I T E C O N C E P T L I M I T E D W A R R A N T Y 1 2
4 . G E N E R A L D E S C R I P T I O N 1 2
5 . LX OPENING AND ASSEMBLING 18
1 . B O X C O N T E N T S 1 8
2 . A S S E M B L I N G Y O U R L X 1 9
6 . Q U I C K S T A R T 2 4
1 . I D E A L P O S I T I O N N I N G O F T H E L X I N Y O U R R O O M 2 4
2 . T U R N I N G T H E P O W E R O N / O F F 2 6
3 . C H O O S I N G Y O U R S O U R C E 2 7
4 . V O L U M E A N D B A S S S E T T I N G S 2 8
7 . U S I N G Y O U R L X W I T H Y O U R D E V I C E S 2 9
1 . B L U E T O O T H ® C O N N E C T I O N 2 9
2 . U S B P L U G 2 9
3 . CHA RG I NG TH RO U GH TH E I EC PO WE R S OCK ET 3 0
4 . U S B C H A R G E R 3 0
5 . W I R E L E S S C H A R G E R 3 0
6 . C A B L E C O N N E C T I O N 3 1
7 . C O N N E C T A T U R N T A B L E 3 2
8 . W H A T T O D O ? 3 6
1 . T O C L E A N Y O U R L X 3 6
2 . N O P O W E R 3 6
3 . N O S O U N D 3 6
4 . T H E S O U N D I S D I S T O R T E D O R B U Z Z E S 3 6
5 . B A C K G R O U N D N O I S E A N D U N D E S I R A B L E I N T E R F E R E N C E S 3 7
6 . T H E R M A L P R O T E C T I O N O F T H E P O W E R 3 7
6 . B L U E T O O T H ® I S S U E S 3 7
9 . T E C H N I C A L S U M M A R Y 3 8
Page 3
1. YOUR LX SPEAKER
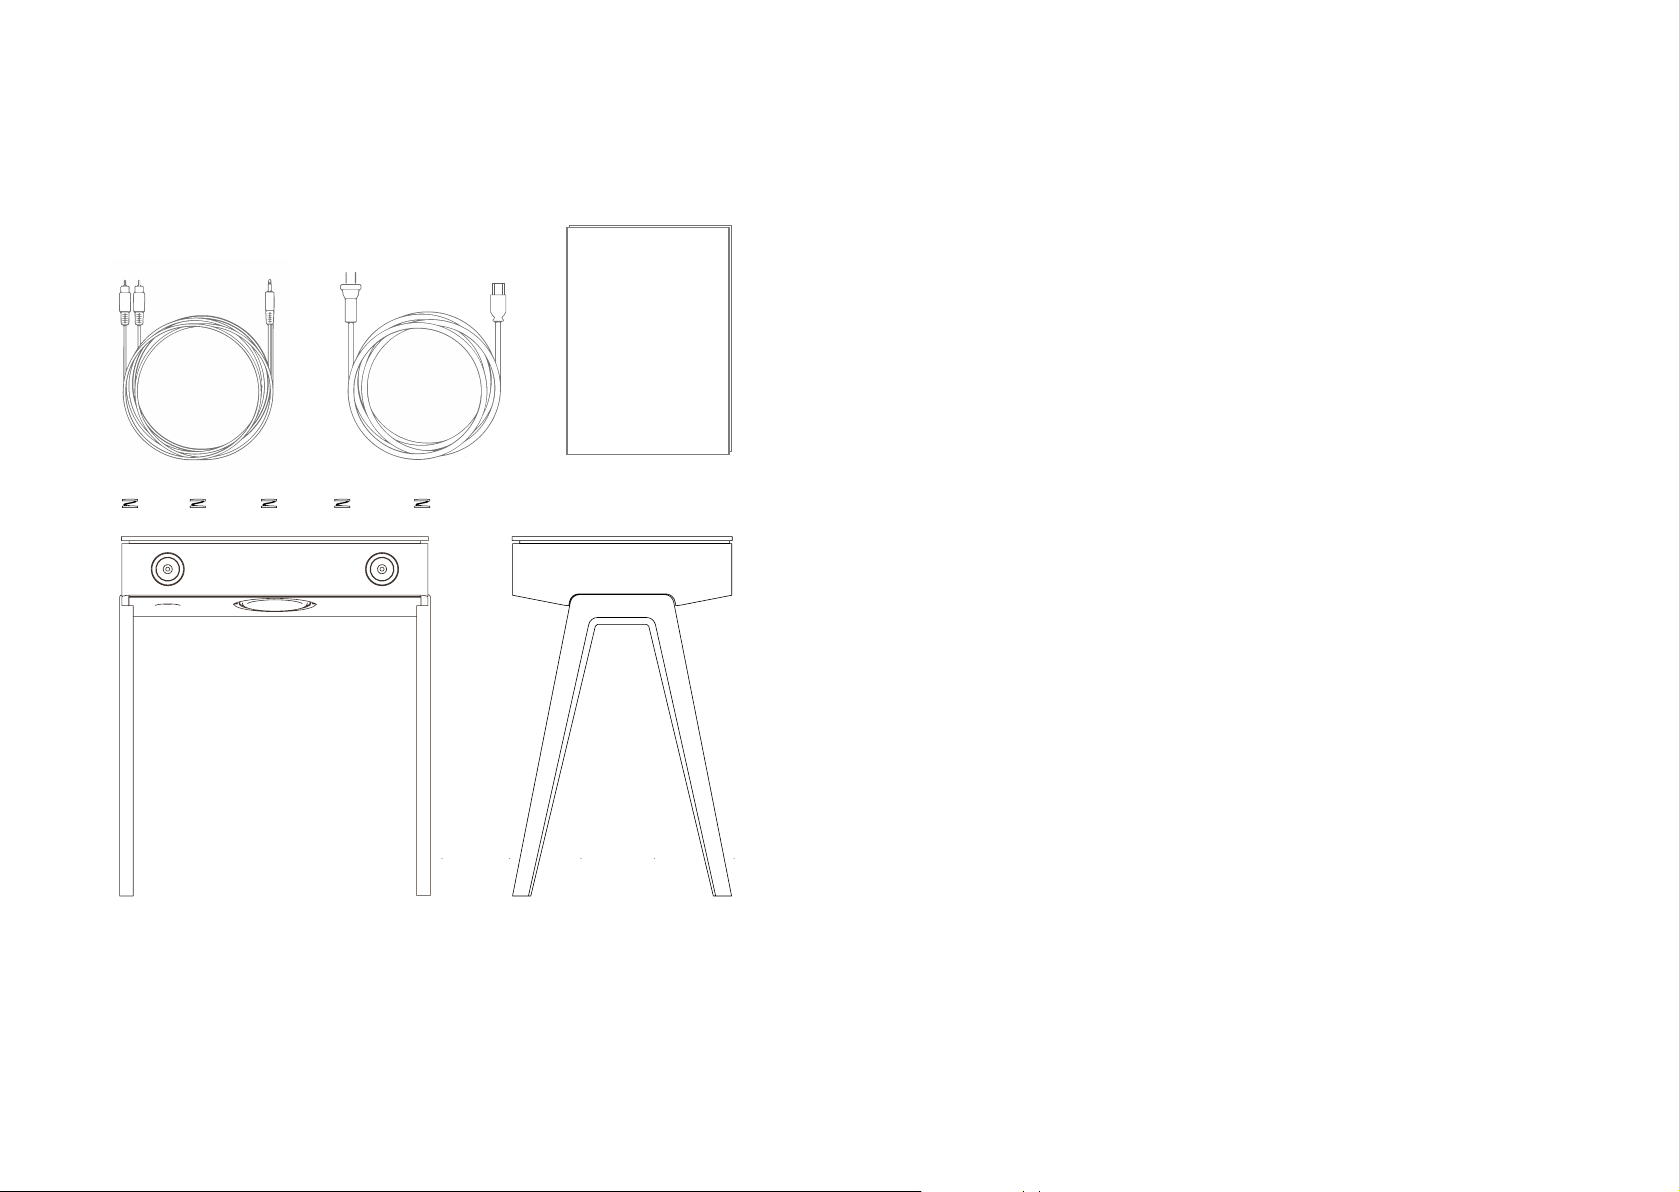
B OX CONTE N T S
/ 3 power cords (C7 connector to EU plug, US plug, UK plug)
/ Audio cord (RCA to 3,5mm stereo jack)
/ 5 shock absorbers for the vinyl turntable
/ User Manual and Warrantly card
/ IEC adapter
/ LX speaker on his legs
L X
LA N OTI CE
2. SAFETY INFORMATION
1. Read these instructions.
2. Keep these instructions.
3. Heed all warnings.
4. Follow all instructions.
5. Do not use this apparatus near water.
6. Clean only with a dry cloth.
7. Do not block any ventilation openings. Install in accordance with the manufacturer’s
instructions.
8. Do not install near any heat sources such as radiators, heat registers, stoves, or other
apparatus (including amplifiers) that produce heat.
9. Respect the safety principale of the biased plug or an earth type plug. A biased plug is
equipped with two pins, one larger than the other. An earth type plug has two pins and
a third of the earth type. The large pin or the third pin are provided for your safety. If the
provided pin is not adapted to your electrical wall power socket, call an electrician to
replace the obsolete electrical wall power socket.
10. Protect the power-supply cord from being stepped on or pinched, particulary at plugs,
convenience receptacles and the point where they exite from the apparatus.
11. Only use attachments / accessories specified bu the manufacturer.
12. Use the LX only in its original base.
13. Unplug this apparatus during lightning storms or when unused for long period of time.
14. Have all maintenance work done by qualified, specialized personnel. Repairs are
required when the device has been damaged : power cord or plug damaged ; liquid
spilled on the device or if an object has fallen on it ; if it rains on the device or if it is wet
or damp ; if the device not normally operating ; or is the device has fallen.
4 5
Page 4
WARNINGS To reduce the risk of fire or electruc discharge, do not expose the unit to rain
or wet sources. The unit is class 1 classified, and it must be connected to the electrical wall power
socket with an earth plug.
The unit must be installed so that it can be removed from the electrical network by means of the
earth plug (or with an adapted connector located on the rear side of the unit).
If the power plug is used as a disconnection device, the unit must be available and easy to use.
Only use the power cords supplied with the unit. We recommend not to place in a confined
space. Do not place the unit on a rug, or on a smooth surface, and do not obstruct the air holes,
the amplifier’s radiator (blades), or the output screens.
The unit must not be used nearby water ; it must not be exposed to an evacuation source, or to
splashing, or to any other types of liguids. No object filled with water such as vases, should be
placed on the unit.
WARNING DISCLAIMER: the assembly of the LX is a very important step for the correct
use of the product. The end user should carefully read the assembly guidelines before setting up
the product or consult a brand representative in case of any question. CCLAB La Boite concept
and its distributors cannot be held responsible in case of the product falling due to a mounting
that did not follow these guidelines.
!
ATTENTION
The purpose of the exclamation
point in equilateral triangle is to
inform the user of the presence of
important instructions in this manual
about how to operate the device and
maintenance operations.
DEEE SYMBOL
The separate recycling of electrical and
electronic devices. This product contains
electrical and electronic equipments
which can be reused, recycled or
recovered, and therefor msut not be
discarded in your usual trash, which is
not selectively sorted. Please return the
unit or contact the authorized dealer
who supplied you the product for more
information.
DANGEROUS VOLTAGE
The luminous indicator with the “arch
in an equilateral triangle” symbol
is intented to warn the user of the
presence of a “dangerous current”
not insulated in the product, and
this current could be strong enough
to cause an electric discharge on
people.
MARQUE CE
This product in conformed to the
European directives related to low voltage
(2006/95/EC) and electromagnetic
compatibility (89/336/EEC) when the
unit is installed and used accordingly
to the users manual instructions. To
guarantee extended confirmity, only La
Boitr Concept accessories should be used
with this product and the maintenance
operations must be conferred to qualified
and specialized personnel.
NORMES FCC
The LX speaker in an acoustic speaker
which integrates a power amplifier.
6
7
Page 5

IMPORTANT : THE MANUFACTURER DISCLAIMS ANY RESPONSABILITIES FOR RADIO OR
AUDIOVISUAL INTERFERENCES GENRATED BY UNAUTHORISED CHANGES MADE ON THSI
DEVICE.
SUCH CHANGES COULD WOULD VOID THE MANUFACTURER WARRANT AND CANCEL THE
AUTHORIZATION OF UTILIZATION BY THE USER.
This device complies with Part 15 of the FCC Rules. Operation is subject to the following two
conditions:
(1) This device may not cause harmful interference, and (2) This device must accept any
interference received, including interference that may cause undesired operation.
This equipment was created and tested in confirmity with the limits of class B digital devices in
accordance to FCC rules. These limits were defined to provide a reasonable protection against
dangerous interferences inside a residential installation. The equiment genrates, uses and may
emits radio frequency radiation if it is not installed or used in conformity with the instructions, and
this may cause dangerous interference for radio communications.
However, it is impossible to guarantee that no interferences will appear in a specific installation.
If this device generates interferences which disturbs the reception of radio or televison emissions,
which may be noted by activating or deactivating the device, we propose to the user to try to
remedy such interferences in one of the following ways :
/ Reorient or move the reception antenna ;
/ Increase the distance between the equipment and the radio televison set ;
/ Connect the device to a wall power socket of another circuit than that one used for
the radio or the TV ;
/ Contact the dealer or an experienced TV/radio technician for assistance.
The equipments recommended by La Boite concept complies with FCC exposure guidelines and
are approved as part of an uncontrolled environment. These equiments have been designed so
that are installed and used from a minimum distance of 20 cm between the transmitter equipment
and the user(s).
F CC CAUTI O N
Any changes or modifications to this unit not expressly approved by the party responsible for
compliance could void the user’s authority to operate the equipment.
A ERATION / I M P O R T ANT
The unit may heat when used. Never operate the central part without its side bases. Do not place
the equipment in a completely closed room or in a compartment insufficiently ventilated. Make
sure that no small object can pass through the LX. If it happens, immediately switch off the device,
diconnect it from the wall power socket and contact your dealer for assistance and advice.
L OCATION
Carefully select a spot for installing your equipment. Avoid placing it directly in sunlight or
nearby a heat source. No fire source such as candles shall be placed on the device. Also, avoid
any source which could cause vibration, dust, coolness or moisture. The device can be used at
average temperatures. The unit must be installed on the two (2) LX provided legs.
Do not operate the central part without its sides bases. Do not install the equipment in a completely
closed room or in a set of compartments. Do not place the unit on an unstable surface or on a
shelf. Make sure that the furniture inserts have been correctly fastened. If not, the unit could fall
and injury a child or an adult, and damage the product as well. Due to the disturbed magnetic
fields, no record player or CRT television set must be placed nearby the device to avoid possible
interference.
P OWER SOU R C E
The unit should only be used with the type of electric power source compatible indicated in the
trapdoor storage space. If you are not sure about the power source rating in your place, please
contact your dealer or the company responsible for the electric power installation in your area.
The unit was designed to be left in Stand-by mode when not in use ; this wall allow increasing
the amplifier’s life (this is true for all electrical devices). To switch off the unit, press the ON/OFF
button on the rear of the device (metal plate located under the central unit). If you do not intend
to use the unit for a long period, simply unplug it from the wall power socket.
8 9
Page 6

O VERLOAD
Avoid overloading the wall-mounted electrical installations or the extension cords because this
could cause a fire or an electrical discharge. Overloaded DC installations, extension cords,
damaged power cables, a damaged or cracked insulation and broken plugs are dangerous.
They could cause a discharge or a fire. Make sure that each cables are correctly inserted.
To avoid humming or background noise, do not mix interconnections with the power cord or
loudspeakers cables.
C LEANING
In order to clean the unit, wipe it with a dry, lint-free cloth. Do not use liquid cleaning products
containing alcohol, ammonia or abrasives. Do not use a spray on and nearby the unit.
R EPAIRS
These units should not be repaired by the user. Do not try to repair, dismount or un-assemble
the unit if a problem occurs. A strong electric discharge could take place if this precautionary
measures are not respected. In case of a problem or failure, please contact your dealer.
10
Page 7

3. LA BOITE CONCEPT
3 / This warranty is only eligible to products with faulty workmanship and/or defective
parts at the moment of purchase and does not apply in the following cases:
LIMITED WARRANTY
This product was designed and manufactured in accordance with the most rigorous quality
standarts. However, in case of a problem, La Boite concept, and their national distributors,
guarantee labour (exclusions possible) and spare parts free in all countries served by a La Boite
concept approved distributor.
This limited warranty is valid for a two years period from the date of purchase unless exclusions
are applicable in some countries according to the national legislation. Contact La Boite concept’s
dsitributor in your country for more information. Please make sure to suscribe to the warranty on
La Boite concept website.
Please make sure you register your PR/01 speaker on our website :
www.laboiteconcept.com/register
Or use this QR code to access directly :
a. Deteriorations resulting from an in correct installation, connection or packaging.
b. Deteriorations resulting from an usage other than the correct usage described in
the User Manual, negligence, changes or the use of parts not manufactured
or approved by La Boite concept.
c. Deteriorations resulting from a defective or unsuitable auxiliary equipment.
d. Deteriorations resulting from : accidents, lightning, water, heat, war, breaches of
public order, or other causes outside of the reasonable control La Boite concept or its
approved distributors.
e. Products with serial numbers modified, erased, eliminated or rendered unreadable.
f. Products repaired or changed by an unauthorised person.
4 / This warranty is an addition to any national / regional legal obligation on behalf
of the national distributors or dealers and does not affect your
statutory rights as a customer.
5 / To claim this warranty please use the original packaging of your LX.
H OW TO FI L E A C L A IM UNDER T H E W A R RANTY
Please follow the procedure below if you desire to file a claim under the warranty :
1 / If the equipment is used in the country where it was purchased, please contact the
distributor approved by NATIVE UNION or La Boite concept which sold the equiment.
1 / The warranty is limited to the repar of the equipment. Transport or other costs, and
risks associated with the pickup, transport and installation of the products are not
covered by this warranty.
2 / The warranty is exclusively reserved for the original owner and may not be transferred.
2 / If the equipment is used in a country other than the country where it was purchased,
please contact the national La Boite concept distributor of the residence country,
which indicates to you where you can have the equipment repaired. If you
desire to file a claim from France, please contact La Boite concept in
France at laboiteconcept.com to obtain an accurate telephone/email adress of
your local distributor. To validate, your warranty, you should present the original
copy of your sales invoice or another form of proof of your purchase and
the date of purchase.
12 13
Page 8
4. GENERAL DESCRIPTION
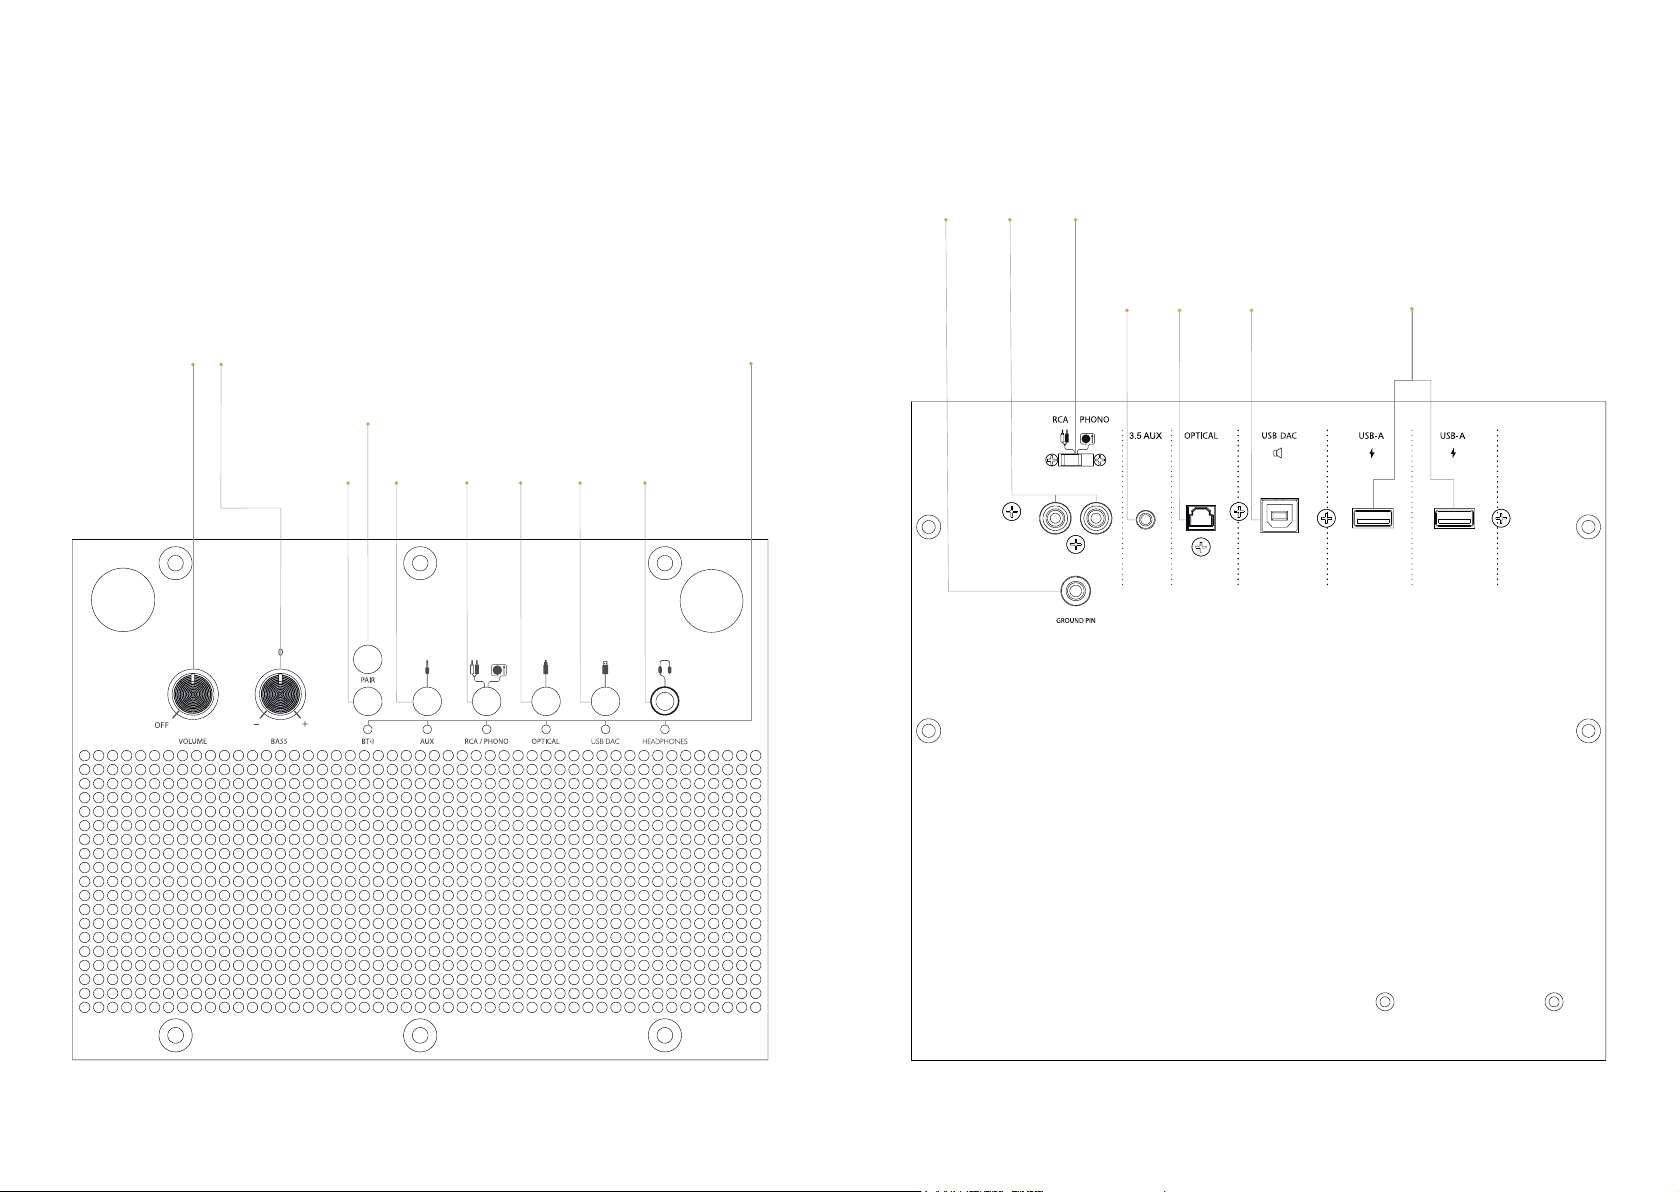
K NOBS AND C O N T R O L PANEL
C ONT R OL P A NEL
I NPU T PA N E L
Phono
grounding
post
Entrée
RCA
RCA or
Phono
selection
button
Volume
control knob
ON / OFF
Bass
control knob
0 = standard level
Pairing button
for Bluetooth®
Bluetooth®
knob
AUX
button
RCA
or
Phono
button
Optical
button
USB DAC
button
LED light
(source indicator)
Headphones
output
AUX 3.5
input
Optical
input
USB DAC
input
USB-A
input
14
15
Page 9
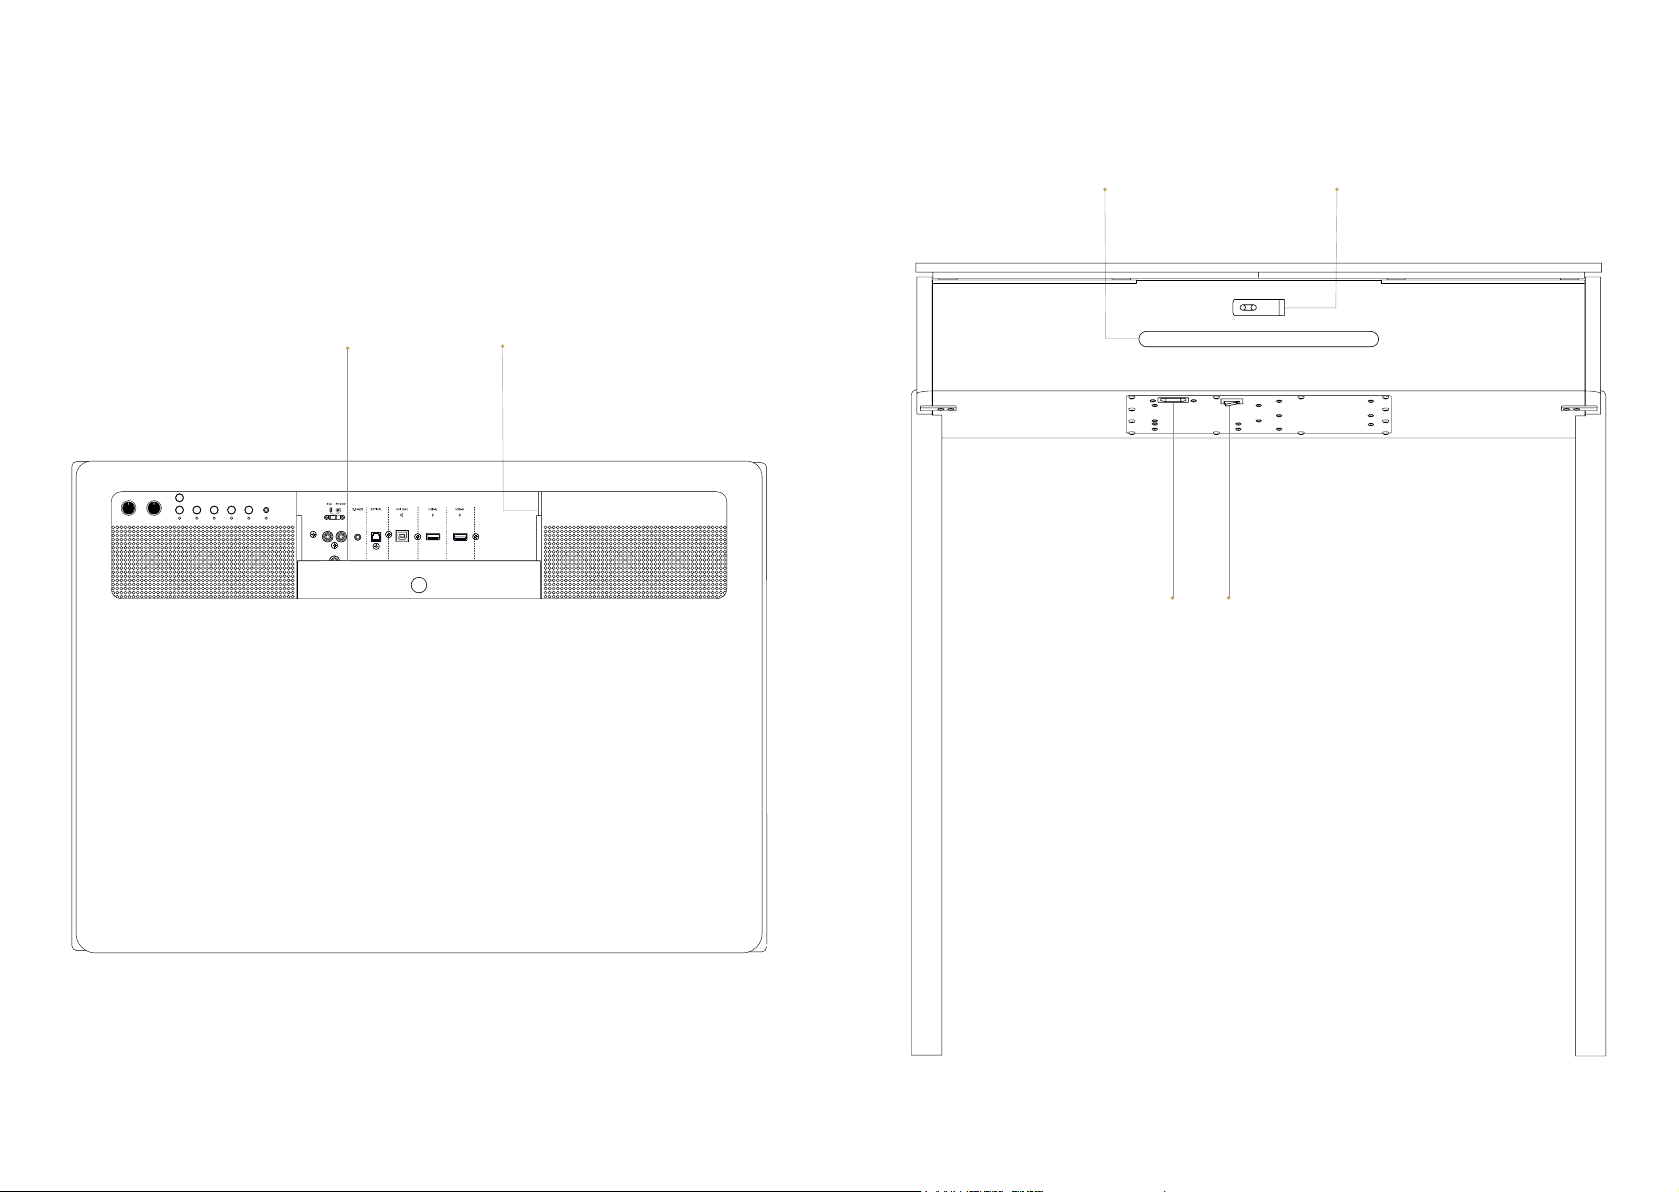
B ACK OF Y O UR L X
T OP O F Y O U R L X
accessing the central
Sliding trap door
IEC power socket
Cable
guide
Power socket 150W
100/240 V
50/60 Hz
Hook holding the
cable
Master ON/OFF
button
16 17
Page 10
5. LX OPENING AND
ASSEMBLING
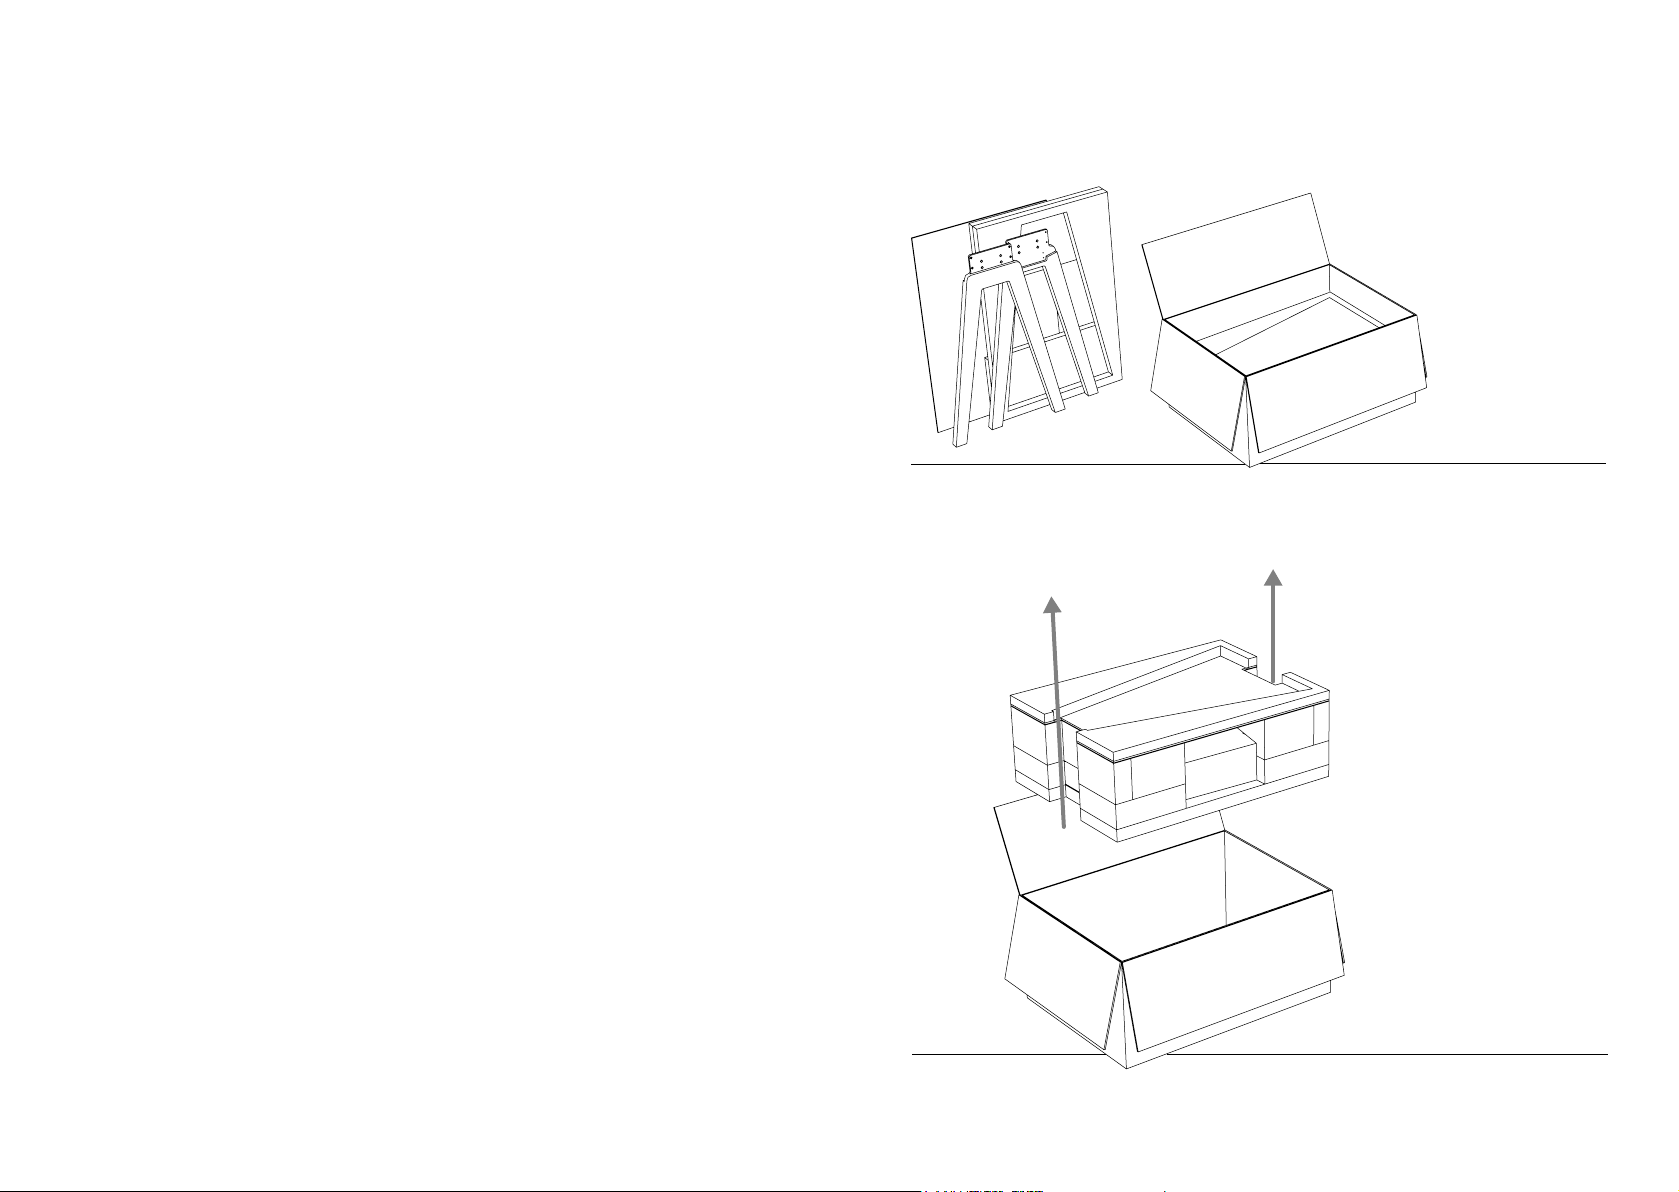
1 . BOX C O N T E N T S
Don’t forget that the LX is heavy; Save the original packaging in case you should have to return
the device because the limited warranty does not cover damages due to shipping. La Boite
concept’s “return within 3O days” policy covers only prodcuts which are returned in their original
packaging.
/ Loudspeaker cabinet carton box
/ Protective Foam
/ Protective cover
/ A LX acoustic loudspeaker
/ A front cover
/ A blotter
/ A pair of stands
/ Four flat head screws
/ Four rounded head screws
/ An allen key 6 pan
/ A RCA - mini-jack cable
/ Un câble d’alimentation
/ A universal adaptator (IEC C14) for the power socket in the trap door
/ A user manual
2 . ASSEM B L I N G Y O UR LX
1. Remove the
stands and
protective foams.
2. With the help of
somebody : using
the notches on the
side of the foam,
grab the entire
unit and pull it
out. Please keep
the carton box as
well as the original
protective foams.
18 19
Page 11
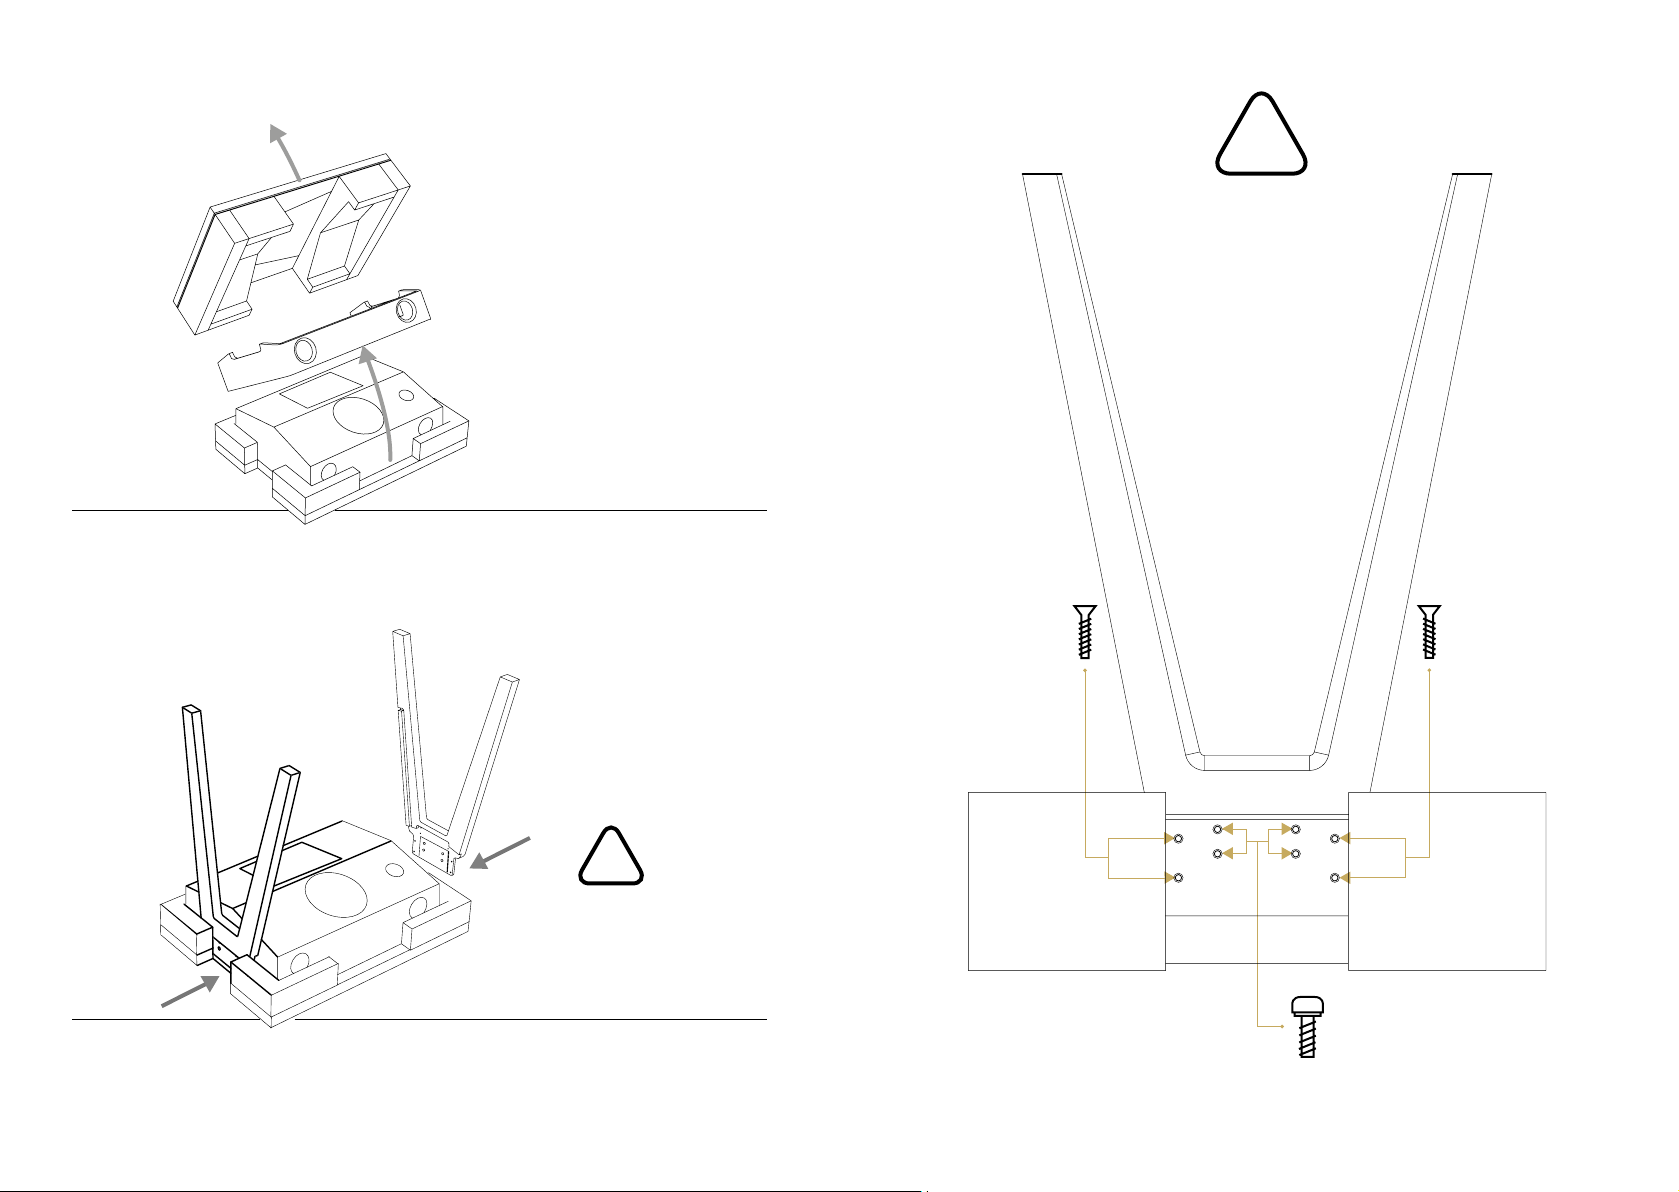
3. Remove the upper
protective foam. With
the help of somebody,
lift the loudspeaker
to remove the front
cover. Then, replace
the loudspeaker back
into its protective foam.
respective.
4. Use the “LEFT” and
“ RIGHT” indications to
match the stands and
the loudspeaker and
screw the stands on the
loudspeaker.
Flat head screws
!
Flat head screws
Please pay
attention to
use the right
screws on the
right place
!
following
the stickers
provided for
the purpose.
Rounded head screws
20 21
Page 12
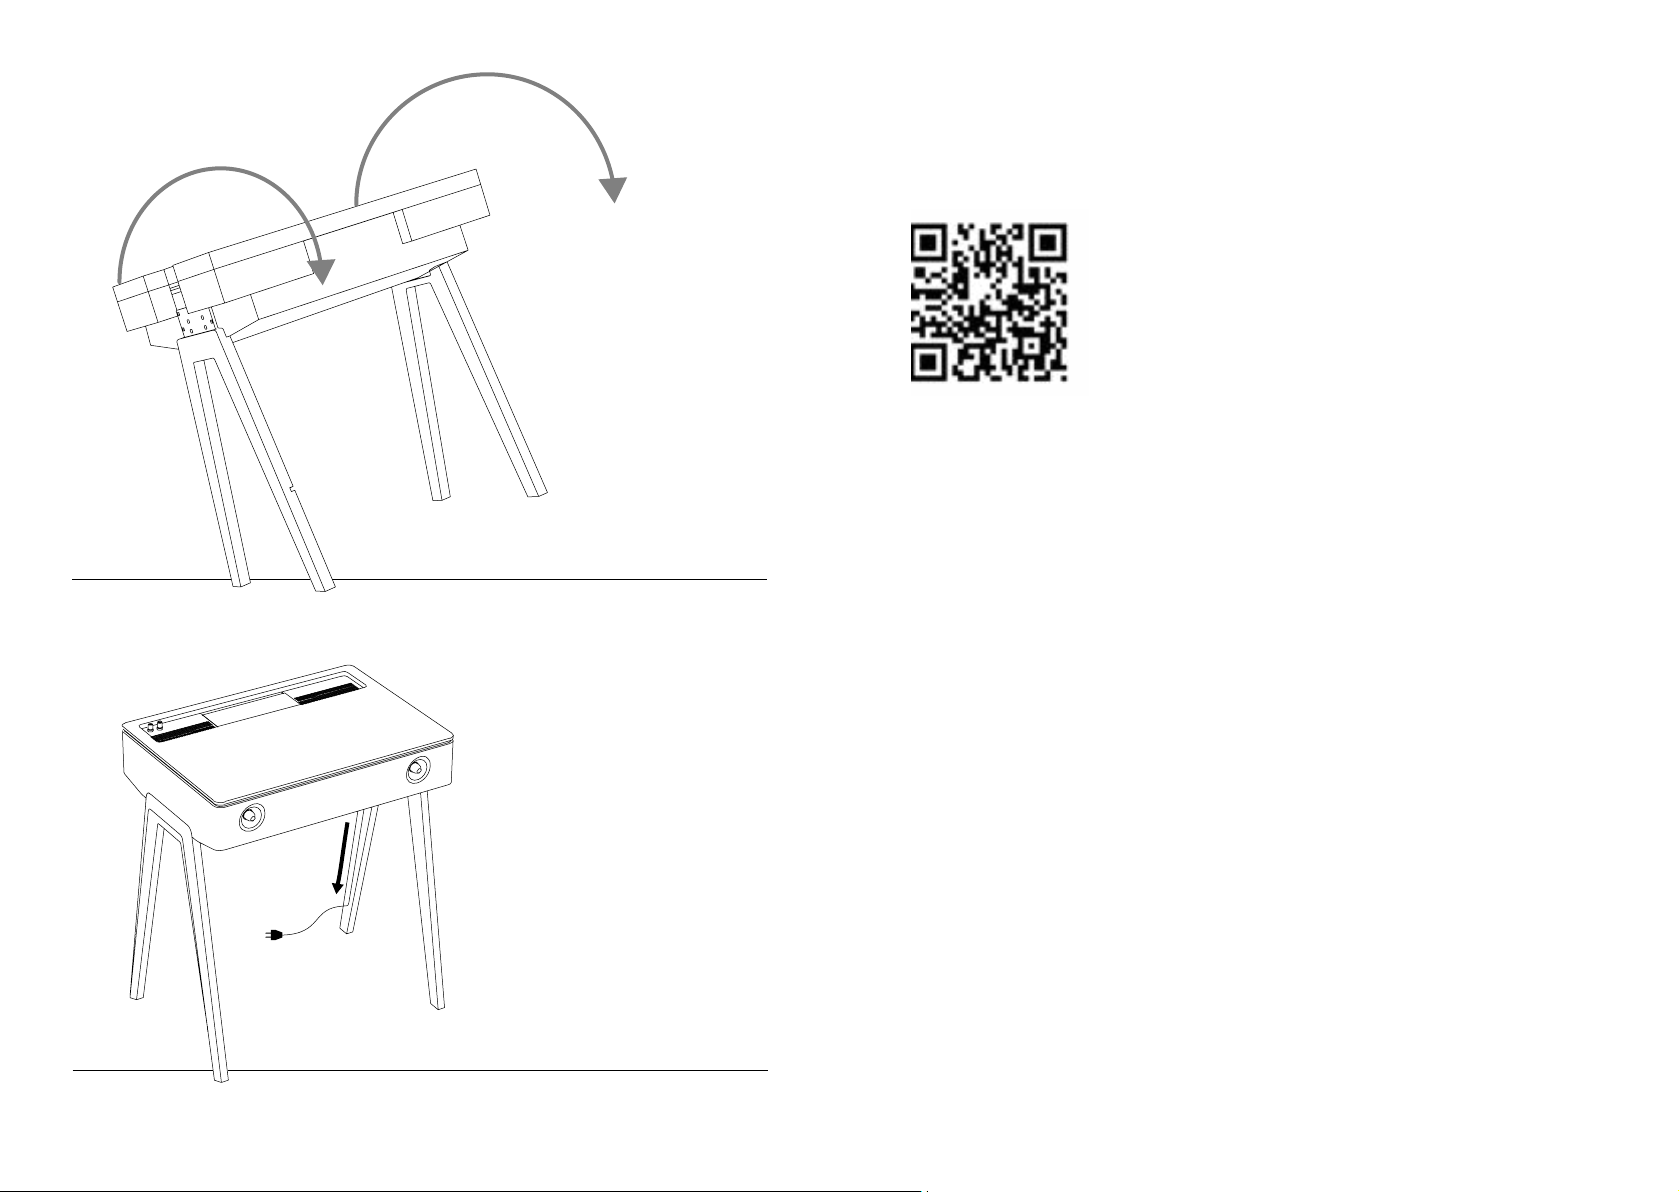
5. With the help of
somebody, flip the LX to
standing position and remove
the protective foam.
Besoin d’aide pour monter votre LX Platine ?
Veuillez consulter notre notice vidéo disponible sur YouTube : LX Montage.
Accédez-y directement depuis le QR code suivant :
22
6. Place the front cover as
well as the blotter on top
and plug the LX into a power
socket. We recommend
placing the power cable into
the groove on the stands
provided for the purpose. You
are now ready to enjoy your
LX to the fullest !
Page 13
6. QUICK START
1 . IDEAL P O S I T I O NNING OF T H E L X IN YOUR R O O M
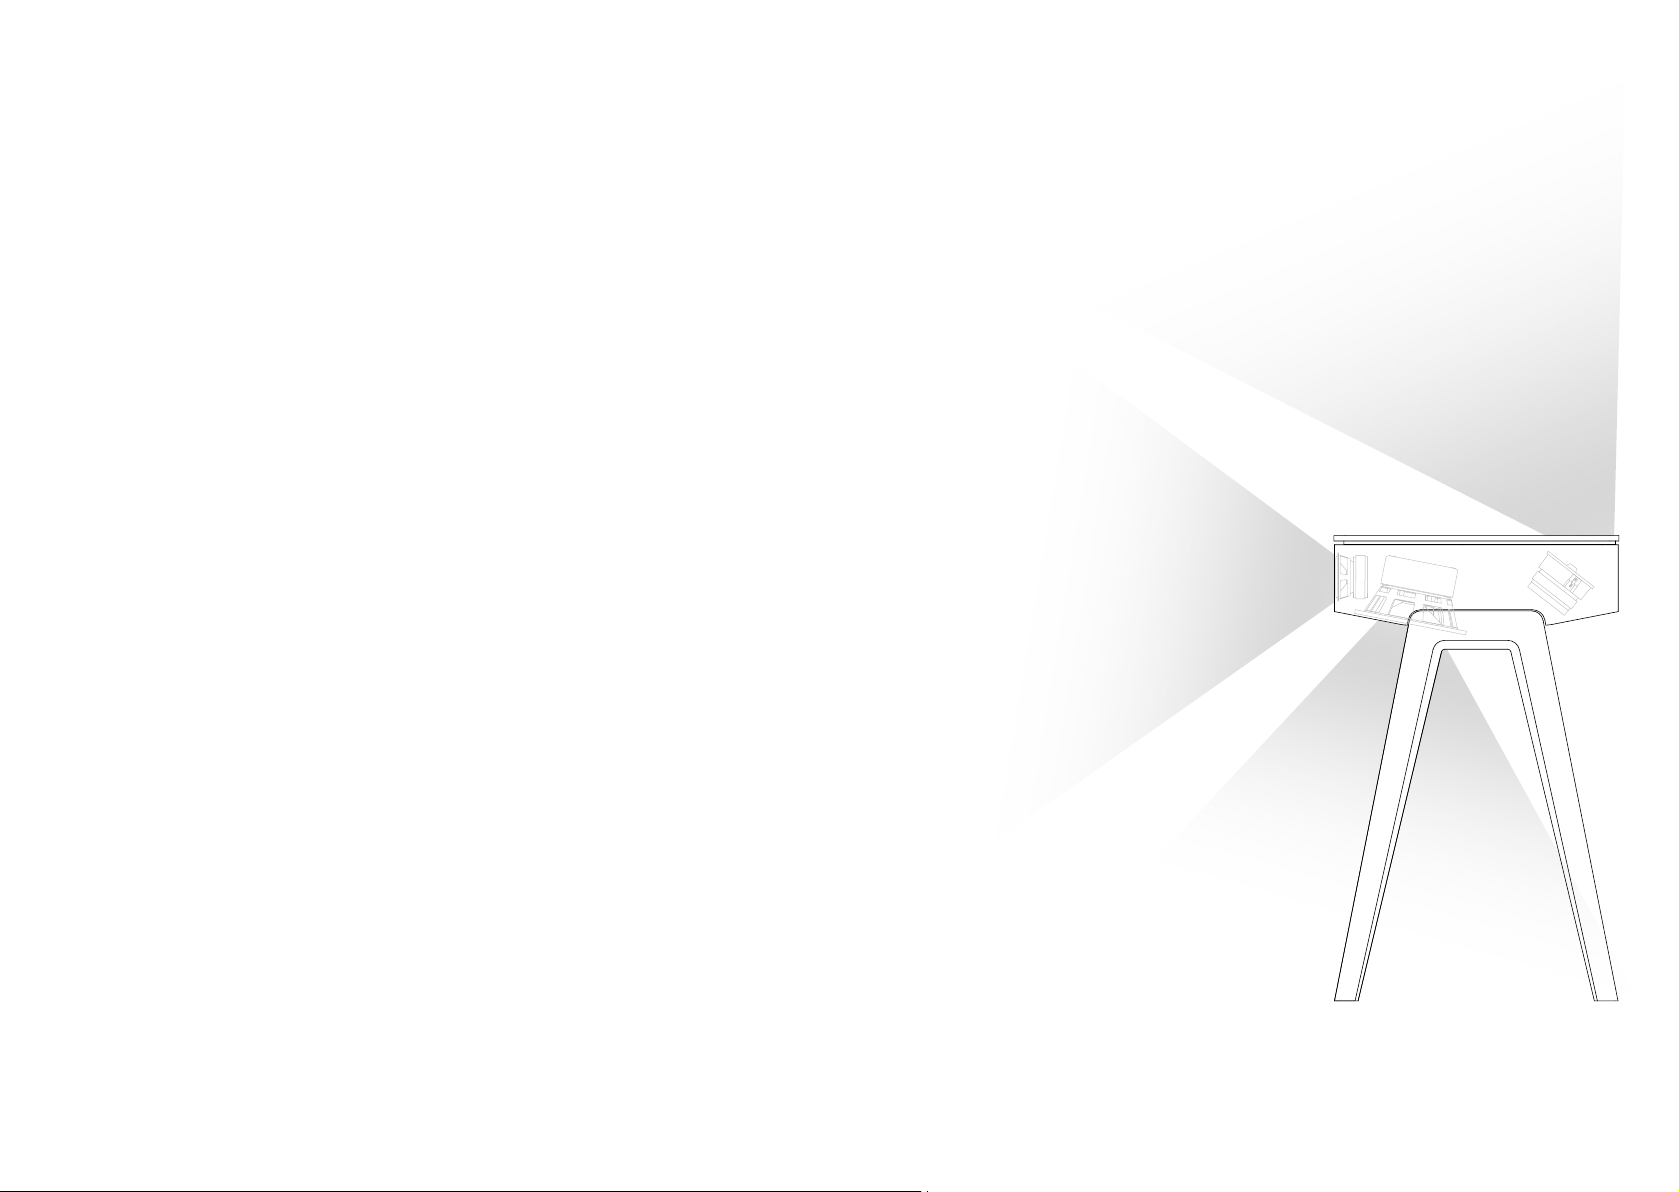
Traditional acoustic speakers have a restricted ideal listening field in both longitudinal and latitude planes. Thanks to its filtering and the pattern of its acoustic blaffles, as well as the positionning of its rear loudspeaker, the LX offers optimal listening wherever you are seated or moving.
Thus, the LX has been designed for both high fidelity listening at low levels, as well as for a group
experience during a party at high levels.
FILLING YOUR ROOM WITH SOUND
The spatialization of the “Wide Stereo Sound 3.0®” (patented by La Boite concept) is the result
of research aimed to obtain stereophonic sound renderings and homogeneous quality under all
circumstances, whether the listener is alone or in a group, seated or standing, close to the speaker
or further away.
Besides enhancing the greatest listener mobility with respect to the LX, these researches has contributed to preserving the sound of the device, regardless of its location inside the listening room,
thus reducing installation constraints for the user.
The LX side baffles help to enlarge the stereophonic listening from one of the furniture’s sides, by
reducing the nearby effects from one channel to the other.
As a result, the listener does not have to stand in the central position in order to obtain an enjoyable rendering of the stereophonic image (which also allows the possibility of several listeners
simultaneous enjoying a stereophonic sound broadcast).
Furthermore, the user no longer needs to place the LX perfectly symmetrical according to the
walls of the room.
24 25
S PATIALIZ A T I O N O F THE SOU N D O F T H E LX
Page 14
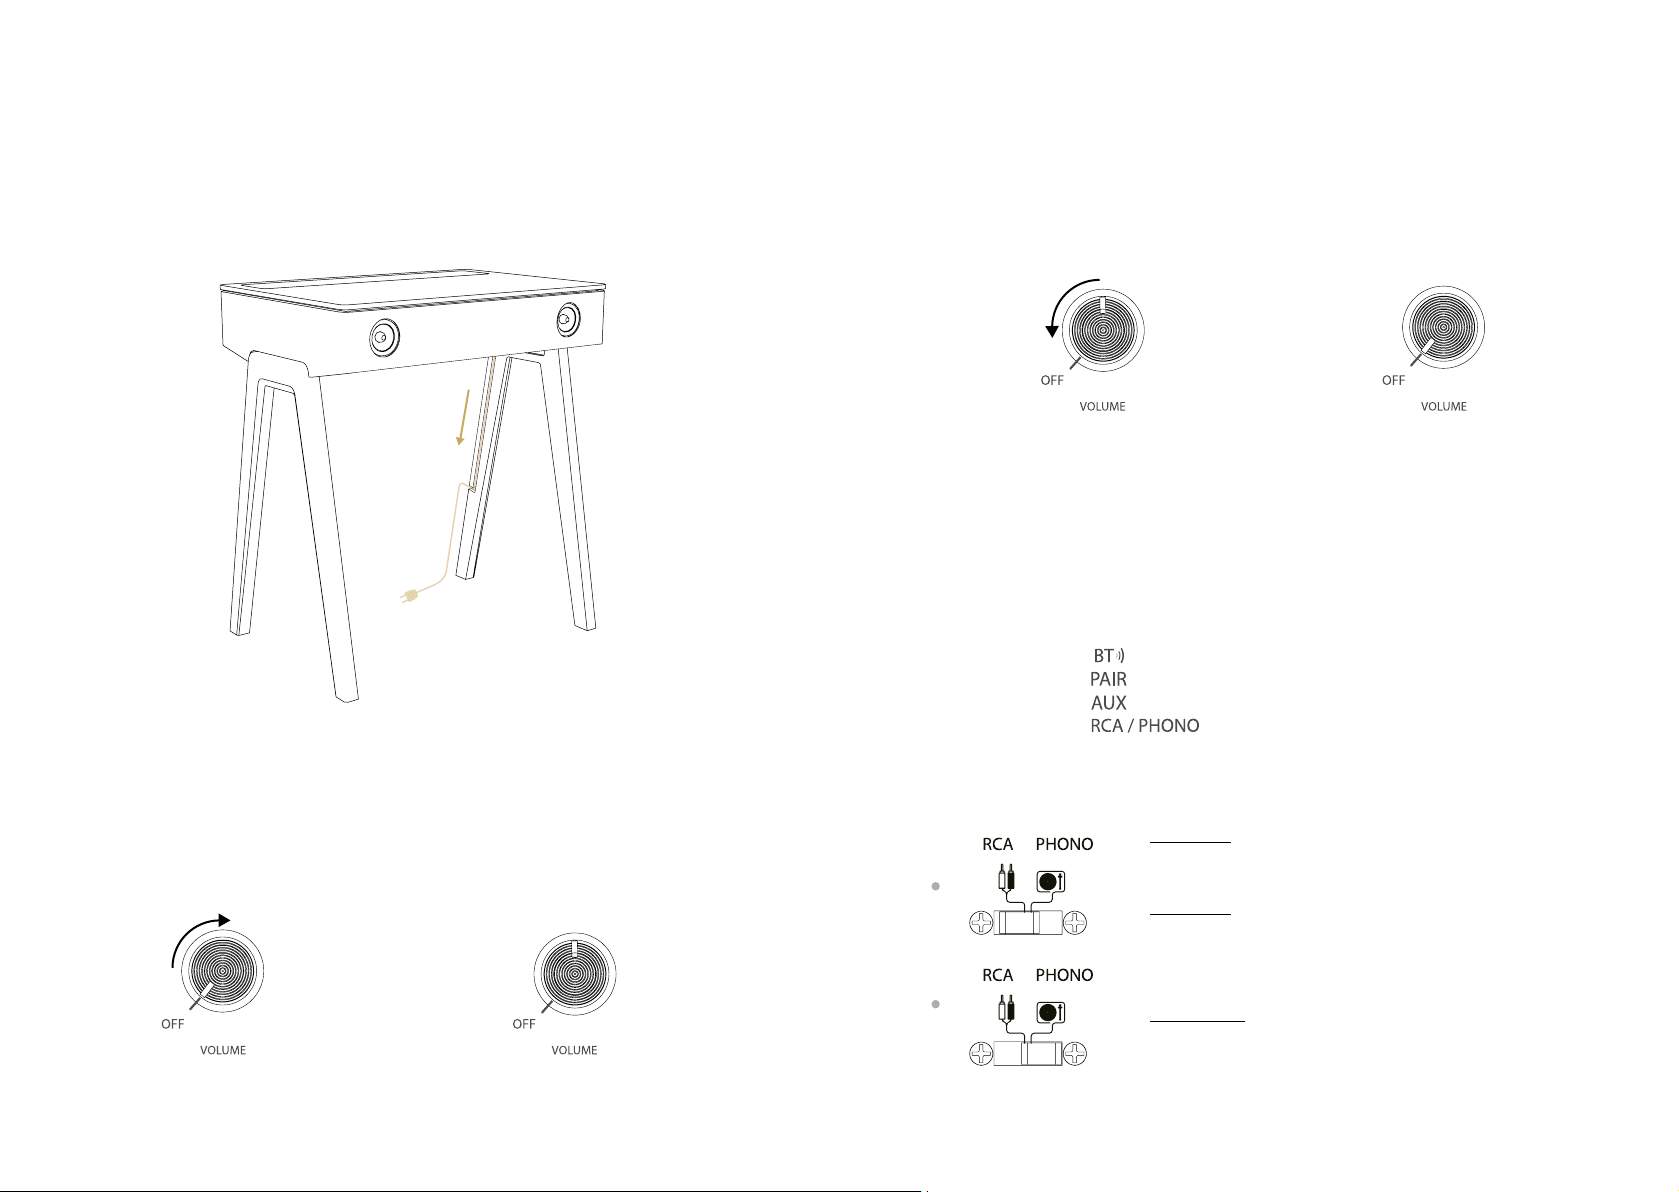
2 . TURNIN G T H E P O WER ON/O F F
1. Insert the power cord into the power cable plug located under your LX (please refer to the
drawing on page 17).
6. The LX will automatically go into standymode if youe leave your device without signal for 30
minutes. The standby LED light will turn red. To wake up the device, press the control knob or
play music from either sources.
2 . Place the power cord into the groove on the stands provided for this purpose.
3 . Connect the power cord to the wall socket.
4 . First, turn on the the LX by switching the master ON/OFF at the back of the loudspeaker
(please refer to the drawing on page 17).
5. Then, turn the volume control knob clockwise to switch on the LX. The Bluetooth LED lights up.
7. To temporarily put the LX into “off” mode and avoid power consumption, turn the volume
control knob counter clockwise to the “OFF” point until you hear a “click” sound.
8. To fully swith the LX off, switch the master ON/OFF at the back of the loudspeaker (please
refer to the drawing on page 17). All the LED lights are now off and the USB power discon-
nects. .
3 . CHOOS I N G Y O U R SOURCE
Once you have set up your connections on the input panel, you can select the source you want
to use by pressing the corresponding button on the control panel (from 1 to 7).
/ Selecting the source corresponds to (1) the Bluetooth connection with your devices.
/ Selecting the source corresponds to (2) the Bluetooth pairing with your devices.
/ Selecting the source corresponds to (3) the AUX input.
/ Selecting the source corresponds to (4) the Phono or RCA inputs provided
to connect your vinyl turntable. This source is linked to the RCA/Phono button located on the
input panel.
RCA mode: for a line level input (CD, DVD, …) or to use if
your turntable is preamplified.
26
RCA mode: to use with the cable with the two audio ends
(one RCA end and one stereo 3,5mm end) provided.
Phono mode: if your turntable is not preamplified (traditional turntable with a ground output).
27
Page 15
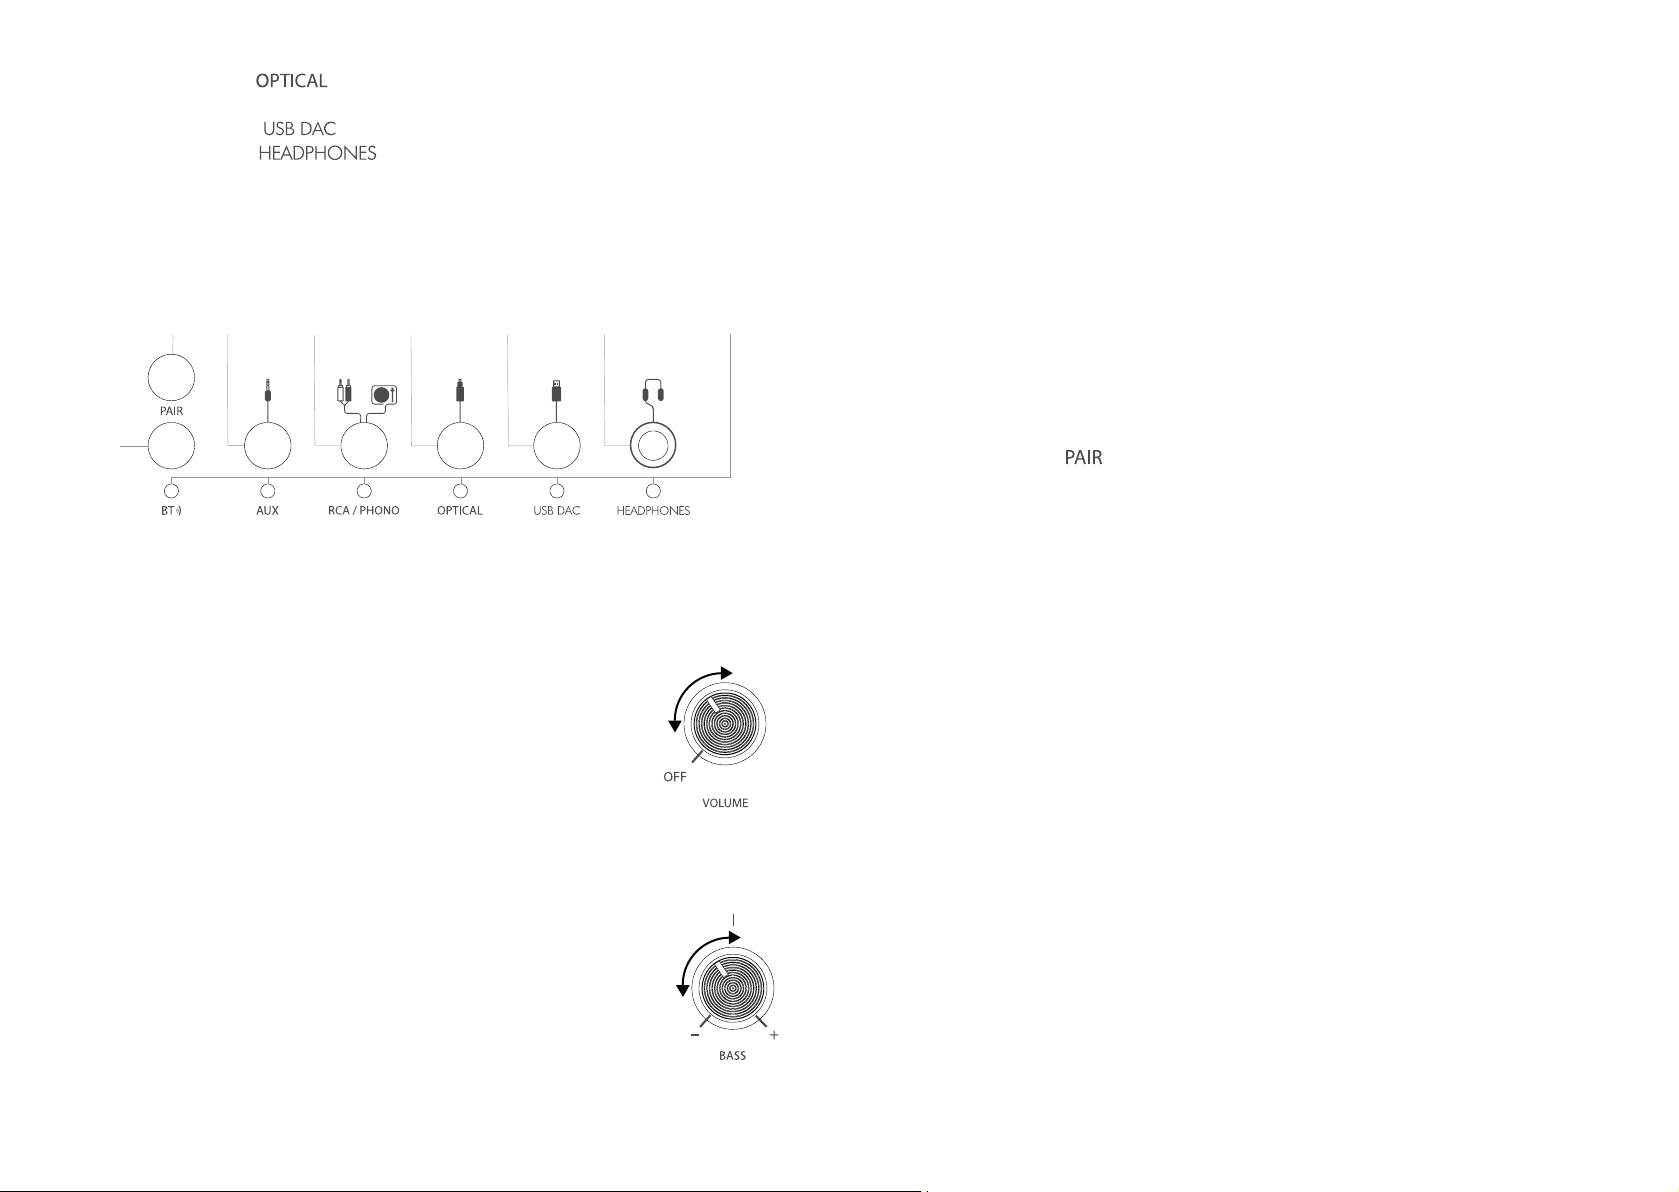
/ Selecting the source corresponds to (5) the input for the Optical cable (no
latency between the sound and the image).
/ Selecting the source corresponds to (6) the input for the USB DAC cable.
/ Selecting the source corresponds to (7) the headphone / earphone
output.
NOTE : THE USED SOURCE IS INDICATED BY THE LED LIGHT
213
4
5
6 7
8
7. USING YOUR LX WITH
YOUR DEVICES
1 . BLUETO O T H ® C O N NECTION
Your LX is equipped with Wireless Bluetooth®. This technology allows you to send your music wirelessly from your computer, tablet or smartphone to your La Boite concept speaker. The Bluetooth®
receiver allows you to listen high definition music wirelessly. To use this connection, you have to :
To use this connection, you need to :
1. Turn the LX on.
2. The Bluetooth® is the default source and will automatically turn ON. The LED light on the LX
will start to flash in white.
3. Activate the Bluetooth® functionality on your device (computer, tablet or smartphone).
4. Press rapidly the button on your LX, the LED light flashes rapidly.
5. On your device, select the LX in the list.
6. The LED light will turn to a steady white, you are now connected.
7. You can now control your playlists from your source (computer, tablet or smartphone) in a
radius of about 10 meters around your LX.
V OLUME SE T T I N G S
TO INCREASE THE VOLUME
Turn the volume control knob clockwise.
TO DECREASE THE VOLUME
Turn the volume control knob counter clockwise.
B ASS SETT I N G S
Turn the knob towards the – to decrease the bass and towards the + to
increase the bass.
When the knob is positioned at twelve o’clock, the bass is neutral.
28
NOTES:
You only need to pair your computer, tablet or smartphone with the LX once, after which the
device will be included in the list of your Bluetooth® devices. When pairing a new device,
press the pair button again, and reeat steps above. Your LX is able to store up to six devices in
its memory.
The Bluetooth® word mark and logos are registered trademarks owned by the Bluetooth® SIG,
Inc. and any use of such marks by Design Pool Limited is under license. Other trademarks and
trade names are those of their respective owners.
2 . USB P L U G
This plug allows connecting a computer. this function allows you to use the sound card integrated
0
in the device without using and regardless of the qualilty of the card integrated in your computer.
Only this plug allows reading music via computer. This system was developed for an effective operation without parameter setting. However, in some situations (music software already opened,
for example), this USB input can be used with a simple manipulation. In this case, for the connection to be effective, simply select the USB sound card in your computer’s menu.
29
Page 16
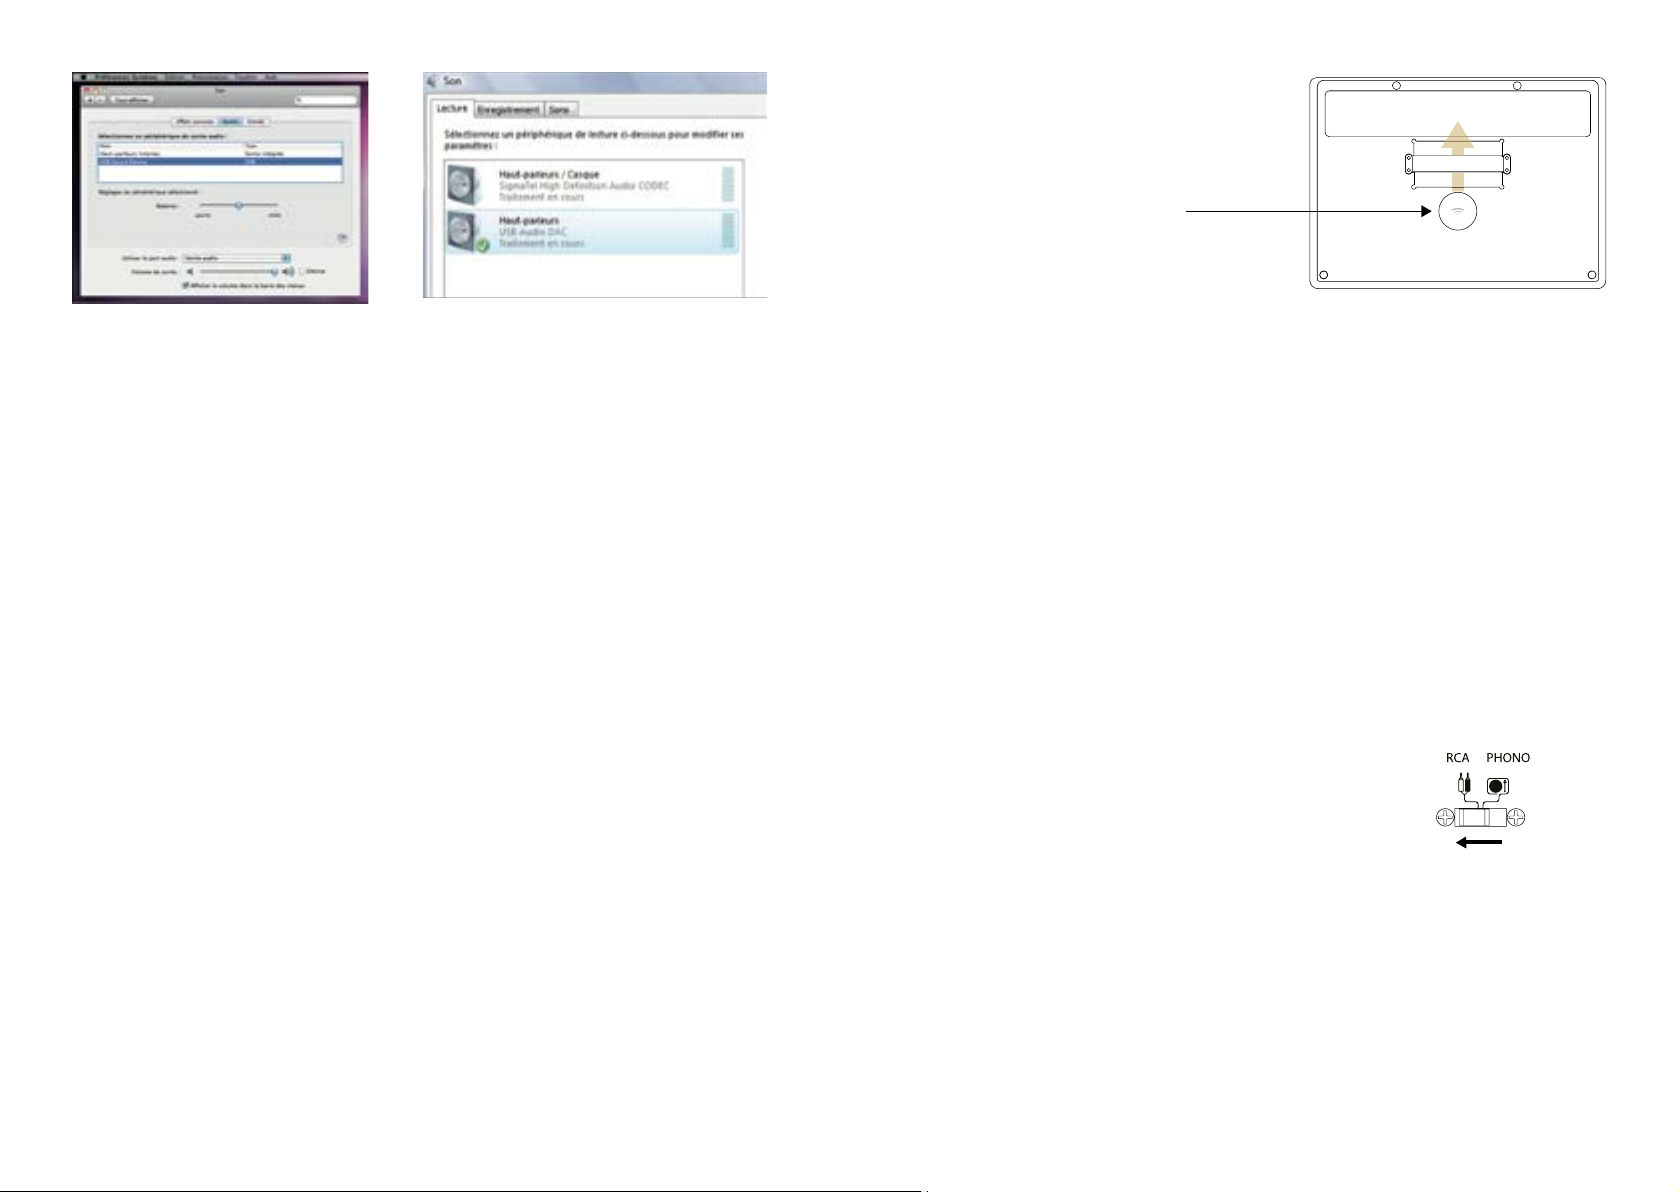
Under the blotter
Wireless charger to slide under the elasctic
On WindowsOn Mac
6 . CABLE C O N N E C T ION
3 . CHARG I N G T H R O UGH THE I E C P O W E R SOCKET
The LX is equipped with an integrated IEC power socket located in the trap door, on the right
hand. Thanks to the C14 IEC universal adaptor provided, you will be able to plug in and charge
all your devices even when the LX is asleep. However, if you turn off the LX using the master ON
/ OFF, there will no longer be power running through the IEC plug.
4 . USB C H A R G E R
The LX comes with a built-in-2-port USB charger. The ports will power your USB devices even if
the speaker is in standby mode. Powering off the LX with the rear main switch will also power off
the USB ports.
The charger works with most USB compliant devices at 5V and can provide up to 2.4A for USB-A-charging
current (for fast iPad charging).
Note : Never use the charger with damaged cables as they could overheat and cause a fire.
USB-A charging current s limited to 15W. This is enough to charge most phones and tablets. The
charger is not compatible with the old iPod Classic (pre 2010)and other rare devices not fully
compatible with the USB standard.
5 . WIREL E S S C H A R GER
The LX also has a built-in recess inside the top wooden enclosure which can accommodate the
NATIVE UNION wireless charher “DROP” (sold separetly). The DROP can be placed conveniently
inside the foam fixation for easy alignment. Wireless charging connectivity has been tested to
work with iPhone X and iPhone 8/8 Plus. When using other phone models or thick phone cases
the wireless charging may not work. In this case it is recommended to place the wireless charger
on top of the speaker instead of under the wooden enclosure.
You can still use another wireless charger. To proceed so, just remove the foam provided for the
DROP and place your own wireless charger.
OPTICAL: OPTICAL AUDIO DIGITAL INPUT
Use the optical input to connect your LX to your TV, hard disk player, streaming player and satellite or cable receiver. The optical input only works with PCM stereo, if a connected device sends
5.1 audio (or similar surround sound), the LX will not work. We recommend that you use the optical input for the videos as this cable avoid the latency between image and sound.
To use this connection, you just have to :
1. Connect the optical audio cable to the optical audio input on your source.
2. Turn the LX on.
3. Select Optical source by pushing the control knob.
RCA ANALOG INPUT
Use the RCA input for connecting your LX to audio sources such as your mobile phone, music
player or tablet.
To use this connection, you need to :
1. Connect the audio cable provided to your LX and to the audio output of your music device
(source).
2. Swap to RCA source by switching the button on the input panel.
3. Select RCA/Phono as source by pushing the Control knob unitl RCA/ Phono LED is illuminated.
AUXILIARY : 3.5 MM STEREO PLUG
Use the 3.5mm jack input to connect your LX to audio sources such as your CD player or turntable
(pre-amplified).
To use this connection, you need to :
1. Connect the audio cable to your LX and the audio output of your music device (source).
2. Select AUX as source by pushing the Control knob until the AUX LED is illuminated.
30
31
Page 17
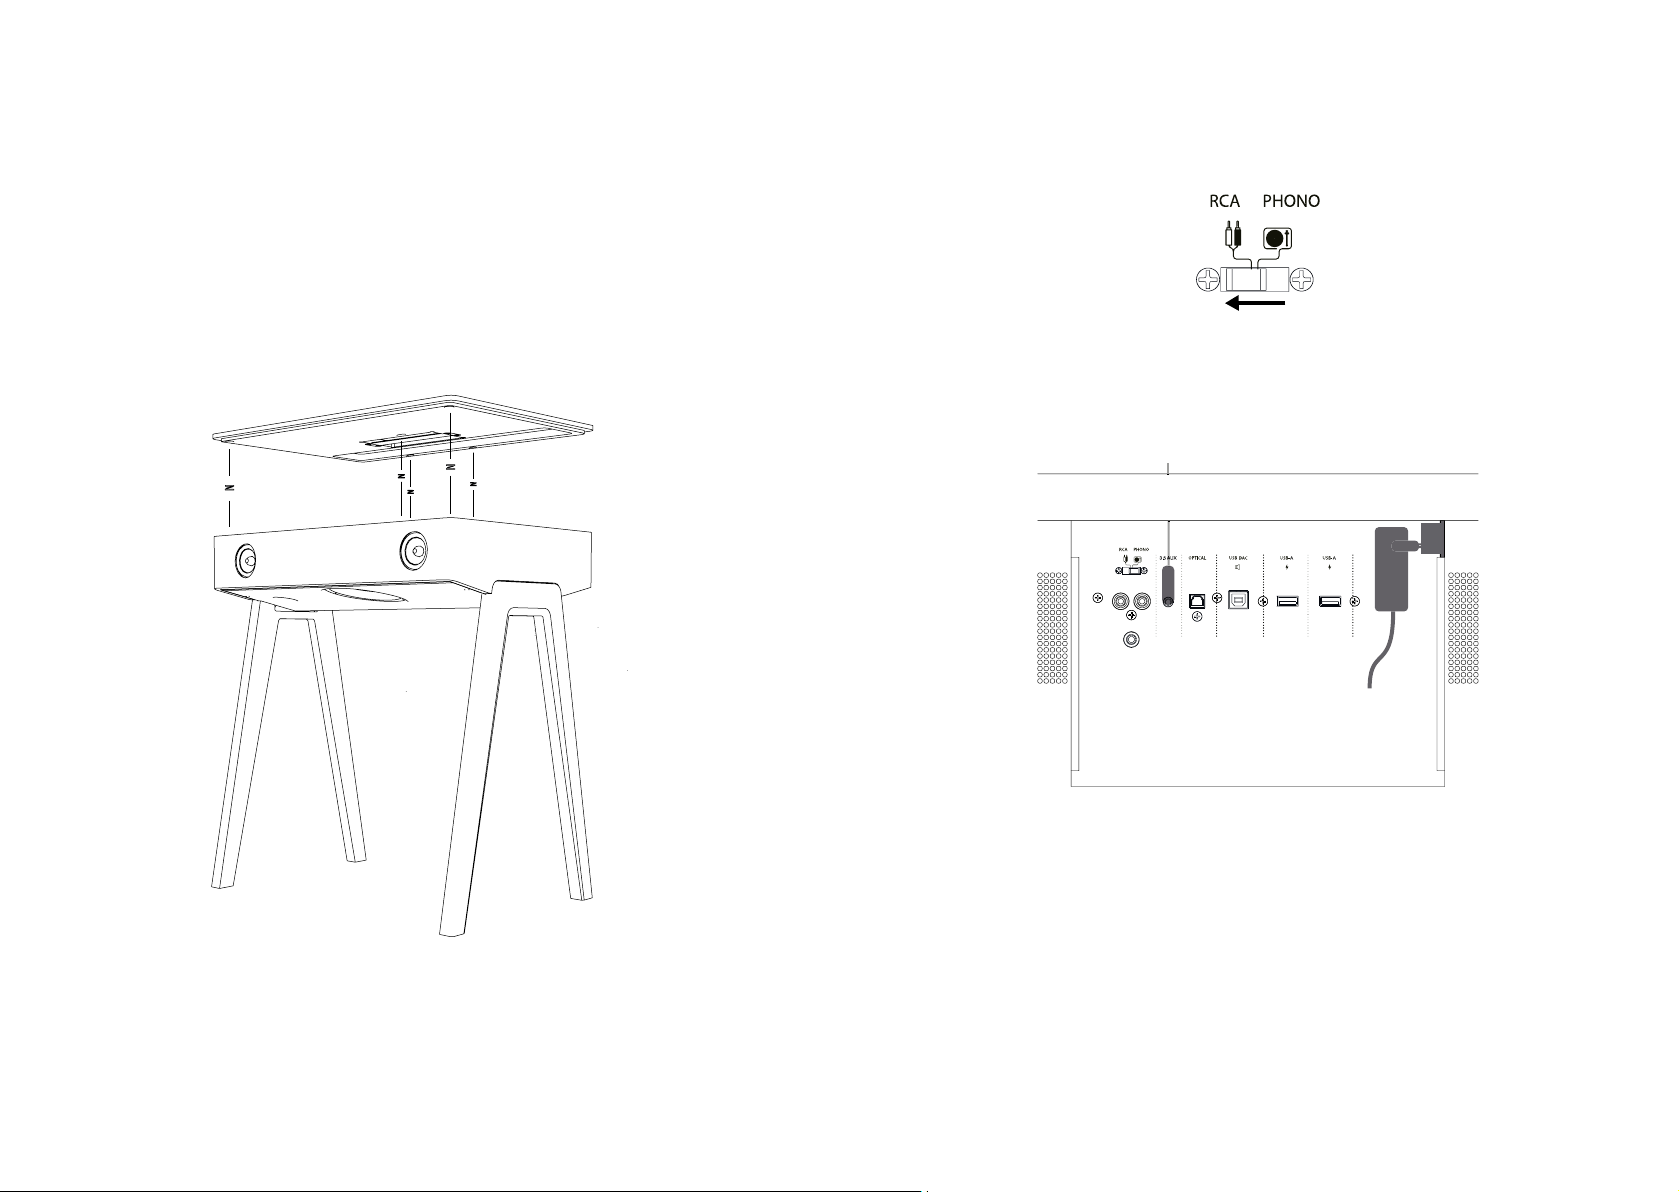
7 . CONNE C T A T U R NTABLE
IF YOU OWN A PREAMPLIFIED TURNTABLE (MODERN):
1 / Remove the five silicone pads which are located underneath the blotter: those are stick with
a double-sided adhesive.
2 / Clip the 5 shock absorbers in the groove of the pods provided for the purpose: there are 2
pods per shock absorber.
3 / Then place them in the grooves located on the loudspeaker.
6 / Swap to RCA source by switching the button on the input panel.
7 / Plug the turntable’s audio signal cable into the AUX input of the LX. Then plug in your turntable to the power socket inside the trapdoor.
Do not forget to pass the cables through the hole designed for the purpose.
4 / Put the blotter down on the shock absorbers and search for a “click” sound.
5 / Check if the blotter is in the right position on the shock absorbers.
32
8 / Press the AUX button on the control panel to select the source.
33
Page 18
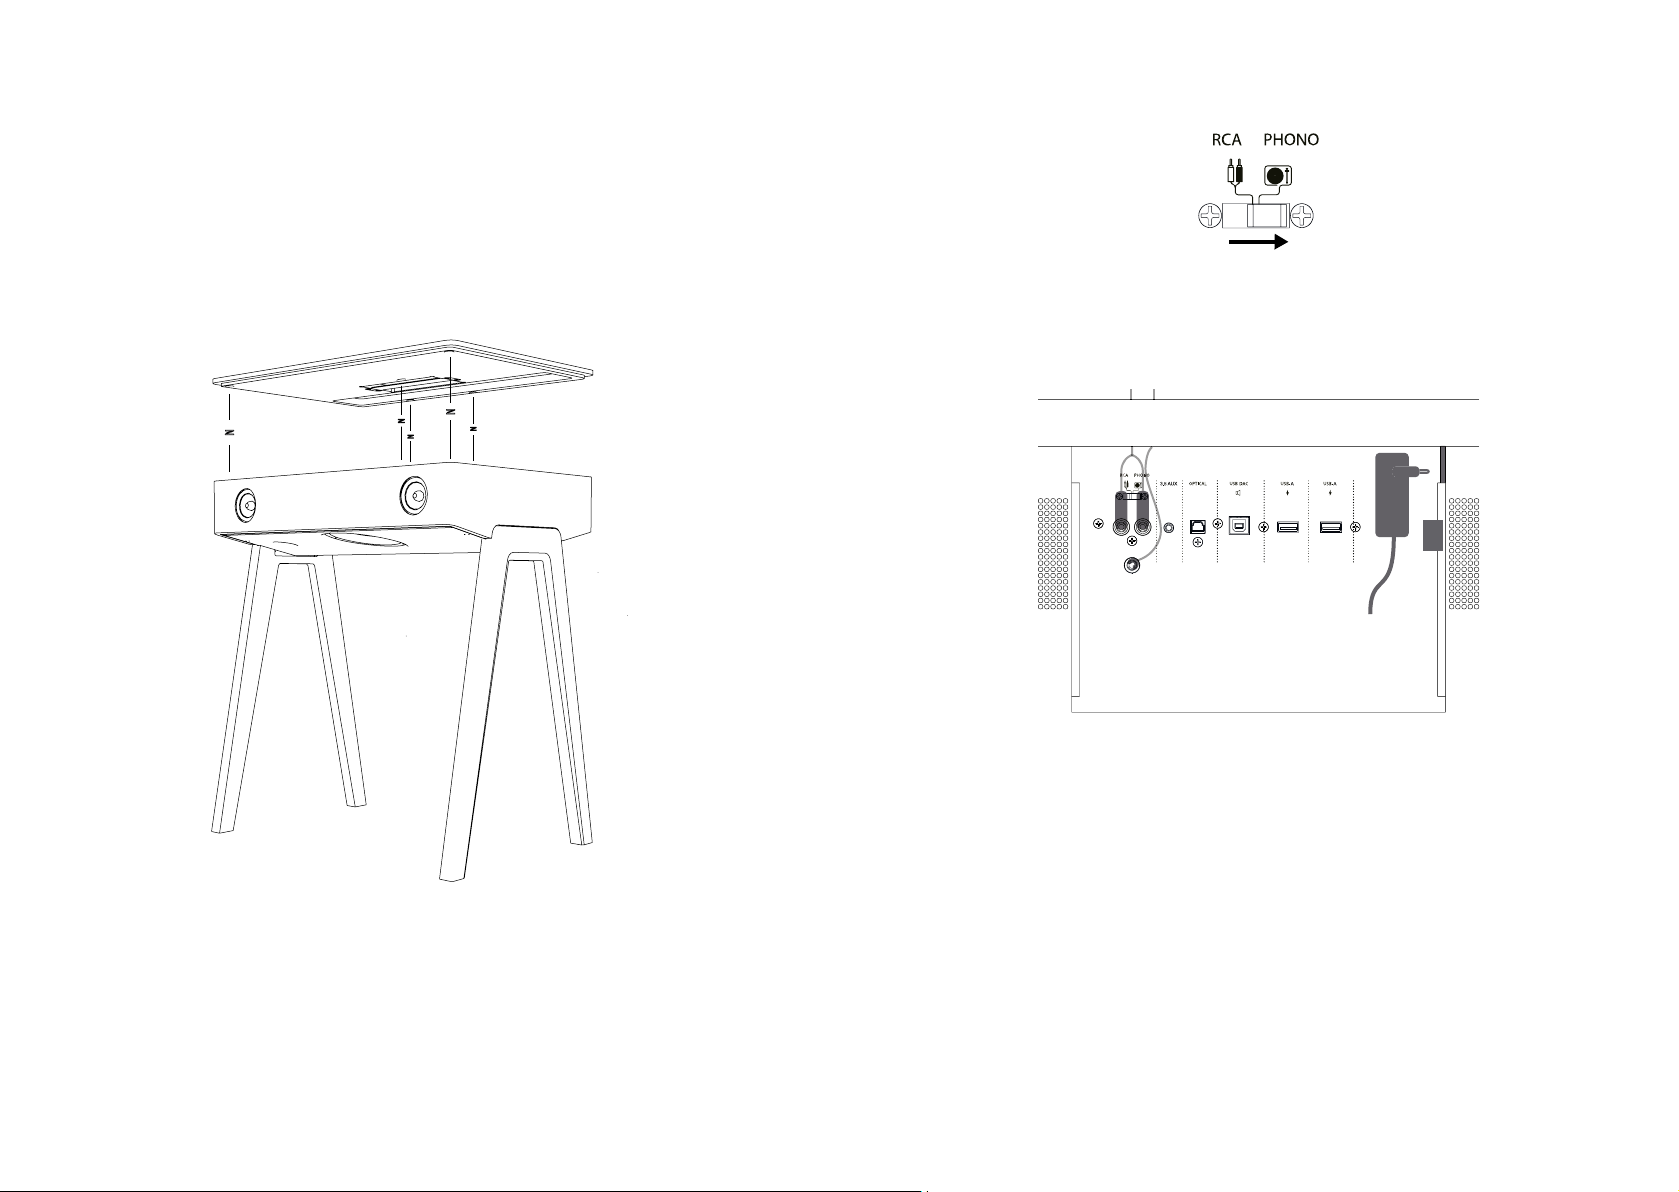
IF YOU OWN A NON PREAMPLIFIED TURNTABLE (TRADITIONAL)
1 / Remove the five silicone pads which are located underneath the blotter: those are stick with
a double-sided adhesive.
2 / Clip the 5 shock absorbers in the groove of the pods provided for the purpose: there are 2
pods per shock absorber.
3 / Then place them in the grooves located on the loudspeaker.
6 / Swap to PHONO source by switching the button on the input panel.
7 / Plug your turntable’s audio signal cable into the RCA input. Connect your turntable’s ground
wire to the GROUND PIN. Then plug in your turntable to the power socket inside the trapdoor.
Do not forget to pass the cables through the hole designed for the purpose.
4 / Put the blotter down on the shock absorbers and search for a “click” sound.
5 / Check if the blotter is in the right position on the shock absorbers.
34
8 / Press the RCA / PHONO button on the control panel to select the source.
35
Page 19

8. WHAT TO DO ?
6 . THERM A L P R O T E CTION OF T H E P O W ER AMPLI F I E R
1 . TO CL E A N Y O U R LX
Before cleaning the device, unplug your LX from the power socket. Clean the device only with a dry cloth. Do
not use cleaning alcohol or solvents to clean the device’s surface because these could damage the painting
and cause electrical failures or fire if they penetrate the device’s electronics.
2 . NO PO W E R
Make sure that the AC cable is solidly connected. Make sure that the plug is fully inserted in the power socket
and there is power. Check that the master ON / OFF located underneath the loudspeaker (please refer to
page 17) is positioned on “ON”. Make sure that the LX is not in standby mode. Make sure that the device is
switched on by checking the Bluetooth® white LED on the top panel. (please refer to page 14).
3 . NO SO U N D
Make sure that the volume is turned up to audible level and that the input source is at its maximum. Make
sure that an available input source is selected (please refer to page14, 15, 27, 29 : Using your LX with your
devices). Make sure that the LX is not in standby mode. Check if the bluetooth connection with your device is
still active. Finally, if you still cannot hear any sound coming out of the LX, increase the volume (please refer
to page 28).
4 . THE S O U N D I S DISTORED O R B U Z Z ES
In case of high level extended uses, a rising temperature can alter the performance of the amplifier. Above
110 degres, the highest level allowed for safe optimal listening conditions must be lowered until the amplifier
cools down.
7 . BLUET O O T H I S S UES®
When connecting a new device make sure the LX input source is switched to Bluetooth®. If the LX does not
show up on your device make sure to manually refresh the Bluetooth® device list on your phone / device
after rapidly pressing the LX Bluetooth button. There will be a short audio signal once your device makes
connection. If you can’t hear any sound make sure the LX is not in standby and turn up the volume.
Your device may lose connection to the LX when leaving the Bluetooth range or if in standby mode. In this
case Bluetooth connection can easily be made again from your phone’s Bluetooth settings page ( without
the need to press the Bluetooth button on the LX).
Note that depending on your installation and your mobile device the Bluetooth range will be limited to 5-10
meters or less if walls or furniture obstruct the signal.
Check the connections of your music readers. Make sure that all the connecting cables are correctly plugged
in, especially the earth/protection shield connections. Make sure that your cables are in good condition.
5 . BACKG R O U N D N O ISE AND U N D E S I R A BLE
I NTERFERE N C E S
Separate the device from other electrical appliances which may be causing the interference. If the above
solutions do not remedy your problem, please contact a professional. Your home electrical installation may
be connected to earth ground or it may be polluted by electrical parasites devices that implies audible noise.
For any repairs during or after the warranty, please contact your dealer.
36
37
Page 20
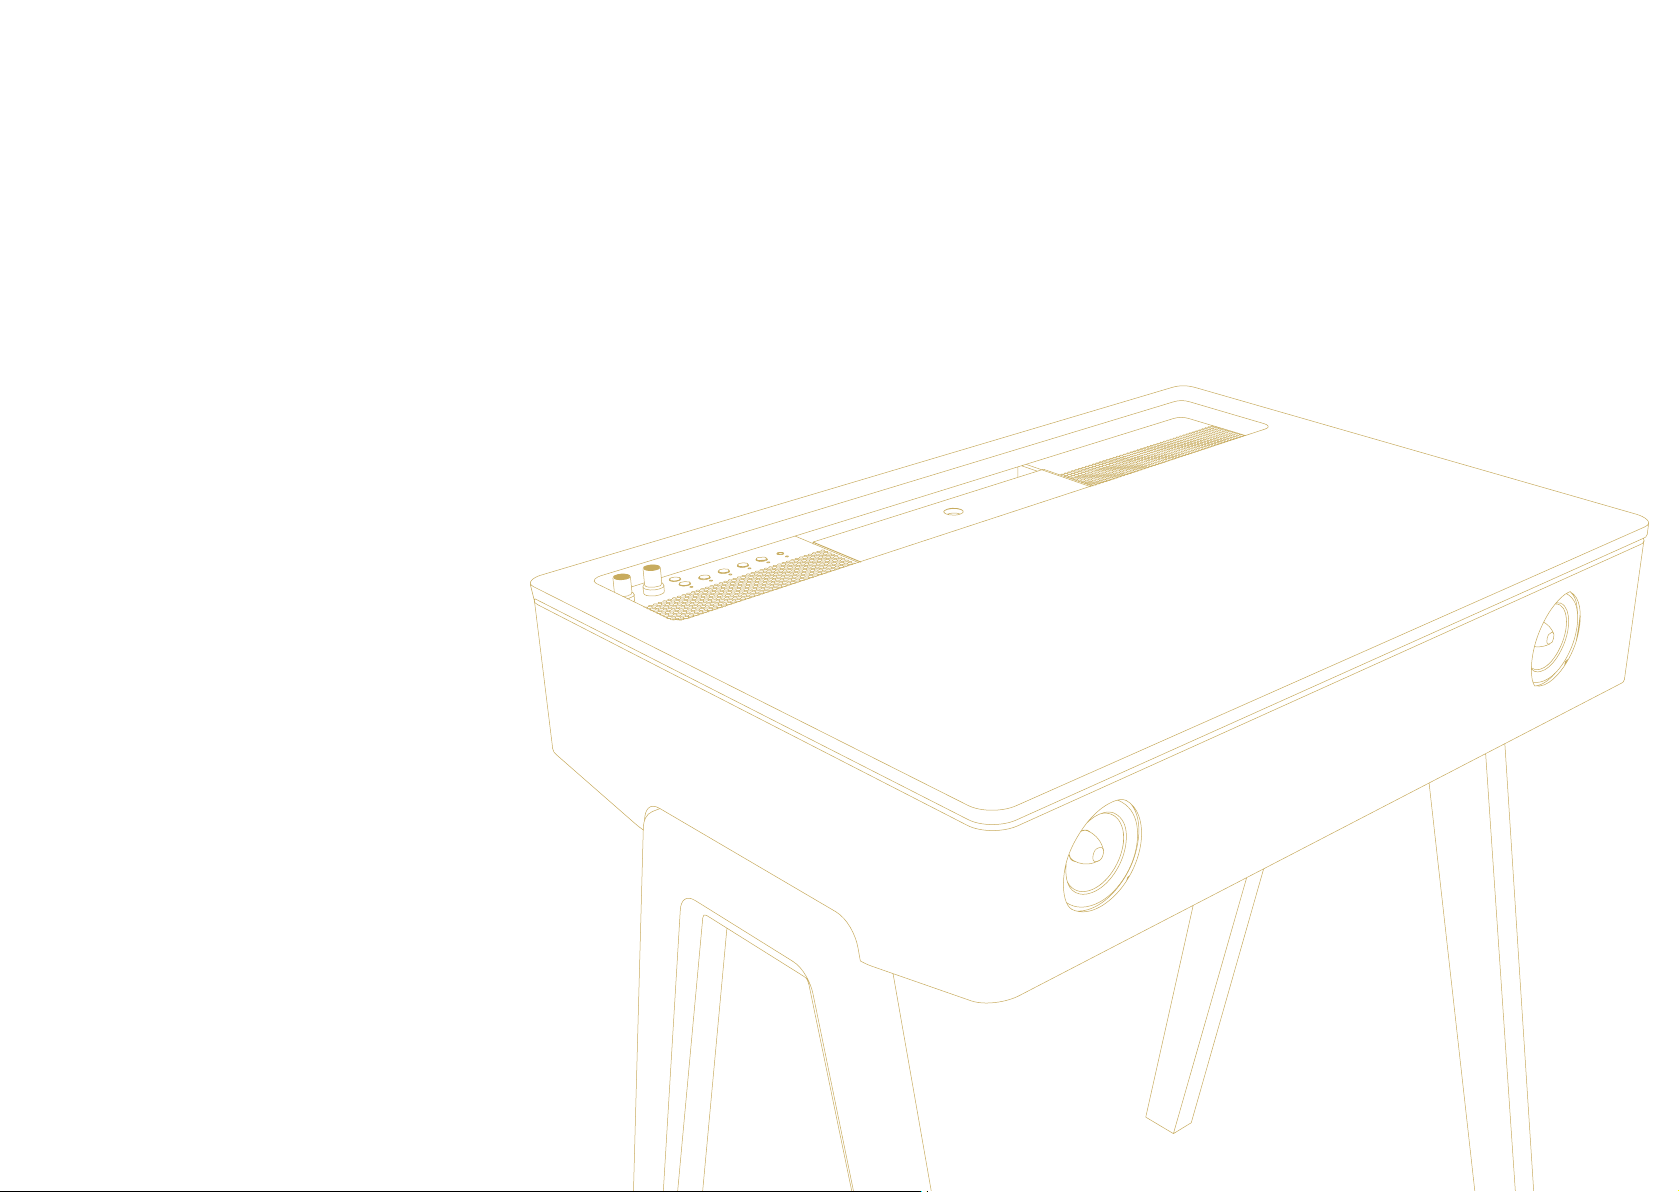
9. TECHNICAL SUMMARY
SOURCES
Bluetooth® AptX
AUX : stereo jack 3.5mm
Phono input with ground
RCA input
Optical: optical digital audio input DAC Wolfsond 24 bits USB
USB CHARGERS
2 x USB-A (permanent connection, charging up to 2,4 A)
DIMENSIONS & WEIGHT
H : 790mm, L : 690mm, D : 480mm
Weight : 30 kg
LOUDSPEAKERS
1 x Bass reflex woofer with cellulose pulp cone
2 x tweeters TWZ WS 3.0 with cones and bullet equipped
with internal convex deflectors
2 x fiberglass mid-range drivers with aluminium cones.
Class D 5 channels 4.1 amplifier
38
Page 21

269 Chemin De Mentaberrikoborda, 64480 USTARIZ - 05 64 11 54 18
41 Rue Sedaine, 75011 PARIS - 01 43 72 53 24
[email protected]
www.laboiteconcept.com
 Loading...