

USER’S MANUAL OF WLAN BROADBAND ROUTER Version: 2.2
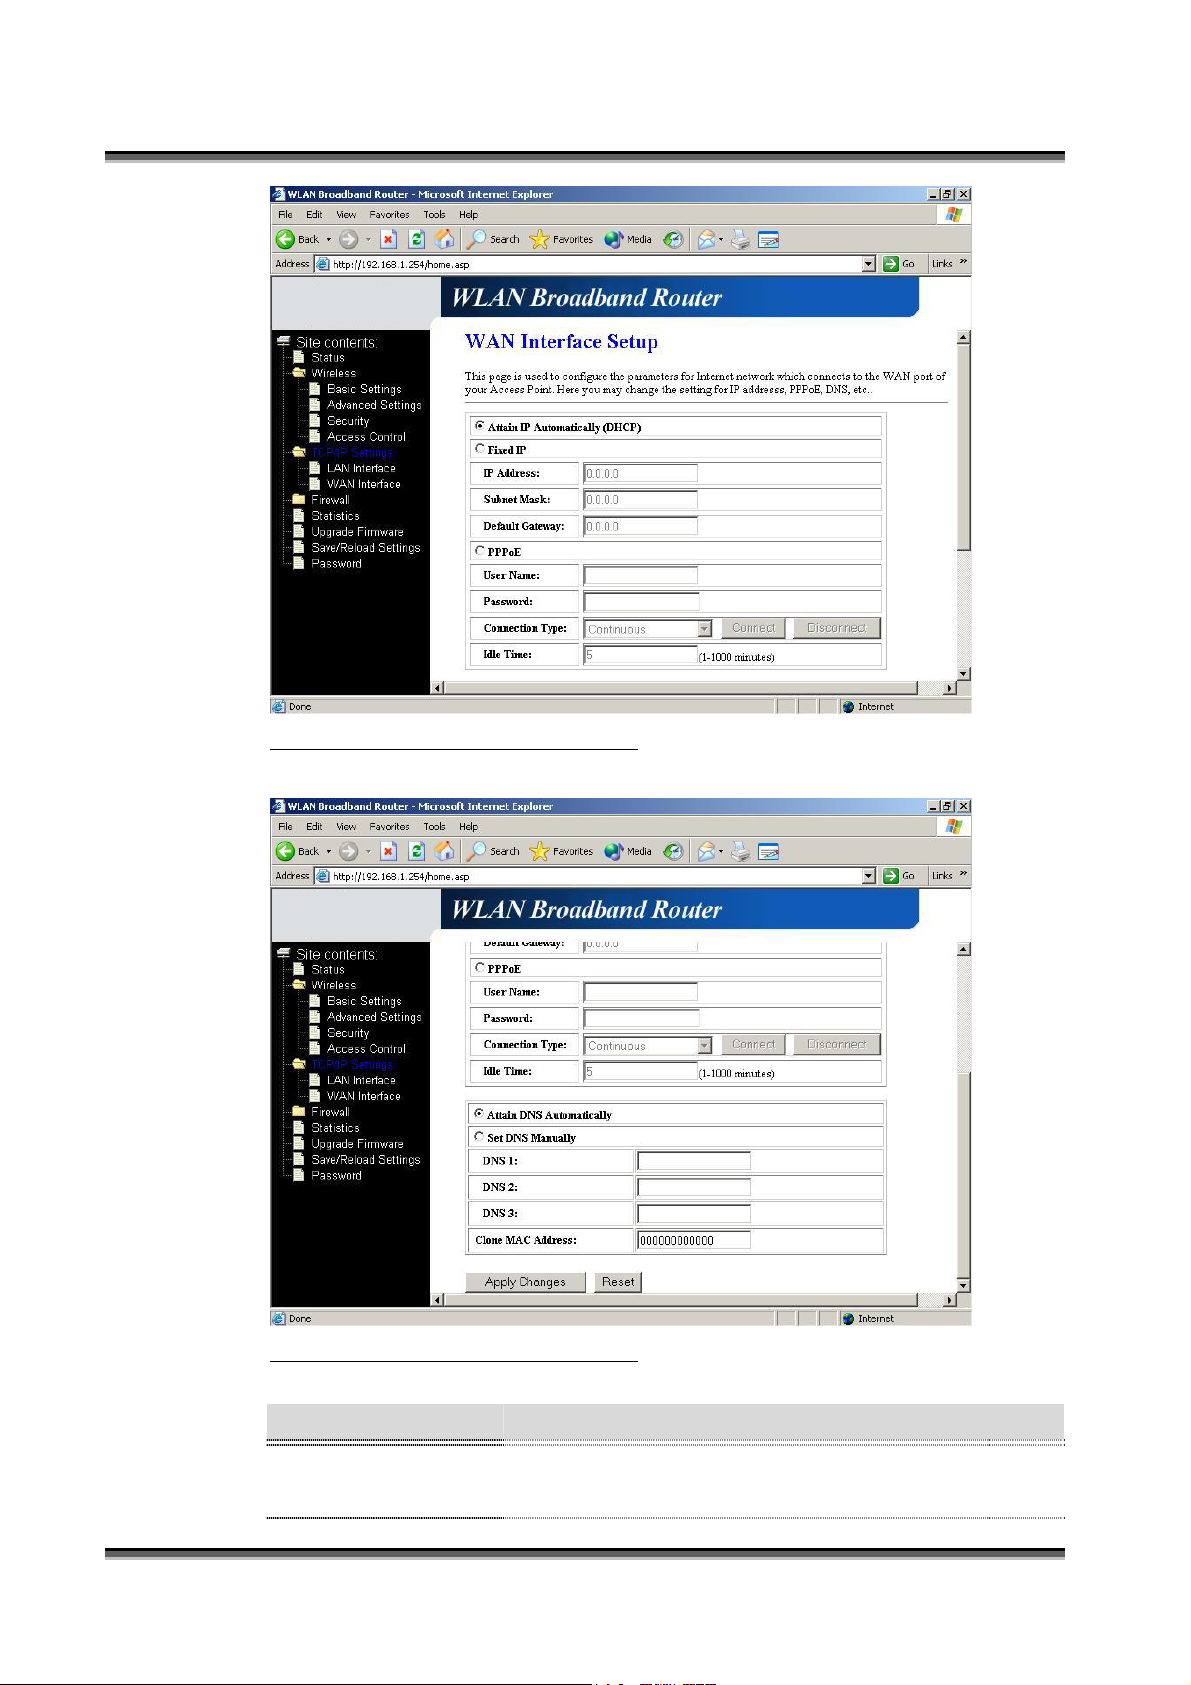
Screenshot – WAN Interface Setup - 1
Screenshot – WAN Interface Setup - 2
Item Description
Attain IP
Automatically (DHCP)
18
Click to select DHCP support on WAN interface for IP
address assigned automatically from a DHCP server.

USER’S MANUAL OF WLAN BROADBAND ROUTER Version: 2.2
Fixed IP
IP Address
Subnet Mask
Default Gateway
PPPoE
User Name
Password
Click to select fixed IP support on WAN interface. There
are IP address, subnet mask and default gateway settings
need to be done.
If you select the fixed IP support on WAN interface, fill
in the IP address for it.
If you select the fixed IP support on WAN interface, fill
in the subnet mask for it.
If you select the fixed IP support on WAN interface, fill
in the default gateway for WAN interface out going data
packets.
Click to select PPPoE support on WAN interface. There
are user name, password, connection type and idle time
settings need to be done.
If you select the PPPoE support on WAN interface, fill in
the user name and password to login the PPPoE server.
If you select the PPPoE support on WAN interface, fill in
Connection Type
the user name and password to login the PPPoE server.
Select the connection type from pull-down menu. There
are Continuous, Connect on Demand and Manual three
types to select.
Continuous connection type means to setup the
connection through PPPoE protocol whenever this
WLAN Broadband Router is powered on.
Connect on Demand connection type means to setup the
connection through PPPoE protocol whenever you send
the data packets out through the WAN interface; there are
a watchdog implemented to close the PPPoE connection
while there are no data sent out longer than the idle time
set.
Manual connection type means to setup the connection
through the PPPoE protocol by clicking the Connect
button manually, and clicking the Disconnect button
manually.
Idle Time
If you select the PPPoE and Connect on Demand
connection type, fill in the idle time for auto-disconnect
function. Value can be between 1 and 1000 minutes.
Attain DNS
19
Click to select getting DNS address for DHCP, PPPoE
USER’S MANUAL OF WLAN BROADBAND ROUTER Version: 2.2
Automatically
support. Please select Set DNS Manually if the Fixed IP
support is selected.
Set DNS Manually
DNS 1
DNS 2
DNS 3
Apply Changes
Click to select getting DNS address for Fixed IP support.
Fill in the IP address of Domain Name Server 1.
Fill in the IP address of Domain Name Server 2.
Fill in the IP address of Domain Name Server 3.
Click the Apply Changes button to complete the new
configuration setting.
Reset
Click the Reset button to abort change and recover the
previous configuration setting.
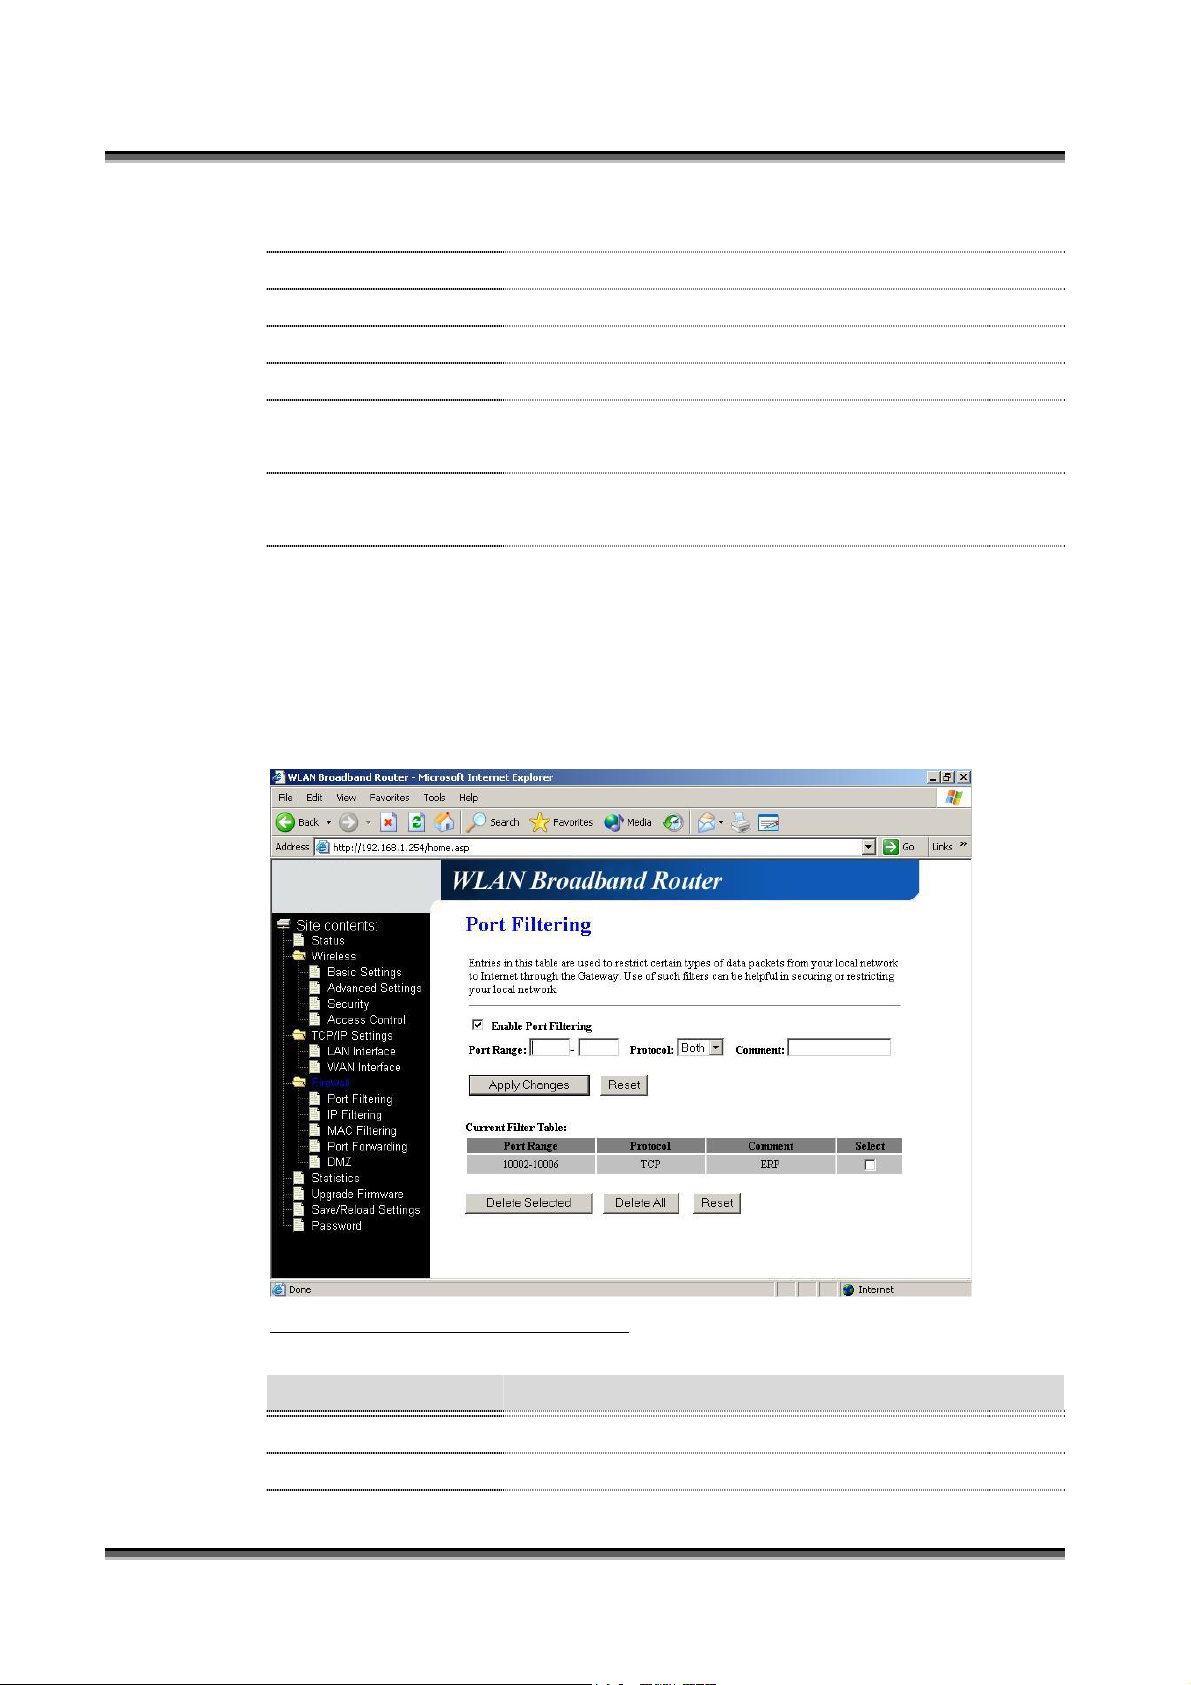
3.3.8 Firewall - Port Filtering
Entries in this table are used to restrict certain types of data packets from your
local network to Internet through the Gateway. Use of such filters can be helpful
in securing or restricting your local network.
Screenshot – Firewall - Port Filtering
Item Description
Enable Port Filtering
Port Range
20
Click to enable the port filtering security function.
To restrict data transmission from the local network on
USER’S MANUAL OF WLAN BROADBAND ROUTER Version: 2.2
Protocol
Comments
Apply Changes
Reset
Delete Selected
Delete All
Reset
certain ports, fill in the range of start-port and end-port,
and the protocol, also put your comments on it.
The Protocol can be TCP, UDP or Both.
Comments let you know about whys to restrict data from
the ports.
Click the Apply Changes button to register the ports to
port filtering list.
Click the Reset button to abort change and recover the
previous configuration setting.
Click to delete the selected port range that will be
removed from the port-filtering list.
Click to delete all the registered entries from the
port-filtering list.
Click the Reset button to abort change and recover the
previous configuration setting.
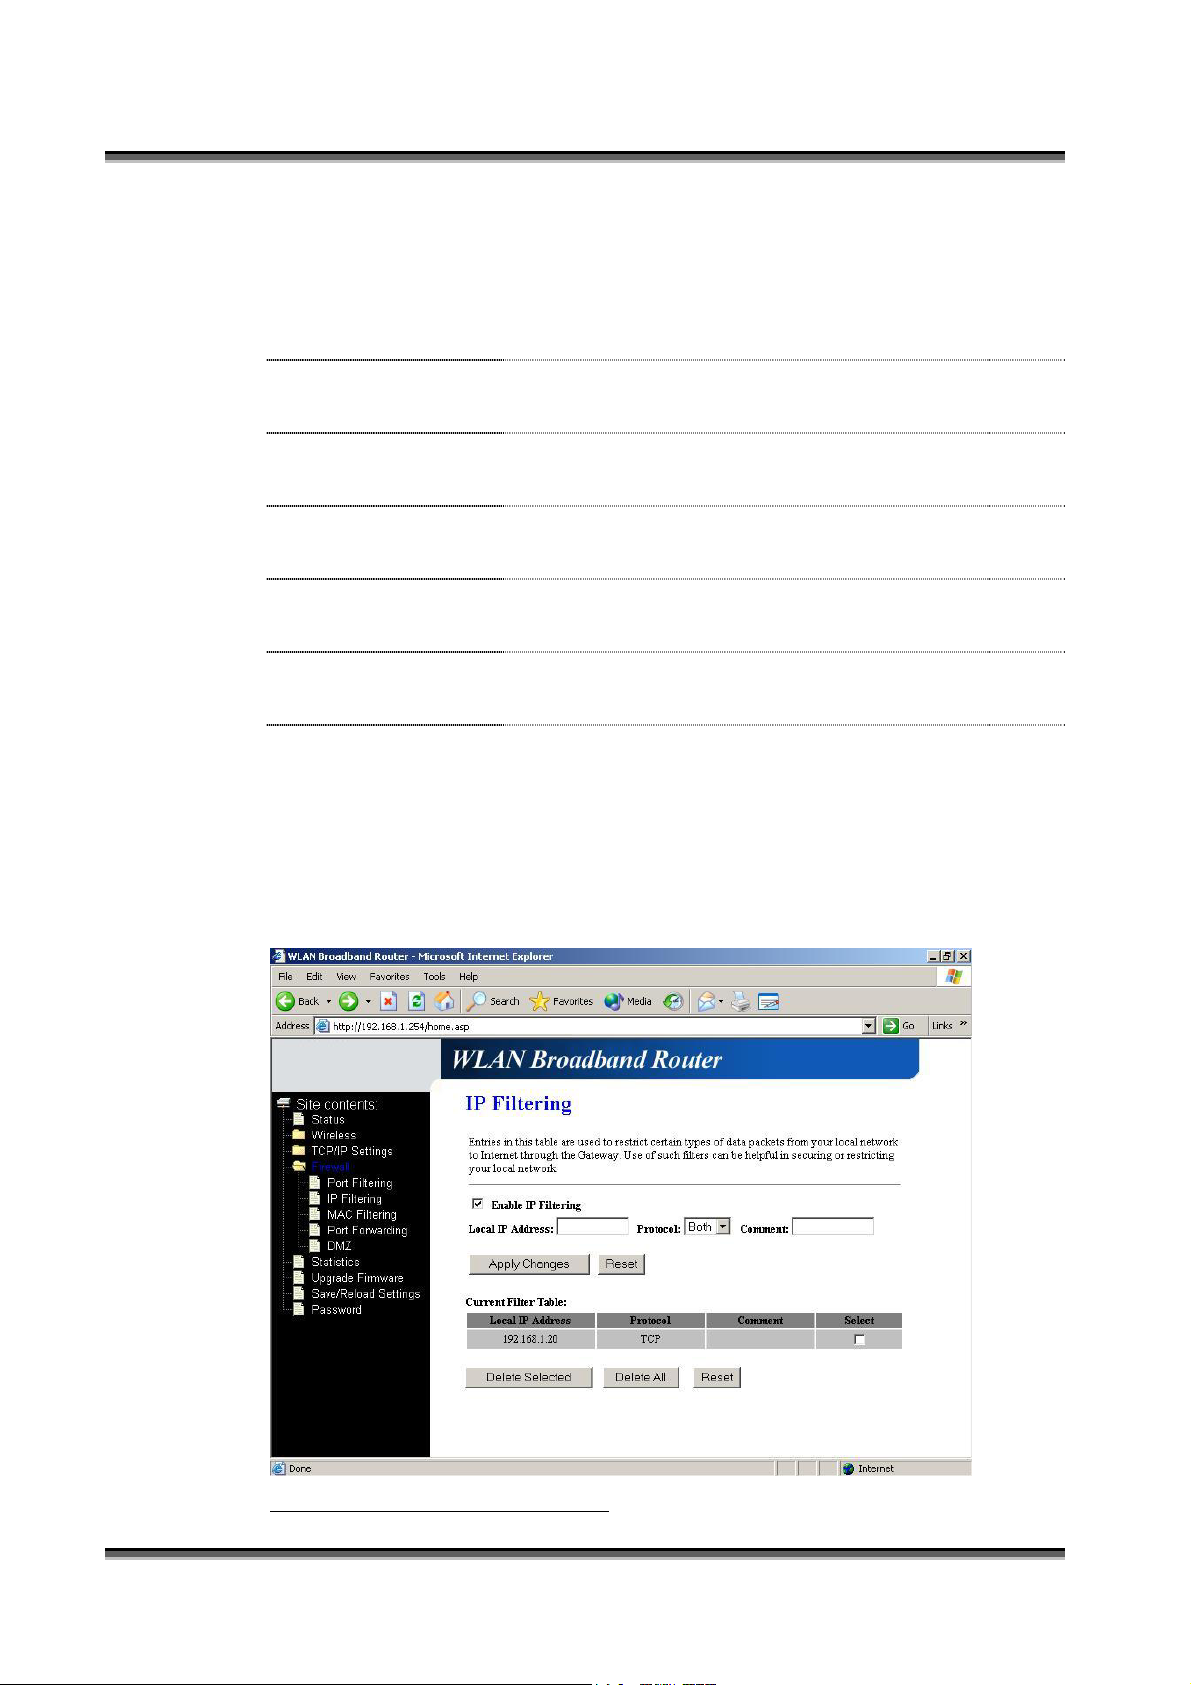
3.3.9 Firewall - IP Filtering
Entries in this table are used to restrict certain types of data packets from your
local network to Internet through the Gateway. Use of such filters can be helpful
in securing or restricting your local network.
Screenshot – Firewall - IP Filtering
21

USER’S MANUAL OF WLAN BROADBAND ROUTER Version: 2.2
Item Description
Enable IP Filtering
Click to enable the IP filtering security function.
Local IP Address
Protocol
Comments
Apply Changes
Reset
Delete Selected
Delete All
Reset
To restrict data transmission from local network on
certain IP addresses, fill in the IP address and the
protocol, also put your comments on it.
The Protocol can be TCP, UDP or Both.
Comments let you know about whys to restrict data from
the IP address.
Click the Apply Changes button to register the IP address
to IP filtering list.
Click the Reset button to abort change and recover the
previous configuration setting.
Click to delete the selected IP address that will be
removed from the IP-filtering list.
Click to delete all the registered entries from the
IP-filtering list.
Click the Reset button to abort change and recover the
previous configuration setting.
3.3.10 Firewall - MAC Filtering
Entries in this table are used to restrict certain types of data packets from your
local network to Internet through the Gateway. Use of such filters can be helpful
in securing or restricting your local network.
22

USER’S MANUAL OF WLAN BROADBAND ROUTER Version: 2.2
Screenshot – Firewall - MAC Filtering
Item Description
Enable MAC Filtering
MAC Address
Comments
Click to enable the MAC filtering security function.
To restrict data transmission from local network on
certain MAC addresses, fill in the MAC address and your
comments on it.
Comments let you know about whys to restrict data from
the MAC address.
Apply Changes
Click the Apply Changes button to register the MAC
address to MAC filtering list.
Reset
Click the Reset button to abort change and recover the
previous configuration setting.
Delete Selected
Click to delete the selected MAC address that will be
removed from the MAC-filtering list.
Delete All
Click to delete all the registered entries from the
MAC-filtering list.
Reset
Click the Reset button to abort change and recover the
previous configuration setting.
3.3.11 Firewall - Port Forwarding
Entries in this table allow you to automatically redirect common network services
23

USER’S MANUAL OF WLAN BROADBAND ROUTER Version: 2.2
to a specific machine behind the NAT firewall. These settings are only necessary
if you wish to host some sort of server like a web server or mail server on the
private local network behind your Gateway's NAT firewall.
Screenshot – Firewall - Port Forwarding
Item Description
Enable Port
Click to enable the Port Forwarding security function.
Forwarding
IP Address
Protocol
Port Range
Comment
To forward data packets coming from WAN to a specific
IP address that hosted in local network behind the NAT
firewall, fill in the IP address, protocol, port range and
your comments.
The Protocol can be TCP, UDP or Both.
The Port Range for data transmission.
Comments let you know about whys to allow data
packets forward to the IP address and port number.
Apply Changes
Click the Apply Changes button to register the IP address
and port number to Port forwarding list.
Reset
Click the Reset button to abort change and recover the
previous configuration setting.
24

USER’S MANUAL OF WLAN BROADBAND ROUTER Version: 2.2
Delete Selected
Delete All
Reset
3.3.12 Firewall - DMZ
A Demilitarized Zone is used to provide Internet services without sacrificing
unauthorized access to its local private network. Typically, the DMZ host contains
devices accessible to Internet traffic, such as Web (HTTP ) servers, FTP servers,
SMTP (e-mail) servers and DNS servers.
Click to delete the selected IP address and port number
that will be removed from the port-forwarding list.
Click to delete all the registered entries from the
port-forwarding list.
Click the Reset button to abort change and recover the
previous configuration setting.
Screenshot – Firewall - DMZ
Item Description
Enable DMZ
DMZ Host IP Address
Click to enable the DMZ function.
To support DMZ in your firewall design, fill in the IP
address of DMZ host that can be access from the WAN
interface.
Apply Changes
25
Click the Apply Changes button to register the IP address
USER’S MANUAL OF WLAN BROADBAND ROUTER Version: 2.2
of DMZ host.
Reset
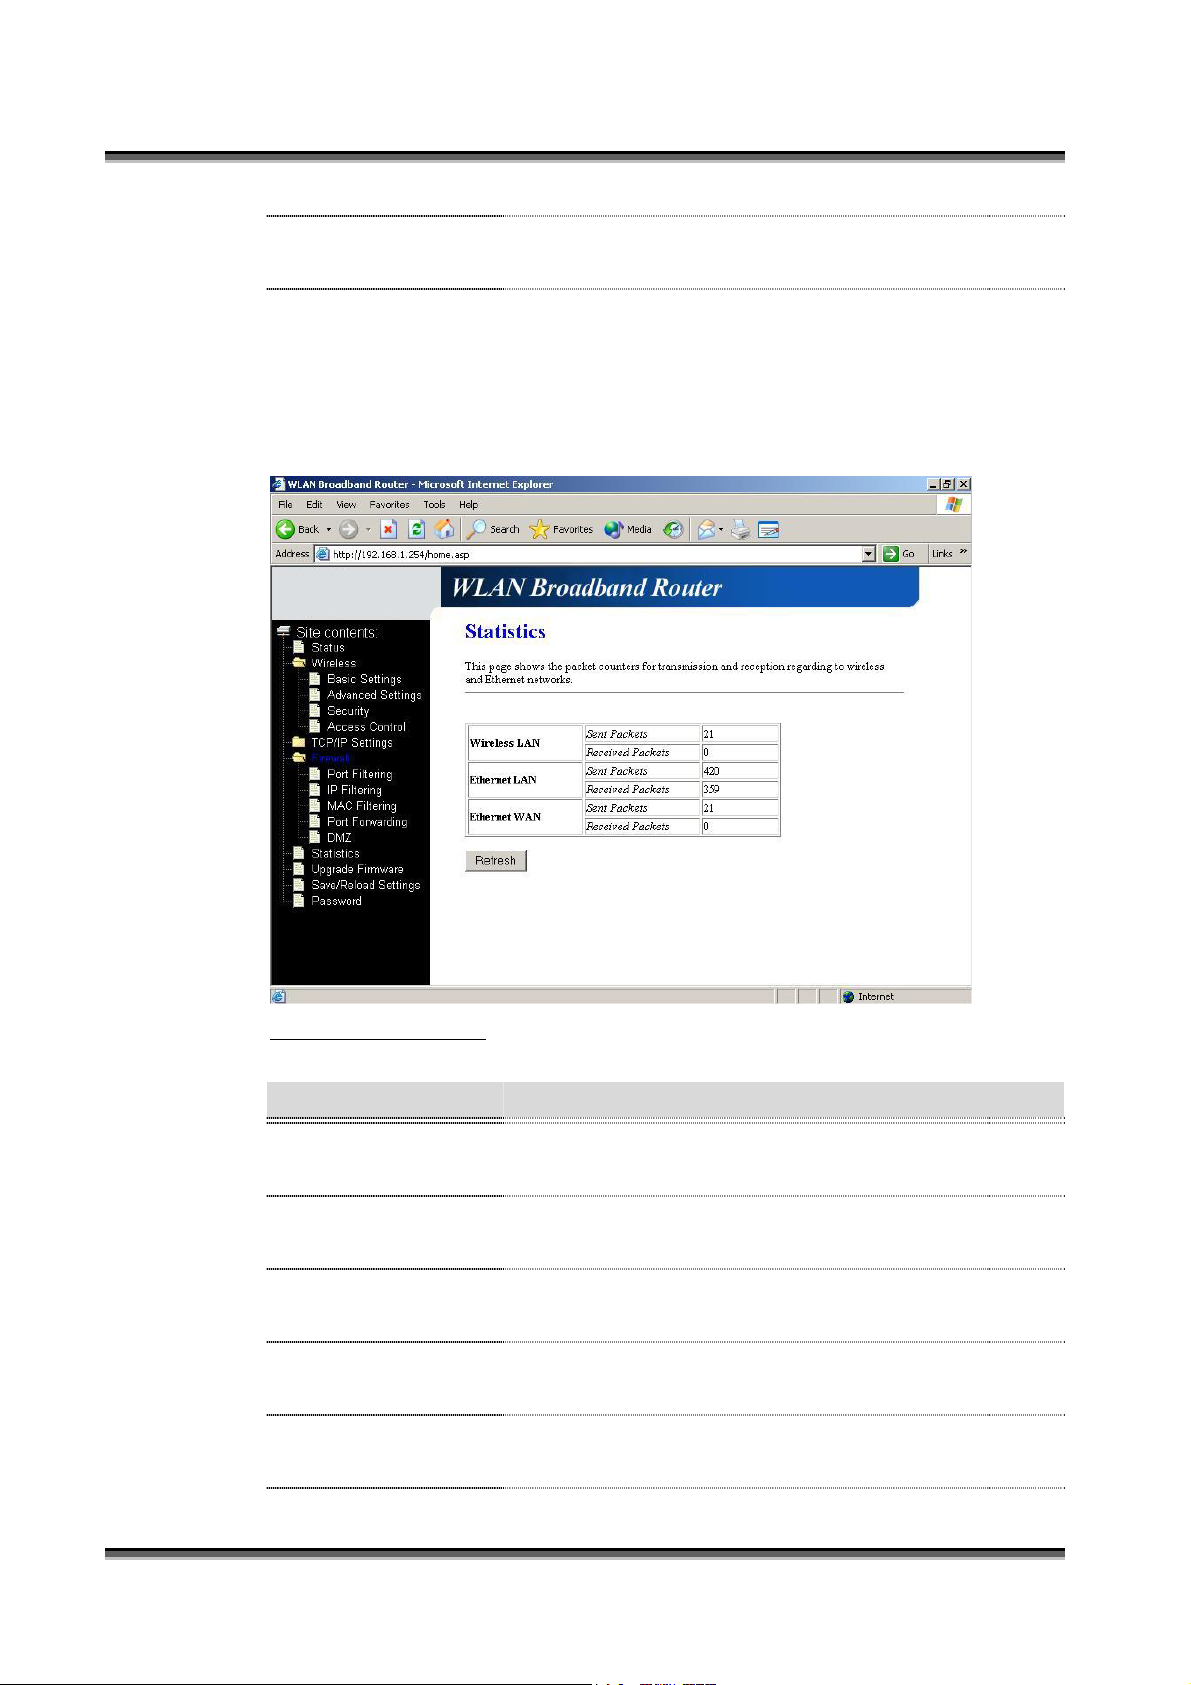
3.3.13 Statistics
This page shows the packet counters for transmission and reception regarding to
wireless, Ethernet LAN and Ethernet WAN networks.
Click the Reset button to abort change and recover the
previous configuration setting.
Screenshot – Statistics
Item Description
Wireless LAN
Sent Packets
Wireless LAN
Received Packets
Ethernet LAN
Sent Packets
Ethernet LAN
Received Packets
Ethernet WAN
Sent Packets
26
It shows the statistic count of sent packets on the wireless
LAN interface.
It shows the statistic count of received packets on the
wireless LAN interface.
It shows the statistic count of sent packets on the
Ethernet LAN interface.
It shows the statistic count of received packets on the
Ethernet LAN interface.
It shows the statistic count of sent packets on the
Ethernet WAN interface.

USER’S MANUAL OF WLAN BROADBAND ROUTER Version: 2.2
Ethernet WAN
Received Packets
Refresh
3.3.14 Upgrade Firmware
This page allows you upgrade the Access Point firmware to new version. Please
note, do not power off the device during the upload because it may crash the
system.
It shows the statistic count of received packets on the
Ethernet WAN interface.
Click the refresh the statistic counters on the screen.
Screenshot – Upgrade Firmware
Item Description
Select File
Click the Browse button to select the new version of web
firmware image file.
Upload
Click the Upload button to update the selected web
firmware image to the WLAN Broadband Router.
Reset
Click the Reset button to abort change and recover the
previous configuration setting.
3.3.15 Save/ Reload Settings
This page allows you save current settings to a file or reload the settings from the
file that was saved previously. Besides, you could reset the current configuration
27

USER’S MANUAL OF WLAN BROADBAND ROUTER Version: 2.2
to factory default.
Screenshot – Save/Reload Settings
Item Description
Save Settings to File
Load Settings from
File
Reset Settings to
Default
3.3.16 Password Setup
This page is used to set the account to access the web server of Access Point.
Empty user name and password will disable the protection.
Click the Save button to download the configuration
parameters to your personal computer.
Click the Browse button to select the configuration files
then click the Upload button to update the selected
configuration to the WLAN Broadband Router.
Click the Reset button to reset the configuration
parameter to factory defaults.
28

USER’S MANUAL OF WLAN BROADBAND ROUTER Version: 2.2
Screenshot – Password Setup
Item Description
User Name
New Password
Confirmed Password
Fill in the user name for web management login control.
Fill in the password for web management login control.
Because the password input is invisible, so please fill in
the password again for confirmation purpose.
Apply Changes
Clear the User Name and Password fields to empty,
means to apply no web management login control.
Click the Apply Changes button to complete the new
configuration setting.
Reset
Click the Reset button to abort change and recover the
previous configuration setting.
29
 Loading...