

Page 1

Wireless Headset
( Bluetooth )
BT-362
USER’S MANUAL
With additional Operation Instruction
for Skype using BTW software
VERSION 1.2
Page 2

1. INTRODUCTION
Thank you for your purchasing of our Wireless Headset
device. Bluetooth is a technology, which is very popular in
short range wireless communication. It allows wireless
connections between Bluetooth devices such as cellular phones,
personal digital assistants (PDA), desktop and notebook
computers, input-output devices (mouse, keyboards,
printers)...etc.
There are two Bluetooth classes, which define the range of
communication. Class I covers 100
covers 10 meters range. In this stereo headset application, it is
a class II device which ranges up to 10 meters.
1.1 Wireless Headset (Bluetooth)
This Wireless Headset offers the latest innovation in
Bluetooth technology. It features crystal clear stereo sound,
which is a remarkable break through that others do not have.
With this Wireless Headset, you can connect it wirelessly with
other Bluetooth devices such as mobile phone, desktop or
notebook computer, PDA (with audio gateway profile supported)
within a range of 10 meters.
meters range,
while Class II
Page 3
1.2 Package Content
* Wireless Headset (Bluetooth).
* Detachable stereo earpiece with microphone.
* USB cable.
* User’s manual.
* 5VDC power adapter (Optional)
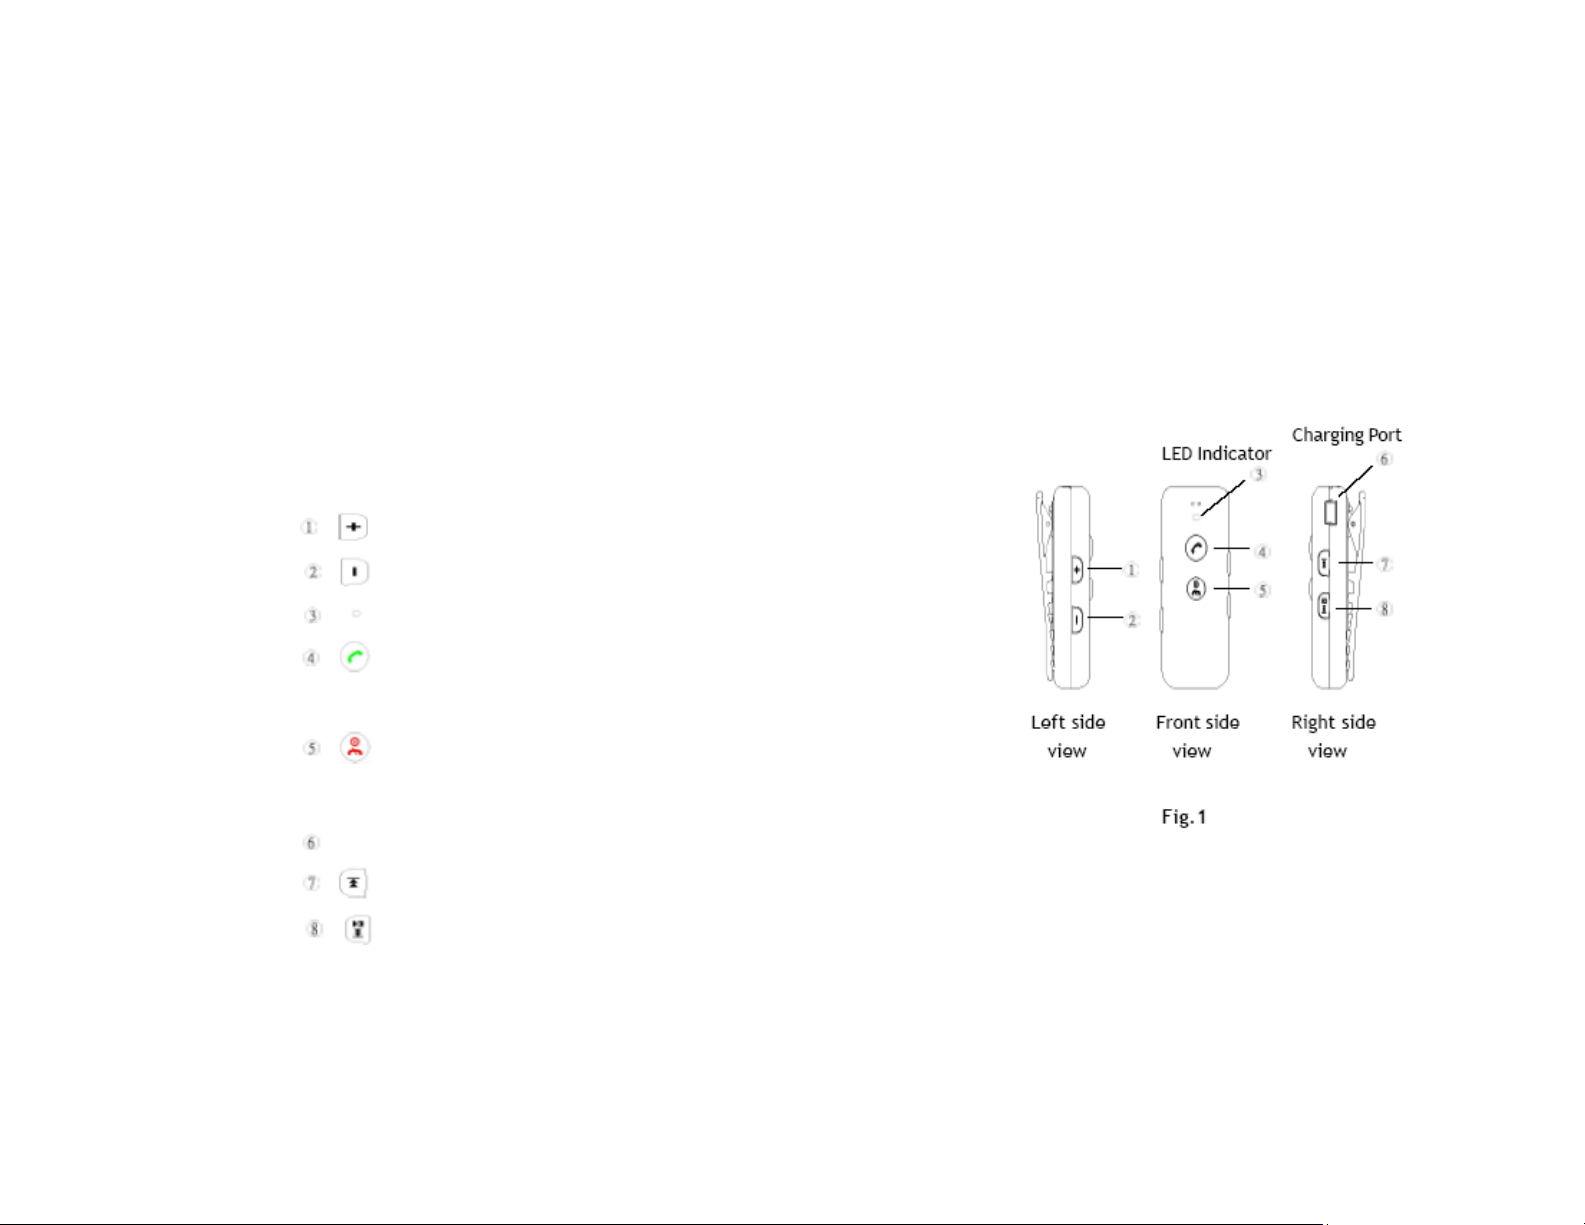
2. HEADSET FEATURES
Buttons: Increase Volume (V+).
Buttons: Decrease Volume (V-).
LED Indicator
Play/Talk Button: Answer all, Play
music, Pause.
On/Off Button: Power on/off, End
Call, Stop Music, Pairing.
Charging Port
Reverse Button: Reverse, Previous Song Title.
Forward Button: Forward, Next Song Title.
3. LED Indication and Definition
Page 4

1. Mobile Mode - Blue LED flash regularly.
2. PC Mode - Red LED flash regularly.
3. Stand-By Mode -Red LED flash in slow pace.
4. Pairing Mode - Blue and Red LED flash interchangeably
5. Charge Mode - Red LED stays solid without blinking.
4. CHARGE BATTERY AND RESET THE HEADSET
4.1 Charge Battery
The headset comes with a build-in high capacity battery,
please let the battery be fully charged before first time use.
* Connect the USB charging cable into the headset charging port
(Fig.1).
You can charge battery when the unit is off or during use.
* The unit will automatically switch to “ON” status and stay in
Stand-By mode when charging the battery regardless of the
On/Off status, the red LED stay on continuously without
blinking.
Once the battery has been fully charged, the red LED light
will start to blink.
Page 5

5. Turn On / Off the Headset
5.1 To turn the Headset on
On/Off Button: Press and hold it about 1 seconds then release.
Both blue and red LED light will flash once. The
headset is now turned on and in stand-by mode.
The red LED light will blink continuously in
stand-by mode.
5.2 To turn the Headset off
On/Off Button: press and hold the button for 5 seconds, the
headset is turned off after the red LED light
quickly flash 3 times.
6 Pair the Headset with Mobile Phone
Pairing is a Bluetooth function that enables Bluetooth devices
to remain constant link to designate device. You need to pair
the headset with the target device (PC or mobile phone) in
order to get connection. (Given that the target device(s) is
ready with Bluetooth connectivity.)
Page 6

6.1 Pairing Steps:
1. Turn off the unit.
2. Press and hold
3. Both blue and red LED light will flash during pairing stage.
4. Make the connection by following the instructions of mobile
devices.
5. Enter the default code “0000”, when the system requests for
password.
6. When pair up with mobile devices, the blue LED light will
also blink within regular interval in addition to the red
blinking LED signal. (No special indication from LED when
pair up with PC devices, only the red blink initiated from the
stand-by mode will blink in regular interval.)
about 3 seconds to enter pairing mode.
Page 7

7 PAIR WITH PC/NOTEBOOK
7.1 Pair with your PC/Notebook
Pairing process is required before making connection with
either PC or Notebook device.
(1) Make sure your PC or Notebook has been installed Bluetooth
driver first, double click on the Bluetooth icon at the
desktop or the right hand of task bar to enter the setup
window “My Bluetooth Center”.
(2) Turn on the headset, press and hold on the On/Off Button
briefly for about 3 seconds.
(3) From “My Bluetooth Center” select “Bluetooth” tab and
select “Search for device”.
(4) Once the icon of the Headset shows up, double click on the
icon to activate the pairing mode.
(5) A new headset icon will appear, double click on the icon
again and the system will pop up a message window asking
for security password.
(6) The Bluetooth icon at the lower right hand corner of the
screen will now turn from white to green. Click on it to open
up the password window.
Page 8

(7) Enter the default password “ 0000 ”, and the pairing
process is now complete.
7.2 Play music with PC and Notebook
Once the pairing process is completed with the PC or
Notebook device, you may listen to the audio through audio
adapter or PC software such as Window Media player or Real
Player.
7.3 Button Functionality and LED Indication
Play music, Pause
Stop music / Power off
Reverse, Previous Song Title.
Forward, Next Song Title.
Increase Volume (V+).
Decrease Volume (V-).
Note:
Once you have successfully paired the headset with the target
device(s), you may press the Play button twice to activate
automatically. However, you do have to complete these pairing
sequences manually for the first time.
Page 9

8 ANSWER/END CALLS
Once the headset is successfully paired with your mobile
phone, you can use the headset to receive calls. Turn the
headset on first. it will automatically link with your mobile
phone if they were paired before.
8.1 Answer and End a phone call
When there is an incoming call, if the headset is turned off,
you need to press On/Off button for 1 second to turn on the
headset first. When the headset is turned on, the headset will
ring.
1. Press the Play/Talk Button to answer a phone call.
2. Adjust the headset volume by pressing the Increase
Button to increase the volume or pressing the Decrease
Button to decrease the volume.
3. Pressing On/Off button to end a phone call.
9 OPERATE MUTIPLE DEVICES SIMULTANEOUSLY
9.1 Operate with mobile device and PC/Notebook
Page 10

simultaneously
It is possible to pair the headset with a mobile device and
PC/Notebook simultaneously. Simply follow the instruction
from this section and you can enjoy this convenient feature in
no time.
(1) Pair the mobile device
Refer to the steps from “Section 5” to complete the pairing
for the mobile device.
(2) Pair with PC, Notebook, or other devices
Refer to the steps from “Section 6” to complete the
pairing.
9.2 Play music while keeping mobile device active.
While you are listening to the music the headset will indicate
an incoming call by a ring sound and pause the music at the
same time.
To receive the call you may:
Press
Press
mode once the call is ended.
to answer the call
to end the call, the music will resume normal playing
Page 11

Note:
Generally, the music may resume 10 seconds after the call has
been terminated. However, depending on the software of the
target device, the delaying time may vary and may not resume
back to the music.
10. CONNECT WITH SKYPE
This headset offers a convenient solution to receive and dial
out calls from Skype remotely.
The following instructions will take you through the steps to
connect with Skype.
1. Section 9.1, Step 1-5, these steps will show you how to set
system’s audio gateway to start automatically, which is the
prerequsite for this headset to operate properly.
2. Section 9.1, Step 6-10, Pairing between Mini Stereo Headset
and your PC.
* Need to repeat this pairing procedure again in the
future if you can’t link with PC then.
3. Section 9.1, Step 11-14, Enable BTW software to identify and
communicate with Skype.
* These setup procedures are required only during the
Page 12

set up for the first time.
4. Section 9.2, Step 1-3, Skype setup: These setup procedures
grant Skype program the proper configuration to utilize BTW
software to send audio signal to Mini Stereo Headset instead
of PC audio device (default setting).
* Need to reestablish these procedures again after
reset Skype to work under PC’s default setting.
Note:
Under Skype you may also listen to music on the side, but it is
set under “Mono Tone” and without remote control function
because the controlling priority has been preserved for Skype’s
functionality.
10.1 Setup Bluetooth environment to work with Skype (For
BTW Software)
1. Double click on the Bluetooth icon to activate My Bluetooth
Places window.
Page 13

2. Select “View My Bluetooth services”.
3. Select “My Audio Gateway”.
Page 14

4. Select “My Audio Gateway”, then select Properties.
5. Make sure to check mark the Startup Automatically option,
then press Apply to confirm.
Page 15

6.Turn on or reactivate the headset by pressing
Be sure to press the key continuously until single red LED
light is blinking regularly with slow beat, which indicates the
headset is now under pairing mode.
7.Select “Search for devices in range” and allow the computer
system to detect your headset.
A new device name with a head shape icon will appear on My
Bluetooth Place as “Mini Stereo Headset”.
8.Select and Right Click on “Mini Stereo Headset” , then
select “Pair Device”.
icon.
Page 16

9.When “Bluetooth PIN Code Request” window comes up,
enter the default password “ 0000 ” and press OK.
10.Once the password has been entered, a check mark will
appear next to the head shap icon, which is the indication
that the “Pairing process” has been completed.
Note: When “Paired” appears under the Additional
Information column, it is an indication that your headset has
been successfully paired with PC .
Page 17

11.Double click on “Mini Stereo Headset” and switch into a
window that has “Headset on Mini Stereo Headset” and
“Keyboard on Mini Stereo Headset” icons.
12. Right click on “Keyboard on Mini Stereo Headset” first and
select “Connect Device” to activate.
TIP:
You may see the status of “Keyboard on Mini
Stereo Headset” just like figure shown in #12
or like the figure shown on the right.
In case you see the status shown as the figure
on the right, just right click on the icon of “Keyboard on Mini
Page 18

Stereo Headset” and select “Disable”. Then, repeat step #12
to reestablish connection.
13.Then, press continuously on the
activate the “Headset on Mini Stereo Headset” icon.
Now, the headset is ready in dialing/receiving position with
Skype.
Now, the headset is ready in dialing/receiving position with
Skype.
10.2 Configure Skype’s settings
Few simple modifications need to be done before you can
connect this headset with Skype properly. Please refer to the
key of the headset to
steps below to make the changes.
1.Activate Skype from your computer. (The following steps are
based on Skype Version 1.2.0.48)
2. Select “Tools” tab and select “Options”
Page 19

3.Under Hotkeys tab, select and enable the “Enable global
hotkeys” option by placing the check mark. Then, enable
both the “Answer call” and “Reject/Hang up call” features
by click on the Enable Hotkey tab.
4.Make sure the Hotkey value for “Answer call” is set as
“Alt+PgUp”, and “Reject/Hang up call” is set as “Alt+PgDn”
in order to work properly.( “Alt+PgUp” and “Alt+PgDn” is
the default value of Skype.)
Page 20

5.Under Sound Devices tab, change the default value of Audio
In and Audio Out to Bluetooth Audio. (This step only require
for Skype version prior version 1.3.0.51. After version
1.3.0.51, the default value under Sound Devices are set as
“Windows default device”. )
Page 21

6. Press Save to complete the setup.
10.3 Basic Operation within Skype Mode
Now, you are ready to use your Bluetooth
headset to work with Skype. As a
prerequisite, Skype’s interface MUST
remain as the ACTIVE WINDOW when
using your headset to control remotely.
1.Press on Play key
receive incoming calls.
2.Press on Forward key
or press on Ctrl +Tab keys to switch in
between tabs under Skype
environment.
3. Switch between
rotate between contact names under
the Contact tab, and press on Play key
The cursor must not stay in the INPUT Box area in order to
let your headset control Skype remotely.
once to dial out or
for 3 seconds
and keys to
to initiate the call.
INPUT Box
Page 22

4. Press on Play key once to dial out after you entered the
numbers at the INPUT Box or by the number pad.
Page 23

g
pp
11 F.A.Q
Q1. Does the headset work with all types of mobile phones ?
Ans : No. It works only with Bluetooth enabled mobile phones.
Q2. Why the headset does not work with my mobile phone after
the headset is fully charged and turned on ?
Ans : You have to activate the Bluetooth function of your
mobile phone then pair it with the headset.
Q3. What is the working distance between this headset and a
Bluetooth mobile phone ?
Ans : The basic operating distance of this Bluetooth device is
about 10 meters. However, it is also depending on the
environment if there is any radio interference or obstacle
around. The quality of a Bluetooth mobile phone also effects
the clearity of the connection . Some mobile phones are
providing less operating distance.
Q4. When my mobile phone was searching for the headset, why
did several Bluetooth devices appear on my mobile phone?
Ans : Most Bluetooth enabled mobil phones with Bluetooth
function activated can search for more than one Bluetooth
device in its nei
hborhood. The headset will a
ear as "BT
Page 24

headset" or "Unknown Device" on your mobile phone after it is
found by your mobile phone.
Q5. Why my mobile phone can not find the headset for pairing ?
Ans : If the headset is not in pairing mode, then your mobile
phone will not find it. Please set the headset into pairing
mode, then use your mobile phone to look for it and pair with
it.
Q6. What should I do when I can not hear very well with the
headset ?
Ans : Adjust the sound volume on your mobile phone, or press
the V+ button of the headset to increase volume, or check if
your mobile phone is in a good signal area.
Q7. Do I need to pair the headset with my mobile phone every
time I use it ?
Ans : No. Once the Pairing is set up between two devices, they
will remain paired even when one or both devices are turned
off.
Q8. What is Pairing ?
Ans : Pairing is a Bluetooth function that enables Bluetooth
devices to remain constant link to designate communication
unit with added security.
Page 25

Q9. What to do when my headset cannot re-establish
connection after being turned off?
Ans : Simply redo the pairing procedures to re-establish proper
connection.
Q10. What to do when the controlling interface is not
responding while attached device such as “Dongle” is in use?
Ans : Unplug the attached device(s), and plug in again. If
these actions do not restore the system back to normal status,
try to reboot the system.
Page 26

12 TROUBLESHOOTING
1.No sound contact between Headset and other devices.
* Make sure that the two devices have been paired.
* Make sure that the Headset is turned on.
* Make sure that the two devices are within a working range.
* Make sure that your mobile phone is within signal strength.
* Some Bluetooth mobile phones can support only one
Bluetooth Headset.
* Disconnection may happen when there is more than one
Headset paired with our mobile phone.
2.No indication of charging is shown.
For the Headset battery that is empty, or has not been used
for a long time, it may take a couple of minutes for the
Headset indicator to show charging status with a steady red
light.
3.The unit is not responding.
Simply plug the unit onto the Mini USB connector of the
battery charger and unplug to reset the unit.
Page 27

13.Product Specification
b
Product Name Wireless Headset (Bluetooth)
Model Name BT-362
Standard Bluetooth v1.2
Bluetooth Profiles A/V profile (AADP), AVRCP, Headset and
Hands-Free profiles
RF Output Power Class 2
Antenna SMD Type Antenna
Sensitivity <-80dBm at < 0.1% BER
Power 4.2 Vdc Lithium Polymer Battery
Multiple connection One A/V link and one HF/HS connection
Audio I/O Detachable stereo earpiece with microphone
Button One button for Power On/Off, Two buttons for
Volume control up/down, one
two button for Fwd/Re-wind..
LED indicator 2 LED's. one LED for Power, another LED for
Mode/Link
Play Time Up to 5 hours
Size 65 (L) x 23(W) x 30(H) mm
utton for Talk,
Page 28

INFORMATION TO USER
Federal Communication Commission Interference Statement
This equipment has been tested and found to comply with the limits
for a class B digital device, pursuant to part 15 of the FCC Rules.
These limits are designed to provide reasonable protection against
harmful interference in a residential installation.
This equipment generates, uses and can radiate radio frequency energy
and, if not installed and used in accordance with the instructions, may
cause harmful interference to radio communications. However, there
is no guarantee that interference will not occur in a particular
installation. If this equipment does cause harmful interference to radio
or television reception, which can be determined by turning the
equipment off and on, the user is encouraged to try to correct the
interference by one or more of the following measures:
---Reorient or relocate the receiving antenna.
---Increase the separation between the equipment and receiver.
---Connect the equipment into an outlet on a circuit different from that
to which the receiver is connected.
---Consult the dealer or an experienced radio/TV technician for help.
Page 29

Installation and use of this must be in strict accordance with the
instructions included in the user documentation provided with the
product. Any changes or modifications (including the antennas) made
to this device that are not expressly approved by the manufacturer
may void the user’s authority to operate the equipment. The
manufacturer is not responsible for any radio or television interference
caused by unauthorized modification of this device, or the substitution
of the connecting cables and equipment other than manufacturer
specified. It is the responsibility of the user to correct any interference
caused by such unauthorized modification, substitution or attachment.
Manufacturer and its authorized resellers or distributors will assume
no liability for any damage or violation of government regulations
arising from failing to comply with these guidelines.
FCC RF Radiation Exposure Statement
This equipment complies with FCC RF radiation exposure limits set
forth for an uncontrolled environment. End users must follow the
specific operating instructions for satisfying RF exposure compliance.
This device and its antenna must not be co-located or operating in
conjunction with any other antenna or transmitter.
Page 30

Your device contains a low power transmitter. When device is
transmitted it sends out Radio Frequency (RF) signal.
Use only with supplied antenna. Unauthorized antenna, modification,
or attachments could damage the transmitter and may violate FCC
regulations.
The users manual or instruction manual for an intentional or
unintentional radiator shall caution the user that changes or
modifications not expressly approved by the party responsible for
compliance could void the user’s authority to operate the equipment.
特別警示:
交通部低功率電波輻射性電機管理辦法第
條及第
12
條規定:
14
經型式認證合格之低功率射頻電機,非經許可,公司、商號或使
用者均不得擅自變更頻率、加大功率或變更原設計之特性及功能。
低功率射頻電機之使用不得影響飛航安全及干擾合法通信;經發
現有干擾現象時,應立即停用,並改善至無干擾時方得繼續使用。
前項合法通信,指依電信法規定作業之無線電通信。低功率射頻
電機須忍受合法通信或工業、科學及醫療用電波輻射性電機設備
之干擾。
Page 31

REGULATORY INFORMATION
Wireless Headset (Bluetooth) must be installed and used in strict
accordance with the manufacturer’s instructions. This device complies
with the following radio frequency and safety standards.
This device complies with Part 15 of the FCC Rules.
Operation is subject to the following two conditions:
(1) This device may not cause harmful interference.
(2) This device must accept any interference received, including
interference that may cause undesired operation.
Europe- R&TTE Compliance Statement
This equipment complies with all the requirements of DIRECTIVE
1999/5/CE OF THE EUROPEAN PARLIAMENT AND THE
COUNCIL of March 9, 1999 on radio equipment and
telecommunication terminal Equipment and the mutual recognition of
their conformity (R&TTE)
Page 32

CE Declaration of Conformity
e
f
c
e
e
For the following equipment:
Wireless Headset (Bluetooth)
(Product Name)
BT-362
(Model Designation)
is herewith confirmed to comply with the requirements set out in th
Council (European parliament) Directive on the Approximation o
the Laws of the Member States relating to Electromagneti
Compatibility of Radio and Telecom device (1999/5/EC). For th
evaluation regarding this Directive, the following standards wer
applied:
EN 300 328 V1.6.1 (2004-11)
EN 301 489-1 V1.4.1 (2002-08), EN 301 489-17 V1.2.1 (2002-08)
EN 60950-1: 2001
EN 50371:2002
 Loading...