

Page 1

User Manual
™
CBTL
is an easy to use,
elegant, single serve brewing
system, based on the proprietary
Caffitaly System, that allows
you to enjoy all the pleasures of
an authentic The Coffee Bean &
®
Tea Leaf
home. One capsule is all you
need to create a single serving
to savor. One touch is all it
takes to brew fresh, fragrant
and flavorful espresso, brewed
coffee or tea. One taste is
enough to transport you to a
moment of comfort—the comfort
of one perfect cup.
café beverage at
KALDI Model S04
One Touch.
One Perfect Cup.
CBTL.com
Page 2

Table of contents
Important Safeguards ______________3
Your CBTL™ System contact ____________ 4
Kaldi overview __________________5
Safety and indicator symbols ___________6
Rinsing machine before rst use _______7
1
2
Preparing your beverage __________8
Indicator light guidelines _________ 10
3
Programming quantity of
4
beverage brewed _____________ 12
5
Programming energy saving function ___ 13
Adjusting for dierent cup sizes ______ 14
6
Daily maintenance ____________ 15
7
Descaling the machine __________ 16
8
Draining the machine ___________ 20
9
10
Troubleshooting _____________ 21
Technical data ______________ 21
11
Page 3

IMPORTANT SAFEGUARDS
When using electrical appliances, basic safety precautions should be always followed,
including the following:
1. Read all instructions
2. Do not touch hot surfaces. Use handles or knobs.
3. Do not use appliance for other than intended use. Appliance is for household use only (non commercial areas).
Appliance is intended to prepare beverages according to these instructions. Use only CBTL™/Cataly System
capsules. CBTL™ assumes no liability for damages from use that is not in accordance with the instructions.
4. The use of accessory attachments not recommended by the appliance manufacturer may result in re, electric
shock or injury to persons.
5. Do not operate any appliance with a damaged cord or plug or after the appliance malfunctions, or has been
damaged in any manner. Contact CBTL™ for examination, repair or adjustment.
6. To protect against re, electric shock and injury do not immerse cord, plugs, or appliance in water or other liquid.
7. Never touch cord with wet hands.
8. Do not overll water tank.
9. Never put the appliance or part of the appliance into dishwasher.
10. Make sure that the power supply voltage matches the rating shown on the data plate on the bottom of the
appliance.
11. Do not place on or near a hot gas or electric burner, or in a heated oven.
12. Do not use outdoors.
13. Close supervision is necessary when any appliance is used by or near children. Brewer dispenses very hot water.
Keep appliance, capsules and accessories out of reach of children.
14. Do not let cord hang over the edge of the table or counter, or touch hot surfaces.
15. Unplug from outlet when not in use and before cleaning. Never touch the cable with wet hands. Allow to cool
before putting on, adding or removing parts, and before cleaning the appliance.
16. Scalding may occur if the lever is lifted during brewing cycles.
17. To disconnect, turn power switch to “o”, then remove plug from the power outlet.
18. This appliance is equipped with a power cord having a grounding wire with a grounding plug. The appliance must
be grounded using a 3-hole properly grounded outlet. In the event of an electrical short circuit, grounding reduces
the risk of electrical shock.
19. Do not, under any circumstances, cut or remove the third (ground) prong from the power cord or use an adapter.
20. To avoid an electrical circuit overload, do not use another high-wattage appliance on the same circuit with your
CBTL™ System.
3
Page 4
IMPORTANT SAFEGUARDS
21. Do not dismantle appliance and do not put anything into openings. Never put your hand inside space for capsules.
22. Consult a qualied electrician if the grounding instructions are not completely understood, or if doubt exists as to
whether the appliance is properly grounded.
23. The CBTL System uses a short power-supply cord to prevent the cord from tangling and to reduce the risk of
tripping over a long cord.
24. If a longer cord is necessary, an approved extension cord may be used.
• The marked electrical rating of the extension cord must be equal to or greater than the rating of the appliance;
• The longer cord should be arranged so that it will not drape over the countertop or tabletop where it can be
pulled on by children or tripped over unintentionally;
• The extension cord should be a grounding type 3-wire cord.
25. WARNING TO PARENTS AND USERS:
• Keep all plastic bags away from children
• DO NOT permit children to use brewer unless there is adult supervision.
WARNING: To reduce the risk of re and electric shock, do not remove the side covers. No
user serviceable parts inside. Repair should be done by an authorized service person only.
DISPOSAL AND ENVIRONMENTAL PROTECTION
• Your appliance contains valuable materials that can be recovered or recycled. Separation of the remaining waste
materials into dierent types facilitates the recycling of valuable raw materials. Leave the appliance at the
collection point. You can obtain information on disposal from your local authorities.
• The appliance and the packaging materials are made of high quality materials that can be reused or recycled.
SAVE THESE INSTRUCTIONS.
Pass them on to any subsequent user
Your CBTL™ System contact
Country Contact Number Email
Visit CBTL.com for FAQs and instructional videos.
4
Page 5
Kaldi Overview
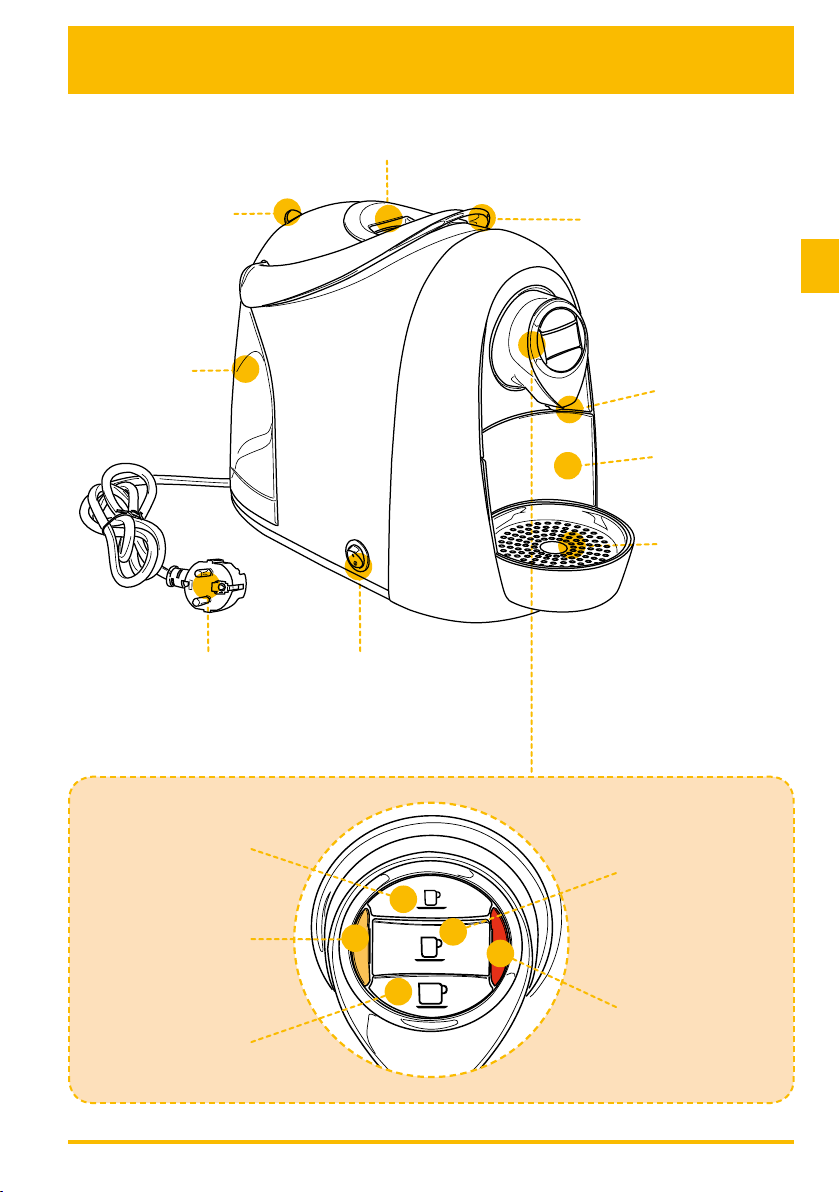
Capsule compartment access
Water tank access
Water tank
Power cord
Lever for opening capsule compartment
Beverage dispensing spout
Used capsule container
for 9-11 capsules
Drip tray
Power on/o switch
Espresso button
Descale indicator light
Brewed coee/tea button
Long espresso button
Alarm indicator light
5
Page 6
Safety and Indicator
Symbols
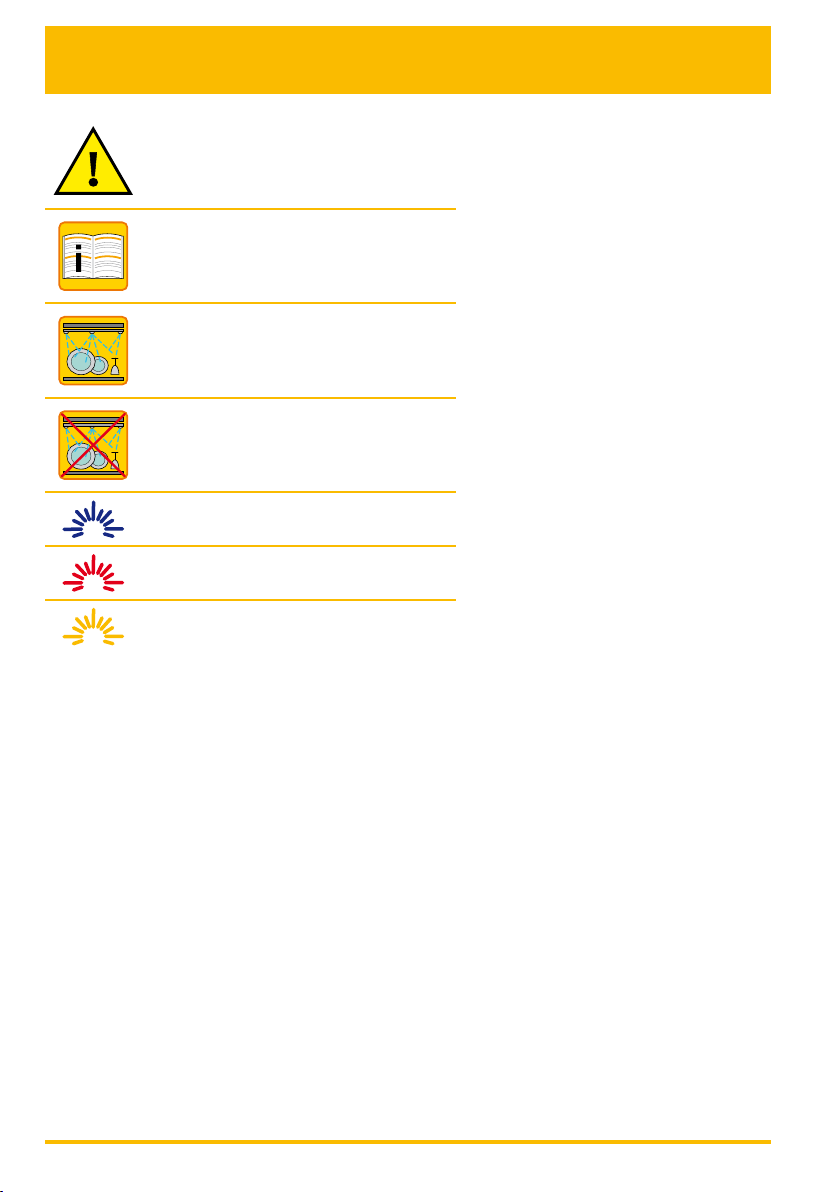
CAUTION
This is a safety warning symbol used to call your
attention to possible risks of personal injury.
NOTE
This symbol is used to highlight some actions that will
optimize use of the appliance.
Dishwasher safe.
Not dishwasher safe.
This symbol is used to indicate a WHITE light.
This symbol is used to indicate a RED light.
This symbol is used to indicate an ORANGE light.
6
Page 7
1
Rinsing machine before rst use
1
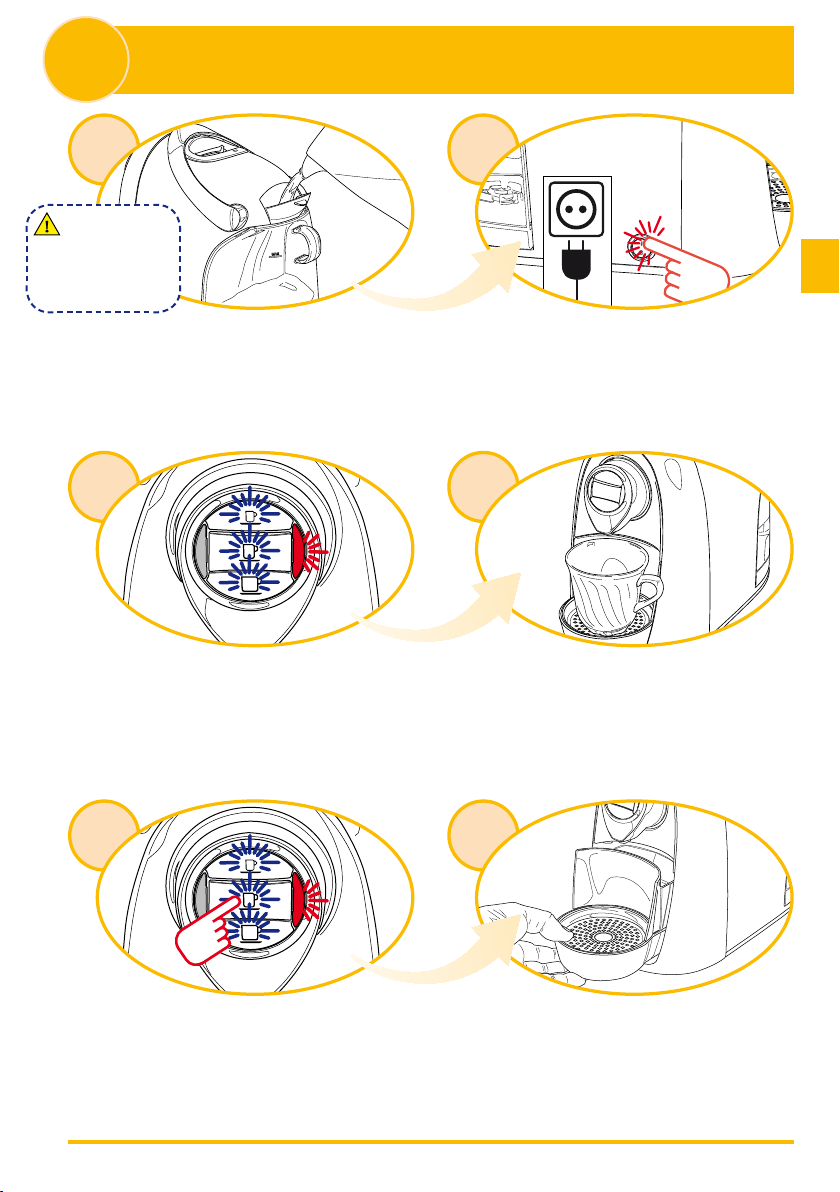
Warning! Use only ltered/
bottled water in this appliance! Do not put any other liquid or
food in the water tank, except as
instructed in the descaling section of
this instruction book.
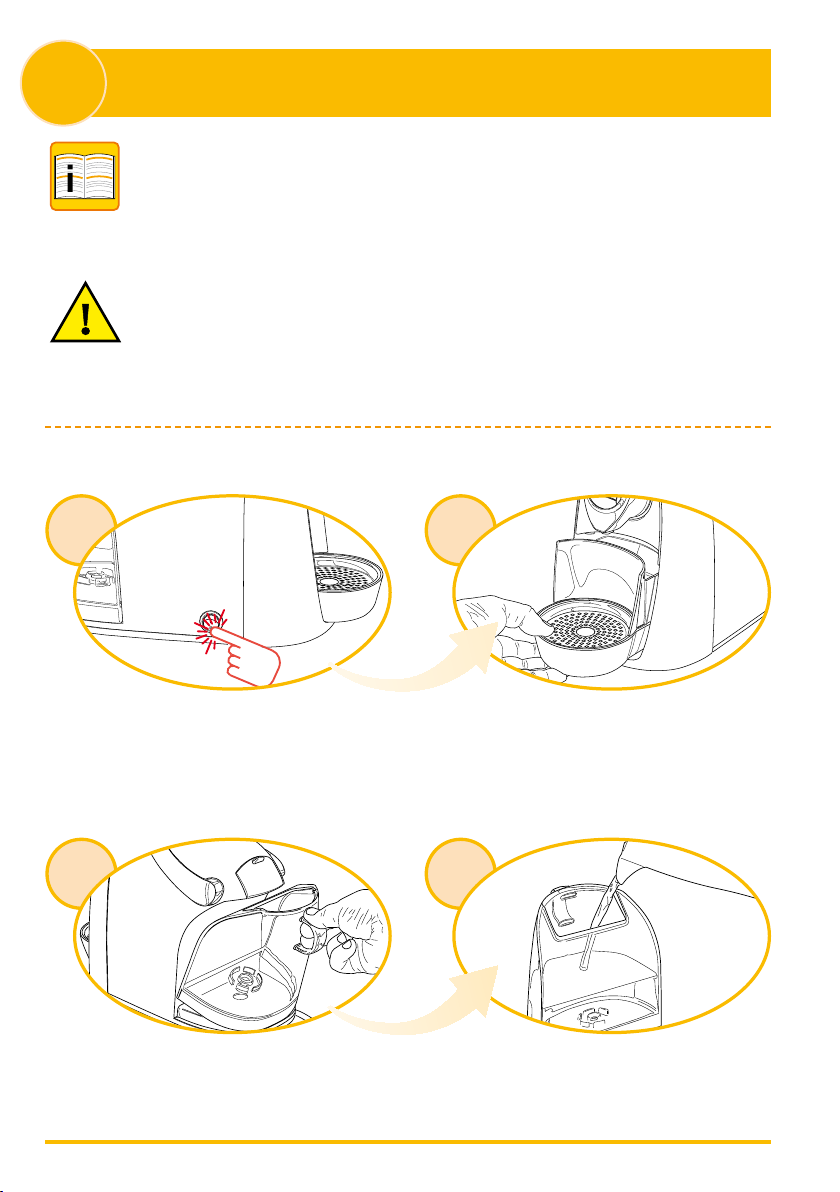
Fill the water tank with ltered/bottled water.
3
The beverage buttons and alarm indicator light will blink
simultaneously.
2
Plug into outlet then switch on.
4
Place an ample container under the beverage dispensing spout.
5
Press the long espresso button. Wait for the machine to complete
a rinse cycle. During this cycle, the alarm indicator light will
blink. Repeat this step until water is dispensed from the beverage
dispensing spout and the alarm indicator light stops blinking. The 3
beverage buttons will blink to conrm end of a rinse cycle.
6
If required, empty water from used capsule container. Your machine
is now ready for use.
7
Page 8
2
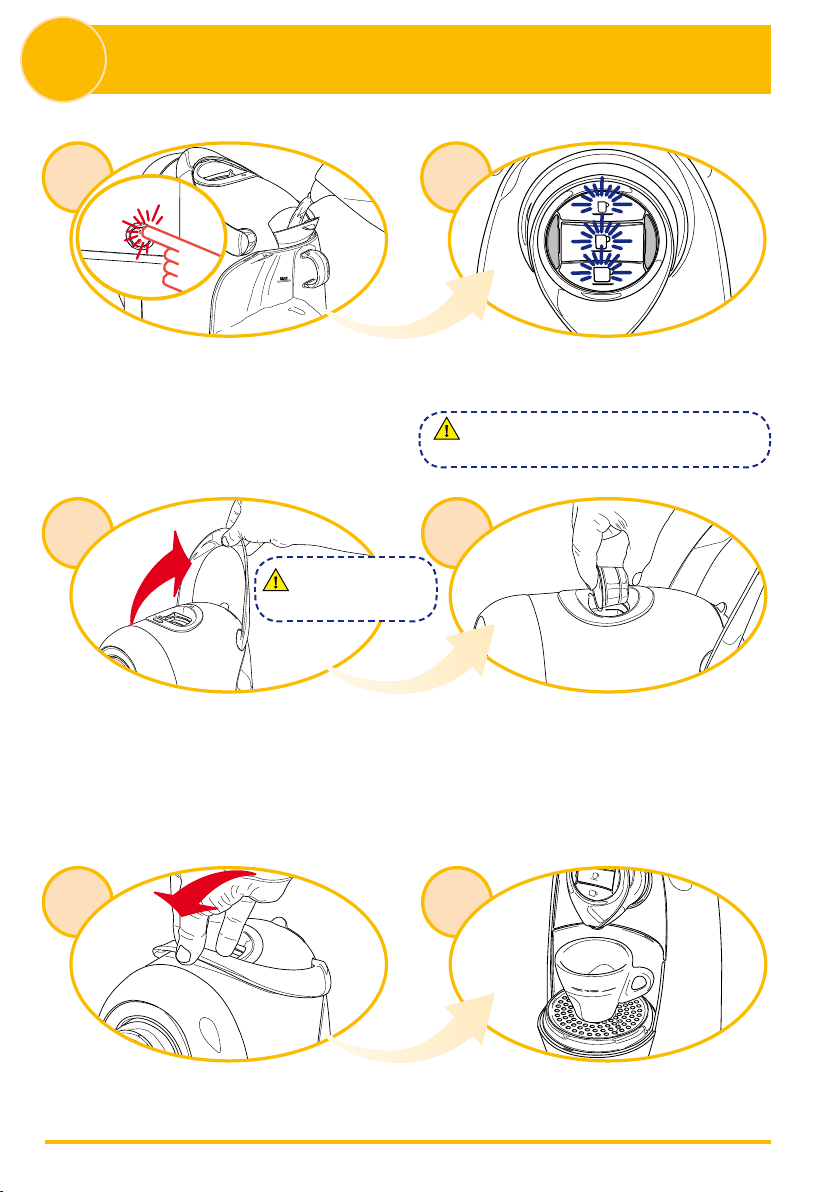
Preparing your beverage
1
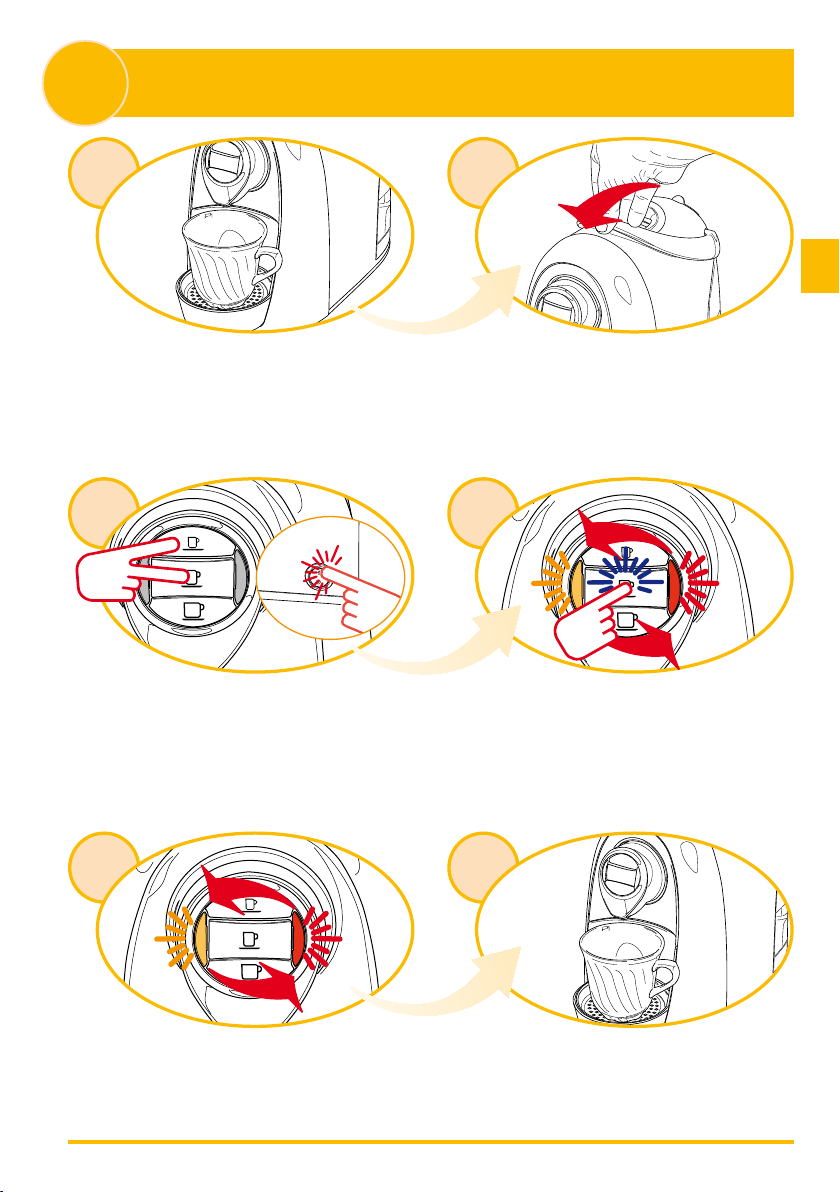
Fill the water tank with ltered/bottled water. Turn the appliance on. The beverage buttons will blink simultaneously to indicate that the
2
machine is warming up. When the buttons remain steadily lit, the
machine is ready for use.
A frozen or extremely cold CBTL™ machine will not operate eciently when
exposed to temperature below freezing. Allow at least 2 hours to reach room
temperature before brewing.
3 4
Warning! Before you start brewing,
make sure the capsule container is
not full.
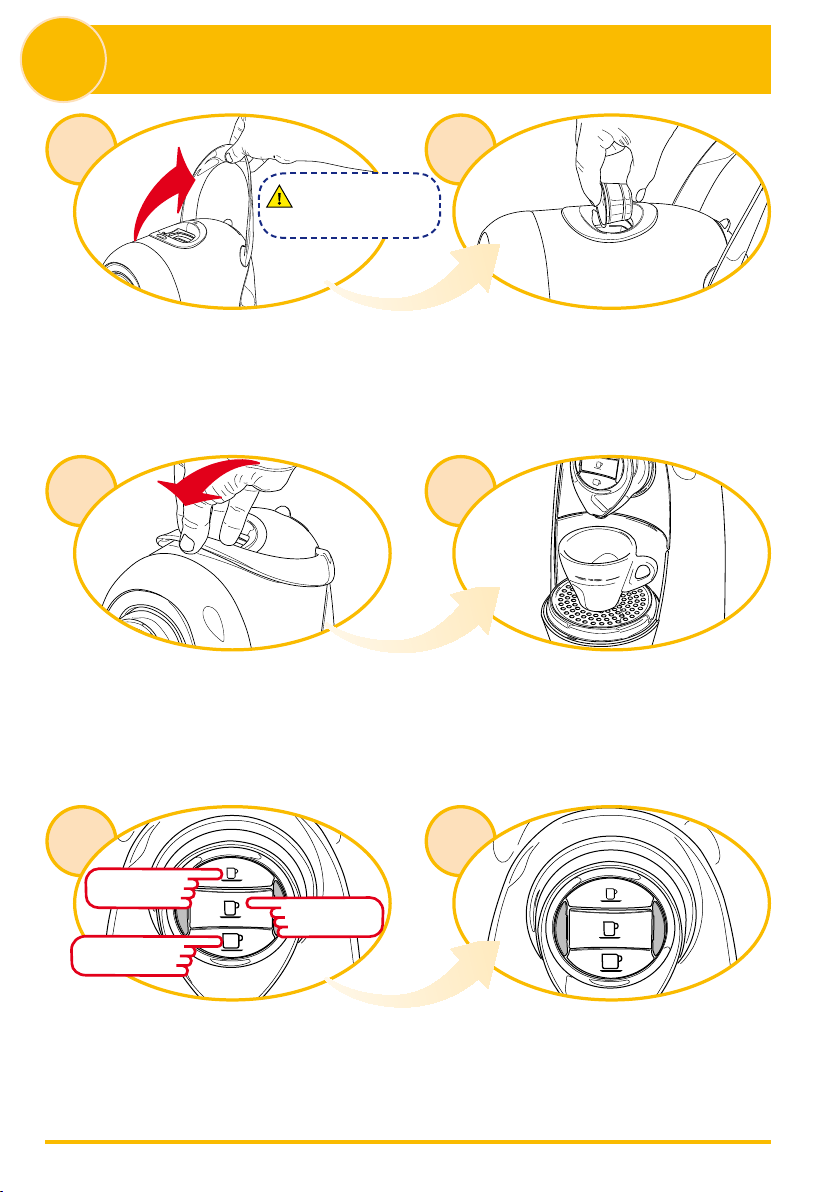
Raise the lever to open the capsule compartment. Insert the capsule, pressing it gently into place.
5 6
Close the lever rmly.
8
Place a cup or mug under the beverage dispensing spout (see section 6).
Page 9
2
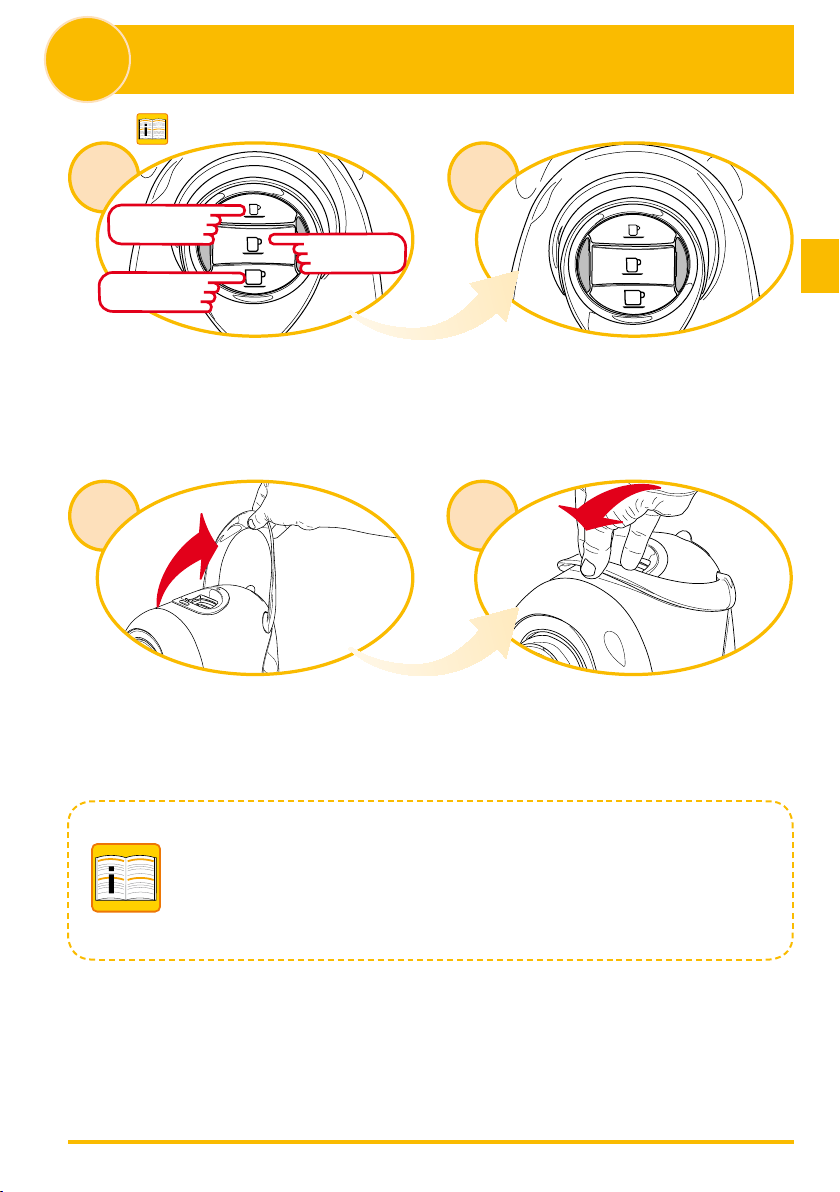
Espresso
Brewed coee/tea
Preparing your beverage
87
Long espresso
Press your desired beverage button.
The selected beverage button will blink. The machine will stop
dispensing beverage on reaching the programmed quantit y, and beep.
109
Raise lever to eject used capsule into the used capsule container. Close the lever.
NOTE:
The amount of beverage dispensed can be reprogrammed according to personal taste. Please refer to section 4
for reprogramming instructions.
When switching from one beverage to another, we suggest rinsing the machine by pressing a beverage button
without inserting a capsule.
9
Page 10
3
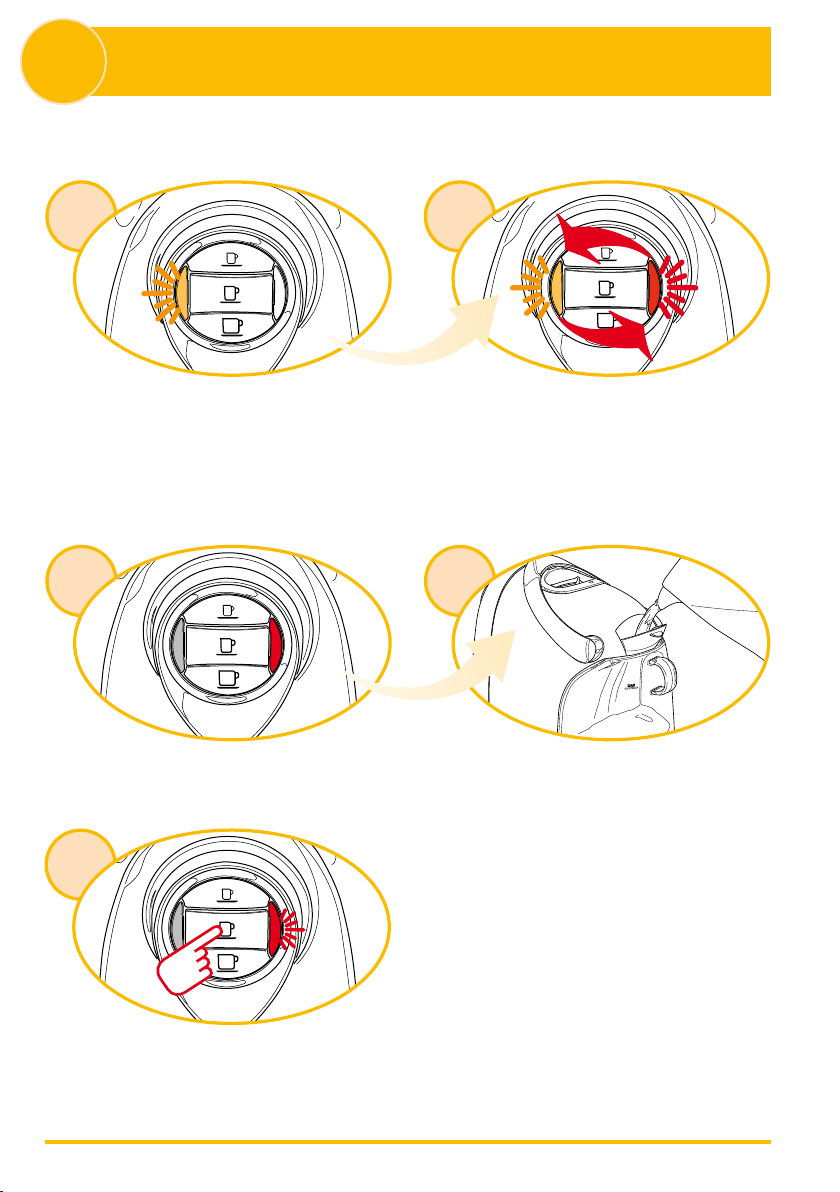
DESCALE INDICATOR
Indicator light guidelines
21
When the descale indicator light blinks and the machine beeps, it is
advisable to carry out a descaling cycle.
EMPTY WATER TANK INDICATOR
1
When the alarm indicator light blinks and the machine beeps,
the water tank is empty.
3
When the descale and alarm indicator lights blink alternately and the
machine beeps, it is necessary to carry out a descaling cycle.
2
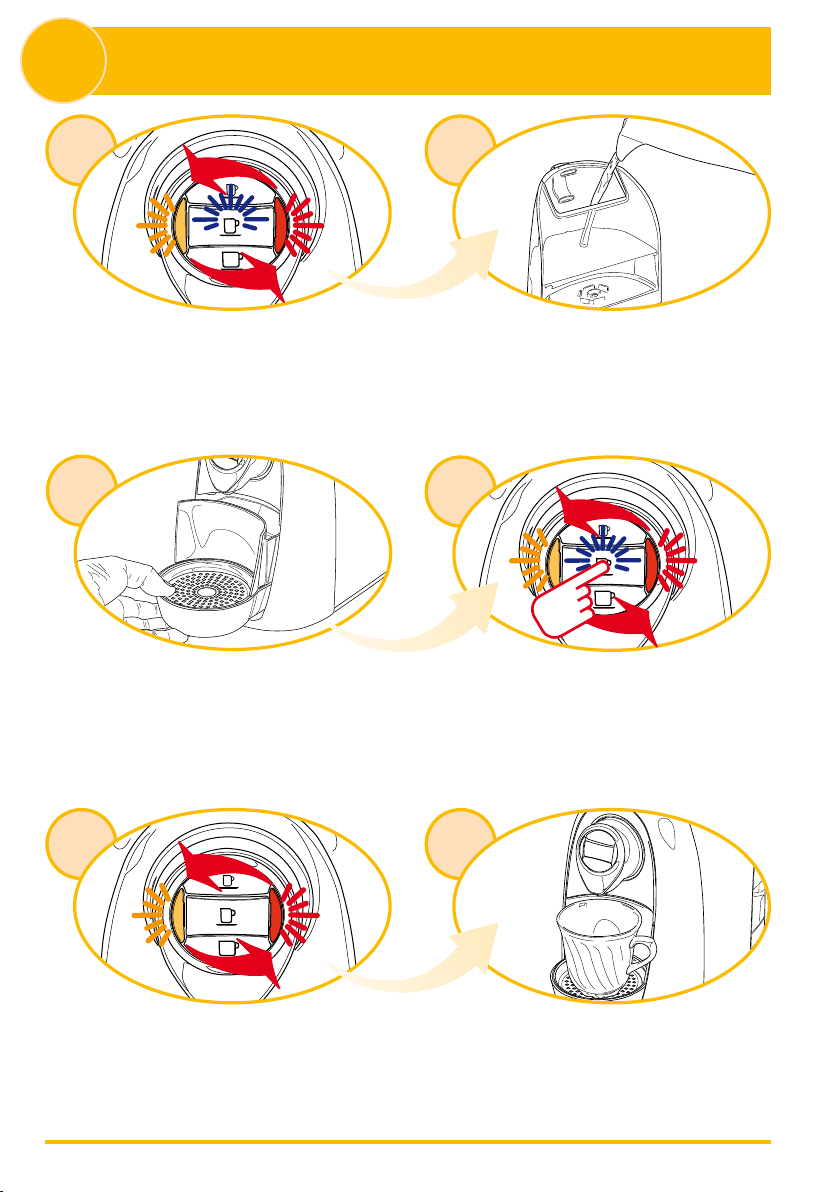
Fill the tank with ltered/bottled water.
Press your desired beverage button to resume dispensing.
10
Page 11
3
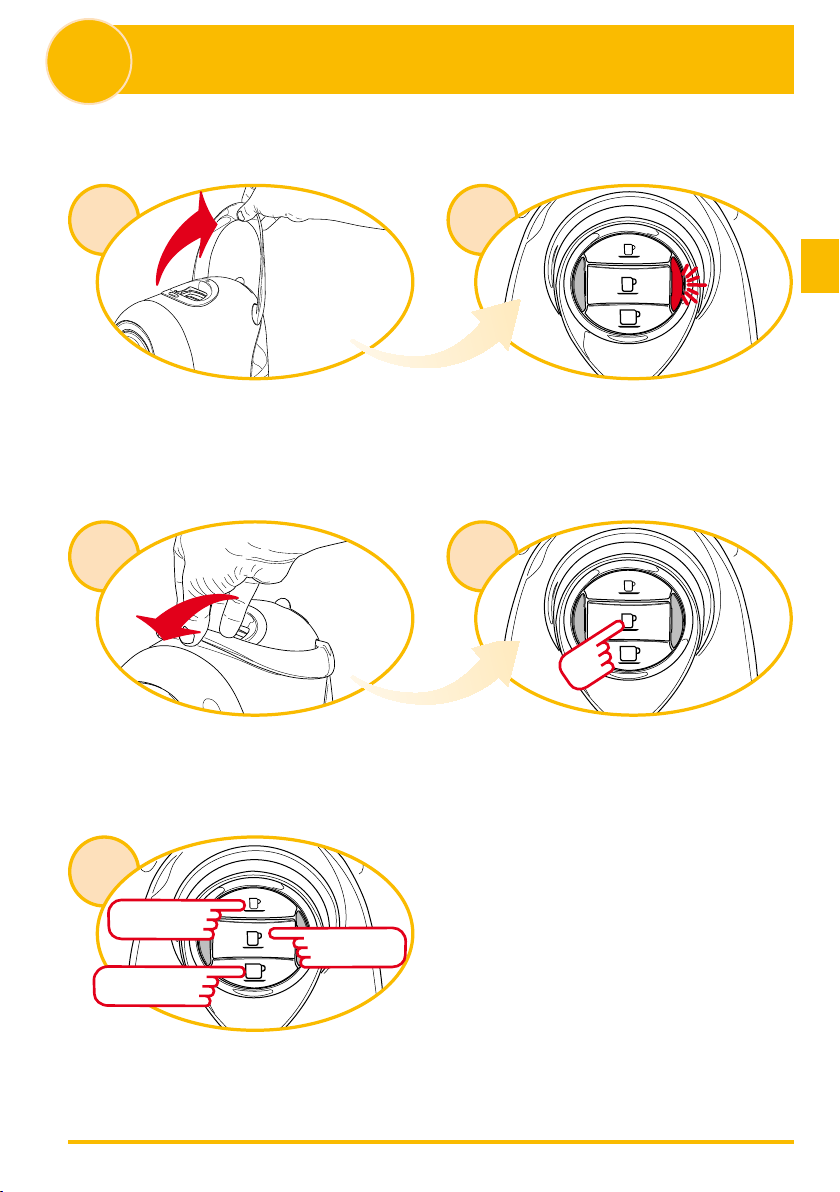
Indicator light guidelines
INTERRUPTED OPERATION INDICATOR
21
When the lever is raised while a beverage is being dispensed—
Close the lever.
5
Espresso
Long espresso
The alarm indicator light will blink and beep. The machine will
immediately stop dispensing.
43
Press a beverage button to reset the alarm indicator light.
Brewed coee/tea
Press your desired beverage button to brew a new cup.
11
Page 12
4
Programming quantity of beverage brewed
1 2
Warning! Before you start brewing,
make sure the capsule container is
not full.
Raise the lever to open the capsule compartment. Insert the capsule, pressing it gently into place.
3 4
Close the lever rmly.
5
Espresso
Brewed coee/tea
Keep your desired beverage button pressed down.
12
Place a cup or mug under the beverage dispensing spout.
6
Long espresso
On reaching the desired amount of beverage, release the button. The
button is now programmed. To reprogram the button or program
another button repeat the above steps.
Page 13
5
The Kaldi features an energy saving function (normally activated)
which automatically reduces energy consumption by around 98%
one hour after last use. To deactivate (or reac tivate) this function,
proceed as follows:
Programming energy saving function
2 3
1
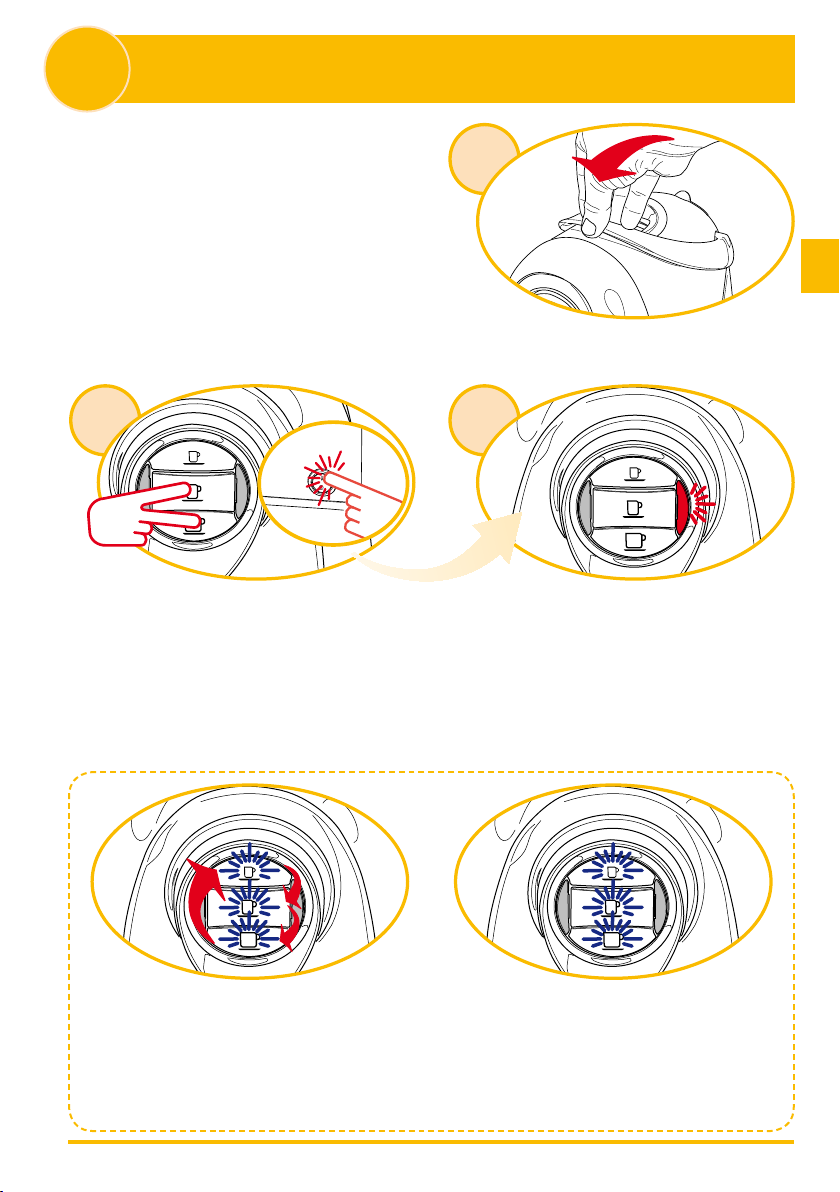
Make sure the lever is lowered.
Keep long espresso and brewed coee/tea buttons pressed down and
simultaneously switch machine on.
Once the “Energy Saving” function has been programmed, the machine
will automatically reduce consumption one hour after last use. The
beverage buttons will blink cyclically during energy saving mode.
The alarm indicator light will blink and beep three times to conrm
deactivation of the “Energy Saving” function. When the function is
reactivated, the alarm indicator light will blink and beep two times.
To restore normal operating conditions, press any beverage button
or raise the lever. The machine will warm up. When the machine
is ready for use the beverage buttons will be steadily lit.
13
Page 14
6
Adjusting for dierent cup sizes
1
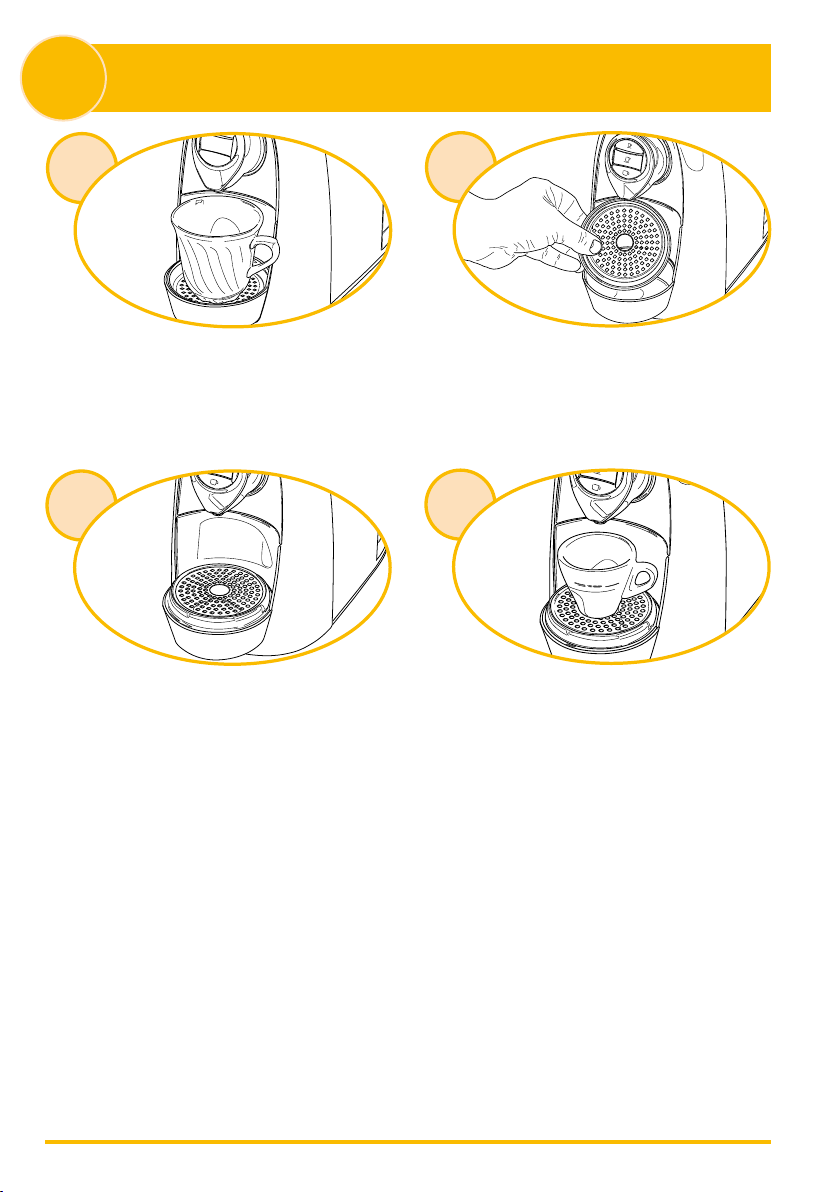
The machine is initially set for use of 10 ounce cups/mugs.
3
The grill must be positioned over the drip tray turned.
2
To use espresso cups, lift and turn the grill on top of the drip tray.
4
Your machine is now set for use of espresso cups.
14
Page 15
7
Daily maintenance
1
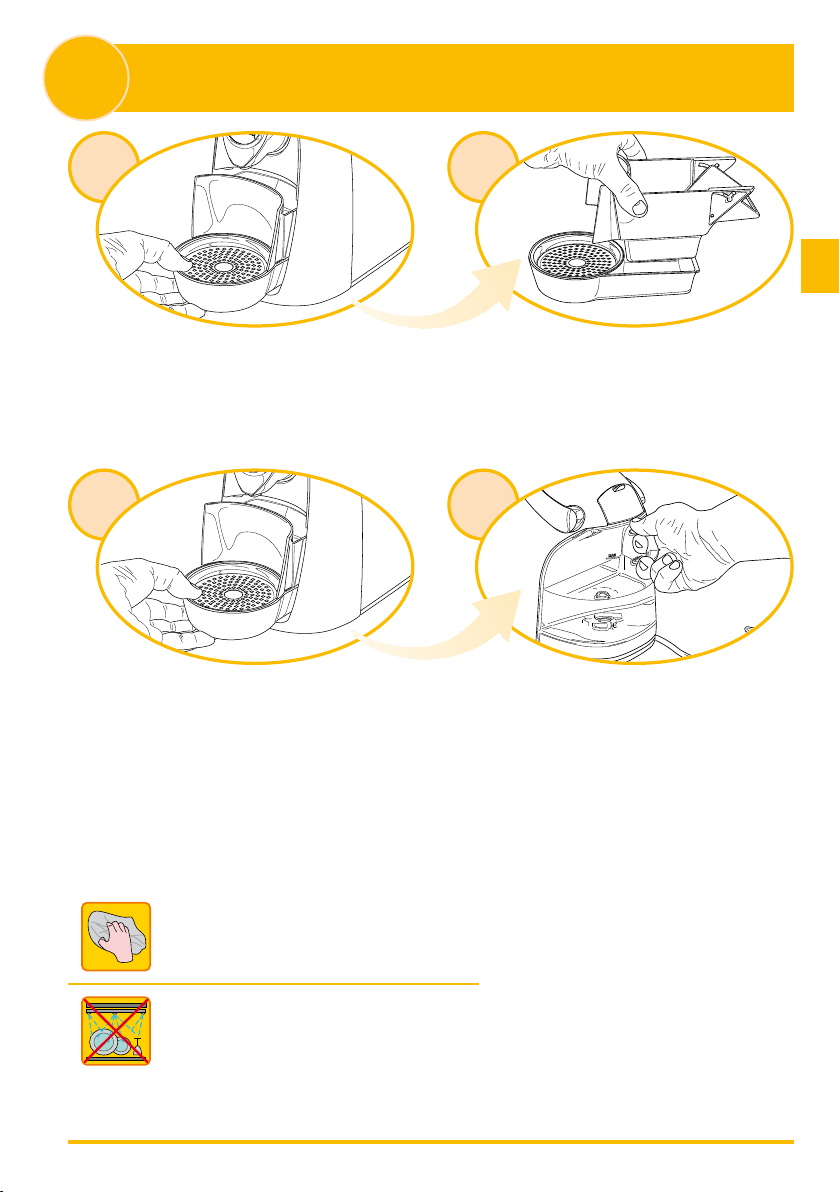
Remove the drip tray and used capsule container.
3
Remove the grill. Empty the drip tray and rinse it with fresh water.
2
Lift the capsule container, empty and rinse.
4
Remove the water tank. Empty and rinse.
NOTE: The water tank is NOT dishwasher safe.
Use a soft, dampened cloth to clean the surfaces
of the machine.
The plastic parts of the machine are not
dishwasher safe.
15
Page 16
8
CBTL™ recommends using the CBTL™ Descaler to descale your machine.
Descaling the machine
Mineral content present in most of the water sources causes calcium deposits or scale to build up in your machine. The Kaldi
features an advanced program tha t detects when it needs to be descaled. Refer to section 3 for descale indicator guidelines.
Carefully read the directions for use on the package of the descaling agent.
Avoid contact with eyes, skin and machine surfaces.
Do not use vinegar: it could damage your appliance! During descaling, do not turn the machine o.
1
Turn the machine o.
3
Remove and empty the water tank.
2
Empty and rinse out the used capsule container and drip tray.
4
Prepare the descaling solution following the manufacturer’s
directions and pour a liter of solution into the tank.
16
Page 17
8
Descaling the machine
5
Place a container under the beverage dispensing spout.
7
Keep the espresso and long espresso buttons pressed down and
simultaneously switch the machine on.
6
Make sure the lever is lowered.
8
The long espresso button and the descale and alarm indicator
lights blink alternately. Press the long espresso button to start the
descale cycle.
9
The machine delivers descaling solution at intervals of approximately
10 minutes. During this cycle, the descale and alarm indicator lights
blink alternately.
10
If the container lls up, empty it out. The descale cycle lasts for
approximately 40 minutes.
17
Page 18
8
Descaling the machine
11 12
At the end of a descale cycle, the long espresso button and the
descale and alarm indicator lights blink alternately.
13
Empty and rinse out the used capsule container and drip tray. The long espresso button and the descale and alarm indicator lights
15
Carefully rinse out the water tank and ll it with ltered/bottled water.
14
blink alternately. Press the long espresso button to start the rinse cycle.
16
Water will rinse through the machine. During this c ycle the descale
and alarm indicator lights blink alternately.
18
If the container lls up, empty it out.
Page 19
8
Descaling the machine
17 18
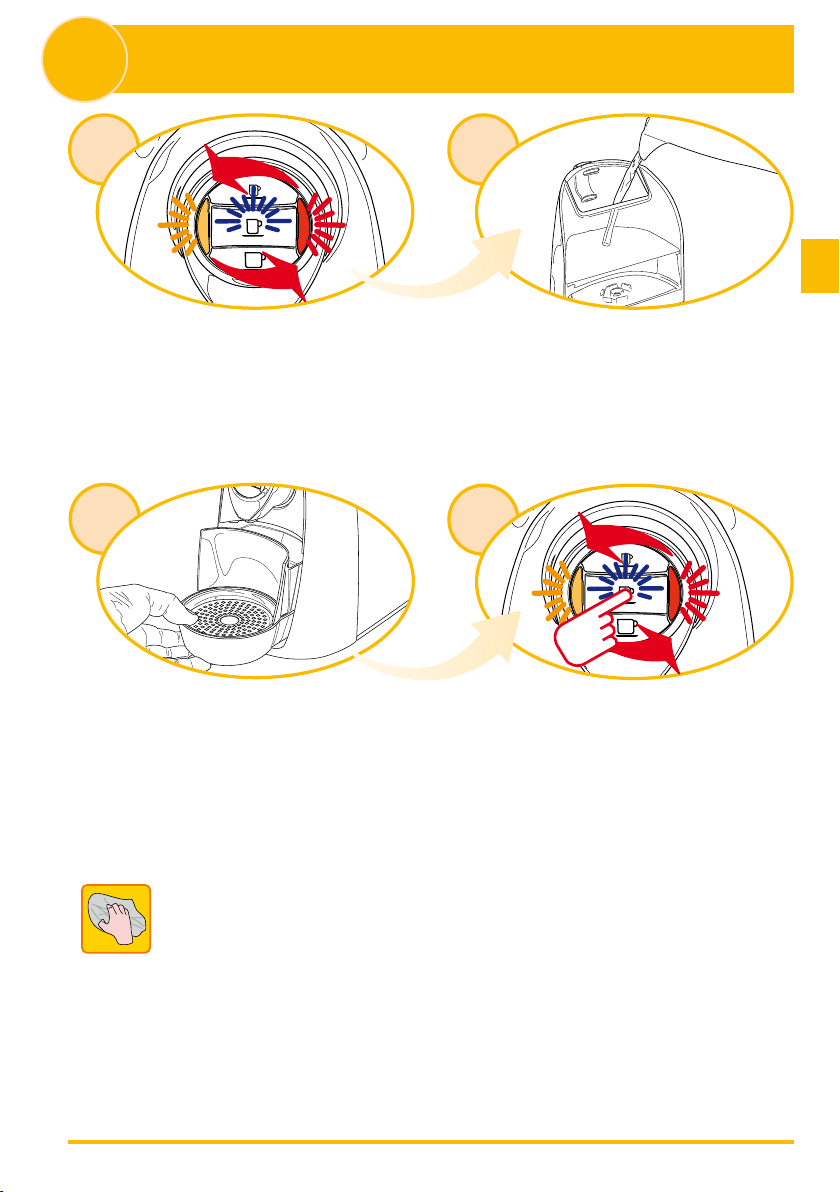
At the end of a rinse cycle, the long espresso button and the descale
and alarm indicator lights blink alternately and the machine beeps.
19
Empty and rinse out the used capsule container and drip tray.
Carefully rinse out the water tank and ll it with ltered/bottled water.
20
Press the long espresso button to exit the rinse cycle.
Use a soft, dampened cloth to clean the surfaces
of the machine.
19
Page 20
9
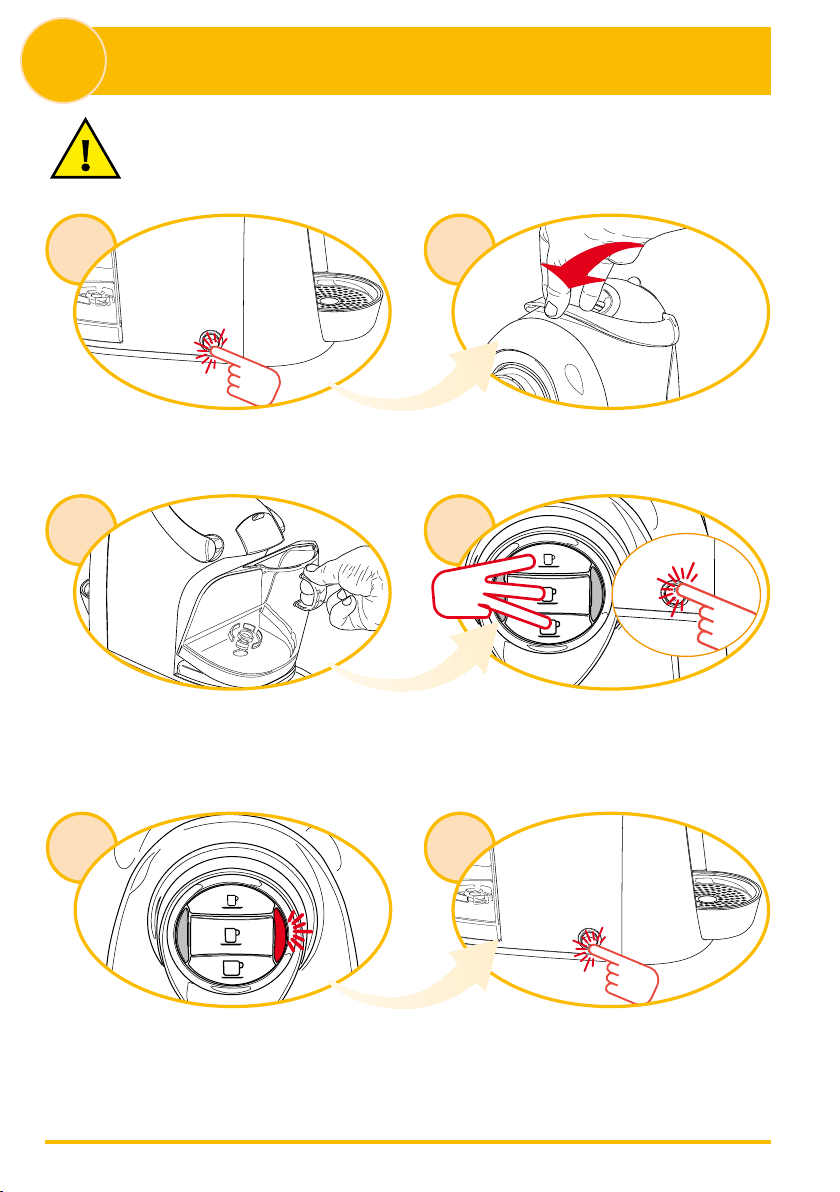
Draining the machine
CAUTION - When the machine is not used for a long time, it is necessary to drain the water lines. Liquids may freeze and
damage the machine.
1
2
Make sure the lever is lowered.Turn the machine o.
3 4
Remove and empty out the water tank. Keep the beverage buttons pressed down and simultaneously switch
the machine on.
5
The alarm indicator light will blink and the machine will carry out a
drainage cycle. The machine will beep at the end of this cycle.
20
6
Turn the machine o. Before next use, follow instructions to rinse the
machine as indicated in section 1.
Page 21
10
Beyond the recommended cleaning and maintenance pro cedures, the CBTL™ machine is
not user serviceable. For additional options, please refer to the Limited Warranty Card .
Troubleshooting
Problem Cause / Solution
No beverage is brewed. The water tank is empty, the alarm
The beverage is not hot enough. Cold cups / mugs
The lever cannot be lowered. The used capsule container is full.
indicator light is on and red.
➤
Fill the tank with ltered/bottled water.
Press the desired beverage button.
The machine will resume brewing.
Scale build-up in machine.
➤
Preheat the cup.
Descale the machine.
Capsule stuck inside the machine.
➤
Empty out the used capsule container.
Remove the used capsule.
11
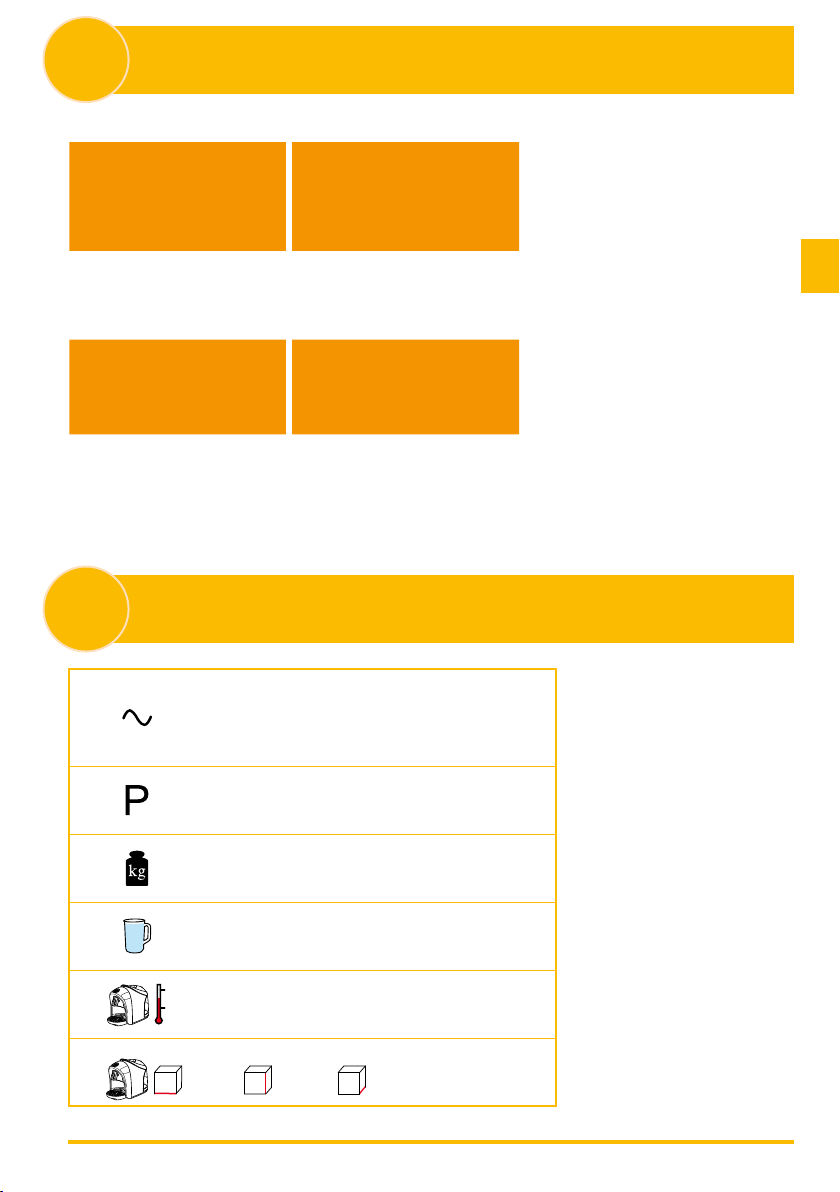
Technical data
See the data plate on the bottom of the machine
Max . 15 bar
approx. 4 kg
1.2 liters
5 °C - 15 °C
5 °C - 15 °C
170 mm 296 mm 260 mm
21
Page 22
CBTL™ Support Service
Country
USA
Singapore
Malaysia
Korea
UAE
Contact Number
888-520-CBTL (888-520-2285)
+65 6273-2221
(603) 92001833
82-2-548-0552
+971 4 3539500
Email
Order Online at
CBTL.com
 Loading...