

Page 1

Compal Broadband Networks
CH7486E
Wireless Voice Gateway Series
User Guide
1
Page 2

Table of Contents
Overview
Contact Information ................................................................................................................ 4
Standard Features ................................................................................................................... 4
CH7486E LAN Choices ............................................................................................................. 5
Wireless LAN ....................................................................................................................... 5
Wired Ethernet LAN ........................................................................................................... 6
Front Panel ................................................................................................................................ 8
Rear Panel ................................................................................................................................ 9
MAC Label .............................................................................................................................. 10
Getting Started
Inside the Box ......................................................................................................................... 11
Before You Begin ................................................................................................................... 12
System Requirements ...................................................................................................... 12
Position Your Wireless Router .......................................................................................... 12
Connecting the CH7486E ..................................................................................................... 14
Setting Up Internet Access.................................................................................................... 15
Configuring TCP/IP in Windows XP ................................................................................ 15
Configuring TCP/IP in Windows Vista ............................................................................ 16
Verifying the IP Address in Windows XP ........................................................................ 16
Verifying the IP Address in Windows Vista .................................................................... 17
Renewing Your IP Address .............................................................................................. 17
Setting Up a Wi-Fi Network .................................................................................................... 17
Status
Starting the CH7486E Configuration Manager (CMGR) ................................................... 18
Modem ............................................................................................................................. 19
WiFi .................................................................................................................................... 20
Voice................................................................................................................................. 20
My Network ...................................................................................................................... 21
Wireless Pages
Basic Settings .......................................................................................................................... 23
WPS .......................................................................................................................................... 24
Access Control ....................................................................................................................... 24
WMM ....................................................................................................................................... 25
Neighbor APs .......................................................................................................................... 26
Router
Basic ........................................................................................................................................ 27
LAN Settings ..................................................................................................................... 27
DHCP Server ..................................................................................................................... 28
2
Page 3

WAN Settings .................................................................................................................... 28
Network Map ................................................................................................................... 28
Advanced .............................................................................................................................. 29
MAC Filtering .................................................................................................................... 29
IP Filtering .......................................................................................................................... 30
Port Filtering ...................................................................................................................... 31
Port Forwarding ............................................................................................................... 31
Port Triggering .................................................................................................................. 32
URL Filtering ...................................................................................................................... 33
DMZ ................................................................................................................................... 34
DDNS ................................................................................................................................. 34
Firewall .............................................................................................................................. 35
Firewall Logs ..................................................................................................................... 36
Management ......................................................................................................................... 36
Admin Account ............................................................................................................... 37
Remote Management ................................................................................................... 37
Event Log .......................................................................................................................... 38
Diagnostics ....................................................................................................................... 38
Cable Modem ....................................................................................................................... 40
Device Information ......................................................................................................... 40
Connection ...................................................................................................................... 41
Configuration ................................................................................................................... 42
Telephony Status ............................................................................................................. 42
Troubleshooting
Solutions .................................................................................................................................. 43
Front-Panel LEDs and Error Conditions ................................................................................ 44
3
Page 4

1
Overview
The CBN CH7486E Wireless Gateway is the worldwide most compact EuroDOCSIS
3.0 Voice Gateway with stylish and elegant outlook, designed for your home,
home office, or small business/enterprise. It can be used in households with one or
more computers capable of wireless connectivity for remote access to the
wireless gateway.
This user guide provides product overview and setup information for the CH7486E.
It also provides instructions for installing the wireless gateway and configuring the
wireless LAN, Ethernet, router, DHCP, and security settings.
Contact Information
For any questions or assistance with the CH7486E Wireless Gateway, contact
your Internet Service provider.
Standard Features
The CH7486E Wireless Gateway combines high-speed Internet access,
networking, and computer security for a home or small-office LAN. It offers the
following features:
Combination of five separate products in one compact unit — an EURO
DOCSIS® 3.0 cable modem, IEEE 802.11b/g/n/ac wireless access point,
Ethernet 10/100/1000 Base-T connections, VoIP Internet telephone
connections, and firewall.
An integrated high-speed cable modem for continuous broadband access
to the Internet and other online services with much faster data transfer than
traditional dial-up or ISDN modems.
Advanced firewall for enhanced network security from undesired attacks
over the Internet. It supports stateful-inspection, intrusion detection, DMZ,
denial-of-service attack prevention, and Network Address Translation (NAT).
One broadband connection for up to 253 computers to surf the web; all
computers on the LAN communicate as if they were connected to the same
physical network.
Two 10/100/1000Base-T Ethernet uplink ports supporting half- or full-duplex
connections with auto-MDIX capability.
4
Page 5

An IEEE 802.11n/ac wireless access point to enable laptop users to remain
connected while moving around the home or small office or to connect
desktop computers without installing network wiring. Depending on distance,
wireless connection speeds can vary.
CH7486E wireless function supports Wi-Fi 2.4G/5G dual-band mode.
A secure Wireless Fidelity (Wi-Fi) broadband connection for Wi-Fi enabled
devices on your network, such as your mobile, laptops, tablet, printers, PDAs,
and desktops.
Routing for a wireless LAN (WLAN) or a wired Ethernet LAN; you can connect
more than two computers using hubs and/or switches
A built-in DHCP server to easily configure a combined wired and/or wireless
Class C private LAN.
Virtual private network (VPN) pass-through operation supporting IPSec, PPTP,
or L2TP to securely connect remote computers over the Internet.
CH7486E Configuration Manager (CMGR) which provides a graphical user
interface (GUI) for easy configuration of necessary wireless, Ethernet, router,
DHCP, and security settings.
CH7486E LAN Choices
You can connect up to 253 client computers to the CH7486E using one or any
combination of the following network connections:
Wi-Fi wireless LAN (WLAN)
Ethernet local area network (LAN)
Wireless LAN
Wireless communication occurs over radio waves rather than a wire. Like a
cordless telephone, a WLAN uses radio signals instead of wires to exchange data.
A wireless network eliminates the need for expensive and intrusive wiring to
connect computers throughout the home or office. Mobile users can remain
connected to the network even when carrying their laptop to different locations
in the home or office.
Each computer or other device on a WLAN must be Wi-Fi enabled with either a
built-in or external wireless adapter.
Laptops — Use a built-in wireless notebook adapter, a wireless PCMCIA slot
adapter, or a wireless USB adapter.
Desktops — Use a wireless PCI adapter, wireless USB adapter, or compatible
product in the PCI slot or USB port, respectively.
5
Page 6
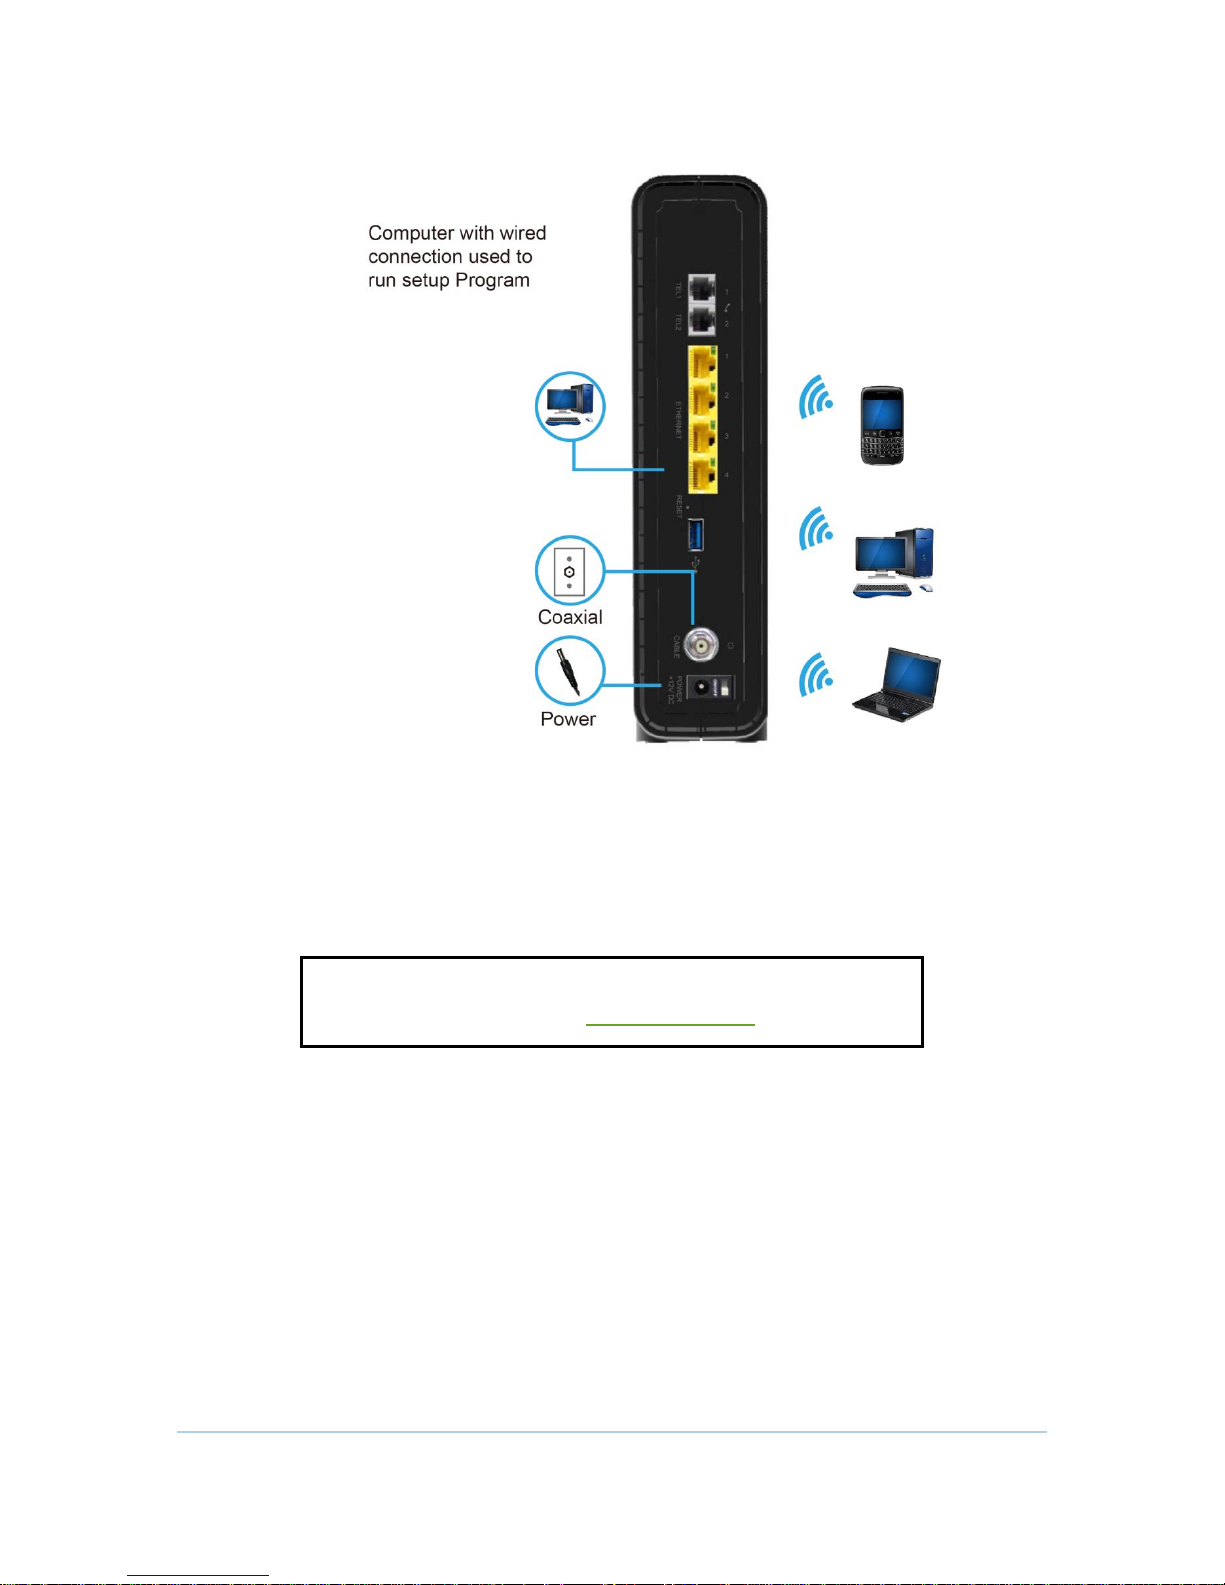
Sample Wireless Network Connections (CH7486E model shown)
Your maximum wireless operation distance depends on the type of materials
through which the signal must pass and the location of your CH7486E and clients
(stations). CBN cannot guarantee wireless operation for all supported distances in
all environments.
Note: To get better wireless coverage, please put your
CH7486E wireless gateway VERTICALLY ONLY
Wired Ethernet LAN
You can easily connect any PC with an Ethernet cable to the CH7486E Ethernet
port. Because the CH7486E Ethernet port supports auto-MDIX, you can use a
straight- through or cross-over cable to connect a hub, switch, or computer. Use
category 5, or better, cabling for all Ethernet connections.
6
Page 7
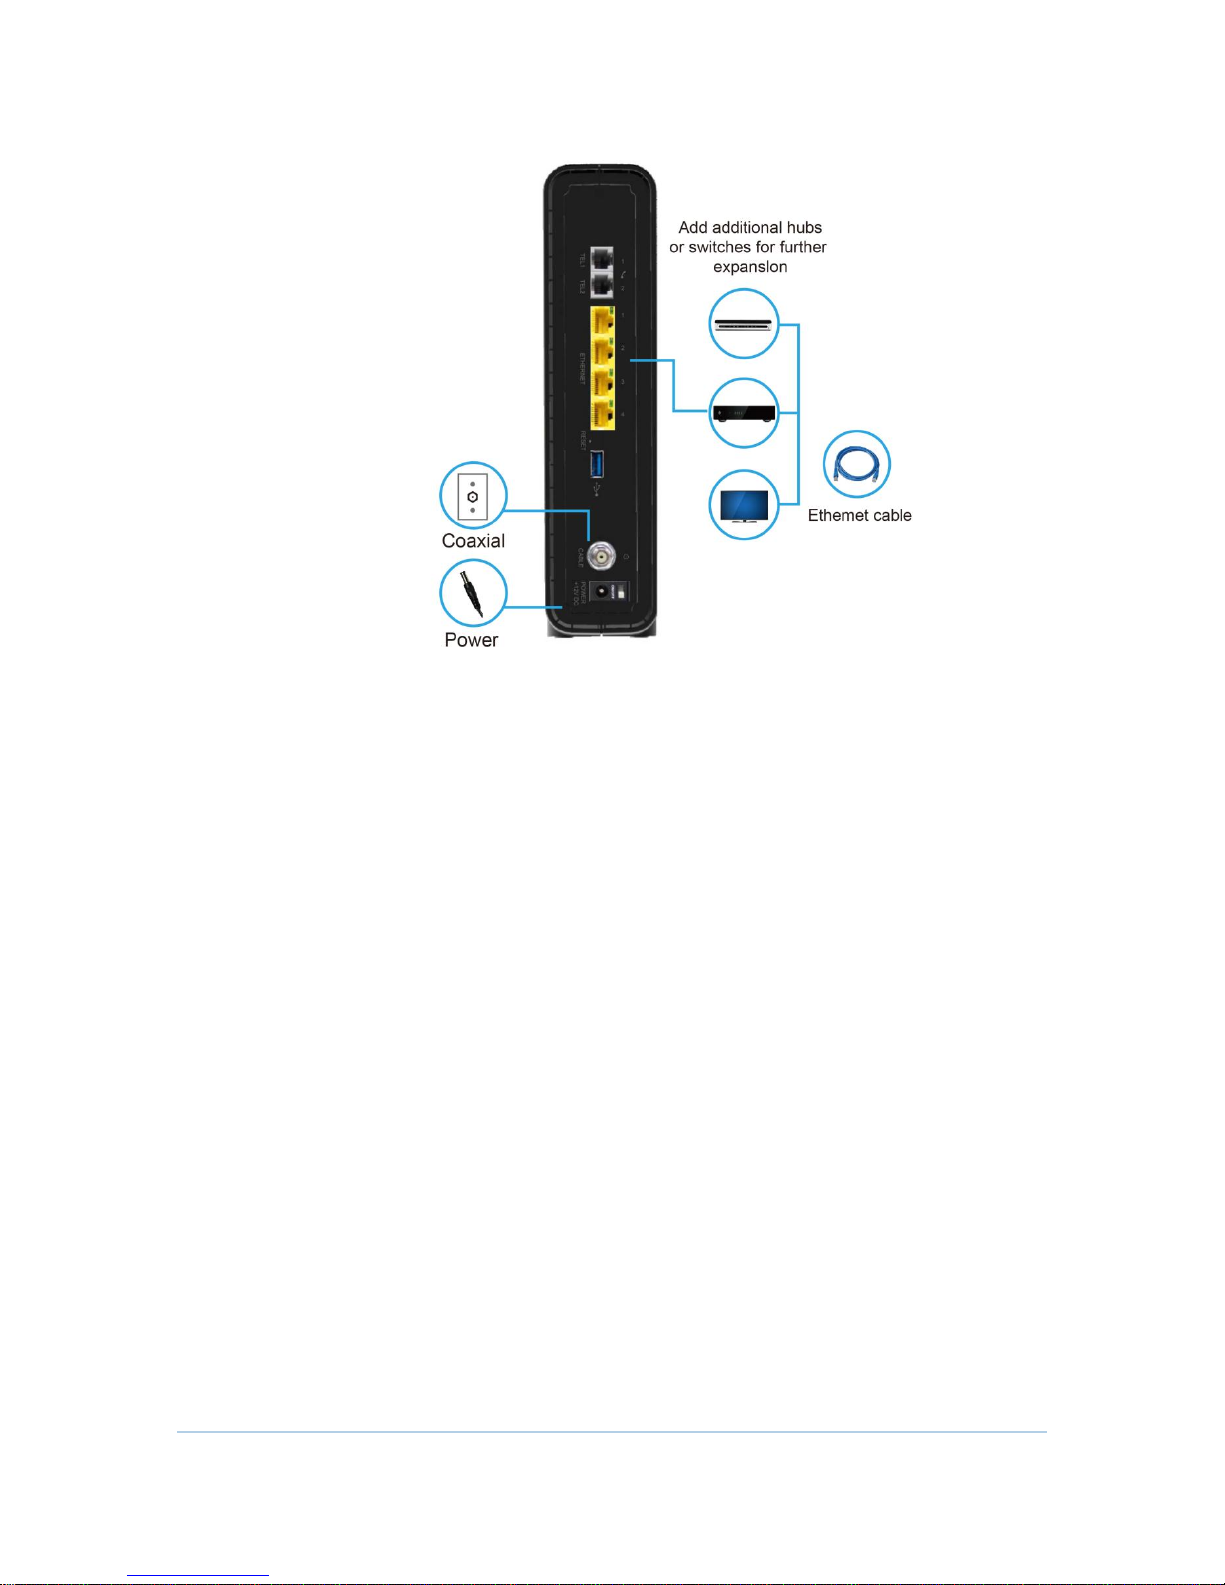
Sample Ethernet to Computer Connection (CH7486E model shown)
A wired Ethernet LAN with more than two computers requires one or more hubs,
switches, or routers. You can:
Connect a hub or switch to any Ethernet port on the CH7486E.
Use Ethernet hubs, switches, or routers to connect up to any combination of
253 computers and wireless clients to the CH7486E.
More detailed information on Ethernet cabling is beyond the scope of this
document.
7
Page 8
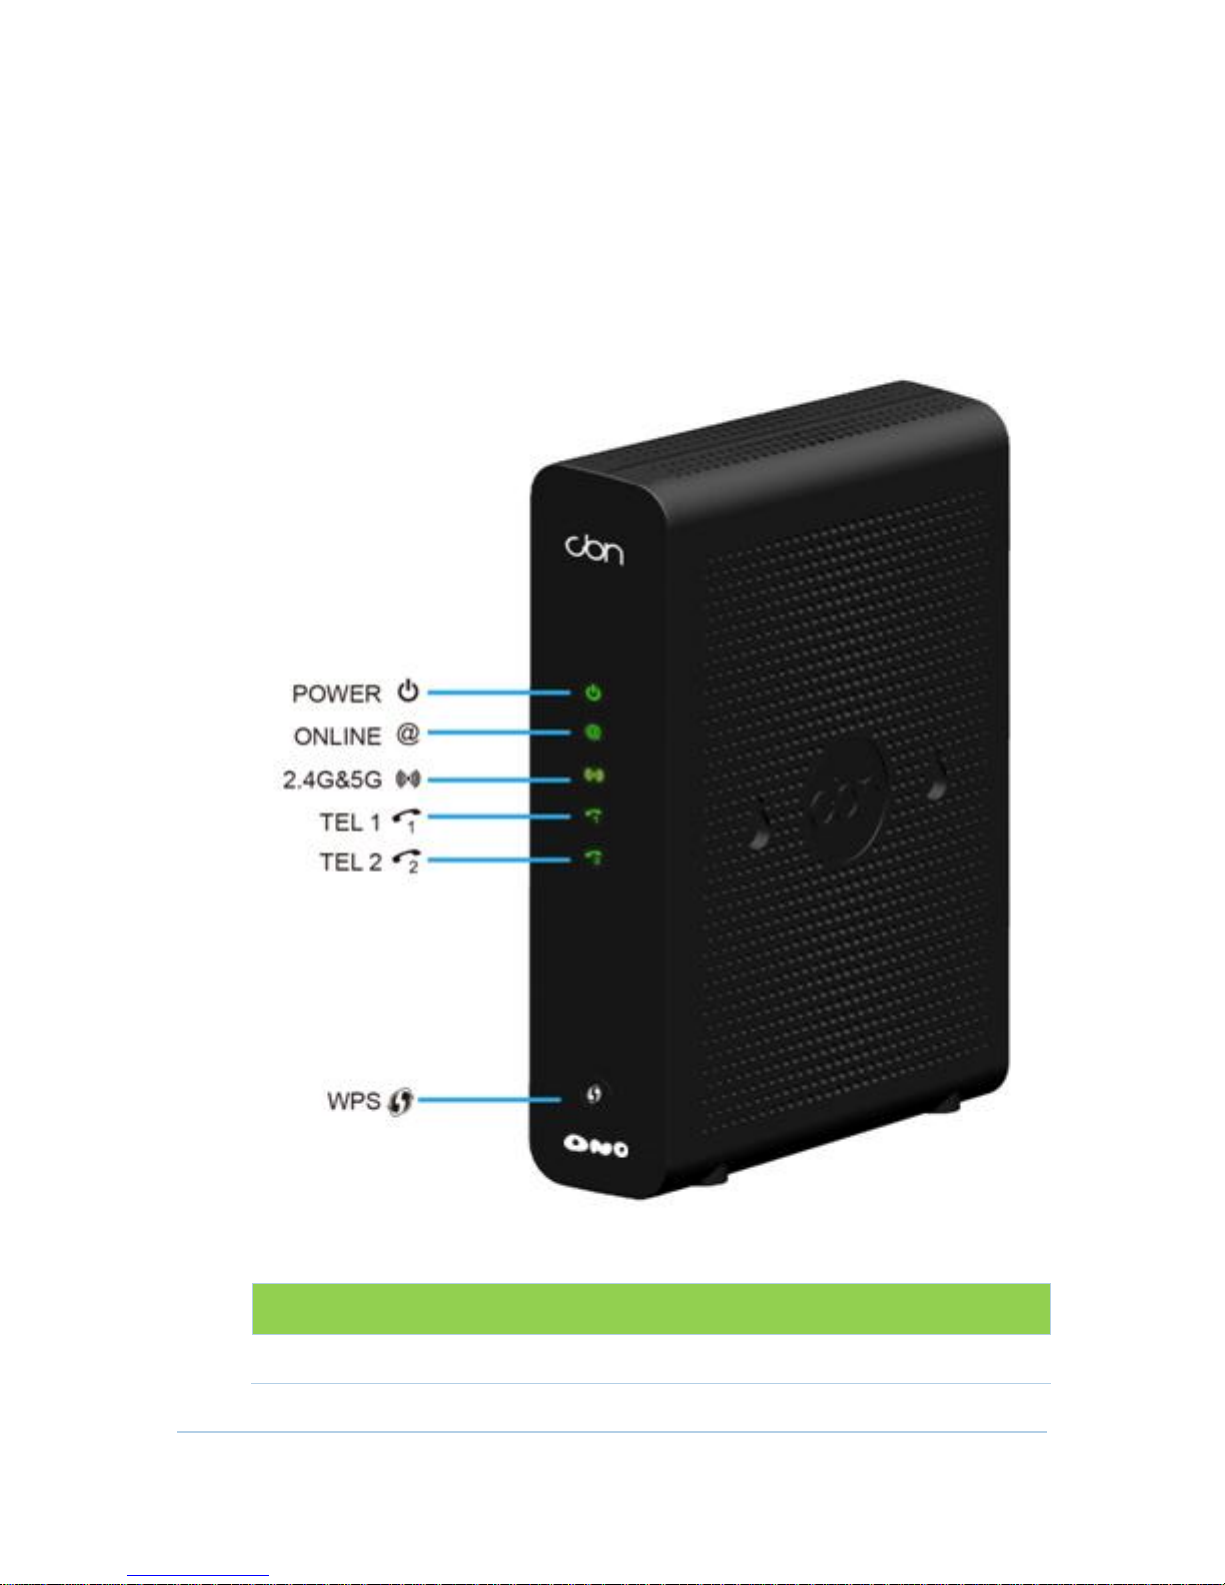
Front Panel
LED
Flashing
On
1
POWER
Not applicable — LED does
Green: Power is properly
The CH7486E front panel contains indicator lights and the Wi-Fi / WPS button
which is used to configure Wi-Fi Protected Security (WPS) on compatible clients
connected to the CH7486E network.
The CH7486E front panel LED indicators provide the following status information
for power, communications, and errors:
8
Page 9
LED
Flashing
On
not flash
connected
2
ONLINE
Scanning for Internet
connection; transmitting or
receiving data over the
Internet
Green: Connected to Internet
3
WIRELESS
2.4GHz
5GHz
Amber: WPS function is
enabled.
Green: Wi-Fi wireless interface
is active now.
4
TEL 1/2
Telephone is off-hook;
dialing or call in progress
Green: Telephone is
connected and activated; onhook
Rear Panel
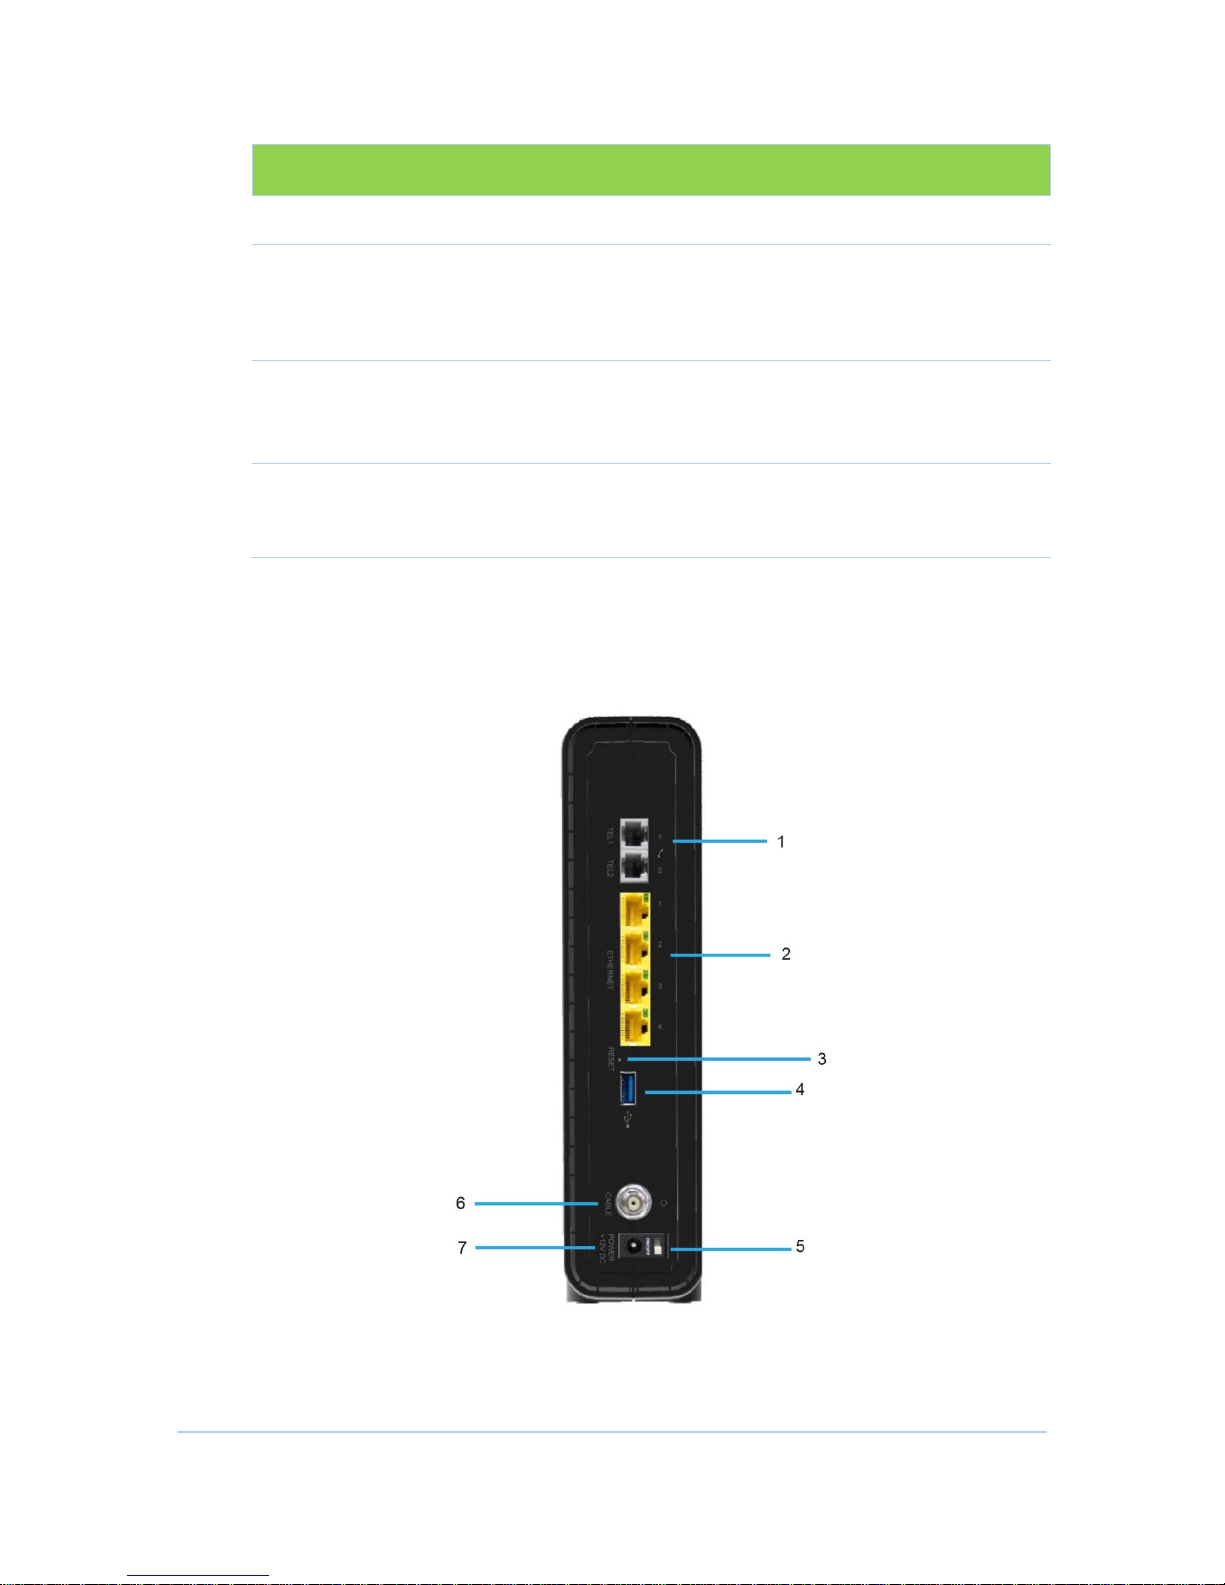
The CH7486E (shown above) rear panel contains the following cabling port and
connectors:
9
Page 10
Item
Description
1
PHONE
1 2
VoIP connection for a single telephone.
2
LAN
1 2 3 4
Use any Ethernet port to connect an Ethernet-equipped computer,
hub, bridge, or switch using an RJ-45 cable.
Activity LED - Green LED defines the activity of the Ethernet
connector.
When LED is ON, this indicates that there is no data traffic and a
connection is stabilized.
When LED is FLASHING, this indicates that there is data being
transmitted upstream or downstream.
When LED is OFF, this indicates that the unit is not powered or there
is no Ethernet connection.
3
RESET
Press and hold the RESET button for five seconds or longer to restore
CH7486E to factory default settings. After factory default settings
are restored, the gateway will restart and may take 5 to 30 minutes
to find and lock on the appropriate communication channels.
4
USB
USB host port for print server or network storage function
5
POWER
SWITCH
Switch gear for power on/off the CH7486E.
6
COAX
Connect the CH7486E to a cable wall outlet.
7
POWER
Provide power to the CH7486E.
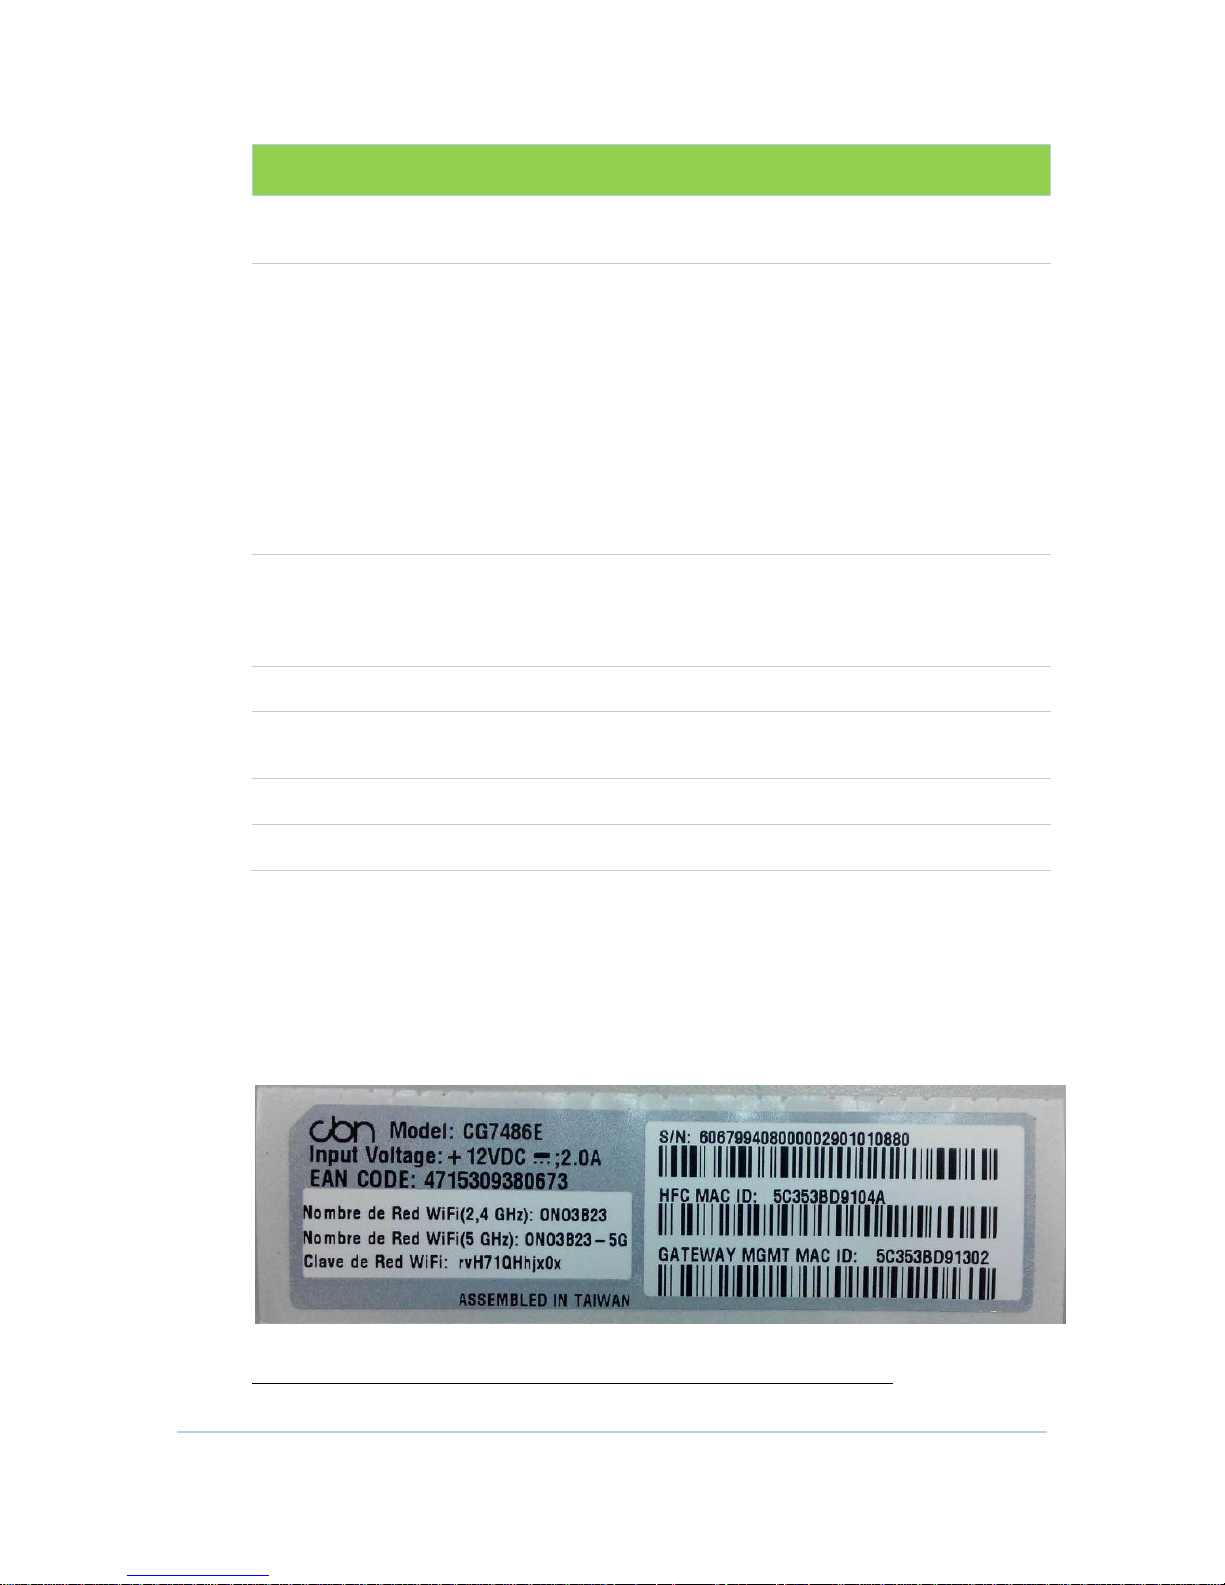
MAC Label
The CH7486E Media Access Control (MAC) label is located on the bottom of the
CH7486E. The label contains the MAC address which is a unique, 48-bit value that
identifies each Ethernet network device. To receive data service, you will need to
provide the MAC address marked HFC MAC ID to your Internet Service provider.”
Note: Label may differ according to local settings or requirements.
10
Page 11
2
Getting Started
Item
Description
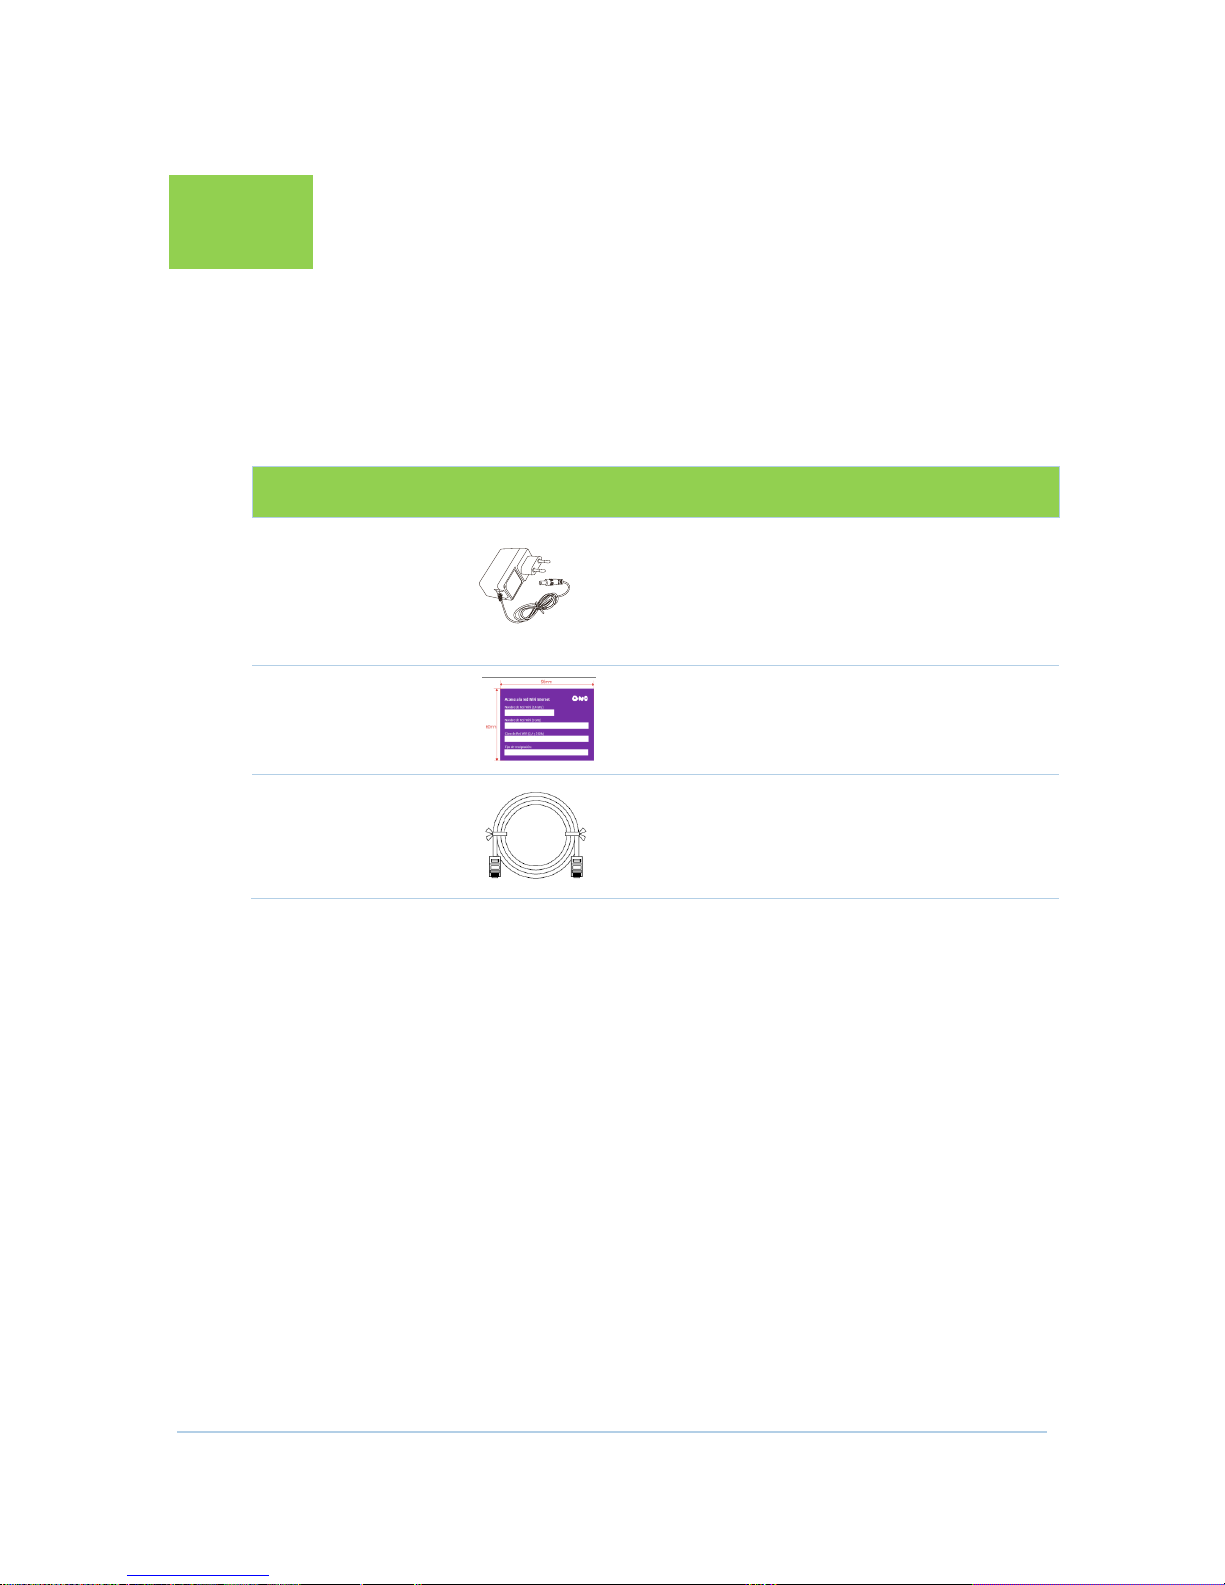
Power Adapter
Connect the CH7486E to an AC electrical
outlet
WiFi Sticker Card
For user placing the WiFI SSID/Password
information for 2.4GHz and 5GHz for future
use.
Ethernet Cable
Connect the CH7486E to PC or Notebook
Inside the Box
Before you install the CH7486E Wireless Gateway, verify that the following items
are included in the box with the CH7486E:
You must have the latest service packs and patches installed on your computer for
your operating system.
You will need a 75-ohm coaxial cable with F-type connectors to connect the
CH7486E to the nearest cable outlet. If a TV is connected to the cable outlet, you
may need a 5 to 900 MHz RF splitter and two additional coaxial cables to use the
TV and the CH7486E.
11
Page 12

Before You Begin
Take the following precautions before installing the CH7486E:
Postpone installation until there is no risk of thunderstorm or lightning activity in
the area.
To avoid potential shock, always unplug the power cord from the wall outlet
or other power source before disconnecting it from the CH7486E rear panel.
To prevent overheating the CH7486E, do not block the ventilation holes on
the sides of the unit. Do not open the unit. Refer all service to your Internet
Service provider.
Check that you have the required cables, adapters, and adapter software. Verify
that the proper drivers are installed for the Ethernet adapter on each networked
computer. For information on WLAN setup, see Setting Up Your Wireless LAN.
System Requirements
Your computer must meet the following minimum requirements:
Computer with Pentium
Any web browser, such as Microsoft Internet Explorer, Netscape Navigator
Mozilla® Firefox®
©
class or better processor
®
, or
Position Your Wireless Router
The CBN CG7486E Wireless Gateway lets you access your network from anywhere
within the operating range of your wireless network. However, the operating distance
or range of your wireless connection can vary significantly depending on the physical
placement of your Gateway. For example, the thickness and number of walls the
wireless signal passes through can limit the range. For best results, place your router:
First and foremost, don't settle prematurely on a location for the wireless
access point or router. Experiment; try placing the device in several different
promising locations. While trial-and-error may not be the most scientific way to
find a good spot for your equipment, it is often the only practical way to
assure the best possible Wi-Fi performance.
Strive to install the wireless access point or router in a central location. If you
have only one wireless client, installing the base station near this client is best.
For WLANs with multiple wireless clients, find a good compromise position.
Clients too far away from the base station will manage only 10% - 50%
the bandwidth of clients nearby to it. You might need to sacrifice the network
performance of one client for the good of the others.
12
Page 13
Next, avoid physical obstructions whenever possible. Any barriers along the
"line of sight" between client and base station will degrade a Wi-Fi radio
signal. Plaster or brick walls tend to have the most negative impact, but really
any obstruction including cabinets or furniture will weaken the signal to some
degree. Obstructions tend to reside closer to floor level; therefore, some folks
prefer to install their wireless access point / router on or near the ceiling.
Avoid reflective surfaces whenever possible. Some Wi-Fi signals literally
bounce off of windows, mirrors, metal file cabinets and stainless steel
countertops, lessening both network range and performance.
Install the wireless access point or router at least 1 m (3 feet) away from other
home appliances that send wireless signals in the same frequency range.
Such appliances include some microwave ovens, cordless telephones, baby
monitors, and home automation equipment like X-10 devices. Any appliance
that transmits in the same general range as802.11b or 802.11g (2.4 GHz) can
generate interference.
Likewise, install the unit away from electrical equipment that also generates
interference. Avoid electric fans, other motors, and flourescent lighting.
Note: To get better wireless coverage, please put your
CG7486E wireless gateway VERTICALLY ONLY
13
Page 14
Connecting the CH7486E
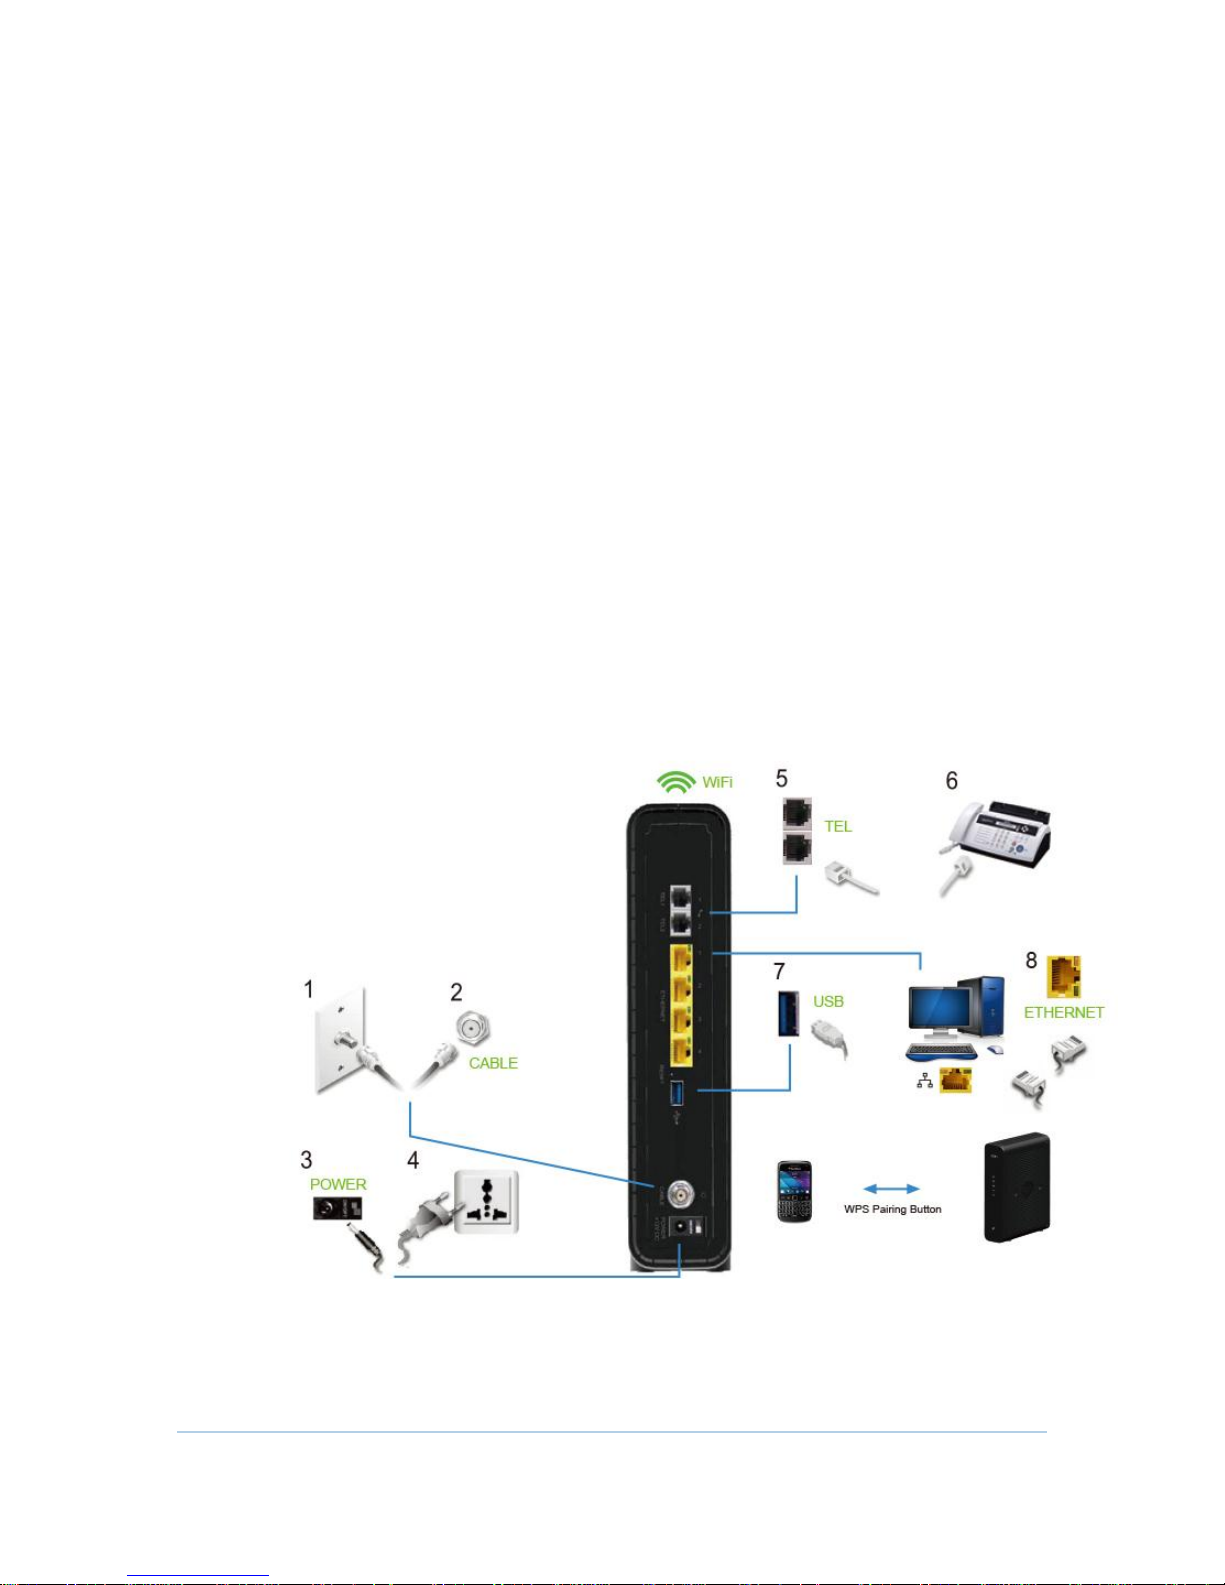
Before starting, be sure the computer is turned on and the CH7486E power cord is
unplugged.
1. Connect one end of the coaxial cable to the cable outlet or splitter.
2. Connect the other end of the coaxial cable to the Cable connector on the
CH7486E. Hand-tighten the connectors to avoid damaging them.
3. Plug the power cord into the Power port on the CH7486E.
4. Plug the other end of the power cord into an electrical wall outlet.
This automatically powers on the gateway. You do not need to unplug the
gateway when it is not in use. The first time you plug in the CH7486E, allow it 5
to 30 minutes to find and lock on the appropriate communications channels.
5. Plug the other end of the telephone cord of a single or two-line telephone
into the TEL 1/2 port on the rear of the CH7486E.
6. Plug the telephone cord of a single or two-line telephone into the telephone.
7. Connect the Ethernet cable to the Ethernet port on the computer, and
connect the other end of the Ethernet cable to the Ethernet port on the
gateway.
8. Check that the LEDs on the front panel cycle through the following sequence:
14
Page 15
CH7486E LED Activity During Startup
LED
Description
POWER
Turns on when AC power is connected to the CH7486E.
Indicates that the power is connected properly.
ONLINE
Flashes during CH7486E registration and configuration.
Changes to solid green when the CH7486E is registered
successfully and ready for Internet access
Setting Up Internet Access
After installing the CH7486E, check that you can connect to the Internet. You can
retrieve an IP address for your computer’s network interface using one of the
following options:
Retrieve the statically defined IP address and DNS address
Automatically retrieve the IP address using the Network DHCP server
The CBN CH7486E Wireless Gateway provides a DHCP server on its LAN. It is
recommended that you configure your LAN to obtain the IPs for the LAN and DNS
server automatically.
Make sure all computers on your LAN are configured for TCP/IP. After configuring
TCP/IP on your computer, you should verify the IP address.
Note: For UNIX or Linux systems, follow the instructions in the
applicable user documentation.
Configuring TCP/IP in Windows XP
1. Open the Control Panel.
2. Double-click Network Connections to list the Dial-up and LAN or High-Speed
Internet connections.
3. Right-click the network connection for your network interface.
4. Select Properties from the drop-down menu to display the Local Area
Connection Properties window. Be sure Internet Protocol (TCP/IP) is checked.
5. Select Internet Protocol (TCP/IP) and click Properties to display the Internet
Protocol (TCP/IP) Properties window.
6. Select Obtain an IP address automatically and Obtain DNS server address
automatically.
7. Click OK to save the TCP/IP settings and exit the TCP/IP Properties window.
15
Page 16

8. Close the Local Area Connection Properties window and then exit the Control
Panel.
9. When you complete the TCP/IP configuration, continue with Verifying the IP
Address in Windows XP
Configuring TCP/IP in Windows Vista
1. Open the Control Panel.
2. Click Network and Internet to display the Network and Internet window.
3. Click Network and Sharing Center to display the Network and Sharing Center
window.
4. Click Manage network connections to display the LAN or High-Speed Internet
connections window.
5. Right-click the network connection for the network interface you want to
change.
6. Click Properties to display the Local Area Connection Properties window.
Vista may prompt you for an administrator password or confirmation. Type the
password or confirmation, then click Continue.
7. Click Networking tab, then select Internet Protocol Version 4 (IPv4).
8. Click Properties to display the Internet Protocol Version 4 (TCP/IPv4) Properties
window.
9. Select Obtain an IP address automatically and Obtain DNS server address
automatically.
10. Click OK to save the TCP/IP settings and close the Internet Protocol Version 4
(TCP/IPv4) Properties window.
11. Click OK to close the Local Area Connection Properties window.
12. Close the remaining windows and exit the Control Panel.
13. When you complete the TCP/IP configuration, continue with Verifying the IP
Address in Windows Vista.
Verifying the IP Address in Windows XP
To check the IP address:
1. On the Windows Desktop, click Start.
2. Select Run. The Run window is displayed.
3. Type cmd and click OK.
4. Type ipconfig and press ENTER to display your IP configuration.
If an Auto-configuration IP Address displays, this indicates possible cable network
problems or an improper connection between your computer and the CH7486E.
Check the following:
Your cable connections
Whether you can see cable-TV channels on your television
16
Page 17

After successfully verifying your cable connections and proper cable-TV
operation, you can renew your IP address.
Verifying the IP Address in Windows Vista
Do the following to verify the IP address:
1. On the Windows Desktop, click Start.
2. Click All Programs.
3. Click Accessories.
4. Click Command Prompt to open a command prompt window.
5. Type ipconfig and press Enter to display the IP address.
If an Auto-configuration IP Address displays, this indicates an improper
connection between your computer and the CH7486E, or there are possible
cable network problems.
Renewing Your IP Address
To renew your IP address in Windows XP or Windows Vista:
1. Open a command prompt window.
2. At the command prompt, type ipconfig /renew and press ENTER to obtain a
new IP address.
3. Type exit and press ENTER to close the command prompt window.
If after performing this procedure your computer still cannot access the Internet,
call your cable service provider for assistance.
Setting Up a Wi-Fi Network
Do the following to set up a Wi-Fi network using the WPS button on the CH7486E :
1. Power on the CH7486E.
2. Power on the WPS-enabled devices you want to have access to the network,
such as a PC, router, or telephone.
The Wi-Fi network will automatically detect the WPS devices.
3. Press WPS button on the CH7486E.
4. If applicable, press WPS button on the other WPS devices.
17
Page 18
3
Status
For normal operation, you do not need to change most default settings. Carefully
consider the following caution statements:
Starting the CH7486E Configuration Manager (CMGR)
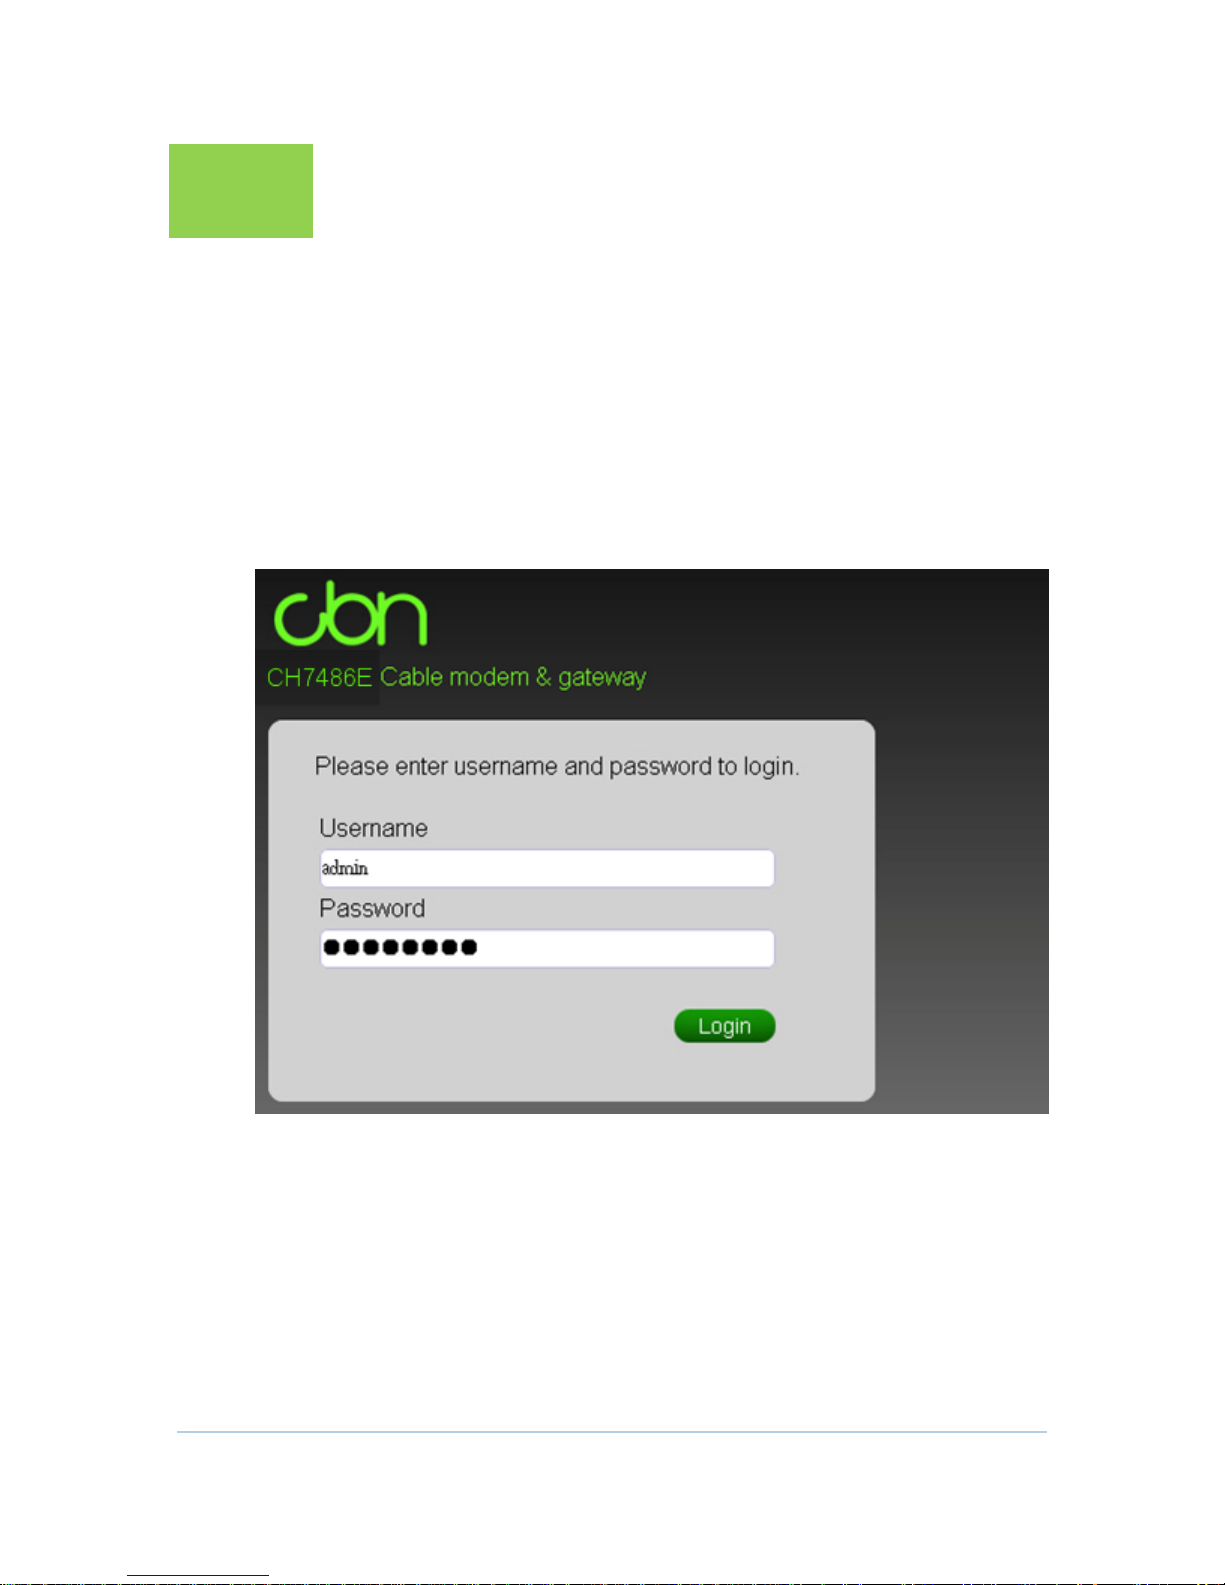
The CH7486E Configuration Manager (CMGR) allows you to change and view the
settings on your CH7486E.
In order to login CMGR, you should key in the correct Username and Password. By
default, they should be admin and password.
18
Page 19
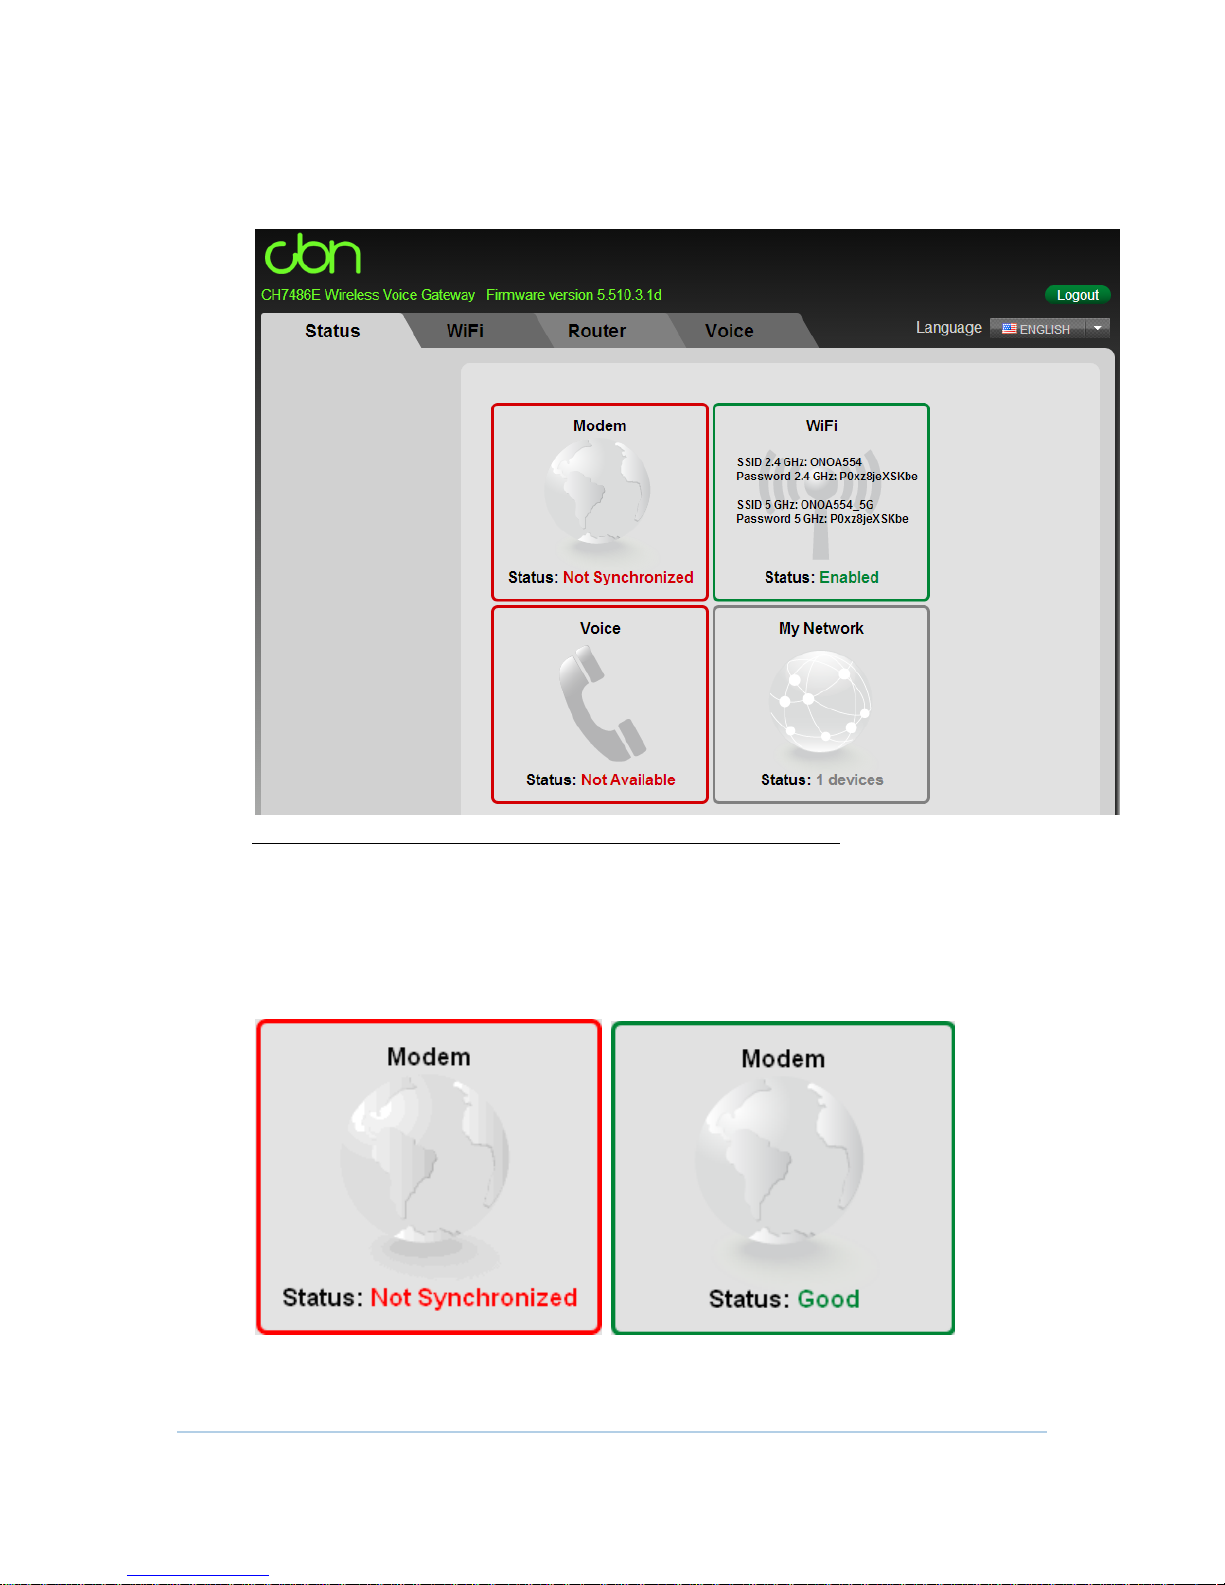
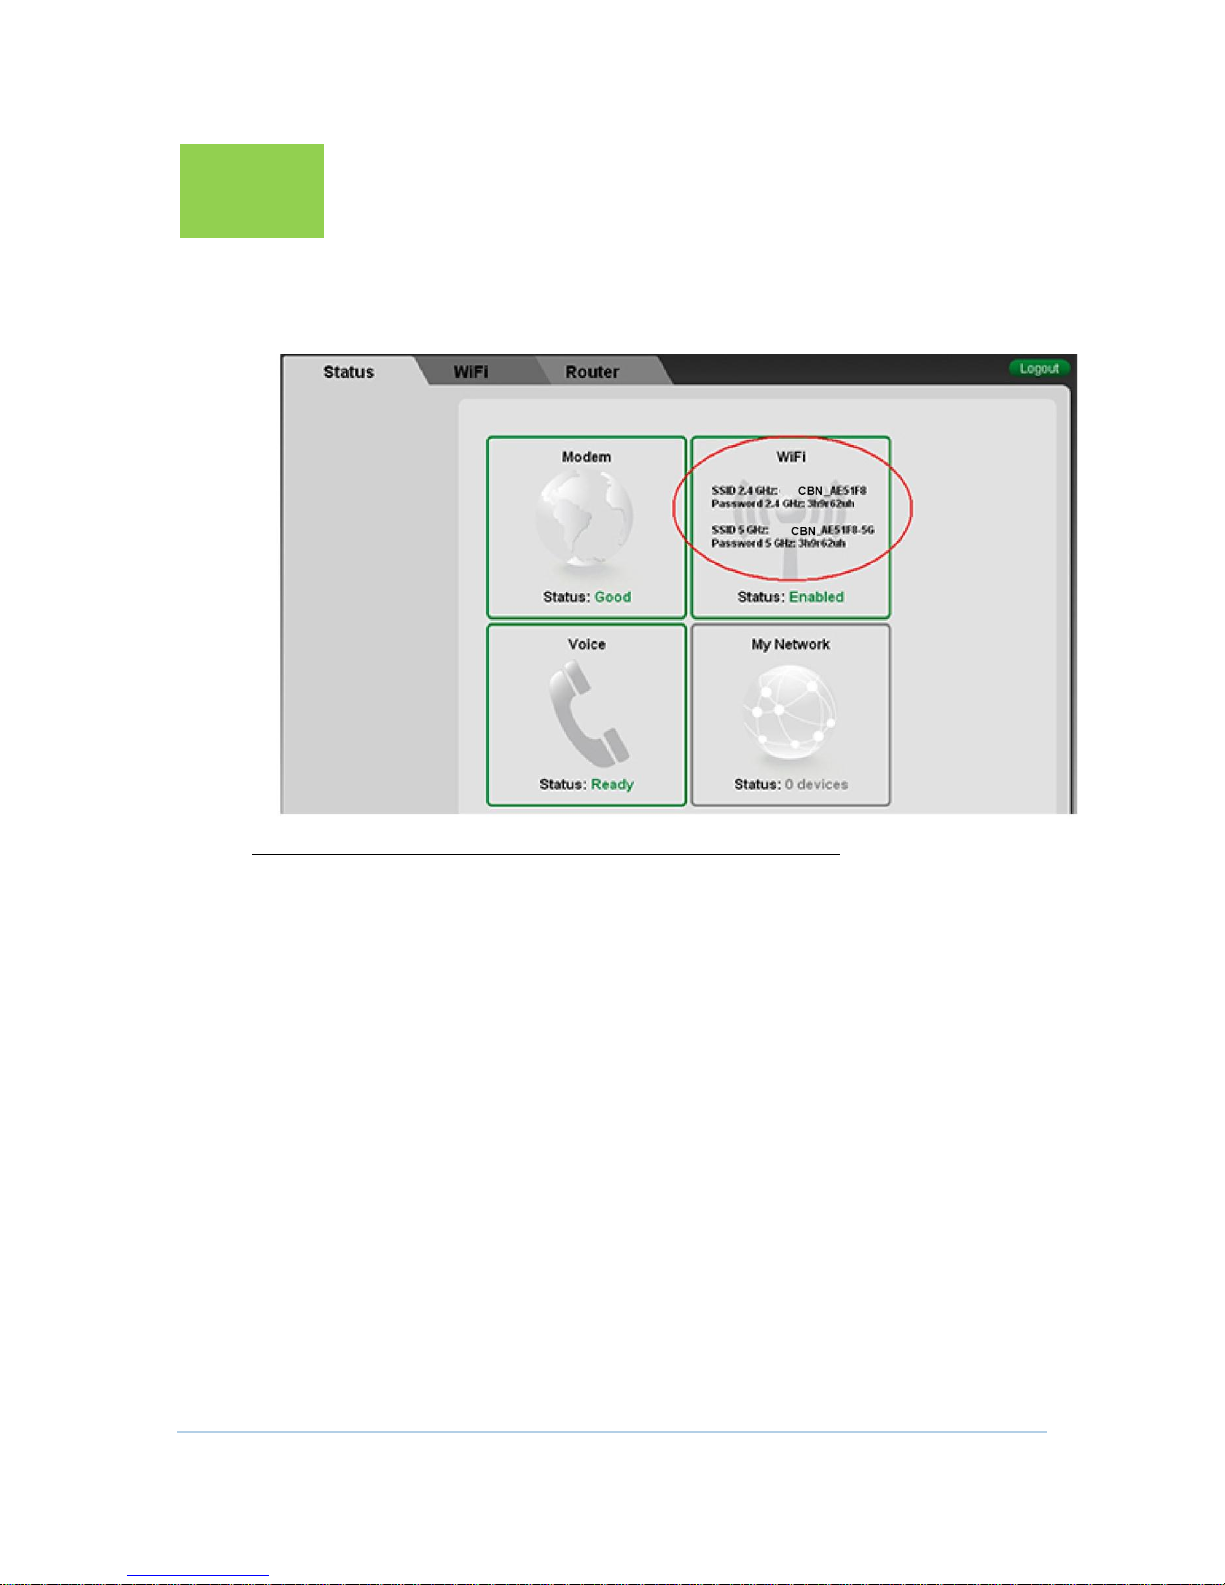
After login management system, the home page shows the current status of
CH7486E.
Note: may differ according to local settings or requirements.
Modem
This item displays the status of cable modem, the red block means off-line state
and the green means on-line. Users can press it to connect to the next page for
more details of the cable modem's HFC and IP network connectivity.
19
Page 20
WiFi
Voice
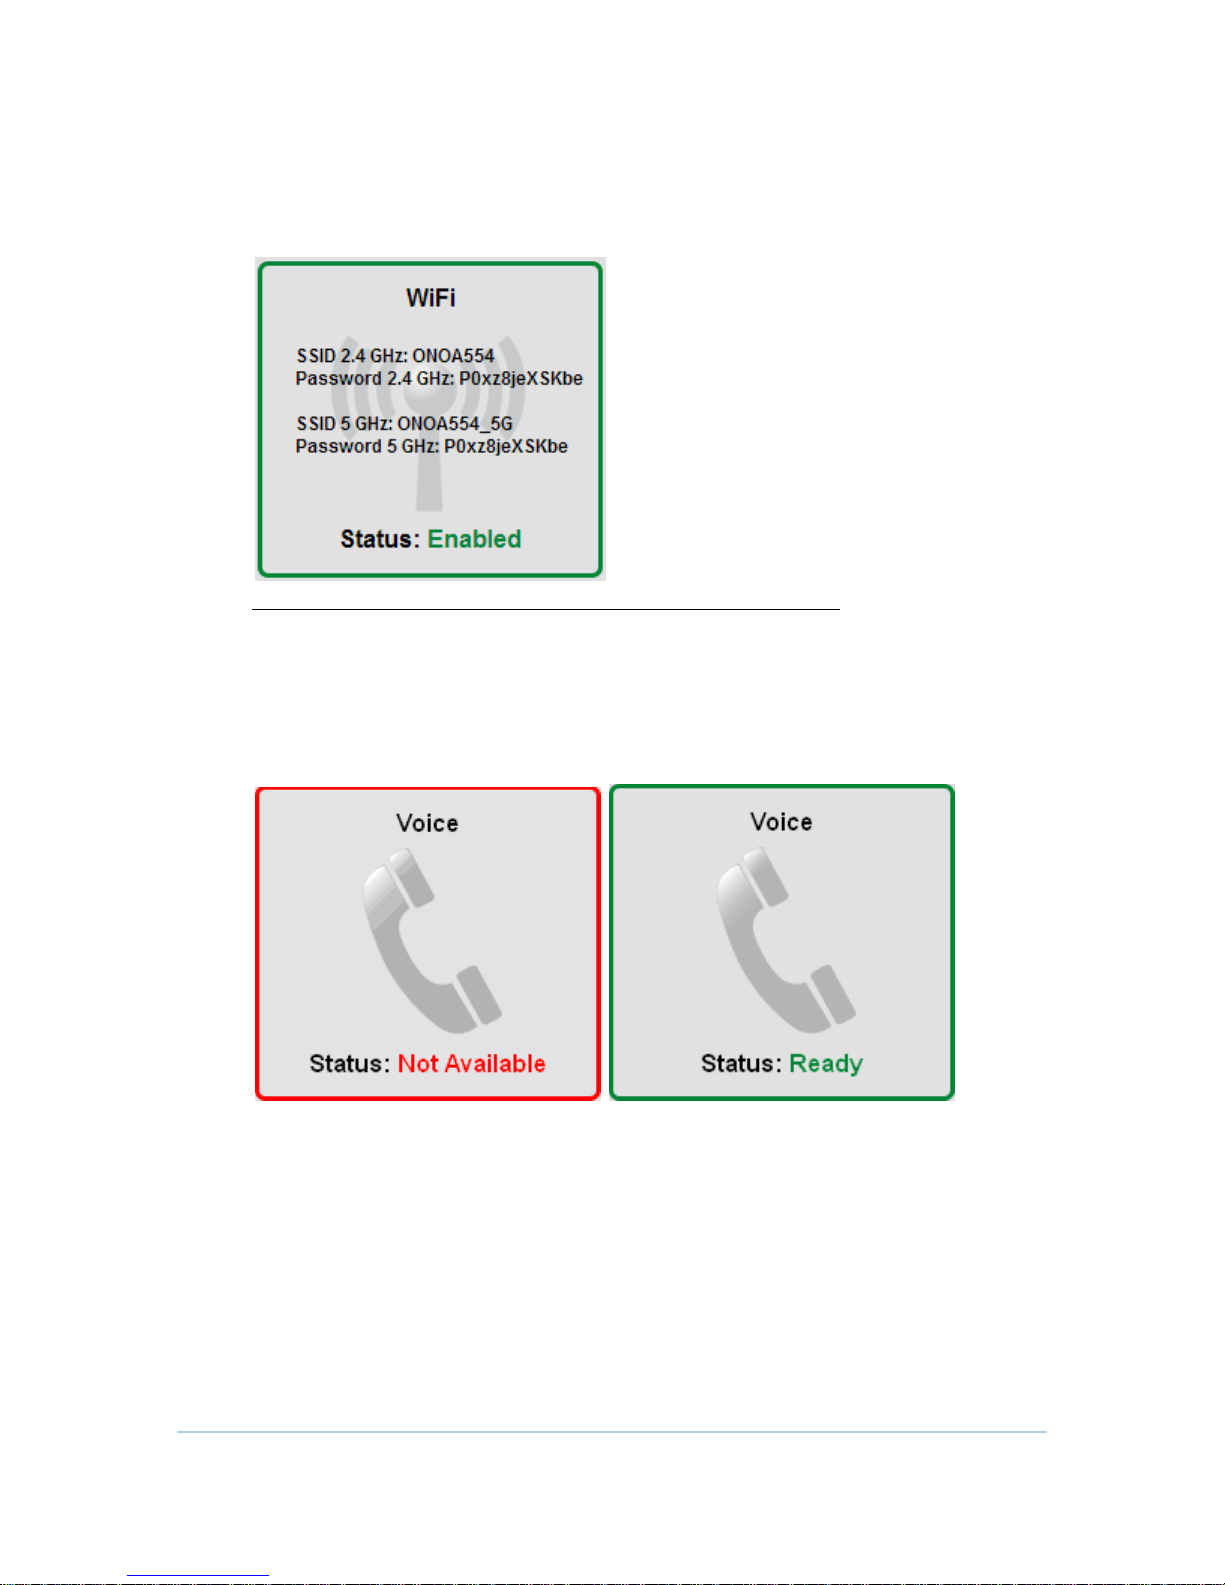
This item shows current WiFi status and you can press it to connect to the next
page for more details.
Note: may differ according to local settings or requirements.
This item displays the status of voice, the red block means off-line state and the
green means on-line. Users can press it to connect to the next page for more
details of the telephony.
20
Page 21
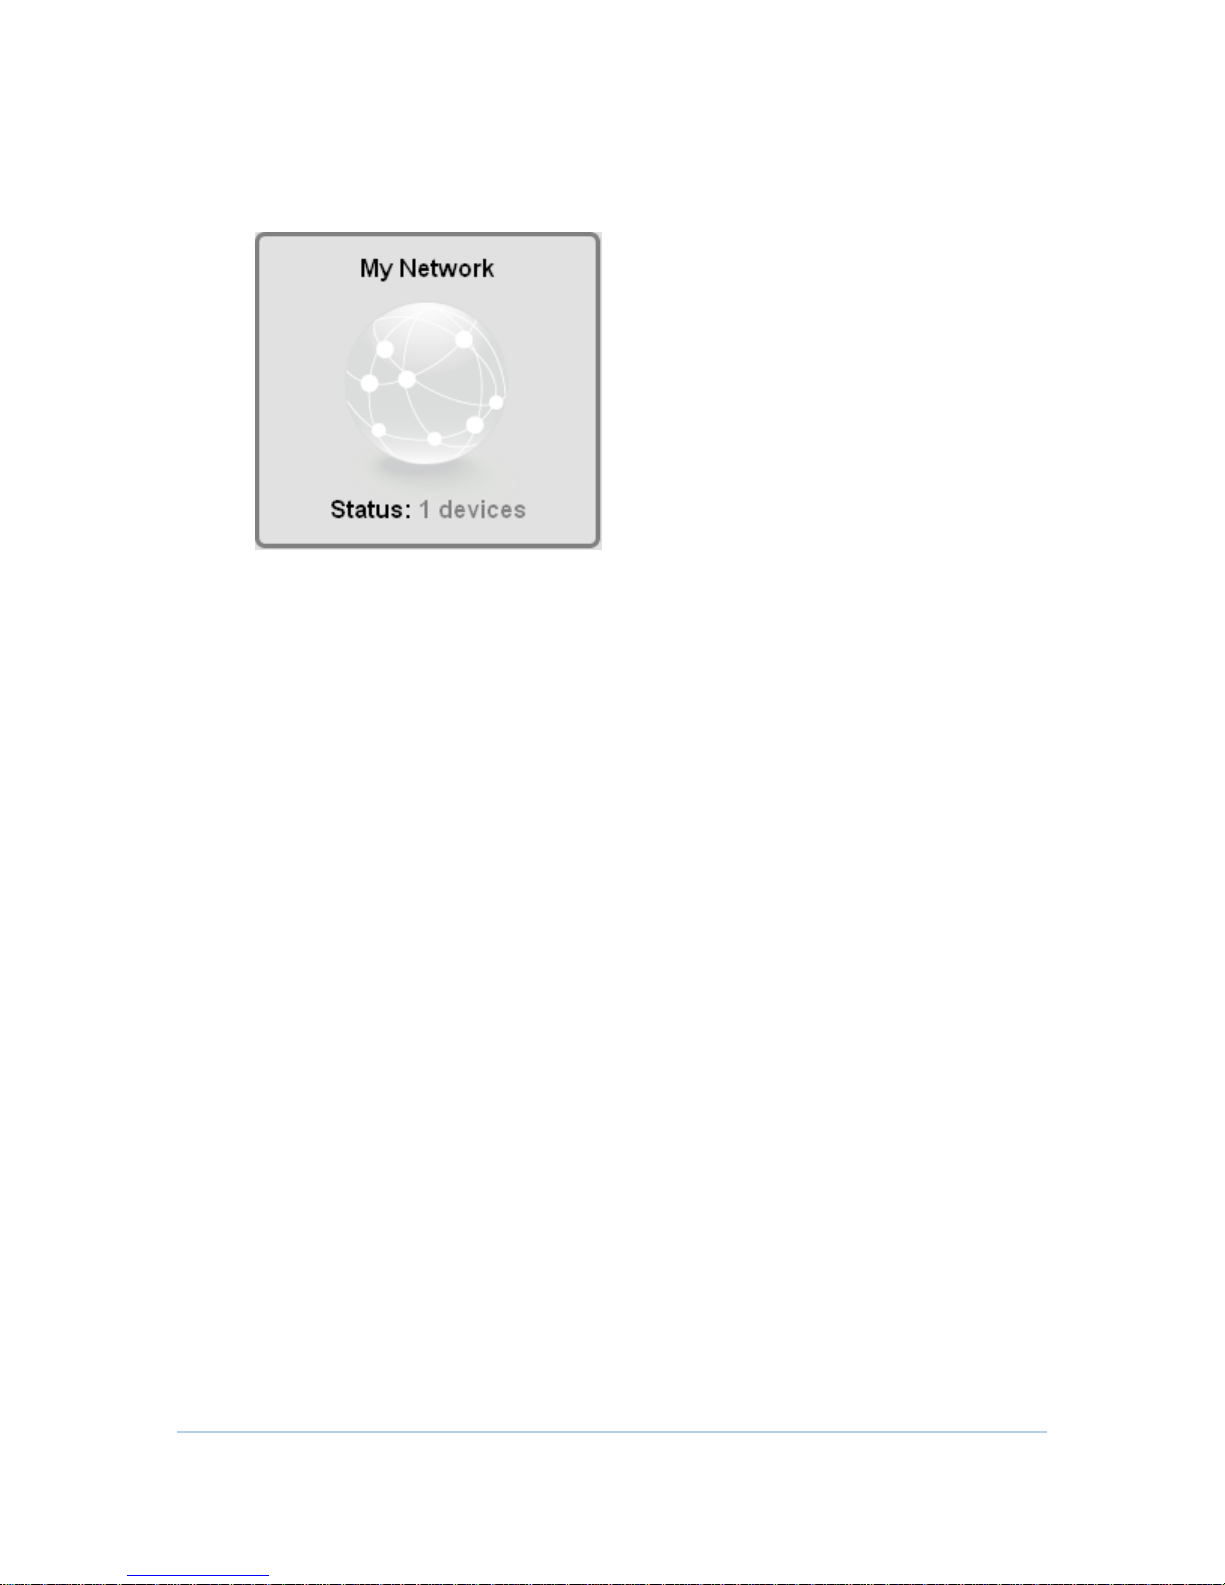
My Network
This item shows how many CPEs connect to CH7486E.
21
Page 22
4
Wireless Pages
The CH7486E Wireless Pages allow you to configure your wireless LAN (WLAN).
You can click WIFI submenu option to view or change the configuration
information for that option.
Note: may differ according to local settings or requirements.
22
Page 23
Basic Settings
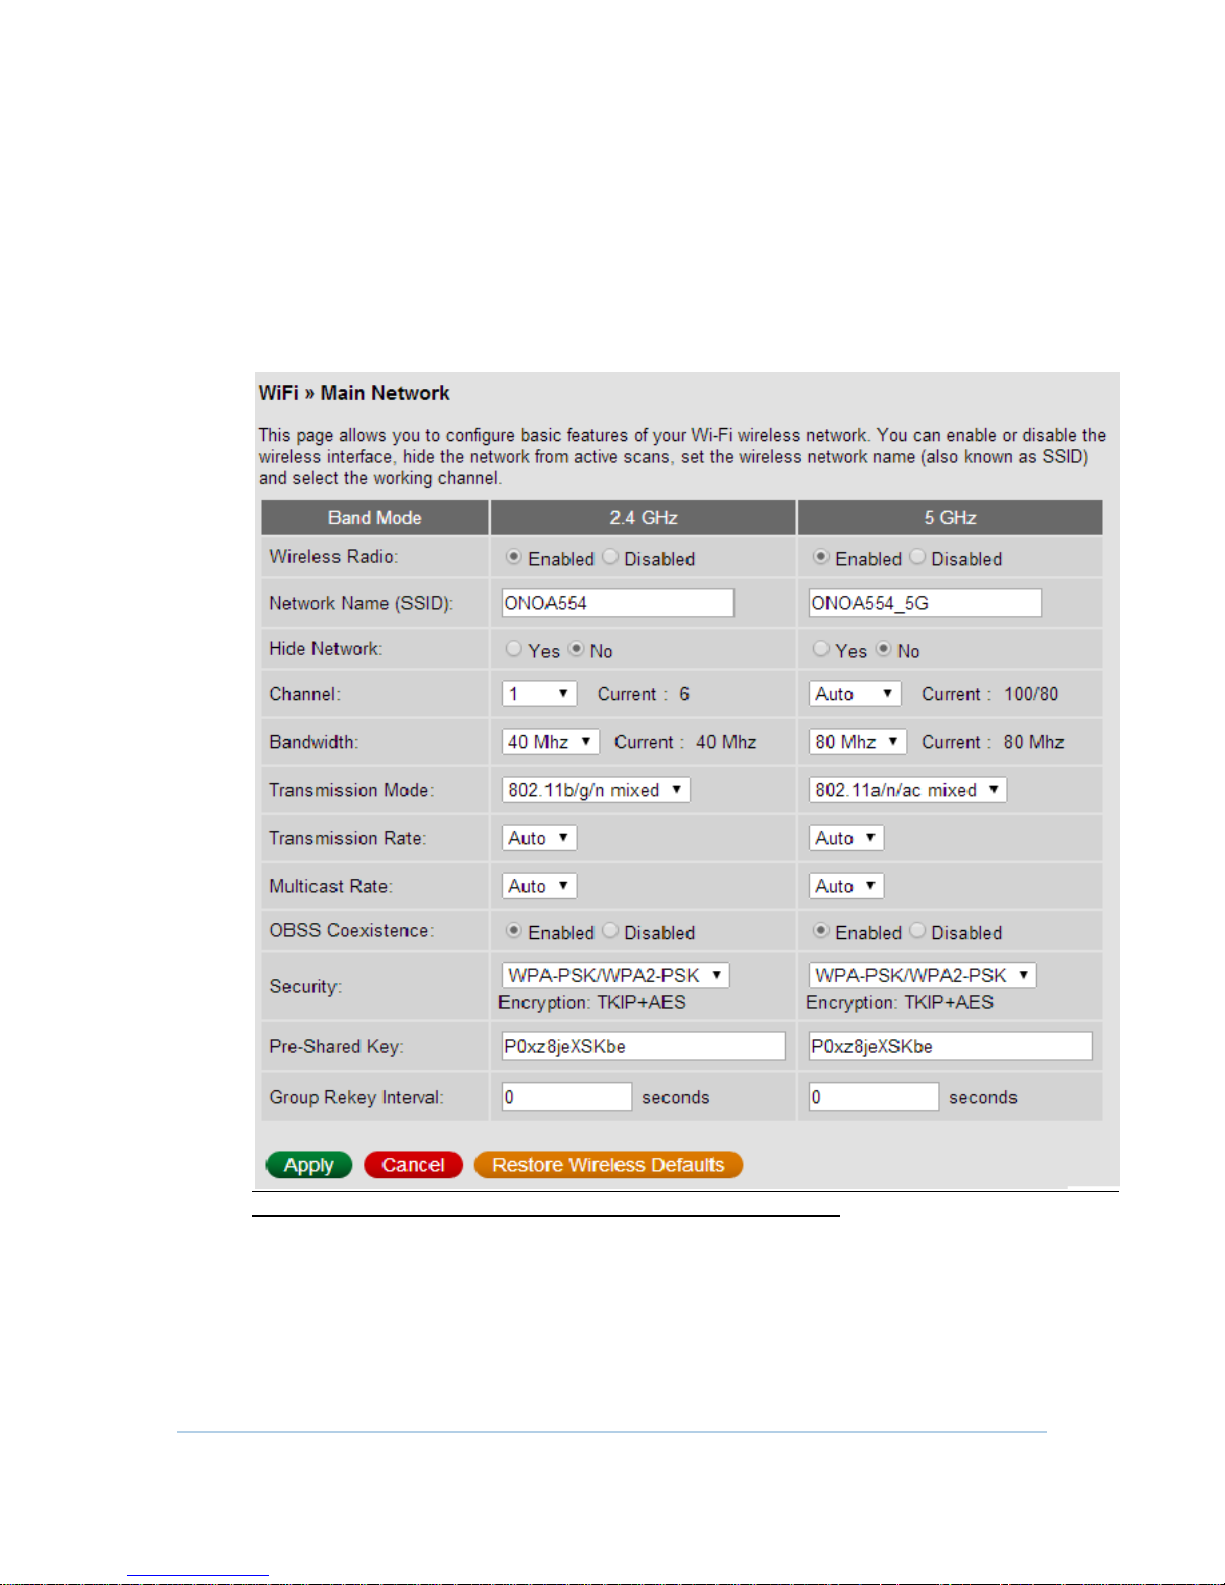
CH7486E is a dual band product and all the basic settings of 2.4GHz and 5GHz
can be changed in this page. You can configure basic features of your Wi-Fi
wireless network, including to enable or to disable the wireless interface, to hide
the network from active scans, to set the wireless network name (also known as
SSID), to change security key for wireless connection and to select the working
channel.
Note: may differ according to local settings or requirements.
23
Page 24
WPS
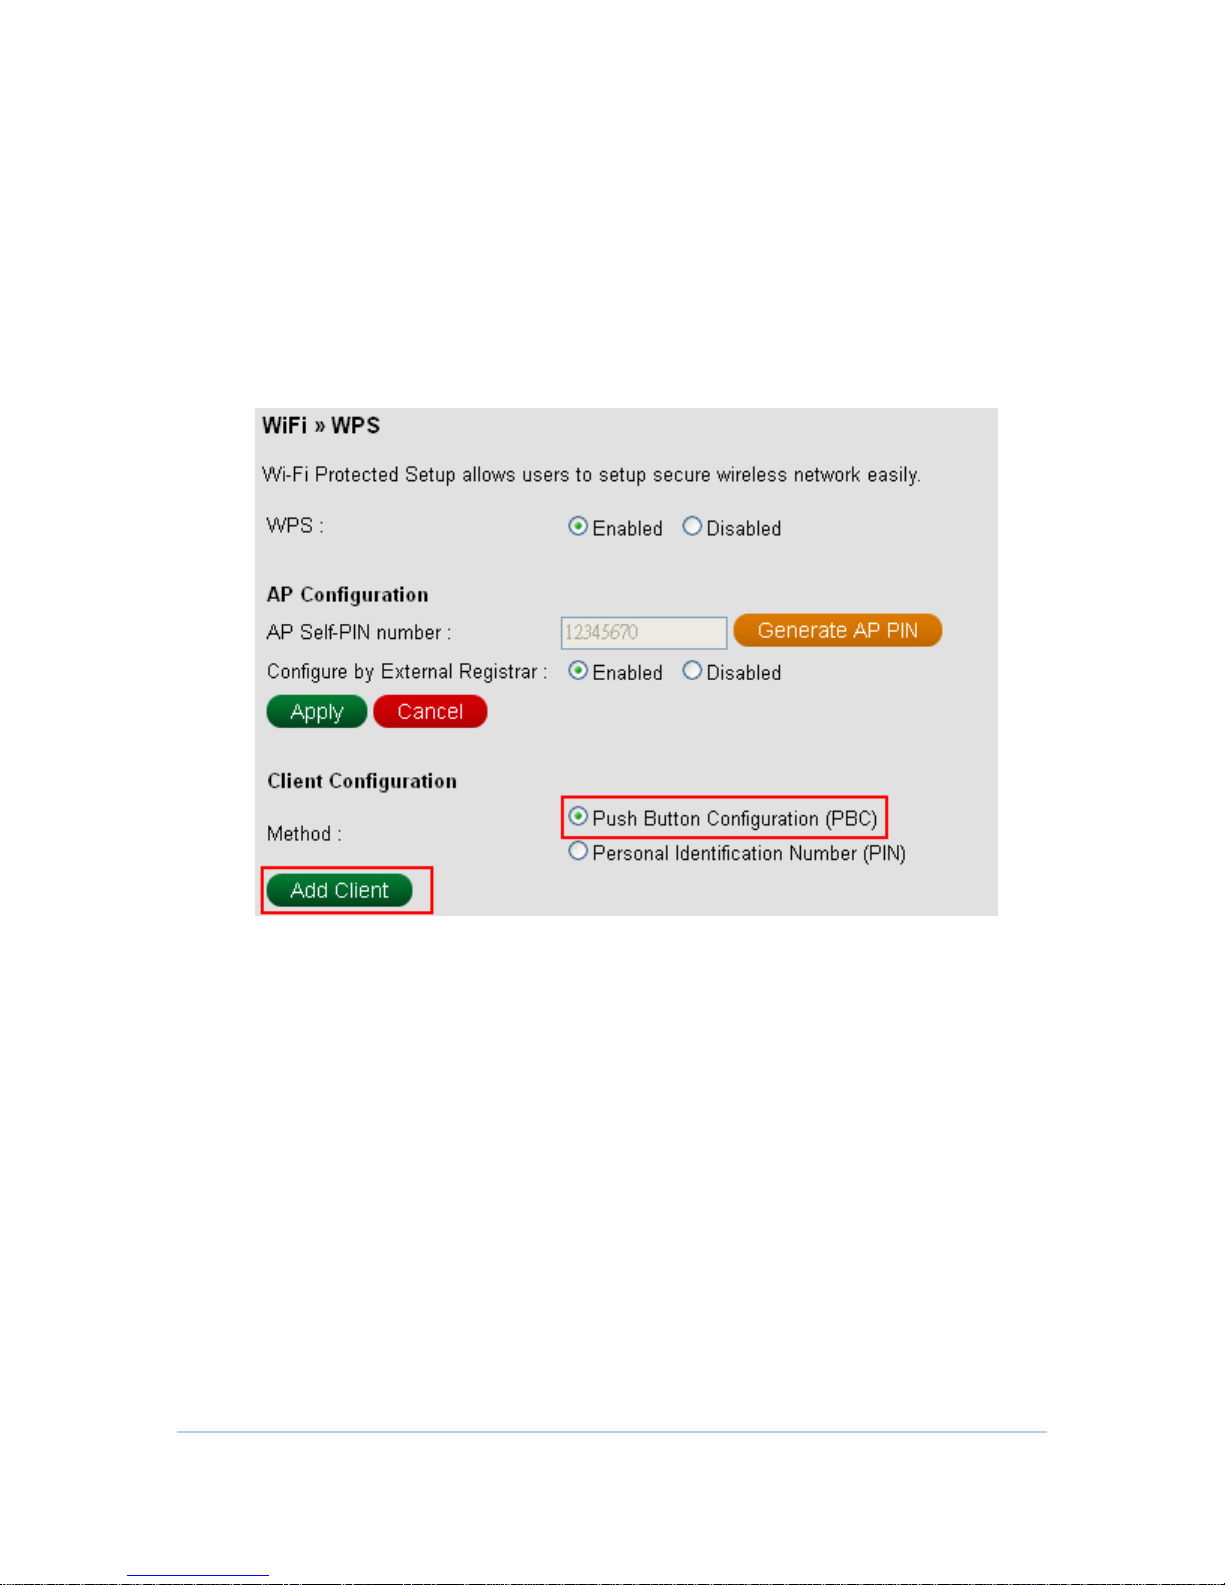
CH7486E provide WPS (Wi-Fi Protected Setup) function, with it enable will support
WPS clients to join the network very easily. It is a standard for easy and secure
establishment of a wireless network. With WPS you can setup and protect your
wireless network in just a few easy steps.
We suggest users to press Add Client button to start WPS directly. By default, that
will be PBC (Push Button Configuration) and easy for users.
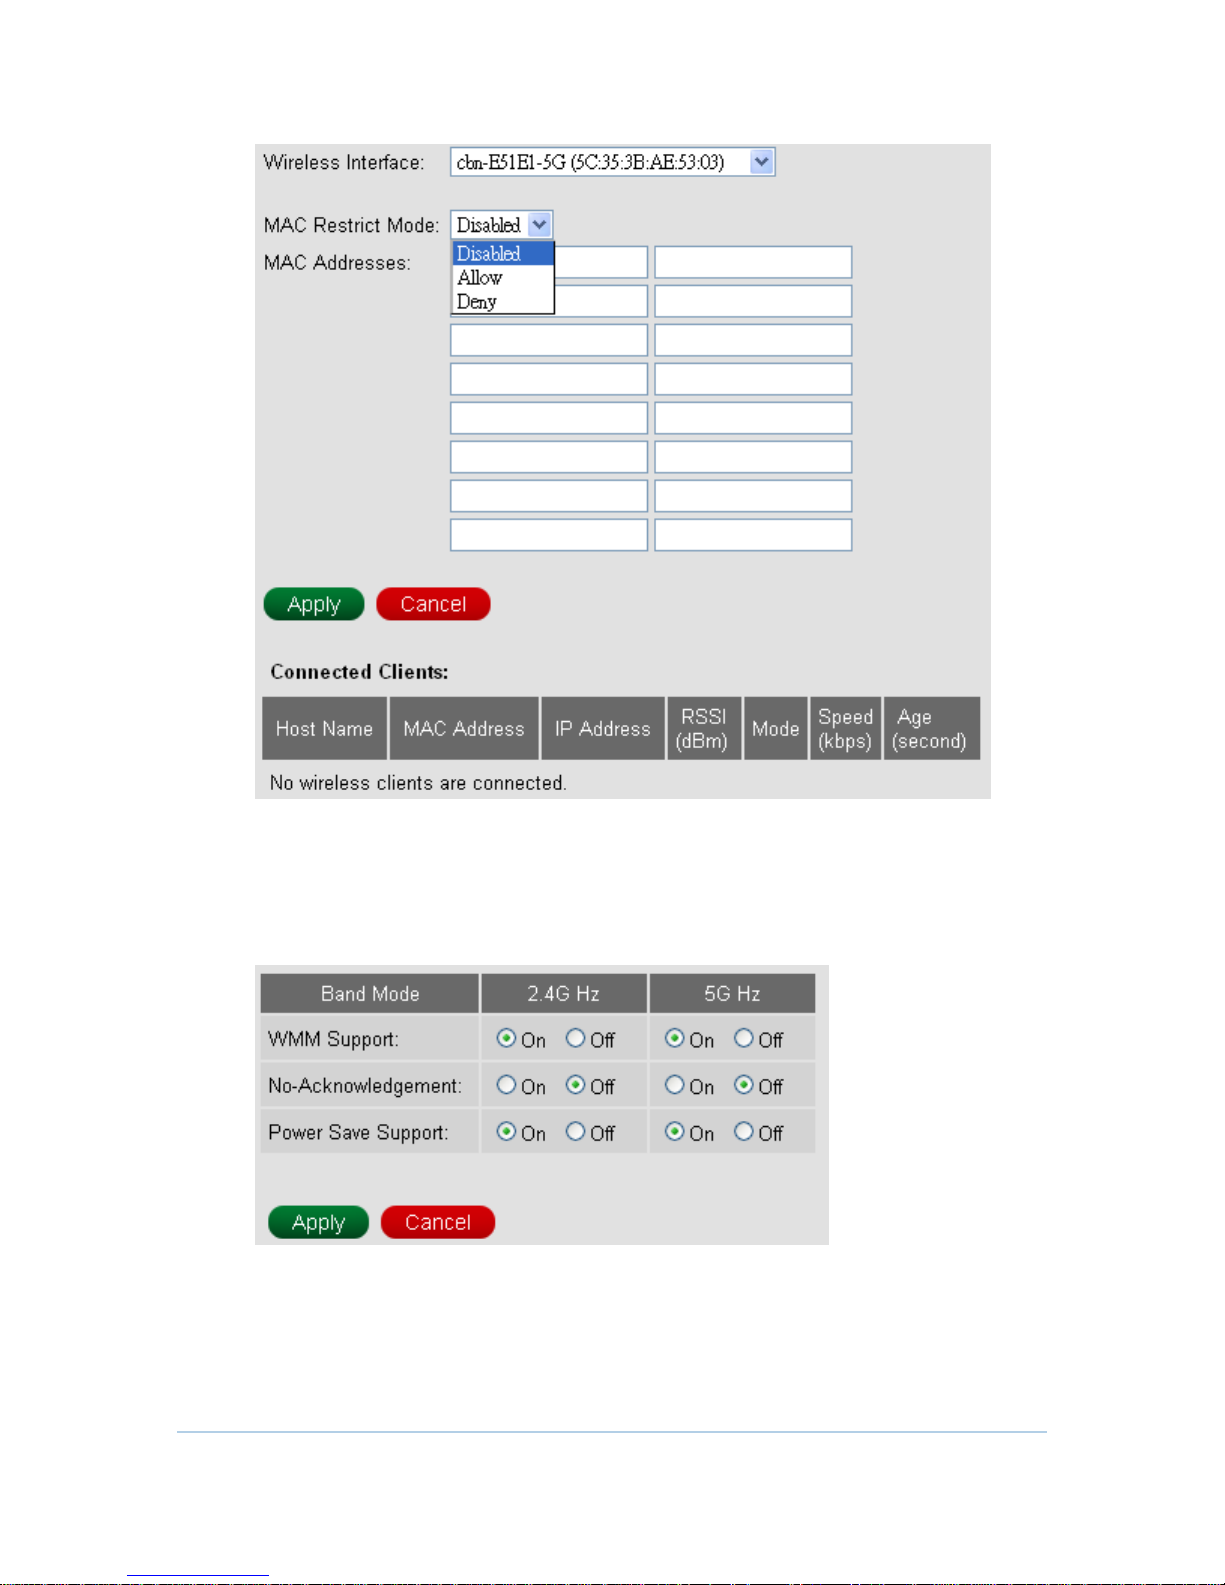
Access Control
This page allows users to specify those wireless clients that are allowed to connect
to this device. This offers additional protection against unwanted connections.
You can choose Allow or Deny rule at first, and then fill in the client MAC to
enable access control function.
24
Page 25
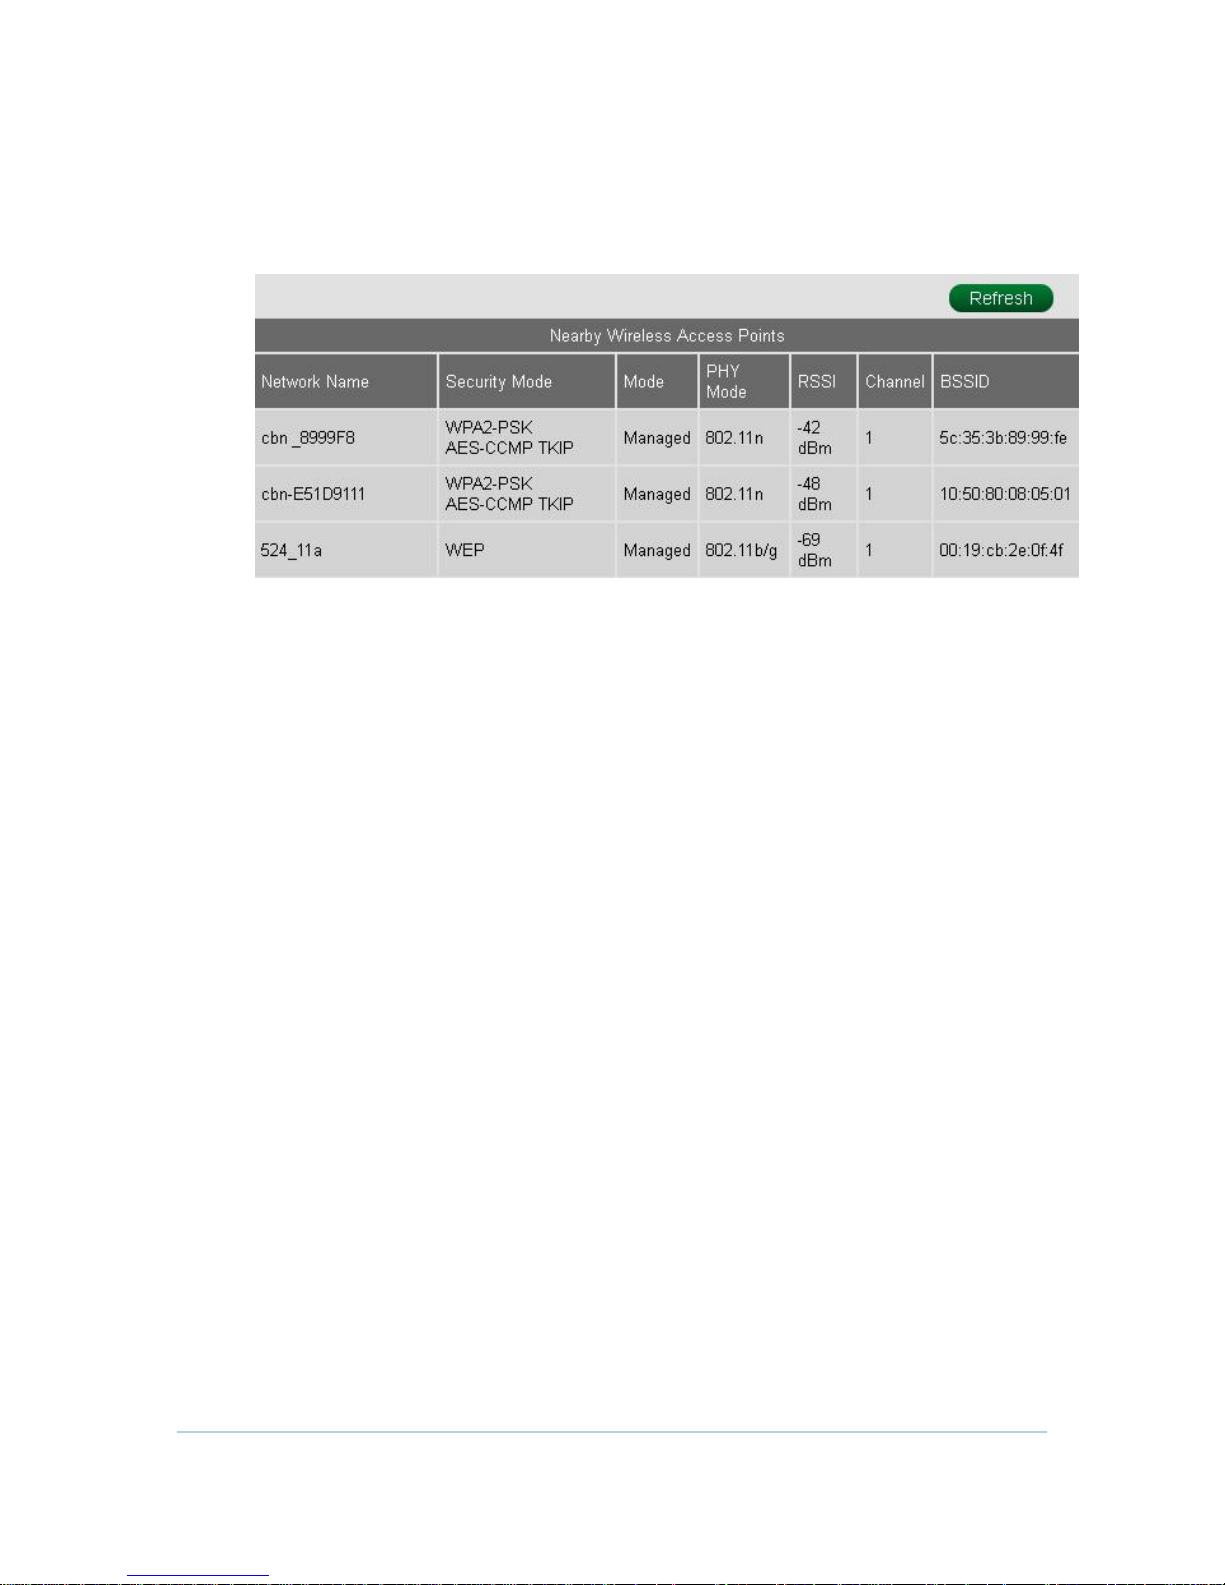
WMM
CH7486E provides WMM page to configure Wi-Fi Multimedia QoS. Actually, we
suggest users to use default settings.
25
Page 26
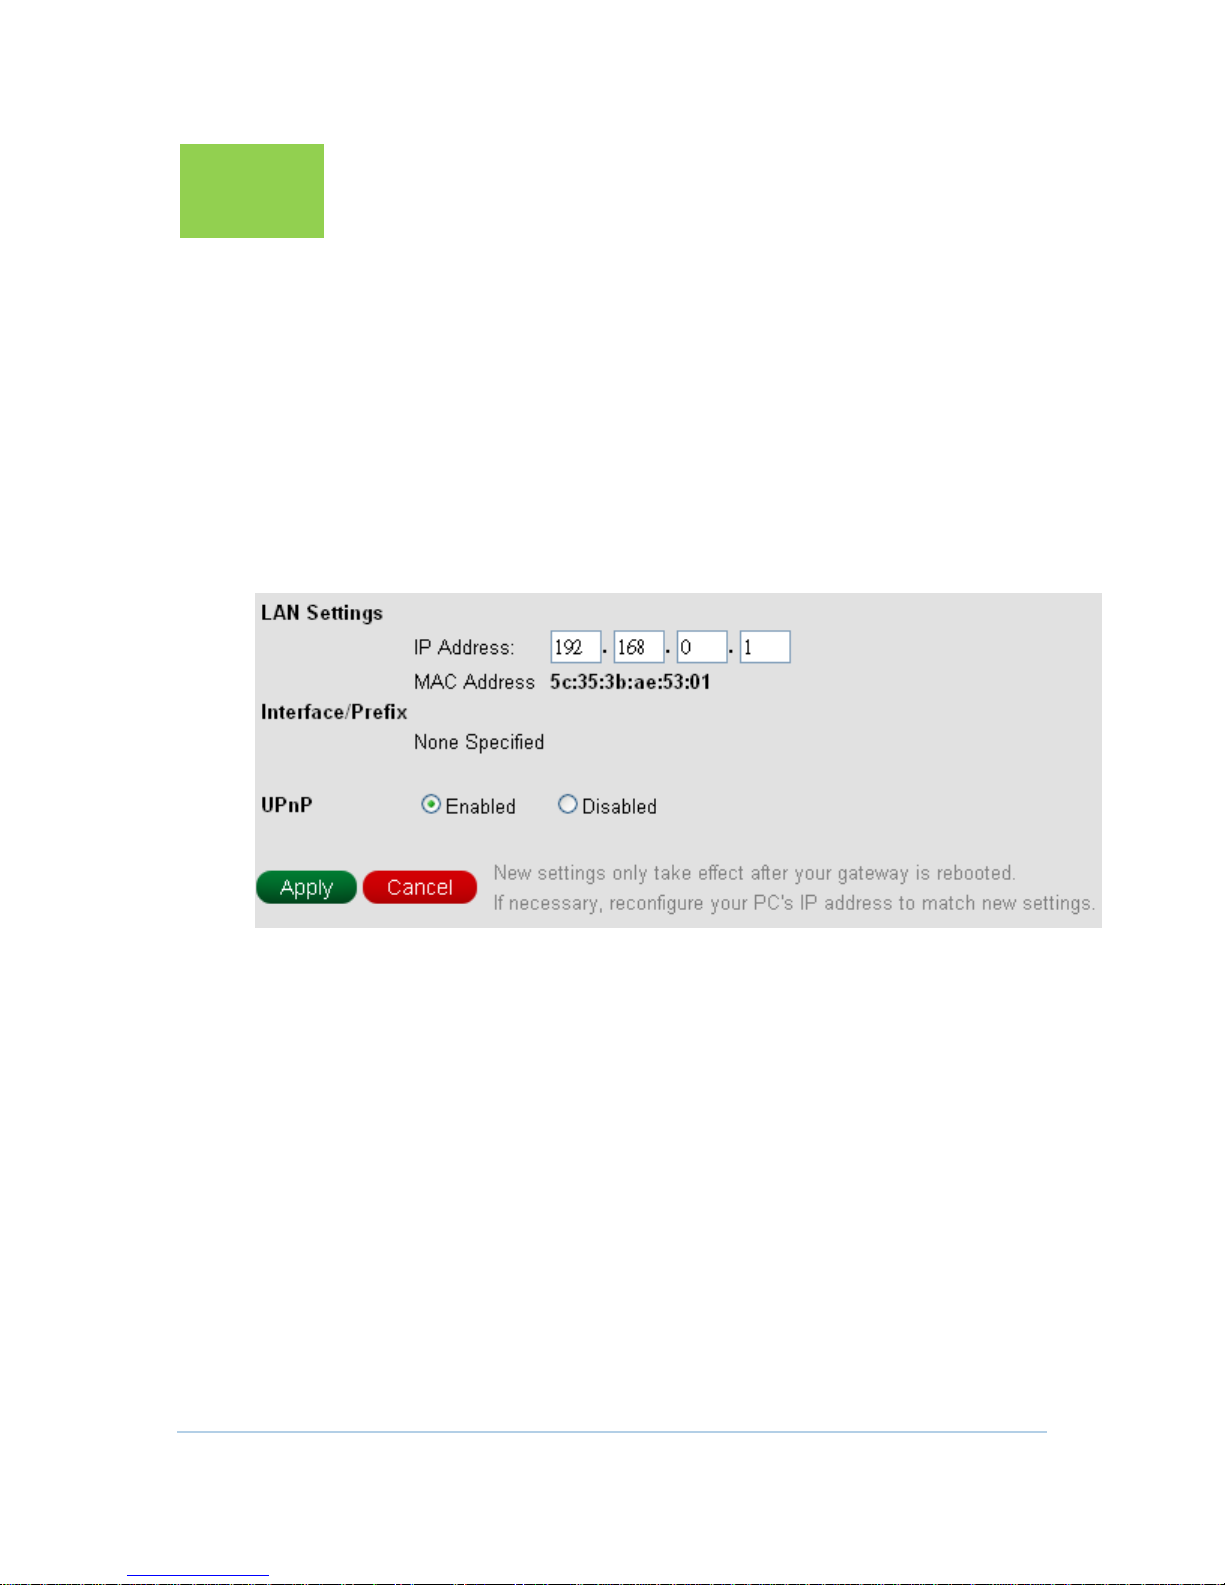
Neighbor APs
CH7486E supports Neighbor APs function and this page shows the details of all the
nearby APs.
26
Page 27
5
Router
The CABLE MODEM pages provide the information of cable connection status,
channel signals and channel configuration during the establishment of cable
connection to cable service provider’s CMTS.
Basic
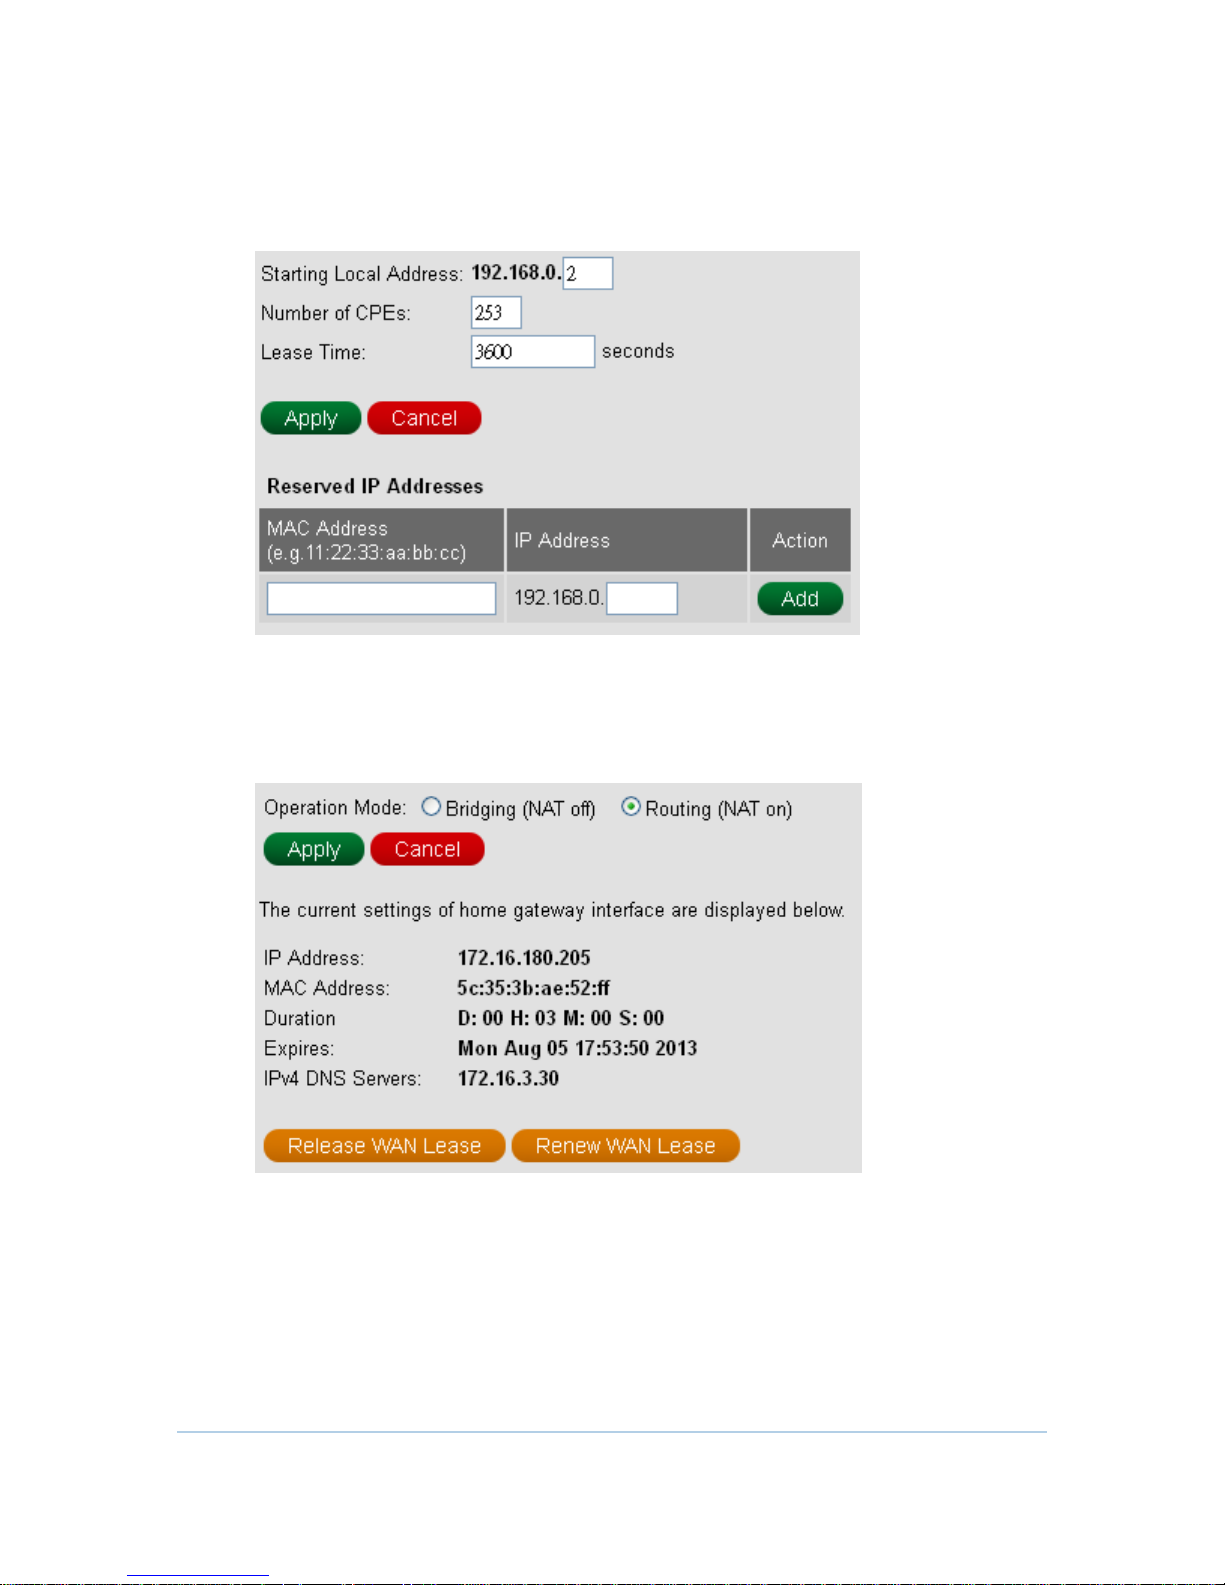
LAN Settings
CH7486E allows users to configure private LAN IP for their home gateway.
27
Page 28
DHCP Server
CH7486E provides DHCP server to manage IP addresses to CPEs and supports
Reserved IP Address for users’ private and static clients.
WAN Settings
This page displays WAN status after CH7486E gets online and provides users to
change Operation Mode.
Network Map
This page shows how many CPEs connect to CH7486E.
28
Page 29
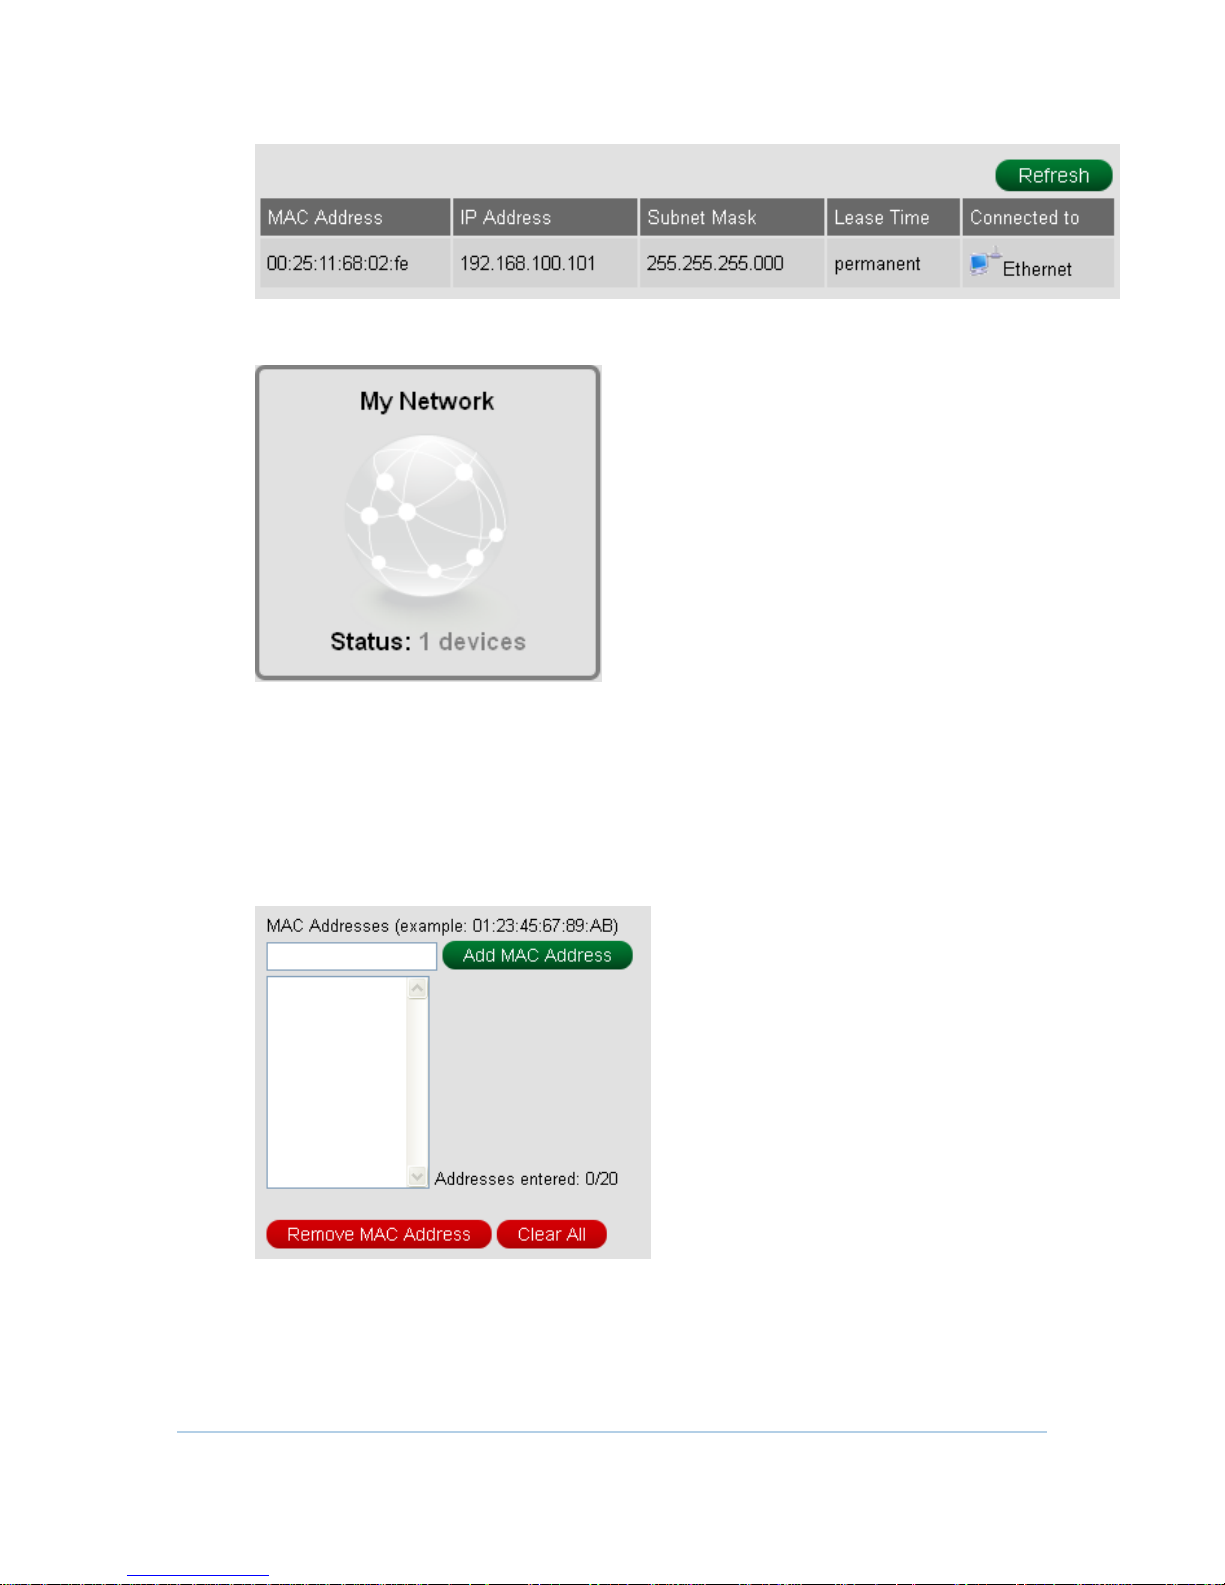
Users can browse here directly through the item at home index.
Advanced
MAC Filtering
This page allows configuration of MAC address filters in order to block Internet
traffic to specific network devices on your local network.
29
Page 30
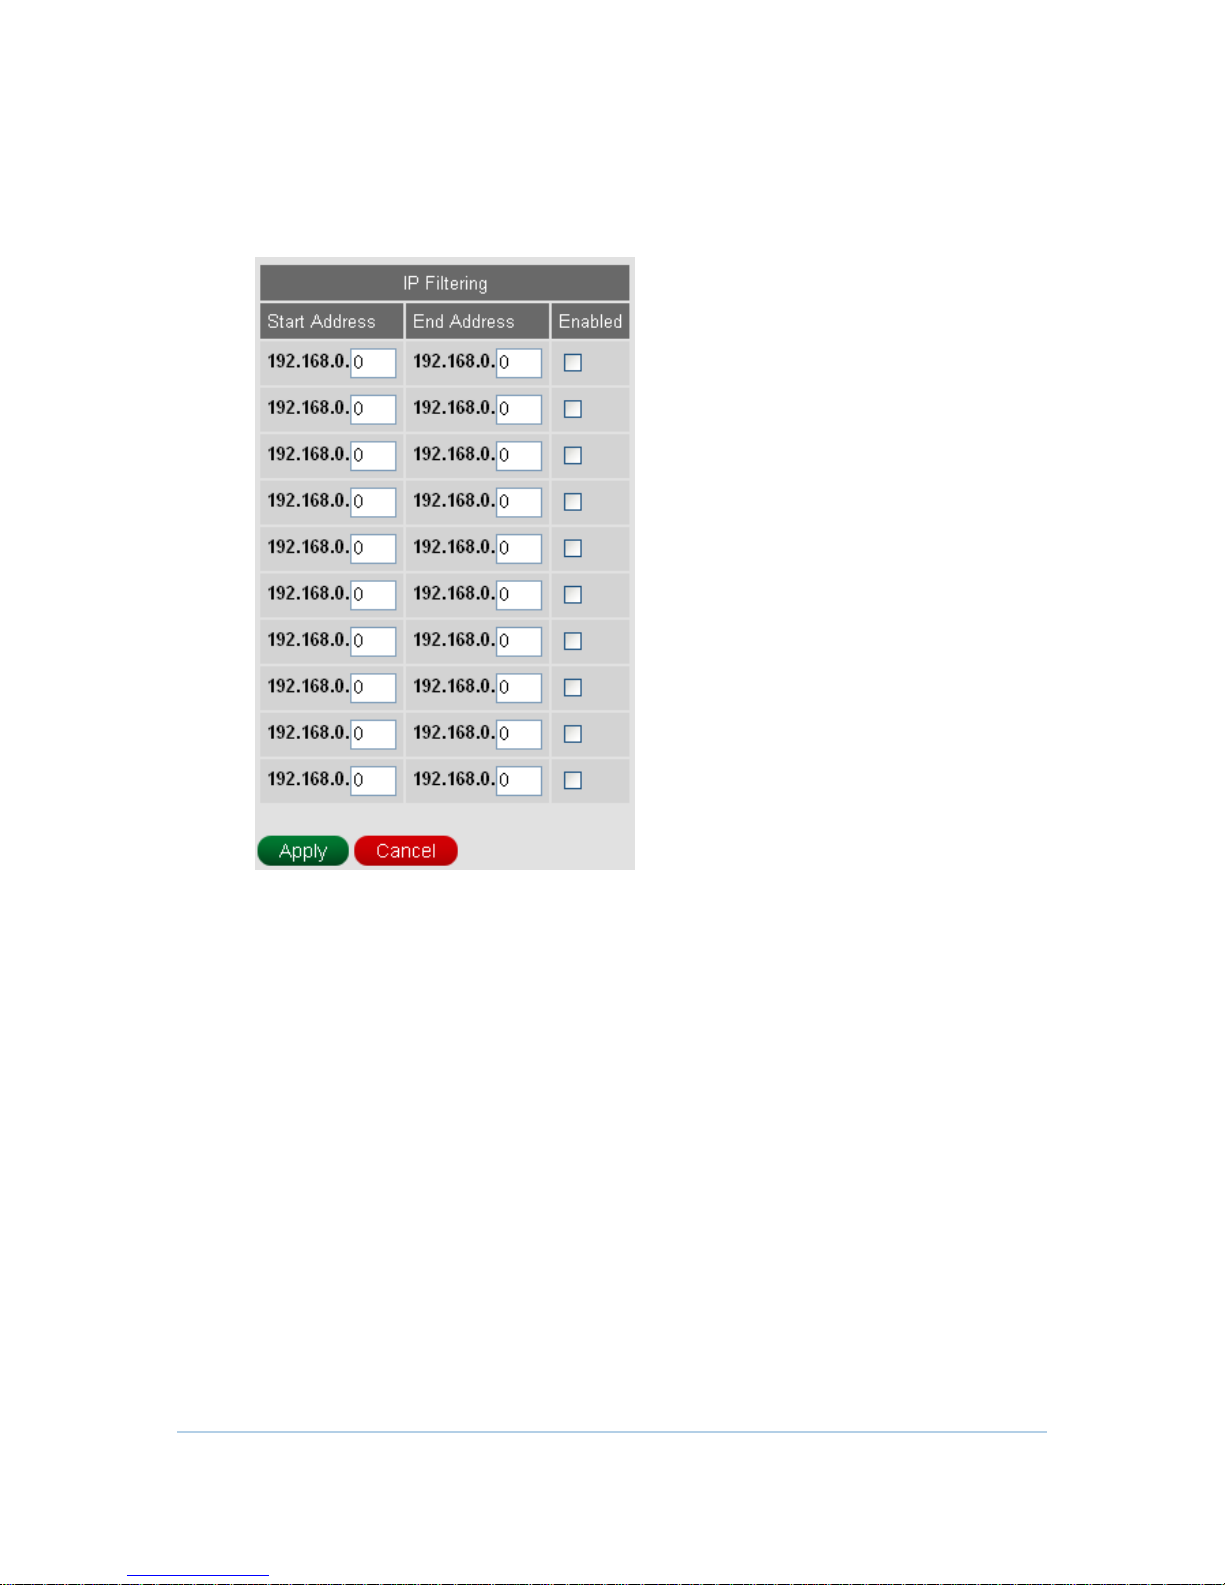
IP Filtering
This page allows you to specify the IP packet filtering rules to prevent the service
accessed from the Internet hosts or limit the Internet access for local hosts.
30
Page 31
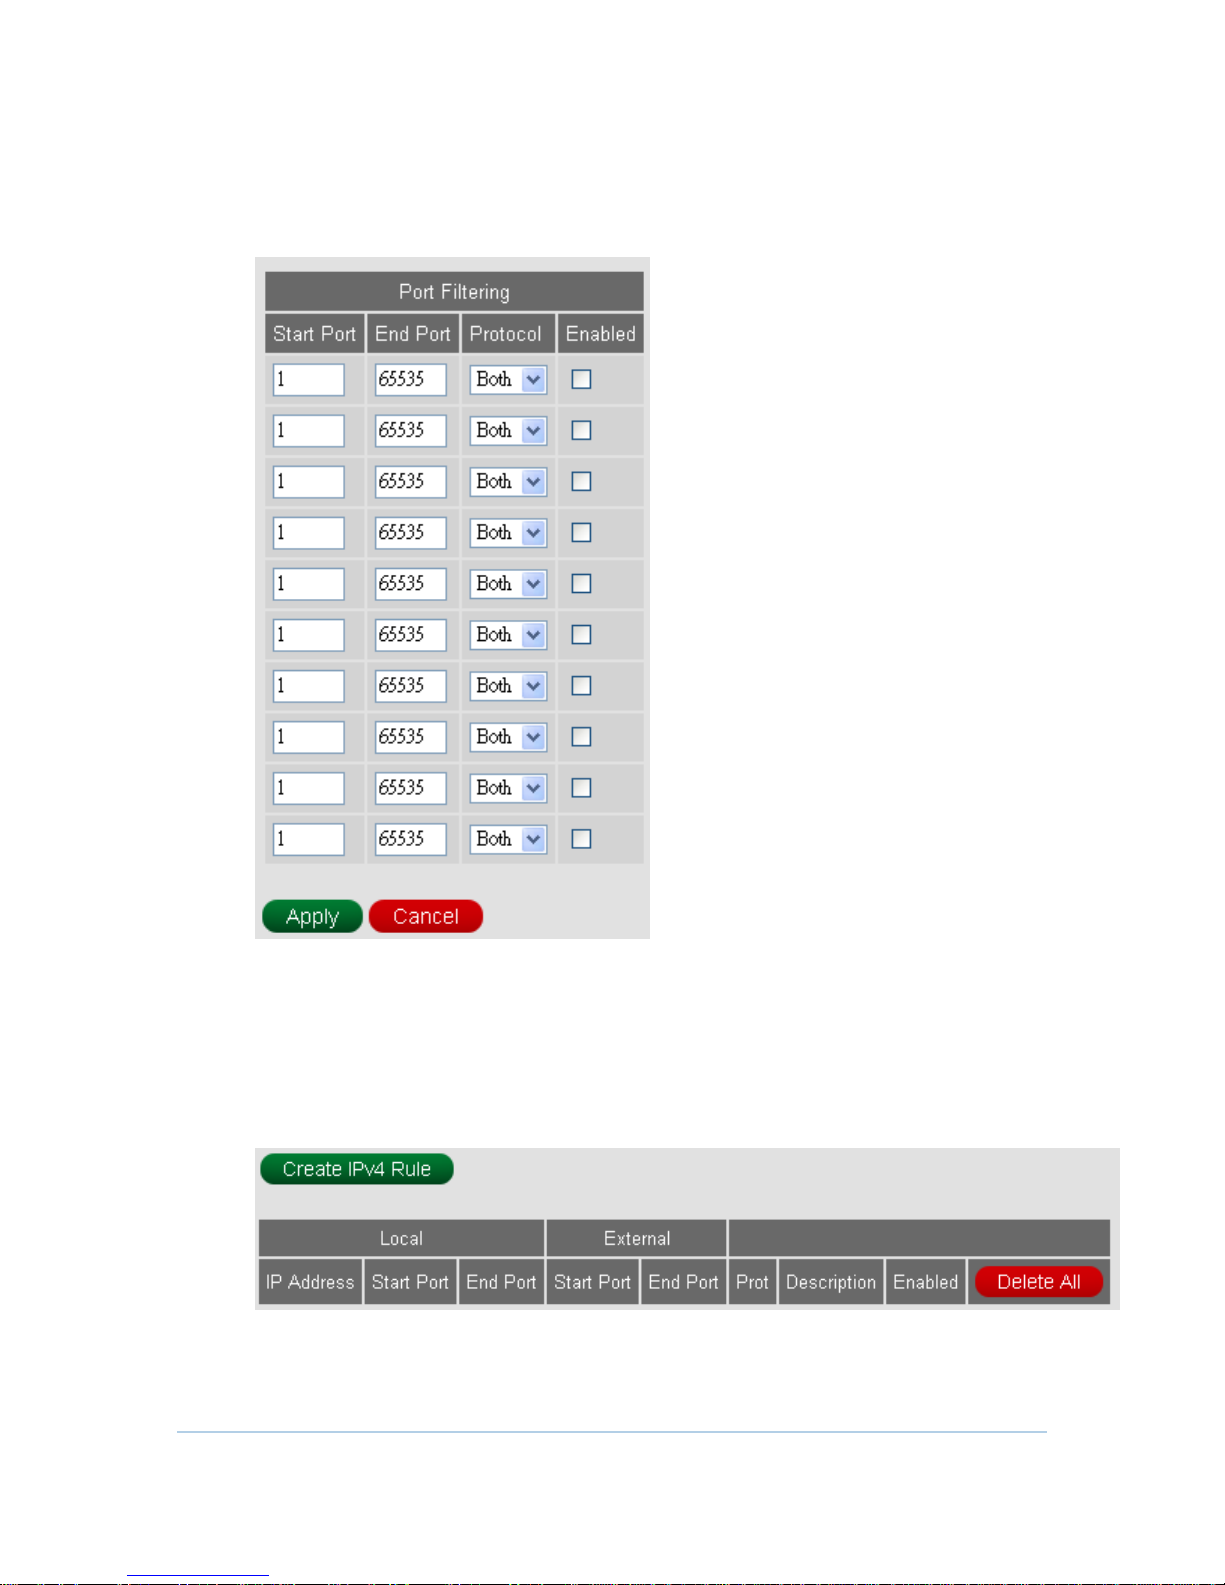
Port Filtering
This page allows you to specify the IP packet filtering rules to prevent the service
accessed from the Internet hosts or limit the Internet access for local hosts.
Port Forwarding
This allows for incoming requests on specific port numbers to reach web servers, FTP
servers, mail servers, etc. so they can be accessible from the public Internet.
1. Press Create IPv4 Rule button to add new rules.
31
Page 32
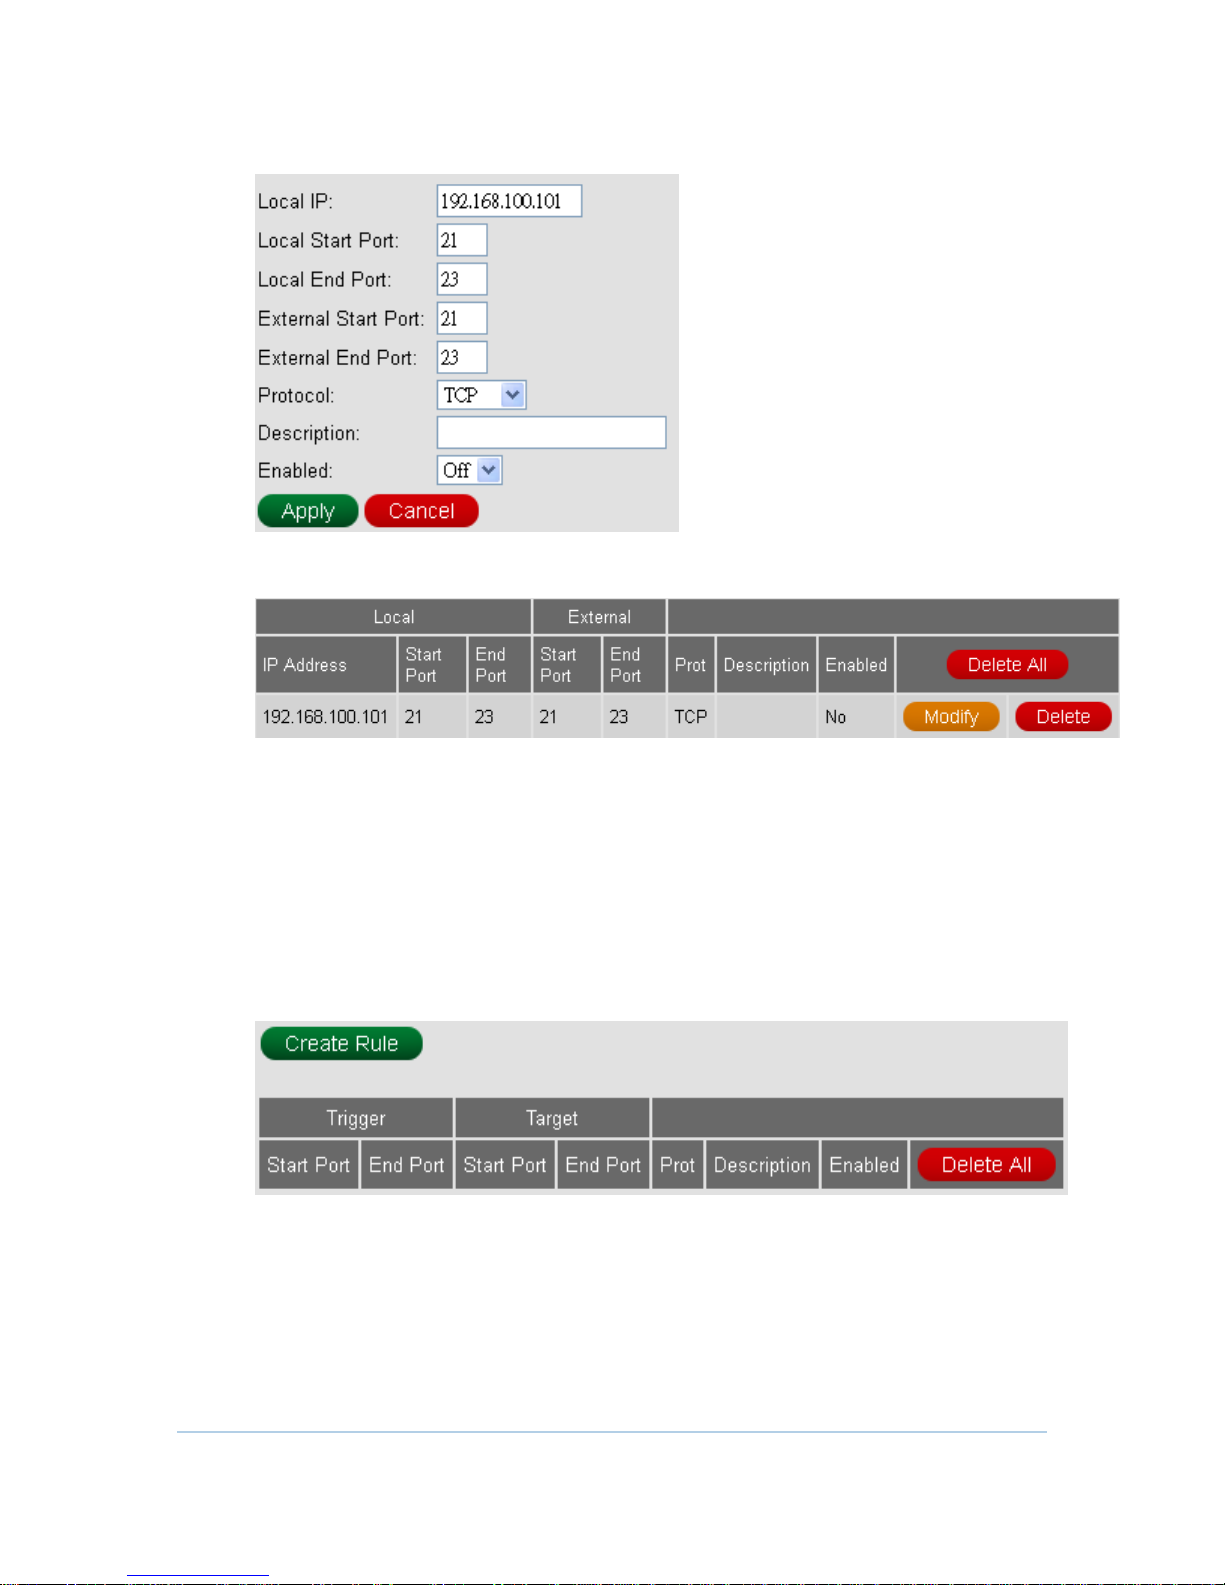
2. Fill in needed information, and then press Apply button.
3. One rule is created. And also, you can Modify or Delete the existed rules.
Port Triggering
Port triggering function is a conditional port forwarding feature. When this device
detects outbound traffic on a specific port (triggered ports), it will set up the port
forwarding rules temporarily on the port ranges you specify to allow inbound traffic.
This is supposed to increase the support for Internet gaming, video conferencing,
and Internet telephony due to these applications require multiple connections.
1. Press Create Rule button to add Port Triggers.
32
Page 33
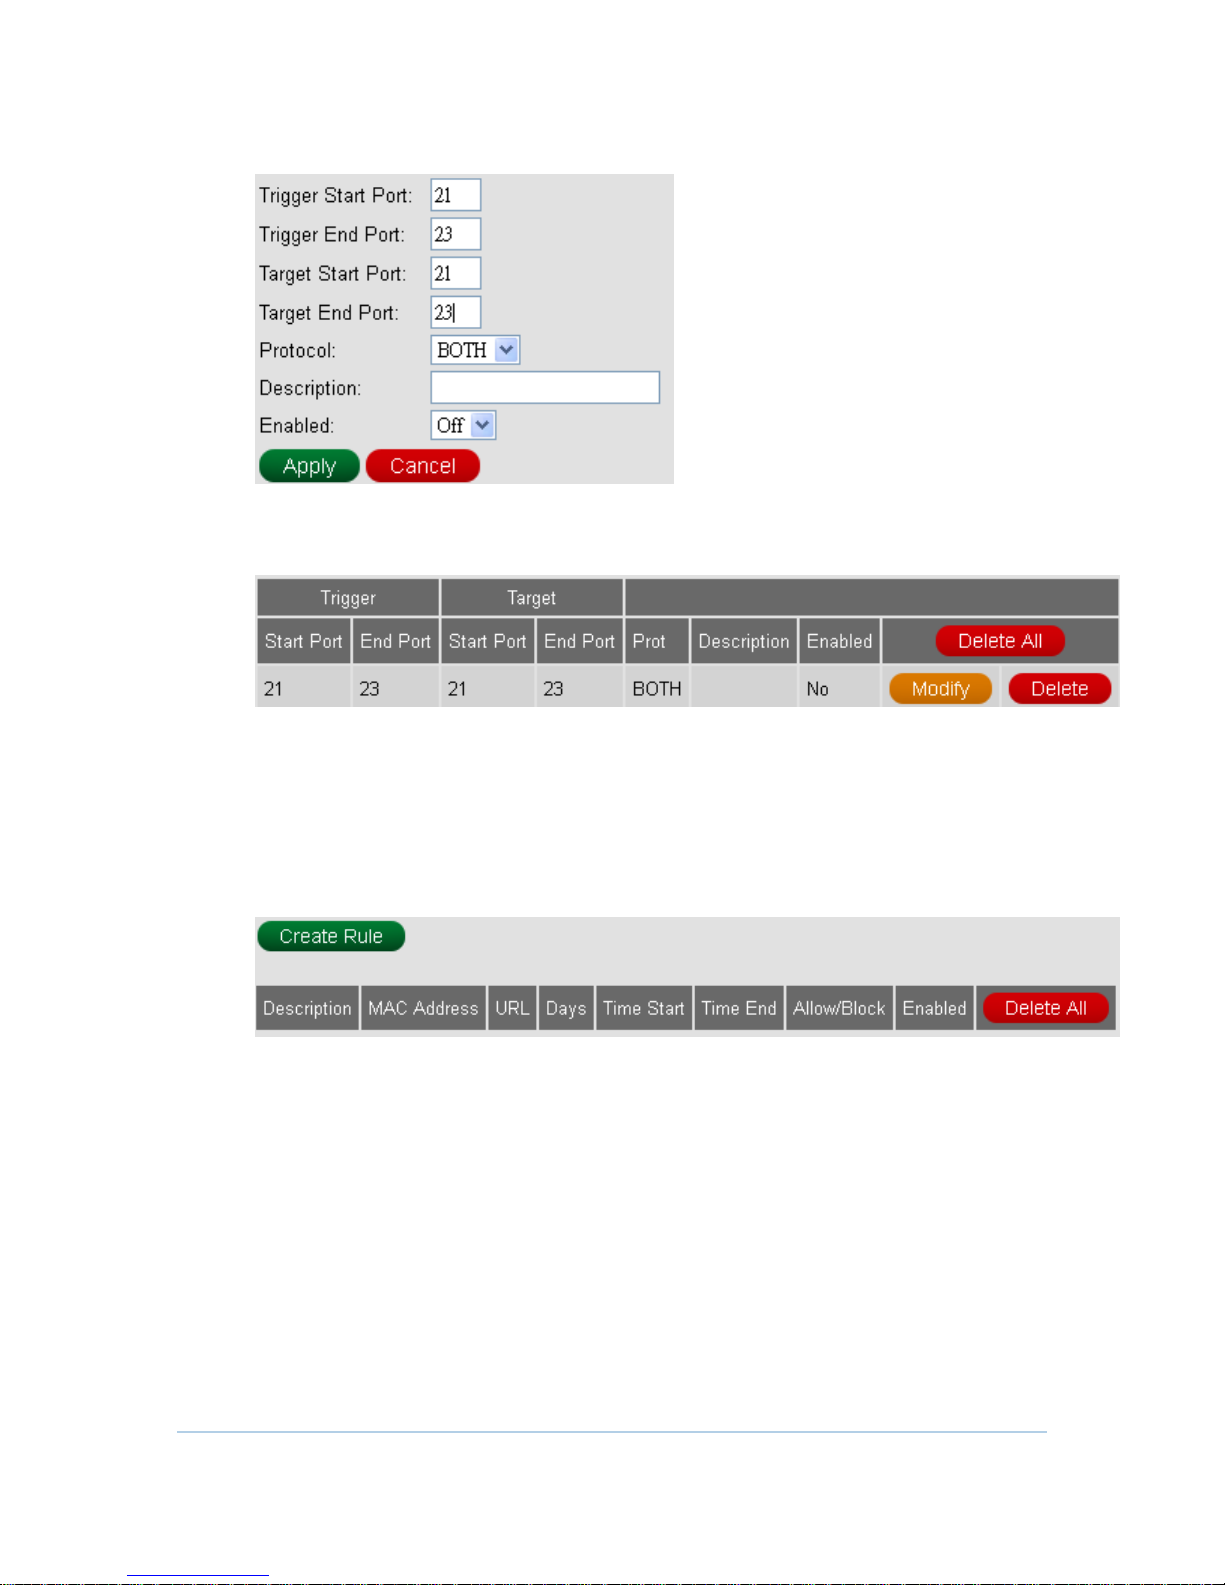
2. Fill in needed information and Apply.
3. One new Port Trigger is generated. And also, you can Modify or Delete the
existed Port Trigger.
URL Filtering
This page is used to configure filtering of outbound connections and display
configured filtering rule of firewall.
1. Press Create Rule button to add one filtering rule.
33
Page 34
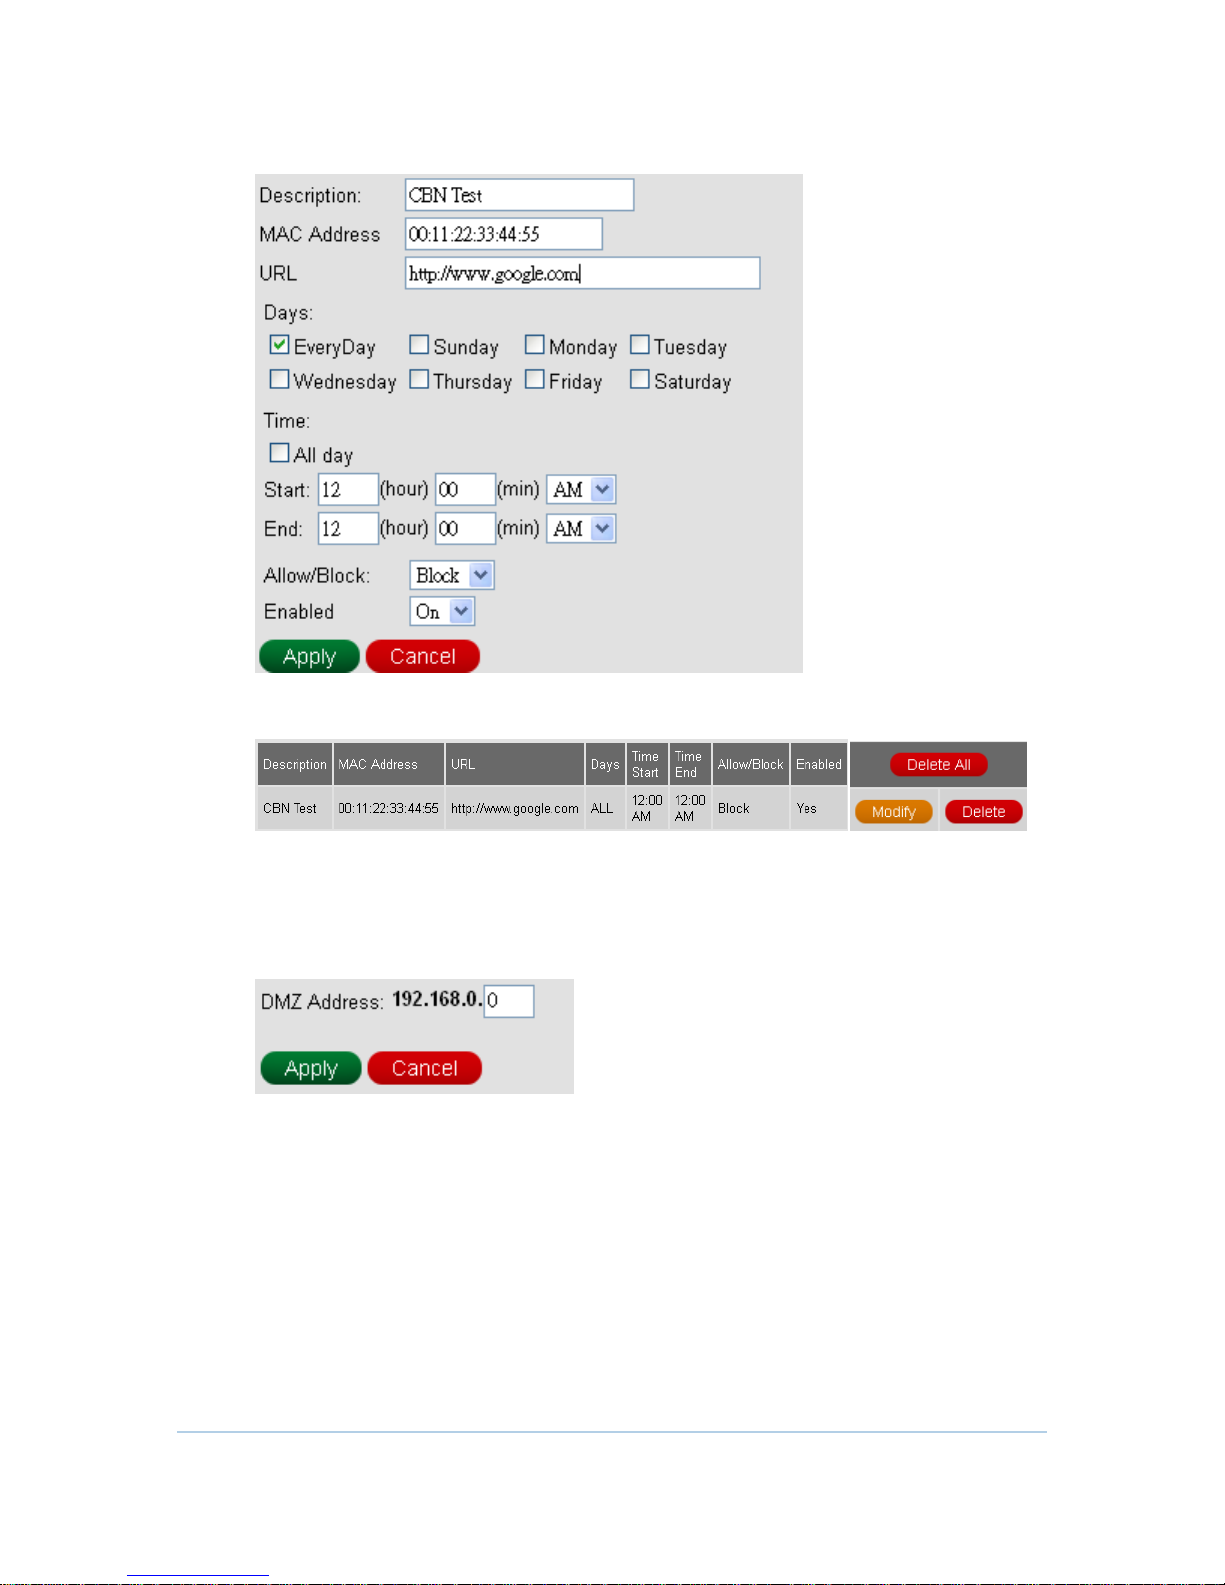
2. Configure outbound information and then press Apply button.
3. One rule is created. And also, you can Modify or Delete the existed rules.
DMZ
DDNS
This page is for DMZ (Demilitarized Zone) configuration. You can fill in the exposed
host and press Apply button.
This page is for DDNS (Dynamic DNS) configuration. You can fill in the registered
DDNS information here, and then press Apply button to enable your DDNS
function.
34
Page 35
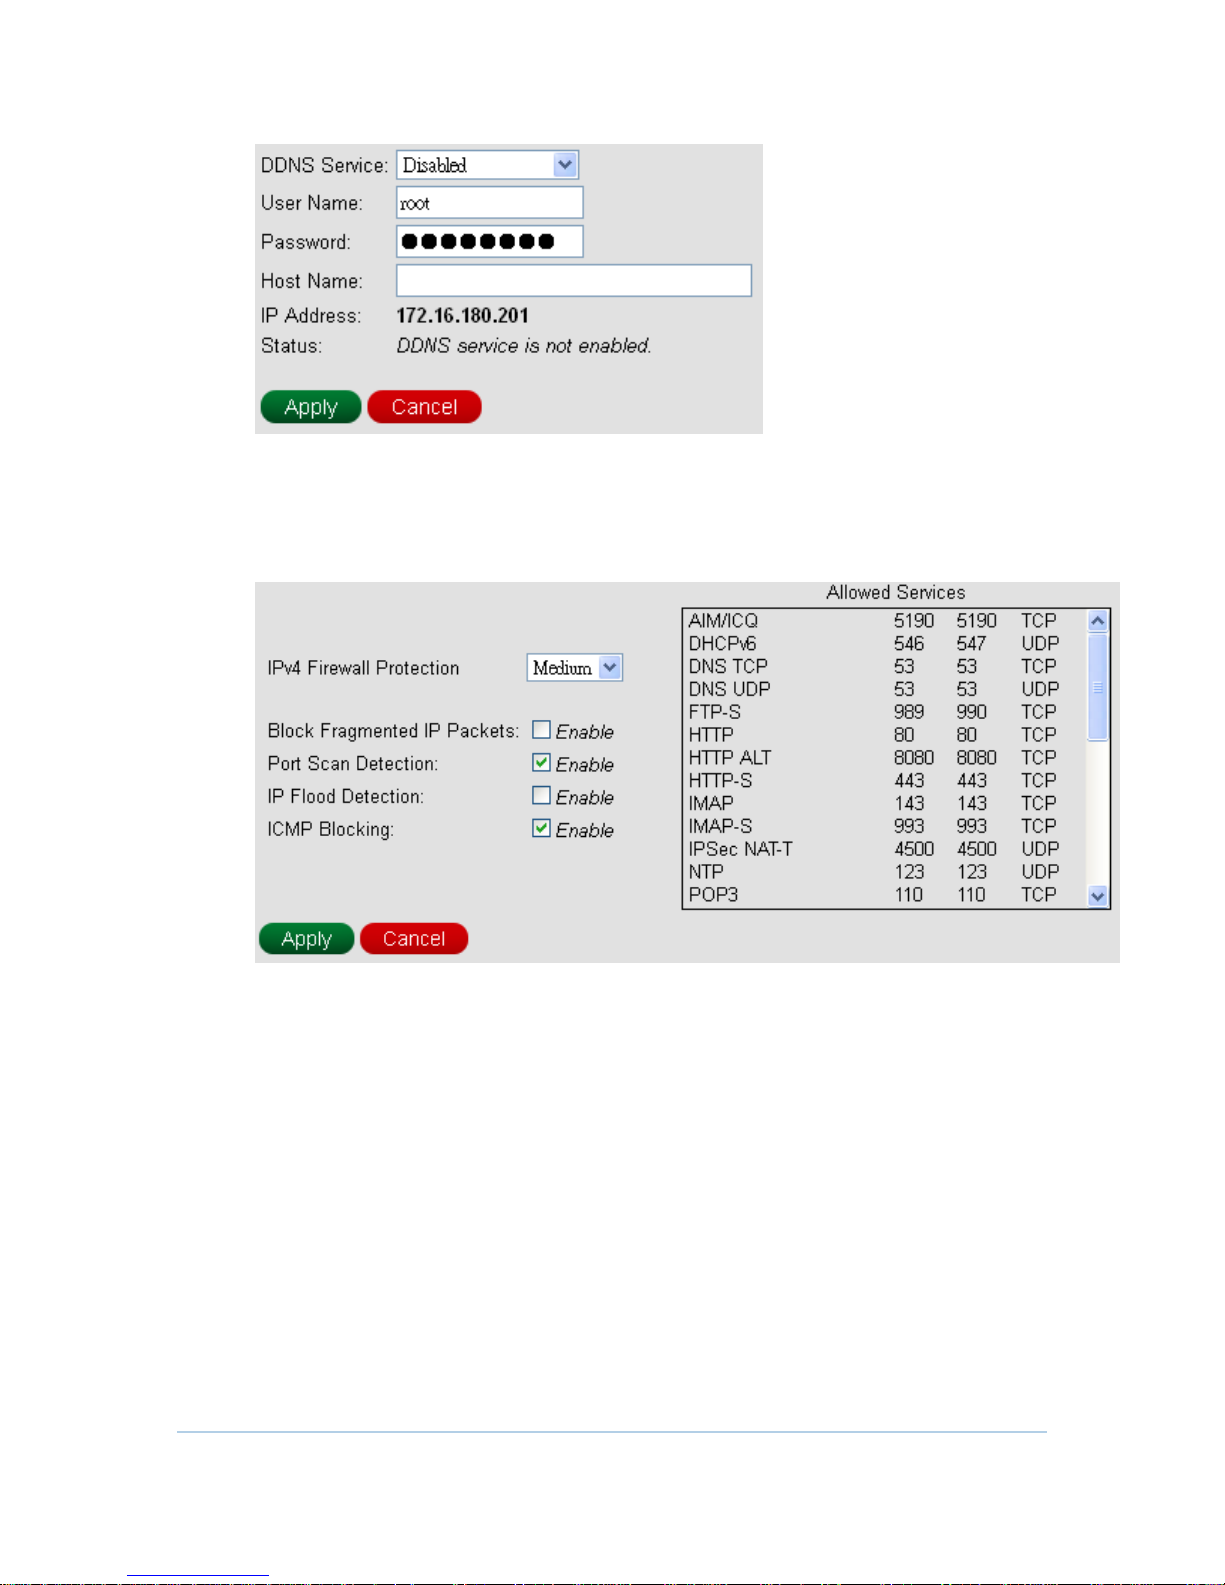
Firewall
This page is used to configure Firewall Protection level and display all allowed
services.
35
Page 36
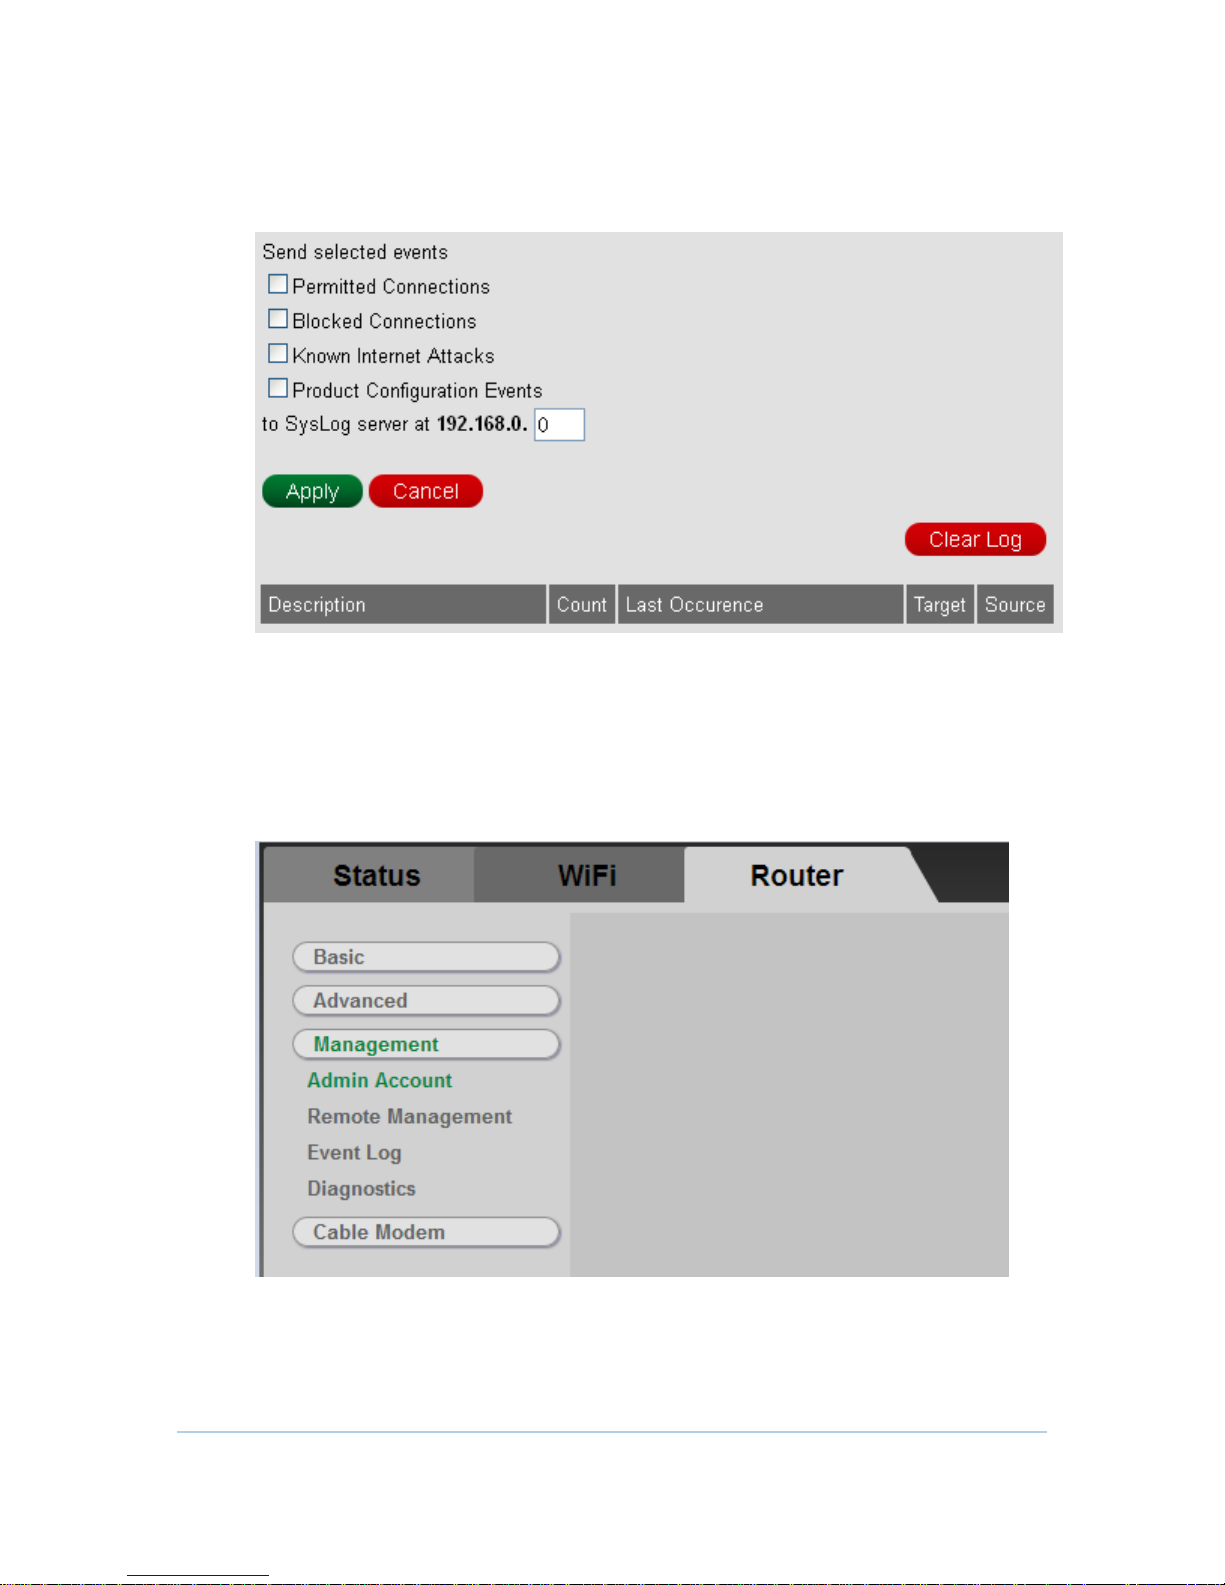
Firewall Logs
This page allows optional configuration of events to be sent to a local SysLog server.
Management
The CH7486E support management for web browser login password including
change password, CM even log, diagnostic tests and backup device current
settings.
36
Page 37
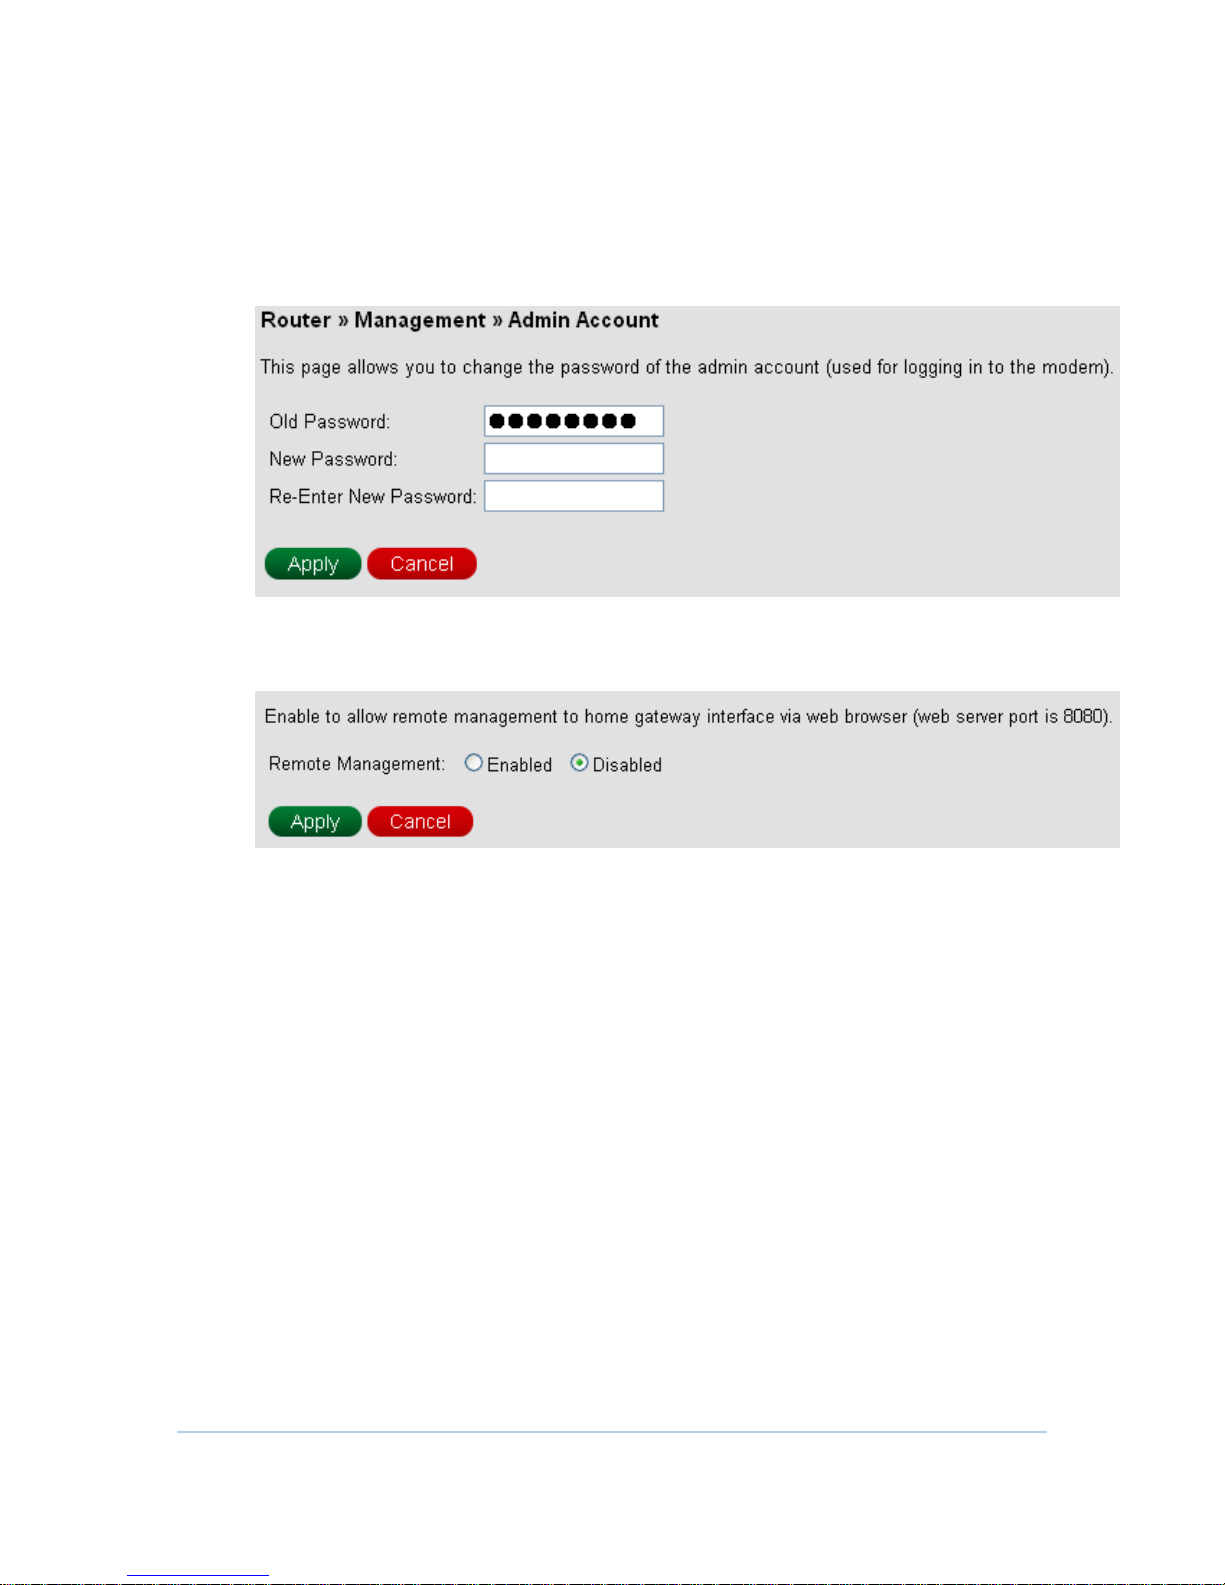
Admin Account
CH7486E allows changing admin password for web browser login. Configure
Password and retype the Password again and then click Apply and when you
login in next time, you must use this new password. For secure, we strongly
suggest to change default password as soon as possible.
Remote Management
37
Page 38
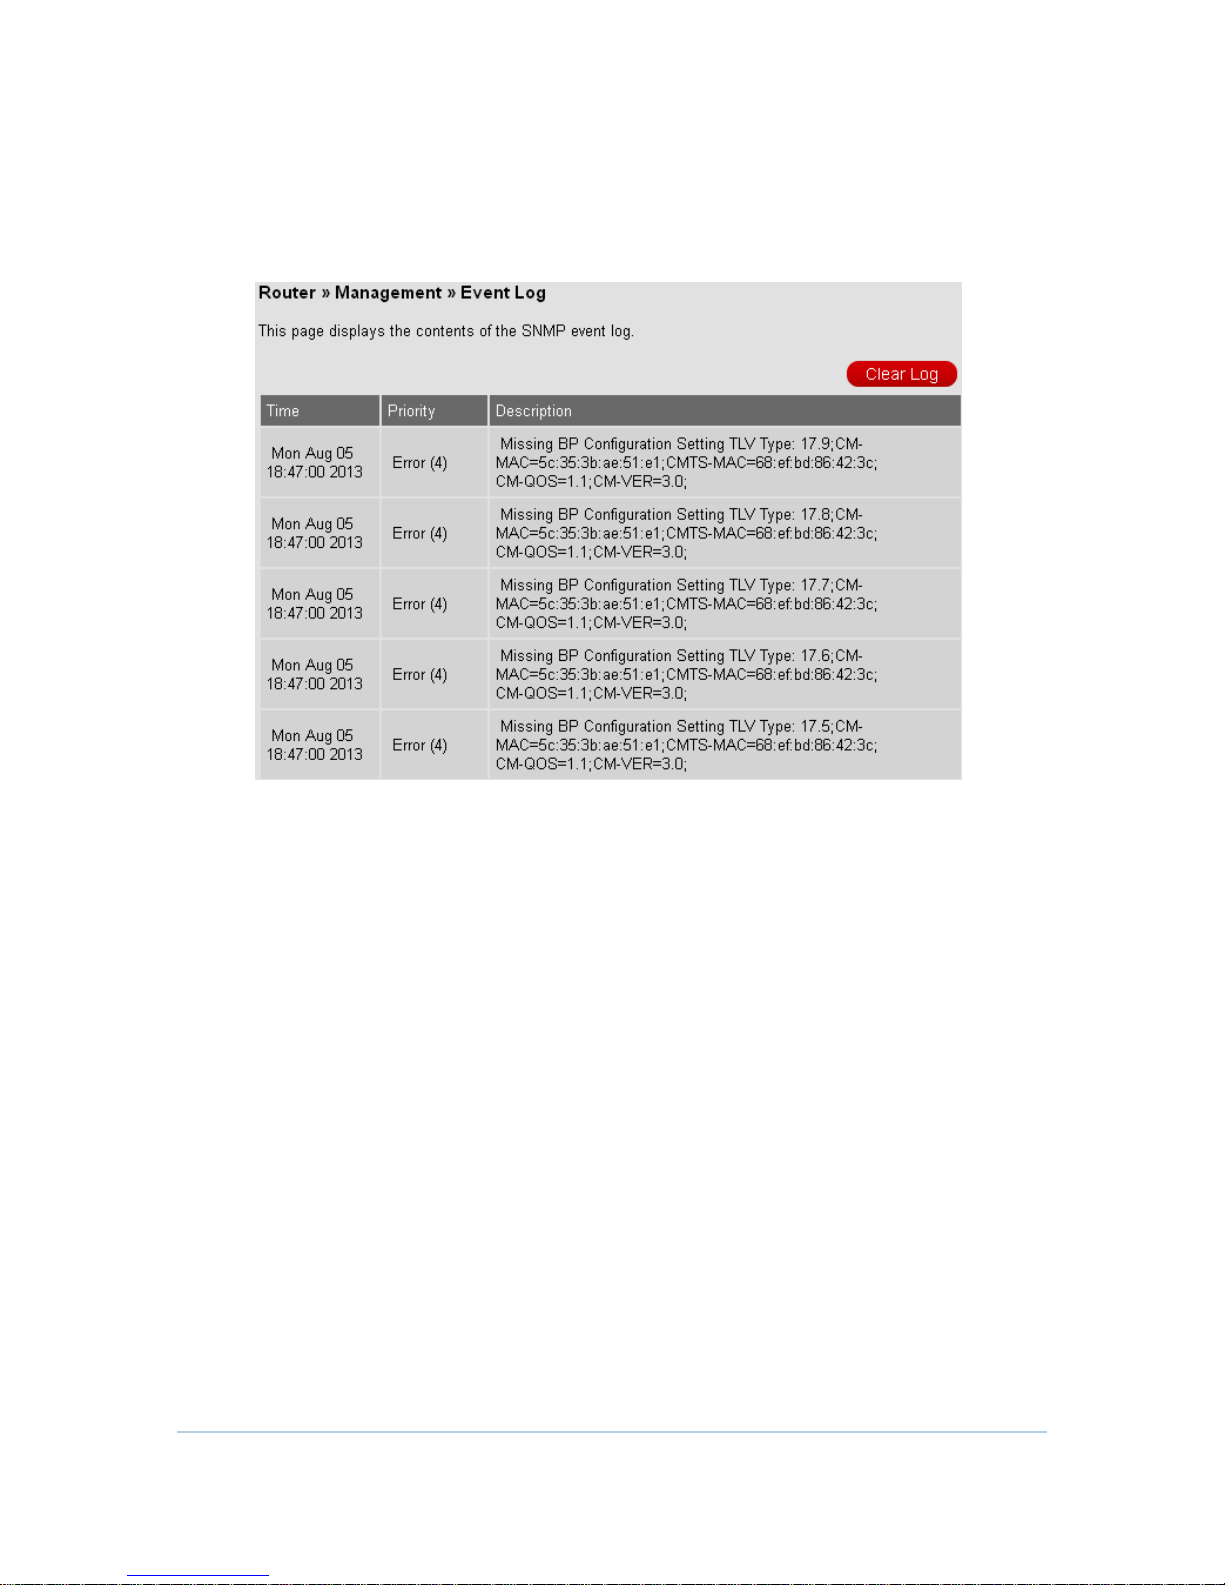
Event Log
CH7486E allows users to review critical system events in chronological order in the
SNMP event log. Also, users can press Clear Log button to clean all records.
Diagnostics
CH7486E allows users to ping diagnostics (LAN) and traceroute (WAN) to help with
IP connectivity problems. And the FTP speed test tool can help to measure the
bandwidth of your downstream Internet connection. You can fill in the IP to the
Target and Start Test.
38
Page 39
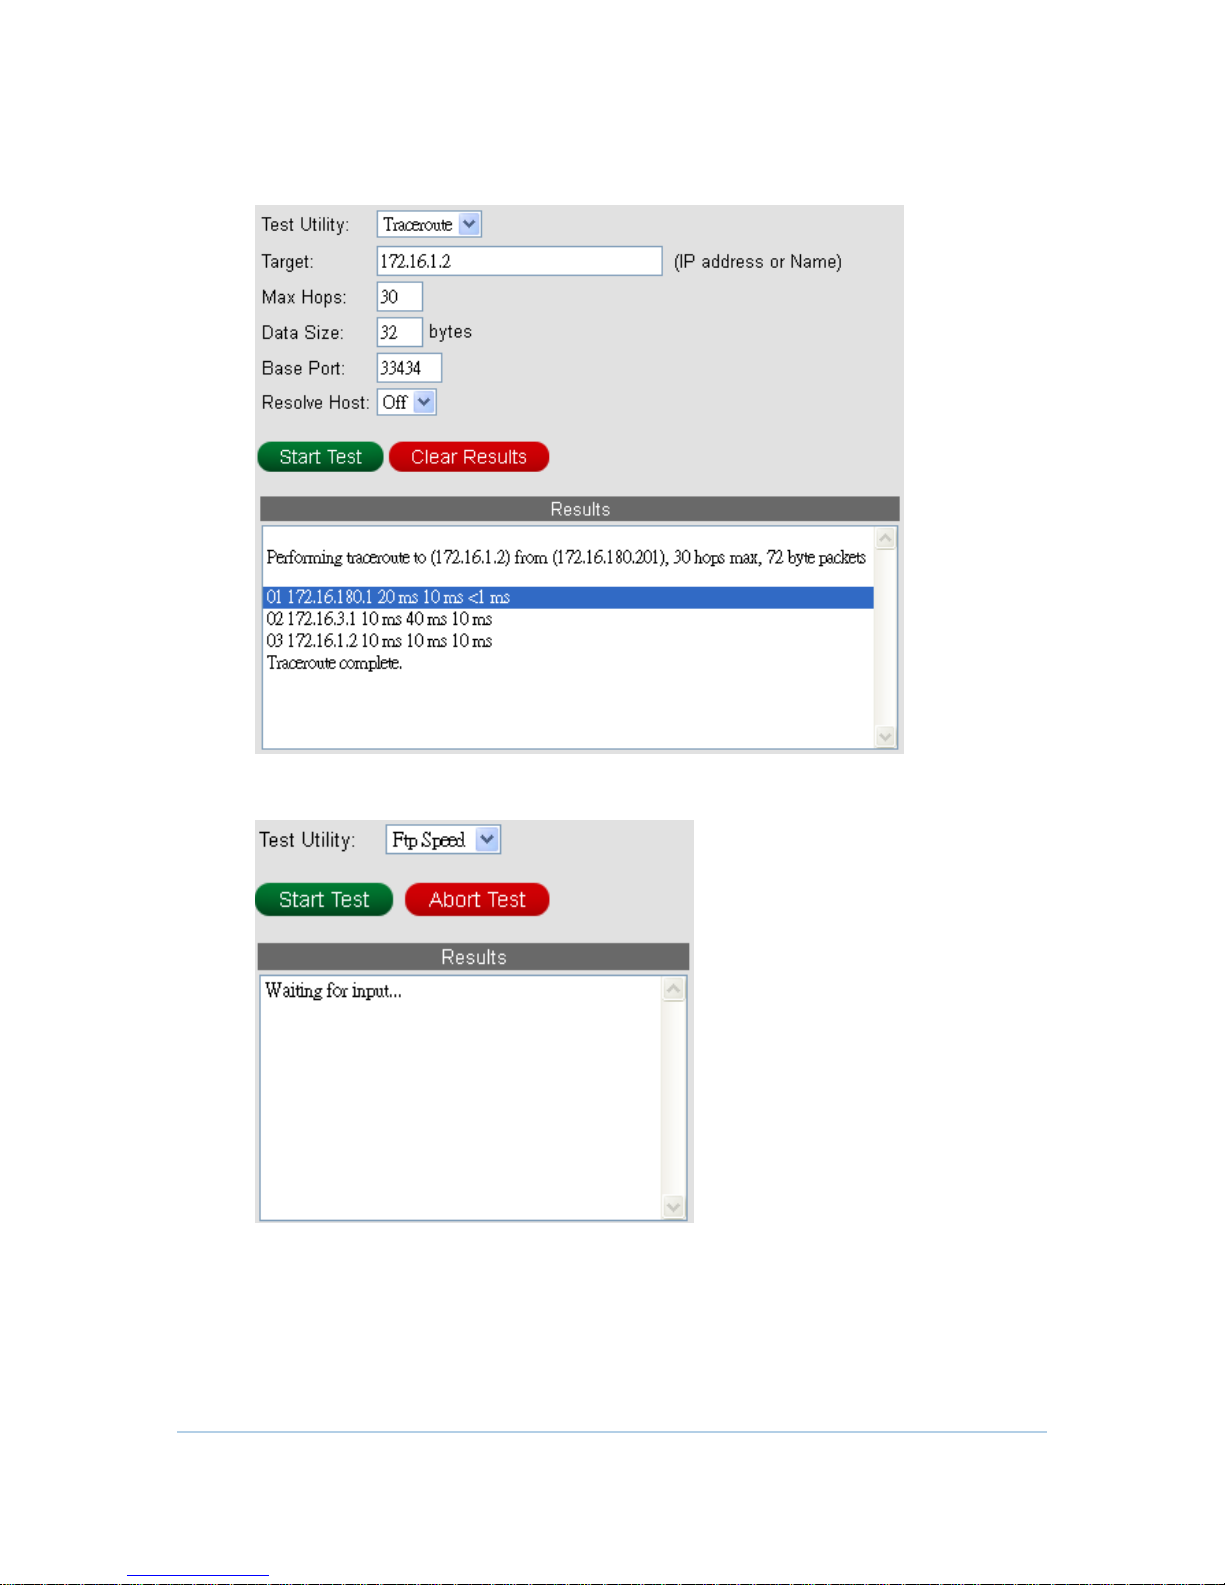
Traceroute Test (WAN)
FTP Speed Test
39
Page 40
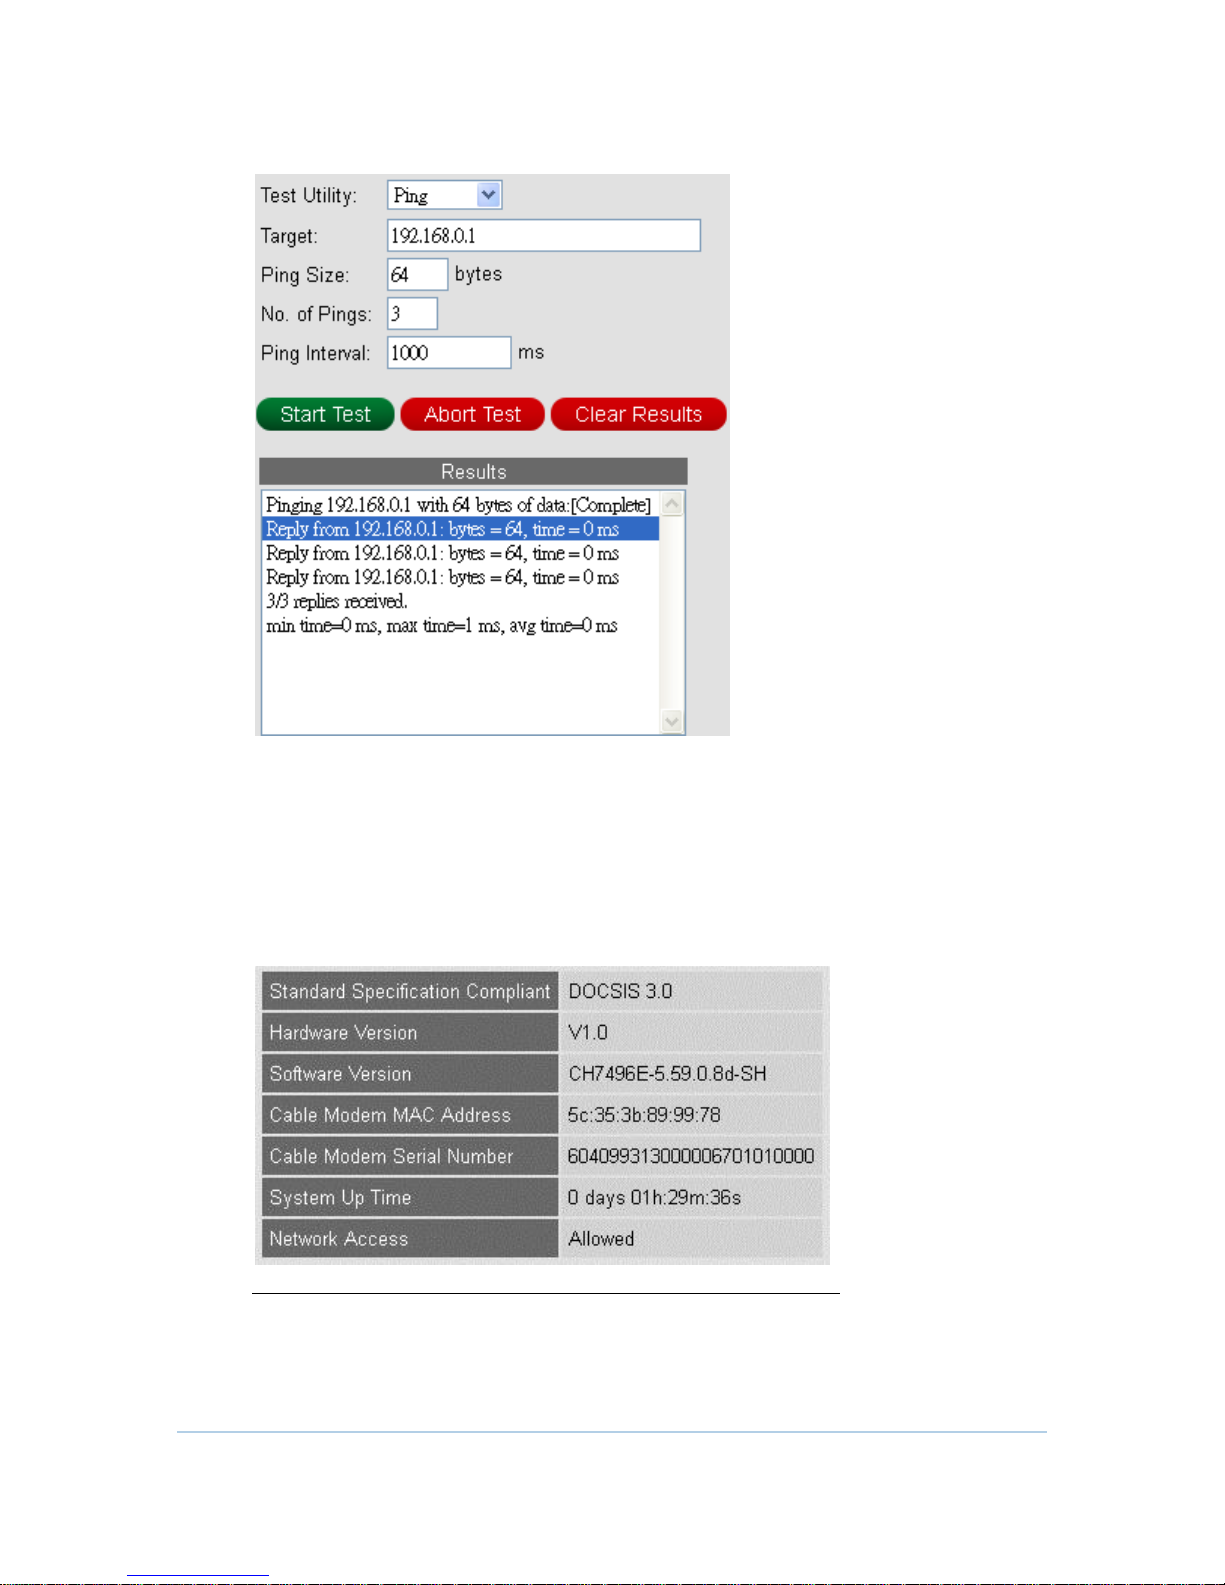
Ping Diagnostics Test (LAN)
Cable Modem
Device Information
CH7486E allows a page to show current status of this home gateway.
Note: may differ according to local settings or requirements.
40
Page 41
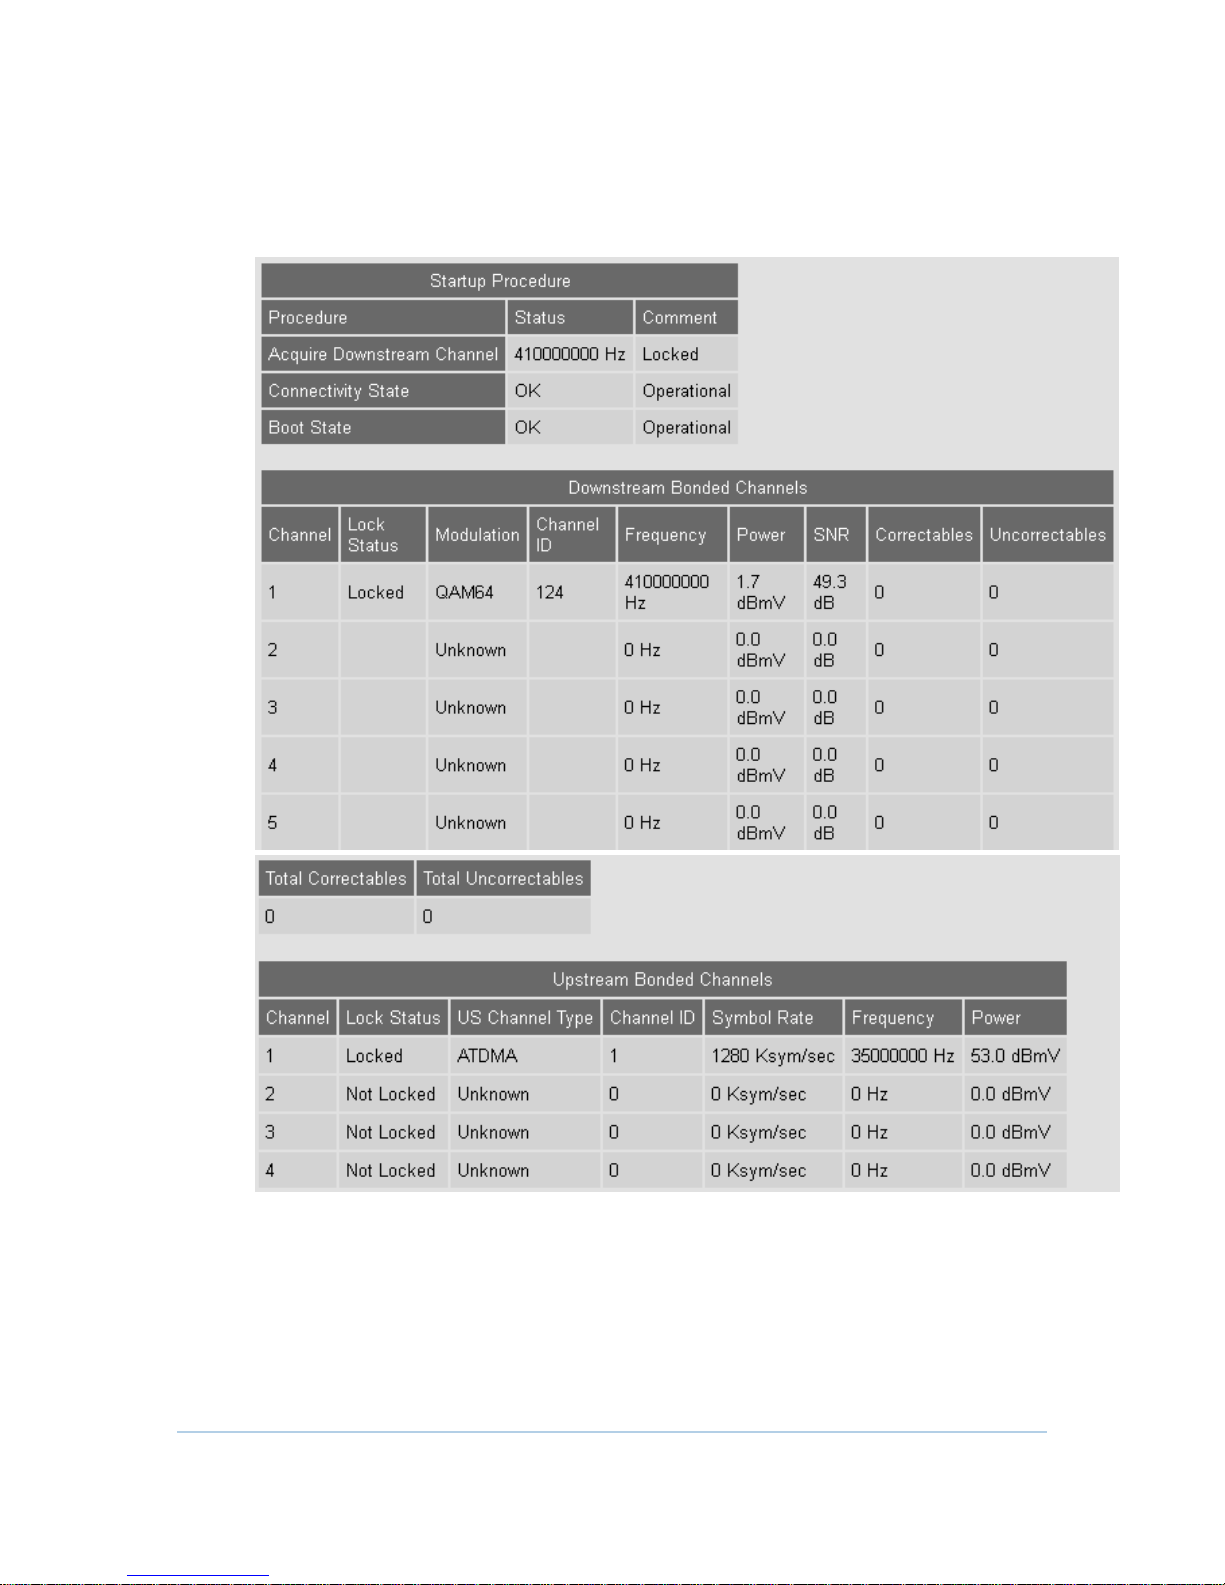
Connection
This page shows information on the status of the cable modem's HFC and IP
network connectivity.
41
Page 42
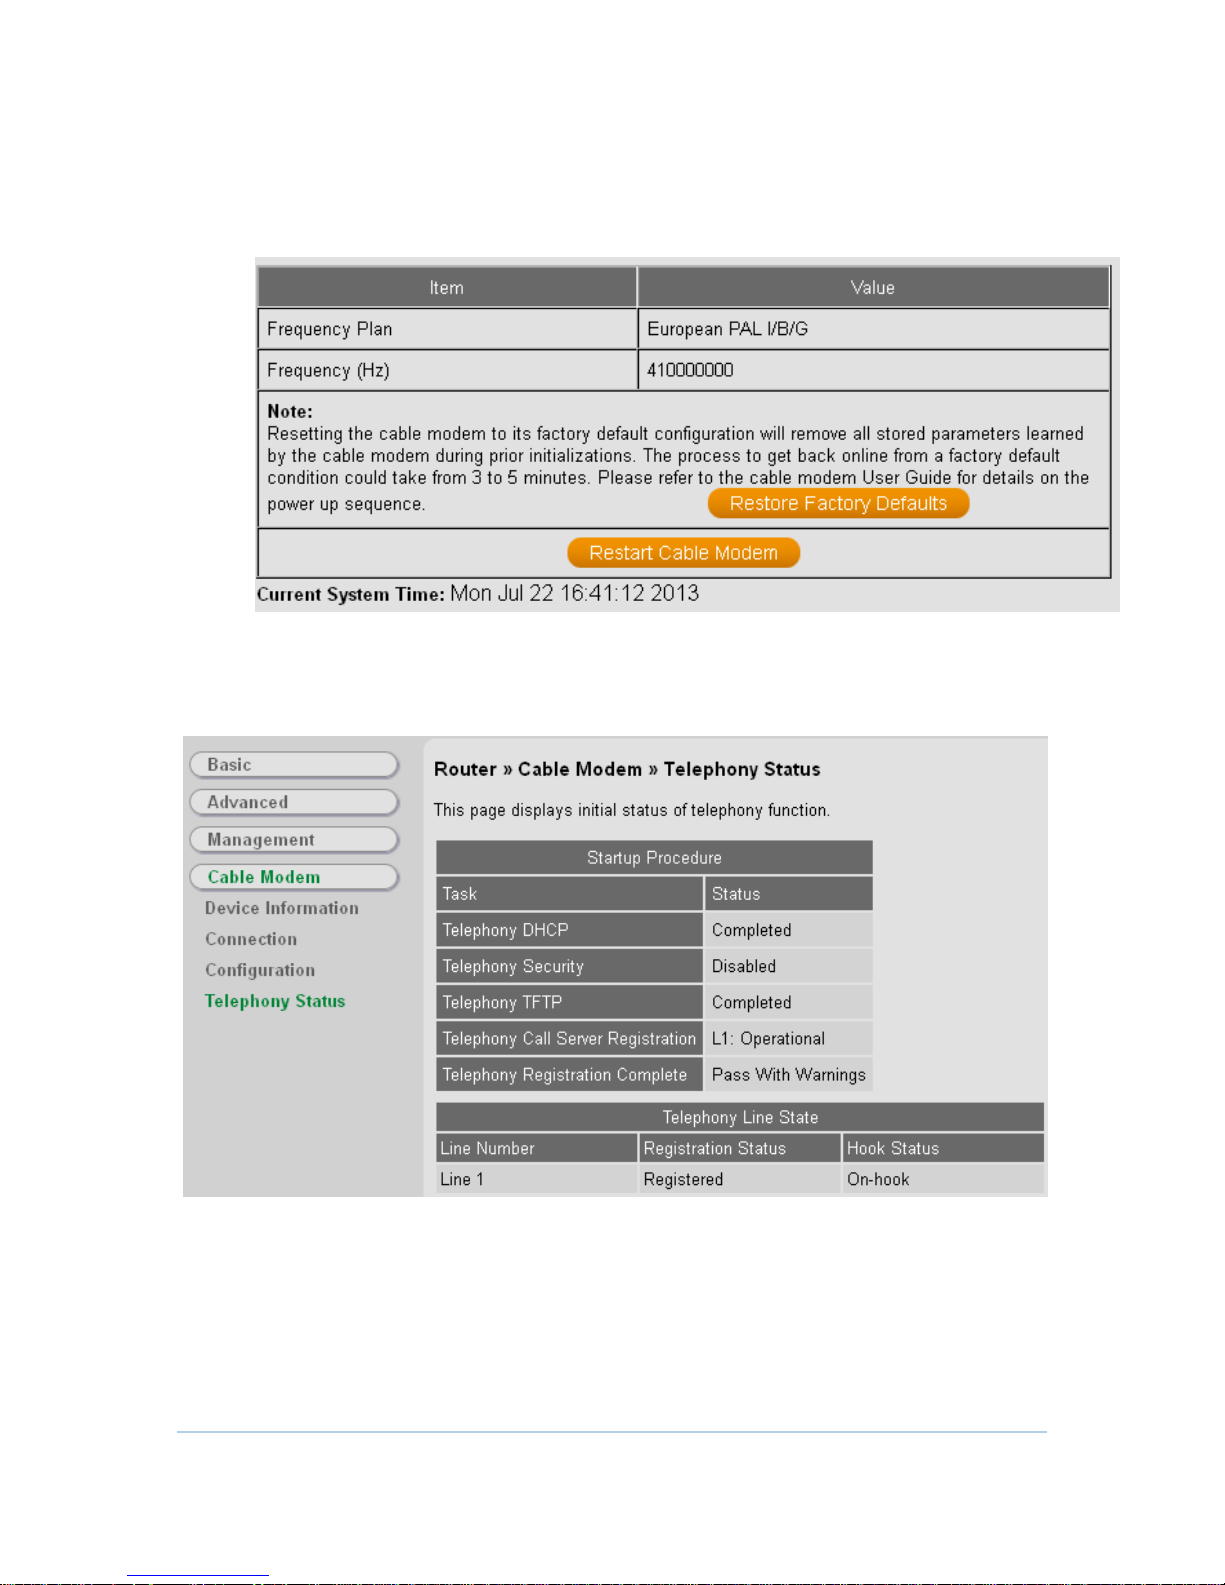
Configuration
This page provides information about the manually configurable settings of the
Cable Modem.
Telephony Status
This page displays the initialization status of the MTA.
42
Page 43

6
Troubleshooting
Problem
Possible Solution
Power light is off
Check that the CH7486E is properly plugged into the electrical
outlet.
Check that the electrical outlet is working.
Cannot send or
receive data
On the front panel, note the status of the LEDs and refer to FrontPanel LEDs and Error Conditions to identify the error. If you have
cable TV, check that the TV is working and the picture is clear. If
you cannot receive regular TV channels, the data service will not
function.
Check the coaxial cable at the CH7486E and wall outlet. Handtighten, if necessary.
Check the IP address.
Check that the Ethernet cable is properly connected to the
CH7486E and the computer.
If a device is connected via the Ethernet port, verify connectivity
by checking the LINK LEDs on the rear panel.
If the solutions listed here do not solve your problem, contact your service
provider.
Before calling your service provider, try pressing the Reset button on the rear
panel of the CH7486E. Please note, if you press the Reset button, you will lose all
your custom configuration settings, including Firewall and Advanced settings.
Your service provider may ask for the front panel LED status; see Front-Panel LEDs
and Error Conditions.
Solutions
Table 1 – Troubleshooting Solutions
43
Page 44

Problem
Possible Solution
Wireless client(s)
cannot send or
receive data
Perform the first four checks in “Cannot send or receive data.”
Check the Security Mode setting on the Wireless Security Page:
If you enabled WPA and configured a passphrase on the
CH7486E, be sure each affected wireless client has the identical
passphrase. If this does not solve the problem, check whether
the wireless client supports WPA.
If you enabled WEP and configured a key on the CH7486E, be
sure each affected wireless client has the identical WEP key. If
this does not solve the problem, check whether the client’s
wireless adapter supports the type of WEP key configured on
the CH7486E.
To temporarily eliminate the Security Mode as a potential issue,
disable security.
After resolving your problem, be sure to re-enable wireless
security.
On the Wireless Access Control Page, be sure the MAC address
for each affected wireless client is correctly listed.
Slow wireless
transmission speed
with WPA enabled
On the Wireless Primary Network Page, check whether the WPA
Encryption type is TKIP. If all of your wireless clients support AES,
change the WPA Encryption to AES.
Front-Panel LEDs and Error Conditions
LED
Status
if, During Startup:
if,During Normal Operation:
POWER
OFF
CH7486E is not properly
plugged into the power outlet
The CH7486E is unplugged
ONLINE
FLASHING
IP registration is unsuccessful
The IP registration is lost
The CH7486E front panel LEDs provide status information for the following error
conditions:
Table 2 – Front-Panel LEDs and Error Conditions
cbn and the cbn logo are trademarks or registered trademarks of Compal Broadband Networks, Inc.
All other product or service names are the property of their respective owners.
© 2014 Compal Broadband Networks, Inc. All rights reserved.
44
 Loading...