

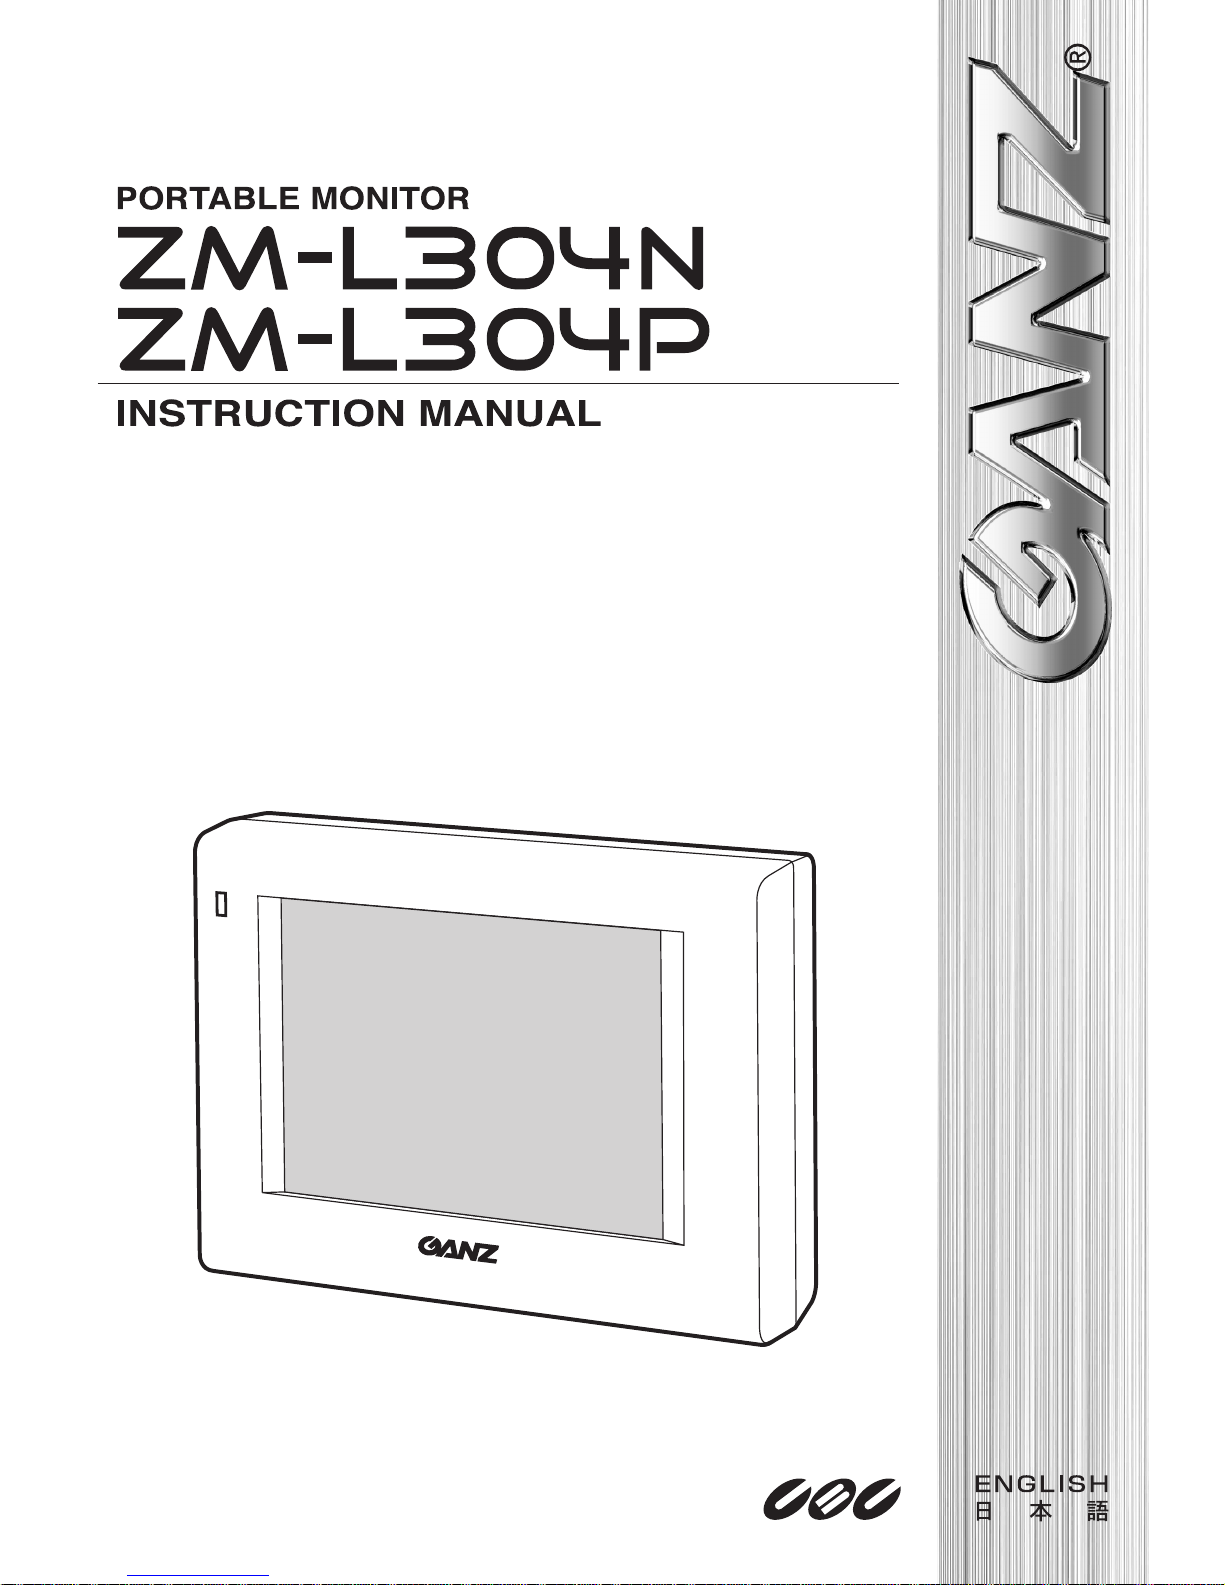
Page 1
Page 2

2
Thank you for purchasing this product.
Q Before operating the product, please read this instruction manual carefully.
Q Please store this instruction manual in a safe place for future reference.
Table of Contents
Product features --------------------------------------------------------------------------------------------------P.2
Safety precautions -----------------------------------------------------------------------------------------------P.3
Part names and functions --------------------------------------------------------------------------------------P.8
Power supply ------------------------------------------------------------------------------------------------------P.9
Using batteries ------------------------------------------------------------------------------------------------------------ P.9
Using an AC adapter ----------------------------------------------------------------------------------------------------- P.9
Using the monitor ------------------------------------------------------------------------------------------------P.11
Using the soft case ------------------------------------------------------------------------------------------------------ P.11
Using the stand ----------------------------------------------------------------------------------------------------------- P.11
Connection with external devices ---------------------------------------------------------------------------P.12
Connection to a camera ----------------------------------------------------------------------------------------------- P.12
Connection to an external monitor ---------------------------------------------------------------------------------- P.12
Operation ----------------------------------------------------------------------------------------------------------P.13
Viewing the screen ------------------------------------------------------------------------------------------------------ P.13
Turning the power off --------------------------------------------------------------------------------------------------- P.13
Tr oublesh ooting --------------------------------------------------------------------------------------------------P.14
Specifi cation ------------------------------------------------------------------------------------------------------P.15
Product features
● This portable monitor displays signals from a camera on a color LCD.
· Easy to carry and can be used to adjust image framing and check camera operation when
photographing on location.
· Equipped with a video through terminal, so the image input from the camera can be viewed
simultaneously on an external monitor.
· Compact and lightweight.
· TFT (Thin Film Transistor) and an active matrix system deliver a high-quality, full-color image.
· Power supply can come from batteries or an AC adapter.
· Brightness can be adjusted manually.
· The 75Ω terminator can be turned on or off.
· When there is no connection to the video input terminal , the power supply is turned off
automatically to avoid battery depletion.
· A battery consumption indicator function is provided, so that the power indicator starts
blinking when remaining battery life falls to approximately 30 minutes.
· The monitor is provided with a soft case, including a shading hood, a strap, stand and AC
adapter.
Page 3
3
Never disassemble or modify the
monitor.
Never take this monitor apart or try
to modify it. It could cause fi re or
electric shock. Ask your vendor to
perform any internal inspections,
servicing or repair.
Never use the monitor in an
environment where it could get wet.
Do not allow the monitor to get wet
or use near water. It could cause
fi re or electric shock. If water gets
into the inside of the monitor, stop
using it immediately and contact
your vendor.
Warning
If anything appears to be
abnormal, stop using the monitor
immediately.
In the following cases, stop using
the monitor, turn its power switch
off, remove the batteries or, when
using the AC adapter, unplug the
power plug from the receptacle,
then contact your vendor.
If you continue to use the monitor
while it is in an abnormal state, it
could cause fi re or electric shock.
Discontinue use immediately if:
● Smoke comes from the monitor, or it
makes a strange odor or sound.
● The monitor becomes abnormally
hot.
● A foreign object falls into the interior.
● The power cable is damaged.
Safety precautions
In order to prevent harm to the user, or to other people, or damage to property, this manual uses
caution labels and icons corresponding to the magnitude of hazard and danger that could be
caused by incorrect operation. Be sure that you have a full understanding of the content of these
precautions before using the product
Precautionary displays
Warning
Incorrect handling of the product, ignoring the precautionary text that goes
with this display, could cause death or serious injury
Caution
Incorrect handling of the product, ignoring the precautionary text that
goes with this display, could cause serious personal injury and damage to
property
Icons
Display Meaning of display
This symbol indicates content (including precautions) intended to warn the user.
Warning content (including precautions) is displayed within
.
This symbol indicates prohibited actions.
Prohibited content is indicated within
.
This symbol indicates content instructing or prohibiting actions while working.
Specifi c requirements are displayed within
.
Page 4
4
Batteries
Incorrect use of batteries could
result in damage to batteries
and/or leaking battery fl uid.
Damaged batteries could burst
resulting in fi re or injury. Always
observe the following:
● Do not take the batteries apart or
short them out.
● Do not heat them or dispose of them
in fi re.
● Do not use old and new batteries
together.
● Do not use batteries of two different
types together.
● Orient the batteries to the polarity
marked on the battery case.
● Do not attempt to recharge batteries.
● If fl uid leaking from batteries gets
in your eyes, rinse them with large
amounts of water, without rubbing,
and seek immediate medical attention. Left untended, it could cause
blindness.
● If fl uid leaking from batteries gets
on your skin or clothes, wash it off
immediately with water.
Handling the LCD
● Do not press strongly on the LCD, or
subject it to strong impact. The glass
of the LCD could break and cause
injury.
● If the glass of the LCD breaks, never
touch the liquid inside. If can cause
infl ammation on contact with skin.
● If the fl uid from inside the LCD
gets in your mouth, gargle and spit
with water immediately, then seek
immediate medical attention.
● If the fl uid from inside the LCD gets
in your eyes, rinse them with water
for at least 15 minutes, then seek
immediate medical attention.
Warning
Do not put any foreign objects
inside the monitor.
If any metal objects get inside
the monitor they could cause fi re,
electric shock or breakdown. Stop
using the monitor immediately and
contact your vendor.
Do not place the monitor on
unstable surfaces
Do not use the monitor in any
unstable location, such as an
unsteady table or on a slope. It
could fall or tip over and cause
injury.
Do not touch the monitor during an
electrical storm.
During an electrical storm do
not touch the metal parts of the
monitor or its AC adapter. It could
cause electric shock.
The AC adapter.
Handle the AC adapter with care.
Using it incorrectly could cause
fi re or electric shock. Always
observe the following:
● Never connect it to a receptacle that
is not for the indicated voltage.
● Always use the AC adapter
provided.
● Do not place anything heavy on the
AC adapter, or expose to heat.
● Do not modify it, or bend it with
excess force.
● Do not twist or pull it.
● Do not touch it with wet hands.
Page 5
5
Care and cleaning
Turn the monitor power off and
unplug before performing maintenance on the monitor. It could
cause fi re or electric shock.
Do not use benzene or other
chemicals to clean the monitor.
Chemicals could cause the case to
deteriorate and the printing to peel
off. If the case is extremely dirty,
soak a soft cloth in neutral liquid
detergent, wring it out thoroughly
and use it to wipe the surface.
Caution
Do not drop or hit the monitor.
Do not drop or subject to strong
vibration. Using the monitor when
it is damaged from being dropped
or otherwise harmed could cause
fi re or electric shock. Stop using
the monitor immediately and
contact your vendor.
Do not touch the monitor with wet
hands.
Do not touch the monitor with
wet hands. It could cause electric
shock.
Batteries
● Remove the batteries if the monitor
is not going to be used for 2 weeks
or more.
● Dispose of used batteries appropriately, according to the state
regulatory agency law and instructions from local authorities.
WARNING
This equipment has been tested and found to comply with the limits for a Class A digital
device, pursuant to Part 15 of the FCC Rules. These limits are designed to provide reasonable protection against harmful interference when the equipment is operated in commercial
environment. This equipment generates, uses and can radiate radio frequency energy and, if
not installed and used in accordance with the instruction manual, may cause harmful interference to radio communications. Operation of this equipment in a residential area is likely to
cause harmful interference in which case the user will be required to correct the interference
at the his own expense.
Industry Canada's Compliance Statement
This Class A digital apparatus complies with Canadian ICES-003.
Cet appareil numérique de la classe A est conforme à la norme NMB-003 du Canada.
The CE Marking is a directive conformity mark of the European Union (EU)..
Page 6

6
Page 7

7
Page 8

8
Part names and functions
67 123549
8
Accessories
Soft case with strap
Stand
AC adapter
(NTSC)
AC adapter
(PAL)
EU type UK type
1 Video input terminal (VIDEO)
Connect to the video output terminal of
the camera by coaxial cable.
2 Video through terminal (THROUGH)
Connect to the input terminal of the
external monitor by coaxial cable.
3 75Ω terminator switch (75Ω)
OFF : When connected to a 75Ω
external monitor.
ON : When no external monitor is
connected.
4 Power switch (POWER)
OFF : To turn the power off.
ON : To turn the power on.
5 Brightness adjustment dial
(BRIGHT)
Adjusts the brightness of the LCD.
6 Power indicator
Light on : Power is on.
Blinking : Battery replacement required.
Light off : Power is off, or batteries
entirely depleted.
7 LCD
8 Battery cover
9 AC adapter connection terminal
Connect to the DC plug when using the
AC adapter provided.
Page 9

9
1
2
3
4
1
AC adapter
connection terminal
Power supply
This monitor can be powered with batteries, or by an AC adapter. Use the power source that best
suits the application.
● Using batteries
Only use alkaline batteries (use of lithium manganese batteries reduces battery operation time
substantially).
● How to insert the batteries
Turn the power switch (POWER) (4) off.
Remove the battery cover (
8
).
Insert six AA-size alkaline batteries.
Orient the batteries to the polarity (+/-)
marked on the battery case.
Close the battery cover.
● Battery life
Using alkaline batteries (LR6) … 7 hours*
* This is the standard value for use at an ambient temperature of 25°C (77°F). Battery life varies
according to operating environment, battery manufacturer, and battery storage conditions.
● Battery replacement
●
When the power indicator (6) blinks, replace the batteries with new ones (batteries can
still be used for some time after blinking starts).
●
Do not use any batteries other than alkaline.
●
Do not use old and new batteries together.
●
Carry spare batteries when using the monitor outdoors.
Caution
●
● When the batteries run down, replace them immediately with new batteries. If discharged
batteries are left in the monitor, they can leak and damage it. If batteries leak, take care to
avoid the fl uid coming into contact with your skin and eyes, and wipe it away with a cloth.
● Using an AC adapter
Only use the AC adapter provided with the monitor.
Plug in to an electrical outlet.
Plug the AC adapter into the electrical
outlet, and then connect the DC plug to
the AC adapter connection terminal of
the monitor.
Caution
●
● Only use the AC adapter provided. Use of a different AC adapter could cause monitor
breakdown, overheating and fi re.
●
● When the DC plug is connected to the monitor, the power supply from the batteries is cut
off. When the AC adapter is in use, take the batteries out of the monitor.
Page 10

10
Caution
●
● Plugging a power plug into an electrical outlet of the wrong voltage can cause the monitor
to break down.
Remove the dummy inlet.
Before attaching the plug, remove
the dummy inlet that is attached for
shipping. It can be removed easily
by inserting a fi nger into area A and
lifting.
Attach the plug
1
Align the groove on the plug with
the projection on the AC adapter,
then push with a fi nger on area B
until it clicks.
2 Check that the plug is not
connected loosely
ZM-L304P (PAL) AC adapter
Attach the power plug provided to the AC adapter provided. There are two plug types: EU
and UK. Choose the right type of voltage and receptacle used in your region and follow the
procedure below to attach it.
Dummy inlet
A
Projection
Groove
B
1
2
UK typeEU type
Power plug
Projection Projection
Page 11

11
A
B
C
D
Stand insertion position
Bottom of the monitor
Using the monitor
When working outdoors or moving around, it is convenient to use the monitor with the soft case
provided. The stand provided can be used to hold the monitor in a fi xed position for use.
● Using the soft case
1 Attach fl aps B and C to the Velcro at
A in the diagram to raise the hood.
The hood blocks light from the front
and sides, making the LCD easier to
see.
2 Open the rear fl ap, at D in the dia-
gram, to reach the monitor terminals.
External devices can be connected to
the monitor while it is in the soft case.
Caution
●
● Do not perform any tasks other than camera adjustment with the case hanging around
your neck. Accidental tangling and tightening of the strap could cause strangulation.
●
● Do not leave the monitor swinging from the strap.
●
● The strap is only for use with the soft case. Do not use it for other purposes.
● Using the stand
Set the monitor, facing forward, on the stand, as shown in the diagram. Fit the stand into the
slot on the bottom of the monitor.
Page 12

12
Connection with external devices
● Connection to a camera
Turn the power switch (POWER) (4) off.
Turn the 75Ω terminator switch (75Ω)(3) on.
Connect the camera to the video input terminal (VIDEO) (1).
Connect the video input terminal to the output terminal of the camera by coaxial cable.
● Connection to an external monitor
Turn the power switch (POWER) (4) off.
Turn the 75Ω terminator switch (75Ω)(3) off.
Connect the external monitor to the video through terminal (THROUGH) (2).
Connect the video through terminal to the input terminal of the external monitor by
coaxial cable.
1
2
123549
Camera External monitor
3
1
2
3
Page 13

13
Operation
● Viewing the screen
Turn the power switch (POWER) (4) on.
When the power is turned on, the power indicator (6) lights and the camera image
is displayed. If the image does not appear, check that the coaxial cable is connected
correctly. If batteries are the power source and the power indicator does not light
when the power is turned on, replace the batteries. (Refer to page 9)
Adjust brightness
Use the brightness adjustment dial (BRIGHT) (5) to adjust to
the necessary brightness.
Caution
●
● The brightness of the LCD varies with the viewing angle. Always view the LCD from
directly in front.
●
● When the video input terminal is not connected, the monitor switches to power saving
mode, and the LCD becomes dimmer.
● Turning the power off
Turn the power switch (POWER) (4) off.
The power indicator (6) goes out and the image disappears from the LCD (7).
1
2
1
67 123549
8
Bright
Dark
Brightness
Page 14

14
Troubleshooting
Check the following points if a problem occurs while the monitor is in use. Contact your vendor if
the problem persists.
Symptoms Likely cause Action
Image does not appear
●
Is the power indicator lit?
Check the power switch.
●
Is the camera connected
to the video input terminal
(VIDEO)?
Connect the coaxial cable correctly.
●
Is the AC adapter set up correctly?
Check the connections between
the monitor AC adapter connection terminal and the DC plug, and
between the AC adapter and the
electrical outlet.
●
Have the batteries run down?
Replace the batteries.
●
Are the batteries inserted in
the right orientation (+/-).
Insert the batteries with the right
polarity.
●
Is the lens cover still on the
camera?
Take the lens cover off.
●
Is the camera switched off?
Switch the camera on.
●
Is the signal type (NTSC /
PAL) correct?
Check the signal type in the region
where you are using the monitor.
The image is either dim or
completely white.
●
Is the brightness adjusted
correctly?
Use the brightness adjustment dial
to adjust brightness.
●
Is the 75Ω terminator switch
(75Ω) set to the right posi-
tion?
Set it to the right position.
Screen color is indistinct, or
there is no color.
●
Is the 75Ω terminator switch
(75Ω) set to the right posi-
tion?
Set it to the right position.
●
Is the signal type (NTSC /
PAL) correct?
Check the signal type in the region
where you are using the monitor.
The image is indistinct, rolls
over on the LCD, is cut off
or superimposed.
●
Is the power indicator blinking?
Replace the batteries. Alternatively,
use the AC adapter.
●
Is the signal type (NTSC /
PAL) correct?
Check the signal type in the region
where you are using the monitor.
The batteries are hot.
●
Have the batteries run down?
(older batteries may generate
more heat, but that does not
indicate a malfunction)
Replace the batteries.
Page 15

15
Specifi cation
Model No. ZM-L304N ZM-L304P
Video signal NTSC PAL
Display confi guration High resolution, high color 4-inch LCD (TFT-type LCD)
Drive system a-si TFT active matrix system
Pixels 480 (V) x 234 (H) (total pixels: 112,320)
LCD dimensions 82.11 (W) x 61.77 (H) mm (2.47-type, 6.3cm diagonal)
Viewing angle H 45° / 45° (right / left)
V 10° / 30° (upper / lower)
Direction of viewing angle 6 o’clock
Image adjustment Brightness adjustment dial
Connecti on termi nals Video input terminal (VIDEO): BNC / Video through terminal (THROUGH): BNC
Termin a l resist an c e 75 Ω : ON / OFF
Power consumption Maximum 2W
Power supply AA-size alkaline batteries (6)
DC 9V (dedicated AC adapter), DC power jack (EIAJ RC5320A, type 4 compliant)
AC adapter AC input: 90V to 264V, DC output: 9V / 660mA
MAP ELECTRONICS CO.,LTD. products (3A-061WP12U)
External dimensions 126 (W) x 96 (H) x 35 (D) mm
Weight Approximately 250g (excluding batteries and accessories)
Ambient operating
temperature and humidity
0°C to 40°C / 32°F to 104°F, RH not exceeding 80% (No condensing)
Temperature and humidity
in storage
-10°C to 60°C / 14°F to 140°F, RH not exceeding 85% (No condensing)
Accessories Soft case with strap, Stand, AC adapter, Instruction manual (this document)
Offi cial standards FCC standard class A compliant, UL
CE
Caution: The LCD panel used as the LCD is constructed with high-precision technology
and has at least 99.98% valid pixels. There may be pixels that do not light, or are
permanently lit, but these are a characteristic of LCD panels and are not a malfunction.
* The specifi cations and/or appearance of the product may change without a prior notice.
Page 16

 Loading...