

Cayman Systems 3220-H Series, 3220-H-WRF, 3220-H-W11 Install Manual
1
Tour of Your Cayman Gateway
Prior to installing the Cayman Gateway in your small business or residential network, we
recommend that you become familiar with the physical features of the product. The following
diagrams describe the front and rear panel layouts of the wired and wireless units.
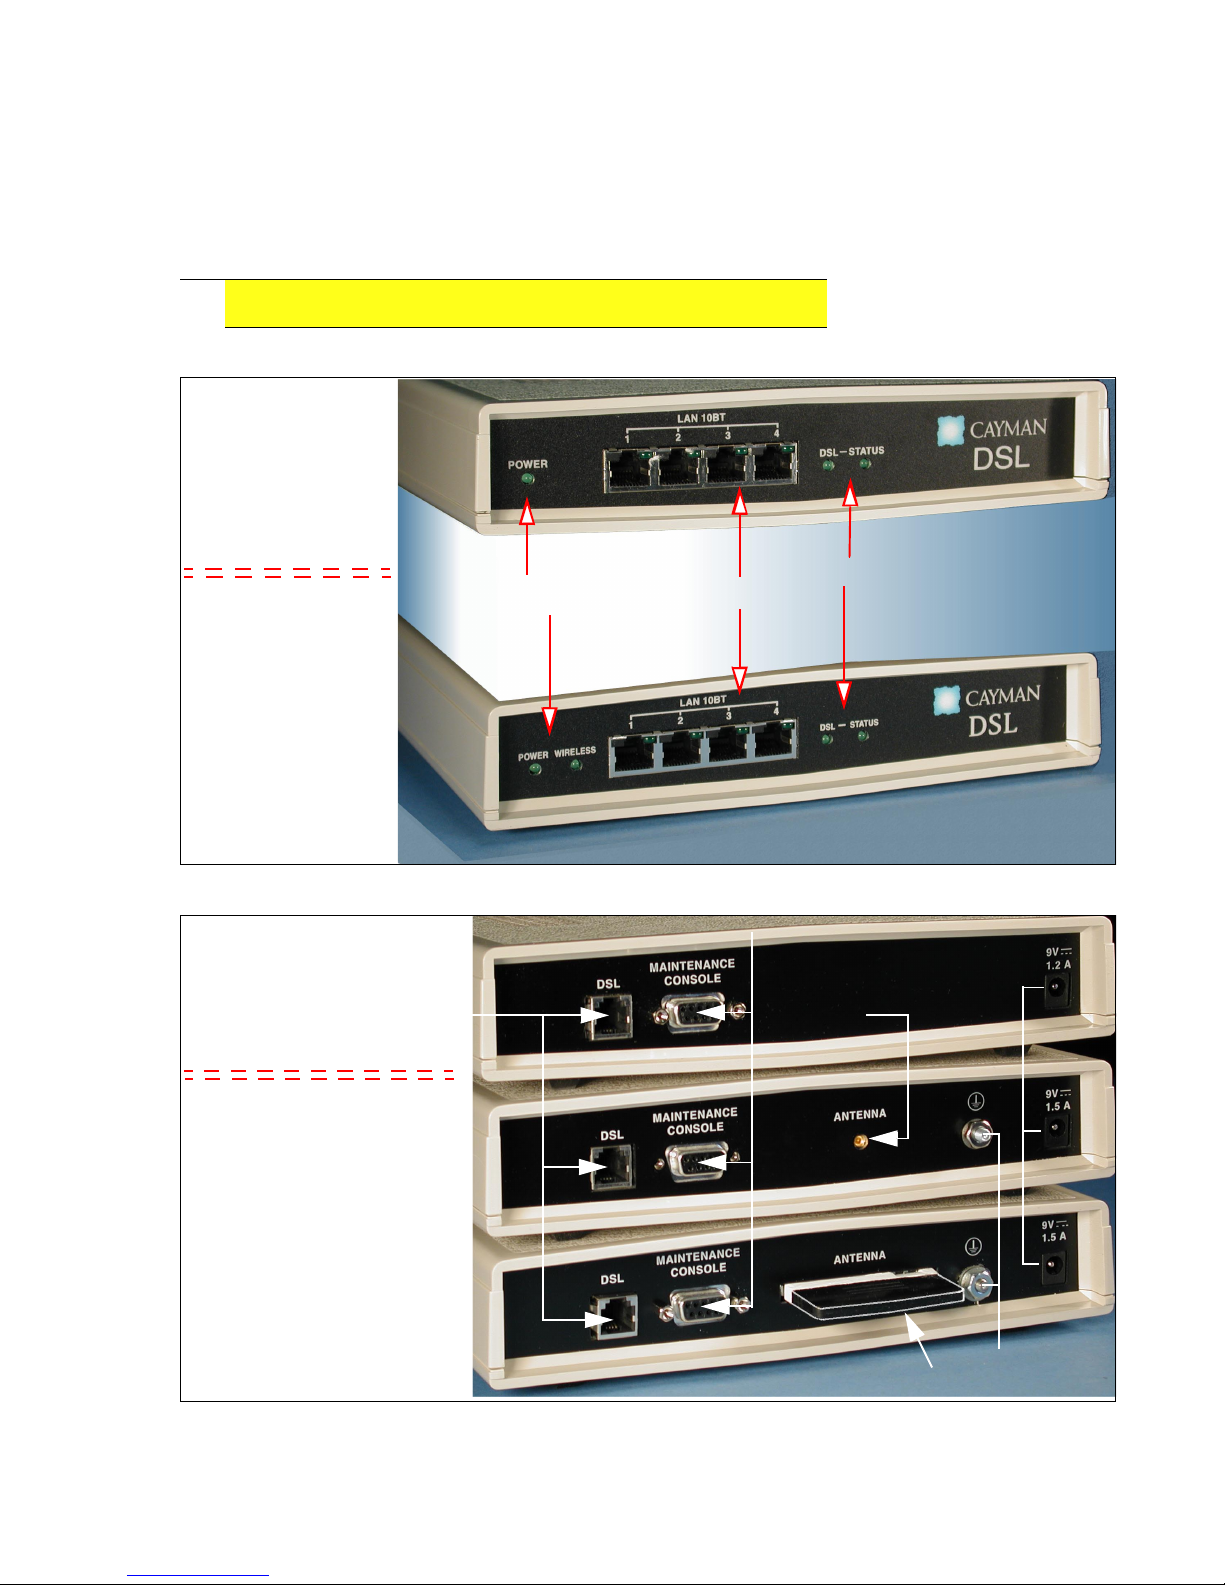
Front Panel Layout
Front Panel LayoutFront Panel Layout
Front Panel Layout
Rear Panel Layout
Rear Panel LayoutRear Panel Layout
Rear Panel Layout
XXXX
Cayman 3220-H Series Gateways
Indicator LEDs
Indicator LEDsIndicator LEDs
Indicator LEDs
Indicator LEDs
Indicator LEDsIndicator LEDs
Indicator LEDs
3220-H
3220-H3220-H
3220-H
Wired Unit
3220-H-WRF
3220-H-WRF3220-H-WRF
3220-H-WRF
Wireless Units
(each gateway includes
four wired ports)
LAN
LANLAN
LAN
Ethernet Hub
Ethernet HubEthernet Hub
Ethernet Hub
Four Ports
Four PortsFour Ports
Four Ports
and
andand
and
3220-H-W11
3220-H-W113220-H-W11
3220-H-W11
Tethered
TetheredTethered
Tethered
Antenna
AntennaAntenna
Antenna
Socket
SocketSocket
Socket
Power
Power Power
Power
Input
InputInput
Input
Ground
GroundGround
Ground
Stud
StudStud
Stud
WAN
WANWAN
WAN
DSL Port
DSL PortDSL Port
DSL Port
3220-H
3220-H3220-H
3220-H
Wired Unit
Socket
SocketSocket
Socket
Fixed Antenna Tab
Fixed Antenna TabFixed Antenna Tab
Fixed Antenna Tab
3220-H-WRF
3220-H-WRF3220-H-WRF
3220-H-WRF
Wireless Unit
(includes four
wired ports)
3220-H-W11
3220-H-W113220-H-W11
3220-H-W11
Wireless Unit
(includes four
wired ports)
External
External External
External
CCCC
onsole Socket
onsole Socketonsole Socket
onsole Socket

2
Install Your Cayman 3220-H Series
Step 1
Step 1Step 1
Step 1 Connect your Cayman 3220 Gateway to the devices on your Ethernet network.
Connect your Cayman 3220 Gateway to the devices on your Ethernet network.Connect your Cayman 3220 Gateway to the devices on your Ethernet network.
Connect your Cayman 3220 Gateway to the devices on your Ethernet network.
With your LAN computers turned off
offoff
off, connect each one to a hub port on the front of
your Cayman 3220 Gateway with a twisted-pair Ethernet cable.
TASK: Connect LAN Ethernet Devices to Your Cayman Gateway
TASK: Connect LAN Ethernet Devices to Your Cayman GatewayTASK: Connect LAN Ethernet Devices to Your Cayman Gateway
TASK: Connect LAN Ethernet Devices to Your Cayman Gateway
Step 2
Step 2Step 2
Step 2 Apply power to the gateway and the LAN computers. Use this sequence:
Apply power to the gateway and the LAN computers. Use this sequence:Apply power to the gateway and the LAN computers. Use this sequence:
Apply power to the gateway and the LAN computers. Use this sequence:
aaaa. Insert the power supply connector into the power socket on the back panel.
bbbb. Plug the power supply module into an appropriate electrical outlet.
cccc. Turn the LAN computers on.
TASK: Connect the Power Supply
TASK: Connect the Power Supply TASK: Connect the Power Supply
TASK: Connect the Power Supply
Step 3
Step 3Step 3
Step 3 Connect your Cayman 3220 Gateway to your DSL service.
Connect your Cayman 3220 Gateway to your DSL service.Connect your Cayman 3220 Gateway to your DSL service.
Connect your Cayman 3220 Gateway to your DSL service.
Using the blue
blueblue
blue DSL data cable, plug the end marked “DSL Modem” into the DSL port on
the back panel of your Cayman 3220 Gateway until you feel it lock. Insert the other end
of the DSL cable into the telephone jack connected to your DSL service.
Important
ImportantImportant
Important:
::
:
XXXX
Observe that the Status LED initially blinks and then stays on. This
Observe that the Status LED initially blinks and then stays on. This Observe that the Status LED initially blinks and then stays on. This
Observe that the Status LED initially blinks and then stays on. This
action could take up to 30 seconds.
action could take up to 30 seconds.action could take up to 30 seconds.
action could take up to 30 seconds.
XXXX
IF the Status LED does not blink and then stay on, replace the blue
IF the Status LED does not blink and then stay on, replace the blue IF the Status LED does not blink and then stay on, replace the blue
IF the Status LED does not blink and then stay on, replace the blue
DSL data cable with the green data cable. The Status LED should
DSL data cable with the green data cable. The Status LED should DSL data cable with the green data cable. The Status LED should
DSL data cable with the green data cable. The Status LED should
blink and then stay on. This action could take up to 30 seconds.
blink and then stay on. This action could take up to 30 seconds.blink and then stay on. This action could take up to 30 seconds.
blink and then stay on. This action could take up to 30 seconds.
XXXX
IF the status LED does not blink and stay on when you use either of
IF the status LED does not blink and stay on when you use either of IF the status LED does not blink and stay on when you use either of
IF the status LED does not blink and stay on when you use either of
the DSL data cables, contact your service provider.
the DSL data cables, contact your service provider.the DSL data cables, contact your service provider.
the DSL data cables, contact your service provider.
To LAN
To LANTo LAN
To LAN Devices
DevicesDevices
Devices
Cayman 3220-H-WRF
Cayman 3220-H-WRFCayman 3220-H-WRF
Cayman 3220-H-WRF
Model:
Model:Model:
Model:
Model: Cayman 3220-H-WRF
Model: Cayman 3220-H-WRFModel: Cayman 3220-H-WRF
Model: Cayman 3220-H-WRF
 Loading...