

Page 1

Cayman 2E-W
User’s Guide
Release 5.6.2
November 2000
Page 2

Copyrights
Copyright © 2000 Cayman Systems
All rights reserved
Printed in the United States of America
Portions of this software are subject to the Mozilla Public License Version 1.1.
Portions created by Netscape are copyright 1994-2000 Netscape
Communications Corporation. You may obtain a copy of the license at http://
www.mozilla.org/MPL/. Software distributed under the License is distributed
on an “as is” basis, WITHOUT WARRANTY OF ANY KIND, either express or
implied. See the License for the specific language governing rights and
limitations under the License.
Portions of this software copyright 1988, 1991 by Carnegie Mellon University.
All rights reserved. Permission to use, copy, modify, and distribute this software
and its documentation for any purpose and without fee is hereby granted,
provided that the above copyright notice and this permission notice appear in
supporting documentation, and that the name of Carnegie Mellon University
not be used in advertising or publicity pertaining to distribution of the software
without specific, written prior permission.
CARNEGIE MELLON UNIVERSITY DISCLAIMS ALL WARRANTIES WITH
REGARD TO THIS SOFTWARE, INCLUDING ALL IMPLIED WARRANTIES OF
MERCHANTABILITY AND FITNESS. IN NO EVENT SHALL CMU BE LIABLE
FOR ANY SPECIAL, INDIRECT, OR CONSEQUENTIAL DAMAGES OR ANY
DAMAGES WHATSOEVER RESULTING FROM LOSS OF USE, DATA, OR
PROFITS, WHETHER IN AN ACTION OF CONTRACT, NEGLIGENCE, OR
OTHER TORTIOUS ACTION, ARISING OUT OF OR IN CONNECTION WITH
THE USE OR PERFORMANCE OF THIS SOFTWARE.
Trademarks
Cayman Systems is a registered trademark of Cayman Systems, Inc. SWIFT-IP,
SafetyNet, Zero Configuration, and the Cayman Systems logo are trademarks of
Cayman Systems, Inc.
Proxim, Symphony, and Symphony-HRF are trademarks of Proxim, Inc.
UNIX is a registered trademark of UNIX System Laboratories, Inc. Ethernet is a
registered trademark of Xerox Corporation. Microsoft and Windows are
registered trademarks of Microsoft Corporation.
Mention of third-party products is for informational purposes only and
constitutes neither an endorsement nor a recommendation. Cayman assumes
no responsibility with regard to the performance or use of these products.
Page 3

Contents
Preface
1 About Your
Cayman 2E-W
2 Setting Up Your
Cayman 2E-W
About This Manual . . . . . . . . . . . . . . . . . . . . . . . . . . . . . . . vii
Who Should Read This Manual . . . . . . . . . . . . . . . . . . . . . . vii
What This Manual Covers . . . . . . . . . . . . . . . . . . . . . . . . . . vii
Documentation Conventions . . . . . . . . . . . . . . . . . . . . . . . . viii
What’s New in Release 5.6.2 . . . . . . . . . . . . . . . . . . . . . . . . 1-1
Cayman 2E-W Features . . . . . . . . . . . . . . . . . . . . . . . . . . . . 1-1
Cayman 2E-W Front Panel . . . . . . . . . . . . . . . . . . . . . . . . . . 1-3
Cayman 2E-W Back Panel . . . . . . . . . . . . . . . . . . . . . . . . . . 1-4
Unpacking Your Cayman 2E-W . . . . . . . . . . . . . . . . . . . . . . 2-1
Connecting Your Cayman 2E-W . . . . . . . . . . . . . . . . . . . . . . 2-2
Step 1: Position the Cayman 2E-W . . . . . . . . . . . . . . . . . 2-2
Step 2: Connect Your Wide Area Network . . . . . . . . . . . 2-3
Step 3: Connect Your Local Area Network . . . . . . . . . . . 2-3
Step 4: Connect Your Wireless Antenna (HomeRF version only)
2-4
Step 5: Power On the Cayman 2E-W . . . . . . . . . . . . . . . 2-4
Disconnecting Your Cayman 2E-W. . . . . . . . . . . . . . . . . . . . 2-5
3 Configuring
Your Cayman
2E-W
Cayman 2E-W User’s Guide Contents
November 2000
Gathering Configuration Information . . . . . . . . . . . . . . . . . . 3-2
QuickStart Information . . . . . . . . . . . . . . . . . . . . . . . . . 3-2
LAN Port (Ethernet A) Information (Optional) . . . . . . . . 3-3
WAN (Ethernet B) Port Information (Optional) . . . . . . . . 3-5
iii
Page 4

Configuring Your Computer. . . . . . . . . . . . . . . . . . . . . . . . . 3-5
To Connect Over the Wireless LAN . . . . . . . . . . . . . . . . 3-7
Opening a Web Connection. . . . . . . . . . . . . . . . . . . . . . . . . 3-7
Entering Basic Settings . . . . . . . . . . . . . . . . . . . . . . . . . . . . 3-10
QuickStart (PPPoE Off) . . . . . . . . . . . . . . . . . . . . . . . . 3-10
Manual QuickStart . . . . . . . . . . . . . . . . . . . . . . . . . . . . 3-12
QuickStart (PPPoE On) . . . . . . . . . . . . . . . . . . . . . . . . 3-15
Entering LAN (Ethernet A) Settings . . . . . . . . . . . . . . . . . . . 3-17
Entering WAN (Ethernet B) Settings . . . . . . . . . . . . . . . . . . 3-19
PPPoE is Off . . . . . . . . . . . . . . . . . . . . . . . . . . . . . . . . 3-19
PPPoE is On . . . . . . . . . . . . . . . . . . . . . . . . . . . . . . . . 3-21
Configuring Password Settings . . . . . . . . . . . . . . . . . . . . . . 3-24
Configuring Pinhole Settings . . . . . . . . . . . . . . . . . . . . . . . 3-26
Configuring Wireless Settings . . . . . . . . . . . . . . . . . . . . . . . 3-30
HomeRF Settings . . . . . . . . . . . . . . . . . . . . . . . . . . . . . 3-30
802.11 Settings . . . . . . . . . . . . . . . . . . . . . . . . . . . . . . 3-31
Configuring SNMP Settings. . . . . . . . . . . . . . . . . . . . . . . . . 3-34
4 Using the
Command Line
Interface
Overview . . . . . . . . . . . . . . . . . . . . . . . . . . . . . . . . . . . . . . 4-1
Starting and Ending a CLI Session . . . . . . . . . . . . . . . . . 4-1
Using the CLI Help Facility . . . . . . . . . . . . . . . . . . . . . . 4-4
Saving Settings . . . . . . . . . . . . . . . . . . . . . . . . . . . . . . . 4-4
About Root Commands . . . . . . . . . . . . . . . . . . . . . . . . . . . . 4-4
ROOT Prompt . . . . . . . . . . . . . . . . . . . . . . . . . . . . . . . . 4-4
ROOT Command Shortcuts . . . . . . . . . . . . . . . . . . . . . . 4-5
ROOT Commands . . . . . . . . . . . . . . . . . . . . . . . . . . . . . 4-5
About CONFIG Commands . . . . . . . . . . . . . . . . . . . . . . . . 4-14
CONFIG Mode Prompt . . . . . . . . . . . . . . . . . . . . . . . . 4-14
Navigating the CONFIG Hierarchy . . . . . . . . . . . . . . . . 4-15
Entering Commands in CONFIG Mode . . . . . . . . . . . . . 4-16
Displaying Current Router Settings . . . . . . . . . . . . . . . . 4-18
Stepping Through Cayman 2E-W Configuration . . . . . . 4-18
Validating Your Configuration . . . . . . . . . . . . . . . . . . . 4-19
CONFIG Commands . . . . . . . . . . . . . . . . . . . . . . . . . . . . . 4-19
BNCP Settings . . . . . . . . . . . . . . . . . . . . . . . . . . . . . . . 4-19
Bridging Settings . . . . . . . . . . . . . . . . . . . . . . . . . . . . . 4-19
DHCP Settings. . . . . . . . . . . . . . . . . . . . . . . . . . . . . . . 4-20
Domain Name System Settings . . . . . . . . . . . . . . . . . . . 4-21
Ethernet MAC Address Settings. . . . . . . . . . . . . . . . . . . 4-21
IP Settings. . . . . . . . . . . . . . . . . . . . . . . . . . . . . . . . . . 4-22
Network Address Translation (NAT) Default Settings. . . 4-31
Contents Cayman 2E-W User’s Guide
iv
November 2000
Page 5

Network Address Translation (NAT) Pinhole Settings . . 4-32
PPPoE Settings . . . . . . . . . . . . . . . . . . . . . . . . . . . . . . 4-33
Command Line Interface Preference Settings . . . . . . . . 4-38
Port Renumbering Settings. . . . . . . . . . . . . . . . . . . . . . 4-39
SNMP Settings . . . . . . . . . . . . . . . . . . . . . . . . . . . . . . . 4-39
System Settings . . . . . . . . . . . . . . . . . . . . . . . . . . . . . . 4-41
Traffic Shaping Settings . . . . . . . . . . . . . . . . . . . . . . . . 4-42
Wireless Settings (HomeRF) . . . . . . . . . . . . . . . . . . . . . 4-43
Wireless Settings (802.11) . . . . . . . . . . . . . . . . . . . . . . 4-43
5 Monitoring
Your Cayman
2E-W
6 Updating Your
System
Software
Displaying the Overview Status . . . . . . . . . . . . . . . . . . . . . . 5-2
Displaying the Diagnostic Log . . . . . . . . . . . . . . . . . . . . . . . 5-3
Displaying IP ARP Statistics . . . . . . . . . . . . . . . . . . . . . . . . . 5-4
Displaying IP Interface Statistics . . . . . . . . . . . . . . . . . . . . . . 5-5
Displaying IP Routes . . . . . . . . . . . . . . . . . . . . . . . . . . . . . . 5-6
Displaying DHCP Server Statistics. . . . . . . . . . . . . . . . . . . . . 5-7
Displaying DHCP Client Statistics . . . . . . . . . . . . . . . . . . . . . 5-8
Displaying Memory Statistics . . . . . . . . . . . . . . . . . . . . . . . . 5-9
Displaying Ethernet Statistics . . . . . . . . . . . . . . . . . . . . . . . 5-10
Displaying PPPoE Statistics . . . . . . . . . . . . . . . . . . . . . . . . 5-11
Displaying Wireless Statistics . . . . . . . . . . . . . . . . . . . . . . . 5-12
Using the Diagnose Utility . . . . . . . . . . . . . . . . . . . . . . . . . 5-13
Using the Home Page to Install a New Image . . . . . . . . . . . . 6-1
Using the Installer to Install a New Image. . . . . . . . . . . . . . . 6-3
Using TFTP to Install a New Image . . . . . . . . . . . . . . . . . . . 6-5
A Technical
Specifications
Cayman 2E-W User’s Guide Contents
November 2000
Components . . . . . . . . . . . . . . . . . . . . . . . . . . . . . . . . . . . .A-1
Power. . . . . . . . . . . . . . . . . . . . . . . . . . . . . . . . . . . . . . . . . A-1
Size. . . . . . . . . . . . . . . . . . . . . . . . . . . . . . . . . . . . . . . . . . . A-1
Interfaces . . . . . . . . . . . . . . . . . . . . . . . . . . . . . . . . . . . . . . A-2
Environment . . . . . . . . . . . . . . . . . . . . . . . . . . . . . . . . . . . .A-2
Certifications . . . . . . . . . . . . . . . . . . . . . . . . . . . . . . . . . . . . A-3
v
Page 6

B Diagnostic
Console
About the Diagnostic Console . . . . . . . . . . . . . . . . . . . . . . .B-1
Connecting a Terminal to the Console Port. . . . . . . . . . . . . .B-2
Using the Diagnostic Console. . . . . . . . . . . . . . . . . . . . . . . .B-3
Diagnostic Console Commands . . . . . . . . . . . . . . . . . . . . . .B-3
Basic Commands. . . . . . . . . . . . . . . . . . . . . . . . . . . . . .B-4
Administration Commands . . . . . . . . . . . . . . . . . . . . . . .B-5
Boot Setting Commands. . . . . . . . . . . . . . . . . . . . . . . . .B-7
C How Your
Cayman 2E-W
Works
Glossary
About Network Address Translation . . . . . . . . . . . . . . . . . . .C-1
About Bridging . . . . . . . . . . . . . . . . . . . . . . . . . . . . . . . . . .C-2
TCP/IP Routing . . . . . . . . . . . . . . . . . . . . . . . . . . . . . . .C-2
Bridging . . . . . . . . . . . . . . . . . . . . . . . . . . . . . . . . . . . . C-2
About DHCP . . . . . . . . . . . . . . . . . . . . . . . . . . . . . . . . . . . .C-3
Cayman 2E-W as DHCP Server. . . . . . . . . . . . . . . . . . . .C-4
Cayman 2E-W as DHCP Client . . . . . . . . . . . . . . . . . . . .C-4
About PPP. . . . . . . . . . . . . . . . . . . . . . . . . . . . . . . . . . . . . .C-5
How PPP Works . . . . . . . . . . . . . . . . . . . . . . . . . . . . . .C-5
Phases of a PPP Link . . . . . . . . . . . . . . . . . . . . . . . . . . .C-5
PPP and Routing Tables. . . . . . . . . . . . . . . . . . . . . . . .C-10
About PPP over Ethernet (PPPoE) . . . . . . . . . . . . . . . . . . . C-13
Advantages of PPPoE. . . . . . . . . . . . . . . . . . . . . . . . . . C-13
PPP over Ethernet Stages . . . . . . . . . . . . . . . . . . . . . . . C-13
About Wireless Networking . . . . . . . . . . . . . . . . . . . . . . . . C-15
Index
Contents Cayman 2E-W User’s Guide
vi
November 2000
Page 7

Preface
About This
Manual
Who Should Read
This Manual
What This
Manual Covers
This manual describes how to connect your Cayman 2E-W to your
local area network (LAN) and wide area network (WAN) and how to
configure it to function as a basestation for a wireless network and
as an Ethernet router. You should read this manual completely before
you connect your Cayman 2E-W to your Ethernet networks.
This manual is intended for network or system administrators
responsible for setting up and maintaining the hardware and
software to connect Ethernet networks.
Here’s what you will find in this manual:
Chapter 1, “About Your Cayman 2E-W,”
overview of the features, ports, and LEDs on your Cayman 2E-W.
presents an
Cayman 2E-W User’s Guide Preface
November 2000
Chapter 2, “Setting Up Your Cayman 2E-W,”
to unpack your Cayman 2E-W and how to connect and
disconnect it from your Ethernet networks.
Chapter 3, “Configuring Your Cayman 2E-W,”
how to use the web-based configuration interface to enter
operating settings for your Cayman 2E-W.
describes how
describes
vii
Page 8

Chapter 4, “Using the Command Line Interface,”
how to use the text-based command line interface to enter
operating settings for your Cayman 2E-W.
describes
Chapter 5, “Monitoring Your Cayman 2E-W,”
describes
how to monitor the performance of your Cayman 2E-W.
Chapter 6, “Updating Your System Software,”
describes
how to install a new version of the Cayman 2E-W operating
software in your router.
Appendix A, “Technical Specifications,”
details hardware
specifications and certifications for the Cayman 2E-W.
Appendix B, “Diagnostic Console,”
describes how to
connect a terminal to the Cayman 2E-W maintenance console
port and how to use the Cayman 2E-W diagnostic console to
display and modify the device’s boot settings.
Appendix C, “How Your Cayman 2E-W Works,”
presents
background information on how the Cayman 2E-W supports
address mapping, bridging, and the Dynamic Host Control
Protocol (DHCP).
Documentation
This manual uses the following conventions to present information:
Conventions
Menu commands and button names appear in
serif
type face.
Computer display text appears in
User-entered text appears in
terminal type face
bold terminal type face
Syntax conventions for the Cayman 2E-W command line interface
are as follows:
Optional command arguments are presented in straight ([ ])
brackets.
Preface Cayman 2E-W User’s Guide
viii
bold italic sans
.
.
November 2000
Page 9

Alternative values for an argument are presented in curly ({ })
brackets, with values separated with vertical bars (|).
Variables for which you must supply your own values are
presented in
italic terminal type face
.
Notes calling attention to important points are presented in
italic type with a Note icon.
Cayman 2E-W User’s Guide Preface
November 2000
ix
Page 10

Preface Cayman 2E-W User’s Guide
x
November 2000
Page 11

1
About Your Cayman
2E-W
Your Cayman 2E-W connects the personal computers, printers, and
other network devices in a workgroup to a remote network or the
Internet. Cayman 2E-W functions include the following:
A wireless bridge that interoperates with either 802.11b or
HomeRF wireless devices to create high-speed networks that do
not require Ethernet cabling.
An auto-configuring Internet router that incorporates Cayman's
Swift-IP™ technology.
What’s New in
Release 5.6.2
Cayman 2E-W
Features
Cayman 2E-W User’s Guide About Your Cayman 2E-W
November 2000
Support for RIP version 2 with MD5 authentication provides a
secure method of exchanging routing information with other
trusted routers while detecting and ignoring forged routing
messages sent from
SWIFT-IP™ means that installing the Cayman 2E-W consists of
connecting the device to your networks and entering a few basic
settings. You can install and configure the Cayman 2E-W in less
than 10 minutes.
Web-based browser configuration makes configuration and
management easy from anywhere on your network.
1-1
Page 12

Full-featured wide-area network bridge supports non-TCP/IP
protocols.
Network Address Translation (NAT) lets your workgroup
network share one IP address when communicating with other
hosts on your corporate network or the Internet.
Support for a NAT default server lets your Cayman 2E-W direct
NAT traffic to a specified host on your network.
Network Address Translation (NAT) conceals the topology of
your local area network from outside hackers while offering full
Internet access to LAN clients.
Dynamic Host Configuration Protocol (DHCP) client
functionality lets a host on your Wide Area Network (WAN)
configure the IP address and other network settings for the WAN
interface on your Cayman 2E-W automatically.
DHCP server functionality lets the Cayman 2E-W automatically
configure the IP address and other network settings for
computers on your Local Area Network.
DHCP relay agent functionality lets devices on the Local Area
Network obtain network address information from a DHCP
server on the WAN without any user setup at the workstation.
IP pinholes let you provide web services from your Local Area
Network without sacrificing network security.
Bandwidth shaping lets carriers and service providers regulate
the amount of WAN traffic.
Support for Point-to-Point Protocol over Ethernet (PPPoE) lets
you connect to an Internet Service Provider using well-defined
protocols.
Diagnose utility simplifies identification and resolution of
network problems.
Cayman 2E-W configuration pages automatically warn you if an
administrator password has not been set.
About Your Cayman 2E-W Cayman 2E-W User’s Guide
1-2
November 2000
Page 13
Security features include restrictions on access to the Cayman
2E-W through its WAN port, limitations on packets addressed to
an interface’s broadcast address, and enhanced handling of
“spoofed” IP addresses.
Ability to install new software images from the Cayman 2E-W
Home page.
Support for Checkpoint and Nortel Contivity virtual private
networks.
Support for negotiation of IPCP subnet allocation from a Remote
Access Server.
Configurable MAC address for WAN port.
Enhanced security, diagnostics, and error reporting for PPP and
PPPoE connections.
Cayman 2E-W
Front Panel
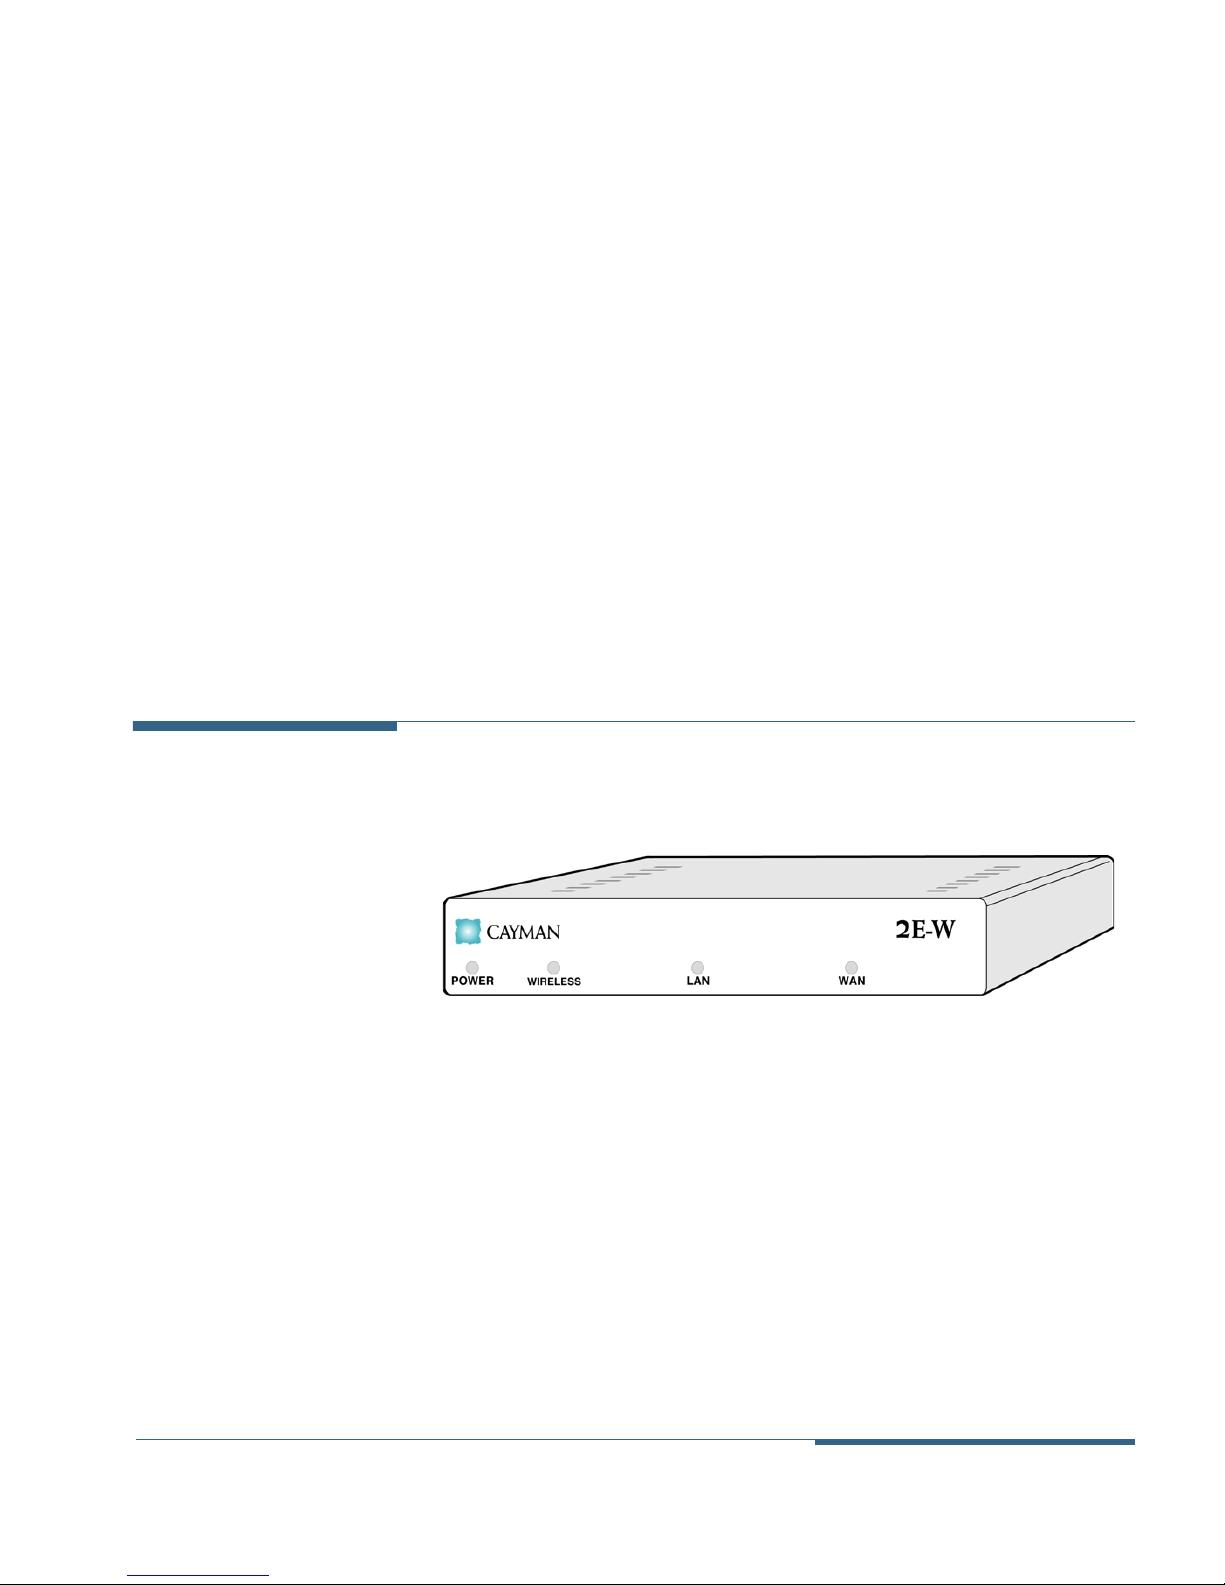
The front panel of your Cayman 2E-W (Figure 1-1) includes the
following LEDs and ports.
Figure 1-1
The
Cayman 2E-W Front Panel
power LED
remains steadily on when you connect your
Cayman 2E-W to a power supply.
The
wireless LED
flashes when a packet is sent or received
over the wireless network port.
The
LAN LED
flashes when a packet is sent or received over the
local area network (LAN) Ethernet port.
Cayman 2E-W User’s Guide About Your Cayman 2E-W
November 2000
The
WAN LED
flashes when a packet is sent or received over the
wide area network (WAN) Ethernet port.
1-3
Page 14
Cayman 2E-W
Back Panel
Do not attempt to
remove or replace the
wireless PCMCIA card
installed in your Cayman
2E-W. Doing so may
damage your wireless
gateway and will void
your warranty.
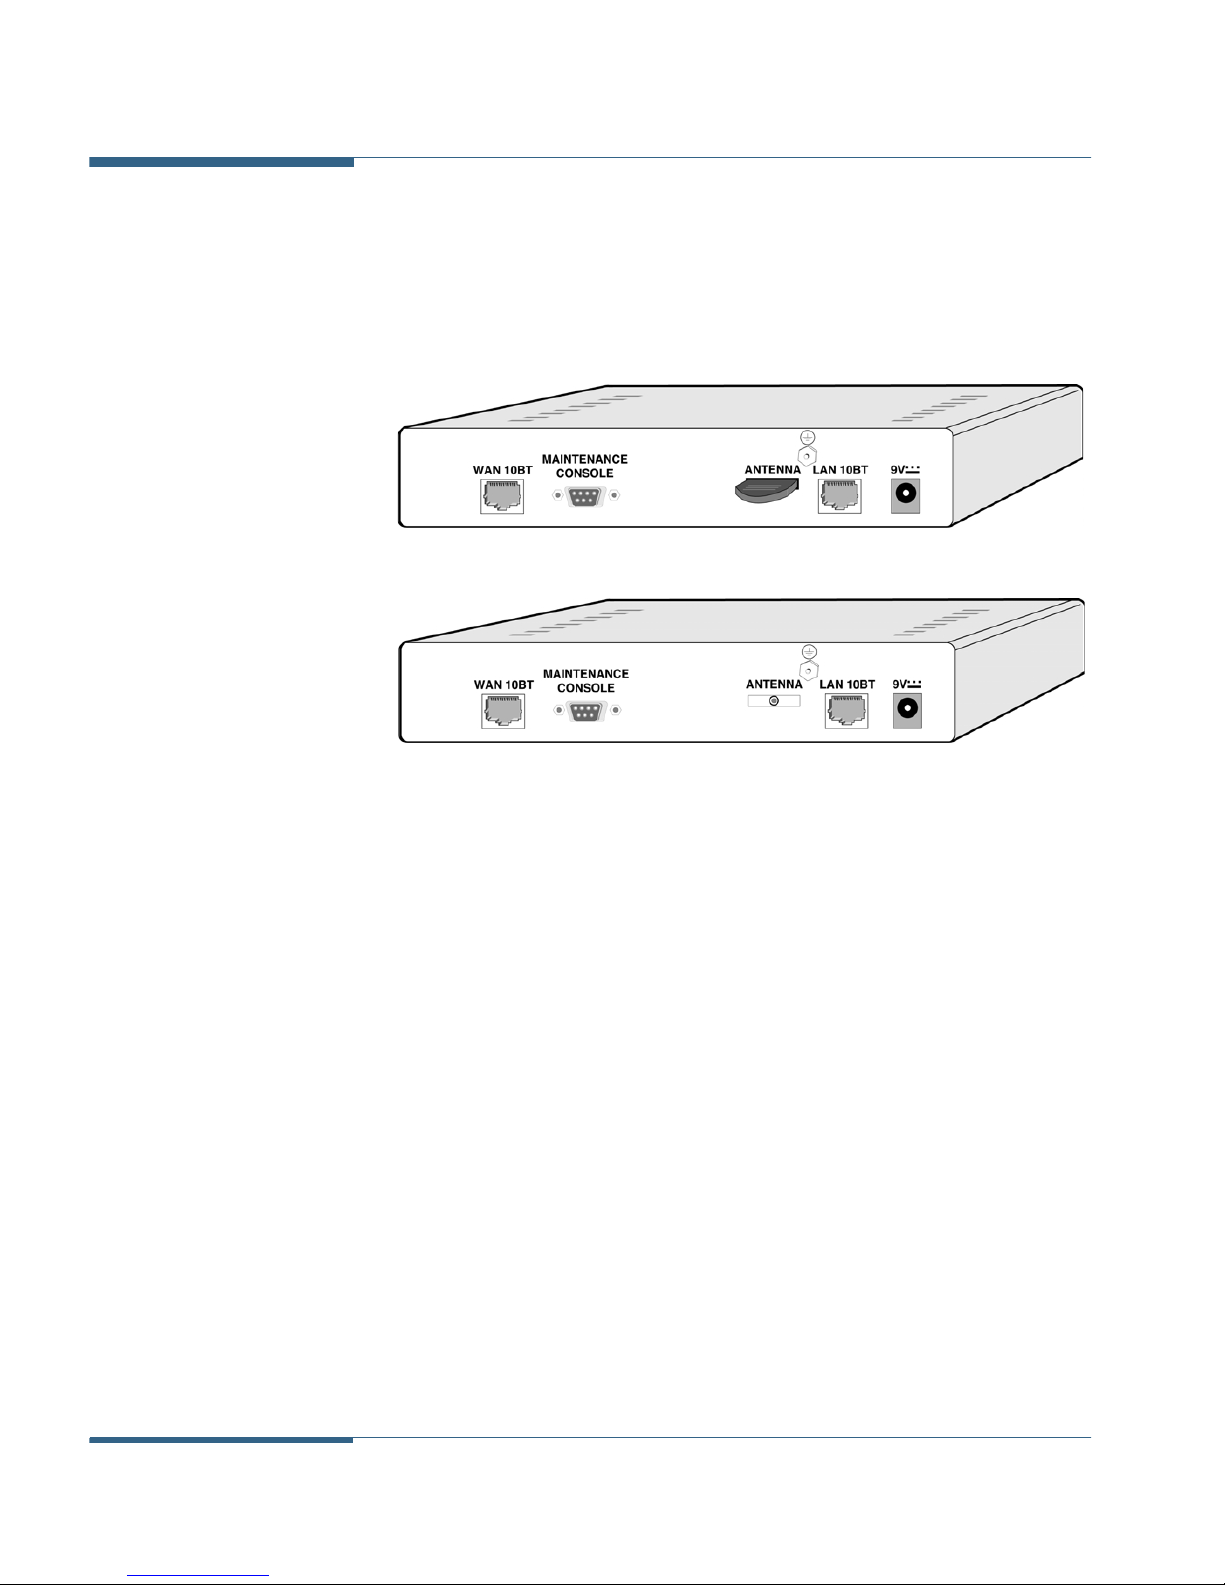
If you purchased the 802.11 version of the Cayman 2E-W the
configuration of the back panel of your Cayman 2E-W includes three
ports (Figure 1-2). If you purchased the HomeRF version of the Cayman
2E-W, the configuration of the back panel of your Cayman 2E-W
includes four ports (Figure 1-3).
Figure 1-2 Cayman 2E-W Back Panel (802.11 Version)
Figure 1-3 Cayman 2E-W Back Panel (HomeRF Version)
The WAN 10BaseT port lets you connect your Cayman 2E-W to
your WAN network through a cable modem, xDSL modem, or
backbone Ethernet link.
The maintenance console port lets you connect the Cayman
2E-W to a terminal or personal computer running a terminal
emulation application to configure its operating settings with
the command line interface (described in Chapter 4.)
If you have the HomeRF version of the Cayman 2E-W, the
antenna port lets you connect the external wireless antenna to
your Cayman 2E-W. If you have the 802.11b version of the
Cayman 2E-W, the wireless antenna is already installed.
The ground connector lets you connect your Cayman 2E-W to
a solid ground source.
The LAN 10BaseT port lets you connect your Cayman 2E-W to
your local area network.
About Your Cayman 2E-W Cayman 2E-W User’s Guide
1-4
November 2000
Page 15

The power port lets you connect the Cayman 2E-W to an electrical
power supply. Transformers for standard U.S. and international
power sources are available from your router vendor.
Using a transformer that has not been approved by your router
vendor will void your warranty. While non-approved power supplies
may appear compatible with the Cayman 2E-W power jack, they may
result in damage to your Cayman 2E-W.
Cayman 2E-W User’s Guide About Your Cayman 2E-W
November 2000 1-5
Page 16

About Your Cayman 2E-W Cayman 2E-W User’s Guide
1-6 November 2000
Page 17

2 Setting Up Your
Cayman 2E-W
Unpacking Your Cayman 2E-W
Connecting Your Cayman 2E-W
Disconnecting Your Cayman 2E-W
Unpacking Your
Cayman 2E-W
The first thing you should do when you receive the Cayman 2E-W
package is confirm that you have everything you should. Remove all
the materials from the shipping carton and verify that you have the
following:
The Cayman 2E-W server in a protective bag
Wireless antenna (HomeRF version only)
Power transformer (U.S. or international)
Cayman 2E-W installation CD-ROM
Cayman 2E-W QuickStart and other documentation
Cayman 2E-W User’s Guide Setting Up Your Cayman 2E-W
November 2000 2-1
Page 18
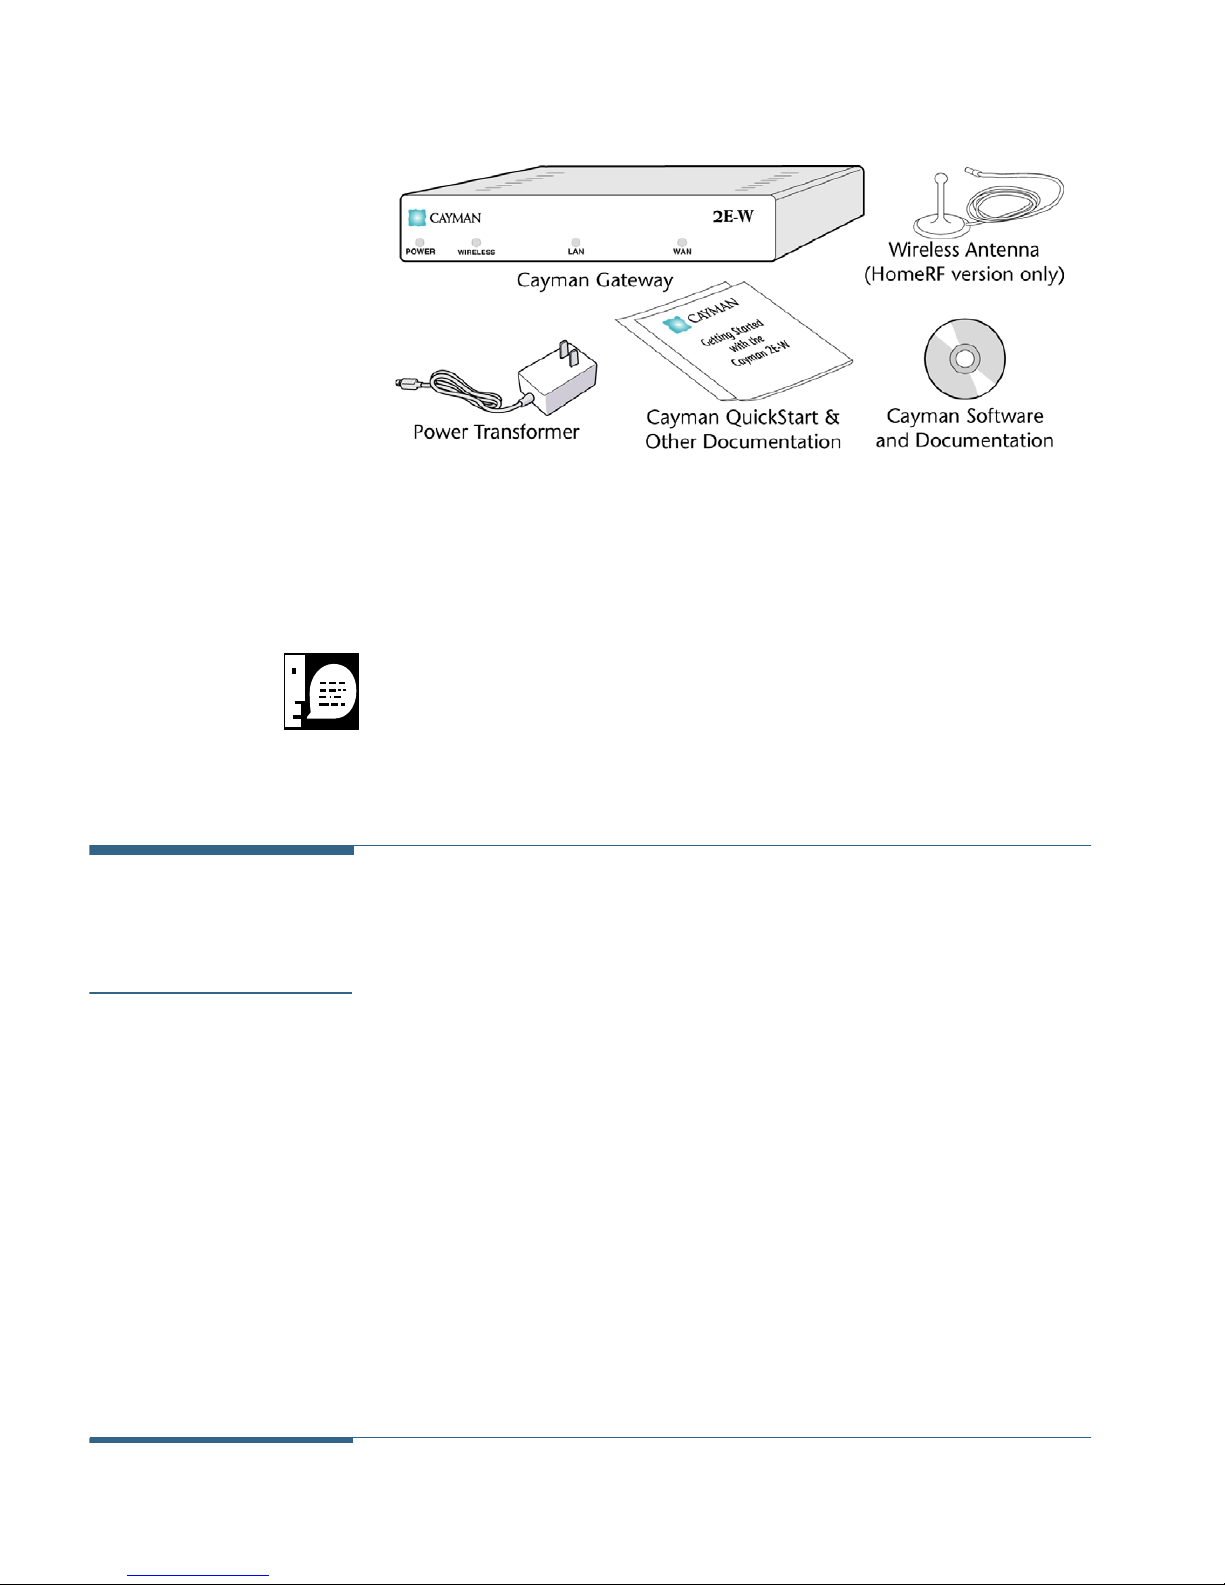
Figure 2-1 Cayman 2E-W Package Components
Your Cayman 2E-W shipping carton may also include release notes
and other materials. If your shipping carton does not contain
everything on this list, contact your hardware vendor.
Keep the shipping carton and all the packing materials used
to ship your Cayman 2E-W. Repack your Cayman 2E-W in its
original carton if you have to move it over long distances or
if you need to ship it to another location.
Connecting Your
Cayman 2E-W
Step 1: Position the
Cayman 2E-W
Setting Up Your Cayman 2E-W Cayman 2E-W User’s Guide
The 10Base-T Ethernet ports on the rear panel of the Cayman 2E-W
are used to connect the device to your Ethernet networks.
Position the Cayman 2E-W in a location where air can circulate freely
around it. The Cayman 2E-W case has vents on its top and bottom.
Leave at least two (2) inches of clearance between the vents on the
top of the Cayman 2E-W and any object that might restrict air flow.
Never operate the Cayman 2E-W when its vents are covered or
obstructed.
2-2 November 2000
Page 19
Step 2: Connect
Your Wide Area
Network
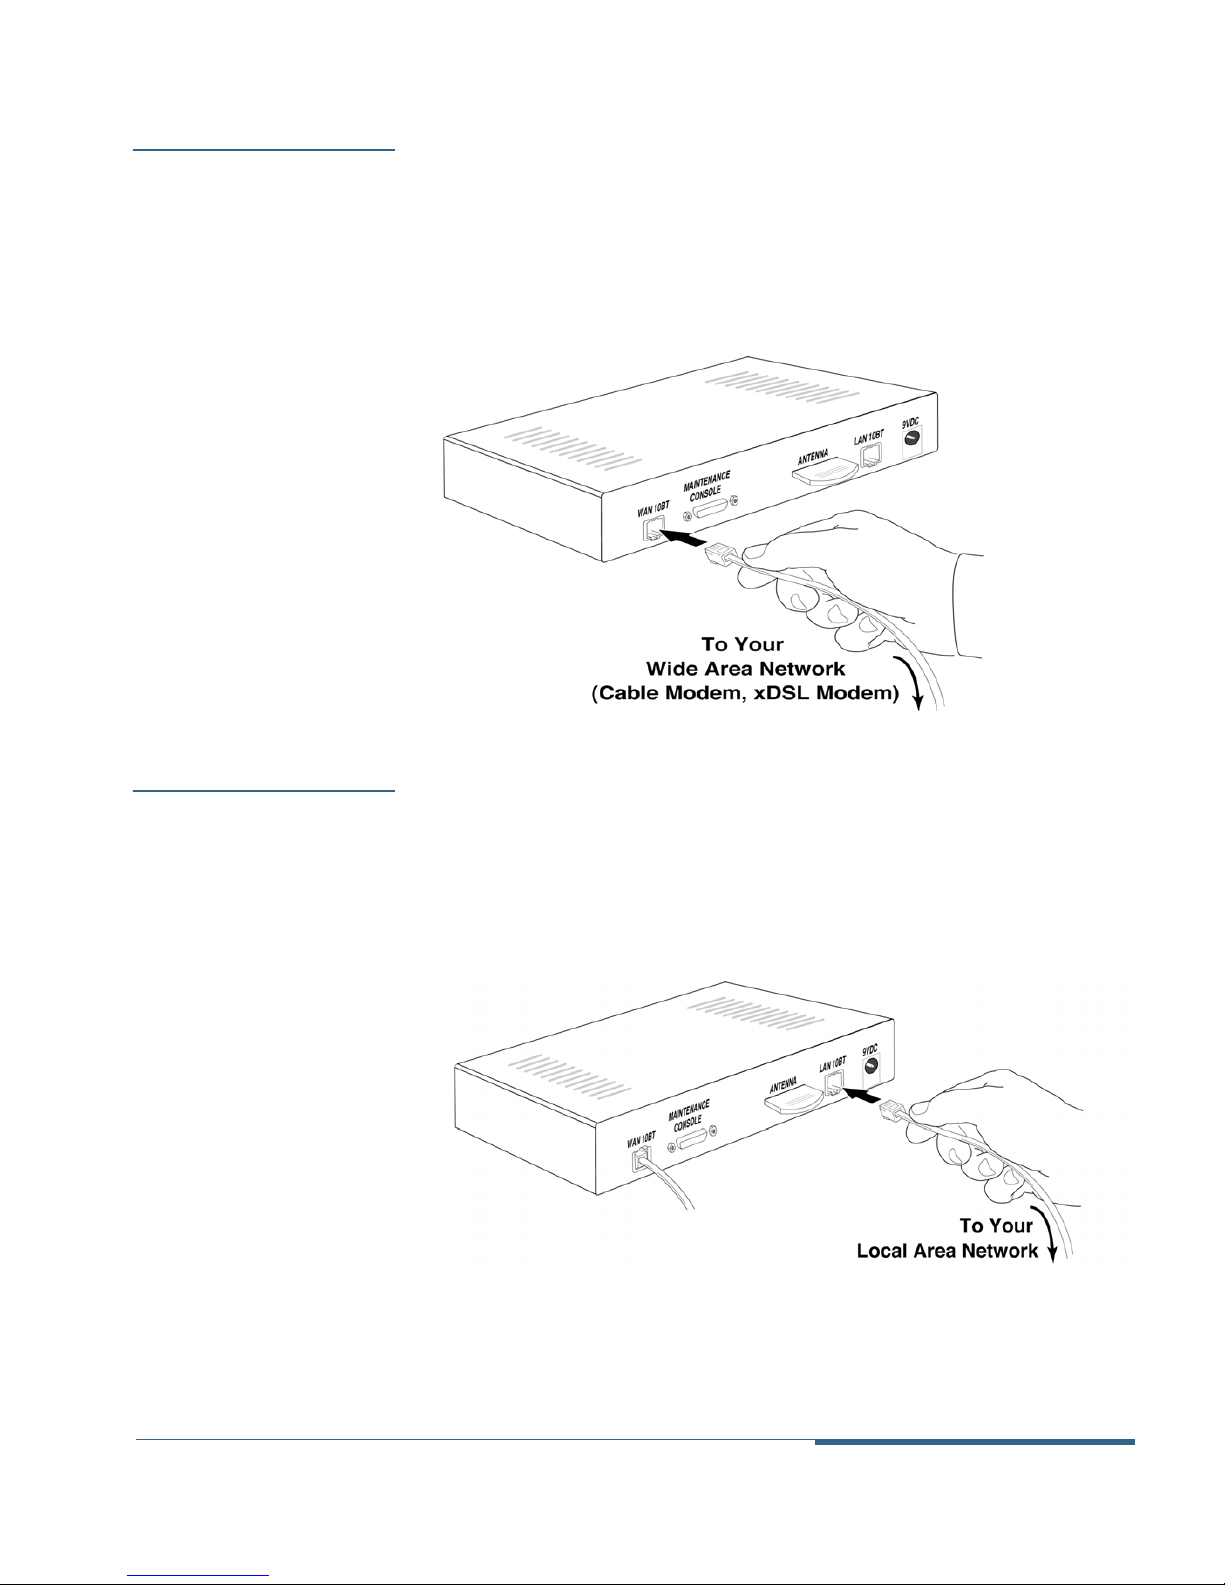
Insert one end of a twisted-pair cable in the port labeled WAN 10BT
on the Cayman 2E-W back panel until you feel it lock (Figure 2-2).
Connect the other end of the cable to the Ethernet hub, cable
modem, or xDSL modem that links you to your corporate network,
wide area network, or the Internet.
Figure 2-2 Connecting Your Cayman 2E-W to Your WAN
Step 3: Connect
Your Local Area
Network
Insert one end of a twisted-pair cable in the port labeled LAN 10BT
on the Cayman 2E-W back panel until you feel it lock (Figure 2-3).
Connect the other end of the cable to the hub for your local area
network.
Figure 2-3 Connecting the Cayman 2E-W to Your LAN
Cayman 2E-W User’s Guide Setting Up Your Cayman 2E-W
November 2000 2-3
Page 20
Step 4: Connect
Your Wireless
Antenna (HomeRF
version only)
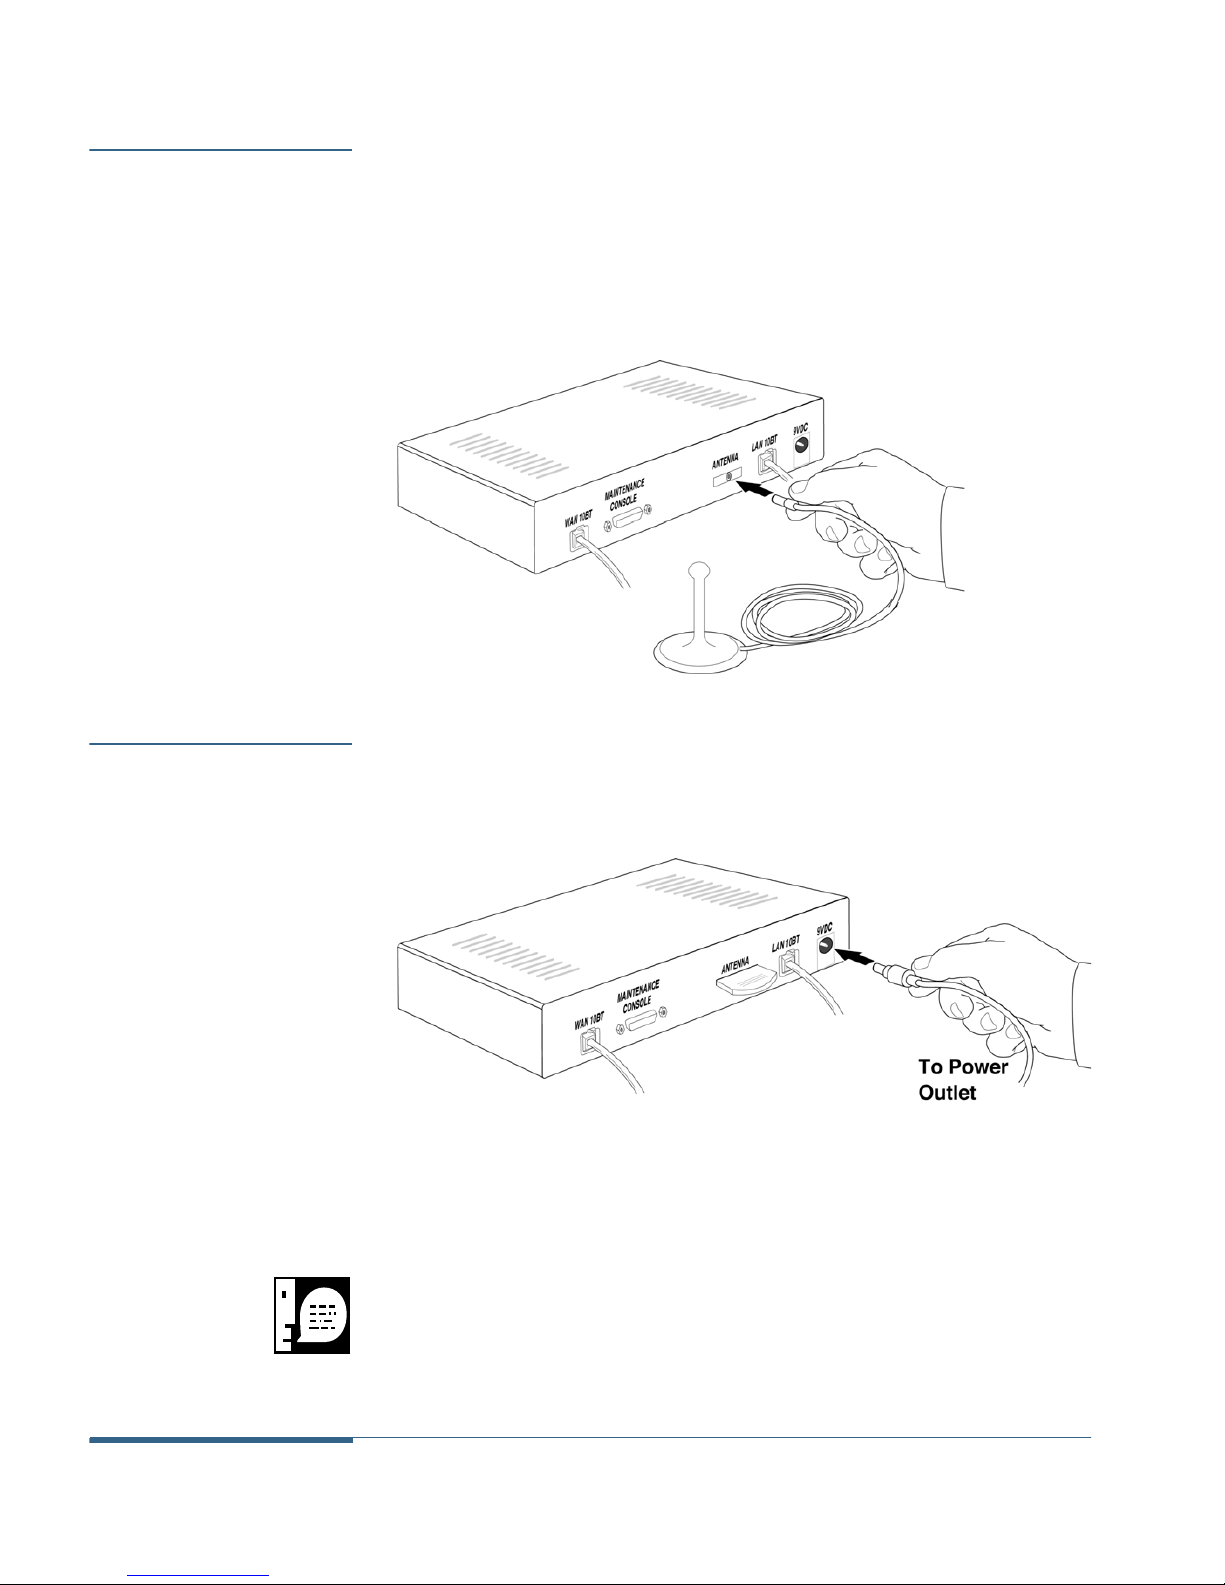
If you are setting up the HomeRF version of the Cayman 2E-W, insert
the antenna plug into the antenna jack on the Cayman 2E-W back
panel until you feel it lock (Figure 2-4). For best results, position the
antenna on a high shelf away from fluorescent lights or devices that
might generate a magnetic field.
Figure 2-4 Connecting Your Wireless Antenna
Step 5: Power On
the Cayman 2E-W
Plug the round end of the transformer cord into the power jack on
the back panel of the Cayman 2E-W (Figure 2-5).
Figure 2-5 Connecting Your Cayman 2E-W to a Power Supply
After you have connected the transformer to the Cayman 2E-W, plug
the pronged end of the transformer cord into a 110-120 volt AC
outlet (or the electrical power outlet appropriate to your location).
Users outside the United States may need a transformer compatible
with local electrical power specifications. Contact your authorized
router vendor for information on appropriate transformers.
Setting Up Your Cayman 2E-W Cayman 2E-W User’s Guide
2-4 November 2000
Page 21

Disconnecting
Your Cayman
2E-W
Complete the following steps to disconnect your Cayman 2E-W from
your Ethernet networks. Return the Cayman 2E-W to its original
carton if you are moving it to a different location.
1. Warn and disconnect network users.
Before you disconnect the Cayman 2E-W, let your network users
know that remote access services will be interrupted
temporarily.
2. Unplug the Cayman 2E-W power supply.
Unplug the Cayman 2E-W transformer from the wall outlet. After
you have unplugged the transformer from its wall outlet,
disconnect the transformer from the Cayman 2E-W.
3. Disconnect the Cayman 2E-W from your local area
network.
Disconnect the Ethernet cables from the LAN port on the
Cayman 2E-W back panel.
4. Disconnect the Cayman 2E-W from your WAN network.
Disconnect the Ethernet cable from the WAN port on the
Cayman 2E-W back panel.
5. (HomeRF version only) Disconnect the external antenna
cable from the Cayman 2E-W back panel.
Cayman 2E-W User’s Guide Setting Up Your Cayman 2E-W
November 2000 2-5
Page 22

Setting Up Your Cayman 2E-W Cayman 2E-W User’s Guide
2-6 November 2000
Page 23

3 Configuring Your
Cayman 2E-W
Gathering Configuration Information
Configuring Your Computer
Opening a Web Connection
Entering Basic Settings
Entering LAN (Ethernet A) Settings
Entering WAN (Ethernet B) Settings
Configuring Password Settings
Configuring Pinhole Settings
Configure Wireless Settings
Configuring SNMP Settings
Cayman 2E-W User’s Guide Configuring Your Cayman 2E-W
November 2000 3-1
Page 24

Gathering
Configuration
Information
Before you configure your Cayman 2E-W, you need to gather
information about your networks. Most users will only need to
complete the QuickStart section.
For many users, the default (or factory) configuration of the
product will provide all the necessary services. Some WAN
service providers may require settings that vary from the
default configuration. In such cases, you should contact the
service provider or network administrator and have them
complete the Quickstart form below.
QuickStart
Information
You can print the following table and use it to enter information in
the Cayman 2E-W QuickStart window.
Field Name Description
System Name
The name used to identify your
Cayman 2E-W on your network.
Default is
Your
Information
Cayman-2E<serialnumber>
Wireless ID
The name used to identify your
Cayman 2E-W to wireless network
clients. Default for HomeRF
networks, which is based on the
gateway’s serial number, can be
found on a label on the underside
of the gateway. Default for 802.11
wireless gateways is
Cayman-2E<serialnumber>.
Ethernet B
(WAN) Local
Address
The IP address assigned to
Ethernet Port B on your Ethernet
network. Default is
0.0.0.0.
Ethernet B
(WAN) Net
Mask
Configuring Your Cayman 2E-W Cayman 2E-W User’s Guide
3-2 November 2000
Subnet mask in use for the
network connected to Ethernet
Port B. Default is typically
255.255.255.0.
Page 25

Field Name Description
Your
Information
LAN Port (Ethernet
A) Information
(Optional)
Default
Gateway
Domain
Name
Primary
Nameserver
Address
Secondary
Nameserver
Address
IP address of the host to which the
Cayman 2E-W should send
network traffic when it can't find
the destination host. Blank by
default.
The name of the DNS domain you
access most frequently. Blank by
default.
The IP address of the primary DNS
name server for your network.
Default is
The IP address of the backup DNS
name server for your network.
Default is
0.0.0.0.
0.0.0.0.
If you want to customize the settings for the LAN (Ethernet A)
interface on your Cayman 2E-W, print the following table and use it
to enter information in the Cayman 2E-W LAN Ethernet window.
Some fields listed in the table only appear after you click the Expert
Mode button on the Cayman 2E-W Home window.
Field Name Description
Local Address
The IP address of the Cayman
2E-W on the network
connected to its LAN (Ethernet
A) port. Default is
Your
Information
192.168.1.254.
Net Mask
Subnet mask in use for the
network connected to the LAN
(Ethernet A) port. Default is
typically
255.255.255.0.
Cayman 2E-W User’s Guide Configuring Your Cayman 2E-W
November 2000 3-3
Page 26

Field Name Description
Your
Information
DHCP Mode
(expert mode)
Start Address
(expert mode)
End Address
(expert mode)
Off – Disable DHCP server.
Server – Cayman 2E-W uses
DHCP to provide network
configuration information to
hosts on the Local Area
Network.
setting.
Server is the default
Relay-agent – Cayman 2E-W
forwards DHCP requests and
responses to a remote DHCP
server.
The first IP address the
Cayman 2E-W should assign
for Dynamic Host Control
Protocol clients. Applicable
when DHCP Mode is set to
Server. Default is
192.168.1.1.
The last IP address the Cayman
2E-W should assign for
Dynamic Host Control
Protocol clients. Applicable
when DHCP Mode is set to
Server. Default is
192.168.1.254.
Lease Time
(expert mode)
Server
Address
(expert mode)
Configuring Your Cayman 2E-W Cayman 2E-W User’s Guide
3-4 November 2000
The time, in DD:HH:MM:SS
format, for which a
configuration issued by the
Cayman 2E-W DHCP server is
valid. Applicable when DHCP
Mode is set to
is
00:01:00:00 (one hour).
The IP address the remote
DHCP server to which your
Cayman 2E-W will relay
Dynamic Host Control
Protocol address requests.
Applicable when DHCP Mode
is set to
Relay-agent.
Server. Default
Page 27

WAN (Ethernet B)
Port Information
(Optional)
If you want to customize the settings for the WAN (Ethernet B) port
on your Cayman 2E-W, print the following table and use it to enter
information in the Cayman 2E-W Ethernet B (WAN) Configuration
window.
Field Name Description
Local Address
The IP address of the Cayman
2E-W on the network
connected to the WAN
(Ethernet B) port. Default is
0.0.0.0.
Net Mask
Subnet mask in use for the
network connected to the
WAN (Ethernet B) port.
Default is typically
255.255.255.0.
Network
Address
Translation
(NAT) On/Off
Specifies whether the Cayman
2E-W will perform Network
Address Translation. This
feature hides the IP addresses
of the PCs on the LAN from
the wide area network and the
Internet. Unless specifically
instructed, you should leave
this feature on, as it provides
additional security to your
LAN. Default is
Your
Information
On.
Configuring Your
Computer
Cayman 2E-W User’s Guide Configuring Your Cayman 2E-W
November 2000 3-5
The following instructions assume that you want all devices on your
workgroup Ethernet network to use IP addresses on the 192.168.1.0
network. If your workgroup network must use another network
number, refer to Entering LAN (Ethernet A) Settings on page 3-17
for information on how to change the IP address of the LAN interface
for the Cayman 2E-W.
Page 28

1. Configure your computer to use an IP address on the
same TCP/IP network as the Cayman 2E-W.
If you are using Windows 95/Windows 98/Windows NT:
a. Open the Network Control Panel and select the TCP/IP
service for the Ethernet card in your computer (for
example, TCP/IP ->3Com EtherLink III).
b. Open the Properties window.
c. Click the Gateways tab, and remove any installed
gateways.
d. Click the DNS Configuration tab, and disable DNS.
e. Click the IP Address tab, and click the Obtain an IP
Address Automatically option button.
f. Click OK to save the modified TCP/IP settings.
If you are using a Macintosh running Open Transport:
a. Open the TCP/IP Control Panel.
b. Choose Connect via Ethernet.
c. Choose Configure Using DHCP Server and enter the IP
address of the Cayman 2E-W (192.168.1.254) in the
Name Server Address text box.
d. Click OK.
If you are using a Macintosh running MacTCP:
a. Open the MacTCP Control Panel and select the
Ethernet interface icon.
b. Enter 192.168.1.x (where x is any number in the range
1-253) in the IP Address text field.
Configuring Your Cayman 2E-W Cayman 2E-W User’s Guide
3-6 November 2000
c. Click the More button.
Page 29

d. Click the Obtain Address Manually radio button.
e. Enter 192.168.1.254 in the Gateway Address text field.
f. Pull down the Class dropdown list and choose C, which
sets your subnet mask to 255.255.255.0.
g. In the Domain Name Server Information fields, enter
your Internet Service Provider’s domain name in the
Domain text field and enter 192.168.1.254 in the IP
Address text field.
2. Restart your computer.
3. Configure each computer that will use the Cayman 2E-W’s
address sharing feature to use DHCP, as described in Step
1, above.
Configure devices that will not use DHCP with static IP
addresses on the same network as the Cayman 2E-W. Restart
each device after you have updated its TCP/IP configuration.
To Connect Over
the Wireless LAN
Opening a Web
Connection
If you want to configure your Cayman 2E-W from a device on your
wireless local area network, you will need to install and configure
the wireless network hardware and software. For information on
installing and configuring your wireless network software in your
laptop, refer to the Configuring Your PC for HomeRF or the
Configuring Your PC for 802.11 Wireless Networking manuals.
You use a Web browser, such as Netscape Navigator or Microsoft
Internet Explorer, to open a connection to your Cayman 2E-W.
To open a connection to your Cayman 2E-W:
1. Run your Web browser.
Cayman 2E-W User’s Guide Configuring Your Cayman 2E-W
November 2000 3-7
Page 30
2. Enter the name or IP address of your Cayman 2E-W in the
browser's Open Location window and press Enter.
For example, you would enter http://192.168.1.254/ if your
Cayman 2E-W is using its default IP address. You can enter
http://2e/ if your computer has been configured to use DHCP
address assignment.
3. If an administrator or user password has been assigned to
the Cayman 2E-W, enter your name and the appropriate
password and click OK.
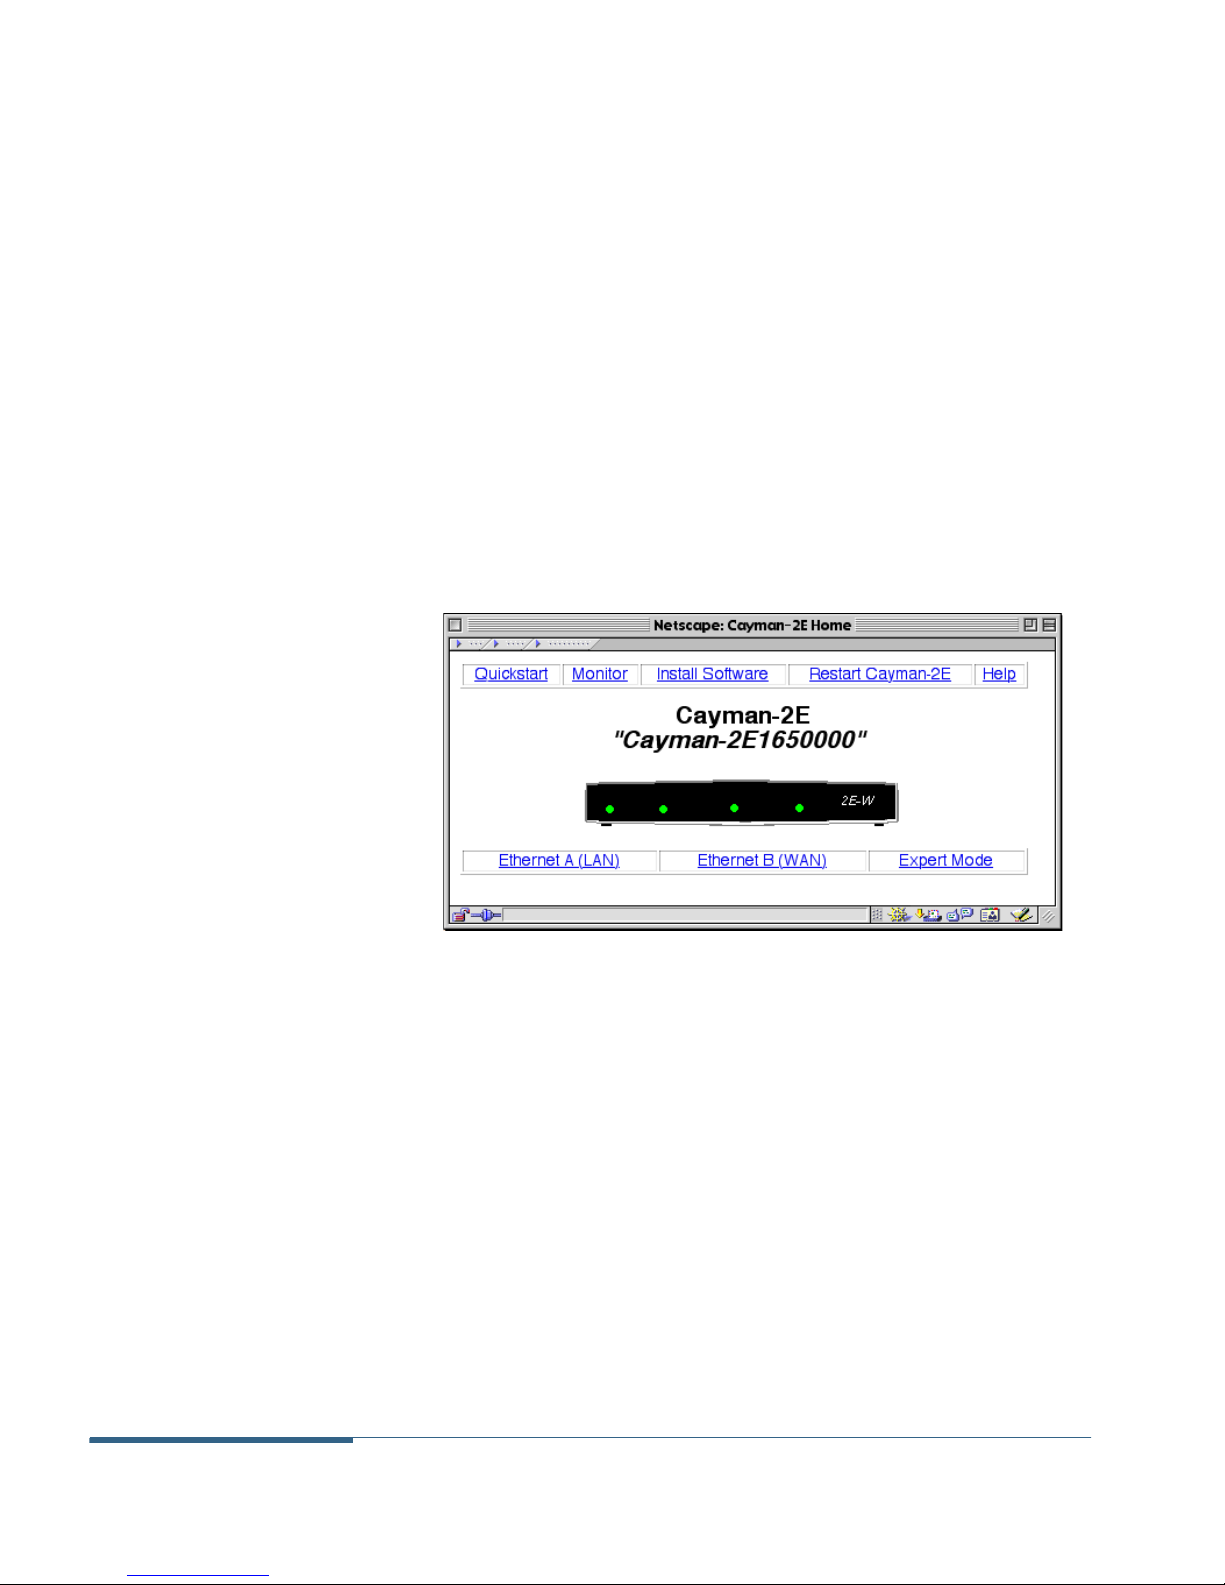
The Cayman 2E-W Home window (Figure 3-1) opens. By default,
you are in Novice Mode and PPP over Ethernet (PPPoE) is turned
off, which is appropriate for most users.
Figure 3-1 Cayman 2E-W Home Window (Novice Mode)
If you enable PPPoE, the Cayman 2E-W Home window refers to
the WAN port as Ethernet B (PPPoE) instead of Ethernet B
(WAN) (Figure 3-2).
Configuring Your Cayman 2E-W Cayman 2E-W User’s Guide
3-8 November 2000
Page 31
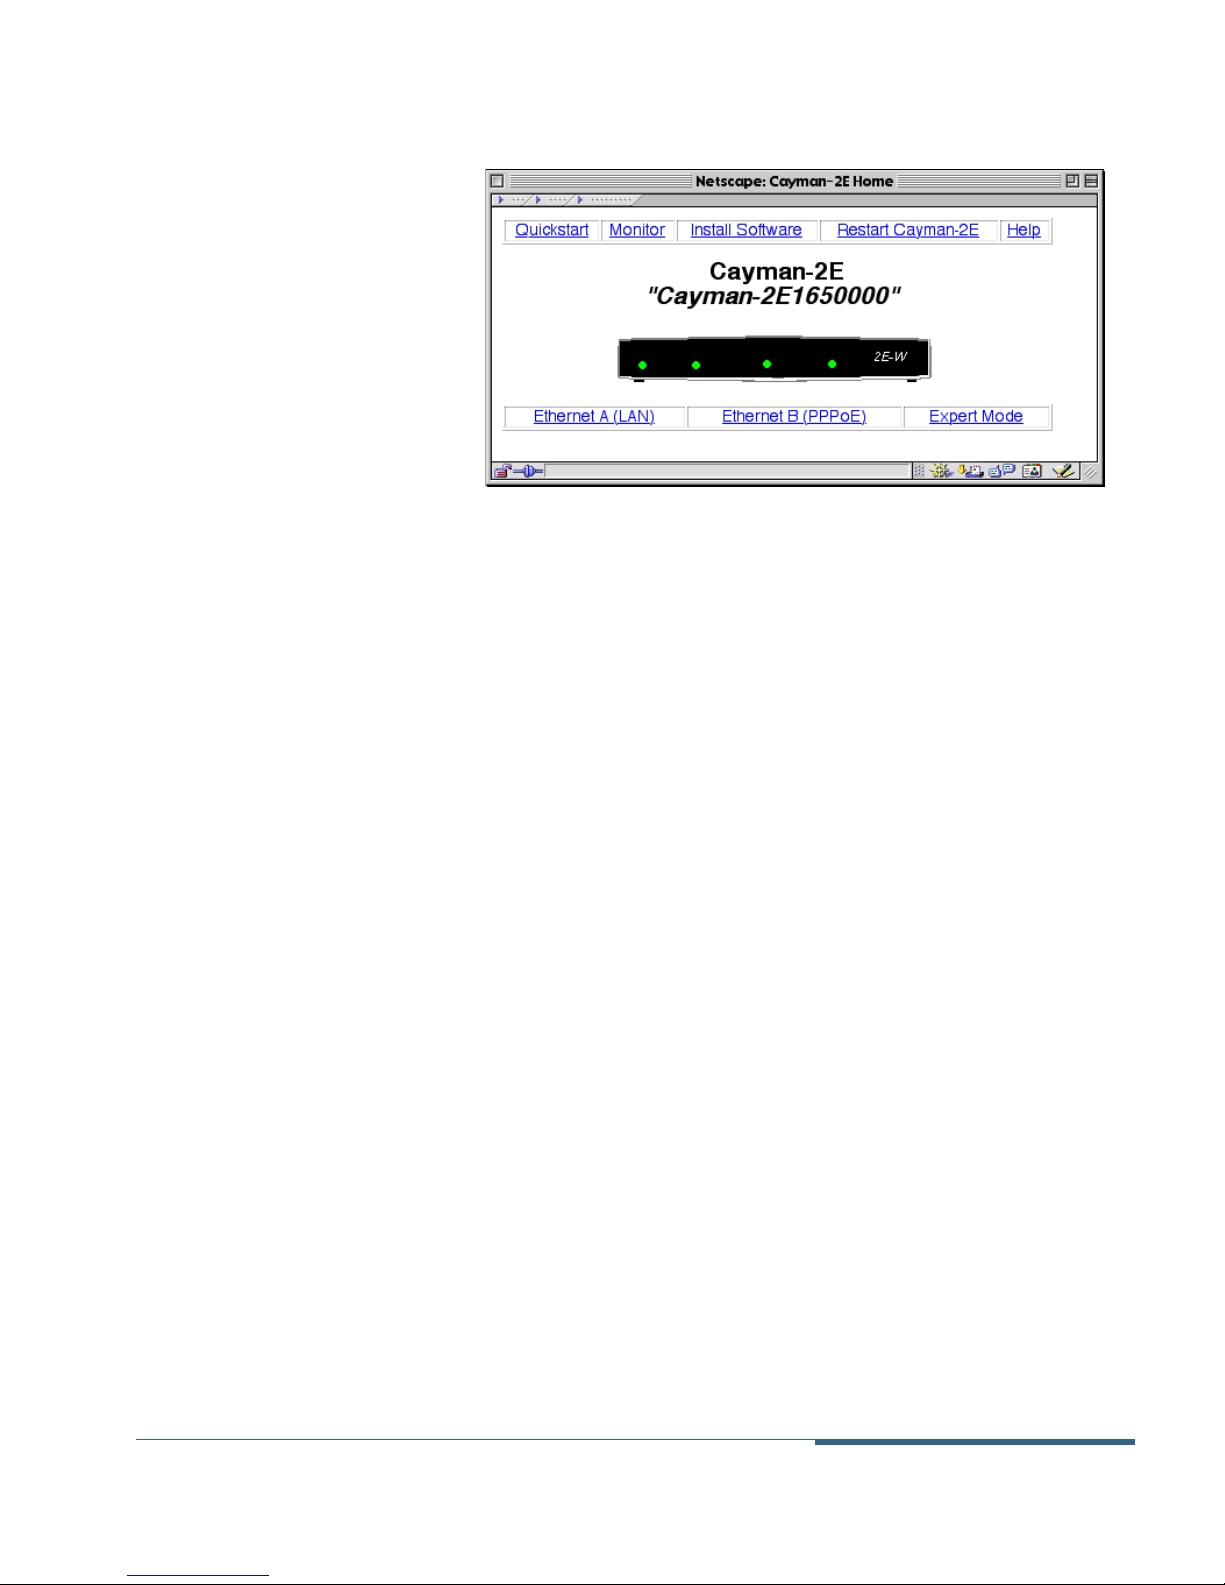
Figure 3-2 Cayman 2E-W Home Window (PPPoE turned on)
4. Use the buttons on the Cayman 2E-W Home Page to issue
a command or open a window.
The Quickstart button opens the QuickStart window,
which lets you enter basic settings for your Cayman 2E-W.
The Monitor button opens the Monitor window, which lets
you display operating statistics for your Cayman 2E-W.
The Install Software button opens the Install New Cayman
Software window, which lets you install new operating
system software in your Cayman 2E-W.
The Restart Cayman-2E button restarts your Cayman 2E-W,
causing it to load any updated configuration information
you have saved.
The Help button opens a window explaining how to access
the Cayman 2E-W online help system.
The Ethernet A (LAN) button opens the Ethernet A window,
which lets you configure TCP/IP address settings for the
Ethernet A port on the Cayman 2E-W.
Cayman 2E-W User’s Guide Configuring Your Cayman 2E-W
November 2000 3-9
The Ethernet B (WAN)/Ethernet B (PPPoE) button opens
the Ethernet B window, which lets you configure TCP/IP
address settings for the Ethernet B port on the Cayman
2E-W.
The Expert Mode button adds four additional buttons
(Passwords, Pinhole, Wireless, and SNMP) to the Cayman
2E-W Home page (Figure 3-3). Under normal circumstances,
you do not need to modify these settings.
Page 32
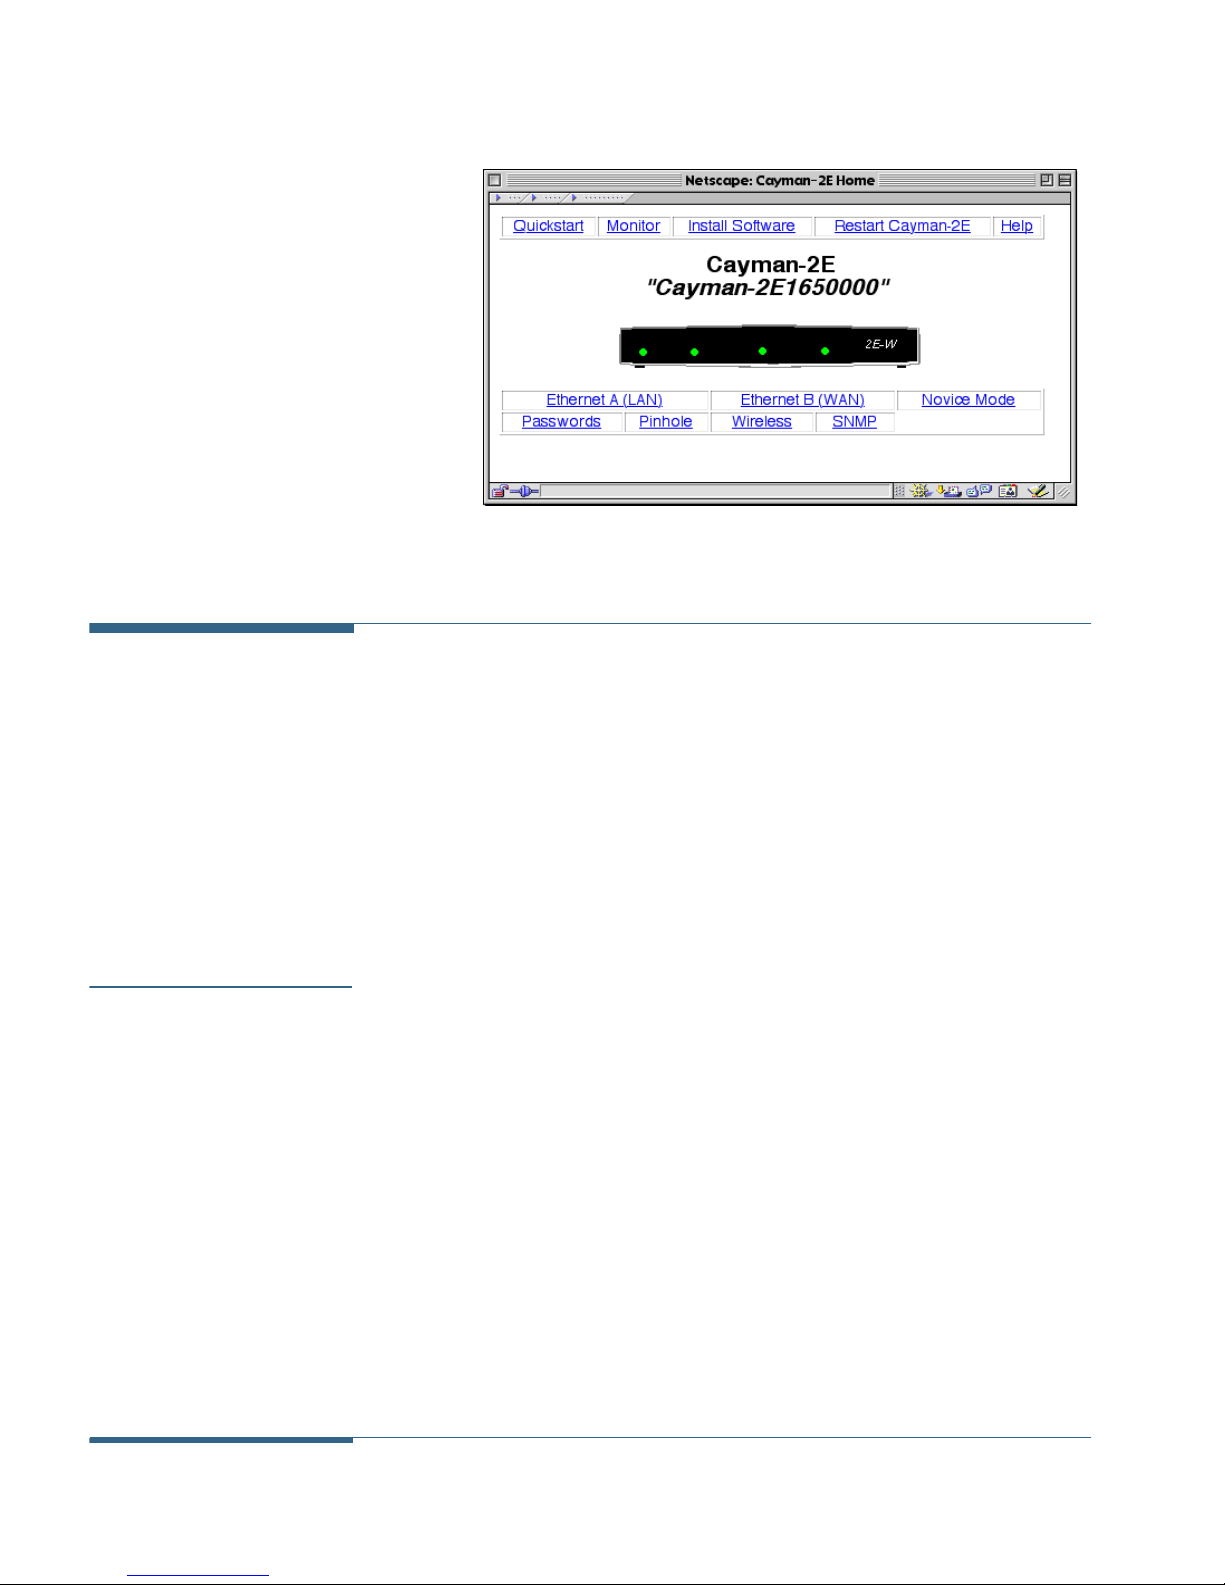
Figure 3-3 Cayman 2E-W Home Window (expert mode)
Entering Basic
Settings
QuickStart (PPPoE
Off)
The Cayman 2E-W QuickStart window lets you enter basic
configuration information for your Cayman 2E-W. If you use the
default settings for IP address information for the device's WAN
(Ethernet B) port, the Cayman 2E-W QuickStart window asks you
only for the name you want to assign your Cayman 2E-W. If you have
overridden the default settings for IP address information for
Ethernet Port B and entered IP address information manually, you
can use the Cayman 2E-W QuickStart window to display and modify
those settings.
To display the QuickStart window (Figure 3-4), click the QuickStart
button on the Cayman 2E-W Home Page.
Configuring Your Cayman 2E-W Cayman 2E-W User’s Guide
3-10 November 2000
Page 33
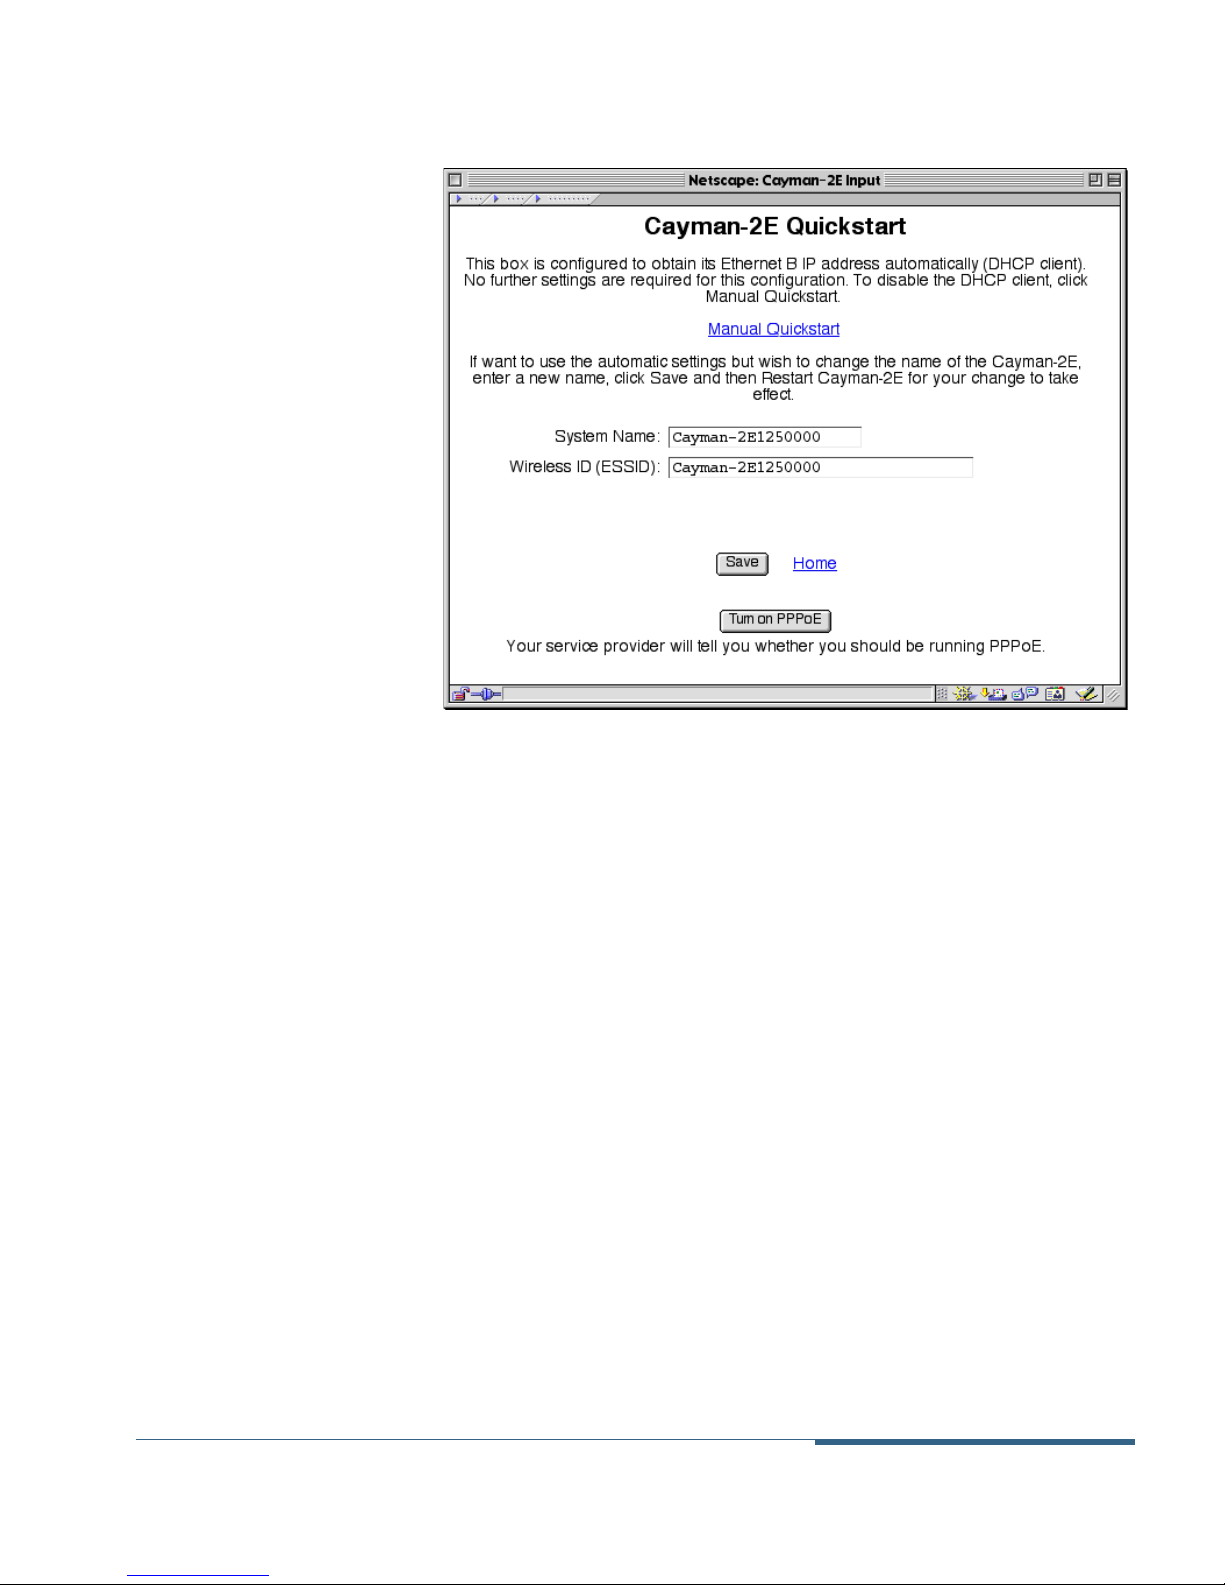
Figure 3-4 QuickStart Window (PPPoE Off)
To configure the QuickStart window:
1. Enter the name of your Cayman 2E-W in the System Name
field.
Each Cayman 2E-W is assigned a name as part of its factory
initialization. The default name for a Cayman 2E-W consists of
the word “Cayman-2E” and the serial number of the device.
2. Enter the identifier for your Cayman 2E-W on your
HomeRF or 802.11 wireless network in the Wireless ID
field.
HomeRF wireless network – The default HomeRF wireless
ID for a Cayman 2E-W consists of two four-digit numbers,
which are located on the label on the bottom of your
Cayman 2E-W. You must configure other devices on your
wireless network to use this identifier before they can
communicate with your Cayman 2E-W.
Cayman 2E-W User’s Guide Configuring Your Cayman 2E-W
November 2000 3-11
802.11 wireless network – The default 802.11 wireless ID
for a Cayman 2E-W consists of the word “Cayman-2E” and
Page 34
the serial number of the device. You must configure other
devices on your 802.11 wireless network to use this
identifier before they can communicate with your Cayman
2E-W.
3. Click the Save button to store your modified
configuration in the Cayman 2E-W memory.
The Cayman 2E-W Home Page opens.
4. Click the Restart Cayman-2E button to restart your
Cayman 2E-W with its new configuration.
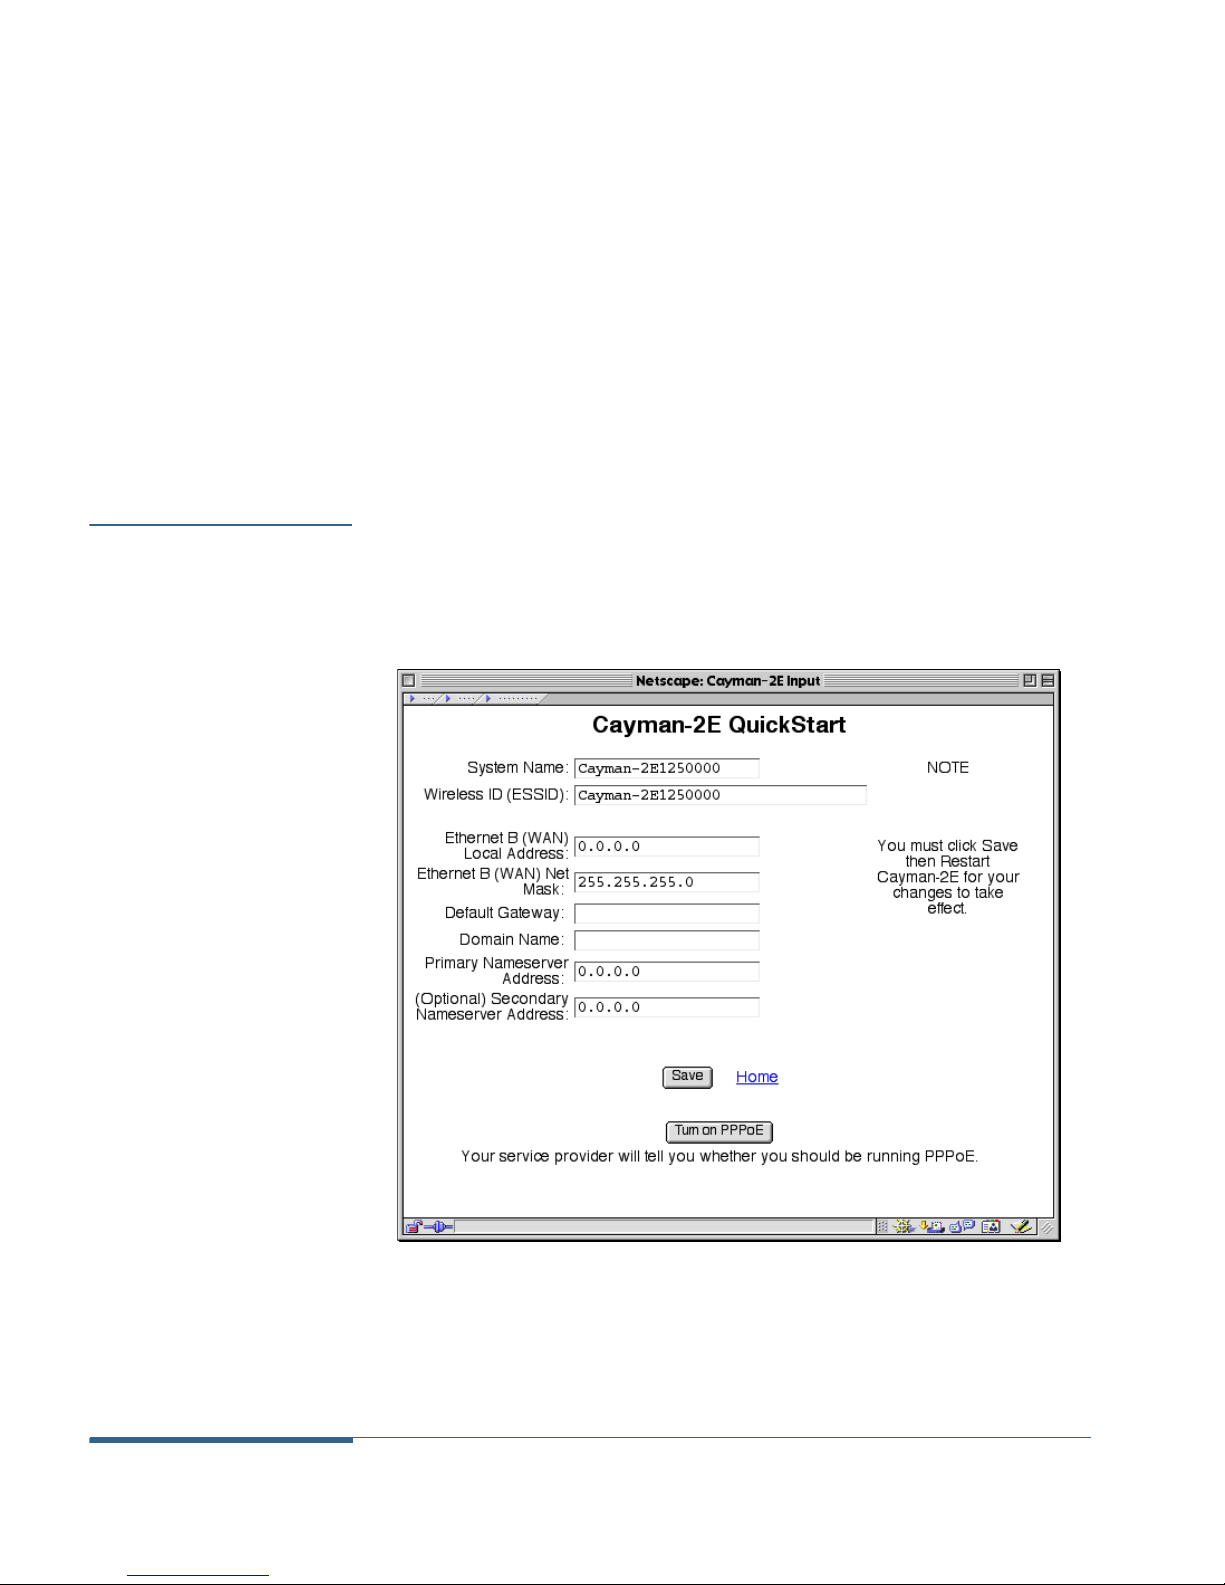
Manual QuickStart If you want to modify the default settings for the Cayman 2E-W’s
WAN port, click the Manual QuickStart button on the QuickStart
window to display the Manual QuickStart window (Figure 3-5).
Figure 3-5 Manual QuickStart Window
Configuring Your Cayman 2E-W Cayman 2E-W User’s Guide
3-12 November 2000
Page 35

To configure the Manual QuickStart window:
1. Enter the name of your Cayman 2E-W in the System Name
field.
Each Cayman 2E-W is assigned a name as part of its factory
initialization. The default name for a Cayman 2E-W consists of
the word “Cayman-2E” and the serial number of the device. A
device name can be 1-32 characters long and cannot include
spaces or special characters.
2. Enter the identifier for your Cayman 2E-W on your
HomeRF or 802.11 wireless network in the Wireless ID
field.
HomeRF wireless network – The default HomeRF wireless
ID for a Cayman 2E-W consists of two four-digit numbers,
which are located on the label on the bottom of your
Cayman 2E-W. You must configure other devices on your
wireless network to use this identifier before they can
communicate with your Cayman 2E-W.
802.11 wireless network – The default 802.11 wireless ID
for a Cayman 2E-W consists of the word “Cayman-2E” and
the serial number of the device. You must configure other
devices on your 802.11 wireless network to use this
identifier before they can communicate with your Cayman
2E-W.
3. Enter the IP address of Ethernet Port B in the Ethernet B
(WAN) Local Address field.
The IP address you assign to Ethernet Port B must not be used
by another device on your network.
4. Enter the subnet mask for the network connected to
Ethernet Port B in the Ethernet B (WAN) Net Mask field.
The subnet mask specifies which bits of the 32-bit binary IP
address represent network information. Most sites should use
255.255.255.0 for their subnet mask.
Cayman 2E-W User’s Guide Configuring Your Cayman 2E-W
November 2000 3-13
Page 36

5. Enter the IP address of the default gateway for your
network in the Default Gateway field.
The default gateway is the host to which the Cayman 2E-W will
send packets if it does not know how to reach a destination host.
6. Enter your domain name in the Domain Name field.
Domain names identify organizations on the Internet. Enter the
domain name you use most frequently in the Domain Name
field. This is usually the domain name of your company (if it has
one) or the domain name of your Internet Service Provider.
7. Enter the IP address of your primary domain name server
in the Primary Nameserver Address field.
A domain name server is a network computer responsible for
matching host names to numeric IP addresses so that network
traffic can be routed correctly. Your Internet Service Provider
can provide the IP address of their domain nameserver.
8. Enter the IP address of your backup domain name server
in the Secondary Nameserver Address field.
The secondary nameserver is consulted when the primary
nameserver cannot be reached.
Do not click the Turn On PPPoE button unless you are
instructed to do so by your Internet Service Provider.
9. Click the Save button to store your modified
configuration in the Cayman 2E-W memory.
10. Click the Restart Cayman-2E button on the Cayman 2E-W
Home Page to restart your Cayman 2E-W with its new
configuration.
Configuring Your Cayman 2E-W Cayman 2E-W User’s Guide
3-14 November 2000
Page 37
QuickStart (PPPoE
On)
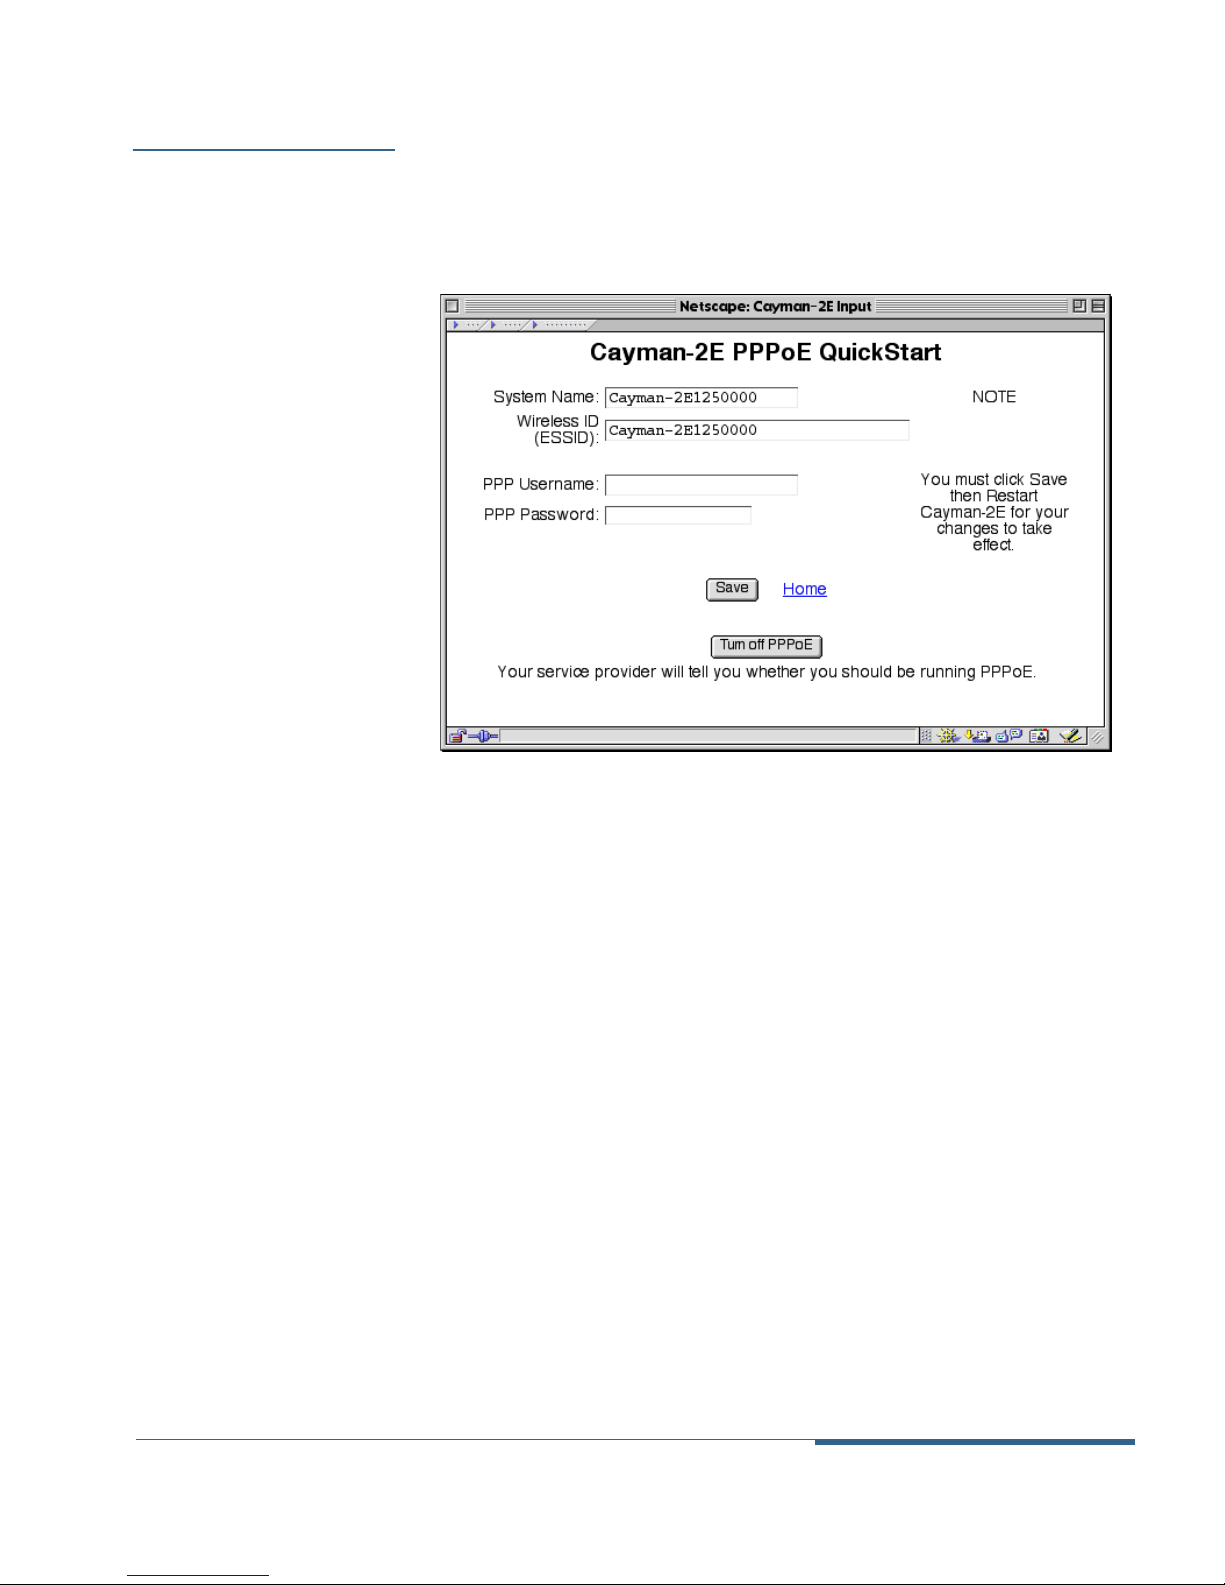
If your Cayman 2E-W is configured to use PPPoE (PPP over Ethernet)
framing, the PPPoE QuickStart window (Figure 3-6) opens when you
click the QuickStart button on the Cayman 2E-W Home Page.
Figure 3-6 QuickStart Window (PPPoE On)
To configure the PPPoE QuickStart window:
1. Enter the name of your Cayman 2E-W in the System Name
field.
Each Cayman 2E-W is assigned a name as part of its factory
initialization. The default name for a Cayman 2E-W consists of
the word “Cayman-2E” and the serial number of the device.
2. Enter the identifier for your Cayman 2E-W on your
HomeRF or 802.11 wireless network in the Wireless ID
field.
HomeRF wireless network – The default HomeRF wireless
ID for a Cayman 2E-W consists of two four-digit numbers,
which are located on the label on the bottom of your
Cayman 2E-W. You must configure other devices on your
wireless network to use this identifier before they can
communicate with your Cayman 2E-W.
Cayman 2E-W User’s Guide Configuring Your Cayman 2E-W
November 2000 3-15
Page 38

802.11 wireless network – The default 802.11 wireless ID
for a Cayman 2E-W consists of the word “Cayman-2E” and
the serial number of the device. You must configure other
devices on your 802.11 wireless network to use this
identifier before they can communicate with your Cayman
2E-W.
3. Enter the login name you want your Cayman 2E-W to
send when the PPP link is being established in the PPP
Username field.
This is the username the Cayman 2E-W sends in a PAP or CHAP
response packet. The information you enter must match the
CHAP username configured in the remote PPP peer's
authentication database.
4. Enter the password you want your Cayman 2E-W to send
when the PPP link is being established in the PPP
Password field.
This is the PAP password or CHAP secret the Cayman 2E-W
sends. The information you enter must match the PAP
password/CHAP secret configured in the remote PPP peer's
authentication database.
5. Click the Save button to store your modified
configuration in the Cayman 2E-W memory.
The Cayman 2E-W Home Page opens.
6. Click the Restart Cayman-2E button to restart your
Cayman 2E-W with its new configuration.
Configuring Your Cayman 2E-W Cayman 2E-W User’s Guide
3-16 November 2000
Page 39
Entering LAN
(Ethernet A)
Settings
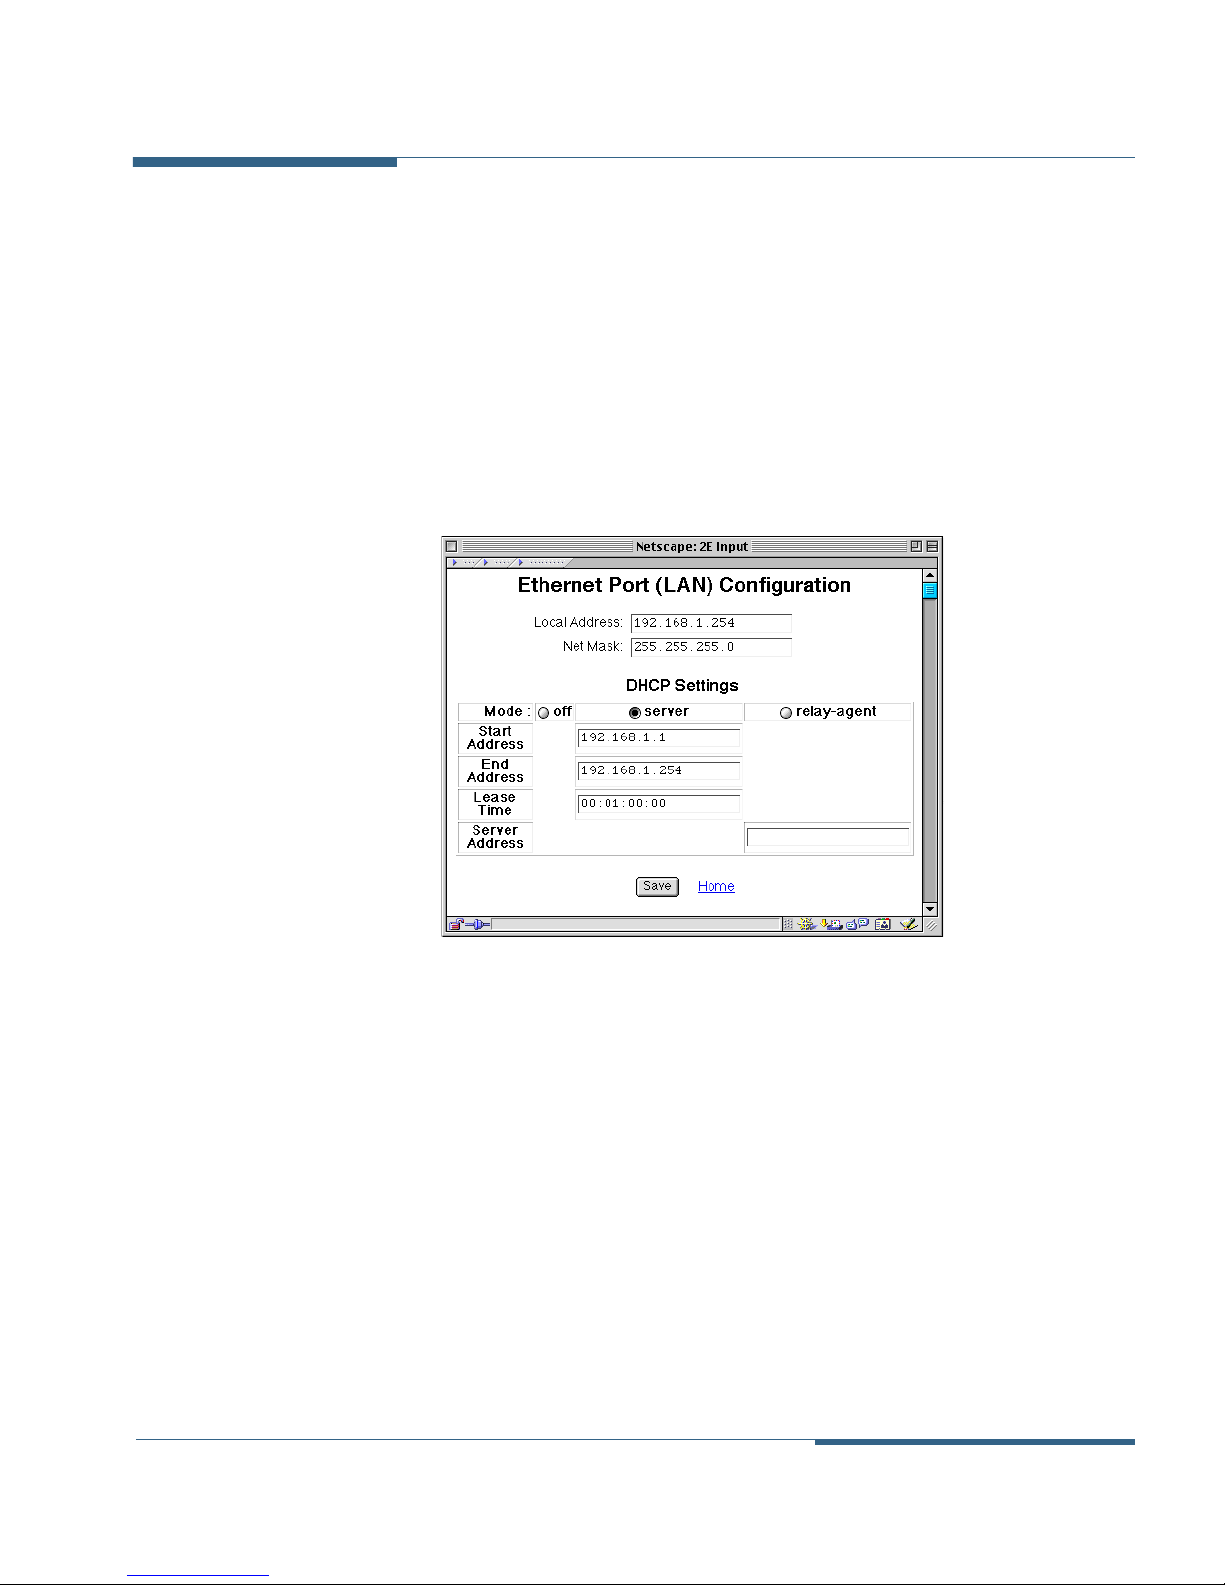
The Ethernet Port (LAN) Configuration window lets you enter
TCP/IP configuration information for the LAN (Ethernet A) interface
on your Cayman 2E-W. The Cayman 2E-W provides default settings
that are appropriate for networks that do not already have TCP/IP
addresses. If your network falls into this category, do not change the
LAN Ethernet settings.
To display the Ethernet Port (LAN) Configuration window (Figure
3-7), click the Ethernet A (LAN) button on the Cayman 2E-W Home
Page.
Figure 3-7 Ethernet Port (LAN) Configuration Window (expert mode)
To configure your Ethernet settings:
1. Enter the IP address of the Cayman 2E-W’s LAN Ethernet
interface in the Local Address field.
The IP address you assign to your Cayman 2E-W’S LAN interface
must not be used by another device on your LAN network. The
IP address you assign the Cayman 2E-W LAN interface does not
correspond to the IP address associated with any of the device’s
hub ports.
Cayman 2E-W User’s Guide Configuring Your Cayman 2E-W
November 2000 3-17
Page 40

2. Enter the subnet mask for the network connected to the
LAN Ethernet interface in the Net Mask field.
The subnet mask specifies which bits of the 32-bit binary IP
address represent network information. Most sites should use
255.255.255.0 for their subnet mask.
If you have turned on Expert Mode on the Cayman 2E-W Home
window, you will see a set of DHCP fields on the Ethernet Port
Configuration (LAN) window. If you did not turn on Expert Mode,
you can skip to Step 8, below.
If you use the Cayman 2E-W as a DHCP server, you should
assign IP addresses outside the DHCP address range to
devices requiring static IP addresses. Before the Cayman
2E-W assigns an IP address to a DHCP client, it verifies that
no other device is using that address. However, network
conflicts can result when the Cayman 2E-W assigns an
address in its DHCP range to one device and then another
device configured to use that address is turned on.
3. Use the DHCP Mode buttons to specify whether you want
your Cayman 2E-W to act as a DHCP server or DHCP relay
agent for other devices on your local area network.
Options are:
Off – Disable DHCP server functions in the Cayman 2E-W.
Server – Cayman 2E-W uses DHCP to provide network
configuration information to hosts on the Local Area
Network. Server is the default setting.
Relay-agent – Cayman 2E-W forwards DHCP requests to a
remote DHCP server and sends responses back to hosts
asking for configuration information.
4. If you chose Server in Step 3, enter the first IP address the
Cayman 2E-W should assign for Dynamic Host Control
Protocol clients in the Start Address field.
5. If you chose Server in Step 3, enter the last IP address the
Cayman 2E-W should assign for Dynamic Host Control
Protocol clients in the End Address field.
Configuring Your Cayman 2E-W Cayman 2E-W User’s Guide
3-18 November 2000
Page 41

6. If you chose Server in Step 3, specify the default duration
for DHCP leases in the Lease Time field.
Enter the lease duration in day:hour:minute:second
(DD:HH:MM:SS) format.
7. If you chose Relay-agent in Step 3, specify the IP address
the remote DHCP server to which your Cayman 2E-W will
relay Dynamic Host Control Protocol address requests in
the Server Address field.
8. Click the Save button to store your modified
configuration in the Cayman 2E-W memory.
9. Click the Restart Cayman-2E button on the Cayman 2E-W
Home Page to restart your Cayman 2E-W with its new
configuration.
Entering WAN
(Ethernet B)
Settings
The Ethernet Port B (WAN) Configuration window lets you enter
TCP/IP configuration information for the WAN (Ethernet B) port on
your Cayman 2E-W. The appearance of the Ethernet B window
depends on whether you have turned on PPP over Ethernet on the
port.
The Cayman 2E-W is configured at the factory to determine the
correct configuration for its WAN port automatically. You will only
configure this information if the Cayman 2E-W cannot determine its
Ethernet Port B configuration information from a DHCP server on
your wide area network.
PPPoE is Off To display the Ethernet Port B (WAN) Configuration window (Figure
3-8), click the Ethernet B (WAN) button on the Cayman 2E-W Home
Page.
Cayman 2E-W User’s Guide Configuring Your Cayman 2E-W
November 2000 3-19
Page 42
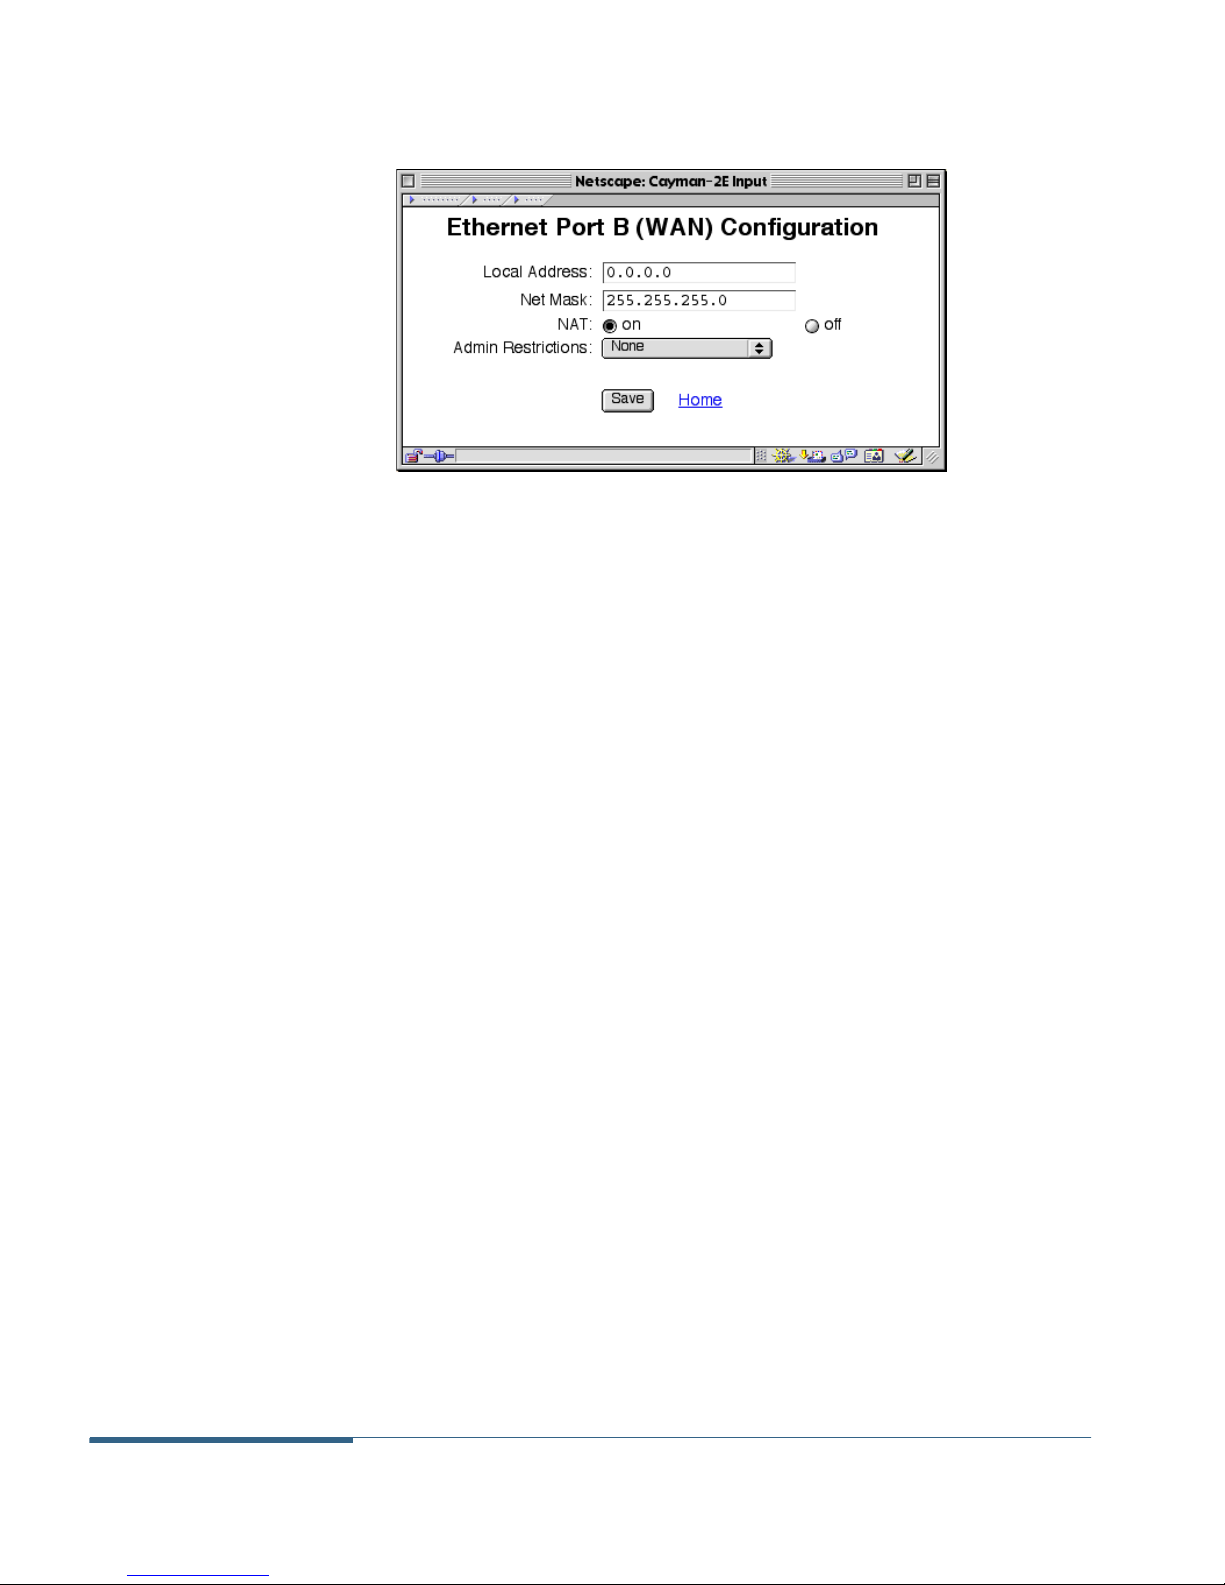
Figure 3-8 Ethernet Port B (WAN) Configuration Window
To configure settings for the WAN (Ethernet B) port:
1. Enter the IP address of the Cayman 2E-W’s WAN Ethernet
port in the Local Address field.
If you want to specify the IP address for Ethernet Port B, make
sure you enter an address that is not being used by another
device on your network.
If you want your Cayman 2E-W to acquire the IP address for its
WAN port from a DHCP server on your wide area network, enter
0.0.0.0.
2. Enter the subnet mask for the network connected to the
Cayman 2E-W’s WAN Ethernet port in the Net Mask field.
The subnet mask specifies which bits of the 32-bit binary IP
address represent network information. Most sites should use
255.255.255.0 for their subnet mask.
3. Use the NAT On/Off buttons to specify whether you want
Configuring Your Cayman 2E-W Cayman 2E-W User’s Guide
3-20 November 2000
If you want your Cayman 2E-W to acquire the subnet mask for
its WAN port from a DHCP server on your backbone network,
enter 0.0.0.0.
the Cayman 2E-W to use network address translation.
Page 43
4. Use the Admin Restrictions list to specify whether the
Cayman 2E-W accepts administrative commands received
over the WAN port.
Options are:
None – All traffic is accepted over this port.
Admin-Disabled – Router traffic is accepted over this port
but administration commands are ignored.
5. Click the Save button to store your modified
configuration in the Cayman 2E-W memory.
6. Click the Restart Cayman-2E button on the Cayman 2E-W
Home Page to restart your Cayman 2E-W with its new
configuration.
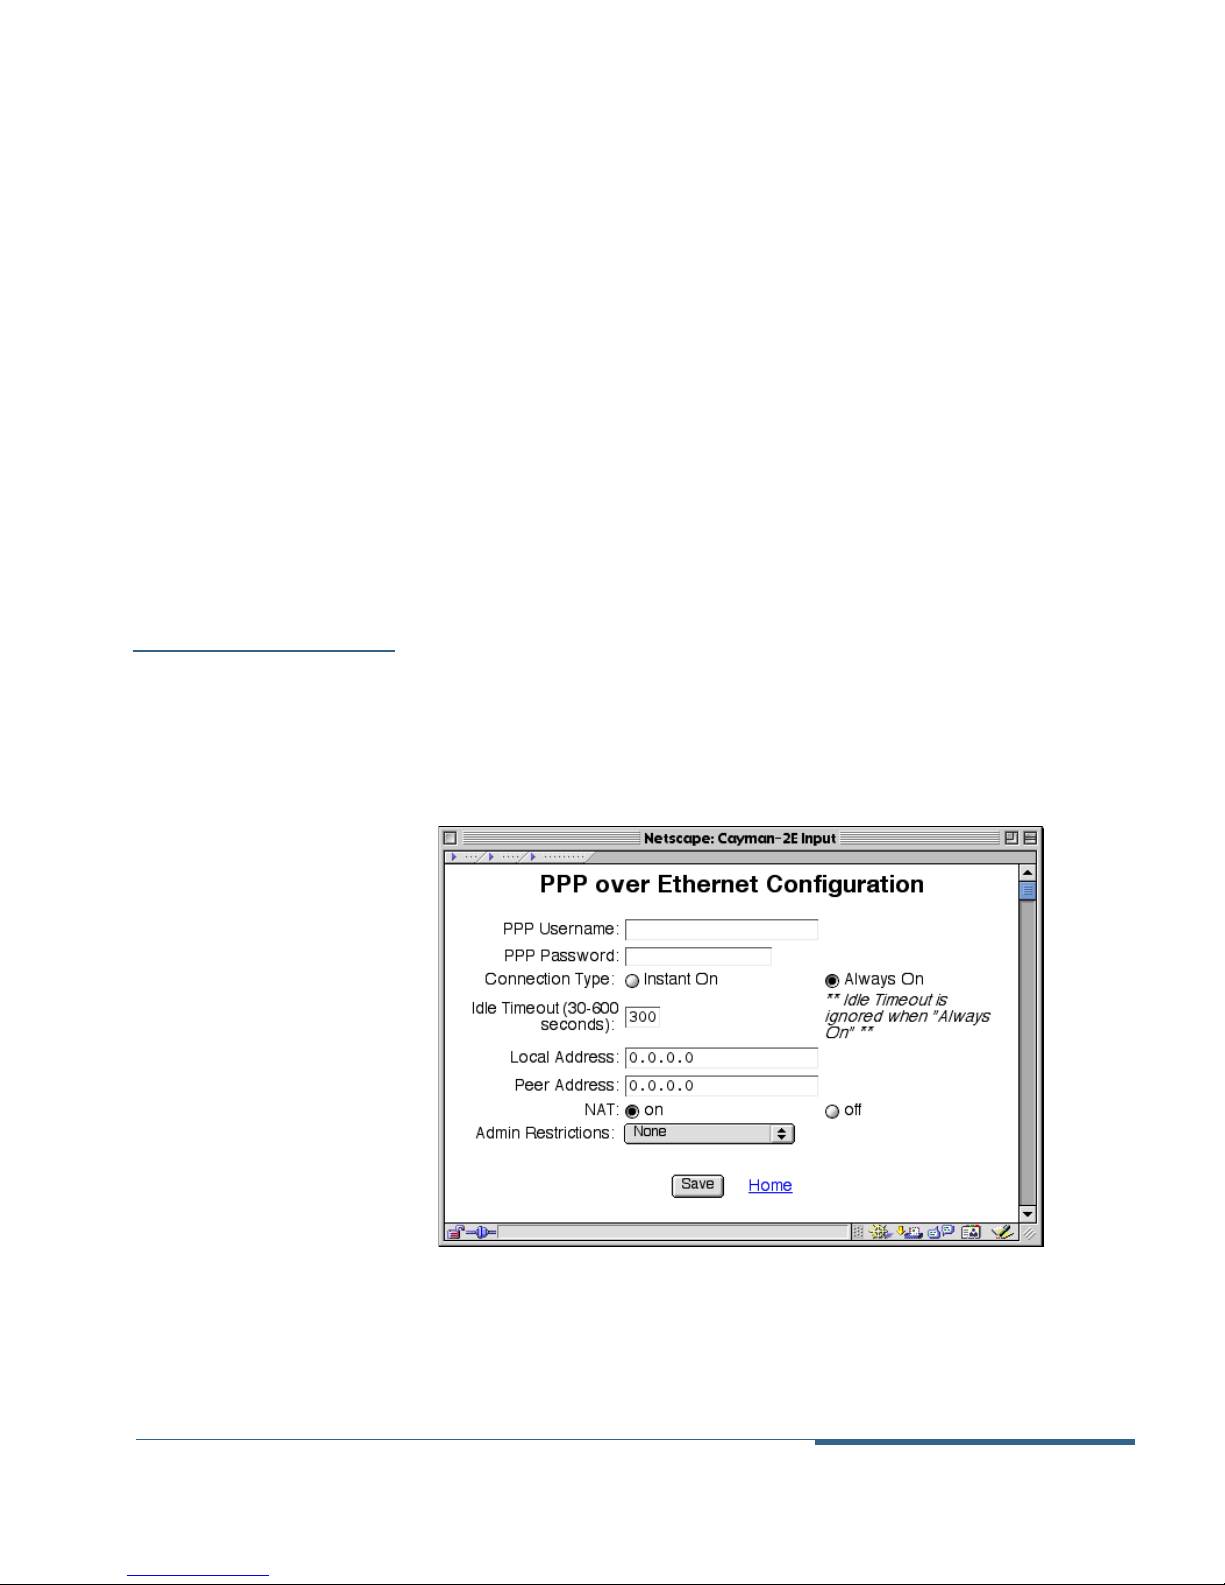
PPPoE is On If you turn on PPPoE for the Cayman 2E-W’s WAN port (meaning that
your Cayman 2E-W uses PPP framing over its WAN interface), you
will see a different window (Figure 3-9) when you click the Ethernet
B (PPPoE) button on the Cayman 2E-W Home Page.
Cayman 2E-W User’s Guide Configuring Your Cayman 2E-W
November 2000 3-21
Figure 3-9 Ethernet Port B (PPPoE) Configuration Window
Page 44

To configure settings for the WAN (Ethernet B) port:
1. Enter the identifier you want your Cayman 2E-W to send
when the PPP link is being established in the PPP
Username field.
This is the username the Cayman 2E-W sends in a PAP or CHAP
response packet. The information you enter must match the
CHAP username configured in the remote PPP peer's
authentication database.
2. Enter the password you want your Cayman 2E-W to send
when the PPP link is being established in the PPP
Password field.
This is the PAP password or CHAP secret the Cayman 2E-W
sends. The information you enter must match the PAP
password/CHAP secret configured in the remote PPP peer's
authentication database.
3. Specify whether you want the connection to be
maintained constantly or only when it is needed.
If you choose a connection type of Instant On, the Cayman
2E-W shuts down the PPP link if it is not being used for the
number of seconds specified in the Idle Timeout field. If you
choose a connection type of Always On, the Cayman 2E-W
keeps the PPP link open at all times.
4. If you specified a connection type of Instant On, specify
the number of seconds, in the range 30-600, you want the
Cayman 2E-W to wait before shutting down the PPP link.
The default is 300 seconds.
5. Enter the IP address of the Cayman 2E-W’s WAN Ethernet
port in the Local Address field.
The default value for the Local Address field is 0.0.0.0,
which indicates that the virtual PPP interface will use the IP
address assigned to it by the remote peer. Note that the
remote peer must be configured to supply an IP address to
Configuring Your Cayman 2E-W Cayman 2E-W User’s Guide
3-22 November 2000
Page 45

your Cayman 2E-W if you enter 0.0.0.0 in the Local Address
field.
If you specify an IP address other than 0.0.0.0, your Cayman
2E-W will not negotiate its IP address with the remote peer.
If the remote peer does not accept the IP address you
specify in the Local Address field, the link will not come up.
6. Enter the IP address of the peer on the other end of the
PPP link in the Peer Address field.
The default value for the Peer Address field is 0.0.0.0, which
indicates that the virtual PPP interface will accept the IP
address returned by the remote peer. If you enter 0.0.0.0,
the peer system must be configured to supply this address.
If you specify an IP address other than 0.0.0.0, your Cayman
2E-W will not negotiate the remote peer's IP address. If the
remote peer does not accept the address in the Peer Address
field as its IP address (typically because it has been
configured with another IP address), the link will not come
up.
7. Use the NAT On/Off radio buttons to specify whether you
want the Cayman 2E-W to use network address
translation for traffic over the PPP link.
8. Use the Admin Restrictions list to specify whether the
Cayman 2E-W accepts administrative commands received
over the WAN port.
Options are:
None – All traffic is accepted over this port.
Admin-Disabled – Router traffic is accepted over this port
but administration commands are ignored.
9. Click the Save button to store your modified
configuration in the Cayman 2E-W memory.
10. Click the Restart Cayman-2E button on the Cayman 2E-W
Home Page to restart your Cayman 2E-W with its new
configuration.
Cayman 2E-W User’s Guide Configuring Your Cayman 2E-W
November 2000 3-23
Page 46

Configuring
Password
Settings
You can establish different levels of access security to protect your
Cayman 2E-W settings from unauthorized display or modification.
Admin level access lets you display and modify all settings in
the Cayman 2E-W.
User level access lets you display (but not change) settings in
the Cayman 2E-W. You must assign the Cayman 2E-W an Admin
password before you can assign it a User password.
You will see a warning on the Cayman 2E-W configuration screens
until you set an administrative password.
To prevent anyone from observing the password you enter,
characters in the old and new passwords are not displayed as you
type them.
Passwords go into effect immediately. You do not have to restart the
Cayman 2E-W for the password to take effect. Assigning a password
to a Cayman 2E-W does not affect communications through the
device.
To display the Password Configuration window (Figure 3-10), click
the Passwords button on the Cayman 2E-W Home Page. You must be
in Expert Mode to open the Password Configuration window.
Configuring Your Cayman 2E-W Cayman 2E-W User’s Guide
3-24 November 2000
Page 47
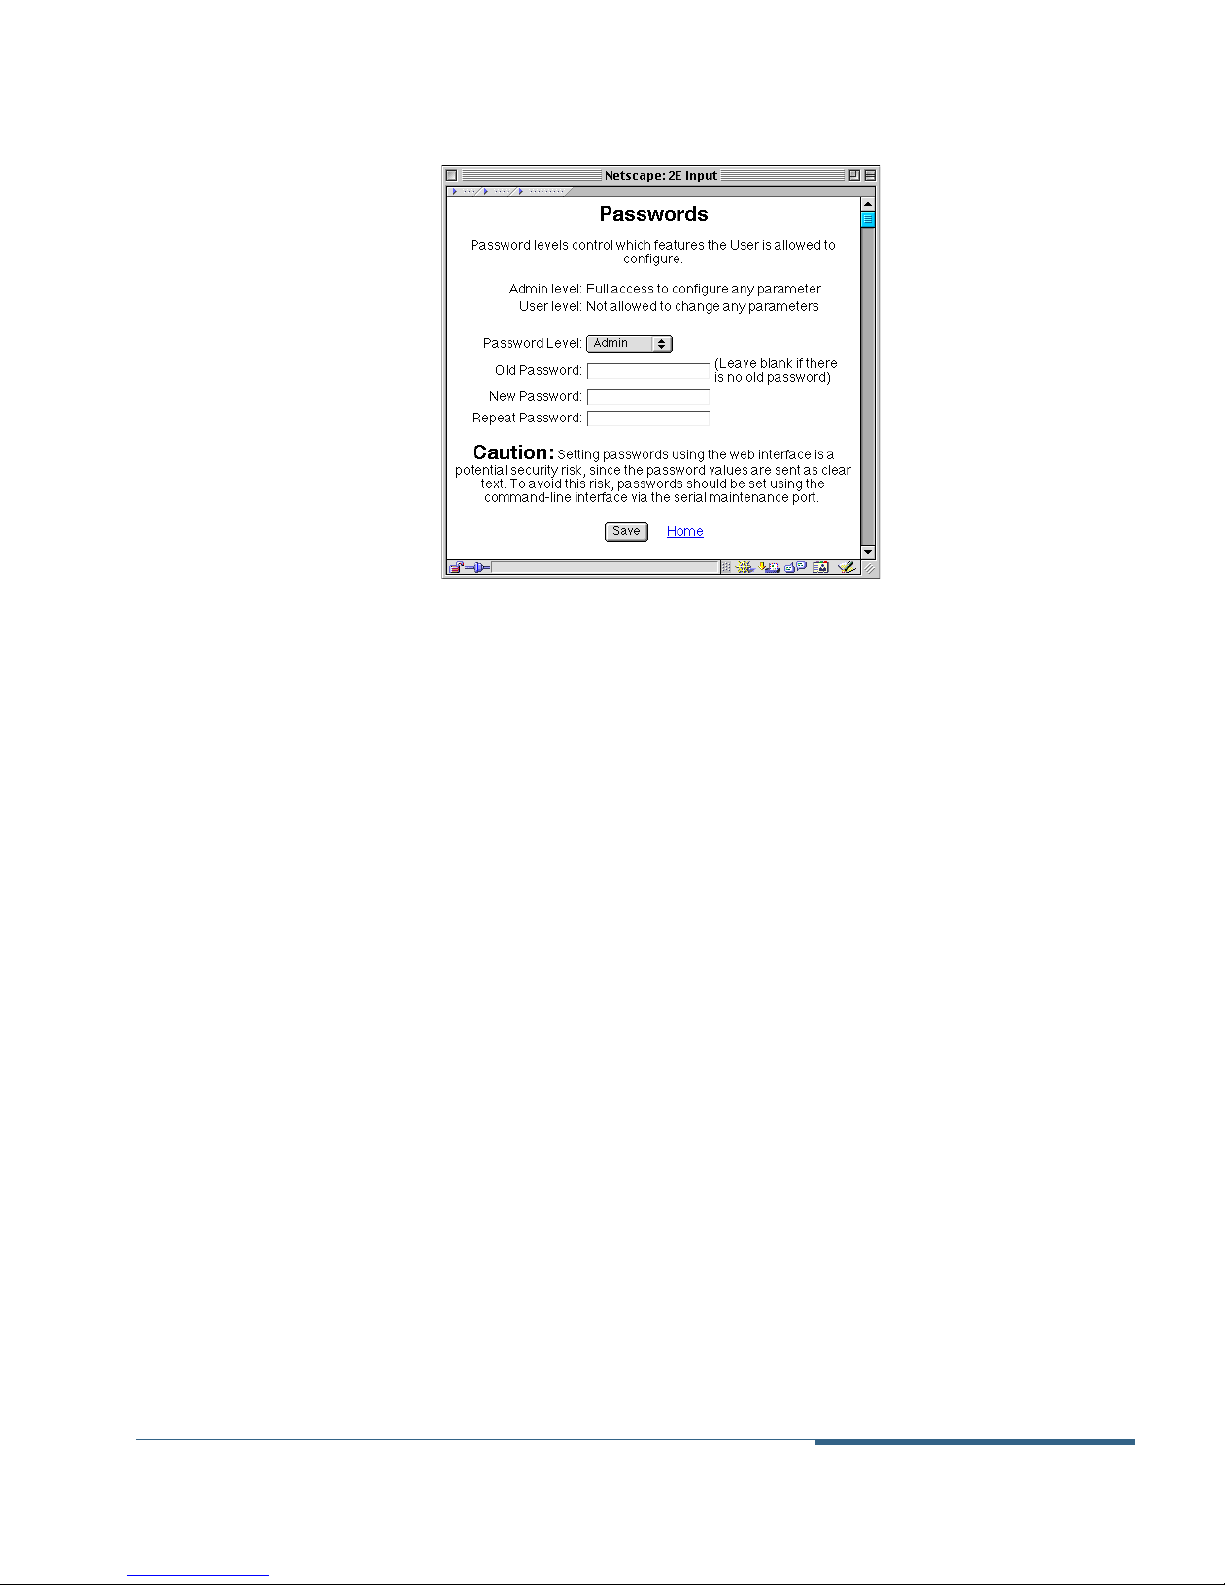
Figure 3-10 Password Configuration Window
To configure passwords for your Cayman 2E-W:
1. Use the Password Level list to select the type of password
you want to enter.
You can choose Admin or User. You must assign the Cayman
2E-W an Admin password before you can assign it a User
password.
2. If you assigned a password to the Cayman 2E-W
previously, enter your current password in the Old
Password field.
3. Enter your new password in the New Password field.
A password can be as many as eight alphanumeric characters.
Passwords are case-sensitive and cannot include special
characters or leading, trailing, or embedded spaces. For
example, if you assign a password of GatoR, you could not enter
GATOR, gator, or Gator as an acceptable password.
Cayman 2E-W User’s Guide Configuring Your Cayman 2E-W
November 2000 3-25
Page 48

4. Enter your new password again in the Repeat Password
field.
You repeat the new password to verify that you entered it
correctly the first time.
5. When you are finished, click the Save button to store
your modified configuration in the Cayman 2E-W
memory.
Configuring
Pinhole Settings
Network Address Translation (NAT) pinholes let you pass specific
types of network traffic through the router's NAT interfaces. NAT
pinholes allow you to route selected types of network traffic, such as
FTP requests or HTTP (Web) connections, to a specific host on the
Cayman 2E-W’s LAN network transparently.
To set up NAT pinholes, you identify the type(s) of traffic you want
to redirect by port number, and you specify the internal host to
which each specified type of traffic should be directed.
The following list identifies protocol type and port number for
common TCP/IP protocols:
FTP (TCP 21)
Telnet (TCP 23)
SMTP (TCP 25),
TFTP (UDP 69)
SNMP (TCP 161, UDP 161)
Establishing pinholes to allow access through the router to
internal hosts can create potential security risks. You should
implement internal network security measures to prevent
unauthorized access by outside users.
To display the Pinhole Configuration window (Figure 3-11), click the
Pinhole button on the Cayman 2E-W Home Page. You must be in
Expert Mode to open the Pinhole Configuration window.
Configuring Your Cayman 2E-W Cayman 2E-W User’s Guide
3-26 November 2000
Page 49
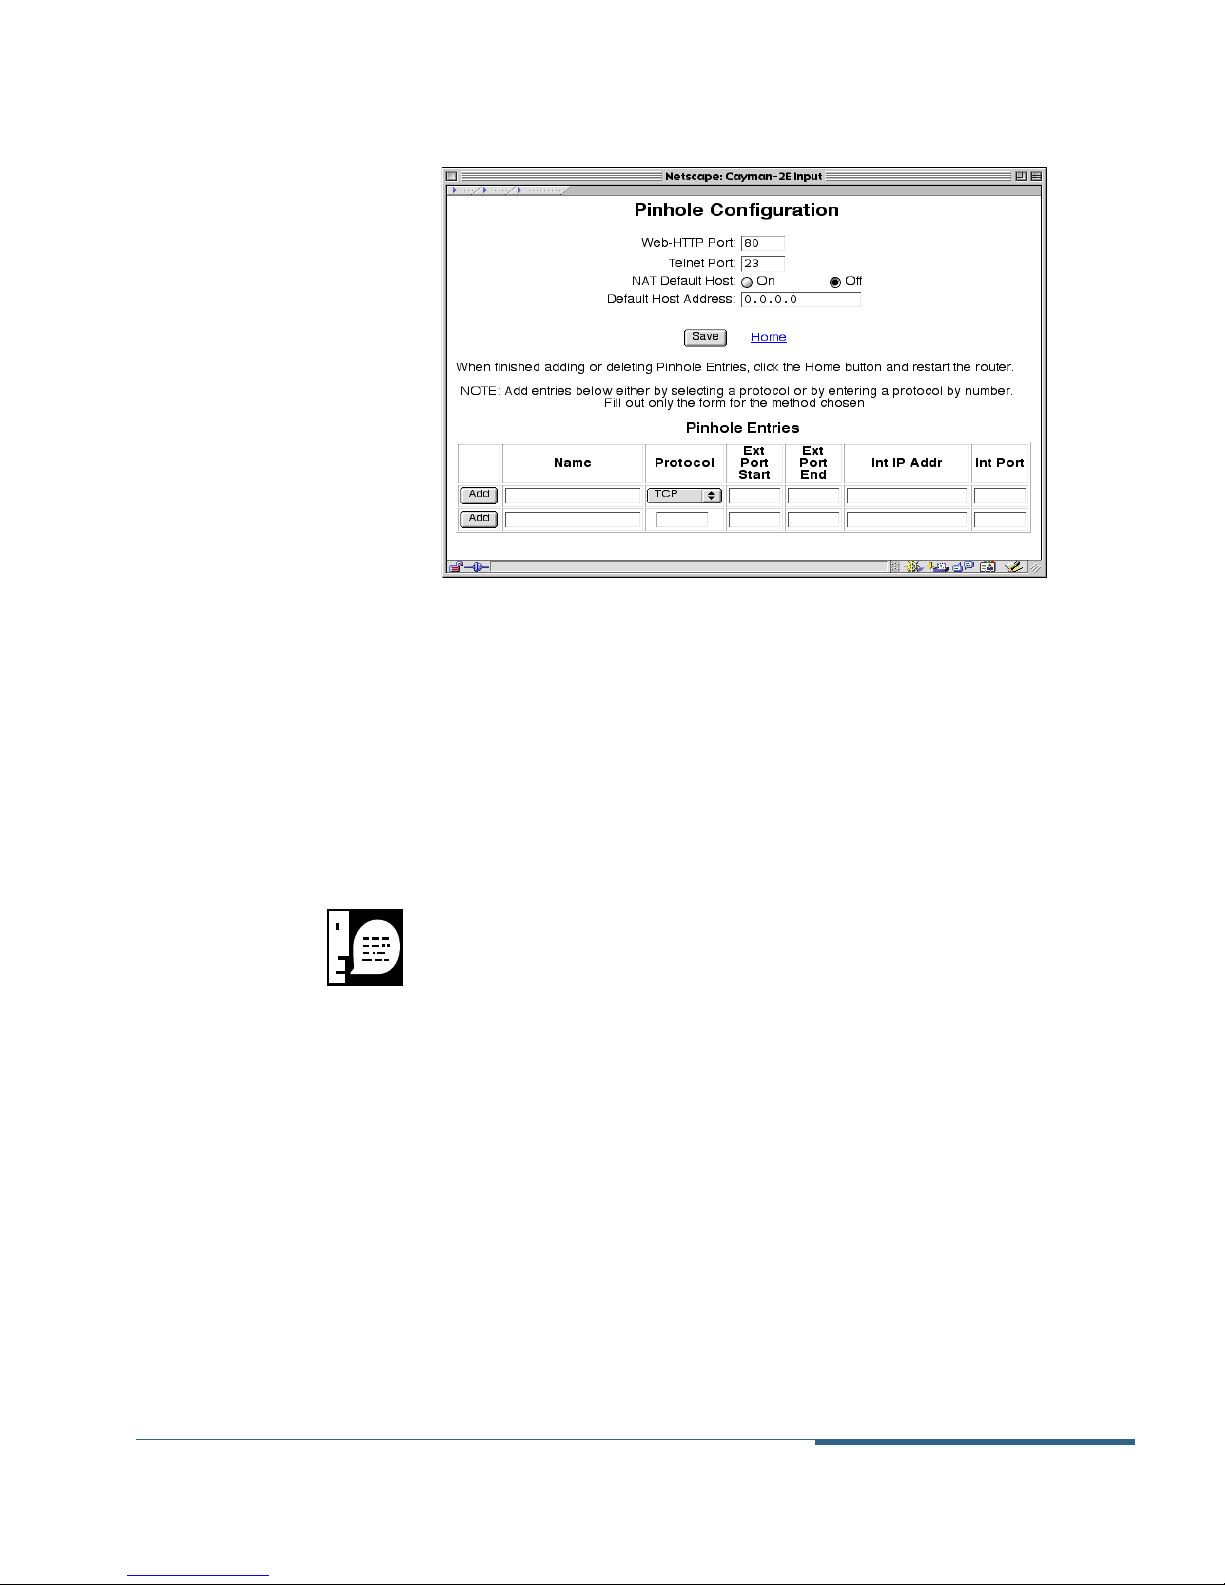
Figure 3-11 Pinhole Configuration Window
To configure pinhole settings:
1. Enter the number identifying the port used by the
Cayman 2E-W to listen for Web-based configuration
connection requests in the Web-HTTP Port field.
If you set up a NAT pinhole for HTTP traffic (port 80), enter a
number other than 80 in this field.
After you have made this change, you will need to use this
port number to open a Web connection to the Cayman
2E-W. For example, if you change the Web-HTTP port to
1080 on a Cayman 2E-W using its default IP address
(192.168.1.254), you would open a web connection to the
device by entering the URL http://192.168.1.254:1080.
2. Enter the number identifying the port used by the router
to listen for Telnet-based configuration connection
requests in the Telnet Port field.
Cayman 2E-W User’s Guide Configuring Your Cayman 2E-W
November 2000 3-27
If you set up a NAT pinhole for Telnet traffic (port 23), enter a
number other than 23 in this field.
Page 50

After you have made this change, you will need to include
this port number when you open a Telnet connection to the
Cayman 2E-W. For example, if you change the Telnet port to
1023 on a Cayman 2E-W using its default IP address
(192.168.1.254), you would open a Telnet connection to the
device by entering telnet 192.168.1.254 1023 in a DOS
window or command line.
3. Use the NAT Default Host radio buttons to specify
whether you want your Cayman 2E-W to send NAT traffic
it would otherwise drop to a host on your network.
The NAT default host function is useful in situations where you
cannot create a specific NAT pinhole for a traffic stream because
you cannot anticipate what port number an application might
use. For example, some network games select arbitrary port
numbers when a connection is being opened. By identifying
your computer (or another host on your network) as a NAT
default server, you can specify that NAT traffic that might
otherwise be discarded by the Cayman 2E-W should be directed
to a specific host.
4. Use the Default Host Address field to specify the IP
address of the internal host to which NAT traffic
should be directed.
5. If you are finished, click the Save button to store your
modified configuration in the Cayman 2E-W memory.
6. Enter an identifier for the pinhole table entry in the
Name field.
You can identify table entries by protocol name (ftp, Telnet,
http), sequentially (1, 2, 3), by port number (21, 80, 23), or by
some other naming scheme.
Configuring Your Cayman 2E-W Cayman 2E-W User’s Guide
3-28 November 2000
Page 51

7. Use the Protocol dropdown menu to select the type of
protocol (TCP, UDP, ICMP, or PPTP) you want to
redirect.
If you want to redirect a protocol type other than TCP, UDP,
ICMP, or PPTP, use the second line of the table to enter the
protocol type name.
8. Enter the starting number of the external port range
over which incoming traffic will be received in the Ext
Port Start field.
For example, you would enter 21 to indicate you want FTP
traffic forwarded to another host.
9. Enter the ending number of the external port range
over which incoming traffic will be received in the Ext
Port End field.
For example, you would enter 23 to indicate you want Telnet
traffic forwarded to another host.
10. Enter the IP address of the internal host to which
traffic of the specified type(s) should be transferred in
the Int IP Addr field.
11. Enter the port number your router should use when
forwarding traffic of the specified type(s) in the Int Port
field.
Under most circumstances, you would use the same number for
the external and internal ports.
12. Click the Add button in the left column of the pinhole
table.
The configuration page adds a new row to the Pinhole Entries
table.
Cayman 2E-W User’s Guide Configuring Your Cayman 2E-W
November 2000 3-29
Page 52
13. When you are finished adding pinhole table entries,
click the Home button.
Your router saves the new pinhole information and return you
to the Cayman 2E-W home page.
14. Click the Restart Cayman-2E button on the Cayman 2E-W
Home Page to restart your Cayman 2E-W with its new
configuration.
Configuring
Wireless Settings
You can use your Cayman 2E-W as a basestation for HomeRF or
802.11 wireless networking. Your Cayman 2E-W bridges your
wireless network functions to your Ethernet local area network,
letting computers on the wireless network access the Internet and
share LAN resources such as printers and servers. The Wireless Setup
window lets you enter identification information for your Cayman
2E-W.
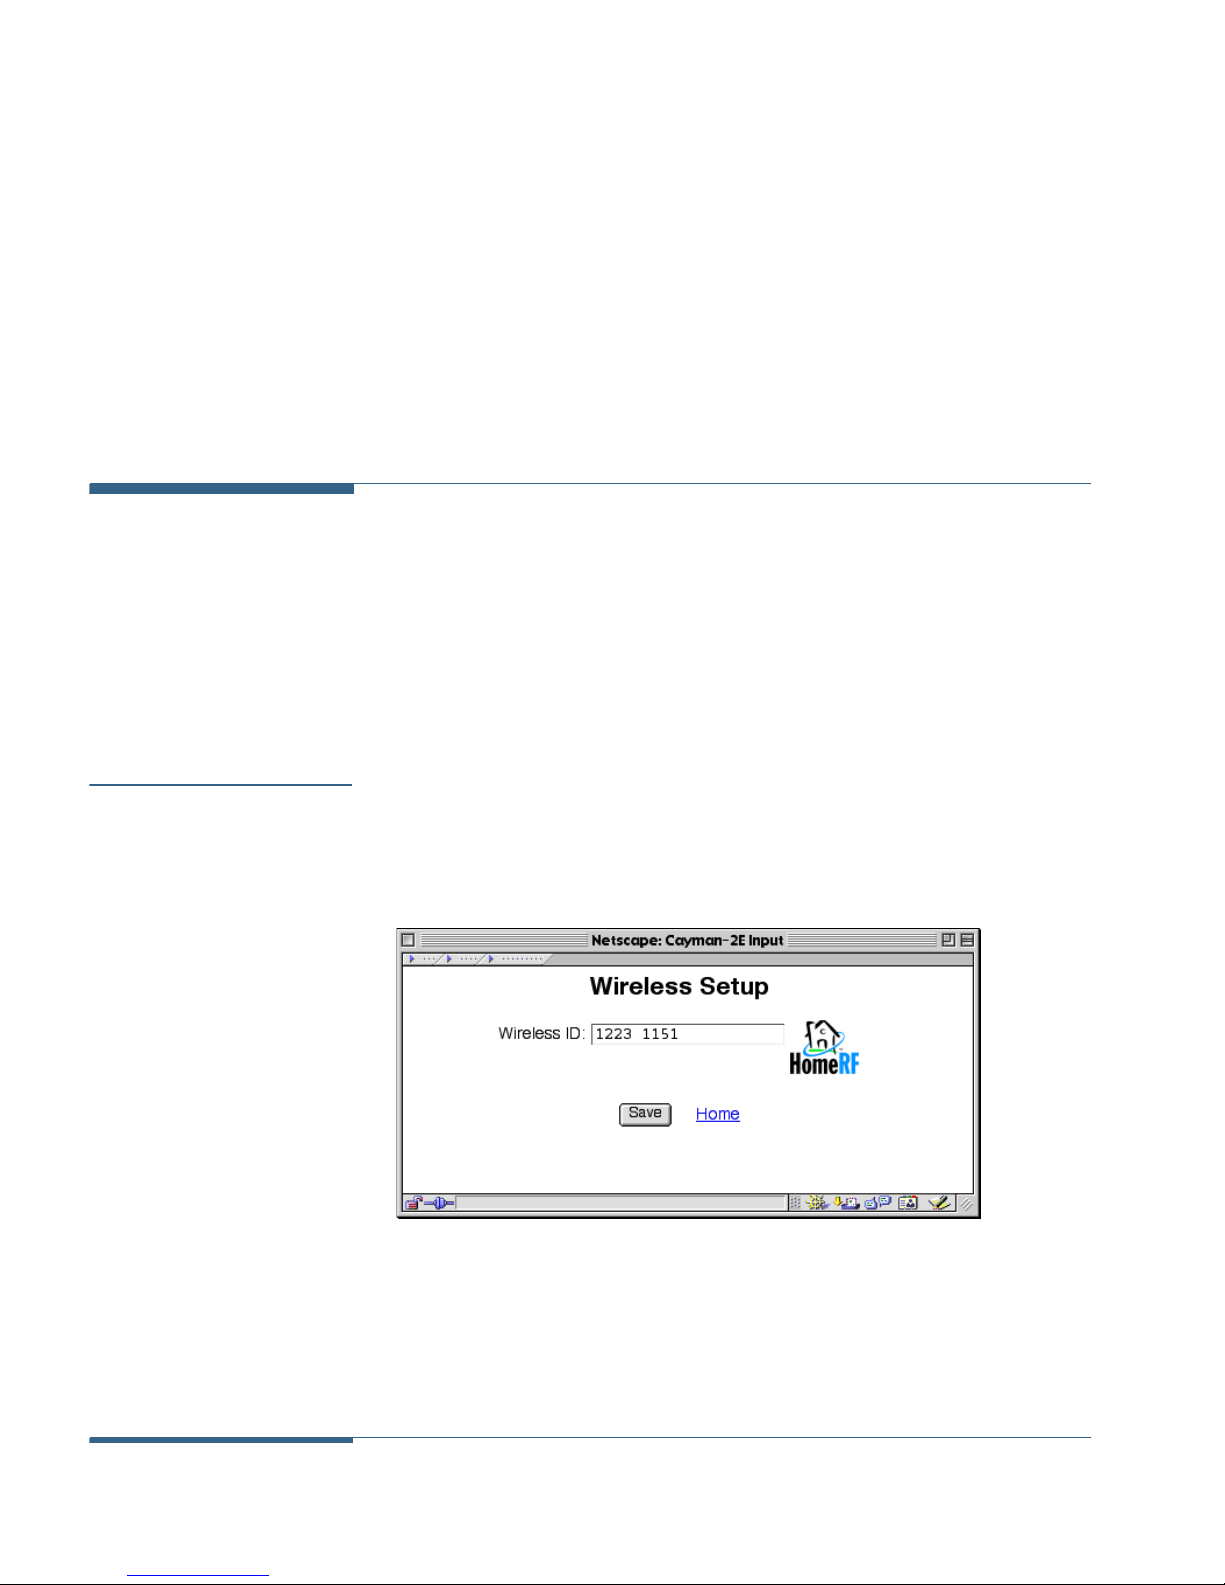
HomeRF Settings To display the Wireless Setup window for HomeRF (Figure 3-12),
click the Wireless button on the Cayman 2E-W Home Page. You must
be in Expert Mode to open the Wireless Setup window.
Figure 3-12 Wireless Setup Window (HomeRF)
Configuring Your Cayman 2E-W Cayman 2E-W User’s Guide
3-30 November 2000
Page 53

To configure the HomeRF wireless settings for your Cayman 2E-W:
1. Enter the identifier for your Cayman 2E-W on the wireless
network in the Wireless ID field.
The default HomeRF wireless ID for a Cayman 2E-W consists of
two four-digit numbers, which are located on the label on the
bottom of your Cayman 2E-W. You must configure other devices
on your wireless network to use this identifier before they can
communicate with your Cayman 2E-W.
2. Click the Save button to store your modified
configuration in the Cayman 2E-W memory.
3. Click the Restart Cayman-2E button on the Cayman 2E-W
Home Page to restart your Cayman 2E-W with its new
configuration.
802.11 Settings To display the Wireless Setup window for 802.11 wireless
networking (Figure 3-13), click the Wireless button on the Cayman
2E-W Home Page. You must be in Expert Mode to open the Wireless
Setup window.
Cayman 2E-W User’s Guide Configuring Your Cayman 2E-W
November 2000 3-31
Page 54
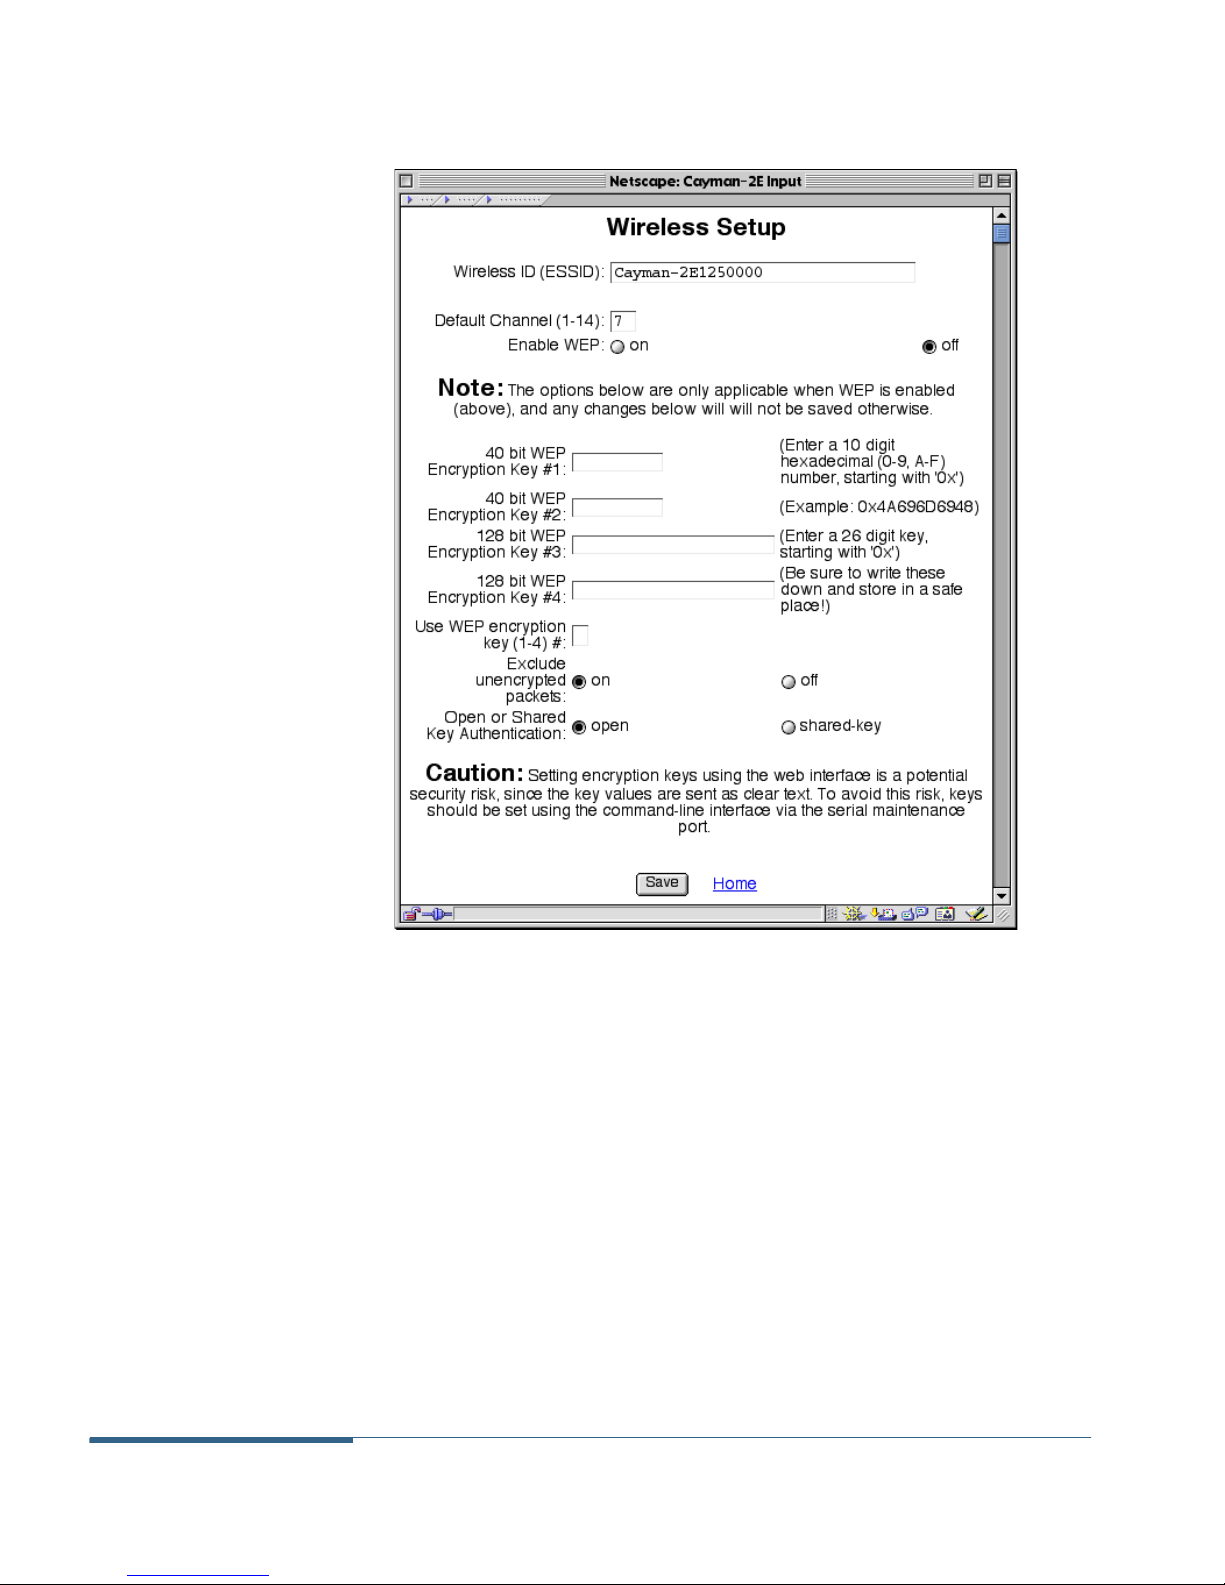
Figure 3-13 Wireless Setup Window (802.11)
To configure the wireless settings for your Cayman 2E-W:
1. Enter the identifier for your Cayman 2E-W on the wireless
network in the Wireless ID (ESSID) field.
You must configure all devices on your wireless network to use
the identifier you enter here.
2. Specify the radio channel you want your Cayman 2E-W to
use by entering a number in the range 1-11 in the Default
Channel field.
By default, your Cayman 2E-W uses channel 7, which uses a
frequency of 2442MHz. You should not change this channel
Configuring Your Cayman 2E-W Cayman 2E-W User’s Guide
3-32 November 2000
Page 55

unless you are using more than one Cayman 2E-W in the same
area.
The following table lists the frequencies associated with 802.11
channels and the regions for which each channel is authorized.
Channel Frequency Geographic Usage
1 2412 MHz US, Canada, ETSI
2 2417 MHz US, Canada, ETSI
3 2422 MHz US, Canada, ETSI
4 2427 MHz US, Canada, ETSI
5 2432 MHz US, Canada, ETSI
6 2437 MHz US, Canada, ETSI
7 2442 MHz US, Canada, ETSI
8 2447 MHz US, Canada, ETSI
9 2452 MHz US, Canada, ETSI
10 2457 MHz US, Canada, ETSI, France Spain
11 2462 MHz US, Canada, ETSI, France Spain
12 2467 MHz ETSI, Spain
13 2472 MHz ETSI, Spain
14 2484 MHz Japan
3. If you want to use WEP (Wired Equivalent Privacy) to
encrypt wireless network traffic, click the Enable WEP On
radio button and enter one or more encryption keys in
the Encryption Key fields. Enter a number (1-4) in the Use
WEP Encryption Key field to specify which key you want
your Cayman 2E-W to use to encrypt/decrypt messages.
WEP is a method of encrypting network traffic to protect it from
snooping. You can enter two 40-bit encryption keys and two
128-bit encryption keys. If you use encryption, all wireless
network devices must have WEP enabled and must use the same
encryption key you select here.
Cayman 2E-W User’s Guide Configuring Your Cayman 2E-W
November 2000 3-33
Page 56

4. If you enable WEP, specify whether you want your
Cayman 2E-W to ignore unencrypted packets.
If you want your Cayman 2E-W to accept encrypted but ignore
unencrypted packets, click the Exclude unencrypted packets
On radio button.
If you want your Cayman 2E-W to accept both encrypted and
unencrypted packets, click the Exclude unencrypted packets
Off radio button.
5. If you enable WEP, specify whether you want your
Cayman 2E-W to use open or shared-key authentication.
If you select Open authentication, any client can exchange
network traffic with your Cayman 2E-W. If you select
Shared-Key authentication, a client must have the same
encryption keys as your Cayman 2E-W to pass authentication.
6. Click the Save button to store your modified
configuration in the Cayman 2E-W memory.
Configuring
SNMP Settings
7. Click the Restart Cayman-2E button on the Cayman 2E-W
Home Page to restart your Cayman 2E-W with its new
configuration.
The Simple Network Management Protocol (SNMP) lets a network
administrator monitor problems on a network by retrieving settings
on remote network devices. The network administrator typically
runs an SNMP management station program on a local host to obtain
information from an SNMP agent such as the Cayman 2E-W. The
SNMP Setup window lets you enter SNMP configuration information
for your Cayman 2E-W.
To display the SNMP Setup window (Figure 3-14), click the SNMP
button on the Cayman 2E-W Home Page. You must be in Expert
Mode to open the SNMP Setup window.
Configuring Your Cayman 2E-W Cayman 2E-W User’s Guide
3-34 November 2000
Page 57
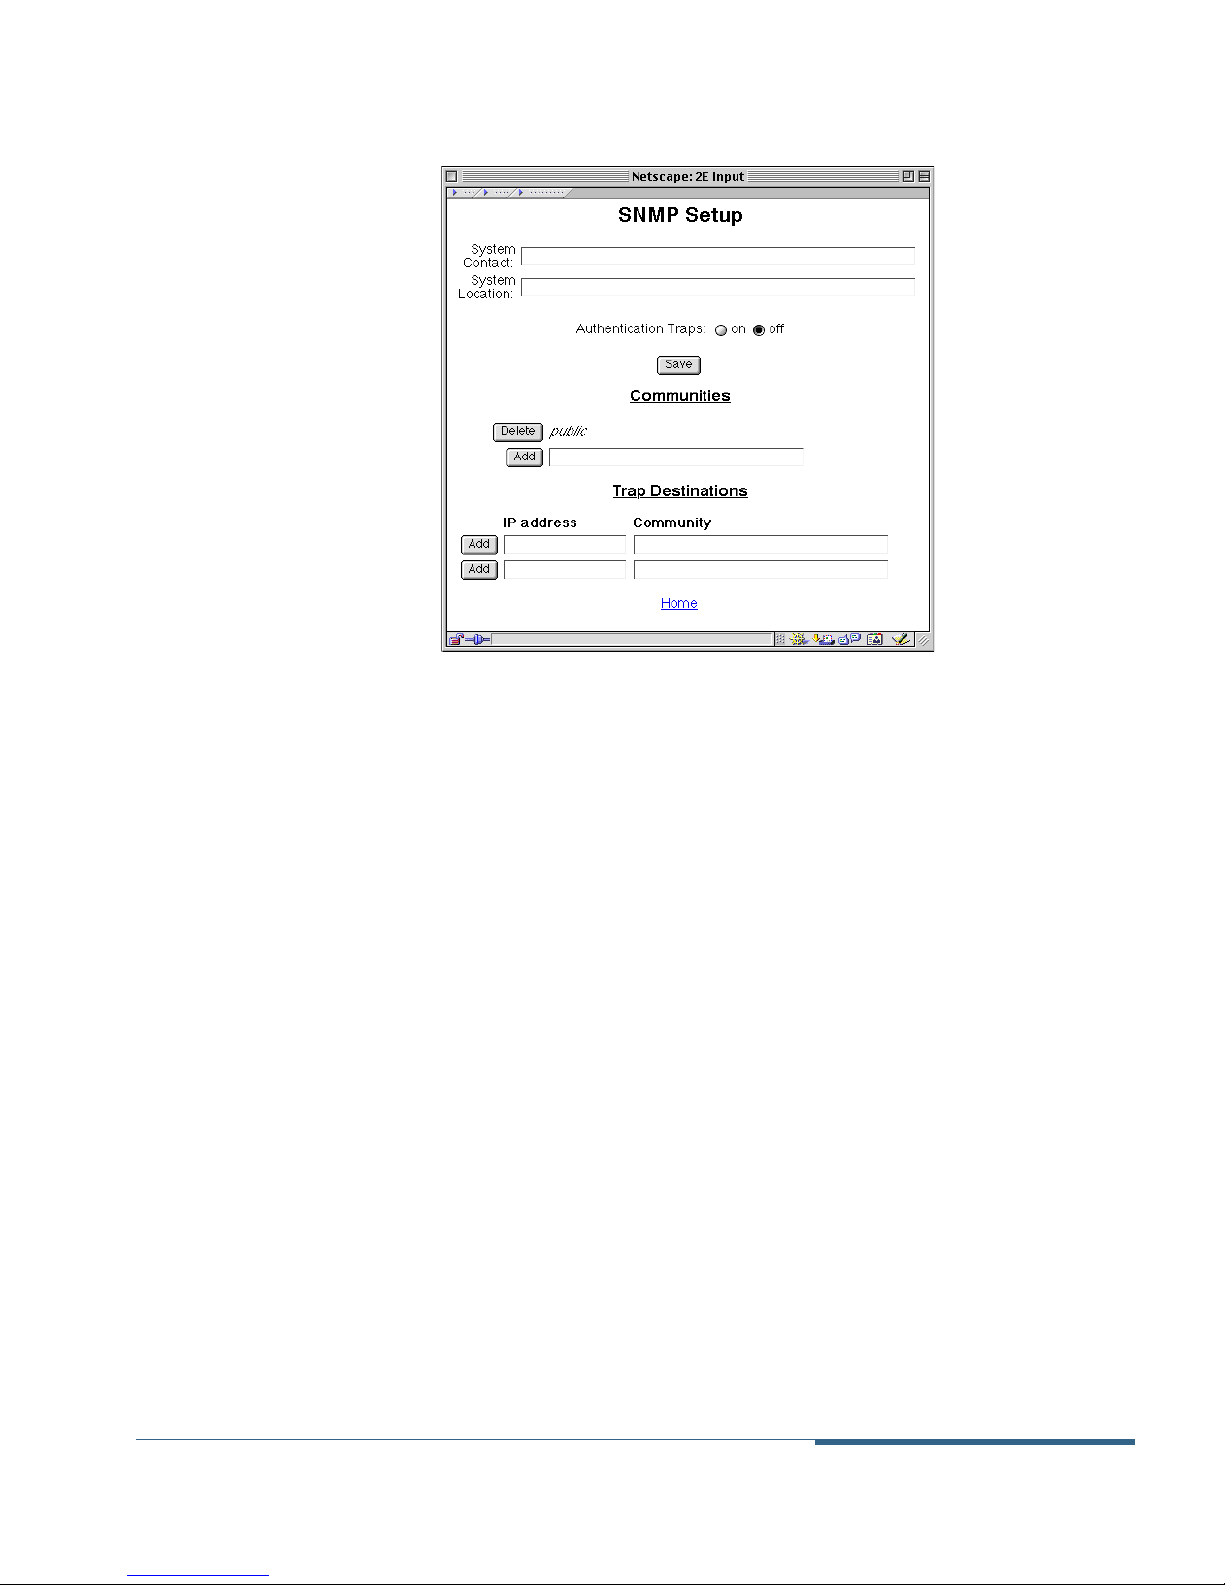
Figure 3-14 SNMP Setup Window
To configure the SNMP settings for your Cayman 2E-W:
1. Enter information about the system contact in the System
Contact field.
For example, you might enter the name, phone number, beeper
number, or email address of the person responsible for the
Cayman 2E-W.
2. Enter information about the system location in the System
Location field.
For example, you might enter the building, floor, or room
number where the Cayman 2E-W is located.
3. Click the Save button to store your modified
configuration in the Cayman 2E-W memory.
4. If you want the Cayman 2E-W to use authentication traps,
click the Authentication Traps On radio button.
Cayman 2E-W User’s Guide Configuring Your Cayman 2E-W
November 2000 3-35
If SNMP trapping is enabled, your Cayman 2E-W sends
authentication traps to all SNMP trap destinations. You must
Page 58

enable trap authentication before you set up your trap
destinations.
5. Identify the SNMP communities to which the Cayman
2E-W belongs by entering a community name in the
Communities field and clicking the Add button.
By default, the Cayman 2E-W is associated with the public
community. You can associate as many as 16 communities with
the Cayman 2E-W.
6. If your Cayman 2E-W is using authentication traps,
identify the destinations to which the Cayman 2E-W
should send SNMP trap messages.
Enter the IP address of a host acting as an SNMP console in the
IP Address field.
7. Optionally, enter the name of the community for which
the trap destination is responsible in the Community field.
The optional community name identifies the name of the
Cayman 2E-W community, which is included in the trap message
the device sends to the management console. This name, which
is not used for authentication, does not have to match a
predefined community name.
8. Click the Add button.
9. Click the Restart Cayman-2E button on the Cayman 2E-W
Home Page to restart your Cayman 2E-W with its new
configuration.
Configuring Your Cayman 2E-W Cayman 2E-W User’s Guide
3-36 November 2000
Page 59

4 Using the Command
Line Interface
Overview
About Root Commands
About CONFIG Commands
CONFIG Commands
Overview The Cayman 2E-W operating software includes a command line
interface (CLI) that lets you monitor and configure your Cayman
2E-W over a Telnet or console connection. You can use the command
line interface to enter and update a Cayman 2E-W’s configuration
settings, monitor its performance, and restart it.
Starting and
Ending a CLI
Session
Cayman 2E-W User’s Guide Using the Command Line Interface
November 2000 4-1
You can open a command line interface session by opening a Telnet
connection from a workstation on your network or by connecting a
terminal to the console port on the Cayman 2E-W.
Connecting from Telnet
You initiate a Telnet connection by issuing the following command
from an IP host that supports Telnet (or a personal computer running
a Telnet application such as NCSA Telnet).
Page 60
telnet ip_address
You must know the IP address of the Cayman 2E-W before you can
make a Telnet connection to it. By default, your Cayman 2E-W uses
192.168.1.254 as the IP address for its LAN interface. You can use a
Web browser or the maintenance console to configure the Cayman
2E-W IP address.
Connecting from the Maintenance Console Port
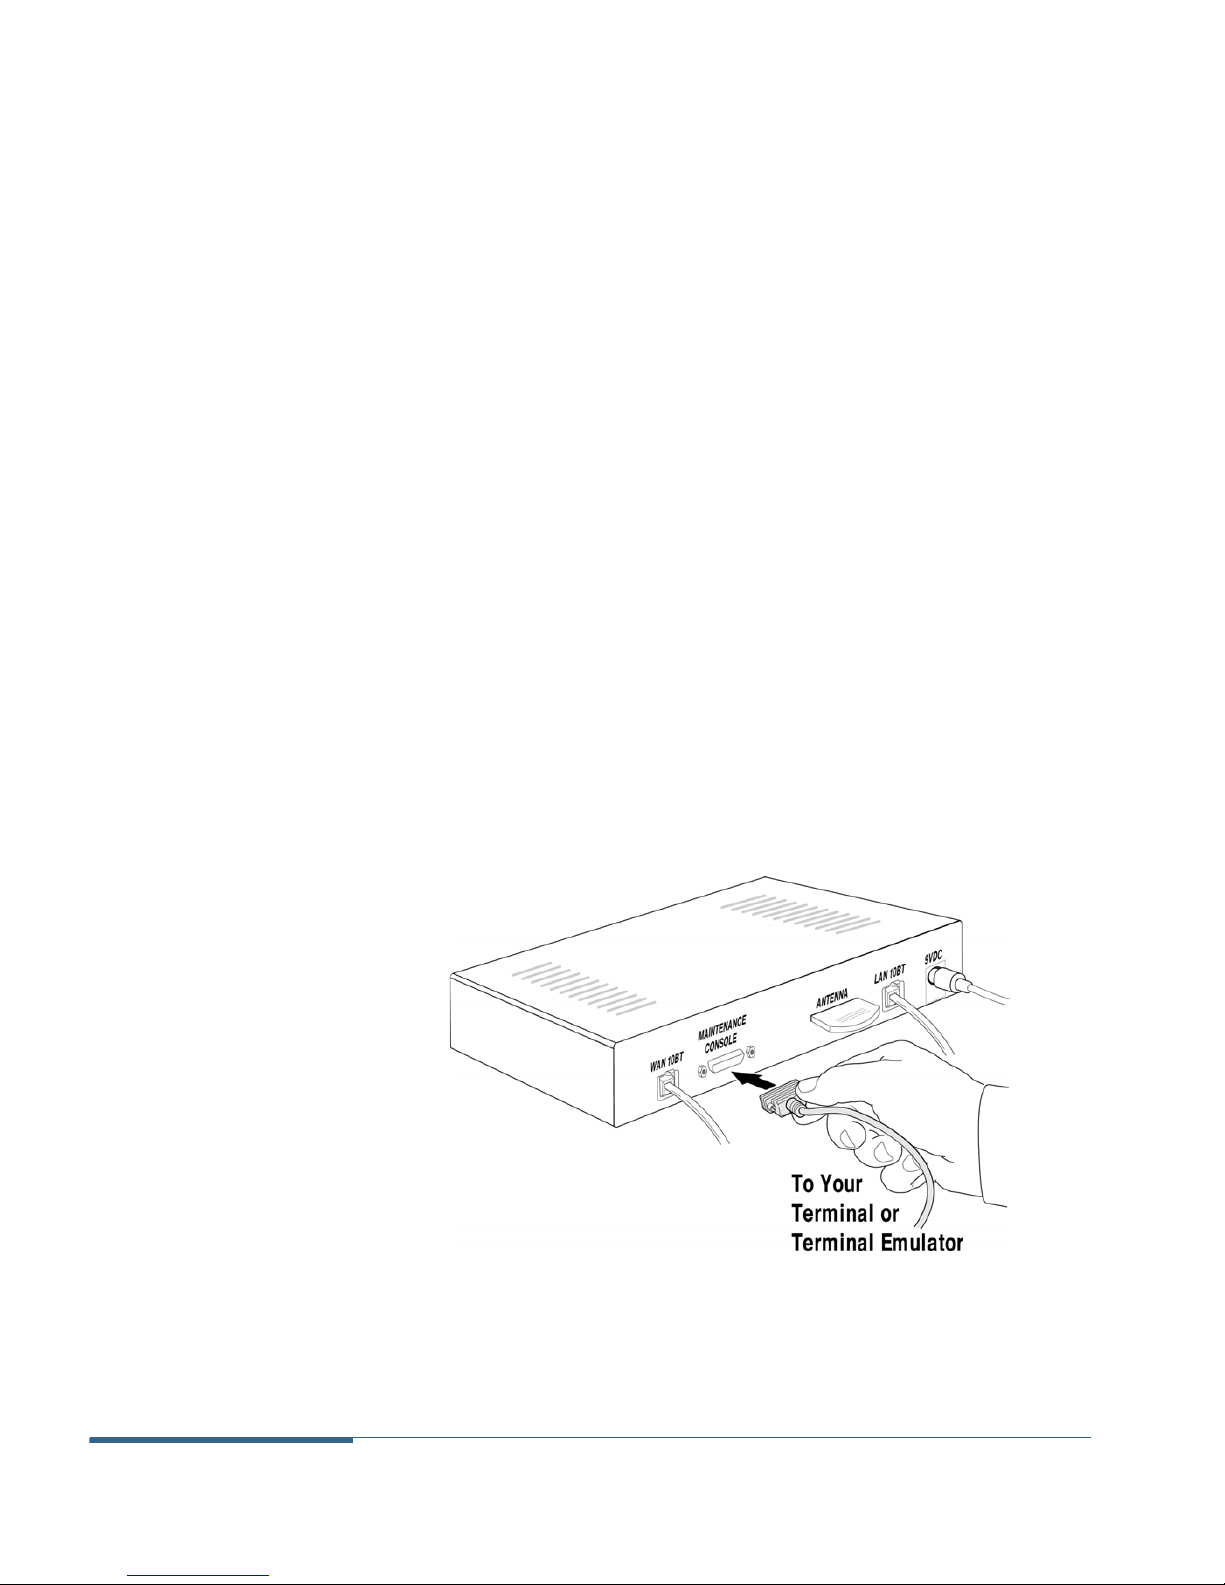
You can connect a terminal or terminal emulator to the maintenance
console port on the Cayman 2E-W to configure, administer, and
monitor your Cayman 2E-W.
To use the Cayman 2E-W console, you need a serial cable and either
a terminal or terminal emulator (such as a personal computer with a
terminal emulation application that supports 9600-baud
communication).
To connect your Cayman 2E-W to a terminal or terminal emulator:
1. Plug the DB-9 end of a serial cable into the maintenance
console port on the Cayman 2E-W back panel.
Figure 4-1. Connecting Your Cayman 2E-W to a Terminal
Using the Command Line Interface Cayman 2E-W User’s Guide
4-2 November 2000
Page 61

2. Connect the other end of the serial cable to the serial port
on your terminal (or terminal emulator) or the modem
port of your computer.
3. Turn on the terminal or run the terminal emulator
program on your computer.
Use the following settings to configure your terminal emulation
session:
Setting Set To
Speed 9600 bps
Parity None
Databits 8
Stopbits 1
Duplex Full
Flow Control None
The console interface uses the same command line interface as the
Telnet interface.
Logging In
The command line interface log-in process emulates the log-in
process for a UNIX host. If your Cayman 2E-W has been assigned an
administrator password or user password, you must enter a
username (up to 32 characters) and your password.
Entering your username lets the Cayman 2E-W record your
access; your username is not used to validate your authorization.
Entering the administrator password lets you display and update
all Cayman 2E-W settings.
Entering a user password lets you display (but not update)
Cayman 2E-W settings.
Cayman 2E-W User’s Guide Using the Command Line Interface
November 2000 4-3
Page 62

When you have logged in successfully, the command line interface
lists the username and the security level associated with the
password you entered in the diagnostic log.
Ending a CLI Session
You end a command line interface session by typing quit from the
ROOT node of the command line interface hierarchy.
Using the CLI Help
Facility
The help command lets you display on-line help for ROOT and
CONFIG commands. To display a list of the commands available to
you from your current location in the command line interface
hierarchy, enter help.
To obtain help for a specific CLI command, type help command. You
can truncate the help command to h or a question mark when you
request help for a CLI command.
Saving Settings The save command saves the working copy of the settings to restart
values. You can save the changes you have entered for a specific
function or for all functions in the Cayman 2E-W. The Cayman 2E-W
automatically validates its settings when you save and displays a
warning message if the configuration is not correct.
About Root
Commands
You begin in ROOT mode when you start a CLI session. ROOT mode
lets you monitor the performance of your Cayman 2E-W, display and
reset Cayman 2E-W statistics, and issue administrative commands to
restart Cayman 2E-W functions.
ROOT Prompt When you are in ROOT mode, the CLI prompt is the name of the
Cayman 2E-W followed by a right angle bracket (>). For example, if
you open a CLI connection to the Cayman 2E-W named “Dogzilla,”
you would see Dogzilla> as your CLI prompt.
Using the Command Line Interface Cayman 2E-W User’s Guide
4-4 November 2000
Page 63

ROOT Command
Shortcuts
You can truncate most commands in the CLI to their shortest unique
string. For example, you can use the truncated command q in place
of the full quit command to exit the CLI. However, you would need
to enter rese for the reset command, since the first characters of
reset are common to the restart command.
The only command you cannot truncate is restart. To prevent
accidental interruption of communications, you must enter the
restart command in its entirety.
You can use the Up and Down arrow keys to scroll backward and
forward through recent commands you have entered. Alternatively,
you can use the !! command to repeat the last command you
entered.
ROOT Commands arp nnn.nnn.nnn.nnn
Sends an Address Resolution Protocol (ARP) request to match the
nnn.nnn.nnn.nnn IP address to an Ethernet hardware address.
clear [yes]
Clears the configuration settings in a Cayman 2E-W. If you do not use
the optional yes qualifier, you are prompted to confirm the clear
command.
configure
Puts the command line interface into Configure mode, which lets
you configure your Cayman 2E-W with Config commands. Config
commands are described starting on page 4-14.
diagnose
Runs a diagnostic utility to conduct a series of internal checks and
loopback tests to verify network connectivity over each interface on
your Cayman 2E-W. The console displays the results of each test as
the diagnostic utility runs. If one test is dependent on another, the
diagnostic utility indents its entry in the console window. For
Cayman 2E-W User’s Guide Using the Command Line Interface
November 2000 4-5
Page 64

example, the diagnostic utility indents the Check IP connect to
Ethernet (LAN) entry, since that test will not run if the Check
Ethernet LAN Connect test fails.
Each test generates one of the following result codes:
PASS The test was successful.
FAIL The test was unsuccessful.
SKIPPED The test was skipped because a test on which it
depended failed.
PENDING The test timed out without producing a result. Try
running the test again.
download [server_address] [filename] [confirm]
Copies the current configuration settings of the Cayman 2E-W from
a TFTP (Trivial File Transfer Protocol) server. The TFTP server must be
accessible on your Ethernet network.
You can include one or more of the following arguments with the
download command. If you omit arguments, the console prompts
you for this information.
The server_address argument identifies the IP address of the
TFTP server from which you want to copy the Cayman 2E-W
configuration file.
The filename argument identifies the path and name of the
configuration file on the TFTP server.
If you include the optional confirm keyword, the download
begins as soon as all information is entered.
install [server_address] [filename] [confirm]
Downloads a new version of the Cayman 2E-W operating software
from a TFTP (Trivial File Transfer Protocol) server, validates the
software image, and programs the image into the Cayman 2E-W
memory. After you install new operating software, you must restart
the Cayman 2E-W.
Using the Command Line Interface Cayman 2E-W User’s Guide
4-6 November 2000
Page 65

The TFTP server must be accessible on your Ethernet network. The
server_address argument identifies the IP address of the TFTP
server on which your Cayman 2E-W operating software is stored. The
filename argument identifies the path and name of the operating
software file on the TFTP server.
If you include the optional confirm keyword, you will not be
prompted to identify a TFTP server or file name. Your Cayman 2E-W
begins the software installation using its default boot settings.
log message_string
Adds the message in the message_string argument to the Cayman
2E-W diagnostic log.
loglevel [level]
Displays or modifies the types of log messages you want the Cayman
2E-W to record. If you enter the loglevel command without the
optional level argument, the command line interface displays the
current log level setting.
You can enter the loglevel command with the level argument to
specify the types of diagnostic messages you want to record. All
messages with a level number equal to or greater than the level you
specify are recorded. For example, if you specify loglevel 3, the
diagnostic log will retain high-level informational messages (level 3),
warnings (level 4), and failure messages (level 5).
Use the following values for the level argument:
1 or low – Low-level informational messages or greater; includes
trivial status messages.
2 or medium – Medium-level informational messages or greater;
includes status messages that can help monitor network traffic.
3 or high – High-level informational messages or greater;
includes status messages that may be significant but do not
constitute errors.
4 or warning – Warnings or greater; includes recoverable error
conditions and useful operator information.
Cayman 2E-W User’s Guide Using the Command Line Interface
November 2000 4-7
Page 66

5 or failure – Failures; includes messages describing error
conditions that may not be recoverable.
netstat -i
Displays the IP interfaces for your Cayman 2E-W.
netstat -r
Displays the IP routes stored in your Cayman 2E-W.
nslookup { hostname | ip_address }
Performs a domain name system lookup for a specified host.
The hostname argument is the name of the host for which you
want DNS information; for example, nslookup klaatu.
The ip_address argument is the IP address, in dotted decimal
notation, of the device for which you want DNS information.
ping [-s size] [-c count]{ hostname | ip_address }
Causes the Cayman 2E-W to issue a series of ICMP Echo requests for
the device with the specified name or IP address.
The hostname argument is the name of the device you want to
ping; for example, ping ftp.cayman.com.
The ip_address argument is the IP address, in dotted decimal
notation, of the device you want to locate. If a host using the
specified name or IP address is active, it returns one or more
ICMP Echo replies, confirming that it is accessible from your
network.
The -s size argument lets you specify the size of the ICMP
packet.
The -c count argument lets you specify the number of ICMP
packets generated for the ping request.
Using the Command Line Interface Cayman 2E-W User’s Guide
4-8 November 2000
Page 67

You can use the ping command to determine whether a hostname
or IP address is already in use on your network. You cannot use the
ping command to ping the Cayman 2E-W’s own IP address.
quit
Exits the Cayman 2E-W command line interface.
reset arp
Clears the Address Resolution Protocol (ARP) cache on your Cayman
2E-W.
reset crash
Clears crash-dump information, which identifies the contents of the
Cayman 2E-W registers at the point of system malfunction.
reset dhcp client release
Releases the DHCP lease the Cayman 2E-W is currently using to
acquire the IP settings for its WAN (Ethernet B) port.
reset dhcp client renew
Renews the DHCP lease the Cayman 2E-W is currently using to
acquire the IP settings for its WAN (Ethernet B) port.
reset dhcp server
Clears the DHCP lease table in the Cayman 2E-W.
reset enet
Resets Ethernet statistics to zero.
reset ipmap
Clears the IP mapping table.
Cayman 2E-W User’s Guide Using the Command Line Interface
November 2000 4-9
Page 68

reset log
Rewinds the diagnostic log display to the top of the existing Cayman
2E-W diagnostic log. The reset log command does not clear the
diagnostic log. The next show log command will display information
from the beginning of the log file.
reset ppp [enet-B]
Resets the point-to-point connection over the WAN interface. When
you issue a reset ppp command, the Cayman 2E-W closes any PPP
session (including PPP over Ethernet). On older versions of the
Cayman 2E-W, the reset ppp command initializes the modem
connected to the serial port.
restart [seconds]
Restarts your Cayman 2E-W. If you include the optional seconds
argument, your Cayman 2E-W will restart when the specified
number of seconds have elapsed. You must enter the complete
restart command to initiate a restart.
show bridge interfaces
Displays bridge interfaces maintained by the Cayman 2E-W.
show bridge table
Displays the bridging table maintained by the Cayman 2E-W.
show crash
Displays the most recent crash information, if any, for your Cayman
2E-W.
show dhcp agent
Displays the DHCP relay-agent leases being administered by your
Cayman 2E-W.
Using the Command Line Interface Cayman 2E-W User’s Guide
4-10 November 2000
Page 69

show dhcp client
Displays the DHCP address information being used by your Cayman
2E-W for each WAN interface.
show dhcp server leases [ used | free ]
Displays the DHCP leases stored in RAM by your Cayman 2E-W. You
can include the used argument to see the list of DHCP leases that are
in use or that have been used since your Cayman 2E-W was restarted.
You can include the free argument to see the list of DHCP leases that
are available for use.
show dhcp server store
Displays the DHCP leases stored in NVRAM by your Cayman 2E-W.
show enet
Displays the Ethernet statistics for your Cayman 2E-W.
show ip arp
Displays the Ethernet address resolution table stored in your Cayman
2E-W.
show ip igmp
Displays the contents of the IGMP Group Address table and the IGMP
Report table maintained by your Cayman 2E-W.
show ip interfaces
Displays the IP interfaces for your Cayman 2E-W.
show ip routes
Displays the IP routes stored in your Cayman 2E-W.
show log
Displays blocks of information from the Cayman 2E-W diagnostic
log. To see the entire log, you can repeat the show log command or
you can enter show log all and scroll through the complete log.
Cayman 2E-W User’s Guide Using the Command Line Interface
November 2000 4-11
Page 70

show memory [all]
Displays memory usage information for your Cayman 2E-W. If you
include the optional all argument, your Cayman 2E-W will display
a more detailed set of memory statistics.
show ppp [{ stats | lcp | ipcp | lastconnect }]
Displays information about open PPP links. You can display a subset
of the PPP statistics by including an optional stats, lcp, ipcp, or
lastconnect argument for the show ppp command.
show pppoe
Displays status information for each PPP socket, such as the socket
state, service names, and host ID values.
show status
Displays the current status of a Cayman 2E-W, the device's hardware
and software revision levels, a summary of errors encountered, and
the length of time the Cayman 2E-W has been running since it was
last restarted. Identical to the status command.
show wireless
Displays status and statistics information for the wireless interface on
your Cayman 2E-W. The statistics displayed depend on the type of
wireless network card (HomeRF or 802.11) installed in your Cayman
2E-W.
start ppp
Opens a PPP link (typically PPP over Ethernet).
status
Displays the current status of a Cayman 2E-W, the device's hardware
and software revision levels, a summary of errors encountered, and
the length of time the Cayman 2E-W has been running since it was
last restarted. Identical to the show status command.
Using the Command Line Interface Cayman 2E-W User’s Guide
4-12 November 2000
Page 71

telnet { hostname | ip_address } [port]
Lets you open a Telnet connection to the specified host through your
Cayman 2E-W.
The hostname argument is the name of the device to which you
want to connect; for example, telnet ftp.cayman.com.
The ip_address argument is the IP address, in dotted decimal
notation, of the device to which you want to connect.
The port argument is the number of the port over which you
want to open a Telnet session.
traceroute { hostname | ip_address }
Lets you trace the route between the Cayman 2E-W and the specified
host.
The hostname argument is the name of the device you want to
trace; for example, traceroute ftp.cayman.com.
The ip_address argument is the IP address, in dotted decimal
notation, of the device you want to trace.
Dogzilla> traceroute 192.168.1.10
Traceroute to 192.168.1.10 from local address
192.168.1.254 (timer gran. 100 ms)
...
traceroute to 192.168.1.10, 30 hops max, 56 byte packets
1 192.168.1.10 0 ms! 0 ms! 0 ms!
upload [server_address] [filename] [confirm]
Copies the current configuration settings of the Cayman 2E-W to a
TFTP (Trivial File Transfer Protocol) server. The TFTP server must be
accessible on your Ethernet network. The server_address argument
identifies the IP address of the TFTP server on which you want to
store the Cayman 2E-W settings. The filename argument identifies
the path and name of the configuration file on the TFTP server. If you
include the optional confirm keyword, you will not be prompted to
identify a TFTP server or file name.
Cayman 2E-W User’s Guide Using the Command Line Interface
November 2000 4-13
Page 72

who
Displays the names of the current shell users.
wireless learn
Lets you put your Cayman 2E-W into Learn mode for 60 seconds,
allowing it to acquire its network address from a HomeRF device in
Teach mode on your network. Only supported for HomeRF.
wireless teach
Lets you put your Cayman 2E-W into Teach mode for 60 seconds,
allowing it to advertise its network address to other HomeRF devices
in Learn mode on your network. Only supported for HomeRF.
About CONFIG
Commands
CONFIG Mode
Prompt
You reach the configuration mode of the command line interface by
typing configure (or any truncation of configure, such as c or
config) at the CLI ROOT prompt.
When you are in CONFIG mode, the CLI prompt consists of the
name of the Cayman 2E-W followed by your current node in the
hierarchy and two right angle brackets (>>). For example, when you
enter CONFIG mode (by typing config at the ROOT prompt), the
Dogzilla (top)>> prompt reminds you that you are at the top of the
CONFIG hierarchy. If you move to the ip node in the CONFIG
hierarchy (by typing ip at the CONFIG prompt), the prompt changes
Dogzilla (ip)>> to identify your current location.
to
Some CLI commands are not available until certain conditions are
met. For example, you must enable IP for an interface before you can
enter IP settings for that interface.
Using the Command Line Interface Cayman 2E-W User’s Guide
4-14 November 2000
Page 73

Navigating the
CONFIG Hierarchy
Moving from CONFIG to ROOT — You can navigate from
anywhere in the CONFIG hierarchy back to the ROOT level by
entering quit at the CONFIG prompt and pressing RETURN.
Dogzilla (top)>> quit
Dogzilla >
Moving from top to a subnode — You can navigate from the
top node to a subnode by entering the node name (or the
significant letters of the node name) at the CONFIG prompt and
pressing RETURN. For example, you move to the IP subnode by
entering ip and pressing RETURN.
Dogzilla (top)>> ip
Dogzilla (ip)>>
As a shortcut, you can enter the significant letters of the node
name in place of the full node name at the CONFIG prompt. The
significant characters of a node name are the letters that
uniquely identify the node. For example, since no other
CONFIG node starts with I, you could enter one letter (“i”) to
move to the IP node.
Dogzilla (top)>> i
Dogzilla (ip)>>
Jumping down several nodes at once — You can jump down
several levels in the CONFIG hierarchy by entering the complete
path to a node.
Dogzilla (top)>> ip static-routes
Dogzilla (ip static-routes)>>
Moving up one node — You can move up through the
CONFIG hierarchy one node at a time by entering the up
command.
Dogzilla (ip static-routes)>> up
Dogzilla (ip)>>
Cayman 2E-W User’s Guide Using the Command Line Interface
November 2000 4-15
Page 74

Jumping to the top node — You can jump to the top level
from anywhere in the CONFIG hierarchy by entering the top
command.
Dogzilla (ip static-routes)>> top
Dogzilla (top)>>
Moving from one subnode to another — You can move from
one subnode to another by entering a partial path that identifies
how far back to climb.
Dogzilla (ip)>> bridge
Dogzilla (bridge)>>
Moving from any subnode to any other subnode — You
can move from any subnode to any other subnode by entering a
partial path that starts with a top-level CONFIG command.
Dogzilla (ip static-routes)>> ip gateway
Dogzilla (ip gateway)>>
Scrolling backward and forward through recent
commands — You can use the Up and Down arrow keys to
scroll backward and forward through recent commands you
have entered. When the command you want appears, press
Enter to execute it.
Entering
Commands in
CONFIG Mode
CONFIG commands consist of keywords and arguments. Keywords
in a CONFIG command specify the action you want to take or the
entity on which you want to act. Arguments in a CONFIG command
specify the values appropriate to your site. For example, the
CONFIG command
set ip ethernet [ A | B ] address ip_address
consists of three keywords (ip, ethernet, and address) and two
arguments ([ A | B ] and ip_address). When you use the
command to configure your router, you would replace the
arguments with a value appropriate to your site.
set ip ethernet A address 192.31.222.57
Using the Command Line Interface Cayman 2E-W User’s Guide
4-16 November 2000
Page 75

The following table provides guidelines for entering and formatting
CONFIG commands.
Command
component
Command verbs CONFIG commands must start with a command
Keywords Keywords are case-insensitive. You can enter
Argument Text Text strings can be as many as 32 characters
Rules for entering CONFIG commands
verb (set, view, delete).
You can truncate CONFIG verbs to three
characters (set, vie, del).
CONFIG verbs are case-insensitive. You can
enter “SET,” “Set,” or “set.”
“Ethernet,” “ETHERNET,” or “ethernet” as a
keyword without changing its meaning.
Keywords can be abbreviated to the length that
they are differentiated from other keywords.
long, unless otherwise specified.
Special characters are represented using
backslash notation.
Text strings may be enclosed in double (“) or
single (‘) quote marks. If the text string includes
an embedded space, it must be enclosed in
quotes.
Special characters are represented using
backslash notation.
Numbers Enter numbers as integers.
IP addresses Enter IP addresses in dotted decimal notation (0
to 255).
If a command is ambiguous or miskeyed, the CLI prompts you to
enter additional information. For example, you must specify which
Ethernet port you are configuring when you are setting up a Cayman
2E-W.
Dogzilla (ip)>> ethernet
Ethernet (?) [A | B]: A
Dogzilla (ip ethernet [A])>>
Cayman 2E-W User’s Guide Using the Command Line Interface
November 2000 4-17
Page 76

Displaying Current
Router Settings
You can use the view command to display the current CONFIG
settings for your Cayman 2E-W. If you enter the view command at
the top level of the CONFIG hierarchy, the CLI displays the settings
for all enabled functions. If you enter the view command at an
intermediate node, you see settings for that node and its subnodes.
Stepping Through
Cayman 2E-W
Configuration
The Cayman 2E-W command line interface includes a step mode to
automate the process of entering configuration settings. When you
use the CONFIG step mode, the command line interface prompts
you for all required and optional information. You can then enter the
configuration values appropriate for your site without having to
enter complete CLI commands.
When you are in step mode, the command line interface prompts
you to enter required and optional settings. If a setting has a default
value or a current setting, the command line interface displays the
default value for the command in parentheses. If a command has a
limited number of acceptable values, those values are presented in
brackets, with each value separated by a vertical line. For example,
the following CLI step command indicates that the default value is
off and that valid entries are limited to on and off.
option (off) [on | off]: on
You can accept the default value for a field by pressing the Return
key. To use a different value, enter it and press Return.
You can enter the CONFIG step mode by entering set from the top
node of the CONFIG hierarchy. You can enter step mode for a
particular service by entering
Using the Command Line Interface Cayman 2E-W User’s Guide
4-18 November 2000
set service_name. For example:
Dogzilla (top)>> set system
Stepping set mode (press Control-X <Return/Enter> to
exit)
...
system
name (“Dogzilla”):
Diagnostic Level (High): medium
Stepping mode ended.
Mycroft
Page 77

Validating Your
Configuration
You can use the validate CONFIG command to make sure that your
configuration settings have been entered correctly. If you use the
validate command, the Cayman 2E-W verifies that all required
settings for all services are present and that settings are consistent.
Dogzilla (top)>> validate
Error: Subnet mask is incorrect
Global Validation did not pass inspection!
You can use the validate command to verify your configuration
settings at any time. Your Cayman 2E-W automatically validates your
configuration any time you save a modified configuration.
CONFIG
Commands
This section describes the keywords and arguments for the various
CONFIG commands.
BNCP Settings set bncp option {on | off }
Enables or disables bridging over a PPP link. Typically used when the
PPP peer doesn't support IPCP encapsulation.
Bridging Settings Bridging lets the Cayman 2E-W use MAC (Ethernet hardware)
addresses to forward non-TCP/IP traffic from one network to
another. When bridging is enabled, the Cayman 2E-W maintains a
table of up to 255 MAC addresses. Entries that are not used within 10
minutes are dropped. If the bridging table fills up, the oldest table
entries are dropped to make room for new entries.
set bridge option { on | off }
Cayman 2E-W User’s Guide Using the Command Line Interface
November 2000 4-19
Enables or disables bridging services in the Cayman 2E-W. You must
enable bridging services within the Cayman 2E-W before you can
enable bridging for a specific interface.
Page 78

set bridge ethernet [ A | B ] option { on | off }
Enables or disables bridging services for the Ethernet interface.
set bridge ethernet [ A | B ] filters pppoe-only
{ on | off }
Enables or disables bridging services for the specified Ethernet
interface.
set bridge interwan-bridging { on | off }
Enables or disables bridging between remote networks.
DHCP Settings As a Dynamic Host Control Protocol (DHCP) server, your Cayman
2E-W can assign IP addresses and provide configuration information
to other devices on your network dynamically. A device that acquires
its IP address and other TCP/IP configuration settings from the
Cayman 2E-W can use the information for a fixed period of time
(called the DHCP lease).
set dhcp option { off | server | relay-agent }
Enables or disables DHCP services in the Cayman 2E-W. You must
enable DHCP services before you can enter other DHCP settings for
the Cayman 2E-W.
If you turn off DHCP services and save the new configuration, the
Cayman 2E-W clears its DHCP settings.
set dhcp start-address ip_address
If you selected server, specifies the first address in the DHCP
address range. The Cayman 2E-W can reserve a sequence of up to 253
IP addresses within a subnet, beginning with the specified address
for dynamic assignment.
set dhcp end-address ip_address
If you selected server, specifies the last address in the DHCP address
range.
Using the Command Line Interface Cayman 2E-W User’s Guide
4-20 November 2000
Page 79

set dhcp lease-time lease-time
If you selected server, specifies the default length for DHCP leases
issued by the Cayman 2E-W. Enter lease time in dd:hh:mm:ss
(day/hour/minute/second) format.
set dhcp relay-agent ip_address
If you selected relay-agent, specifies the IP address in the remote
DHCP server to which your Cayman 2E-W relays DHCP requests.
Domain Name
System Settings
Domain Name System (DNS) is an information service for TCP/IP
networks that uses a hierarchical naming system to identify network
domains and the hosts associated with them. You can identify a
primary DNS server and one secondary server.
set dns domain-name domain-name
Specifies the default domain name for your network. When an
application needs to resolve a host name, it appends the default
domain name to the host name and asks the DNS server if it has an
address for the “fully qualified host name.”
set dns primary-address ip_address
Specifies the IP address of the primary DNS name server.
set dns secondary-address ip_address
Specifies the IP address of the secondary DNS name server. Enter
0.0.0.0 if your network does not have a secondary DNS name
server.
Ethernet MAC
Address Settings
Cayman 2E-W User’s Guide Using the Command Line Interface
November 2000 4-21
You can use the command line interface to change the Ethernet MAC
address associated with the WAN port on your Cayman 2E-W.
set ethernet-MAC-override option { on | off }
Enables or disables your ability to override the Ethernet MAC address
for the WAN port on your Cayman 2E-W. You must enable the
Page 80

Ethernet MAC address before you can specify a new Ethernet MAC
address.
set ethernet-MAC-override address mac_address
Specifies the Ethernet MAC address (in hexadecimal
nn.nn.nn.nn.nn.nn format) for your Cayman 2E-W.
To restore the default MAC address for the Cayman 2E-W WAN port,
enter the set ethernet-MAC-override option off command and
restart your Cayman 2E-W.
IP Settings You can use the command line interface to specify whether TCP/IP
is enabled, identify a default gateway, and to enter TCP/IP settings for
the Cayman 2E-W LAN and WAN ports. If PPPoE is turned off, you
must specify settings for Ethernet A and B separately. if PPPoE is
turned on, you can omit the A|B labels.
Basic Settings
set ip option { on | off }
Enables or disables TCP/IP services in the Cayman 2E-W. You must
enable TCP/IP services before you can enter other TCP/IP settings for
the Cayman 2E-W. If you turn off TCP/IP services and save the new
configuration, the Cayman 2E-W clears its TCP/IP settings.
Ethernet Settings
set ip ethernet [ A | B ] option { on | off }
Enables or disables communications through the designated
Ethernet port in the Cayman 2E-W. You must enable TCP/IP
functions for an Ethernet port before you can configure its network
settings.
set ip ethernet [ A | B ] address ip_address
Assigns an IP address to the Cayman 2E-W on the specified network.
The IP address you assign to an Ethernet port must be unique on
Using the Command Line Interface Cayman 2E-W User’s Guide
4-22 November 2000
Page 81

your network. By default, the Cayman 2E-W uses 192.168.1.254 as its
LAN IP address.
set ip ethernet [ A | B ] broadcast broadcast_address
Specifies the broadcast address for the TCP/IP network connected to
the designated Ethernet port. IP hosts use the broadcast address to
send messages to every host on your network simultaneously.
The broadcast address for most networks is the network number
followed by 255. For example, the broadcast address for the
192.168.1.0 network would be 192.168.1.255.
set ip ethernet [ A | B ] netmask netmask
Specifies the subnet mask for the TCP/IP network connected to the
Ethernet port. The subnet mask specifies which bits of the 32-bit
binary IP address represent network information. The default subnet
mask for most networks is 255.255.255.0 (Class C subnet mask).
set ip ethernet A restrictions { none | admin-disabled }
set ip ethernet B restrictions { none | admin-disabled |
admin-only }
Specifies whether an administrator can open a Telnet connection to
the Cayman 2E-W over the designated Ethernet interface to monitor
and configure the Cayman 2E-W. On the Cayman 2E-W LAN port, you
can enable or disable administrator access. On the WAN port, you
can enable or disable administrator access or specify that the WAN
port can only be used for administrative traffic. By default,
administrative restrictions are turned off on both Ethernet ports,
meaning an administrator can open a Telnet connection through
either port.
If you specify admin-only access for the Cayman 2E-W
WAN port, you will turn off routing services through that
port. Do not turn on admin-only access without consulting
with your network administrator.
Cayman 2E-W User’s Guide Using the Command Line Interface
November 2000 4-23
Page 82

set ip ethernet [ A | B ] proxy-arp { on | off }
Specifies whether you want the Cayman 2E-W to respond when the
it receives an address resolution protocol for devices behind it. By
default, proxy ARP is turned off.
set ip ethernet [ A | B ] rip-send { off | v1 | v2 |
v1-compat | v2-MD5 }
Specifies whether the Cayman 2E-W should use Routing Information
Protocol (RIP) broadcasts to advertise its routing tables to other
routers on your network. RIP Version 2 (RIP-2) is an extension of the
original Routing Information Protocol (RIP-1) that expands the
amount of useful information in the RIP packets. While RIP-1 and
RIP-2 share the same basic algorithms, RIP-2 supports several new
features, including inclusion of subnet masks in RIP packets and
implementation of multicasting instead of broadcasting (which
reduces the load on hosts which do not support routing protocols.
RIP-2 with MD5 authentication is an extension of RIP-2 that increases
security by requiring an authentication key when routes are
advertised.
Depending on your network needs, you can configure your Cayman
2E-W to support RIP-1, RIP-2, or both.
set ip ethernet [ A | B ] rip-receive { off | v1 | v2 |
v1-compat | v2-MD5 }
Specifies whether the Cayman 2E-W should use Routing Information
Protocol (RIP) broadcasts to update its routing tables with
information received from other routers on your network.
set ip ethernet [ A | B ] rip-send-keyid keyid
Specifies the authentication key that will be included with all
outgoing RIP packets if v2-MD5 is selected for rip-send. This
authentication key must match the key the remote router is
expecting, or the RIP update will be ignored. RIP authentication
keys can be 1-16 characters long, and can include spaces and special
characters. You must enclose the authentication key string in double
quotes (““).
Using the Command Line Interface Cayman 2E-W User’s Guide
4-24 November 2000
Page 83

set ip ethernet [ A | B ] rip-receive-keyid keyid
Specifies the key that will be used to authenticate all incoming RIP
packets if v2-MD5 is selected for rip-send. When your Cayman 2E-W
receives a RIP packet, it uses the expected key to create an MD-5
digest of the RIP message. It then compares this calculated digest to
the MD-5 digest sent with the RIP packet. If the calculated digest
does not match the received digest, the RIP message is discarded. If
the two digests match, the packet is processed as a normal RIP-2
packet.
IP authentication keys can be 1-16 characters long, and can include
spaces and special characters. You must enclose the authentication
key string in double quotes (““).
Default IP Gateway Settings
set ip gateway option { on | off }
Specifies whether the Cayman 2E-W should send packets to a default
gateway if it does not know how to reach the destination host.
set ip gateway interface { ip-address | ppp }
Specifies how the Cayman 2E-W should route information to the
default gateway. If you select ip-address, you must enter the IP
address of a host on a local or remote network. If you specify ppp,
the Cayman 2E-W uses the default gateway being used by the remote
PPP peer.
set ip gateway default ip_address
Specifies the IP address of the default IP gateway.
WAN-to-WAN Routing Settings
Use the following command to configure settings for routing
between WAN connections.
set ip interwan-routing { on | off }
Enables or disables routing between WAN connections.
Cayman 2E-W User’s Guide Using the Command Line Interface
November 2000 4-25
Page 84

IP-over-PPP Settings
Use the following commands to configure settings for routing IP over
a virtual PPP interface.
set ip ip-ppp option { on | off }
Enables or disables IP routing through the virtual PPP interface. By
default, IP routing is turned off. You must enable IP routing before
you can enter other IP routing settings for the virtual PPP interface.
If you turn off IP routing and save the new configuration, the
Cayman 2E-W clears IP routing settings.
set ip ip-ppp address ip_address
Assigns an IP address to the virtual PPP interface. If you specify an IP
address other than 0.0.0.0, your Cayman 2E-W will not negotiate its
IP address with the remote peer. If the remote peer does not accept
the IP address specified in the ip_address argument as valid, the link
will not come up.
The default value for the ip_address argument is 0.0.0.0, which
indicates that the virtual PPP interface will use the IP address
assigned to it by the remote peer. Note that the remote peer must be
configured to supply an IP address to your Cayman 2E-W if you enter
0.0.0.0 for the ip_address argument.
set ip ip-ppp peer-address ip_address
Specifies the IP address of the peer on the other end of the PPP link.
If you specify an IP address other than 0.0.0.0, your Cayman 2E-W
will not negotiate the remote peer's IP address. If the remote peer
does not accept the address in the ip_address argument as its IP
address (typically because it has been configured with another IP
address), the link will not come up.
The default value for the ip_address argument is 0.0.0.0, which
indicates that the virtual PPP interface will accept the IP address
returned by the remote peer. If you enter 0.0.0.0, the peer system
must be configured to supply this address.
Using the Command Line Interface Cayman 2E-W User’s Guide
4-26 November 2000
Page 85

set ip ip-ppp restriction
{ none | admin-disabled | admin-only }
Specifies restrictions on the types of traffic the Cayman 2E-W accepts
over the PPP virtual circuit. The none argument means that all traffic
is accepted. The admin-disabled argument means that router traffic
is accepted but that administrative commands are ignored. The
admin-only argument means that router traffic is ignored but that
administrative commands are accepted.
set ip ip-ppp addr-mapping { on | off }
Specifies whether you want the Cayman 2E-W to use network
address translation (NAT) when communicating with remote
routers. Network address translation lets you conceal details of your
network from remote routers. By default, address mapping is turned
on.
For more information on network address translation, see “About
Network Address Translation” on page C-1.
set ip ip-ppp vj-compression { on | off }
Specifies whether you want to negotiate Van Jacobson header
compression for asynchronous PPP links. By default, TCP/IP header
compression is turned on.
When Van Jacobson header compression is turned on, your Cayman
2E-W allocates memory for 16 slots (headers) by default. The number
of slots may be reduced during link configuration if the remote peer
can only support a lower number.
set ip ip-ppp ipcp-subnet { on | off }
Specifies whether you want your Cayman 2E-W to negotiate
allocation of an IP subnet, rather than a single IP address, from a
remote access server. You should only enable this feature if you are
told to do so by your Internet Service Provider.
Cayman 2E-W User’s Guide Using the Command Line Interface
November 2000 4-27
Page 86

Static ARP Settings
Your Cayman 2E-W maintains a dynamic Address Resolution Protocol
(ARP) table to map IP addresses to Ethernet (MAC) addresses. Your
Cayman 2E-W populates this ARP table dynamically, by retrieving IP
address/MAC address pairs only when it needs them. Optionally, you
can define static ARP entries to map IP addresses to their
corresponding Ethernet MAC addresses. Unlike dynamic ARP table
entries, static ARP table entries do not time out.
You can configure as many as 16 static ARP table entries for a Cayman
2E-W. Use the following commands to add static ARP entries to the
Cayman 2E-W static ARP table:
set ip static-arp ip-address ip_address
Specifies the IP address for the static ARP entry. Enter an IP address
in the ip_address argument in dotted decimal format. The
ip_address argument cannot be 0.0.0.0.
set ip static-arp hardware-address MAC_address
Specifies the Ethernet hardware address for the static ARP entry.
Enter an Ethernet hardware address in the MAC_address argument in
nn.nn.nn.nn.nn.nn (hexadecimal) format.
Static Route Settings
A static route identifies a manually configured pathway to a remote
network. Unlike dynamic routes, which are acquired and confirmed
periodically from other routers, static routes do not time out.
Consequently, static routes are useful when working with PPP, since
an intermittent PPP link may make maintenance of dynamic routes
problematic.
You can configure as many as 16 static IP routes for a Cayman 2E-W.
Use the following commands to maintain static routes to the Cayman
2E-W routing table:
Using the Command Line Interface Cayman 2E-W User’s Guide
4-28 November 2000
Page 87

set ip static-routes destination-network net_address
Specifies the network address for the static route. Enter a network
address in the net_address argument in dotted decimal format. The
net_address argument cannot be 0.0.0.0.
set ip static-routes destination-network net_address
netmask netmask
Specifies the subnet mask for the IP network at the other end of the
static route. Enter the netmask argument in dotted decimal format.
The subnet mask associated with the destination network must
represent the same network class (A, B, or C) or a lower class (such
as a class C subnet mask for class B network number) to be valid.
set ip static-routes destination-network net_address
interface [ ip-address | ppp ]
Specifies the interface through which the static route is accessible.
set ip static-routes destination-network net_address
gateway-address gate_address
If you specified the gateway is accessible through an IP address,
specifies the IP address of the gateway for the static route. The
default gateway must be located on a network connected to the
Cayman 2E-W configured interface.
set ip static-routes destination-network net_address
metric integer
Specifies the metric (hop count) for the static route. The default
metric is 1. Enter a number from 1 to 15 for the integer argument to
indicate the number of routers (actual or best guess) a packet must
traverse to reach the remote network.
You can enter a metric of 1 to indicate either:
The remote network is one router away and the static route is
the best way to reach it;
Cayman 2E-W User’s Guide Using the Command Line Interface
November 2000 4-29
Page 88

The remote network is more than one router away but the static
route should not be replaced by a dynamic route, even if the
dynamic route is more efficient.
delete ip static-routes destination-network net_address
Deletes a static route. Deleting a static route removes all information
associated with that route.
WAN Settings
set ip wan option { on | off }
Enables or disables communications through the WAN Ethernet port
in the Cayman 2E-W. You must enable TCP/IP functions for the WAN
port before you can configure its network settings.
set ip wan address ip_address
Assigns an IP address to the Cayman 2E-W on the wide area network.
The IP address you assign to an Ethernet port must be unique on
your network.
set ip wan broadcast broadcast_address
Specifies the broadcast address for the TCP/IP network connected to
the WAN Ethernet port. IP hosts use the broadcast address to send
messages to every host on your network simultaneously.
The broadcast address for most networks is the network number
followed by 255. For example, the broadcast address for the
192.168.1.0 network would be 192.168.1.255.
set ip wan netmask netmask
Specifies the subnet mask for the TCP/IP network connected to the
WAN Ethernet port. The subnet mask specifies which bits of the
32-bit binary IP address represent network information. The default
subnet mask for most networks is 255.255.255.0 (Class C subnet
mask).
Using the Command Line Interface Cayman 2E-W User’s Guide
4-30 November 2000
Page 89

set ip wan restrictions { none | admin-disabled |
admin-only }
Specifies whether an administrator can open a Telnet connection to
the Cayman 2E-W over the WAN Ethernet interface to monitor and
configure the Cayman 2E-W. You can enable or disable administrator
access or specify that the WAN port can only be used for
administrative traffic. By default, administrative restrictions are
turned off, meaning an administrator can open a Telnet connection
through the WAN port.
If you specify admin-only access for the Cayman 2E-W
WAN port, you will turn off routing services through that
port. Do not turn on admin-only access without consulting
with your network administrator.
set ip wan addr-mapping { off | on }
Specifies whether network address translation (NAT) is enabled for
the WAN port on the Cayman 2E-W.
Network Address
Translation (NAT)
Default Settings
set ip wan proxy-arp { on | off }
Specifies whether you want the Cayman 2E-W to respond when the
it receives an address resolution protocol for devices behind it. By
default, proxy ARP is turned off.
NAT default settings let you specify whether you want your Cayman
2E-W to forward NAT traffic to a default server when it doesn’t know
what else to do with it. The NAT default host function is useful in
situations where you cannot create a specific NAT pinhole for a
traffic stream because you cannot anticipate what port number an
application might use. For example, some network games select
arbitrary port numbers when a connection is being opened. By
identifying your computer (or another host on your network) as a
NAT default server, you can specify that NAT traffic that would
otherwise be discarded by the Cayman 2E-W should be directed to a
specific hosts.
Cayman 2E-W User’s Guide Using the Command Line Interface
November 2000 4-31
Page 90

set nat-default option { off | on }
Specifies whether you want your Cayman 2E-W to forward NAT
traffic to a default server when it doesn’t know what else to do with
it.
set nat-default address ip-address
Specifies the IP address of the default NAT server.
Network Address
Translation (NAT)
Pinhole Settings
NAT pinholes let you pass specific types of network traffic through
the NAT interfaces on the Cayman 2E-W. NAT pinholes allow you to
route selected types of network traffic, such as FTP requests or HTTP
(Web) connections, to a specific host behind the Cayman 2E-W
transparently.
To set up NAT pinholes, you identify the type(s) of traffic you want
to redirect by port number, and you specify the internal host to
which each specified type of traffic should be directed.
The following list identifies protocol type and port number for
common TCP/IP protocols:
FTP (TCP 21)
Telnet (TCP 23)
SMTP (TCP 25),
TFTP (UDP 69)
SNMP (TCP 161, UDP 161)
set pinhole name name
Specifies the identifier for the entry in the router's pinhole table. You
can name pinhole table entries sequentially (1, 2, 3), by port number
(21, 80, 23), by protocol, or by some other naming scheme.
set pinhole protocol-select { tcp | udp | icmp | pptp |
other }
Specifies the type of protocol being redirected.
Using the Command Line Interface Cayman 2E-W User’s Guide
4-32 November 2000
Page 91

set pinhole numerical-protocol [ 0 - 65535 ]
If you select other, specifies the number of the protocol you want to
translate.
set pinhole external-port-start [ 0 - 65535 ]
Specifies the first port number in the range being translated.
set pinhole external-port-end [ 0 - 65535 ]
Specifies the last port number in the range being translated.
set pinhole internal-ip internal-ip
Specifies the IP address of the internal host to which traffic of the
specified type should be transferred.
set pinhole internal-port internal-port
Specifies the port number your Cayman 2E-W should use when
forwarding traffic of the specified type. Under most circumstances,
you would use the same number for the external and internal port.
PPPoE Settings You can use the following commands to configure basic settings,
port authentication settings, and peer authentication settings for PPP
over Ethernet on your Cayman 2E-W.
set pppoe { on | off }
Enables or disables PPP over Ethernet on your Cayman 2E-W. You
must enable PPPoE before you can enter other PPP settings.
Basic PPP Settings
set PPP module option { on | off }
Enables or disables PPP on the Cayman 2E-W. By default, PPP is
turned off.
Cayman 2E-W User’s Guide Using the Command Line Interface
November 2000 4-33
Page 92

set PPP module mru integer
Specifies the Maximum Receive Unit setting for the PPP interface.
The integer argument can be any number between 128 and 2048.
By default, the MRU value for PPP over Ethernet is 1492.
set PPP module magic-number { on | off }
Enables or disables LCP magic number negotiation. By default, magic
number negotiation is turned on.
set PPP module protocol-compression { on | off }
Specifies whether you want the Cayman 2E-W to compress the PPP
Protocol field when it transmits datagrams over the PPP link. By
default, protocol field compression is turned off.
set PPP module lcp-echo-requests { on | off }
Specifies whether you want your Cayman 2E-W to send LCP echo
requests. By default, LCP echoing is turned on. You should turn off
LCP echoing if you do not want the Cayman 2E-W to drop a PPP link
to a nonresponsive peer.
set PPP module failures-max integer
Specifies the maximum number of Configure-NAK messages the PPP
module can send without having sent a Configure-ACK message. The
integer argument can be any number between 1 and 20. The default
value for the maximum failure count is 10.
set PPP module configure-max integer
Specifies the maximum number of unacknowledged configuration
requests that your Cayman 2E-W will send. The integer argument can
be any number between 1 and 10. The default value for the integer
argument is 10.
set PPP module terminate-max integer
Specifies the maximum number of unacknowledged termination
requests that your Cayman 2E-W will send before terminating the
Using the Command Line Interface Cayman 2E-W User’s Guide
4-34 November 2000
Page 93

PPP link. The integer argument can be any number between 1 and
10. The default value for the integer argument is 2.
set PPP module restart-timer integer
Specifies the number of seconds the Cayman 2E-W should wait
before retransmitting a configuration or termination request. The
integer argument can be any number between 1 and 30. The default
value for the integer argument is 3 seconds. You can reduce the
restart timer value if your link is relatively fast (28,800 bps or
greater). Conversely, you should increase the restart timer value for
slow links.
set PPP module connection-type [ instant-on | always-on ]
Specifies whether a PPP connection is maintained by the Cayman
2E-W when it is unused for extended periods. If you specify
always-on, the Cayman 2E-W never shuts down the PPP link. If you
specify instant-on, the Cayman 2E-W shuts down the PPP link after
the number of seconds specified in the time-out setting (below) if
no traffic is moving over the circuit.
set PPP module time-out integer
If you selected a connection type of instant-on, specifies the
number of seconds, in the range 30-600, the Cayman 2E-W should
wait for communication activity before terminating the PPP link. The
default is 300 seconds.
Port Authentication
You can use the following commands to specify how your Cayman
2E-W should respond when it receives an authentication request
from a remote peer. The settings for port authentication on the local
Cayman 2E-W must match the authentication that is expected by the
remote peer. For example, if the remote peer requires CHAP
authentication and has a name and CHAP secret for the Cayman
2E-W, you must enable CHAP and specify the same name and secret
on the Cayman 2E-W before the link can be established.
Cayman 2E-W User’s Guide Using the Command Line Interface
November 2000 4-35
Page 94

set PPP module port-authentication chap-option { on | off }
Specifies whether CHAP authentication is enabled. By default, CHAP
authentication is turned off. CHAP authentication must be enabled
before you can enter other CHAP information. If CHAP is turned on,
it will be the first authentication method offered to the remote peer
during link negotiation.
If you turn port authentication off and peer authentication on, the
PPP software still uses the port authentication chap-name and
pap-name for authentication. As a result, the port authentication
names for PAP and CHAP must be identical to the peer names for
your Cayman 2E-W on the remote peer. If you do not configure a
chap-name or pap-name, then the authentication packets sent by the
local peer will have blank name values. This may cause
authentication to fail for some PPP implementations.
set PPP module port-authentication chap-name chap_name
Specifies the name the Cayman 2E-W sends in a CHAP response
packet. The chap_name argument is 1-32 alphanumeric characters.
The information you enter must match the CHAP username
configured in the remote PPP peer's authentication database.
set PPP module port-authentication chap-secret secret
Specifies the CHAP secret for CHAP authentication. The secret
argument is 1-32 alphanumeric characters. The information you
enter must match the CHAP secret used by the PPP peer.
set PPP module port-authentication pap-option { on | off }
Specifies whether PAP authentication is enabled for a port. By
default, PAP authentication is turned off. PAP authentication must be
enabled before you can enter other PAP information. If you disable
PAP authentication and save the modified configuration, your
Cayman 2E-W retains its PAP settings.
Using the Command Line Interface Cayman 2E-W User’s Guide
4-36 November 2000
Page 95

set PPP module port-authentication pap-name pap_name
Specifies the name the Cayman 2E-W sends in a PAP response packet.
The pap_name argument is 1- 32 alphanumeric characters. The
information you enter must match the PAP username configured in
the PPP peer's authentication database.
set PPP module port-authentication pap-password password
Specifies the password the Cayman 2E-W sends when a PPP peer
sends a PAP authentication request. The password argument is 1-32
alphanumeric characters. The information you enter must match the
PAP password used by the PPP peer.
Peer Authentication
You can specify that your Cayman 2E-W will use PAP, CHAP, or both
to authenticate a remote peer as a PPP link is being completed.
Perform the following steps to specify how your Cayman 2E-W
should authenticate remote peers.
set PPP module peer-authentication chap-option { on | off }
Specifies whether the Cayman 2E-W will use CHAP to authenticate
connections to PPP peers. By default, CHAP authentication is turned
off.
set PPP module peer-authentication pap-option { on | off }
Specifies whether the Cayman 2E-W will use PAP to authenticate
connections to PPP peers. By default, PAP authentication is turned
off.
set PPP peer-database peer-name hostname
Specifies the hostname for an authorized PPP peer. The hostname
argument is 1-32 alphanumeric characters. The information you
enter must match the username that will be returned by the PPP
peer when it is being authenticated.
Cayman 2E-W User’s Guide Using the Command Line Interface
November 2000 4-37
Page 96

set PPP peer-database peer-name hostname chap-secret secret
Specifies the secret associated with a PPP peer. The secret argument
is 1-32 alphanumeric characters. The information you enter must
match the secret that will be returned by the PPP peer when it is
being authenticated.
set PPP peer-database peer-name hostname pap-password
password
Specifies the password associated with a PPP peer. The password
argument is 1-32 alphanumeric characters. The password you enter
for that peer must match the password that will be returned by the
PPP peer when it is being authenticated.
Command Line
Interface
Preference
Settings
You can set command line interface preferences to customize your
environment.
set preference verbose { on | off }
set define verbose { on | off }
Specifies whether you want command help and prompting
information displayed. By default, the command line interface
verbose preference is turned off. If you turn it on, the command line
interface displays help for a node when you navigate to that node.
set preference more lines
set define more lines
Specifies how many lines of information you want the command line
interface to display at one time. The lines argument specifies the
number of lines you want to see at one time. By default, the
command line interface shows you 16 lines of text before displaying
the prompt More …[y|n] ?. If you enter 0 for the lines argument, the
command line interface displays information as an uninterrupted
stream (which is useful for capturing information to a text file).
Using the Command Line Interface Cayman 2E-W User’s Guide
4-38 November 2000
Page 97

Port Renumbering
Settings
If you use NAT pinholes to forward HTTP or Telnet traffic through
your Cayman 2E-W to an internal host, you must change the port
numbers the Cayman 2E-W uses for its own configuration traffic. For
example, if you set up a NAT pinhole to forward network traffic on
Port 80 (HTTP) to another host, you would have to tell the Cayman
2E-W to listen for configuration connection requests on a port
number other than 80, such as 6080.
After you have changed the port numbers the Cayman 2E-W uses for
its configuration traffic, you must use those port numbers instead of
the standard numbers when configuring the Cayman 2E-W. For
example, if you move the router's Web service to port 6080 on a box
with a DNS name of superbox, you would enter the URL
http://superbox:6080 in a Web browser to open the Cayman 2E-W
graphical user interface. Similarly, you would have to configure your
Telnet application to use the appropriate port when opening a
configuration connection to your Cayman 2E-W.
set servers web-http [ 0 - 32767 ]
Specifies the port number for HTTP (web) communication with the
Cayman 2E-W. Because port numbers in the range 0-1024 are used
by other protocols, you should use numbers in the range 2000-32767
when assigning new port numbers to the Cayman 2E-W web
configuration interface.
set servers telnet-tcp [ 0 - 32767 ]
Specifies the port number for Telnet (CLI) communication with the
Cayman 2E-W. Because port numbers in the range 0-1024 are used
by other protocols, you should use numbers in the range 2000-32767
when assigning new port numbers to the Cayman 2E-W Telnet
configuration interface.
SNMP Settings The Simple Network Management Protocol (SNMP) lets a network
administrator monitor problems on a network by retrieving settings
on remote network devices. The network administrator typically
runs an SNMP management station program on a local host to obtain
information from an SNMP agent such as the Cayman 2E-W.
Cayman 2E-W User’s Guide Using the Command Line Interface
November 2000 4-39
Page 98

set snmp community name
Adds the specified name to the list of communities associated with
the Cayman 2E-W. By default, the Cayman 2E-W is associated with
the public community. You can associate as many as 16 communities
with the Cayman 2E-W.
set snmp traps authentication-traps { on | off }
Enables or disables SNMP trapping. If SNMP trapping is enabled,
your Cayman 2E-W sends authentication traps to all SNMP trap
destinations. You must enable trap authentication before you set up
your trap destinations.
set snmp traps ip-traps ip-address [ community
community-name ]
Identifies the destination for SNMP trap messages. The ip-address
argument is the IP address of the host acting as an SNMP console.
The optional community community-name identifies the name of the
Cayman 2E-W community, which is included in the trap message the
device sends to the management console. This name, which is not
used for authentication, does not have to match a predefined
community name.
set snmp sysgroup contact contact_info
Identifies the system contact, such as the name, phone number,
beeper number, or email address of the person responsible for the
Cayman 2E-W. You can enter up to 256 characters for the
contact_info argument. You must put the contact_info argument
in double-quotes if it contains embedded spaces.
set snmp sysgroup location location_info
Identifies the location, such as the building, floor, or room number,
of the Cayman 2E-W. You can enter up to 256 characters for the
location_info argument. You must put the location_info
argument in double-quotes if it contains embedded spaces.
Using the Command Line Interface Cayman 2E-W User’s Guide
4-40 November 2000
Page 99

System Settings You can configure system settings to assign a name to your Cayman
2E-W and to specify what types of messages you want the diagnostic
log to record.
set system name name
Specifies the name of your Cayman 2E-W. Each Cayman 2E-W is
assigned a name as part of its factory initialization. The default name
for a Cayman 2E-W consists of the word “Cayman-2E” and the serial
number of the device; for example, Cayman-2E810700. A device
name can be 1-16 characters long and cannot include spaces or
special characters. Once you have assigned a name to your Cayman
2E-W, you can enter that name in the Open Location text field of
your browser to open a connection to your Cayman 2E-W.
set system diagnostic-level level
Specifies the types of log messages you want the Cayman 2E-W to
record. All messages with a level number equal to or greater than the
level you specify are recorded. For example, if you specify set system
diagnostic-level 3, the diagnostic log will retain high-level
informational messages (level 3), warnings (level 4), and failure
messages (level 5).
Use the following values for the level argument:
1 or low - Low-level informational messages or greater; includes
trivial status messages.
2 or medium - Medium-level informational messages or greater;
includes status messages that can help monitor network traffic.
3 or high - High-level informational messages or greater; includes
status messages that may be significant but do not constitute
errors.
4 or warning - Warnings or greater; includes recoverable error
conditions and useful operator information.
5 or failure - Failures; includes messages describing error
conditions that may not be recoverable.
Cayman 2E-W User’s Guide Using the Command Line Interface
November 2000 4-41
Page 100

set system password { admin | user }
Specifies the administrator or user password for a Cayman 2E-W.
When you enter the set system password command, you are
prompted to enter the old password (if any) and new password. You
are prompted to repeat the new password to verify that you entered
it correctly the first time. To prevent anyone from observing the
password you enter, characters in the old and new passwords are not
displayed as you type them.
A password can be as many as eight alphanumeric characters.
Passwords are case-sensitive and cannot include special characters or
leading, trailing, or embedded spaces. For example, if you assign a
password of “GatoR” to a Cayman 2E-W, you could not enter
“GATOR”, “gator”, “Gator”, or “GatoR ” (with a trailing space) as an
acceptable password.
Passwords go into effect immediately. You do not have to restart the
Cayman 2E-W for the password to take effect. Assigning an
administrator or user password to a Cayman 2E-W does not affect
communications through the device.
Traffic Shaping
Settings
Traffic shaping lets you control how much traffic can flow through
an Ethernet interface by limiting the size of the WAN “pipe.” This
function is most suitable for Internet Service Providers or
multi-interface routers.
When you use the traffic-shaping option to set the maximum speed
for a router port, the router will silently discard any packets that
exceed the maximum port speed.
set trafficshape option { on | off }
Enables or disables traffic-shaping in the Cayman 2E-W.
set trafficshape ethernet [ A | B ] option { on | off }
Enables or disables traffic-shaping on the designated Ethernet
interface.
Using the Command Line Interface Cayman 2E-W User’s Guide
4-42 November 2000
 Loading...