

Cayman Systems 2E-H User Manual

Cayman 2E-H
User’s Guide
Release 5.6.2
November 2000

Copyrights
Copyright © 1999-2000 Cayman Systems
All rights reserved
Printed in the United States of America
Portions of this software copyright 1988, 1991 by Carnegie Mellon University.
All rights reserved. Permission to use, copy, modify, and distribute this software
and its documentation for any purpose and without fee is hereby granted,
provided that the above copyright notice and this permission notice appear in
supporting documentation, and that the name of Carnegie Mellon University
not be used in advertising or publicity pertaining to distribution of the software
without specific, written prior permission.
CARNEGIE MELLON UNIVERSITY DISCLAIMS ALL WARRANTIES WITH
REGARD TO THIS SOFTWARE, INCLUDING ALL IMPLIED WARRANTIES OF
MERCHANTABILITY AND FITNESS. IN NO EVENT SHALL CMU BE LIABLE
FOR ANY SPECIAL, INDIRECT, OR CONSEQUENTIAL DAMAGES OR ANY
DAMAGES WHATSOEVER RESULTING FROM LOSS OF USE, DATA, OR
PROFITS, WHETHER IN AN ACTION OF CONTRACT, NEGLIGENCE, OR
OTHER TORTIOUS ACTION, ARISING OUT OF OR IN CONNECTION WITH
THE USE OR PERFORMANCE OF THIS SOFTWARE.
Trademarks
Cayman Systems is a registered trademark of Cayman Systems, Inc. SWIFT-IP,
SafetyNet, Zero Configuration, and the Cayman Systems logo are trademarks of
Cayman Systems, Inc.
UNIX is a registered trademark of UNIX System Laboratories, Inc. Ethernet is a
registered trademark of Xerox Corporation. Microsoft and Windows are
registered trademarks of Microsoft Corporation.
Mention of third-party products is for informational purposes only and
constitutes neither an endorsement nor a recommendation. Cayman assumes
no responsibility with regard to the performance or use of these products.

Contents
Preface
1 About Your
Cayman 2E-H
2 Setting Up Your
Cayman 2E-H
About This Manual . . . . . . . . . . . . . . . . . . . . . . . . . . . . . . . vii
Who Should Read This Manual . . . . . . . . . . . . . . . . . . . . . . vii
What This Manual Covers . . . . . . . . . . . . . . . . . . . . . . . . . . vii
Documentation Conventions . . . . . . . . . . . . . . . . . . . . . . . . viii
What’s New in Release 5.6.2 . . . . . . . . . . . . . . . . . . . . . . . . 1-1
Cayman 2E-H Features. . . . . . . . . . . . . . . . . . . . . . . . . . . . . 1-1
Cayman 2E-H Front Panel . . . . . . . . . . . . . . . . . . . . . . . . . . 1-3
Cayman 2E-H Back Panel . . . . . . . . . . . . . . . . . . . . . . . . . . 1-4
Unpacking Your Cayman 2E-H . . . . . . . . . . . . . . . . . . . . . . 2-1
Connecting Your Cayman 2E-H . . . . . . . . . . . . . . . . . . . . . . 2-2
Step 1: Position the Cayman 2E-H . . . . . . . . . . . . . . . . . 2-2
Step 2: Connect Your Local Devices. . . . . . . . . . . . . . . . 2-3
Step 3: Connect Your Wide Area Network . . . . . . . . . . . 2-4
Step 4: Power On the Cayman 2E-H. . . . . . . . . . . . . . . . 2-4
Disconnecting Your Cayman 2E-H . . . . . . . . . . . . . . . . . . . . 2-5
3 Configuring
Your Cayman
2E-H
Cayman 2E-H User’s Guide Contents
November 2000
Gathering Configuration Information . . . . . . . . . . . . . . . . . . 3-2
QuickStart Information . . . . . . . . . . . . . . . . . . . . . . . . . 3-2
LAN Port (Ethernet A) Information (Optional) . . . . . . . . 3-3
WAN (Ethernet B) Port Information (Optional) . . . . . . . . 3-5
Configuring Your Computer. . . . . . . . . . . . . . . . . . . . . . . . . 3-5
Opening a Web Connection. . . . . . . . . . . . . . . . . . . . . . . . . 3-7
Entering Basic Settings. . . . . . . . . . . . . . . . . . . . . . . . . . . . 3-10
iii

QuickStart (PPPoE Off) . . . . . . . . . . . . . . . . . . . . . . . . 3-10
Manual QuickStart . . . . . . . . . . . . . . . . . . . . . . . . . . . . 3-11
QuickStart (PPPoE On) . . . . . . . . . . . . . . . . . . . . . . . . 3-13
Entering LAN (Ethernet A) Settings . . . . . . . . . . . . . . . . . . . 3-15
Entering WAN (Ethernet B) Settings . . . . . . . . . . . . . . . . . . 3-17
PPPoE is Off . . . . . . . . . . . . . . . . . . . . . . . . . . . . . . . . 3-17
PPPoE is On . . . . . . . . . . . . . . . . . . . . . . . . . . . . . . . . 3-19
Configuring Password Settings . . . . . . . . . . . . . . . . . . . . . . 3-22
Configuring Pinhole Settings . . . . . . . . . . . . . . . . . . . . . . . 3-24
Configuring SNMP Settings. . . . . . . . . . . . . . . . . . . . . . . . . 3-28
4 Using the
Command Line
Interface
Overview . . . . . . . . . . . . . . . . . . . . . . . . . . . . . . . . . . . . . . 4-1
Starting and Ending a CLI Session . . . . . . . . . . . . . . . . . 4-1
Using the CLI Help Facility . . . . . . . . . . . . . . . . . . . . . . 4-4
Saving Settings . . . . . . . . . . . . . . . . . . . . . . . . . . . . . . . 4-4
About Root Commands . . . . . . . . . . . . . . . . . . . . . . . . . . . . 4-4
ROOT Prompt . . . . . . . . . . . . . . . . . . . . . . . . . . . . . . . . 4-4
ROOT Command Shortcuts . . . . . . . . . . . . . . . . . . . . . . 4-5
ROOT Commands . . . . . . . . . . . . . . . . . . . . . . . . . . . . . 4-5
About CONFIG Commands . . . . . . . . . . . . . . . . . . . . . . . . 4-14
CONFIG Mode Prompt . . . . . . . . . . . . . . . . . . . . . . . . 4-14
Navigating the CONFIG Hierarchy . . . . . . . . . . . . . . . . 4-14
Entering Commands in CONFIG Mode . . . . . . . . . . . . . 4-16
Displaying Current Router Settings . . . . . . . . . . . . . . . . 4-17
Stepping Through Cayman 2E-H Configuration. . . . . . . 4-17
Validating Your Configuration . . . . . . . . . . . . . . . . . . . 4-18
CONFIG Commands . . . . . . . . . . . . . . . . . . . . . . . . . . . . . 4-19
BNCP Settings . . . . . . . . . . . . . . . . . . . . . . . . . . . . . . . 4-19
Bridging Settings . . . . . . . . . . . . . . . . . . . . . . . . . . . . . 4-19
DHCP Settings. . . . . . . . . . . . . . . . . . . . . . . . . . . . . . . 4-20
Domain Name System Settings . . . . . . . . . . . . . . . . . . . 4-21
Ethernet MAC Address Settings. . . . . . . . . . . . . . . . . . . 4-21
IP Settings. . . . . . . . . . . . . . . . . . . . . . . . . . . . . . . . . . 4-22
Network Address Translation (NAT) Default Settings. . . 4-31
Network Address Translation (NAT) Pinhole Settings . . 4-31
PPPoE Settings . . . . . . . . . . . . . . . . . . . . . . . . . . . . . . 4-33
Command Line Interface Preference Settings. . . . . . . . . 4-38
Port Renumbering Settings . . . . . . . . . . . . . . . . . . . . . . 4-38
SNMP Settings . . . . . . . . . . . . . . . . . . . . . . . . . . . . . . . 4-39
System Settings . . . . . . . . . . . . . . . . . . . . . . . . . . . . . . 4-40
Traffic Shaping Settings . . . . . . . . . . . . . . . . . . . . . . . . 4-42
Contents Cayman 2E-H User’s Guide
iv
November 2000

5 Monitoring
Your Cayman
2E-H
Displaying the Overview Status . . . . . . . . . . . . . . . . . . . . . . 5-2
Displaying the Diagnostic Log . . . . . . . . . . . . . . . . . . . . . . . 5-2
Displaying IP ARP Statistics . . . . . . . . . . . . . . . . . . . . . . . . . 5-4
Displaying IP Interface Statistics . . . . . . . . . . . . . . . . . . . . . . 5-4
Displaying IP Routes . . . . . . . . . . . . . . . . . . . . . . . . . . . . . . 5-5
Displaying DHCP Server Statistics. . . . . . . . . . . . . . . . . . . . . 5-5
Displaying DHCP Client Statistics . . . . . . . . . . . . . . . . . . . . . 5-6
Displaying Memory Statistics . . . . . . . . . . . . . . . . . . . . . . . . 5-7
Displaying Ethernet Statistics . . . . . . . . . . . . . . . . . . . . . . . . 5-7
Displaying PPPoE Statistics . . . . . . . . . . . . . . . . . . . . . . . . . 5-8
Using the Diagnose Utility . . . . . . . . . . . . . . . . . . . . . . . . . . 5-9
6 Updating Your
System
Software
A Technical
Specifications
B Diagnostic
Console
Using the Home Page to Install a New Image . . . . . . . . . . . . 6-1
Using the Installer to Install a New Image. . . . . . . . . . . . . . . 6-3
Using TFTP to Install a New Image . . . . . . . . . . . . . . . . . . . 6-4
Components . . . . . . . . . . . . . . . . . . . . . . . . . . . . . . . . . . . .A-1
Interfaces . . . . . . . . . . . . . . . . . . . . . . . . . . . . . . . . . . . . . . A-1
Power. . . . . . . . . . . . . . . . . . . . . . . . . . . . . . . . . . . . . . . . . A-1
Size. . . . . . . . . . . . . . . . . . . . . . . . . . . . . . . . . . . . . . . . . . . A-2
Environment . . . . . . . . . . . . . . . . . . . . . . . . . . . . . . . . . . . .A-2
Certifications . . . . . . . . . . . . . . . . . . . . . . . . . . . . . . . . . . . . A-2
About the Diagnostic Console . . . . . . . . . . . . . . . . . . . . . . .B-1
Connecting a Terminal to the Console Port. . . . . . . . . . . . . .B-2
Using the Diagnostic Console. . . . . . . . . . . . . . . . . . . . . . . .B-3
Diagnostic Console Commands . . . . . . . . . . . . . . . . . . . . . . B-3
Basic Commands. . . . . . . . . . . . . . . . . . . . . . . . . . . . . .B-4
Administration Commands. . . . . . . . . . . . . . . . . . . . . . .B-5
Boot Setting Commands . . . . . . . . . . . . . . . . . . . . . . . .B-7
C How Your
Cayman 2E-H
Works
Cayman 2E-H User’s Guide Contents
November 2000
About Network Address Translation . . . . . . . . . . . . . . . . . . . C-1
About Bridging . . . . . . . . . . . . . . . . . . . . . . . . . . . . . . . . . . C-2
TCP/IP Routing . . . . . . . . . . . . . . . . . . . . . . . . . . . . . . . C-2
Bridging . . . . . . . . . . . . . . . . . . . . . . . . . . . . . . . . . . . . C-2
v

About DHCP . . . . . . . . . . . . . . . . . . . . . . . . . . . . . . . . . . . .C-3
Cayman 2E-H as DHCP Server . . . . . . . . . . . . . . . . . . . .C-3
Cayman 2E-H as DHCP Client . . . . . . . . . . . . . . . . . . . .C-4
About PPP. . . . . . . . . . . . . . . . . . . . . . . . . . . . . . . . . . . . . .C-4
How PPP Works . . . . . . . . . . . . . . . . . . . . . . . . . . . . . .C-5
Phases of a PPP Link . . . . . . . . . . . . . . . . . . . . . . . . . . .C-5
PPP and Routing Tables. . . . . . . . . . . . . . . . . . . . . . . .C-10
About PPP over Ethernet (PPPoE) . . . . . . . . . . . . . . . . . . . C-13
Advantages of PPPoE. . . . . . . . . . . . . . . . . . . . . . . . . . C-13
PPP over Ethernet Stages . . . . . . . . . . . . . . . . . . . . . . . C-13
D For Older
Cayman 2E-H
Models
Glossary
Index
What Older Models Look Like . . . . . . . . . . . . . . . . . . . . . . D-1
Cayman 2E-H Home Page . . . . . . . . . . . . . . . . . . . . . . . . . D-2
Entering Serial Settings. . . . . . . . . . . . . . . . . . . . . . . . . . . . D-2
Contents Cayman 2E-H User’s Guide
vi
November 2000

Preface
About This
Manual
Who Should Read
This Manual
What This
Manual Covers
This manual describes how to connect your Cayman 2E-H to your
local area network (LAN) and wide area network (WAN) and how to
configure it to function as an Ethernet hub/router. You should read
this manual completely before you connect your Cayman 2E-H to
your Ethernet networks.
This manual is intended for network or system administrators
responsible for setting up and maintaining the hardware and
software to connect Ethernet networks.
Here’s what you will find in this manual:
Chapter 1, “About Your Cayman 2E-H,”
overview of the features, ports, and LEDs on your Cayman 2E-H.
presents an
Cayman 2E-H User’s Guide Preface
November 2000
Chapter 2, “Setting Up Your Cayman 2E-H,”
to unpack your Cayman 2E-H and how to connect and
disconnect it from your Ethernet networks.
Chapter 3, “Configuring Your Cayman 2E-H,”
how to use the web-based configuration interface to enter
operating settings for your Cayman 2E-H.
describes how
describes
vii

Chapter 4, “Using the Command Line Interface,”
how to use the text-based command line interface to enter
operating settings for your Cayman 2E-H.
describes
Chapter 5, “Monitoring Your Cayman 2E-H,”
describes how
to monitor the performance of your Cayman 2E-H.
Chapter 6, “Updating Your System Software,”
describes
how to install a new version of the Cayman 2E-H operating
software in your router.
Appendix A, “Technical Specifications,”
details hardware
specifications and certifications for the Cayman 2E-H.
Appendix B, “Diagnostic Console,”
describes how to
connect a terminal to the Cayman 2E-H maintenance console
port and how to use the Cayman 2E-H diagnostic console to
display and modify the device’s boot settings.
Appendix C, “How Your Cayman 2E-H Works,”
presents
background information on how the Cayman 2E-H supports
address mapping, bridging, and the Dynamic Host Control
Protocol (DHCP).
Appendix D, “For Older Cayman 2E-H Models,”
describes
how to configure PPP and serial port functions in older Cayman
2E-H models that have a serial port.
Documentation
This manual uses the following conventions to present information:
Conventions
Menu commands and button names appear in
serif
type face.
Computer display text appears in
User-entered text appears in
terminal type face
bold terminal type face
Preface Cayman 2E-H User’s Guide
viii
bold italic sans
.
.
November 2000

Syntax conventions for the Cayman 2E-H command line interface are
as follows:
Optional command arguments are presented in straight ([ ])
brackets.
Alternative values for an argument are presented in curly ({ })
brackets, with values separated with vertical bars (|).
Variables for which you must supply your own values are
presented in
italic terminal type face
.
Cayman 2E-H User’s Guide Preface
November 2000
ix

Preface Cayman 2E-H User’s Guide
x
November 2000

1
About Your Cayman
2E-H
The Cayman 2E-H combines an eight-port Ethernet hub with a
network router. The Cayman 2E-H connects the personal
computers, printers, and other network devices in a workgroup to
your corporate network, wide area network, or the Internet.
Segmenting your workgroups using the Cayman 2E-H ensures that
the impact on your corporate network is minimized while providing
the bandwidth needed for workgroup applications.
What’s New in
Release 5.6.2
Cayman 2E-H
Features
Support for RIP version 2 with MD5 authentication provides a
secure method of exchanging routing information with other
trusted routers while detecting and ignoring forged routing
messages sent from
Integrated 10BaseT eight-port Ethernet hub on the Cayman 2E-H
front panel lets you add or move workgroup network
connections quickly and easily.
SWIFT-IP™ means that installing the Cayman 2E-H consists of
connecting the device to your networks and entering a few basic
settings. You can install and configure the Cayman 2E-H in less
than 10 minutes.
Web-based browser configuration makes configuration and
management easy from anywhere on your network.
Cayman 2E-H User’s Guide About Your Cayman 2E-H
November 2000
1-1

Full-featured wide-area network bridge supports non-TCP/IP
protocols.
Network Address Translation (NAT) lets your workgroup
network share one IP address when communicating with other
hosts on your corporate network or the Internet.
Network Address Translation (NAT) conceals the topology of
your local area network from outside hackers while offering full
Internet access to LAN clients.
Dynamic Host Configuration Protocol (DHCP) client
functionality lets a host on your Wide Area Network configure
the IP address and other network settings for the WAN interface
on your Cayman 2E-H automatically.
DHCP server functionality lets the Cayman 2E-H automatically
configure the IP address and other network settings for
computers on your Local Area Network.
DHCP relay agent functionality lets devices on the Local Area
Network obtain network address information from a DHCP
server on the WAN without any user setup at the workstation.
IP pinholes let you provide web services from your Local Area
Network without sacrificing network security.
Bandwidth shaping lets carriers and service providers regulate
the amount of WAN traffic.
Support for Point-to-Point Protocol over Ethernet (PPPoE) lets
you connect to an Internet Service Provider using well-defined
protocols.
Diagnose utility simplifies identification and resolution of
network problems.
Cayman 2E-H configuration pages automatically warn you if an
administrator password has not been set.
Security features include restrictions on access to the Cayman
2E-H through its WAN port, limitations on packets addressed to
an interface’s broadcast address, and enhanced handling of
“spoofed” IP addresses.
About Your Cayman 2E-H Cayman 2E-H User’s Guide
1-2
November 2000

Ability to install new software images from the Cayman 2E-H
Home page.
Support for Checkpoint and Nortel Contivity virtual private
networks.
Support for negotiation of IPCP subnet allocation from a Remote
Access Server.
Configurable MAC address for WAN port.
Enhanced security, diagnostics, and error reporting for PPP and
PPPoE connections.
Support for a NAT default server lets your Cayman 2E-H direct
NAT traffic to a specified host on your network.
Cayman 2E-H
Front Panel
The front panel of your Cayman 2E-H (Figure 1-1) includes the
following LEDs and ports.
LAN 10BT
2
12345678
POWER WAN
Figure 1-1
The
Cayman 2E-H Front Panel
power LED
remains steadily on when you connect your
E-H
Cayman 2E-H to a power supply.
Eight 10BaseT Ethernet hub ports lets you connect network
devices within a workgroup. Each hub port has an
LED
that remains on when the Cayman 2E-H is connected to the
integrated
device and that flashes when a packet is sent or received over
the associated hub port.
Cayman 2E-H User’s Guide About Your Cayman 2E-H
November 2000
The
WAN LED
flashes when a packet is sent or received over the
wide area network (WAN) port.
1-3
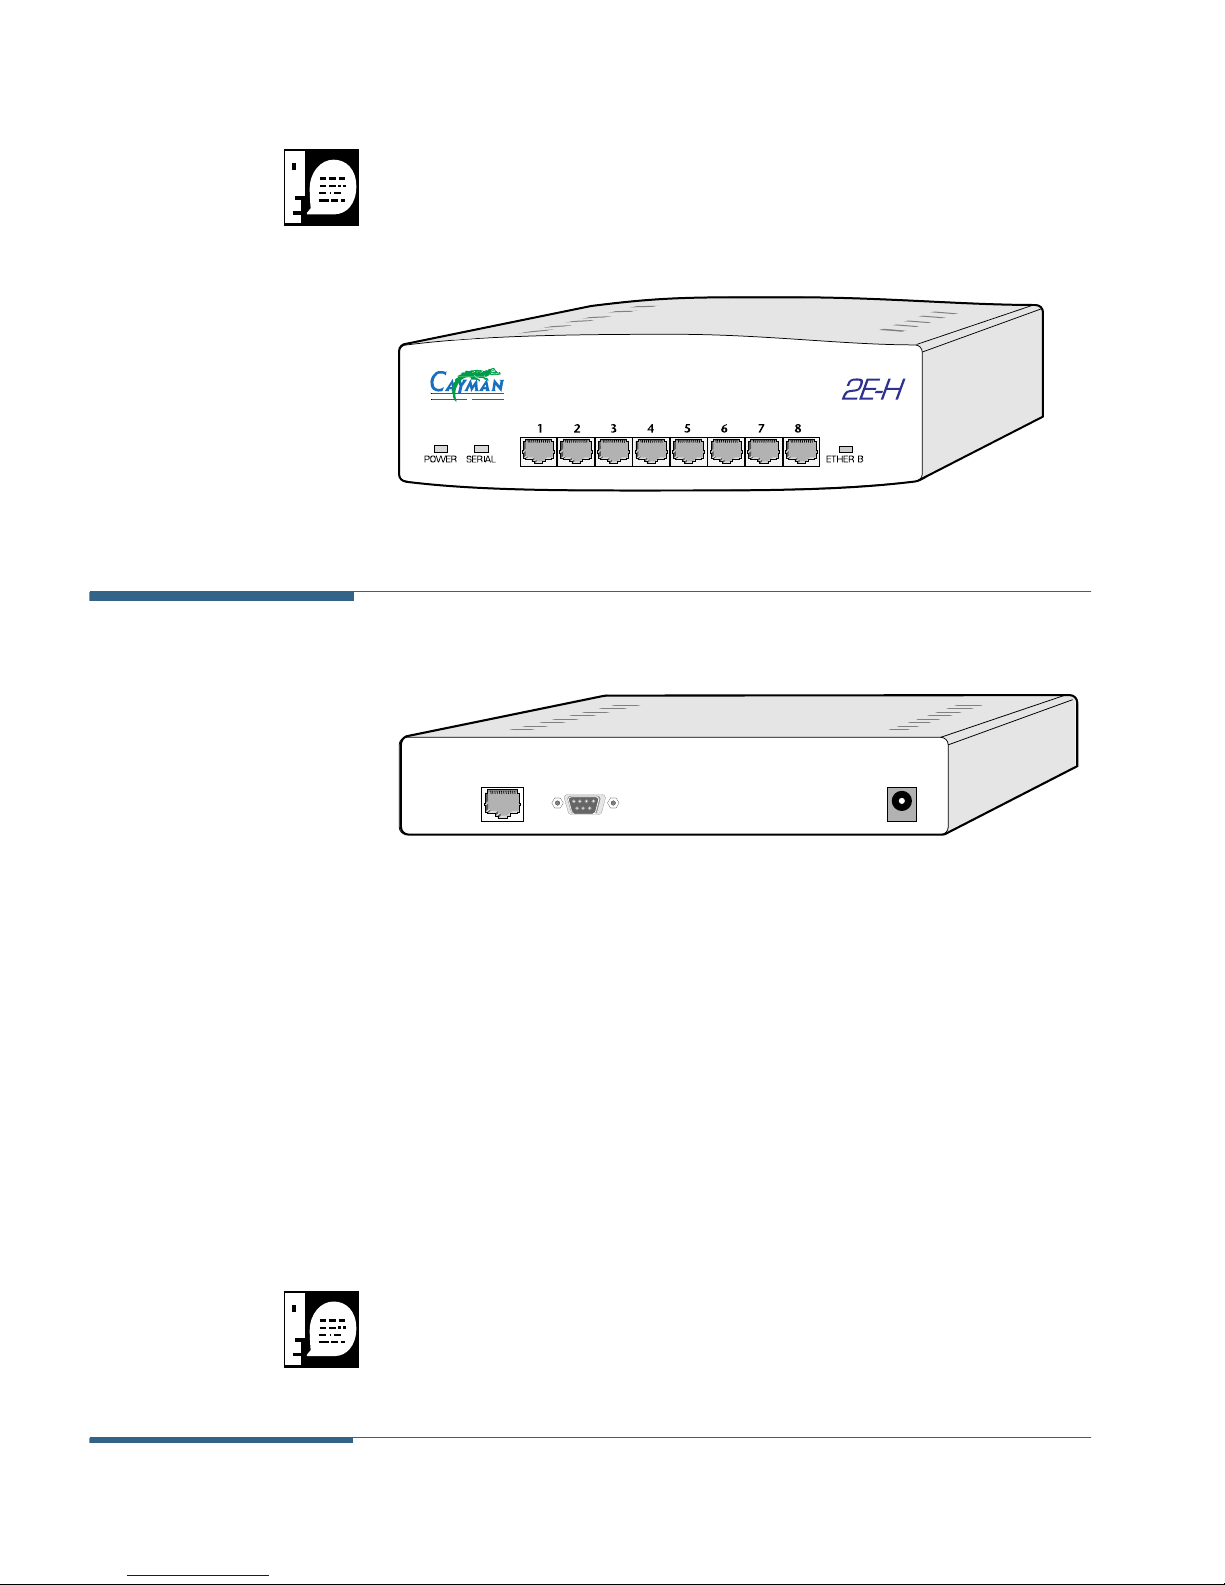
If your Cayman 2E-H has a Serial LED and looks like the device in
Figure 1-2, you have an older version of the Cayman 2E-H. If so, you
should consult Appendix D, “For Older Cayman 2E-H Models,” in
addition to the information in chapter 3 and 4.
T
EM
Y
S
S
S
Inc.
Figure 1-2 Older Model of Cayman 2E-H
Cayman 2E-H
Back Panel
The back panel of your Cayman 2E-H (Figure 1-3) includes three ports.
WAN 10BT
MAINTENANCE
CONSOLE
Figure 1-3 Cayman 2E-H Back Panel
The WAN 10BaseT port lets you connect your Cayman 2E-H to
9VDC
your WAN network through a cable modem, xDSL modem, or
backbone Ethernet link.
The maintenance console port lets you connect the Cayman
2E-H to a terminal or personal computer running a terminal
emulation application to configure its operating settings with
the command line interface (described in Chapter 4.)
The power port lets you connect the Cayman 2E-H to an electrical
power supply. Transformers for standard U.S. and international
power sources are available from your router vendor.
Using a transformer that has not been approved by your router
vendor will void your warranty. While non-approved power supplies
may appear compatible with the Cayman 2E-H power jack, they may
result in damage to your Cayman 2E-H.
About Your Cayman 2E-H Cayman 2E-H User’s Guide
1-4
November 2000

2 Setting Up Your
Cayman 2E-H
Unpacking Your Cayman 2E-H
Connecting Your Cayman 2E-H
Disconnecting Your Cayman 2E-H
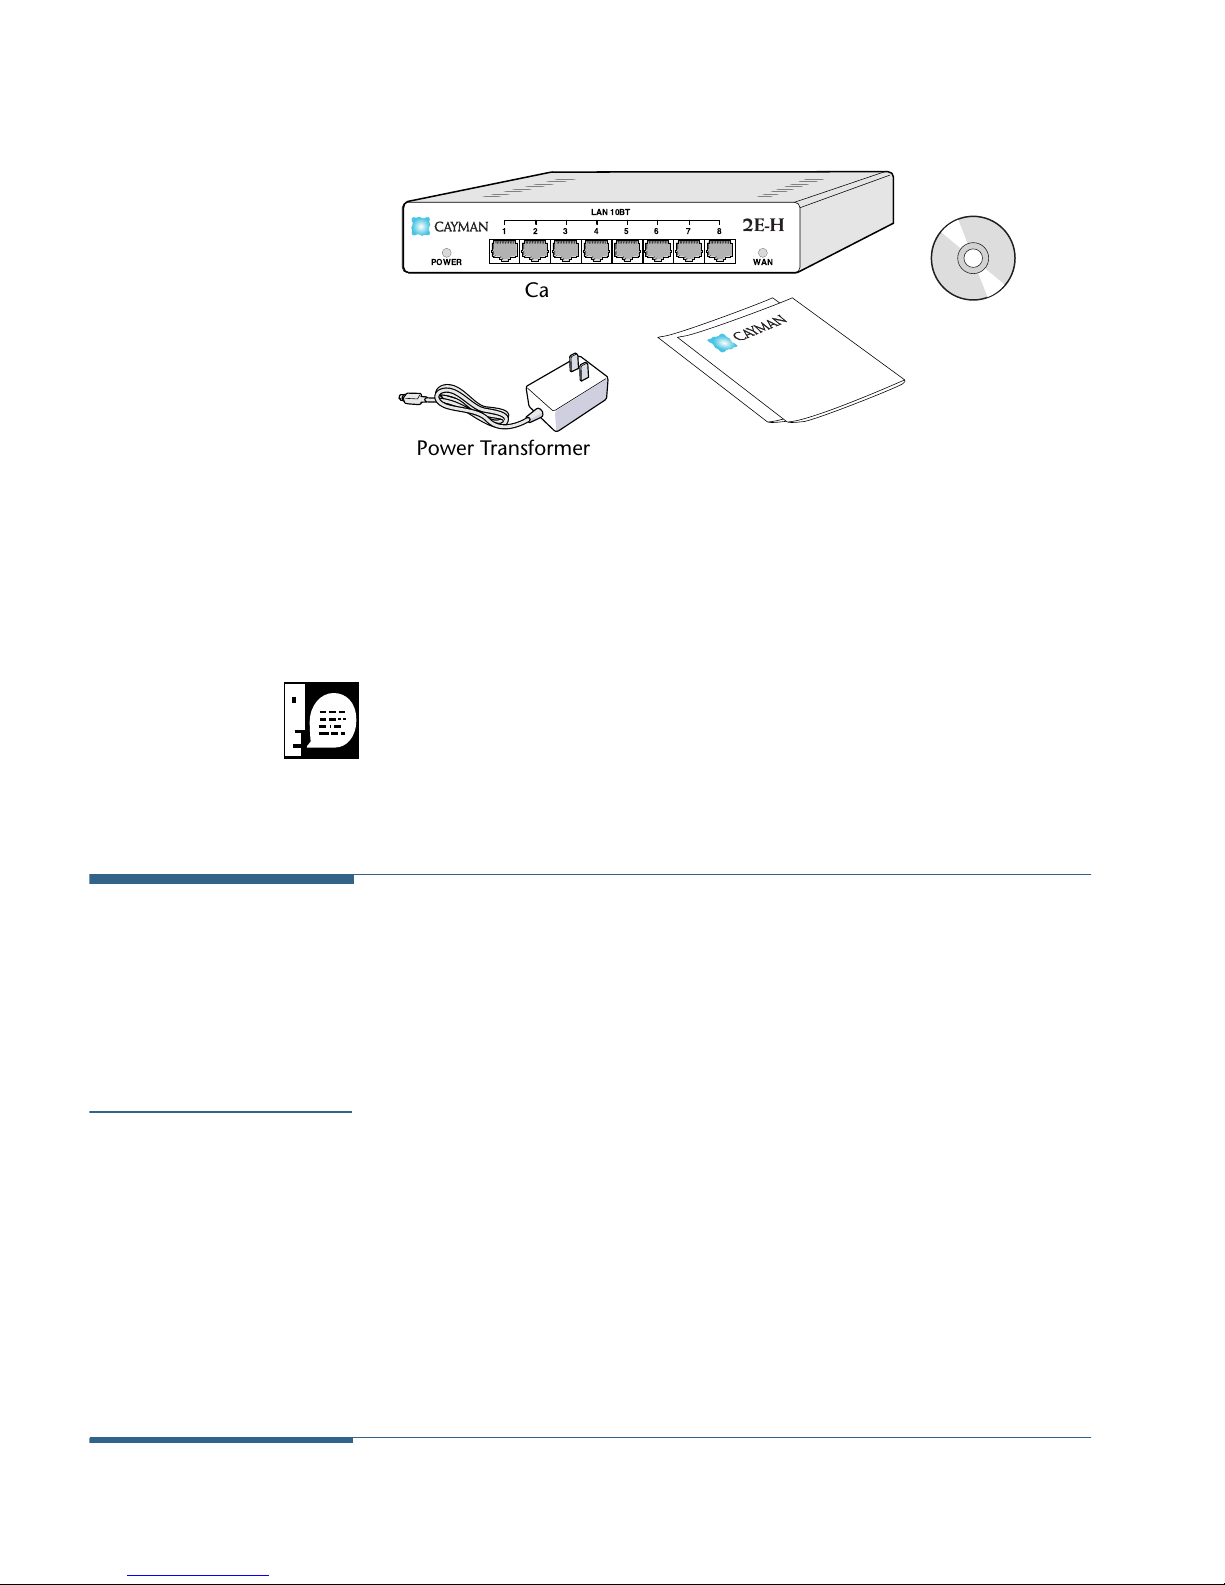
Unpacking Your
Cayman 2E-H
The first thing you should do when you receive the Cayman 2E-H
package is confirm that you have everything you should. Remove all
the materials from the shipping carton and verify that you have the
following:
The Cayman 2E-H server in a protective bag
Power transformer (U.S. or international)
Cayman 2E-H installation CD-ROM
Cayman 2E-H QuickStart
Cayman 2E-H User’s Guide Setting Up Your Cayman 2E-H
November 2000 2-1
12345678
LAN 10BT
POWER WAN
Cayman Gateway
E-H
2
Getting Started
with the
Cayman 2E-H
Cayman Software
and Documentation
Connecting Your
Cayman 2E-H
Power Transformer
Figure 2-1 Cayman 2E-H Package Components
Cayman QuickStart &
Other Documentation
Your Cayman 2E-H shipping carton may also include release notes
and other materials. If your shipping carton does not contain
everything on this list, contact your hardware vendor.
Keep the shipping carton and all the packing materials used
to ship your Cayman 2E-H. Repack your Cayman 2E-H in its
original carton if you have to move it over long distances or
if you need to ship it to another location.
The 10Base-T Ethernet ports on the front panel of the Cayman 2E-H
let you connect the personal computers, printers, and other
network devices in your workgroup. The 10Base-T Ethernet ports on
the rear panel of the Cayman 2E-H are used to connect the device to
your corporate network, wide area network, or the Internet.
Step 1: Position the
Cayman 2E-H
Position the Cayman 2E-H in a location where air can circulate freely
around it. The Cayman 2E-H case has vents on its top and bottom.
Leave at least two (2) inches of clearance between the vents on the
top of the Cayman 2E-H and any object that might restrict air flow.
Never operate the Cayman 2E-H when its vents are covered or
obstructed.
Setting Up Your Cayman 2E-H Cayman 2E-H User’s Guide
2-2 November 2000
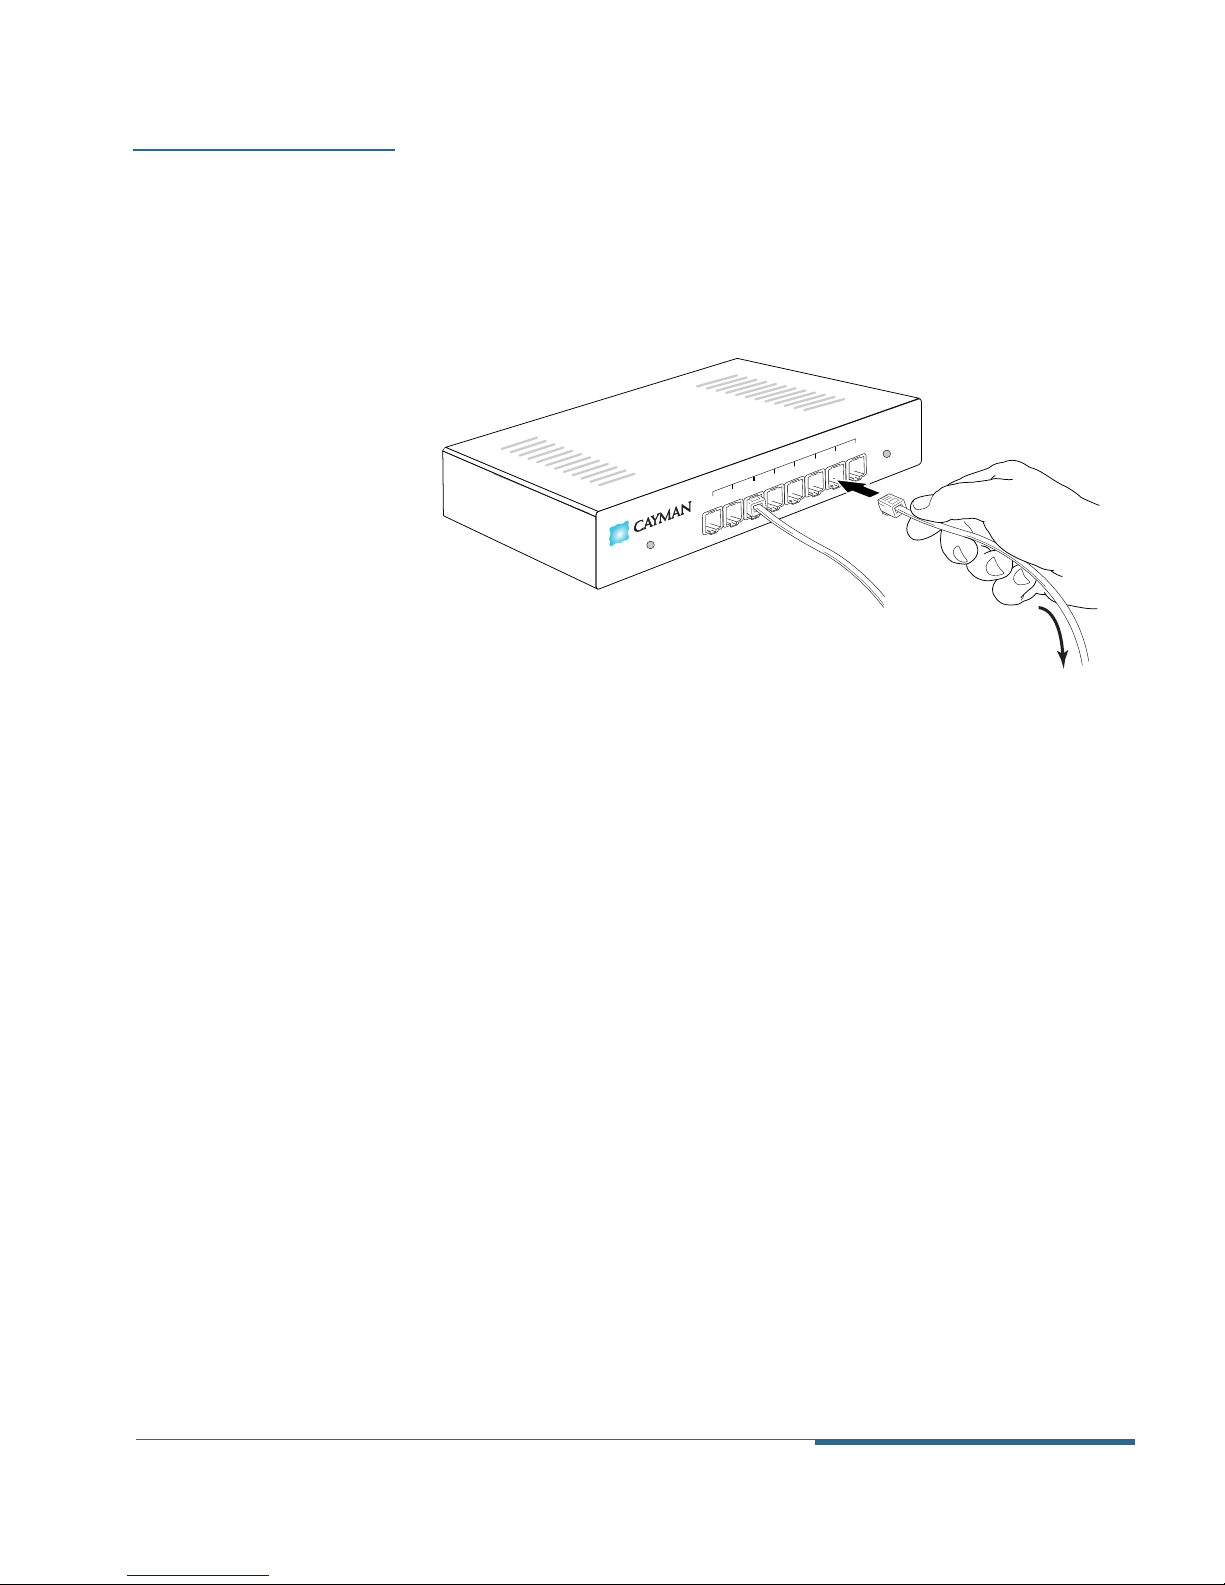
Step 2: Connect
Your Local Devices
Insert one end of a twisted-pair cable in one of the ports labeled LAN
10BT on the Cayman 2E-H front panel until you feel it lock (Figure
2-1). Connect the other end of the cable to the Ethernet port on a
personal computer or other networked device. You can connect
your network devices to any of the Cayman 2E-H Ethernet hub ports.
2E-H
8
7
6
5
WAN
Power
LAN 10BT
4
3
2
1
To PC or
Other Networked Device
Figure 2-1 Connecting the Cayman 2E-H to Your LAN
If you require more than eight Ethernet hub ports, you can connect
your Cayman 2E-H to another Ethernet hub. To do so, use a standard
twisted-pair Ethernet cross-over cable to connect any LAN port on
the Cayman 2E-H to any Ethernet port on the other hub.
Cayman 2E-H User’s Guide Setting Up Your Cayman 2E-H
November 2000 2-3

Step 3: Connect
Your Wide Area
Network
Insert one end of a twisted-pair cable in the port labeled WAN 10BT
on the Cayman 2E-H back panel until you feel it lock (Figure 2-2).
Connect the other end of the cable to the Ethernet hub, cable
modem, or xDSL modem that links you to your corporate network,
wide area network, or the Internet.
9VDC
MAINTENANCE
CONSOLE
DSL
To Your
Wide Area Network
(Cable Modem, xDSL Modem)
Figure 2-2 Connecting Your Cayman 2E-H to Your WAN
Step 4: Power On
the Cayman 2E-H
Plug the round end of the transformer cord into the power jack on
the back panel of the Cayman 2E-H (Figure 2-3).
9VDC
MAINTENANCE
CONSOLE
WAN 10BT
To Power
Outlet
Figure 2-3 Connecting Your Cayman 2E-H to a Power Supply
After you have connected the transformer to the Cayman 2E-H, plug
the pronged end of the transformer cord into a 110-120 volt AC
outlet (or the electrical power outlet appropriate to your location).
Users outside the United States may need a transformer compatible
with local electrical power specifications. Contact your authorized
router vendor for information on appropriate transformers.
Setting Up Your Cayman 2E-H Cayman 2E-H User’s Guide
2-4 November 2000

Disconnecting
Your Cayman
2E-H
Complete the following steps to disconnect your Cayman 2E-H from
your Ethernet networks. Return the Cayman 2E-H to its original
carton if you are moving it to a different location.
1. Warn and disconnect network users.
Before you disconnect the Cayman 2E-H, let your network users
know that remote access services will be interrupted
temporarily.
2. Unplug the Cayman 2E-H power supply.
Unplug the Cayman 2E-H transformer from the wall outlet. After
you have unplugged the transformer from its wall outlet,
disconnect the transformer from the Cayman 2E-H.
3. Disconnect the Cayman 2E-H from your local Ethernet
devices.
Disconnect the Ethernet cables from the LAN ports on the
Cayman 2E-H front panel.
4. Disconnect the Cayman 2E-H from your WAN network.
Disconnect the Ethernet cable from the WAN port on the
Cayman 2E-H back panel.
Cayman 2E-H User’s Guide Setting Up Your Cayman 2E-H
November 2000 2-5

Setting Up Your Cayman 2E-H Cayman 2E-H User’s Guide
2-6 November 2000

3 Configuring Your
Cayman 2E-H
Gathering Configuration Information
Configuring Your Computer
Opening a Web Connection
Entering Basic Settings
Entering LAN (Ethernet A) Settings
Entering WAN (Ethernet B) Settings
Configuring Password Settings
Configuring Pinhole Settings
Configuring SNMP Settings
Cayman 2E-H User’s Guide Configuring Your Cayman 2E-H
November 2000 3-1

Gathering
Configuration
Information
Before you configure your Cayman 2E-H, you need to gather
information about your networks. Most users will only need to
complete the QuickStart section.
For many users, the default (or factory) configuration of the
product will provide all the necessary services. Some WAN
service providers may require settings that vary from the
default configuration. In such cases, you should contact the
service provider or network administrator and have them
complete the Quickstart form below.
QuickStart
Information
You can print the following table and use it to enter information in
the Cayman 2E-H QuickStart window.
Field Name Description
System Name
The name used to identify
your Cayman 2E-H on your
network. Default is
Your
Information
2E<serialnumber>
Ethernet B
(WAN) Local
Address
The IP address assigned to
Ethernet Port B on your
Ethernet network. Default is
0.0.0.0.
Ethernet B
(WAN) Net
Mask
Default
Gateway
Subnet mask in use for the
network connected to
Ethernet Port B. Default is
typically
IP address of the host to which
the Cayman 2E-H should send
network traffic when it can't
find the destination host. Blank
by default.
255.255.255.0.
Domain
Name
Configuring Your Cayman 2E-H Cayman 2E-H User’s Guide
3-2 November 2000
The name of the DNS domain
you access most frequently.
Blank by default.

Field Name Description
Your
Information
LAN Port (Ethernet
A) Information
(Optional)
Primary
Nameserver
Address
Secondary
Nameserver
Address
The IP address of the primary
DNS name server for your
network. Default is
The IP address of the backup
DNS name server for your
network. Default is
0.0.0.0.
0.0.0.0.
If you want to customize the settings for the LAN (Ethernet A)
interface on your Cayman 2E-H, print the following table and use it
to enter information in the Cayman 2E-H LAN Ethernet window.
Some fields listed in the table only appear after you click the Expert
Mode button on the Cayman 2E-H Home window.
Field Name Description
Local Address
The IP address of the Cayman
2E-H on the network
connected to its LAN (Ethernet
A) port. Default is
Your
Information
192.168.1.254.
Net Mask
DHCP Mode
(expert mode)
Subnet mask in use for the
network connected to the LAN
(Ethernet A) port. Default is
typically
255.255.255.0.
Off – Disable DHCP server.
Server – Cayman 2E-H uses
DHCP to provide network
configuration information to
hosts on the Local Area
Network.
setting.
Server is the default
Relay-agent – Cayman 2E-H
forwards DHCP requests and
responses to a remote DHCP
server.
Cayman 2E-H User’s Guide Configuring Your Cayman 2E-H
November 2000 3-3

Field Name Description
Your
Information
Start Address
(expert mode)
End Address
(expert mode)
Lease Time
(expert mode)
The first IP address the
Cayman 2E-H should assign for
Dynamic Host Control
Protocol clients. Applicable
when DHCP Mode is set to
Server. Default is
192.168.1.1.
The last IP address the Cayman
2E-H should assign for
Dynamic Host Control
Protocol clients. Applicable
when DHCP Mode is set to
Server. Default is
192.168.1.254.
The time, in DD:HH:MM:SS
format, for which a
configuration issued by the
Cayman 2E-H DHCP server is
valid. Applicable when DHCP
Mode is set to
is
00:01:00:00 (one hour).
Server. Default
Server
Address
(expert mode)
The IP address the remote
DHCP server to which your
Cayman 2E-H will relay
Dynamic Host Control
Protocol address requests.
Applicable when DHCP Mode
is set to
Relay-agent.
Configuring Your Cayman 2E-H Cayman 2E-H User’s Guide
3-4 November 2000

WAN (Ethernet B)
Port Information
(Optional)
If you want to customize the settings for the WAN (Ethernet B) port
on your Cayman 2E-H, print the following table and use it to enter
information in the Cayman 2E-H Ethernet B (WAN) Configuration
window.
Field Name Description
Local Address
The IP address of the Cayman
2E-H on the network
connected to the WAN
(Ethernet B) port. Default is
0.0.0.0.
Net Mask
Subnet mask in use for the
network connected to the
WAN (Ethernet B) port.
Default is typically
255.255.255.0.
Network
Address
Translation
(NAT) On/Off
Specifies whether the Cayman
2E-H will perform Network
Address Translation. This
feature hides the IP addresses
of the PCs on the LAN from
the wide area network and the
Internet. Unless specifically
instructed, you should leave
this feature on, as it provides
additional security to your
LAN. Default is
Your
Information
On.
Configuring Your
Computer
Cayman 2E-H User’s Guide Configuring Your Cayman 2E-H
November 2000 3-5
The following instructions assume that you want all devices on your
workgroup Ethernet network to use IP addresses on the 192.168.1.0
network. If your workgroup network must use another network
number, refer to Entering LAN (Ethernet A) Settings on page 3-15
for information on how to change the IP address of the LAN interface
for the Cayman 2E-H.

1. Configure your computer to use an IP address on the
same TCP/IP network as the Cayman 2E-H.
If you are using Windows 95/Windows 98/Windows NT:
a. Open the Network Control Panel and select the TCP/IP
service for the Ethernet card in your computer (for
example, TCP/IP ->3Com EtherLink III).
b. Open the Properties window.
c. Click the Gateways tab, and remove any installed
gateways.
d. Click the DNS Configuration tab, and disable DNS.
e. Click the IP Address tab, and click the Obtain an IP
Address Automatically option button.
f. Click OK to save the modified TCP/IP settings.
If you are using a Macintosh running Open Transport:
a. Open the TCP/IP Control Panel.
b. Choose Connect via Ethernet.
c. Choose Configure Using DHCP Server and enter the IP
address of the Cayman 2E-H (192.168.1.254) in the
Name Server Address text box.
d. Click OK.
If you are using a Macintosh running MacTCP:
a. Open the MacTCP Control Panel and select the
Ethernet interface icon.
b. Enter 192.168.1.x (where x is any number in the range
1-253) in the IP Address text field.
Configuring Your Cayman 2E-H Cayman 2E-H User’s Guide
3-6 November 2000
c. Click the More button.

d. Click the Obtain Address Manually radio button.
e. Enter 192.168.1.254 in the Gateway Address text field.
f. Pull down the Class dropdown list and choose C, which
sets your subnet mask to 255.255.255.0.
g. In the Domain Name Server Information fields, enter
your Internet Service Provider’s domain name in the
Domain text field and enter 192.168.1.254 in the IP
Address text field.
2. Restart your computer.
3. Configure each computer that will use the Cayman 2E-H’s
address sharing feature to use DHCP, as described in Step
1, above.
Configure devices that will not use DHCP with static IP
addresses on the same network as the Cayman 2E-H. Restart
each device after you have updated its TCP/IP configuration.
Opening a Web
Connection
You use a Web browser, such as Netscape Navigator or Microsoft
Internet Explorer, to open a connection to your Cayman 2E-H.
To open a connection to your Cayman 2E-H:
1. Run your Web browser.
2. Enter the name or IP address of your Cayman 2E-H in the
browser's Open Location window and press Enter.
For example, you would enter http://192.168.1.254/ if your
Cayman 2E-H is using its default IP address. You can enter
http://2e/ if your computer has been configured to use DHCP
address assignment.
Cayman 2E-H User’s Guide Configuring Your Cayman 2E-H
November 2000 3-7
3. If an administrator or user password has been assigned to
the Cayman 2E-H, enter your name and the appropriate
password and click OK.
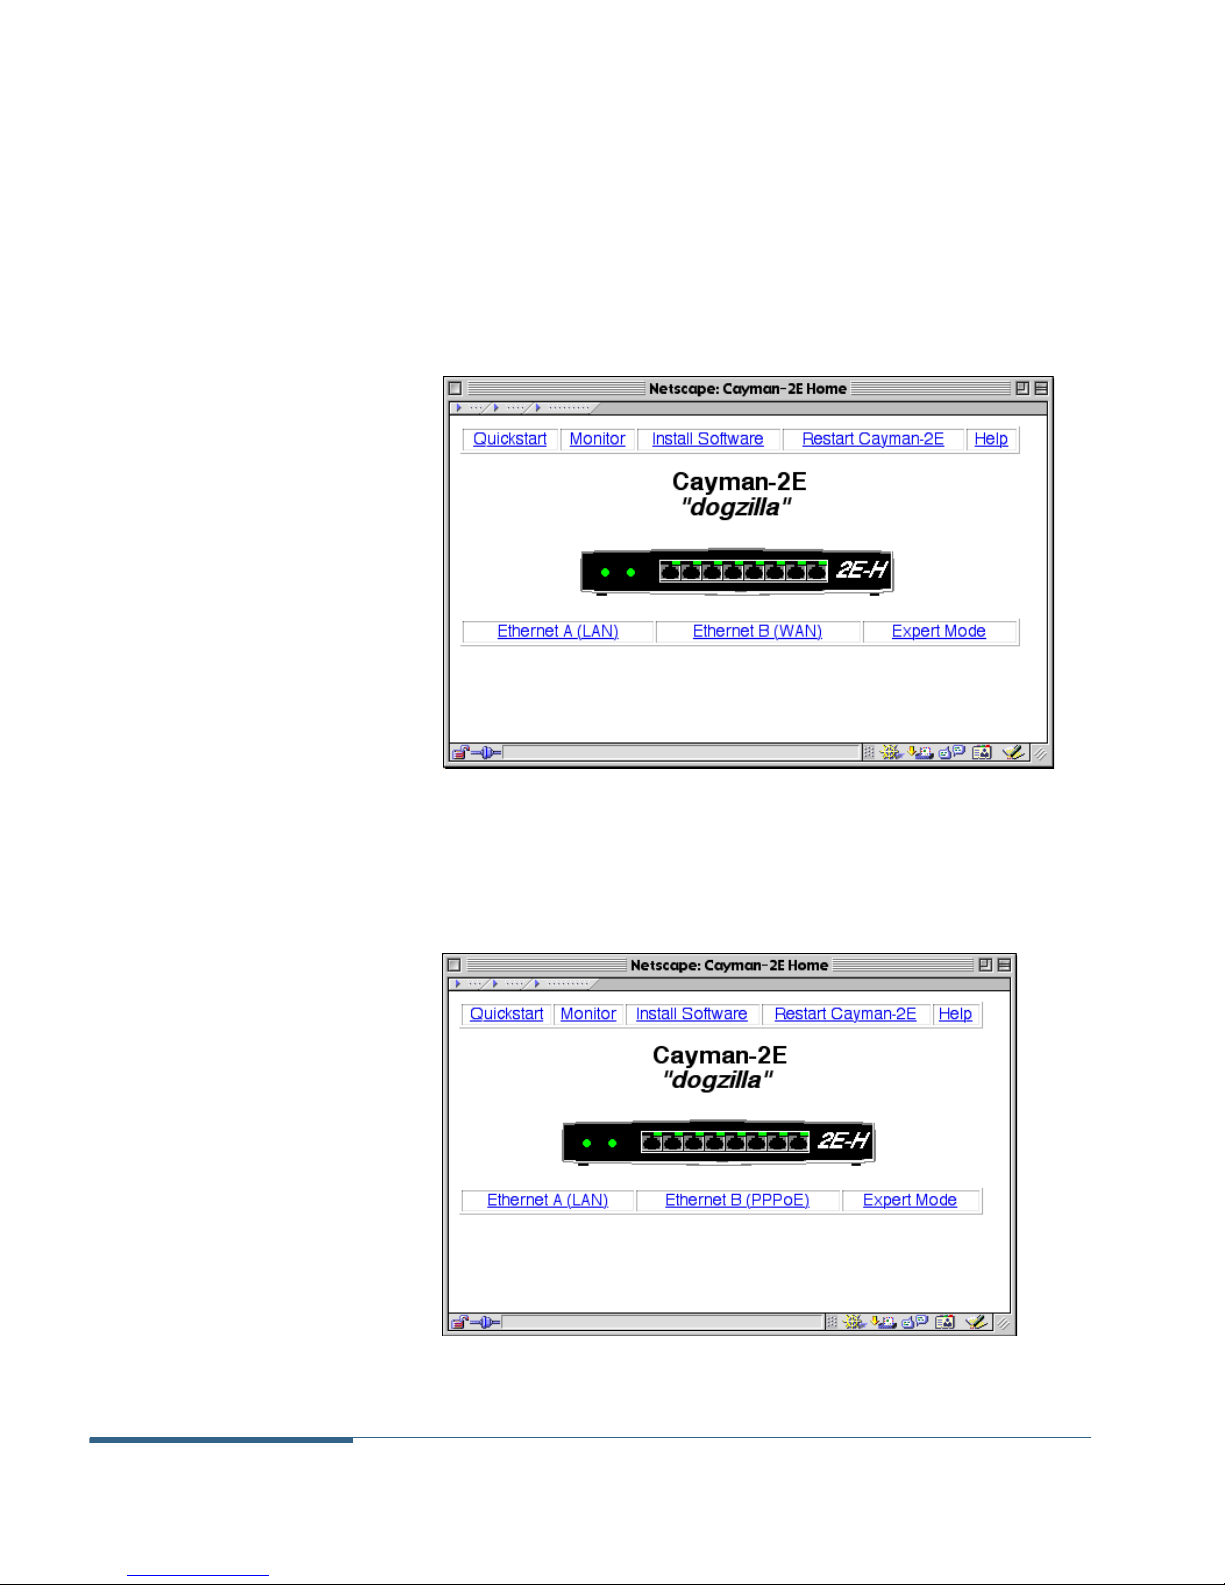
The Cayman 2E-H Home window (Figure 3-1) opens. By default,
you are in Novice Mode and PPP over Ethernet (PPPoE) is turned
off, which is appropriate for most users.
Figure 3-1 Cayman 2E-H Home Window (Novice Mode)
If you enable PPPoE, the Cayman 2E-H Home window refers to
the WAN port as Ethernet B (PPPoE) instead of Ethernet B
(WAN) (Figure 3-2).
Figure 3-2 Cayman 2E-H Home Window (PPPoE turned off)
Configuring Your Cayman 2E-H Cayman 2E-H User’s Guide
3-8 November 2000
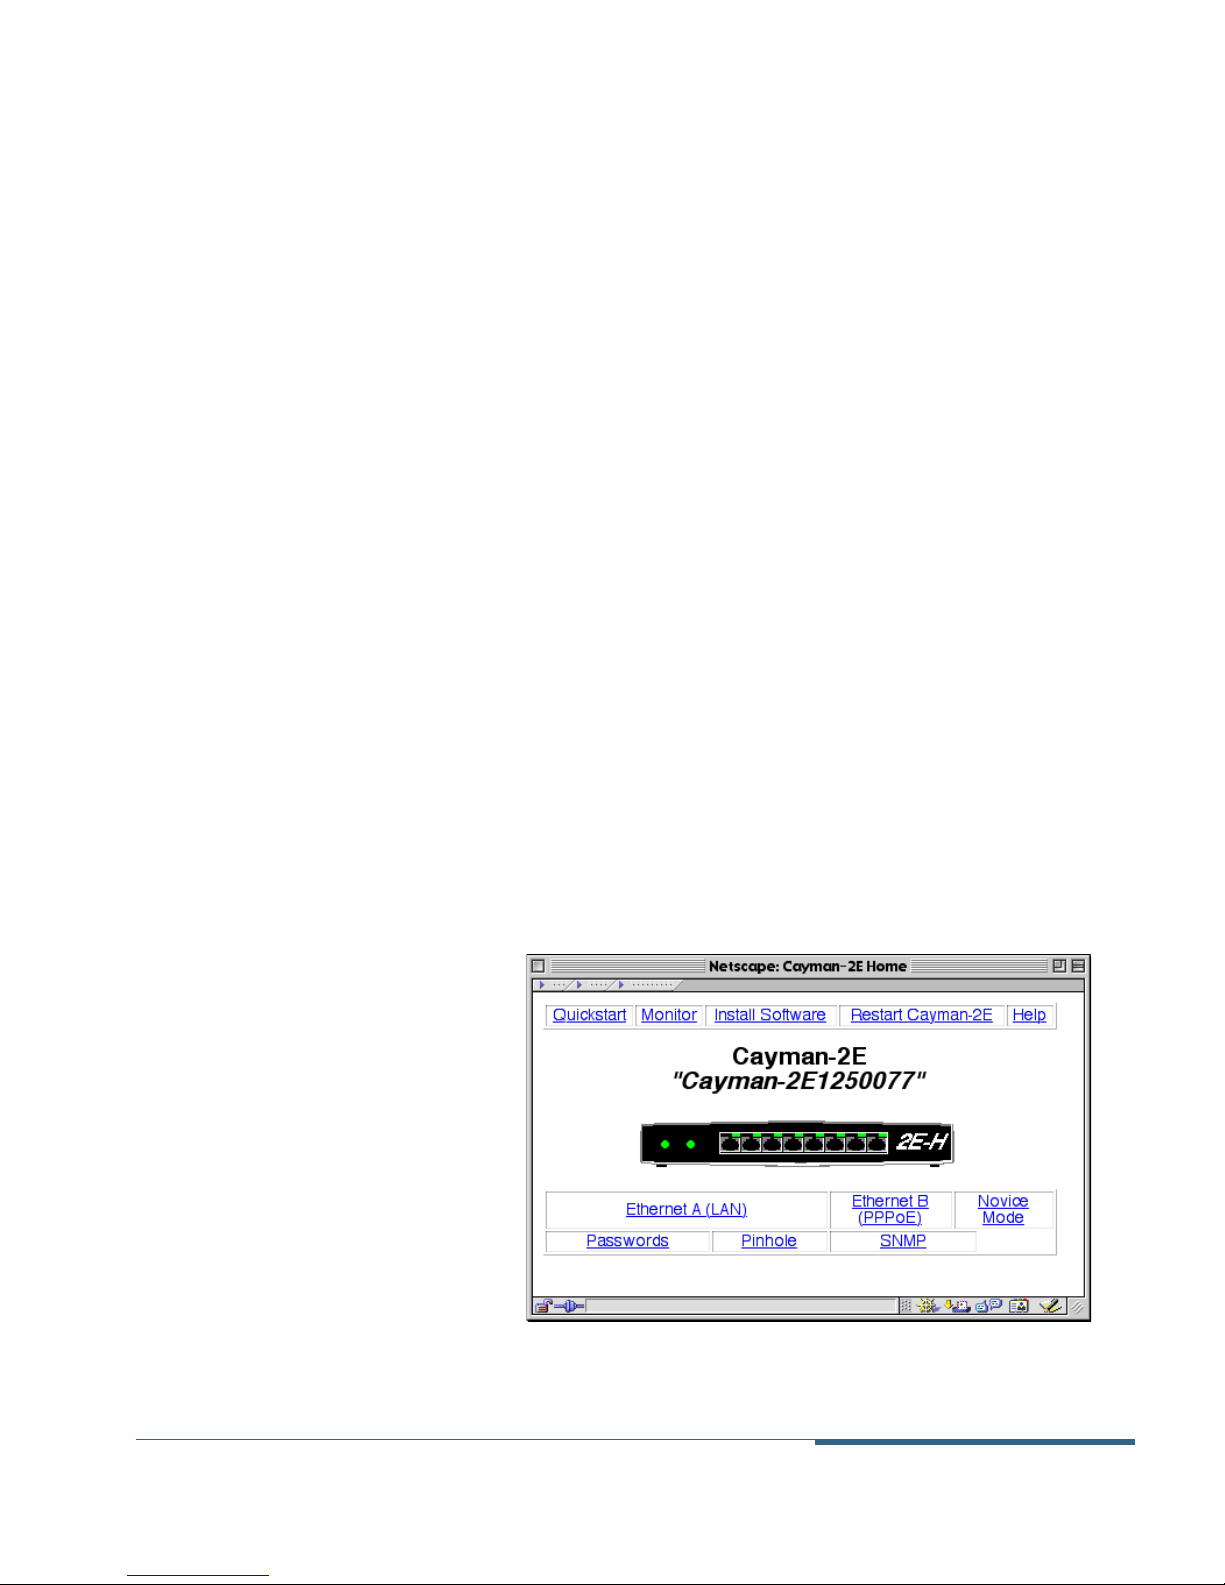
4. Use the buttons on the Cayman 2E-H Home Page to issue
a command or open a window.
The Quickstart button opens the QuickStart window,
which lets you enter basic settings for your Cayman 2E-H.
The Monitor button opens the Monitor window, which lets
you display operating statistics for your Cayman 2E-H.
The Install Software button opens the Install New Cayman
Software window, which lets you install new operating
system software in your Cayman 2E-H.
The Restart Cayman-2E button restarts your Cayman 2E-H,
causing it to load any updated configuration information.
The Help button opens a window explaining how to access
the Cayman 2E-H online help system.
The Ethernet A (LAN) button opens the Ethernet A window,
which lets you configure TCP/IP address settings for the
Ethernet A port on the Cayman 2E-H.
The Ethernet B (WAN)/Ethernet B (PPPoE) button opens
the Ethernet B window, which lets you configure TCP/IP
address settings for the Ethernet B port on the Cayman 2E-H.
The Expert Mode button adds three additional buttons
(Passwords, Pinhole, and SNMP) to the Cayman 2E-H Home
page (Figure 3-3). Under normal circumstances, you do not
need to modify these settings.
Figure 3-3 Cayman 2E-H Home Window (expert mode)
Cayman 2E-H User’s Guide Configuring Your Cayman 2E-H
November 2000 3-9
Entering Basic
Settings
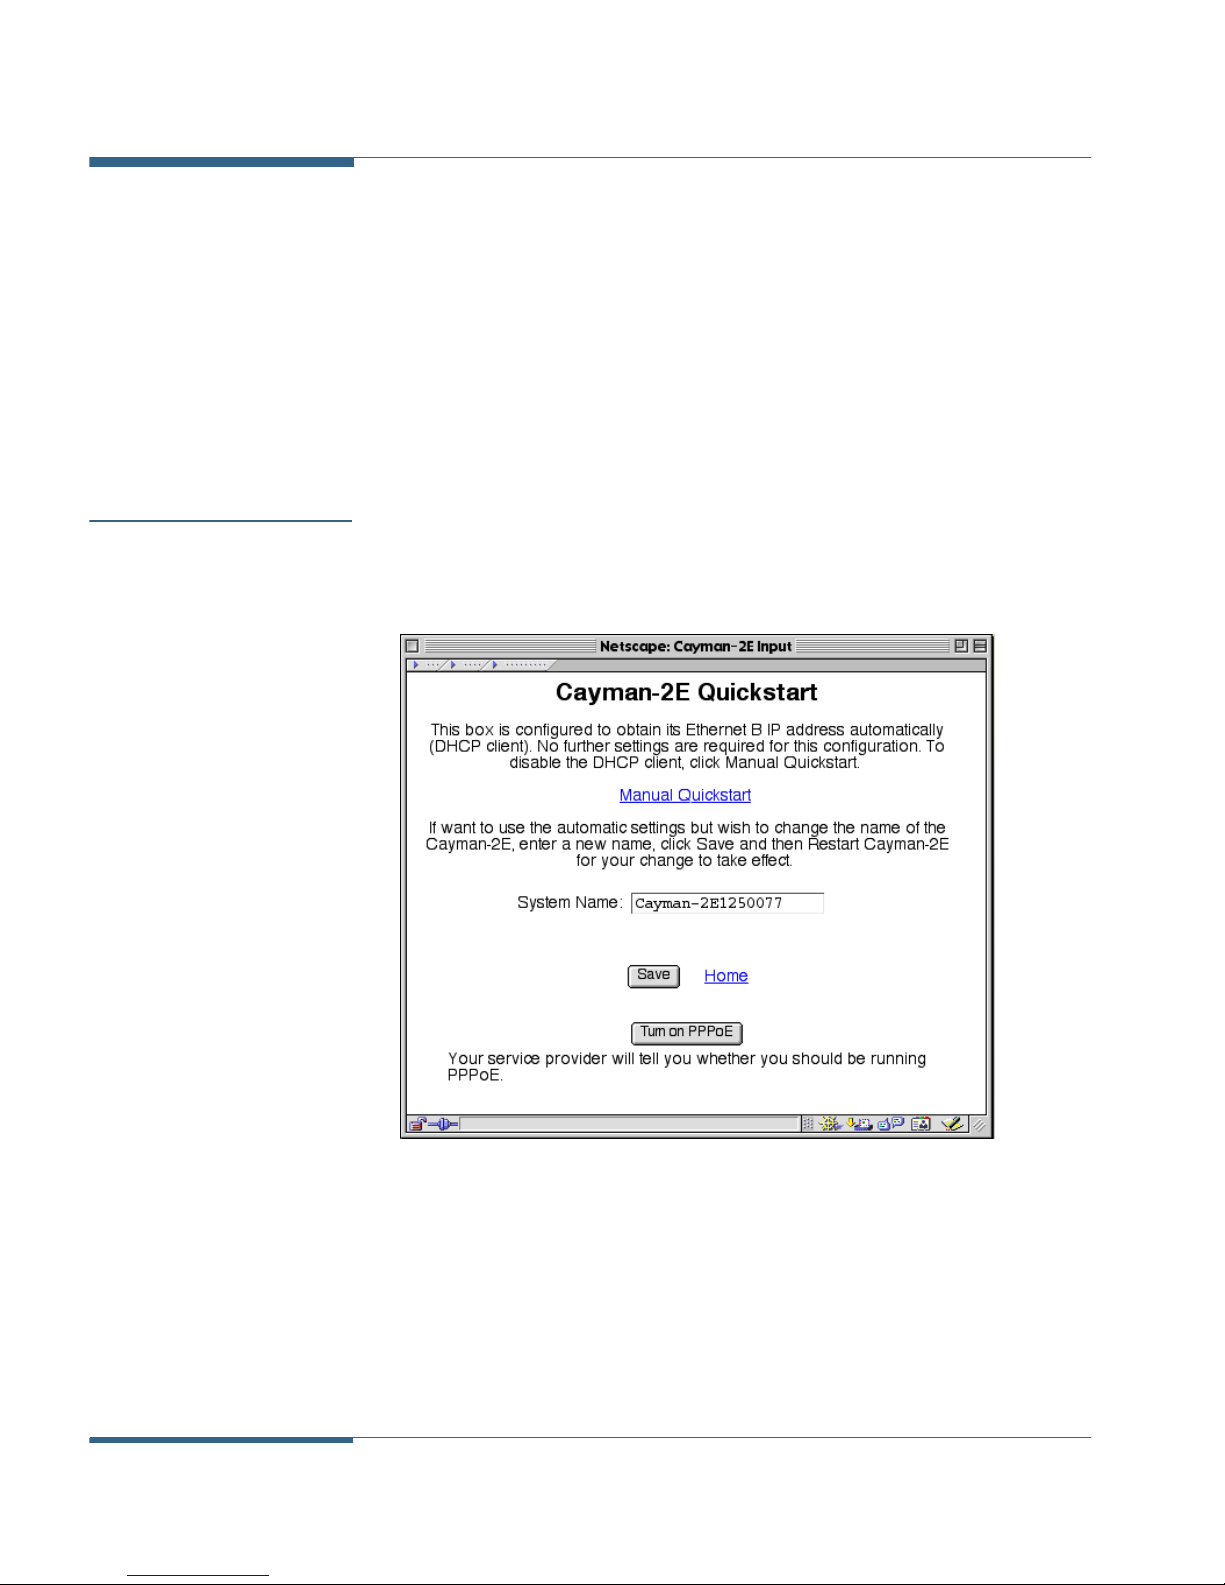
The Cayman 2E-H QuickStart window lets you enter basic
configuration information for your Cayman 2E-H. If you use the
default settings for IP address information for the device's WAN
(Ethernet B) port, the Cayman 2E-H QuickStart window asks you
only for the name you want to assign your Cayman 2E-H. If you have
overridden the default settings for IP address information for
Ethernet Port B and entered IP address information manually, you
can use the Cayman 2E-H QuickStart window to display and modify
those settings.
QuickStart (PPPoE
Off)
To display the QuickStart window (Figure 3-4), click the QuickStart
button on the Cayman 2E-H Home Page.
Figure 3-4 QuickStart Window (PPPoE Off)
Configuring Your Cayman 2E-H Cayman 2E-H User’s Guide
3-10 November 2000
 Loading...