

Page 1

Quick Installation Guide
SMP-WEB Series ● Professional Digital Signage Media Player
►► Hardware Installation
➀ Open SMP package.
➁ Connect the power adapter to a socket, and change
the voltage switch to your country’s setting.
(Default 220V. This step is only for SMP-WEB+.)
➂ Connect the VGA cable to your screen. (The
default screen resolution is 800x600.)
➃ Connect the Ethernet to LAN port. (By default,
SMP will get an IP address from a DHCP server.)
➄ If you need to apply a static IP address to this SMP
client, please connect a keyboard and a mouse to
any of the USB connectors.
➅ Press the power button to turn on the system.
►► Use of Web Manager
The following steps will be different based on your
own network environment.
▌Case I: DHCP (Auto IP)
❶ You can begin to manage this player on any PC
which connects to network and in the same LAN
(Local Area Network) as this SMP player.
❷ Insert the product CD into your CD-ROM, and run
Cayin Device Seeker (\Tool\Device
Seeker\cysrch.exe). You can also copy this file to
your PC for future management.
❸ Click Seek and the seeker will search all available
SMP clients or CMS servers in the same LAN.
When the devices are found, select the one you
want to connect, and click Open Web.
❹ Now, you will link to the Web Manager of that
SMP client. Click LOGIN on the page, and enter a
user name and password.
Default Username: webadmin
Default Password: admin
❺ After logging in, you will see the system status of
this SMP client on the first page.
❻ The default language of Web Manager is English.
We provide five other languages: French, German,
Spanish, Traditional Chinese and Simplified
Chinese. You can switch to a suitable one in the
“SYSTEM” section.
You can also configure other system or network
settings in respective sections if necessary.
❼ Before editing the playlist, we suggest you upload
all files into the Media Folder first.
Open Cayin Device Seeker (see step ❷) and click
Open Folder.
Your PC will open File Explorer, so you can
upload all files from your PC to the SMP player
via Network Neighborhood.
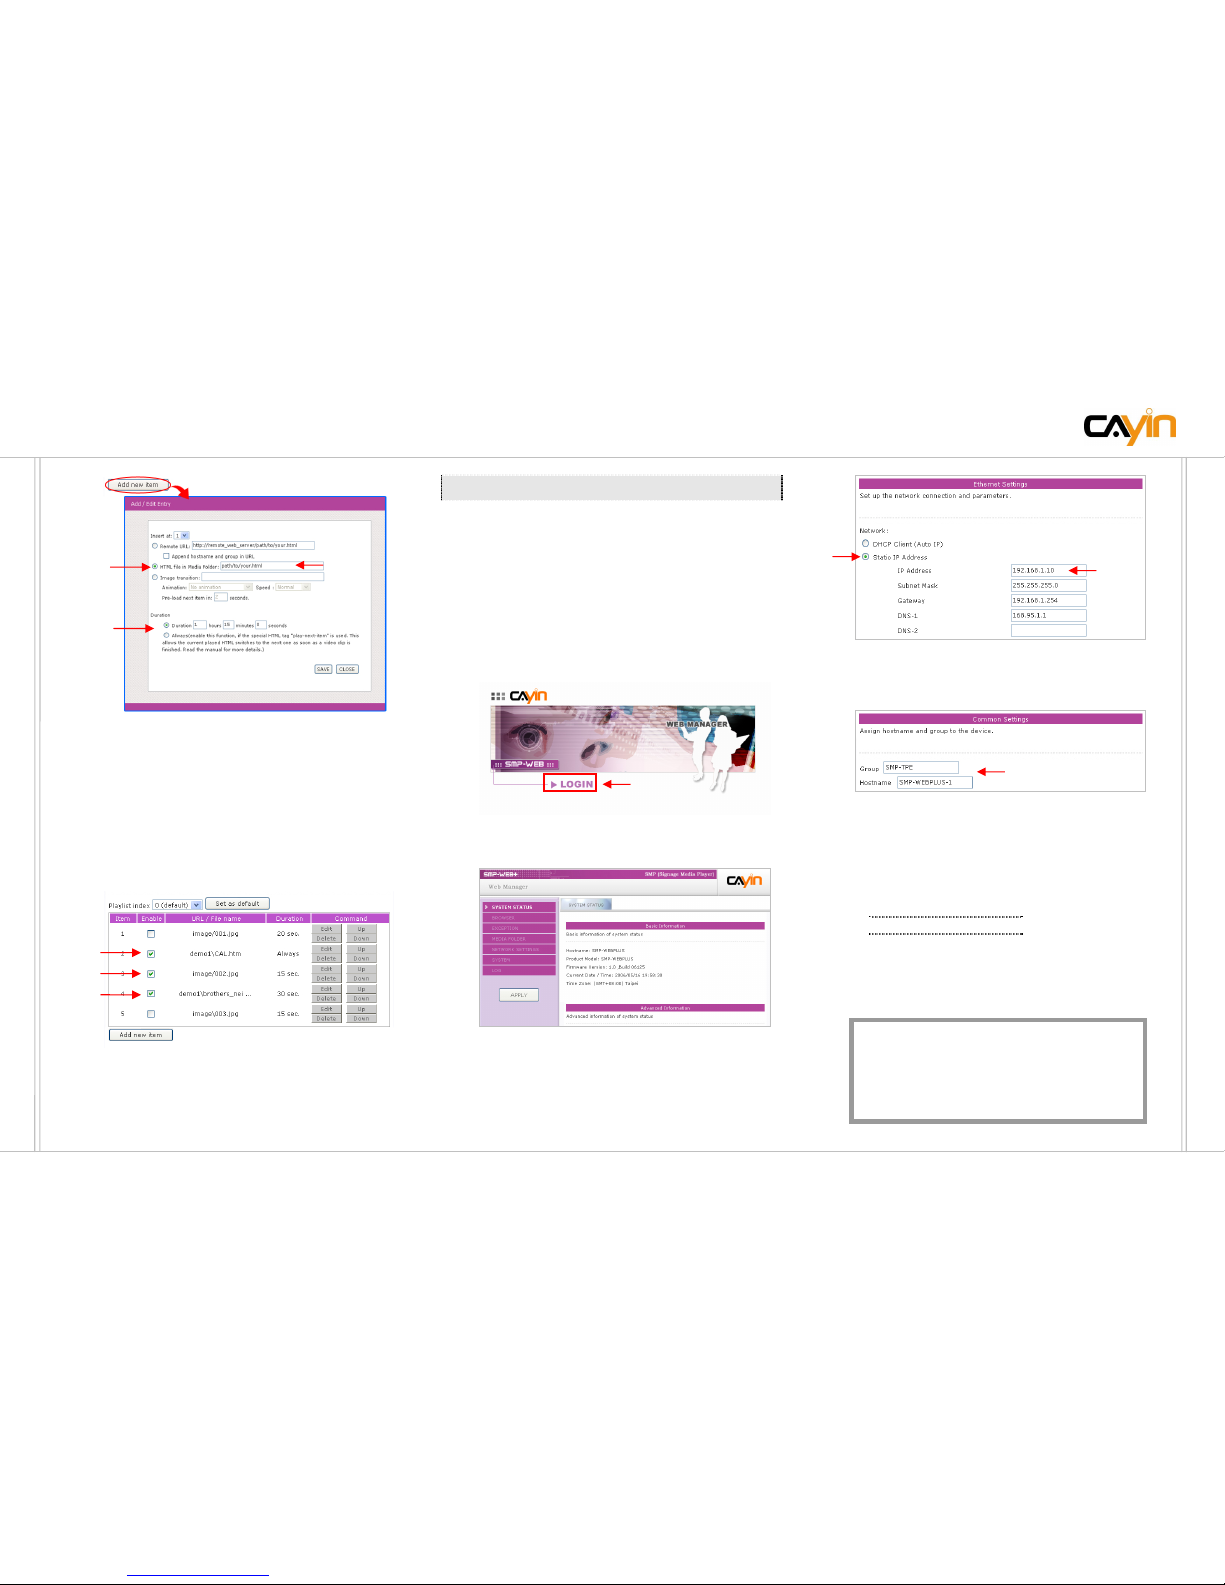
❽ Now we can edit the playlist in Web Manager. Go
to the “BROWSER” section, and click Add new
item to insert a new item in the playlist.
1. Click
2. Select
3. Click
3. Click
1. Click
2. Select
Click
Page 2
Q
SMP-WEB Series ● Professional Digital Signage Media Player
Choose HTML file in Media Folder: and fill in
the file name in the blank. If you put the HTML
file in a sub-folder, you can use folder-
name/filename.html to access file. Then, set the
duration of this playback item, and click SAVE.
❾ You can repeat step ❽ to add more items. After
adding items in the playlist, please remember to
enable those items that you decide to play.
❿ After completing, click SAVE at the bottom and
click APPLY on the left column. Then, the SMP
client will start to play those items in this playlist.
▌Case II: Static IP Address
❶ Please remember to connect a keyboard and a
mouse to USB connectors on the SMP client.
❷ Press the power button to turn on the system, and
you will see the Web Manager’s login page for
this SMP client. Click LOGIN on the page, and
enter a user name and password.
Default Username: webadmin
Default Password: admin
❸ After logging in, you will see the system status of
this SMP client on the first page.
❹ Click “NETWORK SETTINGS” on the left
column to change the network configuration.
❺ Please click Static IP Address in the Ethernet
Settings area and set up all related network settings
for this SMP.
❻ You can also assign a group and a hostname for
this SMP in the Common Setting area for easy
management.
❼ After completing, click SAVE at the bottom and
click APPLY on the left column. Then, the SMP
client will reboot.
❽ You can remove the keyboard and mouse from this
SMP player now, and start to manage it remotely
from your own PC. Please proceed from step ❶
on Case I: DHCP (Auto IP).
❾ You can also open a browser and type
“\\ip_address” in the address bar to access the
Web Manager.
For detailed information, please refer to the
User Manual in the product CD.
CAYIN TECHNOLOGY CO., LTD.
http://www.cayintech.com
Click
Set
Duration
Click
Click
Click
Click
Fill in
Fill in
Click
Fill in
 Loading...