

Page 1

CAYIN TECHNOLOGY
SIGNAGE MEDIA PLAYER: SMP-WEB SERIES
SMP-WEB4
Version 1.0
SMP-WEBDUO
Version 1.5
Version 2.0
SMP-WEBPLUS
Version 5.5
Version 6.0
SMP-WEB3
Version 3.5
Version 4.0
SMP-WEB3N
Version 3.5
Version 4.0
CAYIN TECHNOLOGY CO., LTD.
8F, No. 577, Linsen N. Rd.
Taipei City 104, Taiwan
TEL: +886-2-25951005
FAX: +886-2-25951050
2010 ® CAYIN TECHNOLOGY CO., LTD.
All Rights Reserved
MPWE00/EN/100720
Page 2

About CAYIN
CAYIN Technology offers a complete portfolio of digital signage solutions, including media
players, servers, and software, for various commercial applications, such as education,
transportation, retail, hospitality, corporate use, and nancial and public institutions. CAYIN
is committed to being a reliable partner to its clients worldwide, and has successfully set
up various application references internationally. In order to best facilitate the deployment
of CAYIN products, the Company also provides tailored services to satisfy the ascending
market demand for almost limitless applications.
Copyright Notice
Copyright © 2010 CAYIN TECHNOLOGY CO., LTD. All Rights Reserved.
All the contents in this manual are the intellectual property of CAYIN Technology Co., Ltd.
(“CAYIN”). No part of this manual, including the products and software described in it, shall
be reproduced, transferred, distributed, stored in any form, or translated into any language
without the prior written permission of CAYIN. Specications and information in this manual
are subject to change at any time without obligation to notify any person of such revision or
changes.
This product adopts Arphic's "iFont" technology and fonts.
Trademark Notice
All brand names, icons, and trademarks appeared in this manual are the sole property of
their respective holders.
Disclaimers
THE CONTENTS OF THIS MANUAL ARE PROVIDED “AS IS.” CAYIN MAKES NO OTHER
REPRESENTATION OR WARRANTIES, EITHER EXPRESSED OR IMPLIED WITH
RESPECT TO THE CONTENTS HEREOF AND SPECIFICALLY DISCLAIMS THE IMPLIED
WARRANTIES OF MERCHANTABILITY OR FITNESS FOR A PARTICUAL PURPOSE. IN
NO EVENT SHALL CAYIN, ITS DIRECTORS, OFFICERS, EMPLOYEES OR AGENTS BE
LIABLE FOR ANY INDIRECT, SPECIAL, INCIDENTAL, OR CONSEQUENTIAL DAMAGES
(INCLUDING DAMAGES FOR LOSS OF PROFITS, LOSS OF USE OR DATA, AND THE
LIKE), EVEN IF CAYIN HAS BEEN ADVISED OF THE POSSIBILITY OF SUCH DAMAGES
ARISING FROM ANY DEFECT OR ERROR IN THIS MANUAL OR PRODUCT.
LITHIUM BATTERY CAUTION
type. Dispose of used batteries according to the instructions.
: Risk of Explosion if Battery is replaced by an incorrect
Page 3

Contents
About CAYIN ................................................................................. i
Copyright Notice ........................................................................... i
Trademark Notice ......................................................................... i
Disclaimers ...................................................................................i
1. SMP-WEB Series Overview .................................................... 1
1-1 SMP-WEB4 Appearance ............................................................. 3
1-1-1 Front View (P/N: LB-700) ................................................................3
SMP-WEB SERIES USER MANUAL
1-1-2 Rear View (P/N: LB-700) .................................................................3
1-2 SMP-WEBDUO Appearance ....................................................... 4
1-2-1 Front View (P/N: LB-600) ................................................................4
1-2-2 Rear View (P/N: LB-600) .................................................................4
1-3 SMP-WEBPLUS Appearance ...................................................... 5
1-3-1 Front View (P/N: LB-300) ................................................................5
1-3-2 Rear View (P/N: LB-300) .................................................................5
1-3-3 Front View (P/N: LB-500) ................................................................6
1-3-4 Rear View (P/N: LB-500) .................................................................6
1-4 SMP-WEB3/SMP-WEB3N Appearance ...................................... 6
1-4-1 Front View (P/N: LB-400, LB-400N) ................................................6
1-4-2 Rear View - SMP-WEB3 (P/N: LB-400) ...........................................7
1-4-3 Rear View - SMP-WEB3N (P/N: LB-400N) .....................................7
1-5 Hardware Specications ............................................................8
1-6 System Specications ................................................................ 9
I
Page 4

II
SMP-WEB SERIES
USER MANUAL
1-7 Install SMP-WEB Series ............................................................ 11
1-7-1 Install Hardware .............................................................................11
1-7-2 Login on SMP-WEB Series ...........................................................12
1-7-3 Remote PC Login ..........................................................................14
1-8 Wall Mount Installation ............................................................. 15
2. Conguration in Wizard Mode .............................................. 16
2-1 Upload Files to SMP Player ...................................................... 17
2-2 Wizard Mode Introduction ........................................................ 20
2-3 Network Wizard ......................................................................... 20
2-3-1 Step1: Ethernet Conguration .......................................................20
2-3-2 Step2: Wi-Fi Conguration (Optional) ............................................21
2-3-3 Step3: Ping Gateway .....................................................................22
2-4 System Wizard ........................................................................... 23
2-4-1 Step1: Time & Language Settings .................................................23
2-4-2 Step2: Display Settings .................................................................24
2-4-3 Step3: Media Folder Security Settings ..........................................30
2-5 Content Update Wizard ............................................................. 31
2-5-1 Content Update Settings ...............................................................31
2-6 Playback Wizard ........................................................................ 32
2-6-1 HTML Playlist.................................................................................32
3. Multimedia Contents Playback and Management .............. 33
3-1 Upload Files to SMP Player ...................................................... 34
3-2 Edit Playlist ................................................................................ 37
3-2-1 Edit New Playlist ............................................................................37
3-2-2 Set Default Playlist ........................................................................41
Page 5

III
SMP-WEB SERIES USER MANUAL
3-2-3 Set Central Scheduling ..................................................................41
3-2-4 When playlist changes, resume from the next item .......................42
3-2-5 Enable Playlist Selection from a Keypad Device ..........................42
3-2-6 Check File Timestamp / URL .........................................................43
3-3 Manage Playlist ......................................................................... 43
3-3-1 Export Playlist ................................................................................44
3-3-2 Import Playlist ................................................................................44
3-3-3 Duplicate Playlist ...........................................................................45
3-4 HTTP Proxy ................................................................................ 46
3-5 System Volume .......................................................................... 47
3-6 Program Management ..............................................................47
3-6-1 Manage Your Skin .........................................................................47
3-6-2 Manage Your Program ...................................................................48
3-6-3 Edit Program: Choose Your Skin ...................................................50
3-6-4 Edit Program: Multimedia ..............................................................50
3-6-5 Edit Program: Image Slideshow ....................................................53
3-6-6 Edit Program: Ticker Text ..............................................................54
3-6-6 Edit Program: Flash .......................................................................56
3-6-7 Finish Your Program ......................................................................57
3-7 Local Scheduling ......................................................................57
3-7-1 Web Playlist ...................................................................................57
3-7-2 System Volume ..............................................................................58
4. Using CAYIN Media Player in HTML ..................................... 59
4-1 Media Player Tag and Attributes .............................................. 60
4-2 Image Slide Show Tag and Attributes ..................................... 70
Page 6

IV
SMP-WEB SERIES
USER MANUAL
4-3 Ticker Tag and Attributes ......................................................... 72
4-4 Apply Font in SMP-WEB Series Players ................................. 74
4-5 Hide the Scroll Bar .................................................................... 75
5. Content Update and Media Folder Management ................ 76
5-1 Update Media Folder ................................................................. 77
5-2 Manage Media Folder ................................................................ 80
6. Skin Management .................................................................. 82
6-1 Create Your Own Skin ............................................................... 83
6-1-1 Install Skin Editor ...........................................................................83
6-1-2 Create a new skin le (.csk) ..........................................................84
6-1-3 Upload a Skin File into Skin Template ...........................................90
6-1-4 Edit a Skin File in Skin Template ...................................................91
6-2 Create Your Own Clock (.clk) ................................................... 92
6-2-1 Create a Clock (.clk) ......................................................................92
6-2-2 Upload a Clock (.clk) ...................................................................100
6-3 Upload the CAYIN Skin File into SMP .................................... 100
6-4 Apply Skin ................................................................................ 101
7. System Status and Settings ............................................... 102
7-1 System Status .........................................................................103
7-1-1 Basic Information .........................................................................103
7-1-2 Advanced Information ..................................................................104
7-1-3 Firmware Information ...................................................................106
7-2 System Settings ...................................................................... 106
7-2-1 Set System Time .........................................................................106
7-2-2 NTP Service ................................................................................107
Page 7

V
SMP-WEB SERIES USER MANUAL
7-2-3 Change Web Administrator’s Password ......................................107
7-2-4 Change Service Port of Web Manager ........................................108
7-2-5 Choose Web Manager Language ................................................108
7-2-6 Set System Reboot ......................................................................109
7-2-7 Frequency of Server Communication ..........................................109
7-3 System Maintenance ............................................................... 110
7-3-1 Upload Firmware .........................................................................110
7-3-2 Restart/Shutdown System ...........................................................11 0
7-3-3 Export/Import/Restore System Settings ......................................111
7-3-4 Upload System Background Image ............................................. 111
7-3-5 Remote System Recovery ........................................................... 111
7-3-6 RS-232 Setting ............................................................................112
7-4 Display Settings ...................................................................... 113
7-4-1 Display Information for SMP-WEB4 ............................................113
7-4-2 Display Information for SMP-WEBDUO ......................................116
7-4-3 Display Information for SMP-WEBPLUS .....................................121
7-4-4 Display Information for SMP-WEB3/WEB3N ...............................122
7-4-5 User Dene Resolution (WEB4, WEBDUO and WEBPLUS) ......123
7-4-6 Video Input Settings ....................................................................124
7-4-7 Hide Cursor .................................................................................125
7-4-8 Turn on / Turn off Display ............................................................125
8. Touch Panel Support ........................................................... 126
8-1 Veried Touch Panel ............................................................... 127
8-2 Congure Parameters of Touch Panel ................................. 128
8-3 Screen Saver Mode ................................................................ 129
Page 8

SMP-WEB SERIES
USER MANUAL
9. Network Settings ................................................................. 130
9-1 Ethernet .................................................................................... 131
9-2 Wireless Network .................................................................... 132
9-3 Off-Line Settings ..................................................................... 133
10. LOG Management .............................................................. 134
10-1 Enable Syslog ........................................................................ 135
10-2 Use log_rcv to Change PORT .............................................. 136
10-3 View Logs ..............................................................................137
10-4 Export Log File ...................................................................... 138
11. SMP Console ...................................................................... 139
12. System Recovery ............................................................... 141
Appendix .................................................................................. 143
Appendix A: Test the Resolution of Your Display ...................... 144
Appendix B: Use “log_rcv” to collect syslog from players ...... 146
VI
Page 9

1.
1-1 SMP-WEB4 Appearance .................................................... 3
1-1-1 Front View (P/N: LB-700) ..................................................... 3
1-1-2 Rear View (P/N: LB-700) ...................................................... 3
1-2 SMP-WEBDUO Appearance .............................................. 4
1-2-1 Front View (P/N: LB-600) ..................................................... 4
1-2-2 Rear View (P/N: LB-600) ...................................................... 4
1-3 SMP-WEBPLUS Appearance ............................................ 5
1-3-1 Front View (P/N: LB-300) ..................................................... 5
1-3-2 Rear View (P/N: LB-300) ...................................................... 5
1-3-3 Front View (P/N: LB-500) ..................................................... 6
1-3-4 Rear View (P/N: LB-500) ...................................................... 6
SMP-WEB Series Overview
1-4 SMP-WEB3/SMP-WEB3N Appearance ............................. 6
1-4-1 Front View (P/N: LB-400, LB-400N) ..................................... 6
1-4-2 Rear View - SMP-WEB3 (P/N: LB-400) ................................ 7
1-4-3 Rear View - SMP-WEB3N (P/N: LB-400N) .......................... 7
1-5 Hardware Specications ................................................... 8
1-6 System Specications ...................................................... 9
1-7 Install SMP-WEB Series ...................................................11
1-7-1 Install Hardware ...................................................................11
1-7-2 Login on SMP-WEB Series ................................................ 12
1-7-3 Remote PC Login ............................................................... 14
1-8 Wall Mount Installation ................................................... 15
Page 10
2
SMP-WEB SERIES
USER MANUAL
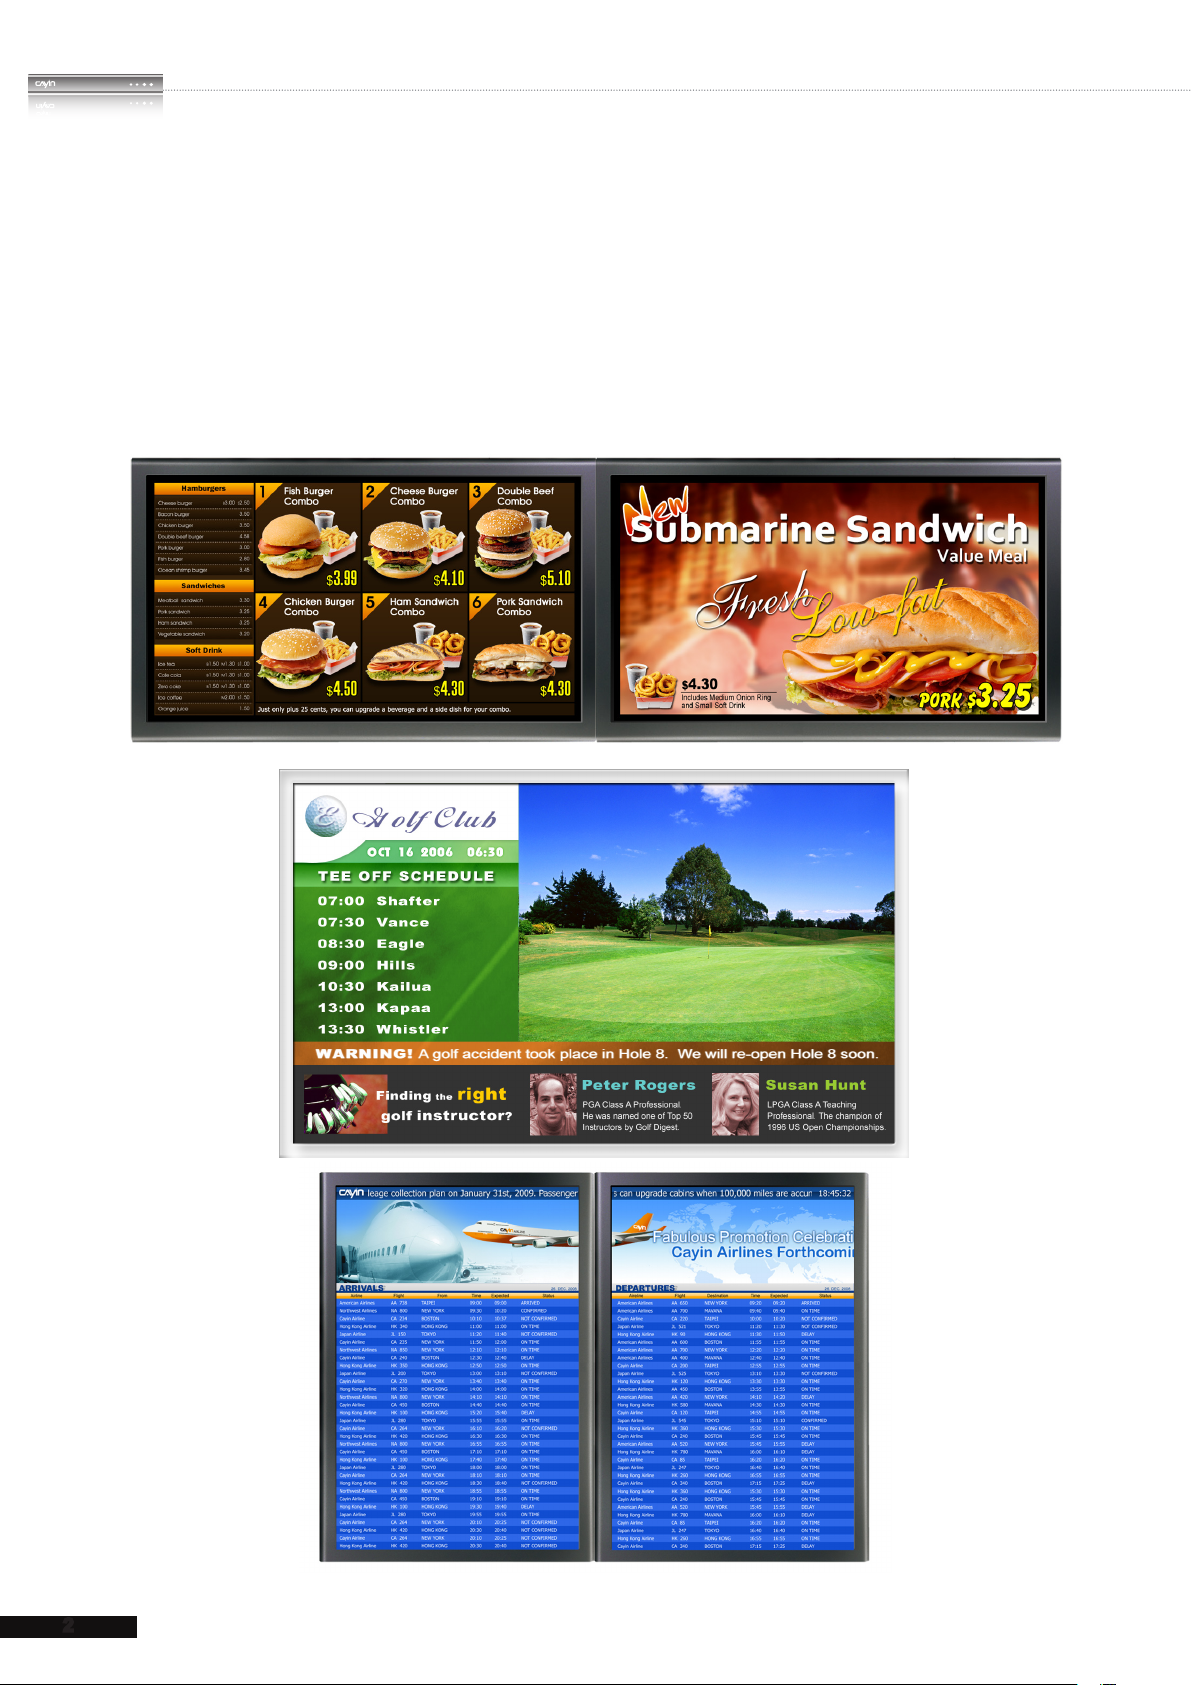
SMP-WEB series is a web-based networked digital signage system. All multimedia contents
are displayed in full-screen webpage, so designers can utilize their own familiar web page
and Flash editing tools and unleash their creativities. SMP-WEB series supports most
popular web languages, image file formats, and audio/video codec. In addition to Flash,
HTML, video, images, animations, and texts, SMP-WEB series players can easily be
extended to provide interactive services incorporating with touch screens.
Page 11
3
SMP-WEB SERIES USER MANUAL
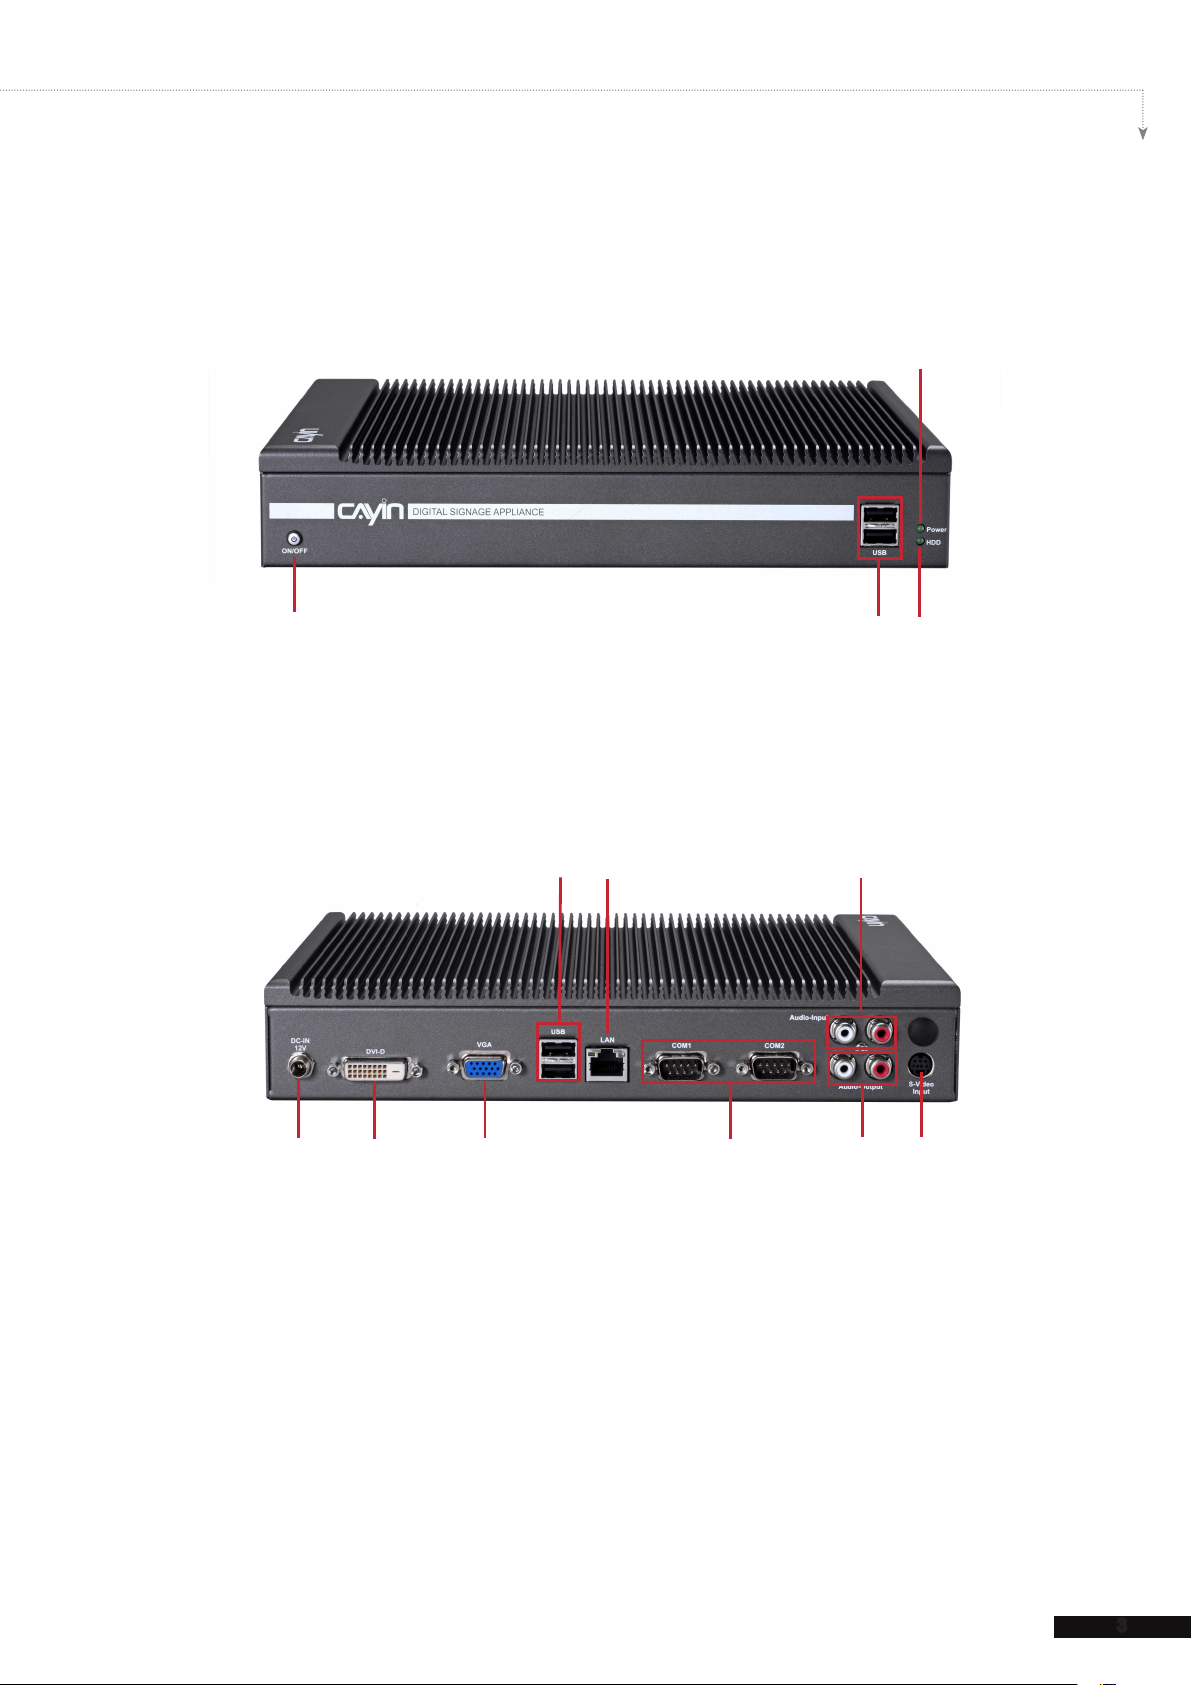
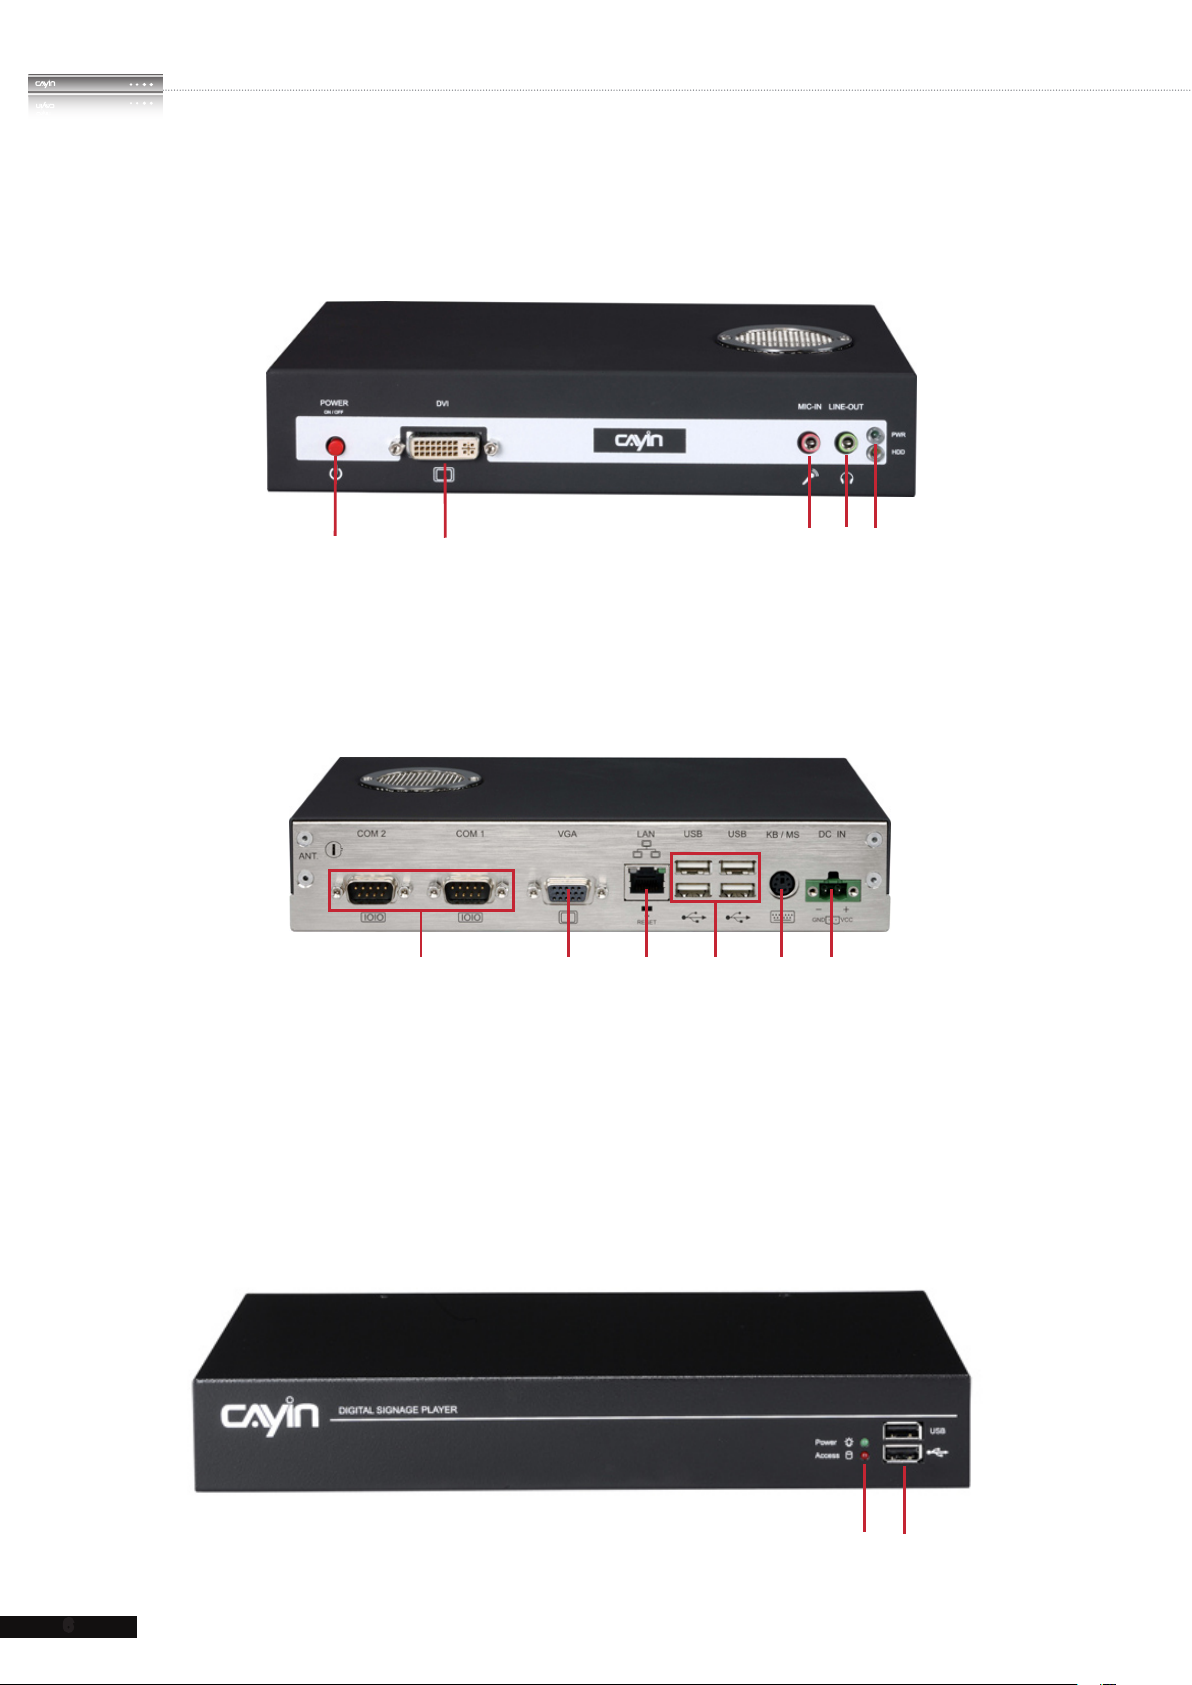
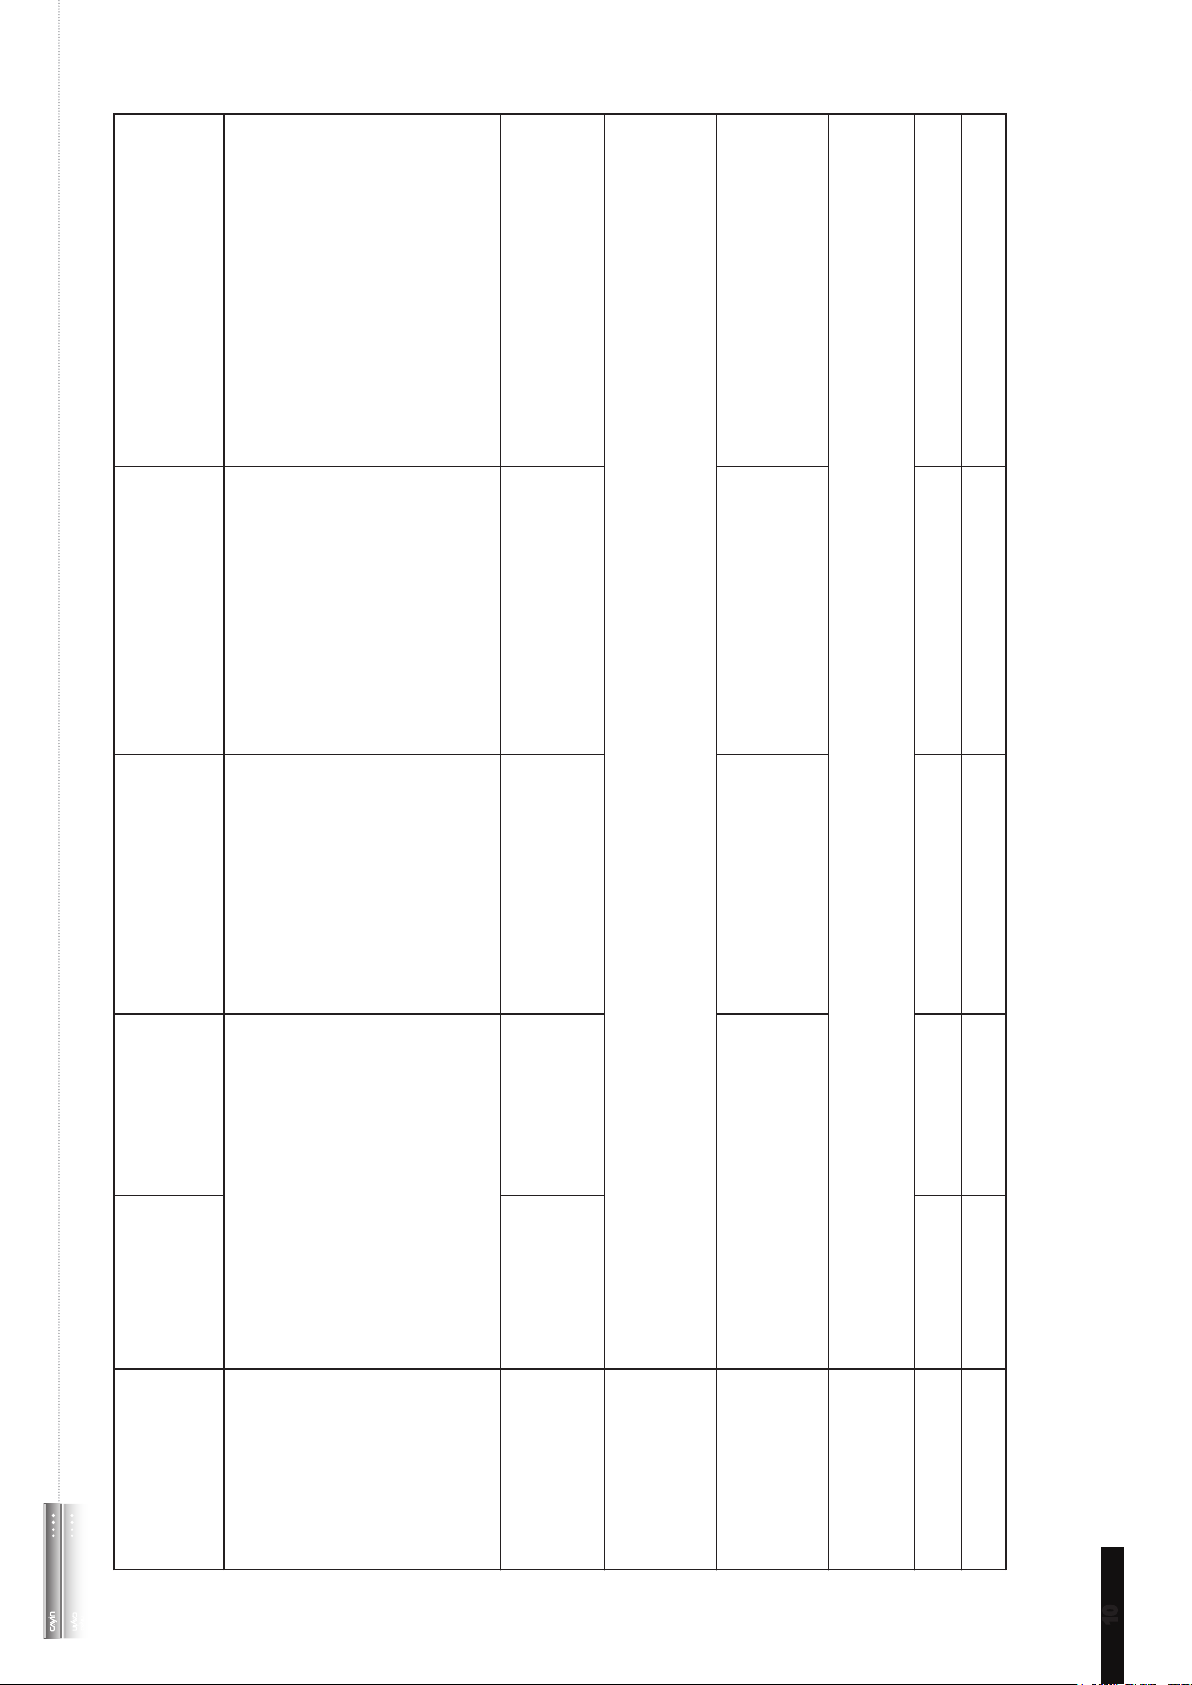
1-1 SMP-WEB4 Appearance
1-1-1 Front View (P/N: LB-700)
3
1
1. Power 2. USBx2 3. Power Indicator 4. Hard Disk Indicator
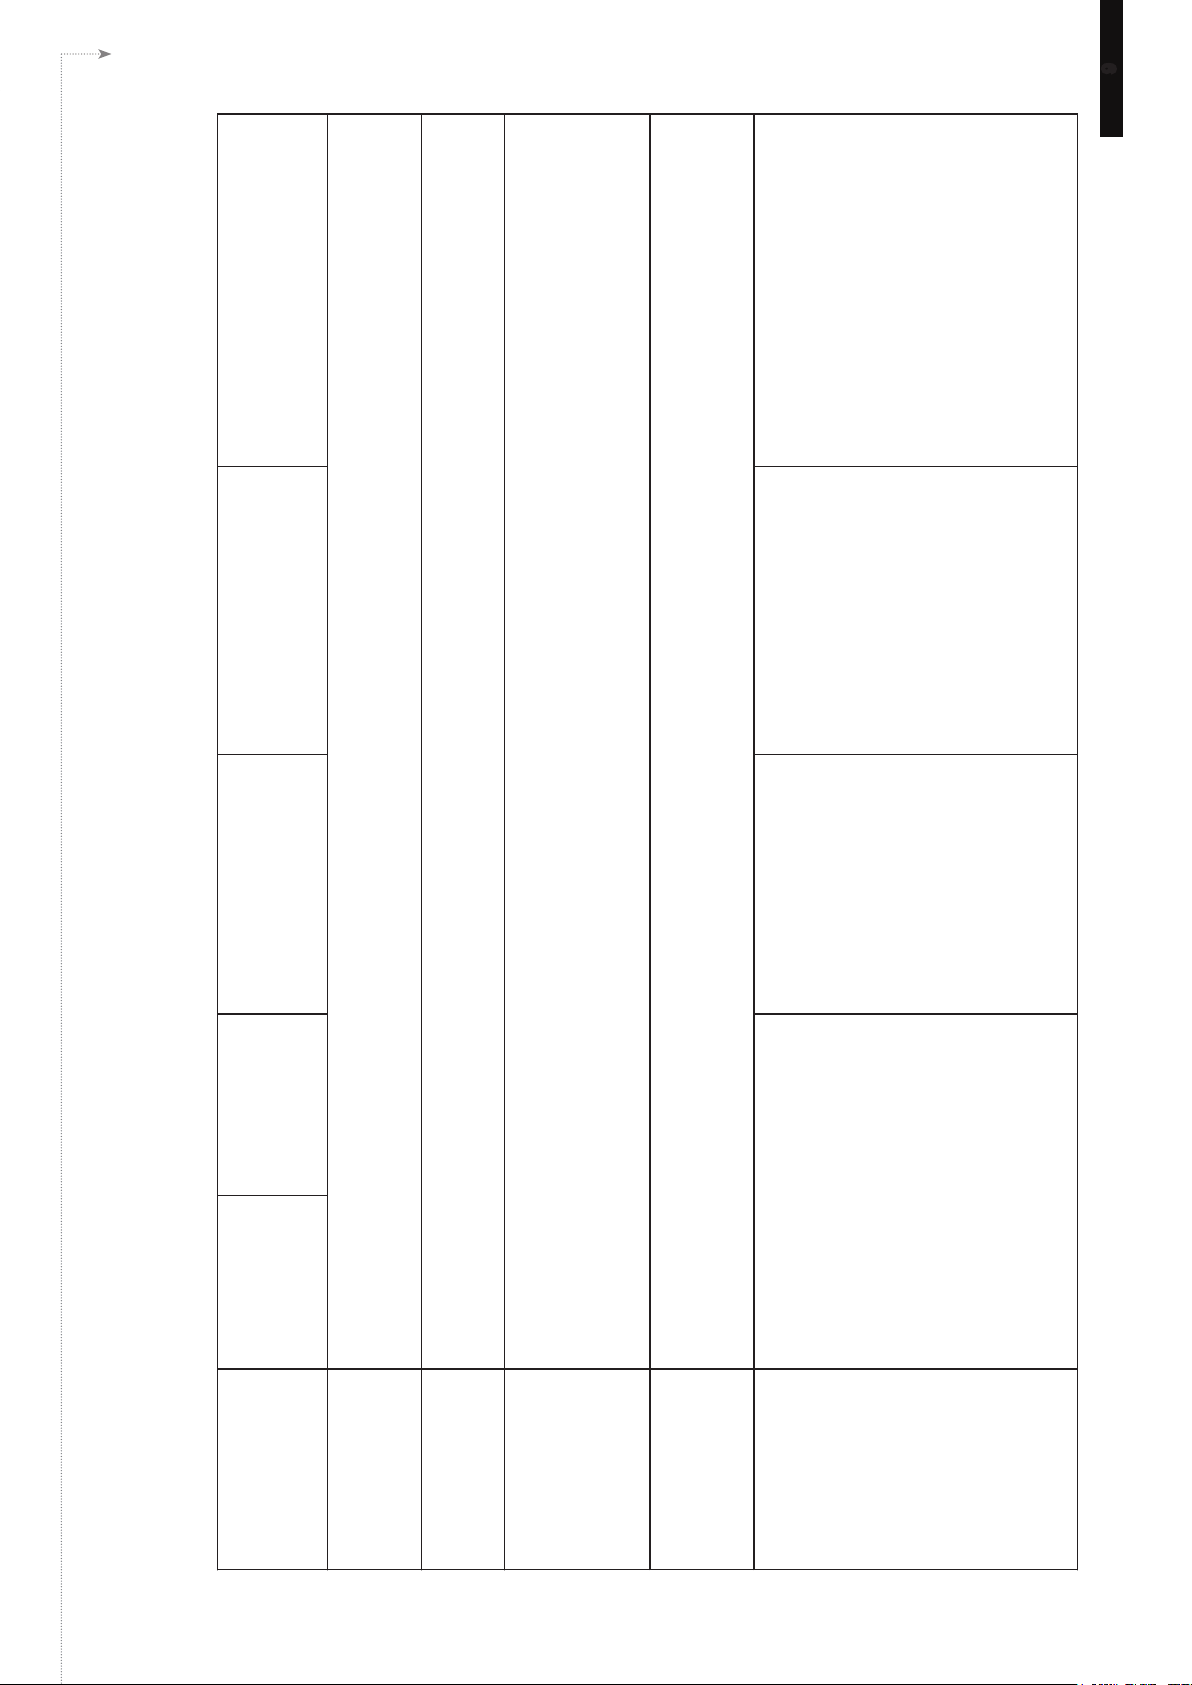
1-1-2 Rear View (P/N: LB-700)
5
4
1
2
3
2
4
8
6
9
7
1. Power Connector 2. DVI 3. VGA 4. USBx2 5. Ethernet LAN
6. RS-232x2 7. Audio-Out 8. Audio-In 9. S-Video-In
Page 12
4
SMP-WEB SERIES
USER MANUAL
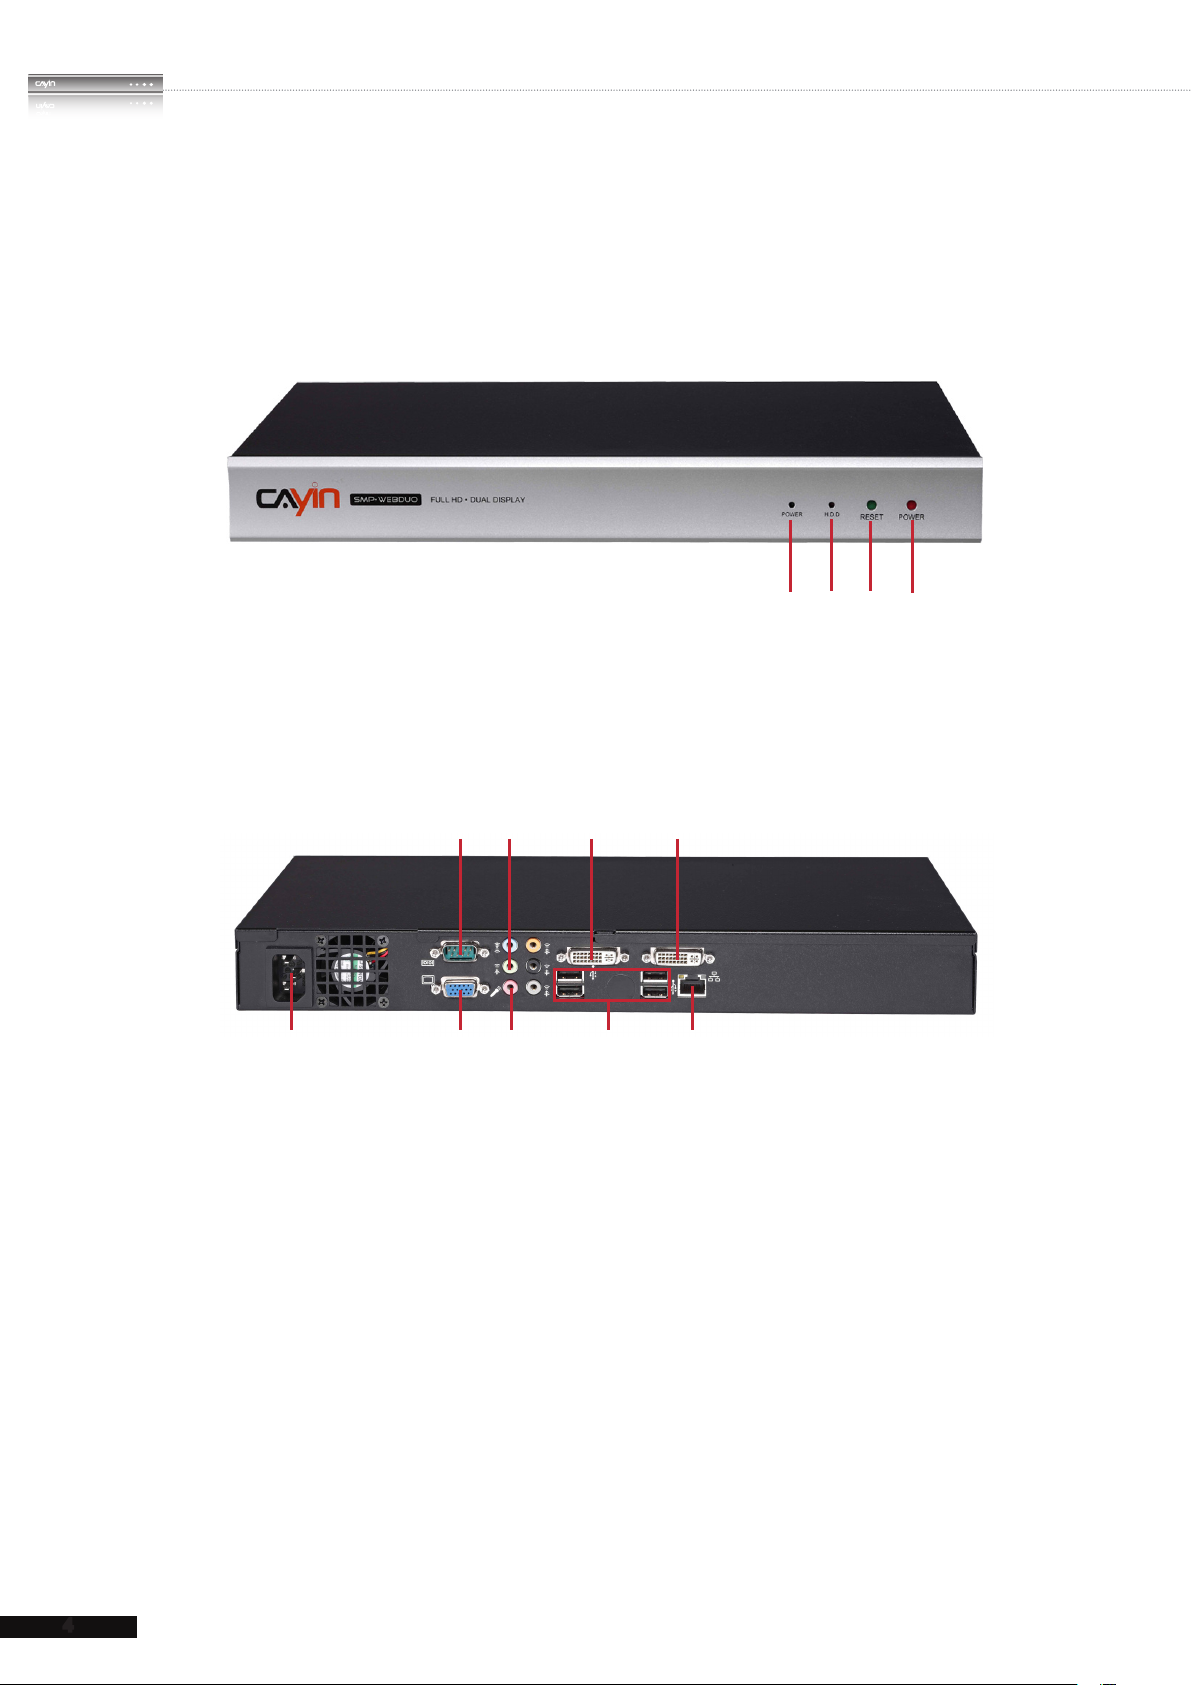
1-2 SMP-WEBDUO Appearance
1-2-1 Front View (P/N: LB-600)
1. Power Indicator 2. Hard Disk Indicator 3. Reset 4. Power
1-2-2 Rear View (P/N: LB-600)
2 4 6 7
1 3 5 8 9
1. Power Connector 2. RS-232 3. VGA 4. Audio-Out
5. Line-In (reserve for future use) 6. DVI 2 7. DVI 1 8. USBx4 9. Ethernet LAN
1
3
2
4
Page 13
5
SMP-WEB SERIES USER MANUAL
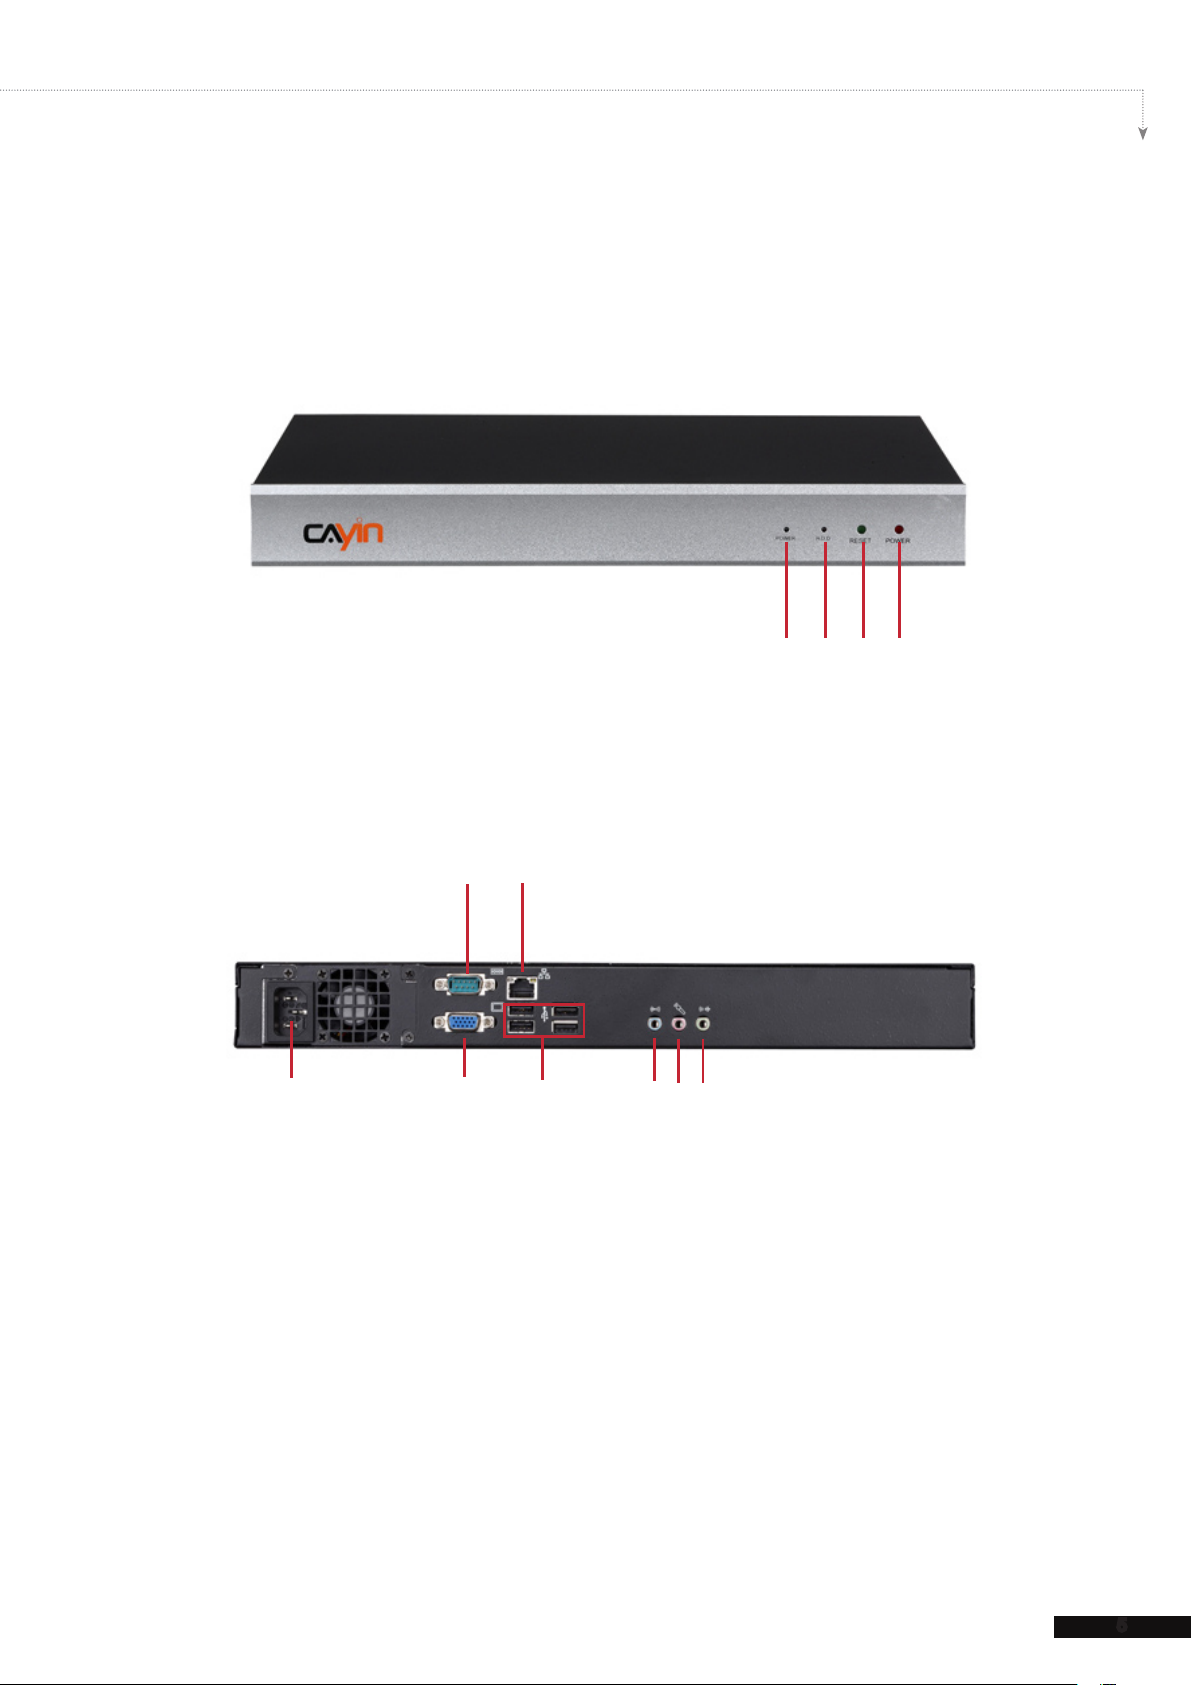
1-3 SMP-WEBPLUS Appearance
1-3-1 Front View (P/N: LB-300)
1 2 3 4
1. Power Indicator 2. Hard Disk Indicator 3. Reset 4. Power
1-3-2 Rear View (P/N: LB-300)
2
4
1 3
1. Power Connector 2. RS-232 3. VGA 4. Ethernet 5. 4×USB 6. Line-In (reserve
for future use) 7. Mic-In (reserve for future use) 8. Audio-Out
5
6
8
7
Page 14
6
SMP-WEB SERIES
USER MANUAL
1-3-3 Front View (P/N: LB-500)
3
1
1. Power Button 2. DVI Connector 3. MIC-IN (Reserved) 4. Audio-out 5. PWR/HDD Indicator
2
4 5
1-3-4 Rear View (P/N: LB-500)
1 2 3 4 5 6
1. RS-232 x 2 2. VGA Connector 3. Ethernet LAN
4. USB x 4 5. PS/2 6. Power Connector
1-4 SMP-WEB3/SMP-WEB3N Appearance
1-4-1 Front View (P/N: LB-400, LB-400N)
1.
Power & HDD LED 2. Front USB connectors
21
Page 15

7
SMP-WEB SERIES USER MANUAL
1-4-2 Rear View - SMP-WEB3 (P/N: LB-400)
1 2
3 4 5 6 7 8 9
1.
AV-in 2. RS-232 3. Power Connector 4. Ethernet 5. AV-Out
6.
S-Video Out
7.
VGA Connector (Output) 8. USBx2 9. Power Switch
1-4-3 Rear View - SMP-WEB3N (P/N: LB-400N)
1
6 7 85432
1.
RS-232 2. Power Connector 3. Ethernet 4. AV-Out
5.
S-Video Out
6.
VGA Connector (Output) 7. USBx2 8. Power Switch
Page 16

SMP-WEB SERIES
USER MANUAL
1-5 Hardware Specications
Dimension
Material
Color
Net Weight
Network
Internal Storage
SMP-WEBPLUS
(P/N: LB-300)
SMP-WEBPLUS
(P/N: LB-500)
SMP-WEB3/
WEB3N
SMP-WEBDUO
(P/N: LB-600)
SMP-WEB4
(P/N: LB-700)
(P/N: LB-400/400N)
44 (H) x 380 (W) x
195 (D) mm
Aluminum + Steel Aluminum + Iron Steel (Fanless) Aluminum + Steel Aluminum + Steel
Silver & Black Gray & White Black Silver & Black Dark Gray
4.4 Kg
(with hard drive)
10/ 1 00/ 1 000 Mb ps
Ethernet
160GB, 3.5” IDE HDD
43 (H) x 222 (W) x
135 (D) mm
1.5 Kg
(with hard disk)
1 0 / 1 0 0 M b p s
Ethernet
80GB, 2.5” IDE HDD
(Share with system
software)
44 ( H) x 290 (W) x
150 (D) mm
2.5 Kg
(with hard disk)
1 0 / 1 0 0 M b p s
Ethernet
80GB, 2.5" IDE HDD 320GB, 3.5” SATA
44 (H) x 380 (W) x
195 (D) mm
4.4 Kg
(with hard disk)
10/100/1000 Mbps
Ethernet
HDD
47 (H) x 268 (W) x
174 (D) mm
(Fanless)
2.2 Kg
(with hard drive)
10/100/1000 Mbps
Ethernet
160GB, 2.5” SATA
HD
(Share wi th system
software)
Video
Audio
Video In
Audio In
Power
Others
Certicate
VGA D-Sub/DVI-D
VGA D-Sub
Phone Jack (Stereo) Phone Jack (Stereo) RCA Stereo Phone Jack
N/A N/A Composite (RCA)
N/A N/A RCA Stereo
100~240V AC
(with internal daptor)
RS-232 (COM),
USB x 4
(No HDCP support)
100~240V AC
(with external
adaptor)
RS-232 (COM),
USB x 4
CE, FCC, RoHS C E , F C C, U L,
LV D, CCC, RoHS
VGA D-Sub,
Composite /S-Video
(NTSC/PAL)
(SMP-WEB3 only)
(SMP-WEB3 only)
100~240V AC
(with external
adaptor)
RS-232 (COM),
USB x 4
C E , F C C , L V D ,
RoHS
V G A D - S u b x 1 ,
D V I - D x 2 ( N o
HDCP support)
(Stereo)
N/A S-Video
N/A RCA (Stereo)
100~240V AC
(with internal
adaptor)
R S -2 32 ( C O M) ,
USB x 4
CE, FCC, RoHS CE, FCC, LVD, CB,
VGA D-Sub, DVI-D
(no HDCP support)
RCA (Stereo)
100~240V AC
(with
external adaptor)
RS-232 x 2 (COM),
USB x 4
CCC, RoHS
8
Page 17
SMP-WEB SERIES USER MANUAL
SMP-WEB4
(P/N: LB-700)
9
● Vide o R esol uti on a nd Spec ific ati on
may differ for different output methods,
su pporting up to 720p (12 80x72 0); bit
rate up to: 10 Mbps (MPEG2), 8~9 Mbps
(MP E G4), 4~8 Mb ps ( WMV) , 3 M b ps
(H.264) [Landscape, 25 fps, single video
playback]
● To avoid syst em runn ing in the low
performance, we suggest you do not use
the po rtrait screen and high re so lution
when SMP player is playing high dinition
video.
2
SMP-WEBDUO
(P/N: LB-600)
SMP-WEB3/WEB3N
(P/N: LB-400/LB-400N)
SMP-WEBPLUS
(P/N: LB-500)
● V i d e o R e s o l u t i o n a n d
Specication may differ for different
output methods, supporting up to
1080p (1920x1080); bit rate up to:
20 Mbps (MPEG2), 10~12 Mbps
(MPEG4), 8~10 Mbps (WMV), 5~8
Mbps (H.264, 720p only) [Single
mode/Landscape, 25 fps, single
video playback]
Video Resolution and Specication
may di ffe r for d i ffer e n t o u t put
methods. Please refer to Chapter
● Support up to 480p (720x480)
● Support video bit-rate up to 5
Mbps (codec dependent)
(SMP-WEB4, SMP-WEBPLUS, SMP-WEBDUO only)
2
2
7-4 for details.
SMP-WEBPLUS
1-6 System Specications
(P/N: LB-300)
● WEB: Build-in Firefox 2.0; support W3C HTML format and JavaScript 1.7
Playback File Format
● Flash: Support Adobe Flash Player V9
● Image: JPEG/GIF(1)/BMP; support image resolution up to 1920x1080 (2 million pixels)
● MPEG/MPG/VOB/MP3/MP4
● WMV/WMA
● AVI
● MPEG-1, MPEG-2 PS, MPEG-2 TS, MPEG-4 ISO
● MP3 (MPEG AUDIO LAYER 3)
● WMV 7/8/9
● WMA 7/8
● RAW DV (SMP-WEB4, SMP-WEBPLUS, SMP-WEBDUO only)
● H.264
● CAYIN RTB (Encapsulation Method: MPEG TS , Codec: MPEG-2/MPEG-4, bit rate: 1~5 Mbps)
● RTP (Encapsulation Method: MPEG TS , Codec: MPEG-2/MPEG-4)
Video Files
3
CODEC
● HTTP/MMS
Network Streaming
● Vide o R e solu tion and Spec i fica tion
may d iffer for different output methods,
supporting up to 720p (1280x720); bit rate
up to: 10~12 Mbps (MPEG2), 8~9 Mbps
(MP E G 4), 4~ 8 Mbps (W M V), 3 Mb ps
(H.264) [Landscape, 25 fps, single video
3
Video Resolution
playback]
● To avoi d sy s tem run n ing in the low
performance, we suggest you do not use
th e f oll owing scr een re sol uti ons wh en
SM P playe r is playing 72 0p HD v ideo:
1920x12 0 0 , 19 2 0 x 1 0 80, 1600x120 0 ,
1280x1024(75Hz) or similar high resolutions
set in the 'User define' mode. 720p HD
video is also not suggested to be used in
the portrait mode.
Page 18
SMP-WEB4
(P/N: LB-700)
SMP-WEBDUO
(P/N: LB-600)
SMP-WEB3/WEB3N
(P/N: LB-400/LB-400N)
● Screen resolutions: 640x480, 800x600,
1 0 2 4x 76 8, 1 1 5 2 x 8 6 4 , 12 8 0 x 1 0 2 4 ,
1280x720 (720p), 1280x768, 1600x900,
● Screen Resolutions: 640x480,
800x 600, 1024x76 8, 1152x86 4,
1280x1024, 1280x720(720p),
● Screen Resolutions: 640x480,
800x600, 1024x768, 1152x864,
1280x1024, 1280x720
1360x768, 1366x768
● Screen resolution up to 2048x2048 by
User-dene mode
● Portr ait Mod e: Supp o rt 90 a nd 270
degree display rotation
3,4
1280x768, 1360x768, 1366x768,
1368x768, 1600x900, 1600x1200,
1 6 8 0 x 1 0 5 0 , 1 9 2 0 x 1 0 8 0 ,
1 9 2 0 x 1 2 0 0 and Us e r def i n e
resolution
● S u ppor t 90 a nd 2 7 0 deg r ee
display rotation (Portrait Display)
3,4
(720p), 1280x768, 1600x900,
1360x768, 1366x768
● Do not support display
rotation
● Composite & S-Video only be
supported on screen resolution
800x600
10/100/1000 Mbps Ethernet
802.11 b/g WIFI controller (optional)
●
●
● 10/100/1000 Mbps Ethernet
● 802.11b/g wireless LAN adaptor
(optional)
● 10/100 Mbps Ethernet
● 802.11b/g wireless LAN
adaptor (optional)
Disk-on-Module (Flash) Disk-on-Module (Flash) HDD (Share with content disk)
SMP-WEBPLUS
(P/N: LB-500)
SMP-WEBPLUS
(P/N: LB-300)
USER MANUAL
SMP-WEB SERIES
3,4
● Screen Resolutions: 640x480, 800x600,
1 0 2 4 x 7 6 8 , 11 5 2 x8 6 4 , 1 2 80 x1 0 2 4,
1600x1200, 1280x720 (720p), 1280x768,
1600x900, 1360x768, 1366x768, 1368x768,
1680x1050, 1920x1080, 1920x1200 and
3
Display Output
● 10/100 Mbps
Ethernet
● 802.11 b/g wireless
LAN adaptor
(optional)
● Support 90 and 270 degree display
User dene resolution
● 10/100/1000 Mbps
Ethernet
● 802.11b/g wireless
LAN adaptor
(optional)
Network Interface
● Support static IP and dynamic IP (DHCP)
● Support HTTP, SMB, ICMP
● Support network detection and will automatically change to backup off-line content during network disconnection
Network Protocols
●Support N/A ●Support ●Support
Detect EDID/DDC
parameters
● Connect to a keyboard or mouse
● Switch playlist by entering keypad key (0~9)
Other
HDD (Share with
content disk)
D i s k - o n - Mo d u l e
(Flash)
●Support ●Support N/A ●Support ●Support
System Disk
HID Touch Support
10
Page 19

1
SMP-WEB series does not support animation GIF and CMYK JPEG.
2
Only 720p H. 264 video is supported, bit-rate up to 5~8 Mbps.
3
The maximum bit-rate and resolution might be different based on your file encoding methods. We acknowledge
video playback results may be influenced by many factors, such as codec, bit-rate, screen resolution, or other
components playing with video at same time… etc.. Please test the video on SMP players in advance. CAYIN DOES
NOT GUARANTEE EVERY VIDEO FILE CAN BE PLAYED ON SMP PLAYERS PROPERLY WITHOUT TESTING
BEFOREHAND.
4
The applicable resolution is also related to the resolutions of your display. Please check the specications of the
display and choose a suitable one for you.
1-7 Install SMP-WEB Series
SMP-WEB SERIES USER MANUAL
1-7-1 Install Hardware
1. Open SMP package.
2. Connect the Ethernet to LAN port. (By default, SMP will get an IP address from a DHCP
server.)
3. Connect the VGA or DVI cable to your screen. (The default screen resolution is
1024x768.)
4. If you need to configure system settings directly from the player, please connect a
keyboard and a mouse to any of the USB connectors.
5. Connect the power adapter to a socket. SMP-WEB will be turned on by itself.
6. Once you see the LOGIN page on the screen, you already complete the installation.
11
Page 20
12
SMP-WEB SERIES
USER MANUAL
At any time, you can switch
between playback and Web
Manager in a local screen.
Just plug a keyboard to SMP
device and press Ctrl+F10
and switch to Web Manager
Login page, then press
Ctrl+F1 to switch to
playback mode.
1-7-2 Login on SMP-WEB Series
After installing a SMP player, please login and complete the
initial settings based on your network environment.
DHCP (Auto IP)
If you are in the DHCP network, SMP players will get an IP
address automatically after installation. You can start to login the
Web Manager page of the player directly after you connect a
keyboard and a mouse to the SMP device.
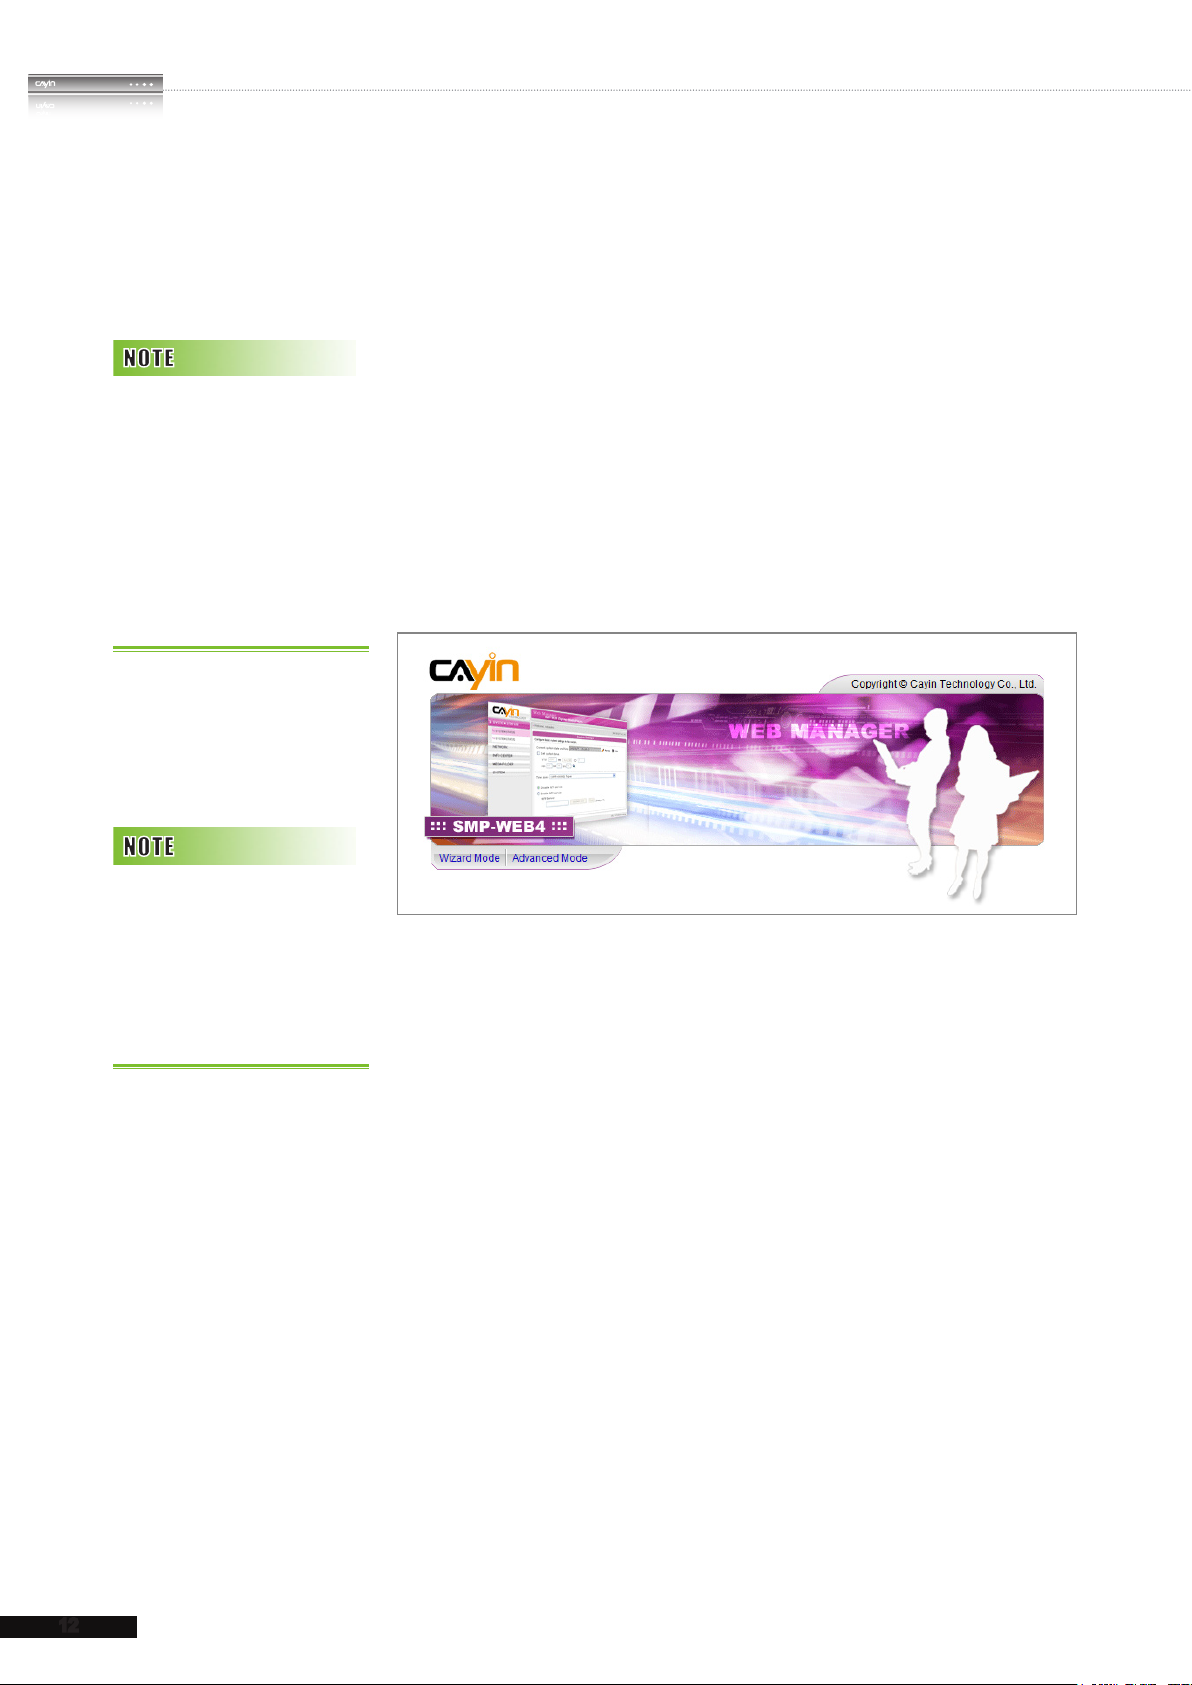
1. Click [
Wizard Mode
Manager, and enter a username and password.
Advanced Mode
] or [
] on the Web
Except for the initial
installation of SMP, we
suggest you to manage or
change settings of SMP by
remote PC, instead of doing
it directly from the player.
Default Username:
Default Password:
webadmin
admin
Static IP
If you are in the static IP network, please follow steps below to
login and complete network settings.
1. Connect a keyboard and a mouse to USB connectors on the
SMP player and connect the power adapter to a socket to
turn on the system. Click [
Mode
Default Username:
Default Password:
] and enter a username and password.
webadmin
admin
Wizard Mode
2. After logging in Web Manager, click [
SETTINGS
Network Wizard
] or [
] on the screen. Then,
Advanced
] or [
NET WOR K
click “
Static IP Address
” in the Ethernet Settings area and
set up all related network settings for this SMP.
Page 21
13
SMP-WEB SERIES USER MANUAL
3. After completing, click [
SAVE
] and [
APPLY
]. In the [
Network Wizard
the wizard steps to nish the settings. Then, the SMP client will reboot.
Wizard Mode
], please follow
Advanced Mode
Page 22

14
SMP-WEB SERIES
USER MANUAL
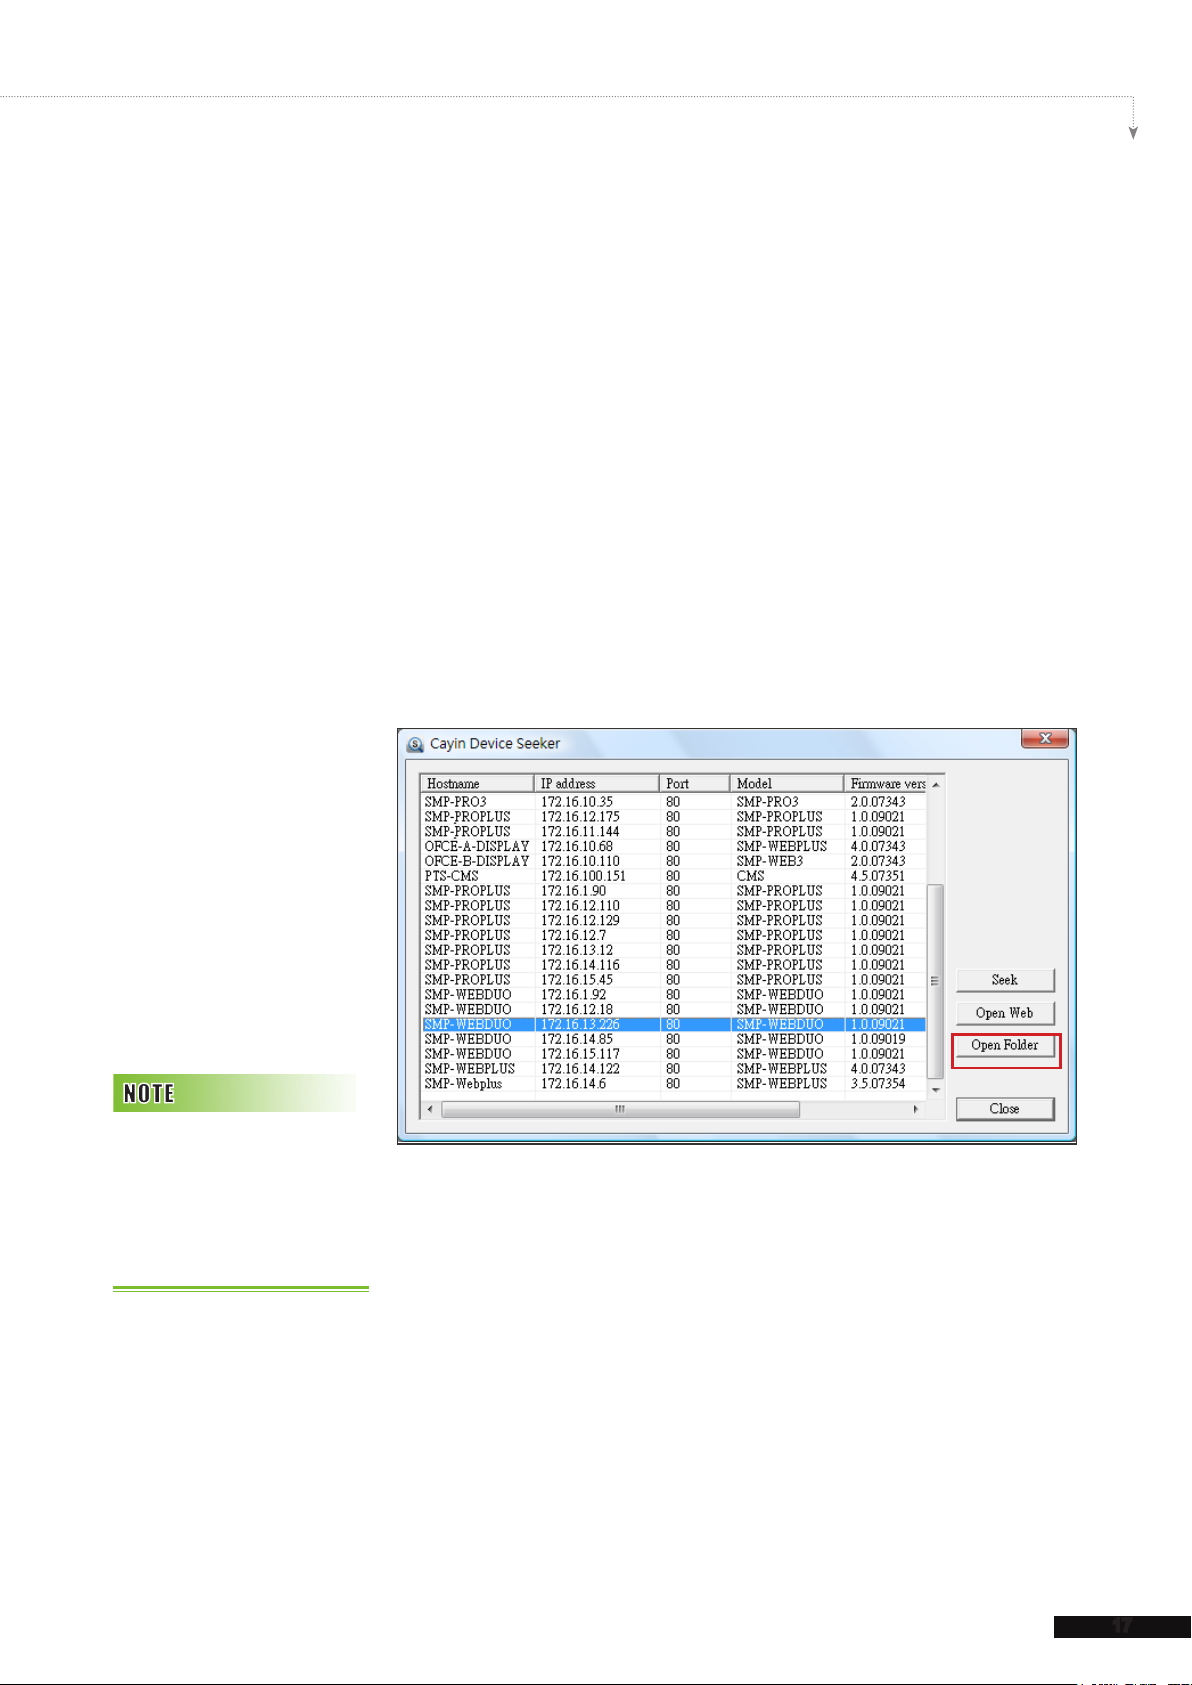
1-7-3 Remote PC Login
If you try to manage SMP remotely on your own PC, please follow below steps:
1. Insert the product CD into your CD-ROM, and run “
CAYIN Device Seeker
” (\
Tool\Device Seeker\seeker.exe). You can also copy this file to your PC for future
management.
2. Click [
Seek
] and the seeker will search all available SMP clients or CMS servers in the
same LAN. Select one player and double click the player’s name. Or, you can also click
a player’s name, and click [
3. You can also open the Media Folder of any player by [
the player you want to connect, and click [
Open Web
].
Open Folder
CAYIN Device Seeker
].
]. Select
4. If your PC and the SMP player are not in the same LAN, the Device Seeker can not
function properly. Please open the browser and enter the IP address of the SMP player.
After you login successfully, you can start to manage the SMP.
2
1
3
Page 23
15
SMP-WEB SERIES USER MANUAL
The enclosed accessories,
such as brackets and
screws, may differ from the
product you purchase.
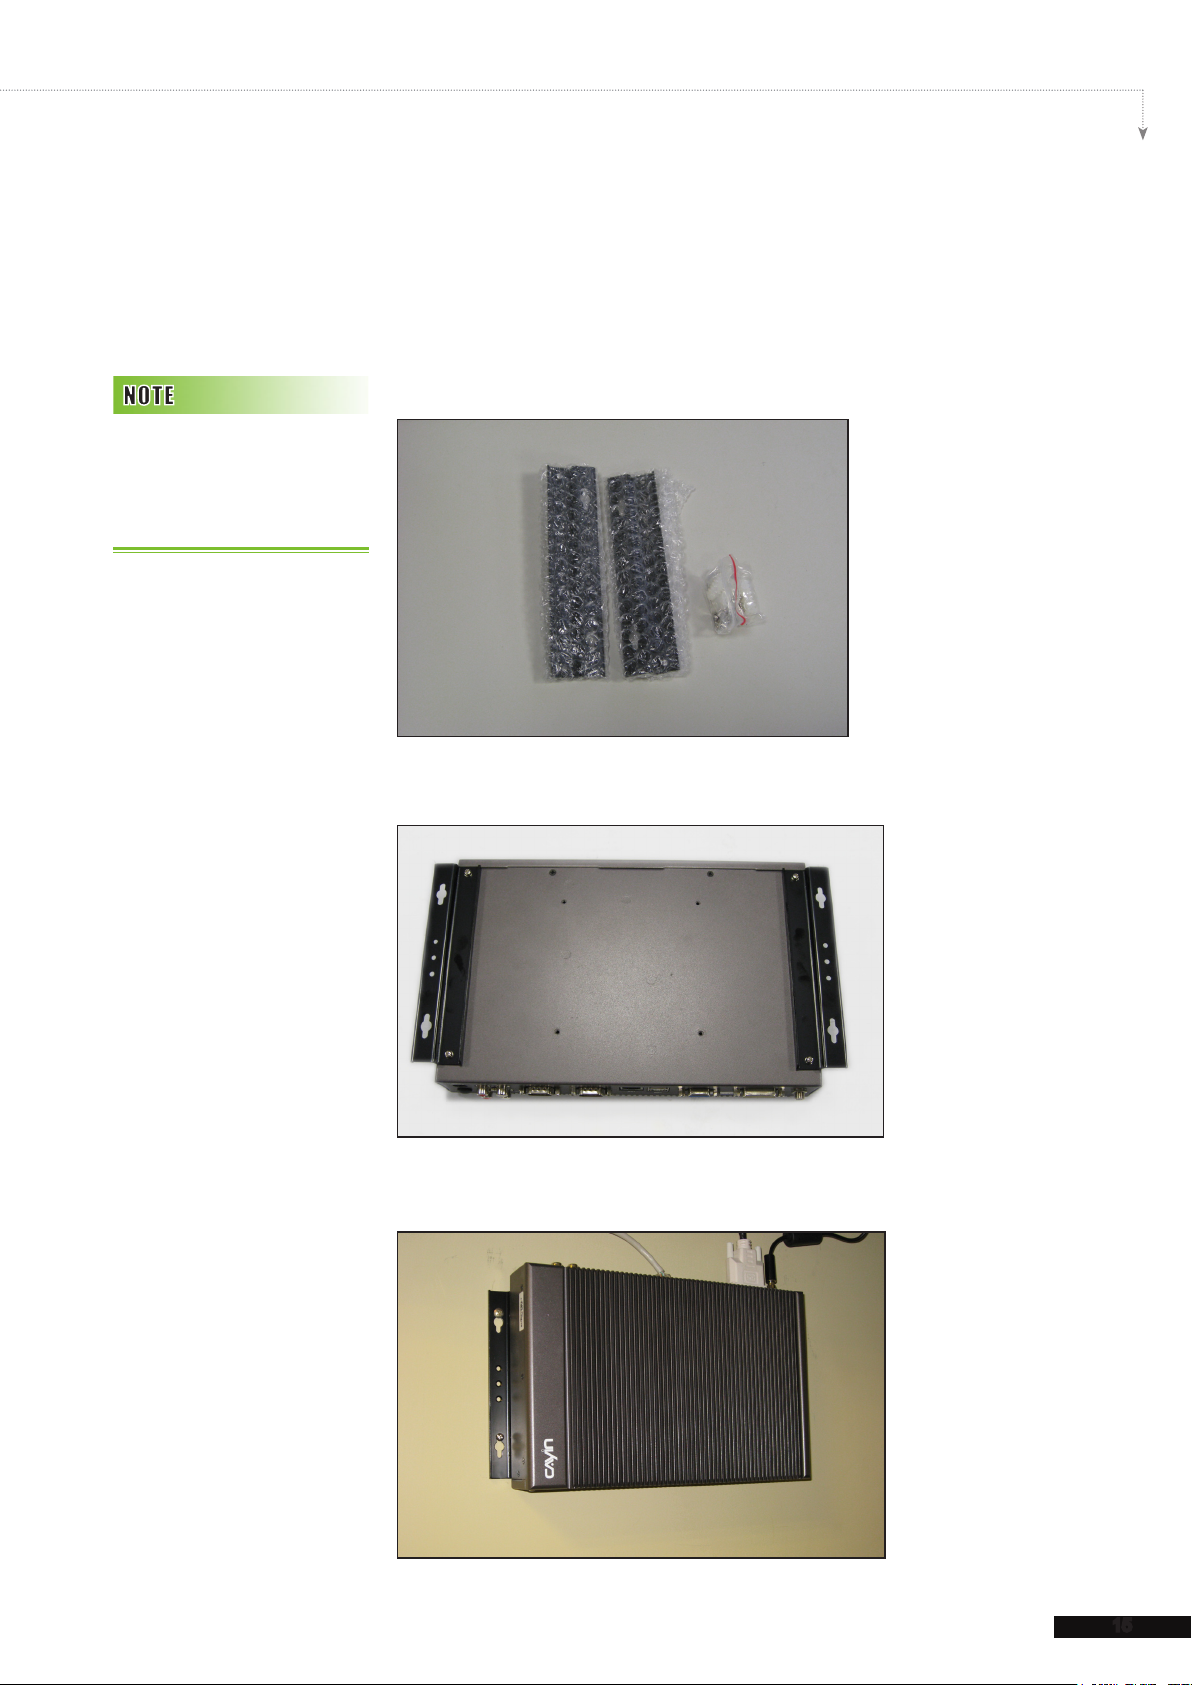
1-8 Wall Mount Installation
If you want to wall mount your SMP player, please read this
section for installation instructions. Here we take SMP-WEB4 for
illustration.
1. Please nd the enclosed brackets and mounting screws.
2. Attach the brackets with your SMP player and secure brackets
with provided mounting screws.
3. Hanging your SMP player to a suitable place and well secure
it with provided screws.
Page 24

2.
2-1 Upload Files to SMP Player ............................................ 17
2-2 Wizard Mode Introduction .............................................. 20
2-3 Network Wizard ............................................................... 20
2-3-1 Step1: Ethernet Conguration ............................................ 20
2-3-2 Step2: Wi-Fi Conguration (Optional) ................................. 21
2-3-3 Step3: Ping Gateway .......................................................... 22
2-4 System Wizard ................................................................. 23
2-4-1 Step1: Time & Language Settings ...................................... 23
2-4-2 Step2: Display Settings ...................................................... 24
Conguration in Wizard Mode
2-4-3 Step3: Media Folder Security Settings ............................... 30
2-5 Content Update Wizard ................................................... 31
2-5-1 Content Update Settings .................................................... 31
2-6 Playback Wizard .............................................................. 32
2-6-1 HTML Playlist ...................................................................... 32
Page 25
2-1 Upload Files to SMP Player
When you use SMP players without CMS server, you can
choose one of the following methods to upload files to SMP-
WEB series players.
Method 1:
SMP-WEB SERIES USER MANUAL
1. Insert the product CD into your CD-ROM, and run [
Device Seeker
] (\Tool\Device Seeker\seeker.exe). You can
CAYIN
also copy this le to your PC for future management.
2. Click [
Seek
] and the seeker will search all available SMP
clients or CMS servers in the same LAN. When the devices
are found, select the one you want to connect, and click
Open Folder
[
].
Your PC and SMP player
have to be in the same LAN,
so that you can use CAYIN
Device Seeker to open the
Media Folder of that SMP.
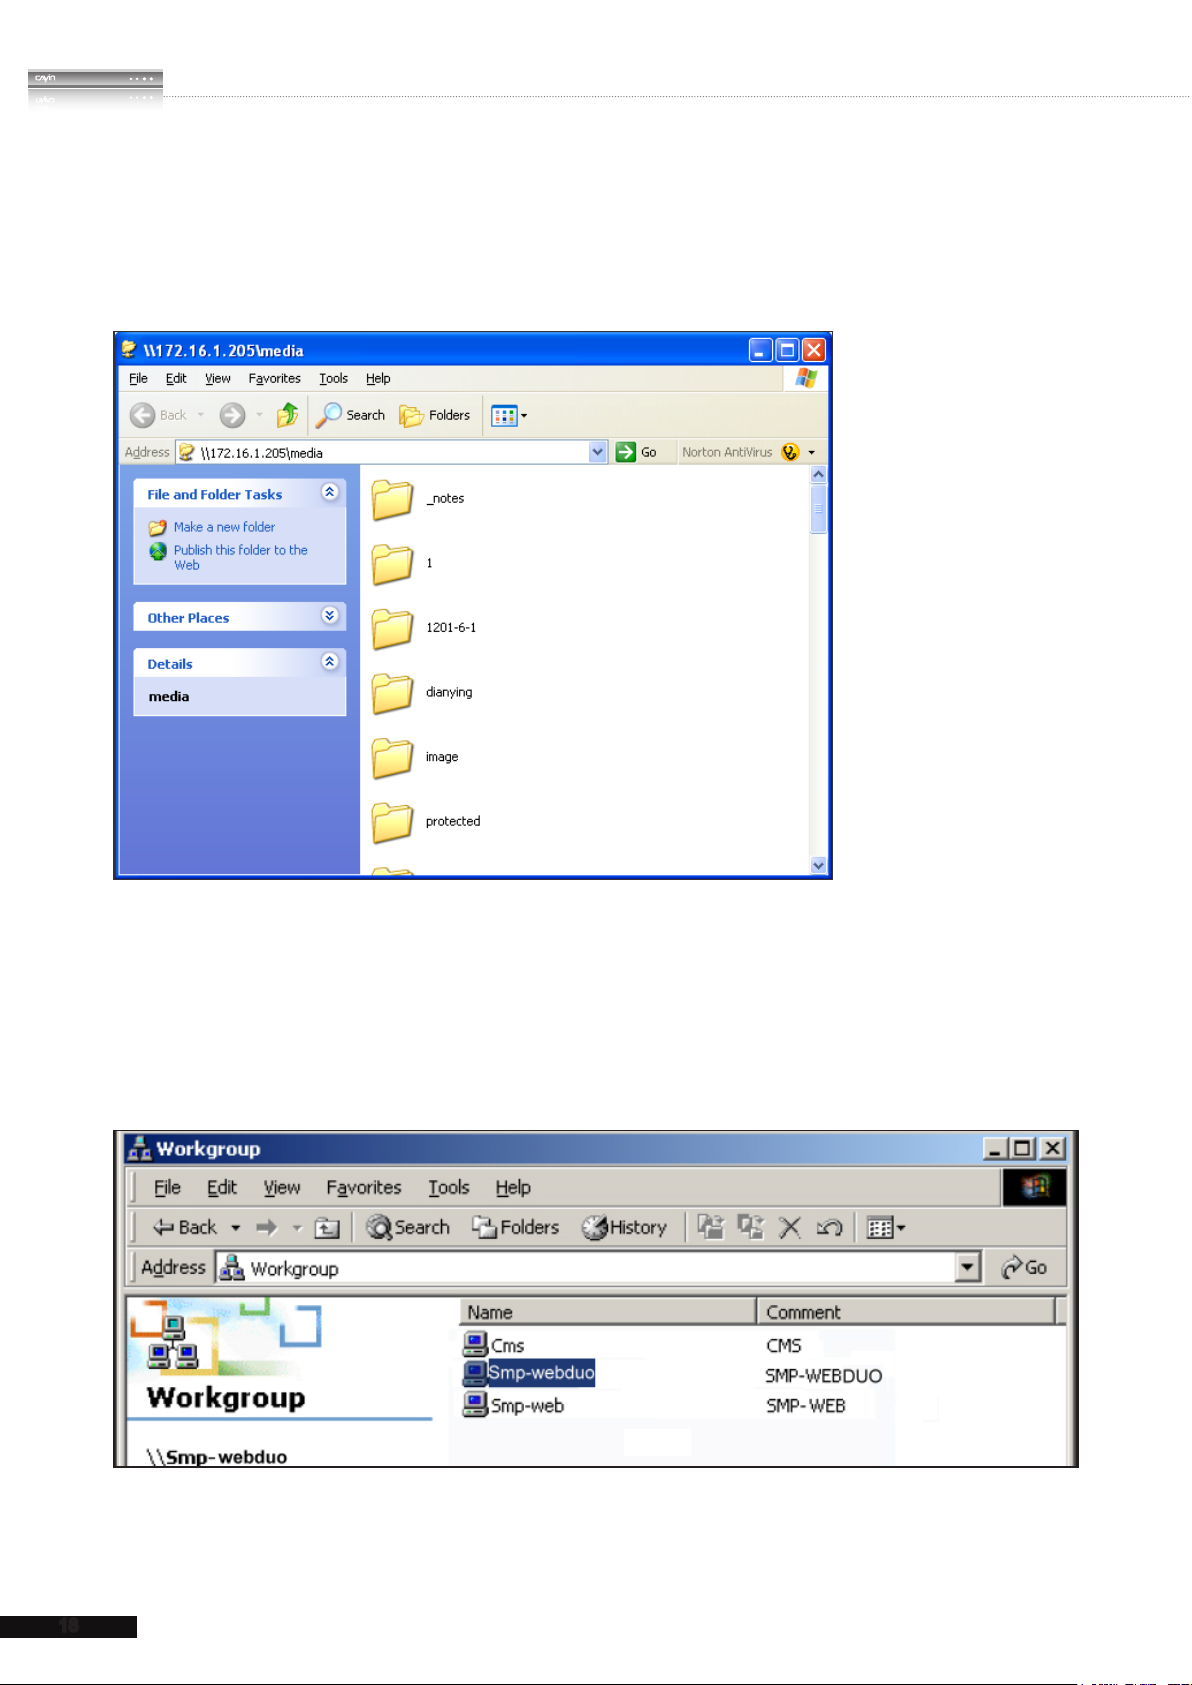
3. Your PC will open File Explorer and you can see files or
folders in your selected player.
4. Copy multimedia files from your PC to the SMP player via
Network Neighborhood and then you can start to play those
les in the SMP player.
17
Page 26
18
SMP-WEB SERIES
USER MANUAL
Method 2:
1. Open [
File Explorer
], and enter the "
\\hostname
\\IP address
" or “
”. For example,
if your hostname is SMP-WEBDUO, please enter \\SMP-WEBDUO or \\172.16.1.205.
2. Copy multimedia les from your PC to the SMP player via Network Neighborhood and
then you can start to play those les in the SMP player.
Method 3:
1. Open
"
Network Neighborhood
"
of your PC. All PCs in
"
Workgroup
"
will be listed.
You can see all SMP clients or CMS servers from your Windows Explorer, like the gure
below:
2. Copy multimedia les from your PC to the SMP player via Network Neighborhood and
then you can start to play those les in the SMP player.
Page 27
19
SMP-WEB SERIES USER MANUAL
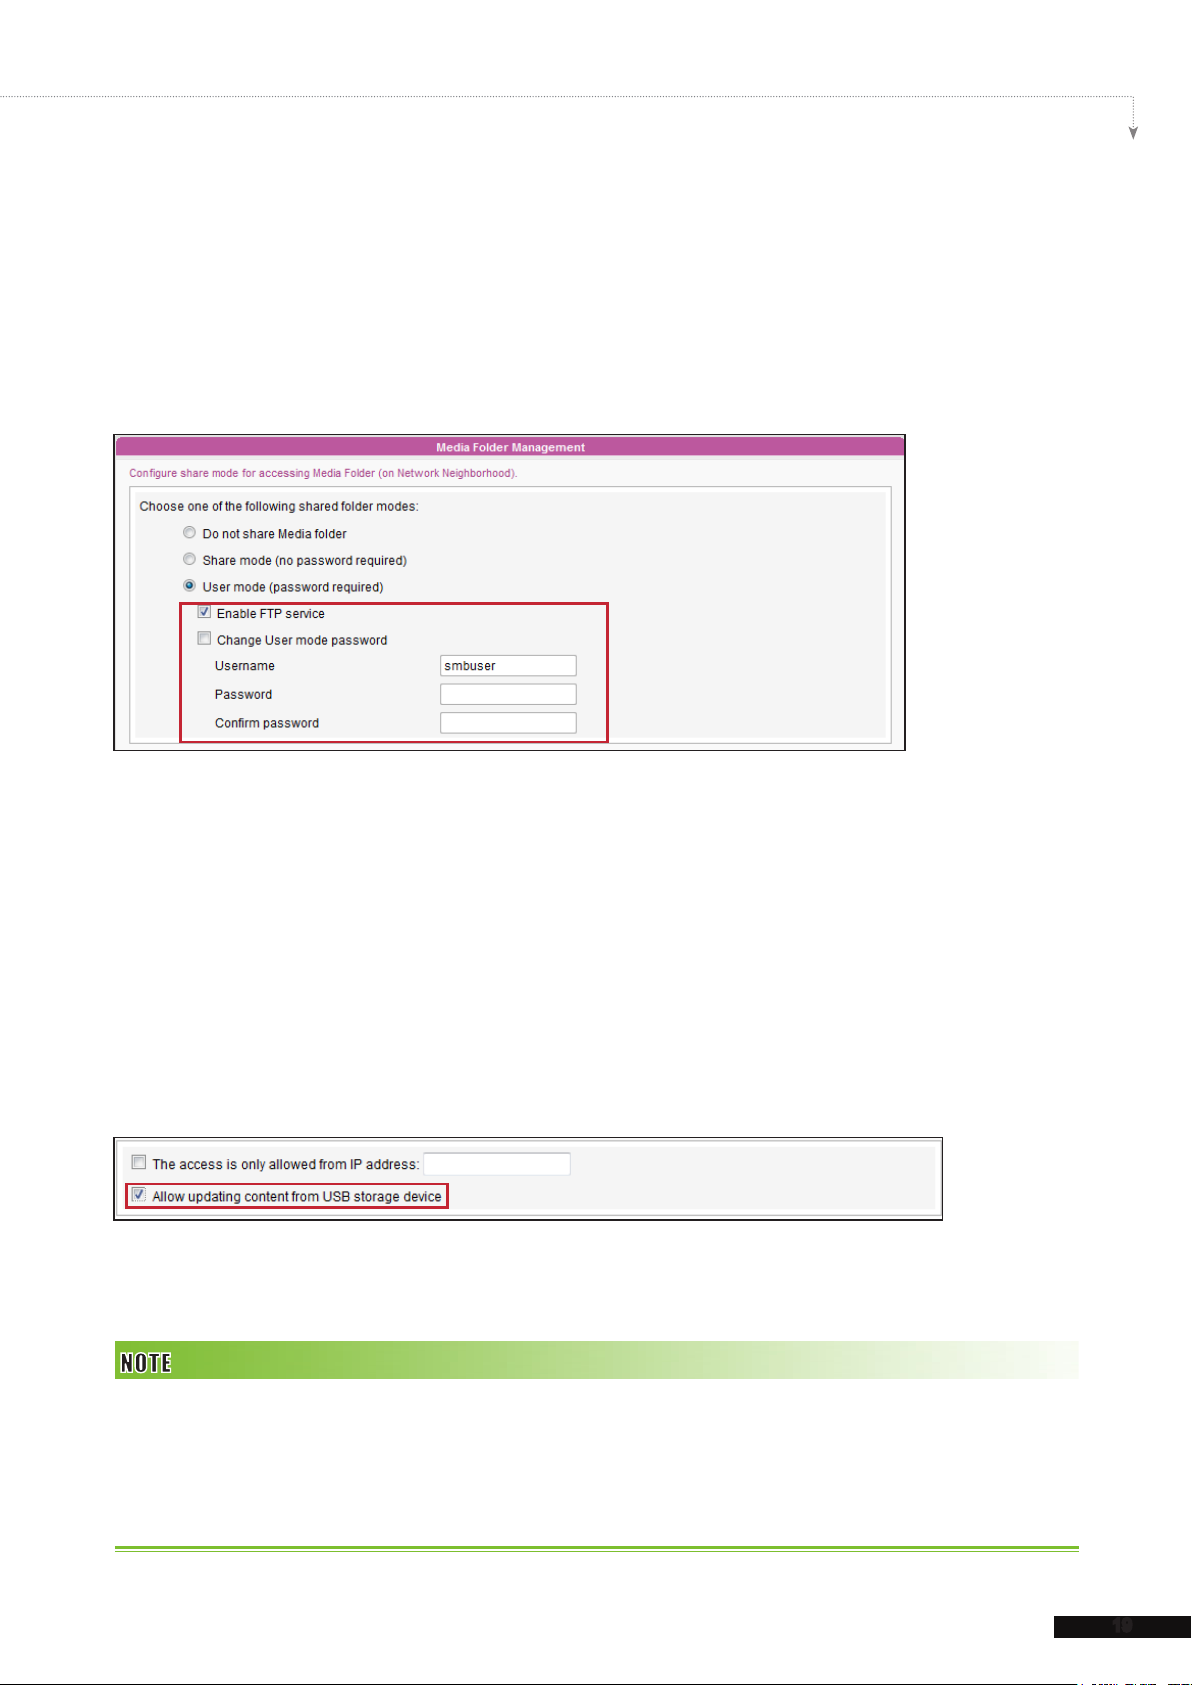
Method 4:
1. Login to SMP Web Manager and click “
2. Go to “
Media Folder Management
Media Folder
” and tick “
Enable FTP service
” in the main page.
” checkbox.
3. Please enter username and password here. The default ID/PW is smbuser/smbuser. If
you want to change password, please tick “
Change User mode password
” and
enter your new password accordingly.
4. Click [
Save
] to save the settings and then click [
Apply
] on left side column to apply the
changes.
5. Now you can use your familiar FTP client software to upload/delete files in Media
Folder(s).
Method 5:
1. Login to SMP Web Manager and click “
2. Go to “
Media Folder Management
content from USB storage device
Apply
click [
] on left side column to apply the changes.
Media Folder
” in the main page.
” and tick the checkbox, “
”. Click [
Save
] to save the settings and then
Allow updating
3. Now you can insert your USB storage device (usually a USB ash drive or USB HDD) to
update the content into Media Folder.
The USB file system supported by SMP players are as followings: SMP-WEB3/WEB3N: FAT/FAT32; SMP-WEB4/
WEBPLUS/WEBDUO: FAT/FAT32/NTFS
If you use FAT/FAT32 in USB storage, we strongly suggest you that all characters in lename should be in lower case
due to le system’s limitation. It may not be a problem if you congure to play all les in the device or in specic folders.
However, the lename must be in lower case, if your playlist includes any specic lename.
Page 28
20
SMP-WEB SERIES
USER MANUAL
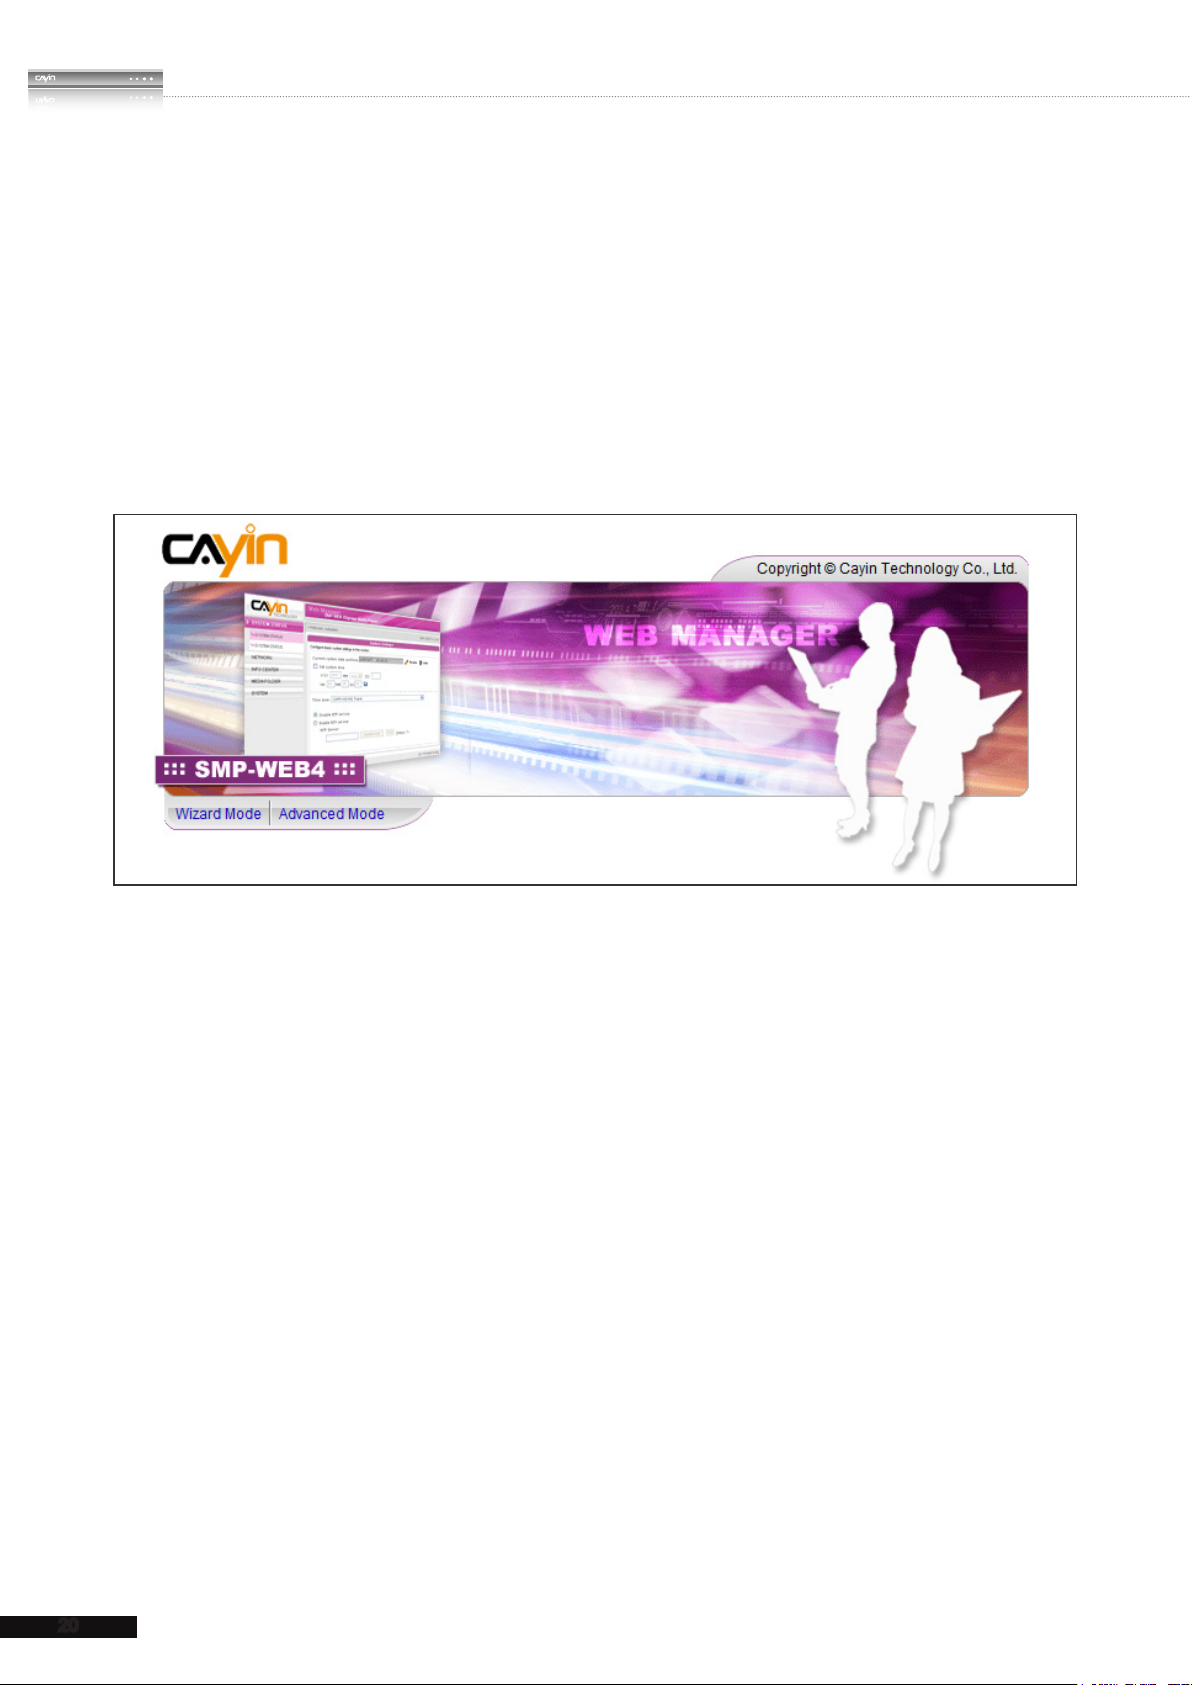
2-2 Wizard Mode Introduction
When you open SMP Web Manager, you can choose to use Wizard Mode by clicking on
Wizard Mode
the [
] button. After entering the Wizard mode, you will see four wizards:
Network Wizard, System Wizard, Content Update Wizard
Wizard
Playback Wizard.
If you need to congure more detailed settings, please switch to the Advanced Mode.
. You can complete the basic conguration step by step from Network Wizard to
, and
Playback
2-3 Network Wizard
“
In the
and Wi-Fi congurations.
Network Wizard
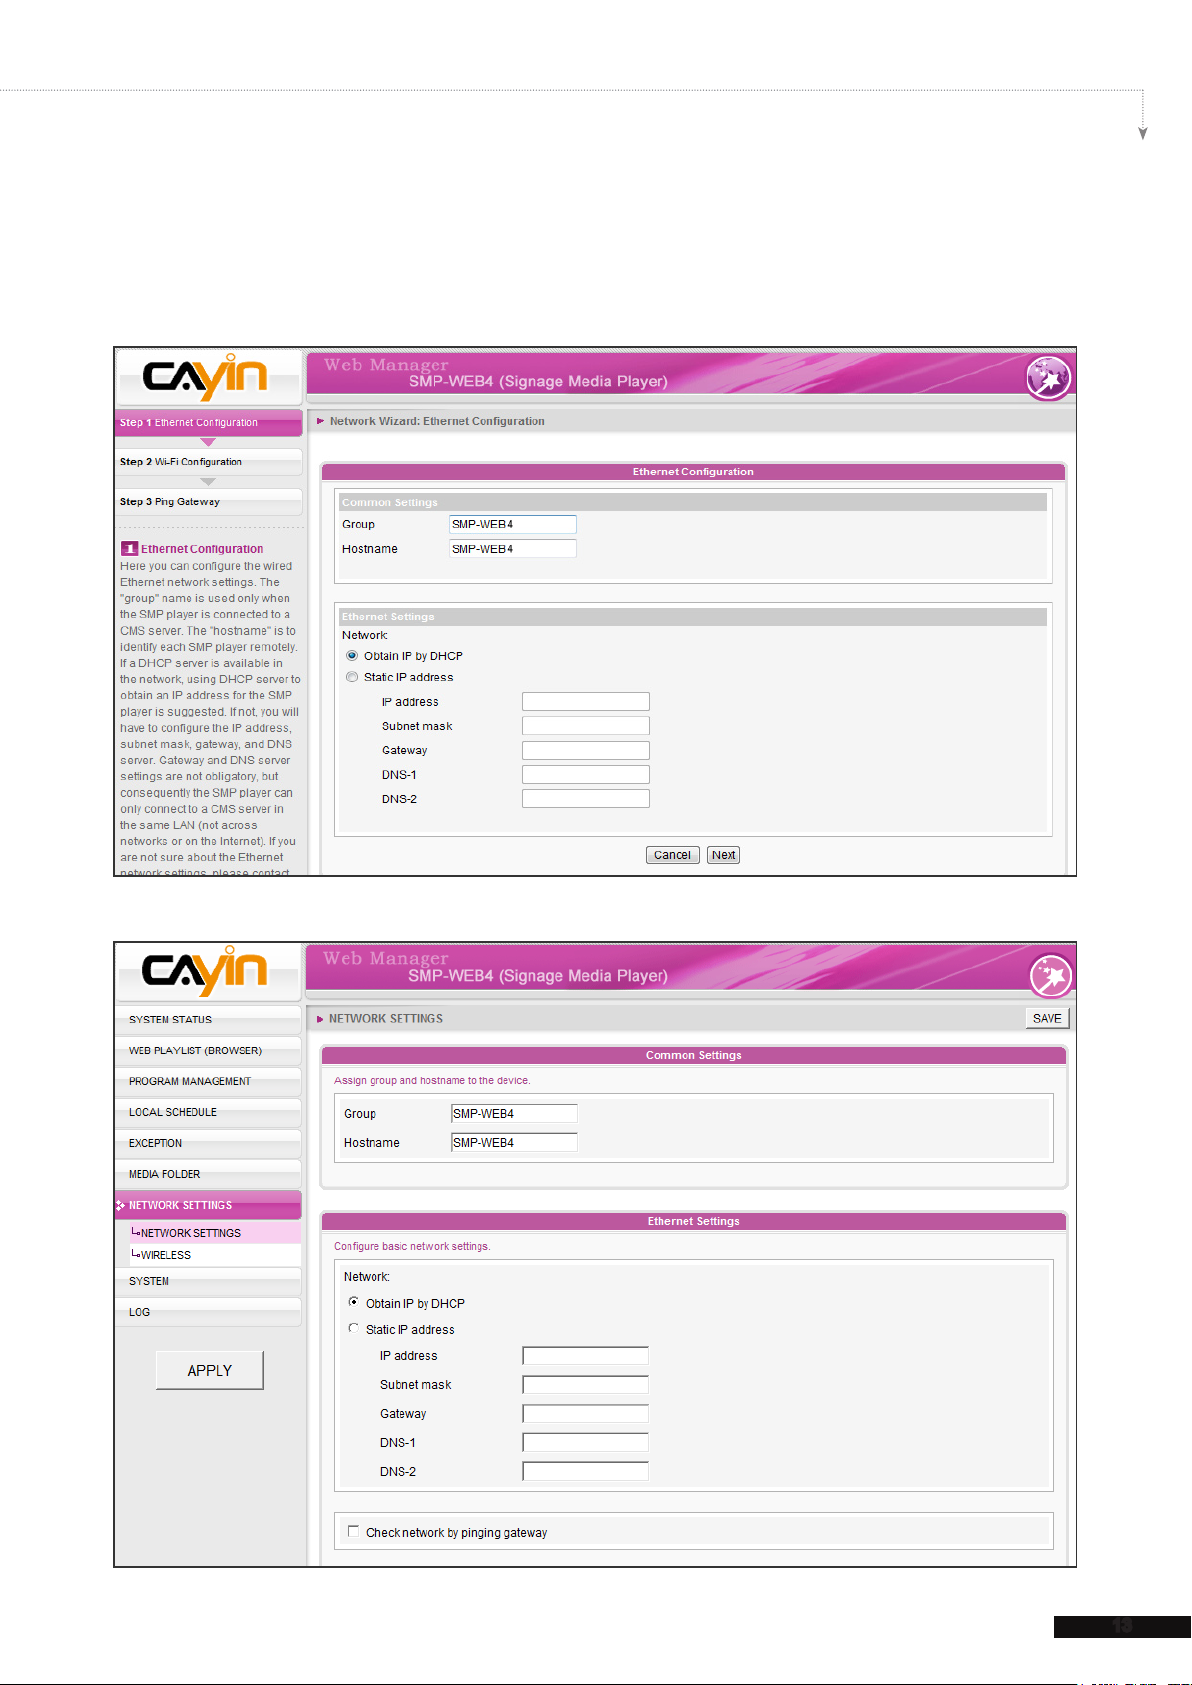
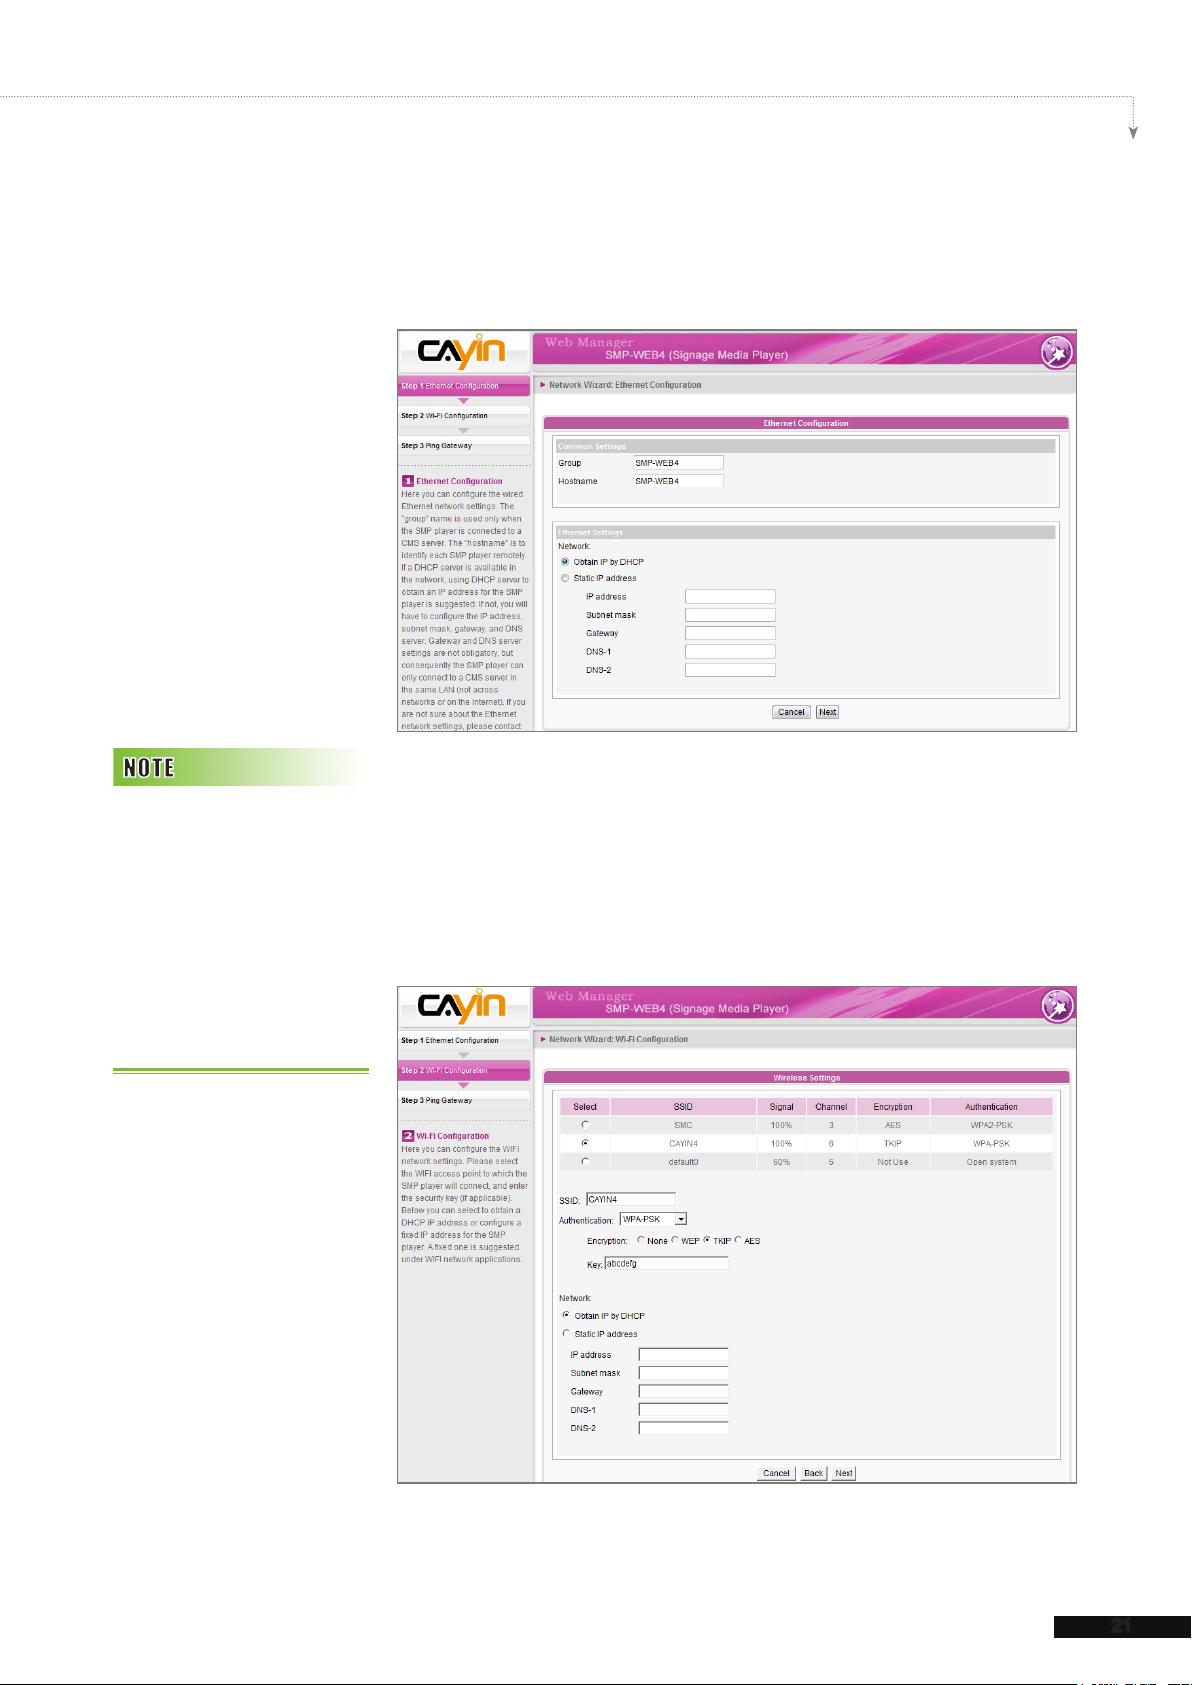
2-3-1 Step1: Ethernet Conguration
Here you can congure the wired Ethernet network settings.
Firstly, please enter the
when the SMP player is connected to a CMS server. The "
SMP player remotely.
Then, select either DHCP or static IP address, based on your own network environment.
If a DHCP server is available in the network, using DHCP server to obtain an IP address
for the SMP player is suggested. If not, you will have to congure the IP address, subnet
mask, gateway, and DNS server. Gateway and DNS server settings are not obligatory,
but consequently the SMP player can only connect to a CMS server in the same LAN (not
”
, you can finish network-related settings, including Ethernet
Group name
Hostname
and
. The "
group
hostname
" name is used only
" is to identify each
Page 29
21
SMP-WEB SERIES USER MANUAL
across networks or on the Internet).
If you are not sure about the Ethernet network settings, please
contact your ISP or network administrator.
If you connect wired and
wireless network to the
player at the same time, the
system will choose the wired
one as the first priority, and
will switch to the wireless
one automatically when you
unplug the wired Ethernet
connection.
2-3-2 Step2: Wi-Fi Configuration
(Optional)
If you attach a compatible USB Wi-Fi adaptor to a SMP player,
you will see the page “
wireless network settings here.
Wireless Settings
” and can congure
Page 30

22
SMP-WEB SERIES
USER MANUAL
If you use WEP, the key will
be 5 or 13 characters, 10 or
26 hexadecimal. If you use
TKIP or AES, the key will be
8~63 characters.
We suggest you use static
IP address for more stable
Wireless connection.
1. Choose a suitable wireless AP (Access Point). Please
be aware that a low-signal AP may lead to an unstable
connection and data loss. If you don’t see any Wi-Fi AP listed,
please check your Wi-Fi environment with your network
administrator.
2. Choose an appropriate authentication and encryption method.
Normally, these settings can be detected automatically.
Please enter the key if necessary.
3. Please specify the DHCP or static IP address for the wireless
connection of the SMP player.
If you need a compatible Wi-Fi adaptor, please contact CAYIN
sales representative, or authorized resellers.
Normally enabling this
function won't cause other
network problems.
2-3-3 Step3: Ping Gateway
When the DHCP server is unstable and results in poor network
connection, the function "
try to repair the network connection. If the SMP player uses a
dynamic IP address assigned by ISP DHCP service, please
check this function. If the SMP player uses a fixed IP address
or a dynamic IP address assigned by a LAN's DHCP service,
please uncheck this function.
After nishing the conguring, press [
Network Wizard's settings.
ping gateway
Finish
" can automatically
] to accomplish the
System may need to reboot after you nish Network Wizard.
Page 31

23
SMP-WEB SERIES USER MANUAL
2-4 System Wizard
You can congure time, language, display, and security settings in this wizard.
2-4-1 Step1: Time & Language Settings
Here you can congure the settings of date, time, and Web Manager's language.
First, please select the right time zone of your location. If the SMP player is connected
to the Internet, it is suggested to use an NTP server (e.g. time.nist.gov) to automatically
synchronize the time. You can also manually configure the correct time, and select the
language of Web Manager. Currently the Web Manager supports English, German, French,
Italian, Spanish, Polish, Japanese, Traditional Chinese, and Simplied Chinese.
1. Choose correct time zone.
2. You can decide to use NTP server or set correct system time by yourself.
3. Choose a preferred UI language
4. Click [
Next
] to proceed.
Page 32

24
SMP-WEB SERIES
USER MANUAL
2-4-2 Step2: Display Settings
Here you can configure the settings relevant to the display
device. According to the actual screen connected to the SMP
player, please congure its screen resolution and refresh rate.
On some SMP models, you can select the video signal output.
If you would like to cut off the VGA signal in specic time to let
the screen switch to standby mode (applicable to most today's
screens for power saving), you can configure the applied time
and days.
SMP-WEBDUO provides several display modes. For detailed
If you choose DVI or VGA
output (not Auto), those
resolutions with * sign after
the number are supported
by display’s EDID (or DDC)
information. Choosing
those resolutions without *
sign is not suggested and
the system may not work
properly. If you cannot see
any * after the resolution
number, please check your
display maker or your VGA/
DVI cable for EDID signal
support.
introduction of each configuration, please refer to section
Display Settings
.
7-4
SMP-WEB4
1. Choose an output method from the drop-down menu and
display configurations such as display orientation and
resolution. Those information will be shown below the drop-
down menu according to your selection. Please congure the
settings accordingly.
2. Tick "
Hide Cursor
cursor on the screen.
" checkbox if you don’t want to see the
Page 33

25
SMP-WEB SERIES USER MANUAL
3. If you want to turn off the display (SMP will cut down the VGA
Most screens will enter the
sleep mode when the VGA
or DVI signal is cut down by
the SMP player. However,
some screens might respond
unexpectedly, such as
showing a blue screen. The
outcome depends on the
rmware of each screen, not
SMP player.
or DVI output automatically), you can set a specific time of
a day or day of week to cut off the VGA/DVI signal at the
bottom of this page.
4. Click [
SAVE
] to save all the settings.
* User Dene Resolution (for advanced user)
If you do not find any suitable resolutions in the drop down
menu, you can customize your own resolution by our "
dene
1. Choose
2. Click the [
” feature.
User dene
User dene
in the drop down menu.
] button; then, you will see a pop-up
User
window.
Some display’s refresh rate
is not happened to be an
integer (e.g. 59.9 Hz). You
must check with your display
vendor or try some numbers
in the vicinity of that possible
refresh rate.
We DO NOT guarantee
any number you choose or
enter on the User-Defined
Display Resolution page
can be compatible to your
display. You must test the
compatibility of your display
before you use it.
3.
Choose either “
Advanced Conguration
“
Basic Conguration
”. For “
Basic Conguration
” (Recommended) or
you just need to enter a compatible resolution and refresh
rate for your display. For “
Advanced Conguration
must enter all necessary parameters, provided by your display
vendor to drive the graphic output. Please note the max.
resolution here is 2048x2048, the min. resolution is 320x240.
4. Click [
5. Click [
Save
SAVE
] and go back to the “
] to save all the settings.
Display Settings
” page.
”,
”, you
Page 34

26
SMP-WEB SERIES
USER MANUAL
If you choose DVI or VGA
output (not Auto), those
resolutions with * sign after
the number are supported
by display’s EDID (or DDC)
information. Choosing
those resolutions without *
sign is not suggested and
the system may not work
properly. If you can not see
any * after the resolution
number, please check you
display maker or your VGA/
DVI cable for EDID signal
support.
SMP-WEBDUO
1. Choose an output method from the drop-down menu as well
as display configurations such as display orientation and
resolution. Those information will be shown below the drop-
down menu according to your selection. Please congure the
Most screens will enter the
sleep mode when the VGA
or DVI signal is cut down by
the SMP player. However,
some screens might respond
unexpectedly, such as
showing a blue screen. The
outcome depends on the
rmware of each screen, not
SMP player.
settings accordingly.
2. Tick "
Hide Cursor
" checkbox if you don’t want to see the
cursor on the screen.
3. If you want to turn off the display (SMP will cut down the VGA
or DVI output) automatically, you can set a specific time of
a day or day of week to cut off the VGA/DVI signal at the
bottom of this page.
4. Click [
SAVE
] to save all the settings.
* User Dene Resolution (for advanced user)
If you do not find any suitable resolutions in the drop down
menu, you can customize your own resolution by our "
dene
” feature.
User
1. Choose
User dene
in drop down menu.
Page 35

27
SMP-WEB SERIES USER MANUAL
Some display’s refresh rate
is not happened to be an
integer (e.g. 59.9 Hz). You
must check with your display
vendor or try some numbers
in the vicinity of that possible
refresh rate.
2. Click the [
User dene
window.
3. Choose either “
Advanced Configuration
or “
Configuration
] button; then, you will see a pop-up
Basic Configuration
” (Recommended)
”. For “
Basic
”, you just need to enter a compatible
We DO NOT guarantee
any number you choose or
enter on the User-Defined
Display Resolution page
can be compatible to your
display. You must test the
compatibility of your display
before you use it.
resolution and refresh rate for your display. For “
Conguration
”, you must enter all necessary parameters,
Advanced
provided by your display vendor to drive the graphic output.
Please note the max. resolution here is 2048x2048, the min.
resolution is 320x240.
4. Click [
5. Click [
SAVE
SAVE
] and go back to the “
] to save all the settings.
Display Settings
” page.
Page 36

28
SMP-WEB SERIES
USER MANUAL
SMP-WEBPLUS (LB-500)
also supports to display
single content on two screens
connected by the VGA and
the DVI-D connectors. We
strongly recommend you
to use two pre-tested and
identical screens to properly
work this function.
SMP-WEBPLUS
1. Tick "
Hide Cursor
" checkbox if you don’t want to see the
cursor on the screen.
2. Choose a proper screen resolution and rotation mode.
Most screens will enter the
sleep mode when the VGA
signal is cut down by the
SMP player. However, some
screens might respond
unexpectedly, such as
showing a blue screen. The
outcome depends on the
rmware of each screen, not
SMP player.
3. If you want to turn off the display (SMP will cut down the VGA
output) automatically, you can set a specic time of a day or
day of week to cut off the VGA signal at the bottom of this
page.
4. Click [
SAVE
] to save all the settings.
* User Dene Resolution (for advanced user)
If you do not find any suitable resolutions in the drop down
menu, you can customize your own resolution by our "
dene
” feature.
User
1. Choose
User dene
2. Click the [
in drop down menu.
User dene
] button; then, you will see a pop-up
Page 37

29
SMP-WEB SERIES USER MANUAL
Some display’s refresh rate
is not happened to be an
integer (e.g. 59.9 Hz). You
must check with your display
vendor or try some numbers
in the vicinity of that possible
refresh rate.
window.
3. Choose either “
Advanced Configuration
or “
Configuration
Basic Configuration
” (Recommended)
”. For “
Basic
”, you just need to enter a compatible
We DO NOT guarantee
any number you choose or
enter on the User-Defined
Display Resolution page
can be compatible to your
display. You must test the
compatibility of your display
before you use it.
resolution and refresh rate for your display. For “
Conguration
”, you must enter all necessary parameters,
Advanced
provided by your display vendor to drive the graphic output.
Please note the max. resolution here is 2048x2048, the min.
resolution is 320x240.
4. Click [
5. Click [
SAVE
Next
] and go back to the “
] to proceed.
Display Settings
” page.
Page 38

30
SMP-WEB SERIES
USER MANUAL
SMP-WEB3/WEB3N
1. Tick "
Hide Cursor
" checkbox if you don’t want to see the cursor on the screen.
2. Choose a proper screen resolution and output connector.
3. If you want to turn off the display (SMP will cut down the VGA output) automatically, you
can set a specic time of a day or day of week to cut off the VGA signal at the bottom of
this page.
4. Click [
SAVE
] to save all the settings.
2-4-3 Step3: Media Folder Security Settings
Here you can congure the security settings for the SMP Media Folder access.
If you select "
you won't be required a password while you access the SMP Media Folder.
You can also use "
After nishing the conguration, press [
share mode
user mod
", which is the most convenient but also the least secured way,
e" and assign a password.
Finish
] to accomplish the "
System Wizard
" Settings.
Page 39

31
SMP-WEB SERIES USER MANUAL
2-5 Content Update Wizard
2-5-1 Content Update Settings
Here you can congure the content synchronization of the Media Folder with a CMS server.
If the SMP player is only for ofine uses and doesn't connect to a CMS server, you can skip
this wizard.
1. Configure how frequently the SMP player will check with CMS server for updated
content.
2. Enter a
3. Enter one CMS server's account name and password. Such account is authorized to
access the content of the group.
4. Enter the CMS' IP or domain address (e.g. cms.your-company.com). You can click [
button to check whether you enter the correct data.
5. After nishing the conguration, press [
settings.
Group
name to which the SMP player belongs.
Finish
] to nish "
Test
Content Update Wizard
]
"
Page 40

SMP-WEB SERIES
USER MANUAL
2-6 Playback Wizard
2-6-1 HTML Playlist
Here you can edit playlist for SMP-WEB series. You can edit playlist here or centrally
manage your playlist by the CMS server.
1. Press [
video, image le, and remote URL, to the playlist.
2. If the selection "
checked, the SMP player will resume playing the next item in the selected playlist when
you change playlist. This function can ensure all items in a playlist can be shown on the
screen even if you stop playing that playlist before every item in that playlist is played.
3. If the selection "
SMP player will periodically check if the remote content les, URLs or content les in
local drive are updated. This selection is normally applied when you congure to play
only a single item on the playlist permanently.
4. Click [
Add new item
When playlist changes, resume from the next item
Check le timestamp/URL every N seconds
Finish
] to nish the "
] button to add a new item, which can be a local HTML, Flash,
" is checked, the
Playback Wizard
" settings.
", is
32
Page 41

Multimedia Contents
3.
3-1 Upload Files to SMP Player ............................................ 34
3-2 Edit Playlist ...................................................................... 37
3-2-1 Edit New Playlist ................................................................. 37
3-2-2 Set Default Playlist ............................................................. 41
3-2-3 Set Central Scheduling ....................................................... 41
3-2-4 When playlist changes, resume from the next item ............ 42
3-2-5 Enable Playlist Selection from a Keypad Device ............... 42
3-2-6 Check File Timestamp / URL .............................................. 43
3-3 Manage Playlist ............................................................... 43
3-3-1 Export Playlist ..................................................................... 44
3-3-2 Import Playlist ..................................................................... 44
3-3-3 Duplicate Playlist ................................................................ 45
3-4 HTTP Proxy ...................................................................... 46
Playback and Management
3-5 System Volume ................................................................ 47
3-6 Program Management ..................................................... 47
3-6-1 Manage Your Skin .............................................................. 47
3-6-2 Manage Your Program ........................................................ 48
3-6-3 Edit Program: Choose Your Skin ........................................ 50
3-6-4 Edit Program: Multimedia ................................................... 52
3-6-5 Edit Program: Image Slideshow ......................................... 53
3-6-6 Edit Program: Ticker Text ................................................... 54
3-6-6 Edit Program: Flash ............................................................ 56
3-6-7 Finish Your Program ........................................................... 57
3-7 Local Scheduling ............................................................. 57
3-7-1 Web Playlist ........................................................................ 57
3-7-2 System Volume ................................................................... 58
Page 42

34
SMP-WEB SERIES
USER MANUAL
SMP-WEB series supports the playback of a variety of
multimedia files. Users can upload all contents to the SMP
player, and edit the playlist. Then, SMP-WEB series player will
play les based on your pre-scheduled playlist. Users can also
choose to manage playlist and content update from CMS server.
3-1 Upload Files to SMP Player
When you use SMP players without CMS server, you can
choose one of the following methods to upload files to SMP-
WEB series players.
Method 1:
Your PC and the SMP player
have to be in the same LAN,
so that you can use CAYIN
Device Seeker to open the
Media Folder of that SMP.
1. Insert the product CD into your CD-ROM, and run [
Device Seeker
] (\Tool\Device Seeker\seeker.exe). You can
CAYIN
also copy this le to your PC for future management.
2. Click [
Seek
] and the seeker will search all available SMP
clients or CMS servers in the same LAN. When the devices
are found, select the one you want to connect, and click
Open Folder
[
].
3. Your PC will open File Explorer and you can see files or
folders in your selected player.
4. Copy multimedia files from your PC to the SMP player via
Network Neighborhood and then you can start to play those
les in the SMP player.
Page 43

35
SMP-WEB SERIES USER MANUAL
Method 2:
1. Open [
File Explorer
], and enter the "
\\hostname
\\IP address
" or “
”. For example,
if your hostname is SMP-WEBDUO, please enter \\SMP-WEBDUO or \\172.16.1.205.
2. Copy multimedia les from your PC to the SMP player via Network Neighborhood and
then you can start to play those les in the SMP player.
Method 3:
1. Open
"
Network Neighborhood
"
of your PC. All PCs in
"
Workgroup
"
will be listed.
You can see all SMP clients or CMS servers from your Windows Explorer, like the gure
below:
2. Copy multimedia les from your PC to the SMP player via Network Neighborhood and
then you can start to play those les in the SMP player.
Page 44

36
SMP-WEB SERIES
USER MANUAL
Method 4:
1. Login to SMP Web Manager and click “
2. Go to “
Media Folder Management
Media Folder
” and tick “
Enable FTP service
” in main page.
” checkbox.
3. Please enter username and password here. The default ID/PW is smbuser/smbuser. If
you want to change password, please tick “
Change User mode password
” and
enter your new password in according eld.
4. Click [
Save
] to save the settings and then click [
Apply
] on left side column to apply the
changes.
5. Now you can use your familiar FTP client software to upload/delete files in Media
Folder(s).
Method 5:
1. Login to SMP Web Manager and click “
2. Go to “
Media Folder Management
content from USB storage device
Apply
click [
] on left side column to apply the changes.
Media Folder
” in the main page.
” and tick the checkbox, “
”. Click [
Save
] to save the settings and then
Allow updating
3. Now you can insert your USB storage device (usually a USB ash drive or USB HDD) to
update the content into Media Folder.
The USB file system supported by SMP players are as followings: SMP-WEB3/WEB3N: FAT/FAT32; SMP-WEB4/
WEBPLUS/WEBDUO: FAT/FAT32/NTFS
If you use FAT/FAT32 in USB storage, we strongly suggest you that all characters in lename should be in lower case
due to le system’s limitation. It may not be a problem if you congure to play all les in the device or in specic folders.
However, the lename must be in lower case, if your playlist includes any specic lename.
Page 45

37
SMP-WEB SERIES USER MANUAL
You can edit at most 31
playlists (index 0~30) of
HTML/JPEG/SWF/VIDEO
and add up to 99 items in
each playlist.
3-2 Edit Playlist
You can edit playlists via Web Manager of SMP-WEB series
player on your own PC.
Only SMP-WEBDUO provides two HTML Playlists for two different screens. If you use “Distinct” as the display
output method, you must edit two web playlist for two displays: “HTML Playlist1” for the 1st display and “HTML
Playlist2” for the 2nd display. For all other display output methods, you only need to edit one HTML Playlist. Any
settings in HTML Playlist 2 will not take effect.
3-2-1 Edit New Playlist
Please follow the following steps to edit a new playlist for a SMP
player.
1. Login SMP and enter Web Manager.
2. Click [
PLAYLIST (BROWSER)
3. Locate the “
WEB PLAYLIST (BROWSER)
” page.
Playlist index
” drop-down menu, and select “0”.
Then, you can start to add an item in the “
4. Click [
Entry
Add new item
” pop-up window.
] and you can see an “
] and select “
Playlist 0
WEB
”.
Add/Edit
Page 46

38
SMP-WEB SERIES
USER MANUAL
5.
In the “
Add / Edit Entry
” window, you can decide the
sequence of this new item in the playlist. By default, the new
item will be inserted as the last item. For example, if you already
have five items in this playlist, the system will automatically
place this new item at the sixth place by default. You can also
choose to insert this new item between the rst and fth place.
Please refer to the following table for the detailed settings:
This method is similar to
the way you use in your PC
browser. SMP-WEB series
products do not support
HTTPS (SSL) protocol
currently.
Remote URL
HTML/SWF
le in Media
Folder
Specify a URL where SMP can connect to the html content, e.g.
http://remote_web_server/path/to/your.html .
You can also use dynamic server script, such as ASP, PHP, or CGI
to generate the HTML page. Check the box "
and group in URL
parameter to the end of the html URL automatically. For example,
you enter http://remote_web_server/test.php in this option, SMP
will actually send a request as http://remote_web_server/test.php?
hostname=hostname&group=groupname
The hostname here is the hostname that you configure in
NETWORK SETTINGS
“
Select to play an html or swf le in the Media Folder. By default,
SMP will automatically list all html and swf files in the Media
Folder, so you can select an item here. If you haven’t uploaded
your les in the Media Folder, you can also pre-edit the playlist
by clicking [
main.html) directly in the text box.
Enter new one
" and the system will append hostname/group
” at run-time.
] and entering the item (e.g. /cayin/
Append hostname
Page 47

39
SMP-WEB SERIES USER MANUAL
Image
transition
You can insert an image le (JPEG/GIF) as a display item or a
transition between two HTML les by enabling this function. You
can also configure the transition effect as follows. By default,
SMP will automatically list all image les in the Media Folder, so
you can select one here. If you haven’t uploaded your les in the
Media Folder, you can also pre-edit the playlist by clicking [
new one
in the text box.
* Animation:
leaves the screen. We now provide four animations: “
top to bottom
to right
* Speed:
* Pre-load next item:
like the system to start pre-loading the next item (eg. an html le)
before the image disappears. For example, the duration of this
image is 20 seconds and you want the system to start pre-loading
the next item at the 18th seconds, you need to set the number
2 (seconds)
“
loading time of the next item (html).
] and entering the item (e.g. /cayin/cartoon.jpg) directly
The transition effect when the image enters and
y from bottom to top
”, “
y from right to left
” and “
The speed of animation effect.
You must set the time when you would
” in the eld. The number here depends on the
”.
y from left
”, “
Enter
y from
If you play video files in the
Media Folder, you will not be
able to set the duration of
this video. The system will
automatically play the next
item in this playlist after the
system finishes playing the
whole video.
Please DO NOT assign an
empty playlist here. The
result may be unpredictable.
You can insert a video le as one of the items in the playlist, and
display a full-screen video. By default, SMP will automatically list
all video les in the Media Folder, so you can select one here. If
Video le in
Media Folder
Video-Input Play Video-in in full screen
Program
Playlist index
you haven’t uploaded your les in the Media Folder, you can also
pre-edit the playlist by clicking [
the item (e.g. /cayin/cartoon.mpg) directly in the text box.
After you select a video le, you can also set the display ratio as
4:3 or 16:9 or auto.
You can choose the program set and corresponding program
that you want to put in your playlist via this function. For detailed
information about how to add/edit the program, please refer to the
chapter
You can jump to a different playlist and item after playing this
newly-added item, as long as you configure the playlist index
and designated item number here. The playback jumps to the
designated item by your command. If the item number doesn’t
exist or is disabled, SMP will play the next available item in the
designated playlist. You don’t need to assign duration parameter
when using this function.
3-6
.
Enter new one
] and entering
Page 48

40
SMP-WEB SERIES
USER MANUAL
6. Once you nished all the settings above according to your requirements, remember to
set the duration of each playback item. After the time is up, SMP will play the next item.
If you congure the duration as “
moving to the next one. You can still use ‘
Always
”, the SMP will keep playing this item without
play-next-item
’ tag to change the playlist
item.
7. Click [
SAVE
] and [
CLOSE
] to complete the settings of an item.
8. Add more items to this playlist. If you want to adjust the order of the items, please click [Up]
Down
or [
9. After completing settings, click [
Please remember to enable those items which you wish to play one by one; or you can click [Select all Items] to
select all items in this playlist. SMP will only play those selected items. If you want to remove all items in this playlist,
please click [Delete all Items]. Moreover, you can also click [Duplicate Playlist] to reproduce any playlists
you’ve created.
] to move forward or backward.
SAVE
] and [
APPLY
].
Page 49

41
SMP-WEB SERIES USER MANUAL
3-2-2 Set Default Playlist
SMP-WEB series player can display only one active playlist at one time, so please click [
as default
word "
display items in that default playlist on the screen after the system start-up.
] if you would like to play the selected playlist index. The index number with the
default
" will be the default playlist and SMP-WEB series player will automatically
Set
3-2-3 Set Central Scheduling
If the playlist of this SMP player will be centrally controlled by a CMS server, please select “
Scheduling
player will play multimedia contents based on the schedule congured on CMS.
” in the drop down menu. You are not allowed to edit playlist directly in SMP. SMP
Central
Page 50

42
SMP-WEB SERIES
USER MANUAL
3- 2- 4 W h e n p l a y li st c h an ge s,
resume from the next item
If you enable this function, SMP will remember the last item it
played and resume from the next item when you switch playlist
by keypad, change default playlist, or change scheduling.
Press “.” Key at keypad, you
can trigger central scheduling
playlist. You can not switch
playlist index 10~30 from a
keypad device.
3-2-5 Enable Playlist Selection
from a Keypad Device
Leave “
device
number keys at a keypad/keyboard device which connects to a
SMP-WEB series player. You can edit up to 10 different playlists,
and user can easily change it by clicking 0~9 key in keyboard or
Enable playlist selection from a keypad
” checked and you can change the playlist by clicking
keypad mapping to playlist index 0~9.
Page 51

43
SMP-WEB SERIES USER MANUAL
3-2-6 Check File Timestamp / URL
When the playlist includes HTML items either from a URL or
SMP-WEB series player
judges if a le is updated by
the following ways:
* For remote URL: HTTP
Last-Modied header tag
* For HTML file in Media
Folder: File time
the Media Folder, you can choose to enable “
timestamp / URL every … seconds
Check file
” to automatically
check the URL or HTML file and refresh the new web page
according to your specified time. If there is no updated file, or
even the le is removed, the system will keep playing the original
one.
3-3 Manage Playlist
You can import or export all playlists or a specific playlist and
save a lot of time while preparing them.
Page 52

44
SMP-WEB SERIES
USER MANUAL
3-3-1 Export Playlist
If you congure the “Pop-up
Blocker” in your browser or
disable “File Download”,
the “Export” function will
not be able to function
properly. Please turn off your
Pop-up Block or add SMP
web manager in the “Allow
Web sites list”. You can
also try to press [Ctrl] key
while you click the [Export]
button. This works for most
pop-up blocker program.
Please follow the steps below o export playlists to your PC.
1. Login SMP and enter Web Manager.
2. Go to the “
Import/Export Web Playlist
the [
WEB PLAYLIST (BROWSER)
] button. Then, you can
” page and click
see a pop-up window.
3. In the “
Export
” area, you can choose to export all playlists
or export a specic playlist.
You cannot export a playlist
when you operate directly on
a SMP player. Please use a
PC to login Web Manager via
Ethernet and then export the
playlist.
4. Click [
CLOSE
] to save the le to your designated path and
folder. Then, you complete the backup process.
3-3-2 Import Playlist
You can import playlist to other SMP-WEB players. To import
playlist, please follow the stepsv below:
1. Login SMP and enter Web Manager.
2. Go to the “
Import/Export Web Playlist
the [
3. Click “
choose an exported playlist le (*.dat for all playlists or *.spl
for a single playlist)
WEB PLAYLIST (BROWSER)
Browse…
” button in the “
Import playlists
” page and click
] button.
” area to
Page 53

45
SMP-WEB SERIES USER MANUAL
4. You can either choose to import all playlists or import a specic playlist.
3-3-3 Duplicate Playlist
You can duplicate items from one playlist to another.
1. Click on [
2. Choose a source playlist
Duplicate Playlist
] button.
Page 54

46
SMP-WEB SERIES
USER MANUAL
3. Select items which you would like to duplicate from
theselected source playlist.
Please do not configure
this setting unless you have
a clear idea about your
network configurations. This
option only affects playback
remote URL at browser. If
you need to update contents
from CMS to SMP and to use
SuperMonitor, please consult
your network administrator to
open the port access.
4. Select a target playlist. You can either replace, append to end,
or insert the source items to the target playlist.
3-4 HTTP Proxy
You can congure proxy settings if your network has restrictions
to Internet connection. Please congure one of the following
settings.
WEB HTTP Proxy DOES
NOT support automatic
account and password
authentication.
Direct connection to the Internet:
Browser connects to
Internet without proxy. This is the default setting.
Auto-detect proxy settings for this network:
Choose
this if you want Firefox to automatically detect the proxy settings
for your network.
Page 55

47
SMP-WEB SERIES USER MANUAL
Manual proxy configuration:
the IP address and port number of the proxy server. You can also specify hostnames or IP
addresses that are not proxied.
Automatic proxy conguration URL:
(.pac) le.
Choose this if you have a proxy server. Please enter
Choose this if you have a proxy conguration
3-5 System Volume
You can adjust the system volume of SMP player here. If you would like to control the
volume of all players by CMS server, please tick "
server
)".
Central Scheduling (by CMS
3-6 Program Management
Program provides an easy guideline to allow users include several multimedia les, ticker
and images into one package. User can also add the pre-edited program into the playlist for
SMP-WEB series players to enrich their contents.
Here you can learn how to congure a program as following steps.
3-6-1 Manage Your Skin
You can edit a schedule to playback different playlists at designated time.
1. Login SMP and enter Web Manager.
2. Go to
about all the skin types and related information in your SMP players. You can also delete
any skins that you do not like here.
PROGRAM MANAGEMENT > SKIN
page and you can have a clear picture
Page 56

48
SMP-WEB SERIES
USER MANUAL
Please refer to Chapter 6
Skin Management for
more detailed Information
about how to create your
own skin les.
3. If you want to upload your own skin file to the SMP player,
please go to “
Browse…
“
Skin Management
” area and click
” button to locate the skin le and click [
Upload
to upload it to your player.
4. You can also export the skin les by clicking [
Export
] button.
3-6-2 Manage Your Program
You can create and configure your own program by CAYIN’s
program wizard.
]
Page 57

49
SMP-WEB SERIES USER MANUAL
1. Login SMP and enter Web Manager.
If you want to upload
your own skin file, please
go to P R O G R A M
MANAGEMENT > SKIN
page to upload your pre-
designed skin le.
2. Go to
You can make your own Program Set by clicking [
Set
3. Click [
PROGRAM MANAGEMENT > PROGRAM
] button.
Add
] button to add a new program. You can see a
Create
wizard mode page, guiding you to create your own program
step by step.
page.
Page 58

50
SMP-WEB SERIES
USER MANUAL
3-6-3 Edit Program: Choose Your
Skin
The skin you choose here will
determine which zones will
be contained and congured
in the following steps. You
can use Preview to know
the detailed information.
1. If necessary, you can choose which
Program Set
want your new program belongs to in the drop down menu.
Remember to enter a
Program name
here and Description
(optional) for your program.
2. Choose the skin you want to use and click [
You can press
Preview
to know more detailed information
Next
] to proceed.
about the skin. If you do not want to adopt any skins, please
No Skin (play multimedia in full screen)
tick “
”
3-6-4 Edit Program: Multimedia
you
Play les in Media Folder
1. Tick “
Multimedia les in Media Folder
Playlist
”, and you will see a pop-up window. All video les
” and click “
in the Media Folder will be listed in the left column. If the left
column is empty, that means there is no file in the Media
Folder. Please add video les to Media Folder rst.
2.
Select the les you want to play. You can select multiple les at one
time by holding the Shift or Ctrl key, or just select les one by one.
In the left column, the item with “*” sign represents a folder’s name.
If you choose this item, it means you will select all les in this folder.
Edit
Page 59

51
SMP-WEB SERIES USER MANUAL
3. Click [
Select=>
], and all selected les in the left column will be duplicated to the right
column. SMP will only play those les in the right column.
4. If you want to play all les in the media folder, you can simply click the [
Select all=>
button. Then, all les in the left column will be duplicated to the right column.
5. Now, you can arrange the order of those selected files. In the right column, each file
will be added a serial number. SMP will play media les in the sequence, 1, 2, 3 … N.
Please refer to the following table for more functions. You can change the sequence of
the playlist by using [
using [
Remove
] and [
Move up
] and [
Remove all
Move down
].
], or delete items in the playlist by
]
Move up Select one item in the right column. Click [
Move down
Remove If you want to remove les from the “
Remove all Click [
Random
Select one item in the right column. Click [
Remove
[
Folder
Media Folder
If you select “
]. Then, those les will be removed from the right column, but will not be deleted from the Media
.
Remove all
], and all items will be removed from the right column, but all les will still be kept in the
.
Random
”, all les in the right column will be played randomly, without following the sequence.
Move up
Move down
Selected Files
], and this item will be moved forward in the playlist.
], and this item will be moved backward in the playlist.
” in the right column, please select les and click
6. If you want to play all multimedia les in the Media Folder more than once, please en-
able “Repeat playlist before proceeding to the next item” and set repeat
number of times here. If you select “Always repeat”, SMP player will keep playing this
program without playing next times in the web playlist. If you select “3”, SMP player will
repeat playing those multimedia les in the Media Folder for three times and then move
on to the next item in the playlist.
Page 60

52
SMP-WEB SERIES
USER MANUAL
If you want to enable the function, “Repeat playlist before proceeding to the next item”, please remember to set
the duration of this program as “Always” in web playlist (WEB PLAYLIST (BROWSER) > WEB PLAYLIST (BROWS-
ER)). If you set a certain duration for this program (e.g. 50 seconds), SMP may not be able to repeat playing all les in the
Media Folder within the congured time period. Then, this function may not be able to function properly as you expect.
Central Scheduling (by CMS Server)
The playlist of media les can be centrally scheduled and controlled by CMS server when
you purchase one. Please follow the following steps:
1. Login SMP player and enter Web Manager.
2. Click [
3. Click “
PLAYBAC K
] and select [
Central Scheduling (by CMS Ser ver)
MULTIMEDIA
] page
”. Then, the playlist of media les will
be centrally managed by CMS server. You can play selected media les once or weekly
at certain time or periods. Please refer to the section “
CENTRAL SCHEDULING
” in
CMS server for further settings.
RTB/RTP Streaming
SMP, incorporating with a CMS server, can play streaming video. To play streaming video as
RTB (Real-Time Broadcast) client, select the channel corresponding to the client’s server, i.e.
CMS server. To play Real-time Transport Protocol (RTP) streaming, enter the port number
of the relevant RTP server. Select the broadcast mode for the source. You can select to play
les in Media Folder when there is no video packet delivered from the streaming.
Page 61

53
SMP-WEB SERIES USER MANUAL
RTB and RTP are different protocols.
1. RTB Client only works with CMS’s RTB Server function.
2. You can use RTP compliant software sending RTP streaming
to SMP, e.g. VideoLAN client/server (http://www.videolan.org)
HTTP/MMS Streaming
To play video le via HTTP or MMS streaming, e.g. video le on a
web server or MMS server, enter the URL of the le in this option.
Video Input (only applied to some models)
To play AV-IN signal on the multimedia area, please select
Please go to “S K I N
MANAGER” page and
select a skin with at least one
pre-edited image slide show
area.
this item, and refer to section
7-4-5
for detailed video input
congurations.
Mute Function
If you do not want to play the audio of the multimedia source,
please tick [
Mute
] option to stop the audio playback.
3 - 6 - 5 E d i t P r o g r a m : I m a g e
Slideshow
You can assign the content source and congure related settings
here and refer the following table for detail descriptions:
Page 62

54
SMP-WEB SERIES
USER MANUAL
Play all image les in Media Folder Play all les in the media folder. Click [
playlist.
Central Scheduling (by CMS Server) Select this option to control the slideshow playlist from CMS server. See CMS
manual for detailed congurations.
2. Set the “
3. Set the “
4. If you enable the function “
Duration
” in seconds for playing each picture.
Sequence
”. You can select to play les forwards or backwards, or randomly.
Scale to t area
”, the system will automatically adjust the
Edit Playlist
] to further congure your
size of each image to t the display area of image slide show which you dene in the
skin.
5. Please complete the “
Image slideshow 2
” settings according to the previous steps.
3-6-6 Edit Program: Ticker Text
Select from multiple sources for the ticker text, and set up the font and the color of the
ticker area. Please refer to the following table to congure the source and content of the
ticker.
Page 63

55
SMP-WEB SERIES USER MANUAL
Enter Text here You can enter a text message, such as “
the settings and the text will be displayed on the screen.
Text le in Media Folder You can type your message in a text le and save the le in Media Folder. When
you enable this option, enter the lename, e.g. scroller.txt, and save the settings.
The message in the text le will be displayed.
SMP-WEB series now supports UTF-8 character encoding. If the content is not
written in English, please choose encoding type “
le.
Text from remote URL/RSS To show a text message available on a URL, enter the URL address in the
option, e.g. http://your_ server/message.txt. If you use the server side script to
generate the dynamic text, we suggest you only send the text result (mime type
txt/plain) back to the SMP player. You can also retrieve live RSS messages.
Enter the URL address in the option, e.g. http://rss.cnn.com/rss/cnn_us.rss. The
format of non-English RSS link should be in the UTF-8 character encoding.
SMP players checks RSS feed every 20 seconds and updates if necessary.
Central Scheduling (by CMS Server) Control ticker text from CMS server. For detailed conguration, please read the
user’s manual of CMS server.
This is a testing message!
UTF-8
” when you save the text
”. Save
You can change the font type, size, and color of the ticker.
1. In “
to right
Text Direction
right to left
” or “
” drop down menu, you can change the direction of the text from “
” to suit your own language conguration.
left
2. You can also select Font and Font Size as well as the Font Color by entering the R, G, B
code directly. Click [>>] to preview the accurate color.
Furthermore, you can enable single color background and choose a suitable color for your
ticker. Otherwise, the ticker background area will be transparent to the Skin background.
1. Click “
Set background color
” and enter the R, G, B code directly. Then, click [>>] to
see the accurate color.
2. If you want to change the scrolling text for ticker, please choose one of options from “
scrolling effect
crawl
”. Set a suitable speed. “1” represents the slowest speed, and “6” represents the
Simple crawl
”, “
Simple bottom-up
”, “
”, and “
Bottom-up and
No
fastest one.
No scrolling effect The text is static without moving
Simple crawl Text moving either from left to right or right to left. The next line will follow the previous line.
Simple bottom-up Text moving from bottom to top. If your sentences are too long, the system will break them
automatically into the next lines.
Bottom-up and crawl First, the text is moving from bottom to top and pause; then it is moving from left to right to
nish a line.
3. Set duration of “
and crawl
”. This option will let text pause for specic seconds when the player nishs
Pause
” when you choose “
Simple bottom-up
Bottom-up
” or “
showing a line.
4. Click [
Next
] to proceed.
Page 64

56
SMP-WEB SERIES
USER MANUAL
3-6-6 Edit Program: Flash
Select from multiple sources for the ticker text, and set up the font and the color of the
ticker area. Please refer to the following table to congure the source and content of the
ticker.
Only SMP-WEB series supports Flash playback. If you select a skin with a Flash area, you
can add and edit your Flash content here.
Flash file in Media Folder
1. “
you want to playback in the drop-down menu. If you want to add any other new extra
”: If you tick this option, you can choose one .swf file
parameter, please click [
Extra Parameters
] and ll in the required elds to add extra
parameters.
Flash le at remote URL
2. “
”: If you tick this option, please enter an URL address of
your Flash le. If you want to add any other new extra parameter, please click [
Parameters
] and ll in the required elds to add extra parameters.
Extra
3. Click [
Next
] to proceed.
Page 65

57
SMP-WEB SERIES USER MANUAL
3-6-7 Finish Your Program
If you copy the program to the
same program set, the “-copy”
will be added in the program
name for distinction.
After nishing all the congurations based on your selected skin,
you will see the preview of your skin together with other related
information. Press [
Now you can see the new program in the program table. Click
Edit
[
detailed program information. If you want to delete a program,
please click [
to the program set you choose. Simply click [
choose programs and the program set that you want to move
your selected programs in.
] to modify your program or click [
Delete
Finish
] to nish the Program Wizard settings.
Info
] to review the
]. You can also copy one or more programs
Duplicate
] and
3-7 Local Scheduling
You can specify weekly schedule for HTML Playlist and volume
on SMP player directly.
3-7-1 Web Playlist
You can edit a schedule to playback different playlists at
designated time.
1. Select a Web Playlist. (If you choose “
output method, you can edit two separated schedules for the
two Web Playlists.)
2. Click [
pop-up window.
3. Specify the schedule name, day of week, and start/end time.
4. Choose an appropriate playlist index.
Add Schedule
] to create a new schedule item in the
Distinct
” display
Page 66

SMP-WEB SERIES
USER MANUAL
Local Scheduling has
higher priority than Central
Scheduling.
Playlist:
Default:
Central Scheduling:
Specify a playlist index and an item number.
Run the default playlist
Run the playlist controlled by CMS
server.
3-7-2 System Volume
You can change system volume at a specific day and time.
For example, the system can lower down the volume at night
automatically after you congure the settings.
58
1. Click [
Add Schedule
] to create a new schedule item in the
pop-up window.
2. Specify the schedule name, day of week, and start and end time.
3. Set the volume. The sound will be louder when the number is
bigger.
4. If you would like to control SMP’s volume by CMS server,
please select “
Central scheduling (by CMS server)
”.
Page 67

Using CAYIN Media
4.
4-1 Media Player Tag and Attributes .................................... 60
4-2 Image Slide Show Tag and Attributes ........................... 70
4-3 Ticker Tag and Attributes ............................................... 72
4-4 Apply Font in SMP-WEB Series Players ........................ 74
4-5 Hide the Scroll Bar .......................................................... 75
Player in HTML
Page 68

60
SMP-WEB SERIES
USER MANUAL
4-1 Media Player Tag and Attributes
CAYIN’s Media Player can be embedded into HTML tag, like Adobe Flash. You can play
media les in Media Folder or real-time streaming by using CAYIN’s media player. You can
embed CAYIN’s media player into browser by dening the <object> tag in HTML.
The following picture depicts how you can display images and CAYIN Media Player in a
HTML page. You can see the complete content of this HTML page with a browser. Assign
this HTML page as an item in the playlist of a SMP-WEB series player; then you can
present multi-media contents, such as a web page, on the display.
We provide many useful “
Tags
” which you can include in your HTML page to control
CAYIN Media Player. Please refer to the following tables and examples.
HTML Code:
<object type="TYPE Attribute" height=" Object height (pixel)" width=" Object width (pixel)">
<param name="NAME Attribute " value=" value ">
<param name="NAME Attribute " value=" value ">
<param name="NAME Attribute " value=" value ">
…
</object>
Page 69

61
SMP-WEB SERIES USER MANUAL
TYPE Attribute:
Attribute Attribute Value Note
Type video/mpeg
video/main
video/sub
For SMP-WEBDUO/WEBPLUS, users can play two videos in one HTML page.
video/main
“
video. For SMP-WEB3/WEB3N/WEB4, users can play video by using the tag
video/mpeg
“
If you decide to play two videos in one HTML page, we suggest that you assign
the video with larger resolutions as the main video.
We do not suggest you play two videos at the same time when you play Full HD
(high resolution) video.
” represents the main video; “
video/main
” or “
”.
NAME Attribute:
Attribute Attribute Value Note
src
le://folder/video_lename
mms://ip_address/mms_url
http://ip_address/http_url
rtb://port
rtb://multi_cast_ip:port
rtp://port
rtp://multi_cast_ip:port
le: play les in Media Folder
mms: Microsoft MMS streaming
http: http streaming
rtb: CAYIN RTB streaming
rtp: Real-time Transport Protocol streaming
Not
e: About ‘
section.
src
’ attribute usage, see examples in the following
video/sub
” represents the secondary
loop
fullscreen 1
hidden
ratio
control-panel
play-local-all 1
1 (default)
0
0 (default)
1
0 (default)
auto (default)
4:3 / 1:1 / 16:9 / 2.11:1
1
0 (default)
0 (default)
Assign to play video repeatedly.
Display full-screen video.
By default (setting 0), the screen will not be hidden. When the
player is hidden, the le will still be played and the sound will not be
mutedS, if available.
Aspect ratio of media player window.
Set the display mode of control-panel. If you enable this function, the
panel will be shown by left clicking the mouse on the region of media
player.
Play all les in the Media Folder.
Page 70

62
SMP-WEB SERIES
USER MANUAL
Attribute Attribute Value Note
Play files in Media Folder according to CMS’s Central Scheduling
1
play-server-
schedule
play-folder-all folder_name Play all les in the selected folder.
2
0 (default)
settings. This option cannot be used with play-local-all.
1: Play rst multimedia central scheduling.
2: Play second multimedia central scheduling. (SMP-WEBPLUS/
WEBDUO only)
0: Disable central scheduling (default)
Example:
<param name=”play-folder-all” value=”folder_name”>
play-next-item 1
random-playlist 1
audio
audio-output-id
Example 1:
<html>
<head>
</head>
Play next Web Playlist item when video playlist nished in this page.
0 (default)
0 (default)
1 (default)
0
1 (green, default),
2 (orange),
3 (black),
4 (grey).
This option is exclusive with loop option (loop must be false).
Randomly play all items in a playlsit
Turn on / off sounds.
In the case of two videos in a HTML page, the “
automatically be turned off, when you set “
This option for SMP-WEBDUO only.
You can control Media Player in SMP-WEBDUO send audio to
different connectors at back-panel.
Play the le, video.mpg, in the Media Folder repeatedly
true
sub-vide
” for the ”
o” will
main video
”.
<body>
………………
<object type="video/main" width="320" height="240">
<param name="src" value="le://video.mpg">
<param name="loop" value="1">
<param name="ratio" value="4:3">
</object>
………………
</body>
</html>
Page 71

63
SMP-WEB SERIES USER MANUAL
Example 2:
Play the le, video.mpg, in the Media Folder repeatedly and display in full
screen
<html>
<head>
</head>
<body>
……………..
<object type="video/main" width="320" height="240">
<param name="src" value="le://video.mpg”>
<param name="fullscreen" value="1">
<param name=”loop” value=”1”>
</object>
……………….
</body>
</html>
Page 72

64
SMP-WEB SERIES
USER MANUAL
Example 3:
If you want to play many items, please add multiple “
src
“
”.
Play several video les in the Media Folder repeatedly
param
” tag and set the “
name
In the following example, the media player will play video les in the sequence of 1.mpg,
2.mpg, 3.mpg, 4.mpg, and 5.mpg.
<html>
<head>
</head>
<body>
…….
<object type="video/main" width="320" height="240">
<param name="loop" value="1">
<param name="src" value="le://1.mpg">
” as
<param name="src" value="le://2.mpg">
<param name="src" value="le://3.mpg">
<param name="src" value="le://4.mpg">
<param name="src" value="le://5.mpg">
</object>
……
</body>
</html>
Page 73

65
SMP-WEB SERIES USER MANUAL
Example 4:
Play all video les in the Media Folder
If you want to play all les in the Media Folder, you can use the attribute “play-local-all”.
Then, the media player will play all les in the alphabetical order.
<html>
<head>
</head>
<body>
…….
<object type="video/main" width="320" height="240">
<param name="loop" value="1">
<param name="play-local-all" value="1">
</object>
……
</body>
</html>
Example 5:
Play several video les in the Media Folder and move automatically to the
next Web playlist after playing the previous one.
In the following example, the player will notify the browser and move to next web playlist
item. We suggest you set the duration of all items in a web playlist as “
Always
”.
<html>
<head>
</head>
<body>
…….
<object type="video/main" width="320" height="240">
<param name="src" value="le://1.mpg">
<param name="src" value="le://2.mpg">
<param name="src" value="le://3.mpg">
<param name="play-next-item" value="1">
</object>
Page 74

66
SMP-WEB SERIES
USER MANUAL
……
</body>
</html>
You can use <param
name="play-server-
schedule" value="2"> to play
the 2nd multimedia Central
scheduling (Multimedia-2) in
CMS server version 5.5 or
later.
Example 6:
Control the playlist by CMS’s central scheduling
The media player will download the playlist in CMS when you
use the tag “
play-server-schedule
”.
<html>
<head>
</head>
<body>
…….
<object type="video/main" width="320" height="240">
<param name="loop" value="1">
<param name="play-server-schedule" value="1 ">
</object>
……
</body>
</html>
Example 7:
Play all videos in a sub-folder and play files
randomly
The media player will play les in a sub-folder of Media Folder
with the attribute “
play-folder-all
”. You can also play the video
les randomly with the attribute “random-playlist”.
<html>
<head>
</head>
<body>
…….
<object type="video/main" width="320" height="240">
<param name="loop" value="1">
Page 75

67
SMP-WEB SERIES USER MANUAL
<param name="play-folder-all" value="folder_name">
<param name="random-playlist" value="1">
</object>
……
</body>
</html>
Example 8:
Play two videos in one web page. SMP-WEBDUO/WEBPLUS
can play two videos in one web page by using attributes, “
<html>
<head>
</head>
<body>
…….
<object type="video/main" width="640" height="480">
<param name="loop" value="1">
<param name="src" value="le://1.mpg">
</object>
……
<object type="video/sub" width="320" height="240">
video/main
” and “
video/sub
”.
<param name="loop" value="1">
<param name="src" value="le://2.mpg">
<param name="audio" value="0">
</object>
…….
</body>
</html>
Page 76

68
SMP-WEB SERIES
USER MANUAL
Example 9:
Hide a media player and play sounds (music) only
If you want to hide a media player and only play music, e.g. MP3, you have to create a CSS
rule to control the attributes of “
OBJECT
” tag, and set the value of param name “
hidden
as “1”.
<html>
<head>
<style type="text/css">
<!-- object {
visibility: visible;
}
object.hiddenObject {
visibility: hidden ! important; width: 0px ! important; height: 0px ! important; margin: 0px !
important; padding: 0px ! important;
”
border-style: none ! important; border-width: 0px ! important; max-width: 0px ! important;
max-height: 0px ! important;
}
-->
</style>
</head>
<body>
<object type="video/main" height="240" width="320" class="hiddenObject">
<param name="src" value="le://1.mp3">
<param name="hidden" value="1">
</object>
</body>
</html>
Page 77

69
SMP-WEB SERIES USER MANUAL
Example 10:
Play Audio Video input (for SMP-WEB3, WEB4 only)
<html>
<head>
</head>
<body>
………………
<object type="video/video-in" width="320" height="240">
</object>
………………
</body>
</html>
Page 78

70
SMP-WEB SERIES
USER MANUAL
4-2 Image Slide Show Tag and Attributes
You can also use Image Slideshow tag to create an image area in you HTML page.
TYPE Attribute:
Attribute Attribute Value Note
Type app/cayin-image You can create Image slideshow area by creating this type of plug-ins.
You can have maximum 8 image areas.
NAME Attribute:
Attribute Attribute Value Note
play-local-all
play-server-schedule-1
src
duration
sequence
recursive 0/Disable/No
scale_t
play-server-schedule-2
le://folder/image.jpg
le://folder2/
[0-9]*
Forward
Backward
Random
1
/Enable/Yes
0
1
2
Image source attribute:
play-local-all
play-server-schedule-x
le: you can specify les or a folder for playing all image les in the
folder.
Duration of displaying each image.
3 is default
Sequence
Include sub-folders
Scale to t area
0: Disable
1: Fit to area (Propotional)
2: Fit to area (Non-Propotional)
: Play all les in the Media Folder.
: follow central schedule area 1 or 2
play-local-all
play-server-
schedule
0
1
0
1
2
Play local all les
0: Disable
1: Enable
Play server schedule
0: Disable
1: Area 1
2: Area 2
Page 79

71
SMP-WEB SERIES USER MANUAL
Example:
Play the image les in the Media Folder repeatedly
<html>
<head>
</head>
<body>
………………
<object type="app/cayin-image" width="320" height="240">
<param name="src" value="le://folder/image1.jpg">
<param name="src" value="le://folder/image2.jpg">
<param name="src" value="le://folder/image3.jpg">
</object>
………………
</body>
</html>
Page 80

72
SMP-WEB SERIES
USER MANUAL
4-3 Ticker Tag and Attributes
You can also use Ticker text tag to create a ticker area in you HTML page.
TYPE Attribute:
Attribute Attribute Value Note
Type cayin/ticker Create Ticker text areas.
Max 2 areas for SMP-WEB3, 4 areas for SMP-WEB4, SMP-WEBPLUS, and
SMP-WEBDUO.
Note
: SMP-WEBDUO can have 4 areas in each Distinct mode display.
NAME Attribute:
Attribute Attribute Value Note
text://Ticker in running on table
src
direction
font
fsize 10~100
fcolor 0x118A3F
bcolor 0x118A3F
le://folder/scr.txt
http://url/news.rss
play-server-schedule
1/Left to Right
2/Right to left
Tahoma
Text
: enter text directly in the tag.
File
: a text le contains the ticker.
http
: a text le or RSS url.
Note: you can specify one source in ticker plugins.
1: Left to Right
2: Right to left
Default font
For other font choices please refer to the following section.
Font size
Font color
First “11” means color Red
Mid “8A” means color Green
Last “3F” means color Blue
All numbers in hexadecimal value
background color
First “11” means color Red
Mid “8A” means color Green
Last “3F” means color Blue
All numbers in hexadecimal value
: Tahoma
: 30 by default
: 0xFFFFFF by default
: 0x000000 by default
seffect
1
2
3
4
Text scrolling effect
1: No scrolling effect
2: Simple crawl
3: Simple Bottom up
4: Bottom up and crawl
Page 81

73
SMP-WEB SERIES USER MANUAL
speed 1, 2, 3, 4, 5, 6 Speed: 3 by default
pause
spacing 0,
play-server-
schedule
Example :
0
, 0.5, 1, 1.5, 2, 2.5, 3 Pause
0.25
, 0.5, 1, 1.25, 1.5 Line spacing
0
1
Play server schedule
0: Disable
1: Enable
Play image les in the Media Folder repeatedly
<html>
<head>
</head>
<body>
………………
<object type="cayin/ticker" width="320" height="240">
<param name="src" value="le://folder/myticker.txt">
</object>
………………
</body>
</html>
Page 82

74
SMP-WEB SERIES
USER MANUAL
4-4 Apply Font in SMP-WEB Series Players
You can use fonts in HTML by the following steps:
1. Open HTML le by a text editor or HTML editor (e.g. Adobe® Dreamweaver®).
2. Copy face name from font list below and specify the font face HTML tag:
Example
<font face="Vagabond">This is a sample text.</font>
If the font supports bold and italic, you can use the following tag to choose bold or italic font:
Bold
:
<b><font face="Luxi Mono">This is a sample text.</font></b>
Italic
:
<i><font face="Luxi Mono">This is a sample text.</font></i>
Bold italic
:
<b><i><font face="Luxi Mono">This is a sample text.</font></i></b>
Default Font list for SMP-WEB Series players
Face name font type Note
AardvarkBold Bold
AR Yenti Heavy B5 Regular Traditional Chinese Font
Broadway Regular
AR PL Mingti2L Big5 Regular Traditional Chinese Font
AR YuanGB Heavy Regular Simplied Chinese Font
Kochi Mincho Regular Japanese Font
Luxi Mono Regular
Bold
Italic
Bold/Italic
Luxi Serif Regular
Bold
Italic
Bold/Italic
Luxi Sans Regular
Bold
Italic
Bold/Italic
Tahoma Regular
Vagabond Bold
Page 83

75
SMP-WEB SERIES USER MANUAL
4-5 Hide the Scroll Bar
If you want to hide the scroll bar in web page, please apply the CSS settings below:
<html>
<head>
<title></title>
<style type="text/css">
<!--
body {
margin-left: 0px;
margin-top: 0px;
overow: hidden;
}
-->
</style></head>
<body>
.....
</body>
</html>
Page 84

Content Update and Media
5.
Folder Management
5-1 Update Media Folder ....................................................... 77
5-2 Manage Media Folder ...................................................... 80
Page 85

You can only download
8192 les and 256 folders in
maximum for each mapping
group.
SMP player cannot
synchronize any le bigger or
equal to 2GB.
In this section, you can enable automatic content update function
of Media Folder with CMS server. You can also configure the
settings of access authorization of Media Folder.
5-1 Update Media Folder
In addition to Network Neighborhood, you can update the
content of Media Folder automatically with CMS server or a web
server.
Please specify the duplicate frequency and source of media les
by completing the following settings of CMS server or entering
the URL of a web server.
1. Login Web Manager; then click [
MEDIA FOLDER
] .
SMP-WEB SERIES USER MANUAL
If you have files copied in
the player and then enable
content update from the
CMS server folder, your
les will be wiped out on the
player side as the content
of the folder on the server
will synchronize with the
hard drive of the player.
Therefore, if you want to edit
SMP client’s media folder
manually, please DO NOT
enable “Media Folder content
synchronization”.
2. Tick “
Enable Media Folder content synchronization
function and SMP player will periodically download new or
”
To prevent some media les
from deleting by CMS server
while you update content
of SMP automatically from
CMS, you can create a folder
named “protected” and keep
your les in that folder.
updated files from CMS’s Content Update Server. It also
removes those les that no longer exist in CMS server.
3. If you would like to download files to a hidden disk space,
please tick “
Enable Use hidden disk buffer
”. After
downloading process completes, the system will copy all les
to Media Folder immediately.
77
Page 86

78
SMP-WEB SERIES
USER MANUAL
The advantage of this function is to make sure that SMP will
not play incomplete contents. SMP will not play contents until
all les are completely downloaded. We suggest you enable
this option.
4. During the synchronization, SMP will check and only
The maximum time interval is
10080 minutes.
If the SMP player is
downloading files while it
pasts the assigned time,
the procedure will only stop
until the downloading file
is completely downloaded.
For the rest of files, SMP
player will keep downloading
them during the next
configured time of content
synchronization.
download new contents. You can choose to compare the “
size
” or the “
le modied time
” of the server and player.
le
You are obliged to choose at least one method to continue.
We suggest you check both of them.
5. Please set content check frequency.
Check for new content every […] minutes Set the time interval of checking
with server
Check for new content daily at HH […]
MM […]
Set the e xact time you want to
check with server. You can set up
to 3 different time arrangements.
6. Specify exclusive time(s) for content synchronization: When
you enable this function, the SMP player will synchronize
contents with CMS server at the selected date (s) and time.
For the rest of the time, the player will stop synchronizing
contents, so that you can control the usage of network
bandwidth usage.
7. If you purchase a CMS server, you can create an account
in the CMS server and authorize such account to manage
the group which this SMP player belongs to. If you choose
to update content by CMS, please enter "
Password
"
Hostname or IP address
"
" and "
Group
" name, of the account, as well as
" of CMS server.
Username
",
Page 87

79
SMP-WEB SERIES USER MANUAL
For the Hostname of the
CMS server, you must enter
FQDN (full qualified domain
name) here (eg. www.
cayintech.com).
Group Assign the group name which this SMP player
belong to.
The username is the account you create in CMS
Username
Password User’s password.
Hostname or IP address Hostname or IP address of CMS server
server, and this account should be authorized to
mange this group.
Central Scheduling of all
contents (Multimedia, Web
Playlist, and Volume) for a
SMP player applies only one
server conguration assigned
here. Please remember to
complete the server settings
here before you start to
use the function (Central
Scheduling).
8. After completing all settings, please click [
Test
] to check
the validity of the account and IP address. Please note that
Test
the [
Username
"
] button can only be used to test the validity of the
Password
", "
Group
", “
”, and "
IP address
".
9. You can also synchronize contents from your own web
server, if you don't have a CMS server. Please enable "
server
" and enter the playlist's URL here.
Web
SMP player will send the HTTP request to the URL (e.g.
http://210.179.61.252/myvedio/playlist.txt) and get the
playlist (e.g. playlist.txt) from the server. Each line (e.g.
http://210.179.61.252/myvedio/video1.mpeg) in the playlist file
will be treated as one individual URL. SMP player will download
new or updated URL(s) in the playlist, and remove the local les
which do not exist in the playlist.
Page 88

80
SMP-WEB SERIES
USER MANUAL
You may type a text le like below and enter the URL of this text le in this eld:
By changing the text le, you can update the SMP player's playlist in media folder.
Files downloaded from Web Server will be located in the root of Media Folder with no
subfolders.
5-2 Manage Media Folder
In this section, you can set share mode of Media Folder (on network neighborhood) for
users.
Page 89

81
SMP-WEB SERIES USER MANUAL
Do not share
Media folder
Share mode Select “
User mode
The access is
only allowed from
IP Address
The folder will not be shared.
folder without username and password.
User mode
In“
want to allow access from a particular user, enable this function and change its username and
password.
Default Username:
Default Password:
Enable FTP service:
protocol. You can use any FTP client of your choice; however, for the non-ANSI le name, you
must use UTF-8 enabled FTP client software.
Change User mode password:
To allow access from particular IP address or subnet, enter the IP address or partial IP address,
e.g. type "
access from all computers in this subnet.
Share mode
”, users need to enter username and password to access the folder. If you only
smbuser
smbuser
172.16.0.1
” if you allow open access of all users. In this mode, users can access the
Enable this feature, and you can also access media folder through FTP
You can change password here.
" to allow access only from this IP address, or type "
172.16.0.
" to allow
A l l o w u p d a t e
content from USB
storage device
Tick this option and you can upload or update contents/les via USB storage devices.
NOTE
: The USB le system supported by SMP players are as followings:
SMP-WEB3/WEB3N: FAT/FAT32
SMP-WEB4/WEBPLUS/WEBDUO: FAT/FAY32/NTFS
Page 90

6.
6-1 Create Your Own Skin ..................................................... 83
6-1-1 Install Skin Editor ................................................................ 83
6-1-2 Create a new skin le (.csk) ............................................... 84
6-1-3 Upload a Skin File into Skin Template ................................ 90
6-1-4 Edit a Skin File in Skin Template ........................................ 91
6-2 Create Your Own Clock (.clk) ......................................... 92
6-2-1 Create a Clock (.clk) ........................................................... 92
6-2-2 Upload a Clock (.clk) ........................................................ 100
6-3 Upload the CAYIN Skin File into SMP .......................... 100
Skin Management
6-4 Apply Skin ...................................................................... 101
Page 91

SMP-WEB SERIES USER MANUAL
If you are using Windows
Vista or Windows 7, please
run CAYIN Skin Editor as
administrator.
You can create your own skin via
CAYIN Skin Editor
, upload
it to players, and adopt it into your contents. In this section,
you can manage your own skin displayed as a background on
which video, image, and ticker play. CAYIN's Skin Editor now is
available in English, German, Spanish, French, Italian, Japanese,
Polish, Thai, Simplied Chinese and Traditional Chinese.
6-1 Create Your Own Skin
6-1-1 Install Skin Editor
You can find the editing tool,
product CD (\Tool\Skin Editor\Multiple Language). Here please
choose your preferred language and execute the
start the installation. Please follow the instructions prompted on
the screen to nish the installation.
CAYIN Skin Editor
setup.exe
, in the
to
After successful installation, you can find the “
program shortcut on Desktop or Program menu.
Skin Editor
”
83
Page 92

84
SMP-WEB SERIES
USER MANUAL
6-1-2 Create a new skin le (.csk)
By using
CAYIN Skin Editor
program, you can make your own skin for SMP players.
Please follow the steps below to build your own skin.
1. Execute the program
Skin Editor
in Start menu or on your desktop.
2. You can prepare at least one JPEG image file or you can choose single color
background.
3. Go to
File > Create New Skin
or just click the icon in toolbar and you will see a pop-
up window.
4. Please choose a product model. If you choose [
resolutions supported on SMP series.
ALL
], you can create a skin le for all
Page 93

85
SMP-WEB SERIES USER MANUAL
5.
Select your skin resolutions and screen rotation. Please
The skin only applies to those
resolutions which you pre-
edit by CAYIN Skin Editor.
So, we suggest you upload all
possible resolutions, in case
you need to use the skin in
different situations.
choose and save one resolution at a time if you want to create
several skin resolutions. You can also select "
to congure your own resolution. Click [
6.
Now name your skin and description (optional). Click [OK] to proceed.
OK
User dene
] to proceed.
"
7. Y
ou can see an area that
matches with the resolution you choose
.
Page 94

86
SMP-WEB SERIES
USER MANUAL
8. You can change the background color for your skin. Just click
CAYIN’s Skin Editor will
detect which kinds of zones
you can include to your skin
file. Also, the Skin Editor will
automatically gray out the
elements you cannot use.
on the
background
icon on the tool bar and choose the
color you want. You can also import your own background
image.
9. Now please choose which zones you want to edit first. For
example, if you want to edit a multimedia zone first, please
click on the
multimedia
icon on the toolbar and drag the
area size you want for the multimedia zone. When it is done,
you can see an area with a multimedia icon in it. This can
help you identify the type of each area.
Page 95

87
SMP-WEB SERIES USER MANUAL
10. When you congure the clock area, you can only adjust the size of the clock area by
selecting a pre-dened size, and place it in any position you want. There are two types
of clocks: analog and digital.
11.
If you want to adjust the size of each element, just click the element you want to adjust
and move your cursor to the edge of that element. When you see the arrow show, please
left click your mouse and drag to the size you want. You can also type the coordinate value
on the columns on the upper side toolbar to change the skin size. If you want to move a
specic zone, please just drag and drop the zone to the place you want.
Page 96

88
SMP-WEB SERIES
USER MANUAL
You may discover in some
zoom ratio, the quality of
background image seems
not good. The image preview
window is for reference only.
It will not affect the final
quality of published skin le.
12. If you upload more than one resolution for your skin, please
select other resolutions from the upper side drop down menu
and start over the conguration process.
13. If you would like to save the unnished skin temporarily, please
go to
File > Save skin to template
. Then, you can save
the skin in “
Template
”, and come back to edit it again later.
Page 97

89
SMP-WEB SERIES USER MANUAL
14. After completing all configurations, please remember to save your skin file (.csk)
individually by clicking
Skin
. You can upload the .csk le into SMP players or CMS by Web Manager later.
Publish Skin
icon on the toor bar or go to
File > Publish
More information about
Create a New Skin Add a new skin
Open skin from csk le Open created skin
Publish skin Save your skin and publish .csk le
Skin settings Congure skin properties such as name, model, and resolution.
Zoom in/Zoom out Enlarge or reduce the view of a skin.
1:1 Display the skin in the actual size.
Fit Fit a skin to the screen.
Align Top/Bottom/Left/Right Arrage selected areas to align top, bottom, left or right with each other.
Coordinate value Adjust the size of each zone you add in the skin.
Resolution drop down menu Choose different resolutions of skins here. Please note you can also see those
CAYIN Skin Editor
resolutions you already congure in Skin settings.
are as follows:
Page 98

90
SMP-WEB SERIES
USER MANUAL
6-1-3 Upload a Skin File into Skin Template
You can download new skin le (.csk) from CAYIN’s PartnerNet website. After downloading
the .csk le, you can easily upload a new skin to Skin Editor.
1. Download a "
.csk
" le from CAYIN's partner website to your PC.
2. Open CAYIN Skin Editor and go to
Import
[
] button. Choose the skin you want to import and press [
Template > Manage Skin Templates
Open
].
and click
3. Now you can nd the imported skin le stored in Skin Template. Choose this skin and
Load
click [
], now you can further edit this skin.
Page 99

91
SMP-WEB SERIES USER MANUAL
You have to save your skin
in the Skin Template first via
“File > Save skin to template”,
or your skin won’t show up in
Skin Template for any further
modication.
6-1 - 4 Edi t a S k in Fi l e i n S ki n
Template
Skin Editor preloads many skins in
your further editing. You can also save your own skin to Skin
Template. Please follow steps below to reload and adjust skin
settings.
Skin Templat
e for
1. Open the
2. Go to
CAYIN Skin Editor
.
File > Load skin from template
pop-up menu.
3. Choose the skin you want to adjust and click [
. You will see a
Load
].
4. Now you can make changes for your skin le.
Page 100

92
SMP-WEB SERIES
USER MANUAL
6-2 Create Your Own Clock (.clk)
6-2-1 Create a Clock (.clk)
You can use
1. Go to
2. Click [
type and how many resolutions you want to create for your clock (Size) here. Click [
to continue.
CAYIN Skin Editor
Template > Manage Clock Templates
New
], you will see a pop-up window. You can name your clock; choose the clock
to create your personal clock le (.clk).
.
OK
]
3. Here you can congure all the settings for your clock. Please follow the following steps
to complete your settings.
Analog Clock
Digital Clock
There are different congurations for analog, digital (image) and digital (text) clock. Please
refer to the following descriptions for these three clocks.
: You can select the type, size, and the date format.
: You can select the type, size, and time format (24 hour or 12 hour).
 Loading...