

Page 1

Digital Signage Player
SMP-2100
SMP-6000
SMP-8000/8000QD
Quick Start Guide
快速安裝手冊
Page 2
1. Product Overview
1.1 SMP-2100
Front View
Rear View
Quick Start Guide
02
COMON/OFF
HDMI 1
HDMI 2
1
2
3
6
5
8
7
Page 3
ENGLISH
中文
03
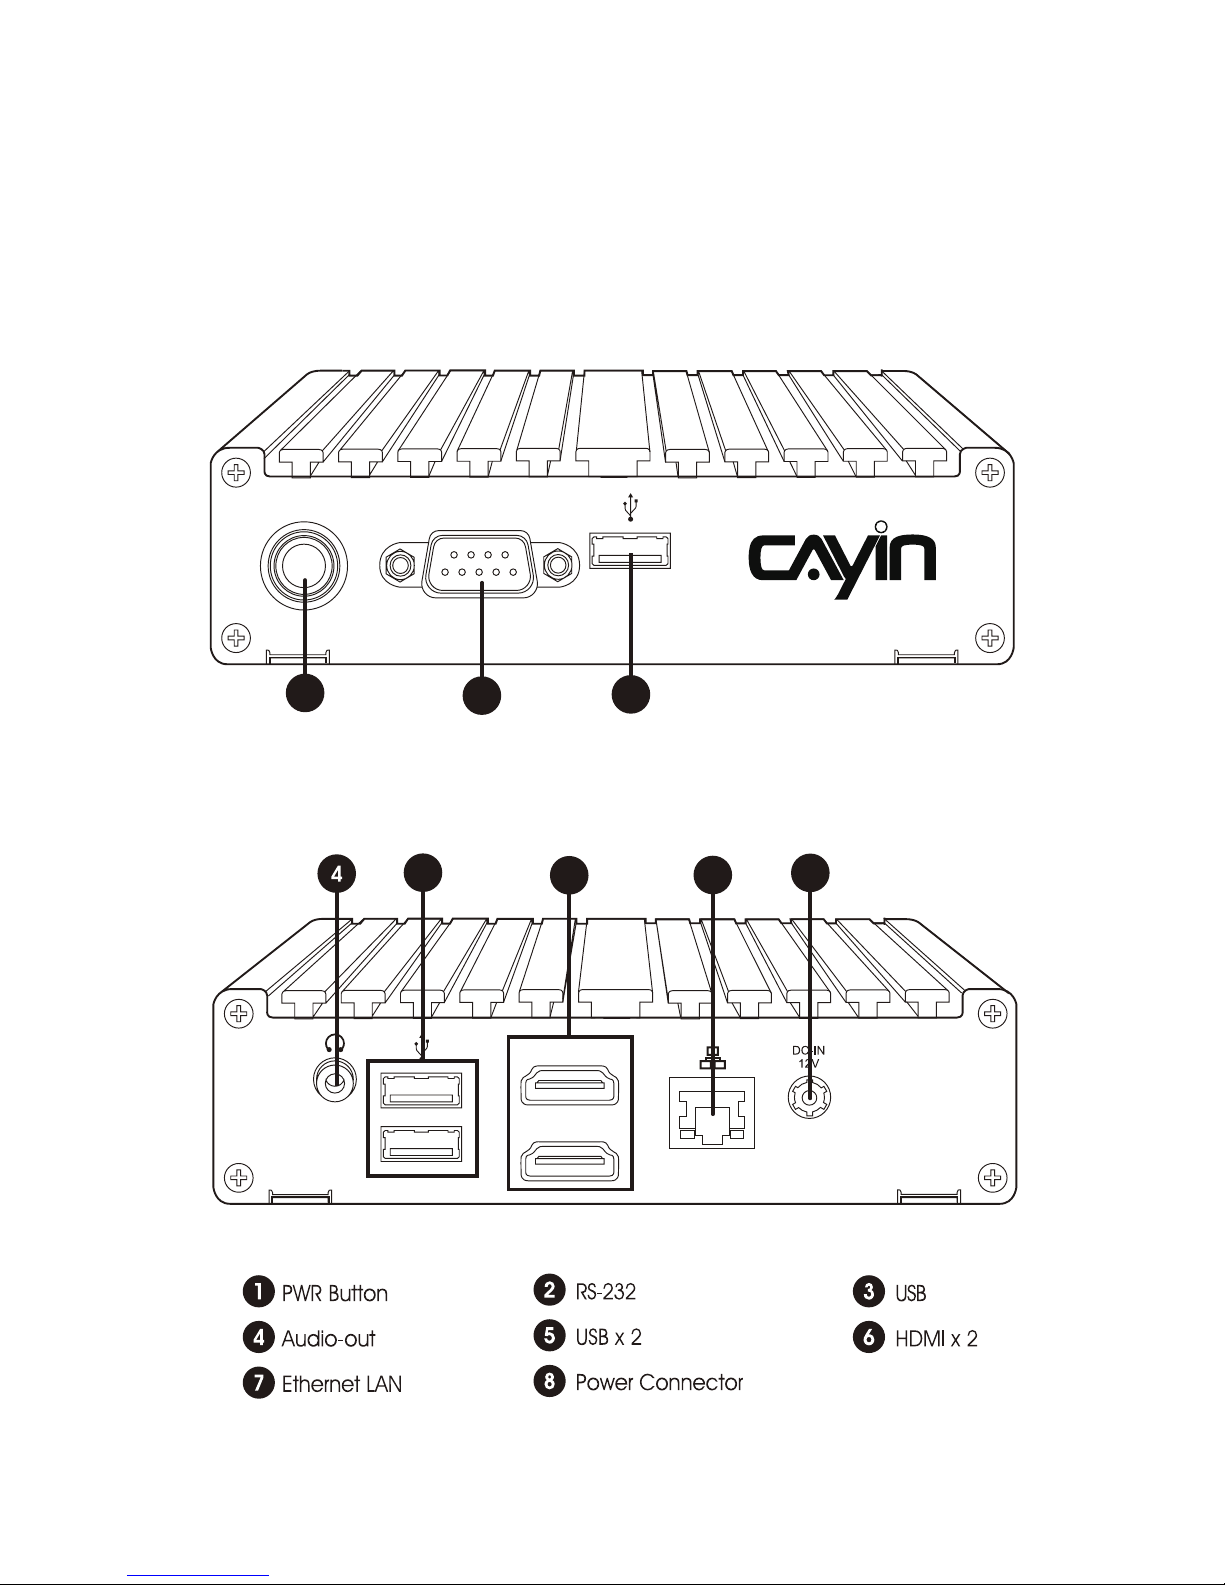
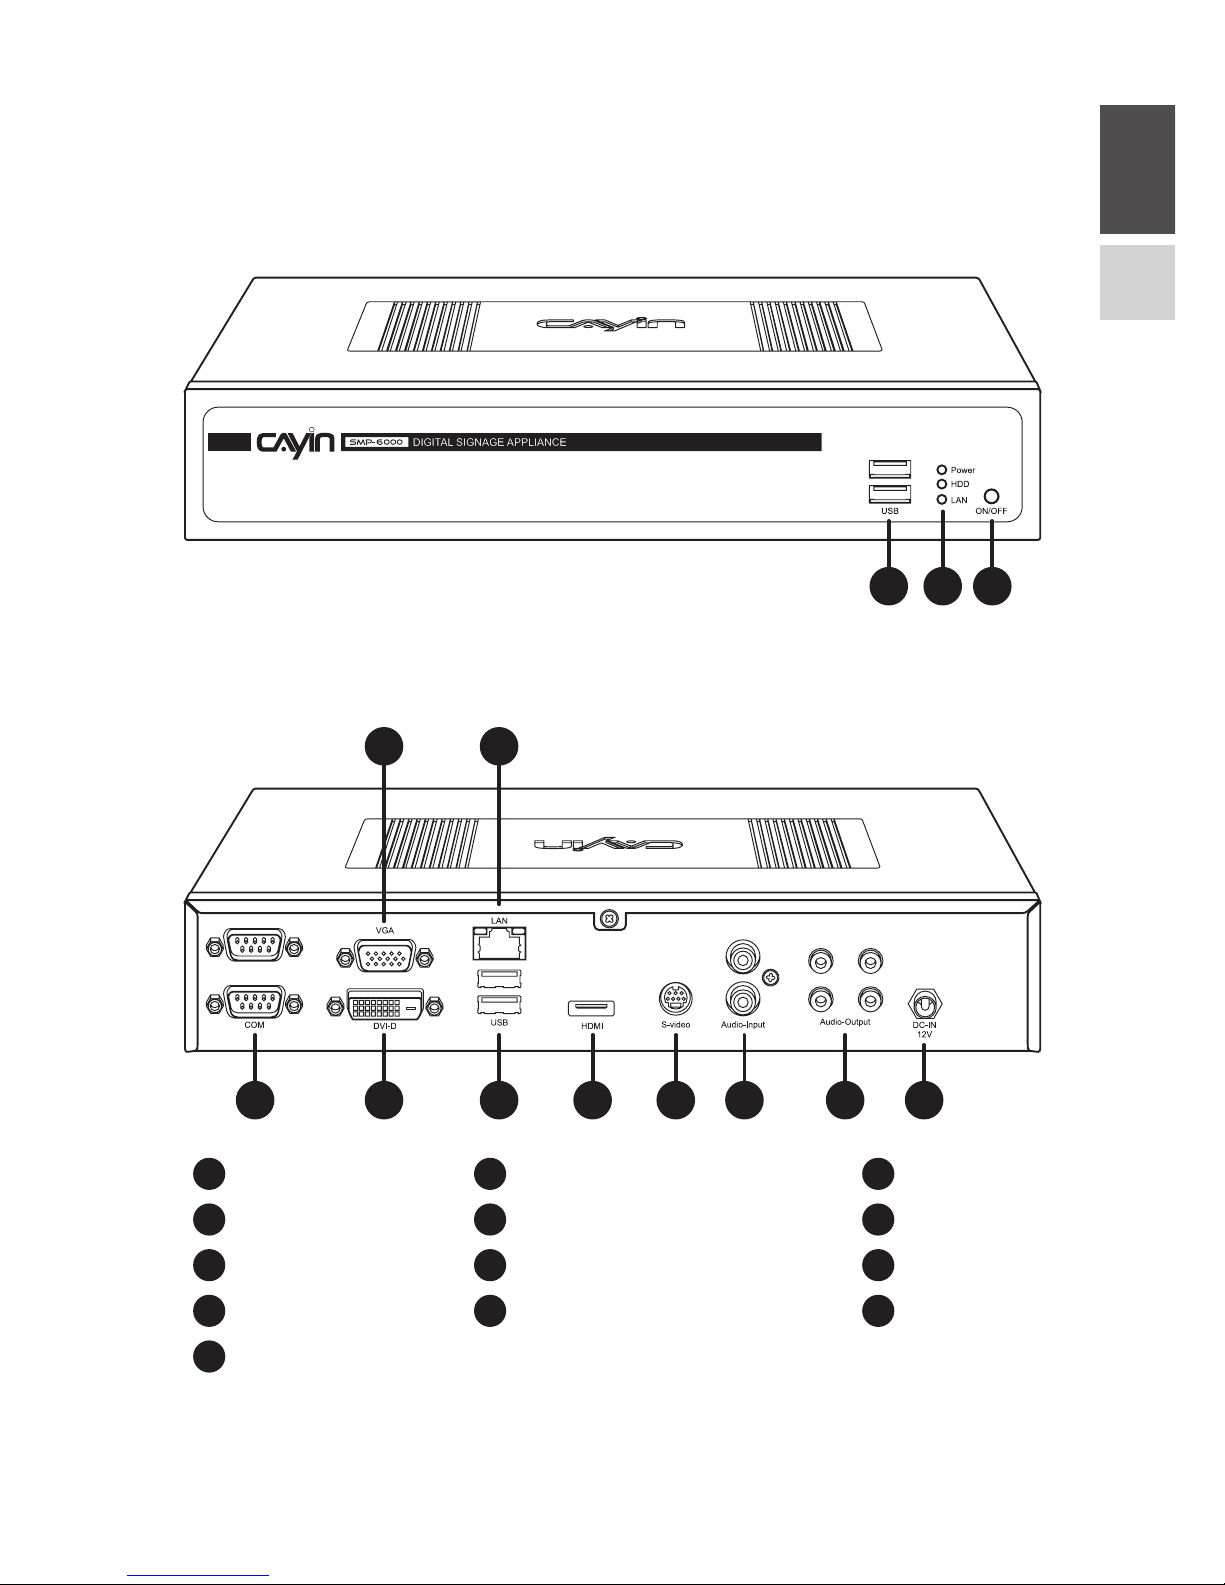
1.3 SMP-6000
Front View
1 2 3
Rear View
4 6 8 9 10 11 12 13
5 7
USB x 2
RS-232 x 2
Ethernet LAN
S-Video-in
Power Connector
Power, HDD & LAN Indicators
VGA
USB x 2
Audio-in
Power Button
DVI
HDMI
Audio-out
1 2
4 5 6
7 8 9
10 11 12
13
3
Page 4
Quick Start Guide
04
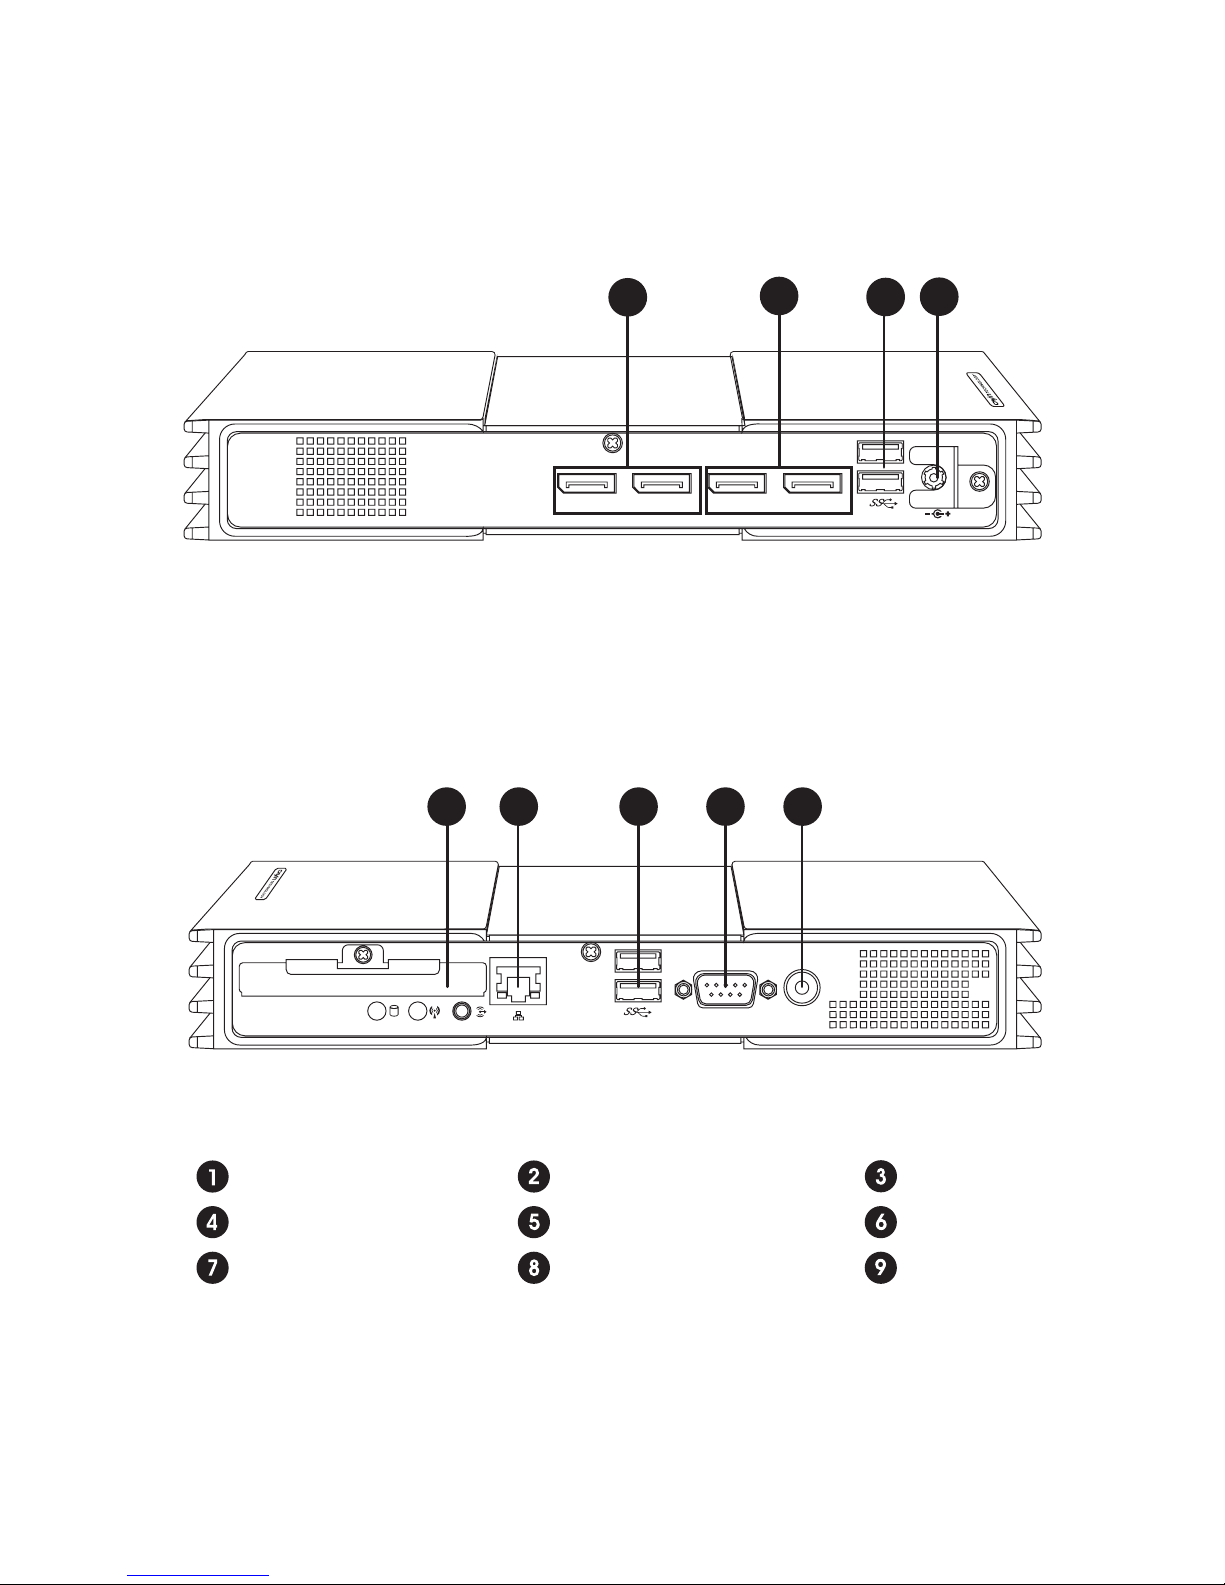
1.4 SMP-8000/8000QD
5 6 7 8 9
DP 1 DP 2 DP 3 DP 4
1
2
3
4
Front View
Rear View
DisplayPort 1.2
DC-IN
USB 3.0 x 2
DisplayPort 1.1
HDD
COM
USB 3.0 x 2
LAN
PWR Button
Page 5
ENGLISH
中文
05
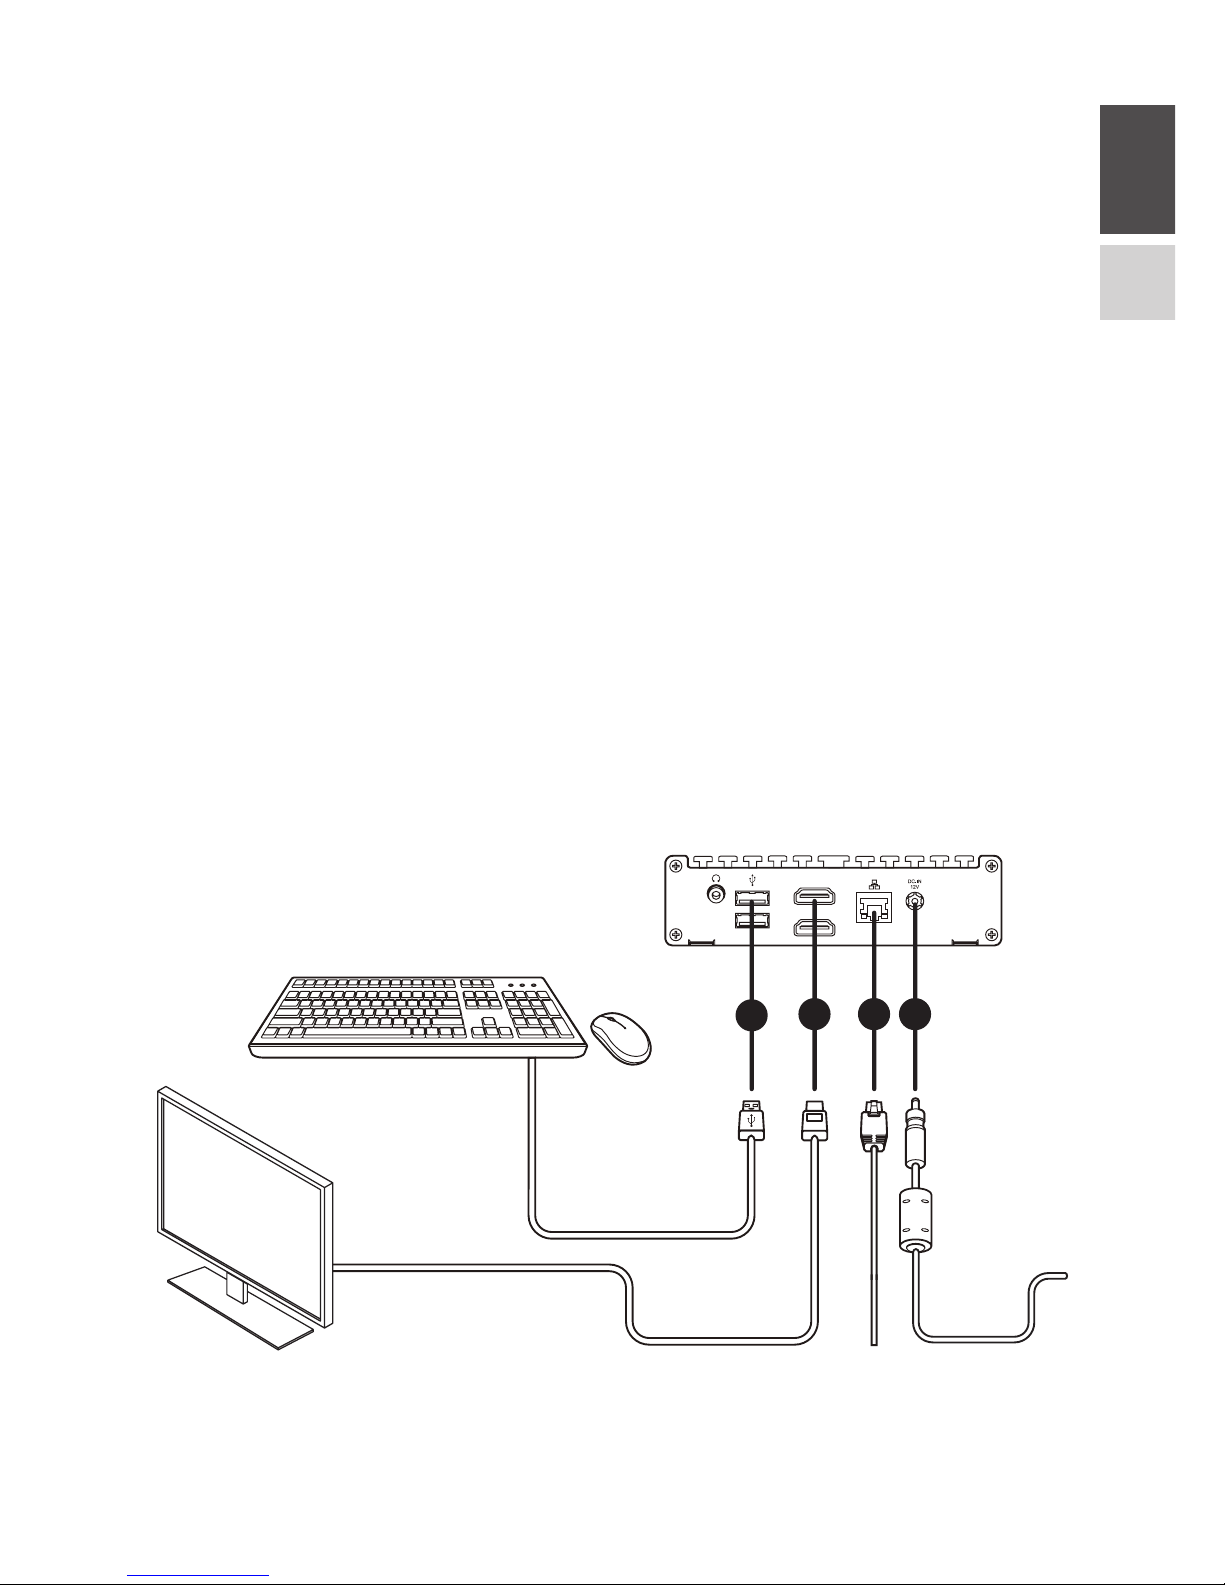
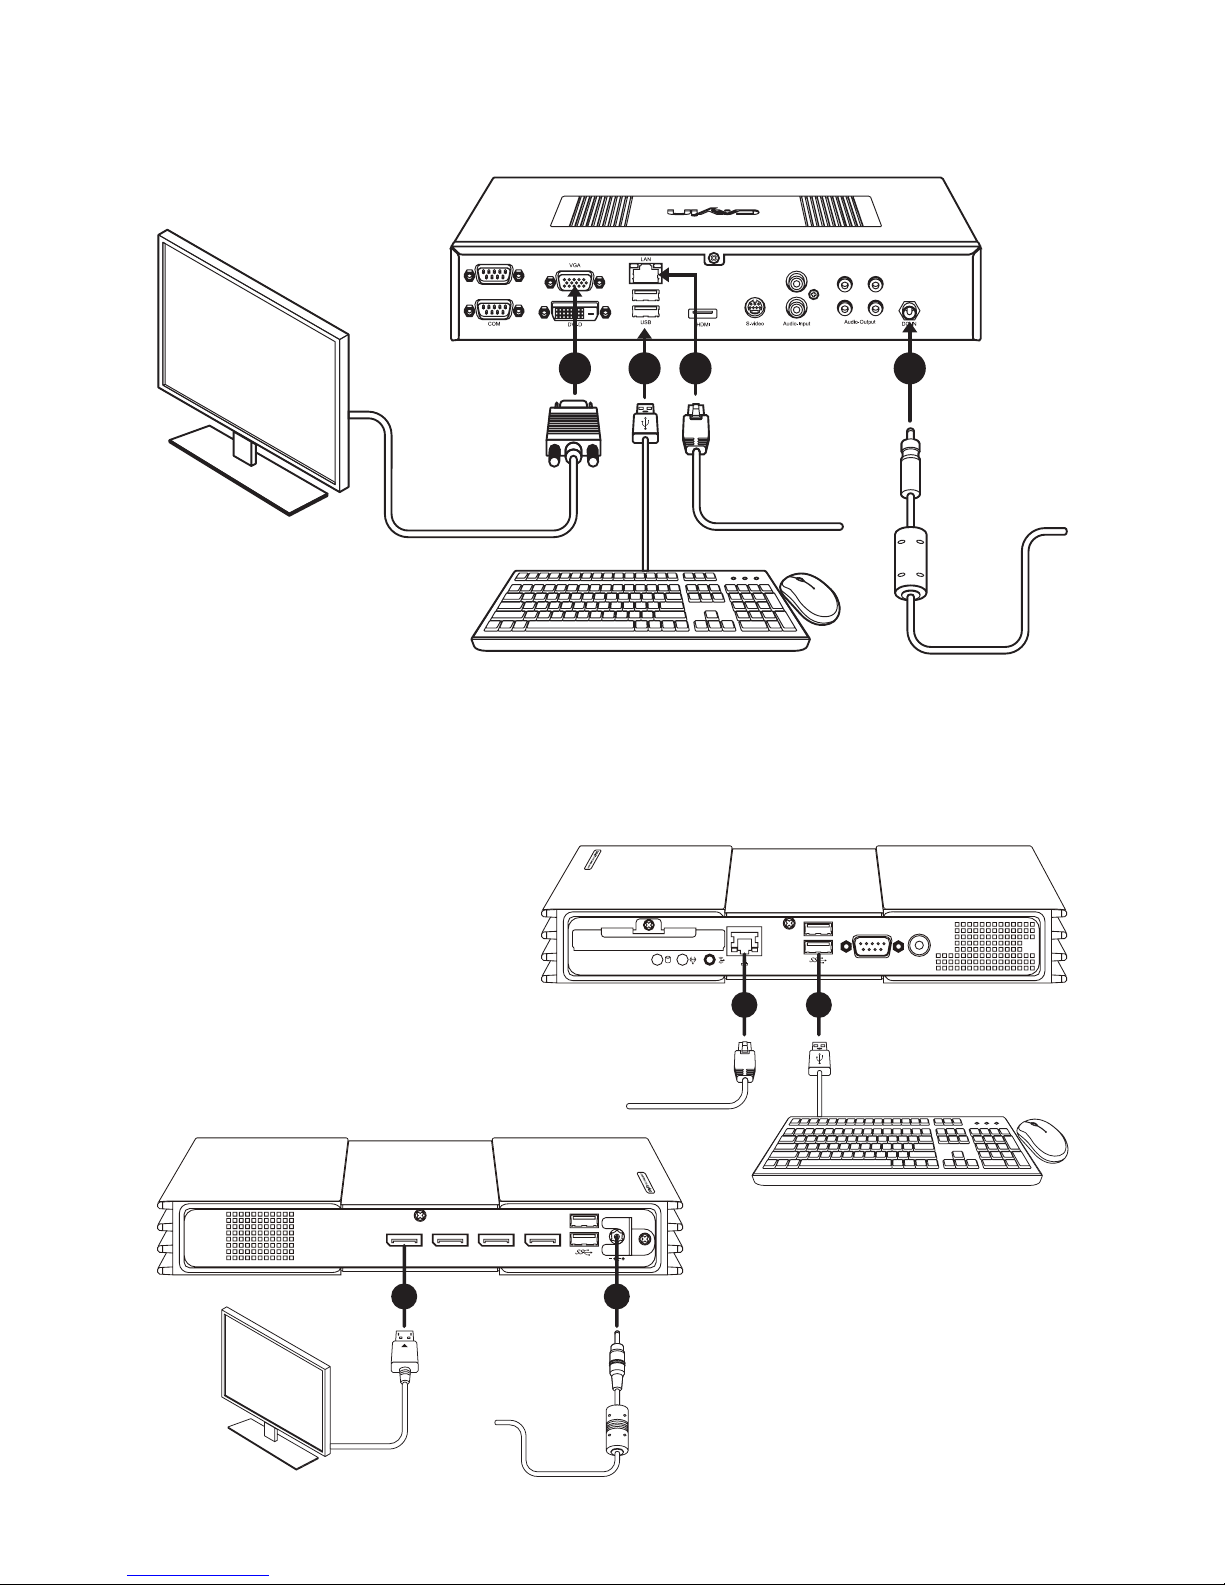
2. Installing your SMP Player
2.1 Hardware Installation
Step 1 Connect an Ethernet cable from your router or hub to the player’s LAN
port. (By default, SMP will get an IP address from a DHCP server.)
Step 2 Connect the VGA/DVI/HDMI cable from the player to your screen.
(The default resolution will be your screen’s native resolution.)
Step 3 If you would like to configure system settings directly from the player,
please connect a keyboard and a mouse to any of the USB ports.
Step 4 Connect the power adapter to a socket. SMP will turn on automatically.
Step 5 You will see the LOGIN page once the hardware installation is complete.
SMP-2100
1
HDMI 1
HDMI 2
42
3
Page 6
Quick Start Guide
06
SMP-6000
13 42
SMP-8000/8000QD
1 3
DP 1 DP 2 DP 3 DP 4
2 4
Page 7
ENGLISH
中文
07
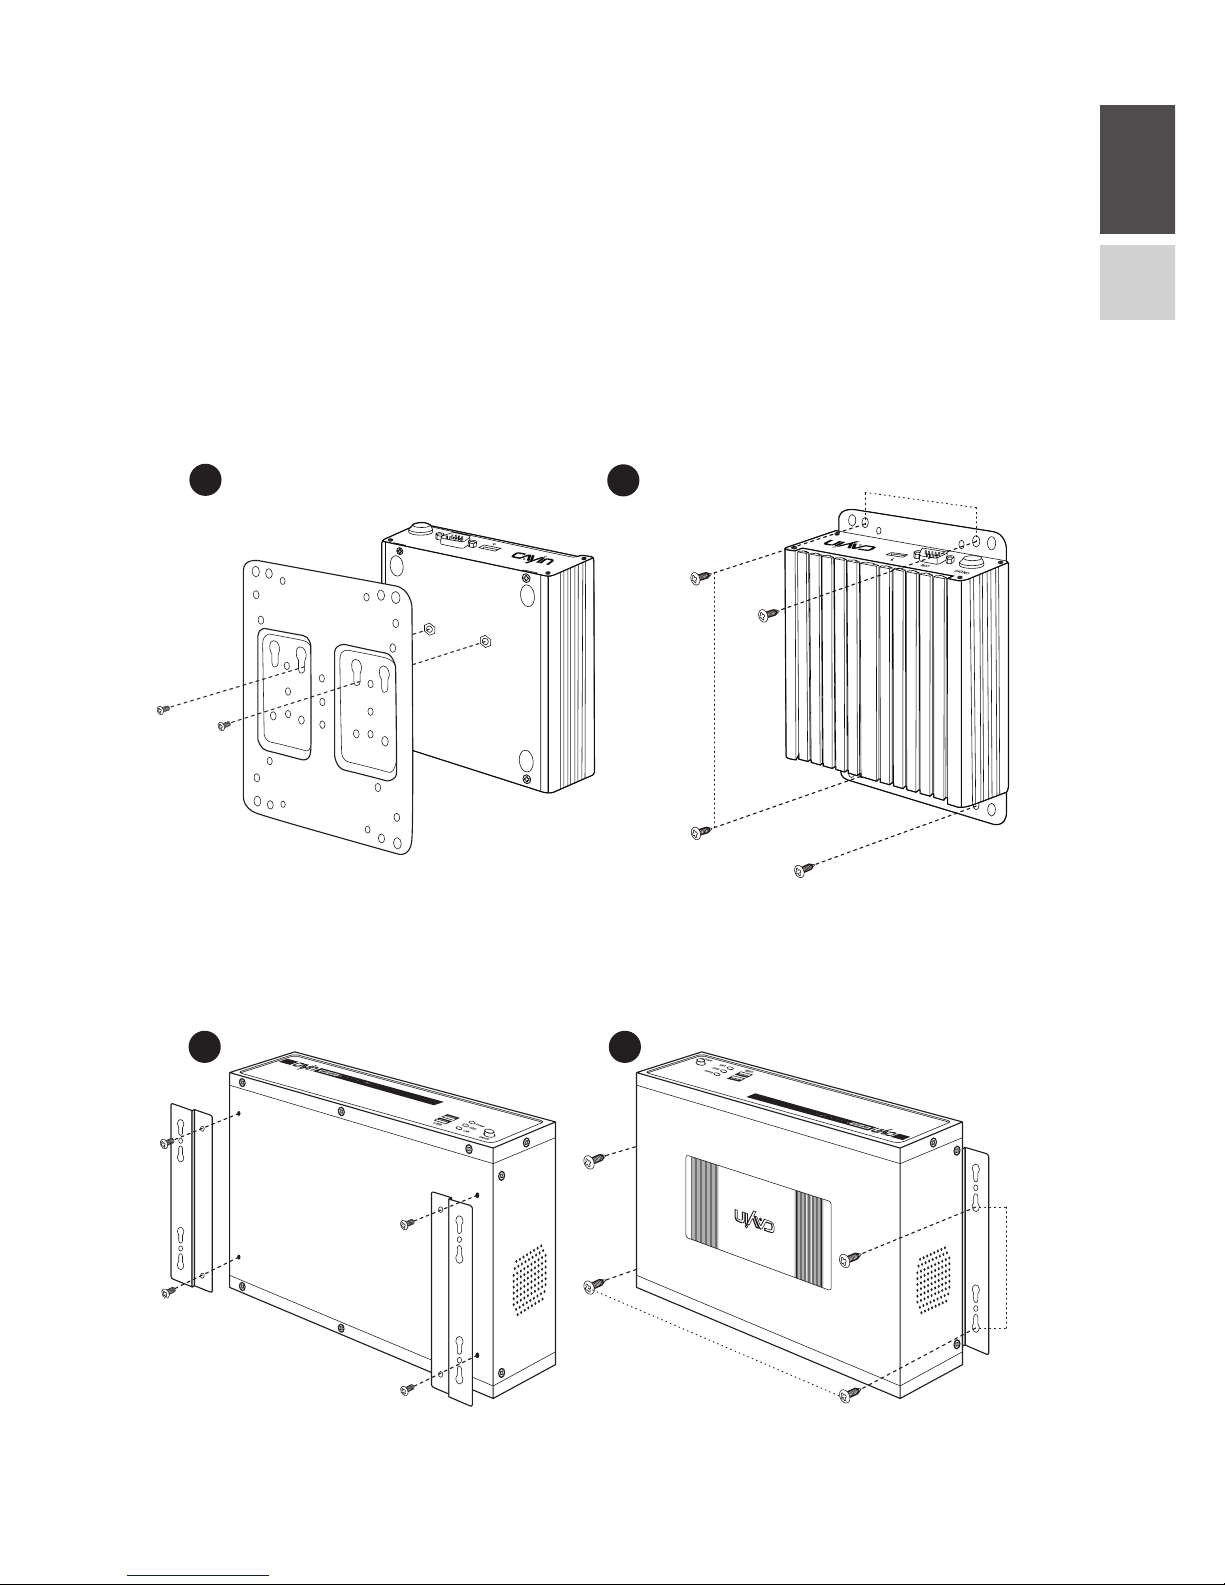
2.2 Wall-Mounting the Player
Step 1 Attach the brackets to your SMP player and secure them with
provided mounting screws.
Step 2 Hang your SMP player to a suitable place and carefully secure it with
provided screws.
SMP-2100
SMP-6000
1 2
293mm
84mm
1
2
80mm
126mm
Page 8

Quick Start Guide
08
SMP-8000/8000QD
1 2
192mm
52.5mm
Page 9

ENGLISH
中文
09
3. Logging in to Web Manager
You can log in SMP’s management platform, Web Manager, with or without
network connection. The procedures will be slightly different based on your
network environment.
3.1 Offline Operation (Local)
You can manage SMP without network connection.
Step 1 Connect a display, a keyboard and a mouse to the SMP player and
connect the power adapter to a socket to turn on the system.
Step 2 You will see the login page of Web Manager after the system boots up.
However, the player will start playing contents after the system boots up
if you have already configured playback settings on the player. You can
press Ctrl+F10 to switch to the login page of Web Manager, and press
Ctrl+F1 to switch back to the playback mode.
Step 3 Enter your username and password and select the language display for
your user interface. Then, click Login.
• Default Username: webadmin
• Default Password: admin
Page 10

Quick Start Guide
10
3.2 Remote Operation - DHCP (Auto IP)
If you are in the DHCP network, SMP players will get an IP address automatically
after installation. You can start managing it remotely from your PC.
1. If the SMP player and the PC are in the same LAN
You can use CAYIN Device Seeker to locate the player and open Web Manager.
2. If the SMP player and the PC are NOT in the same LAN
You can open a browser and type http://ip_address in the address bar to access
Web Manager. However, you need to know the exact IP address in advance
and the IP address might be changed by the DHCP server. Therefore, you might
consider using a static IP address in this case.
When you see the login page of Web Manager, enter your username and
password and select the language display for your user interface. Then, click
Login.
• Default Username: webadmin
• Default Password: admin
Page 11

ENGLISH
中文
11
3.3 Remote Operation - Static IP
If you are in a static IP network, please follow the steps below to log in and
complete network settings.
Step 1 Connect a keyboard and a mouse to USB connectors on the SMP player
and connect the power adapter to a socket to turn on the system. If the
player starts playing contents after the system boots up, press Ctrl+F10
to switch to the login page of Web Manager.
Step 2 Enter your username and password and select the language display for
your user interface. Then, click Login.
• Default Username: webadmin
• Default Password: admin
Step 3 After logging in Web Manager, select NETWORK > Ethernet.
Step 4 Click Static IP Address and complete all related network settings of this
SMP player, e.g. IP address, Subnet mask, Gateway, and DNS.
Step 5 After completing, click Save. Then, the SMP player will reboot.
Page 12

Quick Start Guide
12
Step 6 You can remove the keyboard and mouse from this SMP player now, and
start managing it remotely from your PC.
• If the SMP player and the PC are in the same LAN (Local Area
Network), you can use CAYIN Device Seeker to locate the player and
open Web Manager.
• If the SMP player and the PC are NOT in the same LAN, you can open
a browser and type http://ip_address in the address bar to access
the Web Manager.
3.4 CAYIN Device Seeker
CAYIN Device Seeker is a handy tool for you to search all available SMP players
and CMS servers in the same LAN. Please follow the steps below to use it.
Step 1 Insert the product CD into your CD-ROM, and run CAYIN Device Seeker
(\Tool\Device Seeker\seeker.exe). You can also copy the file to your PC for
future management.
2
3
4
Step 2 Click Seek and the seeker will search all available SMP players and CMS
servers in the same LAN.
Step 3 If you want to open Web Manager of a device, select it and double click
the device name. You can also click on a device name, and click Open
Web.
Step 4 If you want to update contents into the device, select the device you
want to connect, and click Open Folder. Then, you can open the Media
Folder of that device and upload files via Network Shares
(Network Neighborhood).
Page 13

ENGLISH
中文
13
If your PC and SMP players or CMS servers are not in the same LAN, the Device
Seeker will not function properly. Please open a browser and enter the IP address of
the SMP player or CMS server. Once you have successfully logged in, you can start
managing the device.
NOTE
Step 1 Click on the Activate button in System Overview, under System>License.
Step 2 If the player has internet connection, click Activate.
Step 3 If the player is not connected to the internet, click Generate. You will
have to mail the generated .rc file to your sales representative. Once
your representative completes the activation, you will receive a reply with
an activated .cert file. Choose the .cert file, and click Upload.
(Please refer to Online Help ( P.16) for more information on activating your SMP)
3.5 Activating your SMP
Once you are logged in, you will need to activate the appliance to complete
the installation process and receive full access.
1
2
3
Page 14

Quick Start Guide
14
4. Online Help
The SMP User’s Guide provides more detailed information of all features. If you
have questions about any specific function, please log in Web Manager, go to
the configuration page of that function, and click HELP on top of the window.
Then, the system will show you the reference information of that function.
CAYIN Technology Co., Ltd.
8F-2, No. 577, Linsen N. Rd.
Taipei City 104, Taiwan
TEL: +886-2-25951005
FAX: +886-2-25951050
http://www.cayintech.com
Copyright © 2016 CAYIN TECHNOLOGY CO., LTD. All Rights Reserved.
All contents in this manual are the intellectual property of CAYIN Technology Co.,
Ltd. All brand names, icons, and trademarks that are not the property of CAYIN
Technology are the property of their respective holders.
Unregistered players will only display full screen video playback in an alphabetical
order.
NOTE
Page 15

ENGLISH
中文
15
1. 產品說明
1.1 SMP-2100
正面
背面
COMON/OFF
1
2
3
HDMI 1
HDMI 2
6
5
8
7
Page 16

快速安裝手冊
16
1.3 SMP-6000
正面
1 2 3
背面
4 6 8 9 10 11 12 13
5 7
USB x 2
RS-232 x 2
乙太網路
S-Video-in
電源接頭
電源、硬碟與網路指示燈
VGA
USB x 2
Audio-in
電源開關
DVI
HDMI
Audio-out
1 2
4 5 6
7 8 9
10 11 12
13
3
Page 17

ENGLISH
中文
17
1.4 SMP-8000/8000QD
5 6 7 8 9
DP 1 DP 2 DP 3 DP 4
1
2
3
4
正面
背面
DisplayPort 1.2
電源接頭
USB 3.0 x 2
DisplayPort 1.1
硬碟
COM
USB 3.0 x 2
乙太網路
電源開關
1 2
4 5 6
7 8 9
3
Page 18

快速安裝手冊
18
2. 安裝 SMP 播放器
2.1 硬體安裝與準備
步驟 1 將乙太網路線連接到區域網路連接埠(在預設的狀況下,SMP 會從 DHCP
伺服器上取得 IP 位址)。
步驟 2 連接 VGA、DVI 或 HDMI 線到螢幕上。預設的螢幕解析度為螢幕的內建解析
度。
步驟 3 若需從 SMP 本機做系統設定,請於任一 USB 接頭連接鍵盤與滑鼠。
步驟 4 連接上電源供應器後,SMP 會自動啟動。
步驟 5 一旦螢幕出現登入系統畫面,即表示已完成硬體安裝。
SMP-2100
1
HDMI 1
HDMI 2
42
3
Page 19

ENGLISH
中文
19
SMP-6000
13 42
SMP-8000/8000QD
1 3
DP 1 DP 2 DP 3 DP 4
2 4
Page 20

快速安裝手冊
20
2.2 播放器壁掛安裝方式
步驟 1 將壁掛架與 SMP 播放器用螺絲鎖緊。
步驟 2 將 SMP 播放器壁掛於適當位置,並以隨附的螺絲固定鎖緊。
SMP-2100
SMP-6000
1 2
293mm
84mm
1
2
80mm
126mm
Page 21

ENGLISH
中文
21
SMP-8000/8000QD
1 2
192mm
52.5mm
Page 22

快速安裝手冊
22
3. 登入 Web Manager
不論您是否處於網路連線的環境,皆可以登入 SMP 播放器的管理平台 Web Manager,但操作的過程會依您的網路環境有些許差異。
3.1 離線操作 ( 本機登入 )
您可以在無網路連線的環境管理 SMP 播放器。
步驟 1 將 SMP 播放器接上螢幕、鍵盤與滑鼠,再插上電源線來啟動系統。
步驟 2 系統開機之後,您將會看到 Web Manager 的登入畫面。然而,若您已經
在該台 SMP 播放器完成播放設定,播放器則會在開機後自動開始播放多媒
體內容。此時,您可以按下【Ctrl+F10】切換至 Web Manager的登入畫面,
之後再按下【Ctrl+F1】回到播放模式。
步驟 3 輸入使用者名稱及密碼,再選擇一個管理介面的語系,然後點擊【登入】。
• 預設的使用者名稱:webadmin
• 預設的密碼:admin
3.2 遠端操作 - DHCP ( 自動 IP 設定 )
若您的網路環境是採用 DHCP 的 IP 指派方式,在完成硬體安裝、啟動系統後,SMP
會自動取得 IP 位址,您就可以開始從您的個人電腦遠端控管。
Page 23

ENGLISH
中文
23
1. SMP 播放器與個人電腦位於同一區域網路
您可以使用【鎧應裝置搜尋器 (CAYIN Device Seeker)】來尋找播放器,並開啟
Web Manager 管理介面。
2. SMP 播放器與個人電腦位於不同區域網路
您可以開啟一個瀏覽器,並在位址列中輸入 http://ip_address 來連接 Web
Manager。然而,您必需要事先知道正確的 IP 位址,而此 IP 位址又可能會被 DHCP
伺服器變更。因此,若 SMP 播放器與個人電腦不在同一區域網路,我們建議您考
慮使用固定 ( 靜態 ) IP 位址的方式。
當您看到 Web Manager 的登入畫面時,請輸入使用者名稱與密碼,再選擇一個管
理介面的語系,然後點擊【登入】
• 預設的使用者名稱:webadmin
• 預設的密碼:admin
3.3 遠端操作 – 固定 IP 位址
若您的網路環境是採用指定固定 IP 的方式,請依循下列步驟登入管理介面,並完成
網路相關設定。
Page 24

快速安裝手冊
24
步驟 1 將 SMP 播放器接上螢幕、鍵盤與滑鼠,再插上電源線來啟動系統。若開機
後播放器開始播放多媒體內容,請按下【Ctrl+F10】切換至
Web Manager 的登入畫面。
步驟 2 輸入使用者名稱及密碼,再選擇一個管理介面的語系,然後點擊【登入】。
• 預設的使用者名稱:webadmin
• 預設的密碼:admin
步驟 3 登入 Web Manager 後,請選擇【網路 > 乙太網路】。
步驟 4 點選【固定 IP 位址】,然後完成所有與該 SMP 播放器相關的網路設定,例
如:IP 位址、子網路遮罩 (Subnet mask) 、 通訊閘 (Gateway) 與域名伺服
器 (DNS) 。
步驟 5 設定完成後,請點擊【儲存】。然後,SMP 播放器就會重新啟動。
步驟 6 現在,您可以移除連接 SMP 播放器的鍵盤與滑鼠,並開始從您的個人電腦
上遠端控管播放器。
• 若 SMP 播放器與個人電腦位於同一區域網路,您可以使用【鎧應裝置
搜尋器 (CAYIN Device Seeker)】來尋找播放器,並開啟 Web Manager
管理介面。
Page 25

ENGLISH
中文
25
步驟 2 點擊【Seek】, 軟體將搜尋相同的子網路端點中可用的 SMP 播放器及
CMS 伺服器裝置。
步驟 3 若您想要開啟任一裝置的 Web Manager 管理介面,雙擊該裝置的名稱即
可建立連線。您也可以先點選該裝置的名稱,然後點擊【Open Web】。
步驟 4 若您想要更新內容至任一裝置,請先選擇欲連結的裝置名,然後點擊【Open
Folder】。如此,您將可以開啟該裝置的多媒體檔案夾,經由網路芳鄰上
傳檔案。
3.4 鎧應裝置搜尋器
鎧應裝置搜尋器 (CAYIN Device Seeker) 為一個方便的小工具,讓您能輕鬆搜尋同
一區域網路內所有的 SMP 播放器與 CMS 伺服器,使用方法如下:
步驟 1 將產品光碟放到 CD-ROM 中,並且執行【鎧應裝置搜尋器 (CAYIN Device
Seeker)】 ( 檔案位於 \Tool\Device Seeker\seeker.exe)。您也可以將此檔案
複製一份至您的電腦上,以利未來快速取用管理。
• 若 SMP 播放器與個人電腦不位於同一區域網路,您可以開啟一個瀏覽
器,並在位址列中輸入 http://ip_address 來連接 Web Manager。
2
3
4
Page 26

快速安裝手冊
26
3.5 軟體啟用
當您首次登入本機時,必須啟用軟體才能完成安裝程序,並使用機器的完整功能。
步驟 1 請點擊系統概要 > 系統 > 軟體憑證中的啟用軟體。
步驟 2 確定網路已連線後請點擊啟用軟體。
步驟 3 若您的機器無法連線至網路,或是線上啟用無法辨識網路時,請點擊產生
認證碼;.rc 認證檔產生後,請手動 email 至您的銷售人員信箱,您的銷售
人員將會進行認證程序並提供 .cert 證書檔,請選擇證書檔,並點擊上傳。
(欲瞭解手動啟用詳情,請參照線上手冊(P.16))。
2
3
1
若您的個人電腦與 SMP 播放器或 CMS 伺服器不在同一區域網路中,Device Seeker
將無法正常運作。請開啟瀏覽器,並在位址列中鍵入 SMP 播放器或 CMS 伺服器的 IP
位址。成功登入後,您就可以開始管理該裝置。
注意
Page 27

ENGLISH
中文
27
鎧應科技股份有限公司
104 台北市中山區林森北路 577 號 8 樓之 2
電話:(02) 2595 1005
傳真:(02) 2595 1050
http://tw.cayintech.com
著作權 © 2016 鎧應科技股份有限公司。版權所有。
本手冊的所有內容,其著作財產權歸鎧應科技股份有限公司所有。使用手冊中所提
到的非鎧應科技的產品、名稱或註冊商標,均屬於其合法註冊公司所有。
4. 線上說明
SMP 播放器的線上使用說明能提供所有功能的詳盡解說。若您對於某項功能的操作
方式有疑問,請登入 Web Manager 並進往該功能的設定頁,然後點擊位於視窗上
方的【求助】,系統將會顯示該功能的使用說明頁。
未完成啟用的 SMP,只能按檔案名稱字母排序播放全螢幕的影片。
注意
Page 28

TEL: +886-2-25951005 FAX: +886-2-25951050
http://www.cayintech.com
電話:(02) 2595 1005 傳真:(02) 2595 1050
http://tw.cayintech.com
 Loading...