

Page 1
4. 4 B AL.
STD
POW ER PH ON ES
4PI N BAL .
M
L
IM PE DA NC E
XLR
H
SO UR CE S
TR
RCA
UL
VO LU ME
4.4 B AL AN CE
ON OFF
STA ND ARD
HA-6A
TR UL
4P IN B AL AN CE
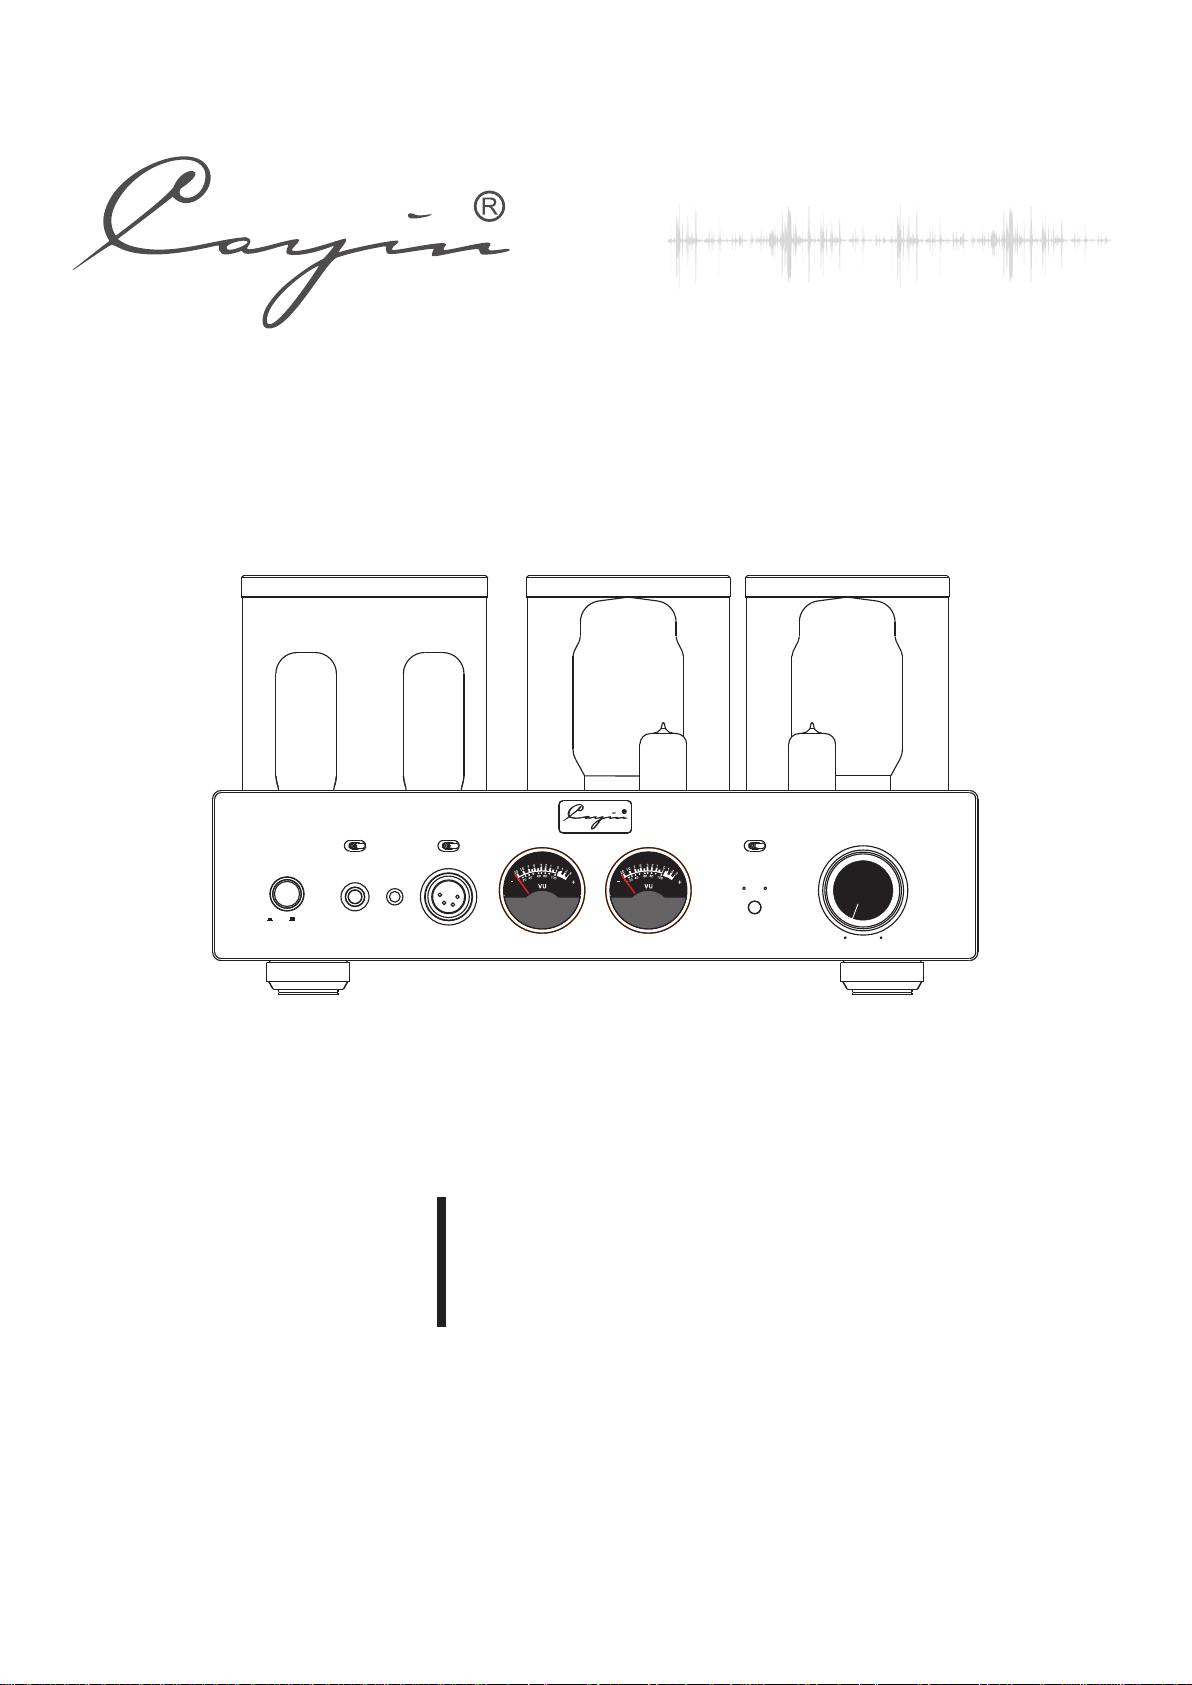
HEAD PHONE AMPL IFI ER HA-6 A
/
MIN
MAX
HEADPHONE AMPLIFIER
User's Manual
Page 2

Thank you for choosing Cayin HA-6A Headphone Amplifier
We have inserted protective foam inside the Vacuum Tube Cage in order to protect the vacuum tubes during
transportation. Please remove these foams before you connect the amplifier into your sound system. Fail to do
so might cause serious damage to the amplifier or disaster such as fire accident.
We have prepared this user manual to help you understand the features and get familiar with the operation of
the amplifier. We suggest all customers read through this manual before they start to use the device.
Table of Contents
Table of Content ………………… …………………………………………………………
Package Contents ……………………………………………………….……………………………………
Product Features ……………………………………………………………………………………………...
Safety Precautions ……………………………………………………………………………………………
Specificati o n s ……………………… … … … ……………………………… … … … ……………………….
Daily Care ……………………………………………………………………………………………………...
Wa r r a nty Serv i c e ………………………………… … … ………………………………………… … … . ..
Prep a r atio n …………… … ………… … …………… … ………… … ………… … … ………… … ……….
Front Panel Functional Description …………………………………………………………………….
Re ar Panel Functional Descrip tion ………… ………………………… ………………… ………….
Top Panel Functional De s c r iption ……………………………………………………………… … . . .
Ins t al l at i on ……… … ……… … …… … …… … ……… … …… … …… … ……… … …… … …… … ……. . .
Va cu u m T u b e Sub st it ut i o n …… … …… …… …… …… … … … … … … … …… …… …… …… … … . . .
……… …………
1
2
3
4
5
6
6
7
8
9
10
11
11
Con nec t to Aud i o Equ ipm ent … … ……… ……… ……… … …… … …… … …… … …… … …… … ...
Co nn ec t to H ea dp ho ne s … … … … … … … … … … … … … … … … … … … … … … … … … … … …… .. .
Bas i c Oper a tio n …… … ……… … ……… ……… … ……… … ……… … ……… … ……… … ……… … .
M a i n t e n a n c e …… … …… … … … … … … … … … … … … … … … … … … … … … …… … … … … … … . . .
T r o u b l e s ho o t i n g … … … … … … … … … … …… … … … …… … … … … … …… … … … … … …… .
F o l l o w u s … … … … … … …… … … …… … … … …… … … …… … … … …… … … …… … … … ……
1
12
13
14
15
16
17
Page 3
Notice:
This amplifier is designed, optimized and manufactured by factory designated components. Cayin reserves the
right to void the warranty of the product in case of unauthorized repair, modification or change to the product,
and we shall not responsible to any failure or damage caused by replacement of non-designated components.
Package Contents
Please place the box in upright position according to the marking of the package. Please examine the product
package before you open it, the package should be free from any physical damage or water stain. You should
find the following items when you open the package:
1.Cayin HA-6A x1
2.Electro-Harmonix EL34EH Vacuum TUBE x2
3.Wood Packing Box for EL34EH x1
4.User's Manual x1
5.AC Power Cord x1
6.Spare Fuses:
①.External Main Fuse x2(~220V-240V:T1AL250V; ~100V-120V:T2AL250V)
②.External Fuse for high voltage x2(T160mAL250V)
Recommendation
Please keep all packaging materials for future use as you may need to repackage the amplifier in the future.
Please fill in the product warranty card immediately and mail it to authorized dealer to safeguard your after-
sales service.
Note: Please make sure the AC voltage of your local power supply match the voltage information printed on the
back panel before you power up the amplifier. Incorrect input voltage setting will cause damage to the machine
or might even lead to serious household accident. Cayin reserves the right to refuse service or responsibility on
related instances. If the marked voltage is different from your local power supply voltage, please contact your
authorized dealer or Zhuhai Spark Electronic Equipment Co., Ltd.
Attention: the product package should include only the items in the list above.
2
Page 4

Product Features
◆
Point to point wi elding with premium wire. The entire circuitry is handwired by skil lful
craftsman.
◆
Matched- pair custom build EI outp ut transformers.
◆
Custom build EI p ower transformers.
◆
Two pieces NOS RC A 22DE4 are applied for power rectificati on.
◆
Multi- stage independent power supply v oltage amplification employs indepe ndent regulator
design minimu m ripple effect of power interference ens ure outstanding audio performance,
free from any gra in and hardness.
◆
Dedicated imp lementation of single- e nded amplification circuit offer simple, pure and
devote d music presentation.
◆
JJ 12AU7/ECC8 2 are used for voltage amplification.
◆
Genalex Gold Li on KT88 or Electro- H armonix EL34EH are used for power amplificatio n.
◆
High- precision 24 steps potenti onmeters are applied.
◆
High quality Ne utrik 6. 35mm singl e- ended headphone, NIPP ON DICS 4. 4mm b alanc ed
headphone, an d Neutrik 4- pin bala nced he adphone are included.
◆
In - house designed output transfo rmers provide three set of impedance matched outputs
( High, Mid, Low) from 8Ω to 600Ω at your direction .
◆
Two sets of line in put XLR balanced RCA single- ended.
◆
Dual operatio n mode Triode & Ultralinear. Triode mode is t endering, rich in harmonic,
smooth, iush an d holography. Ideal for vocal and string mu sic. Ultra- linear mode ca n
improve power a nd extension. Clean, energetic, and aut horitative. Ideal for music
requires a lot of p unch, dynamic and control.
◆
With TUBE SEL, di fferent power tubes can be chose.
◆
Strong output p ower to match with wide range of headphone in t he market.
◆
Premium shiel d silver- plated ca ble are used for minimize interference du ring transmission.
◆
Soft start function ( about 60 secon ds) .
◆
Design with an in novative circuit layout and highly effe ctive shielding consideration, the
components wi ll function at premium environment to ensure high quality audio performan ce form
the amplifier .
◆
Equipped with e asily- installe d tube cover for protection.
3
Page 5
Safety precautions
1. Unplug the power cord if you a re not going to use the amplifier for an extend ed period of time, and
keep the m achin e in proper condition.
2. Tube amplifier will buil t-up its operation temperature after lo ng hours of operation. Please keep t he
amplifier at a we ll-ventilated environment an d do not cover the amplifier or blocked the ven ts. Poor
ventilation w ill lead to excessively high operation temperature and can cause malfunct ion or fire.
3. To avoid damaging the ampl ifier, you must connect a source device to the input terminals before you
select that as the active input of your HA-6A.
4. To avoid damaging the ampl ifier, short circuit among the output terminals are strictly forbidden.
5. Do not attempt to service th is product yourself. Opening the c over may expose you to electric shoc k or
other ha zards.
6. Do not attempt to disassem ble the machine. Cayin reserves th e right to void the warranty of the
product in case o f unauthorized repair, modific ation or change to the product. All se rvice and
maintenance m ust be conducted by authorized ser vice technician.
7. The amplifier must be keep a way from water dripping or water splittin g, do not place any objects filled
with liquids su ch as vases or some others on the top or aro und the amplifier.
8. Please disconnect powe r cable before you attempt to clean the machi ne. Please use soft clean cloth
to wipe cl ean the chassis, do not use volatile soluti on or corrosive to clean product.
9. Please handle with care, a void tempering to the machine.
◆ To reduce the risk of electric shock, do not remove the cover.
◆ No user serviceable parts inside. Refer servicing to qualified service
personnel.
◆ To reduce the risk of fire or electronic shock, do not expose the unit to
rain or moisture.
This symbol warns the users that uninsulated voltage within the unit may be sufficient to cause
electrical shock. It is dangerous to make any kind of contact with any part inside the unit.
This symbol alerts the users that important information concerning the operation and maintenance of
this unit has been provided. The information should be read carefully to avoid problems.
4
Page 6
Specifications
Item
Specifications
KT88
Single Ended
TR: 800mW+800mW(L); 1600mW+1600mW(M);2500mW+2500mW(H)
UL: 1200mW+1200mW(L);2200mW+2200mW(M);3600mW+3600mW(H)
Balanced
TR: 1200mW+1200mW(L);2000mW+2000mW(M);3200mW+3200mW(H)
UL: 1900mW+1900mW(L);3000mW+3000mW(M);4500mW+4500mW(H)
EL34
Single Ended
TR: 750mW+750mW(L); 1400mW+1400mW(M);2200mW+2200mW(H)
UL: 1000mW+1000mW(L);2000mW+2000mW(M);3300mW+3300mW(H)
Balanced
TR: 1000mW+1000mW(L);1800mW+1800mW(M);2900mW+2900mW(H)
UL: 1600mW+1600mW(L);2800mW+2800mW(M);4200mW+4200mW(H)
Frequency Range
10Hz~65kHz ±3dB
TH+D
1%(1kHz)
Sensitivity
220mV~450mV
S/N Ratio
98dB (A-Weighted)
Headphone Impedance
L:8~64Ω; M:65~250Ω; H:251~600Ω
Headphone Connectors
6.35mm x1 ;4.4mm BALANCEx1; 4pin XLR x1,
Input Connector
XLR,RCA
Tube used
JJ 12AU7/ECC82 Genalex ×2、 KT88/Electro-Harmonix EL34EH ×2、
RCA 22DE4×2
Dimension
360mm 322mm 197mm× ×
Net Weight
19.5KG
Fuse
~220V-240V ~100V-120V:T1AL250V; :T2AL250V
Power Consumption
140W
Working Condition
Temperature °C °C Moisture 0 ~40 20%~80%
Storage Condition
Temperature °C °C Moisture -20 ~70 20%~90%
Rated Output
5
Page 7
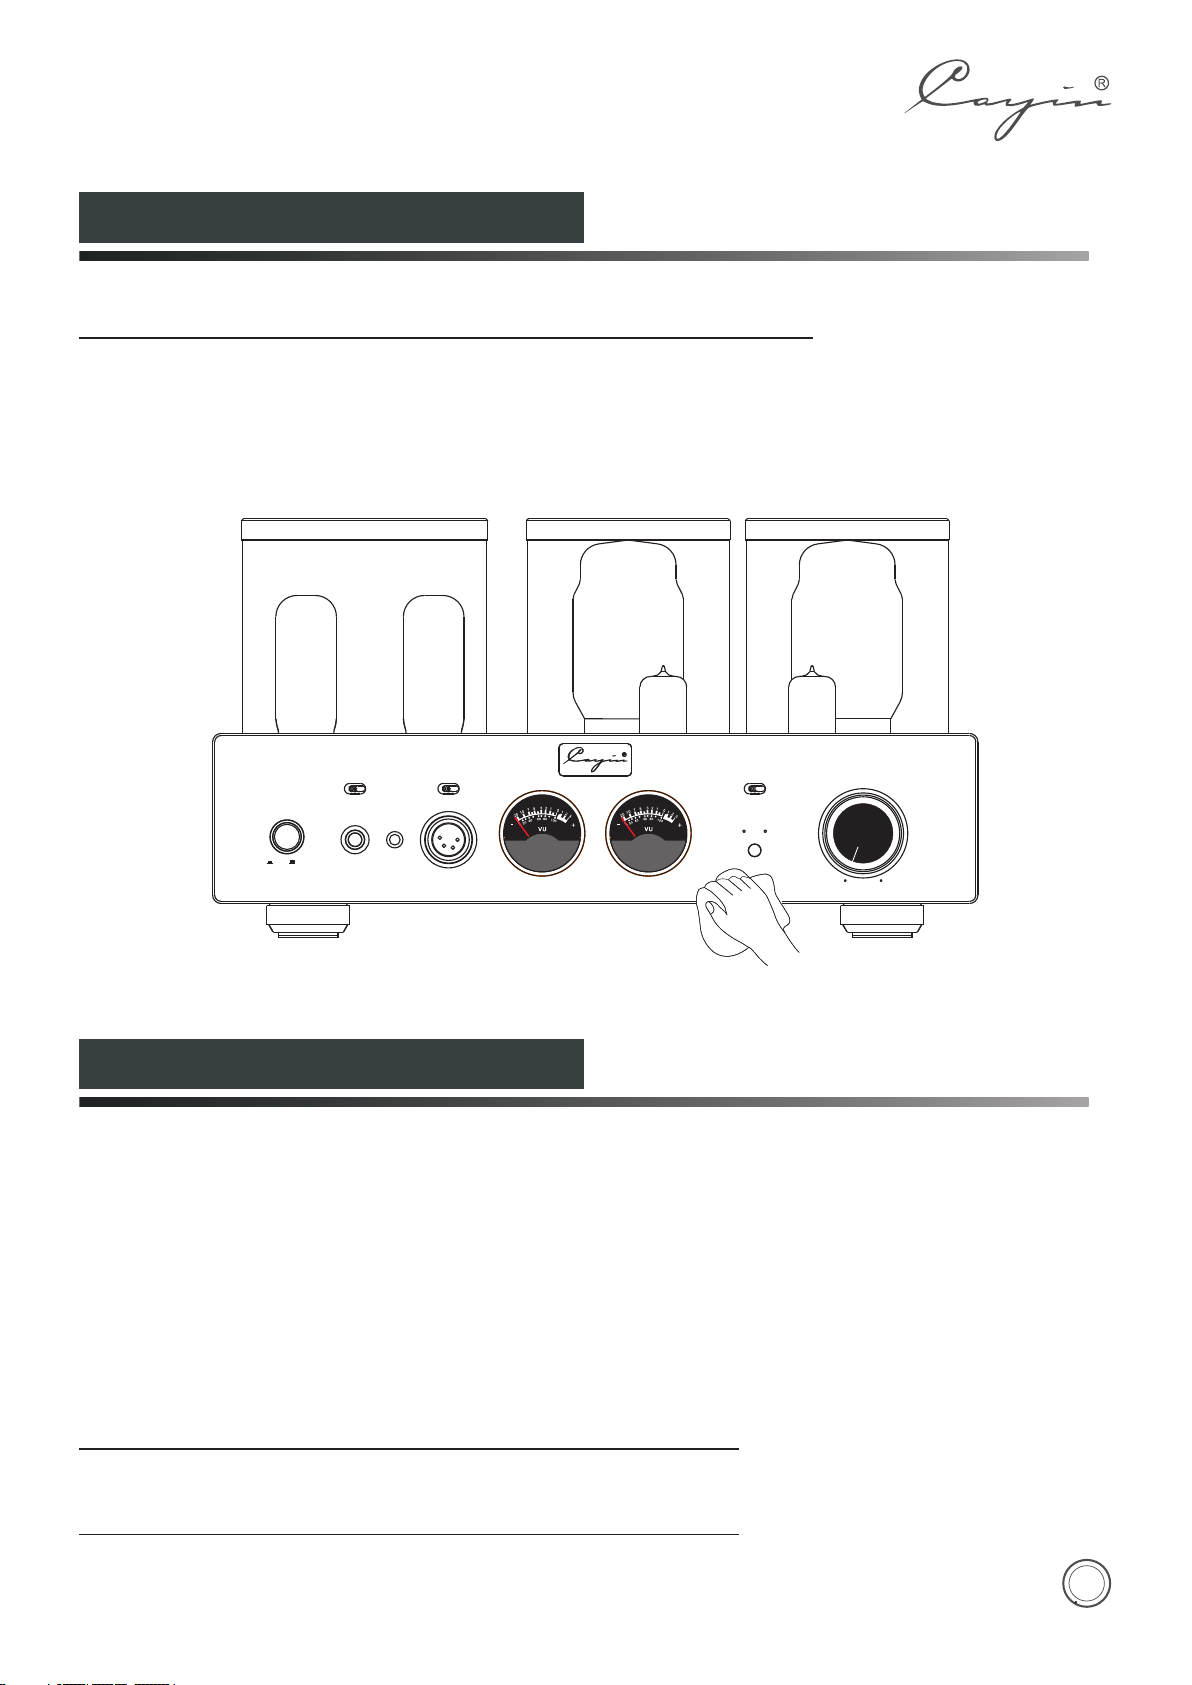
Daily Care
Notice:
◆ ◆ Please use soft clean cloth to clean the chassis regularly
Do not use volatile solution or corrosive cleaning product or pre-treated cloth
4. 4 B AL.
STD
POW ER PH ON ES
ON OFF
STA ND ARD
Warranty Service
4PI N BAL .
4.4 B AL AN CE
M
L
IM PE DA NC E
4P IN B AL AN CE
XLR
H
HEAD PHO NE AMPL IFI ER HA-6 A
SO UR CE S
TR
TR UL
RCA
UL
/
VO LU ME
MIN
MAX
1.The Product is warranted for a period of twelve (12) months from the date of original purchase (the “Warranty
Period”). Replacement Products are warranted for the remainder of the original twelve (12) month warranty
period. Six-month warranty on stock vacuum tubes.
2.The defective product must be returned to our authorized agent or Zhuhai Spark Electronic Equipment Co.,
Ltd (the “Company”) for service. You must receive approval from our authorized dealer or the “Company”
before you send out the defective product.
3.Do not attempt to disassemble the machine without prior approval of the “Company” otherwise we reserves
the right to void the warranty of the product
NOTE:
The information in this manual is subject to change without prior notice.
6
Page 8
Precautions
SOURCES
XLR
RCA
TUBE SEL.
EL3 4
KT8 8
CAUTI ON
RISK OF ELECTRIC SHOCK
DO NOT OPEN
HEA DPHO NE AMP LIF IER
-HA 6 A
ZHU HAI S PARK E LEC TRO NIC E QUI PME NT CO. , LT D.
HV FUSE
T1 AL60m 250V
140
T1A L2 50 V
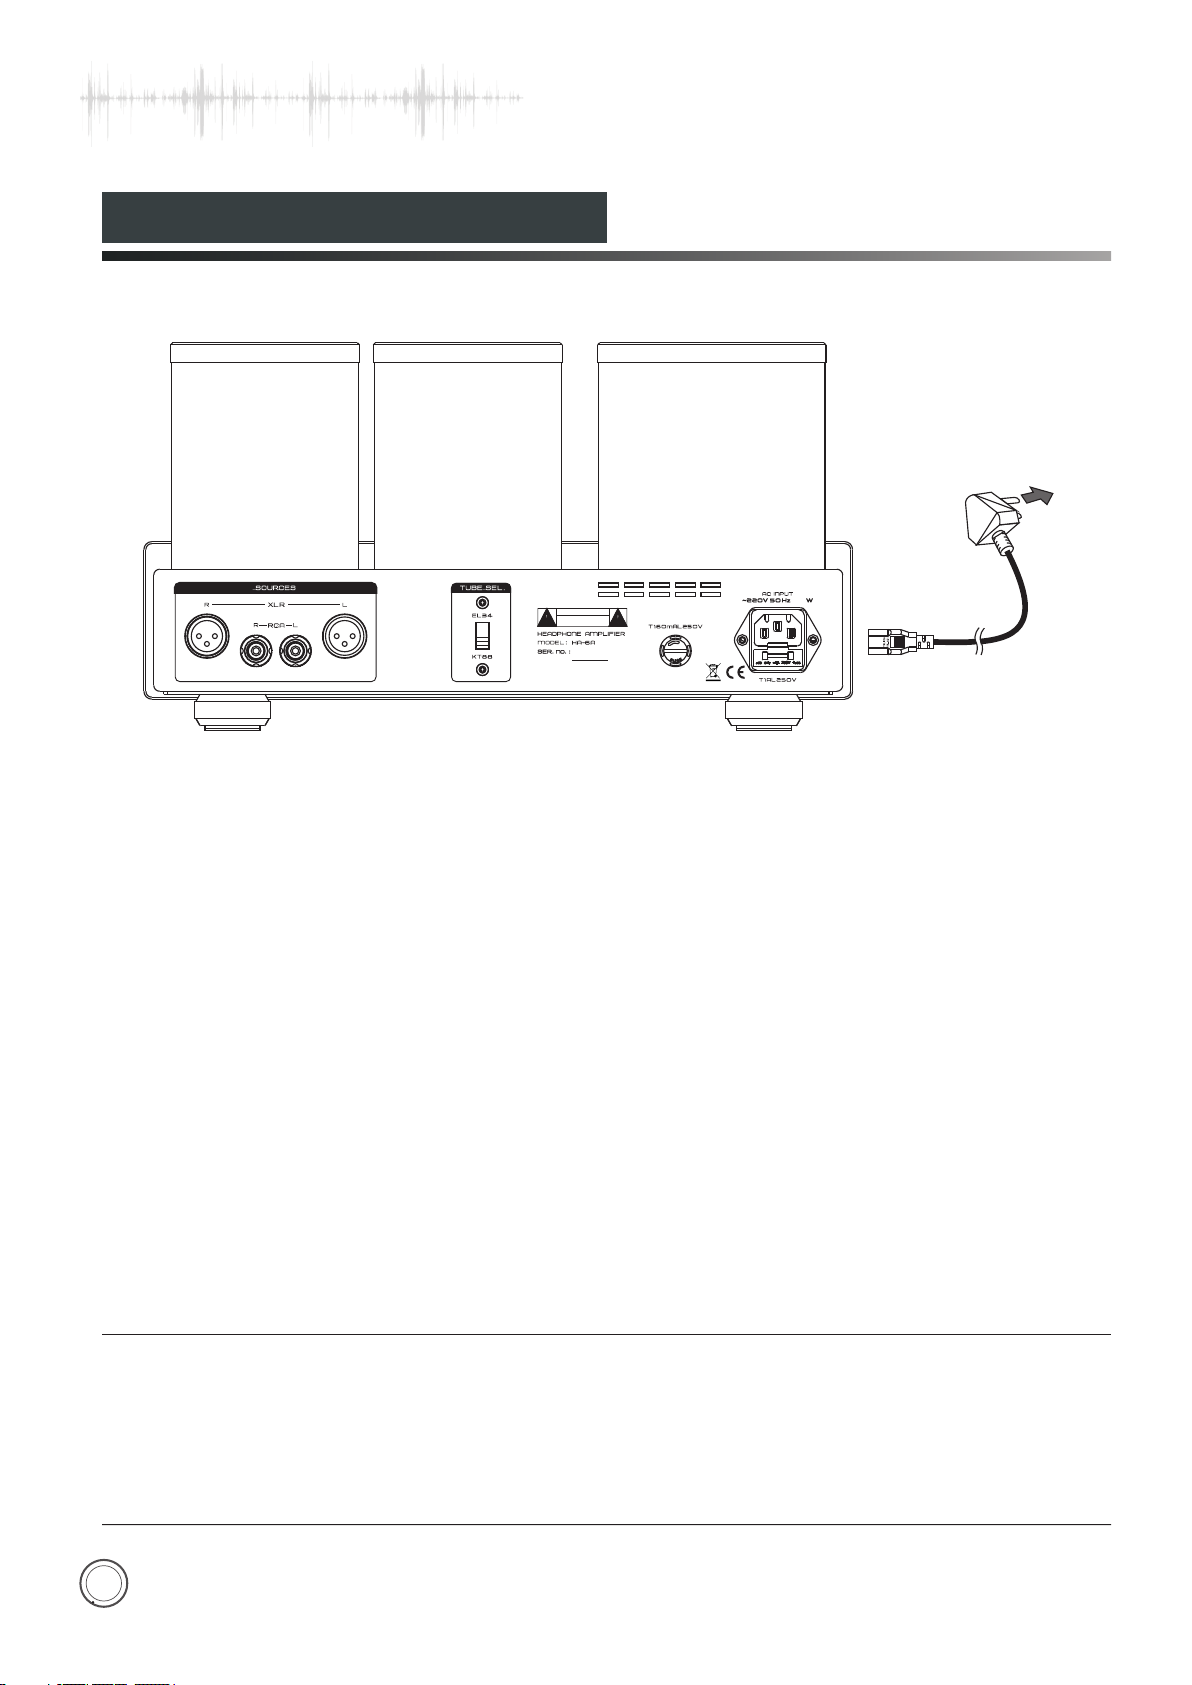
Connecting AC Power Cord
Connect the signal cables first and then insert the power cord into the power socket.
Connect to AC
Power Supply
Attention:
◆Connect power cord after all equipments are well connected.
◆It is normal that the transformers will emit heat when the amplifier is used for long hours
◆Please unplug the power plug if you won’t use the amplifier for a long time
◆Please make sure the AC voltage of your local power supply match the voltage of the amplifier. Cayin
will not be responsible for the damage or accidents such as fire caused by incorrect input voltage
7
Page 9
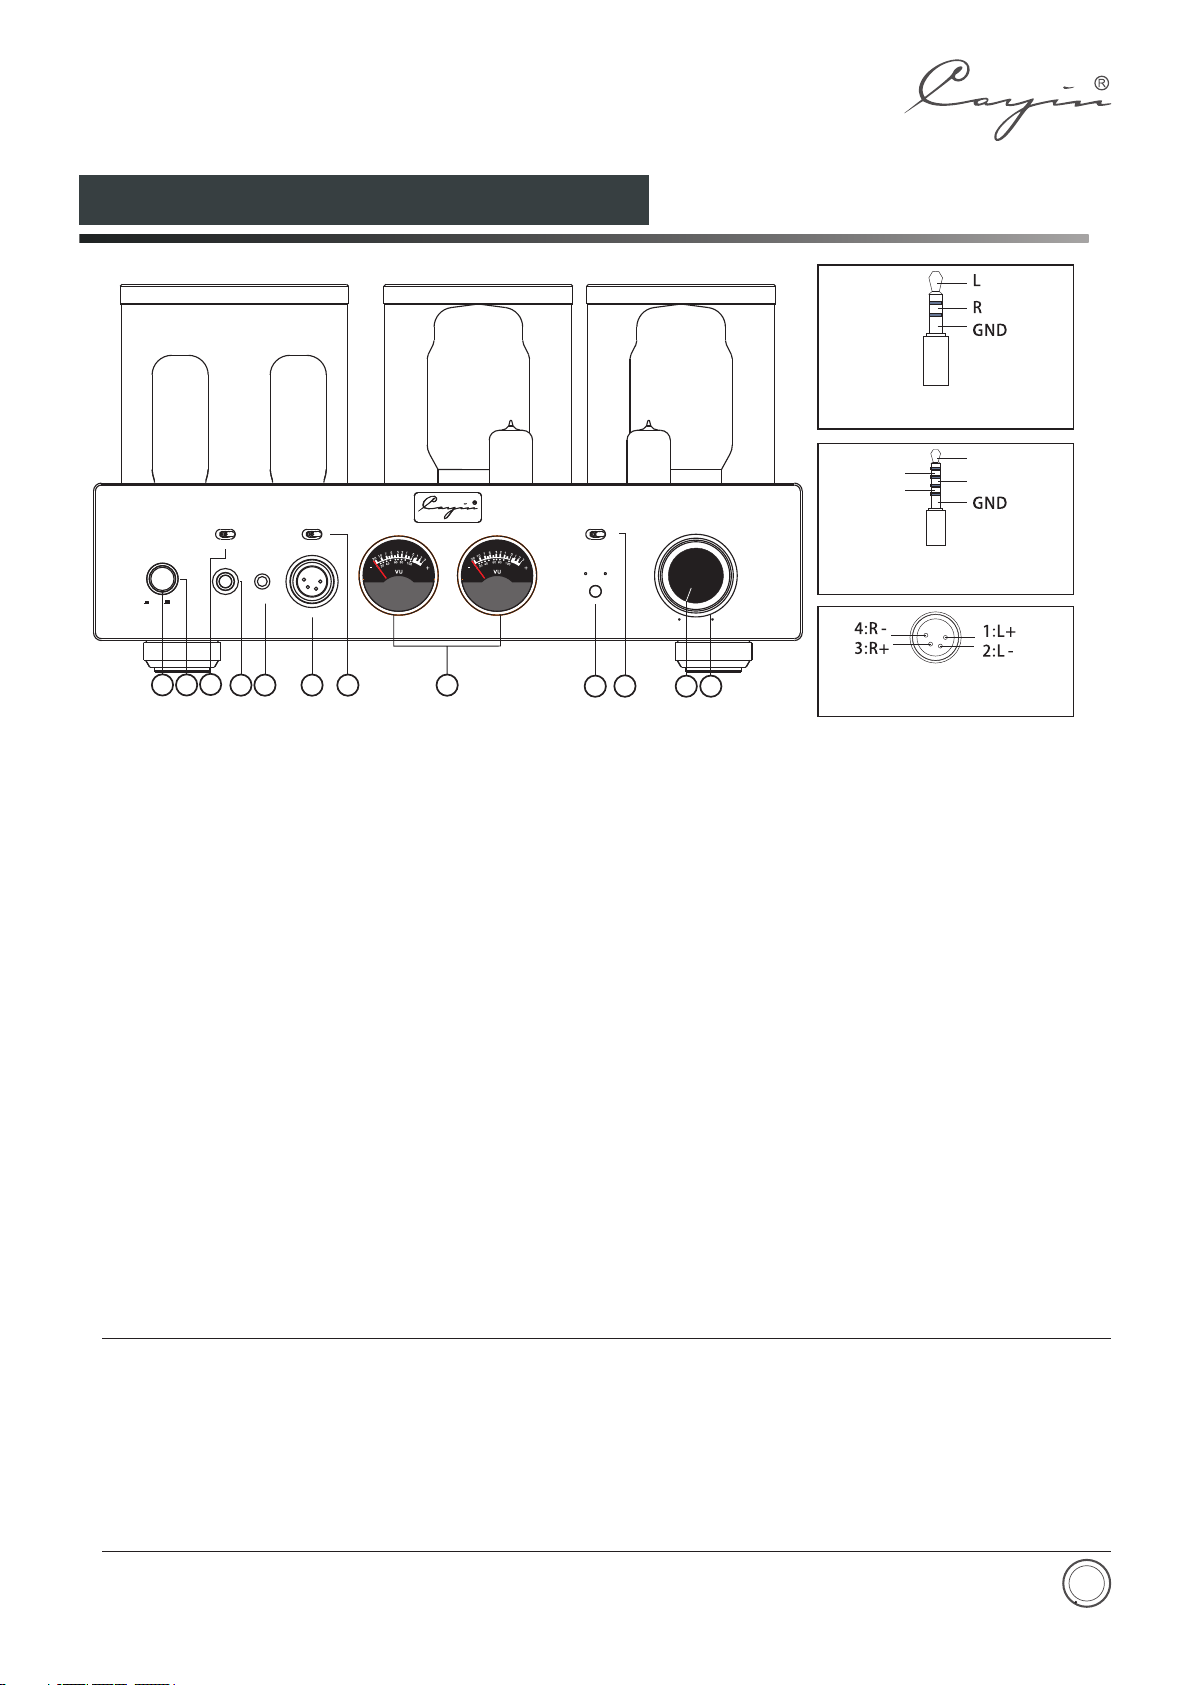
Front Panel Functional Description
Polarity Diagram for 6.35mm
Headphone Jack.
4. 4 BA L.
STD
POW ER PH ON ES
1 2
STA NDA RD
3
ON OFF
4PIN B AL .
4.4 B AL ANC E
4
M
H
L
IM PE DAN CE
4P IN B ALA NC E
6
5
7
HEAD PHO NE A MPLI FIE R HA -6A
8
Diagram 1:HA-6A Fro nt Pane l
Power On/Off: Turn on and off the amplifier. Press
①.
“down” the button to turn on the amplifier, Press
again the button will resume to original position and
the amplifier will power off.
Power Indicator
②. : Indicate the working status: The
indicator will remain always on when the amplifier is
in regular operation
③.Headphone Output Selector:
With the switch you
can select the suitable type of headphone
output. HA-6A offers three types output.
④.STANDARD: Output for headphones terminated in
6.35mm TRS connector
⑤.4.4 Balance Output:4.4 balance output for
headphone terminated in 4.4mm connector.
⑥.4PIN BALANCE: Output for headphones
terminated in 4pins XLR connector
L+
XLR
SO UR CES
TR
LR-
RCA
UL
VO LU ME
Polarity Diagram for 4.4mm
R+
Balanced Headphone Jack
TR UL
/
9
10
MIN
MAX
11
12
Polarity Diagram for 4 PIN XLR
Balanced Headphone Jack
⑦.IMPEDANCE: Select the most desirable: impedance-
matched output from the amplifier, three options were
offered: (L:8~64Ω; M:65~250Ω; H: 251~600Ω)
⑧.VU meter: monitor output level of the amplifier
Triode/ Ultralinear Indicator
⑨.
When the TR Indicator is on: Triode working state
When the UL Indicator is on: Ultralinear working state
⑩.SOURCES: select balanced or single-ended input
⑪ Working State Indicator/Mute Indicator
.
Used to indicate the working state. The indicator will
be on when it is working normally. The indicator will
flicker for 30 seconds when it delays to work. The
indicator will keep flickering when it is at mute state.
⑫ Volume Knob
.
Used to control volume
Attention:
If your want to connect a 3.5mm terminated headphone to the amplifier, you need a 3.5mm to 6.3mm
◆
adapter (not included in the package).
◆Listening through headphones at a high volume for extended periods of time can result in hearing
impairments.
◆Please do not use mono (TS) phone plug with this amplifier as this might cause serious damage
such as short circuit in the amplifier.
◆Please unplug the power plug from AC power circuit if the amplifier is not used for a long time
8
Page 10
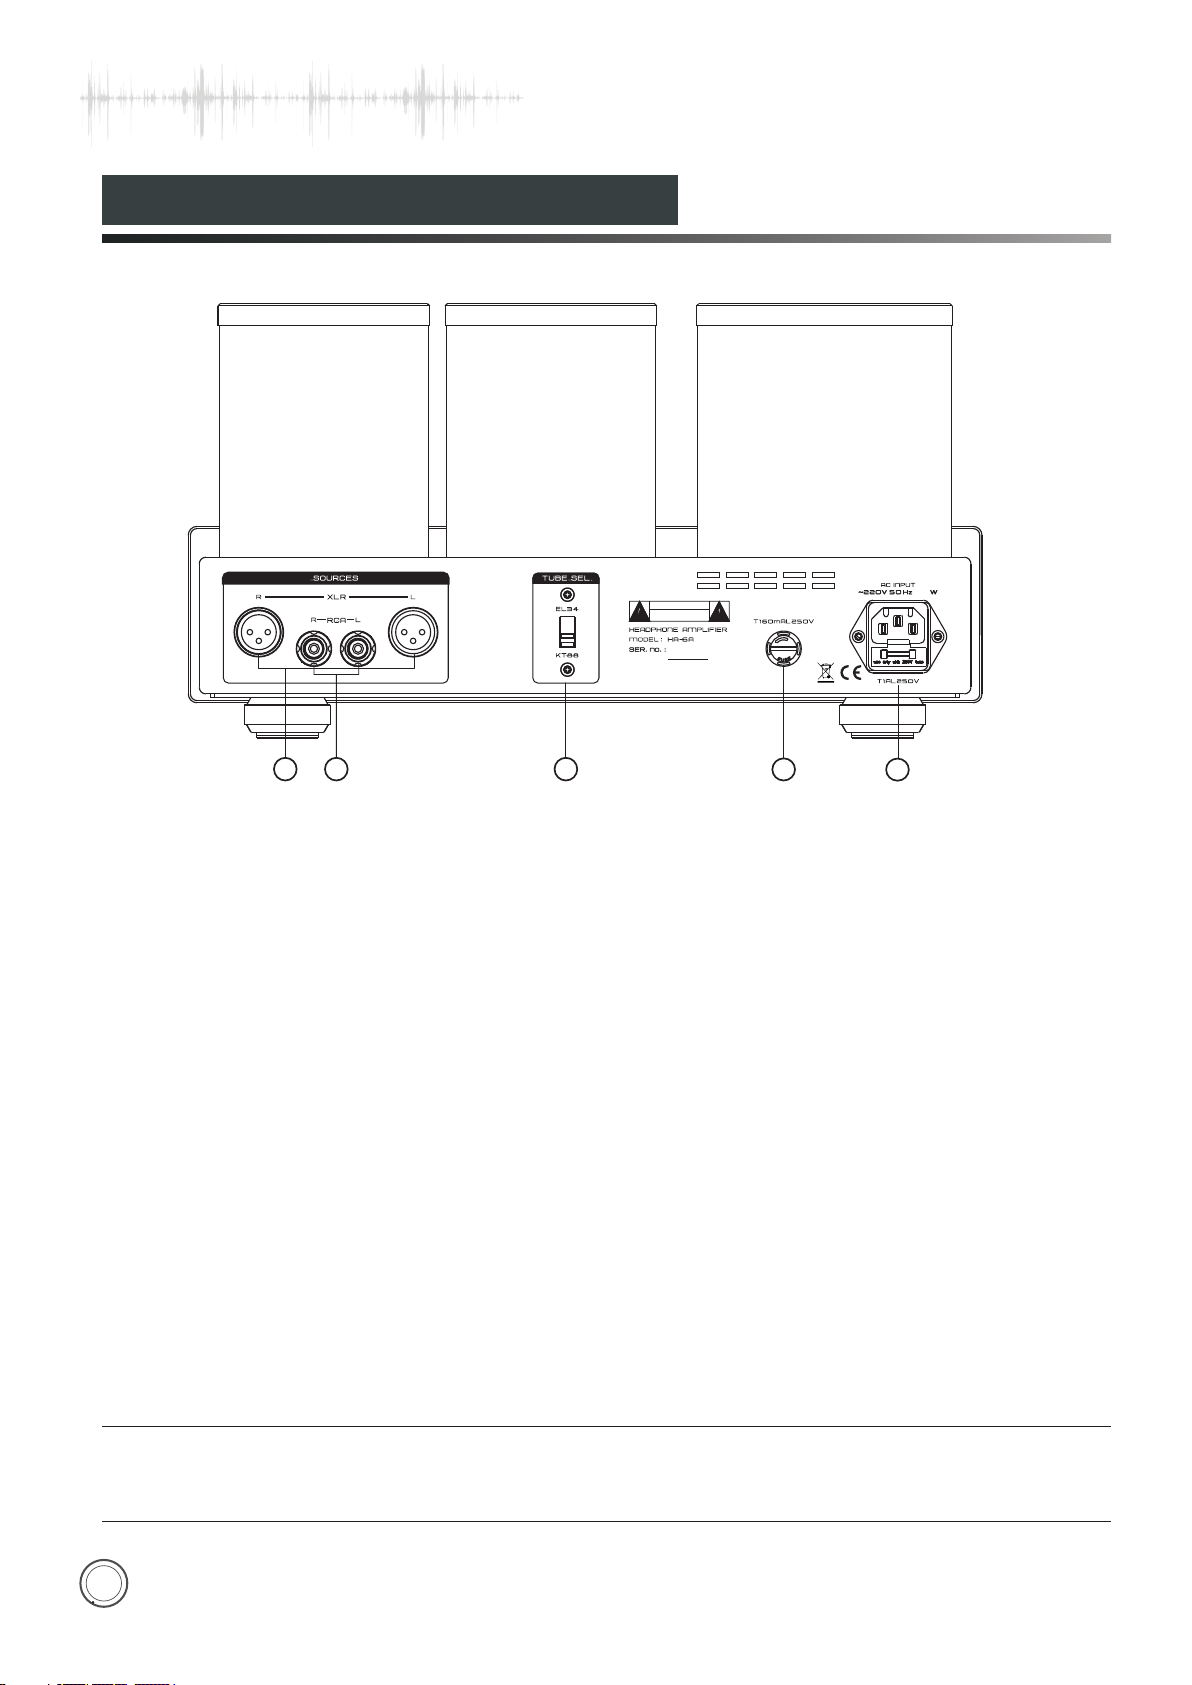
Rear Panel Functional Description
TUBE SEL .
1
Balanced input (XLR)
①.
SOURCE S
XLR
RCA
2
Diagram 2: HA-6A Rear Panel
Connect a balanced audio input to the
amplifier. Please make sure the left and
right channel is connected correctly
②.Single-ended input (RCA)
Connect a single-ended audio input to the
amplifier. Please make sure the left and
right channel is connected correctly
EL3 4
HEA DPH ONE AM PLIFIER
KT8 8
ZHU HAI S PAR K ELE CT RON IC EQ UIP ME NT CO. , LT D.
3
CAUT ION
RISK OF ELECT RIC SHOCK
DO NOT OPEN
-HA 6A
HV FUSE
T1 AL60m 250V
4
140
T1AL2 50V
5
③.Tube Selector Switch
Tube selector switch is accessible on the
rear of HA-6A. Please make sure the
switch is at the right position when you are
exchanging power tubes. Please refer to
page 11 for details on vacuum tube
substitution.
④.External Fuse for high voltage (T160mAL250V)
⑤.AC Power Input with Fuse Holder: please
replace fuse with the same specification
Attention:
Please make sure the AC voltage of your local power supply match the voltage of the amplifier. Cayin
will not be responsible for the damage or accidents such as fire caused by incorrect input voltage
9
Page 11
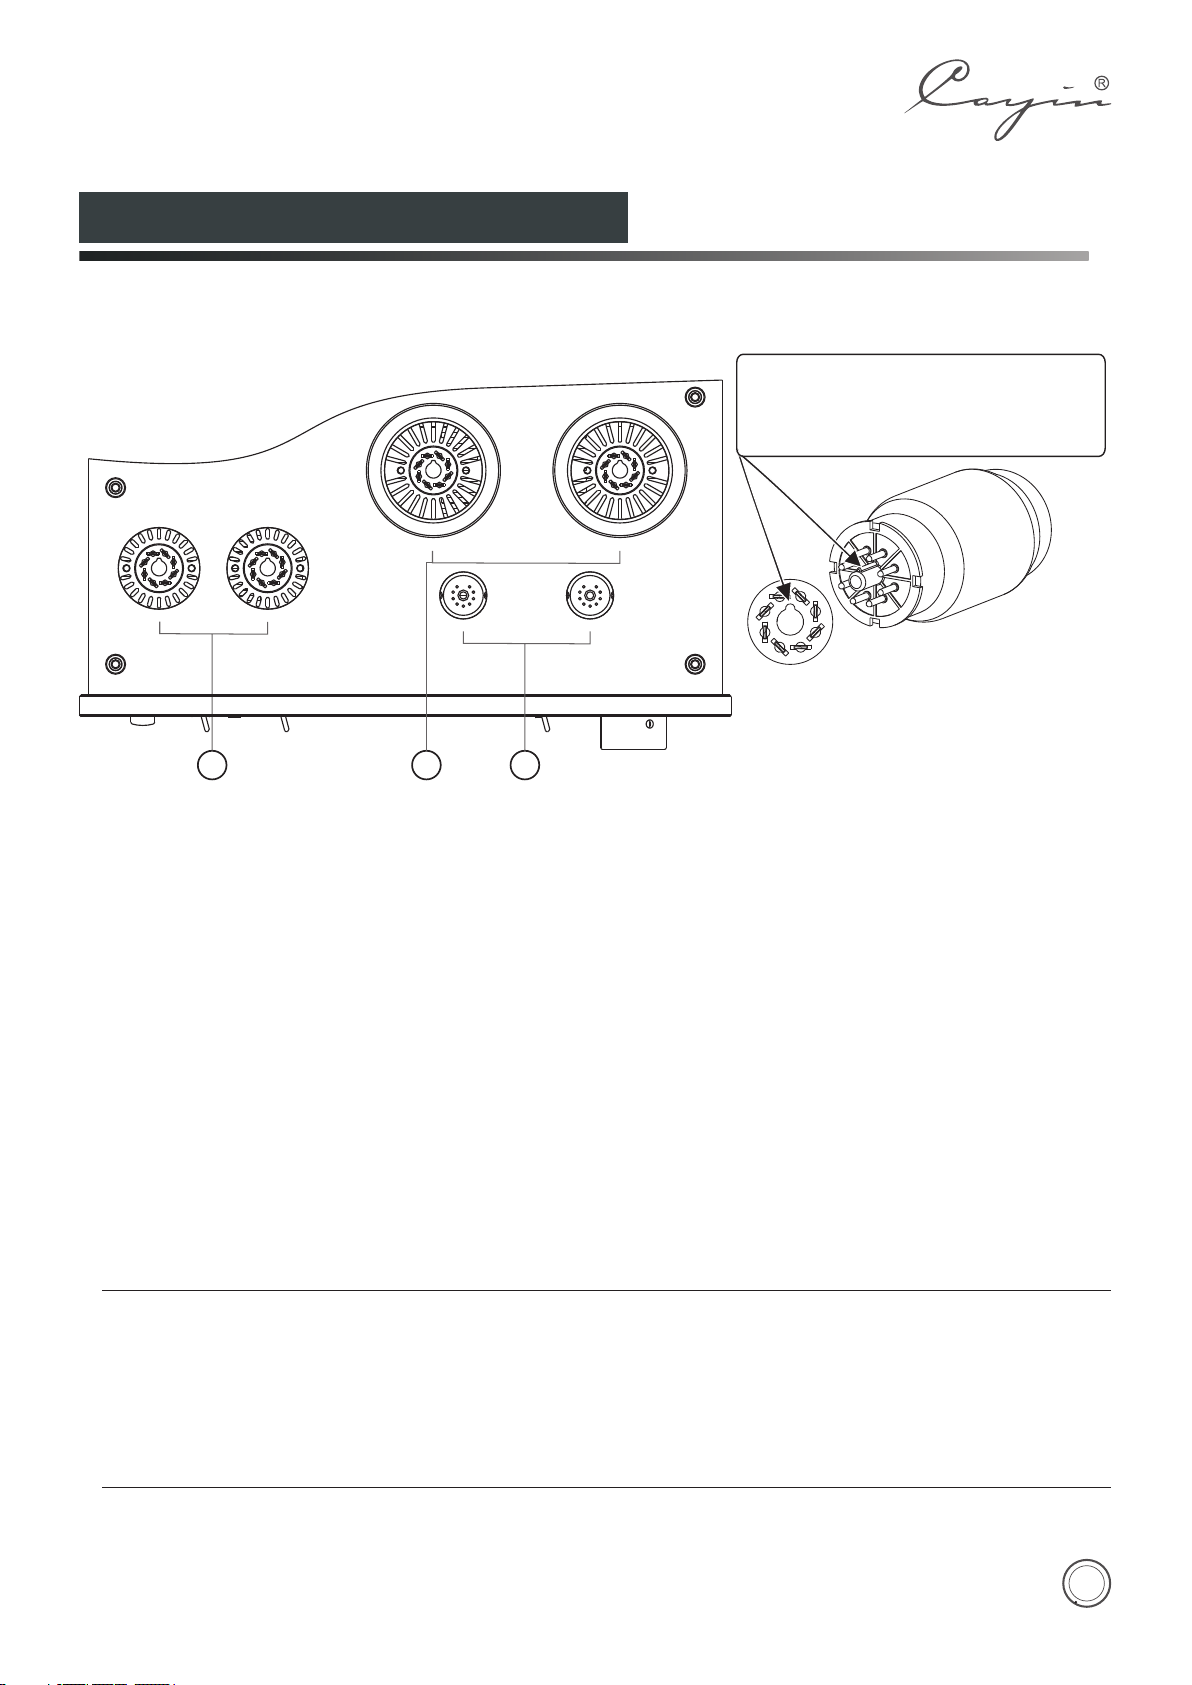
Top Panel Functional Description
When install vacuum tube to the amplifier,
position the vacuum tube correctly according
to the alignment pin before push the vacuum
tube base into the socket.
A2 A1
/
V3 22D E4
.
① V3、V4: RCA 22DE4 Vacuum TUBE
.
② A1、A2: Genalex KT88/Electro-Harmonix EL34EH Vacuum TUBE
.
③ V1、V2: JJ 12AU7/ECC82 Vacuum TUBE
/
V4 22D E4
Diagram 3: HA-6A Top Panel
/
V1 12A U7
2
31
/
V2 12A U7
Attention:
The vacuum tube will become very hot during operation, please be careful and don’t get burned.
◆
Please turn off the amplifier for 20 minutes before replacing the vacuum tube. Hold the base of vacuum tube
◆
firmly and to avoid damaging the fragile part of the vacuum tube.
When install vacuum tube to the amplifier, position the vacuum tube correctly according to the alignment pin
◆
before push the vacuum tube base into the socket.
10
Page 12
Installation
Please make sure all associated equipment are in perfect working condition before you install
the amplifier
Please pay attention to the following details when you install the amplifier.
◆Do not place the power amplifier under direct sunlight or near other heat sources.
◆To prevent the amplifier from overheating, please keep the amplifier at a well-ventilated
environment and do not cover the amplifier or blocked the vents.
◆Avoid moisture, keep the amplifier from dust if possible.
◆Make sure the amplifier are setup at a location that can be connected to the AC power
supply and other audio equipment conveniently.
◆Place the amplifier at a flat surface, make sure all four supporting tips are evenly loaded.
◆Please keep amplifier not less than 15cm away from and the wall.
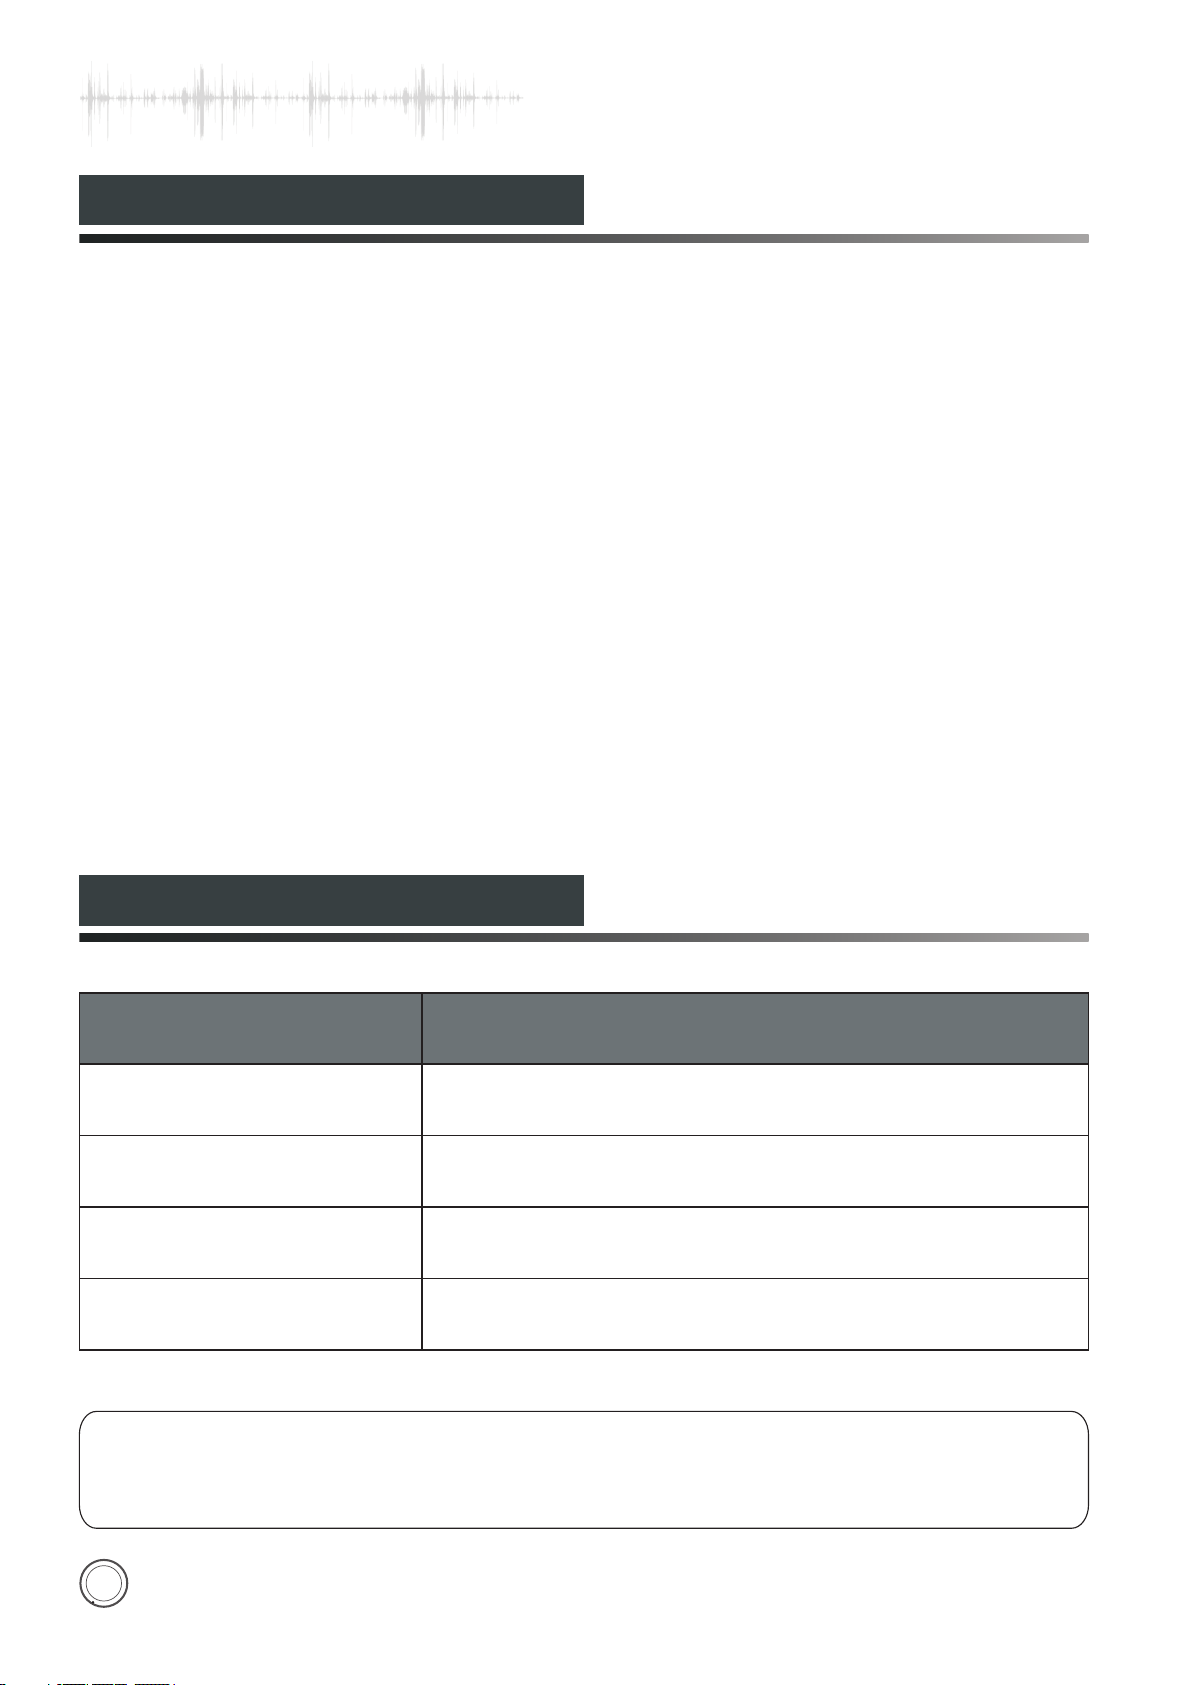
Vacuum Tube Substitution
No t e : Exchanging the tube please make sure TUBE SEL. Switch is at the right position
Vacuum Tube
JJ 12AU7/ECC82
Genalex KT88
Electro-Harmonix EL34EH
RCA 22DE4
Substitution
ECC82、 CV4003、 、 A、6189ECC802S、
KT100、KT90、KT88、6550、6550A、6550EH
EL34、EL37、6CA7、6L6GC、5881、KT77、KT66
22DE4
12AU7 5814
on the rear position in order to avoid damage to the tubes.
11
Page 13
Connect to Audio Equipment
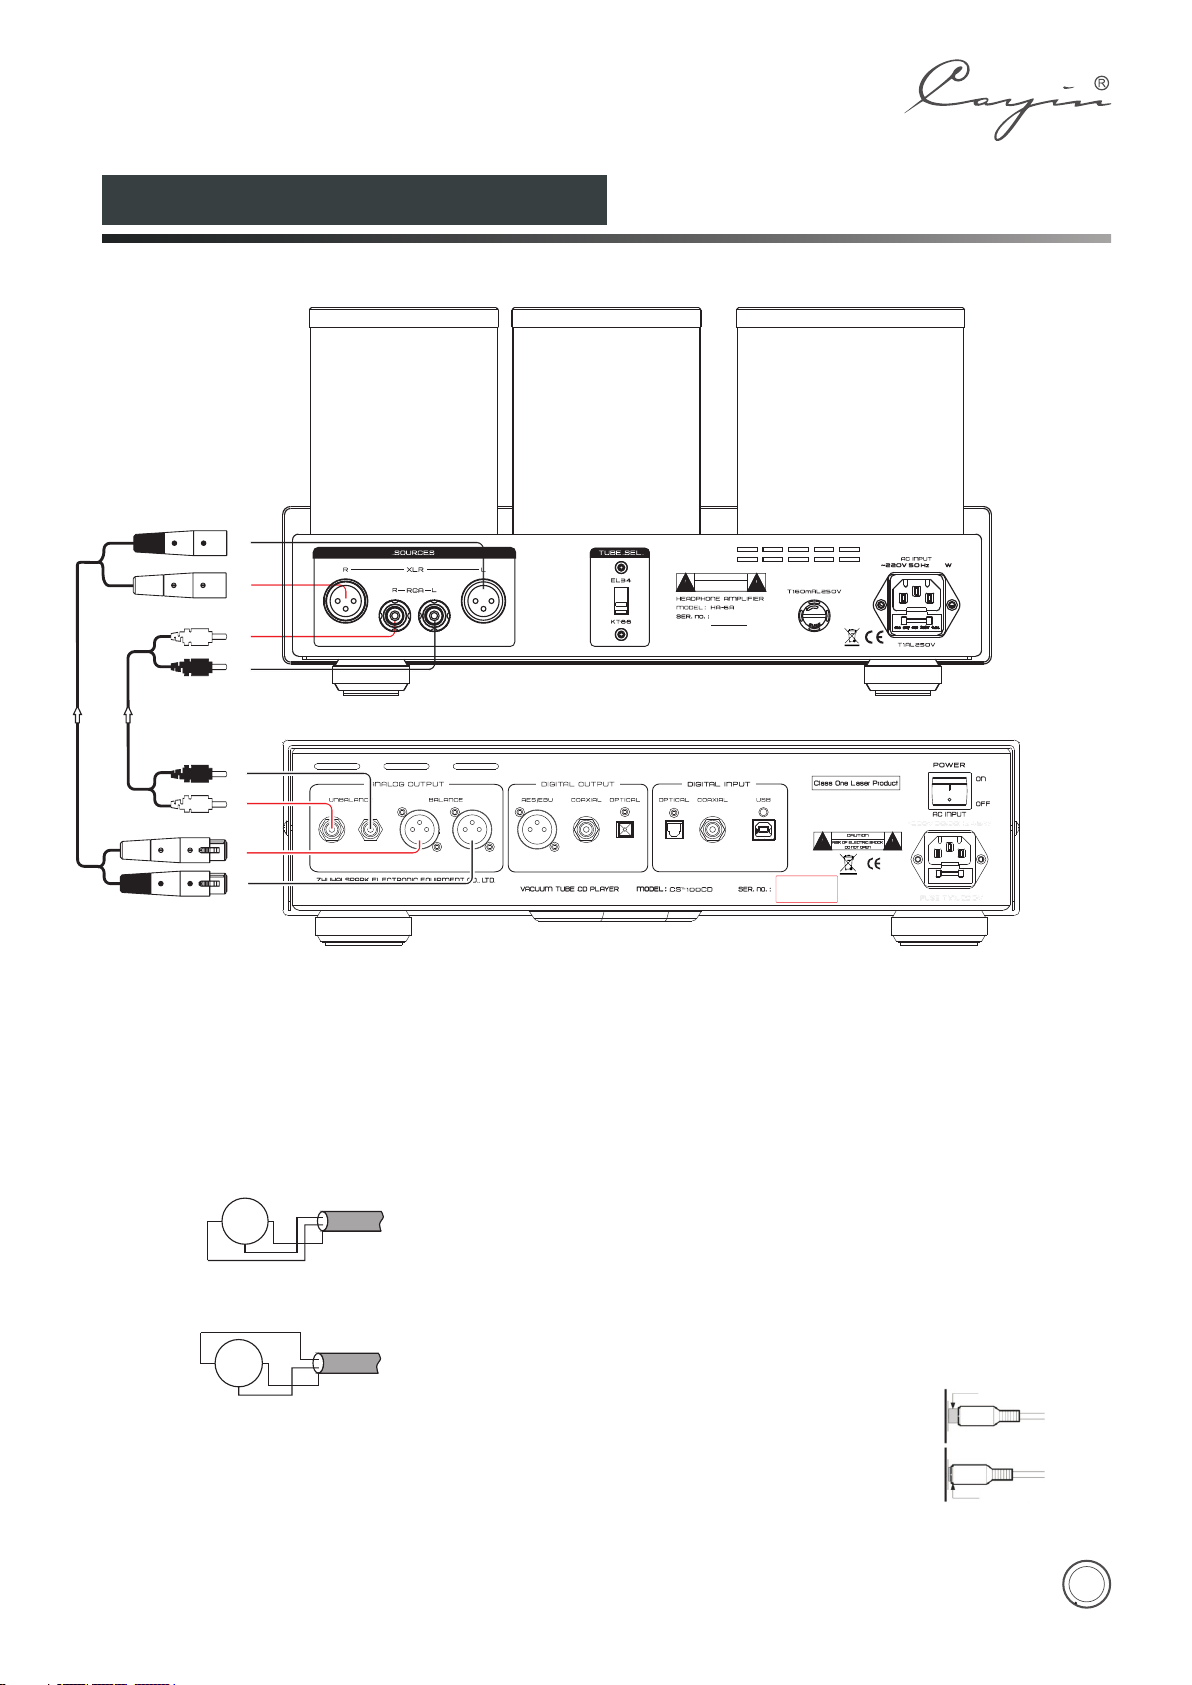
This section will illustrate how to connect audio equipment to the HA-6A amplifier.
HA-6A
L
R
SOURCES
XLR
RCA
R
L
CS-100CD
TUBE SEL.
EL3 4
KT8 8
CAUTI ON
RISK OF ELECTRI C SHOCK
DO NOT OPEN
HEA DPHO NE AMP LIF IER
-HA 6 A
ZHU HAI S PARK E LEC TRO NIC E QUI PME NT CO. , LT D.
HV FUSE
T1 AL60m 250V
140
T1A L2 50 V
L
R
R
ANALOG O UT PU T DIGITAL O UT PU T
RIG HT
LEF T
RIG HT
BAL AN CEUNB AL ANC E
LEF T
AES /EB U
L
Connect to
Audio Outp ut
Balanced Conn ector:
1.This amplifier use X LR connectors that are
commonly used i n professional application
for balanced co nnection.
2.There are two XLR wiri ng standards:
European standard: pin 1=Grou nd,
Pin 2 = COLD, Pin 3 = HOT
GNDCOL D
①
②
③
HOT
American stan dard: pin 1=Ground,
Pin 2 = HOT, P in 3 = COLD
GND
①
②
HOT
③
COL D
3.This amplifier use A merican standard. When
connect to audi o equipment with balanced output
wired in Europe an, the playback signal might be in
reversed phas e. We advise user to maintain the
phase of the system correctly.
OPT IC ALCOA XI AL
CS-100CD
USBCOA XI ALOPT IC AL
Attention to Audio Conne ction:
1. Please refer t o the manual of associated
equipment whe never necessary.
2. Do not connect t he power cord until all
equipment are p roperly connected
3. “R”indicates th e right channel; “L” indicates
left cha nnel.
4. Please make su re all connectors are securely
installed. Ba d connection might cause noise
and degrade in au dio performance, or even
damaging your e quipment.
5. Please do not tie th e power cord, audio
interconnec ts, and speaker cable together or
run them in paral lel because
Wrong connection
this will produ ce adverse
effect on audio p erformance.
Right connection
Note: Please ma ke sure + and -, left and right are
connec ted properly.
12
Page 14
Connect to Headphones
扬声器连接
Selecting Hea dphone Connection
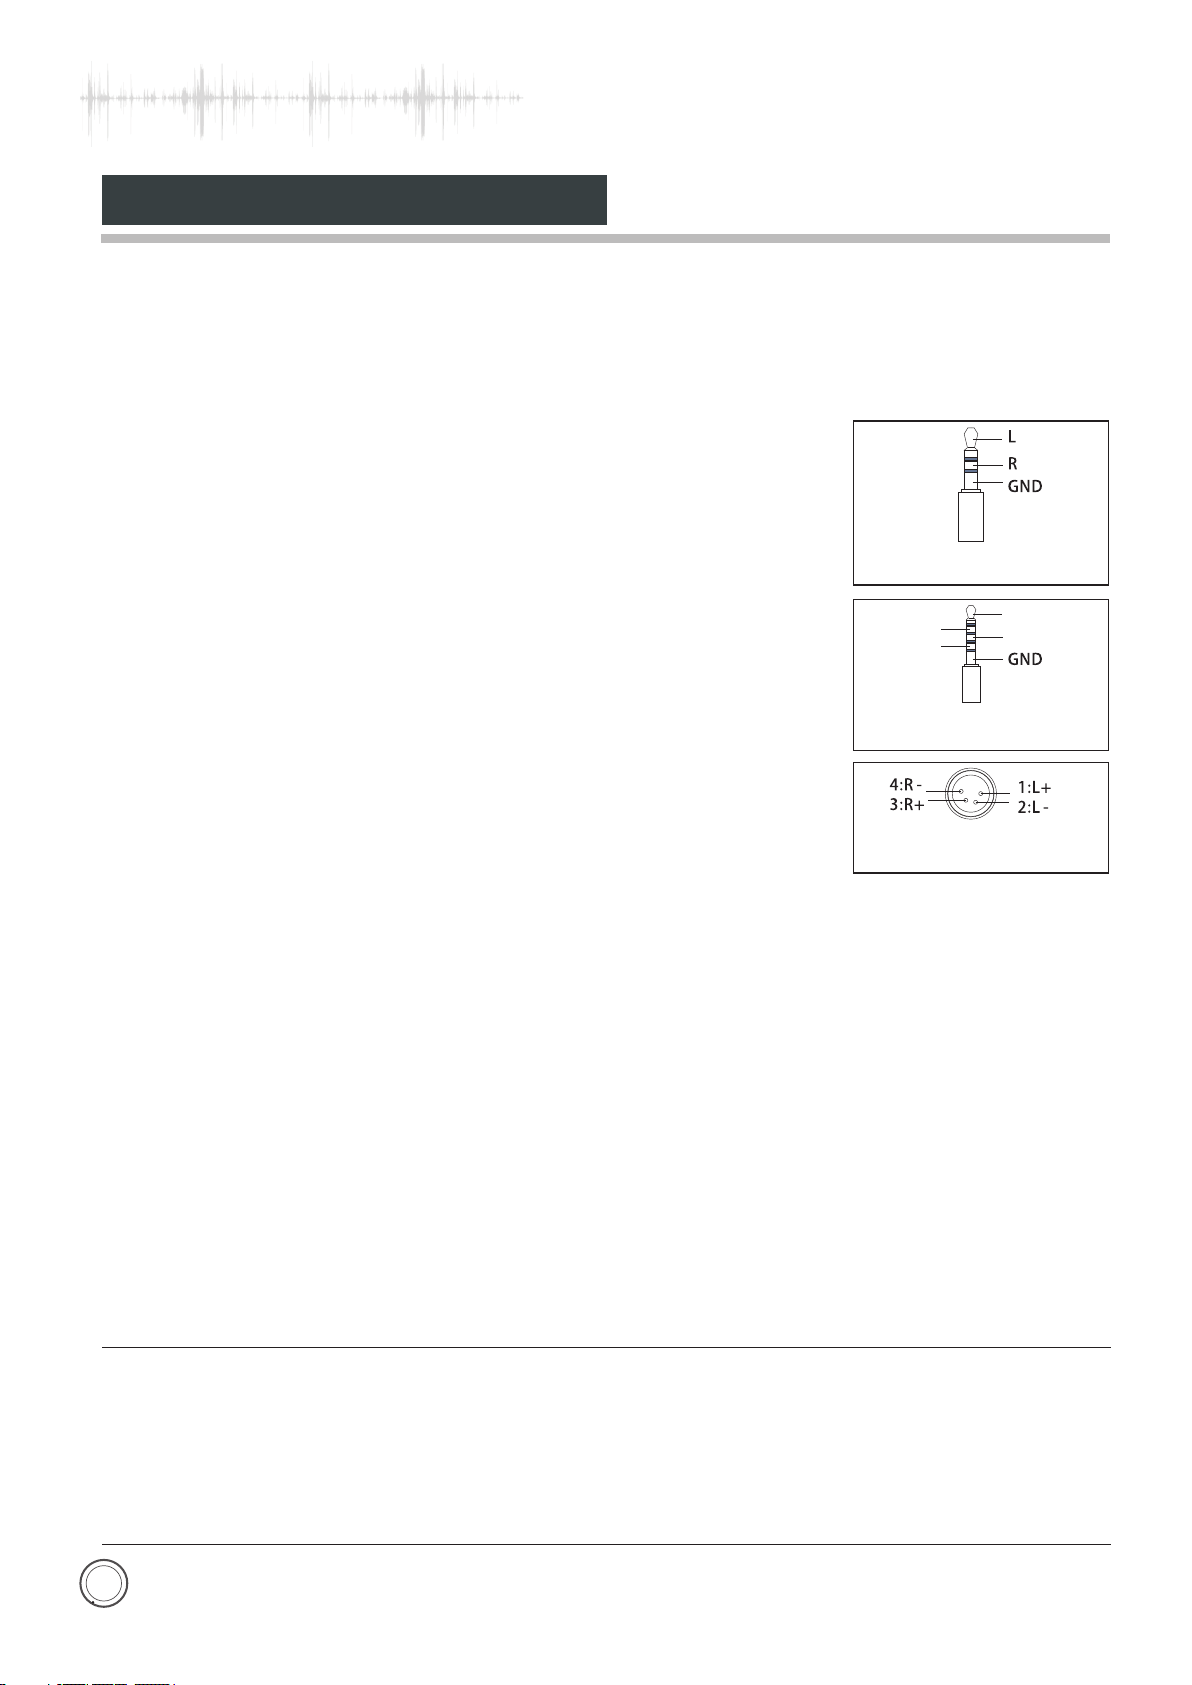
HA-6A provide d three types of headphone output: 4 -pins XLR for balanced, 4.4mm Balanced ,6 .35mm
for singled-e nd, we have optimized the headphone ampli fier to perform satisfactory for a ll outputs, user
are free to use any h eadphone output according to the ir need without worrying one is better than t he
other.
Single -ende d Headphone Connection
HA-6A provide s one set of 6.35mm headphone input,
the pin definit ion of the headphone connector is as i llustrated.
Headphones te rminated with 3.5mm connector wi ll require a 3.5mm
to 6.35mm adapter in order to use it with this headphon e amplifier.
4. 4mm Balanced Headp hone Co nnection
HA-6A provides one set of 4.4mm hea dphone input, the pin
Polarity Diagram for 6.35mm
Headphone Jack.
LR-
L+
R+
definition of t he headphone connector is as illus trated.
Headphones terminated with 2. 5mm connector will require a 2.5mm
Polarity Diagram for 4.4mm
Balanced Headphone Jack
to 4.4mm a dapter in order to use it with this headphone a mplifier.
XLR Balance Hea dphone Connections
HA-6A provide one set of 4-pin XLR he adphone input, the pin
definition of t he XLR connector is as illustrated .
Headphones terminated with du al XLR (3-pins), 4.4mm or 2.5mm
Polarity Diagram for 4 PIN XLR
Balanced Headphone Jack
balanced head phone connectors will require corresp onding XLR4
adapter in orde r to use it with this headphone amplif ier.
IMPEDANCE mat ched output
Headphones are currently avai lable from 8Ω to 600Ω, in view of this wid e range o f impedance rating,
HA-6A provide s three sets of impedance matched ou tputs (L:8~64Ω ; M:65~250Ω ; H: 25 1~600Ω ) to
ensure the head phone amplifier can handle vast va riety of headphones satisfactory.
We recommend users to start with the output setting that match t he impedance rating of your
headphone.
It is technically safe to se lect any impedance setting for your headp hone. You can try other impedance
settin g witho ut worrying causing any damage to yo ur headphone.
Attention:
Balanced head phones can convert into single-ended he adphone with appropriate converter an d
◆
use the 6.35mm he adphone output.
◆Single-ende d headphone cannot use an adapter to plug int o the XLR4 balanced headphone output
of the HA-6A, it can cause damage to your headphone and /or headphone amplifier.
◆Turning the vol ume to the minimum when you exchange the Head phone.
13
Page 15

Basic Operation
Please make sure all connections are correct and power supply voltage is stable before turn on the amplifier.
1. Turn on the amplifier, the power indicator will light up.
2. When the power indicator remains lighted up steadily, the amplifier is ready for operation. If the power
indicator will become steady (always ON). It means that the amplifier is ready for operation. If the power
indicator did not light up, the amplifier is malfunction, please turn off the power and contact your local dealer
for service support.
3. The tubes regulated power supply might require around 30-60 seconds to ramp up the voltage gradually, it is
normal if you heard ting-ting noise from your headphone or speaker during this time.
4. The vacuum tube might require 10 minutes of warm up before they reach optimum performance.
5. Select your input source: XLR for balanced input, RCA for single-ended input.
6. If you are using single-ended headphone, insert the 6.35mm connector of your headphone into the
STANDARD headphone output on the front panel. Switch the headphone output selector (PHONES) to STA.
7. If you are using a 4.4mm balanced headphone, insert the 4.4 connector of your headphone into the 4.4
BALANCE headphone output on the front panel. Switch the headphone output selector (PHONES) to 4.4 BAL.
8. If you are using a 4pin XLR balanced headphone, insert the XLR4 connector of your headphone into the 4 PIN
BALANCE headphone output on the front panel. Switch the headphone output selector (PHONES) to 4 PIN BAL.
9. Select the appropriate output (L, M, or H) on the IMPEDANCE switch according to the specification of your
headphone for optimized performance.
10. Adjust Volume to appropriate level and enjoy your music.
Attention:
Please do not dis connect your interconnect when t he amplifier is operating, this
◆
might ca use dam age to the amplifier or associated e quipment
◆You can swap head phones during playback, but to avoid dama ging your sensitive headphone and
protect your hearing, please turn the volume down t o 0 when you unplug or plug in another pair of
headphone.
◆If you have turn off the amplifier, please wait 2 minut es before you turn in on again, ot it migh t cause
damage to the vacuum tubes.
14
Page 16

Maintenance
Read the Manual: to operate the amplifier correctly, please read this user's manual carefully to understand
product features and safety precaution .
Keep the Manual: Please keep this manual properly for future reference.
Signage: Do not tear off or rub away the serial number.
Operation: Please follow the operations in this manual strictly.
Accessories: If you are going to use non-factory supplied accessories such as power cord or fuse, please
make sure they are fully compatible with the safety requirements otherwise might cause damage due to
improper usage.
Placement: The amplifier is heavy and the vacuum tubes are fragile, please place the amplifier on a stable, flat
surface, preferably a strong cabinet or rack. If the amplifier falls down because of insecure placement, the
amplifier will suffer damage and possibly causing serious household accident.
Power Supply: Please make sure your household AC power supply matches the power requirement of your
amplifier. If you are uncertain about the power supply situation, please contact your authorized dealer or local
power supply institutions.
Overloading: If you have to connect the amplifier to a power stripe or multi-socket, please make sure the
loading is within safety consideration. Overloaded power connection might lead to electric shock or fire
accident.
Warranty Service: Do not attempt to disassemble the machine or modify the component, this will void the
warranty service and might exposure yourself to electric shock.
Troubleshooting: If you encounter any abnormal behavior during setup or playback, please refer to the
advices in next pages of this manual to recover your amplifier back to normal operation. If you fail to rectify the
problems after that, please contact your authorized dealer for technical support.
15
Page 17
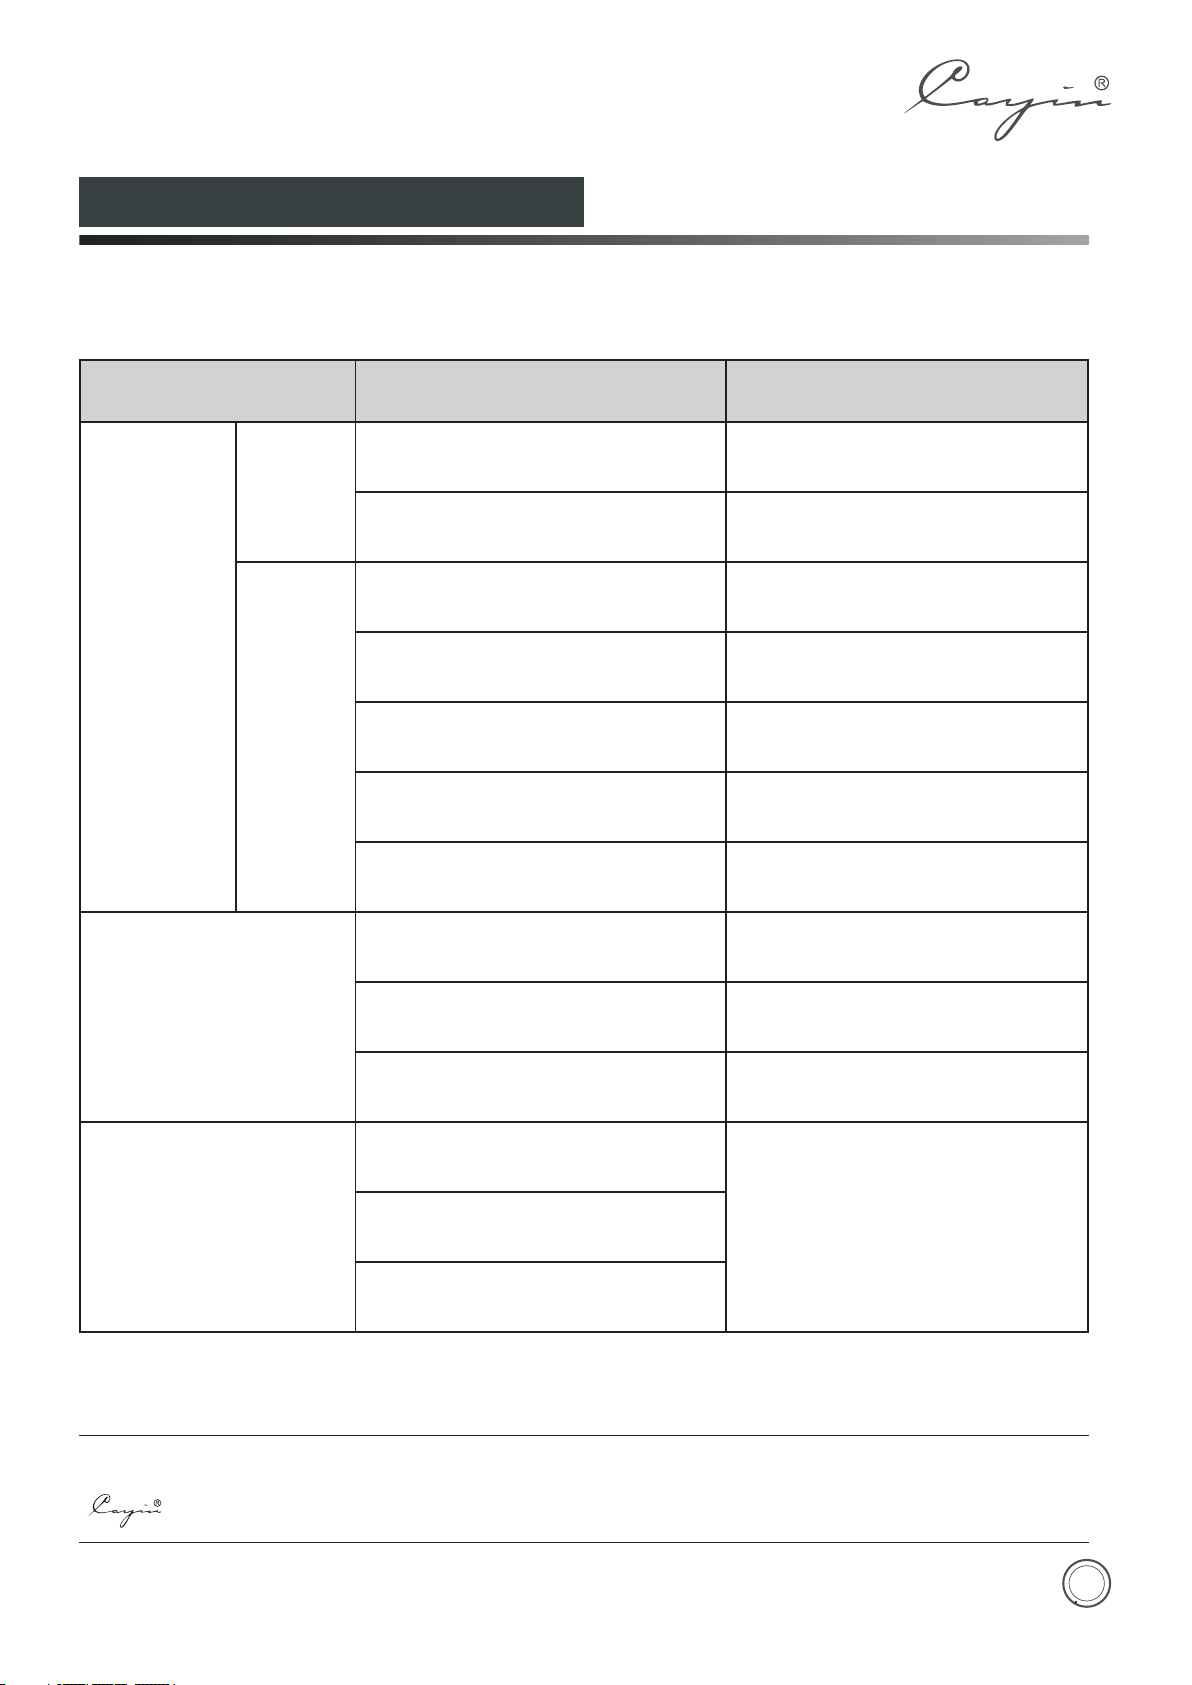
Troubleshooting
Problem
Cause
Solution
No Sound after
power on
Power
Indicator is
OFF.
Power is not conn ected
Connect power c ord securely
Check main powe r supply
Main fuse is out.
Replace fuse wi th same
specificati on
Power
Indicator
is ON.
NO input signal .
Check source eq uipment is working
Select input so urce correctly
Volume at minim um position
Turn up volume
Interconnec t not properly connected
Connect all cab les securely
Headphone cab le not properly
connected
Connect headp hone cable properly
Headphone out put not specified
correctly
Select headph one output correctly
Excessive noi se
Input source badly connected
Install inter connect properly
Interconnec t grounding
disconnecte d
Replace interconnect
Equipment mal function
Contact autho rized dealer for
technical sup port
Soundstage an d imaging
not focused
Left and right ch annel of source
equipment rev ersed
Reinstall rel ated cabled correctly
Headphone cab le polarity reversed
Speaker cable p olarity reserved
Please follow the instruction in the manual in order to keep the amplifier under proper working condition. If the
amplifier is not functioning as intended, please check according to following tip to look for the possible reason.
Important Notice:
is registered trademark of Zhuhai Spark Electronic Equipment Co., Ltd. All right reserved
16
Page 18
Please follow us:
Cayin Facebook
Cayin SINA Weibo Cayin Website
Zhuhai Spark Electronic Equipment Co., LTD
www.cayin.cn
Tel::0756- 3828711
Fax:0756- 3828722
Email: [email protected]
Address: 9 Lianfa Road, Liangang Industrial Park, Shuanglin Zone,Zhuhai, Guangdong, China
Post Code:519045
17
 Loading...