

Page 1
HA-300
DIRECT HEATED TRIODE TUBE
HEADPHONE AMPLIFIER
User Manual
1
Page 2

Thank you for choosing Cayin HA-300 Direct Heated Triode Tube Headphone Amplifier
Table of Content ……………………………………………………………………………
Package Contents …………………………………….……………………………………
Product Features …………………………………………………………………………...
Safety Precautions …………………………………………………………………………
Specifications ……………………………………………………………………………….
Daily Care …………………………………………………………………………………...
Warranty Service …………………………………………………………………………...
Preparation ………………………………………………………………………………….
Front Panel Functional Description ……………………………………………………….
Rear Panel Functional Description ……………………………………………………….
Top Panel Functional Description ………………………………………………………...
Installation …………………………………………………………………………………...
Vacuum Tube Substitution ………………………………………………………………...
Connect to Audio Equipment ……………………………………………………………...
Connect to Headphones …………………………………………………………………...
Connect to Speakers ……………………………………………………………………….
Basic Operation …………………………………………………………………………….
Maintenance ………………………………………………………………………………...
Troubleshooting …………………………………………………………………………….
Follow us …………………………………………………………………………………….
2
3
4
5
6
7
7
8
9
10
11
12
12
13
14
15
16
17
18
19
We have inserted protective foam inside the Vacuum Tube Cage in order to protect the
vacuum tubes during transportation. Please remove these foams before you connect the
amplifier into your sound system. Fail to do so might cause serious damage to the amplifier or
disaster such as fire accident.
We have prepared this user manual to help you understand the features and get familiar with
the operation of the amplifier. We suggest all customers read through this manual before they
start to use the device.
Table of Content
2
Page 3
Recommendation
Please keep all packaging materials for future use as you may need to
repackage the amplifier in the future. Please fill in the product warranty card
immediately and mail it to authorized dealer to safeguard your after-sales
service.
Note: Please make sure the AC voltage of your local power supply match the
voltage information printed on the back panel before you power up the
amplifier. Incorrect input voltage setting will cause damage to the machine or
might even lead to serious household accident. Cayin reserves the right to
refuse service or responsibility on related instances. If the marked voltage is
different from your local power supply voltage, please contact your authorized
dealer or Zhuhai Spark Electronic Equipment Co., Ltd.
Attention: the product package should include only the items in the list above.
Notice
This amplifier is designed, optimized and manufactured by factory designated components.
Cayin reserves the right to void the warranty of the product in case of unauthorized repair,
modification or change to the product, and we shall not responsible to any failure or damage
caused by replacement of non-designated components.
_Package Contents_
Please place the box in upright position according to the marking of the package. Please
examine the product package before you open it, the package should be free from any
physical damage or water stain. You should find the following items when you open the
package:
1. Cayin HA-300 x1
2. Product User Manual (Chinese) x1
3. Warranty Card x1
4. AC Power Cord x1
5. Umbilical Power cable x1
6. Replacement Fuse x2
3
Page 4

_Product Features_
1. Single-ended amplification approach brings out the charm of the tubes with natural and
realistic music playback.
2. Voltage Amplification: one piece of Shuguang WE6SN7 (replica of Western Electric) per
channel
3. Power Amplification: one piece of Full Music gold pins ceramic base 300B per channel
4. Support Balanced (XLR) and single-ended (RCA) input. To maintain single-ended
amplification, balanced input will transform to single-ended through a pair of input
transformer.
5. The output from 300B will feed into a pair of custom design in-house manufactured high
quality EI output transformer for single-ended (6.35mm) or balanced (4-pins XLR)
headphone output.
6. To make sure HA-300 can handle vast variety of headphones satisfactory, the output
transformers are designed to support three sets of impedance matched output (L, M and H).
7. Powerful headphone output, can handle demanding low sensitivity current hungry planar
headphone with ease..
8. Excellent vacuum tube shock absorber implementation provides quiet and realistic playback
from sensitive headphones
9. One set of speaker terminal as alternative output, can be used as an integrated speaker
amplifier with 8W+8W Class A output
10. Outboard power supply provides pure and steady power for the amplification circuit with
minimum interference from power transformer
11. Custom design in-house manufactured high quality toroidal power transformer
12. High voltage power rectification with set of four NOS RCA 22DE4 tubes
13. Exotic multi-stage dedicated power supply approach, reduce interference to signal
amplification effectively through independently regulated power supply for voltage
amplification circuit. Optimize power provision to all circuit and enhance audio performance
significantly
14. Effective design with sensible layout and effective shielding and isolation, the corner stone
for excellent overall performance.
15. Handmade, point-to-point wielding on all circuit,
16. High-Precision 24 steps potentiometer
17. MUNDORF MCap RELY SilverGold premium grade coupling capacitor
18. High quality shielded silver-plated cable for internal wiring, minimize interference during
internal transmission.
19. Detachable vacuum tube shielding cage, easy to detach and install
4
Page 5
_
WARNING
High Voltage Components
Do not open the cabinet
To avoid electrical shock, please do not remove the cover or back
panel
All repair can only be carried out by qualified technician for repair
To avoid fire or electrical shock, please keep away from water spill
or moisture environment
WARNING
High Voltage Components
Do not open the cabinet
This symbol warns the users that uninsulated voltage within the unit may be sufficient to cause
electrical shock. It is dangerous to make any kind of contact with any part inside the unit.
WARNING
High Voltage Components
Do not open the cabinet
This symbol alerts the users that important information concerning the operation and maintenance
of this unit has been provided. The information should be read carefully to avoid problems.
We recommend customers to use this amplifier under 2000 meters
above sea level and non-tropical climate environment
Safety Precautions_
1. Unplug the power cord if you are not going to use the amplifier for an extended period of time, and
keep the machine in proper condition
2. Tube amplifier will built-up it operation temperature after long hours of operation. Please keep the
amplifier at a well-ventilated environment and do not cover the amplifier or blocked the vents.
Poor ventilation will lead to excessively high operation temperature and can cause malfunction or
fire
3. To avoid damaging the amplifier, you must connect a source device to the input terminals before
you select that as the active input of your HA-300.
4. To avoid damaging the amplifier, short circuit among the output terminals are strictly forbidden.
5. Do not attempt to service this product yourself. Opening the cover may expose you to electric
shock or other hazards.
6. Do not attempt to disassemble the machine. Cayin reserves the right to void the warranty of the
product in case of unauthorized repair, modification or change to the product. All service and
maintenance must be conducted by authorized service technician.
7. The amplifier must be keep away from water dripping or water splitting, do not place any objects
filled with liquids such as vases or some others on the top or around the amplifier.
8. Please disconnect power cable before you attempt to clean the machine. Please use soft clean cloth
to wipe clean the chassis, do not use volatile solution or corrosive to clean product.
9. Please handle with care, avoid tempering to the machine
5
Page 6
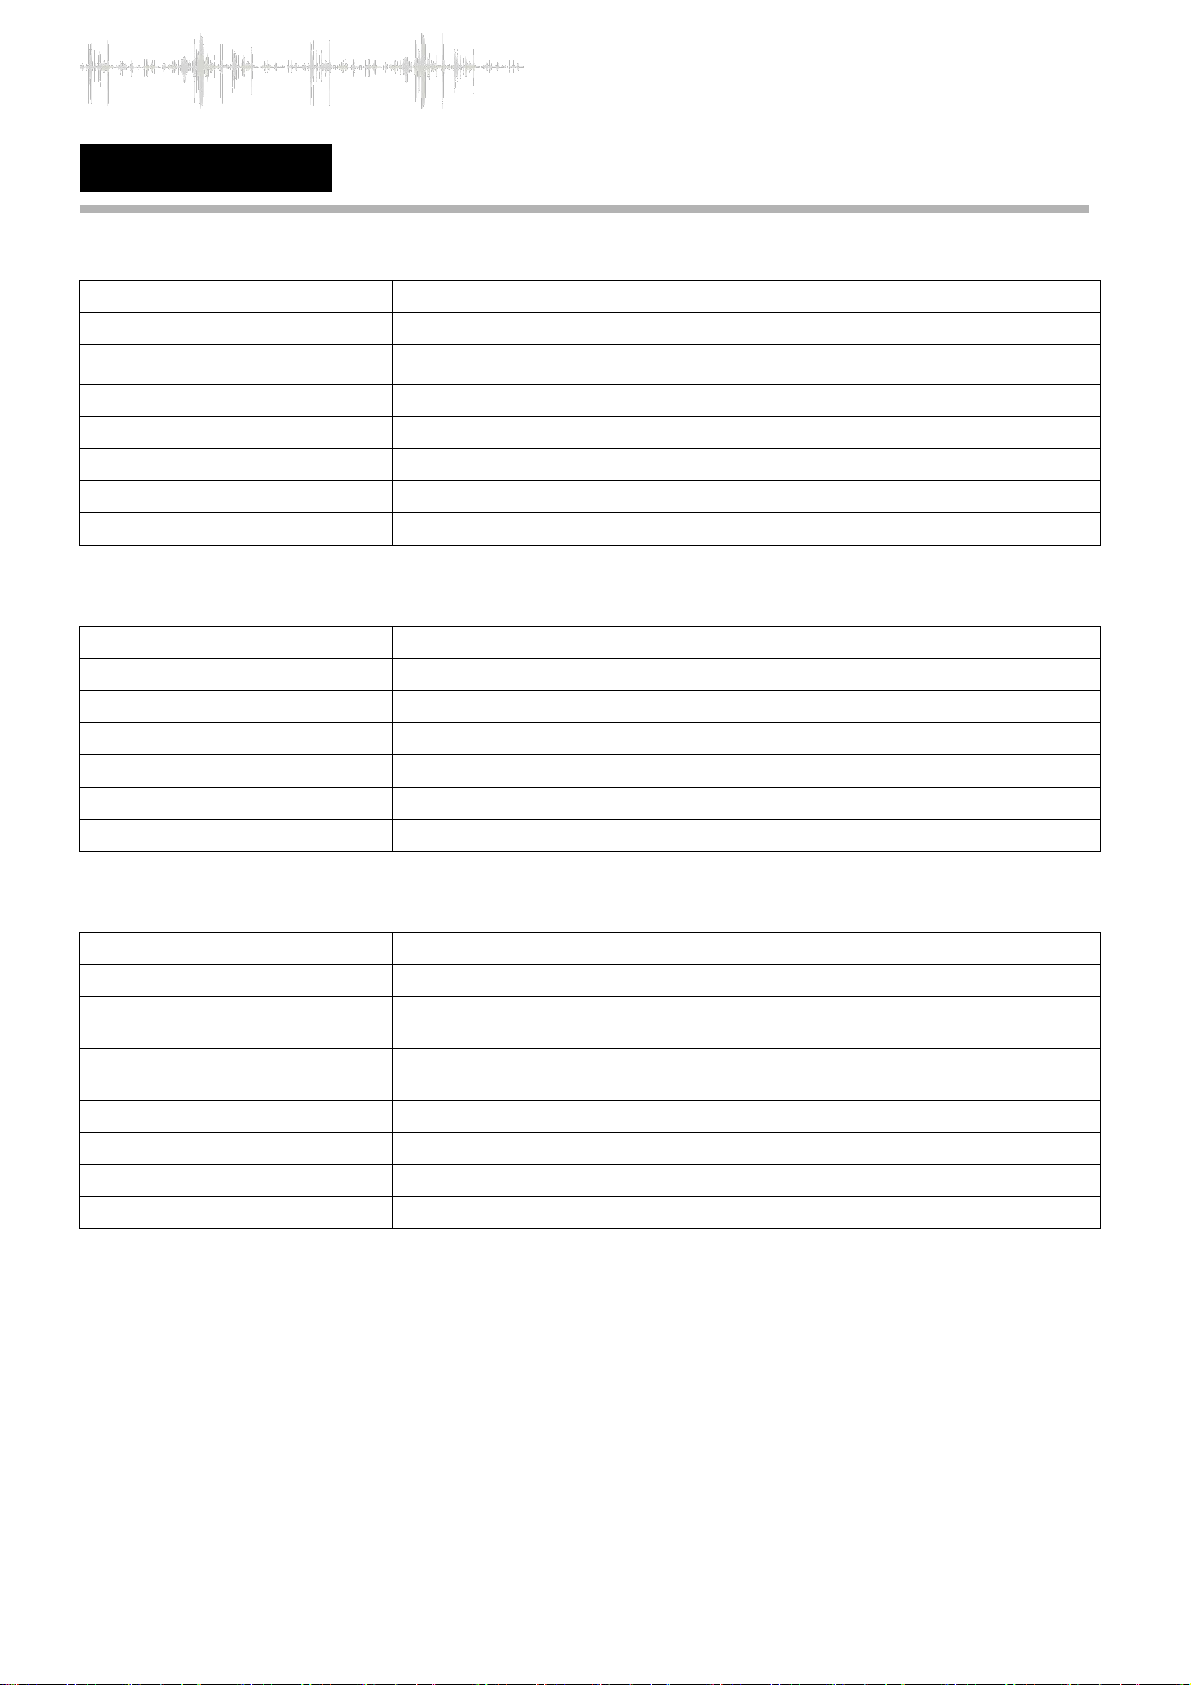
_Specifications_
Rated Output (Balanced)
1800mW+1800mW(L), 2200mW+2200mW(M), 3700mW+3700mW(H)
Rated Output (Single Ended)
1100mW+1100mW(L), 2400mW+2400mW(M), 5000mW+5000mW(H)
Frequency Range
10Hz~50kHz ±3dB
TH+D
1%(1kHz)
Sensitivity
200mV ~ 440mV
S/N Ratio
100dB (A-weighted)
Headphone Impedance
L : 8~64Ω; M : 65~250Ω; H : 251~600Ω
Headphone Connectors
4pin XLR x1, 6.35mm x1
Rated Output
8W + 8W Class A
Frequency Range
10Hz~60kHz ±3dB
TH+D
1%(1kHz)
S/N Ratio
100dB (A-weighted)
Input Sensitivity
440mV
Output Impedance
4~8Ω
Input Impedance
100kΩ
Input Connector
XLR, RCA
Tubes used
300B x 2, 6SN7x2, 22DE4×4
Dimension
Amplifier: 286mm×368mm×210mm;
Power Supply: 286mm×368mm×210mm
Weight
Amplifier: 20Kg;
Power Supply: 9.5Kg
Fuse
~220V-240V: T1.6AL250V; ~100V-120V: T3.15AL250V
Power Consumption
185W
Working Condition
Temp: 0oC~40oC; Humidity: 20% - 80%
Storage Condition
Temp: -20oC~70oC; Humidity: 20% - 90%
Headphone output
Speaker Output
Others
6
Page 7

_Daily Care_
Notice
Please use soft clean cloth to clean the chassis regularly
Do not use volatile solution or corrosive cleaning product or pre-treated cloth
_Warranty Service_
1. The Product is warranted for a period of twelve (12) months from the date of original
purchase (the “Warranty Period”). Replacement Products are warranted for the
remainder of the original twelve (12) month warranty period.
2. The defective product must be returned to our authorized agent or Zhuhai Spark
Electronic Equipment Co., Ltd (the “Company”) for service. You must receive
approval from our authorized dealer or the “Company” before you send out the
defective product.
3. Do not attempt to disassemble the machine without prior approval of the “Company”
otherwise we reserves the right to void the warranty of the product
Note: The information in this manual is subject to change without prior notice.
7
Page 8

_Preparation_
Connect to AC
Power Supply
Screw-threaded
connector
Umbilical Power cable
Connecting Umbilical Power cable and AC Power cord
After connecting the speaker and source equipment, connect the AC power cord and
umbilical power cord to the Amplifier
Umbilical Power Cord Connection
Position the alignment groove of screw-threaded connector on the umbilical power cord
against the alignment pin of power input/output connector of the amplifier/power supply unit,
push the umbilical power cord into the connector and start to turn the screw-threaded
connector clockwise until the connector is secured and is difficult to turn further with bare
hand. Complete the connection by repeating the process with the other end of the screwthread connector on the umbilical power cord.
Please leave ample space around the power socket so that the power cord can be
easily disconnected.
Attention
Connect power cord after all equipment and speakers are connected p.
It is normal that the transformers will emit heat when the amplifier is used for long hours
Please unplug the power plug if you won’t use the amplifier for a long time。
Please make sure the AC voltage of your local power supply match the voltage of the
amplifier. Cayin will not be responsible for the damage or accidents such as fire caused by
incorrect input voltage
8
Page 9

_Front Panel Functional Description_
① Power On/Off: Turn on and off the
amplifier. Press “down” the button to turn
on the amplifier, Press again the button will
resume to original position and the
amplifier will power off.
② Power Indicator: Indicate the working
status: The indicator will remain always on
when the amplifier is in regular operation
③ Headphone Output Selector: Select
Balanced or Single-ended headphone
output
④ STANDARD: Output for headphones
terminated in 6.35mm TRS connector
⑤ BALANCE: Output for headphones
terminated in 4pins XLR connector
⑥ IMPEDANCE: Select the most
desirable impedance-matched output
from the amplifier, three options were
offered: (L:8~64Ω; M:65~250Ω; H:
251~600Ω)
⑦ VU meter: monitor output level of the
amplifier
⑧ OUTPUT: select headphone or speaker
output
⑨ SOURCES: select balanced or single-
ended input
⑩ VOLUME: Control volume of amplifier,
turn the knob clockwise to increase
volume, and turn the knob
counterclockwise to reduce the volume.
Diagram 1: HA-300 Front Panel
If your want to connect a 3.5mm terminated headphone to the amplifier, you need a 3.5mm to
6.3mm adapter (not included in the package).
Listening through headphones at a high volume for extended periods of time can result in
hearing impairments.
Please do not use mono (TS) phone plug with this amplifier as this might cause serious
damage such as short circuit in the amplifier.
Please unplug the power plug from AC power circuit if the amplifier is not used for a long time
Attention
9
Page 10

_Rear Panel Functional Description_
①. Balanced input (XLR)
Connect a balanced audio input to the
amplifier. Please make sure the left and
right channel is connected correctly
②. Single-ended input (RCA)
Connect a single-ended audio input to
the amplifier. Please make sure the left
and right channel is connected correctly
③. Right Channel Speaker Terminal connect
to the right channel speaker
④. Left Channel Speaker Terminal connect
to the left channel speaker
⑤. Power Input for Amplifier chassis
⑥. Power Output from power supply unit
⑦. AC Power Input with Fuse Holder: please
replace fuse with the same specification
Diagram 2: HA-300 Rear Panel
Please make sure the AC voltage of your local power supply match the voltage of the
amplifier. Cayin will not be responsible for the damage or accidents such as fire caused
by incorrect input voltage
Attention
10
Page 11

_Top Panel Functional Description_
Diagram 3: HA-300 Top Panel
① V5、V6、V7、V8: 22DE4 Vacuum Tube
② V1、V2: 6SN7 Vacuum Tube
③ V3、V4: 300B Vacuum Tube
Attention
The vacuum tube will become very hot during operation, please be careful and don’t
get burned.
Please turn off the amplifier for 20 minutes before replacing the vacuum tube. Hold the
base of vacuum tube firmly and to avoid damaging the fragile part of the vacuum tube.
When install vacuum tube to the amplifier, position the vacuum tube correctly according
to the alignment pin before push the vacuum tube base into the socket.
Only used matched pair 300B and 6SN7 in the HA-300 amplifier.
11
Page 12

_Installation
Vacuum Tube
Acceptable Substitution
6SN7
6SN7GT、6H8C、ECC32、6N8P、CV181
22DE4
22DE4
300B
300B
_
Please make sure all associated equipment are in perfect working condition before you install
the amplifier\
Please pay attention to the following details when you install the amplifier.
Do not place the power amplifier under direct sunlight or near other heat sources
To prevent the amplifier from overheating, please keep the amplifier at a well-ventilated
environment and do not cover the amplifier or blocked the vents
Avoid moisture, keep the amplifier from dust if possible
Make sure the amplifier are setup at a location that can be connected to the AC power
supply and other audio equipment conveniently.
Place the amplifier at a flat surface, make sure all four supporting tips are evenly loaded.
Please keep amplifier not less than 15cm away from and the wall.
_Vacuum Tube Substitution
_
12
Page 13

_Connect to Audio Equipment_
Connect to
Audio Output
Balanced Connector:
1. This amplifier use XLR connectors that
are commonly used in professional
application for balanced connection.
2. There are two XLR wiring standards:
European standard: pin 1=Ground,
Pin 2 = COLD, Pin 3 = HOT
American standard: pin 1=Ground,
Pin 2 = HOT, Pin 3 = COLD
3. This amplifier use American standard.
When connect to audio equipment with
balanced output wired in European, the
playback signal might be in reversed
phase. We advise user to maintain the
phase of the system correctly.
Attention to Audio Connection:
1. Please refer to the manual of associated
equipment whenever necessary.
2. Do not connect the power cord until all
equipment are properly connected
3. “R” indicates the right channel; “L”
indicates left channel.
4. Please make sure all connectors are
securely installed. Bad connection
might cause noise and degrade in audio
performance, or even damaging your
equipment
5. Please do not tie the power cord, audio
interconnects, and speaker cable
together or run them in parallel because
this will produce
adverse effect on audio
performance
Note: Please make sure
+ and -, left and right are
connected properly.
Bad Connection
Push all the way in
This section will illustrate how to connect audio equipment to the HA-300 amplifier.
13
Page 14

_Connect to Headphones_
Selecting Headphone Connection
HA-300 provided two types of headphone output: 4-pins XLR for balanced, 6.35mm for singledend, we have optimized the headphone amplifier to perform satisfactory for both output, user are
free to use both headphone output according to their need without worrying one is better than the
other.
Single-ended Headphone Connection
HA-300 provides one set of 6.35mm headphone input, the pin
definition of the headphone connector is as illustrated.
Headphones terminated with 3.5mm connector will require a 3.5mm
to 6.35mm adapter in order to use it with this headphone amplifier.
Balance Headphone Connections
HA-300 provide one set of 4-pin XLR headphone input, the pin
definition of the XLR connector is as illustrated.
Headphones terminated with dual XLR (3-pins), 4.4mm or 2.5mm
balanced headphone connectors will require corresponding XLR4
adapter in order to use it with this headphone amplifier,
IMPEDANCE matched output
Headphones are currently available from 8Ω to 600Ω, in view of this wide range of impedance
rating, HA-300 provides three sets of impedance matched outputs (L:8~64Ω; M:65~250Ω; H:
251~600Ω) to make the headphone amplifier can handle vast variety of headphones
satisfactory.
We recommend users to start with the output setting that match the impedance rating of your
headphone.
It is technically safe to select any impedance setting for your headphone. You can try other
impedance setting without worrying causing any damage to your headphone.
Attention
Balanced headphones can convert it into single-ended headphone with appropriate
converter and use the 6.35mm headphone output.
Single-ended headphone cannot use an adapter to plug into the XLR4 balanced
headphone output of the N8, it can cause damage to your headphone and/or
headphone amplifier.
14
Page 15

_Connect to Speakers_
Speaker (R) Speaker (L)
Red
Black
Red
Black
Banana
connector
Spade
connector
Bare Wire
Connect the speaker to the terminals on the rear panel (as illustrated)
Connect the red speaker cable to the positive terminal (+) and the black speaker cable to the
negative terminal (COM)
If the positive and negative terminals are reversed during connection, the speaker will be out of
phase, the sound will become unnatural and does not have focus.
Connecting Speaker Cable
If your speaker cable is terminated by spade speaker
connector, turn the top part of the speaker terminal anticlockwise to release the locking mechanism, insert the
spade connector into the gap as illustrated, and tighten
the speaker terminal again.
If your speaker cable is terminated by banana speaker
connector, you can insert the connector to rear
connection hole directly. Some banana connector has a
locking mechanism, please refer to the instruction of the
banana terminal for detail.
If your speaker cable in not terminated (bare wire), you
should follow the procedure as spade connector but you
need to insert the bare wire into the hole of the center
rod of the speaker terminal before you tighten the terminal.
15
Page 16

_Basic Operation_
Please make sure all connections are correct and power supply voltage is stable before
turn on the amplifier.
1. Turn on the amplifier, the power indicator will light up.
2. When the power indicator remains lighted up steadily, the amplifier is ready for
operation. If the power indicator will become steady (always ON). It means that the
amplifier is ready for operation. If the power indicator did not light up, the amplifier is
malfunction, please turn off the power and contact your local dealer for service support.
3. The tubes regulated power supply might require around 30-60 seconds to ramp up the
voltage gradually, it is normal if you heard ting-ting noise from your headphone or
speaker during this time.
4. The vacuum tube might require 10 minutes of warm up before they reach optimum
performance.
5. Select your input source: XLR for balanced input, RCA for single-ended input
6. Select your output option to headphone or speaker according to the icon on the front
panel.
7. If you are using single-ended headphone, insert the 6.35mm connector of your
headphone into the STANDARD headphone output on the front panel. Switch the
headphone output selector (PHONES) to STA.
8. If you are using balanced headphone, insert the XLR4 connector of your headphone
into the BALANCE headphone output on the front panel. Switch the headphone output
selector (PHONES) to BAL.
9. Select the appropriate output (L, M, or H) on the IMPEDANCE switch according to the
specification of your headphone for optimized performance
10. Adjust Volume to appropriate level and enjoy your music.
Attention
Please do not disconnect your interconnect or speaker cable when the amplifier is
operating, this might cause damage to the amplifier or associated equipment
You can swap headphones during playback, but to avoid damaging your sensitive
headphone and protect your hearing, please turn the volume down to 0 when you
unplug or plug in another pair of headphone.
If you have turn off the amplifier, please wait 2 minutes before you turn in on again,
ot it might cause damage to the vacuum tubes.
16
Page 17

_Maintenance_
Read the Manual: to operate the amplifier correctly, please read this user's manual carefully to
understand product features and safety precaution
Keep the Manual: Please keep this manual properly for future reference.
Signage: Do not tear off or rub away the serial number.
Operation: Please follow the operations in this manual strictly.
Accessories: If you are going to use non-factory supplied accessories such as power cord or
fuse, please make sure they are fully compatible with the safety requirements otherwise might
cause damage due to improper usage.
Placement: The amplifier is heavy and the vacuum tubes are fragile, please place the amplifier
on a stable, flat surface, preferably a strong cabinet or rack. If the amplifier falls down because
of insecure placement, the amplifier will suffer damage and possibly causing serious household
accident.
Power Supply: Please make sure your household AC power supply matches the power
requirement of your amplifier. If you are uncertain about the power supply situation, please
contact your authorized dealer or local power supply institutions.
Overloading: If you have to connect the amplifier to a power stripe or multi-socket, please make
sure the loading is within safety consideration. Overloaded power connection might lead to
electric shock or fire accident
Warranty Service: Do not attempt to disassemble the machine or modify the component, this will
void the warranty service and might exposure yourself to electric shock.
Troubleshooting: If you encounter any abnormal behavior during setup or playback, please refer
to the advices in next pages of this manual to recover your amplifier back to normal operation. If
you fail to rectify the problems after that, please contact your authorized dealer for technical
support.
17
Page 18

_Troubleshooting_
Problem
Cause
Solution
No
Sound
after
power
on
Power
Indicator
is OFF
Power is not connected
Connect power cord securely
Check main power supply
Main fuse is out
Replace fuse with same specification
Power
Indicator
is On
No input signal
Check source equipment is working
Select input source correctly
Volume at minimum position
Turn up volume
Interconnect not properly
connected
Connect all cables securely
Headphone cable not properly
connected
Connect headphone cable properly
Headphone output not
specified correctly
Select headphone output correctly
Selected the wrong output
Select headphone or speaker output
correctly
Umbilical Power cable not
properly connected
Reconnect the umbilical power cable,
position the alignment groove correctly
before tighten up the screw-threaded
connector
Excessive noise
Input source badly connected
Install interconnect properly
Interconnect grounding
disconnected
Replace interconnect
Equipment malfunction
Contact authorized dealer for technical
support.
Soundstage and
imaging not focused
Left and right channel of source
equipment reversed
Reinstall related cabled correctly
Headphone cable polarity
reversed
Speaker cable polarity reserved
To ensure the amplifier will function at optimum condition, please follow the safety precaution
and operation instruction as advised. Some of the perceived malfunction might be caused by
improper operation, crosscheck with the following table might resolve your problems.
Sometime the problems are related to associated equipment, please also check and make
sure everything including power cords and interconnects are in proper condition. If the
problem persists after thorough troubleshooting process, please contact your authorized
dealer for technical support.
. is registered trademark of Zhuhai Spark Electronic Equipment Co., Ltd.
Important Notice
All right reserved
.
18
Page 19

Cayin Facebook
Cayin SINA Weibo
Cayin Website
Please follow us:
Zhuhai Spark Electronic Equipment Co., LTD
www.cayin.cn
Tel::0756-3828711
Fax:0756-3828722
Email: market@cayin.cn
Address: 9 Lianfa Road, Liangang Industrial Park, Shuanglin Zone, Post Code:519045
Zhuhai, Guangdong, China
19
 Loading...