

Page 1

Thank you for purchasing the Cayin CS-55CD compact disc player.
Ⅰ
Ⅱ
Used properly and carefully, it should give you many years of outstanding musical
reproduction. Please read this user manual carefully before using it.
SPECIFICATIONS
CD PLAYER:
Output level: 2.0V±1.5dB
Frequency response: 20Hz~20kHz ±0.5dB
Distortion and noise: ≤-60dB
S/N ratio: ≥90dB
Dynamic range: ≥90dB
Digital output characteristics: According to the IEC958 standard
USB Audio:
Compatible with Audio Class 1.0 and Audio Class 2.0
Word Length: 16 - 24 bit
Sampling Frequency Rates: 44.1, 48, 88.2, 96, 176.4 and 192kHz
Operating system: Windows XP®,Windows Vista®,Windows 7®
Windows 8® and Mac OS(10.6.3 and above)
Power requirements: 230VAC, 50/60Hz
Weight: 6kg
Dimension: 360×325×90mm (W×D×H)
Power consumption: 20W
OPENING THE PACKAGE
Please check the carton carefully whether there are any damages before you open it.
Put it on a flat surface with the arrow upward. Rip away the sealed tape and open the
carton, then you’ll find:
1. One set of CS-55CD cd player
2. SP-13G remote control unit
3. Two fuses
4. One power cord
5. One user manual
6. One USB cable
7. One driver software CD
1
Page 2
Ⅲ
Ⅳ
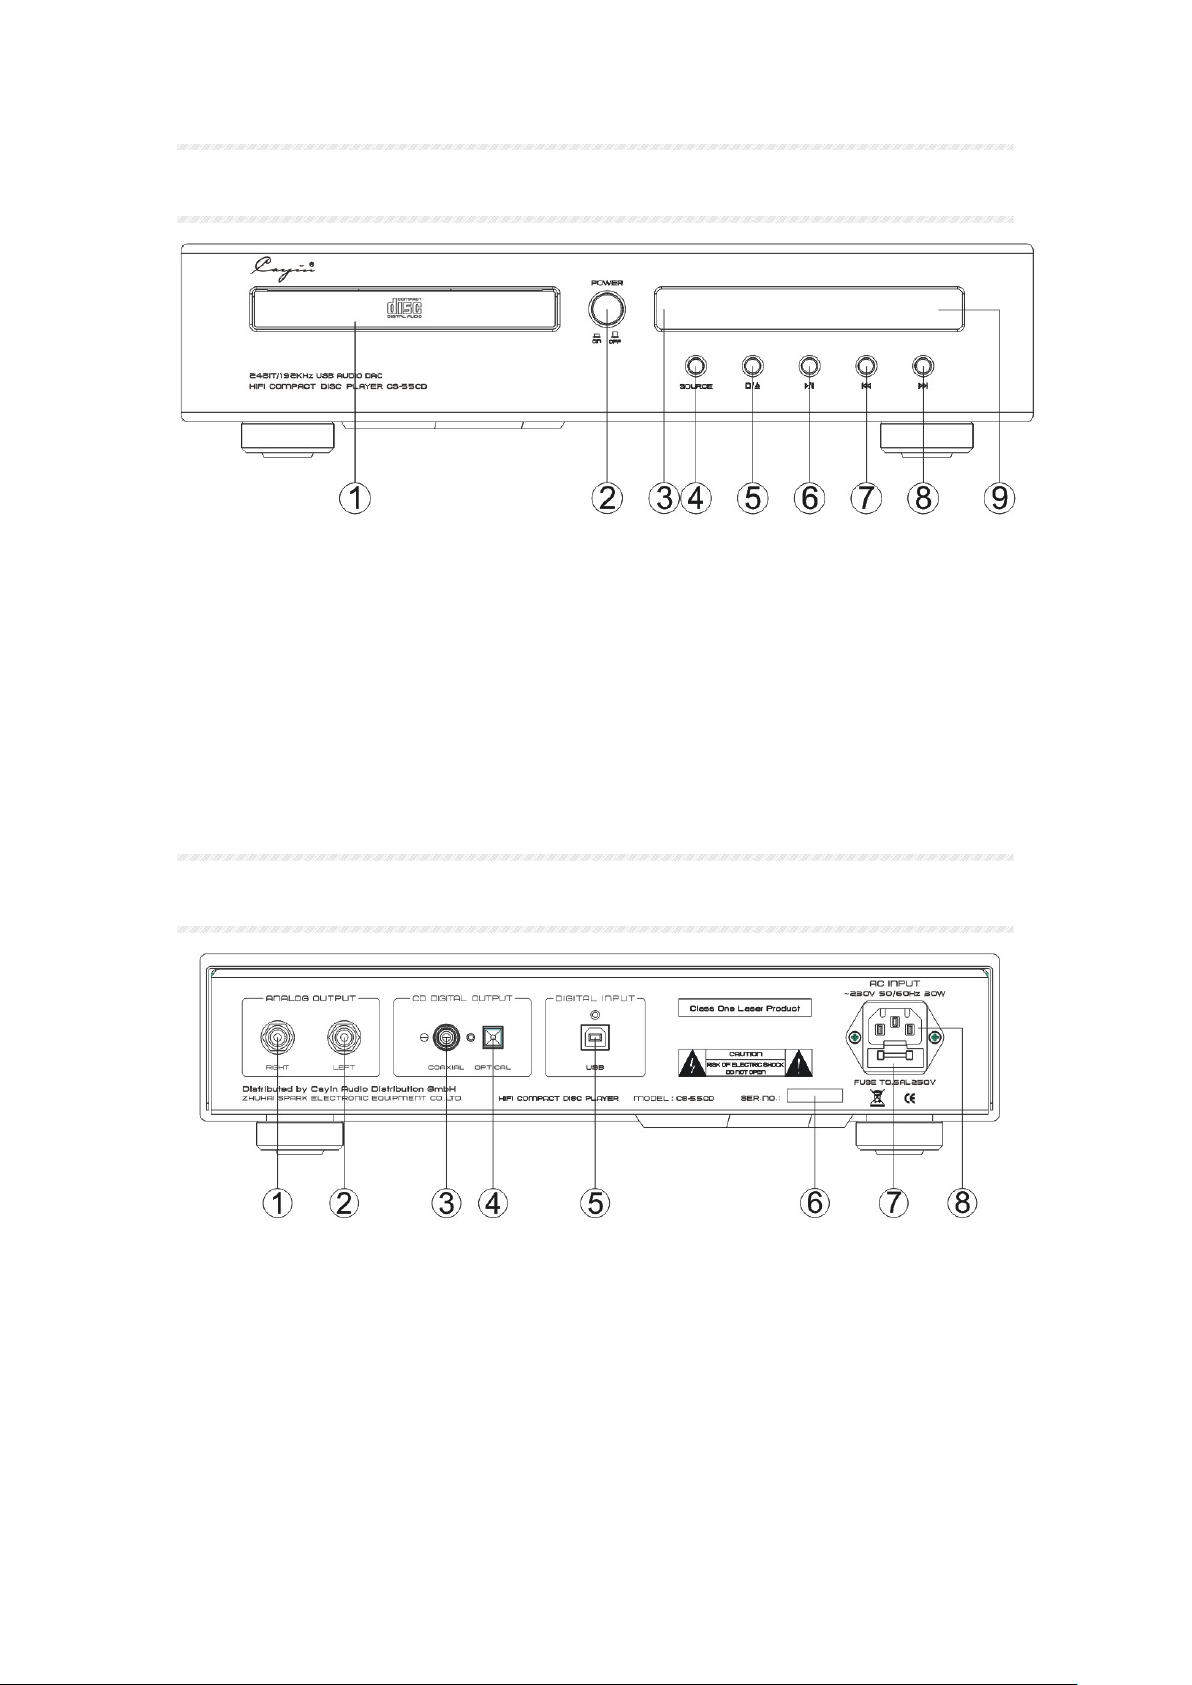
FRONT PANEL
① Disc tray
② Power switch
③ VFD display
④ Source button
⑤ Open/Stop button
⑥ Play/Pause button
⑦ Skip (reverse) button
⑧ Skip (forward) button
⑨ Remote sensor window
REAR PANEL
① Analog output (Right channel)
② Analog output (Left channel)
③ CD digital output (Coaxial)
④ CD digital output (Optical)
⑤ USB input port
⑥ Serial NO.
⑦ Fuse socket
⑧ Power socket
2
Page 3
Ⅴ
Left speakers
Right speakers
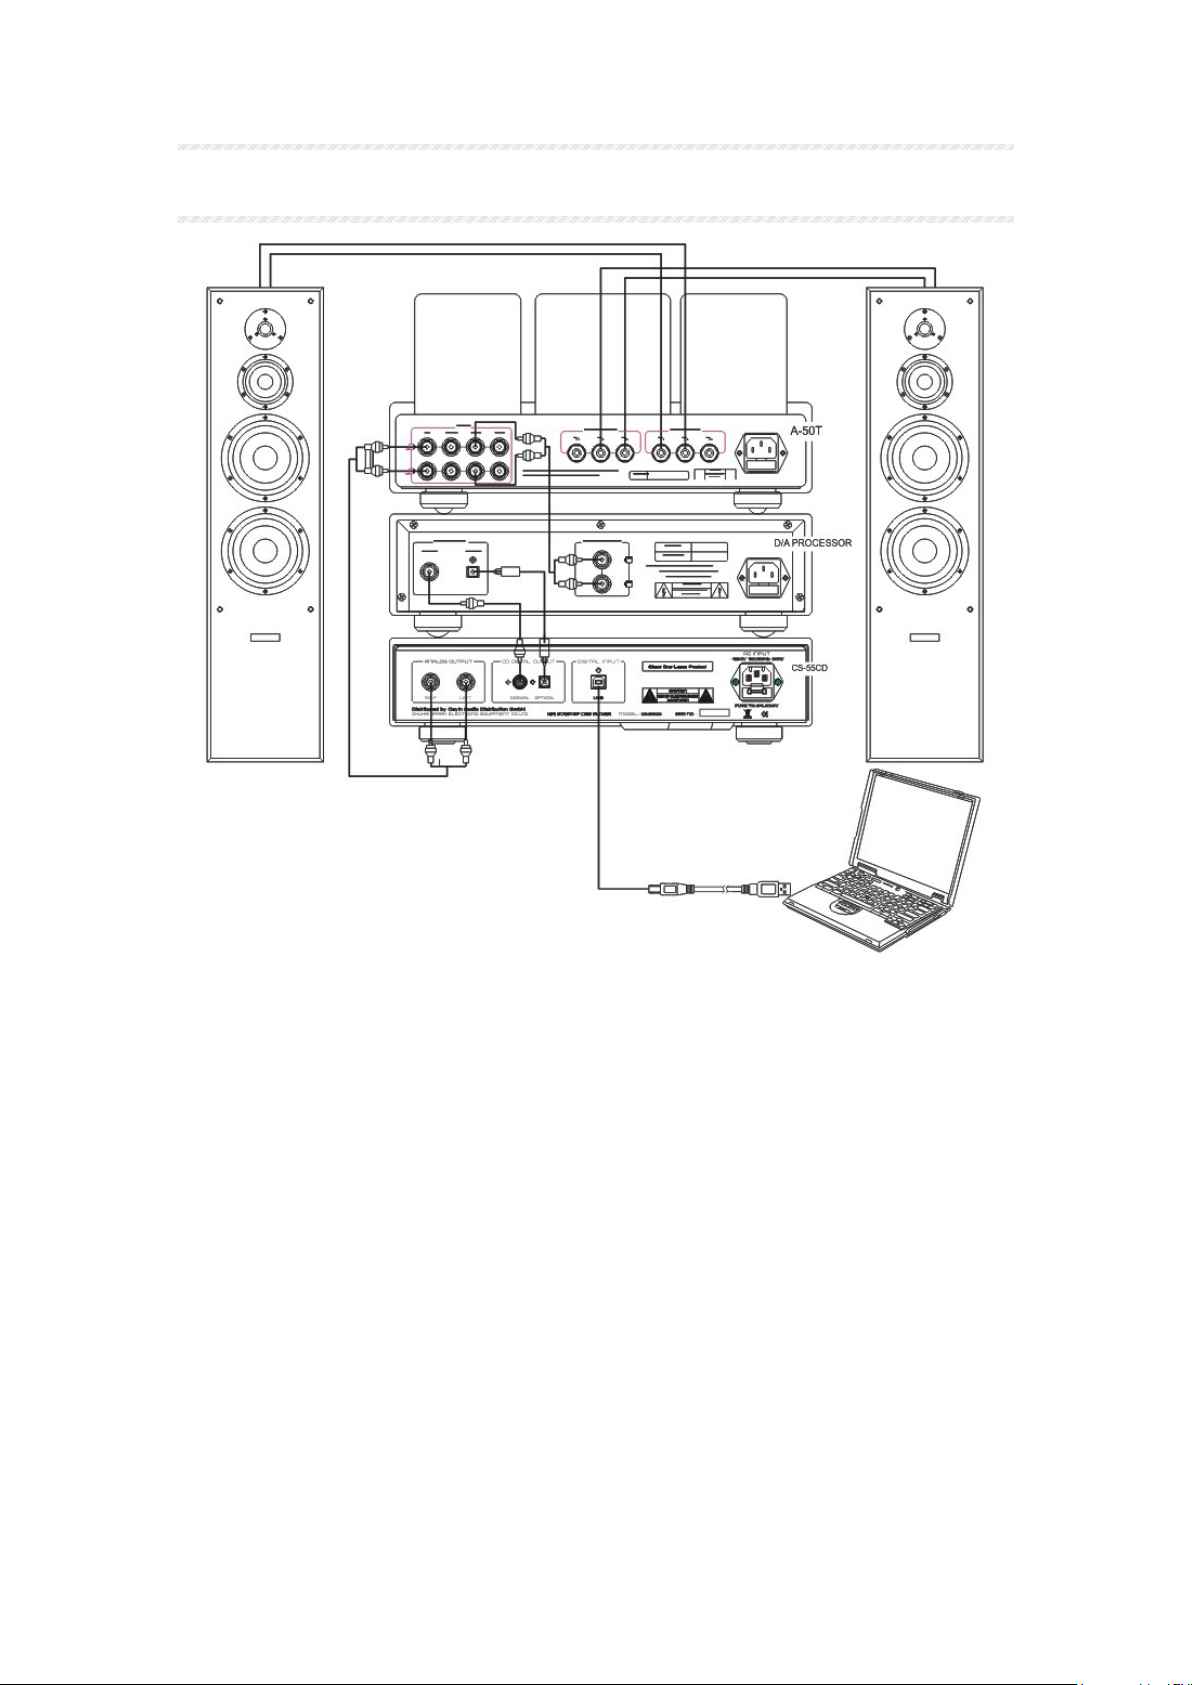
CONNECTION DIAGRAM
1. Connect to computer
Connect the USB port to the computer’s USB port with the USB cable which
must be according to the USB2.0 specification. Only the USB port in the rear panel
can be used for desktop computer.
2. Connect to DAC
Connect the COAXIAL output to the COAXIAL input of the DAC with the
coaxial cable. Or you can connect the OPTICAL output to the OPTICAL input of the
DAC with optical cable.
3. Connect to power amplifier
Connect the analog output terminal to the analog input terminal of the power
amplifier with audio cable.
Note: Be sure to use at rated voltage. Please check whether the rated voltage marking
on the rear panel corresponds to your line voltage. If not, please contact your dealer.
CAUTION: Please shut down the power before connections in case of noise and
damage to the unit. You need to wait for about 35 seconds after you turn on the unit
every once, because the vacuum tube needs to be preheated.
3
Page 4
Ⅵ
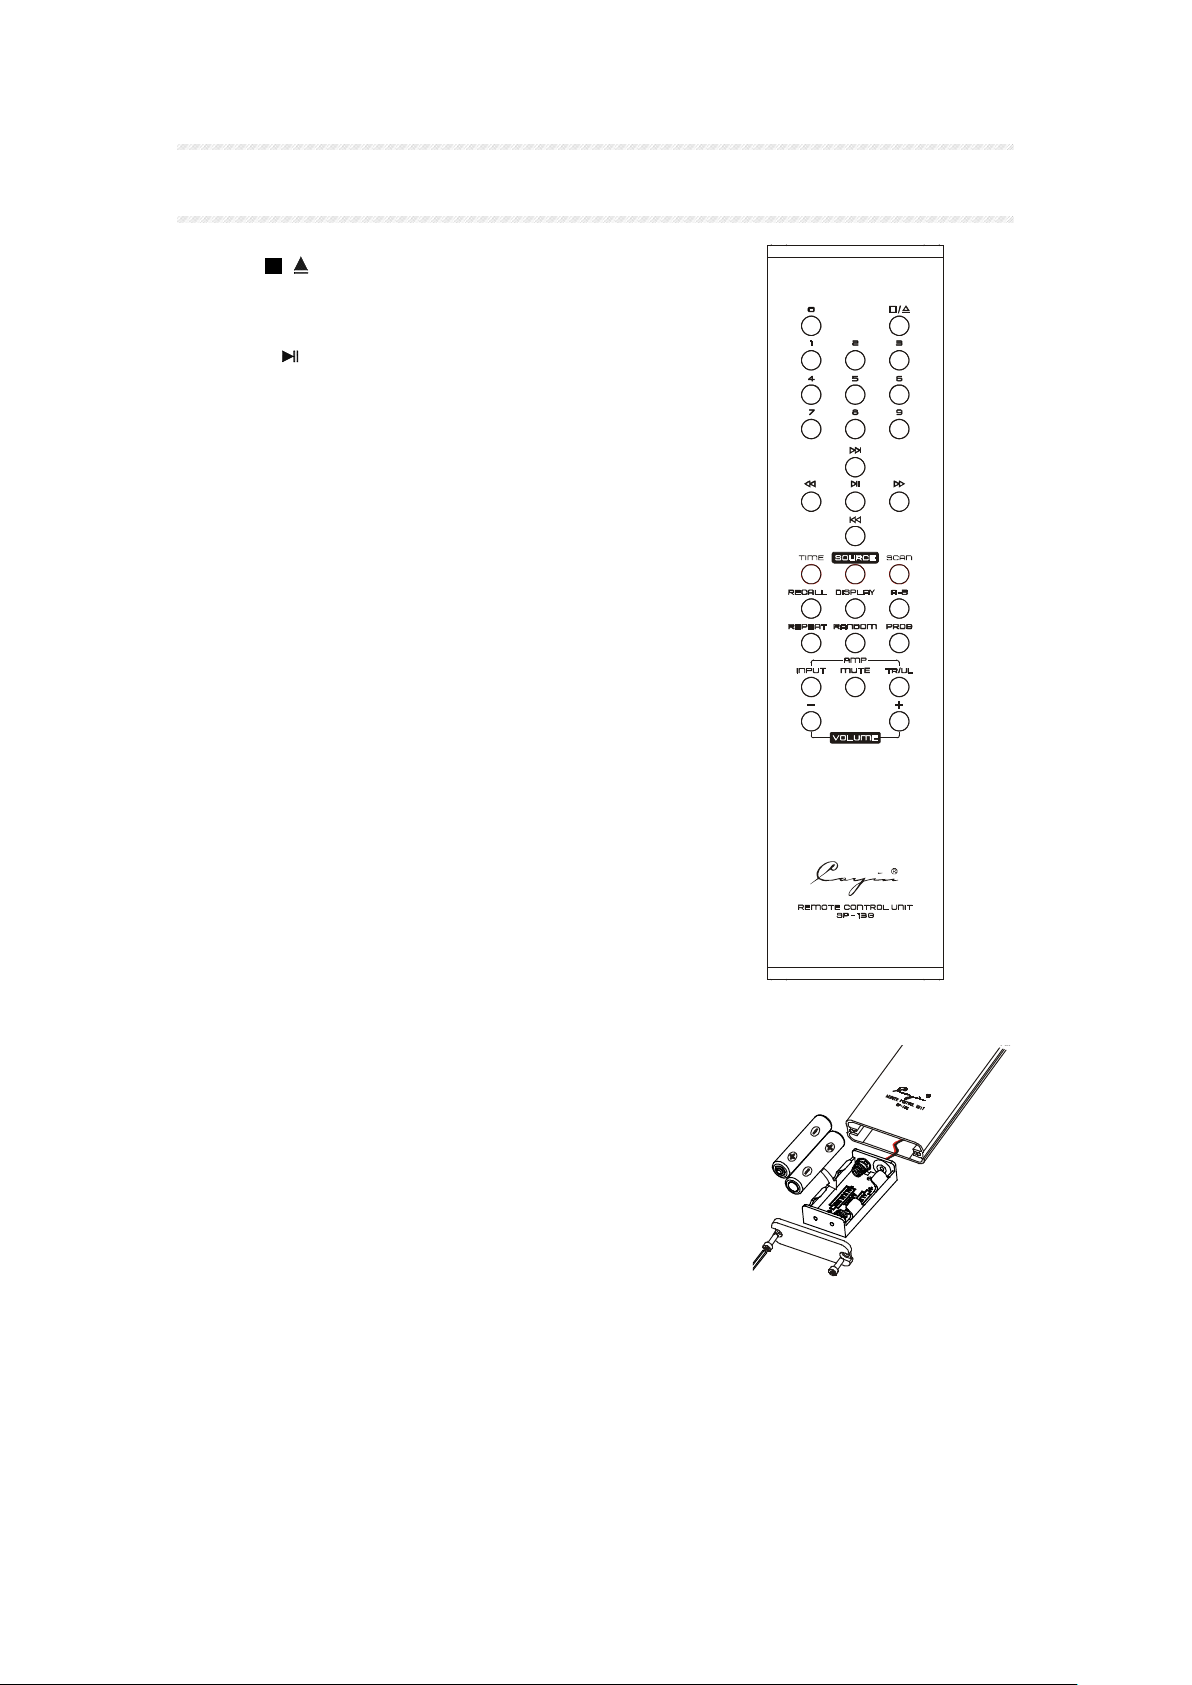
REMOTE CONTROL UNIT
① “ / ”: Stop/Open/Close button
② “0” “1” “2”… “9”: Numeric button
③ “ ”: Play/Pause button
④ “ ”: Search (reverse) button
⑤ “ ”: Search (forward) button
⑥ “ ”: Skip (reverse) button
⑦ “ ”: Skip (forward) button
⑧ “TIME”: Time model button
⑨ “SOURCE”: Source button
⑩ “SCAN”: Scan button
⑪ “RECALL”: Recall button
⑫ “DISPLAY”: Adjusting brightness
⑬ “A-B”: Section repeat button
⑭ “REPEAT”: Repeat button
⑮ “RANDOM”: Random button
⑯ “PROG”: Program button
⑰ Other button: Only for Cayin power amplifier
※REPLACE THE BATTERIES
1. Place the remote control upside up. Screw
the rear cover open with the screwdriver.
2. Pull out the old battery case carefully (do
not break the wires connected).
3. Put in the new batteries with correct polarity.
4. Push in the battery case and screw the rear
cover close.
※NOTE
◆ Don't drop the remote control. Keep the remote control dry.
◆ Replace the batteries timely.
◆ Don't mix new and old batteries together and use the
batteries with the same specification
◆Take out the batteries if you don't use the remote control for an extended period of
time.
◆ Batteries with high quality are recommended.
4
Page 5
Ⅶ
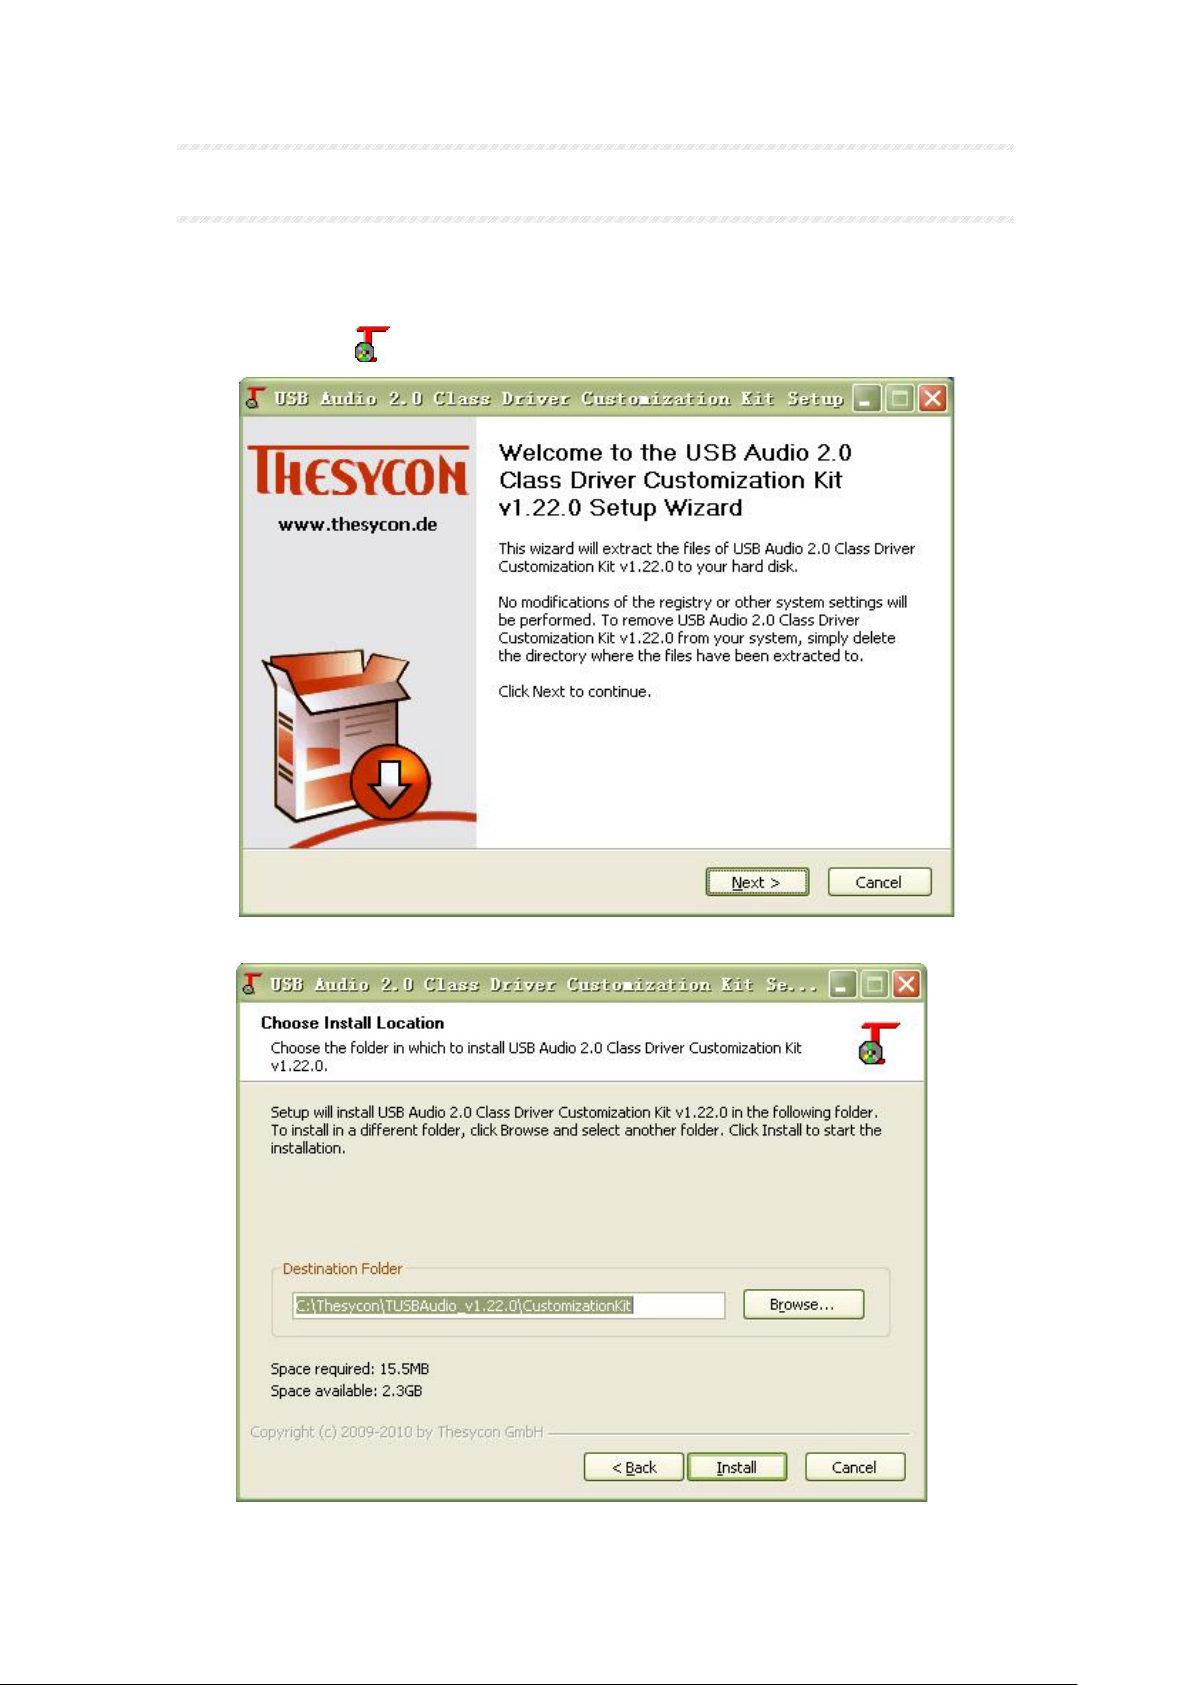
INSTALLING USB AUDIO DRIVER SOFTWARE
If your computer operation system is Windows, you should install driver to get the
function of USB audio before using it.
1. Connect the computer to the unit with USB cable.
2. Double-click “ ”to run the driver installer,As below:
3. Choose the install location,as below:
5
Page 6
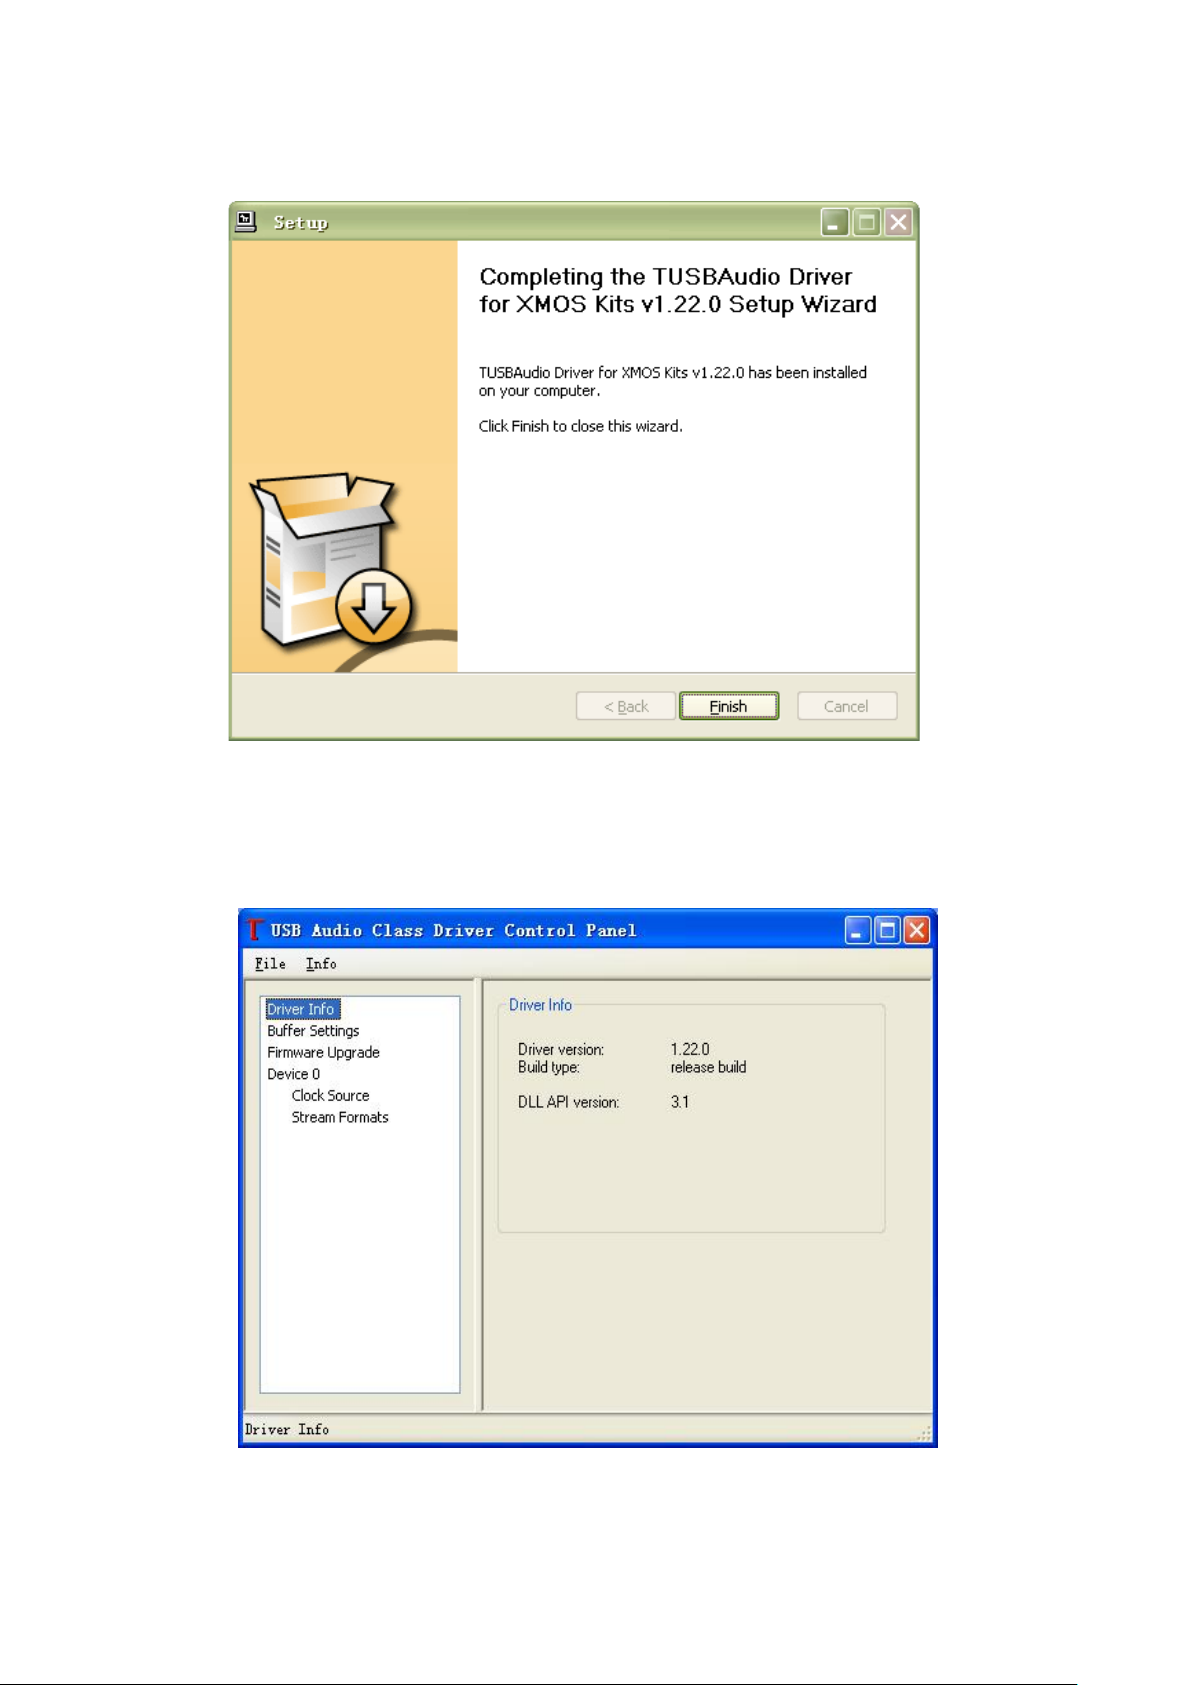
4. Follow the steps of the installation interface to continue,As below:
5. After finish installing driver, click the “Start” →“Program” →“Thesycon” →
“TUSBAudio Driver for XMOS Kits”, then click “TUSBAudio Control Panel” to
open the USB Audio card driver control panel, connect the unit to computer with USB
cable, then the USB Audio driver control panel will show some information, As below:
There is no need to install driver software if your computer operation system is Mac.
6
Page 7
Ⅷ
①
②
③
④
OPERATION
Turning ON/OFF
Press the power switch (POWER) on the front panel, if the unit is CD state, the unit
will firstly execute closing storehouse, the display will show CLOSE, and the unit
will do self-check. Press the power switch (POWER) again the unit will turn off.
Select CD mode
Select CD mode
Press the “SOURCE” button on the front panel or press the “SOURCE” button on
the remote control unit to select CD mode.
Playback
1) Press the “ ” button, the disc tray slides out.
2) Place the compact disc in the disc tray label-side up.
3) Press the “ ” button, the disc tray is closed.
4) After the display indicates the number of tracks on the disc and the total time of
the disc, press the “ ” button on the front panel or the “ ” button on the remote
control unit to start playing the disc.
If the disc tray is open when you press the “ ” button on the front panel or press
the “ ” button on the remote control unit, it will close automatically and start
playing.
Normally, the disc will start playing with the first track. However, you can select a
different track using the skip buttons of the numeric buttons to start playing a different
selection.
Pause
1) During playback, press the “ ” button on the front pa nel or press the “ ” button
on the remote control unit to interrupt the playback temporarily.
2) Press the “ ” button on the front panel or press the “ ” button on the remote
control unit again to resume playback from the position where pause mode was
entered.
Even when the player is in pause mode, the disc motor is still revolving. Since
leaving the player in this condition can shorten the lifetime of the motor, do not leave
the player in pause mode for a long period of time.
Stop
1) During playback or in pause mode, press the“ ” button to stop a disc that is
playing and resets the player.
2) In program mode, press the “ ” button cancels any programmed selections.
3) In scan mode, press the “ ” button cancels any scan play
7
Page 8

⑤
⑥
⑦
Track search
During playback or in stop mode, you can select a track to play using the skip
( or ) buttons or the numeric keys (remote only).
Using the skip buttons
1) Press the “” button advances to the beginning of the next track. If the
current track is the last track, press this button advances to the beginning of
the first track.
2) Press the “”button returns to the beginning of the previous track. If the
current track is the first track, press this button returns to the beginning of the
last track.
3) In program mode, the skip buttons advance or reverse to the next track in the
memorized selection list.
4) In pause mode, the skip buttons advance or reverse to the next track is still in
pause mode.
Using the numeric buttons (Remote only)
1) Press the numeric buttons on the remote control unit to directly access a track to
play.
2) The first nine tracks on a disc can be selected by pressing the corresponding
button.
3) When accessing track numbers equal or greater than 10, press the two buttons of
the track numbers in 2 seconds.
For example, to select track 2, press the 2 button. To sele ct track 12, press the 1
button and the 2 button in 2 seconds. After you pressing the 1 button, the unit will
wait the second number for 2 seconds. If the second number is not entered in 2
seconds, the first track will be played.
Fast forward or fast back (Remote only)
Hold the scan buttons be pressed, playback advances or reverses at high speed.
1) Hold “” button be pressed for fast- forward operation.
2) Hold “” button be pressed for fast-reverse operation.
3) Release the scan buttons to start playback at normal speed.
4) During normal playback, when scan to the end-point of the disc the scan
operation will stop.
5) In repeat 1 mode, when scan to the end-point of the current track the unit will
play the current track from the starting-point.
6) In repeat al mode, when scan to the end-point of the disc the unit will play the
current disc from the starting-point.
7) In program mode, when scan t o the end –point of the current track, the unit will
play the next track in the memorized program. When scan to the end-point of the
memorized program, the scan operation will stop.
Repeat (Remote only)
This function allows you to repeat the current track, the memorized program or the
8
Page 9

entire disc continuously.
⑧
⑨
⑩
⑪
1) During playback, press the “REPEAT” button once to repeat the current track, the
display will show “ ”.
2) Press the “REPEAT” button again to repeat the entire disc, the display will show
“ ”ALL.
3) Press the “REPEAT” button a third time to cancel the repeat function.
The repeat function is automatically cancelled when the disc tray is opened.
In program mode, the repeat button continuously plays the memorized program.
Section repeat (Remote only)
This function allows you to repeat a specified section. You can select the start point
and the end point of a section in the current track and repeat it continuously.
1) During playback, press the “A-B” button at the start point of the section to be
repeated.
2) Press the “A-B” button at the end point of the section to be repeated. Playback
returns to the beginning of the section and the section is repeated continuously.
3) Press the “A-B” button a third time to resume the normal playback.
Recall (Remote only)
Press “RECALL” button after stopping, the unit will play from the track stopped last time.
Random (Remote only)
1) Press “RANDOM” button once, the unit will play from random track, the display will show
“RAND”.
2) Press
Program (Remote only)
This function allows you to memorize some tracks on the current disc for playback
in a specific order.
1) Insert a disc, the unit will read the contents of the disc, or stop playback of the
2) Press the “PROG” butt on followed by the track numbers in a specific order, the
3) After entering all of the track numbers, press the “PROG” button, your selections
4) Press the “ /SOURCE” button on the front panel or press the “ ” button on the
To s to p program play, Press the “ / ” button twice during program playback, or
open the disc tray in stop mode. When program play is stopped, the memorized
program will be cancelled.
In program mode, the skip buttons advance to the next track in the memorized
program.
“RANDOM” button again, the unit will return to normal.
current disc.
display will show “PROG” and “00 P 00”. Two numbers before “P” express
current track selected. Two numbers after “P” express track total number.
will be memorized automatically.
remote control unit, the memorized program will play.
9
Page 10

⑫
⑬
⑭
Scan (Remote only)
Press “SCAN” button, the display will show “INTRO”, the unit will play ten seconds of every
track from No.1 track.
Brightness adjusting (Remote only)
This function allows you to adjust brightness of display window.
Press “DISPLAY” button every once, the brightness of display window will circularly change
from “bright” to “brighter” and “dim”.
Time display (Remote only)
This function allows you to step through three alternative time displays.
During playback, press the “TIME” button each time, the display reads the following
time circularly.
The elapsed time of the current track
⇓
The time remaining in the current track
⇓
The time remaining in the entire disc
⇓
The elapsed time of the current track
Select USB audio mode
① Connect the USB port to the USB port of the computer with the USB cable which
must be according to the USB2.0 specification.
② In no disc state, press the “SOURCE” button on the front panel or press the
“SOURCE” button on the remote control unit to select USB, the display will show
“USB”, USB input indicator will turn on.
③ Select the USB audio device of the computer as CS-55CD Output, and keep it in
working state.
10
 Loading...