

Page 1
1
QZ. ABC DEF
GHI JKL MNO
PRS TUV
-SP
WXY
2 3
4 5 6
7 8
0
9
*
#
ALPHA
VX 520
Installation Guide
Included:
• Ethernet cable
• Power cable
• Phone jack
• One roll of paper
• Warranty paperwork
Page 2
1
QZ. ABC DEF
GHI JKL MNO
PRS TUV
-SP
WXY
2 3
4 5 6
7 8
0
9
*
#
ALPHA
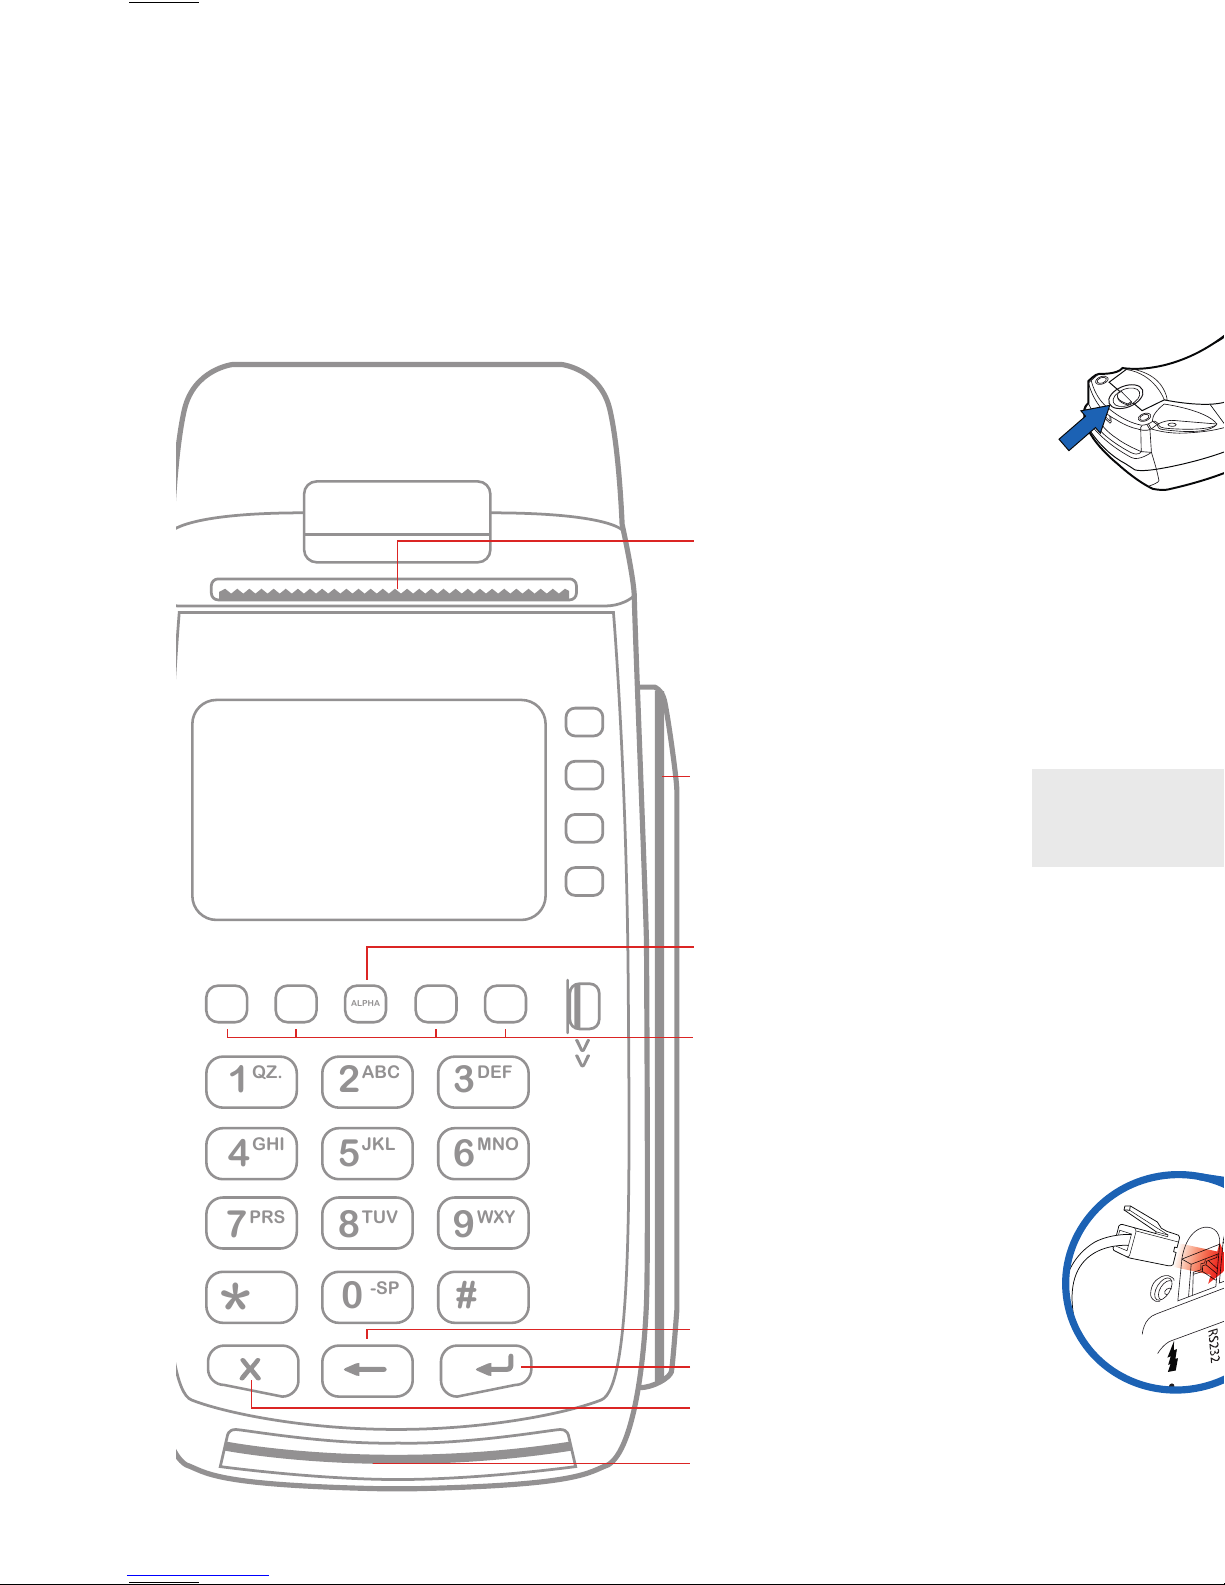
Paper receipt feed
Cancel key
EMV card slot
Enter key
Backspace/clear key
Magstripe reader
Programmable Function
(PF keys)
Alpha key
T
his guide answers some common questions that
you might have when using the VX520. We’re here
for you 24/7/365, so feel free to contact us if you
need assistance or have any questions.
TECHNICAL SUPPORT • 800.941.6557
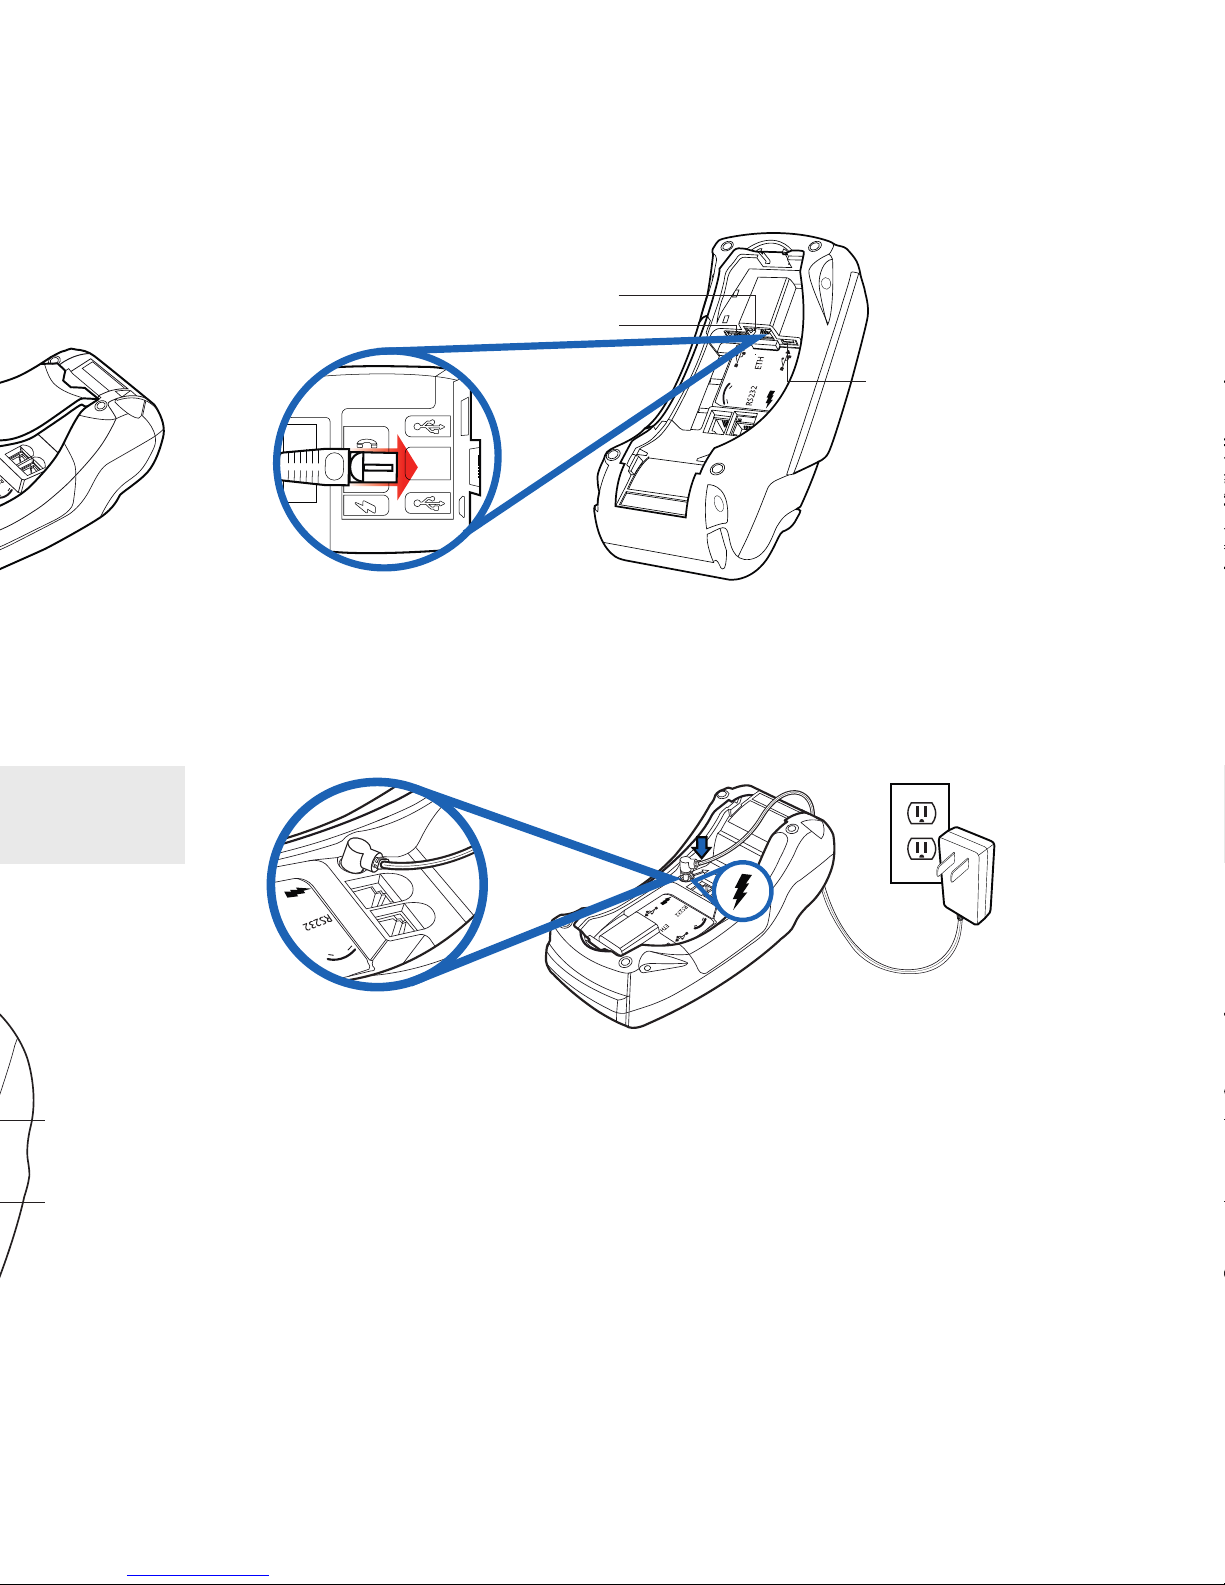
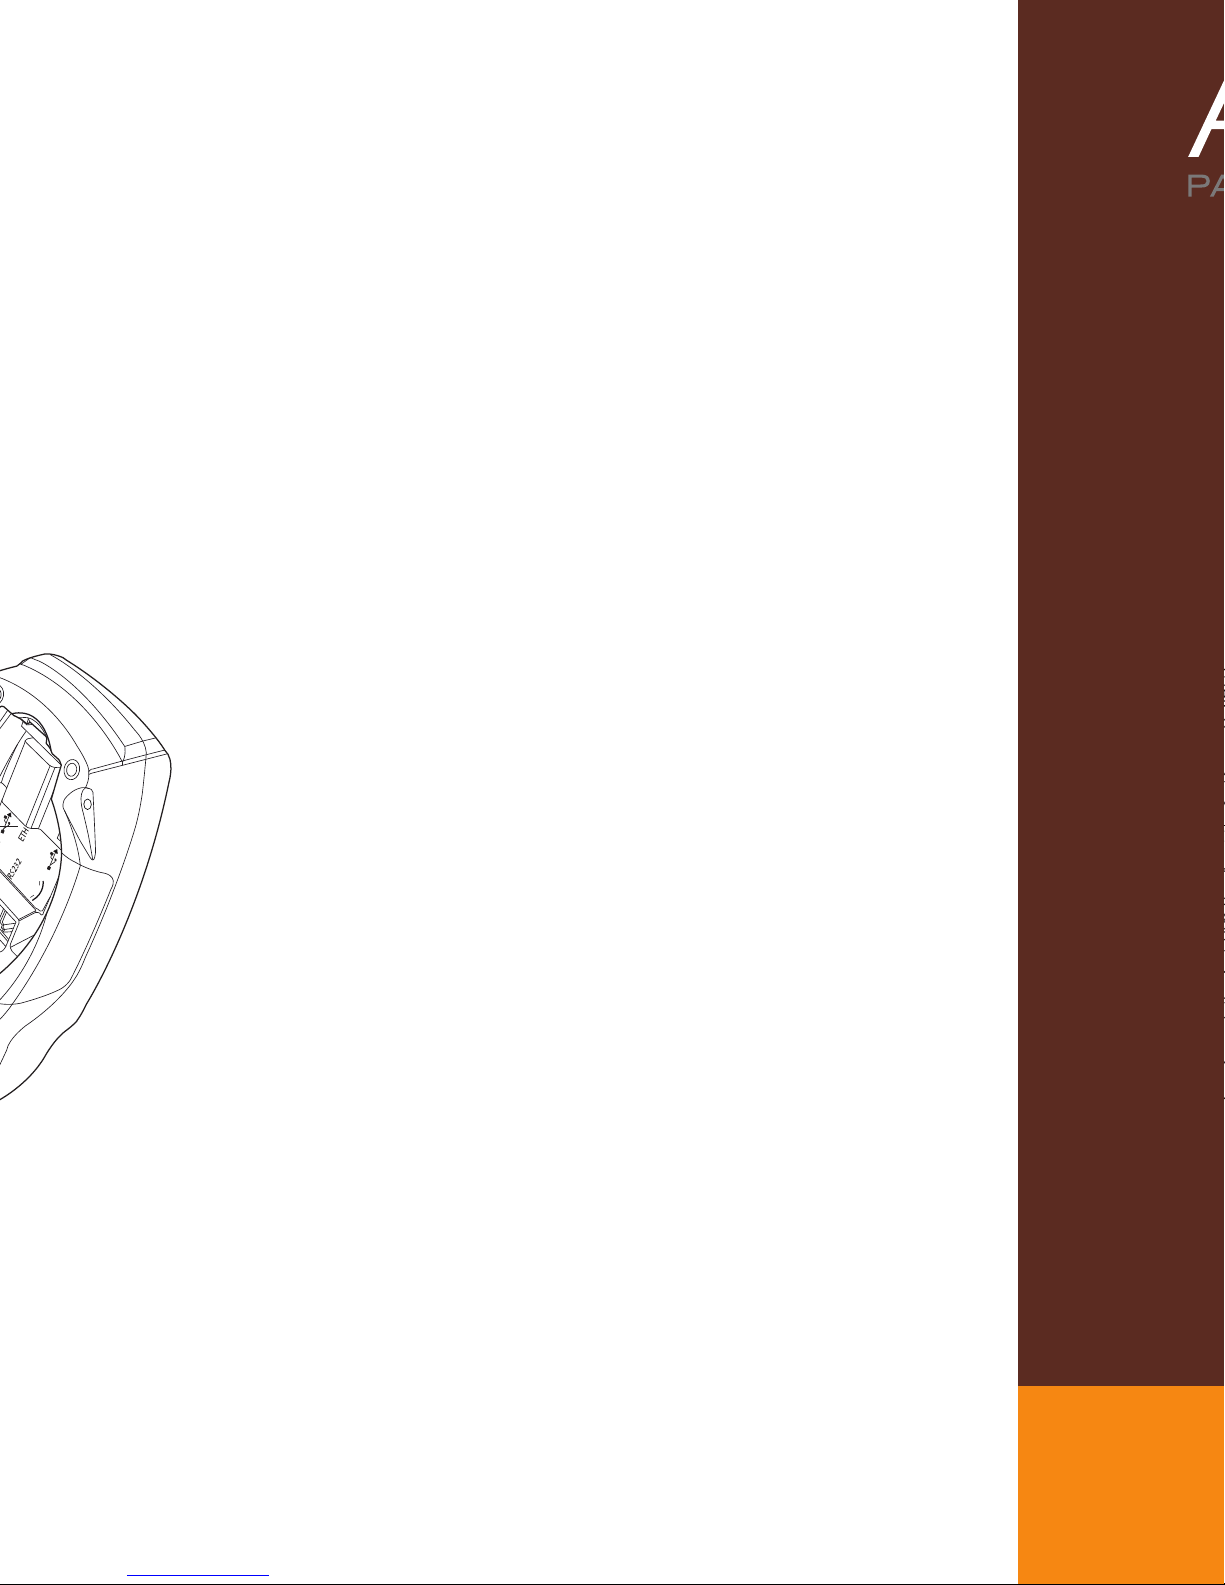
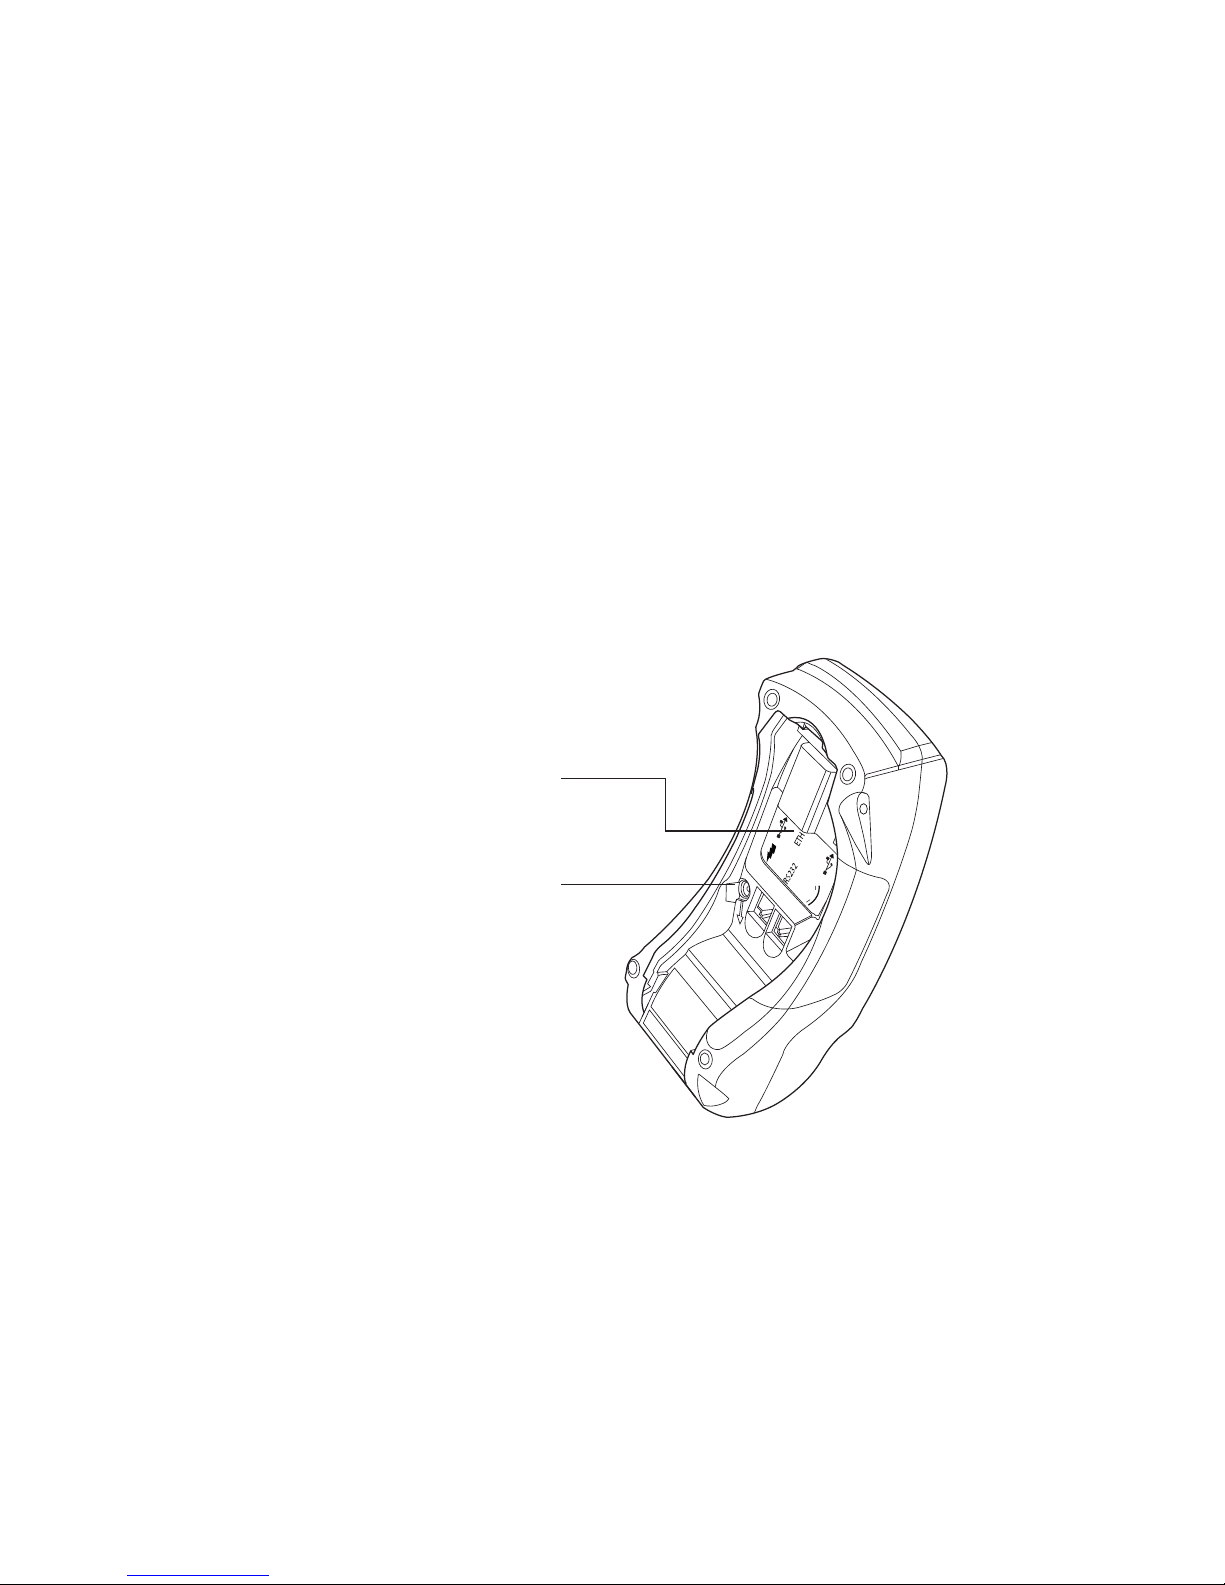
Turn the VX520 upside-down, and remove the rear cover
as shown to view the connection ports.
Setting up your terminal to use a dial-up connection
Important: If you want to use a dial-up connection for your
terminal, you must connect to a dedicated analog phone line.
Digital and VOIP lines do not support this connection method.
Connect one end of the phone cord to the telephone port on
the terminal, and connect the other end to your telephone jack.
POWER PORT
Accessing the connection ports
ETH
RS232
Page 3

Accessing the connection ports
ETH
RS232
Setting up your terminal to use an Ethernet connection
Turn the VX520 upside-down, and remove the rear cover
as shown to view the connection ports.
Setting up your terminal to use a dial-up connection
Connect one end of the Ethernet cable to the ETH port on the
terminal, and connect the other end to an available port on
your router/switch.
Powering the terminal
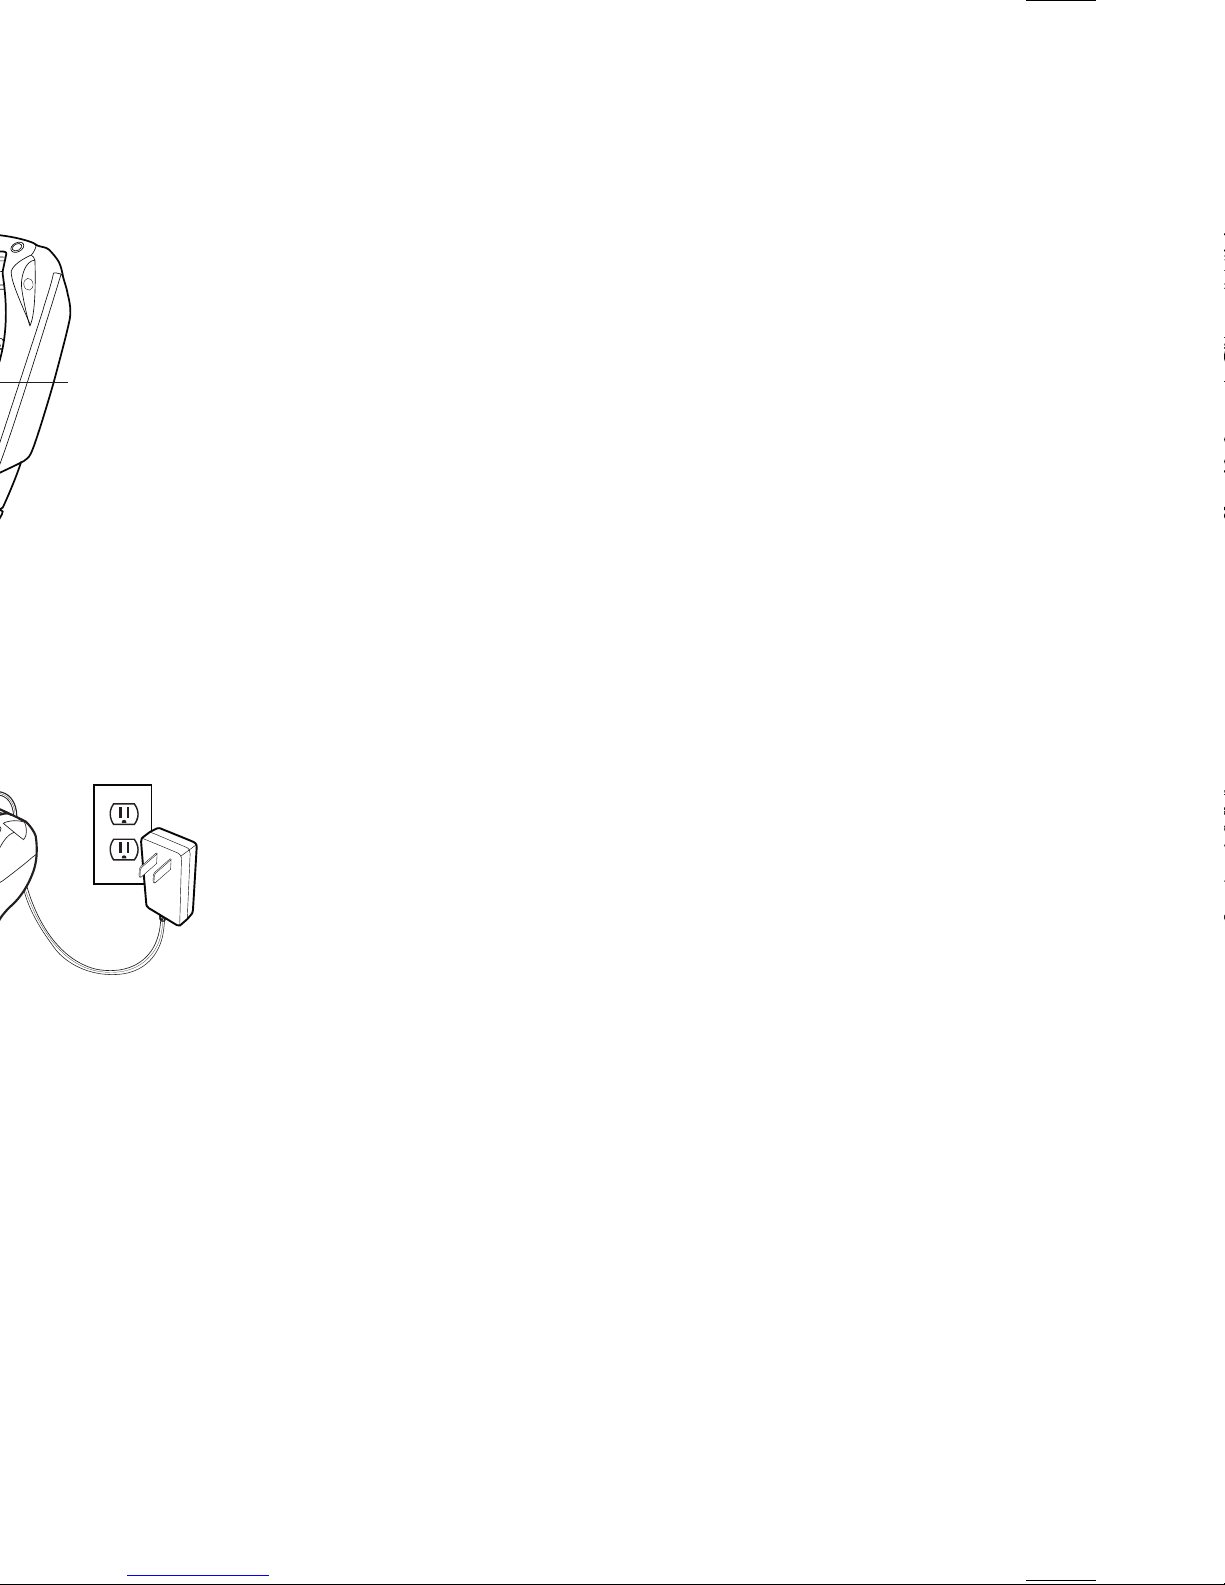
Connect the round end of the power cord into the power port
on the bottom of the terminal, then plug the adapter into a
power socket.
Important: If you want to use a dial-up connection for your
terminal, you must connect to a dedicated analog phone line.
Digital and VOIP lines do not support this connection method.
Connect one end of the phone cord to the telephone port on
the terminal, and connect the other end to your telephone jack.
POWER PORT
RS-232 PORT
RJ-11
TELEPHONE PORT
Tidying the cords
Run all cords in the terminal over the back of the device, and
attach the rear cover.
Accessing the SoftPay home screen to start
processing transactions
The SoftPay home screen is the starting point for all of your
transactions, and for many of the troubleshooting tasks.
From the main menu, press F3 (SOFTPAY – FDMS) to access the
SoftPay home screen. (The SoftPay home screen displays the
Sale, Refund, and Void options.)
Page 4
Setting up your terminal to use an Ethernet connection
ETH
RS232
Adjusting the header or footer of the receipt
Connect one end of the Ethernet cable to the ETH port on the
terminal, and connect the other end to an available port on
your router/switch.
ETHERNET PORT
HOST USB PORT
CLIENT
USB PORT
Powering the terminal
Connect the round end of the power cord into the power port
on the bottom of the terminal, then plug the adapter into a
power socket.
The receipt header and footer typically contain information about
your business such as your company name, address, phone number,
web address, and any other information you want to include.
1) From the SoftPay home screen,
press 6 on the keypad.
(The SoftPay home screen
displays the Sale, Refund,
and Void options.)
2) Press F3 (Terminal).
3) Press F2 (View).
4) Press F2 (Next) to cycle through
the receipt lines. For example,
press F3 (Next) three times to
display Header Line 1.
• If you pass the line you want
to change, press F1 (Previous)
to cycle to the previous line.
5) To edit the current line,
press F3 (Edit).
RS-232 PORT
RJ-11
TELEPHONE PORT
Tidying the cords
Run all cords in the terminal over the back of the device, and
attach the rear cover.
Accessing the SoftPay home screen to start
processing transactions
The SoftPay home screen is the starting point for all of your
transactions, and for many of the troubleshooting tasks.
6) Press the Backspace key to
delete the existing text.
7) Use the keypad and Alpha key
to enter new text as follows:
a) Press the key which displays
the letter that you want to insert.
CAPK Error File Not Found
This error occurs if you have not updated the terminal to accept
the type of card which the customer is trying to use.
1) From the SoftPay home
screen, press Enter.
The SoftPay home screen
displays the Sale, Refund,
and Void options.)
2) Press F3 (Setup).
3) Type the password as follows:
From the main menu, press F3 (SOFTPAY – FDMS) to access the
SoftPay home screen. (The SoftPay home screen displays the
Sale, Refund, and Void options.)
• Press 1, Alpha, Alpha,
6, 6, 8, 3, 1.
• Press Enter.
Page 5
CAPK Error File Not Found
This error occurs if you have not updated the terminal to accept
the type of card which the customer is trying to use.
1) From the SoftPay home
screen, press Enter.
The SoftPay home screen
displays the Sale, Refund,
and Void options.)
2) Press F3 (Setup).
3) Type the password as follows:
• Press 1, Alpha, Alpha,
6, 6, 8, 3, 1.
• Press Enter.
Adjusting the header or footer of the receipt
The receipt header and footer typically contain information about
your business such as your company name, address, phone number,
web address, and any other information you want to include.
1) From the SoftPay home screen,
press 6 on the keypad.
(The SoftPay home screen
displays the Sale, Refund,
and Void options.)
2) Press F3 (Terminal).
3) Press F2 (View).
4) Press F2 (Next) to cycle through
the receipt lines. For example,
press F3 (Next) three times to
display Header Line 1.
• If you pass the line you want
to change, press F1 (Previous)
to cycle to the previous line.
5) To edit the current line,
press F3 (Edit).
6) Press the Backspace key to
delete the existing text.
7) Use the keypad and Alpha key
to enter new text as follows:
a) Press the key which displays
the letter that you want to insert.
b) Press the Alpha key to
cycle through the letters
until you reach the letter
you want to insert.
• For example, to enter
the letter “C” press 2 on
the keypad, then press
the Alpha key three times.
c) Repeat steps a) and b)
until your text is complete.
8) When you have finished
your changes, press Enter.
9) Repeat steps 4) – 8) to
change the text in any
other lines.
10)Press the Cancel key
three times to return to
the SoftPay home screen.
CLIENT
USB PORT
4) Press the leftmost purple
key five times.
5) Press F3 (EMV Key Update).
• The terminal may take up
to five minutes to down
load the updates. Once
the download is complete,
the screen displays
“Download Complete”.
6) Press the Cancel key
five times to return to
the SoftPay home screen.
Page 6
Power Fail Recovery
This error occurs if the terminal loses power during a transaction.
To clear the error, complete the following steps:
1) From the Power Fail Recovery screen, press Enter.
2) Press F1 (Yes).
The terminal does not detect cards – the screen shows
“Commserver SoftPay”
SoftPay home screen needs to be active to process cards.
(The SoftPay home screen displays the Sale, Refund, and
Void options.)
• Press F3 (SoftPay – FDMS) to access the SoftPay home screen.
The terminal prompts for a password when running
transactions
The terminal’s keypad is locked. To unlock the keypad, complete
the following steps:
1) From the SoftPay home
screen, press 8 on the
keypad. (The SoftPay
home screen displays
the Sale, Refund,
and Void options.)
2) Type the password as
follows:
a) On the keypad, press 1,
Alpha, Alpha, 6, 6, 8, 3, 1.
b) Press Enter.
3) Press F2 (No).
I need to add an extra number to dial an outside line (PABX)
1) From the SoftPay home
screen, press 6 on the
keypad. (The SoftPay
home screen displays
the Sale, Refund, and
Void options.)
2) Press F2 (Phone).
3) Press F2 (View).
4) Press F3 (Edit).
5) Enter the code which the
terminal needs to access
an outside line, then press
Enter.
6) Press F4 (Exit).
7) Press F2 (OK) to save your changes.
8) Press Cancel twice to return
to the SoftPay home screen.
Included:
• Ethernet cable
• Power cord
• Phone jack
• One roll of paper
• Warranty paperwork
Page 7
I need to change the date or time on the terminal
Power Fail Recovery
1) From the SoftPay home
screen, press Enter.
(The SoftPay home
screen displays the Sale,
Refund, and Void options.)
2) Press F2 (Setup).
3) Type the password as
follows:
a) On the keypad, press
1, Alpha, Alpha, 6, 6, 8, 3, 1.
b) Press Enter.
4) Press the leftmost purple
key four times.
Datawire 1007/1008 error
These are connection errors.
1) Check that the Ethernet
cable is plugged into the
ETH port.
5) Press F4 (Date/Time).
6) Use the keypad to type the
correct date, in the format
(MMDDYYYY), then press
Enter.
7) Use the keypad to type the
correct time, in 24-hour
time format (HHMMSS),
then press Enter.
8) Press Cancel twice to
return to the SoftPay
home screen.
This error occurs if the terminal loses power during a transaction.
To clear the error, complete the following steps:
1) From the Power Fail Recovery screen, press Enter.
2) Press F1 (Yes).
The terminal does not detect cards – the screen shows
“Commserver SoftPay”
SoftPay home screen needs to be active to process cards.
(The SoftPay home screen displays the Sale, Refund, and
Void options.)
• Press F3 (SoftPay – FDMS) to access the SoftPay home screen.
The terminal prompts for a password when running
transactions
The terminal’s keypad is locked. To unlock the keypad, complete
the following steps:
1) From the SoftPay home
screen, press 8 on the
keypad. (The SoftPay
home screen displays
the Sale, Refund,
and Void options.)
2) Unplug the power cord,
leaving the Ethernet
cable attached, and
wait five seconds.
3) Plug the power cord back
in, and run a test transaction.
If the terminal still displays the error, follow these steps:
1) From the SoftPay home
screen, press * on the
keypad. (The SoftPay home
screen displays the Sale,
Refund, and Void options.)
If the terminal still displays the error, contact the Support Team.
2) Press F2 (Commserver).
3) Press the purple key
immediately to the right
of the Alpha key.
4) Press F4 (Repair).
I need to add an extra number to dial an outside line (PABX)
1) From the SoftPay home
screen, press 6 on the
keypad. (The SoftPay
home screen displays
the Sale, Refund, and
Void options.)
2) Press F2 (Phone).
3) Press F2 (View).
4) Press F3 (Edit).
Page 8

TECHNICAL SUPPORT • 800.
941.6557
I need to change the date or time on the terminal
1) From the SoftPay home
screen, press Enter.
(The SoftPay home
screen displays the Sale,
Refund, and Void options.)
2) Press F2 (Setup).
3) Type the password as
follows:
a) On the keypad, press
1, Alpha, Alpha, 6, 6, 8, 3, 1.
b) Press Enter.
4) Press the leftmost purple
key four times.
Datawire 1007/1008 error
The terminal is prompting for a server number when
I don’t want it to, or it is not prompting for a server
number when I want it to.
1) From the SoftPay home
screen, press Enter on the
keypad. (The SoftPay home
screen displays the Sale,
Refund, and Void options.)
2) Press F2 (Setup).
3) Type the password as
follows:
• On the keypad, press 1,
Alpha, Alpha, 6, 6, 8, 3, 1.
• Press Enter.
4) Press the leftmost purple key.
5) Press F1 (Terminal)
6) Press F2 (Next) nine times.
These are connection errors.
1) Check that the Ethernet
cable is plugged into the
ETH port.
2) Unplug the power cord,
leaving the Ethernet
cable attached, and
wait five seconds.
3) Plug the power cord back
in, and run a test transaction.
If the terminal still displays the error, follow these steps:
1) From the SoftPay home
screen, press * on the
keypad. (The SoftPay home
screen displays the Sale,
Refund, and Void options.)
Switching from dial-up to IP communication
1) From the SoftPay home
screen, press 6 on the keypad.
(The SoftPay home screen
displays the Sale, Refund,
and Void options.)
2) Press F4 (Communications).
3) Press F2 (View).
4) Press F3 (Edit), then F2 (Next)
until the bottom left of the
screen displays “New:
Commserver”.
5) Press F3 (Select).
6) Press F2 (Next) three times
until the screen displays
“FDMS Settle Comm.”
7) Press F3 (Edit).
• If the terminal is prompting
for a server number, and
you want to disable the
feature, press F1 (None).
• If you want to the terminal
to prompt for a server
press F3 (Prompt).
8) Press F4 (Exit).
9) Press F2 (OK).
10) Press Cancel twice to
return to the SoftPay
home screen.
7) Press F3 (Edit), then F2
(Next) until the bottom
left of the screen displays
“New: Commserver”.
8) Press F3 (Select).
9) Press Cancel three
times to return to the
SoftPay home screen.
10) Unplug the device for
five seconds, and then
plug it in.
11) After the terminal
reboots, press F3
(SOFTPAY – FDMS), and
run a test transaction.
If the terminal still displays the error, contact the Support Team.
 Loading...