

CAVS JB-199 II User's Manual

CAVS JB-199
Digital Karaoke Jukebox Player
USER’S MANUAL
Be sure to read this manual before starting the
operation of the unit.
POWER
MIC.1 MIC. 2 MIC.1 MIC. 2 ECHO
JB/CD TEMPO UP
KEY
b
LIST
MENU VOCAL
TEMPO DOWN
.
.
.
.
.
.
.
.
.
.
.
.
.
.
.
.
.
.
.
.
.
.
.
.
BGV
KEY #
.
.
POWER
Open/Close
MUTE
SET UP
TEMP
TIME
123
456
7809
CANCEL
D
R
O
C
E
R
JB/CD
F
A
N
F
R
A
PLAY
VOL
KEY
VOL
.
.
.
.
.
.
.
R
JB-199
INFO TITLE
UP
C
L
MENU
E
A
R
E
RIGHT
LEFT
SELECT
LIST
DOWN
ENTER
BGV
RANDOM
PPgm
PROG
REPEAT
VOCAL
PAUSESTOP
IMPORTANT SAFETY INSTRUCTIONS
All the safety and operating instructions should be read
before the product is operated.
The safety and operating instructions should be
retained for future reference.
All warnings on the product and in the operating
instructions should be adhered to.
All operating and using instructions should be followed.
Unplug this product from the wall outlet before
cleaning.
Do not use liquid cleaners or aerosol cleaners, Use
damp cloth for cleaning.
A product and cart combination should be moved with care. Quick stops, excessive forces and
-
uneven surfaces may cause the product and cart combination to overturn.
This symbol is to be included in the important safeguards
of applicable units adjacent to the upper side content.
Do not use attachments not recommended by the
product manufacturer as they may cause hazards.
Do not use this product near water - for example, near a
bath tub, wash bowl, kitchen sink or laundry tub; in a
wet basement; or near swimming pool; and the like.
Do not place this product on an unstable cart, stand,
tripod, bracket, or table, The product may fall, causing
serious injury to a child or an adult and serious damage
to the product.
CAUTION
RISK OF ELECTRIC SHOCK,
DO NOT OPEN
CAUTION : TO REDUCE THE RISK OF ELECTRIC SHOCK
DO NOT REMOVE COVER (OR BACK).
NO USER SERVICEABLE PARTS INSIDE
REFER SERVICING TO
QUALIFIED SERVICE PERSONNEL
WARNING
To prevent fire or shock hazard, do not expose
the unit to rain or moisture.
This symbol is intended to alert the user to the presence of
uninsulated "dangerous voltage" within the product's
enclosure that may be of sufficient magnitude to constitute
a risk of electric shock to persons.
This symbol is intended to alert the user to the presence of
important operating and maintenance(servicing) instructions
in the literature accompanying the appliance.
Caution : To prevent electric shock do not use this
(polarized) plug with an extension cord, receptacle
or other outlet unless the baldes can be inserted
to prevent blade exposure.
Attention : Pour prevenir les choes electriques ne pas
utiliser cetre fiche polarisee avec un prolongateur,
une prise de courant ou une autre sortie de
courant, sauf si les lames prevent etre inserees a
fond sans en laiser aucune partie a decouvert.

A product and cart combination should be moved with care. Quick stops, excessive force, and uneven surface may cause the
product and cart combination to overturn.
Slots and openings in the cabinet are provided for ventilation and to ensure reliable operation of the product and to protect it
from overheating, and these openings must not be blocked or covered. The openings should never be blocked by placing the
product on a bed, sofa, rug, or other similar surface.
The openings should not be placed in a built-in installation such as a bookcase or rack unless proper ventilation is provided or
the manufacturer's instructions have been adhered to.
This product should be operated only from the type of power source indicated on the marking label. If you are not sure of the
type of power supply to your home, consult your product dealer or local power company. For products intended to operate
from battery power, or other sources, refer to the operating instructions.
Power supply cord should be routed so that it is not likely to be walked on or pinched by items placed upon or against them,
paying particular attention to cords at plugs, convenience receptacles, and the point where they exit from the product.
Do not overload wall outlets, extension cords, or integral convenience receptacles as this can result in a risk of fire or electric
shock.
Never push any kinds of objects into this product through openings as they may touch dangerous voltage points or short-out
parts that could result in a fire or electric shock. Never spill any kind of liquid on the product.
Do not attempt to service this product yourself as opening or removing covers may expose you to dangerous voltage or other
hazards.
Refer all servicing to qualified service personnel.
Unplug this product from the wall outlet and refer servicing to qualified service personnel under the following conditions:
- When the power supply cord or plug is damaged.
- If liquid has been spilled, or objects have fallen into the product.
- If the product has been exposed to rain or water.
- If the product does not operate normally.
- If the product has been dropped or damaged in any way.
- When the product exhibits a distinct change in performance.
When replacement parts are required, be sure the service technician has used replacement part specified by the
manufacturer or have the same characteristics as the original part. Unauthorized subsitutions may result in fire, electric shock,
or other hazards.
Upon completion of any service or repair to this product, ask the service technician to perform safety checks to determine that
the product is in proper operating condition.
The product should be situated away from heat sources such as radiators, heat registers, stoves, or other products (including
amplifiers) that produce heat.
Grounding or Polarization - This product may be equipped with a polarized alternating-current line plug (a plug having one
blade wider than the other).
This plug will fit into the power outlet only one way. This is a safety feature. If you are unable to insert the plug fully into the
oulet, try reversing the plug. If the plug should still fail to fit, contact your electrician to replace your obsolete outlet. Do not
defeat the satety purpose of the polarized plug.
Alternate Warnings - This product may be equipped with a three-wire grounding-type plug, a plug having a third(grounding)
pin. This plug will only fit into a grounding-type power outlet. This is a safety feature. if you are unable to insert the plug into
the outlet, contact your electrician to replace your obsolete outlet. Do not defeat the safety purpose of the grounding-type
plug.
Lightning - For added protection for this product during a lightning storm, or when it is left unattended and unused for long
periods of time, unplug it from the wall outlet and disconnect the antenna or cable system. This will prevent damage to the
product due to lightning and power-line surges.

Federal Communications Commission Requirements
WARNING
CHANGES OR MODIFICATIONS NOT EXPRESSLY APPROVED BY THE PARTY
RESPONSIBLE FOR COMPLIANCE WITH THE FCC'S RULES(THE FCC 'GRANTEE')
COULD VOID THE USER’S AUTHORITY TO OPERATE THE EQUIPMENT.
Note
This equipment consists of parts that has been tested and found to comply with the
limits for a Class B digital devices, pursuant to part 15 of the FCC Rules. These limits
are designed to provide reasonable protection against harmful interference in a
residential installation. This equipment generates, uses and can radiate radio frequency
energy and, if not installed and used in accordance with the instructions, may cause
harmful interference to radio communications. However, there is no guarantee that
interference will not occur in a particular installation. If this equipment does cause
harmful interference to radio or television reception, which can be determined by
turning the equipment off and on, the user is encouraged to try to correct the
interference by one or more of the following measures :
Reorient or relocate the receiving antenna.
Increase the separation between the equipment and receiver
Connect the equipment into an outlet on a circuit different from that to which
the receiver is connected.
Consult the dealer or an experienced radio/TV techical for help.

CAVS JB-199 Karaoke Jukebox
CAVS JB-199 Karaoke Player is the next generation digital jukebox capable of storing
100,000 songs of DVD, Video CD, CD+G, or CD format. It also instantly records and
makes custom Audio CDs providing premiere services to patrons. It can also connect
to LAN or Internet network providing around the clock song updates and services.
Contents
1. Product features
2. Safety/Precautions
3. Check points before use
4. Controls and Functions
5. Using remote controller
6. How to connect
7. How to operate
Basic Functions
Disc Play
Advanced Functions
1. Jukebox
2. Disc Capture
3. Disc Recording
4. Download (DateCD)
5. System Control
6. Video Control
7. Audio Control
8. Download Song Files from JB-99
JB-199 Manager program
1. Preparing song files
2. Transfering song files
3. Program upgrades
4. Picture files
5. Edit, save, and print song list
4
5
8
9
17
19
26
26
31
32
32
33
35
36
37
38
39
40
41
42
44
46
47
49

Contents
(continued)
Making DataCD
Optional devices
1. External disc drive
2. External hard drive
3. VGA monitor
4. Keyboard and mouse
Windows platform
1. USB Camera
2. NTSC / PAL
3. Play DVD and Video CD
4. Change Welcome (title) page
5. Copy a song list
6. JB-199 Manager program
8. Trouble Shooting
9. Specification
* Limited Warranty
51
54
54
55
55
55
56
56
57
57
57
58
58
59
60

1
1
PRODUCT FEATURES
FEATURES
POWER
MIC.1 MIC. 2 MIC.1 MIC. 2 ECHO
JB/CD TEMPO UP
KEY
b
TEMPO DOWN
MENU VOCAL
.
.
.
.
.
.
.
.
.
.
.
BGV
LIST
KEY #
.
.
.
.
.
.
.
.
.
.
.
.
.
.
.
.
.
.
.
.
.
.
R
JB-199
JB-199
Play DVD, VCD, CD+G, MIDI and CD songs from the internal memory of JB-199
Play Super CD+G, CD+G, MIDI and CD discs.*
Store up to 100,000 songs.**
Capture CD+G and CD songs directly from discs (No need for PC).*
Instantly record and make custom Audio CDs.*
Connect to LAN network or Internet for remote management.
Dual disc drives for easy quick disc loading.*
Tempo control, Digital key control, Voice cancel (multiplex), Fanfare, Score
Program, Priority program, Random selection and Repeat play
On-screen song list and search
JB-199 Manager program for easy song data and list management
Background video (BGV) from internal video files, still images, and USB camera.
* Optional disc drive is required. See Chapter: External Disc Drives in
Section: Optional Devices.
* Optional hard drive capacity is required.
4
2
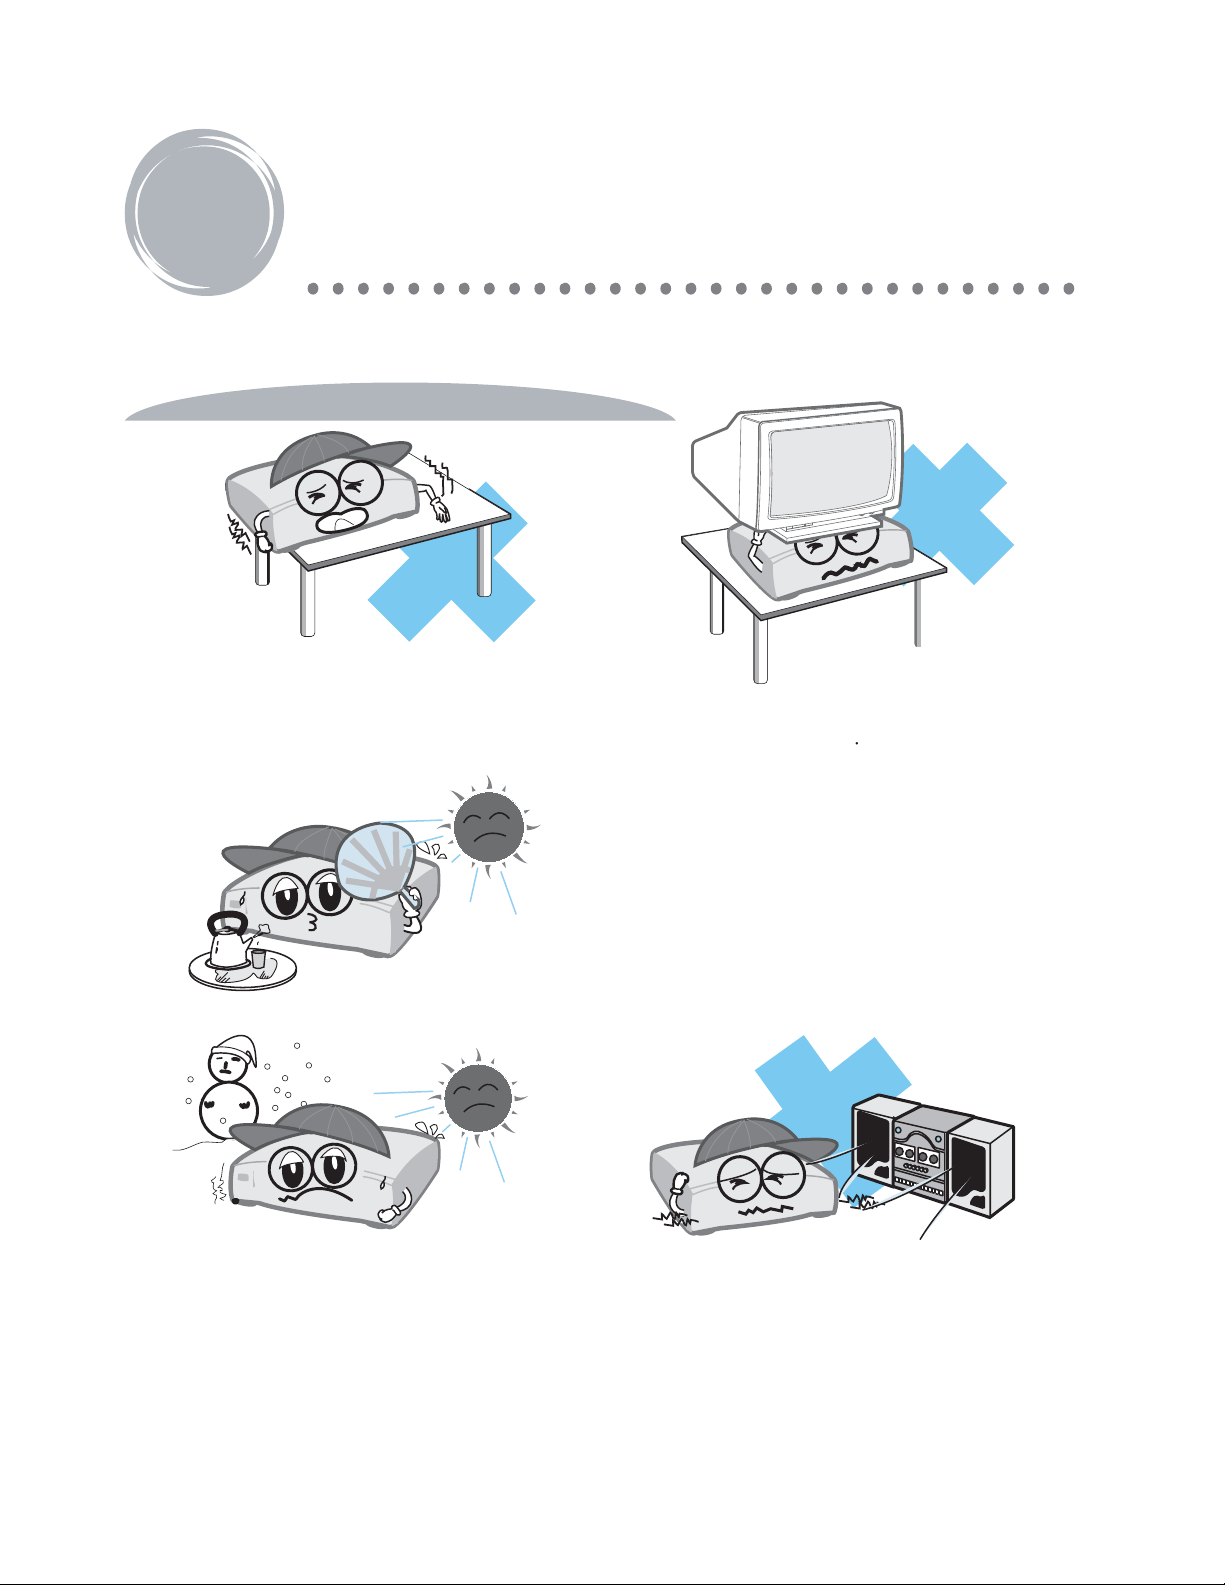
SAFETY / PRECAUTIONS
WHEN INSTALLING UNIT
Place the unit on even-level.
Tilted position may cause damage to
the unit and the disc.
Do not place heavy equipment such as
TV on top of the unit
Do not place the unit in areas with
- vibration
- high humidity
- limited or no ventilation
- under direct sunrays
- high or low temperature.
Moving the unit between extreme
temperatures may cause water dew
on the laser pickup of the unit and
result in malfunctioning. If so turn off
the unit and wait for one or two hours
before starting again.
To avoid the magnetic interference,
place the unit away from speakers.
5

S'
RESU
L
A
U
N
AM
SAFETY / PRECAUTIONS
SAFETY
Be sure to read the user manual
before operating the unit
Place the unit in an area well
ventilated an with no heat.
Never open the top cover. It is very
dangerous to touch the inside of the
unit due to possible electric shock.
When not in use for long duration, be
sure to pull out the power cord from
the electric outlet. Also do not use the
unit when the power cord is damaged
as it may cause electric shock.
The unit and its power cord should be
arranged safely at all times and never be
handled with wet hands due to a danger of
electric shock.
Check the supply voltage before turning
on the unit.
The unit uses 100 - 240V AC.
6
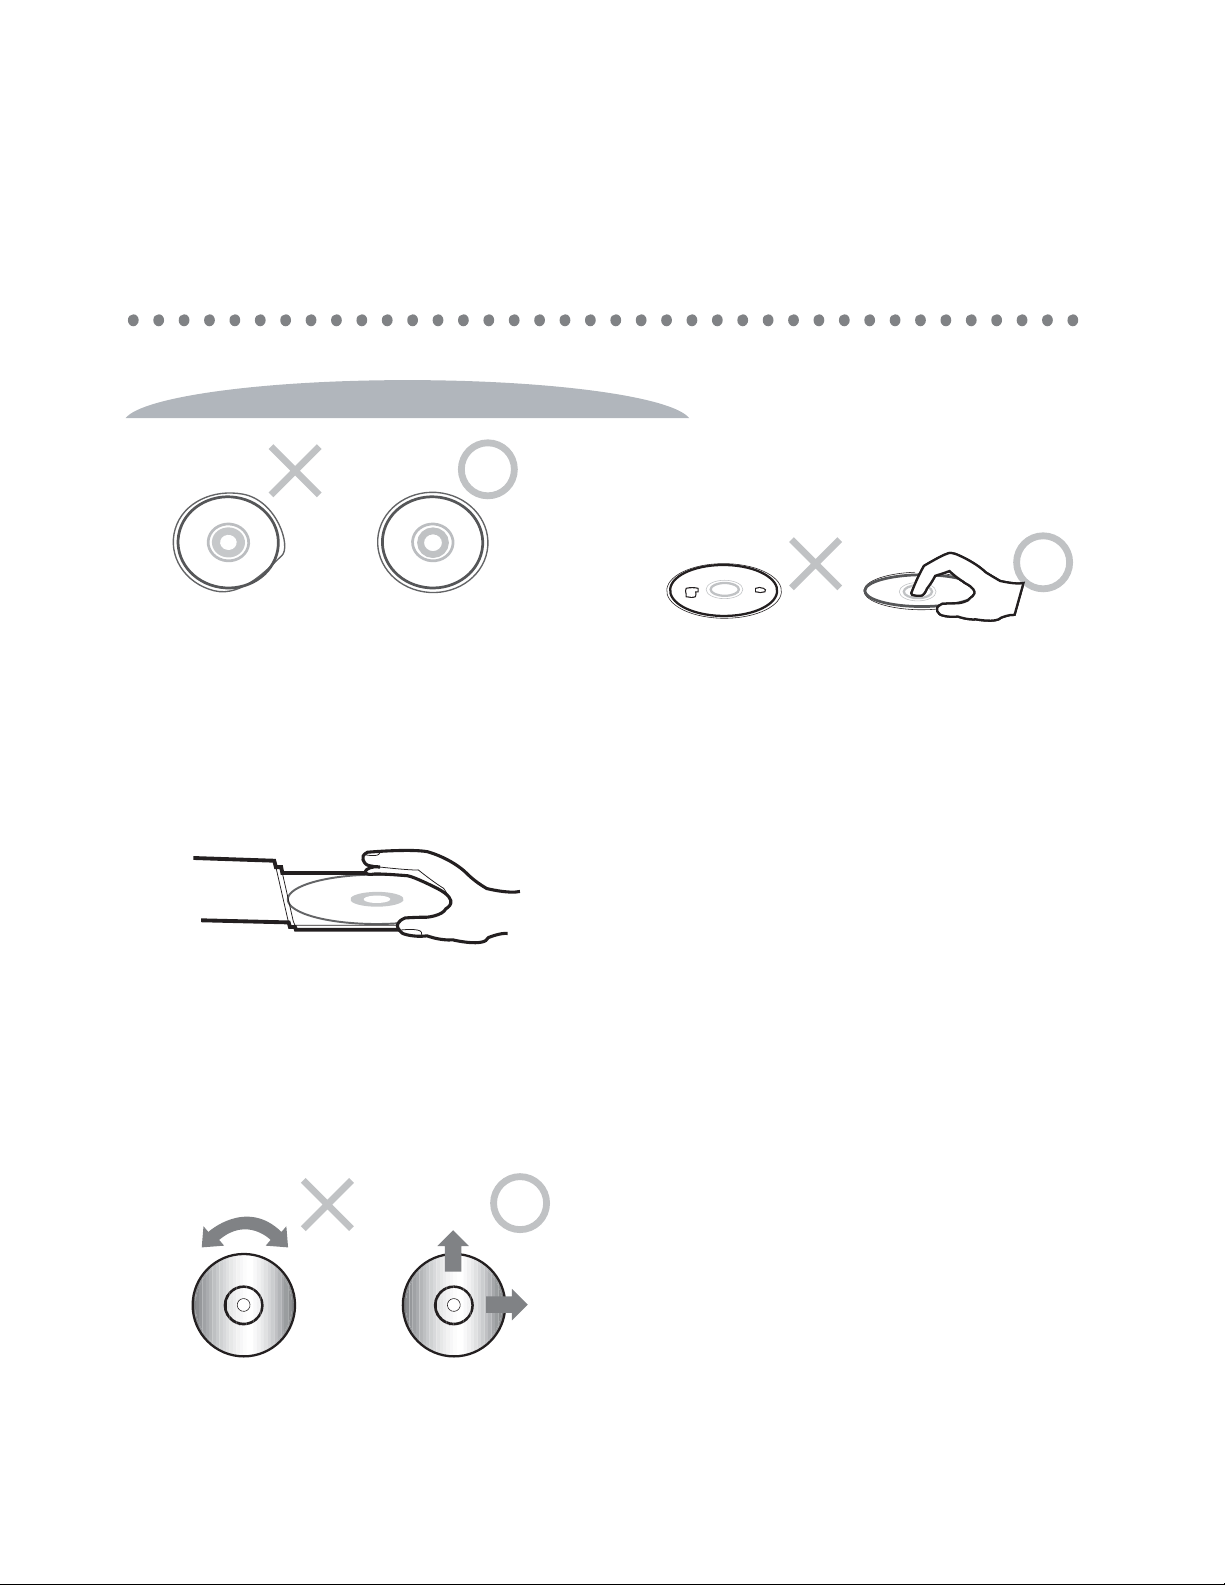
How to handle
When handling disc, take hold of the
outer edge and the center hole, not
the top and bottom sides, as
illustrated above.
Do not place paper stickers or tapes
on the disc, or write on the surface of
the disc. Be careful not to place the
disc under a direct sunray or near
high heat.
Foreign materials
Fingermarks
Heavy scratches
Paper stickers or tapes
Direct sunray
Electric heater
Do not use damaged discs.
Damaged disc will not play its
audio/video content as specified and
can cause damage to the unit due to
high speed rotation when inserted.
WHEN HANDLING DISCS
SAFETY / PRECAUTIONS
How to keep.
To prevent discs from bending, be sure to
pull discs out of the unit after using and
keep them in the disc case.
How to clean.
Wipe the disc with soft cloth to remove
dust and fingermarks using the motion as
illustrated.
When cleaning the disc, use only the liquid
disc cleaner and never use benzene,
thinner, or sprays for electrostatic
protection.
7
3
3
CHECK POINTS BEFORE USE
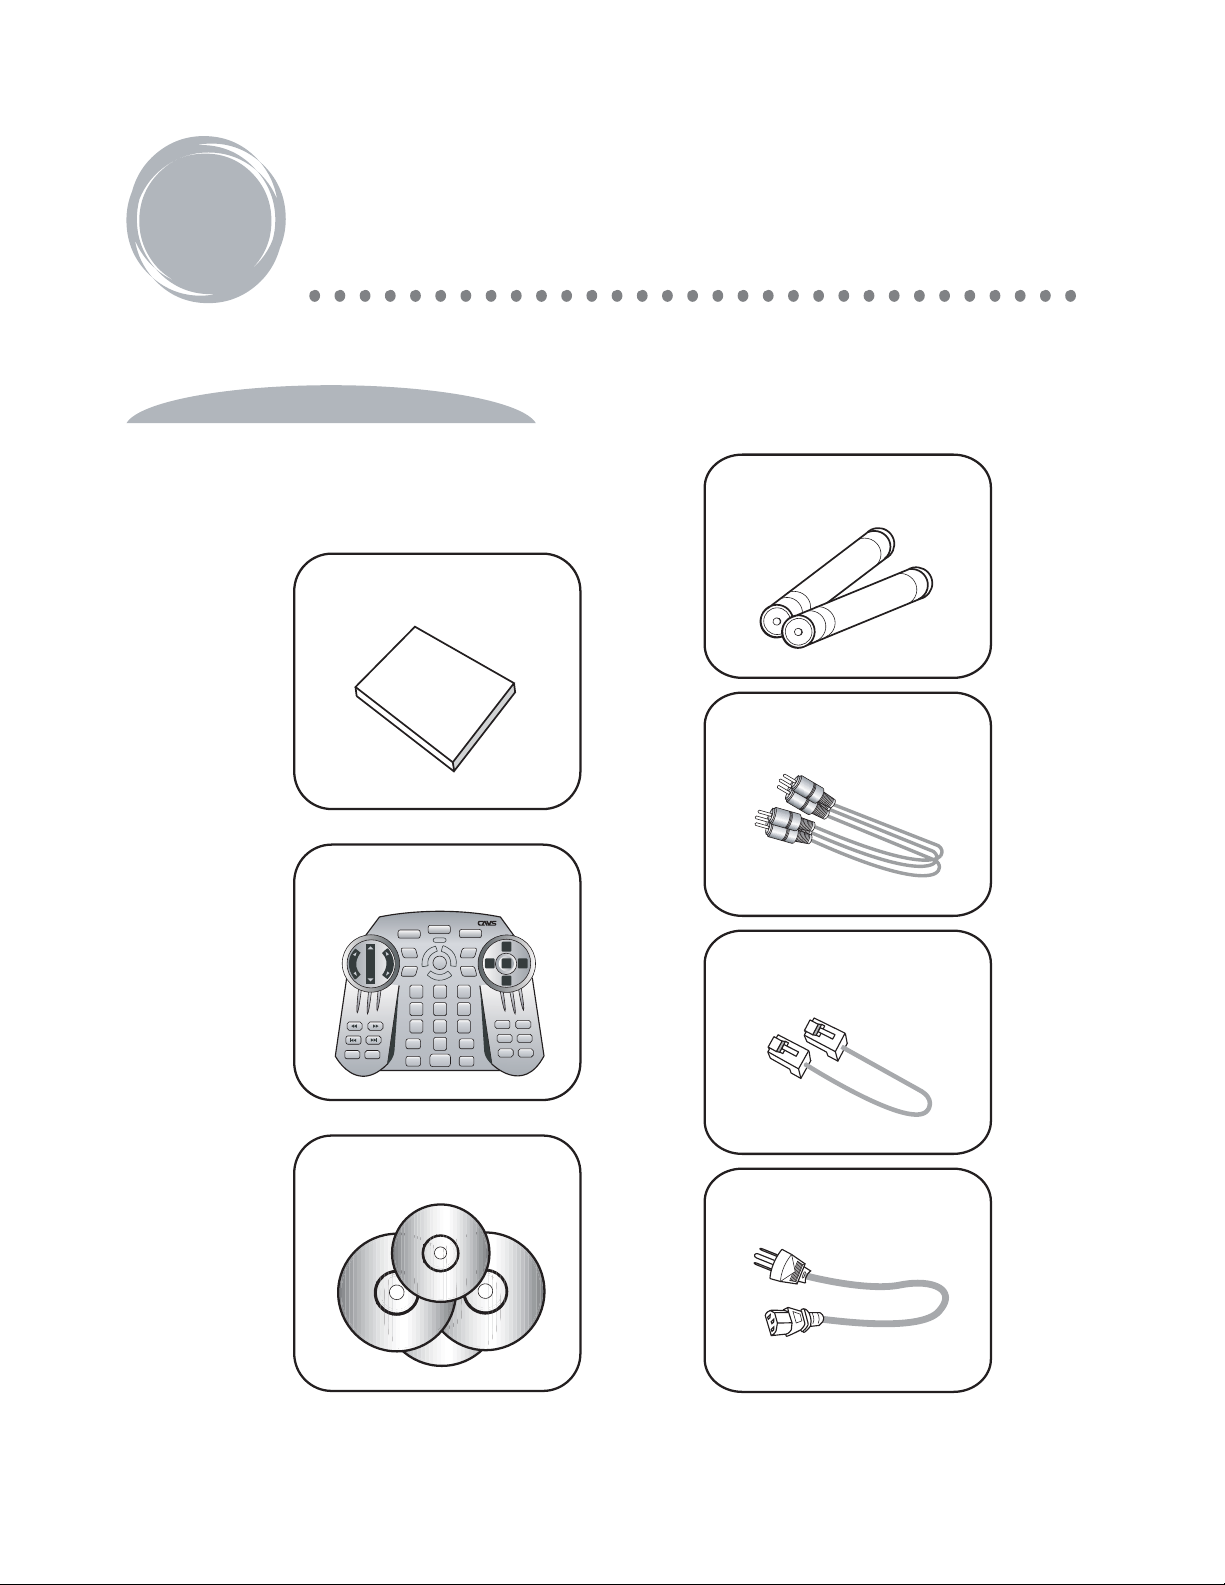
ACCESSORIES
Accessories of the unit are as follows.
User manual : 1
User’s manual
Remote controller : 1
POWER
Open/Close
KEY
INFO TITLE
VOL
VOL
MUTE
SET UP
TEMP
TIME
123
456
7809
CANCEL
D
R
O
C
E
R
JB/CD
F
A
N
E
F
R
A
PLAY
UP
C
L
MENU
E
A
R
RIGHT
LEFT
SELECT
LIST
DOWN
BGV
ENTER
RANDOM
PPgm
PROG
REPEAT
VOCAL
PAUSESTOP
Batteries : 2
Video and audio cable : 1
Lan cable : 1
8
JB-199 Program CDs
Power cord : 1
4
4
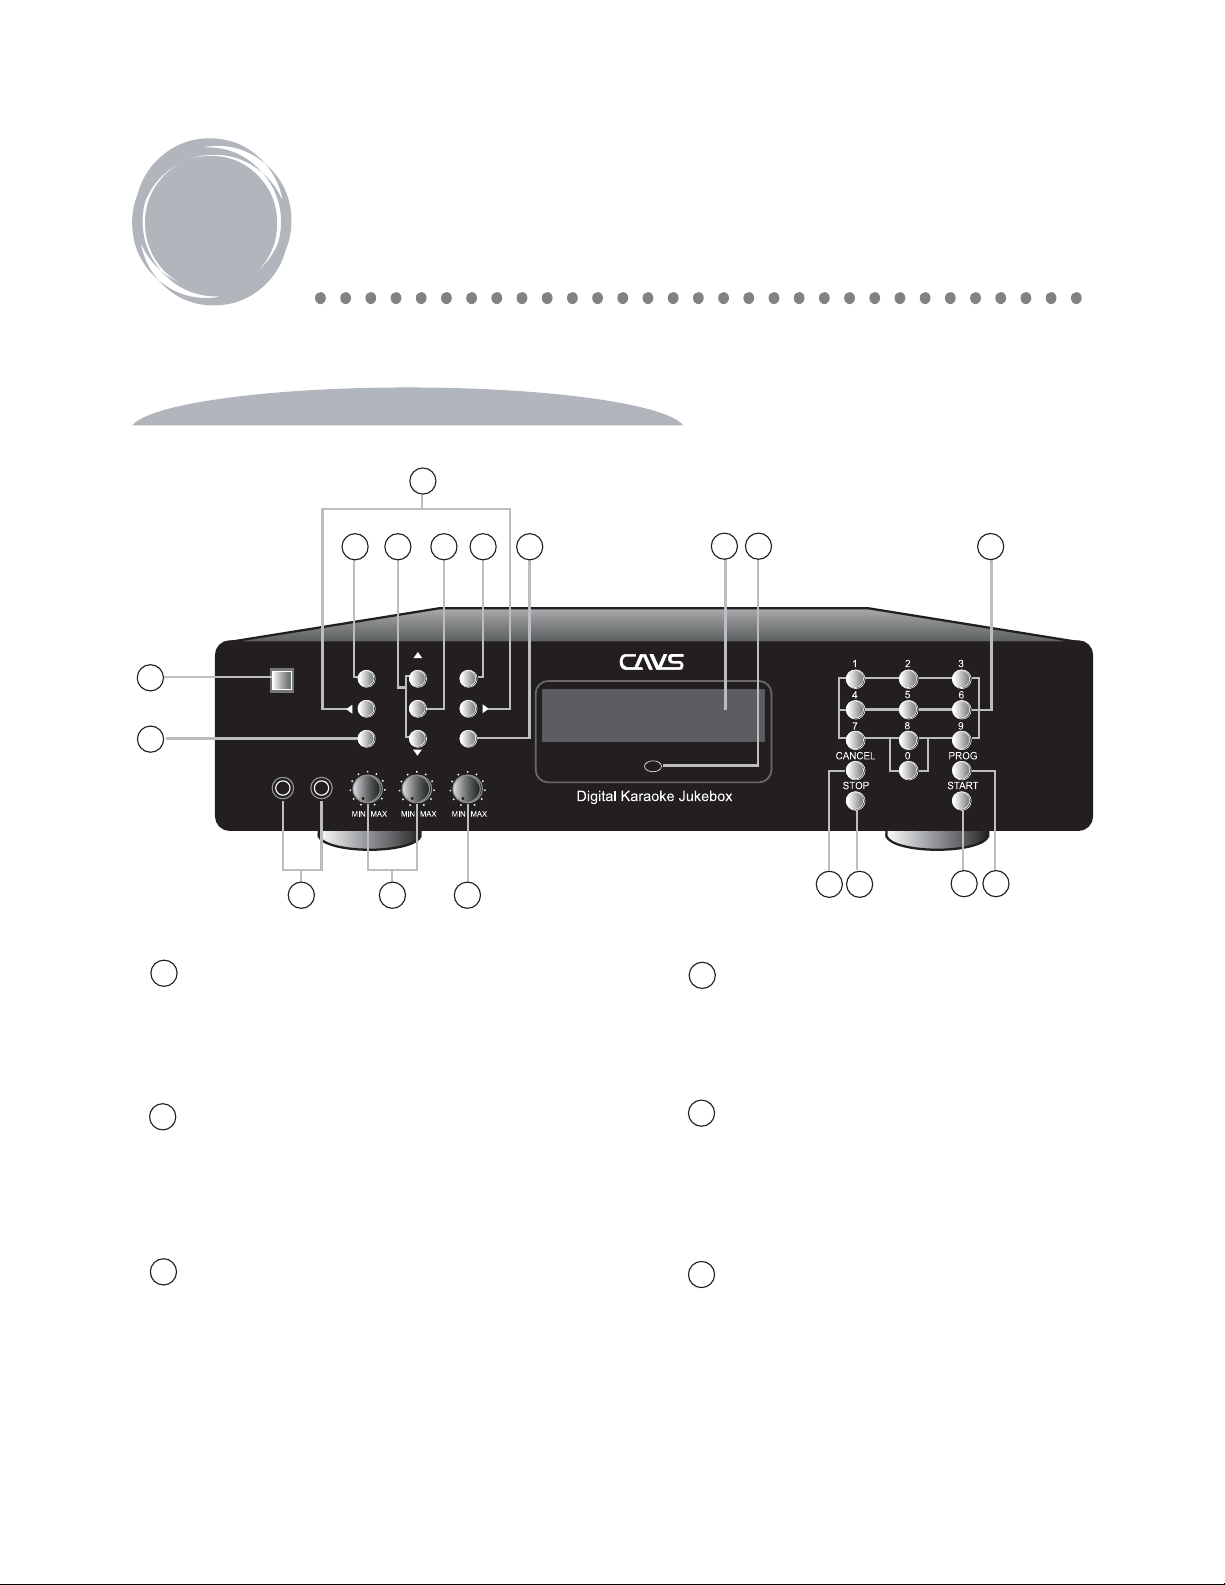
CONTROLS AND FUNCTIONS
FRONT PANEL
8
6 79115
POWER
1
10
1
POWER Button
MIC.1 MIC. 2 MIC.1 MIC. 2 ECHO
JB/CD TEMPO UP
KEY
b
TEMPO DOWN
MENU VOCAL
.
.
.
.
.
.
.
.
.
.
.
Turn on / off the unit.
2
MIC 1 and MIC 2 Inputs
1312
BGV
LIST
KEY #
.
.
.
.
.
.
.
.
.
.
.
.
.
.
.
.
.
.
.
.
.
.
432
R
JB-199
15
4
ECHO Control
17
14
1618
Echo control for MIC 1 and MIC 2
microphones.
5
JB/CD Selector
Plug-in jacks for MIC 1 and MIC 2
microphones.
3
MIC 1 and MIC 2 Volume Controls
Volume controls for MIC 1 and MIC 2
microphones.
Select between JUKE (hard drive)
and CD (disc) play mode.
6
Up & Down, Tempo UP & Down
Move up / down, Tempo up / down.
9

CONTROLS AND FUNCTIONS
7
BGV Selector
Turn on / off the background video (BGV).
8
Left & Right, Key Up & Down
Move left / right, Key (pitch) up / down.
9
LIST Selector
Open / close on-screen song list.
10
MENU Selector
Open / close MENU display.
11
VOCAL Selector
14
Numeric Buttons (0 - 9)
Input number of a song, track, or a
menu item.
15
CANCEL Button
Cancel programmed songs.
16
PROG Button
Program up to 99 songs with pre-specified
key and tempo settings.
17
STOP Button
Stop play or return.
18
PLAY Button
10
Select left / right / stereo channels.
12
LCD Display
Display status of song, mode, time, etc.
13
Remote Sensor
Receive infrared signal from the remote
control.
Play a song or select an item.
When playing, press to pause.

REAR PANEL
CONTROLS AND FUNCTIONS
VIDEO OUT
AUDIO OUT
2
VIDEO IN
This device complies with Part 15
of the FCC Rules. Operation is
subject to the following two
conditions; (1) This device may
not cause harmful interference,
and (2) This device must accept
any interference that may cause
undesired operation.
VHS VGA
3
9
MODEL : CAVS JB-199
POWER : AC100-240V~50/60Hz
SERIAL NO. :
MANUFACTURED :
DATE : OCT. 2004
CONTROL
RESET
10
11 13
86
CAUTION
RISK OF ELECTRIC SHOCK
DO NOT OPEN
WARNING : TO REDUCE
CAUTION: TO REDUCE THE RISK OF ELECTRIC
THE RISK OF FIRE OR
SHOCK, DO NOT REMOVE COVER, NO
ELECTRIC SHOCK, DO NOT
USER-SERVICEABLE PARTS INSIDE. REFER
SERVICING TO QUALIFIED SERVICE PERSONNEL.
EXPOSE THIS APPLIANCE TO
RAIN OR MOISTURE.
MOUSE
USB
LAN
KEYBOARD
45712
1
AUDIO Output Terminals
1
Audio L/R output terminals (1, 2).
CUPMKC-000001
MADE IN USA
BILL / COIN
4
KEYBOARD Connector
Connector for PC keyboard.
14
2
VIDEO Output Terminals
Composite video output terminals (1, 2).
3
VHS Output Terminal
S-video output terminal (if available
in your TV) for higher video quality.
5
VIDEO IN Input Terminal
Connect to external video source
(For use in upgrade).
6
MOUSE Connector
Connector for PC mouse.
11

CONTROLS AND FUNCTIONS
7
USB 2.0 Connectors
Connector for external disc drive,
hard drive, camera, etc.
8
LAN (100/10 Mbps) Connector
Connector for 100/10 Mbps LAN cable
9
VGA Connector
Connector for PC monitor.
10
RESET Button
Restart JB-199.
11
CONTROL Terminal
Audio / video signal control output
terminal.
12
BILL / COIN Connector
Connector for bill, coin, or card acceptor.
13
POWER Selector
Select power input between 110V/60Hz
and 230V/50Hz.
14
POWER Cord Plug
Plug for power cord.
12
CONTROLS AND FUNCTIONS
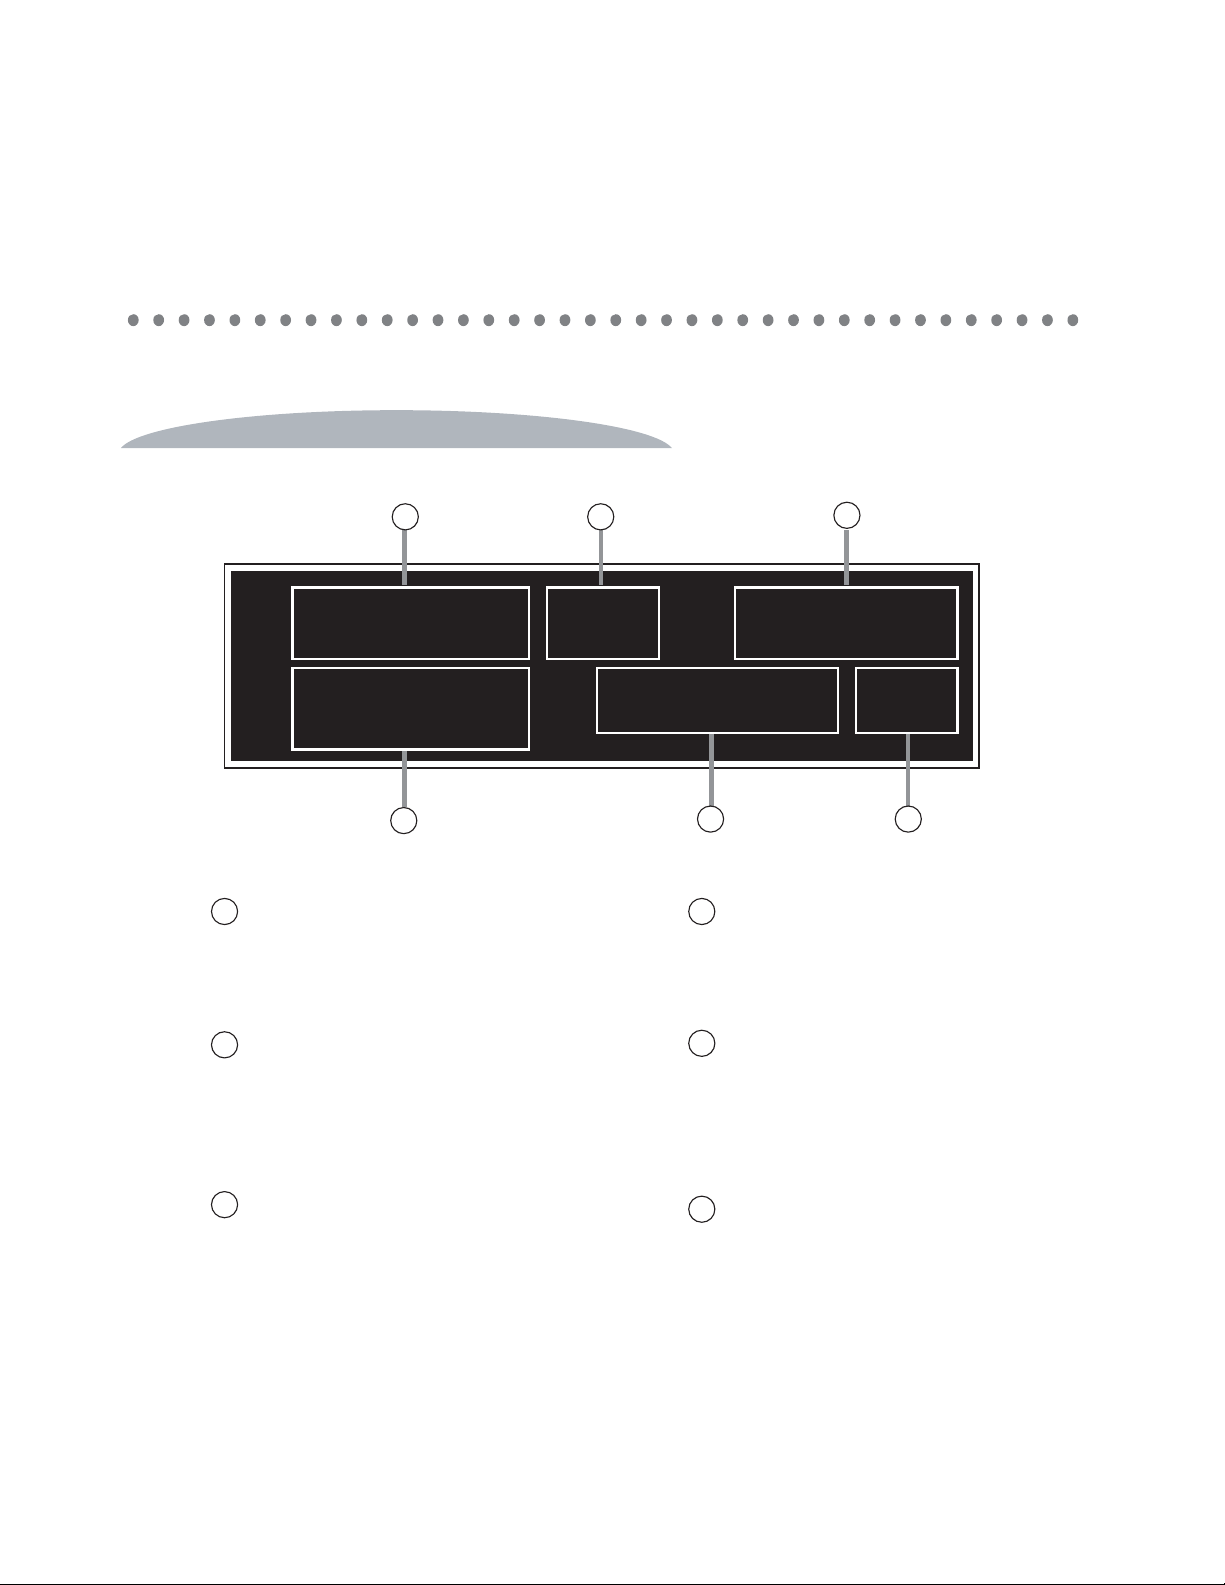
LCD DISPLAY PANEL
12
>03456
Stop 00000 ??
4
1
SONG IN PLAY
Display song number in play.
2
AVAILABLE CREDIT
Credit remaining for bill, coin, or card
acceptor.
--
*
3
00 00
5 6
4
STATUS
Display Stop, Play or Pause.
5
SONG IN SELECTION
Display song number being selected.
:
3
TIME
Display elapsed or remaining time.
6
SELECTION STATUS
Display selection result.
13
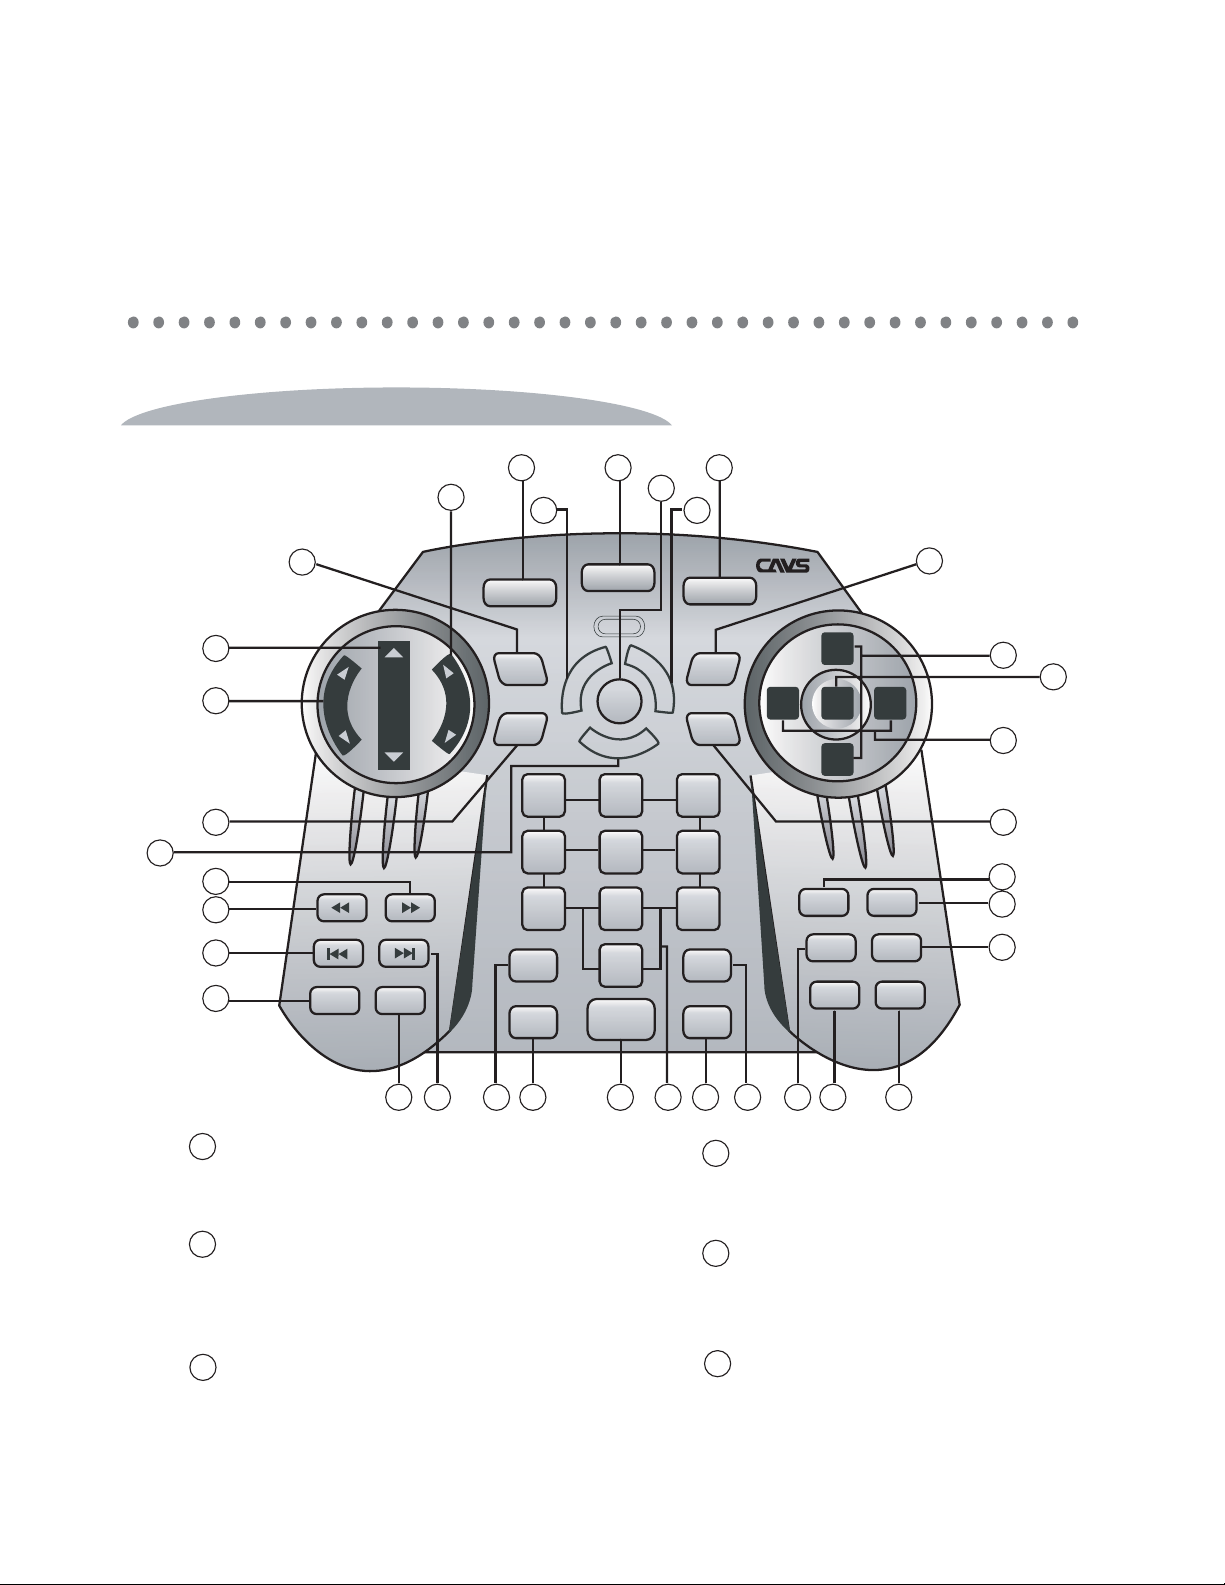
CONTROLS AND FUNCTIONS
REMOTE CONTROLLER
12 3
6
11
109
12
5
4
8
20
19
21
23
7
KEY
INFO TITLE
VOL
VOL
MUTE
SET UP MENU
TEMP
TIME LIST
POWER
D
R
O
C
E
R
F
A
JB/CD
N
F
123
4
56
789
CANCEL
STOP
0
PLAY
Open/Close
C
L
E
A
R
LEFT
E
R
A
BGV
PROG
PAUSE
18 29 32 34 35
282224 26 2725
RANDOM
REPEAT VOCAL
UP
SELECT
DOWN
RIGHT
ENTER
PPgm
13
15
16
17
14
30
31
33
14
1
MUTE
Mute on / off master music volume.
2
POWER
Power off the player. To power on, press
the POWER button on the front panel.
3
OPEN/CLOSE
Open / close disc drive (Disc Mode only)..
4
KEY Control
Raise / lower key (pitch) level.
5
VOLUME CONTROL
Raise / lower master music volume.
6
TEMPO Control
Raise / lower tempo (speed) level.

CONTROLS AND FUNCTIONS
7
SETUP Button
Peripheral device control
(disabled for stand alone JB-199).
8
TIME Button
Select elapsed or remaining time.
9
RECORD Button
Press to start / stop recording.
10
CLEAR Button
Press to delete the last recorded track.
11
JB/CD Button
Select JUKE (hard drive) or CD
(disc) for song selection.
16
SELECT Button
Press to select.
17
LEFT / RIGHT Buttons
Press to select / return.
18
NUMERIC Buttons
Input number of a song, title, or menu item.
19
FAST BACKWARD
Move fast backward during play.
20
FAST FORWARD
Move fast forward during play.
12
FANFARE Button
Select a fanfare. Press PLAY to play.
13
MENU Button
Display MENU screen. Press again
to close.
14
LIST Button
Display on-screen song list. Press
again to close.
15
UP / DOWN Buttons
Move cursor up / down.
21
PREVIOUS
Go to previous song.
22
NEXT
Go to next song.
23
INFO
Display SYSTEM STATUS window.
Press again to close.
24
TITLE
Display TIME information window.
Press again to close.
15

CONTROLS AND FUNCTIONS
25
CANCEL
Press to cancel programmed songs.
26
STOP
Press to stop / return.
27
PLAY
Press to play. Press again to pause.
28
PROG
Press to program a song.
29
PAUSE
Press to pause. Press again to play.
33
PPGM
Press to priority-program a song in front
of the program queue.
34
REPEAT
Press to select REPEAT ONE / ALL / OFF.
35
VOCAL (Voice Cancel)
Press to select L / R/ Stereo channels.
16
30
BGV
Press to select background video from
Off / Internal video / Still images / USB camera.
31
ENTER
Press to select.
32
RANDOM
Select on / off to play a song in random.
5
USING REMOTE CONTROLLER
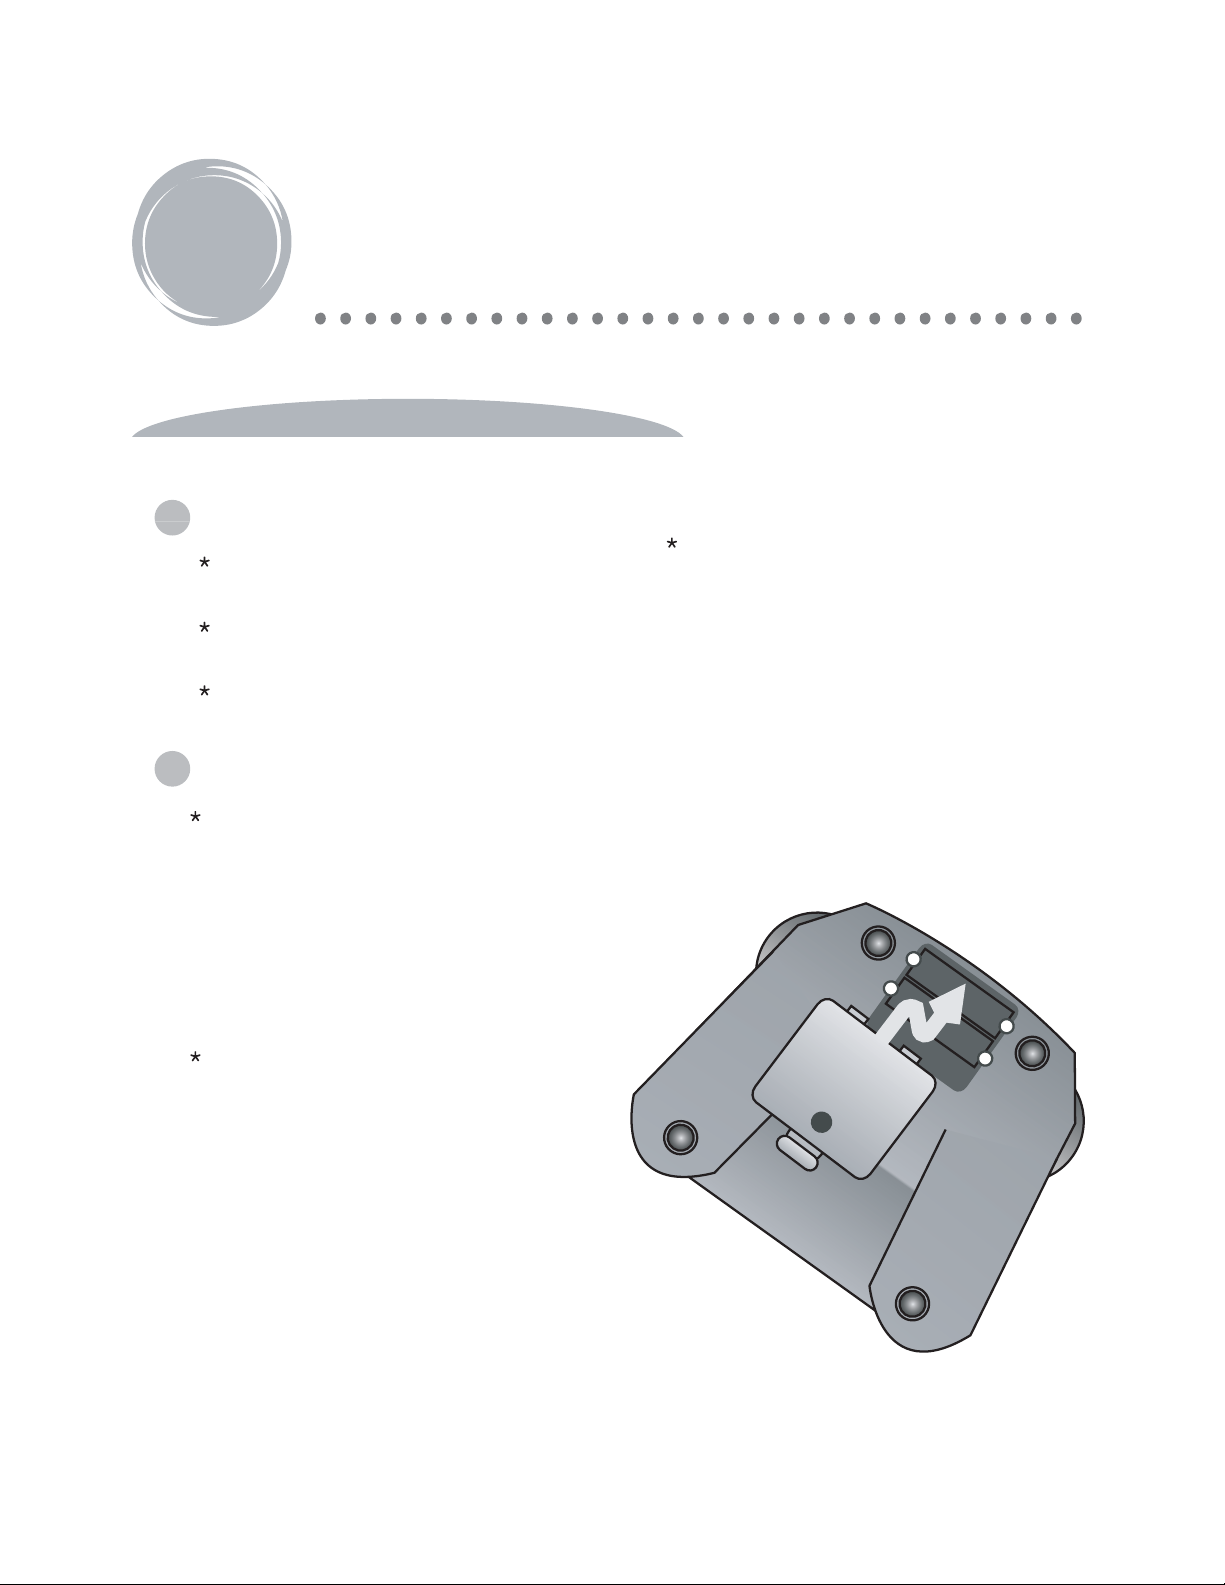
BATTERY
How to load the batteries
Open the bottom cover of the remote
controller.
Load two batteries (1.5V) of "AA"
size with +/- polarities as specified.
Close the bottom cover.
Precautions in using batteries
When handling batteries
1. Do not over charge, heat,
disassemble or short-circuit the
batteries.
2. For long term storage, take out the
batteries from remote controller as
the batteries may leak electrolytic
liquid which can damage the
When changing batteries
1. Check the +/- polarities of the
batteries to be as specified on the
case of remote controller.
2. Do not mix the types of two
batteries even though they are of
same size.
When using a battery charger
Use the battery charger only after
checking carefully its charging time
and voltage.
(Use only direct voltage of 2.4V to
3.6V for both batteries combined.)
controller.
+
-
-
+
17
 Loading...