

Page 1
UK
Commercial reference: 5101-003
Developed by CAVIUS
PLEASE READ THE USER GUIDE
CAREFULLY BEFORE USE AND
RETAIN FOR FUTURE USE!
Please note: The product label must not be
removed as it contains important information
regarding the product.
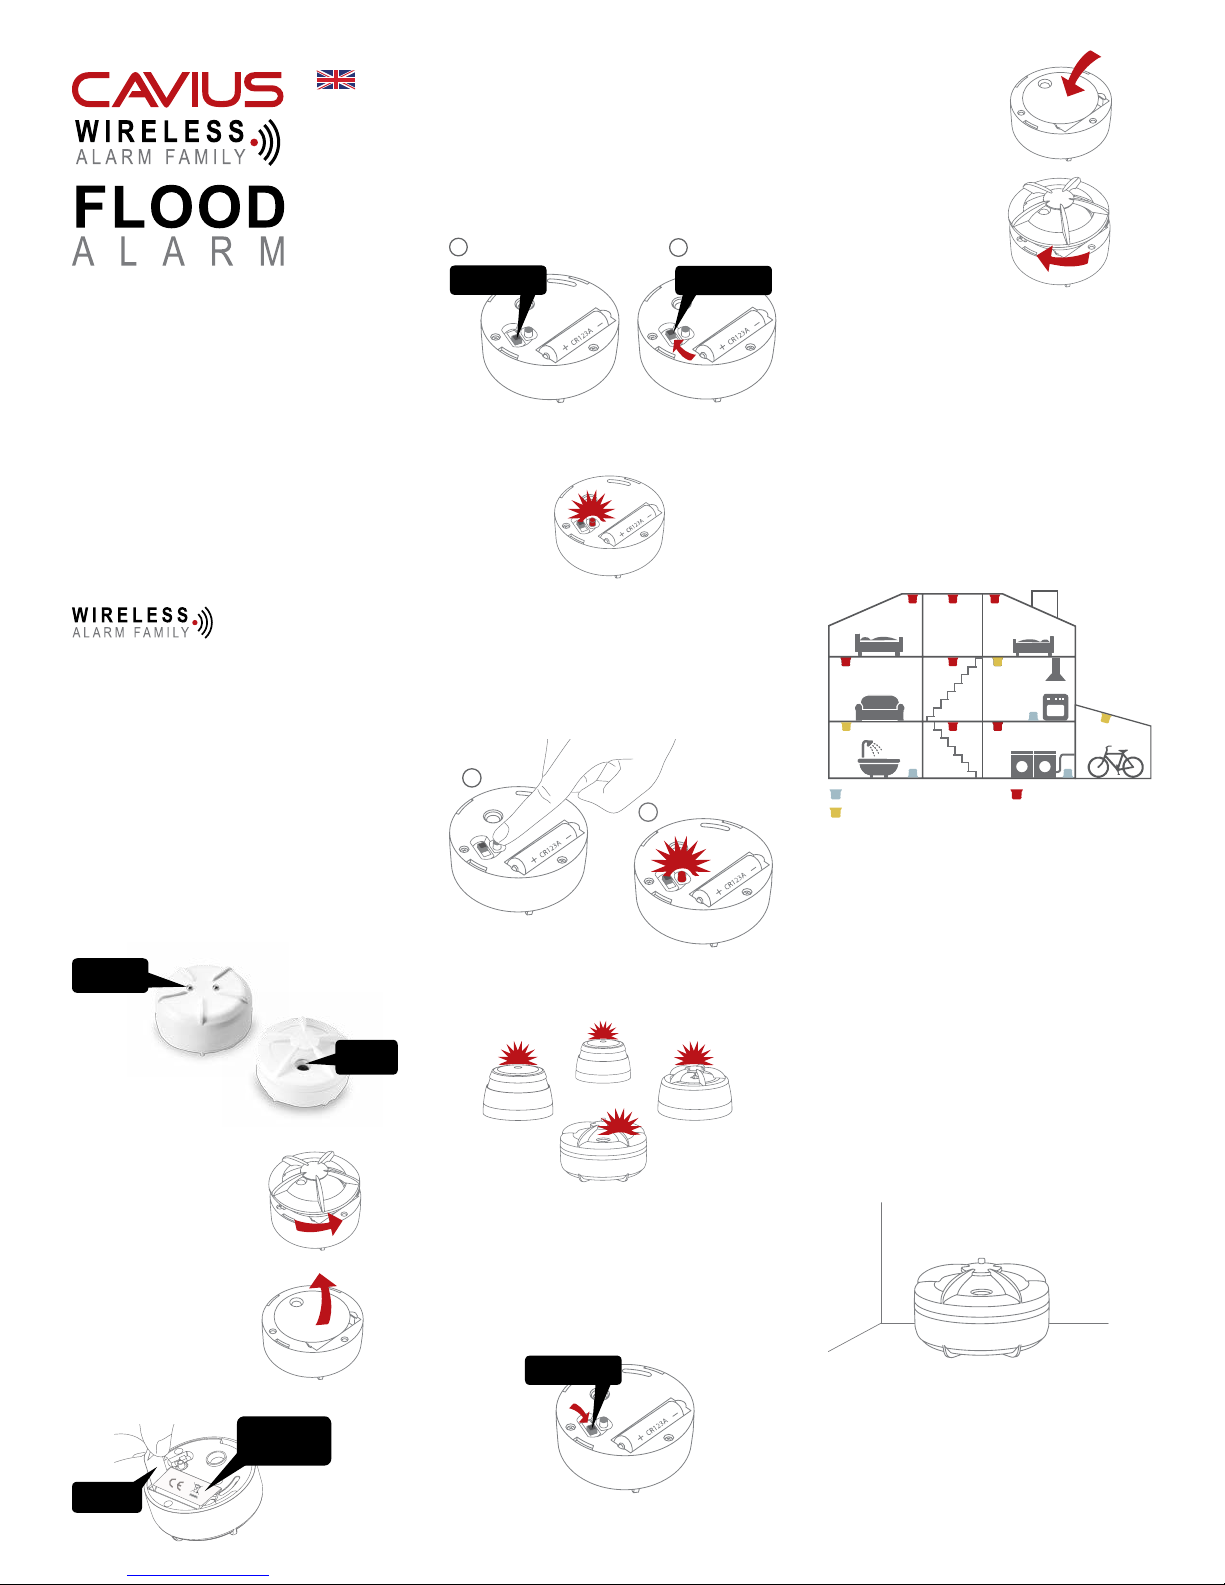
All alarms that need to be connected in the
house should be put into ‘Learn Mode’ by sliding
the switch on the top of the alarm to the ‘Learn
mode’ position.
1
NORMAL MODE
2
LEARN MODE
5. Remount the Test
button / Lid.
6. Close the ood alarm
top cover by twisting
clockwise.
2. THE BEST AREAS TO INSTALL THE
FLOOD ALARM:
• Install a ood alarm where it is hard to discover
possible leaks.
The Flood Alarm is designed to detect a leak of
water from washing machines, water pipes or
under-sink cabinets. It can also be used to detect
ooded basements.
TECHNICAL INFORMATION:
The maximum number of alarms that can be interlinked within a house group is 32.
Please note: These must be alarms from the CAVIUS
The distance between interlinked alarms depends on
the house layout and they should always be tested
after installation. It is not advised to get more than
10m distance between two alarms.
Diameter: 60mm. Height: 37mm.
The alarm is powered by a replaceable 3v CR123A
lithium battery. Please note that correct operation of
the ood alarm device is ensured by use of one of
the following batteries: DURACELL, PANASONIC or
HUIDERUI.
Interlinked by RF: 868 MHz.
Complies to standards: RoHS, REACH, R&TTE
(EN300-220-1 and 2), EMC directive 2004/108/EC.
SENSOR
PINS
SOUND
The red LED will light up to indicate that ‘Learn
Mode’ has been selected.
Do not take out the battery during ‘Learn Mode’ as
this will interrupt the learn process.
Press and hold the test button at one alarm only,
until it beeps and the LED ashes. This alarm will
become the master and will start sending out a
specic house code to the other alarms.
1
2
As the other alarms receive the specic house
code, they will also ash the LED light.
• Install next to washing machine, dishwasher,
uder-sink cabinet or in the cellar.
• Install in basements.
Place the alarm where it is reachable in order
to test the battery.
Minimum ood alarms Minimum smoke alarms
Minimum heat alarms
3. AREAS WHERE NOT TO INSTALL FLOOD
ALARMS:
• On the ceiling.
• On the wall (unless using accessory wall
mounting base, see section 5).
• In rooms where temperature goes outside
0°C to 40°C.
Place the alarm where it is reachable in order
to test the battery.
1. HOW TO SET UP AND CONNECT ALARMS:
1. Open the ood alarm top
cover by twisting counter
clockwise.
2. Remove the Test button / Lid
to accessto the battery and
the RF learn slide switch.
3. Start by pulling out the battery isolation strip as
shown.
ISOLATION
STRIP
DO NOT
REMOVE THE
PRODUCT LABEL
4. PLACEMENT:
The ood alarm is designed to be placed on the
oor near to possible leaks.
When all alarms flash the red LED, they are
connected and can be switched out of ‘Learn
Mode’ and installed.
4. Switch out of ‘Learn Mode’ by sliding the switch
on the top of the alarm to the ‘Normal mode’ position.
NORMAL MODE
NOTE: If you place the ood alarm in places
where a potential water leak / ood can rise higher
than 2cm, there is a risk of your ood alarm beeing
damaged. In these places we recommend wall
mounting base with probe.
Page 2
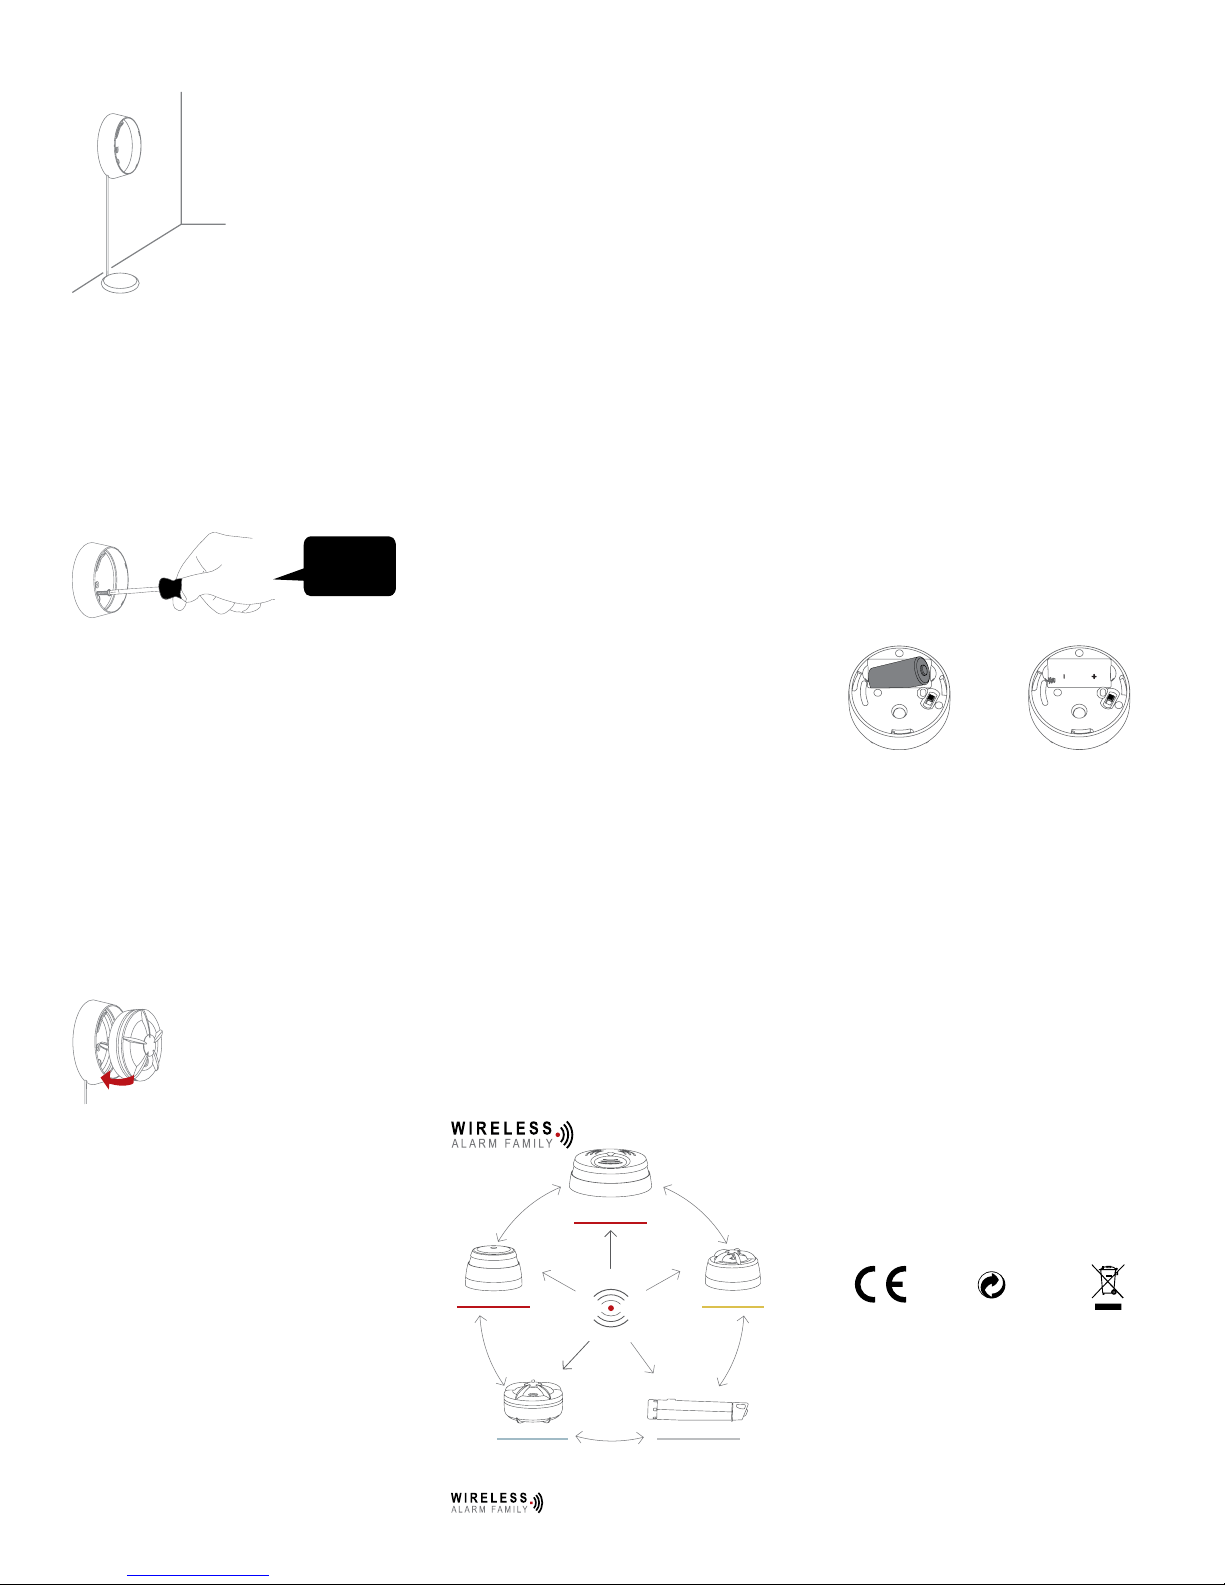
5. ACCESSORY WALL MOUNTING BASE WITH
PROBE:
NOTE: The wall mounting base with probe is an
accessory option for the ood alarm. It must be
purchased separately.
For installation in basements with risk of ooding
or areas with difcult accessibility.
Installation with screws and plugs:
Place the ood alarm base on the wall and the
probe on the oor.
Make sure that the probe reaches required level
either to the ground or down the drain.
USE THE
ENCLOSED
SCREWS AND
PLUGS
Installation with adhesive tape:
1. Choose a suitable spot. Make sure that the
mounting area is stable, dry and free of dust and
grease. Check that the surface is flat. Once
assembled the Mounting base cannot be removed
or repositioned.
2. Attach the alarm into the socket. Make sure that
the alarm has been tted into the socket properly be-
fore you start sticking it to the wall.
3. Remove the protective Foil from the adhesive tape.
4. Mount the socket with the attached alarm to the
wall by applying light pressure.
5. Test the alarm according to the users guide of your
alarm.
Note: When attached or detaching the alarm from
the socket always make sure to secure the socket by
holding onto the socket.
Turn the alarm until it clicks all the
way in and can’t be turned - then
it is correct position.
6. TEST FUNCTION:
After installation, and at least once per quarter,
test all of your alarms to ensure they are operating correctly and are within range of each
other.
It is recommended to check visually every week if
the LED ashes correctly (every 48sec.).
Press the test button on any alarm for 2 sweeps of
alarm signal 1 (--- --- ---) - Please refer to section 8.
This will send out a test signal from the alarm; all other
connected alarms should receive the signal within a
short time. The alarms will emit a short beep and the
LED will ash every 8 seconds for 2 minutes.
NOTE: Test function also allows to send a depleted
RF signal to ensure an optimal operation in normal
conditions.
When the test signal is sent out, the alarms will
respond by:
A single beep every 8 seconds to indicate that the
alarms are connected and functioning.
If required this indication can be stopped early on
each alarm by a short press of the test button.
TIP: It is safe to cover the sound output hole with
your nger during the testing to minimize the
sound level emitted.
Test of the water leak function:
To test the water leak function, place the ood
alarm on a wet cloth and it should go into alarm.
7. NORMAL MODE:
In normal mode the LED will ash every 48 seconds
to show correct operation.
8. ALARM MODE:
Flood alarm condition is indicated by a series of
repeated tones.
The ood alarm will also transmit the alarm signal to
the other connected alarms, which will also sound
the alarm signal after a short delay.
The CAVIUS Wireless Family have two different
alarm signals:
Alarm signal 1 (--- --- ---) is life threatening
alarms, like a smoke alarm.
Alarm signal 2 (- - -) is a non life threatening
alarm, like a ooding alarm.
Smoke alarm signal: --- --- --Heat alarm signal: --- --- --Flood alarm signal: - - CO alarm low level signal: - - CO alarm high level signal: --- --- ---
Please note that only the originating alarm’s LED
will ash, so it can be identied.
9. PAUSE/HUSH FUNCTION:
Flood alarm can be paused for 10 minutes by
pressing the test button on the originating alarm
only (indicated by the ashing LED, and after 10
minutes goes back to normal function).
The reason that you can not pause the other alarms,
only the originating alarm, is for your own safety. It is
necessary to locate the source of the alarm to make
sure that it is not a situation that needs your attention.
10. ADD EXTRA DEVICE:
MAINS POWERED
SMOKE ALARM
SMOKE ALARM
FLOOD ALARM
HEAT ALARM
SMART REMOTE
All CAVIUS interconnected alarms within the
can be added to the system as
they run on the same frequency and use the same
data protocol. This means that the wireless system
can consist of a combination of smoke, heat, ood etc.
Place all alarms into ‘Learn Mode’ and repeat sectio n 1.
Always test connection to all devices by repeating
test function section 6 after adding devices.
11. LOW BATTERY SIGNAL:
Your product has a 5Y battery life.
When the battery is starting its end of life, a short
beep will sound out every 48 seconds for 30 days.
The alarm effected by the low battery will only beep,
no other connected alarms will sound.
It is safe to change batteries in the alarms without
going through the learn process again – they will
not forget the codes during the battery change
process.
12. BATTERY REPLACEMENT:
To replace the battery, detach the cover of the ood
alarm by twisting counterclockwise.
Replace the battery respecting the polarities.
Put the test button back, close the casing by
twisting it clockwise, and test the alarm.
13. TROUBLE SHOOTING:
In case of bad or weak signal, change the location
of the ood alarm.
If the ood alarm does not work when the test
button is pushed or tested on a damp cloth, the
probable cause is a faulty battery. Check if the
battery is worn out or wet and replace it. Always
test the alarm after replacement of battery.
If the problem continues, please visit www.cavius.
com for any trouble shooting.
14. OTHER INFORMATION:
Do not paint the alarm.
Note the local country regulations regarding
installation.
Disposal: For battery and product, please dispose
properly at the end of life. This is electronic waste
which should be recycled.
The CE mark afxed to this product conrms its compliance with the European Directives which apply to the
product.
All Rights reserved: CAVIUS Aps assumes no responsibility for any errors, which may appear in this manual.
Furthermore, CAVIUS Aps reserves the right to alter
the hardware, software, and/or specications detailed
herein at any time without notice, and CAVIUS Aps does
not make any commitment to update the information contained herein. All thetrademarks listed herein are owned
by their respective owners. Copyright © CAVIUS Aps.
Developed by CAVIUS Aps Julsøvej 16, DK-8600
Manufactured in P.R.C.
126849 rev1
 Loading...