

Page 1

PLEASE READ THIS USER GUIDE CAREFULLY
Page 2
PLEASE READ THE USER
GUIDE CAREFULLY BEFORE
INSTALLATION AND RETAIN
FOR FUTURE USE.
Cavius DIY Heat Alarm
Model 3002-TK001
Manufactured by CAVIUS
For large text option and maintenance guide visit
www.cavius.co.nz/downloads
www.cavius.com.au/downloads
1.
Page 3
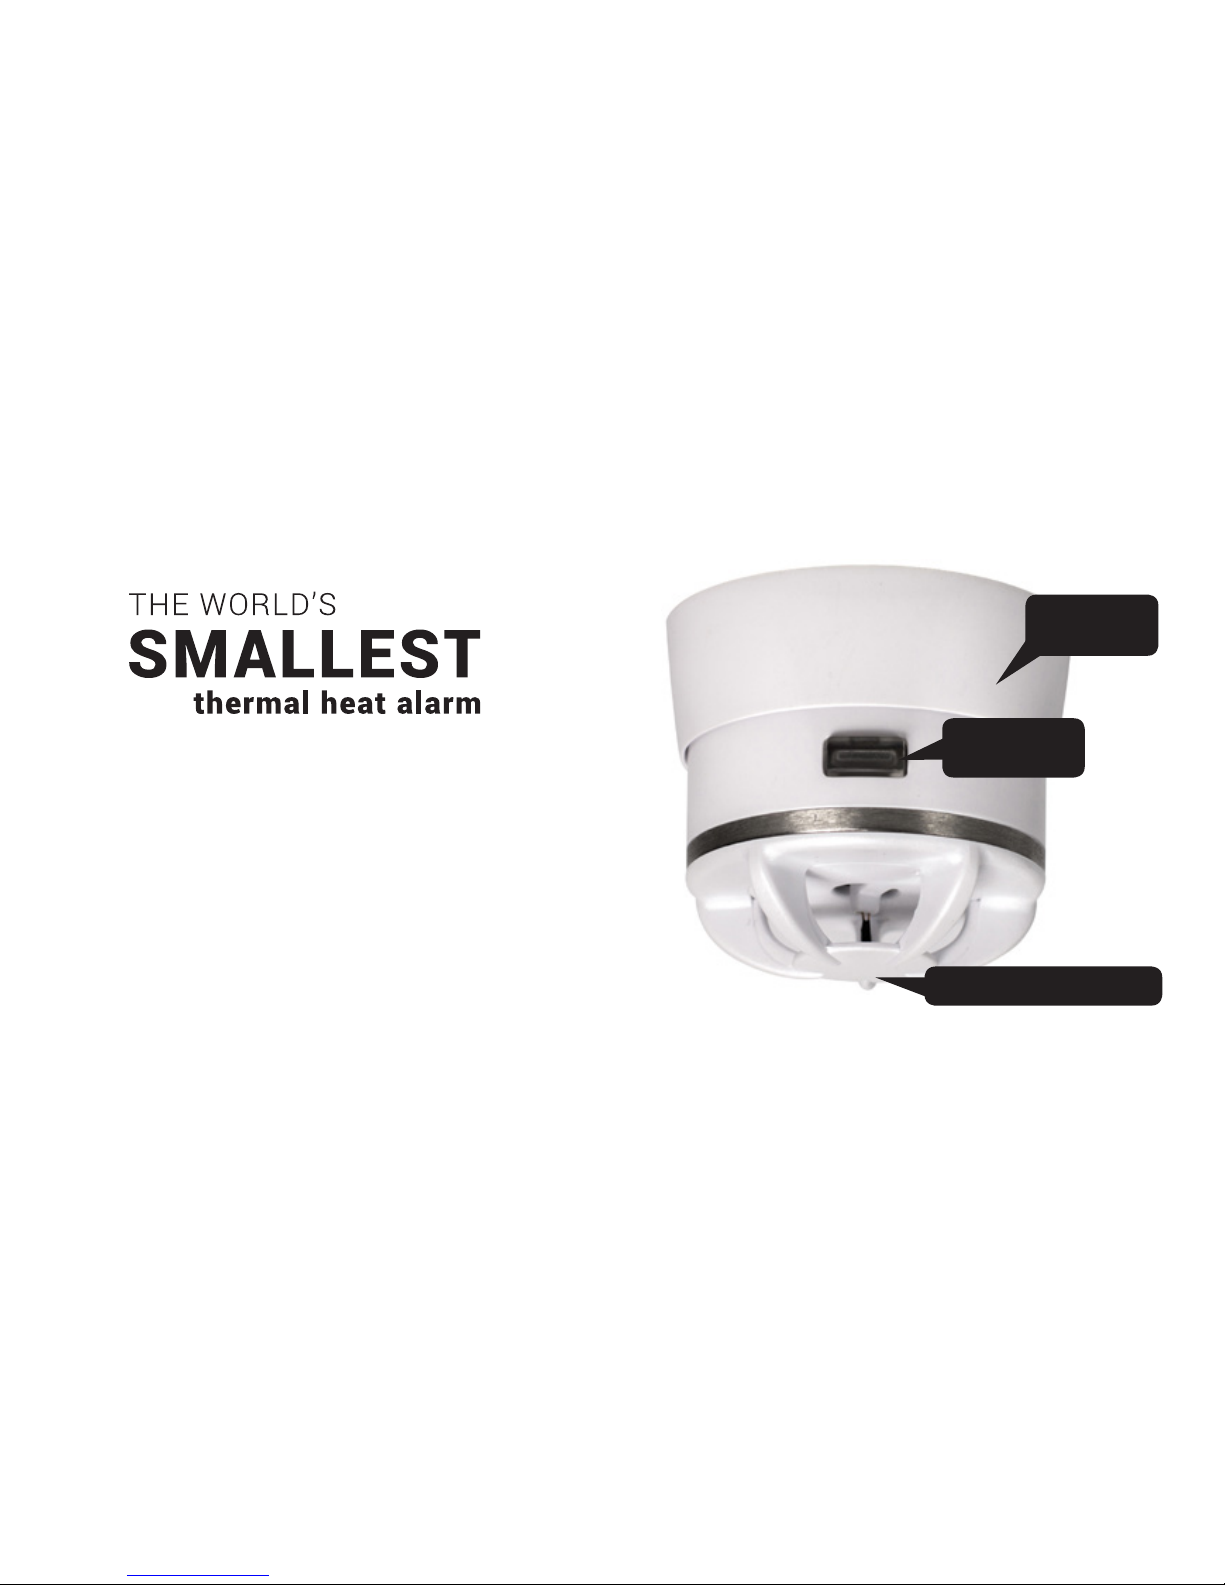
The CAVIUS Thermal Heat Alarm is designed for areas
where a re will be more ame and heat than smoke;
areas such as kitchens, garages, laundries and
workshops. This device is activated when it senses a
rapid increase in room temperature.
Tested to comply to the standard of system
heat alarms EN54-5 class A1/R.
TEST/ HUSH
BUTTON
MOUNTING
BASE
ALARM AUDIBLE ALERT
2. 3.
Page 4
The best locations in your home to install
the heat alarm:
•
Kitchen area
•
Living room with wooden stove burner
•
Garage area
•
Washing and drying area.
Additional heat alarms will increase the security.
The NZ and Australian Fire Services recommend heat
and smoke alarms in every bedroom, hallway and
living area for early re detection.
Installation of heat alarm:
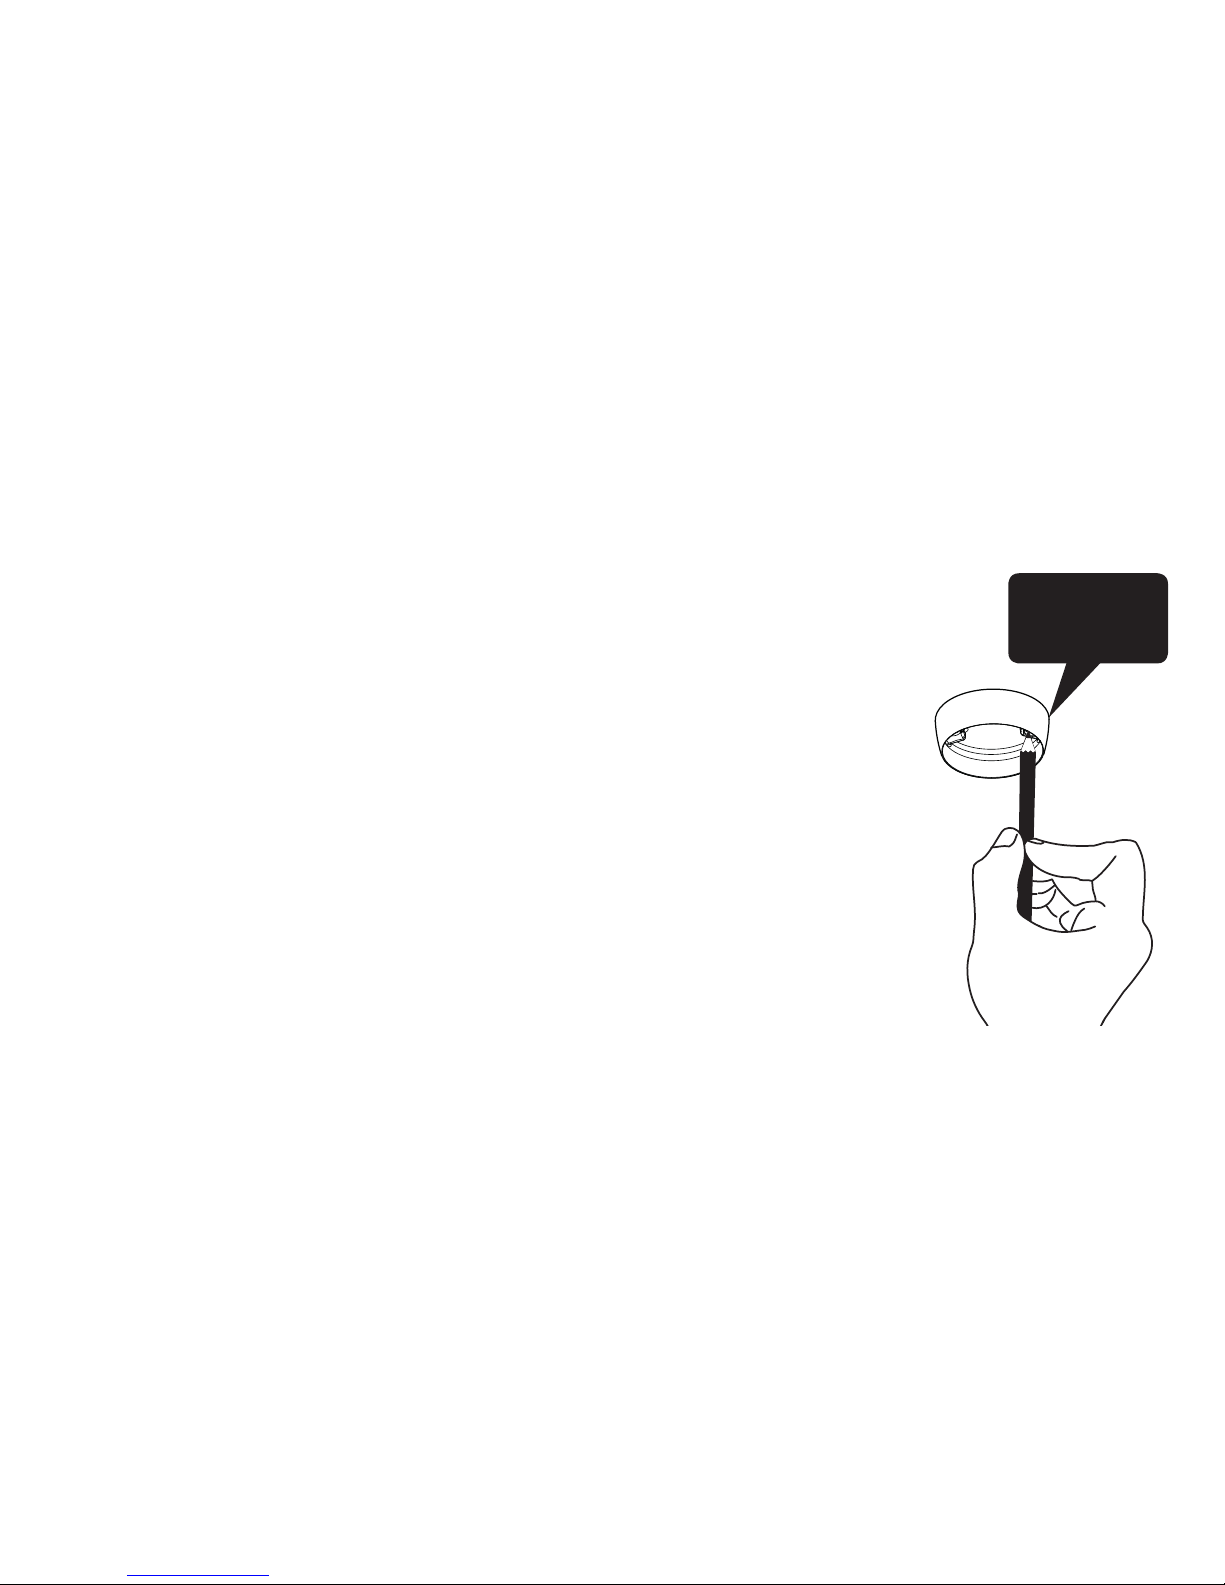
Info: The label in the product
must not be removed due
to important information
regarding the product.
1. The heat alarm is
not in the mounting
base when purchased.
Use the mounting base ring
to mark the screw holes on
the ceiling. Use the
enclosed screws and
plugs for installing the
mounting base.
MARK UP
SCREW HOLES
WITH A PEN
4. 5.
Page 5
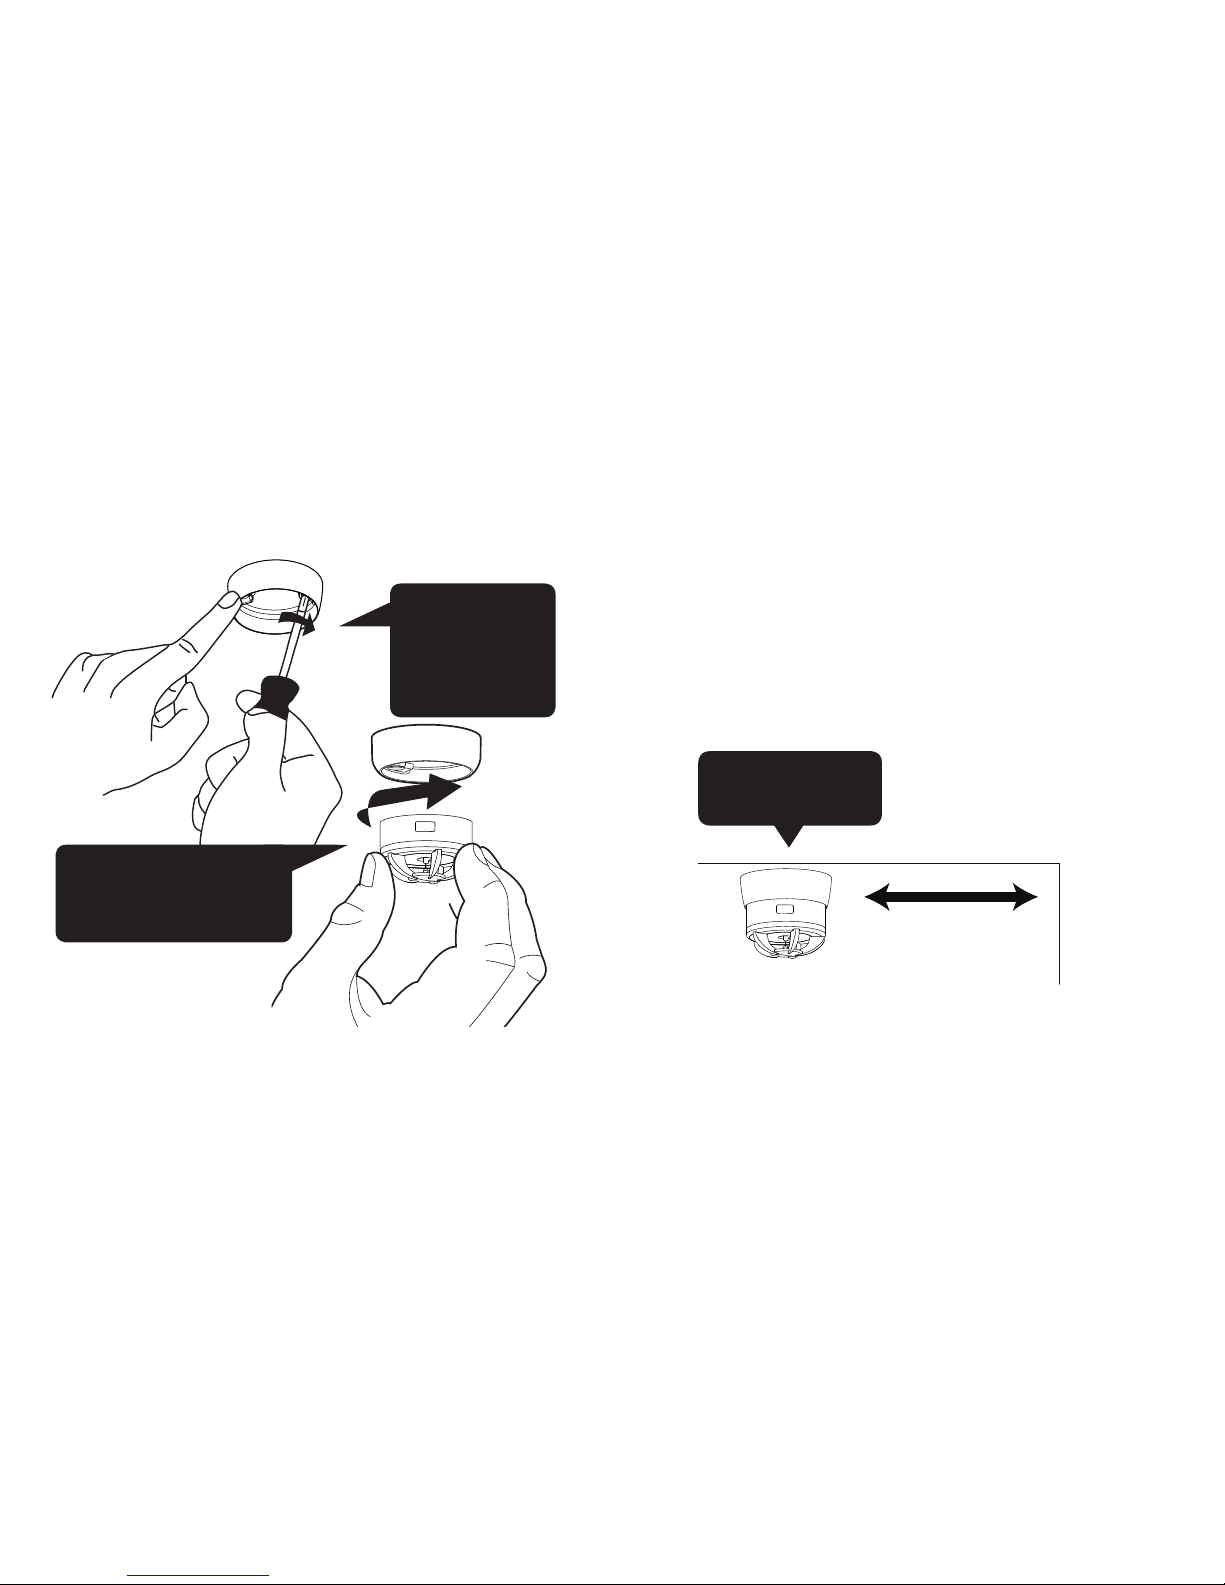
USE THE
ENCLOSED
SCREWS AND
PLUGS FOR
INSTALLATION
CLICK THE HEAT ALARM
FIRMLY INTO THE BASE
TO ACTIVATE
Placement: Designed for placement on the ceiling
in the centre of the room it is fitted in. Never install
directly above the oven/hob/stove. The heat alarm
should be a minimum 50 cm from the wall.
CEILING
WALL
50cm
MINIMUM 50cm
FROM WALL
6. 7.
Page 6
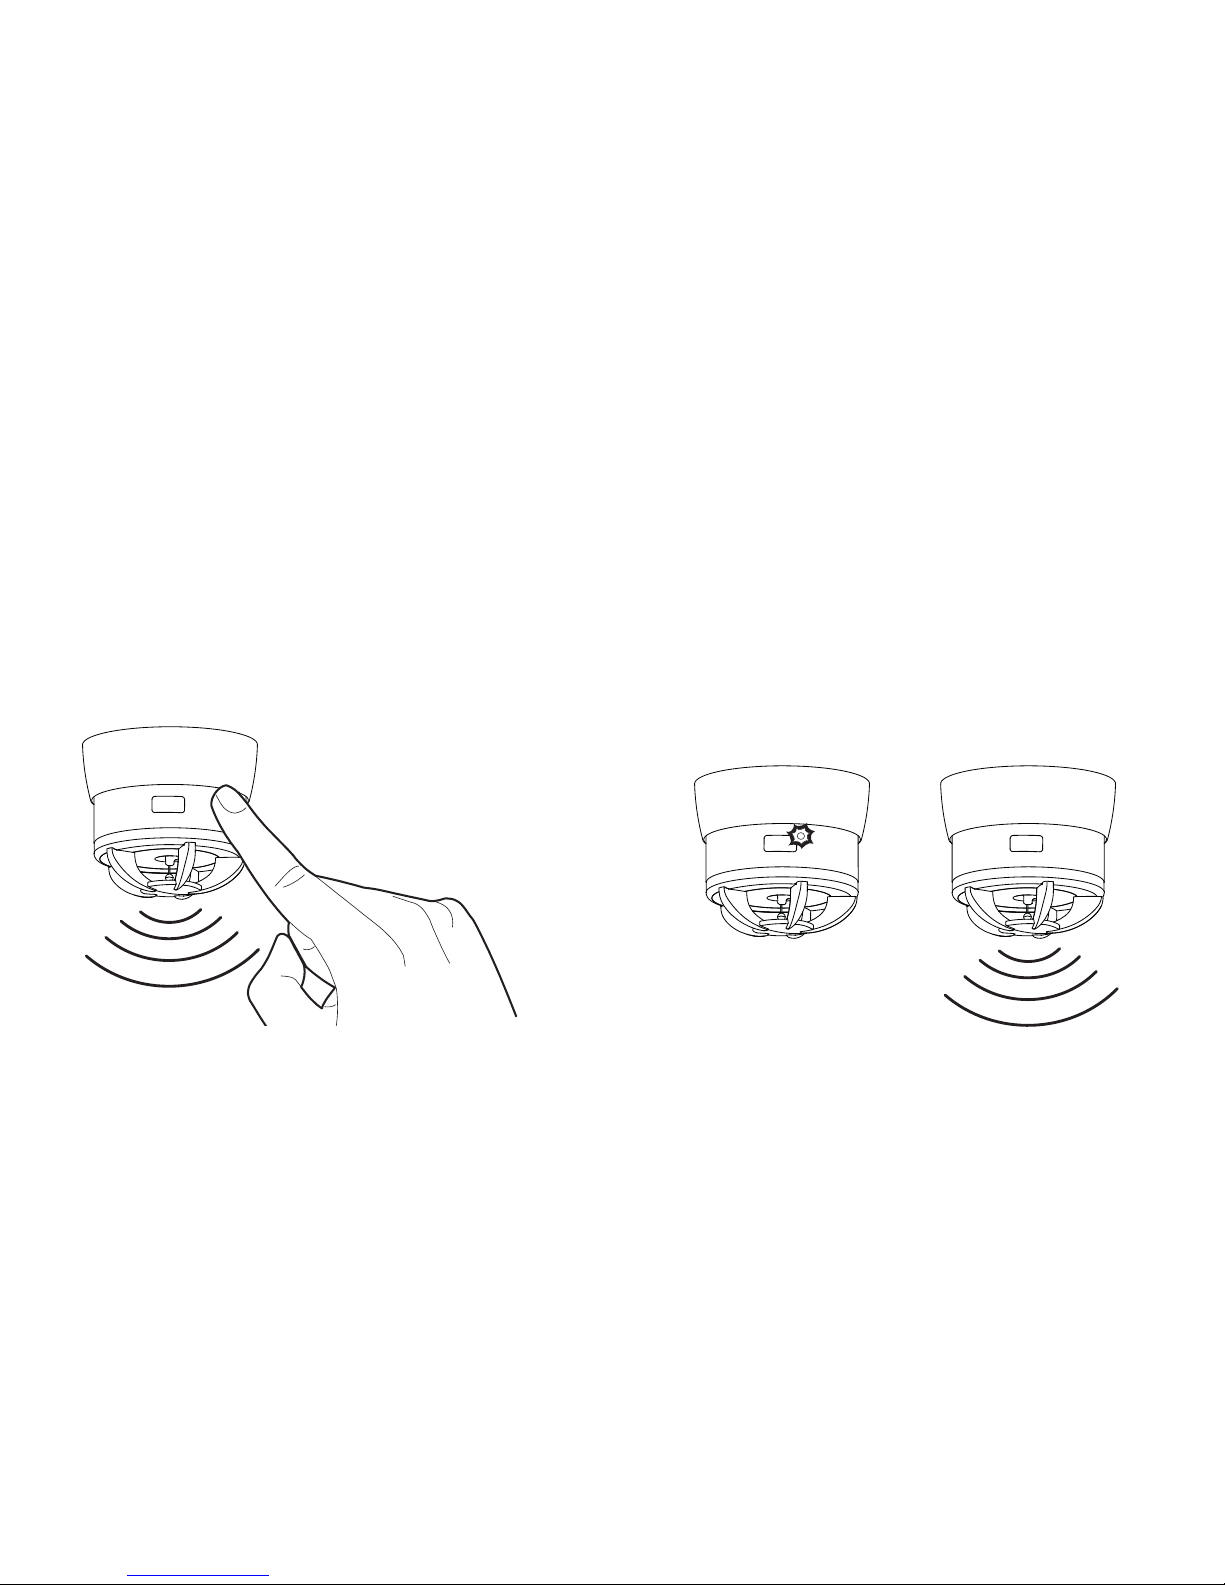
2. Mount the heat alarm to the base by using the
smart clip-on-ceiling mechanism. After mounting,
test the heat alarm by pushing the test button on
the side and get an alarm signal.
Heat alarm signal: The heat alarms have
a visual and acoustic signal. In the passive state,
the LED will flash every 48 seconds to indicate
normal function. In alarming state the LED will flash
and the alarm will emit a sweeping sound pattern
designed to alert occupants.
8. 9.
Page 7
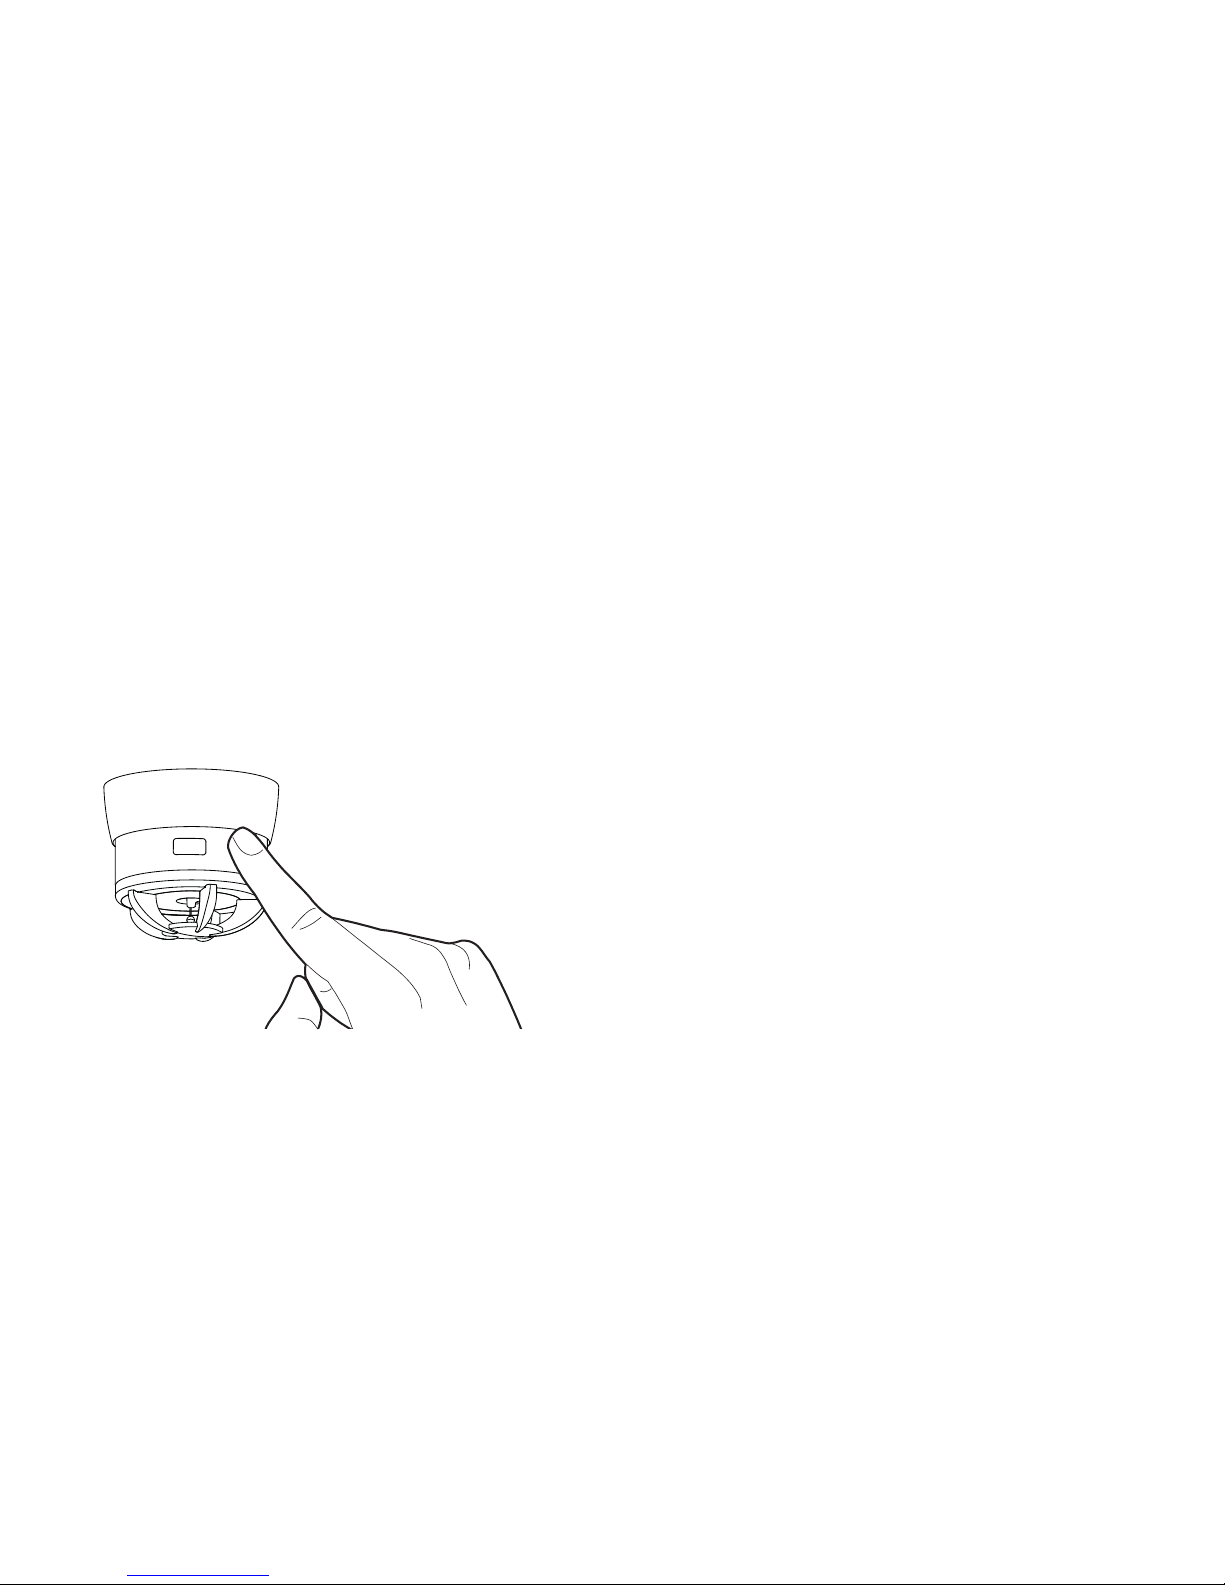
Hush function: In case of unintentional or false
alarms, hold the side hush button for 2 seconds.
This will mute the alarm for 10 minutes, after
which time the alarm will automatically resume
its normal function.
Maintenance: Test the heat alarm once per month
by pushing the side test button. The heat alarm
should produce a loud alarm tone.
Place the heat alarm where it is reachable in order to
test the battery and complete maintenance.
Disposal: For battery and product, please dispose
properly at end of life. This is electronic waste
that should be recycled.
Other information: Do not paint the heat alarm.
If the heat alarm does not work when the test button
is pushed, please check our Trouble Shooting Guides
at: www.cavius.co.nz and www.cavius.com.au
10. 11.
Page 8
Low battery indicator: A short acoustic “beep”
will sound and the LED will flash every 48 seconds
when the battery is near the end of its life. In this
stage it will continue for minimum 30 days.
You must change the heat alarm after 10 years
usage, or if the heat alarm has suffered any damage.
The heat alarm is not active unless it is inserted in
the mounting base.
Always test the heat alarm after inserting into the
mounting base, allow 5 seconds before testing.
FUNCTIONAL INFORMATION
Type of alarm: Cavius heat alarm detects rapidly
increased temperature level and absolute heat level.
Alarm signal: Heat alarm activation is indicated
by a series of repeated tones. The minimum sounds
level is 85 dB at 3 metres.
Battery: Powered by
a non-replaceable 3v
CR123 A DURACELL
Lithium battery with
10-year life (included).
12. 13.
Page 9

Warranty:
Your CAVIUS heat alarm has a 5 year warranty from the date
of purchase against defect in material and workmanship.
Faulty units during this period can be returned to the
place of purchase. You must provide the proof of purchase
date and such defects will be repaired, or replaced at the
distributors option, without charge. This Warranty only covers
defects in materials or workmanship in normal residential
use and does not cover damage resulting from negligent
handling, misuse or lack of reasonable care. This warranty is
in lieu of any other warranty either expressed or implied.
MANUFACTURED BY:
Aps
Julsøvej 16 - DK8600 Silkeborg
www.cavius.com - [email protected]
Manufactured in P.R.C.
DISTRIBUTOR INFORMATION:
CAVIUS Nano Ltd. 2G Ashley Place, Papamoa,
Bay Of Plenty 3118. P.O Box 11241, Palm Beach Plaza,
Papamoa, Bay Of Plenty 3151, New Zealand.
www.cavius.co.nz
Hotline: 0800 766533 or 07 542 2191
REP ELEC.
Locked Bag 45, Plumpton, NSW 2761, Australia.
www.cavius.com.au - PH: 1300 555 586
EN54-5 CLASS A1/R
Product Number: 3002-TK001
126554 rev1
14. 15.
Page 10
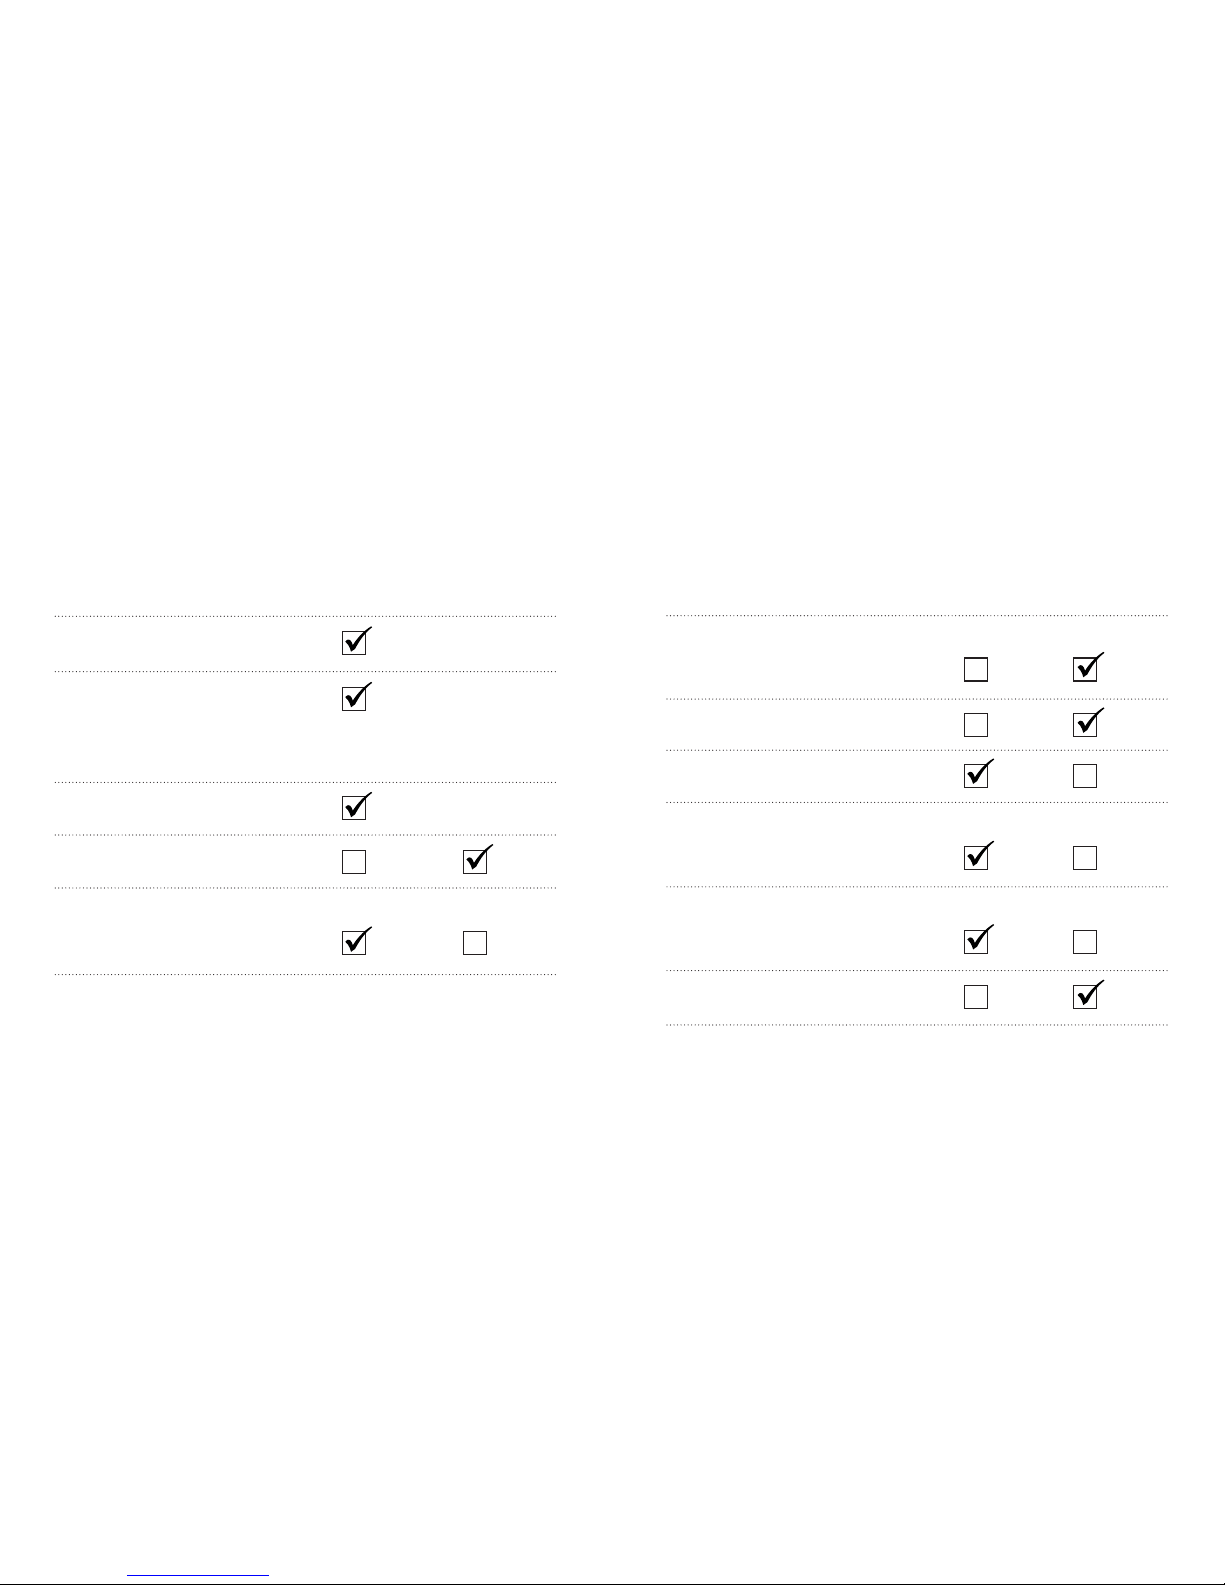
Type of mounting Ceiling only
Main power supply Internal power
source
(battery included)
Battery duration 10 years
Interconnectable device Yes No
Suitable for installation
in mobile home Yes No
Essential certied characteristics:
Connection to external
auxiliary devices Yes No
Radio link Yes No
Individual alarm indicator Yes No
Alarm silence facility
(10min) Yes No
No radioactivity
infrared technology Yes No
Accessibility option Yes No
16. 17.
Page 11
 Loading...