

Cavex Alginate Mixer 3
User manual
Installation – Operation – Troubleshooting
CAVEXYOUR IMPRESSION IS OUR CONCERN
www.cavex.nl

Table of Contents
General information 2
Disclaimer 2
Safety precautions 2
Maintenance 3
Main unit and accessories 4
Installation 5
Panel operations 6
Charger signals 6
Troubleshooting 7
Specifications 8
General information for the user
Congratulations on the purchase of your Cavex Alginate Mixer 3: an automatic mixer
for alginate impression material! Please read this user manual carefully before using
the Cavex Alginate Mixer 3. Its proper use will improve the quality of the mixed
alginate impression material and also increase the mixer’s working life. Keep the
user manual in a safe place and ensure that employees who will be using the Alginate
Mixer 3 receive proper training.
Important
Cavex Holland BV cannot accept responsibility for any inadequate performance,
damage or accidents resulting from a failure to connect the Alginate Mixer 3 in the
manner specied below; using the Cavex Alginate Mixer 3 for materials other than
alginate impression material or gypsum, or in a manner other than that described
below; using parts other than those supplied for the intended purpose by Cavex, or
repairs or modications other than those made by experts appointed by Cavex for that
purpose.
SAFETY PRECAUTIONS
Please follow the instructions in this manual for correct and safe operation of the
device. Pay attention to the following warning signs beside the operation descriptions
where applicable.
DANGER
m
This message appears where improper operation may cause serious injury to the
human body if instructions are not followed correctly.
WARNING
m
This message appears where improper operation may cause serious damage
or defect to other objects or the device itself if instructions are not followed
correctly.
CAUTION
m
This message appears where improper operation may cause slight injury to the
human body if instructions are not followed correctly.
2
IMPORTANT
m
This message appears where improper operation may cause slight damage
or defect to other objects or the device itself if instructions are not followed
correctly.
WARNING
m
To avoid risk of electric shock, this equipment must only be connected to a
supply mains with protective earth.
EU-wide legislation, as implemented in each Member State, requires that
waste electrical and electronic products carrying the mark (left) must be
disposed of separately from normal household waste. This includes monitors
and electrical accessories, such as signal cables or power cords. When you
need to dispose of your products, please follow the guidance of your local
authority, or ask the shop where you purchased the product, or if applicable,
follow any agreements made between yourself.
The mark on electrical and electronic products only applies to the current
European Union Member States.
Explanation of Graphical Symbols:
IEC 60878 and ISO 3864-B.3.6 : Warning: Dangerous voltage.
c
ISO 7000-0434 : Caution, consult accompanying documents.
m
ISO 7000-1641 : Follow operating instructions or consult
instructions for use.
IEC 60417 -5009 : Stand-by.
ENGLISH
ISO 7010-W001 : General warning sign
MAINTENANCE
Alginate Mixer
If there is any dust or stains on the surface of the control panel or unit body, please
use a dry or damp cloth to wipe clean. If it is hard to clean, a neutral detergent is
recommended.
IMPORTANT
m
Never use a solvent or volatile oil for cleaning; this can lead to fading of the print
on the casing.
IMPORTANT
m
Turn off the main power and disconnect the power cord before cleaning or
maintaining the unit. Never clean while the mixer is in operation or the power is on.
Mixing Accessories
The mixing cup, spatula, and stirrer stick should be washed with water and completely
dried after each use. Before using the mixing cup, check whether the cup or the lid is
distorted or cannot be closed properly. Replace the old mixing cup with a new one in
case this occurs.
3

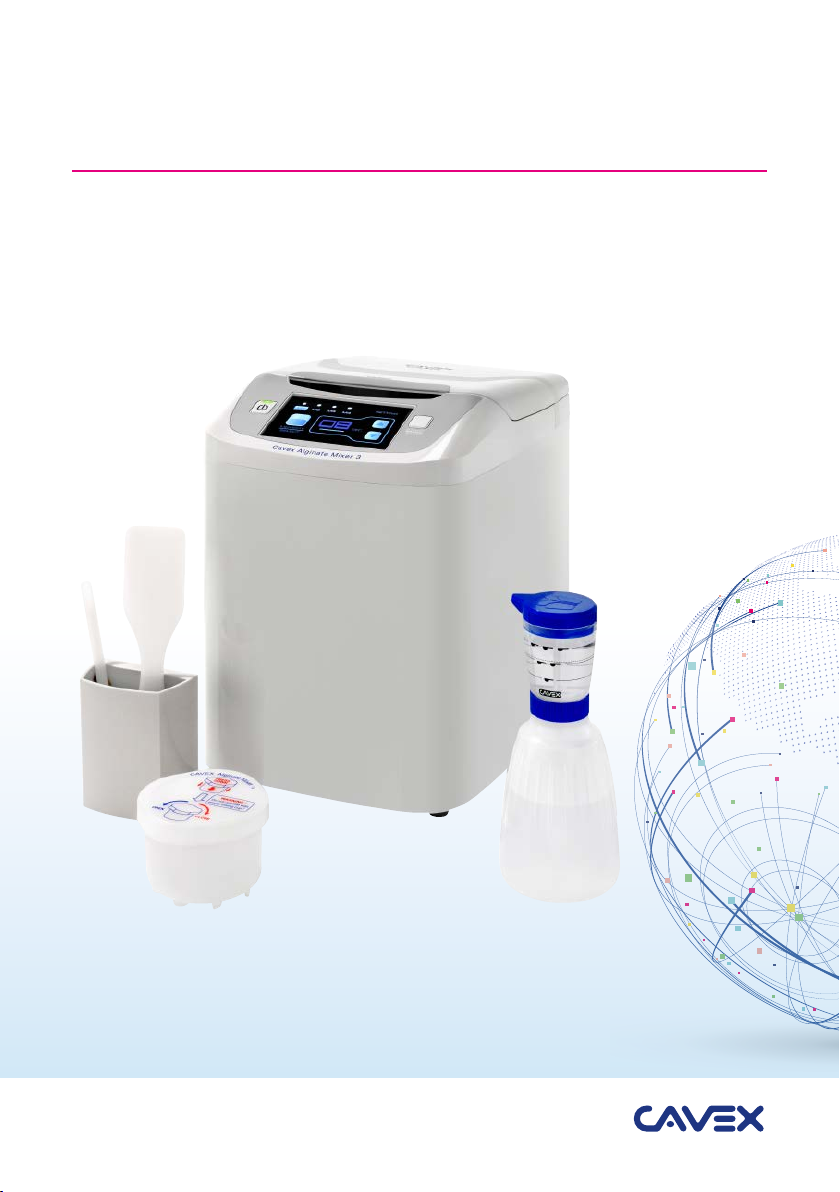
MAIN UNIT AND ACCESSORIES
21 3
1. Power button
Green indicator: ‘Ready for operation’
Orange indicator: ‘Power-on’
2. Display
3. Start/stop button
4. Main power switch
5. Fuse/backup fuse
6. Power cord port
7. Power cord
8. Cavex Alginate Mixer 3
9. Spatula
10. Powder scoop
11. Stirrer stick
12. Water dosing bottle
13. Accessory holder
14. Mixing cup
14 1213
8
7
4
5
11 9
10
6
IMPORTANT
m
Do not use other power cords without authorization from the manufacturer.
WARNING
m
Do not modify this device without authorization of the manufacturer.
4

INSTALLATION
Please carefully follow the instructions below to ensure proper function of the device.
System operational conditions
1. For indoor use only, the device needs to be placed on a stable and at surface.
2. The operation area should be free of dust, acids, and solvent vapors.
3. Before operation, double-check the voltage (AC 220~240V).
CAUTION
m
Make sure to install and operate the unit with dry hands only.
DANGER
m
Keep potentially dangerous substances a minimum of 30 cm away from the unit,
such as ammables, water sources, and contaminants.
Motor fixing screws
1. Remove the two motor xing screws located at the base of the unit.
2. Store the two screws and distance washers in the openings at the back of the
unit for future use.
IMPORTANT
m
If the unit needs to be moved or sent for repairs, secure the motor with the two
motor screws prior to transporting it to avoid damages.
ENGLISH
IMPORTANT
m
Keep the unit upright when removing/installing the screws to prevent disturbing
the balance of the motor.
Plugging in
Double check the input voltage requirement of the unit and of the power source, also
make sure the main power switch is off before plugging the
power cord in.
DANGER
m
There is danger of electric shocks, re or damage to the
unit if the incorrect input voltage is used.
5

PANEL OPERATIONS
1. Power button
2. Memory/select
3. Pre-programed mixing time
4. Adjustment of mixing time (up/down)
5. Start/stop button
(A) Power on
1. Turn on the main power switch, and the unit will enter stand-by mode.
2. Press and hold the power button for three seconds to turn on the screen.
After the Cavex logo is displayed in the marquee mode, the mix mode and mixing
time will be set and displayed on the screen, indicating that the mixer is ready for
operation.
CAUTION
m
Never operate the unit without a mixing cup or with an empty mixing cup, as it
will throw the motor off balance. Always keep the unit’s main power switch off to
avoid accidental mixing when the unit is empty.
(B) Mixing Cup
1. Put the lid on the mixing cup, press
down and close by turning clockwise
until secure.
2. Make sure the opening on the lid is
unblocked.
3. Make sure the exterior of the mixing
cup is clean and dry.
31 2 4 5
(C) Mixing
1. Make sure the mixing cup has been securely closed.
2. Place the prepared mixing cup rmly into the mixing cup holder.
3. Close the lid of the Cavex Alginate Mixer 3 and check that the appropriate mixing
time has been set.
4. Press the ‘Start/stop’ button to start the mixing cycle.
5. Wait for the stop ‘beep’ signal before opening the lid.
6. Remove the alginate mixture from the mixing cup with a spatula and apply.
CHARGER SIGNALS
CAUTION
m
If abnormal sounds or conditions occur during operation, press the ‘Start/stop’
button to terminate immediately.
Note: The mixing cup, spatula, and stirrer stick should be washed with water and
completely dried off after each use.
Note: To stop during operation press the ‘start/stop’ button.
6

TROUBLESHOOTING
PROBLEM CAUSE SOLUTION
The mixer cannot be
powered on
Abnormal sounds
or vibrations during
operation
Power cord is disconnected or
main power switch is off
The fuse is blown Inspect the fuse and change if
Motor screws at the base of the
unit haven’t been removed
Operation of the mixer without
mixing cup or with empty cup
Lid of mixing cup is loose Stop operation and completely
Defective gears Return to the dealer for repair
Plug the power cord in again and
check the main power switch
needed
Remove the motor xing screws
as instructed in page 5
Stop operation
close the lid
ENGLISH
Display panel does
not light up
Unit operation has
delayed start
Mixing cup not closing
or opening well
Mixing results are poor
Display panel shows
‘E1’
Display panel shows
‘E2’
Display panel shows
‘E3’
Defective CPU Board Return to the dealer for repair
Defective CPU Board Return to the dealer for repair
Mixing cup deformed Replace mixing cup
Blocked air hole in the lid Free the air hole
Incorrect mixing ratio of alginate
and water, or incorrect mixing
time
Incorrect operating steps Refer to Panel Operations
Poor or expired alginate
powder
Deteriorated rotation speed Return to the dealer for repair
The lid of the mixer isn’t
completely closed
Defective microswitch Return to the dealer for repair
The lid buckle of the mixer does
not work
Defective microswitch Return to the dealer for repair
Unstable operating platform Ensure operating platform is
Defective microswitch Return to the dealer for repair
Refer to instructions from
alginate supplier
Section C on page 6
Use a new batch of alginate
powder
Open and fully close the lid again
Open and fully close the lid again
stable
When requested to send the unit back for repair, please send the full unit and power cord for
further inspection.
7

SPECIFICATIONS
Model number Cavex Alginate Mixer 3
Timer range 1 ~ 20 seconds
Mixing modes 4
Speed max. 3,600 rpm
Mixing cup capacity 25 ~ 100 g / cup
Dimensions 273(L) x 219(W) x 309(H) mm
Net weight 16.8 kg
Power input AC 220~240V
Electric shock protection level Class I
Fuse Rating 250V, 6.3A
Cavex Holland BV
Fustweg 5
2031 CJ Haarlem
The Netherlands
T +31 23 530 77 00
dental@cavex.nl
www.cavex.nl
CAVEXYOUR IMPRESSION IS OUR CONCERN
ZYAT545.01GB.00 - June 2019
www.cavex.nl
 Loading...