

Cavalry CAND3001T0, CAND37250, CAND3001T5, CAND3002T0, CAND Series User Manual

CAND Series In-Depth User Guide
Dual HD Giganet Network Attached Storage Enclosure
Before you begin
1. To use the Dual HD Giganet NAS Enclosure (hereafter referred to as “NAS”) to share your
files with other computers on the network, you must use an Ethernet cable together with
properly configured network settings.
2. For optimal security and convenience, we recommend designating a single computer to
handle all NAS configuration settings.
Check your package contents
• DUAL HD Giganet NAS (Network Attached Storage)
• Ethernet cable
• External power adapter
• Power cable
• User’s Manual
Connect the NAS to Network.
1. Connect the power adapter to the receptor at the back panel of the NAS and then plug the
other end of the power adapter to an electrical outlet. Turn on the power switch; the Power
LED will light up to indicate proper operation.
2. Insert the Ethernet cable to the LAN port on the back of the unit and the other end to an
available Ethernet port on the network adapter in a router/switch/hub. The LED light for Link
Port will illuminate to indicate proper connection.
-Please use a straight-through cable to the LAN port.
-Please make sure that your Local Area Network is working properly prior to inserting
Ethernet cable.
3. To create a printer server, simply connect the printer via USB directly to the NAS.
Note: the NAS does not support GDI/Host-based printers
4. Press the power switch to start or shut down the NAS. It will take about 3 minutes to boot
up / shut down the operation system.
5. Before setting up the NAS, it’s recommended to go through Q&A section at the end of the
manual to avoid mistakes.
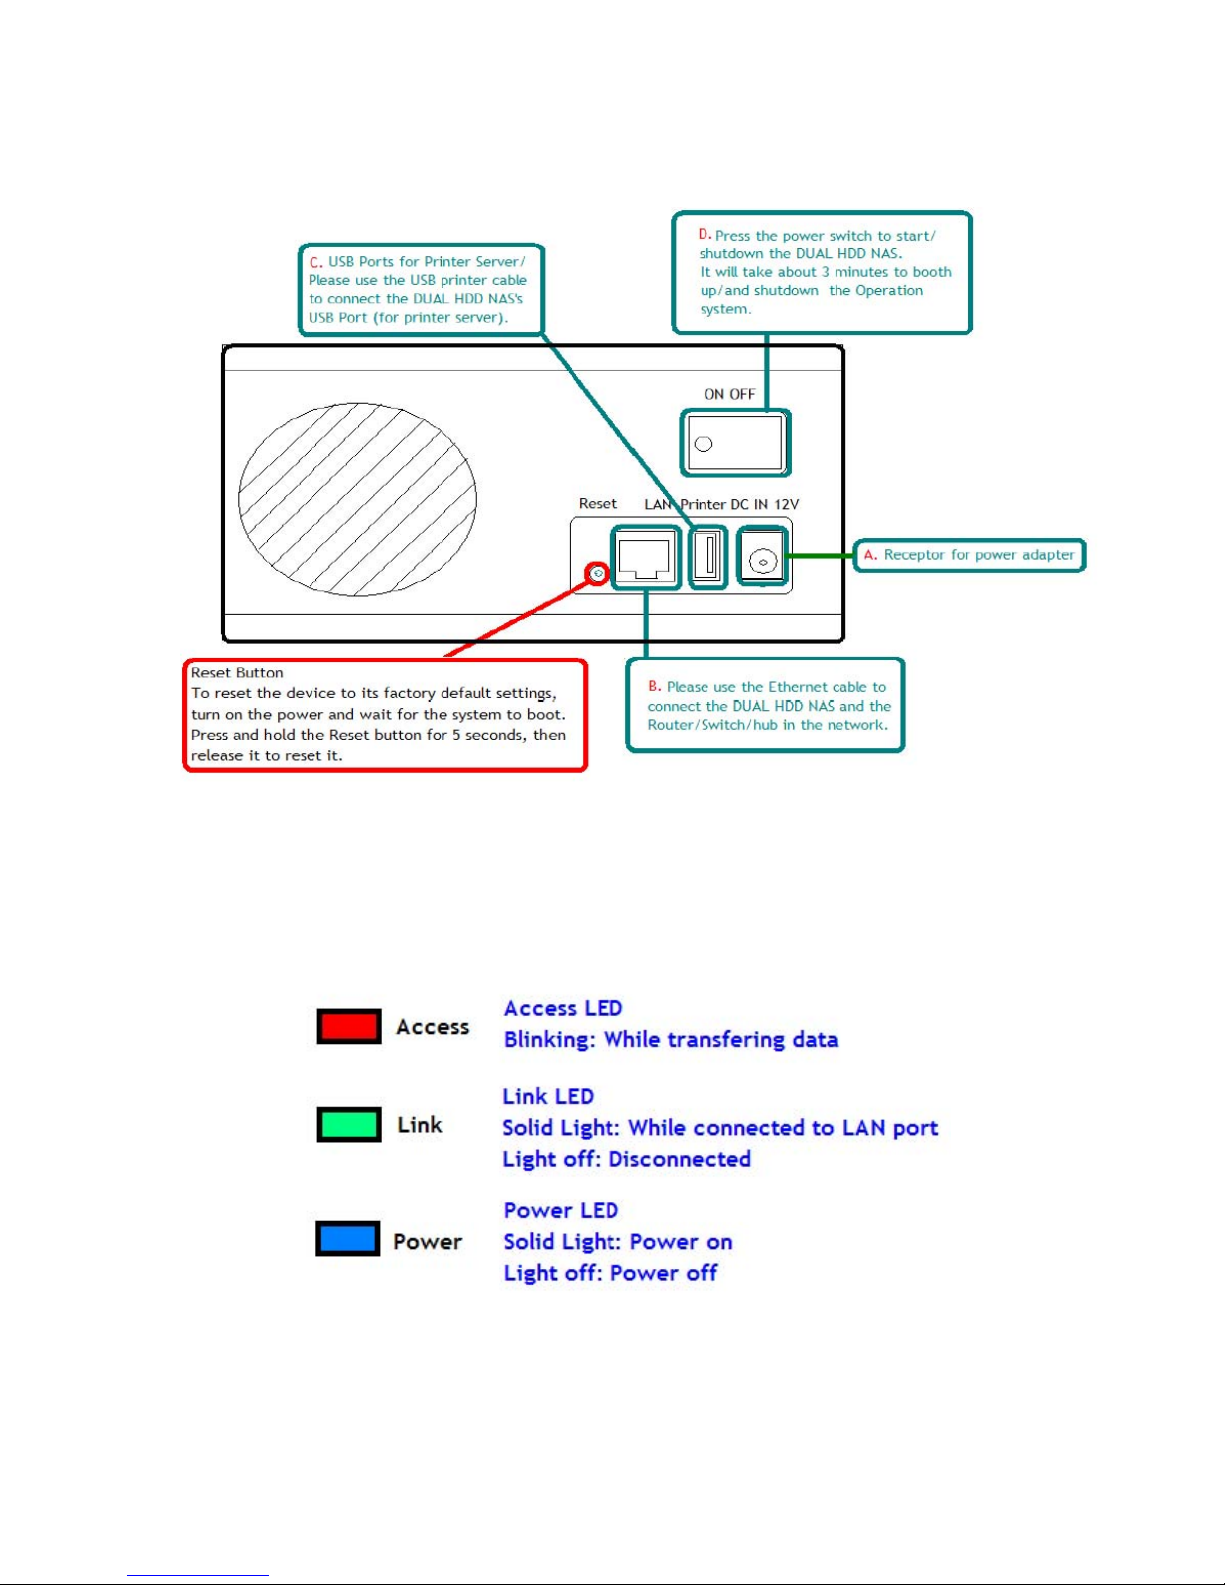
Back of the CAND
LED Indicators

After initial setup, your connected network should follow a form similar to this:
Power ON/OFF Procedure
Always connect the power adapter to your device prior to inserting into electrical outlet. To
turn on the power, press the ON/OFF switch. The blue backlight LED will illuminate and the
unit will begin to boot up. About 2 minutes is required for the drive to be ready. During boot
up, the Link LED will be blinking.
To turn off the NAS, stop all current downloads and transfers, then turn off the power using
the ON/OFF switch. It will take about 1 minute for the drive to park. If the system will be off
for an extended period of time, remember to also remove the power supply from the electrical
outlet.
Alternatively, the device can also be turned off using the admin interface via web browser.
First login, then go to the “Turn off Server” menu in the System area and turn the server off.
Quick Installation Guide
1. Install either one or two hard drives.
2. Connect the Ethernet cable from your network router/switch to the NAS.
3. After everything is connected, turn on the NAS and wait about 2 minutes for boot up.
4. Access the web configuration interface via your web browser. See “How to login” in the
section below.
5. Go to the Maintenance menu and use the disk utility to format the drive. If two identical
drives are installed (as is factory default), you may go to the RAID setting section and create a
RAID array. Do not perform any other functions while formatting and configuring RAID.

6. Once the drive has been formatted, go to the Basic menu and follow the quick setup wizard.
This will help you to set up the IP configuration, add users and prepare file sharing.
7. You are now ready to share and download files.
Note: Without installing and formatting a drive first, most functions will not be available (e.g.
User & Group Management and BitTorrent download).
How to login
To configure your NAS, you will need to use the web browser. You will enter the IP address
and then use the web configuration for further setup. There are several methods to discover
the IP address of the device on the following pages.
Use the Setup utility included on the CD. This will list the device automatically and allow you
to access the web configuration interface. You may also use the same utility to map the
network drive after you setup your shares. The Setup Utility is located in the “Contents/CAND”
folder of the Resources CD. The SetupUtil icon should appear as follows:
Step 1. Turn on the NAS and make sure it is connected to the same network as your
computer.
Step 2. Start the Setup utility by double clicking on the SetupUtil.exe file and then press the
Setup button.
Step 3. Your NAS will automatically show up in the device list; if not, make sure the Setup
utility has access to the network and search again. You might have to configure your firewall
or even temporarily turn it off.

Step 4. Select “nas” and double-click to enter the GUI setup, or click OK to change the IP
setting.
Step 5. Enter the admin password before accessing the device. The default login is admin;
enter admin for the password as well. Press OK to login.

Step 6. You can define the name for your device and set up the IP configuration. We
recommend using the “Automatically obtain an IP address (DHCP)”. Press Next to continue.
Step 7. Set the time zone, current Date and Time. Click Next to continue.

Step 8. You can compare your new settings with the previous configuration. Fix any mistakes
by pressing Back. Press Save to confirm new settings.
Step 9. Double click “nas” to Enter Web GUI of NAS.
Note: Alternatively, you could also simply write down the IP address in the first step of the
setup wizard and then access the web configuration interface via your web browser. Input the
IP address in the URL field of your web browser, hit Enter, enter “admin” for the username,
and “admin” again for the password and then login. You can now use the setup wizard online
or configure the individual settings yourself.
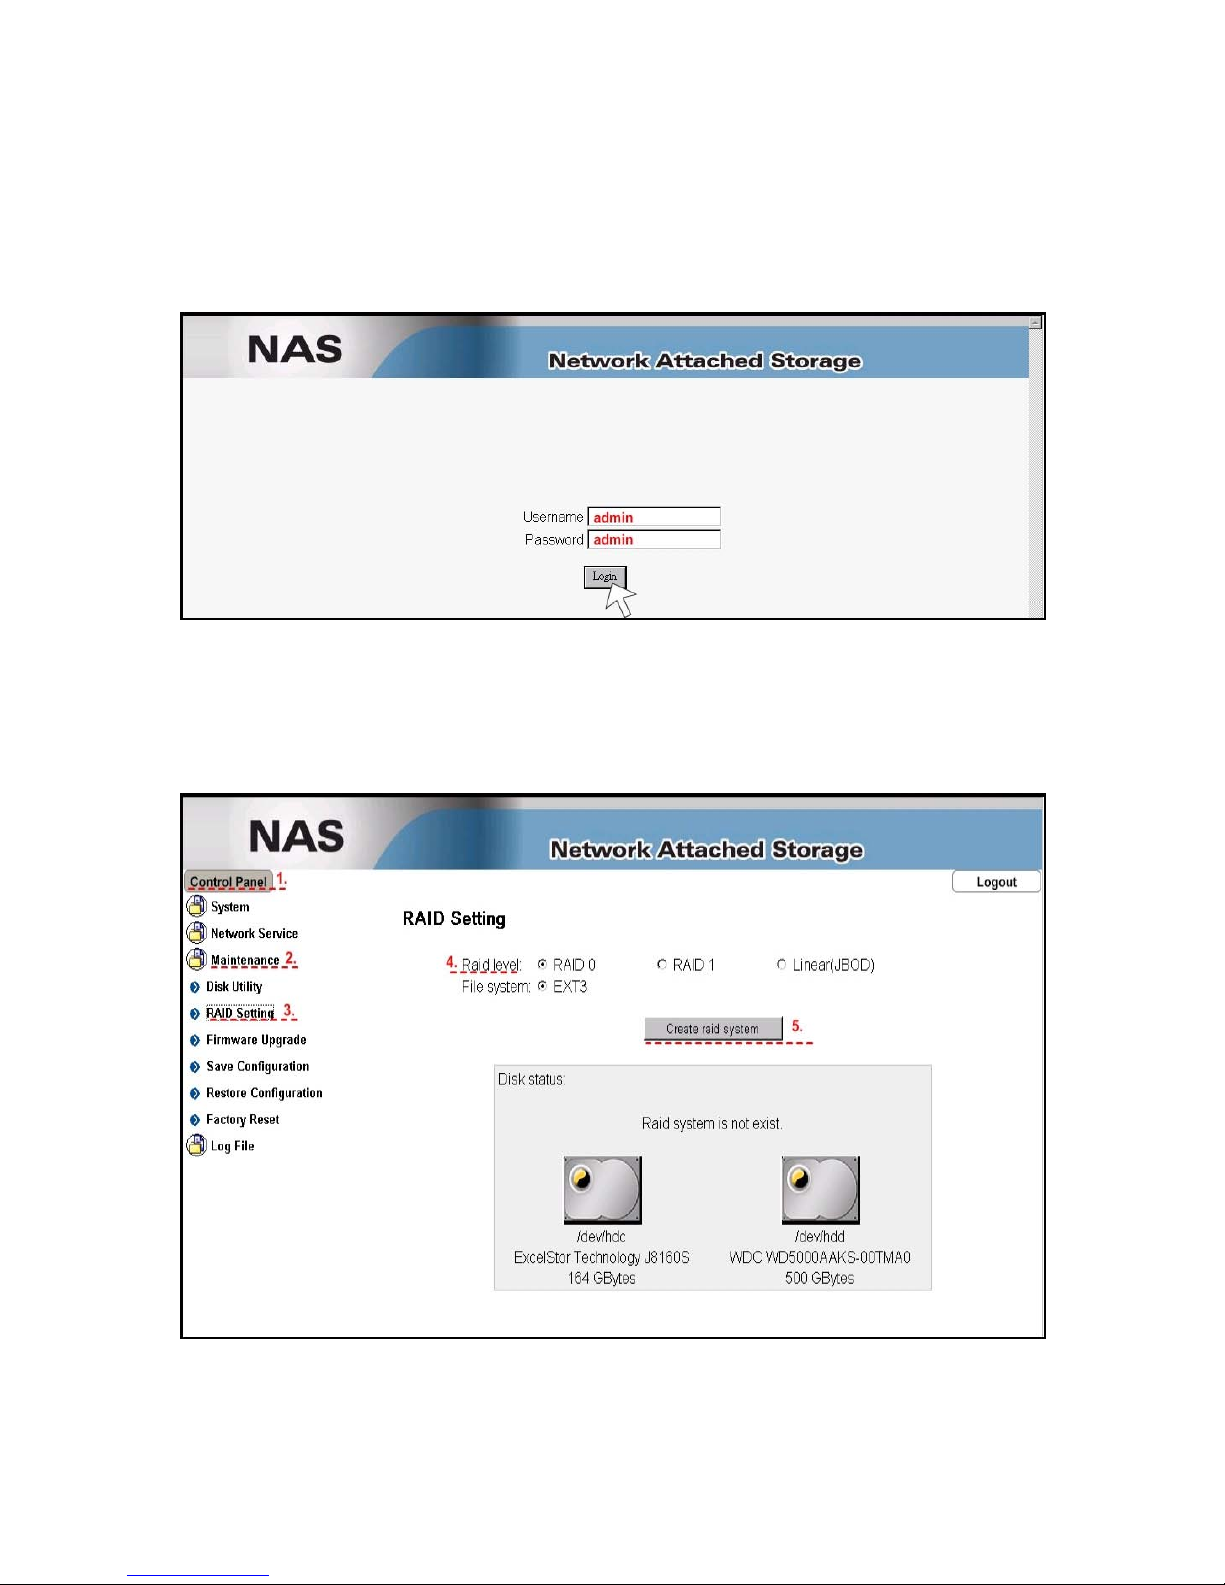
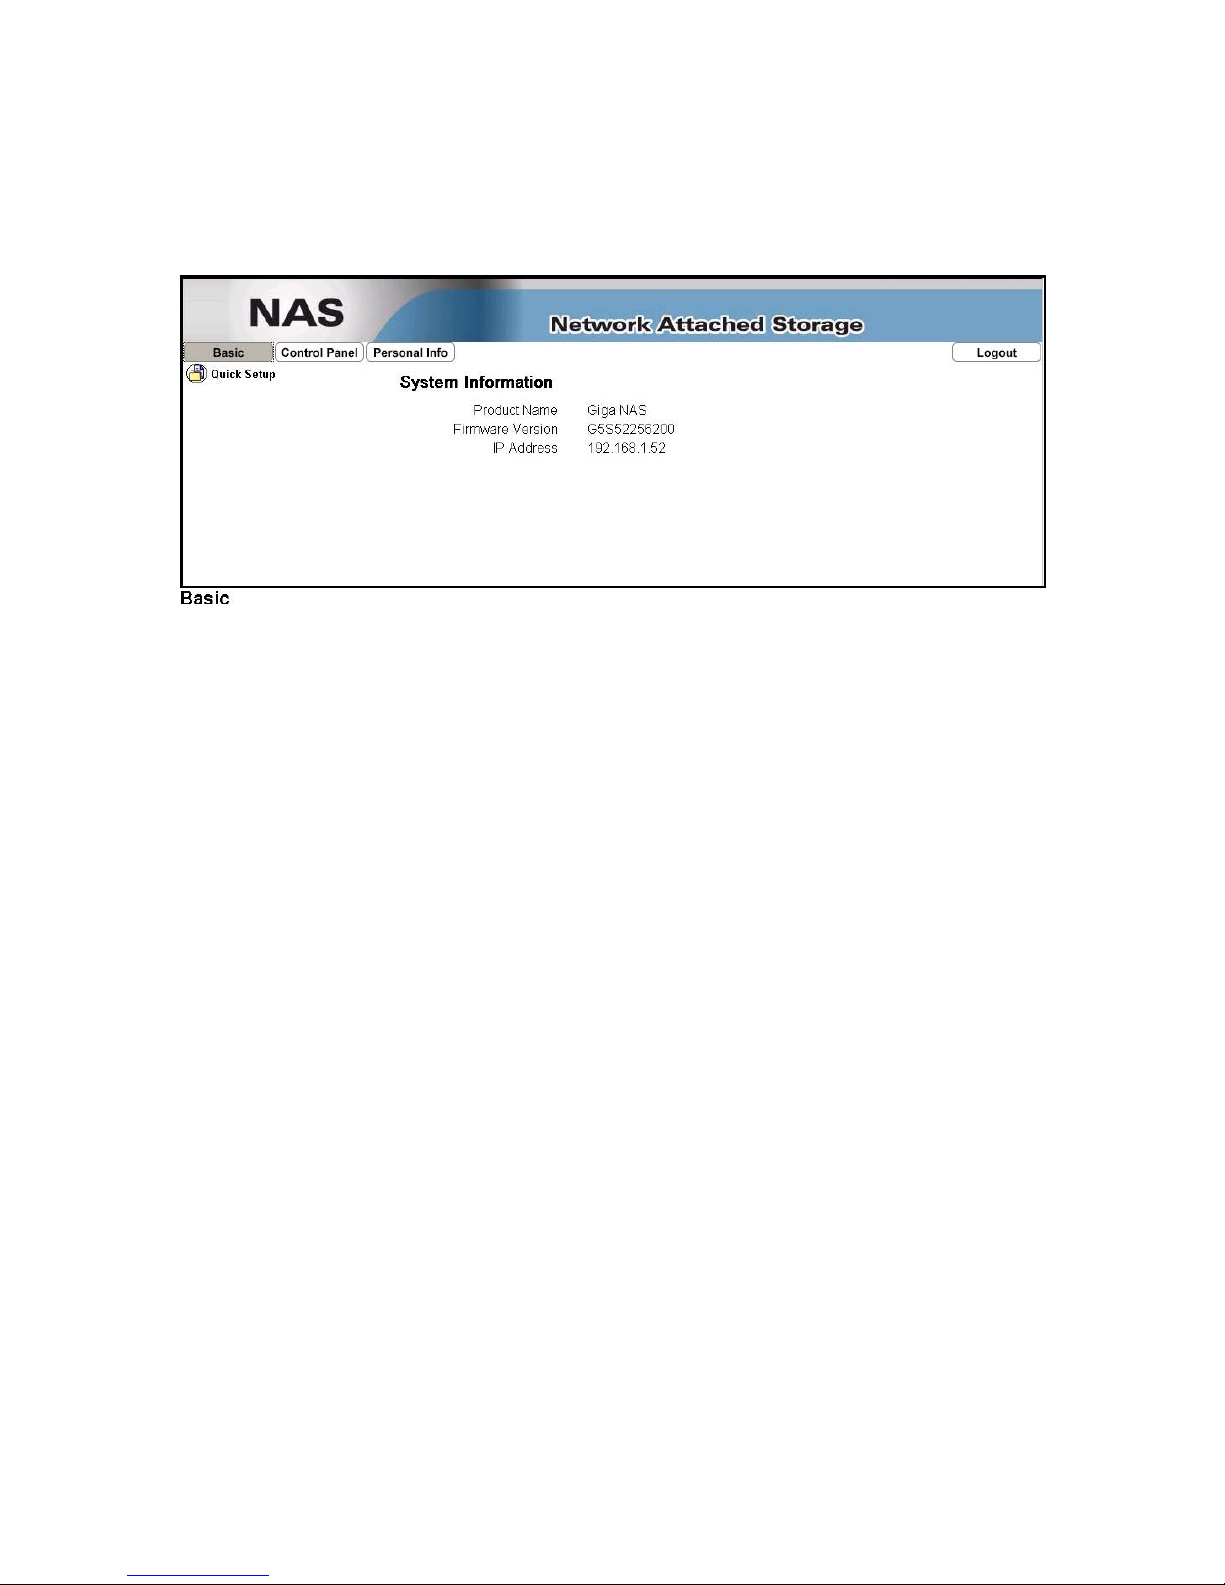
Web Configuration
Input the username and password in the login page; “admin” is the default login and “admin”
is the default password. Changing these security privileges is recommended afterwards.
Hard Disk setup
1. Select Control Panel >> Maintenance >> RAID Setting
2. Select RAID level you want to perform (RAID 0, RAID 1 or JBOD). Cavalry recommends
RAID 1 for optimum data security.
3. Press “Create raid system” to start building RAID level and formatting. (This process may
require some time; do not use other applications during formatting).
The settings in this menu are for users who want to quickly setup the NAS and share files on
the local network. Only the most basic functions and settings are available; this is ideal for
first-time users. For advanced set up, see Control Panel.
Control Panel
This menu includes all the settings and information the NAS offers. Sorted into individual
categories, the user can access particular settings or adjust and modify everything manually.
Personal Info
This menu is for the system administrator account. It includes the option to set the password
and other options related to the web interface.
Logout
This can be used to logout once all the settings have been configured.
Note: Without installing and formatting a drive first, several functions will not be
available (e.g.: User & Group Management and BitTorrent download).
Quick Setup
The settings in this menu are for users who want to quickly setup the NAS and share files on
the local network. Only the most basic functions and settings are available and is ideal for first
users. For advanced set up, see Control Panel.
Wizard
The setup wizard can be used to configure all the basic LAN settings for your NAS. For PC
users, if you have followed the setup wizard previously, there is no need to go through this
again unless you want to change some of the settings or have not yet completed the setup.

Step 1: Select your preferred language for the web interface from, English, German,
Spanish, French, Japanese, Simplified Chinese, and Traditional Chinese.
If strange characters appear after changing the language setting, please change the “IE” code
page setting to solve this problem.
Go to the toolbar and select “View” “Encoding” then select the appropriate language.

Step 2: Set a new password for the web configuration interface. (Optional, but strongly
recommended)
Step 3: If you prefer a different hostname for your NAS, you can change the name here,
otherwise simply use the default name.
Step 4: We recommend setting both IP Address and DNS Server to obtain the IP
automatically but if necessary, it can be set manually. If you need assistance in
filling out these fields, please contact your network administrator for help.
Step 5: Set the date and time manually or select your time zone from the drop down list and
use a NTP server to synchronize the time via the internet.
Step 6: Compare the new settings with the previous configuration and if accu rate, complete
the setup wizard to save the new settings.
Note: For a more detailed explanation of each of the settings, refer to System.
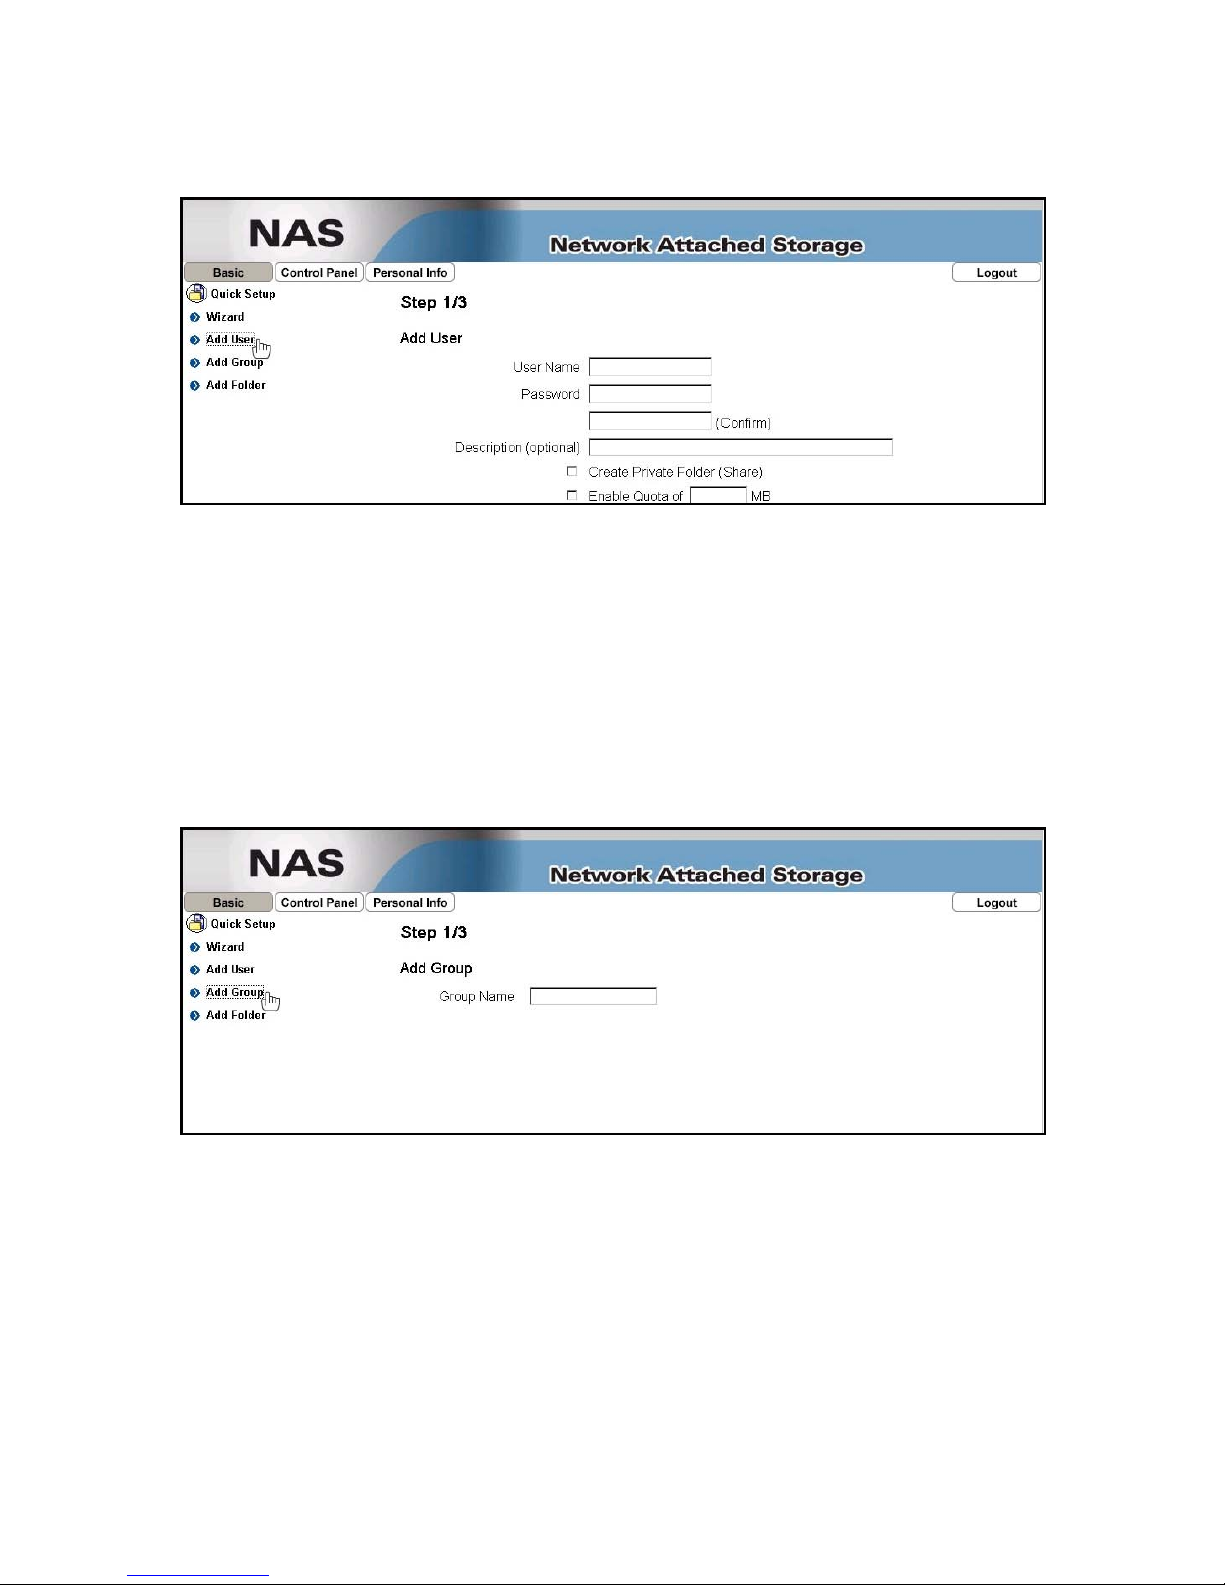
Add User
Use this setup wizard to quickly add and configure a new user account.
Step 1: Enter the user name and password for the new account. You can also create a private
folder for that user and set the quota limit.
Step 2: If there are other users already set up, they can be added to the user account
management.
Step 3: In the last step, you can configure the permissions to the shared folder and add or
remove other users.
Add Group
Use this setup wizard to add a new group.
Step 1: Enter the group name.
Step 2: Configure which members will be included in this group by adding and removing the
members from the list.
Step 3: Configure the share permissions by adding (read only or writable) and removing the
shares from the list.

Add Folder
Use this setup wizard to quickly add a new share folder.
Step 1: Enter the share folder name and an optional description for the share.
Step 2: Configure the Windows/FTP access permissions by adding (read-only or writable) and
removing the members or group from the list.
Step 3: Configure the NFS access permissions by adding a unique IP addresses or a subnet.
Note: For a more detailed explanation to each of the settings, refer to Users and Group
Management or File and Print.
Users and Groups
In this menu, the administrator can manage the users and groups for the NAS. Start by
adding your users first, then create the groups and assign the members to their groups.
Note: If there is no hard drive installed or the HDD is not yet formatted, this menu will not be
available.
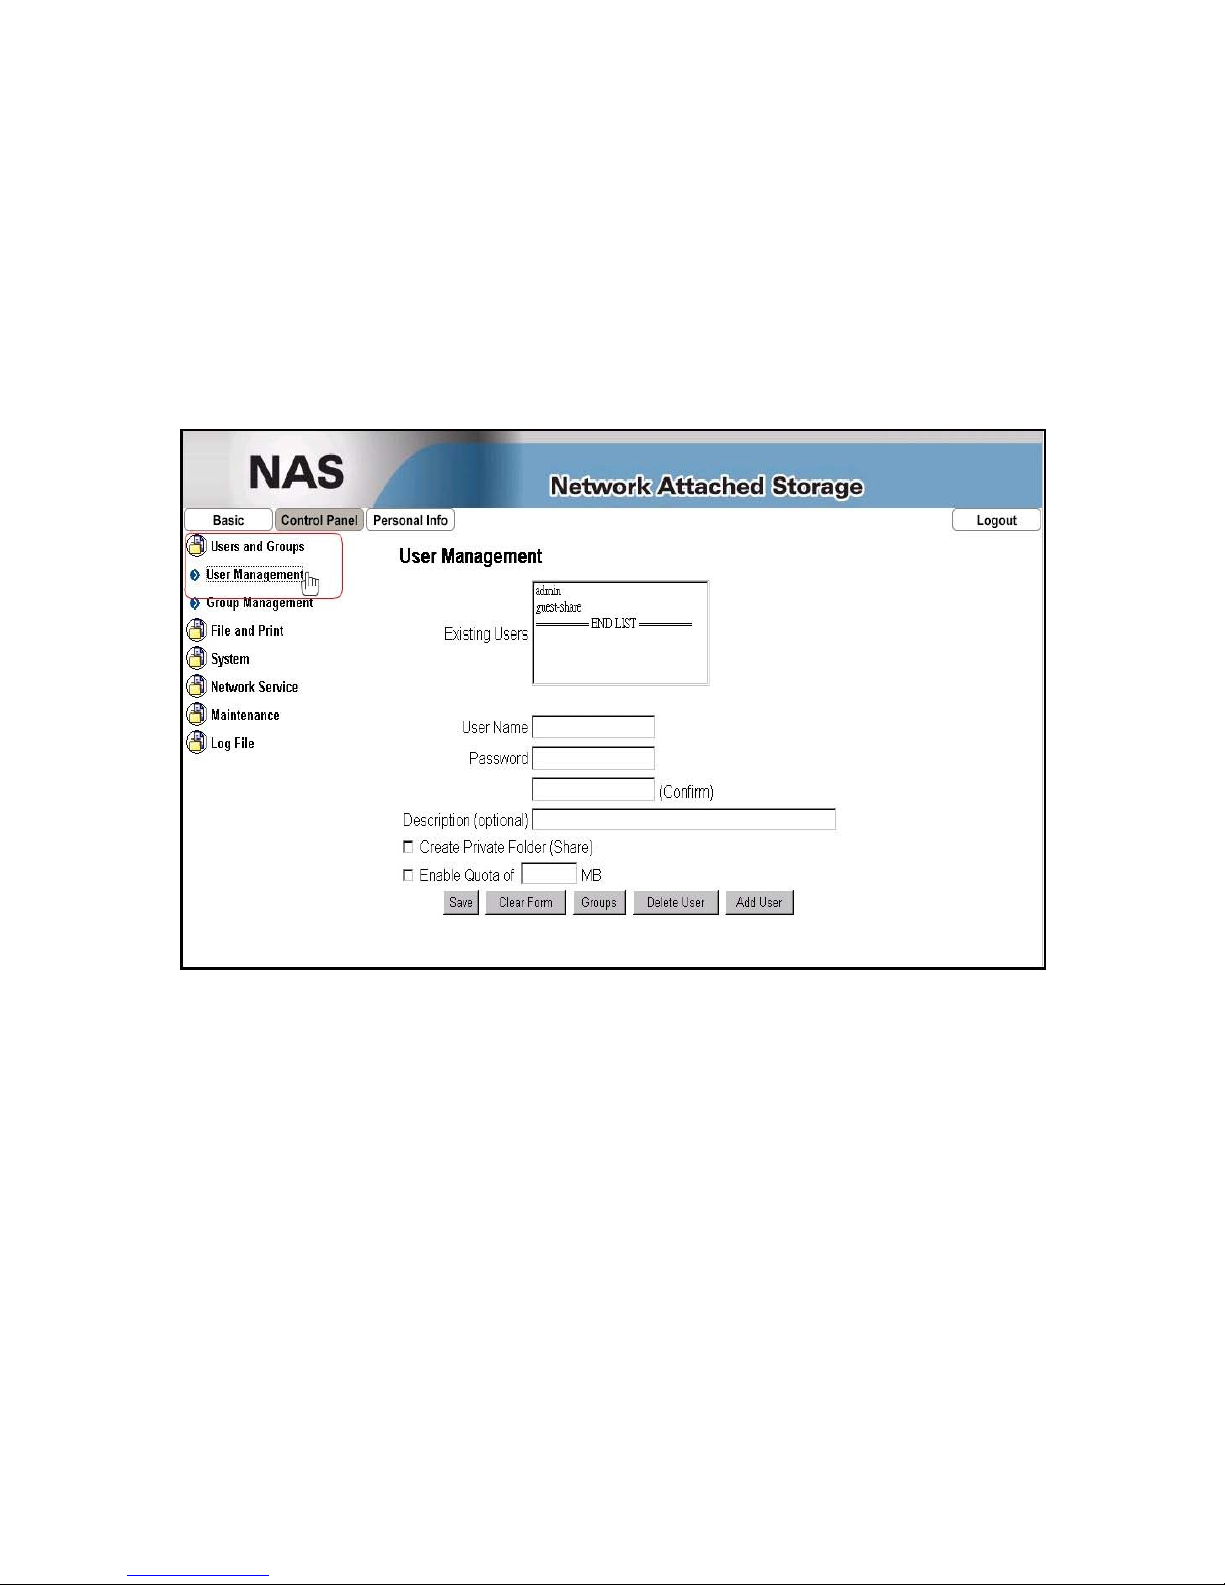
User Management
In this section you can see all existing users for the NAS and manage them by adding or
removing them from the list.
Existing Users: Lists the current users of the NAS.
Modifying Users: Select the user from the existing users list and modify the settings. Once
done, press the “Save” button to apply the new settings.
-Removing Users: To remove a user, select it from the existing users list and then press
“Delete User”.
 Loading...