

Page 1
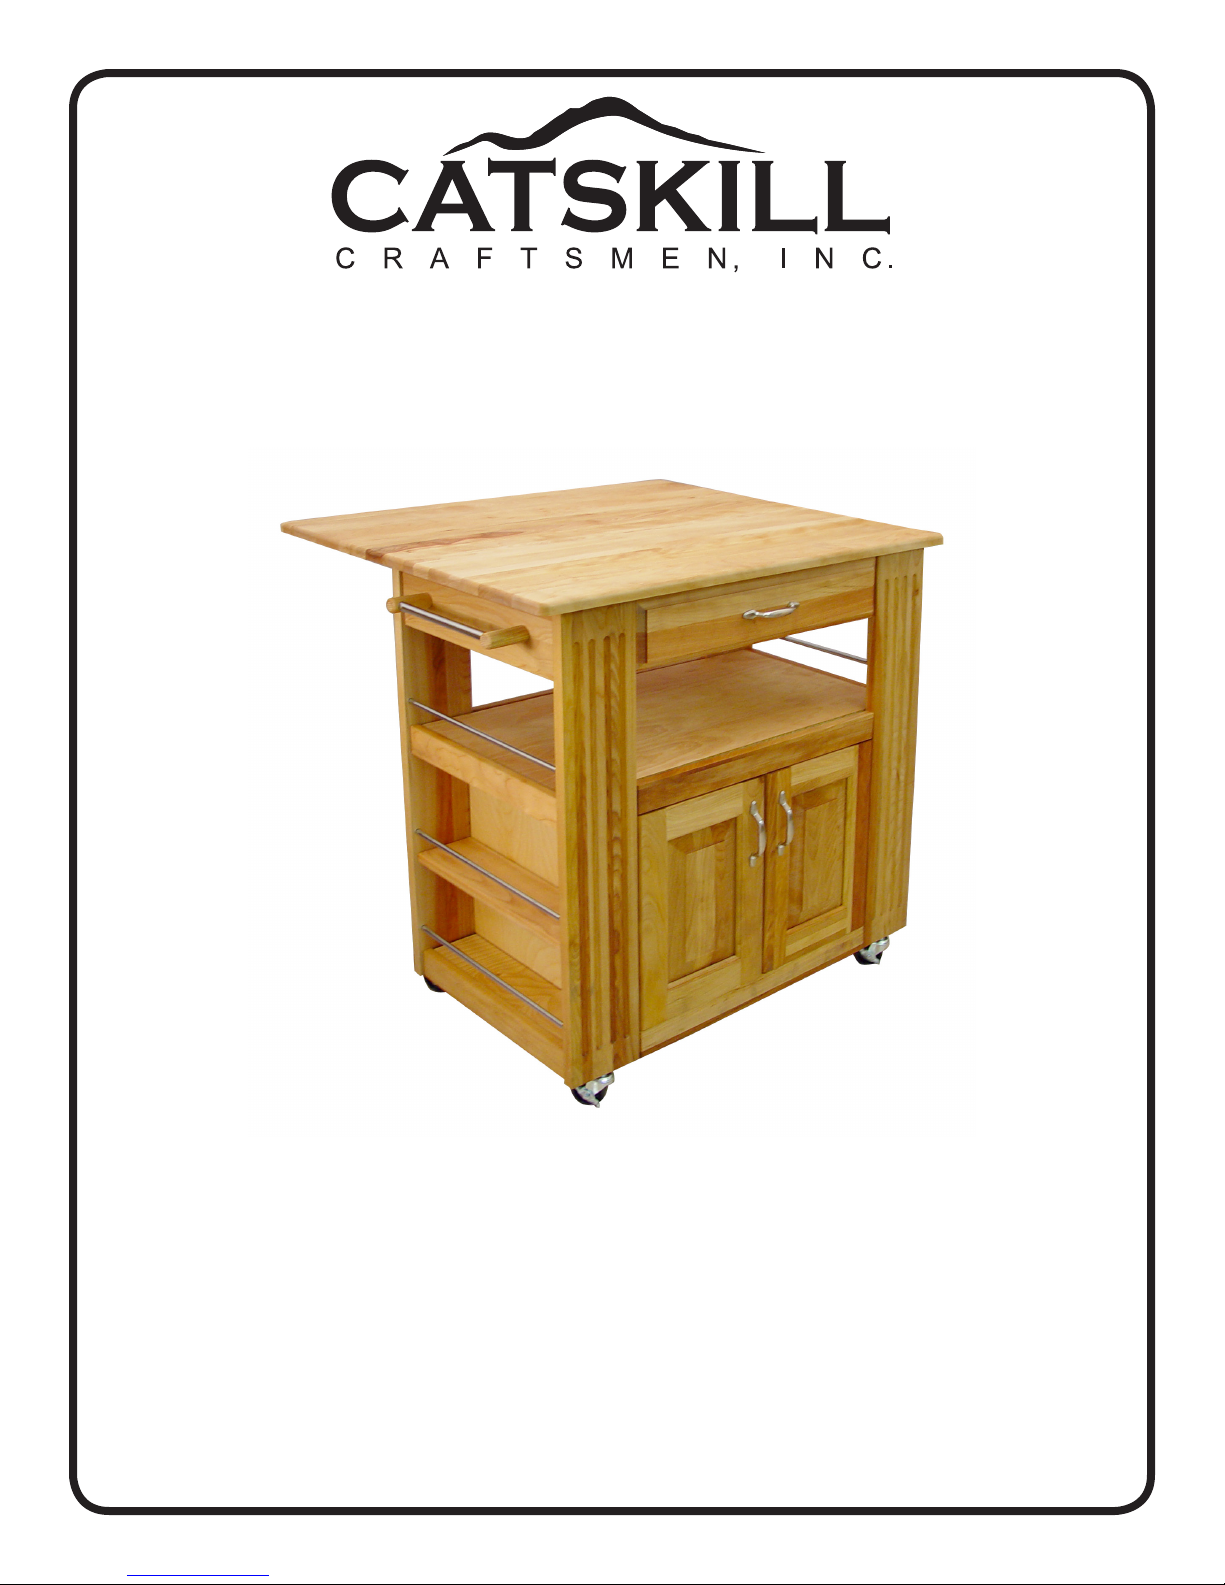
Assembly Instructions
Model 15445
Heart Of The Kitchen Island with Drop Leaf
A. If you need help with assembly, please give us a call at (607) 652-7321 Mon.-Fri. 8am - 4:30 pm EST
and someone will help you. We also have an assembly video on our website www.catskilllcraftsmen.com
B. Assembly uses the Bastion System; a simple yet rugged compression fastening system. We have a
video illustrating the proper way to install this system online at www.catskillcraftsmen.com, click on the
instructions tab at the top.
C. TOOLS NEEDED: Medium-sized at blade screwdriver, a medium-sized and small Phillips screwdriver
and a hammer. A power screwdriver with at/phillips heads will speed assembly on most applications
except drawer glides and magnets/plates.
D. This unit is made of solid North American hardwood and has a factory applied oil nish. See the enclosed
booklet for care instructions.
E. Directions (left/right, front/back) are given as facing the front of an assembled unit.
Page 2
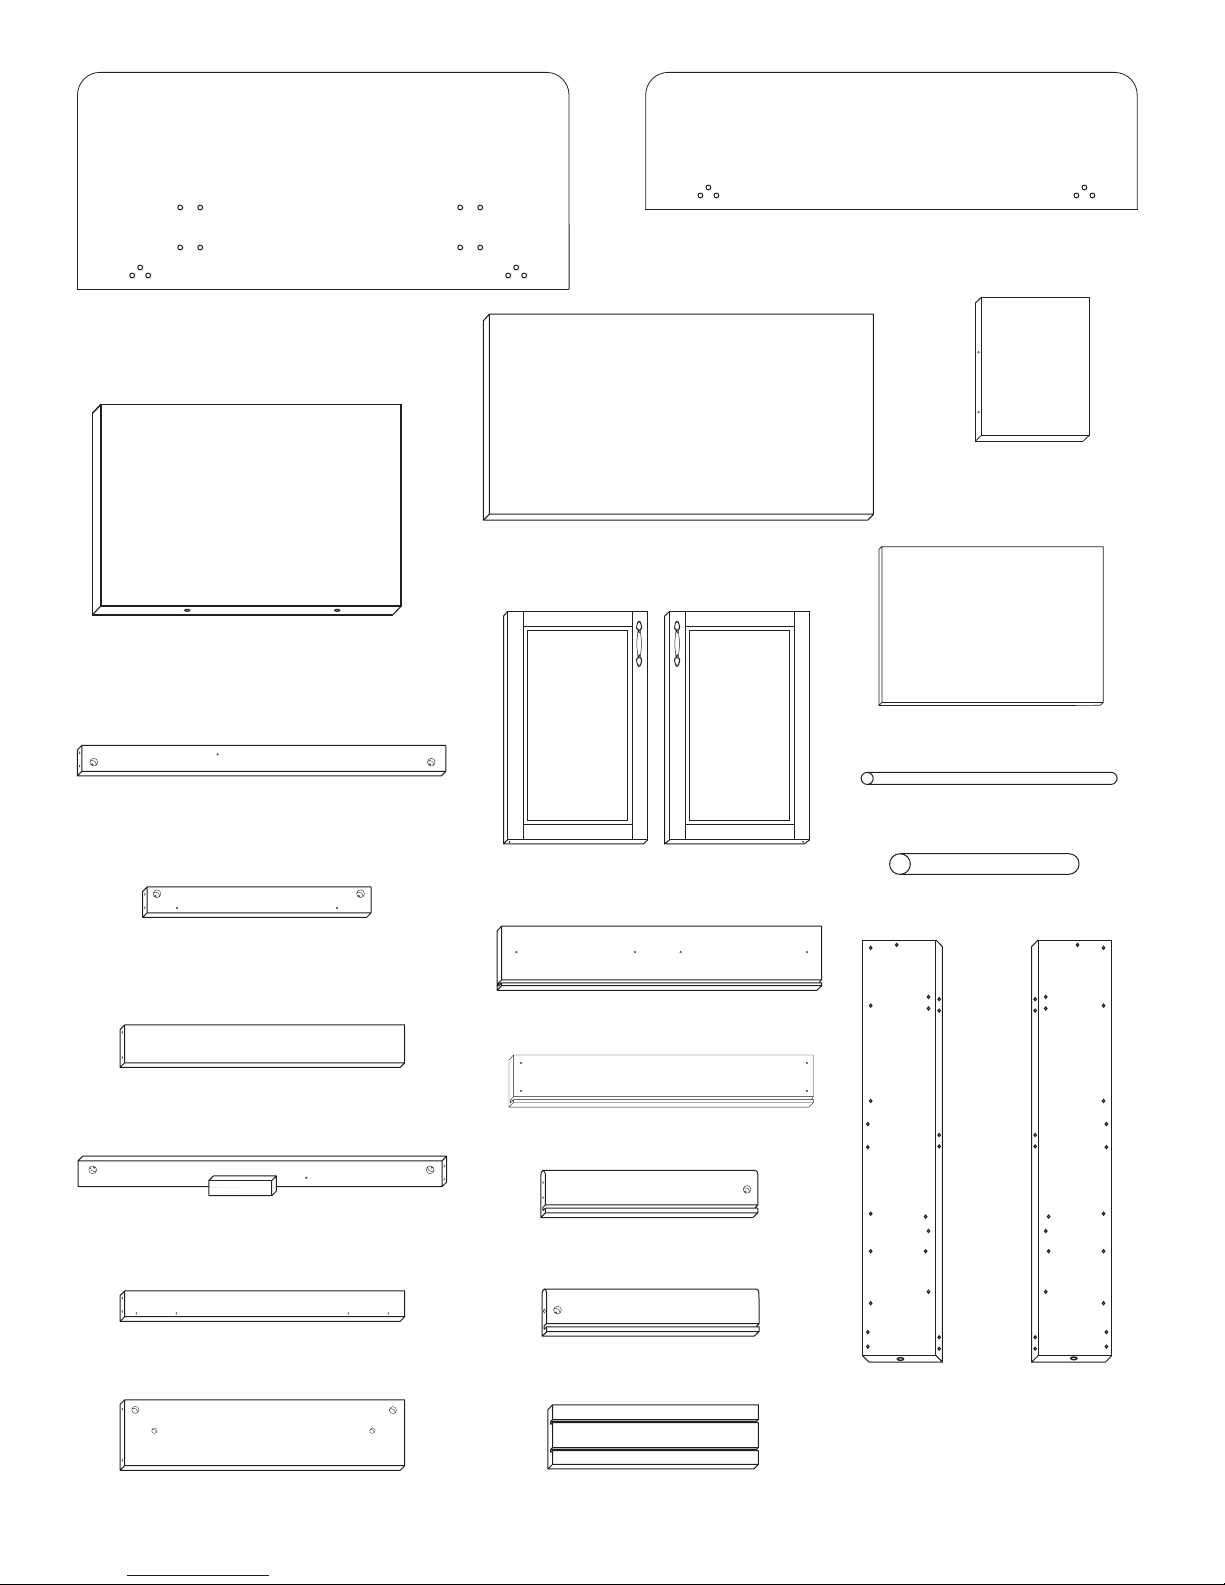
Table Top (1)
34” x 16.5“ x 3/4”
Back Panel (1)
20 7/16” x 15 1/16” x 7/16”
Drop Leaf (1)
34” x 11” x 3/4”
Side Panel (2)
16 5/8” x 14 5/10” x 7/10”
Bottom & Middle Shelf (2)
28 7/16” x 14 1/4” x 7/16”
Drawer Bottom (1)
18 3/4” x 12 3/4” x 1/4”
Bottom Front, Top Back, Middle Back,
& Bottom Back Braces (4)
20 1/2” x 2” x 3/4”
Bottom Side Brace (2)
14 3/8” x 2” x 3/4”
Middle Side Brace (2)
14 3/8” x 2” x 3/4”
Middle Front Brace (1)
20 1/2” x 2” x 3/4”
Glide Support Brace (2)
14 3/8” x 1 1/2” x 3/4”
Left Door (1)
15” x 10” x 3/4”
Drawer Front (1)
20 5/16” x 4 1/2” x 3/4”
Drawer Back (1)
19 9/16” x 3 1/2” x 3/4”
Drawer Side Right (1)
12 1/4” x 3 1/2” x 3/4”
Drawer Side Left (1)
12 1/4” x 3 1/2” x 3/4”
Right Door (1)
15” x 10” x 3/4”
Nickel Side Rods (6)
15” x 3/8” Diameter
Polished Nickel Towel Bar (2)
8 7/8” x 3/8” Diameter
Left Back/
Right Front (2)
31” x 5” x 3/4”
Right Back/
Left Front (2)
31” x 5” x 3/4”
Top Side Brace (2)
14 3/8” x 4 5/8” x 3/4”
Side Shelf (2)
14 5/16” x 4” x 3/4”
NOT TO SCALE
Page 3
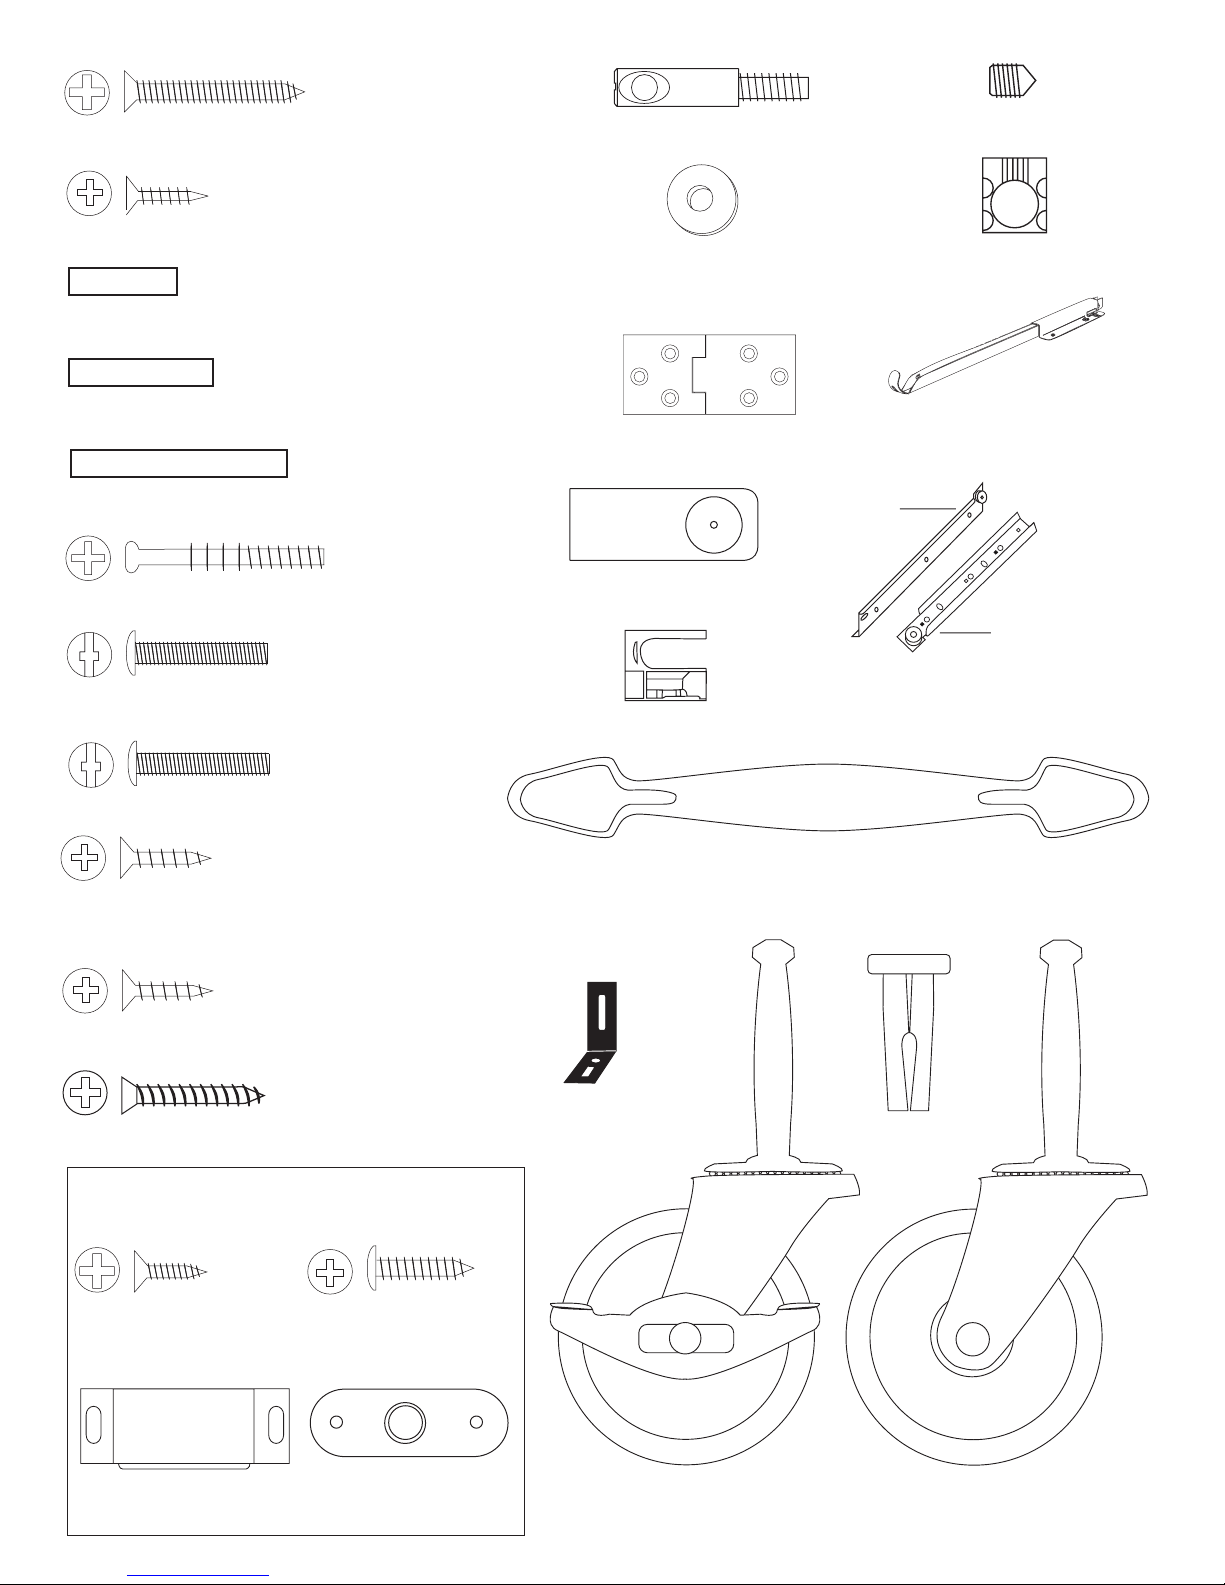
(Drawer back)
1 1/4” Phillips Flat Head #8 Screw (4)
(Drop Leaf Hinges)
5/8” Phillips Flat Head #8 Screw (20)
(Brace ends)
3/4” Long 3/16” DIA. Steel Pin (46)
(Shelf supports)
Bastion Post (18)
3/16” Flat Washer (2)
(Under Door Pins)
Bastion Set Screw (18)
Bastion Barrel Nut (18)
1” Long 3/16” DIA. Steel Pin (14)
(Doors)
1 1/2” Long 3/16” DIA. Steel Pin (4)
(Drawer Front)
Cam Posts (2)
(Drawer handle)
1” Truss Head Machine Screw (2)
(Door Handles)
7/8” Truss Head Machine Screw (4)
(For “L” Brackets &
Attach Glides to Cabinet)
5/8” Phillips Flat Head #7 Screw (12)
Note: 8 are loose packed, 4 are with the glide pack
Towel Bar Post (4)
Hinge (2)
Cam (2)
Drop Leaf Support (2)
Drawer
Cabinet
14” Drawer Glide (2 Sets - 4 pcs.)
Door/Drawer Handle (3)
(Drawer Sides)
5/8” Phillips Flat Head #5 Screw (4)
(Attach Handle)
1” Phillips Flat Head #6 Screw (4)
Magnet Pack
1/2” Phillips Flat
Head #4 Screw (2)
Magnet (2)
5/8” Pan Head #6
Screw (4)
Magnet Plate (2)
“L” Bracket (4)
Locking Wheel Caster (2)
Caster Socket (4)
Non-Locking Wheel Caster (2)
Page 4

1. The Bastion fastening system consists of a steel post (threaded on one end with a
TIPS ON HOW THE BASTION FASTENING SYSTEM WORKS
hole through the shaft on the other end); a Barrel Nut (cylindrical barrel-shaped with
threaded open end & holes through the sides); and a Set Screw (Phillips slot on one end,
pointed on the other)
2. To attach Posts: A) Dip threads of Post in vegetable oil. B) Align threaded end of Post
with hole in wood, tap on slotted end with hard hammer until threads enter, then tighten
down using a flat head screw driver or the provided allen wrench (See the Illus. Bas. 3 for
alternate seating methods). DO NOT TRY TO HAMMER THE POST ALL THE WAY IN AS
IT WILL STRIP THE POST HOLE. C) When solid shaft of Post hits wood, back out
approximately ½ turn until the hole in the posts is properly aligned as per step by step
directions. For example: the holes in the posts on the inside of the drawer front will be
parallel with the long length of the drawer front when properly seated.
3. A) Place a Barrel Nut into the nut access hole, so that the threads in the nut face out.
The small notches on either side of the nut opening, indicate the location of the holes
through the sides of the nut. B) Insert the posts through the end of the braces (or drawer
sides); through the holes in the sides of the nut. When properly aligned, you will see the
hole in the post inside the barrel nut. Post hole should be slightly off-center toward the wood.
4. Insert the Set Screw into the threaded end of the nut and tighten down. The tip of the Set Screw will seek the center of
the hole in the Post as it is tightened down, forcing the Nut toward the main shaft of the Post. This is what tightens the
wooden parts together. Set screws should thread easily – DON’T CROSS THREAD! If Set Screw doesn’t thread easily,
check position of the hole in Post.
Illustration Bas. 1
Post needs to be screwed deeper.
WRONG!
RIGHT!
5. If the wooden parts are not tight against each other, the Post needs to be screwed a half turn at a time until wood joints
are tight.
Illustration Bas. 2
Step 1
Step 2
Illustration Bas. 3
ALTERNATIVE
METHODS FOR
SEATING POSTS
Allen Wrench Provided
See video on our website!
If you have any questions regarding assembly or missing or damaged
parts, call our customer support number:
607-652-7321 or 888-732-7321.
Customer Support Hours are 8am-5pm Mon. - Fri. Eastern Time zone.
Page 5

STEP 1
Illustration 1D
Drawer Assembly
A. Attach the Drawer Back to the Drawer
Sides with four 1 1/4” #8 screws. There are
left and right sides. Make sure the slots that
run the length of the Slides are aligned with
the slot in the Drawer Back to accept the
Drawer Bottom.
B. Slide in Drawer Bottom, best side up, to
inside of drawer.
C. Screw the cam posts into the two outside
holes on the inside face of the drawer front
until seated. Only 3/8” of this post goes into
the wood, leaving the 4 larger guide rings/
head exposed. See illustration 1C. Visit our
website www.catskillcraftsmen.com for a
video on cams.
Illustration 1A
D. Insert the posts into holes in the drawer
sides until seated against the front ends of
the drawer sides. Insert cams so that the
arrow on the outside face of the cam points
to the post. The slot in the cam ts over the
post. Turn with Phillips screwdriver until
seated. Don’t over-torque!! See Illustration
1C. See our video online at www.catskillcraftsmen.com
E. Attach the drawer handle with one 7/8”
Truss head machine screws.
F. Attach the drawer glides (left and right) to
the Drawer Sides using two 5/8” #5 screws
per side. (packed separately) Wheels go
toward Drawer Back and are up. Glides are
ush with front ends of drawer sides and stick
out about 3/4” in back.
FOR TIPS ON HOW THE CAM SYSTEM
WORKS SEE LAST PAGE or visit us online
at www.catskillcraftsmen.com and view our
video.
Illustration 1B
Illustration 1C
Page 6
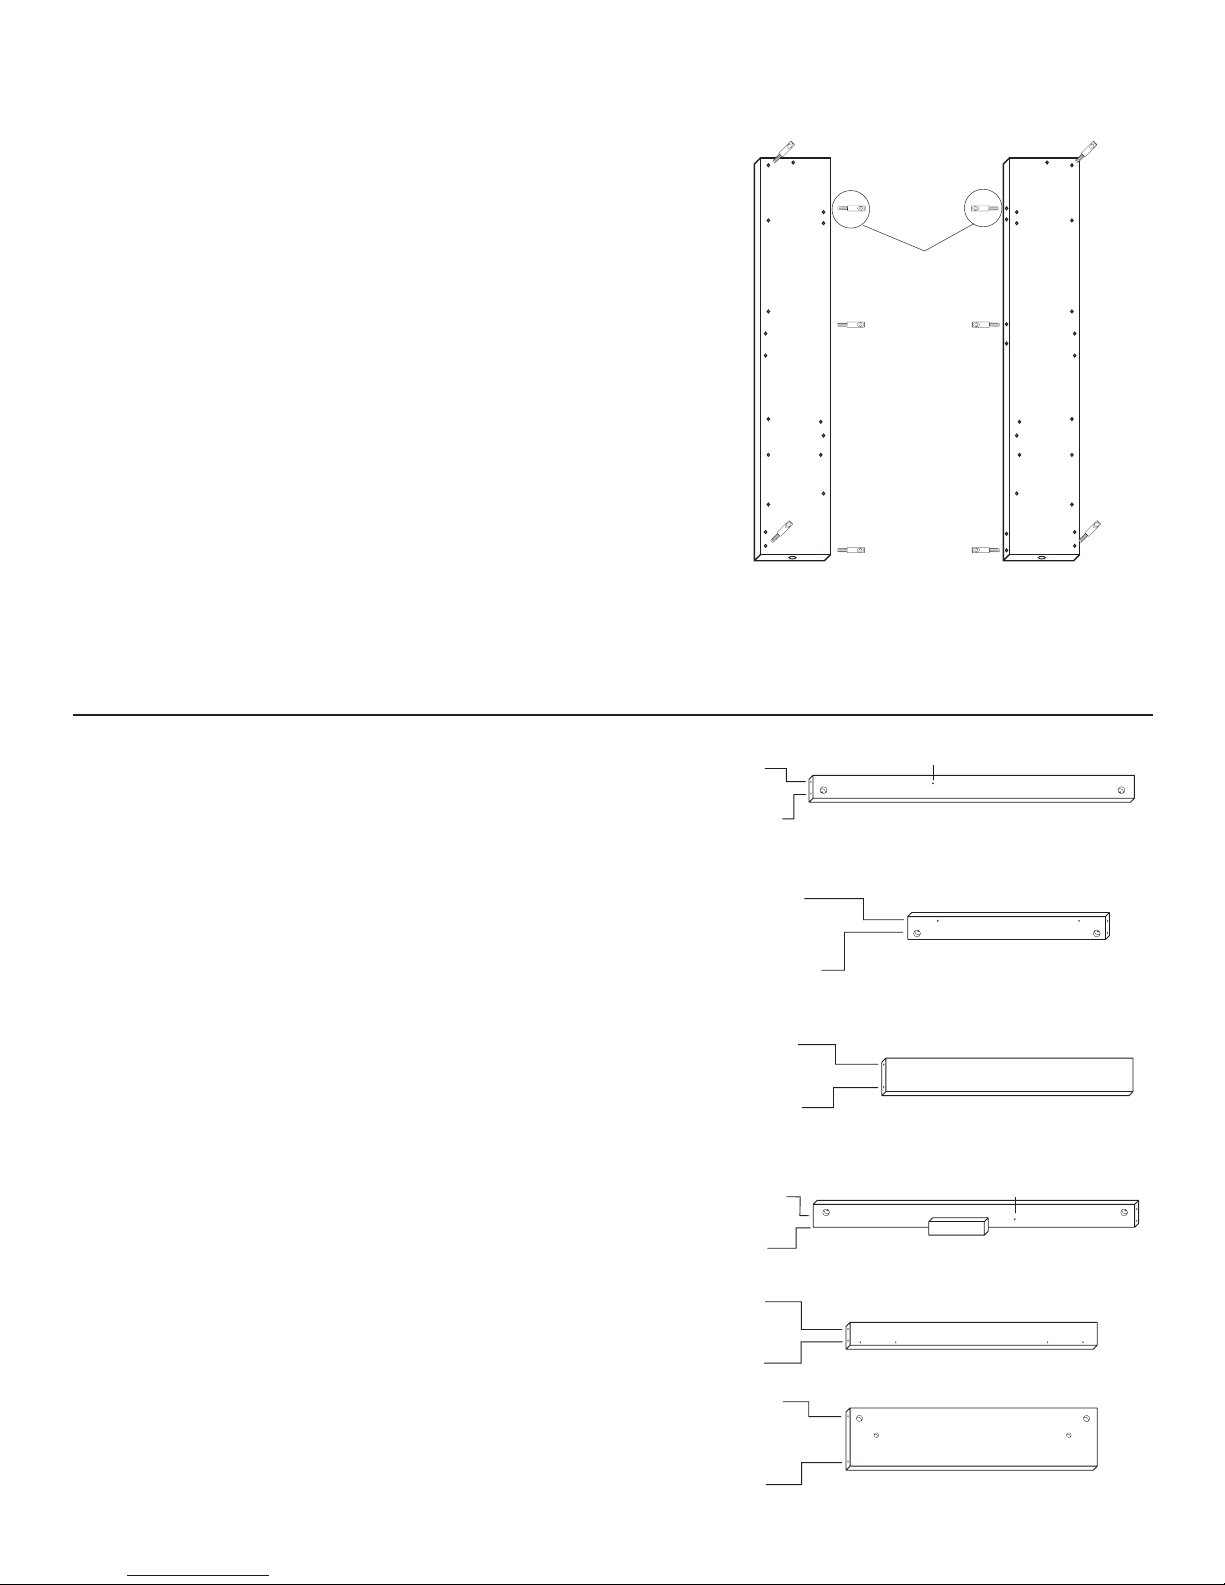
STEP 2
Top Side Brace (2)
Not Used on Top or Middle Back Braces
Attach Posts to Legs
A. There are 2 Right Legs and 2 Left Legs. Diagonal legs are
the same ( Example: Right Front/Left Back). For identication
purposes look at illustration 2 which shows the inside view of a
pair of legs.
B. Take all 4 legs and lay out in pairs as in illustration 2. The
posts will go inside edge hole #1 (top), hole #3 down from top,
and hole #6 (last). On the front legs use holes #3 and #6 only.
Put a few drops of vegetable oil into these holes or dip post
threads to ease screwing of posts into place.
C. Attach two posts to the inside at face of each leg, using the
top and bottom outside holes as illustrated.
FOR TIPS ON HOW THE BASTION FASTENING
SYSTEM WORKS SEE LAST PAGE!!!
Left Back/Right Front Right Back/Left Front
NOTE: The holes in the posts on the inside edges will be
perpendicular to the long edges of the leg when properly
Illustration 2
seated, as pictured in illustration 2. The holes in the posts
on the at surfaces will be parallel with the short edges of the legs when properly seated
Only on Back Legs
(not used on front
leg assembly)
STEP 3
Brace Guide
Identify and group like braces together.
A. The Middle Front, Bottom Front, Middle Back
and Bottom Back Braces are exactly the same,
except the Middle Front Brace has a magnet
block attached. Brace size 20 1/2” long x 2”
wide.
B. The Top Side Braces are 14 3/8” long x 4 5/8”
wide. The Middle Side Braces are identical,are
14 3/8” long x 2” wide with no holes on the at
surfaces. The Bottom Side Braces are identical,
are 14 3/8” long x 2” wide but have pin holes and
nut access holes on inside at face. The Glide
Support Braces are 14 3/8” x 1 1/2” wide with
2 pin holes on each end & 4 holes on bottom
inside.
C. Insert/tap 3/4” steel pins into the ends of ALL
braces. If tight, DON’T OVERDRIVE PINS.
About 3/8” of pin will stick out when seated. Since
the diameter of holes/pins vary from time to time,
some pins will be looser than others. This is not a
problem!
PIN HOLE
POST HOLE
PIN HOLE
POST HOLE
PIN HOLE
PIN HOLE
POST HOLE
PIN HOLE
PIN HOLE
PIN HOLE
POST HOLE
Bottom Front, Middle Back,
Bottom Back & Top Back Brace (4)
Bottom Side Brace (2)
Middle Side Brace (2)
Not Used
Middle Front Brace (1)
Glide Support Brace (2)
PIN HOLE
Page 7
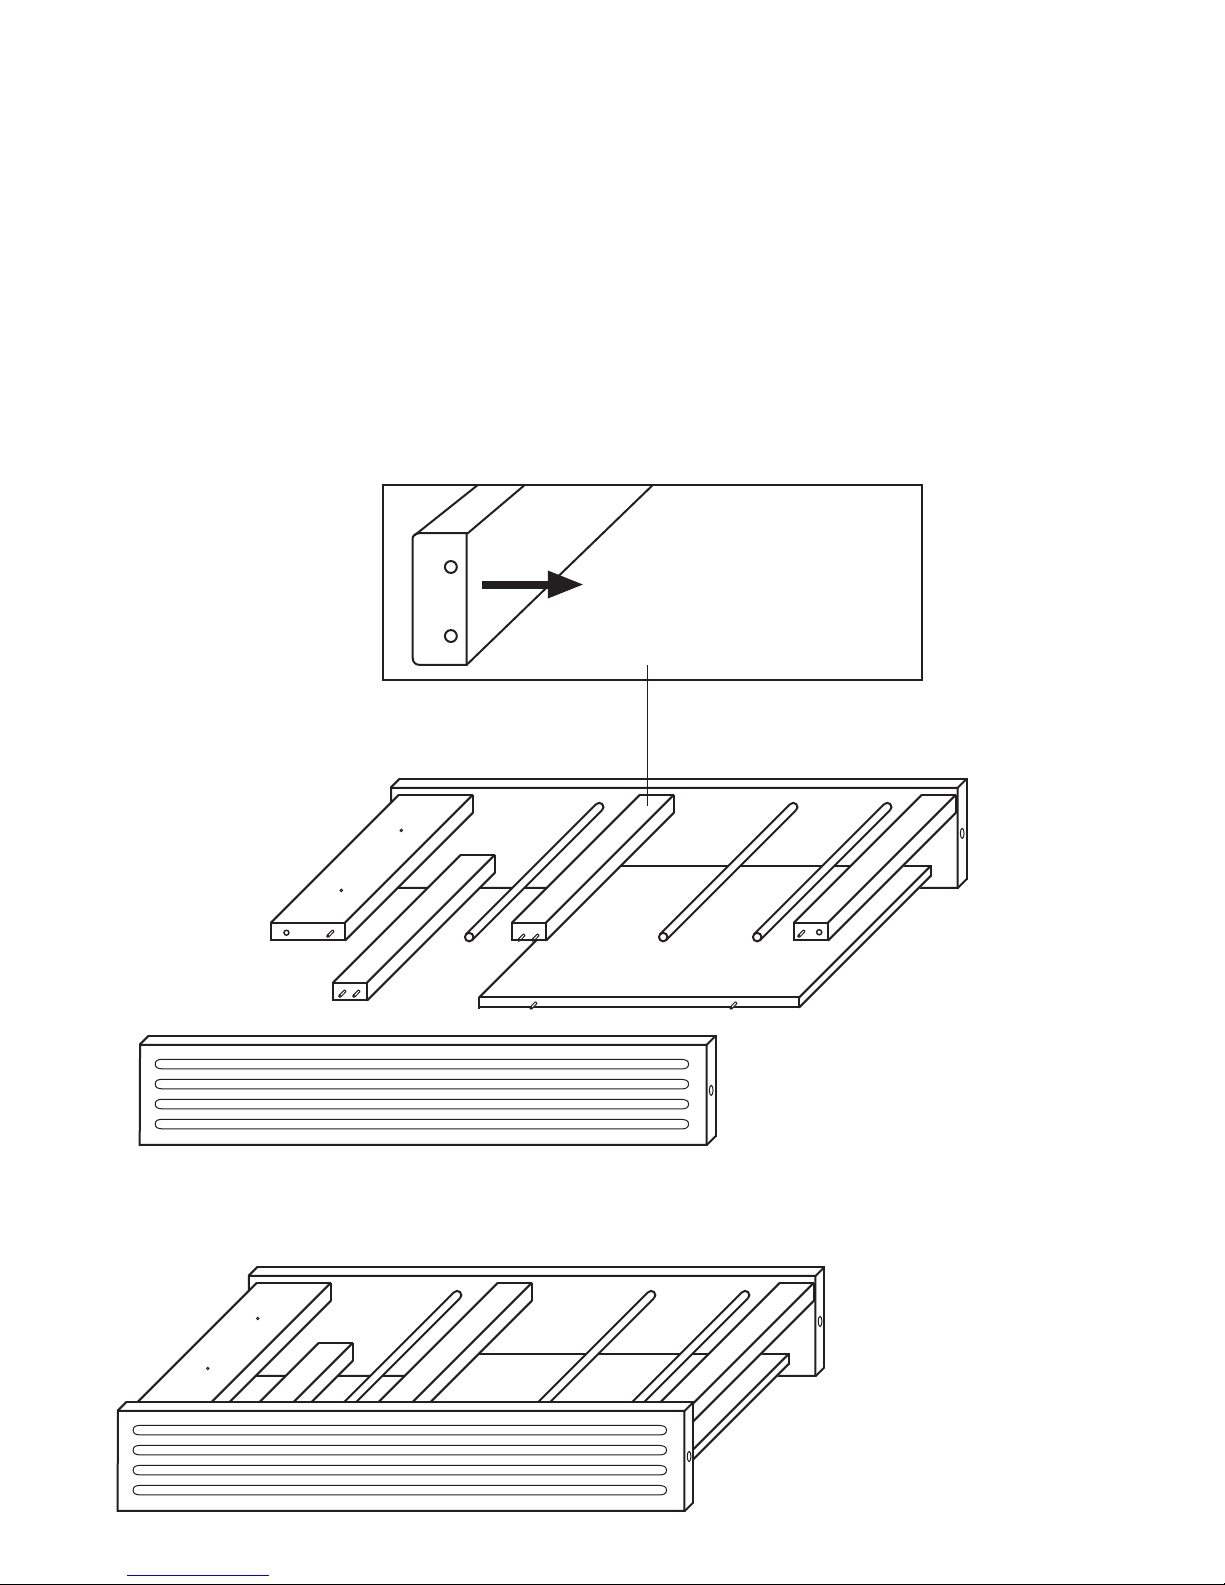
STEP 4
Assemble Cabinet Sides – (We recommend using a second person to help with alignment)
A. Lay a Right Back/Left Front Leg on its back and attach the Top Side Brace to the upper left corner
using the bastion posts and steel pins. Also attach the Middle Side Brace and Bottom Side brace in
like manner. Now slip in the Side Rods into the big holes and t in the Glide Support Brace into the
upper right side so the holes are down and toward the bottom of the brace. Then t the side panel
on the right side of the back leg using 3/4” pins. Make sure that the holes in the braces face the side
panel and glide support. This should now look like illustration 4A.
B. Now take a Left Back/Right Front Leg and t it onto the assembled unit using bastion post/pins.
Now it should look like illustration 4B.
C. Assemble the other side by repeating steps A & B.
Note: Some people nd it
easier to place the leg at on
it’s face with the holes up.
See assembly video.
TOP
Top Side
Glide Support
Toward inside
of cart
Middle Side
Side Panel
IMPORTANT!
Middle Side Brace must be
assembled with the off-center
holes towards the inside of
the cart, rounded edge on the
outside of cart. If the brace is
assembled with holes towards
the outside of the cart, the
center shelf will not fit.
BACK
Bottom Side
BOTTOM
Illustration 4A
FRONT
Illustration 4B
Page 8
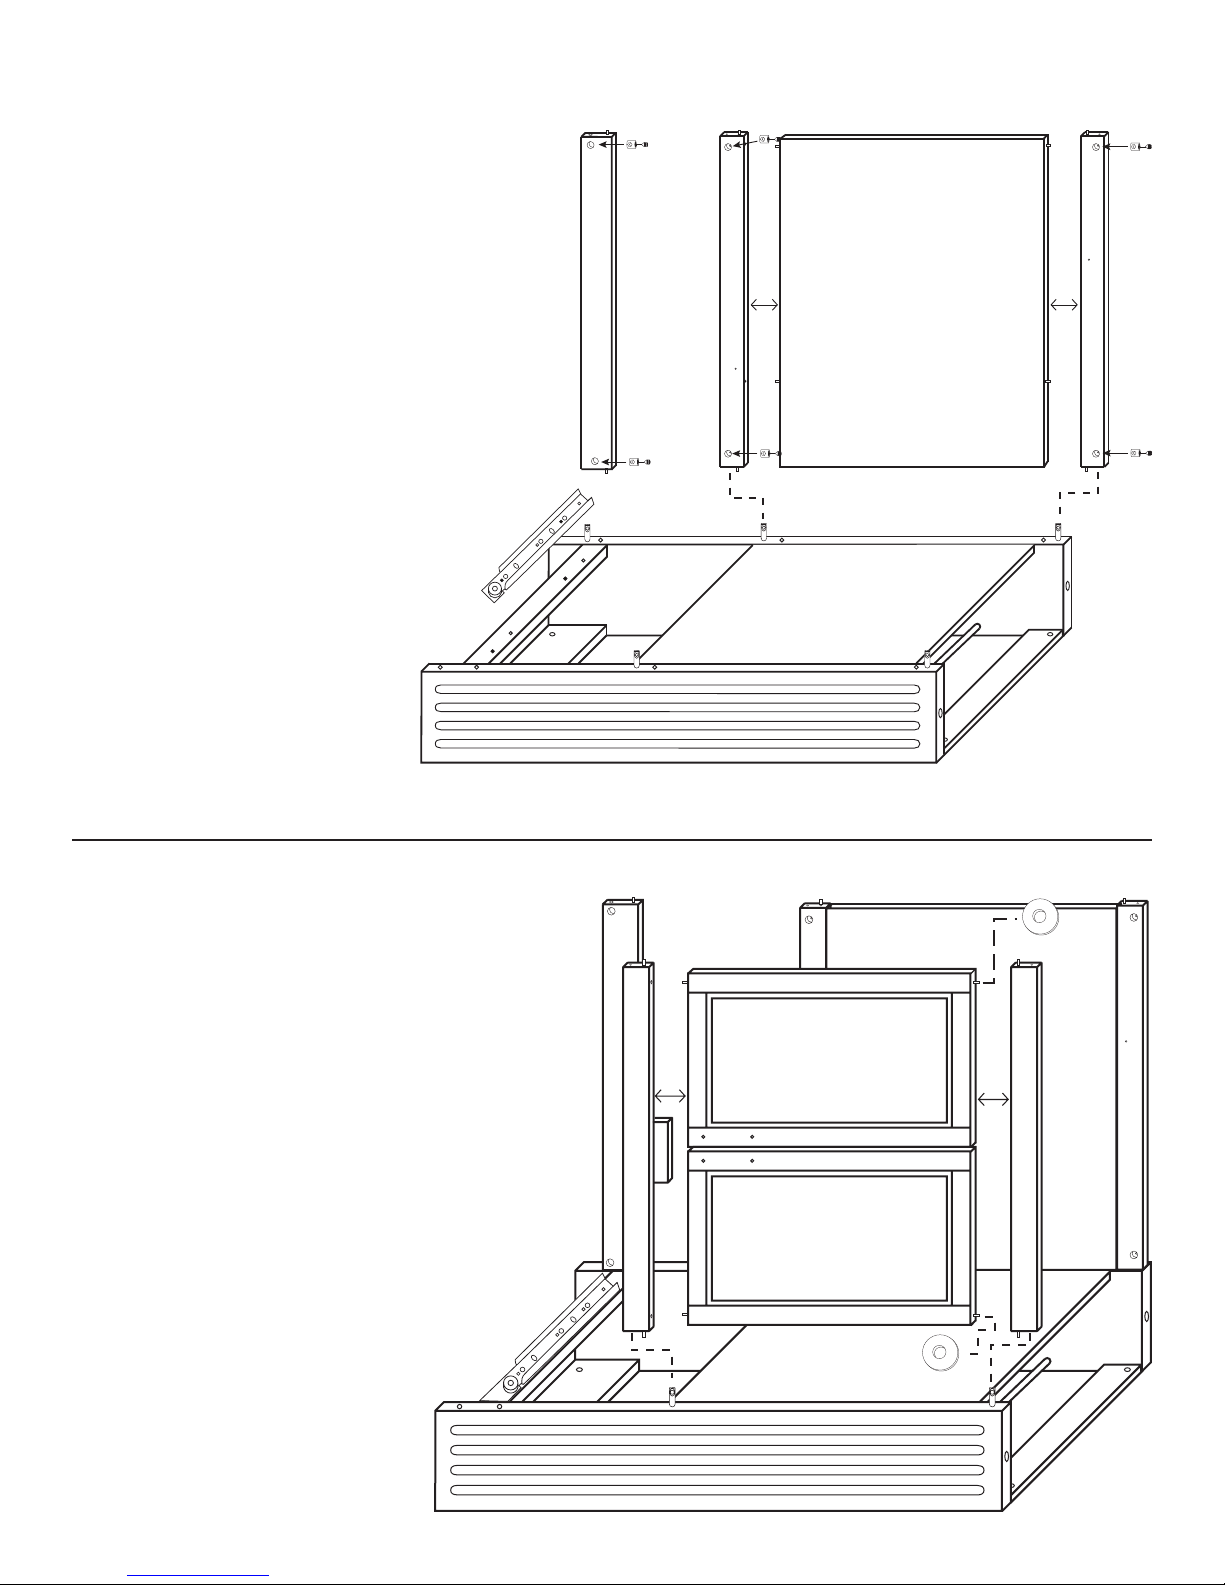
STEP 5
Back Assembly
A. Lay the left side unit as in illustration 5
and attach the top Back Brace using the
bastion post/pins. Now t the Back Panel
between the Bottom Back Brace and Middle
Back Brace using 3/4” steel pins, and then
attach it to the side unit using bastion posts,
pins, barrel nuts and set screws.
See illustration 5
B. Attach the Left Cabinet Glide to the Glide
Support Brace with 5/8” #7 at head screws.
The glides look almost alike however, the
right glide (as you face the cart) has a rolled
lip at the top of the glide that keeps the
drawer glide wheel in place. Line up the
holes in the glides so that the end
with the wheel comes ush with the
edge of the leg.
Inside View
Illustration 5
STEP 6
Front Assembly
A. Tap 1 1/2” pins into the ends of the doors
and t both doors between the Middle Front
Brace and Bottom Front Brace using pins as
shown in illustration 5 but put washers on
pins on the bottom of the doors.
B. Now attach the braces to the side unit
using bastion posts/pins as in illustration 5/6.
Washer
Illustration 6
Washer
Page 9
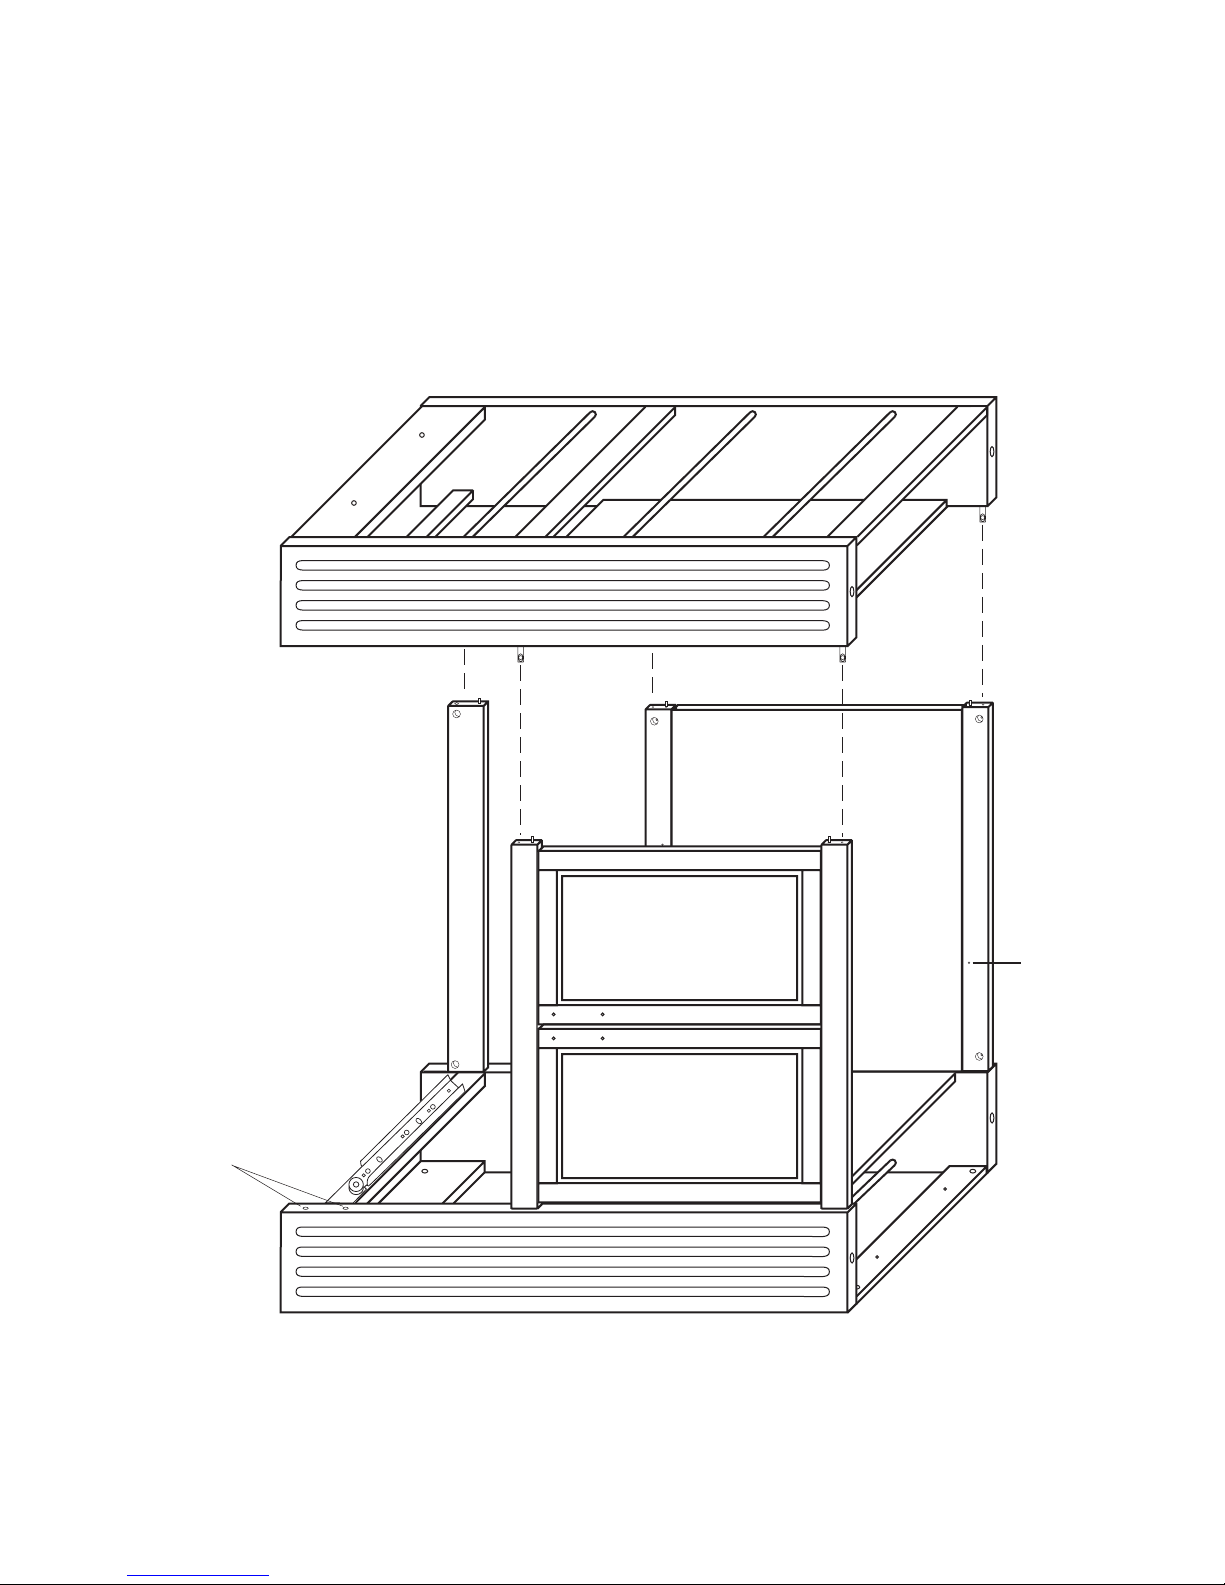
STEP 7
Main Assembly
A. Attach the right cabinet glide to the glide support brace on the right side unit using the same holes
as in step 5B.
B. Take the right side assembly and attach it to the main unit using the bastion system.
NOTE: There are 3 posts in the back legs, only 2 in the front legs (top holes not used on front legs)
Not Used
Not Used
Illustration 7
Page 10
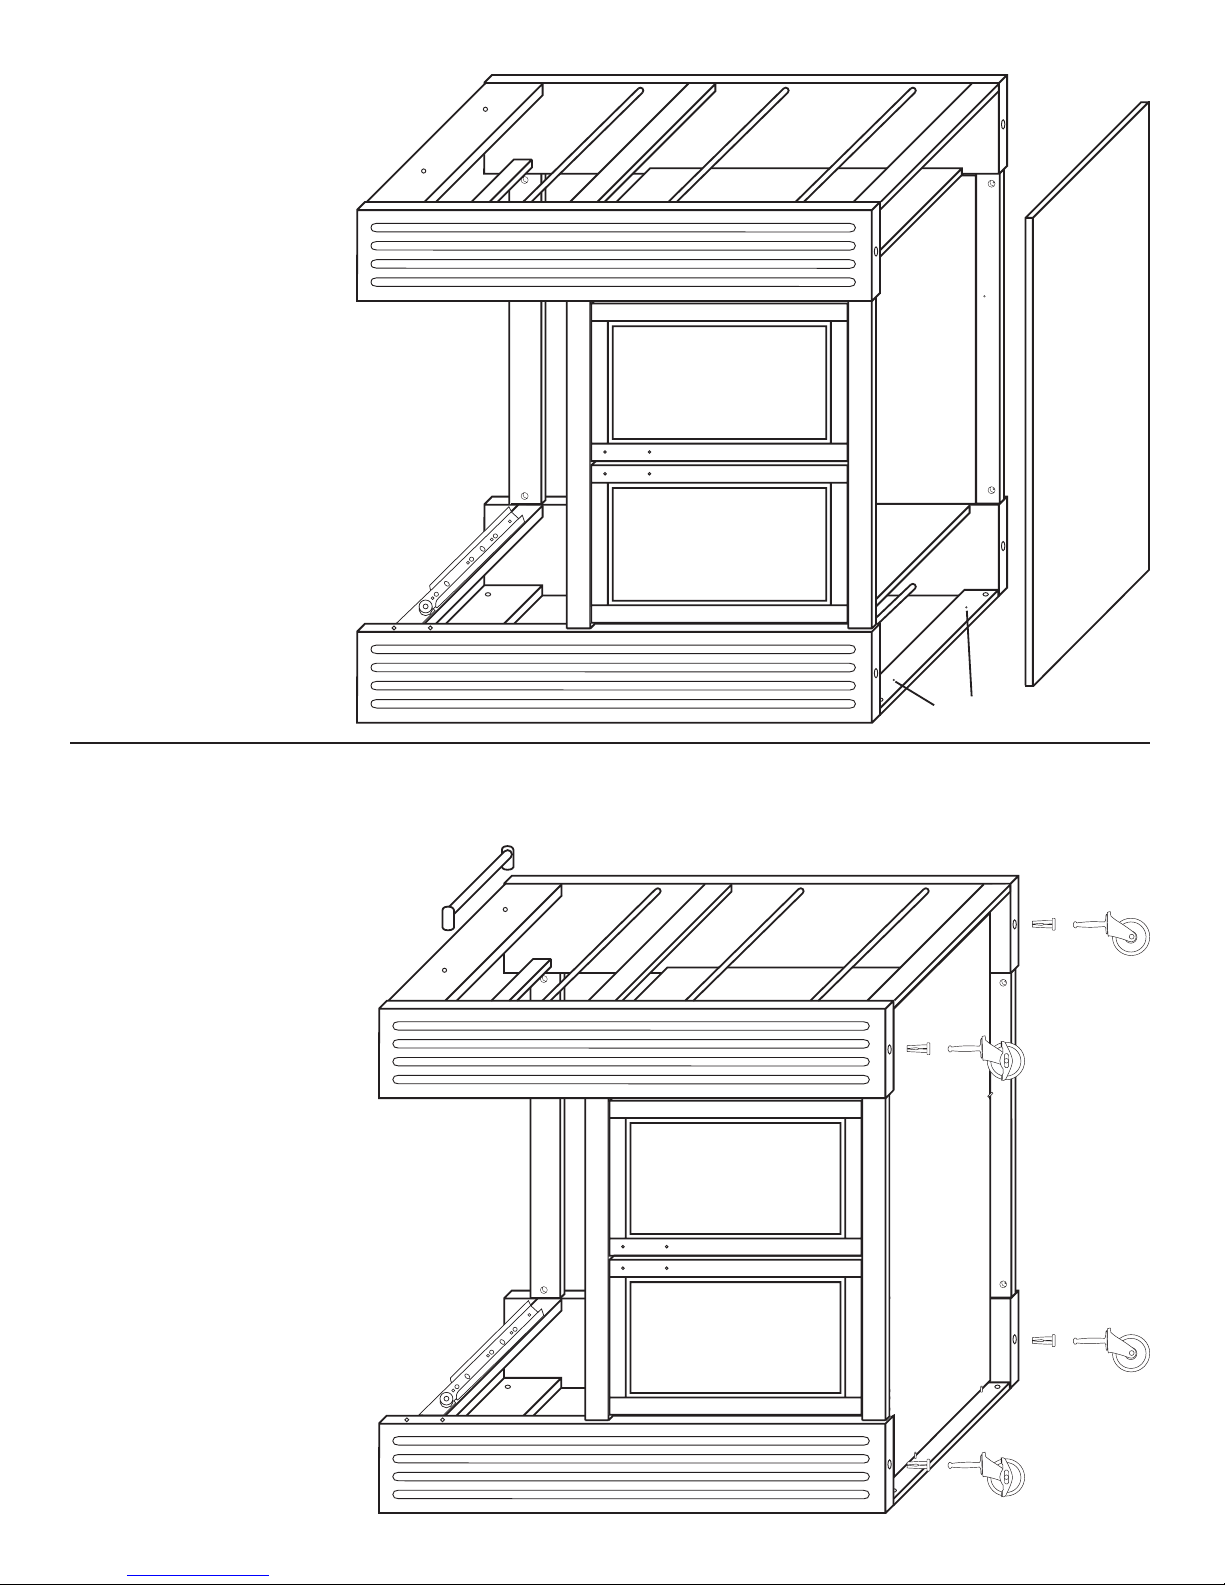
STEP 8
Bottom Assembly
A. With unit still on
its side place bottom
shelf into the bottom
of the cart as in
illustration 8. Secure
by tapping 1” pins (6),
2 in each bottom side
brace and 1 each for
the front/back bottom
braces.
Illustration 8
STEP 9
Caster/Towel Bar Assembly
A. Tap wheel sockets into 3/8”
holes in leg bottoms. Hammer
until socket is seated.
B. Locking wheels in front,
tap in wheels with a
hammer, hitting on solid
xed metal until wheel is
seated. See illustration 9.
C. Upright and attach the handle/
Towel bars to the Top Side Braces
using 1” #8 screws from inside the
Top Side Brace.
1” Pins Go Here
Illustration 9
Page 11
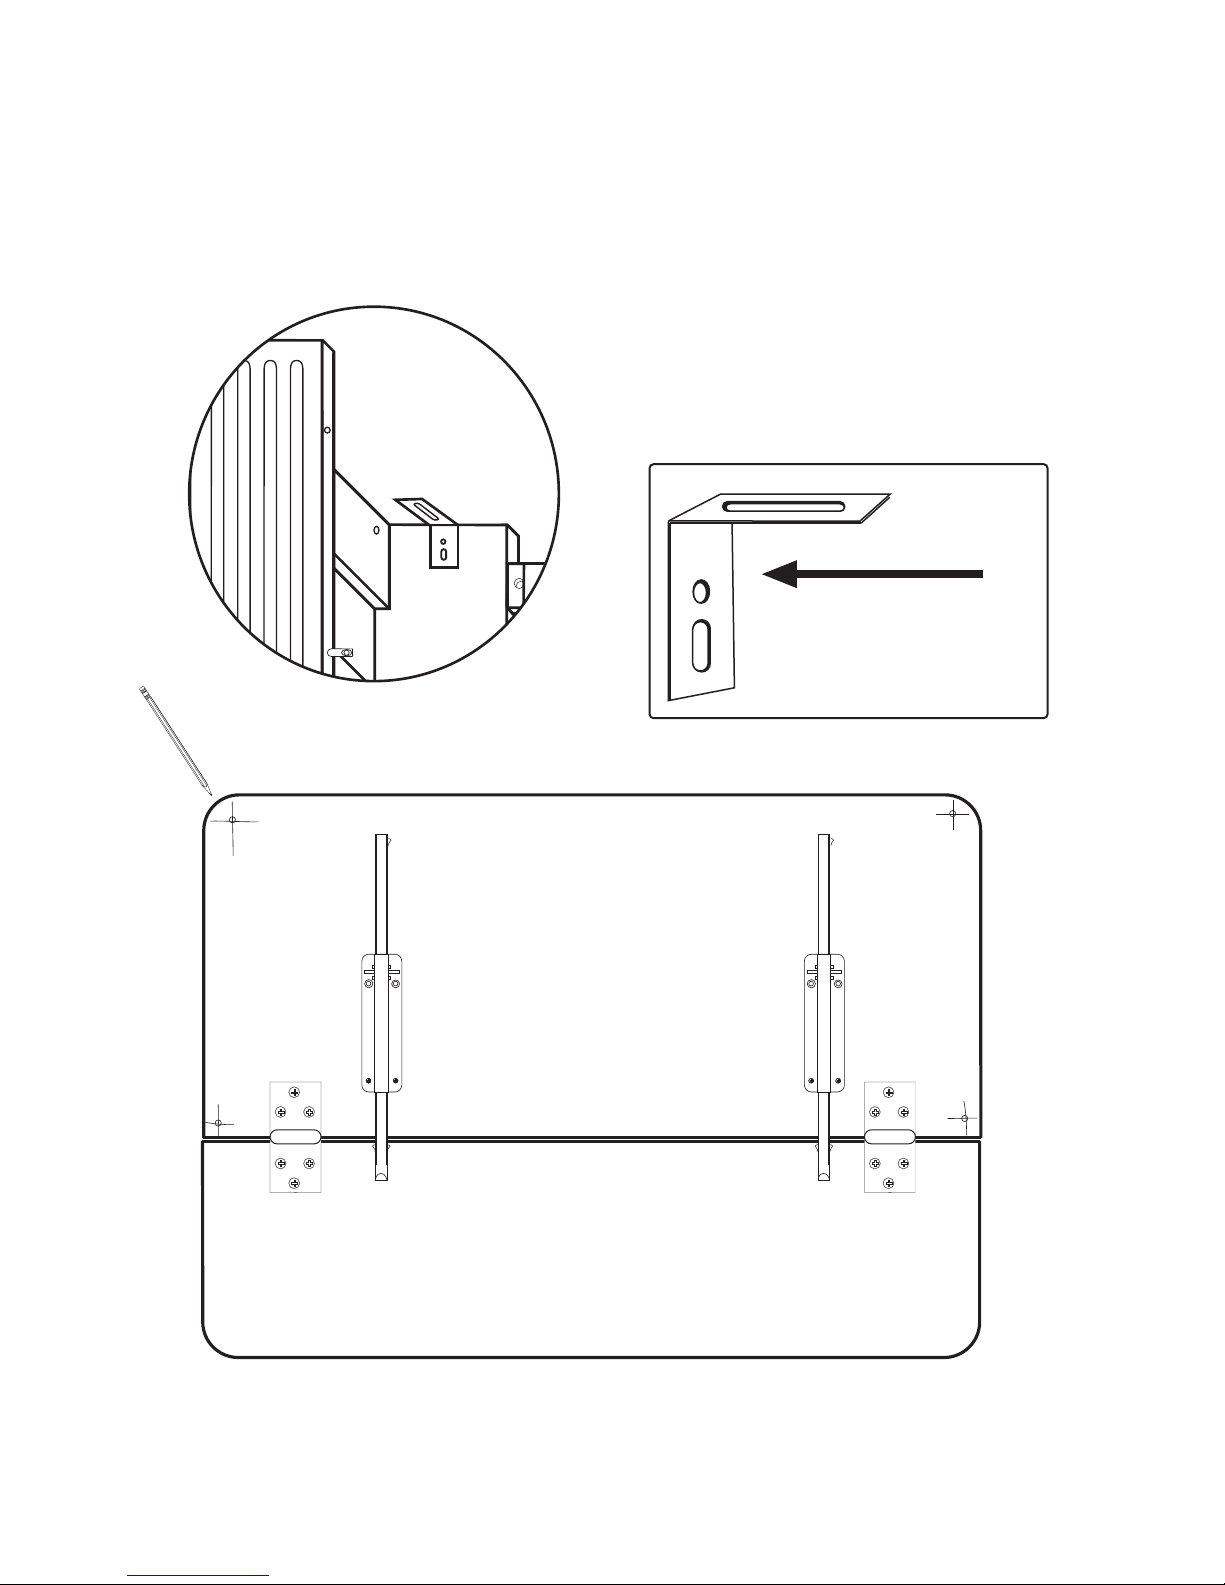
STEP 10
Top Assembly
A. Upright unit and attach an “L” Bracket to the top inside of each leg using 5/8“ #7 Phillips head
screws. The screws go through the round hole in the “L” Bracket.
B. Attach the drop leaf supports and hinges to the Table Top and Drop Leaf using 5/8” #8 screws.
Brace and glide removed in illustration
10A to show placement of “L” Bracket
Illustration 7-A
Make sure the round hole is
used to attach the L-Bracket
to the Leg.
Illustration 10A
A. Mark a cross over the pilot holes as illustrated in Illustration 10B. This helps to line up the pilot
holes when placing the top on the cabinet.
Illustration 10B
Page 12
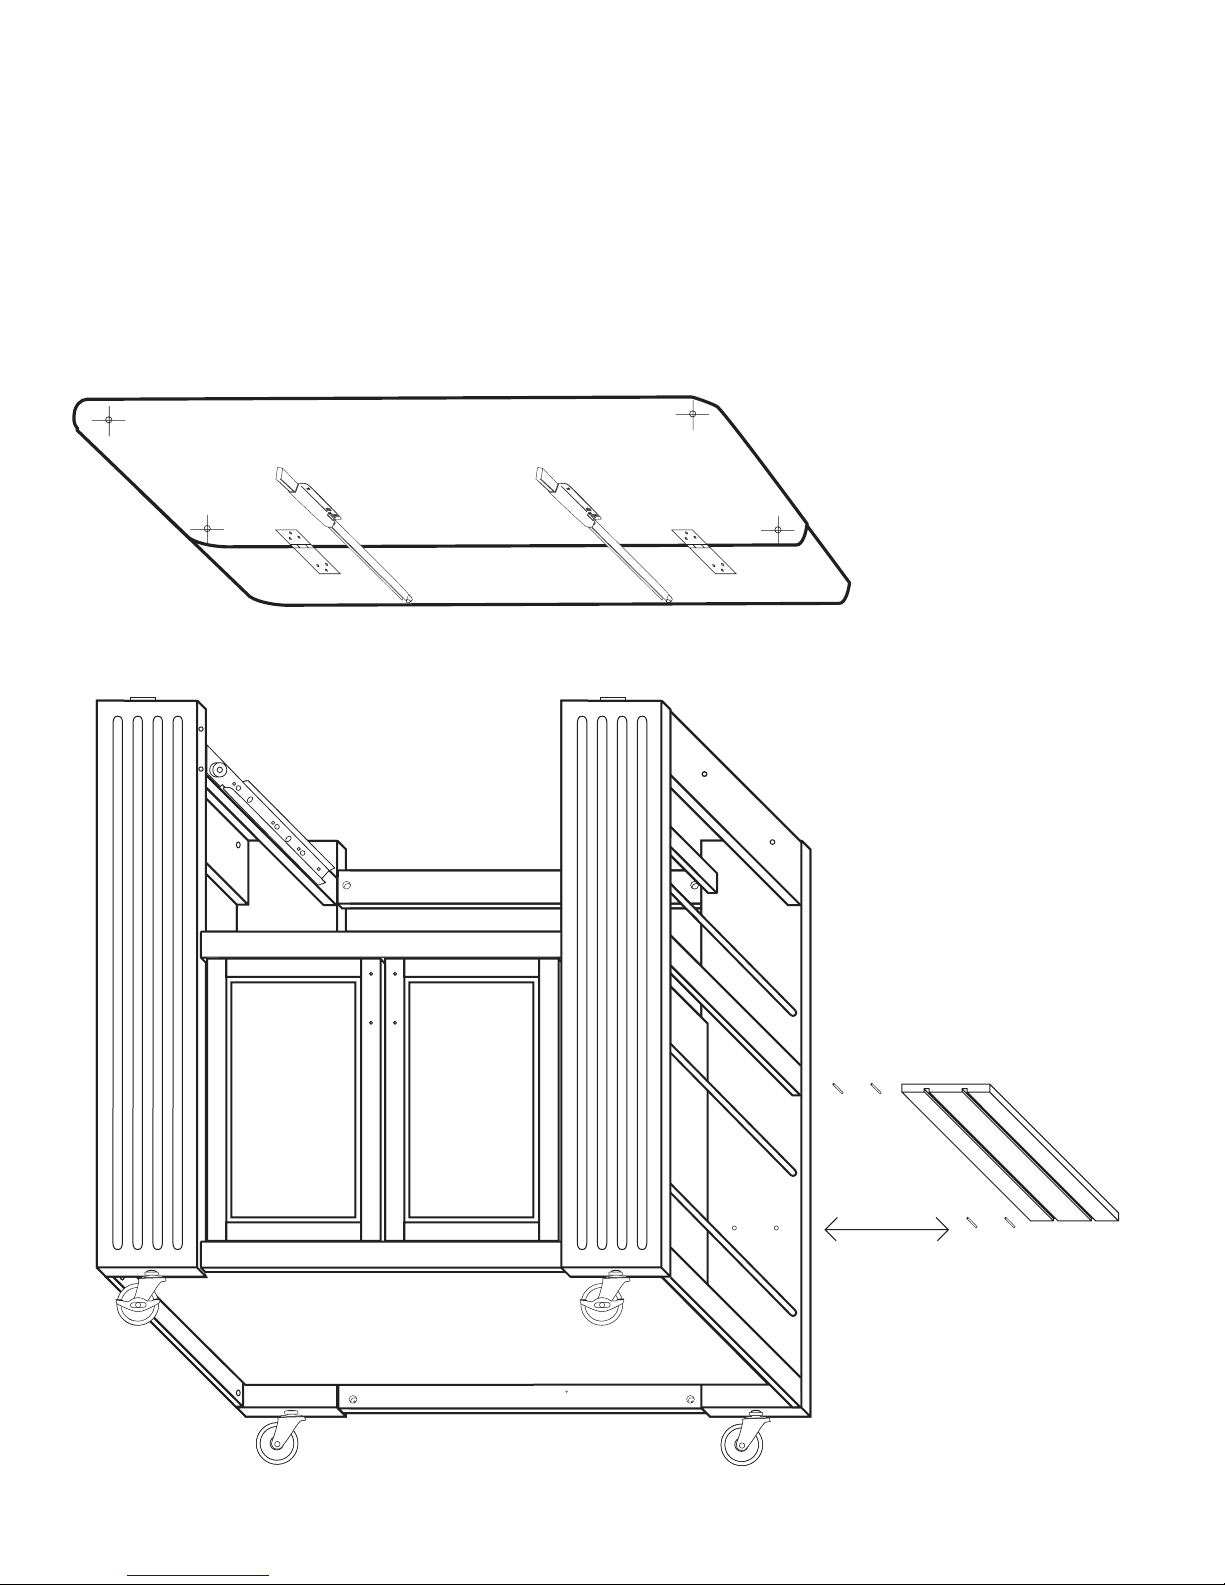
STEP 11 (This step can also be accomplished without the unit upright)
Top Assembly
A. Invert cabinet onto top and secure cabinet to the top using 5/8” #7 screws through the “L”brackets
on the legs, or place cart top on top of cabinet as in illustration 11.
B Insert/tap 1” pins into legs and drop side shelves onto pins, 4 pins for each side shelf.
C. Slide middle shelf into place on top of side panels though one side. Insert drawer.
Illustration 11
Page 13
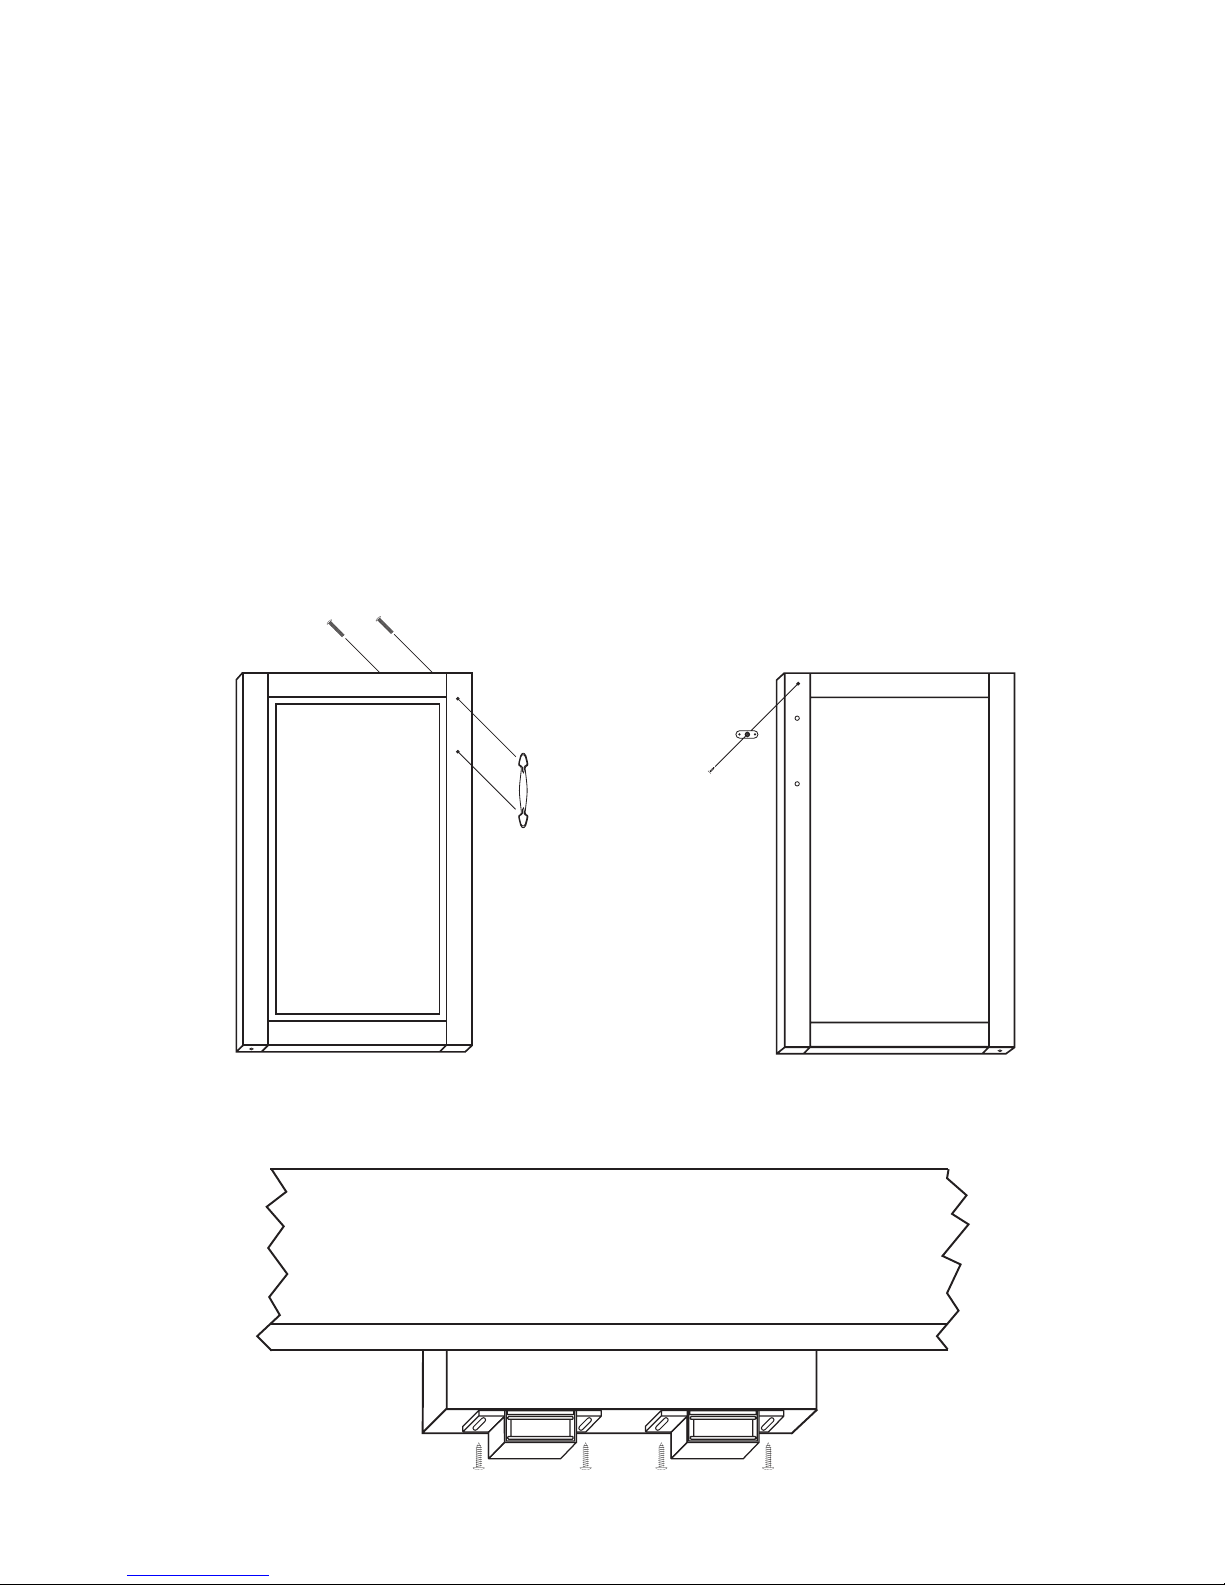
STEP 12
Magnet Block Assembly
A. Attach the magnet plates (may be stuck to magnet!) with 1/2” Phillips at head #4 screws to the
inside top of both doors. The countersunk hole in the plate faces out/bumps go toward wood. See
illustration 12B.
B. Attach metal door handles with 1 8/32” truss head machine screws as in illustration 12A.
C. Stick magnet to magnet plate on right door.
D. With left door open, close the right door. The magnet should be positioned over the wooden block
on the bottom of the Top Front Brace. Hold the magnet in place with your thumb, and open the right
door. The magnet will be in the correct position on the block.
E. Secure magnet with the two round head screws in the magnet packet as in illustration 12 C. Center
screws in the slots in the magnets. This will allow adjustment later, if needed. There are no pilot holes
as blocks are soft wood.
F. Repeat with left door.
Illustration 12A Illustration 12B
Illustration 12C
Page 14
For continued beauty and long life of your
Catskill Craftsmen cart, we recommend
Catskill Craftsmen’s Butcher Block Oil.
Our Butcher Block Oil is available direct-
ly from Catskill Craftsmen’s factory. For
one eight ounce (8 . oz.) bottle, which
is sufcient for two applications, simply
send $
7.95 along with the completed
coupon to the address below. Visit us
online at www.catskillcraftsmen.com to
browse our assortment of butcher block
care products. Visa and Mastercard are
accepted online.
BUTCHER BLOCK OIL COUPON
Please send me______# of bottle(s) of the
Catskill Craftsmen Butcher Block Oil at $7.95
per bottle. My check or money order is
enclosed for a total of $____________.
Item code: 15445
Name _______________________________
Address _____________________________
City ________________________________
State ___________ Zip ________________
Catskill Craftsmen, Inc.
Stamford, NY 12167-1296
15 West End Ave.
Please make checks payable to Catskill Craftsmen
Inc. 15 West End Ave., Stamford, NY 12167-1296
 Loading...