

CAT MATE MICROCHIP CAT FLAP Instructions Manual
CAT MATE
®
INSTRUCTIONS
© PET MATE Ltd · Lyon Road · Hersham · Surrey · KT12 3PU · England
N America: Ani Mate · 104A Longview Drive · Conroe · Texas 77301
36002/0514UK
Ref. 360
MICROCHIP CAT FLAP
For model:
www.pet-mate.com
+44 (0)1932 700 001
N America (936) 760 4333
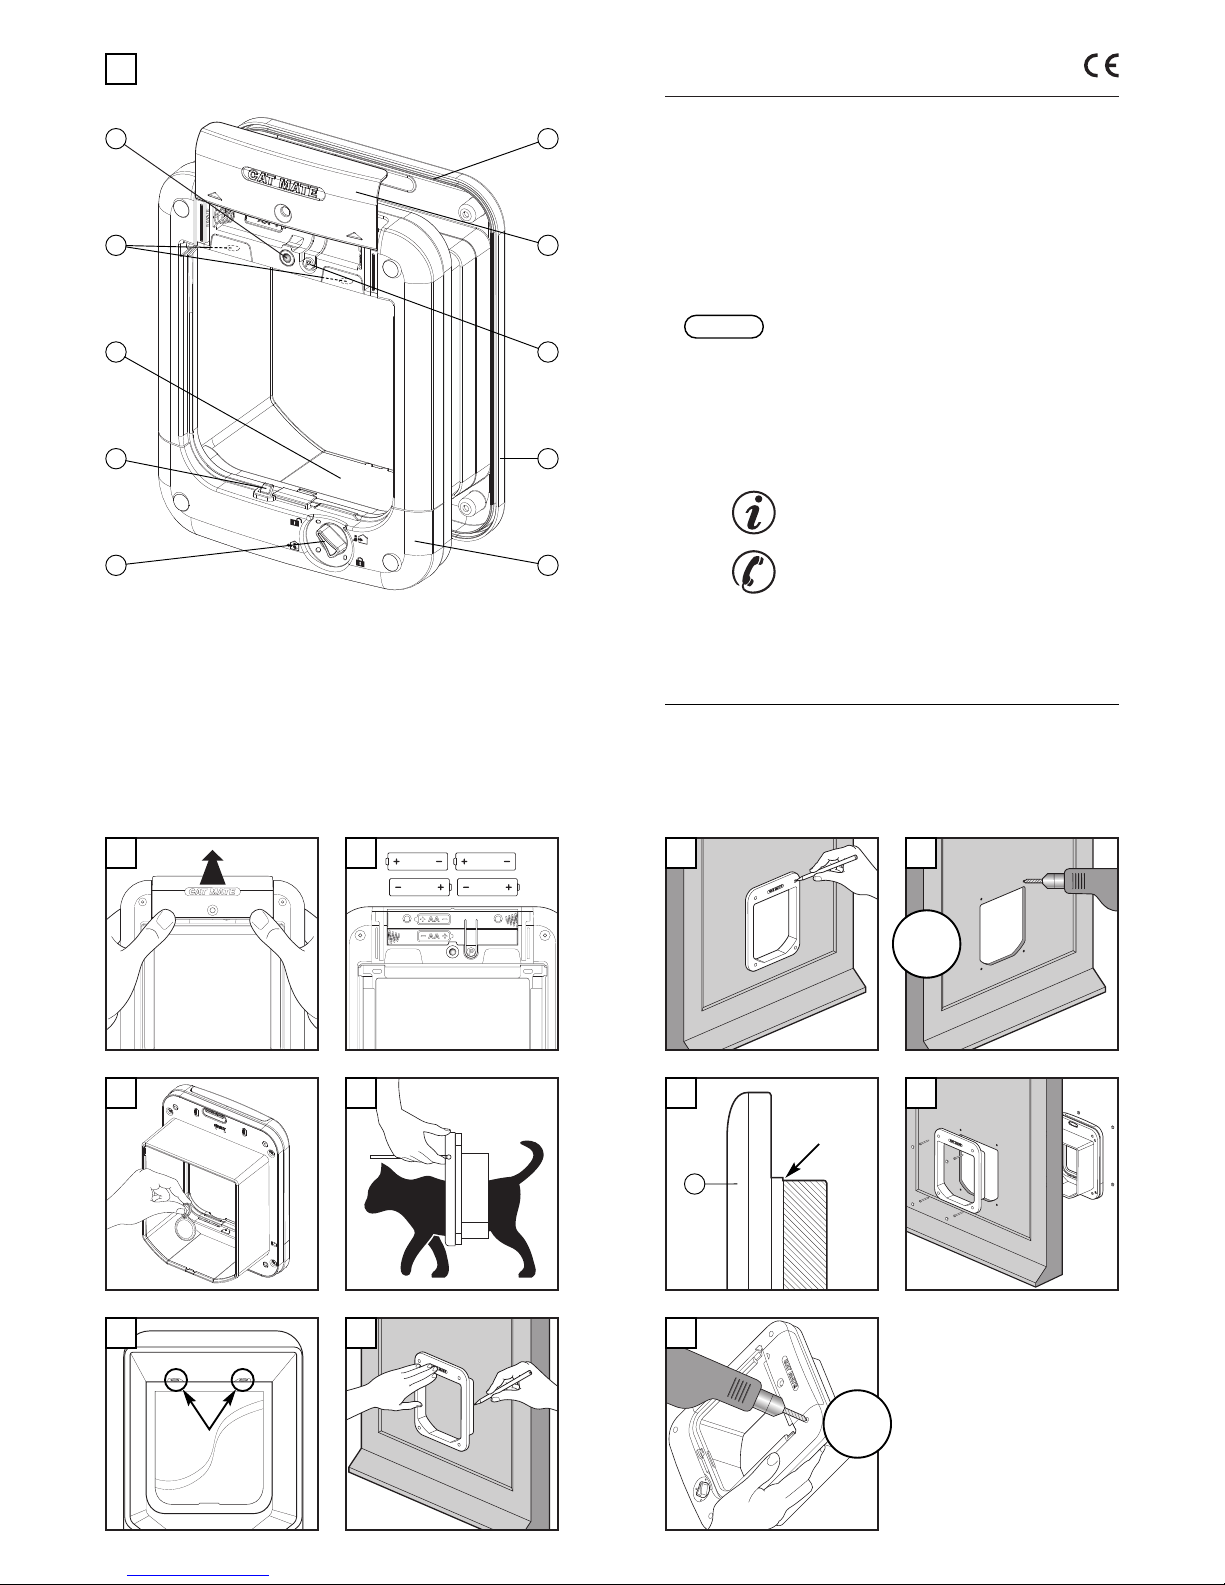
1
A
B
C
D
F
G
H
E
I
J
A. LED
B. Detector lenses
C. Tunnel
D. Catch
E. Rotary 4 way lock
F. Interior frame
G. Exterior frame
H. 'PROGRAM' button
I. Battery Cover
J. Seal
4
6
5
7
2
3
CLEAN
10
8
G
CUT
T
O
LINE
9
11
12
Ø
6mm
1
/4”
Ø
5mm
3
/16”

1.
Introduction
Thank you for choosing the Cat Mate Microchip Cat Flap.
CAREFULLY READ THESE INSTRUCTIONS AND PROGRAM THE CAT
FLAP BEFORE YOU INSTALL IT.
The Cat Mate Microchip Cat Flap allows you to control up to 30 cats' access
through your cat flap.
This cat flap is suitable for all popular microchips. Alternatively it may be
operated by a Cat Mate I.D. Disc (available seperately). You may wish to use
an I.D. Disc for cats without a microchip or in the event that your cat’s
microchip is faulty or poorly positioned.
2.
Fitting the Batteries
2.1
Remove the battery cover by pushing the battery cover upwards (see
Fig.
2).
2.2 Inser t 4 x AA (R6) batteries as shown (Fig. 3). Do not replace cover until
you have programmed the cat flap.
2.3 The cat flap will self check for up to 30 seconds and then the flap is
ready to program.
All popular batteries can be used including rechargeable batteries, but the
battery warning (Section 6) will only work correctly with alkaline batteries.
Good quality alkaline batter
ies should last approximately 12 months
(depending on n
umber of cats and usage). You
MUST NOTuse lithium
batter
ies.
3.
Programming
Prog
ram your cat’s microchip or I.D. Disc(s) as follows:
3.1
Press and hold the 'PROGRAM' button (H, Fig. 1) for 5 seconds until
the LED (A) illuminates
. Wait a minimum of 10 seconds.
3.2
Place an I.D. Disc in the tunnel opening (Fig. 4) or to program your cat’s
microchip
, encourage your cat to slowly pass through the tunnel by
holding the flap open as sho
wn in Fig. 5 after checking the rotary 4 way
loc
k (E) is set to 'IN & OUT'.
3.3
When programmed, the LED will flash.
3.4
Press the 'PROGRAM' button to save the setting.
For additional cats, up to a maximum of 30, repeat steps 3.1 to 3.4.
NO
TE: If you attempt to program more than 30 I.D. Discs / microchips, the LED
will flash.
If this occurs perform a 'FACTORY RESET' (Section 8) and
reprogram I.D. Discs / microchips in current use.
4. Access Options
Once your cat(s) microchip(s) / I.D. Disc(s) are programmed, the access
options available with the rotary 4 way lock are:
'
In & Out'Your cat(s) can come in and out of the flap
'
In Only'Your cat(s) can come in through the flap but cannot
leave through the flap
'
Out Only'Cat(s) can go out through the flap but cannot enter
through the flap
'
Loc
ked
'
Cat(s) cannot use the flap
5. Training Your Cat to Use the Cat Flap or if Your Cat Has Lost its
I.D. Disc
It may take a little time for your cat to get used to its new cat flap. To help
your cat get used to entering and exiting the flap, the flap can be set to
'TRAINING MODE' as f
ollo
ws:
5.1 Remove one battery for 60 seconds.
5.2 Replace battery and wait until interior lock (D) drops after approximately
5 seconds.
5.3 Remove battery within 5 seconds before lock is reactivated and replace
battery cover.
Please be aware that in Training Mode your cat flap will allow access for other
animals
.
To exit the 'TRAINING MODE', simply reinstall all batteries.
NOTE: We do NOT recommend that cats, particularly kittens, are left alone to
use their cat flap until you are satisfied that they are completely familiar with
its operation.
6. Battery Replacement
When the LED flashes slowly (every 30 seconds), alkaline batteries should be
replaced (See Section 2).
Please note
, after fitting ne
w batter
ies the Batter
y w
ar
ning ma
y tak
e up to
15 minutes to disappear.
7. Factory Reset
To erase all programmed I.D. Discs / microchips, press and hold the
'PROGRAM' button for 30 seconds until LED flashes. After a further 30
seconds you may re-programme I.D. Disc(s) / microchip(s) (See Section 3).
8. Maintenance
Regularly clean the two detector lenses
(B, Fig. 6)
fitted in the top of the tunnel
and the interior surface of the tunnel (C) using a damp cloth. Avoid waiting
until the urgent need to clean these surfaces, indicated by a double flash of
the LED (A) every 30 seconds.
9.
Fitting Instructions (See Figs. 7 to 11)
W
ood / Plastic / Metal Door Panels
NO
TE - N. America only: This flap is not suited to 10 digit FDXA microchipped
pets in combination with MET
AL panels.
9.1
Place the exterior frame in desired position on panel and draw round the
outside of the tunnel section as shown in Fig. 7. We recommend the
bottom of the hole is appro
ximately level with your pet's stomach.
9.2 Use an electric jig-saw to cut 2mm (
1
/16”) outside drawn line. Be careful
to cut hole square to the door
, particularly with thicker doors. Ensure
fr
ames are free-fitting in hole.
9.3
Determine thickness of door panel.
9.4 For door panels 3mm (1/8”) - 25mm (1”) thick:
9.4.1 Position exterior frame on outside of door and mark four screw
positions (Fig.
8).
9.4.2
Remove frame and carefully drill screw clearance holes square to
panel at 6mm (
1
/4”) diameter (Fig.
9).
9.4.3
For panels less than 17mm (
5
/8”) thic
k, cut excess liner from
exterior frame (G) as shown in Fig. 10 with a hacksaw or plastic
cutting disc.
9.4.4 Fit seal (J) to exterior frame. Position exterior frame on outside of
door
. Screw interior frame to it by using 37mm (1
1
/2”) scre
ws.
Finally
, fit screw caps (Fig. 11).
9.5
For door panels 25mm (1”) + thick:
9.5.1 Carefully drill out four holes in interior frame to allow close
clearance on screws (recommended drill 5mm (
3
/16”) diameter) as
sho
wn in Fig. 12.
9.5.2
Fit seal (J) to exterior frame. Screw exterior frame to outside of
door using 13mm (
1
/2”) scre
ws.
9.5.3
Screw interior frame to inside of door using 22mm (
7
/8”) scre
ws.
Finally, fit screw caps.
Metal Panels (including plastic coated metal)
After fitting, ensure the flap is tuned to the metal panel by pressing the
'PR
OGRAM' button (H) for 5 seconds until LED (A) lights. After 10 seconds
press the 'PROGRAM' button again to complete retuning.
Walls / Glass Panels
For easy installation you will require an adapter kit available from your cat flap
supplier or direct from Pet Mate (Product Ref. 361).
10. Troubleshooting
10.1 Red LED (A) flashing
• 1 flash every 30 seconds indicates need to replace alkaline batteries.
• 2 flashes every 30 seconds indicates cleaning required (See
Section 8).
• Random flashing indicates changes in light level or need to clean cat
flap (See Section 8).
10.2 Flap does not open in response to programmed I.D. Disc or microchip
•
Chec
k '4
WAY' lock is set to permit access in the chosen direction.
• Check catch (D, Fig. 1) moves freely up and down.
•
Clean cat detector lenses and tunnel (See Section 8).
• Check batteries are correctly orientated (Fig. 3) and not in need of
replacement (See Section 6).
• Check I.D. Disc is correctly fitted to cat's collar.
• If possible, try operation with another programmed I.D.Disc / microchip
to ascertain if there is a fault with a particular I.D. Disc / microchip.
• Check cat flap is mounted at correct height (See Section 9).
• If all else fails, remove one battery and wait a minimum of 5 minutes.
Refit batter
y and then chec
k if flap functions correctly
.
If not perf
or
m a
'F
A
CT
OR
Y RESET' (See Section 7) before reprogramming (See
Section 3).
Pet Mate Ltd. guarantees your product for a period of 3 years from the date of
purchase, subject to the registration of your purchase details on our website
www
.pet-mate
.com
within 14 da
ys of purchase
.
(If y
ou do not ha
v
e access to a
computer
, please send details of y
our purchase with copy of receipt along with
your name and address.) In the event of a fault developing contact Pet Mate
customer ser
vices f
or a retur
ns author
isation n
umber.The guarantee is limited to
any defect arising due to faulty materials or manufacture. Any defective item will
be repaired or replaced free of charge at the manufacturer’s discretion, provided
that the defect has not been caused by neglect, misuse or normal wear and tear.
Your statutor y rights are not affected.
 Loading...