

Page 1

Page 2

Introduction
Thank you for purchasing the CATEYE Q3a Multi-Sport Computer.
The Q3a is a wristwatch heart rate monitor with additional cyclocomputer features to
allow athletes to extensively organize and analyze their training data.
2.4 GHz-frequency digital wireless technology, the same technology used for everyday
equipment such as wireless network is used for both the integrated cadence/speed
sensor and the heart rate sensor. This technology practically eliminates all interference
from external noise and cross-talk with other wireless users, providing you with
stress-free riding.
Read this instruction manual thoroughly and understand the functions of the wristwatch
before using it. Keep this manual in a safe place for future reference.
Important
Always follow the instructions that are marked with “• Warning!!!”.
No part of this manual may be reproduced or transmitted without the prior written •
permission of CatEye Co., Ltd.
The contents and illustrations in this manual are subject to change without notice.•
If you have any questions or concerns about this manual, please contact CatEye •
at www.cateye.com.
This device complies with Part 15 of the FCC Rules and Industry Canada licence-exempt RSS
standard(s). Operation is subject to the following two conditions: (1) this device may not cause
harmful interference, and (2) this device must accept any interference received, including interference that may cause undesired operation.
L’appareil est conforme à la réglementation FCC, section 15 et Industrie Canada RSS standard
exempts de licence (s). Son utilisation est soumise à deux conditions :
1. L’appareil ne doit pas provoquer d’interférences nuisibles, et
2. L’appareil doit supporter les interférences reçues, y compris les interférences empêchant
son fonctionnement correct.
Modifications
The FCC requires the user to be notified that any changes or modifications made to this device that are
not expressly approved by CatEye Co., Ltd. may void the user ’s authority to operate the equipment.
NOTE: This equipment has been tested and found to comply with the limits for a Class B digital
device, pursuant to Part 15 of the FCC Rules. These limits are designed to provide reasonable
protection against harmful interference in a residential installation. This equipment generates,
uses and can radiate radio frequency energy and, if not installed and used in accordance with
the instructions, may cause harmful interference to radio communications. However, there is
no guarantee that interference will not occur in a particular installation.
If this equipment does cause harmful interference to radio or television reception, which can
be determined by turning the equipment off and on, the user is encouraged to try to correct the
interference by one or more of the following measures:
Reorient or relocate the receiving antenna.•
Increase the separation between the equipment and receiver. •
Connect the equipment into an outlet on a circuit different from that to which the receiver is connected. •
Consult the dealer or an experienced radio/TV technician for help.•
This Class B digital apparatus complies with Canadian ICES-003.
Cet appareil numérique de la classe B est conforme à la norme NMB-003 du Canada.
Continue
ENG-1
Page 3

About the manuals
Before use
See this section for installation of the unit on the bicycle, use of the heart rate
sensor, wristwatch set-up, and the basic operation of the product.
Bicycle Installation• ..........................................See page 10-12
Heart rate sensor• .............................................See page 13
Wristwatch set-up• ...........................................See page 14-21
Basic wristwatch operation• .............................See page 22-23
Clock mode (CLOCK)
See this section to learn how to operate the Clock mode functions.
Alarm clock• .....................................................See page 24
Sports mode (SPORTS)
See this section to learn how to operate the wristwatch functions.
Display data in Sports mode• ...........................See page 28-29
Option mode (OPTION)
See this section to learn how to operate the training functions frequently used in Sports
mode (countdown and interval functions), and how to set the HR target zone.
Training functions• ...........................................See page 32-35
Setting the target heart rate zones• ..................See page 37-38
Data mode (DATA)
See this section to review and manage the recorded files.
Recorded data review (File view)• .....................See page 40-45 “File view”
Download recorded data to PC (PC link)• .........See page 45-47 “PC link”
Setup mode (SETUP)
See this section to change the wristwatch configuration.
Changing the wristwatch configuration• ...........See page 49-60
About the CD-ROM supplied
The CD-ROM supplied contains the following information.
Quick start manual • (PDF file)
Installing the unit on the bicycle and setting up the wristwatch are described
using video.
Download software “e-Train Data™• (Windows version)”
This software is used to transfer the measurement data to your personal computer, and then use various functions on the PC, such as a graph display (The
optional “USB communication kit” is required).
Instruction manual • (PDF file)
This manual can be viewed in PDF file (7 languages).
Use the CD-ROM in combination with this manual.
ENG-2
Page 4

Contents
Introduction .........................1
About the manuals .................2
Proper use of the CatEye Q3a ....5
Important ............................6
Description of wristwatch and
its parts ..............................8
Wristwatch .................................8
Accessories................................8
Screen display .....................9
Bicycle Installation ..............10
Mount the speed sensor and
magnet .....................................10
Install the wristwatch onto
the handlebar ...........................12
Heart rate sensor ................ 13
Before wearing the heart rate
sensor ......................................13
Wearing the heart rate sensor
Preparing the wristwatch ....... 14
Removing the insulation sheet
Restarting ................................14
Setting the clock/date ..............15
Switching to the Setup mode ...16
Tire circumference input .......... 16
Selecting measurement unit ....18
Switching to the Sports mode
Operation test ..........................19
Formatting/Restarting
operation..................................21
Basic operation of the
wristwatch ........................ 22
Switching between modes .......22
Backlight ..................................23
Power-saving mode .................23
...13
...14
...18
Transmission sleep mode ........ 23
Saving the power of the
wristwatch ...............................23
Clock mode (CLOCK) ............24
Functions in Clock mode ..........24
Display data in Clock mode ......24
Alarm clock mode ....................24
Sports mode (SPORTS) .........25
Function in Sports mode ..........25
Upper and middle display data
Lower display data ...................26
Starting/Stopping
measurement ...........................26
Resetting the measurement
data and saving the files ..........27
Display data in Sports mode .... 28
Pace function ...........................30
Lap function .............................30
Training function ......................32
Target heart rate zone ..............35
Option mode (OPTION) .......... 36
Function in Option mode ..........36
Setting the training function.....36
Setting the target heart rate
zones .......................................37
Data mode (DATA) ............... 39
Function in Data mode .............39
File view ...................................40
PC link .....................................45
Past records.............................47
Setup mode (SETUP) ............ 49
Function in Setup mode ...........49
Setting the clock/date ..............50
Setting the alarm clock ............51
Setting the tire circumference
...25
...52
Continue
ENG-3
Page 5

Searching for sensor ID ........... 53
Setting the measurement unit
...55
Setting the record interval ........56
Total trip distance/total
elapsed time entry....................57
Setting the auto-mode .............58
Setting sound...........................59
Correcting the sea level altitude
...60
Basic knowledge of the
altitude measurement ........... 61
Altitude measurement function
...61
Relation between the altitude
and atmospheric pressure .......62
Knowledge related to weather
and altitude ..............................62
Heart rate training ............... 63
Target heart rate zone ..............63
Training for competition ..........66
Use of the target zone ..............67
Trouble shooting ................. 68
Trouble on display ...................68
Trouble on operation................70
Water resistance of the
wristwatch ........................ 71
Before aquatic and outdoor
activities ...................................71
Replacing battery ................ 71
Wristwatch ...............................72
Heart rate sensor .....................72
Speed sensor ...........................72
Maintenance ...................... 73
Spare accessories ...............73
Flow of the screen ...............74
Specifications .................... 76
Registration....................... 78
Limited warranty ................. 78
Index ............................... 79
ENG-4
Page 6

Proper use of the CatEye Q3a
Please follow the following instructions for safe usage.
The meaning of icons in this manual:
Warning!!!: Sections marked with these icons are critical for safe use of the
Caution:
The meaning of color on the screen in this manual:
Red: Indicates the displayed data is flashing.
Black/gray: Indicates the displayed data is on.
Warning!!!:
Pace maker users should never use this device.•
Cycling can be a dangerous sport. Always remember to pay attention to the road, •
traffic, and surroundings.
The altitude data of this unit is for reference only. Do not use this unit as an •
instrument for professional purposes.
Do not leave any battery within the reach of children, and dispose of them cor-•
rectly. If a battery is swallowed, consult a doctor immediately.
Caution:
Regularly check the positions of the magnets and the speed/cadence sensors and •
make sure that they are securely mounted. If loose, tighten firmly to avoid falling
and damage.
Avoid leaving the uni t in direct sunlight for extended periods of time. •
A temperature sensor built inside the wristwatch to calculate the altitude may be
affected from excessive heat, causing inaccurate display of temperature.
Do not disassemble the wristwatch, heart rate sensor, or speed sensor.•
Do not subject the wristwatch, heart rate sensor, or speed sensor to strong impact; •
take care also to prevent any of them from falling.
Do not use paint thinner or rubbing alcohol to clean the unit. Use a damp cloth and •
use mild detergent if necessary.
Stop using the unit if you have skin irritation with the HR strap or electrode pad.•
Do not twist or pull strongly the heart rate sensor.•
The heart rate sensor may deteriorate due to long-term use. Replace the heart rate •
sensor if it has frequent measurement errors.
As a nature of liquid crystal displays, sunglasses with polarized lens may block the •
visibility.
device. Be sure to follow these instructions.
Important cautionary notes on the use and operation of the Q3a.
Helpful tips are highlighted with asterisks.*
Continue
ENG-5
Page 7

Important
2.4 GHz digital wireless system
2.4 GHz-frequency digital wireless technology, which is the same technology used for
wireless LAN, is used for both the integrated speed/cadence sensor and the heart rate
sensor. This technology practically eliminates interference from external noise and
cross-talk with other wireless computer users, and enables you to store highly reliable
data. However, in a very rare occasions, objects and places may generate strong
electromagnetic waves and interference, which may result in incorrect measurement.
The following are potential sources of interference:
Should be especially careful while synchronizing the sensor ID.*
TV, PC, radios, motors/engines, or in cars and trains.•
Railroad crossings and near railway tracks, around television transmitting stations •
and radar bases.
Other wireless computers or digitally controlled lights.•
Altitude measurement
The altitude is determined by detecting the change in atmospheric pressure using a
pressure sensor built in the wristwatch, which is then converted into elevation. For
this reason, the measurements may change even at the same location depending on
the change in atmospheric pressure caused by weather conditions. In addition, note
that there is a change of about 30 to 40 m during the early morning through the
evening even in stable weather. This unit may indicate incorrect measurements in the
following locations and/or environments.
When the atmospheric pressure and/or temperature change(s) significantly due to •
rapid weather change.
In a location where pressure is controlled, such as in an airplane.•
The altitude measurement may change temporarily when the temperature changes •
suddenly, such as in cases of going outside from an indoor room. It will return to
the normal value after a while.
ENG-6
Page 8

Automatic recognition of the speed sensor ID
The speed sensor has its own ID, and the wristwatch measures in synchronization
with the ID. Two speed sensor IDs can be registered to one wristwatch, which can
automatically identify the 2 speed sensors once their IDs are registered in advance.
As a tire circumference is set to the speed sensor ID, wheel selection by manual operation is no longer required, which was necessary with conventional units.
The speed sensor currently recognized is indicated with a sensor icon (*
on the screen.
Procedure of automatic recognition
When the wristwatch changes to the Clock mode by its power-saving function, and
then returns to the Sports mode, automatic recognition of the speed sensor ID is
performed through the following procedure.
The wristwatch searches a sensor signal from the speed sensor ID-1.
1.
When the wristwatch receives a sensor signal from ID-1, it displays sensor icon
2.
on the screen, and starts measurement.
When the wristwatch cannot receive any sensor signal from ID-1, it searches a
sensor signal from ID-2.
When the wristwatch receives a sensor signal from ID-2, it displays sensor icon
3.
on the screen, and starts measurement.
When the wristwatch cannot receive any sensor signal from ID-2, it searches a
sensor signal from ID-1 again.
The wristwatch repeats synchronization through the procedure described above
even if it fails in synchronization for some reason, such as communication failure;
in such cases however, it takes time for recognition.
When the wristwatch cannot receive any signal from the speed sensor in 5 *
minutes, the power-saving mode is activated, and the wristwatch changes to the
Clock mode.
Switching the ID by manual operation
The speed sensor ID can be forcibly switched by manual operation from “Setting the
tire circumference” in the Setup mode. Use this operation in the following cases.
When the wristwatch cannot recognize the intended sensor signal, since the 2 •
registered speed sensors are nearby and both are sending a sensor signal.
When you want to switch the speed sensor ID immediately.•
Once you switch the speed sensor ID by manual operation, the wristwatch *
continues to search only the speed sensor ID you switched when returning to
the Sports mode. When the wristwatch cannot receive any sensor signal in 5
minutes, the power-saving mode is activated, and the wristwatch changes to the
Clock mode. The wristwatch searches through the procedure of automatic recognition when it returns to the Sports mode.
or )
Continue
ENG-7
Page 9

Description of wristwatch and its parts
Wristwatch
Menu/enter button
(MENU)
Start/stop/
select button (SSS)
Battery cover
Accessories
Bracket
(for handlebar-mount)
Lap button (LAP)
Speed sensor
(SPEED/CADENCE)
Mode-1/+ button *
(MODE1)
Mode-2/- button *
(MODE2)
Pressing and holding the * MODE1 or
MODE2 button lights up the backlight
(Except in Setup mode).
Serial number
Belt
Pressure sensor
Wheel magnet
Cadence magnet
Nylon ties (x7)
See page 2 for the CD-ROM contents.*
ENG-8
Heart rate sensor
HR strap
CD-ROM
This manual
Page 10
Screen display
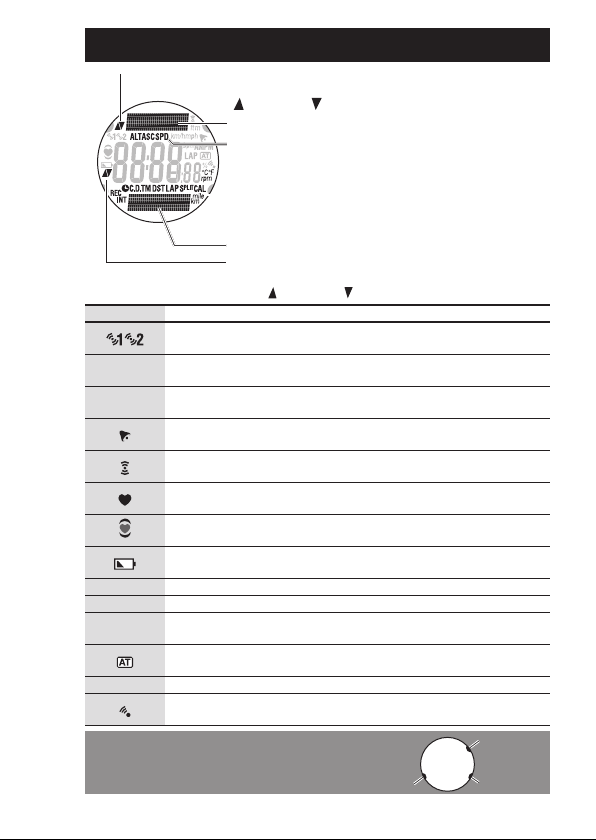
Speed pace arrow (upper display)
The pace arrows show whether the current speed is faster
(
) or slower ( ) than the average speed.
Upper data display
Upper selected mode icon
Indicates the measurement data currently displayed in the
upper data display.
Lower selected mode icon/unit
Indicates the unit along with the data currently displayed in
the lower data display.
Lower data display
Heart rate pace arrow (middle display)
The pace arrows show whether the current heart rate is
faster (
) or slower ( ) than the average heart rate.
Icon Description
Sensor icon
Displays the speed sensor currently synchronized.
km/h mph
AM PM
Button navigation
Indicates the buttons available while setting up
the wristwatch, or on the Setup screen.
Speed unit
Flashes while the measurement (counting the elapsed time).
Altitude unit
ft m
Flashes while the measurement (counting the elapsed time).
Alarm clock
Lights up when the alarm clock is on.
Speed/Cadence sensor signal
Indicate Speed/Cadence sensor signal status. (page 23)
Heart rate sensor signal
Indicate Heart rate sensor signal status. (page 23)
Target zone
Lights up when the target zone is on, and flashes when it is out of the zone.
Low battery alarm
Flashes when the battery of the wristwatch needs replacing with a new one.
bpm
Heart rate unit
AM/PM display (lights up when using the 12-hour system)
Lap indicator
LAP
Lights up while the lap data is displayed.
Auto-mode
Lights up when the auto-mode function is on.
%
Slope angle, zone, memory point utilization
Alarm
Lights up when the HR alarm sound feature is turned on.
SSS
Continue
MODE1
MODE2
ENG-9
Page 11

Bicycle Installation
�
SPEED
CADENCE
SPEED
�
SPEED
CADENCE
Mount the speed sensor and magnet
1
Speed sensor
Cadence magnet
Wheel magnet
Before use
ENG-10
1-1.Lightly secure the speed sensor
Locate the speed sensor on the left (non-drive
side) chain stay as shown above, and loosely
secure it with the nylon ties.
Do not tighten the nylon ties completely at *
this stage. Once a nylon tie is tightened, it
cannot be pulled out.
1-2.Mount the magnet
Loosen the set screws both on the
1.
SPEED side and CADENCE side of the
speed sensor, and turn the sensor to the
angle as shown on the right.
Temporarily secure the wheel magnet to
2.
the spoke so that it faces the sensor zone
on the SPEED side.
Temporarily secure the cadence magnet in-
3.
side the crank with nylon ties, so that it faces
the sensor zone on the CADENCE side.
Two magnets maybe stuck together inside *
the package, and appear as one magnet.
Speed sensor
Nylon ties
Left chain stay
1. Pre-Install the
wheel magnet
3. Set screw on the
CADENCE side
Sensor zone
2. Set screw on the SPEED side
3.
Pre-install the
cadence magnet
Nylon ties
Sensor zone
Page 12

When the speed sensor is not positioned properly in respect to the two *
magnets (in both Steps 2 and 3), move the speed sensor back and forth so
that it is positioned properly. After you move the speed sensor, adjust the
position so that the two magnets face the relevant sensor zone.
After adjustment, tighten the nylon ties firmly to secure the speed sensor.
4.
1-3.Adjust the distance to the magnet
Adjust the distance between the wheel
1.
magnet and the SPEED side of the speed
sensor to be about 3 mm. After adjustment,
tighten the set screw on the SPEED side.
Adjust the distance between the cadence
2.
magnet and the CADENCE side of the speed
sensor to be about 3 mm. After adjustment,
tighten the set screw on the CADENCE side.
For steel axle pedals, the cadence magnet can *
be installed onto the end face of the pedal
axle. Make sure to remove the double-sided
tape from the magnet when doing this.
1-4.Securing various parts
Tighten the speed sensor, set screw, and magnet firmly, and check for any looseness.
Speed/Cadence sensor nylon ties
Speed and Cadence sensor screws
Wheel magnet screw
Cadence magnet
About 3 mm
SPEED
CADENCE
magnet
About 3 mm
Cadence magnet
Cut extra length of the
nylon tie with scissors.
Wheel
Before use
Continue
ENG-11
Page 13

1
2
Install the wristwatch onto the handlebar
2
Install the wristwatch to the handlebar with a bracket.
Check the correct direction of the bracket, and attach it to the handlebar.
1.
Attach the bracket in the correct direction according to the handlebar size,
and fix it using nylon ties.
Nylon ties
Bracket
Bracket
Front
Standard handlebar
Oversize bar
Put the nylon ties through the bracket *
before you attach it to the handlebar.
Wrap the wristwatch around the bracket.
2.
Before use
Firmly fasten the belt so that the wristwatch will not come off.
Wristwatch
ENG-12
Front
Front
Nylon ties
Handlebar
Handlebar
Cut extra length of the
nylon tie with scissors.
Front
BeltHandlebar
Page 14

Heart rate sensor
Heart rate is measured when the heart rate sensor is worn on the chest.
Before wearing the heart rate sensor
Warning!!!:
To avoid measurement errors, it is recommended to moisten the electrode pads •
with water.
If your skin is ultra-sensitive, the electrode pad may be moistened with water and •
worn over a thin undershirt.
Chest hair may interfere with the measurement.•
Wearing the heart rate sensor
Insert the HR strap hook to the hole on the heart rate sensor until it clicks.
1.
Wear the heart rate sensor with the HR strap, and adjust the length of the HR strap
2.
to fit your chest size (under bust). Fastening the strap too tightly may cause discomfort.
Insert the HR strap hook to the other hole on the heart rate sensor
3.
For removal, hold near the hole on the heart rate sensor and the hook, and twist off.
4.
Heart rate sensor
This product must NOT be used by those who have a pacemaker.
Heart rate sensor
HR strap
until it clicks.
Hook
Ensure that the rubber part of the electrode pad is in direct contact with the body.*
Wearing the heart rate sensor when your skin is dry or on top of your undershirt may produce *
measurement errors. To avoid errors, moisten the rubber part of the electrode pad.
Electrode pad
Continue
ENG-13
Before use
Page 15
Preparing the wristwatch
MODE2
MODE1
SSS
MENU
MODE2
MODE1
(or)
SSS
Wristwatch's basic items must be set up before using it.
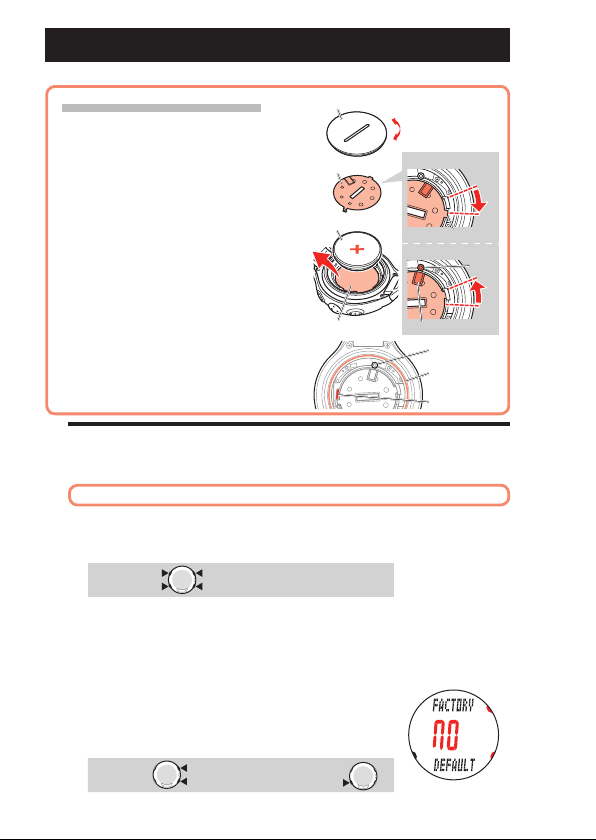
Removing the insulation sheet
When you use the unit for the first time after purchasing, remove the insulation sheet under the battery.
1 Open the battery cover of the wristwatch
using a coin, etc.
2 Turn the inner cover to the open position
using a coin, remove this, and remove the
insulation sheet under the battery.
Do not turn the inner cover excessively. *
Otherwise, the tab may be damaged.
3 Replace the battery, and turn the inner
cover to the closed position. Check that
the cut-out portion of the inner cover
faces the pin, and the 2 tabs are fixed.
4 Press the AC button beside the inner
cover using a tool with a pointed tip.
5 Check that an o-ring is installed to the
groove on the wristwatch, and firmly
close the battery cover.
Restarting
1
When using the unit for the first time after purchasing, or after replacing batteries,
restart the wristwatch to make it work properly.
The wristwatch and each sensor ID have been checked at the factory.*
Simultaneously press and hold the
1.
on the wristwatch for about 4 seconds.
Before use
“FACTORY DEFAULT” is displayed.
(Simultaneously press)
When “* FACTORY DEFAULT” is not displayed on the screen, the button operation has not been completed properly. Simultaneously press and hold the
4 buttons again until the display changes.
Select “NO”.
2.
When “NO” is displayed on the screen, confirm with the
SSS button.
The backlight of the display lights up and a buzzer sounds,
then the display is switched to the clock/date setting screen.
Proceed to the next set-up item, “Setting the clock/date”.
YES ↔ NO :
Battery cover
Inner cover
CR2430
Insulation sheet
MENU, SSS, MODE1, and MODE2 buttons
Confirm :
Open
Close
Open position
Tab
Closed position
Pin
Cut-out portion
Pin
O-ring
AC button
Restarting
ENG-14
Page 16

* Select “YES” by pressing the MODE1 or MODE2 button for
MODE2
MODE1
(or)
SSS
MODE2
MODE1
(or)
SSS
MODE2
MODE1
(or)
SSS
MODE2
MODE1
(or)
SSS
MENU
Formatting
the formatting operation. As the formatting operation deletes all data, select “NO” for the restarting operation. See
“Formatting/Restarting operation” on page 21 for differences between the formatting and restarting operations.
The restarting operation will be cancelled if no button has ben *
pushed for 3 minutes and the wristwatch will enter the Clock screen automatically.
In this case, press the 4 buttons simultaneously and do the restart operation again.
Setting the clock/date
2
Set the current time and date.
Press and hold the * MODE1 or MODE2 button to increase/decrease the number quickly.
Select the clock display format.
1.
Select “24h (24 hour)” or “12h (12 hour)” pressing the MODE1
Display format
or MODE2 buttons, and confirm with the SSS button.
24h ↔ 12h :
Enter the “Hour” and “Minute”.
2.
Enter the “Hour” pressing the MODE1 to increase, and MODE2
Confirm :
Hour
button to decrease the flashing value, confirm with the SSS
button, and then enter the “Minute” in the same way.
Edit value :
Select the date display format.
3.
Select the date display format from YY.MM.DD (Year/
Confirm :
Minute
Month/Day), DD.MM.YY (Day/Month/Year) , and
MM.DD.YY (Month/Day/Year) pressing the MODE1 or
MODE2 buttons, and confirm with the SSS button.
Switch the display :
Enter the “Year”, “Month” and “Day”.
4.
Enter the “Year”, “Month” and “Day” in the display order
Confirm :
Display format
selected in Step 3 using the MODE1 to increase, and MODE2
button to decrease the flashing value, and confirm with the
SSS button. For “Year”, enter the last 2 digits of the year.
Edit value :
After you set the clock/date, press the
5.
plete the restarting operation, and switch to the Clock mode.
To Clock mode (setup is completed):
Confirm :
MENU button to com-
YY/MM/DD
Before use
Continue
ENG-15
Page 17

Switching to the Setup mode
MENU
(press & hold)
MODE2
MODE1
(or)
SSS
MODE2
MODE1
(or)
SSS
MODE2
MODE1
(or)
SSS
MENU
3
Switch the wristwatch from the Clock mode to the Setup mode, and set the tire
circumference and the measurement unit.
Press and hold the MENU button in the Clock mode to
1.
display “SETUP MENU” on the screen.
It switches to “CLOCK DATE” automatically.
Switch modes :
Unless you perform an operation in the Setup mode within 3 minutes, it *
returns to the Clock mode. In such cases, any change is not reflected.
Tire circumference input
4
In the Setup mode “Setting the tire circumference”, enter the tire circumference
Before use
of the bicycle to
See “Tire circumference” on the next page for reference.*
Press and hold the * MODE1 or MODE2 button to increase/decrease the number
quickly.
Press the MODE1 button twice to switch to “TIRE”, and
1.
confirm with the SSS button.
Switch screen :
When and “S/ID:1” are flashing, confirm with the SSS button.
2.
Change the tire circumference of Sensor 1.
Enter the last 2 digits of the tire circumference by press-
3.
ing the MODE1 or MODE2 button, and move digits by
pressing the SSS button.
Then enter the first 2 digits in the same way.
Increase/decrease:
(Sensor 1) in millimeters.
↔ :
Confirm :
Confirm :
Move digits:
Pressing the
4.
ence, and returns to the Setup mode “TIRE”.
To use * (Sensor 2), set the tire circumference of Sensor 2 according to
the Setup mode “Searching for sensor ID” on page 53, after you complete
“Preparing the wristwatch”.
ENG-16
MENU button confirms the tire circumfer-
Setup is completed:
Page 18
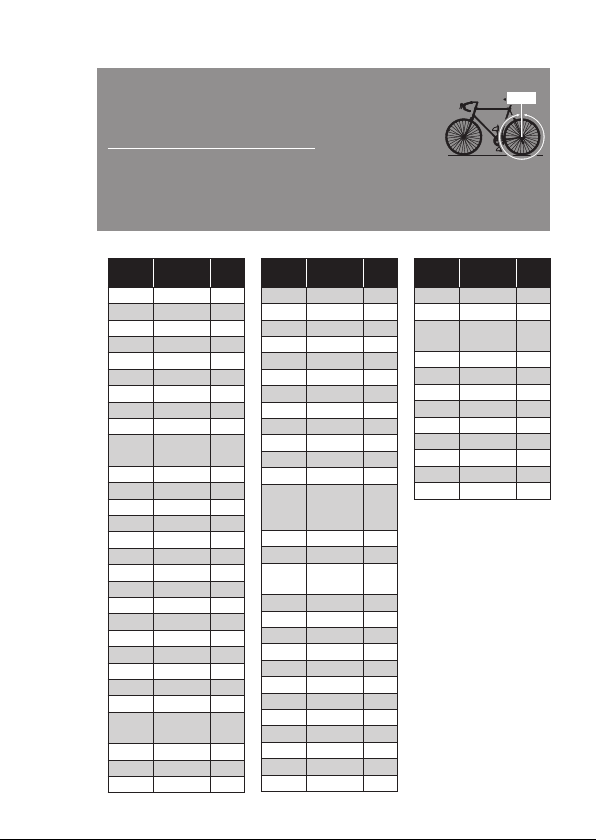
Tire circumference
L mm
You can find the tire circumference (L) of your tire size in the tire circumference reference table below, or actually measure the tire circumference
(L) of your bicycle.
How to measure the tire circumference (L)
For the most accurate measurement, do a wheel roll out. With the tires under
proper pressure, place the valve stem at the bottom. Mark the spot on the floor and with the rider's weight
on the bike, roll exactly one wheel revolution in a straight line (until the valve comes around again to the
bottom). Mark where the valve stem is and measure the distance on the ground in millimeters.
For your reference, use the tire circumference table below.*
Tire circumference reference table
ETRTO
47-203 12 x 1.75 935
54-203 12 x 1.95 940
40-254 14 x 1.50 1020
47-254 14 x 1.75 1055
40-305 16 x 1.50 1185
47-305 16 x 1.75 1195
54-305 16 x 2.00 1245
28-349 16 x 1-1/8 1290
37-349 16 x 1-3/8 1300
32-369
40-355 18 x 1.50 1340
47-355 18 x 1.75 1350
32-406 20 x 1.25 1450
35-406 20 x 1.35 1460
40-406 20 x 1.50 1490
47-406 20 x 1.75 1515
50-406 20 x 1.95 1565
28-451 20 x 1-1/8 1545
37-451 20 x 1-3/8 1615
37-501 22 x 1-3/8 1770
40-501 22 x 1-1/2 1785
47-507 24 x 1.75 1890
50-507 24 x 2.00 1925
54-507 24 x 2.125 1965
25-520 24 x 1(520) 1753
28-540 24 x 1-1/8 1795
32-540 24 x 1-1/4 1905
25-559 26 x 1(559) 1913
Tire size
17 x
1-1/4(369)
24 x 3/4
Tubular
L
ETRTO
(mm)
32-559 26 x 1.25 1950
37-559 26 x 1.40 2005
40-559 26 x 1.50 2010
47-559 26 x 1.75 2023
50-559 26 x 1.95 2050
54-559 26 x 2.10 2068
57-559 26 x 2.125 2070
58-559 26 x 2.35 2083
75-559 26 x 3.00 2170
28-590 26 x 1-1/8 1970
1340
37-590 26 x 1-3/8 2068
37-584 26 x 1-1/2 2100
20-571 650 x 20C 1938
23-571 650 x 23C 1944
25-571
40-590 650 x 38A 2125
40-584 650 x 38B 2105
25-630 27 x 1(630) 2145
28-630 27 x 1-1/8 2155
32-630 27 x 1-1/4 2161
37-630 27 x 1-3/8 2169
18-622 700 x 18C 2070
19-622 700 x 19C 2080
1785
20-622 700 x 20C 2086
23-622 700 x 23C 2096
25-622 700 x 25C 2105
28-622 700 x 28C 2136
Tire size
650C
Tubular
26 x 7/8
650 x 25C
26 x 1(571)
L
ETRTO
(mm)
30-622 700 x 30C 2146
32-622 700 x 32C 2155
35-622 700 x 35C 2168
38-622 700 x 38C 2180
40-622 700 x 40C 2200
42-622 700 x 42C 2224
44-622 700 x 44C 2235
45-622 700 x 45C 2242
47-622 700 x 47C 2268
54-622 29 x 2.1 2288
60-622 29 x 2.3 2326
1920
1952
Continue
Tire size
700C
Tubular
L
(mm)
2130
ENG-17
Before use
Page 19

Selecting measurement unit
MODE2
MODE1
(or)
SSS
MODE2
MODE1
(or)
SSS
MODE2
MODE1
(or)
MENU
MENU
5
Select the speed unit and temperature unit.
Press the MODE1 button twice to switch to “UNITS”, and
1.
confirm with the SSS button.
Switch screen :
Confirm :
Select the speed unit by pressing the MODE1 or MODE2
2.
button, and confirm with the SSS button.
km/h ↔ mph :
Select the temperature unit by pressing the MODE1 or
3.
MODE2 button in the same way.
°C ↔ °F :
Pressing the
4.
unit, and returns to the Setup mode “UNITS”.
Now, the wristwatch setup is completed. Press the MENU
button again to switch to the Clock mode screen.
Switching to the Sports mode
Before use
6
Switch the wristwatch from the Clock mode to the Sports mode for the operation
test of the speed sensor and heart rate sensor.
Press the MENU button in the Clock mode to display
1.
“SPORTS MENU” on the screen.
It switches to the measurement screen automatically.
MENU button confirms the measurement
To the mode top/switch the mode :
Switch modes :
Confirm :
Speed unit
Temperature unit
ENG-18
Page 20

Operation test
7
It may take up to approximately 2 minutes to display the screen because the *
wristwatch checks the sensor when switching to Sports mode.
If the signal icon *
MODE1 or MODE2 button to turn it on.
or on the measurement screen is turned off, press the
Speed sensor (SPEED side)
Raise the rear wheel and spin the wheel.
1.
When the speed is displayed on the screen, it is oper-
2.
ating normally.
Speed sensor (CADENCE side)
Turn the crank.
1.
When the cadence is displayed on the screen, it is
2.
operating normally.
Heart rate sensor
Wear the heart rate sensor (page 13).
1.
When the heart rate is displayed on the screen, it is
2.
operating normally.
* Heart rate sensor can also be activated by rubbing both electrode pads with
thumbs. This method cannot be used to measure the heart rate accurately,
but is used as a simple method for testing the sensor/wristwatch communication and searching for the sensor ID.
Before use
Electrode pad
Continue
ENG-19
Page 21

Important: When the speed, cadence, and/or heart rate are/is not displayed, possible
causes are as follows.
Speed and cadence are not displayed.
Check items Remedy
Is the Speed and Cadence sensor icon on
?
Check whether the distance between the
speed/cadence sensor and the magnet is
too large.
Is the sensor zone of the speed/cadence
sensor aligned the center of the magnet?
Has the power-saving mode been activated,
entering Clock mode?
The display may be delayed depending on
the wireless transmission condition.
Have you performed the formatting operation?
If icon is off, the wristwatch cannot receive any data. Press the
MODE1 or MODE2 button to cancel the transmission sleep mode
(page 23).
Adjust the position of the speed/cadence sensor and that of the
magnet correctly. (See “Bicycle Installation” on page 10.)
Press the MENU button to switch to Sports mode.
Check whether any speed signal is received by spinning the wheel
for a while.
The sensor ID synchronized at the factory is initialized by formatting. Synchronize the speed sensor ID, according to the Setup
mode “Searching for sensor ID” (page 53).
Heart rate is not displayed.
Check items Remedy
Is the Heart rate sensor icon on ? If icon is off, the wristwatch cannot receive any data. Press
Has the power-saving mode been activated,
entering Clock mode?
Is the heart rate sensor attached securely
to your body?
Dry skin (particularly in winter) Slightly moisten the electrode pad of the heart rate sensor.
Is the Heart rate sensor being worn cor-
rectly?
Before use
Have you performed the formatting operation?
the MODE1 or MODE2 button to cancel the transmission sleep
mode (page 23).
Press the MENU button to switch to Sports mode.
Adjust the electrode pad with its rubber surface to have good
contact with the body.
To wear the electrode pad correctly, follow the instructions for
wearing the heart rate sensor (page 13).
The sensor ID synchronized at the factory is initialized by formatting. Synchronize the hear t rate sensor ID, accordi ng to the
Setup mode “Searching for sensor ID” (page 53).
ENG-20
Page 22

Formatting/Restarting operation
There are 2 different wristwatch set-up operations; formatting and restarting operations.
Follow the appropriate one depending on the situation.
Formatting :
Restarting : When you use the unit for the first time after purchasing, or after replac-
Flows of the formatting and restarting operations
The formatting and restarting procedures are as follows.
When you want to delete all data and the setup of the wristwatch.
ing batteries, or an error is displayed.
In the restarting operation, the following data are retained.*
SPORTS MENU Date
OPTION MENU Setting the target zone
DATA MENU
SETUP MENU
For restarting:
Restarting operation (page 14)
• Savedledata
• Ridedata
• Logdata
• Alarmclocksetting
• Tirecircumferenceand
Sensor currently selected
• SensorID
• Measurementunit
• Recordinterval
• Auto-mode
• Trainingfunction
• Soundsetting
• Sealevelaltitude
For formatting:
Formatting operation (page 14)
Setting the clock/date (page 15)
The date when last executed the restarting *
operation will be initially displayed.
Setting the clock/date (page 15)
Tire circumference input (page 16)
Selecting measurement unit (page 18)
Clock mode
In the case of the formatting operation, you can set the “tire circumference” *
and “measurement unit” sequentially after you set the “clock/date”. Each
set-up procedure is described on the page referenced.
After you complete the set-up, be sure to synchronize the sensor ID according
to the Setup mode “Searching for sensor ID” (page 53).
Continue
ENG-21
Before use
Page 23

MENU
MENU
Basic operation of the wristwatch
Switching between modes
The wristwatch has 4 types of mode functions and the Setup mode. “CLOCK MENU”,
“SPORTS MENU”, “OPTION MENU”, and “DATA MENU” are alternatively selected in
sequence by pressing the MENU button. Select the screen of your choice to proceed
to the mode screen automatically.
Clock mode (page 24)
Displays the clock. This mode is
used for everyday wristwatch functions displays also altitude, temperature and alarm.
Press and hold the * MENU button in the Clock mode
or Sports mode to switch to “SETUP MENU”.
(press & hold)
To the previous mode screen
Sports mode (page 25)
This measurement screen is used
as a cyclocomputer and/or heart rate
monitor.
Setup mode (page 49)
This mode is used to edit
values and setup for less
frequently used items,
such as sound and wheel
circumference.
Before use
Option mode (page 36)
This mode is used to edit option setup
values often used while riding bicycle
such as zones, and count down.
Data mode (page 39)
This mode is used to check the data
saved and/or import them to your PC.
ENG-22
Page 24

Backlight
MODE2
MODE1
(or)
Pressing and holding the MODE1 or MODE2 button illuminates
the display for about 3 seconds (Except in the Setup mode).
Pressing any button while backlight is still on extends the illu-*
mination for another 3 seconds.
(press & hold)
Power-saving mode
Transmission sleep mode
When the wristwatch does not receive any data from the speed
sensor or heart rate sensor for 5 minutes, each sensor will
enter the transmission sleep status to save battery power. No
sensor signal can be received in the transmission sleep status.
To restart measuring, press the MODE1 or MODE2 button to
recover from transmission sleep. The signal transmission
status of each sensor can be checked with the relevant signal
icon and the numerical value “---” display.
• (flashing) :
• (constant) :
• (off) :
Transmission sleep is set separately for the speed sensor *
and the heart rate sensor. Accordingly, if the bicycle is
stopped for over 5 minutes with the heart rate sensor worn,
only the speed sensor goes into transmission sleep. When
resuming the ride, speed/cadence sensor must be re-activated in order to display necessary data.
When either the speed sensor or the heart rate sensor is in *
transmission sleep, the display remains in the Sports mode;
however, when both sensors go into transmission sleep,
the wristwatch switches to the power-saving mode.
Saving the power of the wristwatch
When the wristwatch does not receive any data from both the
speed and heart rate sensors for 5 minutes, it will switch to
Clock mode automatically. Press the MENU button to return
to Sports mode and continue measuring. For details, see
“Switching between modes” on page 22.
Even if the power-saving mode is activated, data not reset *
are saved in the wristwatch.
Receiving sensor signal (under operation)
Stand-by for sensor signal (searching for sensors)
Transmission sleep. Displays the symbol “---”.
Speed sensor
signal icon
The speed sensor
is in transmission
sleep. Displays the
symbol “---”.
Heart rate sensor
signal icon
The heart rate sensor is in transmission sleep. Displays
the symbol “---”.
Clock mode
Before use
Continue
ENG-23
Page 25

Clock mode (CLOCK)
MODE1
MODE2
MODE1
MODE1
Switching to Clock mode
Select “CLOCK MENU” by pressing the MENU button until display
swithces to Clock mode.
Clock mode is the default screen, so if the power-saving mode is *
activated in any other mode display will switch to Clock mode.
For details, see “Power-saving mode” on page 23.
Functions in Clock mode
Displays the current time, date, and day of the week. Press the MODE1 button to display the current sea
level altitude. Press the MODE2 button to display the current temperature or turn on/off the alarm clock.
Display data in Clock mode
Displays the current day of the week.
When the measurement
is stopped
Displays the current date.
Displays the current
time in the 12- or
24-hour format.
For setting the time and date, see the Setup mode “Setting the clock/date” (page 50).*
Altitude may need to be adjusted to the current location. For details, see “Correcting the sea *
level altitude” on page 60, and “Basic knowledge of altitude measurement” on page 61.
While the current sea level altitude is displayed on the screen, shortcut operation *
(press and hold the MODE1 button for 3 sec) moves to the Setup mode “Correcting
Clock mode
the sea level altitude” (page 60) for quick altitude correction. This shortcut operation
however does not work while the measurement is continuing in the Sports mode.
Shortcut
(press & hold for 3 sec)
Alarm clock mode
Indicates with an alarm sound when the current time reaches any
pre-set time. When it reaches a predetermined time, the wristwatch switches to Clock mode, and sounds an alarm for 20
seconds regardless of the mode displayed. Press any button on
the wristwatch to stop the alarm.
Press and hold the * MODE1 button for 3 sec in the Clock mode (except
when the current sea level altitude is displayed) to turn on/off the alarm
clock. The icon
For setting the alarm clock, see the Setup mode “Setting the *
alarm clock” (page 51).
ENG-24
appears on the screen when the alarm clock is on.
Altitude
Displays the current altitude.
To altitude correction screen
(page 60)
Temperature
Displays the current
temperature.
Alarm clock icon
Alarm clock on/off
(press & hold for 3 sec)
Page 26

Sports mode (SPORTS)
MODE1
MODE1
MODE1
MODE1
MODE1
MODE1
Switching to Sports mode
Select “SPORTS MENU” by pressing the MENU button until display
switches to Sports mode.
Function in Sports mode
The Sports mode is for measurement using the cyclocomputer and heart rate monitor
functions. 4 types of data such as the heart rate, altitude, and slope are displayed on the
screen. These data can be switched by pressing the MODE1 or MODE2 button.
The displayed data are as follows.
Measurement is maintained even if switched to another mode.*
Upper and middle display data (Switch using the MODE1 button)
Upper display : Displays data related to the speed and altitude.
Middle display (left) : Displays data related to the heart rate.
Middle display (right) : Displays data related to the cadence, temperature and slope
Switch pressing the MODE1 button
Current speed
angle.
Average speed Maximum speed
Heart rate/Cadence
Average heart rate/
Average cadence
Ascending altitude
Heart rate / Slope angle
*1 When the measurement is stopped in
the altitude screen, shortcut operation
(press and hold the MODE1 button for
3 sec.) moves to the Setup mode
“Correcting the sea level altitude”
(page 60).
Maximum heart rate/
Maximum cadence
Altitude
Heart rate / Temperature
When the
measurement is
stopped
To altitude correction screen
(page 60)
Shortcut
(press & hold
for 3 sec)
Continue
Sports mode
*1
ENG-25
Page 27

Lower display data
MODE2
MODE2
MODE2
MODE2
MODE2
MODE2
MODE2
(Switch using the MODE2 button)
Displays additional ride data.
Switch pressing the MODE2 button
To the setting count-down screen
in Option mode (page 36)
When the
measurement is
stopped
Shortcut
(press & hold for 3 sec)
*2
Elapsed time
Clock
*1 The training function screen displays one of the following; countdown distance,
countdown time, or interval. For details, see “Training function (countdown function and interval function)” on page 32.
*2
When measurement is stopped in the training function screen, shortcut operation (press and hold
the MODE2 button for 3 sec.) moves to the Setup mode “Setting the training function” (page 36).
Trip distance
Calorie Consumption
Training function
Lap timer
Starting/Stopping measurement
”km/h [mph]” or “m [ft]” icon flashes during speed measurement.
Initially, the auto-mode function which starts or stops measurement automatically in sync with the bicycle motion is ON. Auto
measurement is switched to manual measurement and vice
versa by ON/OFF operation in the auto-mode. For details, see the
Setup mode “Setting the auto-mode” (page 58). The maximum
speed, maximum heart rate, and maximum cadence are updated
Sports mode
regardless of starting/stopping the measurement.
To use this unit as a heart rate monitor, start/stop the measure-*
ment using the SSS button in the manual measurement.
When the auto-mode is on, you cannot start the measurement.
Auto-mode (automatic measurement)
When the auto-mode is on, appears on the screen. The wristwatch detects the
wheel spinning, and starts/stops the measurement automatically.
When the transmission is stopped and Sensor signal icons * and are off, the
measurement will not start even after the bicycle starts. If a bicycle is stopped for
more than 5 minutes or if heart rate sensor is either far from the bicycle or off the
body, it will go into sleep. This normally happens when taking a rest during the ride.
To recover from the transmission sleep, press the MODE1 or MODE2 button to turn
on the sensor signal icons. For details, see “Transmission sleep mode” on page 23.
ENG-26
AT icon
*1
Page 28

Manual measurement
MODE1
SSS
MODE2SSS
When the auto-mode is off ( is off), use the SSS button to start/stop the measurement.
Stop reminder
The stop reminder function Reminds the rider with an alarm
incase the stopwatch is forgotten to be stopped after the ride.
When any signal is not received from the speed or cadence
sensor for 90 seconds while counting the elapsed time, an
alarm sounds and “STOP” appears on the screen. This alert
display is repeated up to 3 times every 90 seconds. When any
sensor signal is detected, the alarm is stopped.
Stop reminder
Forgetting to stop the measurement is likely to happen at a rest during a ride or *
after a race finishes. In cases you will start again immediately, such as at traffic
signals, or when you use this unit as a heart rate monitor, ignore this.
This function cannot be disabled.*
Resetting the measurement data and saving the files
To reset the measurement data, interval, and lap data to 0,
simultaneously press the SSS + MODE1 or SSS + MODE2
buttons on any screen in the Sports mode (except interval on
the training function screen).
Resetting the measurement data saves the point data, which
was recorded at the timing set for the record interval, automatically in a file. For viewing and deleting the saved data, see
the Data mode “File view” (page 40).
The screen will freeze for about 2 seconds after resetting; *
however, all measurements are operating normally.
After you reset, the countdown distance, countdown time, and interval are returned *
to the predetermined value you set.
Cannot reset for 5 seconds after pressing the * LAP button.
The wristwatch has a limited memory capacity. When the data volume exceeds the *
memory capacity, any new data can no longer be saved. For details, see the Data
mode “File view” (page 40).
Resetting with the interval (* INT) displayed on the training function screen resets the
measurement data of the interval only. For details, see “Training function (countdown
function and interval function)” on page 32.
(Simultaneously press)
or
(Simultaneously press)
Sports mode
Continue
ENG-27
Page 29

Display data in Sports mode (upper and middle display)
MODE1
MODE1
Switch pressing the MODE1 button
Current speed
Heart rate
Cadence
Average speed
Average heart rate
*1*2
Average cadence
*1*3
Maximum speed
Maximum heart rate
*4
Maximum cadence
*4
Sea Level Altitude
(press & hold for 3 sec) (When the measurement is stopped)
Temperature
Sports mode
Ascending altitude
Slope angle
*1 Each average value is displayed on the screen replaced with the character “E” when the elapsed
time (TM) exceeds 100 hours. Clear the data by resetting (page 27). The average speed is displayed
in the same way as above when the trip distance exceeds 10000 km [mile].
*2 This device stops calculating the average when the heart rate sensor is detached, and resumes
the calculation when the heart rate sensor is worn again. This feature produces actual averages
with the heart rate sensor worn.
This device calculates the average excluding the time when you stop pedaling. This feature pro-
*3
duces actual averages, unlike other models that calculate averages also to include any zero values.
Displays the current speed in real time. Updates
every second.
Displays the current heart rate in real time.
Updates every second.
Displays the current number of pedal rotations
per minute. Updated every second.
Displays the average speed since the start of
*1
measurement.
Displays the average heart rate since the start of
measurement. The time with no heart rate
measured is not reflected on the average rate.
Displays the average cadence since the start of
measurement. Any time with no pedaling is not
reflected on the average cadence.
Displays the maximum speed since the start of
*4
measurement.
Displays the maximum heart rate since the start
of measurement.
Displays the maximum cadence since the start of
measurement.
Displays the sea level altitude at the current loca-
tion point.
Shortcut
*5
Displays the current temperature.
Displays the accumulated altitude from the point
you reset to the current point.
* Any descending altitude is not counted.
Displays a ±value on the basis that the slope
*6
angle of 45° is 100%.
ENG-28
Page 30

Display data in Sports mode (lower display)
MODE2
MODE2
Switch pressing the MODE2 button
TM
Elapsed time
DST
Trip distance
Displays the elapsed time from the start of measurement to the 1/10 second. When it exceeds 99:59’59”,
it repeats from 00’00”0.
Displays the trip distance from the start of measurement.
Training function (page 32)
Displays any one selected from the
countdown distance, countdown time,
and interval.
C.D. DST
Countdown
or
or
distance
C.D. TM
Countdown time
INT
Interval
(interval time/
recovery time)
LAP
Lap timer
CAL
Calorie
Consumption
Clock
*4 Each maximum value is updated regardless of starting or stopping the measurement.
*5 When the measurement is stopped, take a shortcut (press and hold the MODE1 button for 3 sec.)
to the Setup mode “Correcting the sea level altitude” (page 60).
*6 The slope angle value is updated every 2 seconds calculated from several changes of altitude
and the trip distance. This may cause some delays in an update. Temporarily abnormal values
may also be displayed because of rapid changes of speed or running at a low speed.
*7 When the measurement is stopped, take a shortcut (press and hold the MODE2 button for 3 sec.)
to the Setup mode “Setting the training function” (page 36).
(press & hold for 3 sec)
Counts down the predetermined distance, and
displays the remaining distance.
Counts down the predetermined time, and displays
the remaining time.
Counts down the predetermined time (interval time),
and then counts up automatically as a recovery time
after the time is up.
Pressing the LAP button starts the interval time
again, which allows you to repeat a high and low
intensity exercise.
Displays the elapsed time from the previous point (for
LAP 01: from the start of measurement) in real time.
Displays the estimated calorie consumption from
the start of measurement based on the heart rate.
Displays the current time of day in the 24- or 12-hour
system.
*7
Shortcut
(When the measurement is stopped)
Continue
Sports mode
ENG-29
Page 31

Pace function
LAP
2 types of pace arrows, for speed and heart rate, are displayed in
Sports mode. The arrow icons indicate whether the current speed/
heart rate is above or below the average speed/heart rate.
:
The current value is above the average.
:
The current value is below the average.
:
No arrows :
The current value is equal to the average.
The current value is “0”.
Current speed
Heart rate
Lap function
Pressing the LAP button during measurement in Sports mode records the measurement
data between a given set of points (average lap speed/maximum lap speed, average
lap heart rate/maximum lap heart rate, lap time/split time) up to 99 points*. Immediately after recording, the lap data is displayed in the order as shown in the figure below,
and then the display returns to the previous screen.
The maximum number of lap records may decrease depending on file utilization. *
For details, see “Wristwatch memory capacity limit” on page 40.
Lap data
Maximum lap speed
Lap number
2.5 sec. 2.5 sec.
Previous
screen
Any screen in
Sports mode
Average lap speed
Average lap heart rate
Sports mode
Average lap speed Displays the average lap speed/heart rate from the previous
Average lap heart rate
Lap number
Lap time
Split time
Maximum lap speed
Maximum lap heart rate
ENG-30
Lap time
point (for LAP 01: from the start of measurement) to the
current point.
Displays the lap number just recorded.
* When the total number of laps exceeds 99 points, “--”
appears indicating further lap recording cannot be done.
Displays the elapsed time from the previous point (for LAP
01: from the start of measurement).
Displays the total elapsed time from the start of measurement.
Displays the maximum lap speed/heart rate from the previous point (for LAP 01: from the start of measurement) to
the current point.
Split time
Maximum lap heart rate
Page 32

MODE2
Lap time and split time
TM
Start of
measurement
Lap time 1
Split time 1
Split time 2
Lap time 2
LAP LAP
LAP
MODE1
MODE1
The lap time displays elapsed time from the last
press of the LAP button. The split time displays
the elapsed time from the start of measurement to
the point LAP button is pressed.
The measured lap data is saved to a file when *
you perform a reset operation (page 27).
Pressing the * LAP button while the total number of
laps reaches 99 points displays the lap data, but
“--” appears in place of the lap number indicating further recording is impossible.
The lap data can be reviewed in the Data mode “File view”(page 40).*
Real time lap data
Pressing and holding the LAP button on any screen in Sports mode displays the
real time lap data in the upper and middle displays. For the real time lap data, the
unit starts/stops the measurement in sync with the primary measurement; however, it resets and restarts the data every time you press the LAP button. This independent feature of lap time can be useful also for pace checks in a lap and sectional trials such as hill climb section.
Real time lap data
Average lap speed
Any screen in
Sports mode
(press &
hold)
Average lap
cadence
Lap timer *
Average lap heart rate
Press the * MODE2 button with the real time lap data to return to the previous
Sports mode screen.
Maximum
lap speed
Lap distance
Maximum lap heart rate
Previous screen
Continue
Maximum
lap cadence
ENG-31
Sports mode
Page 33

Training function (countdown function and interval function)
This unit has a countdown function that counts down the predetermined time and
indicates when the time is up by setting the target trip distance and elapsed time, and
an interval function that is used to set the interval time for a given training. The training function includes both these 2 functions.
Either the countdown function or interval function is displayed in the lower display. For display *
of the training function, see “Display data in Sports mode (lower display)” on page 29.
Select the training function and enter the respective setting values in “Setting the *
training function” (page 36) in Option mode. Display Option mode in the MENU screen
or shortcut (press and hold MODE2) to the training function setting screen.
Countdown distance
Displays the countdown distance to a predetermined target trip distance. When it reaches the target trip distance, the unit switches the
lower display to the countdown data in any Sports mode display, and
notifies by flashing the numerical value/icon and an alarm sound.
Resetting returns the numerical value to the predetermined *
value you set.
Example of how the countdown distance is used:
Entering the race event distance
1.
For distance system events such as a road race and century ride, enter the race event distance before the start, and
develop your strategy and pace based on the countdown
distance during the race.
Entering the destination sign distance
2.
For touring, enter the sign distance whenever you encounter a destination sign
along the road, and develop your pace based on the countdown distance.
Entering the periodical target distance
3.
Sports mode
Enter the periodical target distance for a week, month, or year to check your progress.
Countdown time
Displays the countdown time to a predetermined target elapsed
time. When it reaches the target elapsed time, the unit
switches the lower display to the countdown data in any Sports
mode display, and notifies by flashing the numerical value/
icon and an alarm sound.
Resetting returns the numerical value to the predetermined *
value you set.
Example how the countdown time is used:
Entering a timed race
1.
For a time endurance race, enter the limit time, and check
your pace based on the countdown time.
ENG-32
When the target trip
distance is 20 km
When reached
Beep
(displays for 5
When the target
elapsed time is 1 hour
When reached
Beep
(displays for 5
seconds)
seconds)
Page 34

Setting the return time limit
SSS
INT
SSS
REC
LAP
INT
REC
REC
2.
Enter the half way time when the ride time is limited, and
enjoy your ride without minding the time.
Target time for a Century ride
3.
Enter the target time for big events such as Century ride and Granfondo, and
check your pace.
Interval (interval time/recovery time)
Use this function in the interval training.*
The interval training is a training method that combines the interval time (high intensity exercise time) and the recovery time (rest time). With this unit, the recovery time
is not set for the purpose of simplifying the setup. The recovery time is to be judged
by users based on the count-up display of the wristwatch. Judging the recovery time
by users enables flexible training menus, in which the recovery time in every repeat
is different from the recovery time between the sets (such training that has the recovery time of 3 minutes in every repeat, and 10 minutes between the sets).
You can check recovery progress while riding by viewing the screen.*
Depending on the course condition as signals or traffics, you might not start the *
interval along with the pre-set recovery time. In this case, you can take a training
with smoothness by timing the start on yourself.
An image of interval measurement
Beep
*1
Beep
*1
Interval measurement finish
Interval
restart
*2
Interval
measurement start
*1 Interval time: Starts countdown from the pre-set time to zero. At zero, switches
to recovery time.
*2
Recovery time: No need to pre-set the recovery time. The wristwatch remains in the
recovery period until LAP button is pressed. Press the LAP button at any timing to
restart the next interval.
Sports mode
Continue
ENG-33
Page 35

How to use the interval:
MODE2
SSS
During the interval training, use the interval display to avoid confusing the *
start/stop operation with the reset operation.
Setting the interval.
1.
Switch to Sports mode by selecting the interval from the Option
mode “Setting the training function”.
Press the MODE2 until “INT” icon displayed in the lower display.
2.
Switch the lower screen :
Heart rate
Current speed
Sports mode
ENG-34
Press the SSS button to start the count down interval
3.
measurement. Start a high intensity exercise.
The interval time countdown is displayed.
Interval measurement start :
Use the * SSS button to start/stop the interval even when the auto-mode is
on (
lights up). To start the interval measurement, press the SSS
button with the interval displayed in the lower display. Pressing the SSS
button with the interval displayed does not affect start/stop of the measurement in the wristwatch. However, the elapsed time measurement in the wristwatch will start just
as the interval starts, when the auto-mode is off (
When the interval counts down to zero, it will automatically change to recovery
4.
timer, which counts up until next interval is ready.
When the interval time reaches the predetermined time, an alarm sounds,
various average values and maximum values are displayed in the order as shown
in the figure below, and then the recovery time starts countup. At this point, the
wristwatch records the lap data automatically. Measure for any period of time
in the recovery time, while relaxing and recovering from fatigue.
Average speed Maximum speed Current speed
Interval time
finish
Beep
Av erage
heart rate
Number of intervals
Average
cadence
lights off) and measurement is stopped.
Maximum
cadence
2.5 sec. 2.5 sec.
Maximum
heart rate
Trip distance in the interval
Heart rate
Cadence
Interval time
Interval time
(countdown)
Cadence
Recovery time
(count-up)
Page 36

Press the
LAP
SSS
5.
6.
Resetting with the interval displayed resets the interval measurement data only.*
The lap data is recorded automatically when the interval measurement starts and *
the interval time is up. When interval measurement is inserted during primary
measurement, the lap data is recorded as being continued, like regular lap data.
During the interval measurement, pressing the * LAP button skips the interval time
being counted-down, and starts a new countdown.
The interval time stops just as the elapsed time stops in the wristwatch.*
LAP button to start the next repeat of the interval time again.
Start pedaling at your interval intensity.
Repeat the steps 4 and 5.
Interval restart :
When “
INT” or “REC” is displayed in the lower display, pressing the SSS button
stops the interval measurement.
Interval measurement stop :
To restart the interval measurement, press the * SSS button.
Target heart rate zone
During measurement, the icon “ ” is displayed, which indicates
the target heart rate status.
(constant) : The target zone is set to any of HR.ZONE:1 to 5.
(flashing) :
(off) : The target zone is set to off.
For selecting the zone and setting the zone range, see the Option *
mode “Setting the target heart rate zones” (page 37).
The current heart rate is out of the selected zone.
Target heart rate
zone
Sports mode
Continue
ENG-35
Page 37

MENU
SSS
Option mode (OPTION)
MODE2
MODE1
(or)
Switching to Option mode
Select “OPTION MENU” by pressing the MENU button until it
switches to Option mode.
Function in Option mode
Option mode is used to change the settings of the training function, which is used
most frequently in Sports mode, and the target heart rate zone. Switch to various
settings as follows.
Setting the training function (countdown/interval)
This function is used to select the countdown or interval, and
enter the settings.
Target distance or time currently set
Training function currently selected
DST : Countdown distance
TIME : Countdown time
INT : Interval timer
Setting the target heart rate zones (page 37)
Select the target heart rate zone, and enter the upper and lower
limits.
Heart rate zone currently set
Setting the training function CD.TIMER
Option mode
This function is used to select the training function displayed in the lower of the screen,
and enter the settings.
Stop the measurement before you change the settings.*
In case of shortcutting from Sports mode, proceed to step 2, skipping step 1.*
Press and hold only the * MODE1 button to increase the number quickly.
When any other mode screen is displayed, switch to the Option
1.
mode “CD.TIMER”.
Select “OPTION MENU” by pressing the MENU button several times to switch to “CD.TIMER” automatically. Then,
confirm it pressing the SSS button.
Switch the mode :
Confirm :
ENG-36
Page 38

Select the training function displayed in the lower of the screen.
MODE2
MODE1
(or)
SSS
MODE2
MODE1
(or)
SSS
MENU
MENU
2.
Select the “DST (countdown distance)”, “TIME (countdown
time)”, or “INT (interval timer)” pressing the MODE1 or MODE2
button, and then confirm it pressing the SSS button.
Shortcut from the Sports mode
Select the training function :
(DST ↔ TIME ↔ INT)
Enter the setting.
3.
Enter the target value for the function selected in step 2, each digit one
Confirm :
Countdown function
currently selected
by one. Change the value pressing the MODE1 to increase and MODE2
button to decrease the value, and move digits pressing the SSS button.
Increase/decrease :
Press and hold the * MODE2 button for 3 seconds to confirm
the changes, and shortcut to the previous Sports mode.
Pressing the
4.
to Option mode “CD.TIMER”.
MENU button confirms the change, and returns
Confirm :
Target distance
or time
To switch to other mode, press the MENU button several times
to display the screen of your choice.
To the mode top/switch the mode :
The settings are reflected in the lower display in Sports mode. For details, see “Train-*
ing function (countdown function and interval function)” on page 32.
Setting the target heart rate zones HR ZONE
Select the registered target heart rate zone (1 to 5) or OFF, change the upper/lower
limit of each zone, or set on/off of the zone sound.
Stop measurement and perform the resetting operation (page 27) before you change *
the target heart rate zone. If you do not perform the resetting operation, “DATA RESET”
appears on the screen and you cannot change the target heart rate zones.
For details of the target zone, see “Use of the target zone” (page 67).*
The time in the zone measured can be viewed by file in the Data mode “File view” (page 40).*
Press and hold the * MODE1 or MODE2 button to increase/decrease the number
quickly.
When any other mode screen is displayed, switch to the Option
1.
mode “CD.TIMER”.
Select “OPTION MENU” by pressing the MENU button several times to switch to “CD.TIMER” automatically.
Switch the mode :
Option mode
Continue
ENG-37
Page 39

Switch to “HR ZONE” pressing the MODE1 or MODE2 button,
MODE2
MODE1
(or)
SSS
MODE2
MODE1
(or)
SSS
MODE2
MODE1
(or)
SSS
MODE2
MODE1
(or)
SSS
MENU
2.
then confirm it pressing the SSS button.
Switch the screen :
Confirm :
The target heart rate zone (* ZONE-1 to 5) or “OFF” currently
selected appears on the screen.
Select the target heart rate zone.
3.
Select one of “OFF”, “ZONE-1”, “2”, “3”, “4” or “5” pressing
the MODE1 or MODE2 buttons. To set the target heart rate
zone, select from “1” to “5” and confirm it pressing the SSS
button, and then proceed to the step 4. Otherwise, select “OFF”
and proceed to step 6.
Select the zone:
Enter the lower limit of the zone currently selected pressing
4.
the MODE1 and MODE2 buttons, and confirm it pressing the
Confirm :
SSS button.
Then, enter the upper limit in the same way, and confirm it
pressing the SSS button.
Increase/decrease :
You can enter any upper/lower limit to each zone; however, *
the upper limit is adjusted automatically to the lower limit
+ 1 when the entered lower limit exceeds the upper limit. In
case of the upper limit, vice versa, the lower limit is adjusted in the same way.
It is no problem even if the upper and lower limit range *
overlaps other zones.
Option mode
Select “ON” or “OFF” of the alarm sound pressing the MODE1
5.
and MODE2 buttons, and confirm it pressing the SSS button.
ON ↔ OFF :
Confirm :
When the alarm sound is on, an alarm sounds continuously *
as long as the heart rate is outside the target heart rate zone.
Pressing the
6.
to Option mode “HR ZONE”.
MENU button confirms the change, and returns
Press the MENU button repeatedly to switch to another mode.
To the mode top/switch the mode :
Confirm :
Hear t rat e zone
currently selected
Upper limit
Lower limit
Setting the HR
alarm zone
ENG-38
Page 40

MODE1
MODE2
Data mode (DATA)
Switching Data mode
Select “DATA MENU” by pressing the MENU button until it
switches to Data mode.
Function in Data mode
The Data mode is used to review and delete the saved files, download the measurement
data to your PC, and review past records.
File view (page 40)
This view is used to review and manage the various
data recorded.
Number of total laps in all files
Number of total files saved
Memory point utilization
PC link (page 45)
This is used to send the measurement data to your PC.
The optional “USB communication kit” is required.*
Past records (page 47)
Past trip distance and elapsed time can be reviewed
by time period.
Continue
Data mode
ENG-39
Page 41

File view FILE
F01
F02
F03
F30
The lap and measurement data are saved into a file automatically each time a ride is
reset (Resetting operation on page 27). With the file view, you can review and delete
the files saved.
Saving and managing the files
The wristwatch can record up to 30 files.
A new file is always saved as F01. When the file volume exceeds the wristwatch
memory capacity, the oldest file is deleted automatically.
Date of creation : New
Measurement data to be saved in a file
Date and time of file creation (date/time when the measurement started)•
Trip distance•
Elapsed time•
Various average values (speed/heart rate/cadence)•
Various maximum values (speed/heart rate/cadence/altitude/temperature/•
slope angle)
Various minimum values (altitude/temperature)•
Ascending altitude•
Calorie consumption•
Number of laps used•
Time distribution to the target zone (time in/above/below the zone) and the •
percentages (%)
Lap data (average lap speed, average lap heart rate, maximum lap speed, •
maximum lap heart rate, lap time, split time, trip lap distance)
Point data at the intervals specified.•
Data mode
Wristwatch memory capacity limit
Data can be saved within the following memory capacity limits.
Number of files 30 files
Number of laps Laps shall be 99 or less. (* See “Lap data”)
Memory for each recording interval Points shall be 36000 or less.
Example At 2 seconds Maximum record of 20 hours
At 3 seconds Maximum record of 30 hours
At 5 seconds Maximum record of 50 hours
At 10 seconds Maximum record of 100 hours
Old
ENG-40
Page 42

Lap data•
One lap per file is used even when there is no lap data. Therefore, the total
number of laps is the sum of the total number of laps in all files and the number
of files.
Example) When the following number of laps are recorded in the files:
Number of laps in a file Number of files
F01 : 5 laps
F02 : 0 lap
F03 : 10 laps
3 files
The total number of laps is the sum of the total number of laps in all files
“15”, and the total number of files “3”, i.e., “18”.
• Memory point
This unit has a function to automatically record the data at intervals specified
during measurement (memory point). The recorded data are saved in a file
together with other measurement records and lap data.
The memory point can be viewed in “memory point utilization” on the File
view. To use such data, you have to send them to your PC (page 46).
The automatic record interval can be selected from 4 options in the range of 2
to 10 seconds according to your application. For details, see the Setup mode
“Setting the record interval” (page 56).
When the memory point utilization is over 90%, and the
remaining memory capacity is low:
An alarm sounds during the measurement, “MEMORY”
flashes on the screen. This alert is displayed repeatedly
every 2 minutes until the data volume exceeds the memory
capacity.
When the memory point utilization reaches 100%, and the
data volume exceeds the memory capacity:
An alarm sounds during the measurement, “MEMORY FULL”
flashes on the screen. In this case, the wristwatch automatically saves the data being measured, and creates a file.
Data will be displayed on the screen but now can no longer
be saved. The alert is displayed repeatedly every 2 minutes.
It is recommended to stop the measurement immediately,
and delete the files in the wristwatch.
When using the optional “USB communication kit”, delete the files after you *
send the saved files to your PC.
Data mode
Continue
ENG-41
Page 43

Viewing the contents in a file
MODE2
MODE1
(or)
SSS
MODE2
MODE1
(or)
SSS
MENU
View the measurement data in a file saved in the wristwatch.
Switch to the Data mode “FILE”, when any other mode
1.
screen is displayed.
Select “DATA MENU” by pressing the MENU button several times to switch to “FILE” automatically. Then, confirm
it pressing the SSS button.
Switch the mode :
Select the file number you want to view.
2.
Select the file number pressing the MODE1 or MODE2
button, and confirm it pressing the SSS button.
Switching the file number :
Confirm :
The file number starts with the latest file (* F01).
Scroll through the data saved in each file by pressing the
3.
SSS button.
The display items are as follows on the next page.
4.
Data mode
Pressing the
Press the MENU button repeatedly to switch to another mode.
When the target heart rate zone is set to OFF during measurement, no data re-*
lated to the target heart rate zone saved is displayed.
Pressing the * LAP button while viewing data switches to viewing the lap data. For
details, see “Viewing the lap data” (page 44).
MENU button returns to the Data mode “FILE”.
To the mode top/switch the mode :
Confirm :
Number of total
files saved
Number of total
laps in all files
Memory point
utilization
File number
Number of
laps in a file
Date of file creation
(Displayed
alternately)
Time of the start
ENG-42
Page 44

Flow of file view
SSS
SSS
SSS
SSS
SSS
SSS
SSS
SSS
MODE2SSS
MODE1
SSS
SSS
MENU
(Displayed
alternately)
Data mode “FILE”
(or)
Return
Delete file view screen
Delete all files
(to the top screen
of the File view)
Ascending altitude
Maximum slope
angle
Maximum altitude Minimum altitude
(Displayed
alternately)
Maximum
temperature
(Displayed
alternately)
Time above the zone,
and the percentage
*1: The zone percentage is displayed as
a guide only, and the total percentage
of 3 zones does not come to 100%.
Time below the zone,
*1
and the percentage
Minimum
temperature
(hour/minute/second)
Average heart rate
Calorie consumption
(kcal)
Maximum speed
Maximum heart rate
Maximum cadence
*1
Upper zone limit
Lower zone
limit
Trip time
Trip distance
(km [mile])
Average speed
Average cadence
Heart rate zone number
(Displayed
alternately)
Time in zone, and percentage
Continue
Data mode
*1
ENG-43
Page 45

Viewing the lap data
MODE2
MODE1
(or)
SSS
LAP
MODE2
MODE1
(or)
MENU
SSS
View the lap data in a file saved in the wristwatch.
Select the file number you want to view from the Data mode
1.
“FILE” (page 42).
Select the file number pressing the MODE1 or MODE2
button, and confirm it pressing the SSS button.
Switching the file number :
Confirm :
File number
Number of
laps in a file
Data mode
The file number starts with the latest file (* F01).
LAP button to view the lap data contained in the
Press the
2.
file selected.
Switch the average value to maximum value display pressing the SSS button. Press the LAP button again to return
from the lap data.
Viewing/exiting lap data :
When no lap data is contained in the file, it cannot be *
viewed.
Average lap speed
Average values Maximum values
Average lap
heart rate
Lap time
Lap number
Maximum lap
heart rate
(Displayed alternately)
Split time
Switch the laps, if applicable, pressing the
3.
MODE2 buttons.
Switching the lap number :
Pressing the
4.
Press the MENU button repeatedly to switch to another mode.
ENG-44
MENU button returns to the Data mode “FILE”.
To the mode top/switch the mode :
Trip lap distance
MODE1 and
Date of file creation
(Displayed
alternately)
Time of start
Maximum lap
speed
Page 46

Deleting files
MODE1
SSS
MODE2SSS
SSS
MENU
MENU
You can manually delete the files saved in the wristwatch.
When the data volume exceeds the memory capacity, the wristwatch automatically deletes
the oldest file, and creates a new file. You can manually delete all files at once.
Switch to the Data mode “
1.
with the SSS button.
Simultaneously press the SSS button and the MODE1 or
2.
MODE2 button to switch to the delete screen.
Switch to Delete:
FILE” (page 42), and confirm
(or)
Pressing the
3.
Data mode “FILE”.
Press the MENU button repeatedly to switch to another mode.
SSS button deletes all files, and returns to the
Delete all files :
Cancel deleting files :
To the mode top/switch the mode :
Delete file view
screen
Pressing the * MENU button on the delete screen cancels deleting files, and returns to
the previous screen.
When the wristwatch has no files (* F00) the delete file operation is not operable.
Once any file is deleted, all lap data contained in the file are also deleted.*
Once a file is deleted, it cannot be restored.*
PC link PC LINK
The PC link is used for two-way communication with your PC to which download
software “e-Train Data™ ver.4” is installed. You can send the data measured with this
unit to your PC, and change various settings in the wristwatch from your PC.
The optional “USB communication kit” and installation of the “e-Train Data™ ver.4 (Windows version)” contained in the CD-ROM supplied are required to use this function.
For using the files sent, refer to the e-Train Data™ ver.4 instruction manual contained *
in the CD-ROM supplied.
Continue
Data mode
ENG-45
Page 47

Communication between your PC and this unit
MENU
MODE2
MODE1
(or)
SSS
SSS
Send the files saved in the wristwatch to your PC, or reflect the settings changed
from your PC in the wristwatch.
Boot your PC, and connect the USB communication unit
1.
to the your PC.
USB communication unit
2.
3.
4.
Data mode
Start e-Train Data™ ver.4, and click the “
Communication”
button on your PC screen.
Prepare for sending the data according to the instructions
displayed on your PC screen.
Switch to the Data mode “FILE”, when any other mode
screen is displayed.
Select “DATA MENU” by pressing the MENU button repeat-
edly to switch to “FILE” automatically.
Switch modes :
Switch to “PC LINK” pressing the MODE1 or MODE2 but-
ton, and then press the SSS button.
“LINK-TO PC” appears on the screen, and the wristwatch
automatically starts searching for your PC. Once the communication is established, it switches to “SEND FILE”, and
starts sending the data.
Switch the screen :
Search PC / Send the data :
When communication with your PC cannot be established, *
“LINK-TO PC FAIL” appears. Press the SSS button to return
to “PC LINK”, and check the condition of your PC. Pressing
the SSS button again restarts searching for your PC.
Pressing the * MENU button while sending the data displays
“LINK-TO PC FAIL”, and stops sending the data. Pressing
the SSS button returns to “PC LINK”.
Depending on the number of files saved, it takes up to 5 *
minutes to send the data.
Searching for
your PC
Sending data
ENG-46
Page 48

Once sending data is completed, “SEND FILE END” ap-
SSS
MENU
5.
pears. Press the SSS button and return to the data mode
“PC LINK”.
To the mode top :
Completion of
Press the
6.
mode.
MENU button repeatedly to switch to another
To switch modes :
sending
Data to be sent from this unit to your PC
The data to be sent to your PC are as follows.
File number•
Date/time of file creation (date/time when the measurement started)•
Measured values of the speed, heart rate, cadence, trip distance, elapsed time, •
and sea level altitude, at the record intervals specified
Lap data (lap number, average lap speed, average lap heart rate, Average lap •
cadence, maximum lap speed, maximum lap heart rate, maximum lap cadence,
lap time, split time, and lap distance), Time in the heart rate zone (over / within
the range / under)
The wristwatch has a limited memory capacity. It is recommended to transfer *
the measurement data periodically to your PC, and delete the files in the wristwatch (page 45).
Settings to be changed from your PC
The date, clock, on/off and time of the alarm, tire circumference, speed unit, record
interval, total trip distance/total elapsed time, auto-mode setting, sound setting,
and sea level altitude HOME setting.
Past records VIEW LOG
The past records allow you to view the trip distance and elapsed time by time period,
which are essential for your training management.
Total trip distance (• ODO) and total elapsed time (TTM) since beginning use of this unit
Weekly trip distance and time since Monday•
Monthly trip distance and time since the 1st•
Yearly trip distance and time since January 1st•
You can adjust effectively the training menu by receiving and analyzing the actual
training volume of each period of time.
Continue
ENG-47
Data mode
Page 49

Switch to the Data mode “FILE”, when any other mode screen
MENU
MODE2
MODE1
(or)
SSS
MENU
SSS
SSS
SSS
1.
is displayed.
Select “DATA MENU” by pressing the MENU button several
times to switch to “FILE” automatically.
Switch modes :
Switch to “VIEW LOG” pressing the MODE1 or MODE2 but-
2.
tons, and confirm pressing the SSS button.
Switch the screen :
The total trip distance and total elapsed time since first use of
3.
the wristwatch are displayed.
Confirm:
The weekly, monthly, and yearly trip distance and elapsed time
are displayed in sequence by pressing the SSS button.
Total elapsed time Weekly elapsed time Monthly elapsed time
Total trip distance Weekly trip distance Monthly trip distance Yearly trip distance
Press the
4.
Once you change any date in the past according to the Setup mode “Setting the clock/*
Data mode
date” (page 50), some integrated values for the year, month, or week are deleted according to the relevant changes.
MENU button repeatedly to switch to another mode.
To the mode top/switch the mode :
Total elapsed
time and total
When the year is changed
When the month is changed
When the day is changed Retained Deleted Retained Retained
trip distance
Retained Deleted Deleted Deleted
Retained Deleted Deleted Retained
Elapsed time
and trip distance
for the week
Elapsed time
and trip distance
for the month
The trip distance of “Past records” in the data mode is integrated regardless of start-*
ing or stopping of the measurement. Therefore, the trip distance may differ from that
in the sports mode which is interlocked with the start/stop of the measurement.
The measurement time is integrated into the elapsed time.*
Once “* MEMORY FULL” appears on the screen, the elapsed time is no longer added.
It will resume when the wristwatch attains an available capacity.
ENG-48
Yearly elapsed time
Elapsed time
and trip distance
for the year
Page 50

MODE1
MODE2
Setup mode (SETUP)
MENU
Switching to Setup mode
Press and hold the MENU button in the Clock mode or Sports
mode until “SETUP MENU” appears on the screen, then the
wristwatch switches to the Setup mode automatically.
Function in Setup mode
Setup mode is used to change various settings of the wristwatch. Switch the setup
items pressing the MODE1 or MODE2 button.
Once any setting is changed, confirm it pressing the * MENU button.
Unless you perform an operation within 3 minutes, it returns to Clock mode. In such cases, *
any change is not reflected.
Shortcut from Clock mode or Sports mode does not display the altitude adjusting screen *
as shown in the figure below. It directly switches to the setting entry screen.
Setting the
clock/date
Setting the
alarm clock
(press & hold)
Setting the tire
circumference
Searching for
sensor ID
(page 50)
Correcting the sea
level altitude
(page 60)
Setting sound
(page 59)
(page 51)
Setting the
auto-mode
(page 58)
(page 52)
Total trip distance/total
elapsed time entry
(page 57)
Continue
(page 53)
Setting the
measurement unit
(page 55)
Setting the
record interval
(page 56)
ENG-49
Setup mode
Page 51

Setting the clock/date CLOCK DATE
MENU
(press & hold)
SSS
MODE2
MODE1
(or)
SSS
MODE2
MODE1
(or)
SSS
MODE2
MODE1
(or)
SSS
MODE2
MODE1
(or)
SSS
Set the “Clock display format”, “Hour”, “Minute”, “Date display format”, “Year”, “Month”
and “Day”.
Once you change any date in the past, some integrated values for the year, month, *
or week in the Data mode “Past records” (page 47) are deleted according to the
relevant changes.
Press and hold the * MODE1 or MODE2 button to increase/decrease the number
quickly.
Press and hold the MENU button in the Clock mode or Sports
1.
mode until “SETUP MENU” appears on the screen.
The wristwatch switches to “CLOCK DATE” automatically.
Then, confirm it with the SSS button.
Switch the mode :
Select the clock display format.
2.
Select “24h (24 hour)” or “12h (12 hour)” pressing the MODE1
and MODE2 buttons, and confirm with the SSS button.
Enter the “Hour” or “Minute”.
3.
Enter the “Hour” pressing the MODE1 and MODE2 buttons, confirm
with the SSS button, and then enter the “Minute” in the same way.
Increase/decrease :
Select the date display format.
4.
Select the date display format from “YY.MM.DD”, “DD.MM.YY”,
Setup mode
and “MM.DD.YY” pressing the MODE1 and MODE2 buttons,
and confirm with the SSS button.
Switch the display :
24h ↔ 12h :
Confirm :
Display format
Confirm :
Hour
Confirm :
Confirm :
Minute
Enter the “Year”, “Month” and “Day”.
5.
Enter the “Year”, “Month” and “Day” in the display order selected
in Step 4 pressing the MODE1 and MODE2 buttons, and confirm
with the SSS button. Enter only the last 2 digits of the year.
ENG-50
Increase/decrease :
Confirm :
Display format
YY/MM/DD
Page 52

Pressing the
MENU
MENU
(press & hold)
MODE2
MODE1
(or)
SSS
MODE2
MODE1
(or)
SSS
MODE2
MODE1
(or)
SSS
6.
to the Setup mode “CLOCK DATE”.
MENU button confirms the change, and returns
Press the MENU button repeatedly to switch to another mode.
To the mode top/switch the mode :
Setting the alarm clock ALARM
Set the alarm in Clock mode.
Press and hold the * MODE1 or MODE2 button to increase/decrease the number
quickly.
Press and hold the MENU button in the Clock mode or Sports
1.
mode until “SETUP MENU” appears on the screen.
It switches to “CLOCK DATE” automatically.
Switch modes :
Switch to “ALARM” pressing the MODE1 or MODE2 button,
2.
and then confirm it pressing the SSS button.
Switch screen :
Select “ON” or “OFF” pressing the MODE1 or MODE2 button.
3.
To use the alarm clock, select “ON” and press the SSS button
to proceed to Step 4. Otherwise, select “OFF” to proceed to
Step 5.
ON ↔ OFF:
You can set on/off of the alarm clock also in Clock mode. *
When it is on,
Enter “Hour” and “Minute”.
4.
Enter “Hour” pressing the MODE1 and MODE2 buttons, and
icon appears.
confirm it pressing the SSS button. Then, enter “Minute” in
the same way.
Increase/decrease:
Confirm :
Confirm :
Confirm :
Setup mode
Continue
MinuteHour
ENG-51
Page 53

Pressing the
MENU
MENU
(press & hold)
MODE2
MODE1
(or)
SSS
MODE2
MODE1
(or)
SSS
5.
to the Setup mode “ALARM”.
MENU button confirms the change, and returns
Press the MENU button repeatedly to switch to another mode.
To the mode top/switch the mode :
Setting the tire circumference TIRE
Set the tire circumference (peripheral length) to SP1 (Speed sensor 1) and SP2 (Speed
sensor 2) synchronized according to “Searching for sensor ID” (page 53).
For the tire circumference, see “Tire circumference” (page 17).*
Press and hold the * MODE1 or MODE2 button to increase/decrease the number
quickly.
Press and hold the MENU button in the Clock mode or Sports
1.
mode until “SETUP MENU” appears on the screen.
It switches to “CLOCK DATE” automatically.
Switch modes :
2.
Setup mode
3.
ENG-52
Switch to “TIRE” pressing the MODE1 or MODE2 button, and
then confirm it pressing the SSS button.
Switch screen :
Confirm :
Select (Sensor 1) or (Sensor 2) by pressing the MODE1
or MODE2 button.
↔ :
Confirm :
When using a wristwatch for a single bicycle, set the tire *
circumference to
(Sensor 1) only. When using a wristwatch commonly for two bicycles, sets the tire circumference
of the second bicycle to
(Sensor 2).
Sensor currently
selected
Tire circumference
set to the sensor
currently selected
Page 54

Enter the last 2 digits for the tire circumference of the sensor
MODE2
MODE1
(or)
SSS
MENU
MENU
(press & hold)
MODE2
MODE1
(or)
SSS
4.
selected in Step 3 using the MODE1 and MODE2 buttons, and
move digits using the SSS button.
Then, enter the first 2 digits in the same way.
Increase/decrease:
Pressing the
5.
to the Setup mode “TIRE”.
MENU button confirms the change, and returns
Move digits:
Press the MENU button repeatedly to switch to another mode.
To the mode top/switch the mode :
Switching to the Sports mode displays the sensor icon (* or ) selected. Even
when a wristwatch is commonly used for 2 bicycles, the speed sensor is recognized
automanically; accordingly, the measurement can be started appropriately (it may
take time to recognize it automatically depending on the situation).
For details, see “Automatic recognition of the speed sensor ID” on page 7.
Searching for sensor ID SYNC ID
Pairing the wristwatch with the heart rate and speed/cadence sensors.
This unit requires checking of the sensor ID in order for the wristwatch to receive signals *
from the sensors. Once you format the wristwatch, or when you use a new sensor, synchronize the sensor ID according to the following procedure.
When you use the unit for the first time (at factory default setting), each sensor *
ID has been synchronized to the wristwatch in the package; accordingly, the
following procedure is not required.
To synchronize the sensor ID, each sensor must be near the wristwatch.*
Check that there is not any other sensor of the same type nearby. *
Press and hold the MENU button in the Clock mode or Sports
1.
mode until “SETUP MENU” appears on the screen.
It switches to “CLOCK DATE” automatically.
Switch modes :
Setup mode
Switch to “SYNC ID” pressing the MODE1 or MODE2 button,
2.
and then confirm it pressing the SSS button.
Switch screen :
Confirm :
Continue
ENG-53
Page 55

Select the sensor ID to be checked.
MODE2
MODE1
(or)
SSS
SSS
MENU
3.
Select from “HR (heart rate sensor)”, “SP1 (speed sensor 1)”,
and “SP2 (speed sensor 2)” pressing the MODE1 and MODE2
buttons, and then confirm it pressing the SSS button.
HR ↔ SP1 ↔ SP2:
Confirm :
SP2* is used when a wristwatch is commonly used for 2
bicycles. Once you synchronize the ID of the second bicycle
equipped with a sensor with SP2 in advance, the wristwatch
can identify the second bicycle automatically.
Press the SSS button to start searching for the ID.
4.
When you select “SP1” or “SP2”, press the RESET button on
the speed sensor. When you selected “HR”, wear the heart
rate sensor (page 13), or transmit a sensor signal according
to the following simple method below.
When the heart rate or speed/cadence is displayed with
“ID-OK” on the screen, synchronization is completed.
Start searching :
This unit enters the search mode for 5 minutes after starting *
the ID sync. Press the SSS button in the search mode to
cancel the ID synch, and “ID-SKIP” is displayed. If any sensor signal is not received in 5 minutes, “ID-ERROR” is displayed. When “ID-SKIP” or “ID-ERROR” is displayed, the ID
has not been synchronized properly.
* Even when the heart rate sensor is not worn,
it transmits a heart rate signal by rubbing both
electrode pads with your thumbs.
Setup mode
Pressing the
5.
to the Setup mode “SYNC ID”.
MENU button confirms the change, and returns
Press the MENU button repeatedly to switch to another mode.
To the mode top/switch the mode :
Electrode pad
When you use * SP2, set the tire circumference of (Sensor 2) according to “Setting
the tire circumference” (page 52).
ENG-54
Page 56

Setting the measurement unit UNITS
MENU
(press & hold)
MODE2
MODE1
(or)
SSS
MODE2
MODE1
(or)
SSS
MODE2
MODE1
(or)
MENU
Change the speed unit and temperature unit.
Stop measurement and perform the resetting operation (page 27) before you change *
the unit. Unless you perform the resetting operation, “DATA RESET” appears on the
screen, preventing change of the unit.
Press and hold the MENU button in the Clock mode or Sports
1.
mode until “SETUP MENU” appears on the screen.
It switches to “CLOCK DATE” automatically.
Switch modes :
Switch to “UNITS” pressing the MODE1 or MODE2 button,
2.
and then confirm it pressing the SSS button.
Switch screen :
Confirm :
Select the speed unit pressing the MODE1 or MODE2 button.
3.
To switch the speed unit only, proceed to Step 5. To change
the temperature unit afterwards, press the SSS button, and
then proceed to Step 4.
km/h ↔ mph :
Select the temperature unit using the MODE1 and MODE2
4.
buttons.
Pressing the
5.
to the Setup mode “UNITS”.
MENU button confirms the change, and returns
Press the MENU button repeatedly to switch to another mode.
To the mode top/switch the mode :
After the measurement unit is switched, the total distance measured in the past is *
automatically converted to the new unit.
˚C ↔ ˚F :
Confirm :
Current speed unit
temperature unit
Continue
Current
Setup mode
ENG-55
Page 57

Setting the record interval SAMPLE RATE
MENU
(press & hold)
MODE2
MODE1
(or)
SSS
MODE2
MODE1
(or)
MENU
In primary measurement, the measurement data is recorded in the selected intervals
(seconds).
Stop the measurement and perform the resetting operation (page 27) before you *
change the record interval. Unless you perform the resetting operation, “DATA RESET”
appears on the screen, preventing change of the record interval.
You cannot set the record interval to off.*
Press and hold the MENU button in the Clock mode or Sports
1.
mode until “SETUP MENU” appears on the screen.
It switches to “CLOCK DATE” automatically.
Switch modes :
Switch to “SAMPLE RATE” pressing the MODE1 or MODE2
2.
button, and then confirm it pressing the SSS button.
Switch screen :
Select “T-10s (10 seconds)”, “T-5s (5 seconds)”, “T-3s (3
3.
seconds)” or “T-2s (2 seconds)” pressing the MODE1 or
Confirm :
MODE2 buttons.
T-10s ↔ T-5s ↔ T-3s ↔ T-2s :
Pressing the
4.
to the Setup mode “SAMPLE RATE”.
Setup mode
Press the MENU button repeatedly to switch to another mode.
MENU button confirms the change, and returns
To the mode top/switch the mode :
The wristwatch stores up to 36000 points of data, and the maximum record time *
(maximum time up to the memory point utilization of 100%) depends on the intervals
of the seconds selected. The following time lengths can be used as a guideline.
T-10s (at intervals of 10 seconds) : up to 100 hours
T-5s (at intervals of 5 seconds) : up to 50 hours
T-3s (at intervals of 3 seconds) : up to 30 hours
T-2s (at intervals of 2 seconds) : up to 20 hours
The current memory point utilization can be viewed in the Data mode “File view” *
(page 40).
ENG-56
Current
record interval
Page 58

Total trip distance/total elapsed time entry TOTAL DATA
MENU
(press & hold)
MODE2
MODE1
(or)
SSS
MODE2
MODE1
(or)
SSS
MODE2
MODE1
(or)
SSS
MENU
You can enter any values to the total trip distance and total elapsed time in the Data
mode “Past records” (page 47), then you can start with the values entered.
The total trip distance and total elapsed time can be retained even after formatting the
wristwatch or replacing the wristwatch.
Press and hold the * MODE1 or MODE2 button to increase/decrease the number
quickly.
Press and hold the MENU button in the Clock mode or Sports
1.
mode until “SETUP MENU” appears on the screen.
It switches to “CLOCK DATE” automatically.
Switch modes :
Switch to “TOTAL DATA” pressing the MODE1 or MODE2
2.
button, and then confirm it pressing the SSS button.
Switch screen :
For entry, change each digit one by one for the total trip distance
3.
by pressing the MODE1 or MODE2 button, and move digits by
pressing the SSS button. (6-digit integer number)
To enter the total trip distance only, proceed to Step 5 after
the entry. To enter the total elapsed time at the same time,
move digits to the far left, and then proceed to Step 4 by
pressing the SSS button.
Increase/decrease:
For entry, change each digit for the total elapsed time by
4.
pressing the MODE1 or MODE2 button, and move digits by
pressing the SSS button.
Increase/decrease:
Confirm :
Total trip distance
Move digits:
Move digits:
Setup mode
Pressing the
5.
to the Setup mode “TOTAL DATA”.
MENU button confirms the change, and returns
Press the MENU button repeatedly to switch to another mode.
To the mode top/switch the mode :
Total elapsed time
Continue
ENG-57
Page 59

Setting the auto-mode AUTO MODE
MENU
(press & hold)
MODE2
MODE1
(or)
SSS
MODE2
MODE1
(or)
MENU
Switch on/off of the auto-mode (page 26).
Press and hold the MENU button in the Clock mode or Sports
1.
mode until “SETUP MENU” appears on the screen.
It switches to “CLOCK DATE” automatically.
Switch modes :
Switch to “AUTO MODE” pressing the MODE1 or MODE2
2.
button, and then confirm it pressing the SSS button.
Switch screen :
Select “ON” or “OFF” pressing the MODE1 or MODE2 button.
3.
ON ↔ OFF:
Confirm :
Current setting
4.
Setup mode
ENG-58
Pressing the
MENU button confirms the change, and returns
to the Setup mode “AUTO MODE”.
Press the MENU button repeatedly to switch to another mode.
To the mode top/switch the mode :
Page 60

Setting sound SOUND
MENU
(press & hold)
MODE2
MODE1
(or)
SSS
MODE2
MODE1
(or)
SSS
MODE2
MODE1
(or)
MENU
Switch on/off of the button operation sound and target heart rate zone alarm sound.
Press and hold the MENU button in the Clock mode or Sports
1.
mode until “SETUP MENU” appears on the screen.
It switches to “CLOCK DATE” automatically.
Switch modes :
Switch to “SOUND” pressing the MODE1 or MODE2 button,
2.
and then confirm it pressing the SSS button.
Switch screen :
Select “ON” or “OFF” of the button operation sound pressing
3.
the MODE1 or MODE2 button.
To switch the button operation sound only, proceed to Step
5. To change also the target heart rate zone alarm sound, press
the SSS button, and then proceed to Step 4.
ON ↔ OFF:
Select “ON” or “OFF” of the target heart rate zone alarm sound
4.
pressing the MODE1 or MODE2 button.
ON ↔ OFF:
Confirm :
Confirm :
Pressing the
5.
to the Setup mode “SOUND”.
MENU button confirms the change, and returns
Press the MENU button repeatedly to switch to another mode.
To the mode top/switch the mode :
Continue
Setup mode
ENG-59
Page 61

Correcting the sea level altitude ALT
MENU
(press & hold)
MODE2
MODE1
(or)
SSS
MODE2
MODE1
(or)
SSS
MENU
Correct the sea level altitude.
Stop the measurement before you change the settings.*
In case of shortcutting from Clock mode or Sports mode, proceed to the step 2 *
skipping the step 1.
For details of the altitude, see “Basic knowledge of the altitude measurement” on page 61.*
Press and hold the * MODE1 or MODE2 button to increase/decrease the number
quickly.
Press and hold the MENU button in the Clock mode or Sports
1.
mode until “SETUP MENU” appears on the screen.
It switches to “CLOCK DATE” automatically.
Switch modes :
2.
3.
4.
Setup mode
5.
ENG-60
Switch to “ALT” using the MODE1 or MODE2 button, and then
Shortcut from the Clock mode or Sports mode
confirm it using the SSS button.
Switch screen :
Confirm :
Select “REF (correcting the sea level altitude)” or “HOME
(home altitude)” with the MODE1 and MODE2 buttons, and
then confirm it with the SSS buttons.
There are 2 ways to correct the sea level altitude with this unit. One *
is REF (correcting the sea level altitude), and HOME (home altitude),
the other. For details, “Sea level altitude correction” on page 61.
Select “+” or “-“ of the sea level altitude. Then, change each
digit one by one for the value using the MODE1 and MODE2
buttons, and move digits using the SSS button.
Increase/decrease:
Move digits:
The altitude is entered in 4 digits in the unit of meter, 5 *
digits in the unit of feet, both in integer numbers.
Pressing and holding the * MODE1 button for 3 seconds confirm the
changes, and shortcuts to the previous Clock mode or Sports mode.
Pressing the
MENU button confirms the change, and returns
to the Setup mode “ALT”.
Press the MENU button repeatedly to switch to another mode.
To the mode top/switch the mode :
Current sea level
altitude
Page 62

Basic knowledge of the altitude measurement
Altitude measurement function
1
This unit measures the atmospheric pressure using a built-in pressure sensor and
determines the altitude. It estimates the altitude using the relation between the altitude
and pressure of ISO 2533 (Standard atmosphere), which was developed based on the
international standard atmosphere specified by the International Civil Aviation Organization (ICAO). Generally, a conventional pressure sensor is affected by temperature
and can cause a large margin of error, but this unit is temperature-compensated and
records 1 meter resolution. This unit is designed not to reflect the change in atmospheric pressure to the altitude measurement except during a ride; therefore, the altitude is less prone to weather changes, so while not in motion, value shift is minimal.
The altitude measurement may change temporarily when going outside from an indoor *
room. This is due to a rapid temperature change, and is not a malfunction. It will return
to the normal value after a while.
Sea level altitude correction
There are 2 ways to correct the sea level altitude with this unit. It is recommended to
correct the sea level altitude just before measurement, taking either following methods.
The sea level altitude correction screen is displayed in Setup mode in the * MENU, or is
shortcut to from the orthrometric height screen in Clock mode or in Sports mode.
• REF (sea level altitude correction): Enter the altitude at the current point.
Enter the actual value at the point where the sea level altitude is
well known, such as along the seashore, or at a sign on the mountain, etc.
Press and hold * MODE1 and SSS, or MODE2 and SSS, simultaneously
on the setting screen to reset the corrected value to the default value (a
value according to ISO2533).
• HOME (home altitude setting): Apply the altitude set beforehand.
Preset the sea level altitude at your home in advance. Move to the ALT
HOME screen, and then return to Clock mode or Sports mode by
pressing MENU or the relevant shortcut. Then, the sea level altitude
changes to the preset value. You can start with the correct sea level
altitude by setting home altitude before starting from your home.
Timing for updating the sea level altitude, ascending
altitude, and temperature
The timing for updating the sea level altitude, ascending altitude, and temperature
data differs depending on whether the Sports mode is in measurement or is
stopped.
When the Sports mode is in measurement, and a speed sensor signal is received
When the Sports mode is stopped, or no speed sensor signal is received
This is also valid in Clock mode.*
Condition Timing for updating
5 seconds
5 minutes
Continue
ENG-61
Page 63

Relation between the altitude and atmospheric pressure
2
The higher the altitude, the lower the atmospheric pressure. At an altitude of 500 m
or less, the pressure changes by 12 hPa per 100 m of altitude.
Knowledge related to weather and altitude
3
The change in atmospheric pressure when the weather changes from a good condition such
as clear and sunny, to a bad condition such as rainy and cloudy is equivalent to the ascending
altitude of about 100 m. Thunder storms will be result in even larger changes. Furthermore,
the atmospheric pressure measurements may change more than 30 m in altitude change from
sunrise to sunset even under stable clear weather conditions.
ENG-62
Page 64

Heart rate training
PULSE RATE (bpm)
AGE
200
180
160
140
120
100
90
20 30 40 50 60 70
TARGET
ZONE
TARGET
ZONE
30%
40%
50%
60%
70%
80%
Exercise Level
30%
40%
50%
60%
70%
80%
MAXIMUM HEART RATE (204 – 0.69 x AGE)MAXIMUM HEART RATE (204 – 0.69 x AGE)
190 – AGE
180 – AGE
190 – AGE
180 – AGE
This section is just a general overview of training with heart rate data. For more
complete information, there are books and websites with more in-depth information.
Generally, the heart rate increases during exercise, getting higher in conjunction with
the intensity of the workout. The measurement of your heart beat is a good indicator
of the intensity of your workout. By setting target HR (heart rate) zones and sticking
to pre-set exercises, you will be able to work out more efficiently. Before beginning a
training program, be sure to first consult a medical specialist or sports trainer.
Target heart rate zone
1
Bicycling is one of the best activities to improve your general fitness. To improve
your overall fitness through bicycling, set a target heart rate zone from between
30% and 70% of your maximum HR, depending on your physical strength. For
best results, exercise consistently in this zone for periods of at least 20-30 minutes,
3 or more times a week. Obtain your target heart rate zone from either of the 2
ways below.
Training level for improving general fitness
Check the training level according to your age using the graph below. For beginners, it is recommended to start with the level of 30% of your max. From this
point, gradually increase the level according to your fitness level and experience.
Training at levels over 70% of your HR max will focus more on anaerobic exercise, and less on aerobic exercise. Weight loss usually occurs through longer
rides (over 1 hour) at lower HR levels.
Continue
ENG-63
Page 65

Obtaining individual heart rate zone for building up power
Athletic ability is different from person to person. The effective and reasonable target
heart rate zone has to be obtained from the actual ride data. A time trial for 20 minutes
or 5 km (hereinafter abbreviated as TT) is required to measure the actual data. Perform
the TT under the following conditions, according to the specified procedure.
TT is a training item, in which riders bicycle a specified distance at full speed. *
The last half is especially a very physically demanding workout. Maintain the
pace so that you can ride the specified distance at a stable speed.
Conditions for time trials
For the TT measurement, a continuous ride for 20 minutes is ideal. When
such a course that you can ride continuously for 20 minutes is not available,
use a 5 km course that you can ride continuously. Measure the course distance
in advance, and specify the start and goal points. Repeat the TT twice, and
calculate the average of the average heart rates in the 2 sessions, which will
be used as an average level for setting the zone.
Procedures for time trial measurements
Caution:
Maintain a good physical condition. If you have any worries, consult with •
a doctor before you attempt any time trial.
Do not perform any TT on a road where many signals are located and the •
traffic is heavy.
Be sure to pay attention to the road ahead during a TT.•
Perform a TT in a week which is scheduled with relatively mild training.*
Warm up sufficiently at least for 30 minutes before you attempt any TT.*
Select the manual measurement (on page 27).*
Stop your bicycle at the start point, and reset the wristwatch.
1.
Press the
2.
3.
4.
5.
6.
ENG-64
SSS button to start the TT.
Gradually accelerate up to a stable speed in the first 1-minute. Keep up the
intensity level that you feel is moderately difficult. Set a pace so that you
do not slow down in the last half, and maintain the pace to the finish.
Once you reach the goal, stop the measurement by pressing the
Cool down for 30 minutes while drinking some water.
Repeat the TT once more.
Repeat Steps 1 to 3.
Check the measurement data.
Record the average heart rate of two TT data from the Data mode “File view”
(page 40). Record the other data (time, average cadence, average speed,
etc.) for your reference.
SSS button.
Page 66

Obtain your target heart rate zone from the table below according to the
7.
average heart rate recorded.
e.g.) Average heart rate at 20 minutes time trial is 100%.
Heart rate zone level Lower limit Upper limit
1 (Active Recovery) 0 % 64 %
2 (Endurance) 65 % 79 %
3 (Tempo) 80 % 90 %
4 (Lactate Threshold) 91 % 101 %
5 (VO2 Max) 102 % 112 %
An elite ride should set the value 4% lower than those values above.*
For example, when the average heart rate at 20 minutes time trial is 175
bpm, the zone is categorized as the table shown below.
Heart rate zone level Lower limit Upper limit
1 (Active Recovery) 0 112
2 (Endurance) 114 138
3 (Tempo) 139 158
4 (Lactate Threshold) 159 177
5 (VO2 Max) 178 196
Set the calculated value to the heart rate target zone.
8.
For details of setting the heart rate target zone, see “Setting the target heart *
rate zones” in Option mode (page 37).
Continue
ENG-65
Page 67

Training for competition
2
Measure your resting heart rate just after waking in the morning and your maximum
heart rate (perhaps during competition). Then set your target zone according to
your goal:
A) For recovery, endurance training, and weight loss :
60% - 70% (aerobic exercise)
B) For quality endurance and tempo training :
70% - 80% (aerobic exercise)
C) For increasing TT and race ability, and VO2 max :
85% + (anaerobic exercise)
D) For anaerobic capacity and sprinting :
92.5% + (anaerobic exercise)
Training level (%) = x 100
Target heart rate = (Maximum heart rate - Resting heart rate) x
+ Resting heart rate
(Target heart rate) - (Resting heart rate)
(Maximum heart rate) - (Resting heart rate)
Training level (%)
100
Resting heart rate
Your resting heart rate is usually the lowest recorded rate soon after waking
up in the morning.
Maximum heart rate
The following calculations are generally used: (220 - age) or (204 - 0.69 x age).
For more precise figure, consult a training specialist.
ENG-66
Page 68

60 200
bpm
Heart rate
HR.ZONE :1
100 - 120 bpm
HR.ZONE :2
120 - 140 bpm
HR.ZONE :3
140 - 160 bpm
HR.ZONE :4
160 - 180 bpm
HR.ZONE :5
180 - 200 bpm
Default zone
80 100 120 140 160 180
Target training zone
Heart rate zone
ZONE:1
ZONE:2
ZONE:3
ZONE:4
ZONE:5
Alarm Alarm
Use of the target zone
3
When the heart rate is out of the zone during the measurement, the wristwatch
sounds an alarm and notifies the rider by flashing . The heart rate zone is selected from 5 predetermined zones.
For a training aiming at a heart rate of 140 to 160 bpm, select HR.ZONE:3 as shown
below. Then, the wristwatch sounds an alarm when the heart rate falls below 140
bpm, or rises above 160 bpm. Once the target zone is set to On, the relevant data
are recorded and the time in the zone, time above the zone, and time below the
zone and their percentages can be viewed in the file view (page 40).
The alarm sound is interlocked with the start/stop of the measurement.*
You can enter any upper/lower limit to each zone.*
Select “OFF” of the target heart rate zone, select Zones 1 to 5, change the upper *
and lower limits, and select “ON” or “OFF” of the zone sound in the Option mode
“Setting the target heart rate zones” (page 37). You can select “ON” or “OFF” of
the zone sound also in the Setup mode “Setting sound” (page 59).
Continue
ENG-67
Page 69

Trouble shooting
If a malfunction occurs, check the following before contacting CatEye or your retailer
for repair or service.
Trouble on display
Trouble Check Items Remedy
Display motion becomes
slower.
icon appears.
“STOP” appears. The stop reminder function
“MEMORY” icon flashes on
the screen every 2 minutes.
“MEMORY FULL” i con
flashes on the screen every
2 minutes.
No displays appear. Is the battery for the wrist-
Meaningless display appears.
Cannot measure the current
speed or cadence.
Is the surrounding temperature
low (below zero degree Celsius
or 32 degrees Fahrenheit)?
The remaining battery capacity for the wristwatch is low.
(page 27) is activated.
The rem aining wr istwat ch
memory capacity is low.
The data volume exceeded the
wristwatch memory capacity
during measurement.
watch empty?
Is the Speed and Cadence
sensor icon on
Check whether the distance
between the speed/cadence
sensor and the magnet is too
large.
Is the sensor zone of the
speed/cadence sensor off the
center of the magnet?
Has the power-saving mode
been activated, entering
Clock mode?
Is the battery for the speed
sensor empty?
Did you perform the formatting operation?
?
Tempera tures below free zing may result in
slower screen response. Data is not affected.
Replace it with a new battery (CR2430). After
replacement, be sure to perform the restarting
operation (page 14).
Once any sensor signal is received, the stop
reminder is canceled.
Ignore this during measurement.
It is recommended to delete the files (page
45).
When using the optional “USB communication *
kit”, delete the files after you send the saved
files to your PC.
Measurement data can no longer be recorded.
Delete the files (page 45).
When using the optional “USB communication *
kit”, delete the files after you send the saved
files to your PC.
Replace it with a new battery (CR2430). After
replacement, be sure to perform the restarting
operation (page 14).
Perform the restarting operation (page 14).
If icon is off, the wristwatch cannot receive
any data. Press the MODE1 or MODE2 button to
cancel the transmission sleep (page 23).
Adjust the position of the speed/cadence sensor
and that of the magnet correctly. (See “Bicycle
Installation” on page 10).
Press the MENU button to switch to Sports
mode.
The display may be delayed depending on the
wireless transmission condition. Check whether
any speed signal is received by spinning the
wheel for a while.
For details, see “Automatic recognition of the *
speed sensor ID” on page 7.
Replace it with a new battery (CR2032).
The sensor ID was deleted by formatting. Synchronize the speed sensor ID again (page 53).
ENG-68
Page 70

Trouble Check Items Remedy
Measure the current speed,
but cannot measure the cadence.
Heart rate signals are not
received.
Fluctuation in the heart rate
indicator, for example it returns to zero and then the
he art rat e is m eas ured
again.
Moving the main unit away
from your body will prevent
measurement of the heart
rate.
The sea level altitude display
is wrong.
Some values in the Data
mode “Past records” have
been reset.
Is the connection on the cadence side of the speed sensor dirty?
Is the Heart rate sensor icon
?
on
Has the power-saving mode
been activated, entering
Clock mode?
Is the heart rate sensor attached securely to your
body?
Dry skin
(particularly in winter)
Is the battery for the heart rate
sensor used up?
Check whether
on the wristwatch screen.
Is the electrode pad overly
worn and damaged after long
use?
Did you perform the formatting operation?
Is the electrode pad being
worn correctly?
Check whether
on the wristwatch screen.
Is the battery for the heart rate
sensor used up?
Have you corrected the sea
level altitude?
Did you change any date in
the past according to “Setting
the clock/date”?
lights up
lights up
The continuity on the cadence side of the speed
sensor is bad.
Loosen the set screw on the cadence side to
remove the cadence sensor. Clean the pins with
a dry cloth and replace the sensor. After cleaning,
adjust the distance to t he magne t, and then
firmly secure the sensor.
If icon is off, the wristwatch cannot receive
any data. Press the MODE1 or MODE2 button to
cancel the transmission sleep (page 23).
Press the MENU button to switch to Sports
mode.
Adjust the electrode pad with its rubber surface
to have a good contact with the body.
Slightly moisten the electrode pad of the heart
rate sensor.
Replace it with a new battery (CR2032).
The remaining battery capacity of the wristwatch
is low. Replace it with a new battery (CR2430).
After replacement, be sure to perform the restarting operation (page 14).
Replace it with a new heart rate sensor.
The sensor ID was deleted by formatting. Synchronize the heart rate sensor ID again (page 53).
To wear the electrode pad correctly, follow the
instructions for wearing the heart rate sensor
(page 13).
The remaining battery capacity of the wristwatch
is low. Replace it with a new battery (CR2430).
After replacement, be sure to perform the restarting operation (page 14).
Replace it with a new battery (CR2032).
The sea level altitude may have errors due to the
change in atmospheric pressure. Correct the sea
level altitude before use (page 60).
Some values for the year, month, or week are
deleted according to the relevant changes. For
details, see page 48.
Continue
ENG-69
Page 71

Trouble on operation
Trouble Check Items Remedy
Pressing and holding the
MODE1 or MODE2 b utton
does not turn on a light.
Pressing the SSS butt on
does not start/stop measurement.
The heart rate sensor
(speed sensor) ID check
failed.
Lap data cannot be stored. Check whether “--” appears
Abnormal values appear.
Any setting cannot be
changed in Option mode or
Setup mode.
The record data in the File
view cannot be viewed to
the end.
Check whether the Setup
mode is displayed (page 49).
Check whether
on the wristwatch screen.
Check whether the auto-mode
is turned on (with
nating).
for the Lap No. screen.
Does the lap time exceed 100
hours (or the interval distance
exceed 9999.99 km/mile) ?
Is it immediately after pressing the LAP button?
Are there any objects emitting
electromagnetic waves (railway
tracks, transmitting stations
for television, etc.) nearby?
Is it during measurement? Settings can be only viewed during the measure-
Check whether the auto-mode
is on (
lights up).
Check whether “DATA RESET”
is displayed.
Check whether
“MEMORY FULL” is
displayed on the screen
during measurement.
The backlight does not turn on in the Setup
mode.
The remaining battery capacity of the wristwatch
lights up
is low. Replace it with a new battery (CR2430).
After replacement, be sure to perform the restarting operation (page 14).
When the auto-mode is on ( icon appears),
illumi-
you cannot start or stop the measurement by
pressing the button. To start/stop measurement
by pressing the SSS button, switch the automode to off (page 58).
The battery for the h eart rate sensor (speed
sensor) is possibly depleted. After replacing the
battery with a new one (CR2032), check the
sensor ID again (page 53).
The data volume exceeds the wristwatch memory capacity. Delete the files (page 45).
When using the optional “USB communication *
kit”, delete the files after you send the saved
files to your PC.
Laps cannot be measured, if recordable range
described on the left is exceeded. Reset the data
(page 27), and then perform measurement again.
Recording laps needs at least 5 seconds of interval.
Keep the unit away from any object that may be
causing interference, and reset the data (page
27).
ment.
When the auto-mode is on ( lights up), the
wristwatch may enter measurement mode due
to electromagnetic waves. Keep the unit away
from any object that may be causing interference
with electromagnetic waves.
To change the target heart rate zone, measurement unit, and record interval, the resetting
operation is required. Stop the measurement,
and perform the resetting operation (page 27).
The data volume exceeds the wristwatch memory capacity. The data was saved automatically
during measurement, and any subsequent data
was no longer recorded. Delete the files for
subsequent measurement (page 45).
When using the optional “USB communication *
kit”, delete the files after you send the saved
files to your PC.
ENG-70
Page 72

Water resistance of the wristwatch
The wristwatch is water-resistant up to 100 feet (30 meters). Refer to the following
for proper use.
Before aquatic and outdoor activities
Caution:
The heart rate sensor and speed sensor are waterproof, but should not be used for •
underwater activities.
Wash with pure water and wipe off any salt and dirt, after using in seawater or outdoors.•
Do not press any button when wet.•
Waterproof Capability
Rain, splash, etc.
Shower (hot water, and cold water)
Mild swimming (water depth: shallow)
Diving, surfing, and other marine sports
(water depth: shallow)
Snorkeling (water depth: deep)
OK
OK
OK
NO!
NO!
Replacing battery
The Q3a comes with factory-installed batteries. When a battery is empty, replace it
with a new one according to the following instructions.
Warning!!!:
When any battery for the wristwatch, heart rate sensor, or speed sensor is depleted, *
we recommend replacing all batteries at the same time.
The battery life shown in this manual is not definitive and it varies depending on the *
use environment.
The battery cover sealing is critical to maintain the waterproof feature. When the battery *
cover and the o-ring are dirty, wipe off carefully and check that it is installed properly.
Safely dispose of the old batteries, and do not place them within reach
of children. If a battery is swallowed, consult a doctor immediately.
Continue
ENG-71
Page 73

Wristwatch
Battery life: Approx. 1 year when used for 1 hour per day.
When the remaining battery capacity is low, *
Open the battery cover of the wristwatch
1.
using a coin, etc.
Turn the inner cover to the open position using
2.
a coin, remove this, and insert a new lithium
battery (CR2430) with the (+) side up.
Do not turn the inner cover excessively. *
Otherwise, the tab may be damaged.
Turn the inner cover to the closed position.
3.
Check that the cut-out portion of the inner
cover faces the pin, and the 2 tabs are fixed.
Press the AC button beside the inner cover
4.
using a tool with a pointed tip.
Check that an o-ring is installed to the
5.
groove on the wristwatch, and firmly close
the battery cover.
After replacement, be sure to perform the
6.
restarting operation (page 14) to set the
current time and date.
lights up.
Battery cover
Inner cover
CR2430
Heart rate sensor
Battery life: Approx. 1 year when worn for 1 hour per day.
Remove the battery cover on the back of the heart rate
1.
sensor using a coin, or the equivalent.
Insert new lithium batteries (CR2032) with the (+) sign
2.
upward, and close the battery cover firmly.
The heart rate sensor consumes power when worn. Remove the *
heart rate sensor whenever measurement is not performed.
Speed sensor
Battery life: Approx. 1 year when used for 1 hour per day.
Remove the battery cover on the speed sensor using a
1.
coin, or the equivalent.
Insert new lithium batteries (CR2032) with the (+) sign
2.
upward, and close the battery cover firmly.
After replacing batteries, be sure to check that the posi-
3.
tions of the magnet and sensor are correct and they are
secured firmly.
ENG-72
Open
Close
Open position
Tab
Closed position
Cut-out portion
Pin
O-ring
AC button
Close
Open
CR2032
Close
Open
Pin
CR2032
Page 74

Maintenance
Regularly perform the following instructions to prolong the life of your Q3a.
Regularly check that the positions of the magnets and sensors are correct, and they •
are secured firmly.
When the wristwatch, heart rate sensor, and speed sensor are dirty, wash them with •
water or wipe them with a soft cloth dampened with diluted neutral detergent, then
wipe with dry cloth. Do not use solvents such as benzine or rubbing alcohol as they
may damage the surfaces.
The heart rate strap absorbs sweat easily, and leaving it as such is unsanitary. Wash •
with neutral detergent and keep it clean.
Spare accessories
Standard accessories
#240-0570
Parts kit
#160-2385N
Speed sensor kit
#240-0575
Bracket Handlebar-mount
#160-2390N
Heart rate sensor kit
#169-9766
Cadence magnet
#160-2395
HR Strap
#240-0580
Lithium-battery (CR2430)
for wristwatches
Optional accessories
#240-0590
USB communication kit
(included with the Windows version of e-Train Data™)
#169-9691
Wheel magnet
#166-5150
Lithium-battery (CR2032)
for sensors
Continue
ENG-73
Page 75

Flow of the screen
CLOCK MENU
MENU
SPORTS MENU
MENU
MENU
MENU
SETUP MENU
MENU
OPTION MENU
Clock mode
Day of the week
Clock
Date
Sports mode
Current speed
Heart rate Cadence
Elapsed time
M2
Current speed
Heart rate Cadence
Trip distance
Setup mode
CLOCK DATE
Setting the clock/date
M1
ALT
Correcting the sea level
altitude
Option mode
CD.TIMER
Setting the training
function
M1
Altitude
M1
Temperature
1
M2
Average speed
Average
heart rate
M1
Heart rate Cadence
M2
M1
M2
M2
M2
1
Average
cadence
Elapsed time
Current speed
Training function*
M2
2
ALARM
Setting the alarm clock
SOUND
Setting sound
M1
M2
M1
M2
M1
M1
2
M2
HR ZONE
Setting the target
heart rate zone
MENU
ENG-74
MENU
DATA MENU
Data mode
File view
FILE
M2
M1
PC LINK
PC link
M1
M2
Page 76

MODE2
MODE1
MENU
MODE1
MODE2
MENU
MENU MENU M1 M1 M2 M2
(press & hold)
M1
Maximum
heart rate
Heart rate Cadence
M2
M1
M2
Maximum speed
Maximum
cadence
Elapsed time
Current speed
Lap timer
TIRE
Setting the tire
circumference
AUTO MODE
Setting the auto-mode
Training function: Displays one of the following: countdown distance, countdown time, and *
interval.
VIEW LOG
Log data
M1
Heart rate Temperature
M1
M2
Heart rate Cadence
M2
Calorie Consumption
M1
Setting the sensor ID
M2
M2
Total trip distance/total
elapsed time entry
M1
M1
Altitude
Elapsed time
Current speed
SYNC ID
TOTAL DATA
1
Ascending altitude
Heart rate Slope angle
M1
Elapsed time
Current speed
Heart rate Cadence
M2
M1
M2
M2
M1
Clock
UNITS
Setting the measurement unit
M1
M2
SAMPLE RATE
Setting the
record interval
Continue
ENG-75
Page 77

Specifications
Measurement function
Upper display
Current speed
Average speed 0.0 – 150.0 km/h [0.0 – 93.0 mph]
Maximum speed 0.0 (4.0) – 150.0 km/h [0.0 (3.0) – 93.0 mph]
Altitude -500 – 9000 m [-1640 – 29600 ft]
Ascending altitude 0 – 99999 m [ft]
Average lap speed 0.0 – 150.0 km/h [0.0 – 93.0 mph]
Maximum lap speed 0.0 (4.0) – 150.0 km/h [0.0 (3.0) – 93.0 mph]
Middle display
Heart rate 0 (30) – 240 bpm
Average heart rate 0 – 240 bpm
Maximum heart rate 0 (30) – 240 bpm
Average lap heart rate 0 – 240 bpm
Maximum lap heart rate
Cadence 0 (20) – 199 rpm
Average cadence 0 – 199 rpm
Maximum cadence 0 (20) – 199 rpm
Average lap cadence 0 – 199 rpm
Maximum lap cadence
Temperature -10 – +50 ˚C [+14 – +122 ˚F ]
Slope angle 0 – ±99 % (100 % = 45°)
Lap number 01 – 99
Lower display
Elapsed time 0:00’00”0 – 0:59’59”9 / 1:00’00” – 99:59’59”
Trip distance 0.00 – 9999.99 km [mile]
Countdown distance 9999.90 – 0.00 km [mile] (setting range : 9999.9 – 0.0 km [mile])
Countdown time 99:59’00” – 0:00’00” (setting range : 99:59’ – 0:00’)
Interval timer
Recovery time 0:00’00”0 – 0:59’59”9 / 1:00’00” – 99:59’59”
Lap timer 00’00”0 – 0:59’59”9 / 1:00’00” – 99:59’59”
Calorie consumption 0 – 999999 kcal (calculation-based estimation only)
Clock
Date 00.01.01 – 99.12.31 (display format can be switched)
Lap time 00’00”0 – 0:59’59”9 / 1:00’00” – 99:59’59”
Split time 00’00”0 – 0:59’59”9 / 1:00’00” – 99:59’59”
Lap (With the real time lap function)
Lap display:
Upper display (average lap speed, maximum lap speed)
Middle display (average lap heart rate, lap number, maximum lap heart rate)
Lower display (lap time, split time)
Real time lap display:
Upper display (average lap speed, maximum lap speed)
Middle display (average lap heart rate, maximum lap heart rate, cadence)
Lower display (lap timer, lap distance)
0.0 (4.0) – 150.0 km/h
0.0 (3.0) – 93.0 mph] (For 27-inch tire size)
0 (30) – 240 bpm
0 (20) – 199 rpm
99:59’59” – 1:00’00” / 0:59’59”9 – 0:00’00”0
(setting range : 99:59’59” – 0:00’00”)
0:00’00” – 23:59’59” [AM 1:00’00” – PM 12:59’59”]
(Both 12 and 24-hour modes can be selected)
ENG-76
Page 78

Interval
Upper display (current speed, average speed, and maximum speed)
Middle display (current heart rate, average heart rate, maximum heart rate, current cadence,
Lower display
Saving the data
Saves the data at the time of resetting
(The oldest file will be deleted automatically when exceeding 30 files)
(The oldest file will be deleted and the data during the measurement will be saved automatically when “MEMORY FULL” is displayed.)
Control system
8 bit one-chip microcomputer, crystal oscillator
Display system
Liquid crystal display (EL backlight)
Speed/Cadence sensor signal detection system
Noncontact magnetic sensor
Sensor signal transmission and reception
2.4 GHz ISM Band (With ID. Two IDs of SP1 and SP2 can be set for the speed sensor.)
Sensor coverage distance
5 m (above 5 m, transmission distance may vary due to environmental conditions)
Operating temperature range
32 °F – 104 °F [0 °C – 40 °C]
(This product will not function appropriately when exceeding the working temperature range. Slow
response or black LCD at lower or higher temperature may happen respectively.)
Storage temperature range
-4 °F – 122 °F [-20 °C – 50 °C]
Wheel circumference set range
0100 to 3999 mm: 1 size for each speed sensor ID (default setting: SP1 = 2096, SP2 = 2050)
Power supply/battery life
Wristwatch : CR2430 x 1 / Approx. 1 year (When using 1 hour/day)
Heart rate sensor : CR2032 x 1 / Approx. 1 year (When worn about 1 hour per day)
Speed sensor : CR2032 x 1 / Approx. 1 year (When using 1 hour/day)
Dimensions/Weight
Wristwatch : 55.0 x 46.5 x 15.0 mm (excluding the projection and belt) / 56.4 g (With
Heart rate sensor : 12-13/16” x 1-1/4” x 1/2” (325.0 x 31.4 x 12.2 mm) / 1.41 oz (40 g) (With
Speed sensor : 2-9/16” x 3-9/16” x 9/16” (65.0 x 90.5 x 14.4 mm) / 1.25 oz (36 g)
When the elapsed time exceeds 100 hours, or the trip distance exceeds 9999.99 km/h, “* E” appears in place
of the average speed.
When the elapsed time exceeds 100 hours, “* E” appears in place of the average heart rate and average cadence.
Designs and specifications are subject to change without notice, due to modifications or improvements.*
average cadence, and maximum cadence)
(interval time, number of intervals, trip distance in an interval, and recovery time)
batteries)
batteries)
(With batteries)
Continue
ENG-77
Page 79

Registration
CO
., LTD.
CATEYE Web Site (http://www.cateye.com)
For warranty service you must register your product. Please register your Q3a as
soon as possible. CATEYE provides regular technical support and new product
information as much as possible. Please register on-line through the “Support”
page on our web site. You will need the product’s 7 -digit number (marked on the
battery cover) to register your product.
Limited warranty
2-Year: wristwatch, heart rate sensor and speed sensor
(Not including depletion of batteries)
CatEye products are warranted to be free of defects from materials and workmanship for a period of two years from original purchase. If the product fails to work
during normal use, CatEye will repair or replace the defect at no charge. Service
must be performed by CatEye or an authorized retailer. To return the product, pack
it carefully and enclose the warranty certificate (proof or purchase) with instruction
for repair. Please write or type your name and address clearly on the warranty
certificate. Insurance, handling and transportation charges to CatEye shall be borne
by person desiring service.
For UK and REPUBLIC OF IRELAND consumers, please return to the place of
purchase. This does not affect your statutory rights.
Service & Research Address for USA:
CatEye North America
2300 Central Ave Suite L Boulder, CO 80301
Phone: 303.443.4595 Fax: 303.473.0006
Toll Free: 800.5CATEYE E-mail: service@cateye.com
URL: http://www.cateye.com
Japan Office:
2-8-25, Kuwazu, Higashi Sumiyoshi-ku, Osaka 546-0041 Japan
Attn: CATEYE Customer Service Section
ENG-78
Page 80

Index
2.4 GHz digital wireless system .........6
A
Accessories ........................................ 8
Alarm clock mode ............................ 24
Altitude measurement ........................6
Automatic recognition of the
speed sensor ID .................................7
Auto-mode
(automatic measurement) ................ 26
B
Backlight .......................................... 23
Basic knowledge of the altitude
measurement ...................................61
Bicycle Installation ........................... 10
C
Clock mode (CLOCK) .......................24
Communication between your PC
and this unit .....................................46
Correcting the sea level altitude
(ALT) ................................................ 60
Countdown distance ........................32
Countdown time ............................... 32
D
Data mode (DATA) ...........................39
Data to be sent from this unit to
your PC ............................................47
Deleting files ....................................45
Display data in Sports mode ...... 28, 29
F
File view (FILE) ................................40
Flow of the screen ............................ 74
Formatting .................................14, 21
H
Heart rate sensor .............................13
Heart rate training ............................ 63
HOME (home altitude setting) .......... 61
I
Interval ............................................. 33
Interval time ..................................... 33
L
Lap function ..................................... 30
Lap time ........................................... 31
Limited warranty ..............................78
M
Maintenance .....................................73
Manual measurement ......................27
Memory point ..................................41
O
Operation test ..................................19
Option mode (OPTION) .................... 36
P
Pace function ................................... 30
Past records (VIEW LOG) ................47
PC link (PC LINK) ............................. 45
Power-saving mode ......................... 23
Preparing the wristwatch .................14
R
Real time lap data ............................31
Recovery time ..................................33
REF (sea level altitude correction) ...61
Registration .....................................78
Replacing battery ............................. 71
Resetting .......................................... 27
Continue
ENG-79
Page 81

Restarting ..................................14, 21
S
Saving and managing the files .........40
Screen display ....................................9
Searching for sensor ID (SYNC ID)
Setting sound (SOUND) ...................59
Settings to be changed from your PC
Setting the alarm clock (ALARM) ..... 51
Setting the auto-mode
(AUTO MODE) .................................. 58
Setting the clock/date
(CLOCK DATE) ................................. 50
Setting the measurement unit
(UNITS) ............................................ 55
Setting the record interval
(SAMPLE RATE) ..............................56
Setting the target heart rate zones
(HR ZONE) ....................................... 37
Setting the tire circumference (TIRE) ...
Setting the training function
(CD.TIMER) .....................................36
Setup mode (SETUP) .......................49
Spare accessories ............................ 73
Specifications ...................................76
Split time ..........................................31
Sports mode (SPORTS) ...................25
Starting/Stopping measurement ......26
Stop reminder ..................................27
Switching between modes ...............22
... 53
...47
T
Target heart rate zone ................35, 63
Tire circumference ........................... 17
Tire circumference reference table ... 17
Total trip distance/total elapsed
time entry (TOTAL DATA) ................57
Training for competition ...................66
Training function .............................. 32
Transmission sleep mode ................ 23
Trouble shooting .............................. 68
U
Use of the target zone ...................... 67
V
Viewing the contents in a file ...........42
Viewing the lap data ......................... 44
W
Water resistance ..............................71
52
Wristwatch memory capacity limit ... 40
ENG-80
Page 82

REGISTRATION CARD
Fiche d’enregistrement
Registrierungskarte
Name
お名前(フリガナ)
Nom
Nome
Name
姓名
Naam
姓名
Nombre
Address
ご住所
Adresse
Indirizzo
Adresse
地址
Adres
地址
Dirección
Phone
電話番号
Téléphone
Telefon
Telefoon
Teléfono
Dealer or Shop name
ご購入店名
Nom du magasin ou du revendeur
Name des Händlers oder des Geschäfts
Dealer of Naam van winkel
Nombre del proveedor o de la tienda
Dealer or Shop address
Veuillez indiquer le numéro à 7 chiffres indiqué sur le couvercle de la pile de l’unité principale.
Geben Sie bitte die siebenstellige Nummer an, die auf der Batterieabdeckung der Haupteinheit steht.
Vul de 7-cijferige nummers in die op de batterijendeksel van de computer staan.
Please fill with 7-digits numbers marked on the battery cover of main unit.
Por favor, complete el número de 7 dígitos mostrado en la tapa de las pilas de la unidad principal).
リストウォッチ裏面のバッテリーカバーに記載の7桁の数字をご記入ください。
*1
所在地
請填入手錶後蓋上刻印的7位數字。
请填入手表后盖上刻印的7位数字。
Inserire il codice di 7 cifre indicato sul coperchio del vano batterie dell’unità principale.
Adresse du magasin ou du revendeur
Adresse des Händlers oder des Geschäfts
Dealer of Adres van winkel
Dirección del proveedor o de la tienda
The date of purchase
ご購入日
Date d’achat
Kaufdatum
Datum van aankoop
Fecha de compra
Your name address or e-mail address will not be sold or shared with any other company.
ご送信いただいた情報や内容の管理には万全を期し、新製品情報やテクニカルサポート提供以外に使用することは一切ありません。
Votre adresse postale et votre adresse e-mail ne seront pas vendues ou transmises à d’autres entreprises.
Ihr Name oder Ihre E-Mail-Adresse wird weder weiterverkauft noch an eine andere Firma weitergegeben.
Uw naam, adres of e-mailadres zullen niet beschikbaar worden gesteld aan derden.
Su nombre, dirección o correo electrónico no serán vendidos o compartidos con otras empresas.
IIl vostro nome, indirizzo o indirizzo e-mail non saranno venduti o condivisi con altre società.
顧客情報內容將被妥善管理,只會使用在提供新產品信息及技術支援上。
顾客情报内容将被妥善管理,只会使用在提供新产品信息及技术支援上。
Numero di telefono
電話號碼
电话号码
Data di acquisto
購入日期
购入日期
Registratiekaart
Tarjeta de registro
Nome del punto vendita
經銷商名
经销商名
Indirizzo del punto vendita
經銷商地址
经销商地址
ユーザー登録カード
Scheda di registrazione
用戶登記卡 用户登记卡
*1
Serial No
シリアルNo
No. de série
Seriennr
Numero di matricola
Serienummer
產品編號
Nº de serie
产品编号
E-mail address
Eメールアドレス
Adresse e-mail
E-mail-Adresse
E-mailadres
Dirección de correo electrónico
Indirizzo e-mail
郵箱地址
邮箱地址
®
INTERNATIONAL WARRANTY CERTIFICATE
CERTIFICAT DE GARANTIE INTERNATIONALE
INTERNATIONALES GARANTIEZERTIFIKAT
PURCHASER'S NAME/ADDRESS
ご住所・お名前
NOM/ADRESSE DU CLIENT
NAME UND ANSCHRIFT DES KÄUFERS
NAAM/ADRES KOPER
NOMBRE/DIRECCIÓN DEL COMPRADOR
NOME/INDIRIZZO DEL COMPRATORE
DEALER'S NAME/ADDRESS
販売店名・住所
NOM/ADRESSE DU DISTRIBUTEUR
NAME UND ANSCHRIFT DES HÄNDLERS
NAAM/ADRES VERKOPER
NOMBRE/DIRECCIÓN DEL DISTRIBUIDOR
U.S. Pat. Nos. and Design Pat. Pending
NOME/INDIRIZZO DEL VENDITORE
Copyright© 2010 CATEYE Co., Ltd.
MSCCY3-100816
购买者的姓名/地址購買者的姓名地址
经销商的姓名/地址經銷商的姓名地址
INTERNATIONAAL GARANTIECERTIFICAAT CERTIFICATO DI GARANZIA INTERNAZIONALE
CERTIFICADO DE GARANTÍA INTERNACIONAL
Serial No
保証書
*1
DATE OF PURCHASE
お買い求め年月日
DATE D’ACHAT
VERKAUFSDATUM
AANKOOPDATUM
FECHA DE COMPRA
DATA DELL’ ACQUISTO
购买日期購買日期
国际保固证明书國際保固證明書
Page 83

CATEYE C0., LTD 2-8-25 , KUWAZU, HIGASHI SUMIYOSHI-KU, OSAKA, JAPAN 546-0041
www.cateye.com www.cateye.co.jp
066600810 CY300ENG 1
 Loading...